
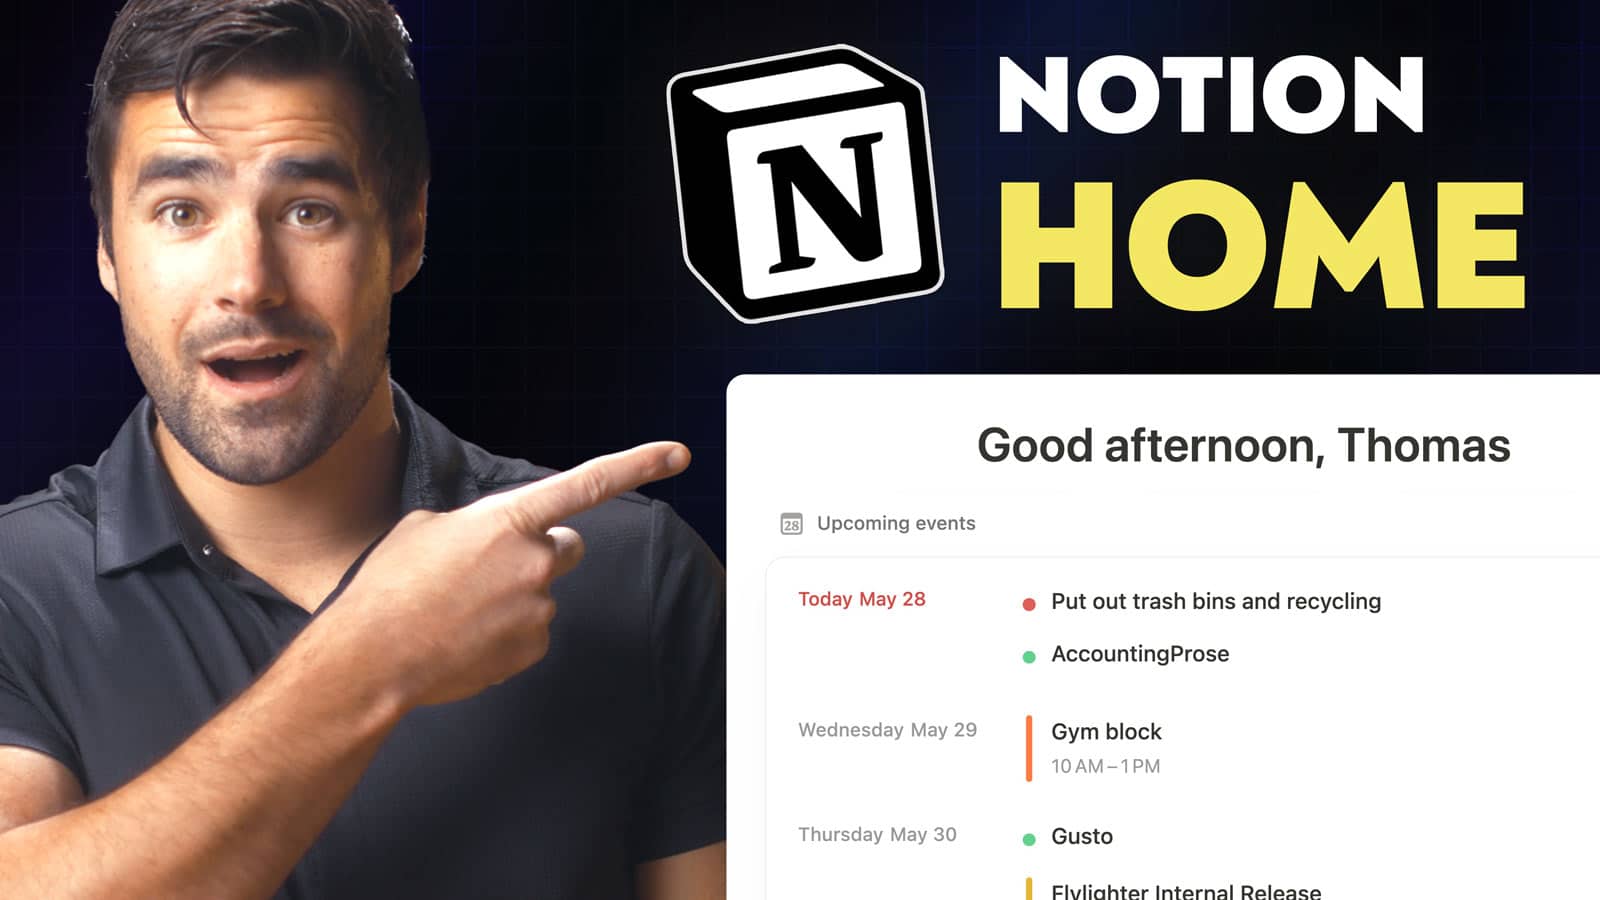
You might have noticed a new section near the top of your Notion sidebar called Home. What is it – and why does it look so much different than every other page in Notion?
In this guide, I’ll answer that question and give you a full breakdown of each widget that’s available in Home.
I’ll also show the one major new feature within Home that teases some huge new capabilities for Notion as a whole (if you’re extra-curious about it, skip to the My Tasks section).
Copy link to headingWhat is Notion Home?
Home is basically a dashboard that serves as a personal starting point for when you open Notion.
Home is a departure from Notion’s traditional canvas-style pages, on which you can place any Notion blocks you want, in any order. In Home, you instead have a limited number of widgets that serve to:
- Give you at-a-glance looks at your calendar, task list, and a small number of other databases
- Let you quickly jump into pages you’ve recently visited, or that Notion thinks you’ll likely want to visit
While you can show or hide most of these widgets, you can’t currently re-order them. Most of them have few or no options for customizations as well.
Copy link to headingWho Can Use Notion Home?
Notion Home initially released to Enterprise workspaces, but now it’s available on all Notion plans, including the Free plan.
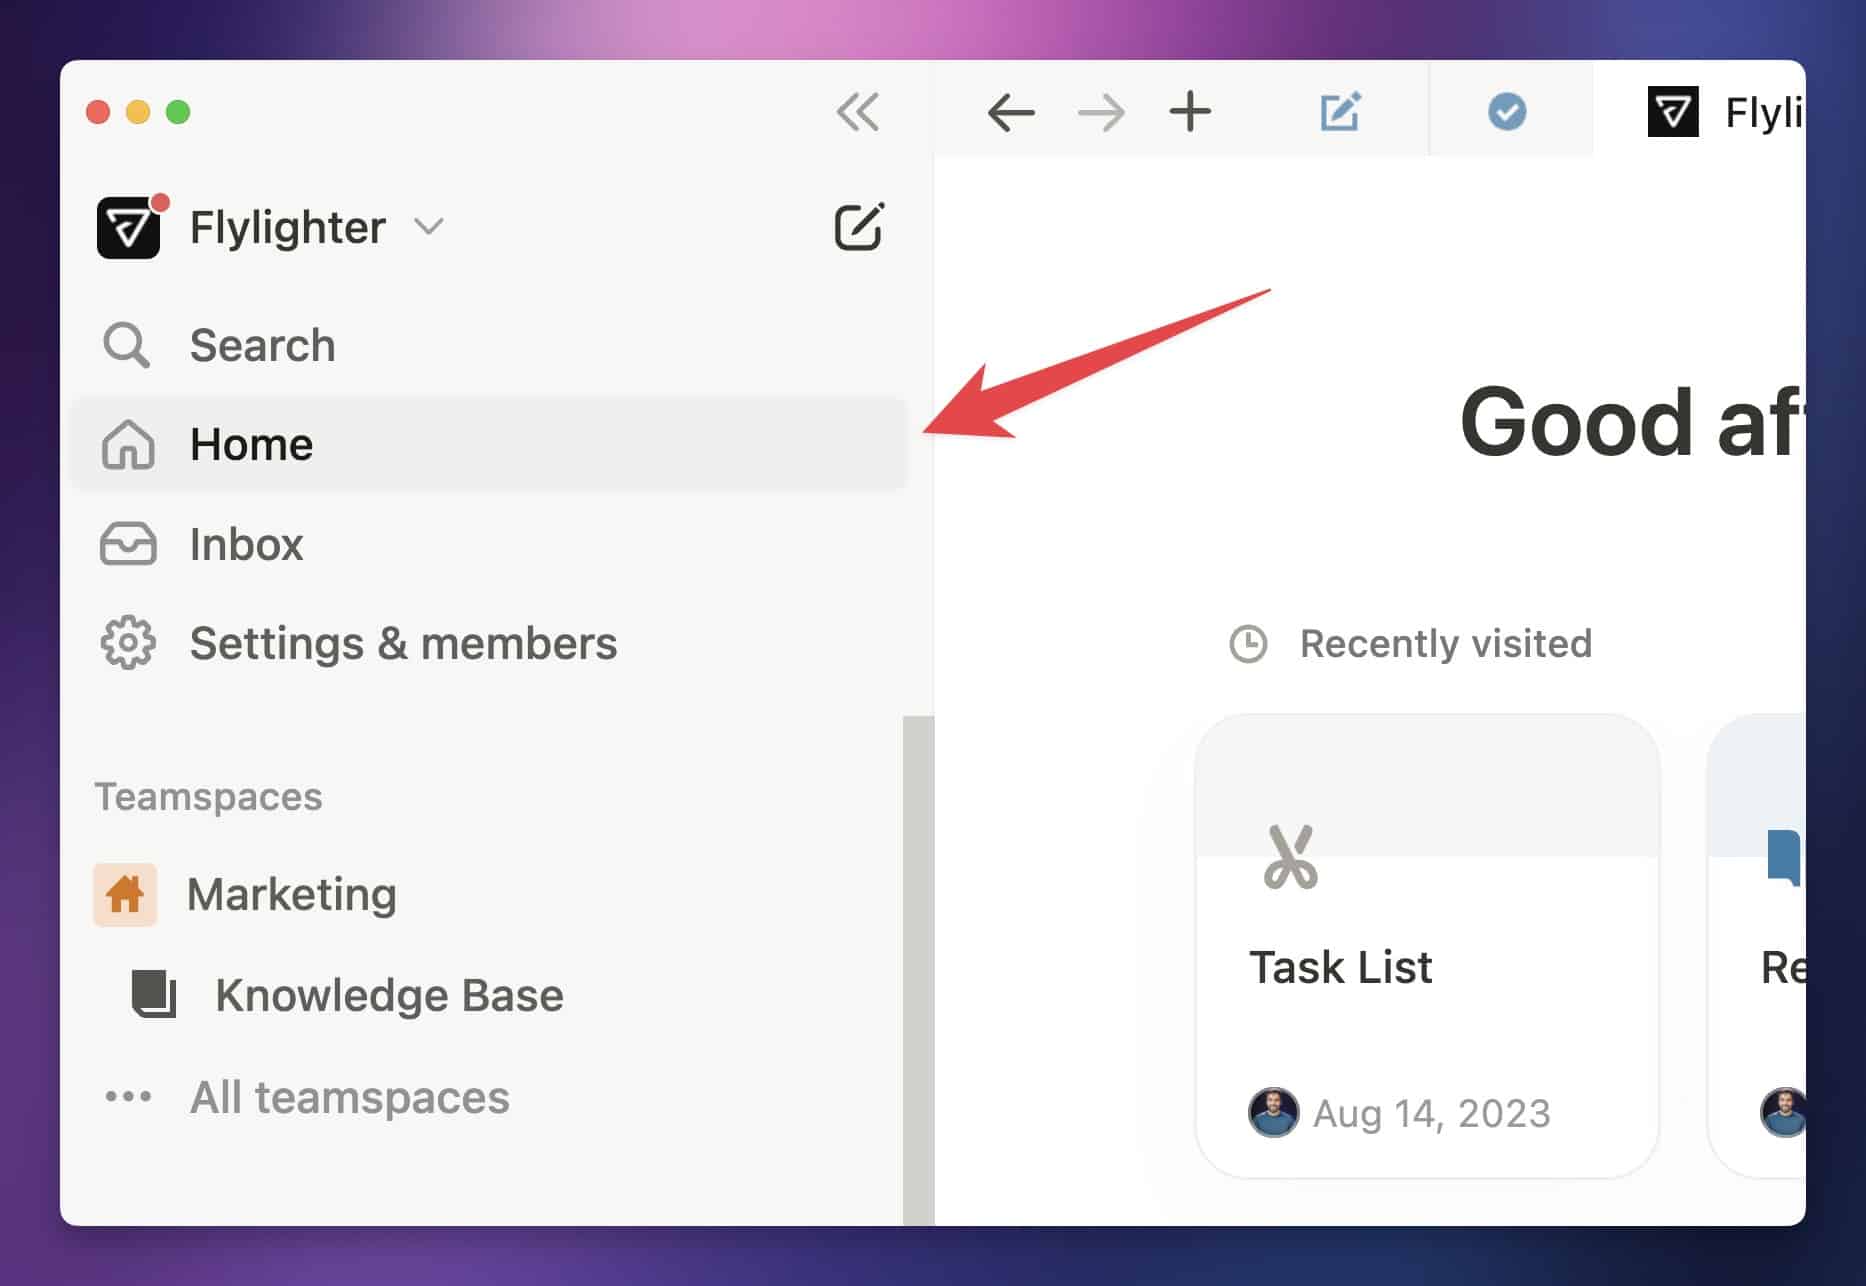
It’s currently rolled out to all users within web and desktop app versions of Notion. You can access Home within your sidebar, within the sticky menu of choices directly beneath the workspace switcher.
You’ll only see Home in workspaces where you’re a full-fledged Member. Guests in your workspace won’t see the Home section in their sidebar.
Learn about the difference between Members and Guests here.
Copy link to headingNotion Home Widgets
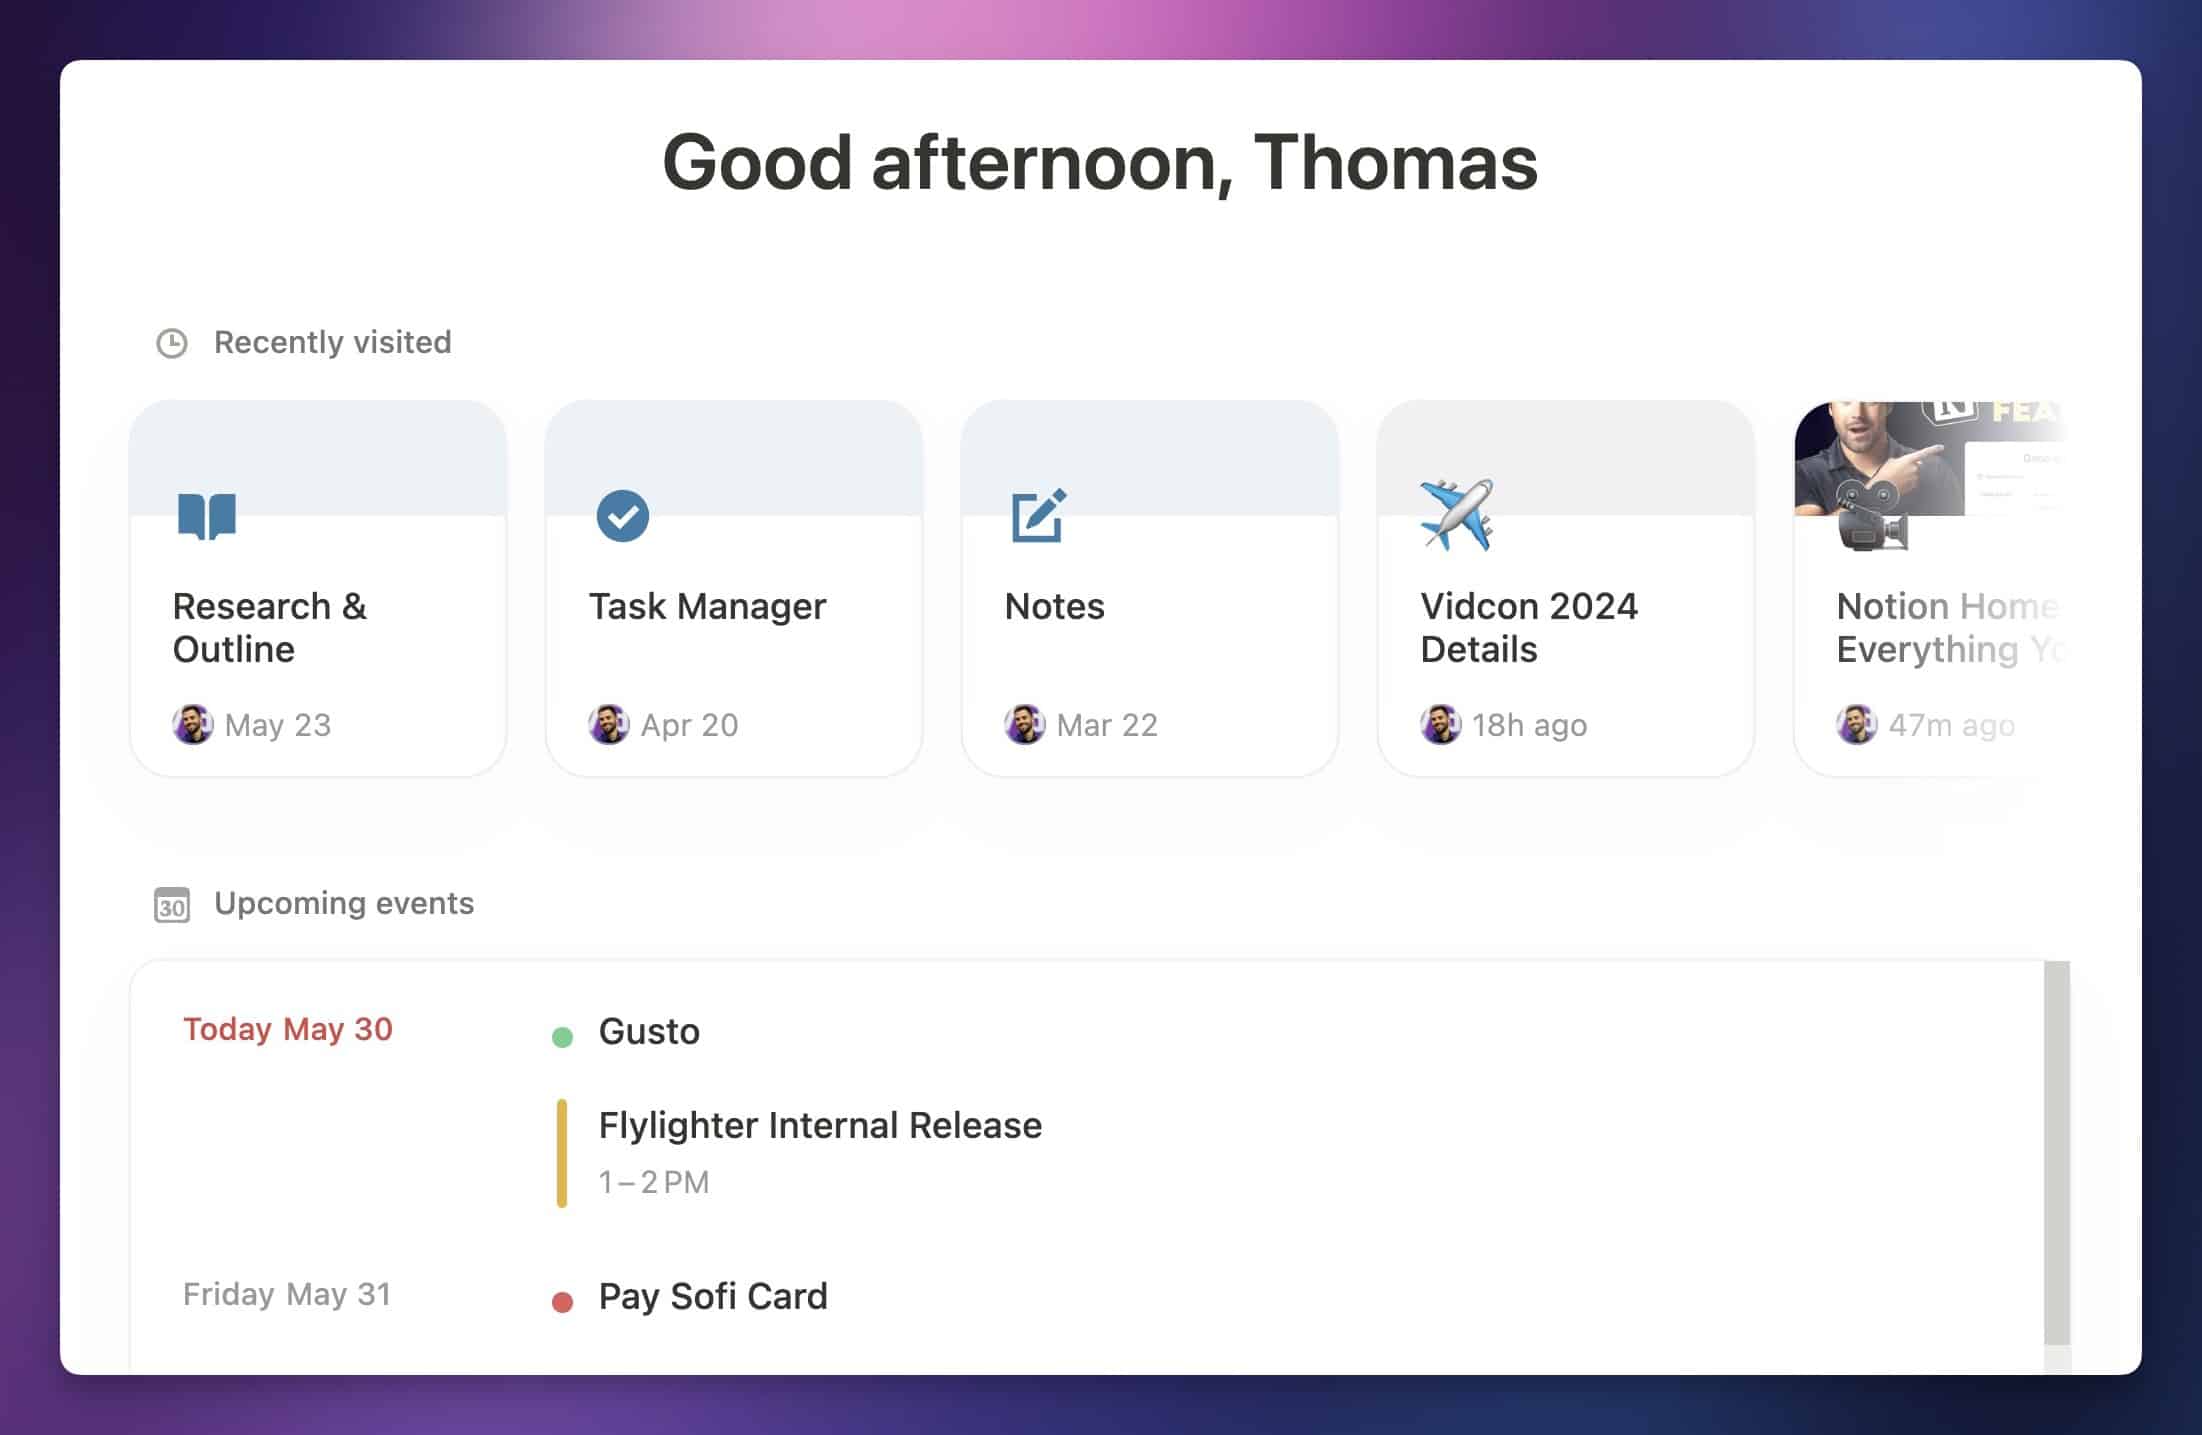
Notion Home gives you several widgets that you can show or hide. Some widgets lets you pull in calendar events or database views from elsewhere in Notion, while others give you quick links to Notion pages.
Here’s a list of all available Home widgets at a glance:
| Widget | Description |
|---|---|
| Recently Visited | Shows your last 20 recently-visited pages. |
| Upcoming Events | Pulls in upcoming events from Notion Calendar. |
| My Tasks | Shows pages from Task databases. Can show pages from multiple Task databases in the same view. |
| Database Views | Allows you to create a linked database view directly in Home. |
| Suggested for You | Lists pages you’re likely to need, based on your workspace actions and page visit history. |
| Trending | Lists popular pages in your workspace, or within a single Teamspace. |
| Learn | Links to videos explaining basic Notion concepts. |
| Featured Templates | Links to a few official Notion templates. |
In the next few sections, I’ll cover the widgets that have additional options or detials that are worth noting. I won’t include a section for the following:
- Recently Visited
- Suggested for You
- Learn
- Featured Templates
There’s not much to say about these sections; if any of them are updated with interesting features in the future, I’ll update this article to reflect those changes.
Copy link to headingUpcoming Events
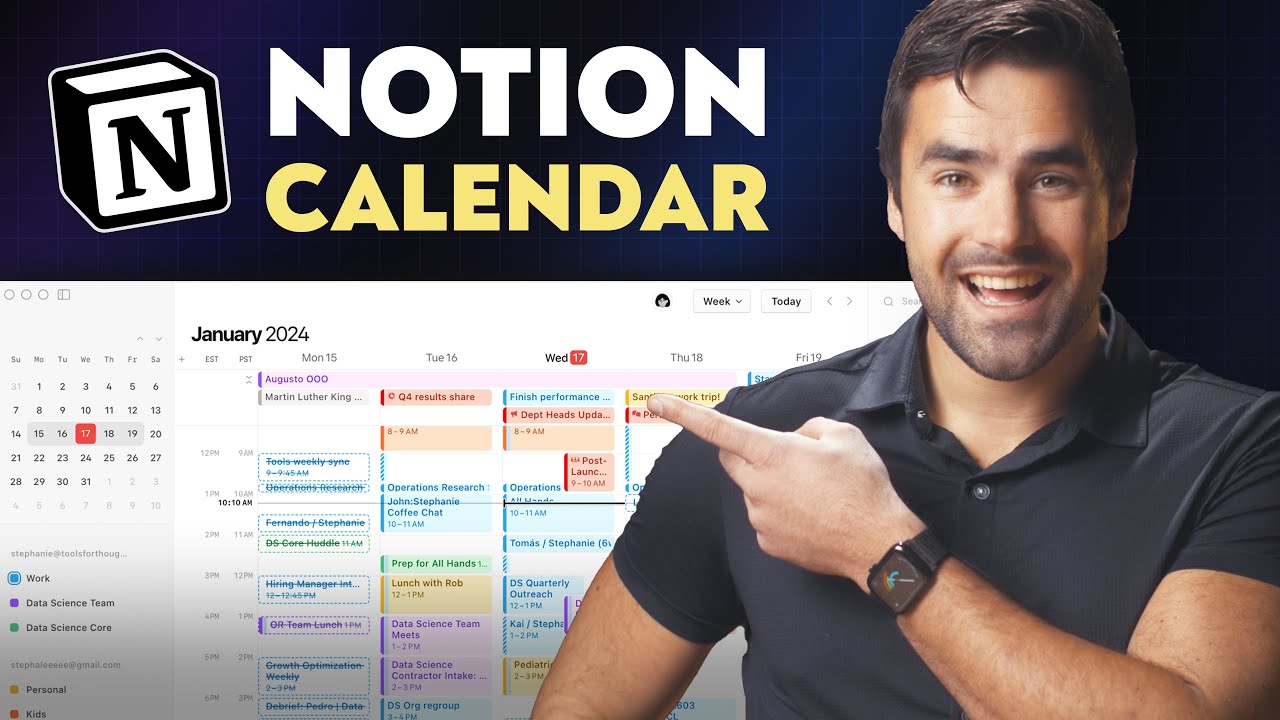
The Upcoming Events widget connects to the Notion Calendar app and can show you upcoming events from your Google Calendar. This is the first official way we’ve ever been able to display actual calendar events in Notion!
Note that using this widget requires that you’re using Notion Calendar. Notion itself currently has no way to connect directly to your Google Calendar account, but the Notion Calendar app is a full-featured calendar client that can do so.
Check out my video on Notion Calendar for all the details, plus tips and tricks on getting the most out of it:
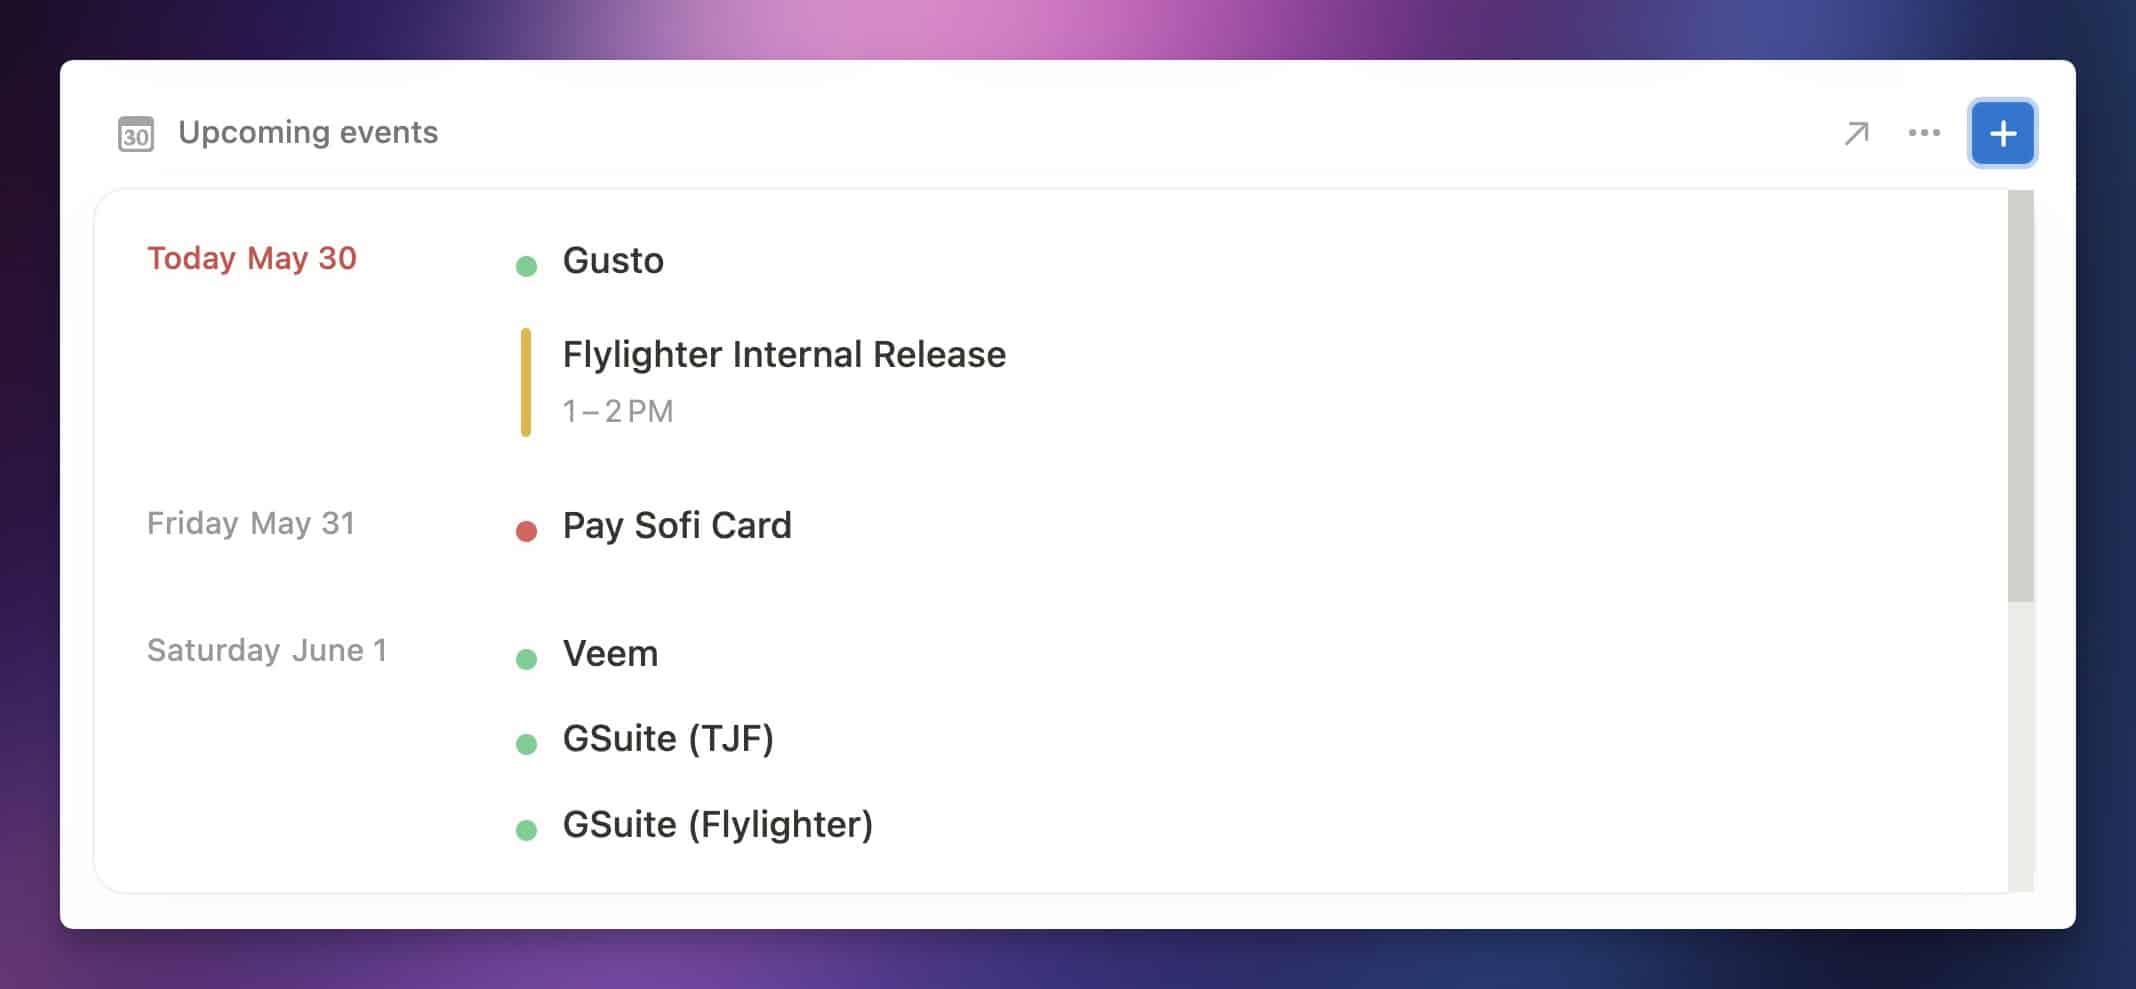
If you click the + button in the top-right corner of the Upcoming Events widget, you can create a new event within Notion Calendar. The new event will have a 30-minute duration by default, and will be created at the current time – or at the next available time, if you’re currently in the middle of an event that’s already on your calendar.
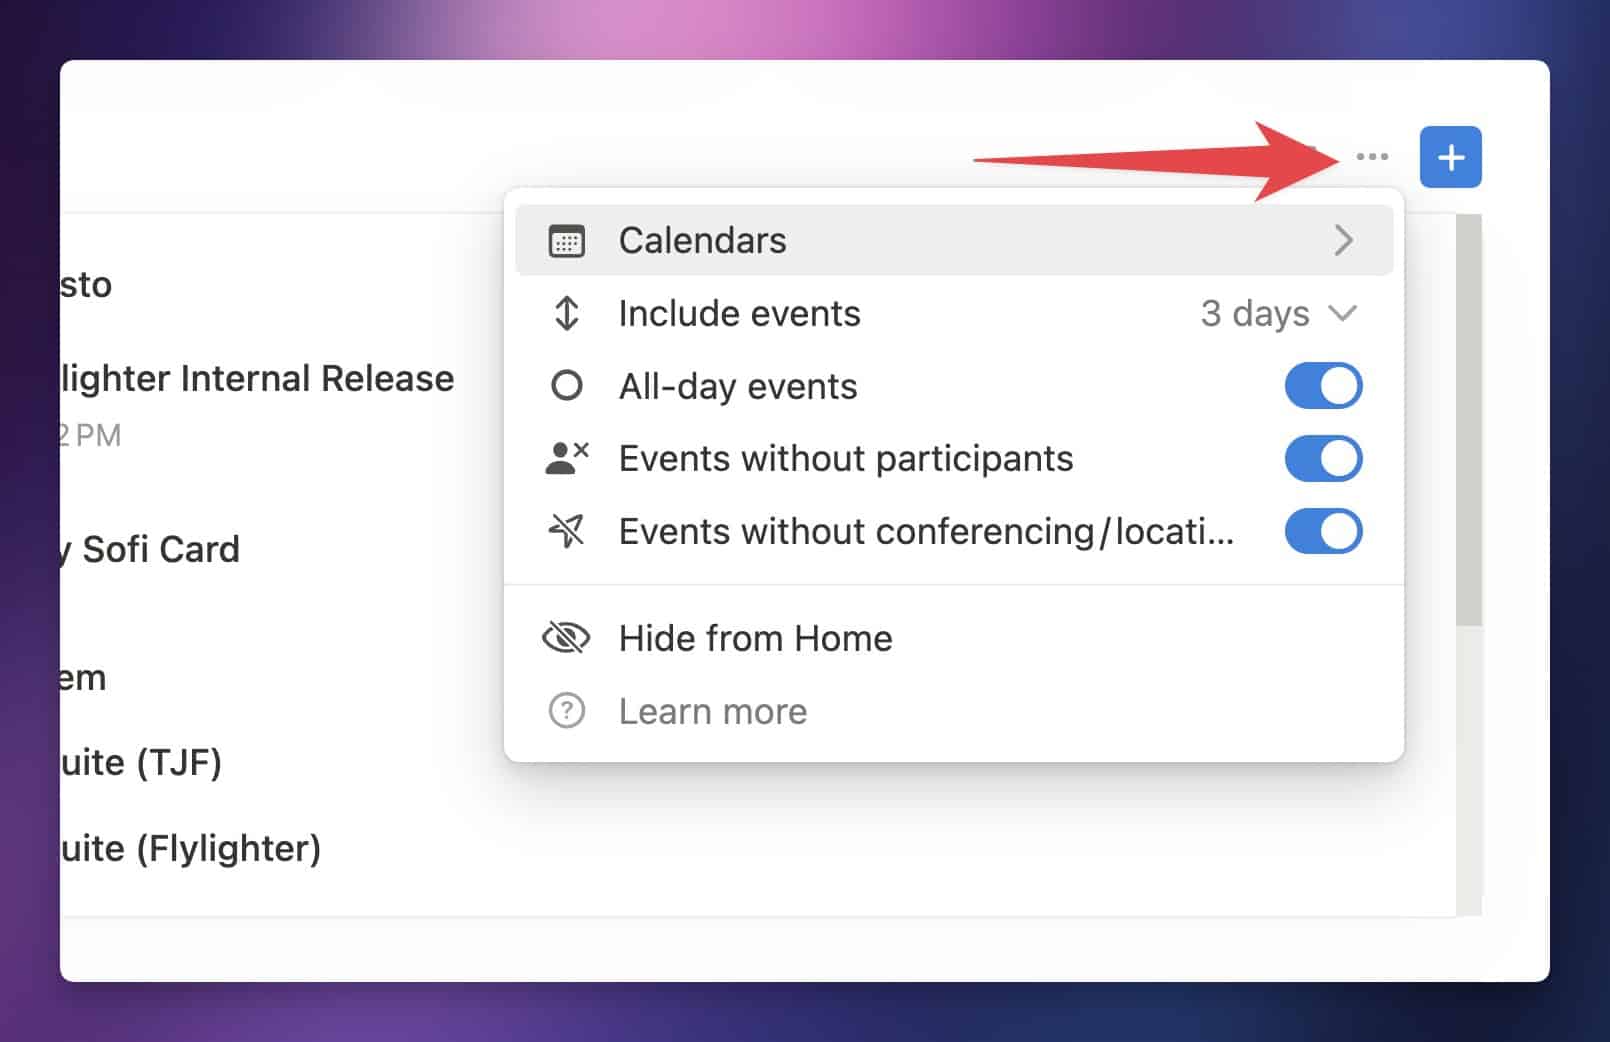
You can also click the ••• menu to access some options, which will let you customize the widget:
- Calendars: Within this menu, you can either mirror all of the shown/hidden calendars from Notion Calendars, or you can choose to show/hide each calendar in your connected Google Calendar events manually.
- Include Events: Choose whether to show events from Today, Today & Tomorrow, 3 days out, or a full week out.
- All Day Events: Disable this to show only events with a set start and end time.
- Events Without Participants: Disable this to show only events that have other participants.
- Events Without Conferencing/Location: Disable this to show only events with either a confernecing link or a set location
The latter two options allow you to use Upcoming Events as a list of your upcoming meetings – perfect for seeing your meeting schedule at a glance, without cluttering it up with other events (e.g. meal prep or rough gym session times).
You may also see that your Upcoming Events section is grayed out, only showing a Connect to Google Calendar button. This will happen if:
- You haven’t used Notion Calendar before
- You’re logged into Notion Calendar
- You’re viewing Home in a different workspace that isn’t already connected to Notion Calendar
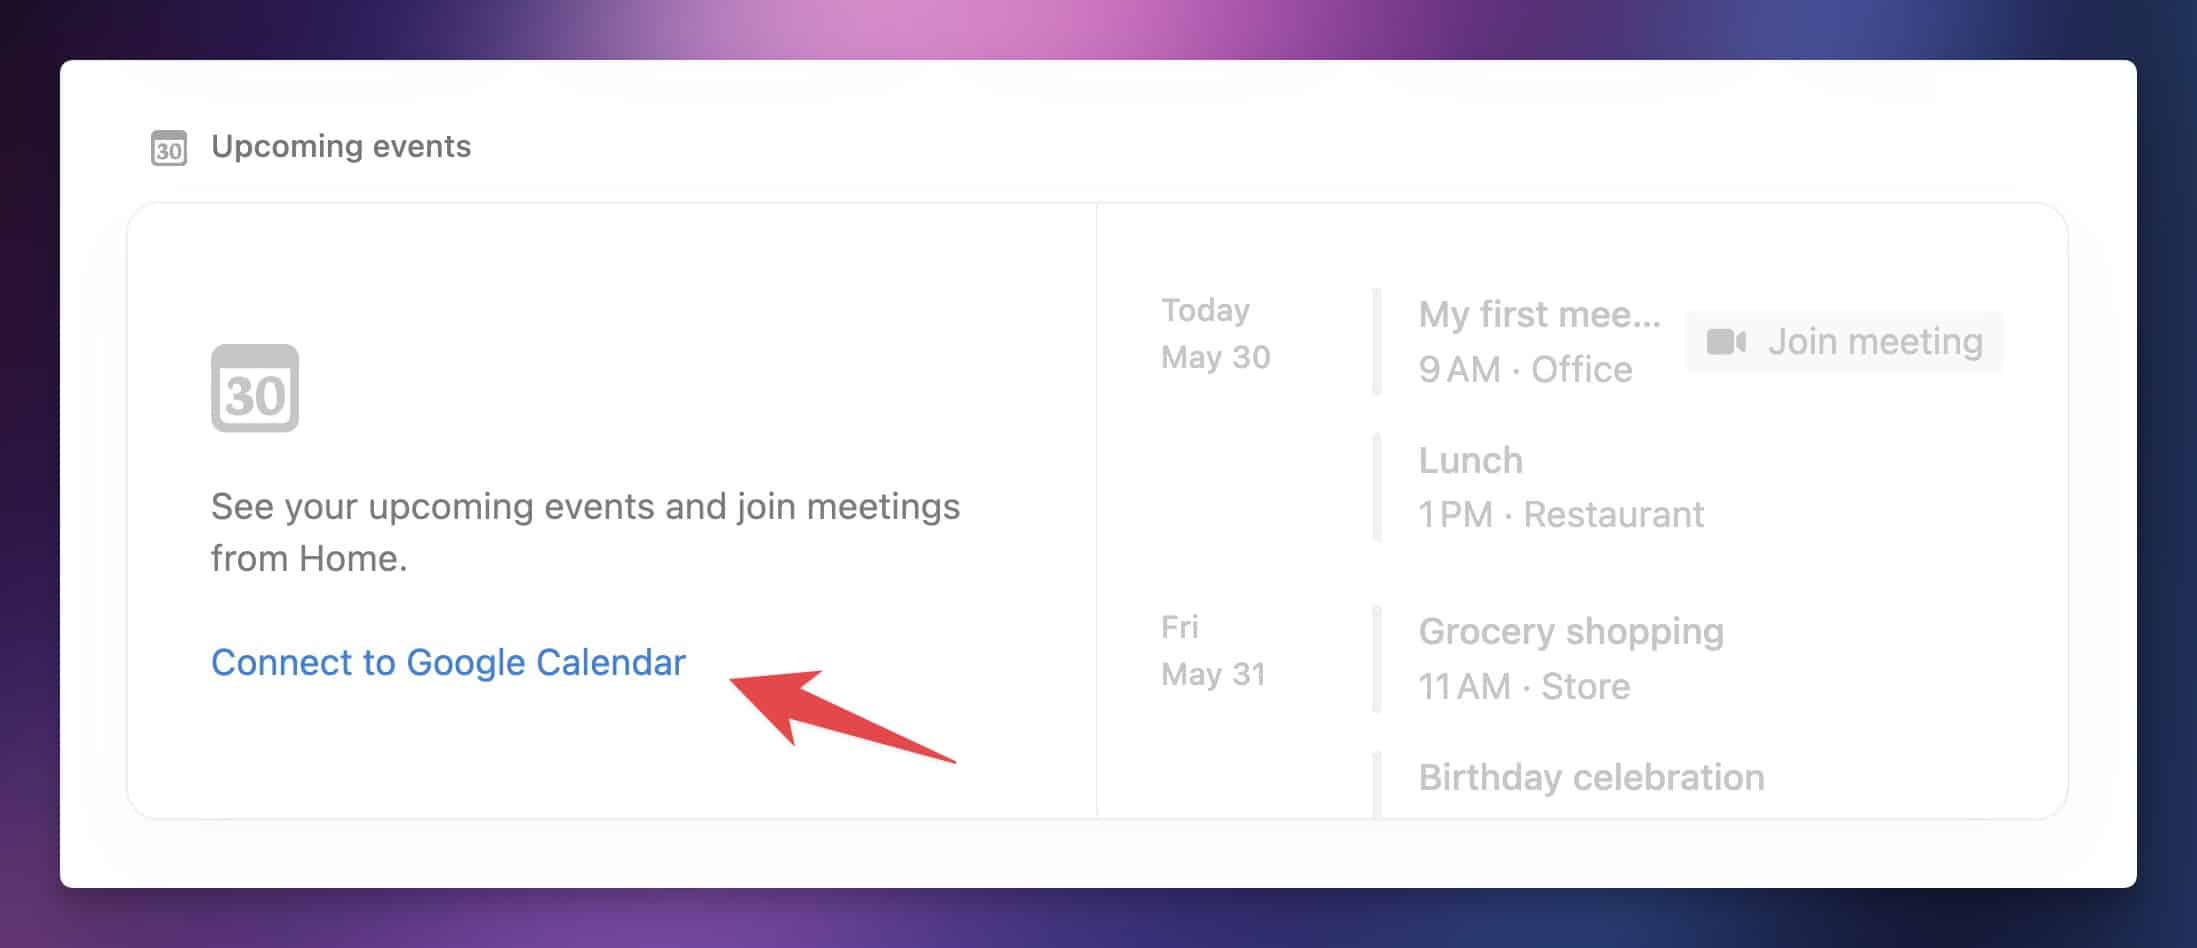
This button’s wording is a bit confusing, since clicking it will prompt you to connect your workspace to Notion Calendar, not to Google Caledendar directly.
However, it makes sense when you remember that, currently, Notion Calendar only works with Google Calendar accounts. I expect this button’s wording to change if Notion Calendar is updated to support other calendar systems in the future, such as Apple Calendar or Outlook Calendar.
P.S. Check out my guide to organizing your calendar if you want to improve your calendar game.
Copy link to headingMy Tasks
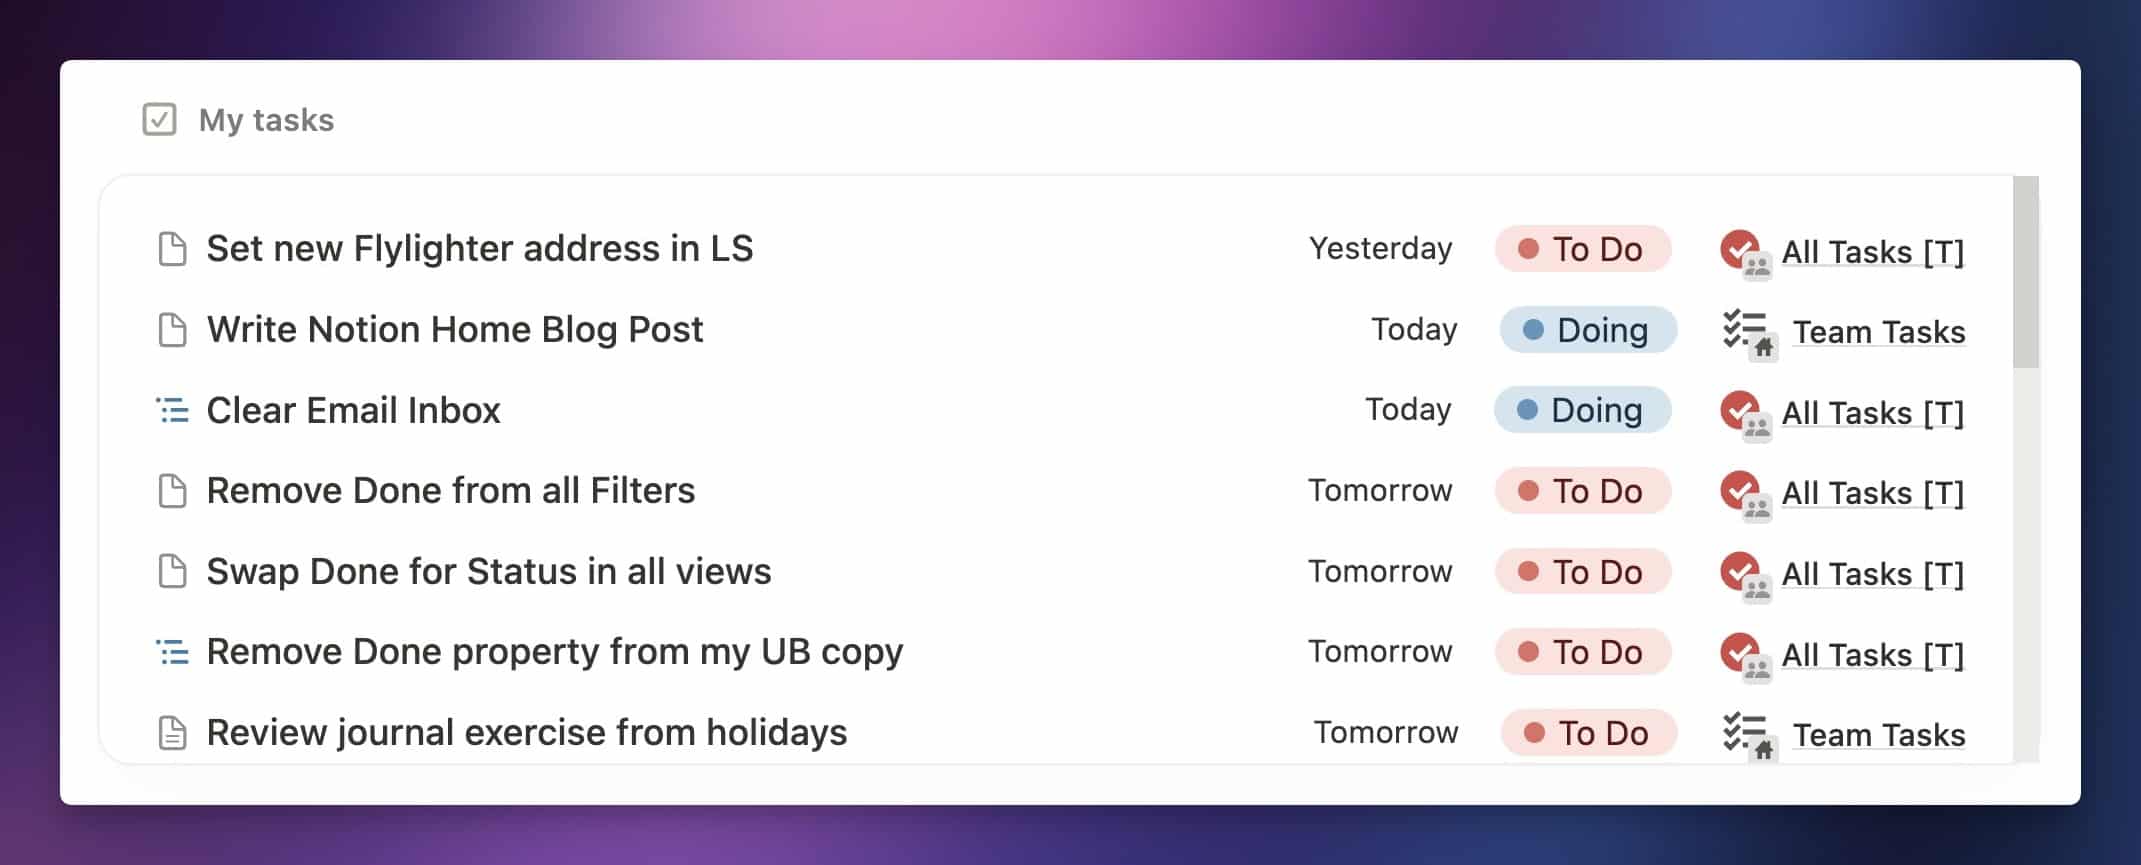
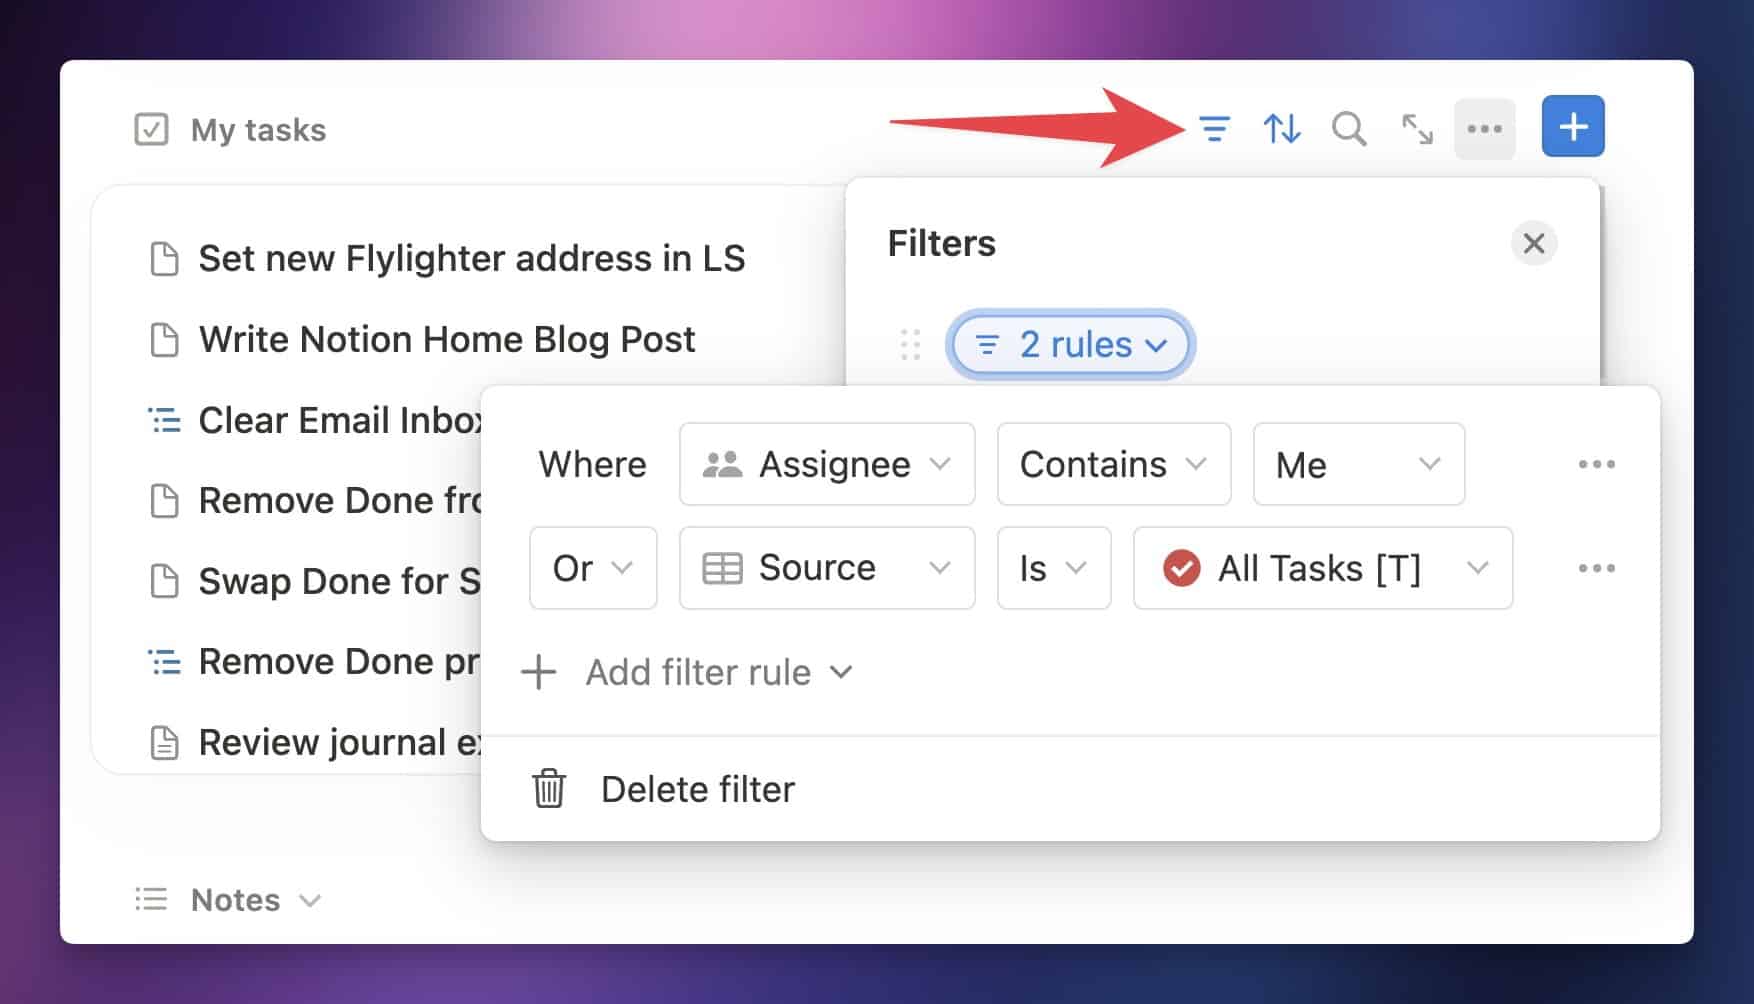
My Tasks is easily the most interesting widget in Home, as it introduces a mega-powerful new capability we’ve never seen in Notion before.
Within My Tasks, you can bring in pages from multiple Notion databases, showing them all in a single view. In the screenshot above, you can see this on the right side; the view contains pages from both the All Tasks [T] database (my personal task database) as well as the Team Tasks database.
This isn’t possible to do anywhere else in Notion, and before it was introduced here in Home, we simply couldn’t do it at all.
Here’s why this is a big deal: In Notion, you give people access to entire databases – you can’t merely give a person access to a filtered set of pages in a database (we’d call this “granular permissions”). This means you can’t, for example, only give a person access to pages in a database where they are set in an Assigee property.
For a long time, this has causes all sorts of headaches. One example is that you couldn’t put your personal, private tasks in a team-accessible database, unless you were cool with your team having access to them.
But now, in Home, you can bring two databases into the same view. This means you could create a private task database for yourself, as well as a broader task database for your entire team.
Then, you could bring both of these databases into the My Tasks widget in Home, as I’ve done in the screenshot above.
That said, there are a couple of catches:
- The My Tasks widget only supports Task databases
- You can only display certain properties from connected databases
Let’s quickly cover these limitations.
First, what is a Task database? A Task database is a special database designation; any database can be turned into one, but it must have a few specific property types set.
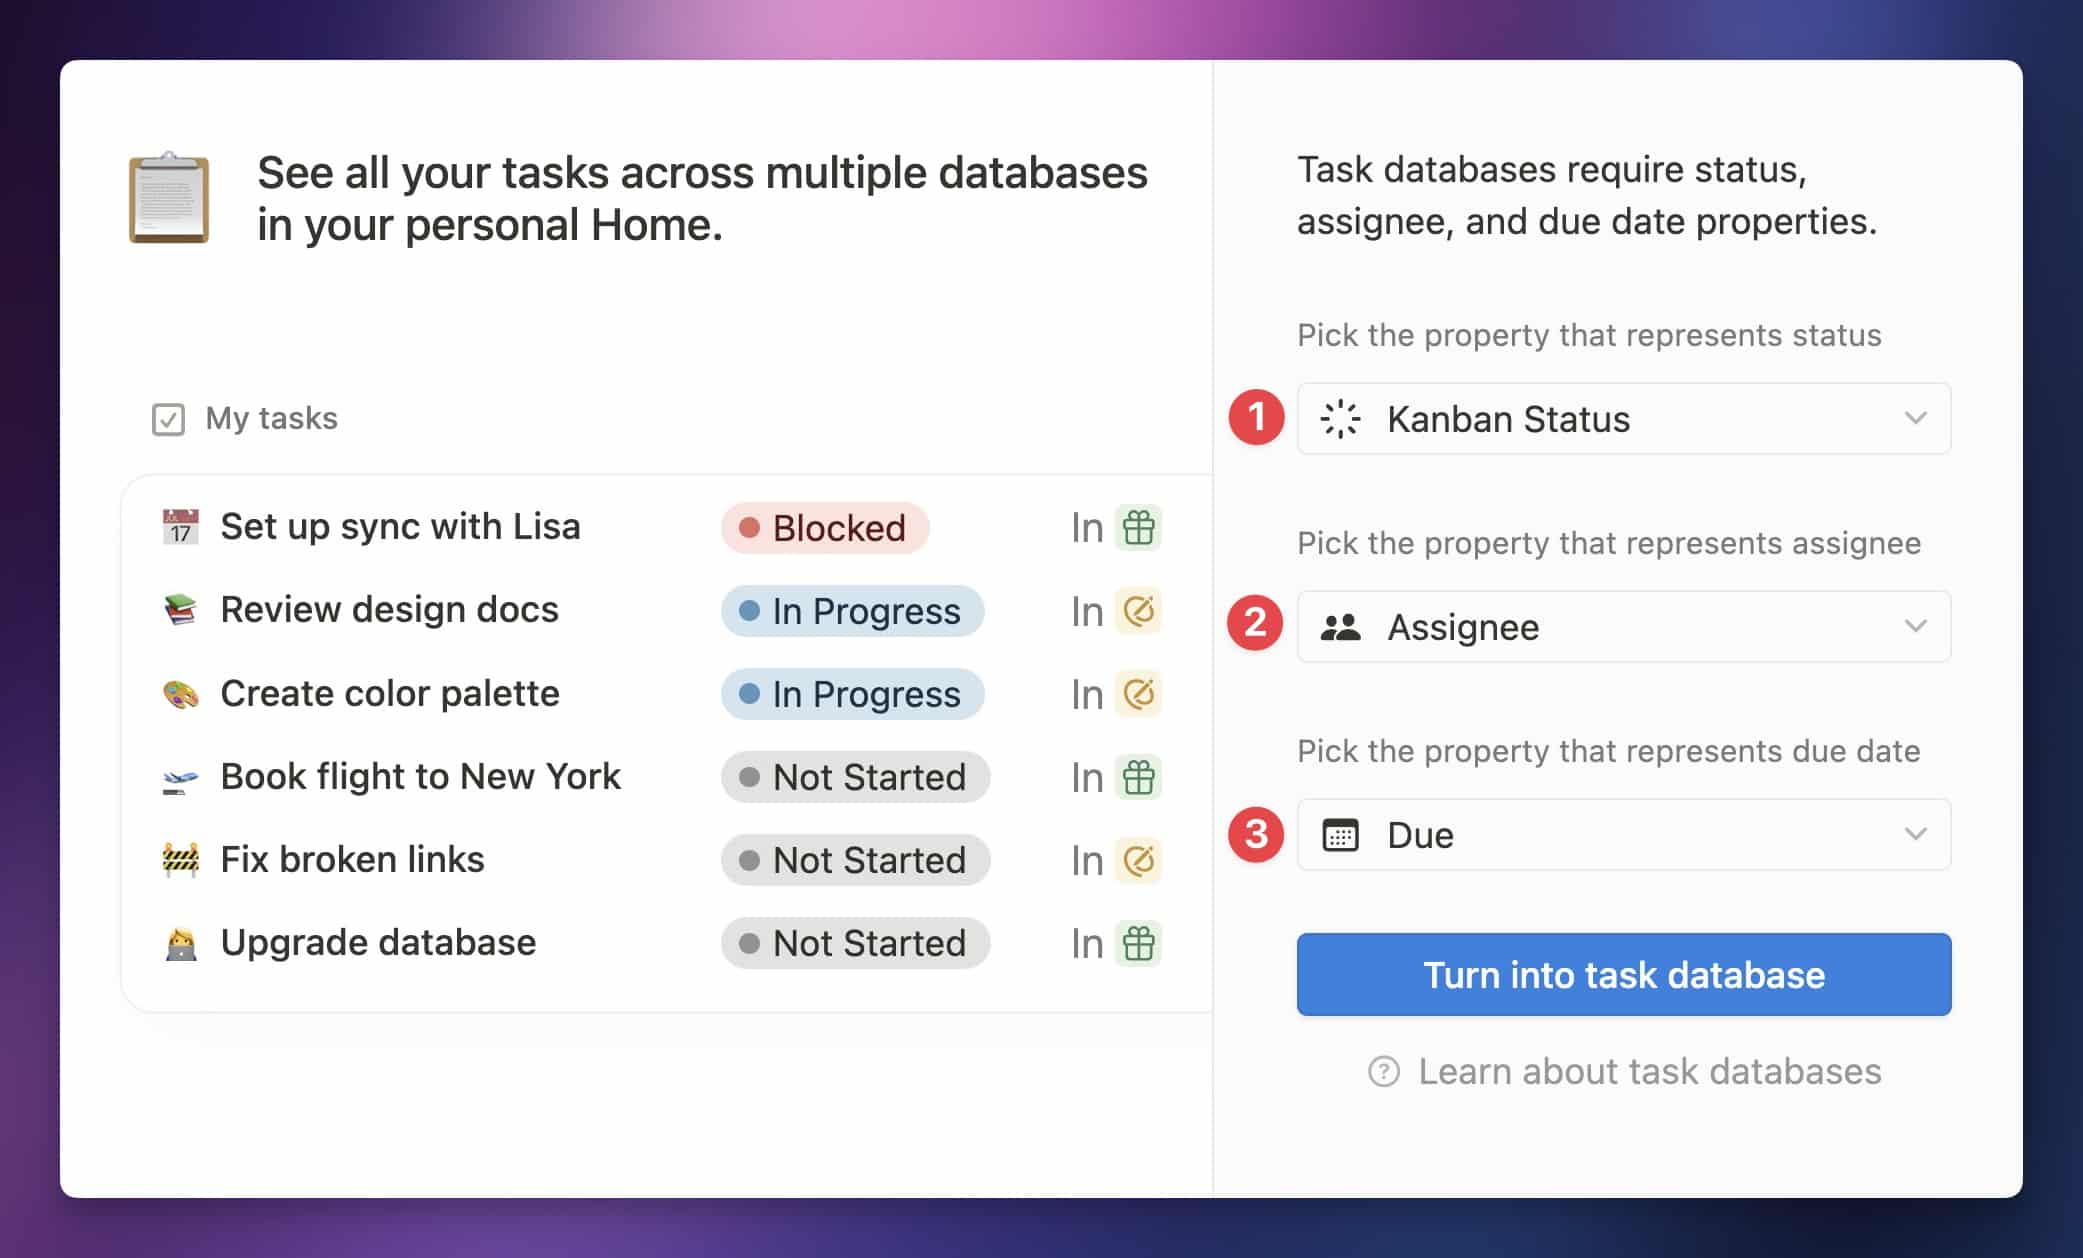
You can convert any database into a Task database by clicking the ••• menu on the source database (not on a linked view), then clicking Turn Into Task Database.
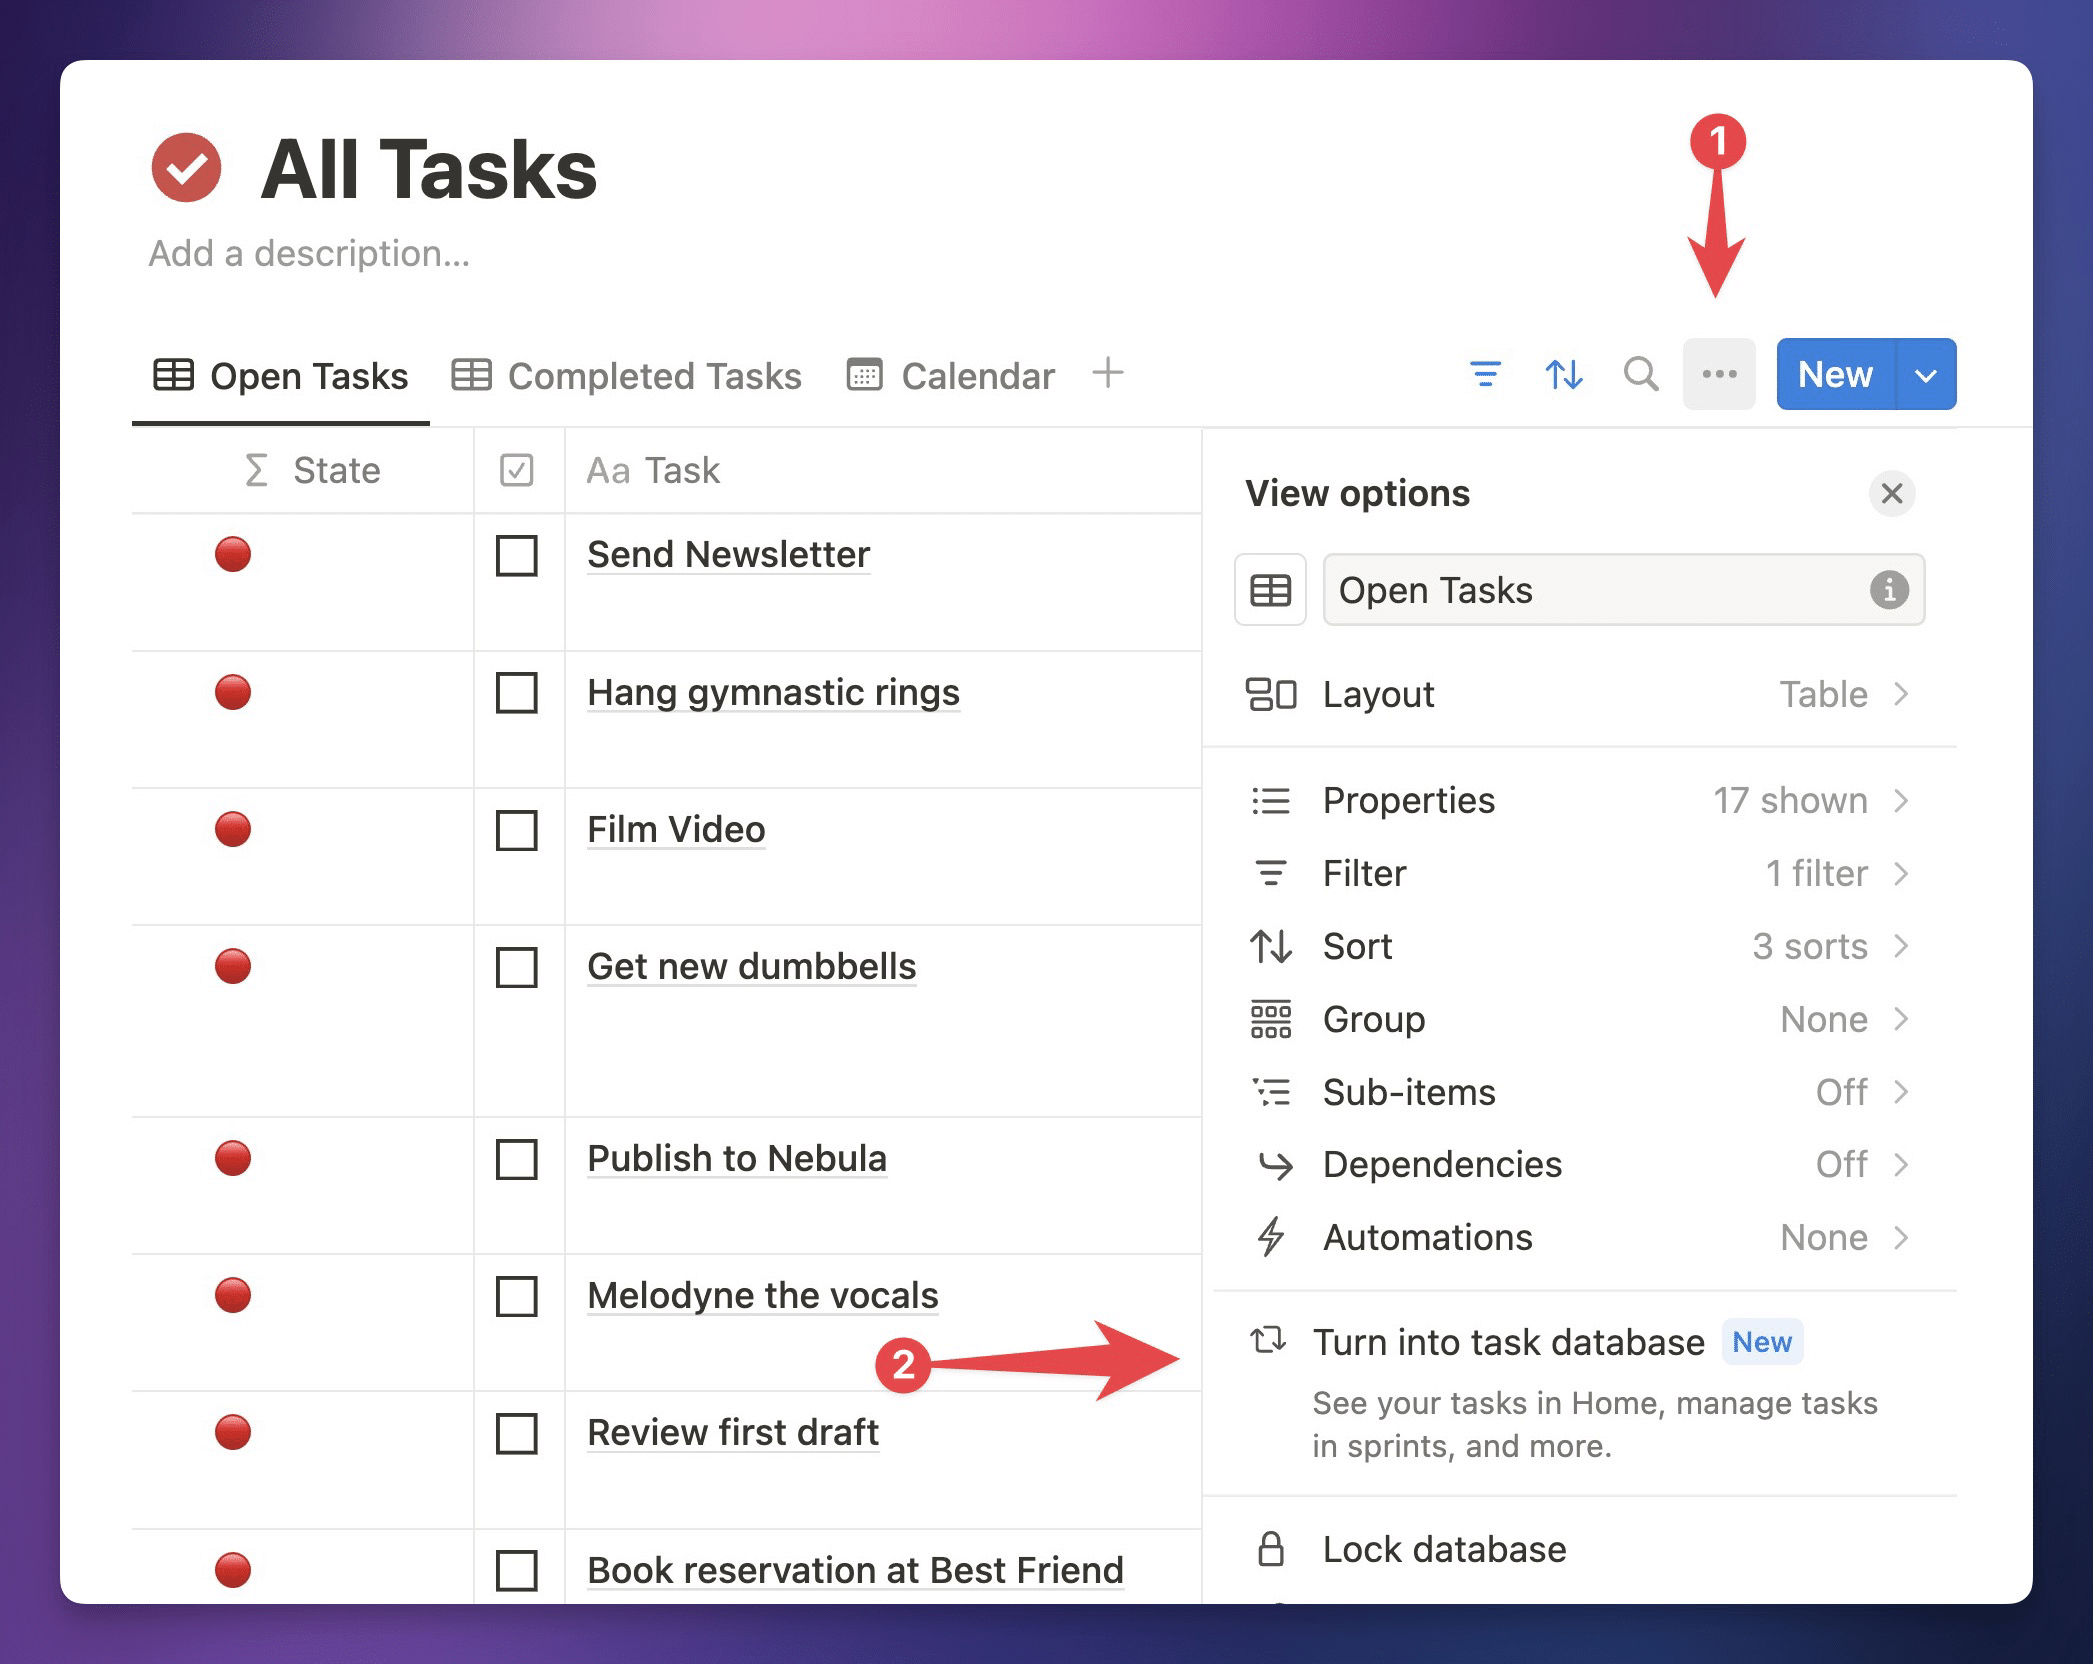
One final step – Task databases are required to have three specific properties set:
- A Status-type property to represent the task’s status
- A Person-type property to represent the assignee
- A Date-type property to represent the due date
If your database doesn’t already have these properties, you’ll be prompted to creat them in this step.
Want a great task template? Ultimate Brain has a full-fledged task database built in, and it has all the properties you need to convert it into a Task database.
Once you’ve turned a database into a Task database, you’ll see tasks from it in the My Tasks widget in Home.
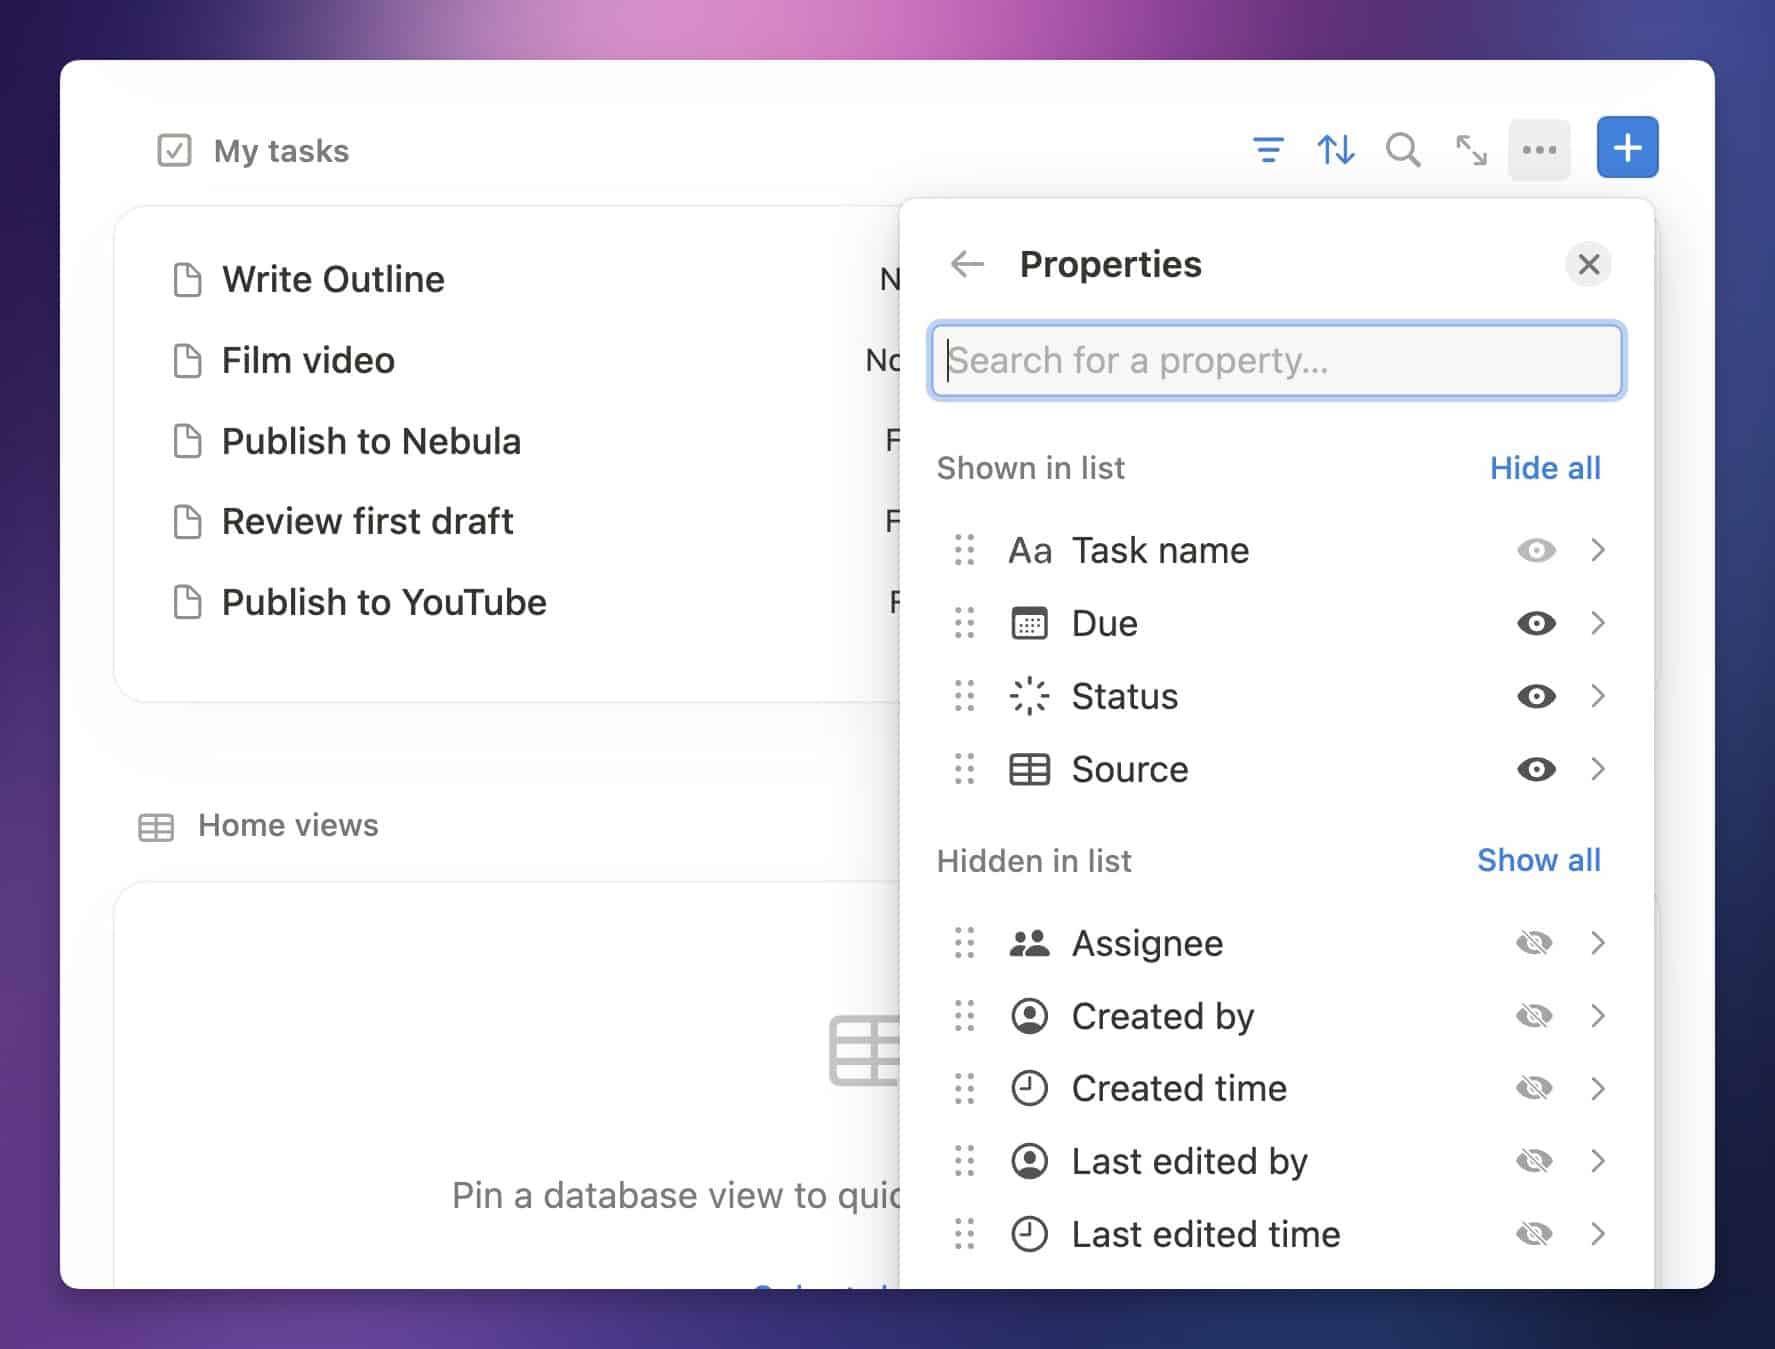
However, this is where we come to the second limitation: There are only a handful of database properties that you can display in this view. Currently, you can show the following properties:
- Task Name (e.g. the Title property)
- Due (the Date property you’ve set to represent due dates)
- Status (the Status property you’ve set to represent task status)
- Assignee (the Person property you’ve set to represent the assignee)
- Source (a unique property showing which Task database the task is from)
- Created by
- Created time
- Last edited by
- Last edited time
My Tasks has some other limitations as well.
While you can still choose your layout, set up grouping, and add filters and sorting, you can’t currently show sub-tasks, dependencies, or sprints. You also can’t set up or edit database automations from this widget.
Moving on from limitations, here are a couple of tricks you can use when working with My Tasks.
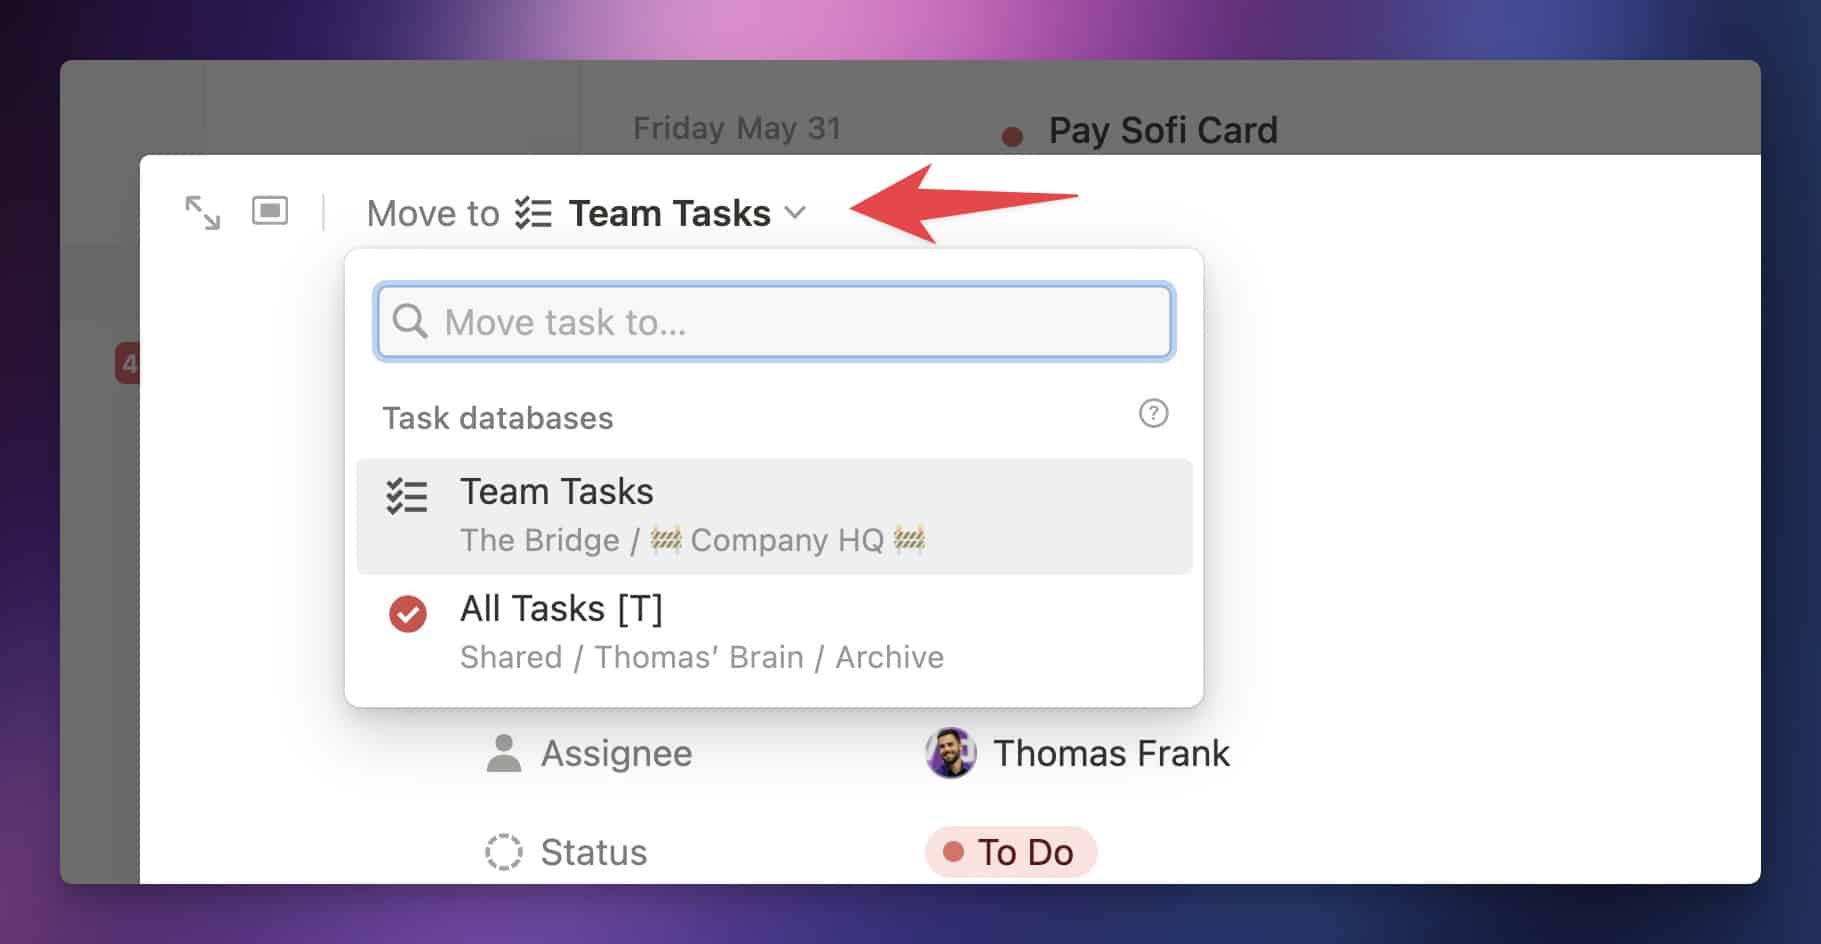
First, when you click the + button to create a new task, you’ll get a Center Peek dialogue where you can enter all the task’s details.
Near the top of this dialogue, you’ll see the Task database where the task was created. If you want, you can click the dropdown to move the task to any of your other Task databases.
Next, you can click the Open as Full Page button next to the filter, sort, and search icons in My Tasks to view all of your tasks in a full-page view.
This lets you see more tasks, but it has another benefit – you get access to the Open Pages In… option within the View Options (•••) → Layout menu. This will let you open tasks in Side Peek, which is my preferred method of viewing them. Within Home itself, you can only open task pages in Center Peek.
I’ll wrap up this section with a recommendation. If you’re planning on combining a team task database and a private task database in this widget, you may want to change the default filters.
By default, My Tasks comes with two filter rules:
- Status is Not Started or In Progress
- Assignee is “Me” (a dynamic value which corresponds to you, the current user)
If you have your own private tasks database, it’s likely that you don’t set yourself as the assignee for every task – instead, you likely leave the Assignee property blank.
If this is the case, you won’t see any tasks from that private task database in My Tasks due to the default filter rules.
You can fix this by first deleting the “Assignee is Me” filter. Then click Add Filter → Add Advanced Filter.
By creating an Advanced Filter, you get access to “OR” rules – e.g. “this OR that”.
In your Advanced Filter, create the following rules:
- Assignee contains Me
- Source is your private task database
To find your database, you may have to click “1 Other Source” when you open the database dropdown.
Finally, make sure to change the “And” dropdown to the left of your second rule to “Or”. This will create an advanced rule that shows you all of your tasks from your private tasks database, plus any tasks specifically assigned to you from the team database!
Database Views
The Database Views widget allows you to create linked database views within Home, pulling pages from any database in your workspace. Unlike My Tasks, this widget does not limit you to only using Task databases.
However, each view in this widget can only show pages from a single database – the same limitation we have when creating linked database views anywhere else in Notion. If you want to show pages from another database, you’ll need to create another view.

If you click the View Options (•••) menu from Home itself, you’ll see a limited number of options for customizing your views.
However, if you click the Open as Full Page button next to the filter, sort, and search icons, you’ll see that this is just like a normal linked database block. From this full-screen view, you’ll have access to all view options. You’ll also see your database views as tabs.
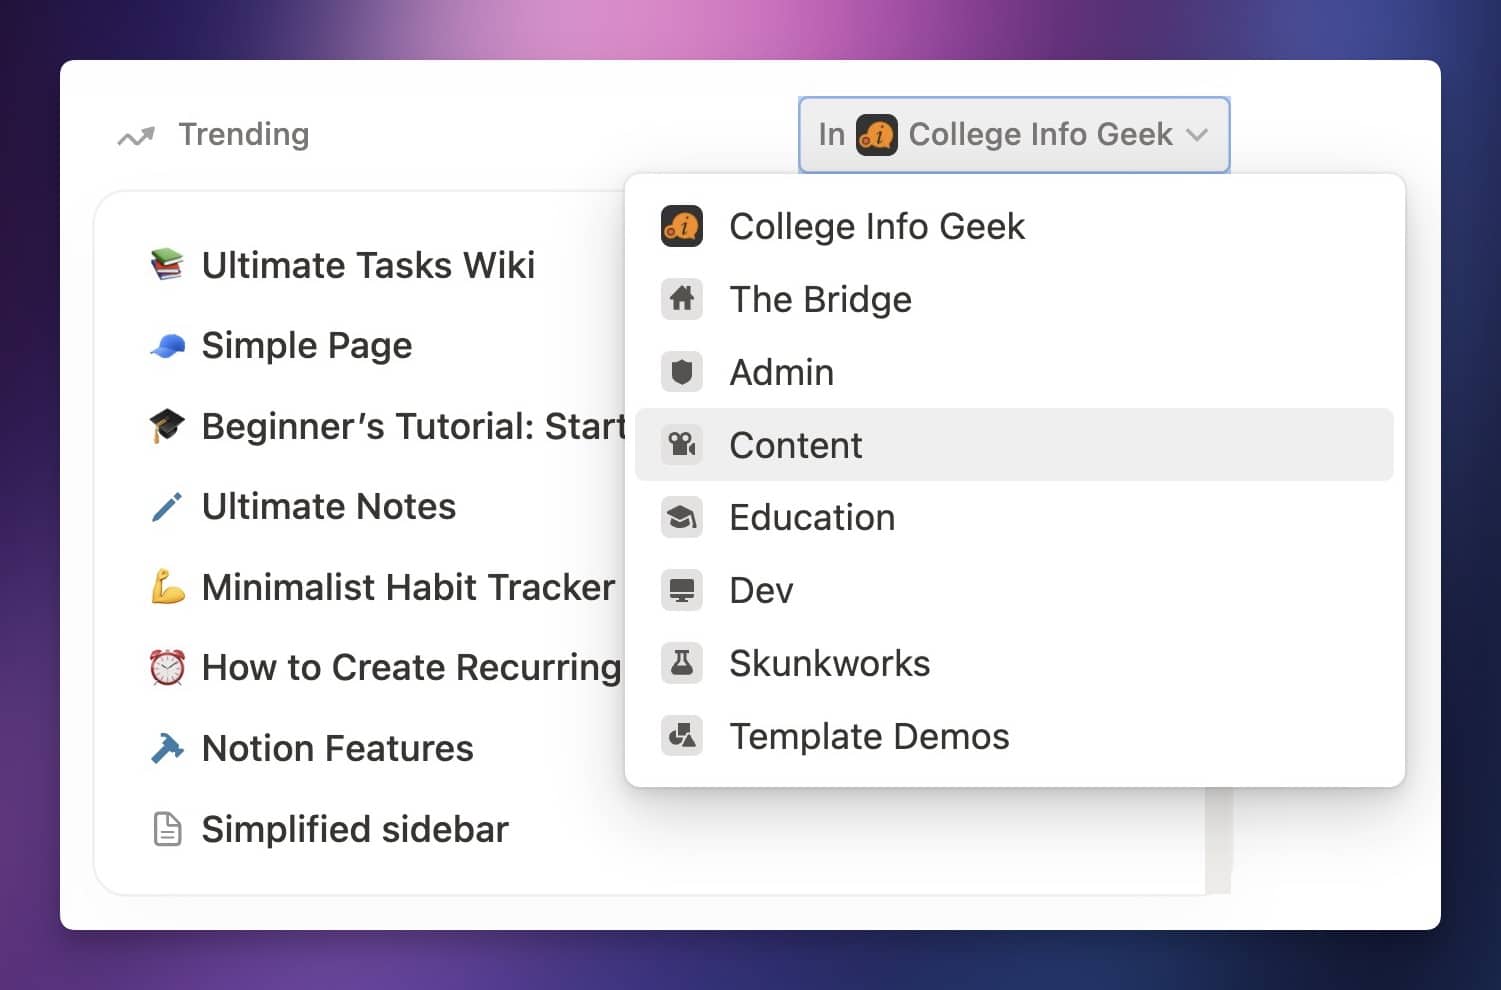
Copy link to headingTrending
The Trending widget shows the most-viewed pages in your workspace, determined by visits from the past week.
If you want, you can filter this to only show popular pages from a specific Teamspace:
Customizing Notion Home
While Notion Home is a much more rigid, opinionated page compared to normal Notion pages, you can still customize a few things.
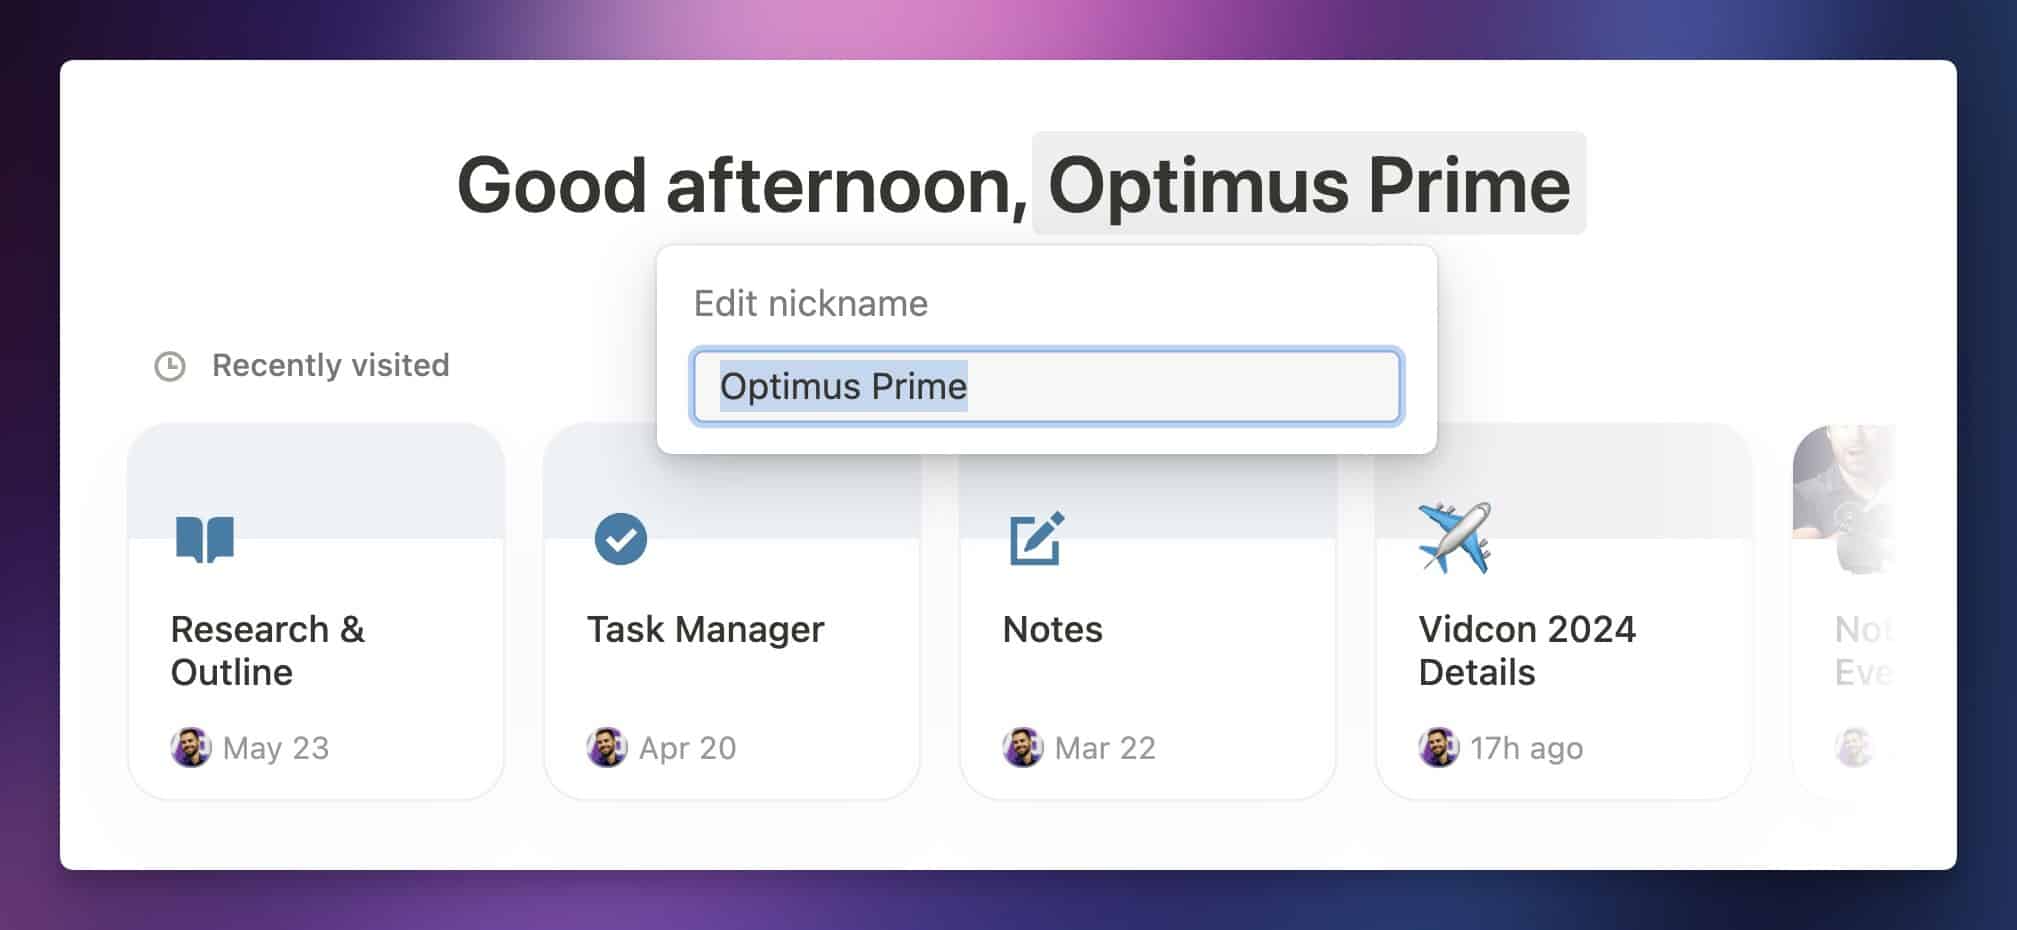
Copy link to headingSet Your Nickname
By default, Notion Home shows a cheery little greeting that pulls your name from your user profile. But what if you want it to call you Optimus Prime instead?
Click your name within that greeting, and you can change it to the leader of the Autobots – or anything else your heart desires.
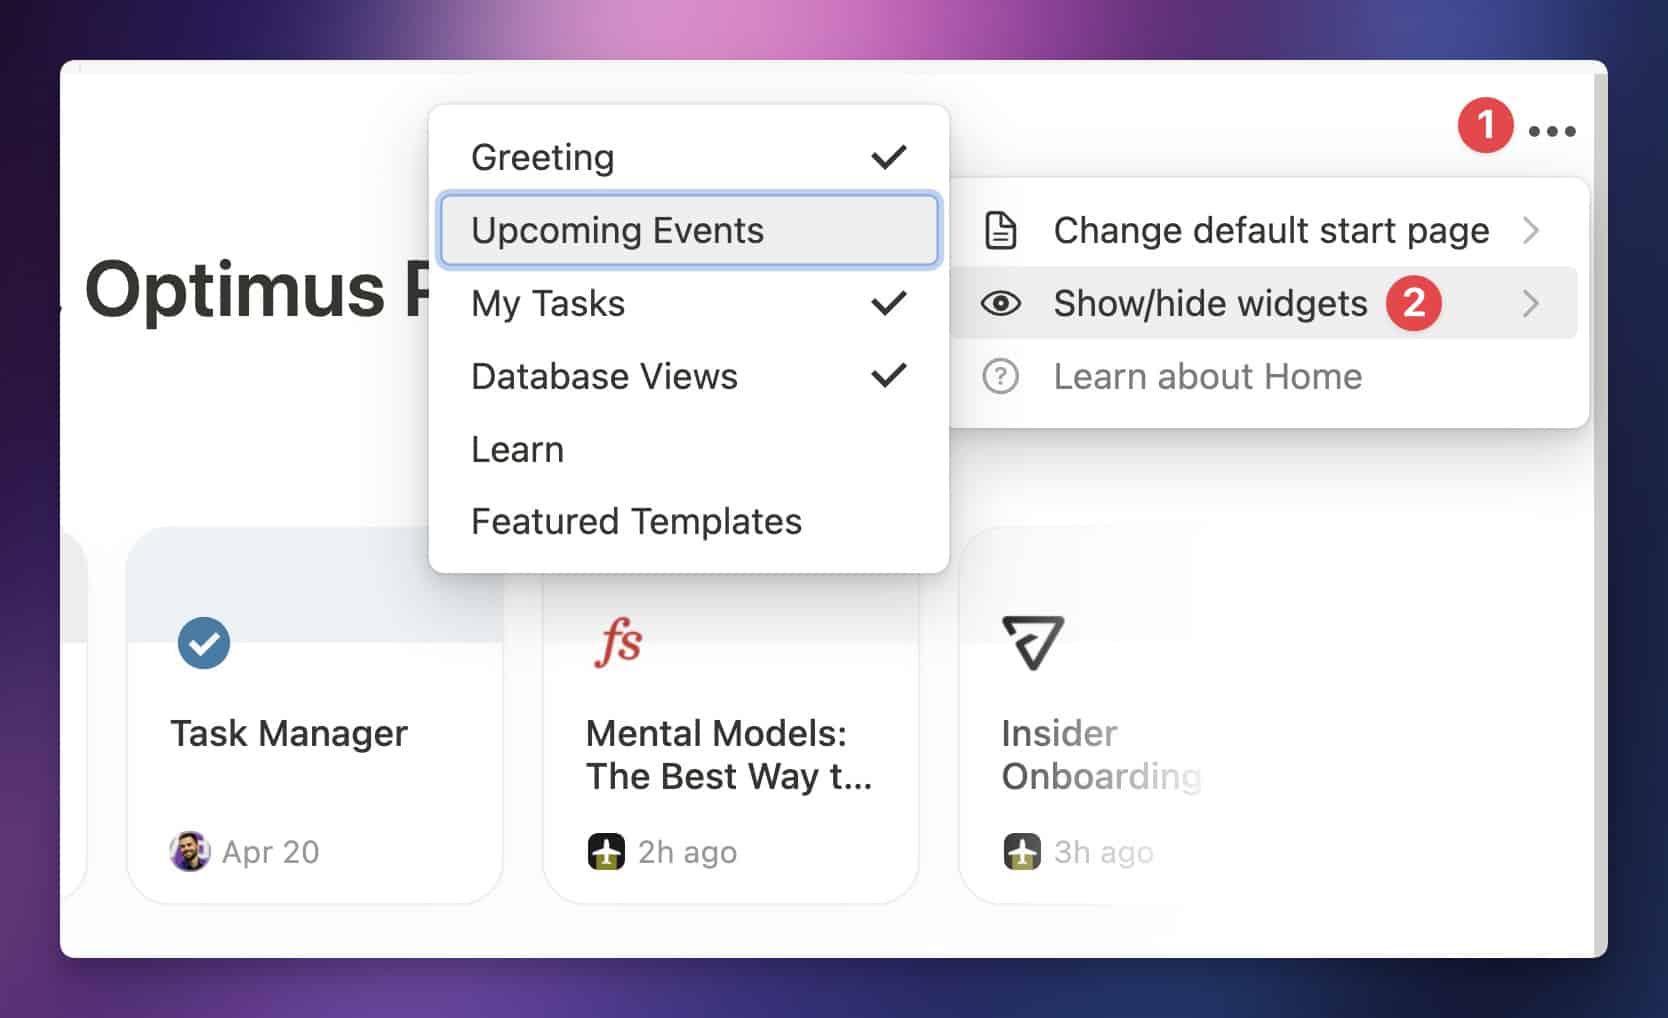
Show and Hide Widgets
You can hide several of the widgets in Home if you want. To do so, click the ••• menu in the top-right corner and choose Show/Hide Widgets.
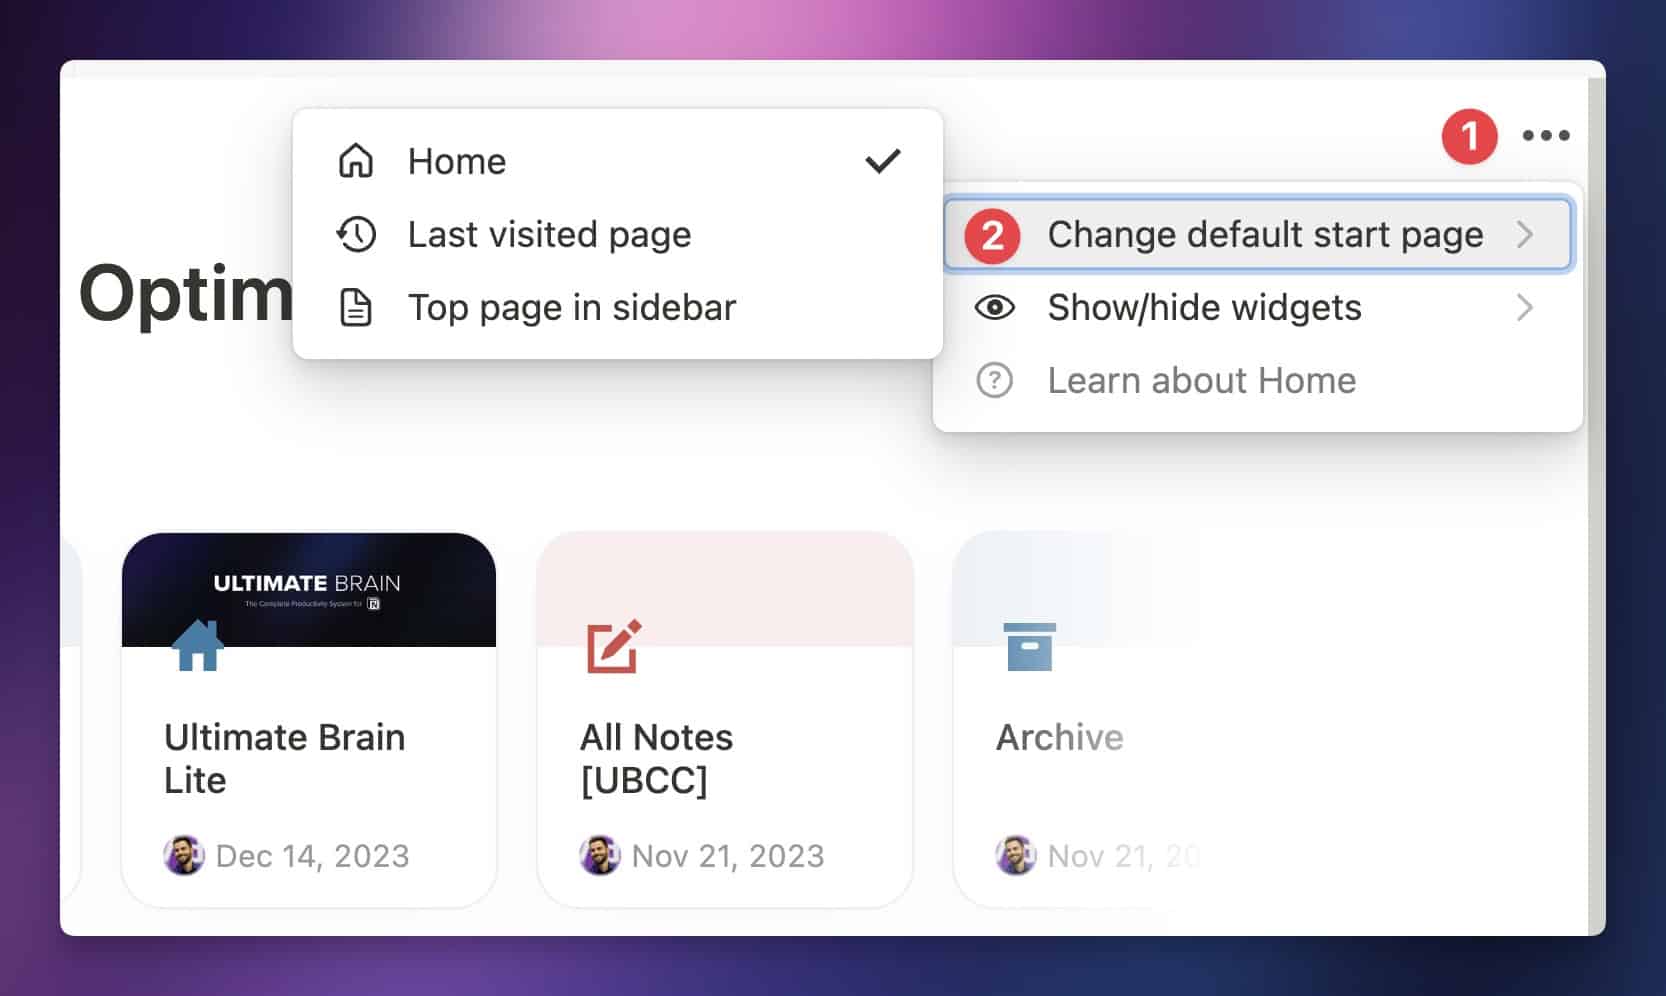
Change Your Default Start Page
Notion will open to your most recently-visited page by default. However, you can change that if you want.
By going to the ••• menu in Home, then clicking Change Default Start Page, you can choose from the following start page options:
- Home
- Last Visited Page
- Top Page in Sidebar
Improve Your Notion Knowledge
In this article, we’ve covered everything there currently is to know about Notion Home. But if you’re new to Notion, we’ve only scratched the surface!
If you step outside of the Home section, you’ll be able to create hyper-flexible pages with multiple columns and dozens of different kinds of blocks. Using these tools, you can create all sorts of useful pages and dashboards.
For example, you can follow this video tutorial to create a full-fledged note-taking system:
If you want to learn all of the basics and build up your arsenal of Notion knowledge, start with my free Notion Fundamentals course. In it, you’ll learn how to create pages, connect them together, build databases, and more.
You can also save a ton of time and get up-and-running quickly with the Notion templates I’ve built:
- Check out Ultimate Brain if you want an all-in-one second brain with tasks, notes, goals, a journal, and more
- Get Ultimate Notes for free if you just need a note-taking system
- Get my free Expense Tracker if you’d like to track your recurring expenses and see them in Notion Calendar
Finally, if you’d like to get updated when I published new tutorials and templates, join my free Notion Tips newsletter!