
The most powerful and flexible tool in Notion is its database feature. Within your Notion workspace, you can create databases that can store almost any kind of data, including text, numbers, file attachments, and more.
Databases can be used to create:
- Task managers (such as Ultimate Tasks)
- Calendars
- Note-taking systems
- CRMs
- Custom dashboards for sales and performance data
…and much more. Once you understand how to work with databases, you’ll unlock a whole new level of capability inside of Notion.
In this Notion Fundamentals lesson, I’ll guide you through all the basics of creating and using databases.
Note: This guide is massive, and is intended to be a truly complete tutorial for Notion databases. I encourage you to use the table of contents to jump around!
In the video version of this lesson, we’ll be using everything we learn to create a useful example database – a simple task manager, which you could include in the personal dashboard that we’ve been building throughout the other lessons in this series.
One thing I’ll note before we get started is that I’ve created a completely free task management template called Ultimate Tasks, which has a lot more capabilities than the example we’ll be building here – such as sub-tasks, recurring tasks, progress bars for projects, and more.
If you’re looking for a capable task manager for Notion, check it out!
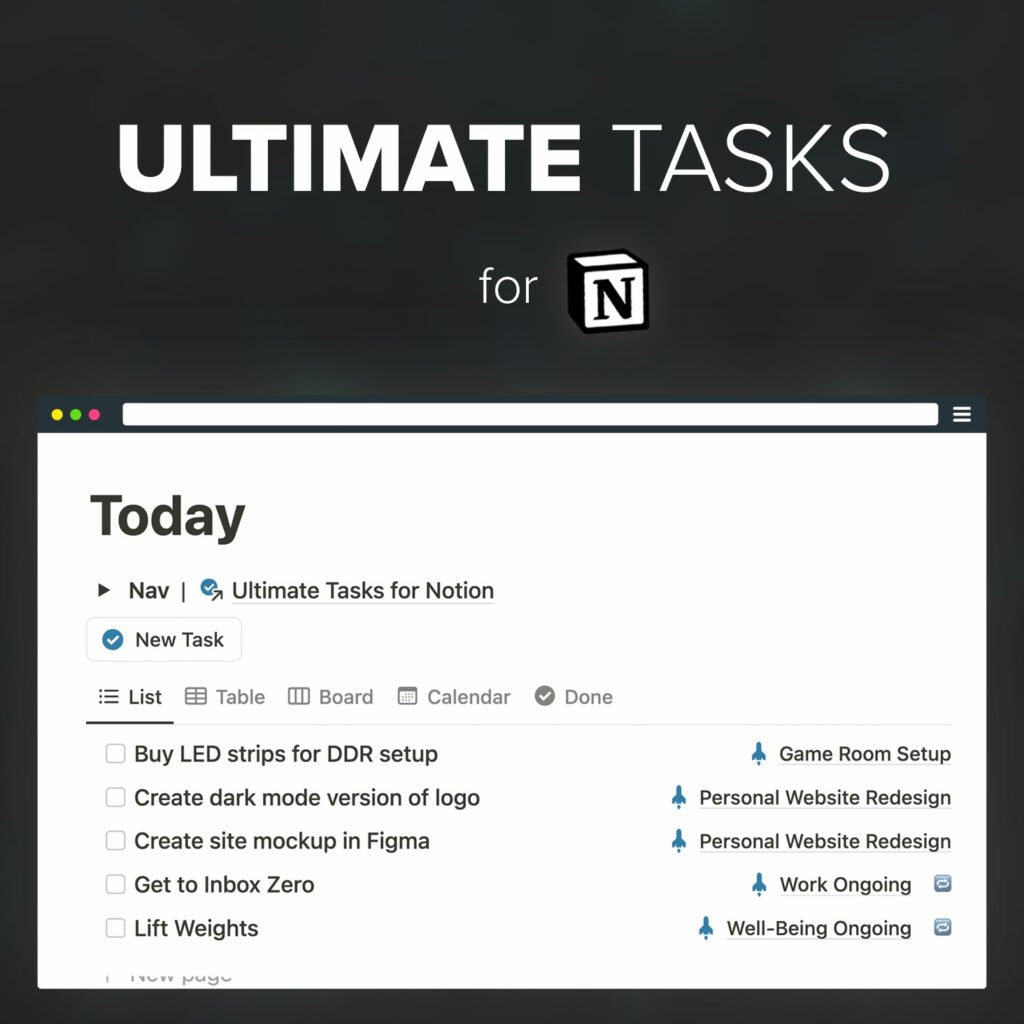
Use this template to move ALL of your task and project management into Notion.
How to Create a Notion Database
The best way to learn is by doing – by trying things out, experimenting, and getting your hands dirty. So let’s start this guide out by covering how to actually create a Notion database.
Doing so is simple; just type /database on any Notion page, and you’ll see a list of database options.
You can start out by choosing Database – Inline, which will create a brand-new database right on that page. Here’s a very simple example database that lists some of my favorite movies:

By default, your new database will be displayed as a table. Notion offers other database layouts, but a table is a great starting point.
There are a couple of alternative ways to create a database as well. First, you can create a blank page (see my lesson on creating pages), and then select one of the database options:
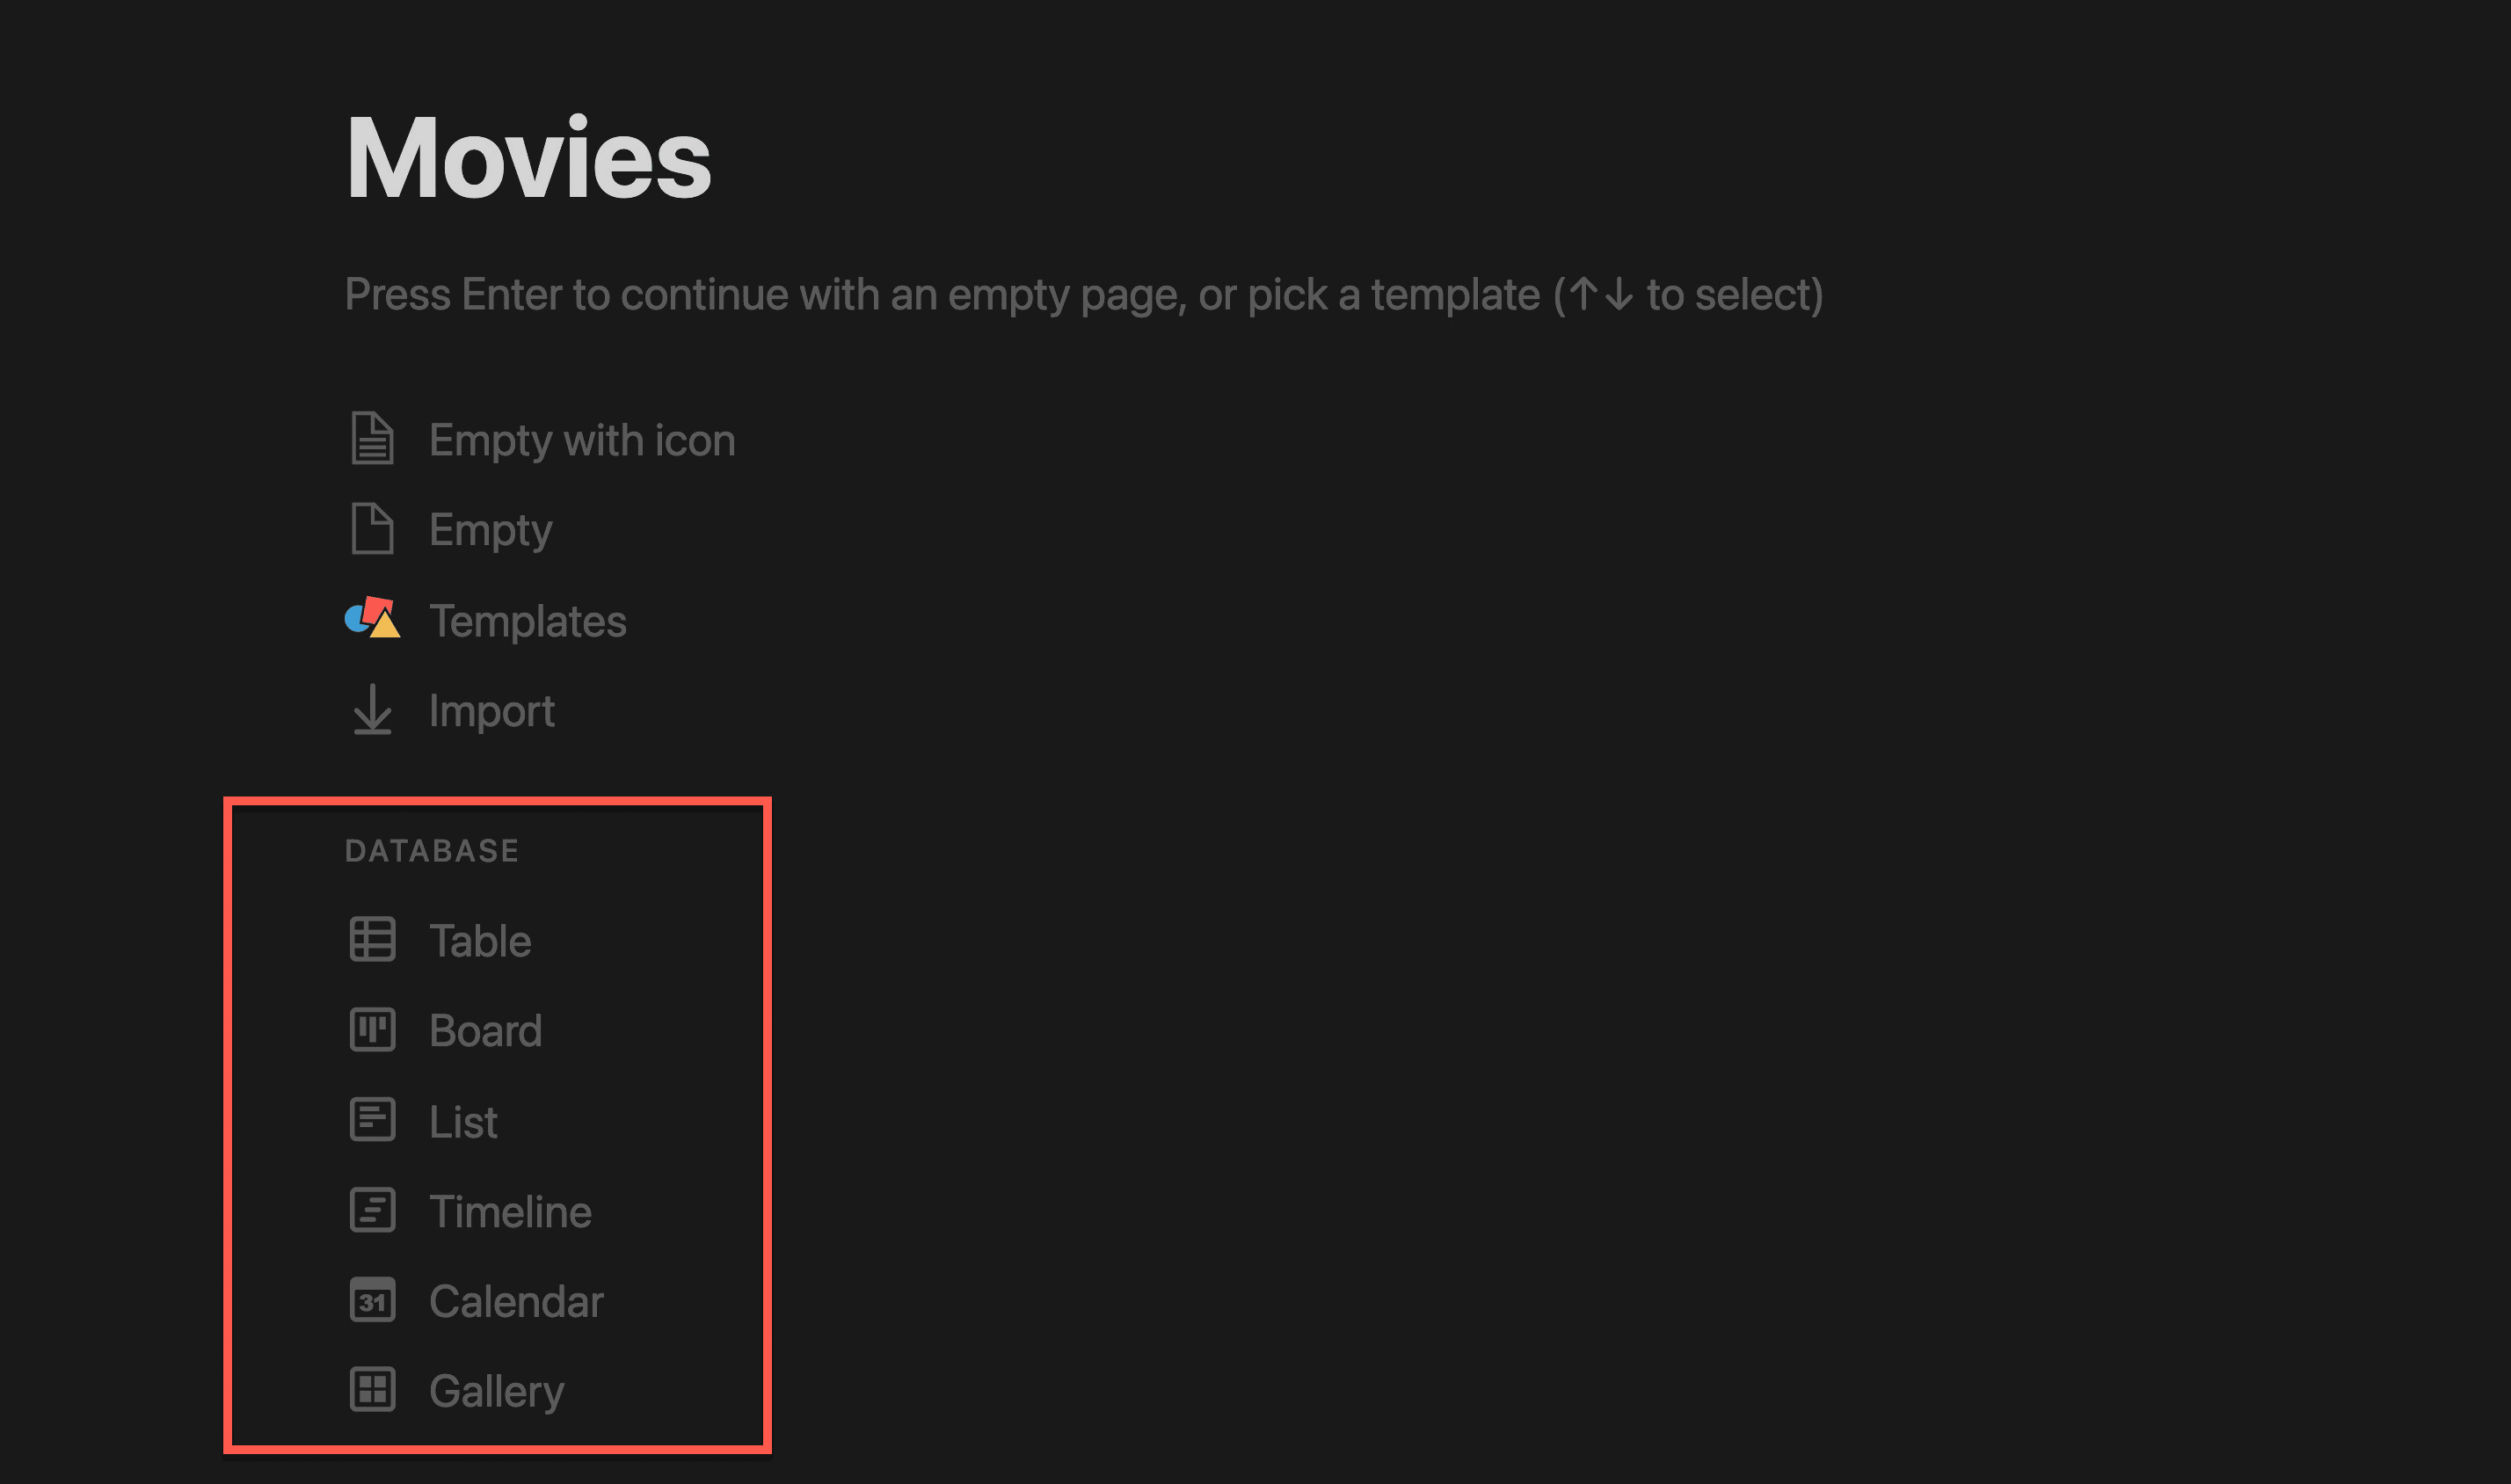
You can also use the / command to create a database with the specific layout you want. The options include:
/Table view/Board view/Gallery view/List view/Calendar view/Timeline view
If you create a database block using a layout command, Notion will give you the option to either create a Linked Database (which links to an existing source database), or to create a new database.
There are later sections in this guide for both (click to jump to them):
For now, it’s just useful to know the ways you can create new databases.
Copy link to headingNotion Databases at a Glance
Databases store rows (sometimes known as records). And in Notion, those rows are actually Notion pages themselves.
The Table layout in Notion displays a database’s rows as they’re actually stored in the database (since Notion uses a table-style database structure with rows and columns). In this example, each movie is a row in the database.
However, I can open up any one of them and get a Notion page that works just like any other:
These pages can hold any type of content you want – text, images, and even other Notion databases.
Databases also have properties. You can see these at the top of the Hot Fuzz page above, or as columns in the Table view.
Properties hold structured information within a database, and typically they’re set on a per-row basis. Here in the movies database, I have two:
- Genre – a Multi-Select property, which allows one or more tags to be applied to each record
- Seen Recently – a simple Checkbox property
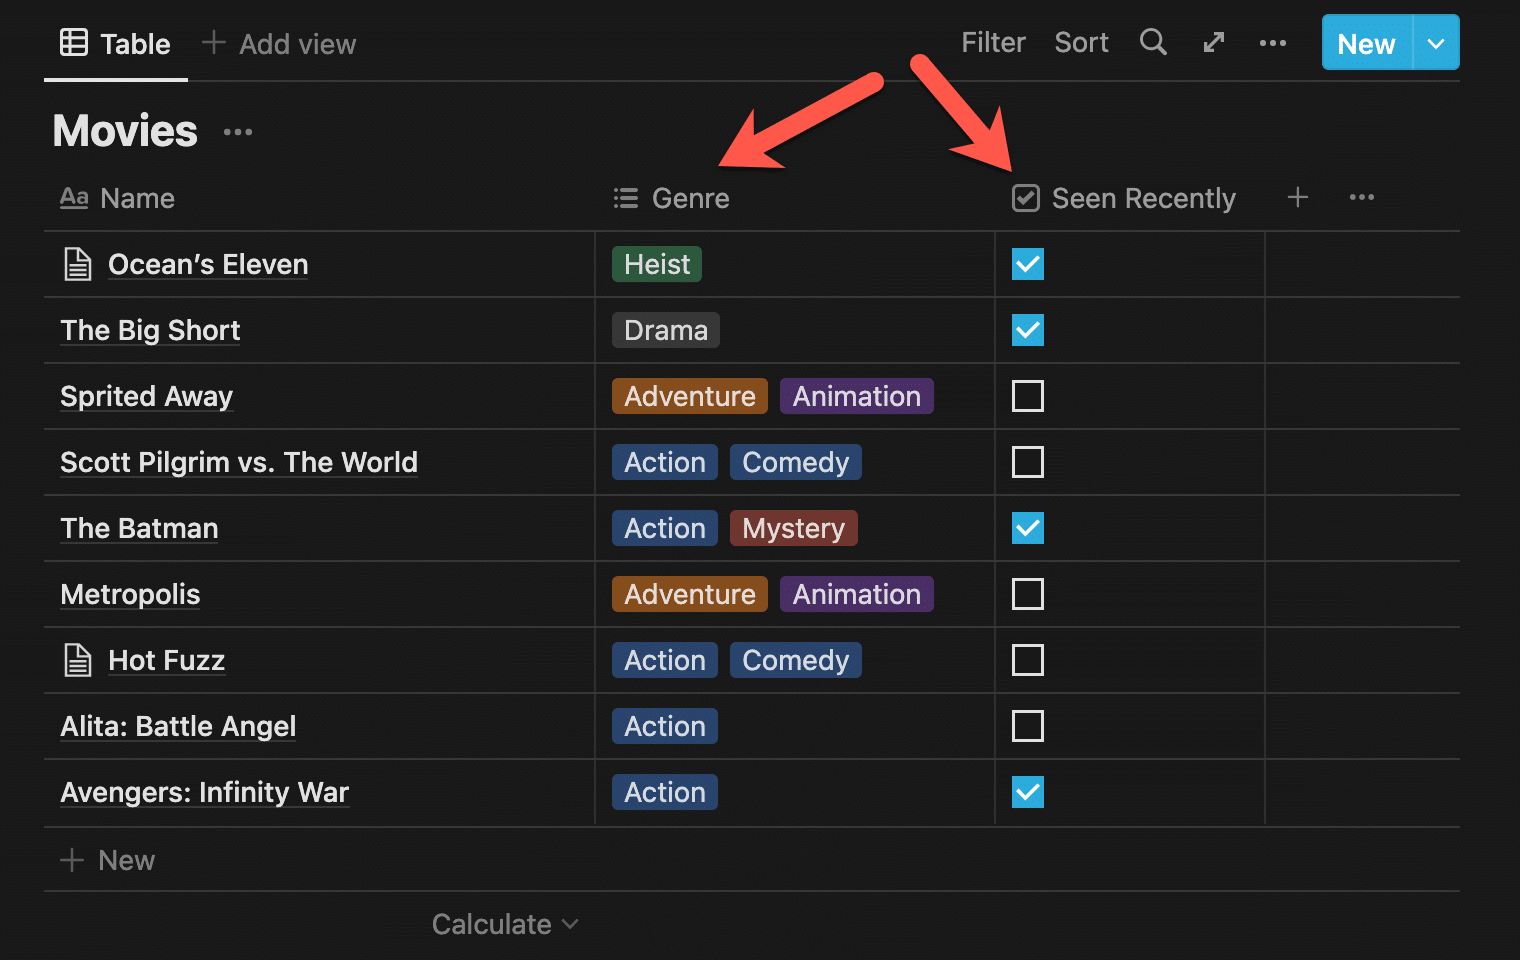
Properties have several uses, but their greatest use is in filtering and sorting your data.
Here’s another view of our Movies table, filtered to show only the movies that we haven’t seen recently:
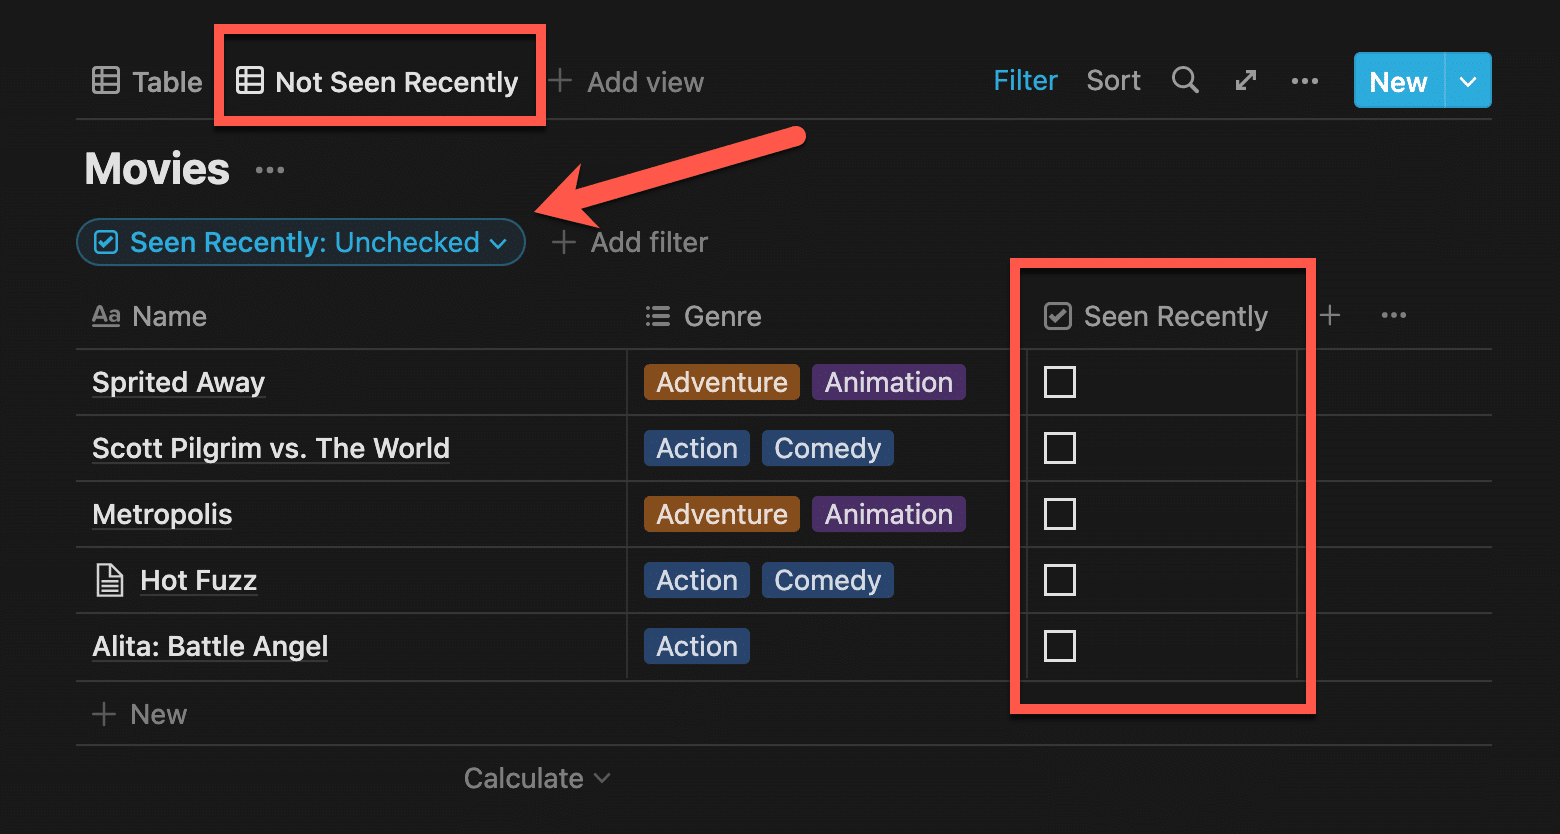
Note how this is a different view of the same database. Our original Table tab doesn’t contain the same filter.
By looking at the same database through different views with unique filters, we can look at the same database in many different ways.
This is immensely powerful. Consider a Notes database containing all the notes in your life. That might be thousands of notes! Without any filters, this data would be hard to sift through.
But by applying properties, sorts, and filters, you could create all sorts of useful views:
- All notes created in the last month
- Notes tagged with “Fitness”
- All notes, sorted by Date Last Updated
- Notes related to the Vacation project in your Project Database
- Notes with a Review Date that falls within the next week
Without a database, these types of filters and sorts aren’t possible in Notion – which means you may eventually end up with long lists of pages that can only be sorted by dragging-and-dropping.
Hopefully, this introduction has shown you just how powerful databases can be.
From here, the rest of this guide is a choose-your-own-adventure:
You can scroll up to the video tutorial above, where we’ll create a simple task manager using some slightly more advanced database techniques.
Or, you can keep reading this written guide, which will detail all the important Notion database features – filters, sorts, grouping, properties, relations, linked databases, and more.
Copy link to headingWhat Is a Database?
Now that you’ve had a proper introduction to how Notion databases work, I’d like to touch a bit on what databases actually are before we get into the details of their individual features within Notion.
In general, a database is defined as an:
“…organized collection of data stored and accessed electronically.”
Nearly every program and web app you use relies heavily on databases. If you’ve ever used a digital calendar app like Google Calendar, then you’ve benefited from a database.
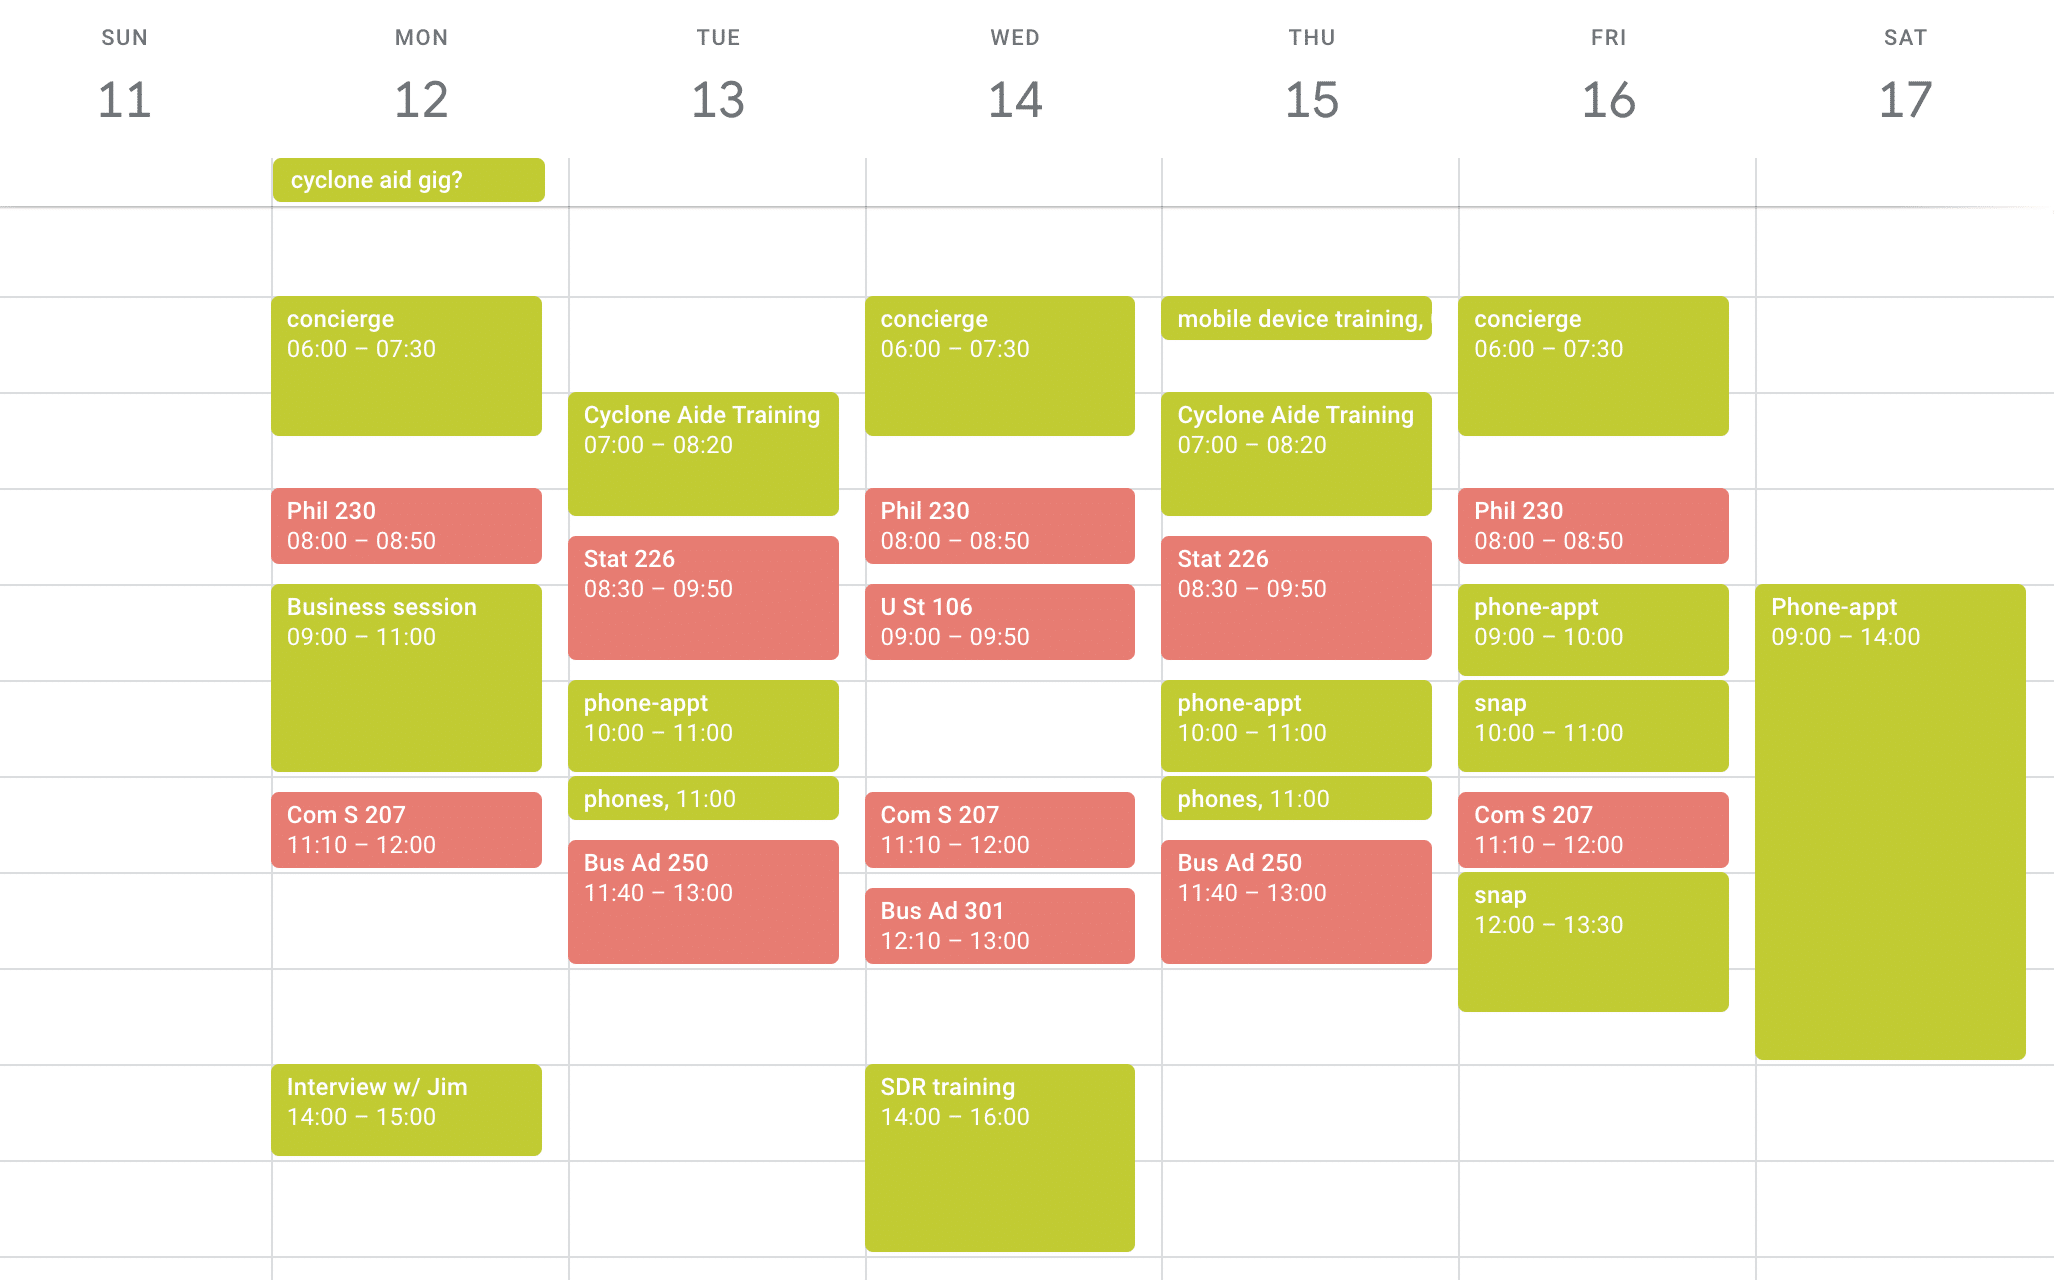
Behind the scenes, every event on your Google Calendar is a row in a database. These rows have properties, just like the ones you saw in this guide’s introduction. Some of these include:
- Event date
- Location
- Calendar (Work, Personal, etc.)
Google Calendar uses the values stored for these properties in each row to intelligently display your calendar, showing you each event on its correct day slot, displaying the event’s location, and color-coding each event based on its Calendar.
Notion works in much the same way, but it gives you a lot more control over your databases. You can create your own properties, customize them, and set up database views that display your data based on filters, sorts, and more.
Here’s an example: What if I just wanted to see events on my Work calendar in the month of August?
In Google Calendar, I’d toggle all my other calendars to their “off” state, and navigate to the correct month:
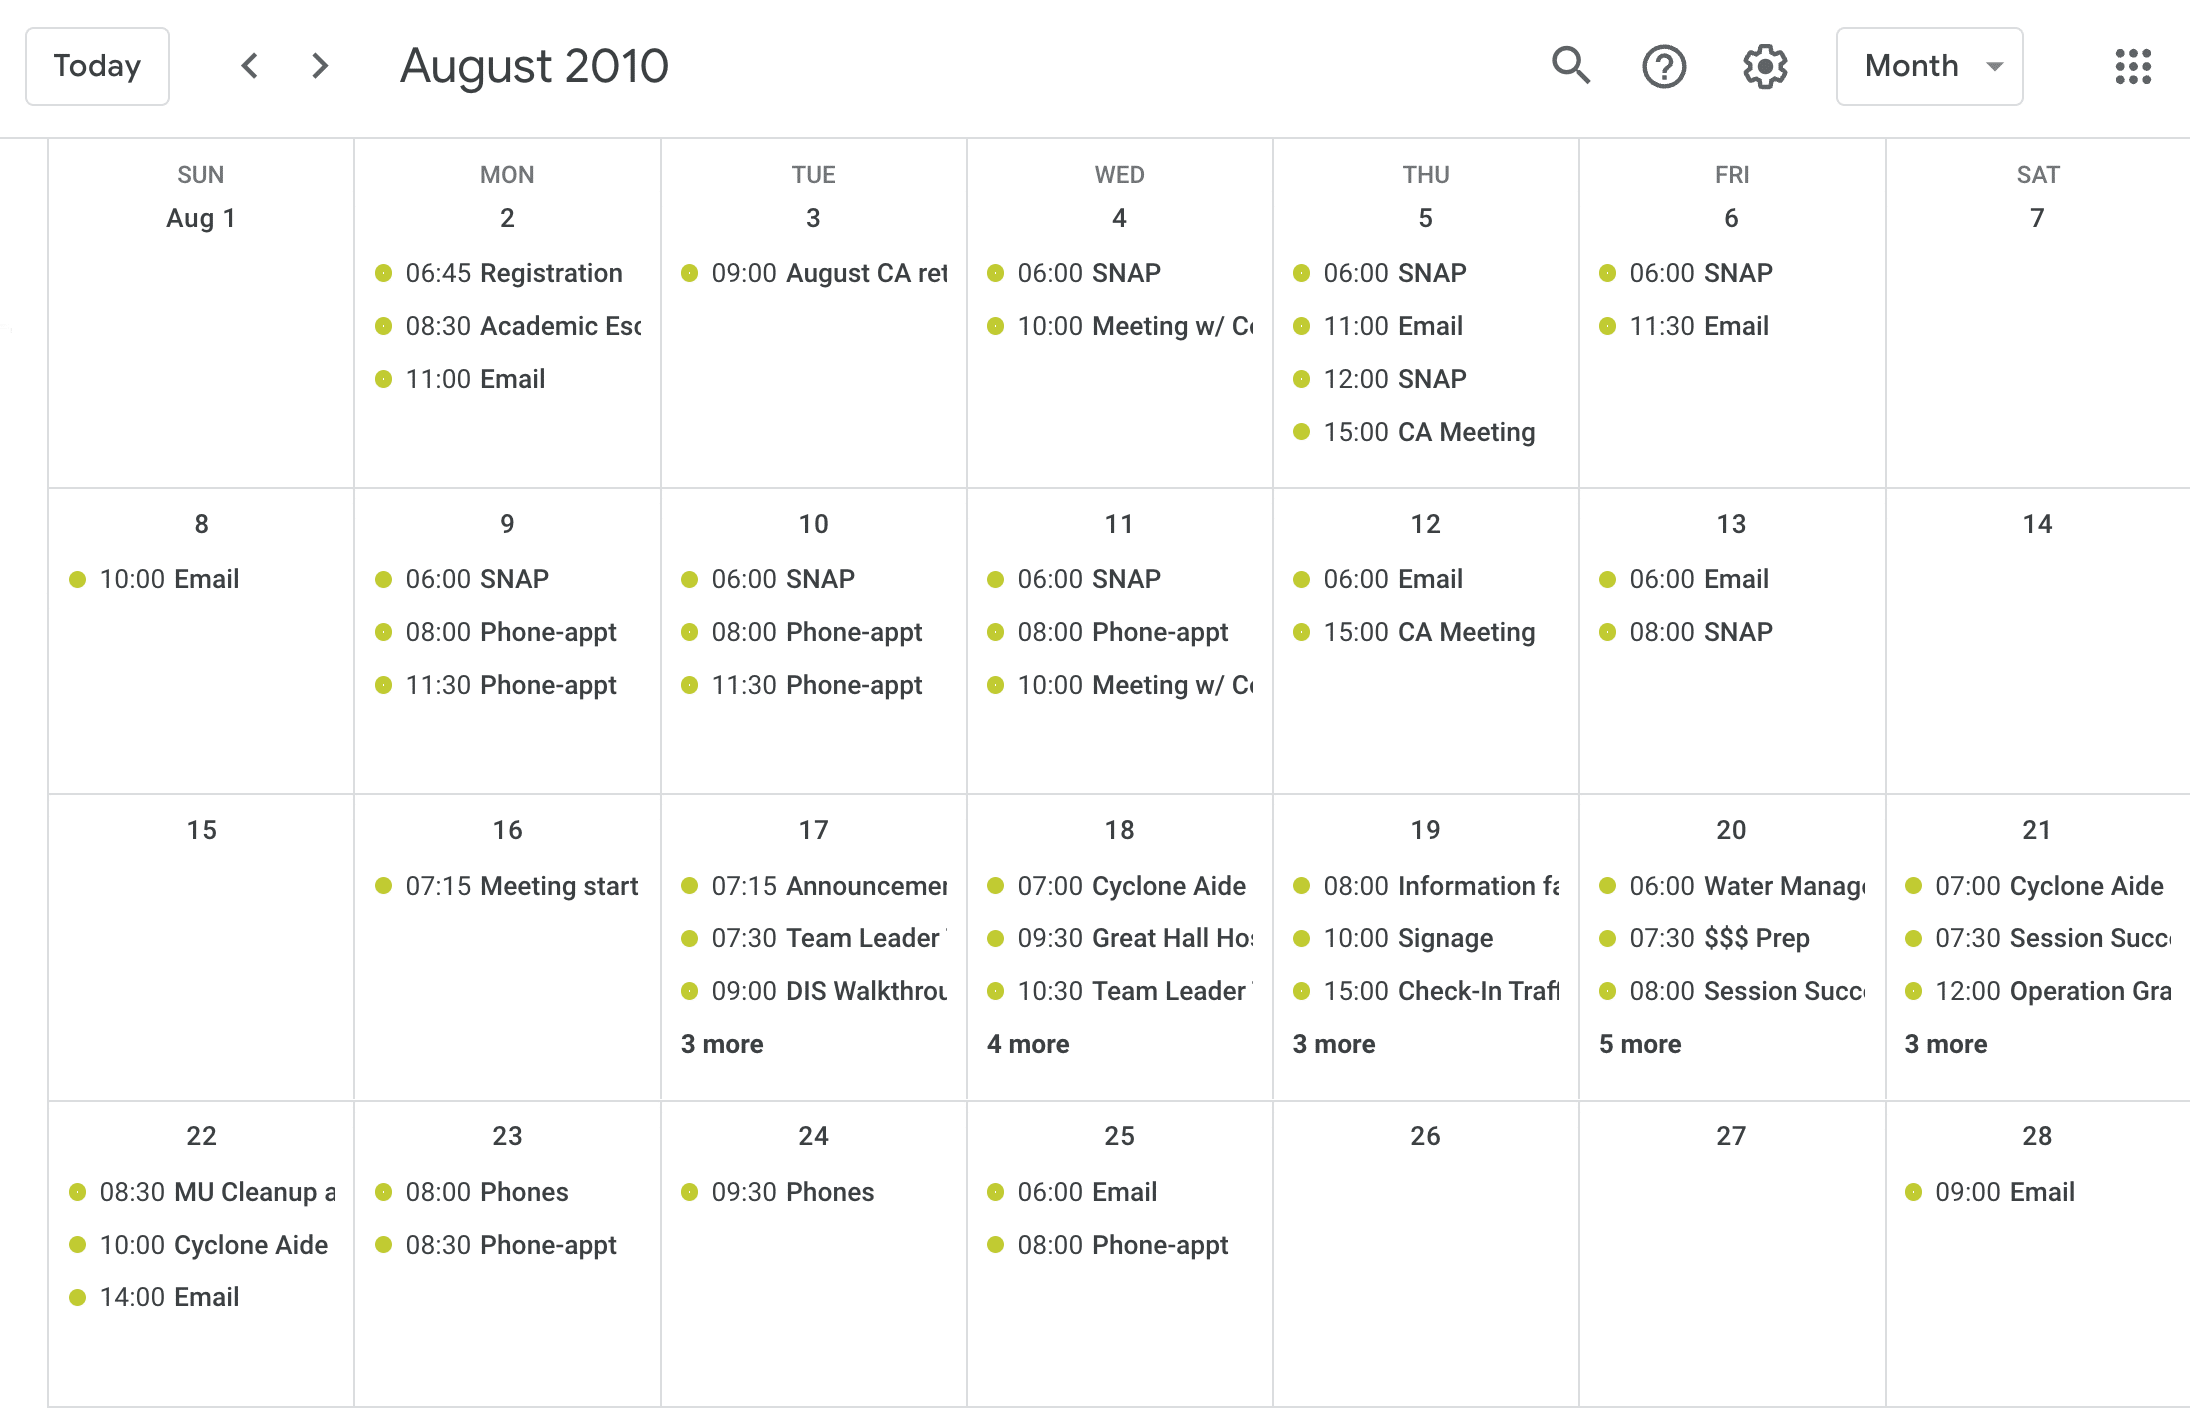
In Notion, I could achieve the same result by first ensuring that I have properties in my Events database for Date and Calendar. Then, I could simply create a view with two filters:
- Where Calendar contains Work
- Where Date is within August 1 ➡ August 31
Of course, Notion also includes a Calendar layout, so the date filter might not be necessary. I just wanted to show you how you’d directly interact with your database properties to create unique, filtered views.
You might have looked at all our example table views in the screenshots and thought,
“Hey, those look like spreadsheets!”
Indeed, they do look like spreadsheets – but they’re not. There’s a fundamental difference between spreadsheets and databases.
On a spreadsheet, data is contained within cells that have specific X:Y coordinates on a grid, such as B2 or D5. This means that formulas can reference specific cells, like B2+D5 – this simple formula will add the values of B2 and D5.

Conversely, databases don’t really have “cells” with X:Y coordinates. Rather, each record has the same number of properties, each of which can be set to a unique value per record.
Technically, since most databases are relational and store data in a table with rows and columns, you could feasibly target coordinates on the table. But since databases are built to be flexible, the vast majority of database tools don’t provide spreadsheet-like cell coordinates for row:property pairs.
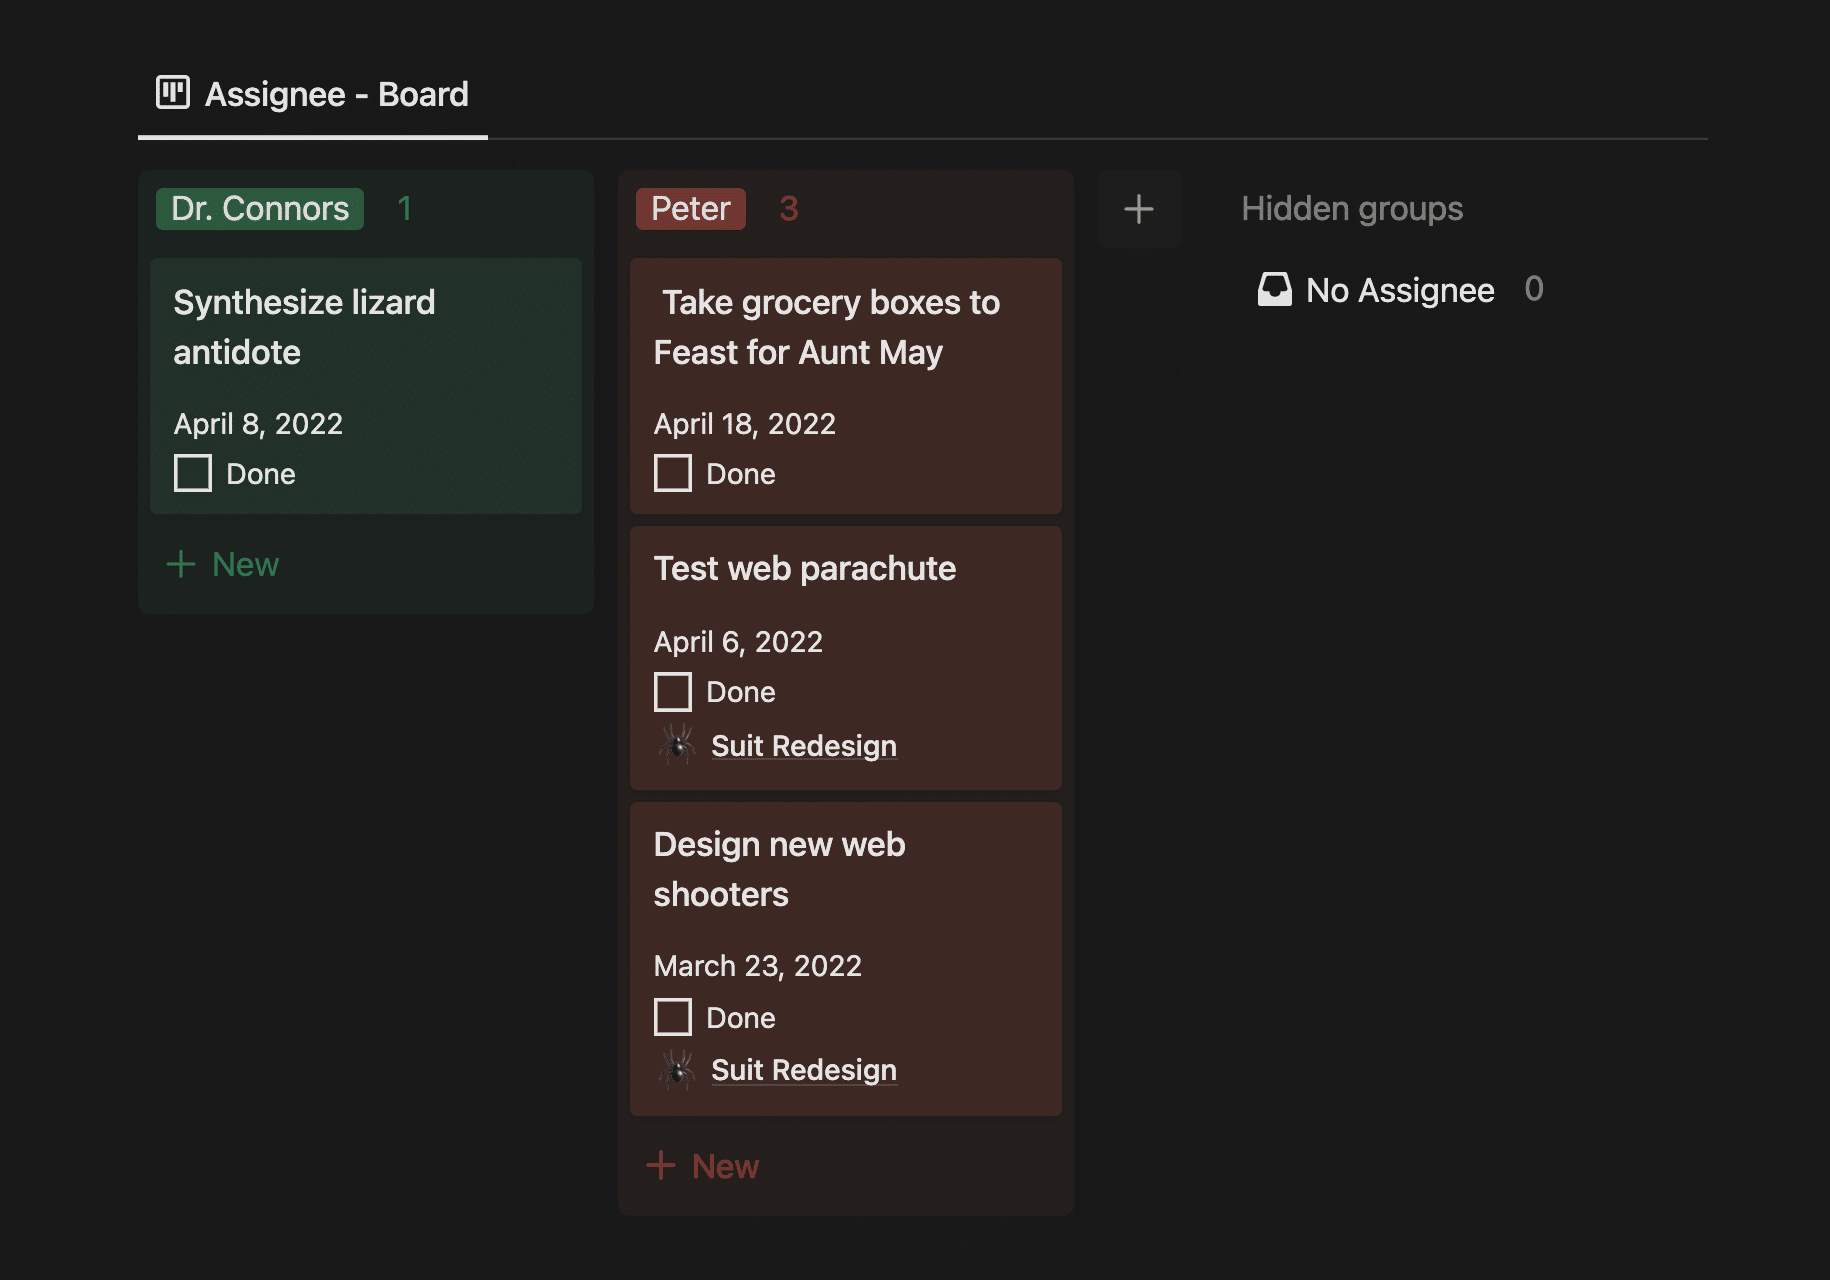
We can display a database in a grid-like table, but it’s not actually a grid of cells that we can target. This means we can easily visualize the information in our database in other ways besides a classic table – such as a Kanban-style board, where the columns are based on the Assignee property:
Spreadsheets and databases do have quite a bit of overlap, though.
In a spreadsheet, we can simulate properties by creating a two-dimensional table. And apps like Excel even allow us to sort of treat a spreadsheet like a database through pivot tables and other functions.
Likewise, an app such as Notion can let us view a database’s table structure, which looks like a spreadsheet.
The most important thing to know as a Notion user, however, is that we can’t target individual row:property combinations as if they were cells on a grid.
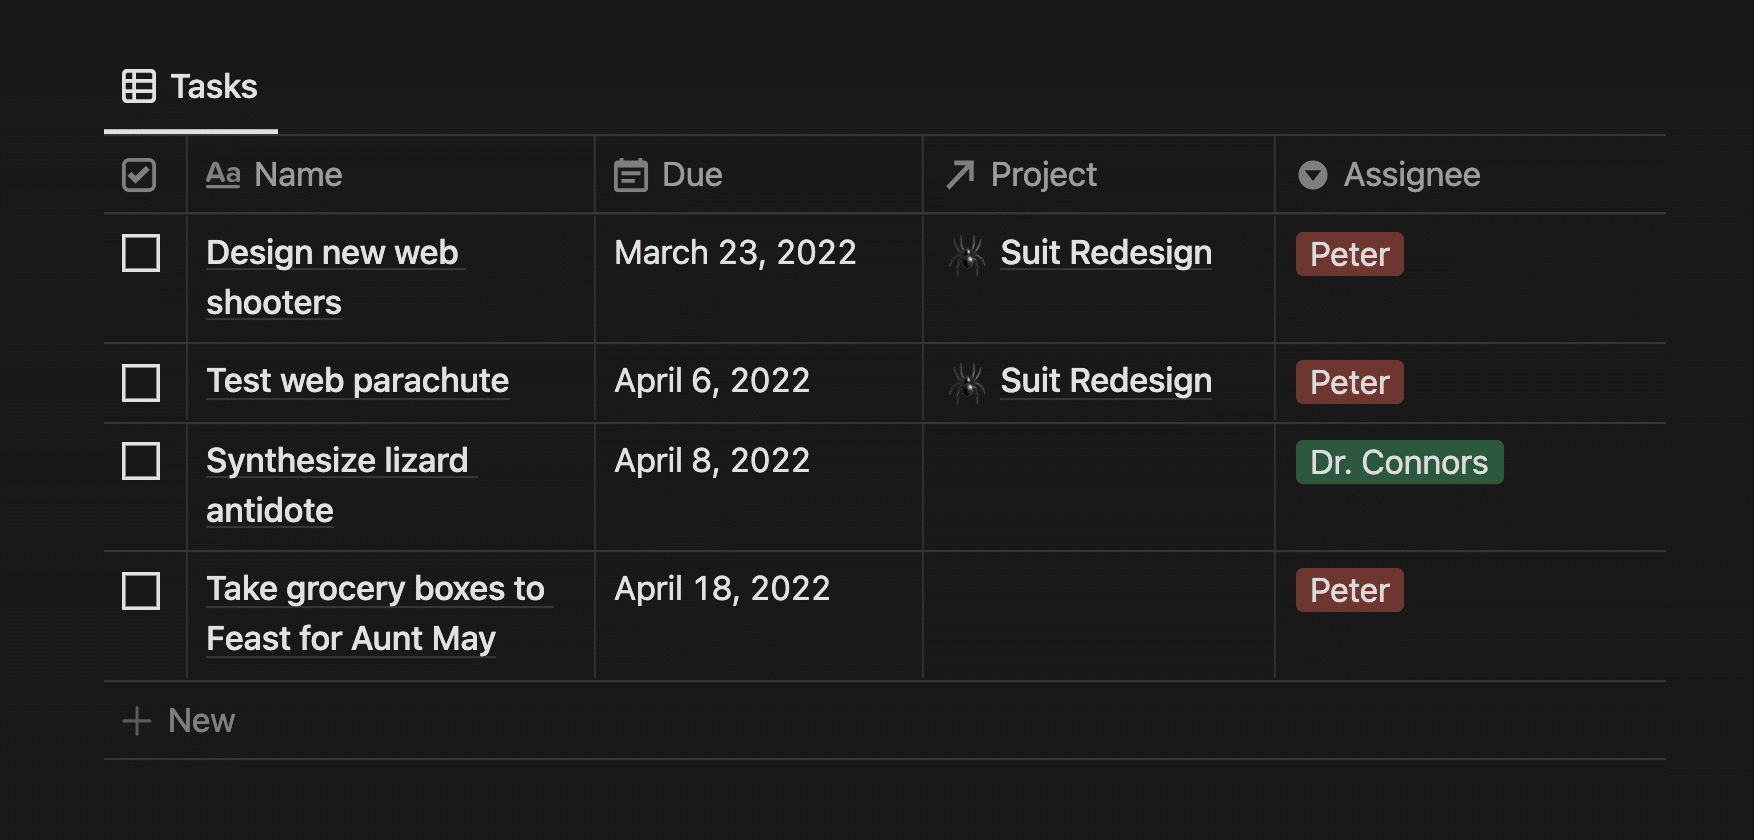
Here on my task table, I couldn’t write a formula that specifically targets the “cell” with “April 6” in it. In Excel, you might think of that location as B3, but there’s no B3 in Notion. Instead, there’s a row – the “Test Web Parachute” row – and its Due Date property is set to April 6.
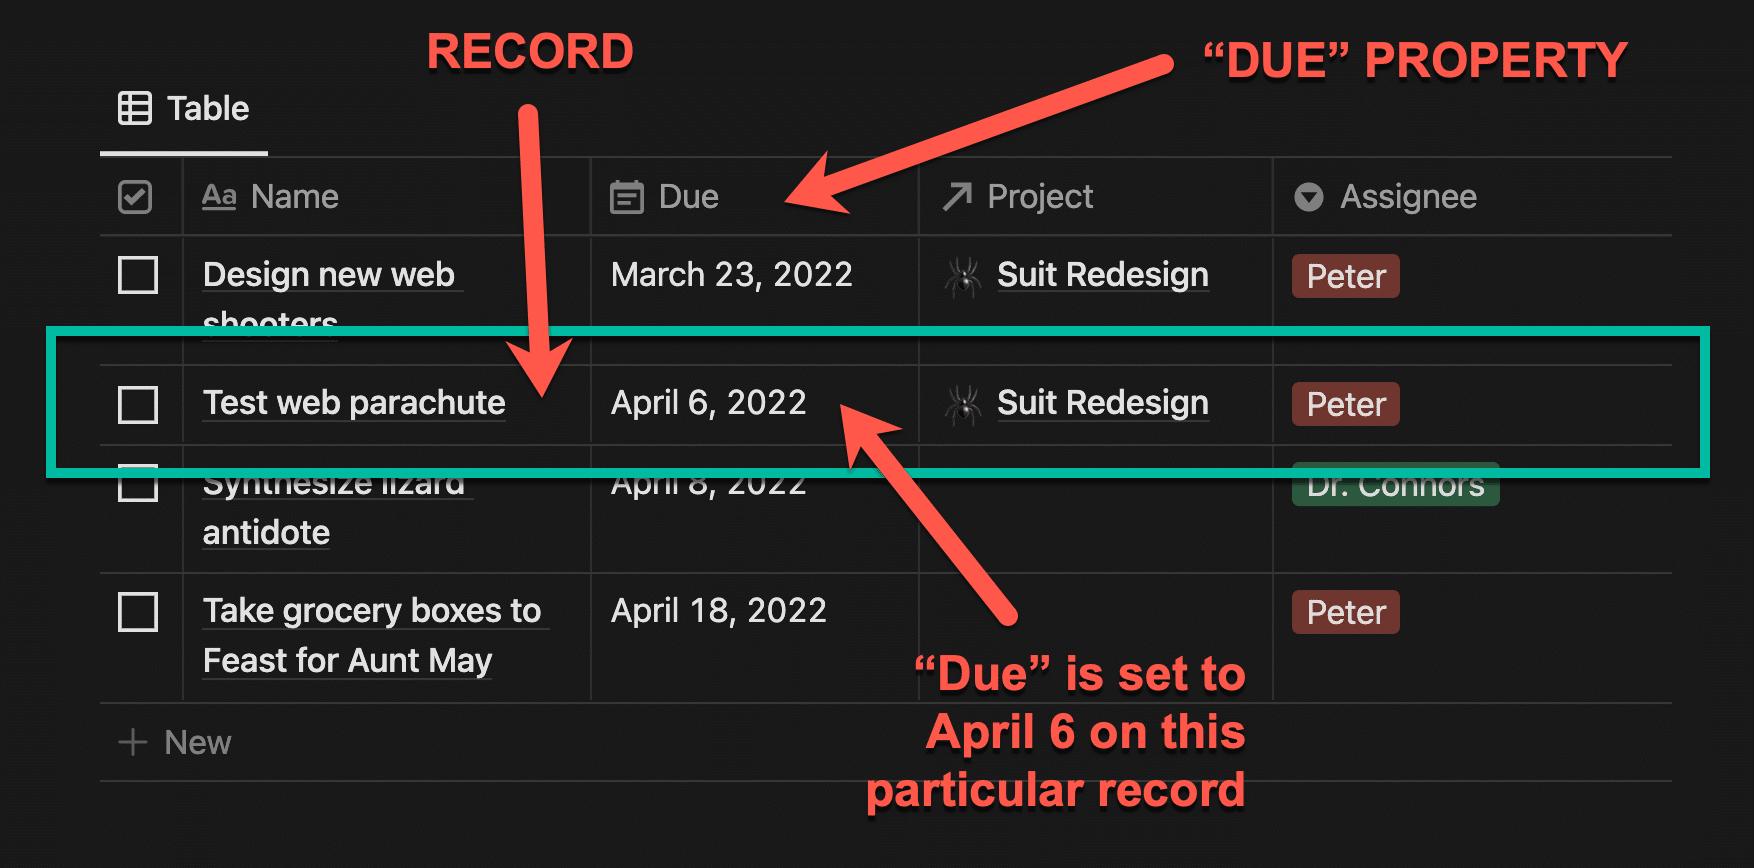
It’s also worth noting that “Test Web Parachute” is itself a specific value in the Name property.
In Notion, new databases get a default property called Name, which can’t be hidden or deleted. But it is still a property – just a special property. Its type is “Title”, and you can actually open it up to see a brand-new Notion sub-page within your database.
If you want to get even nerdier about spreadsheets and databases, check out this article comparing them.
With this high degree of control and flexibility, you can use databases to create all sorts of different tools and applications inside of Notion. After all, many software tools are just collections of filtered database views!
Consider:
Each of these simply gives you tools to work with one or more databases.
As a result, you can create replacements for all of these tools inside of Notion. You can also create hyper-personalized tools that fit the exact information and processes you use for your work.
That’s Notion’s superpower. It allows you to build tools that don’t yet exist, tailored to your exact needs.
Copy link to headingNotion Database Examples

As we dig into all the particulars of Notion’s database tools, you might want some example databases to play around with. Here are a few, which will also serve to show you some of the tools you can build within Notion.
Each of these databases is available as a free template, which means you can duplicate them into your Notion workspace and make changes to the duplicated copy.
Learning happens fastest when you take action, so experiment and make some changes! Add some stuff! Let your cat walk on your keyboard for a minute and then try to fix everything that broke!
I’ll also note that these are very simple example templates. They purposely lack a lot of features so that they’re easy to understand and edit.
I’ve also designed several more robust templates with advanced features. These templates are completely ready to rock, and will instantly upgrade your Notion workspace with useful tools. Check them out on my Notion Templates page.
We’re now ready to start digging into all of the features that Notion databases offer. From here, you may want to use the Table of Contents to the left (or at the top of this article if you’re on mobile) in order to find the topic you most want to learn about.
Copy link to headingDatabase Views
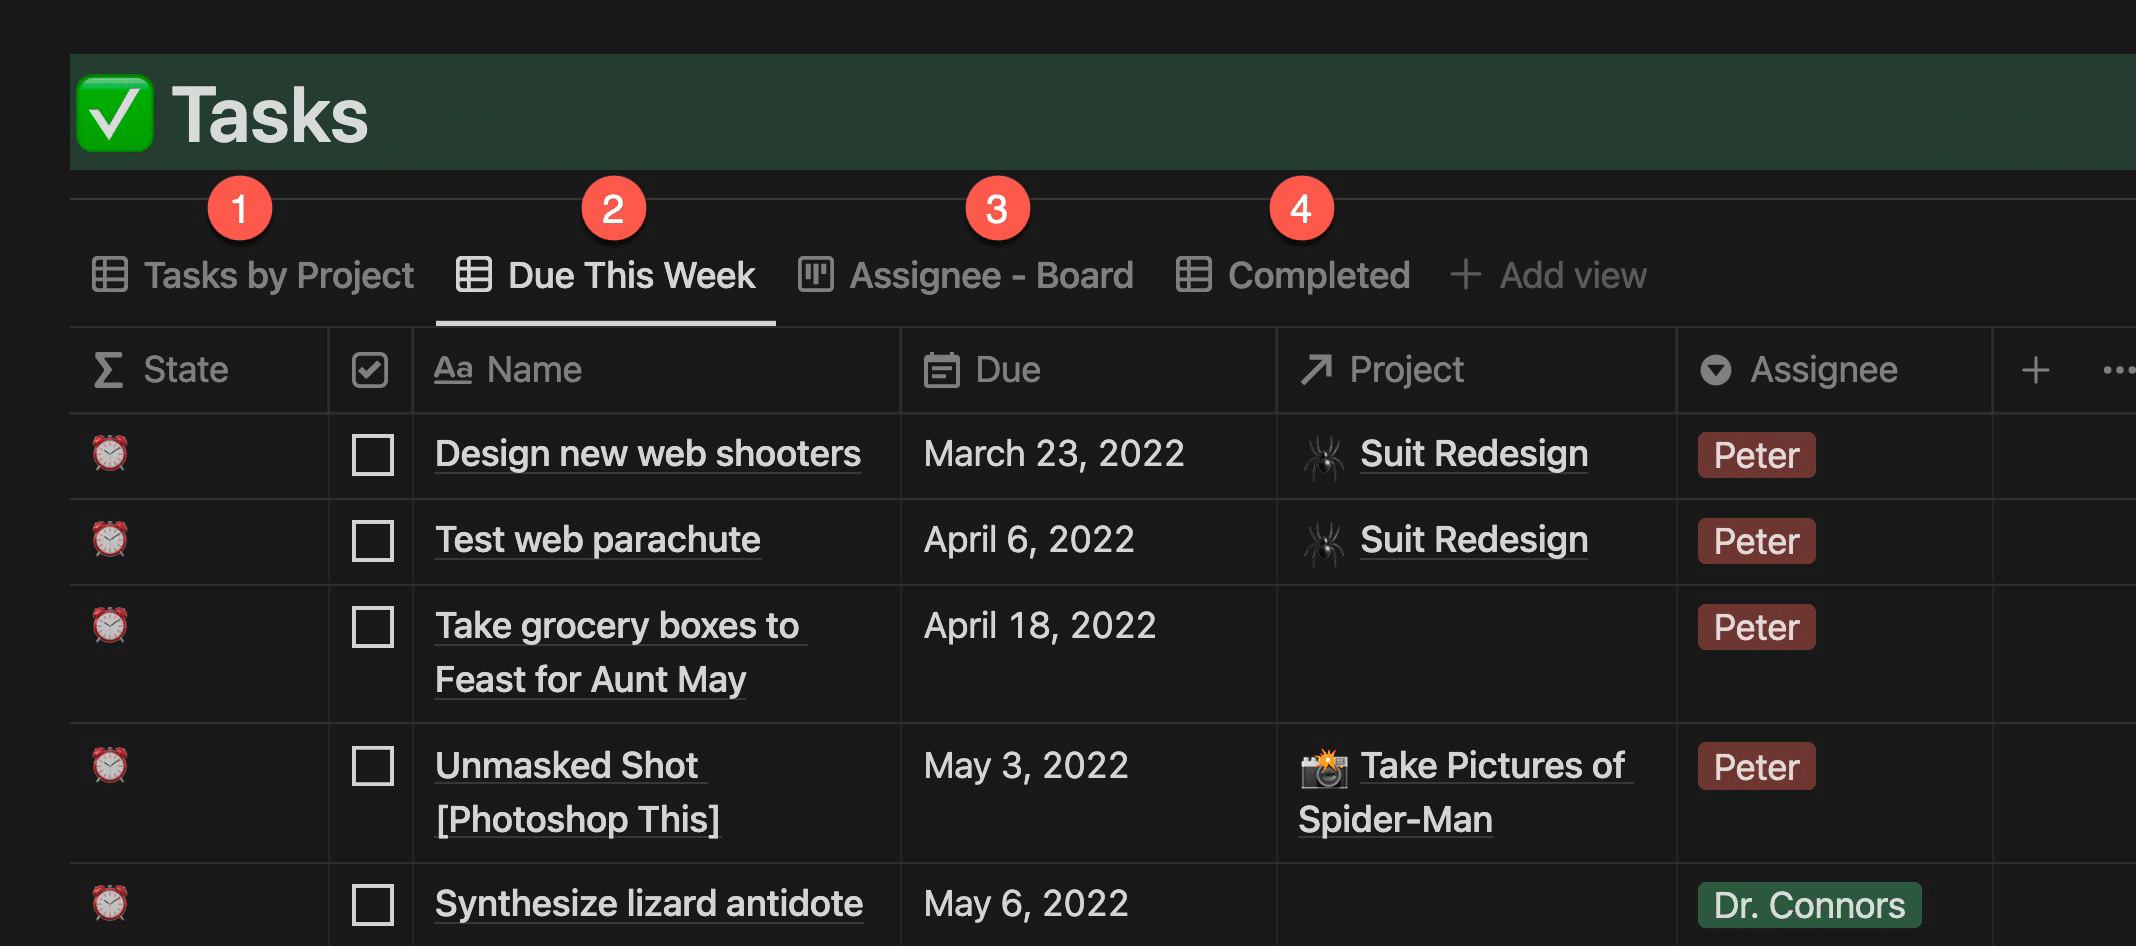
A database view is a specific combination of layout, filters, sorts, etc. Note that a database block can contain multiple views. When it does, you’ll see them all listed across the top as tabs:
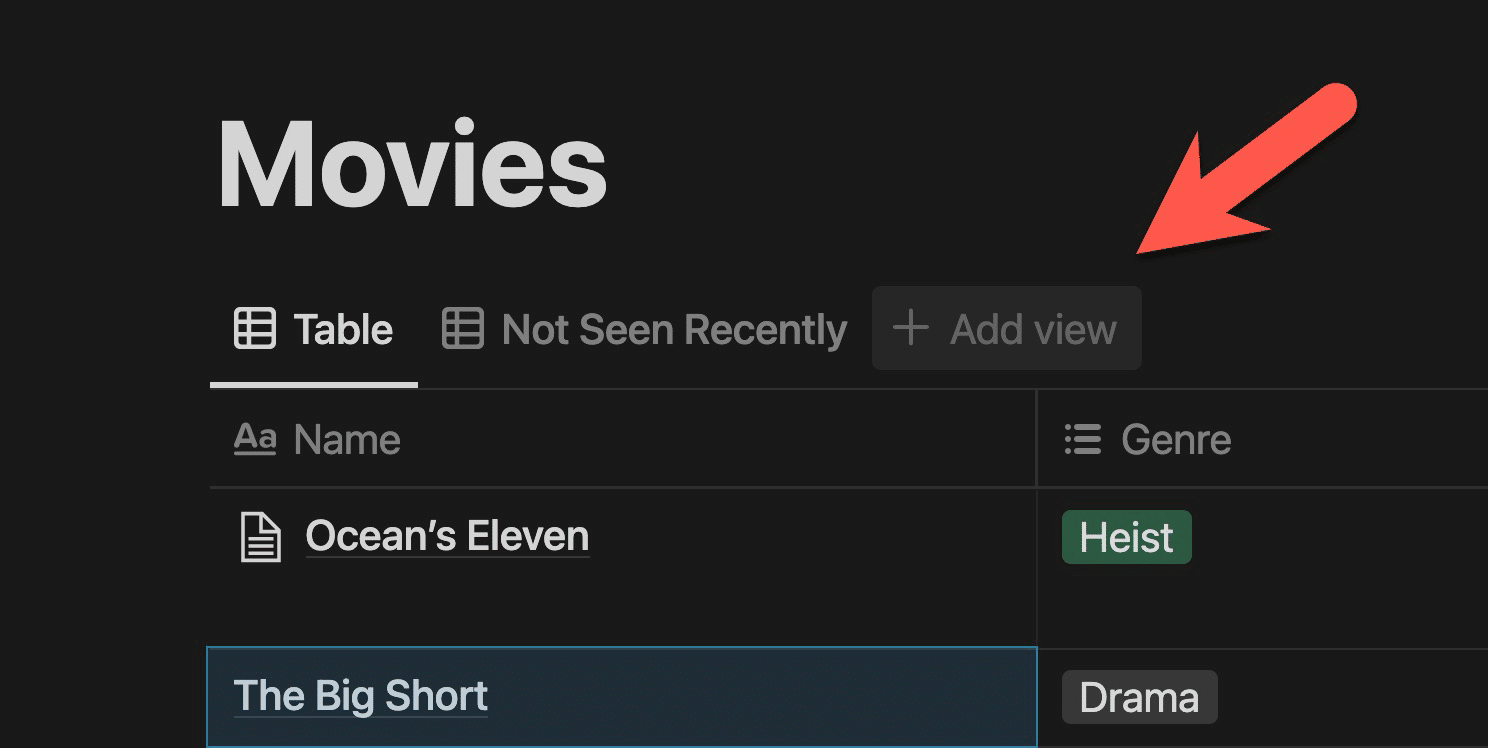
You can also add a new view to a database block using the Add view button:
For each view, you can access a View Options menu, where you’ll be able to change nearly any setting related to that database view:
Here, you’ll have access to nearly every setting inside your database, including:
- Database name
- Layout – Table, Board, Calendar, etc.
- Property settings – show/hide properties on the current view
- Filter options
- Sort options
- Group options
- Load Limit – sets the max number of rows that will be loaded automatically (you can load additional rows using the Load More button at the bottom of any view)
- Lock Database/Lock Views – On a source database, this will lock the entire database. On a Linked Database, you’ll see Lock Views, which merely locks the Linked Database’s views from being changed. (Learn more about locking databases)
- Copy Link to View – copies the link to the current database view to your clipboard
- Duplicate View – duplicates the specific view you’re currently on
- Delete View – deletes the specific view you’re currently on
Layout Types
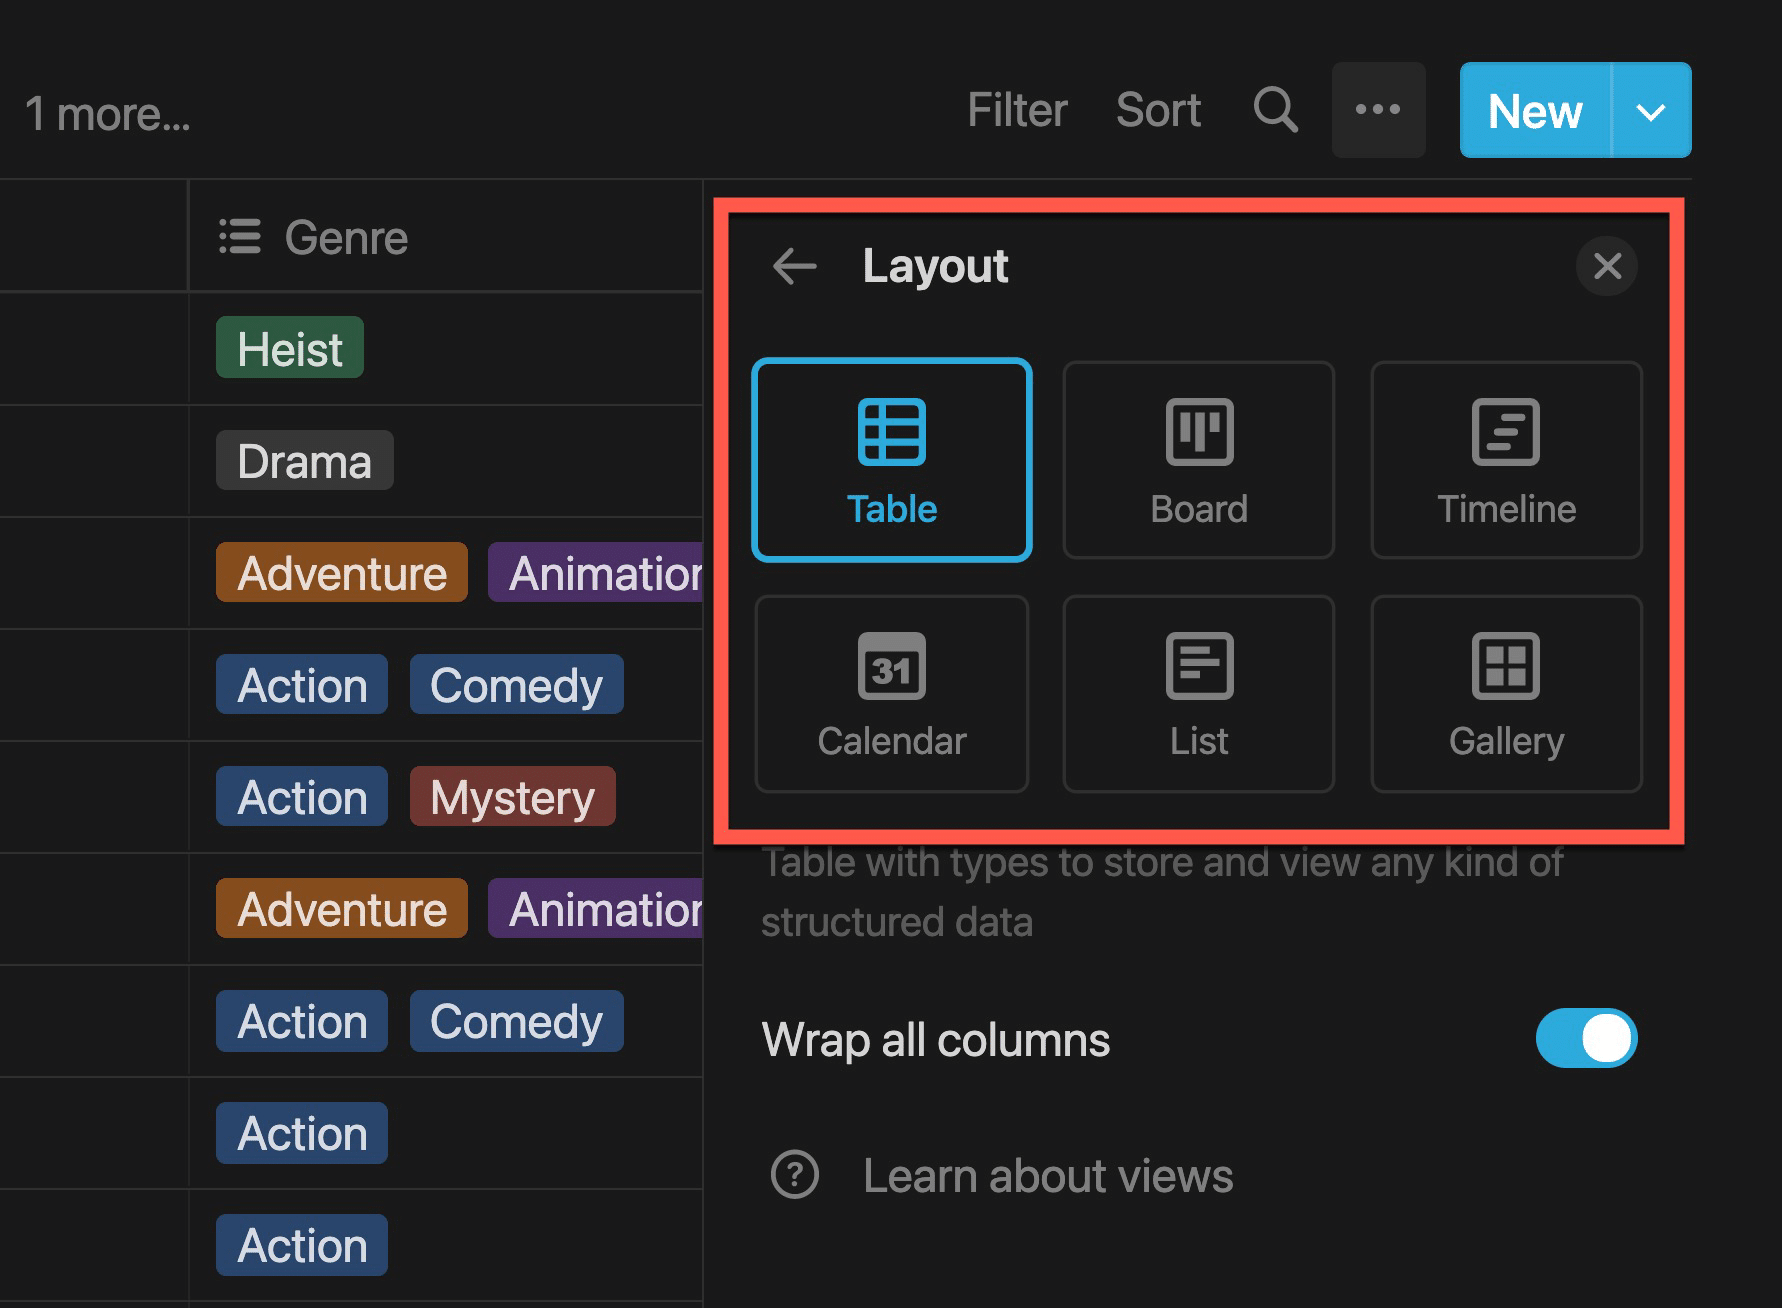
Notion databases can be viewed in several ways. You’ve already seen the Table layout in our examples above, but that’s just one of eight available layouts:
- Table – a traditional, spreadsheet-like view
- Board – a Trello-style “Kanban” view
- Timeline – a Gantt chart view
- Calendar – a no-frills Calendar view
- List – a responsive, mobile-friendly Table alternative
- Gallery – an aesthetic view that’s great for showcasing images
- Chart – lets you visualize database data in column, line, and pie charts (among others)
- Form – allows you to collect responses that become new database pages
Each one of these layout types gives you a different way of displaying the same information from your database. They each have their own advantages, disadvantages, and features, so try them all out!
Copy link to headingAdd New Pages to a Database
You have a few different options for adding new pages to your database.
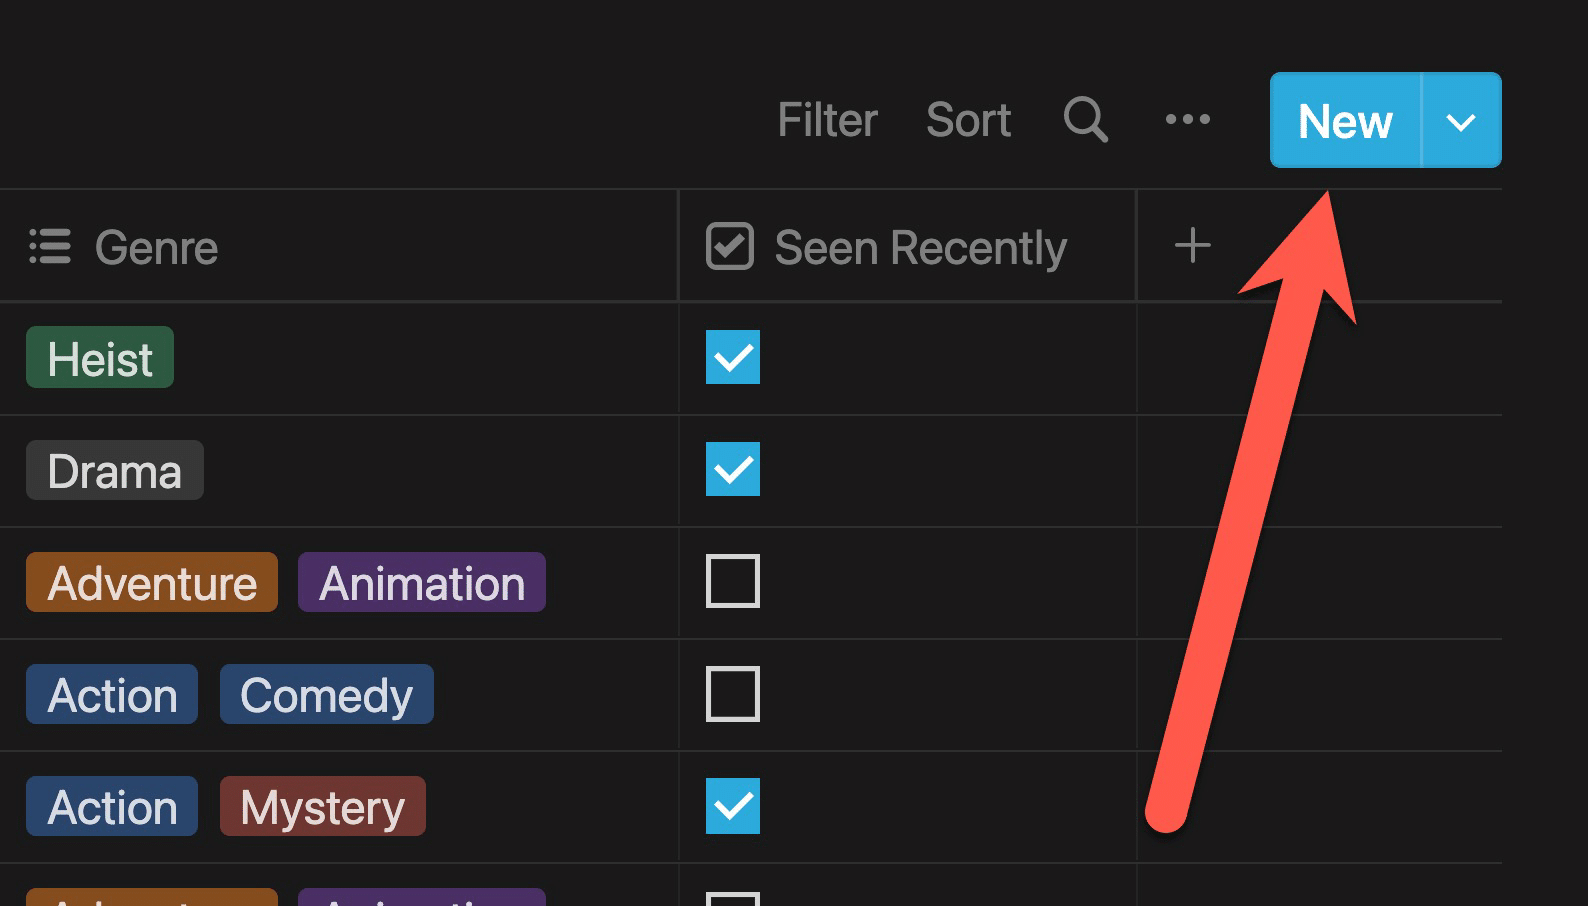
First, you can hit the +New button within your database view. In a Table view, you’ll find it at the bottom of the table:
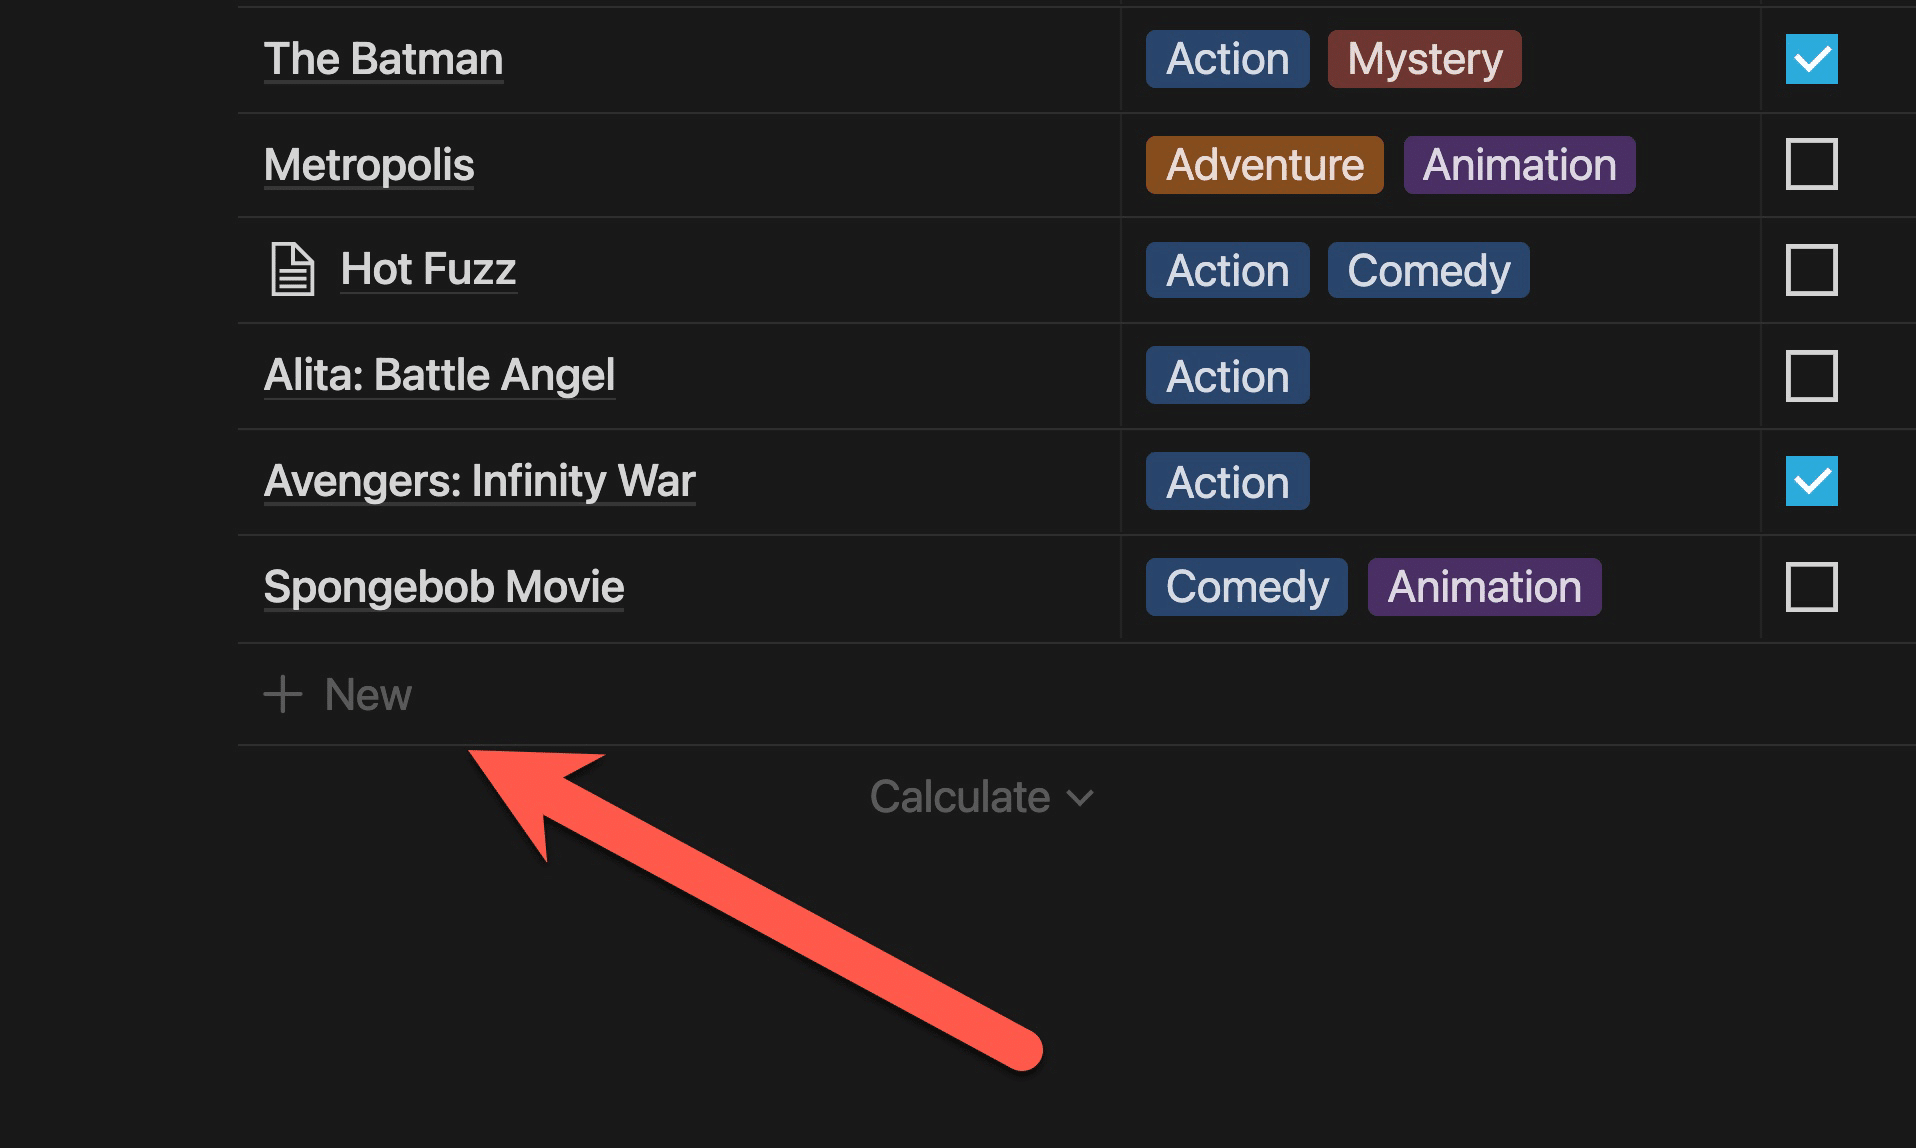
It’s worth noting that this is the only way to add a row that will conform to the view’s filters automatically. Example: If the view above had a filter that said “Genre is Action”, then your new row would automatically be tagged with Action. This is called a forcing function. Click here to jump to the section of the guide on forcing functions.
You can also hit the blue New button in the top-right corner of any database view. This will open up a modal window with a blank record in the database.
Additionally, you can create new rows in a specific database from anywhere in your Notion workspace by using the + link syntax, then choosing the “New page in…” command.
For example, I could add a new row to my Movies database from anywhere by typing +Ghost in the Shell, choosing New page in…, and then selecting the Movies database as the destination. Learn more about this in my guide on linking Notion pages together.

Finally, you can add new rows to a Notion database through external tools. For example, the official Notion web clipper and the Save to Notion extension can both clip web pages into your Notion workspace.
If you want to get more advanced, you can even use the Notion API to add new database rows using thousands of other tools.

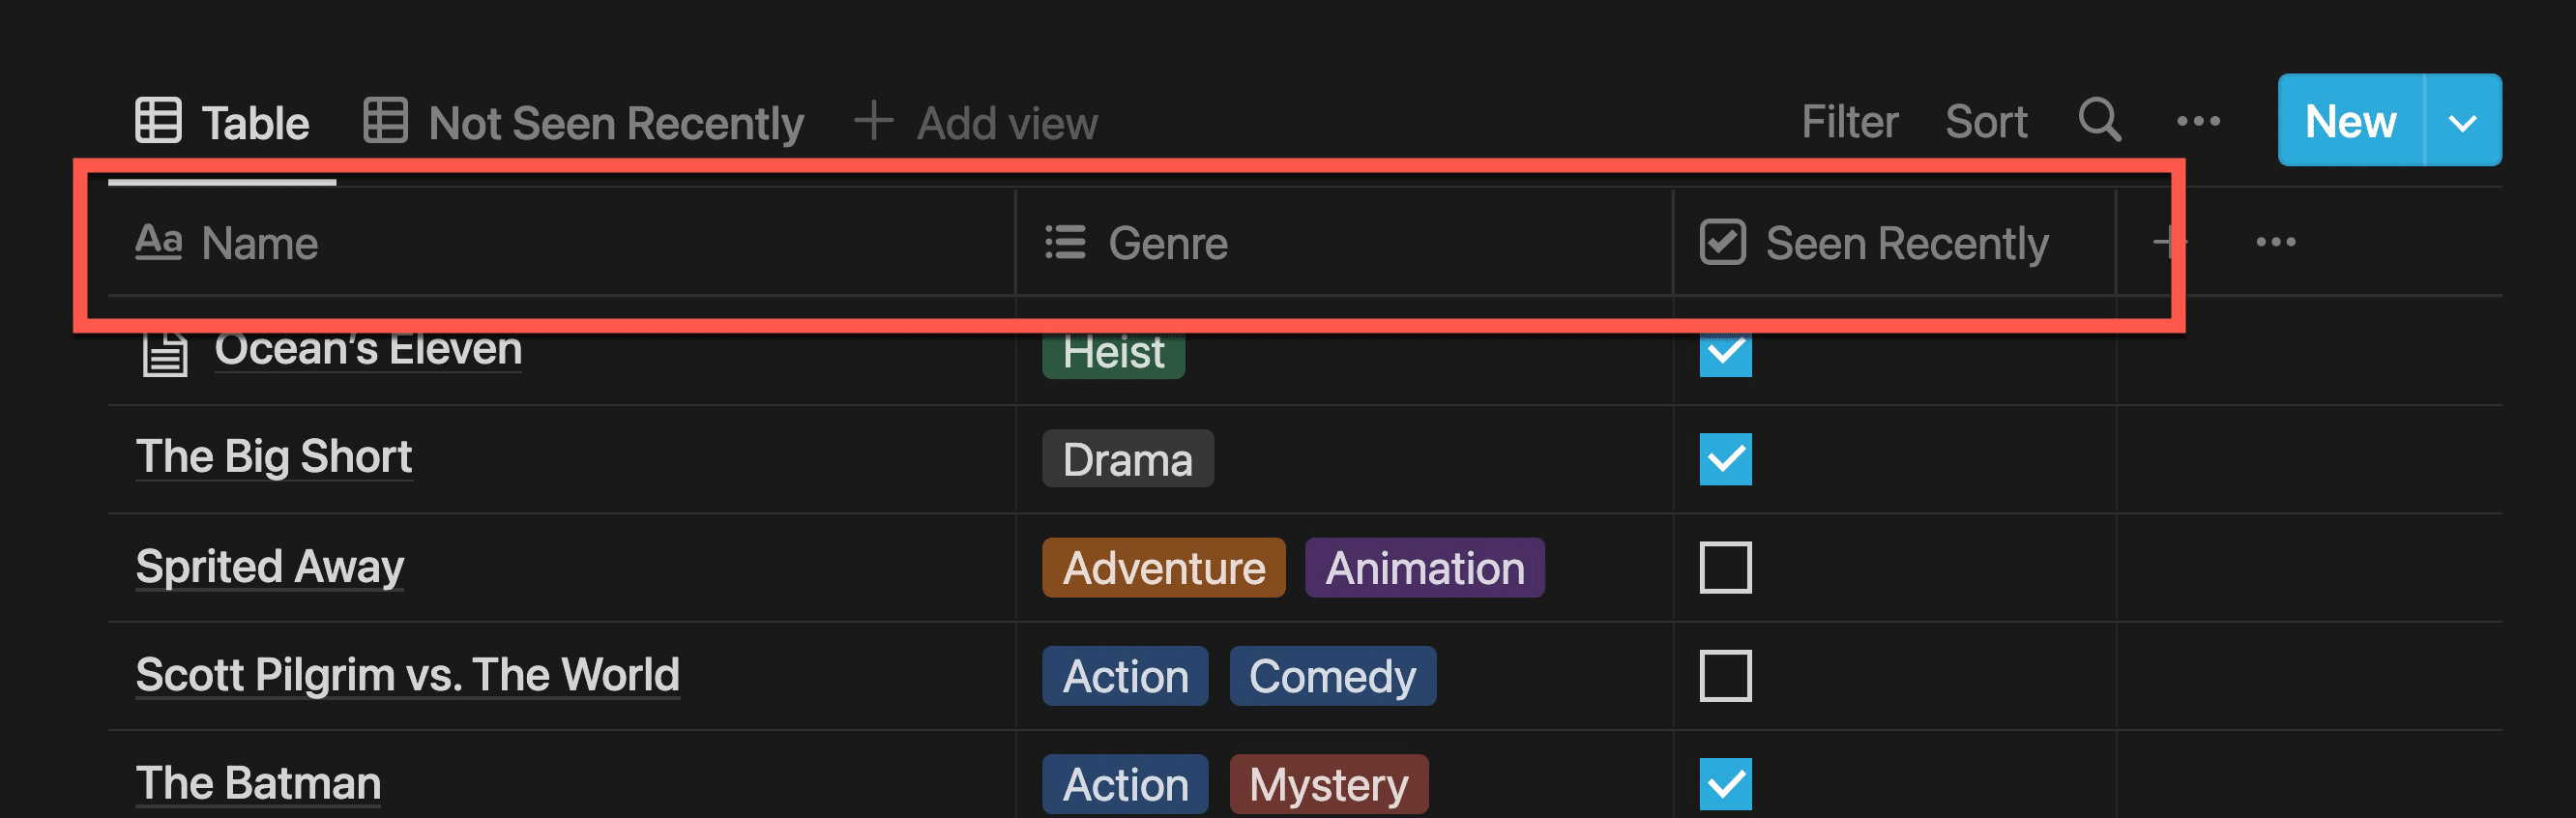
Database Properties
Properties are the columns in a database’s table structure, and they’re useful for holding structured information about each row. They let you add dates, checkboxes, tags, numbers, and a lot more to your databases.
In a Table view, you’ll see your database’s properties as columns:
In other layouts, you’ll see property values listed on the cards for each row:

You can show/hide individual properties on any given view by going to View Options → Properties:
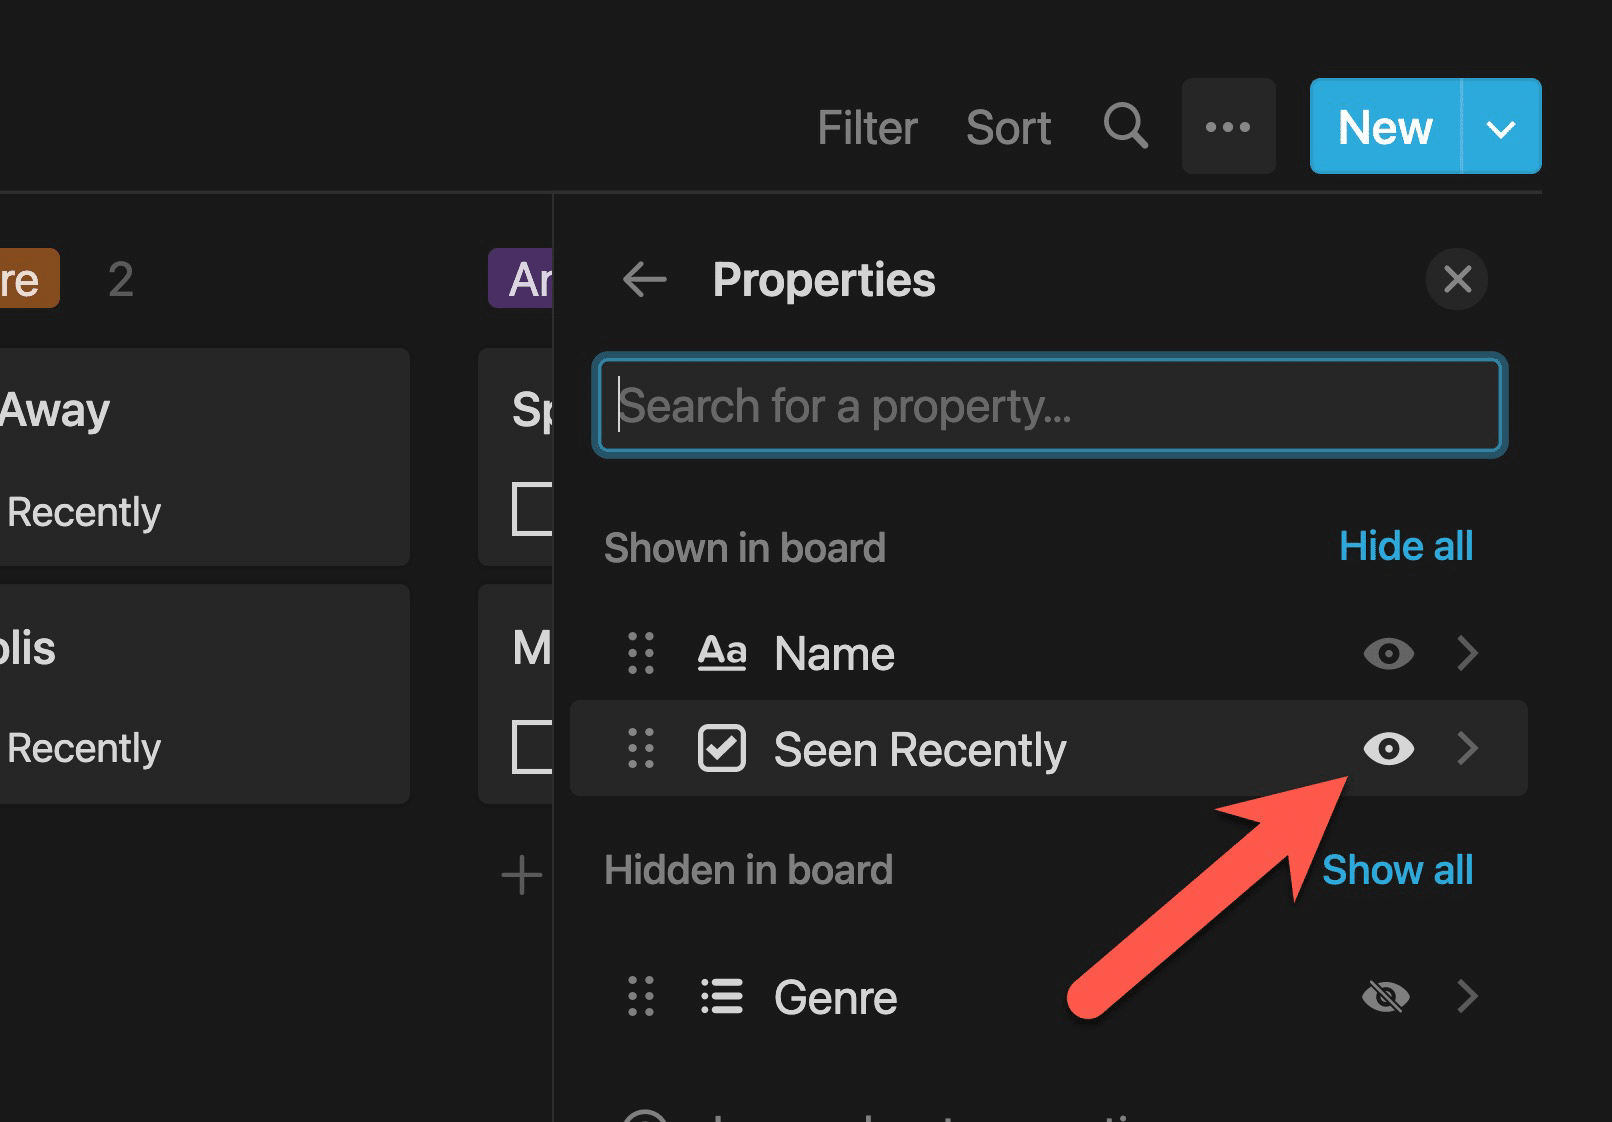
By opening up a row as a page, you’ll be able to see all of the properties in that row’s database. You can also easily add new properties here.

Notion comes with many different types of properties.
Some are writable, meaning you can edit the information they hold on each row. Others are read-only, meaning they hold information that can’t be edited.
Copy link to headingList of All Property Types
Here’s a table showing all of Notion’s property types:
| Property | Description | R/W |
|---|---|---|
| Text | Holds text, which can be formatted. | Writable |
| Number | Holds numbers. Can be formatted as a progress bar. | Writable |
| Select | Holds singular “tags”. | Writable |
| Multi-Select | Can hold multiple “tags”. | Writable |
| Status | Indicates project/task status. Always has a default value. Can show as text or a checkbox. | Writable |
| Date | Holds dates, which can be displayed absolutely (e.g. “03/25/22”) or relatively (e.g. “Tomorrow”). | Writable |
| Person | Holds members or guests of the workspace. | Writable |
| Files & Media | Holds file attachments, including images, audio files, video, etc. | Writable |
| Checkbox | Holds a simple checkbox. | Writable |
| URL | Holds a URL, which is clickable. | Writable |
| Holds an email address. | Writable | |
| Phone | Holds a phone number, which can be called on supported devices. | Writable |
| Formula | Holds formulas that can process and output data in many ways. | Read-Only |
| Relation | Relates the row to other rows in the same database or another database. | Writable |
| Rollup | Pulls in property information from Related rows. | Read-Only |
| Created time | Holds the date and time of the row’s creation. | Read-Only |
| Created by | Holds the workspace user who created the row. | Read-Only |
| Last edited time | Holds the date and time of the row’s last edit. | Read-Only |
| Last edited by | Holds the workspace user who last edited the row. | Read-Only |
| Button | Creates a clickable button that can trigger an automation | Read-Only |
| ID | A unique (in the current database), ascending identifier for each page. | Read-Only |
| Verification | Shows the verification badge and expiration on Verified pages. | Read-Only |
| Owner | Special type of Person property linked to (and created automatically with) Verification property. | Writable |
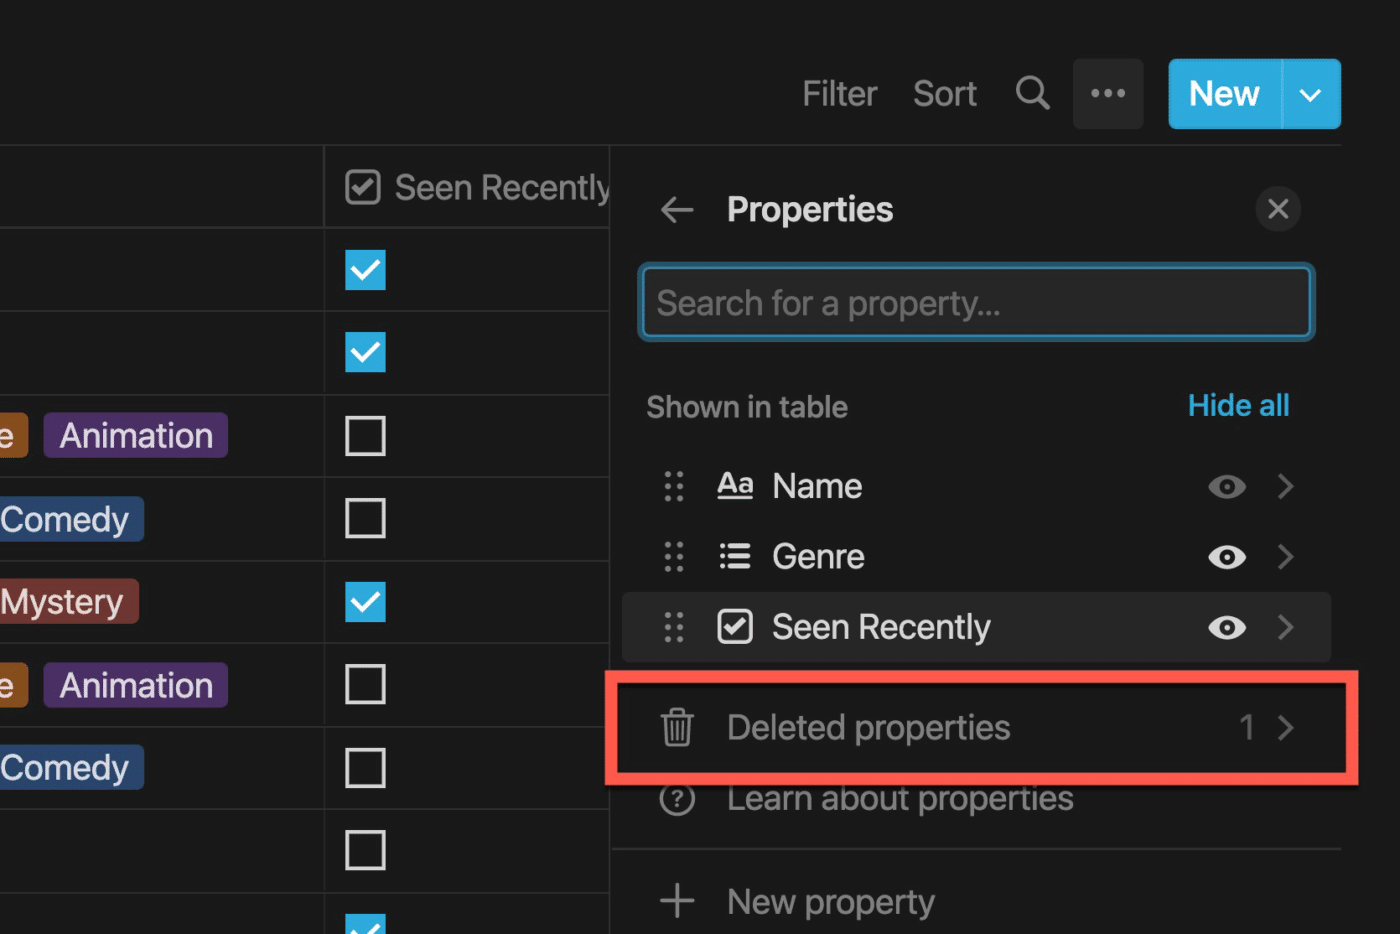
Deleting and Restoring Properties
One last useful thing to know about properties is that they can be deleted and restored.
If you accidentally delete a property, just head to View Options → Properties → Deleted Properties to find it and restore it (or permanently delete it if you want):
Sorting
You can sort a database view by any property, in either ascending or descending order.
To create a sort:
- Hit the Sort button at the top of your database block.
- Select the property by which you’d like to sort your view.
- Choose ascending or descending order.
- Add additional sort criteria if you want.
By adding additional properties, you can create even more granular sorts in your database views. In these cases, the database will be sorted by each property in top-to-bottom order. Drag properties around to change the sort order.
Here, you can see that I have this shot list database sorted first by Type, then by B-Roll Description.
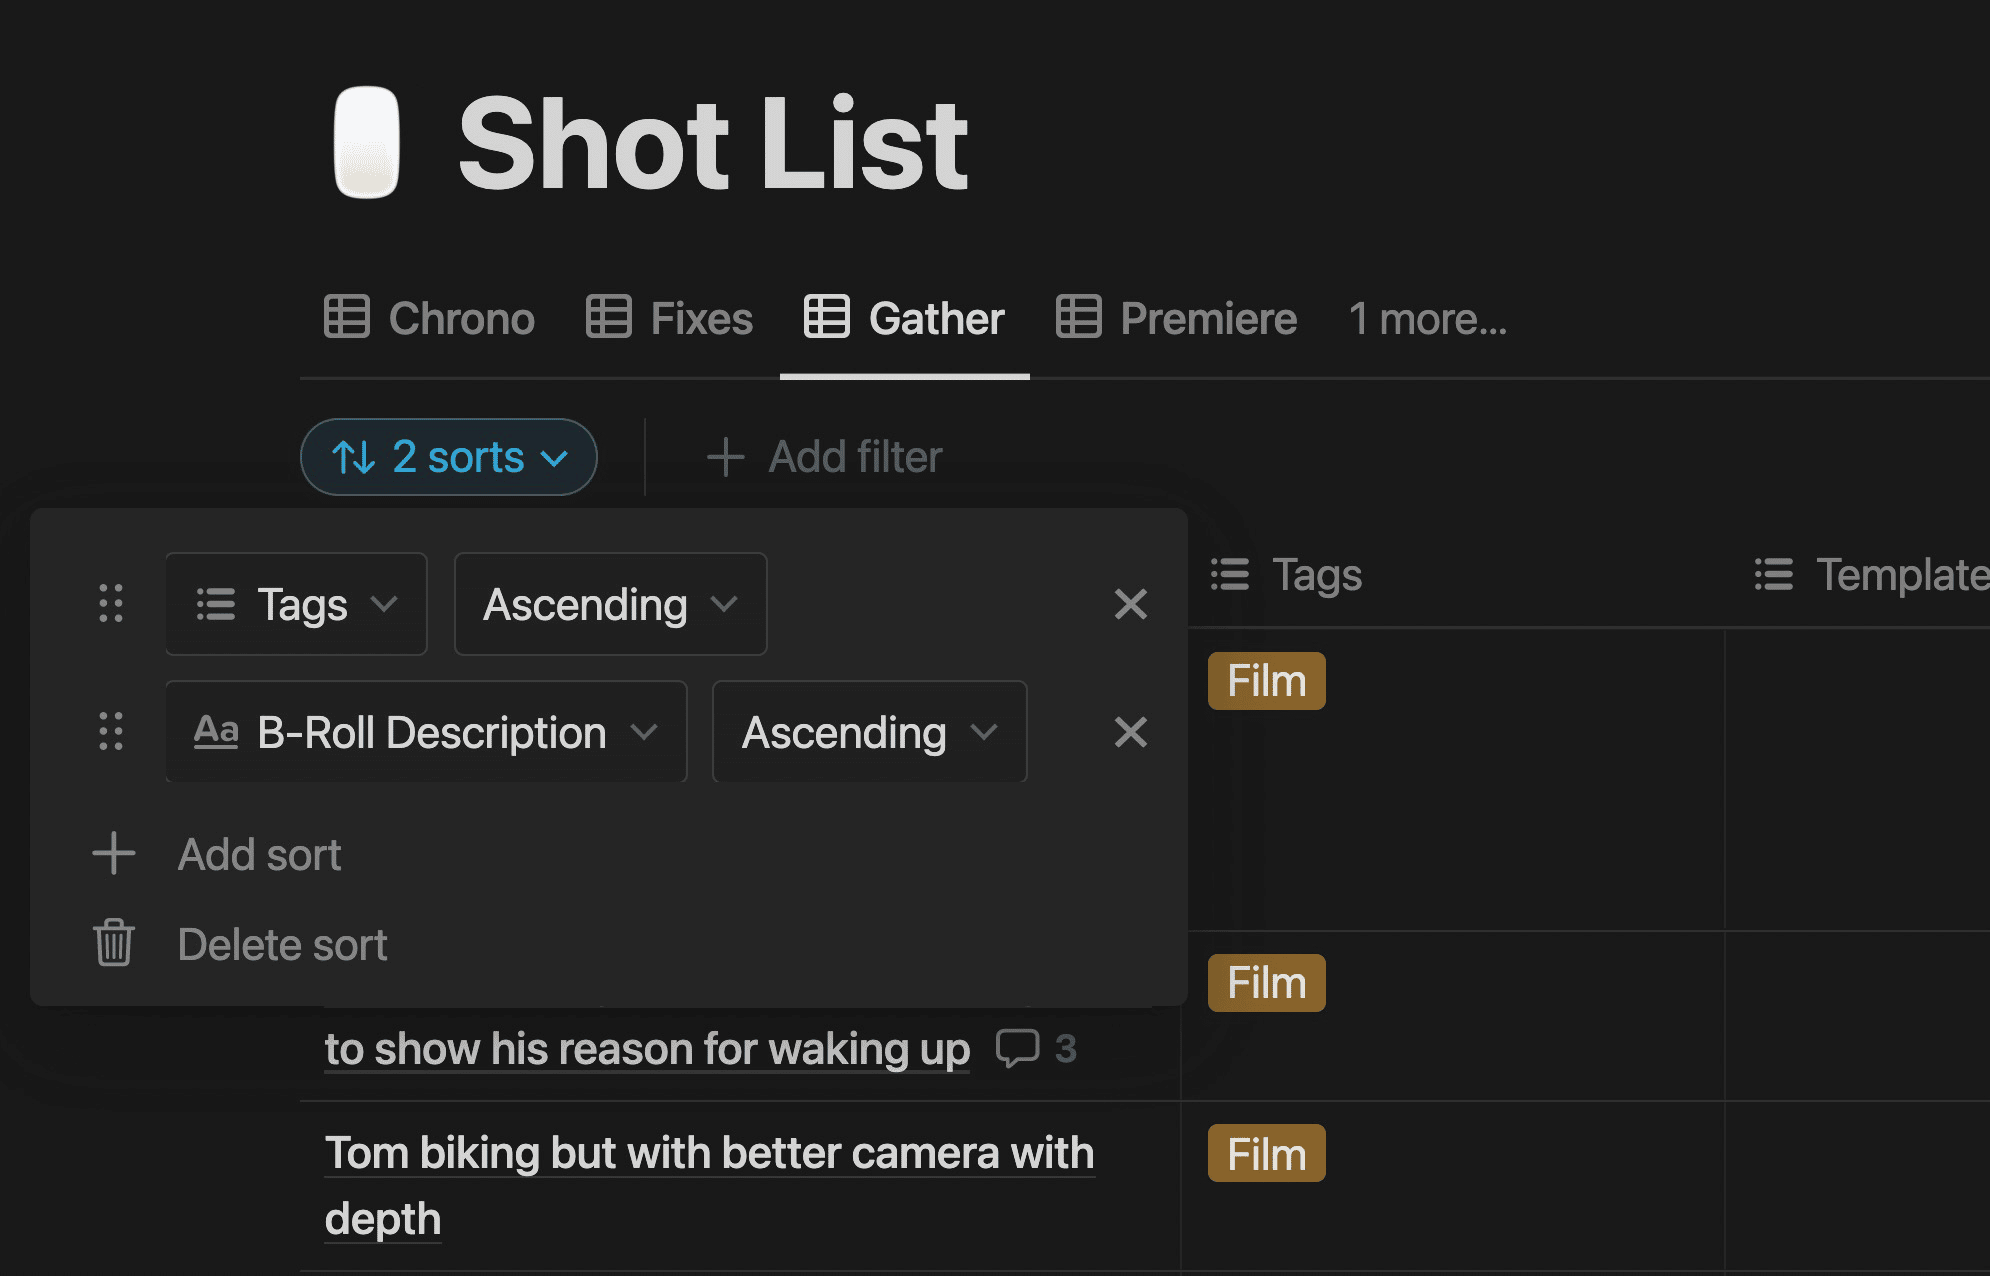
P.S. – This shot list database is part of Creator’s Companion, my all-in-one Notion template for content creators. Check it out if you make videos, blog posts, or social media content.
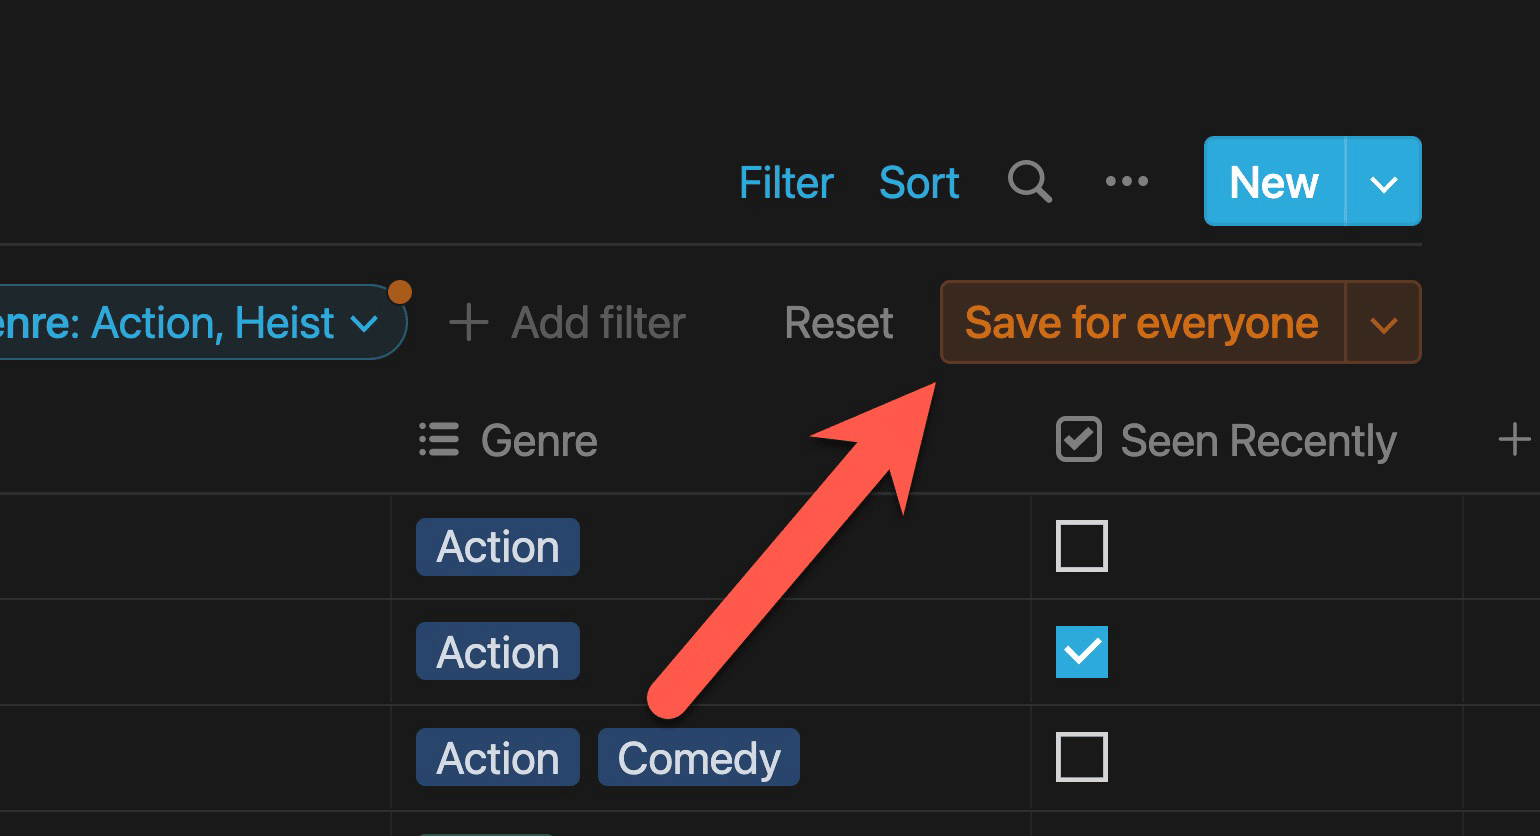
If you create a sort within a database that is shared with others (Team Members or Guests), your sort will initially only be visible to you on your current device.

You’ll notice a Save for Everyone button after creating the sort; click it if you want to apply the sort to the database for everyone. You can also click Reset to remove any changes you’ve made, or simply leave things as-is if you want to keep the sort for your eyes only.
If you’re working on a database that’s private, you won’t see these options; they only come up on shared databases.
Copy link to headingFilters
Databases often contain huge amounts of data, but you rarely need to see all of it at once. Typically, you just need to see the rows that are relevant to a specific context, like:
- Tasks that are due today
- Subscribers who are less than 30 days away from their renewal date
- Movies in the Action genre
This is where filters come in. Filters allow you to limit the rows a view displays, and they’re among the most useful tools you’ll find in Notion.
Just like a sort, you can create a filter by hitting the Filter button at the top of your database block:
There are two types of filters in Notion:
- Simple Filter – a singular filter that targets one property
- Advanced Filter – a set of filters or filter groups
Simple Filters
Simple filters are quick to create and target a single property. To create one, hit the Filter button and then select the property you’d like to filter by.
Filters follow this convention:
Property Name → [Criteria] → Value
Here, you can see that I’m filtering my view by the Genre property, which has the Multi-Select property type:
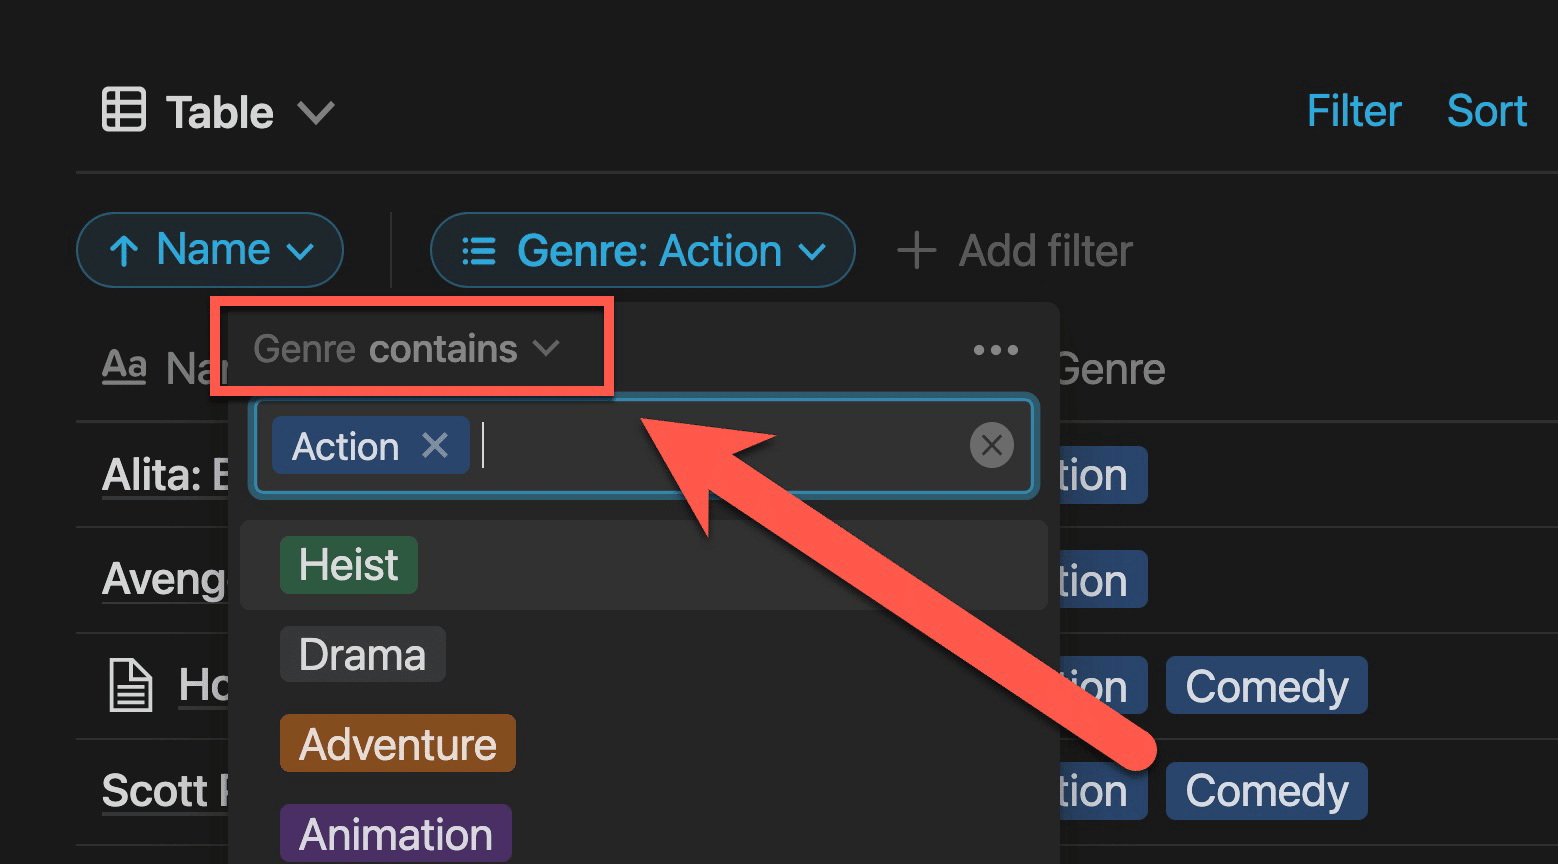
Your criteria options will change depending on the property’s type. Here, I have four options:
- Contains
- Does Not Contain
- Is Empty
- Is Not Empty
Finally, I can choose one or more values.
My completed filter reads: Genre Contains Action, which means my view will only show rows that have Action in their Genre property. Since Genre is a Multi-Select property, rows can also contain other genres.
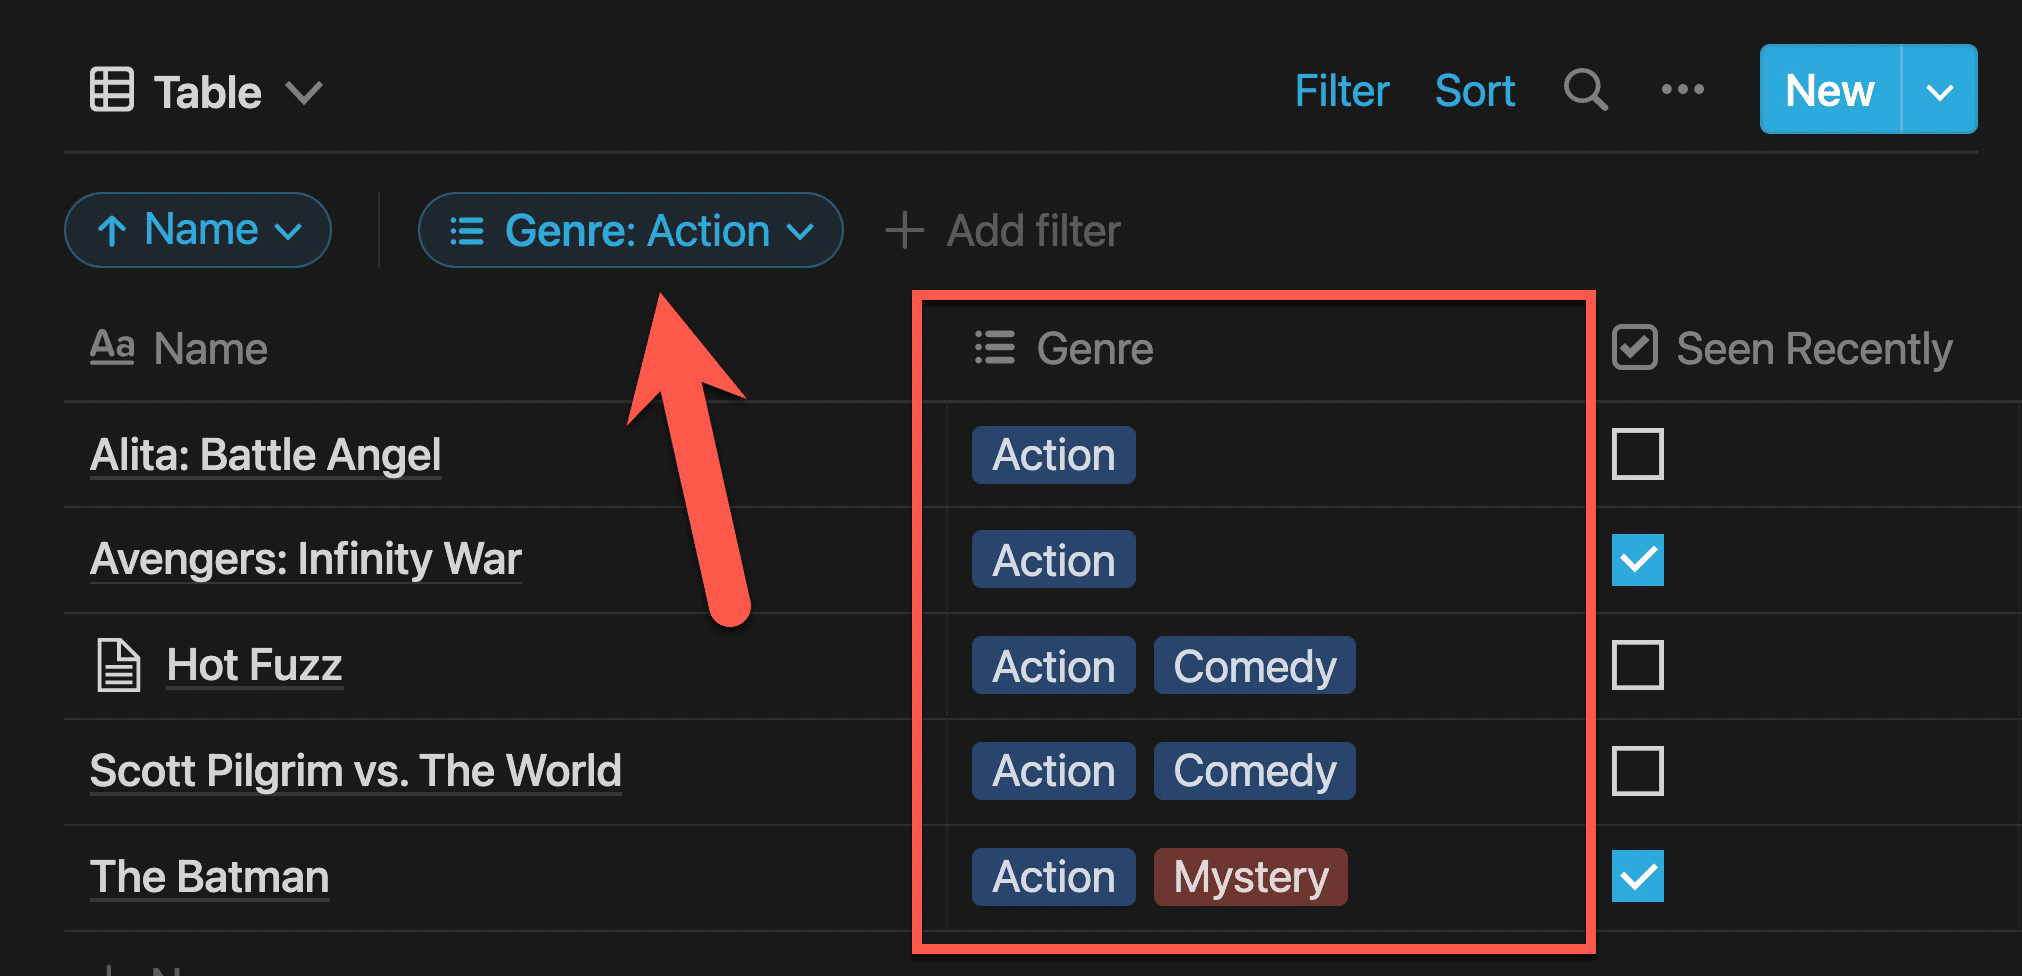
You can add multiple simple filters to a database view, and you’ll see them displayed in a row across the top of your database view when the Filter bar is open.
Copy link to headingAdvanced Filters
An Advanced filter is a set of one or more filters that show up in a single dialogue box.
Using an advanced filter, you can do something that’s incredibly useful; you can mix AND/OR operators when working with multiple filters.
When you create multiple simple filters, you’re always using the AND operator between them.
For example: “Genre contains Action” AND “Seen Recently is Checked”.
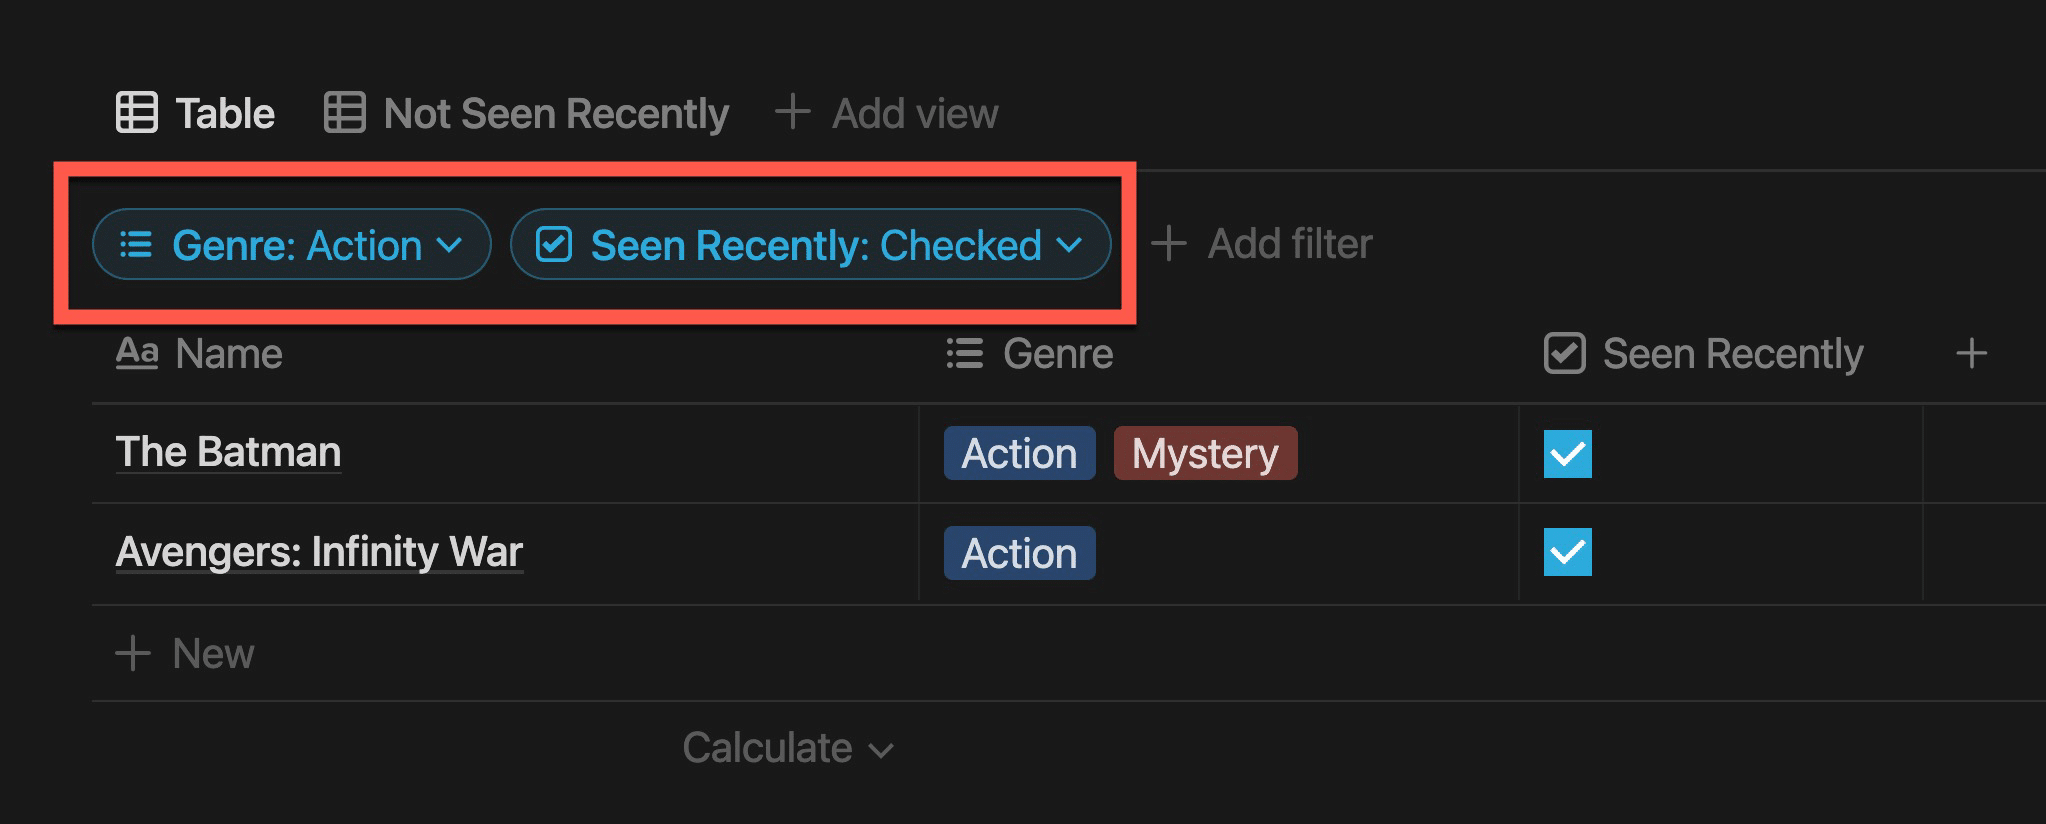
By creating an advanced filter, you could instead set up this filter combo:
“Genre contains Action” OR “Seen Recently is Checked”.
Note how this drastically changes the rows that show up in this view! Now, a row only has to fit one of the filter criteria.
Advanced filters also let you create filter groups. Within an advanced filter, click the Add Filter Rule dropdown and then select Add Filter Group to create one:

Filter groups let you mix your AND/OR operators.
Normally, once you’ve chosen either AND or OR, you’re locked into that choice when you add more rules to the filter.
However, a filter group gives you a nested box where you can select a new operator.
How is this useful?
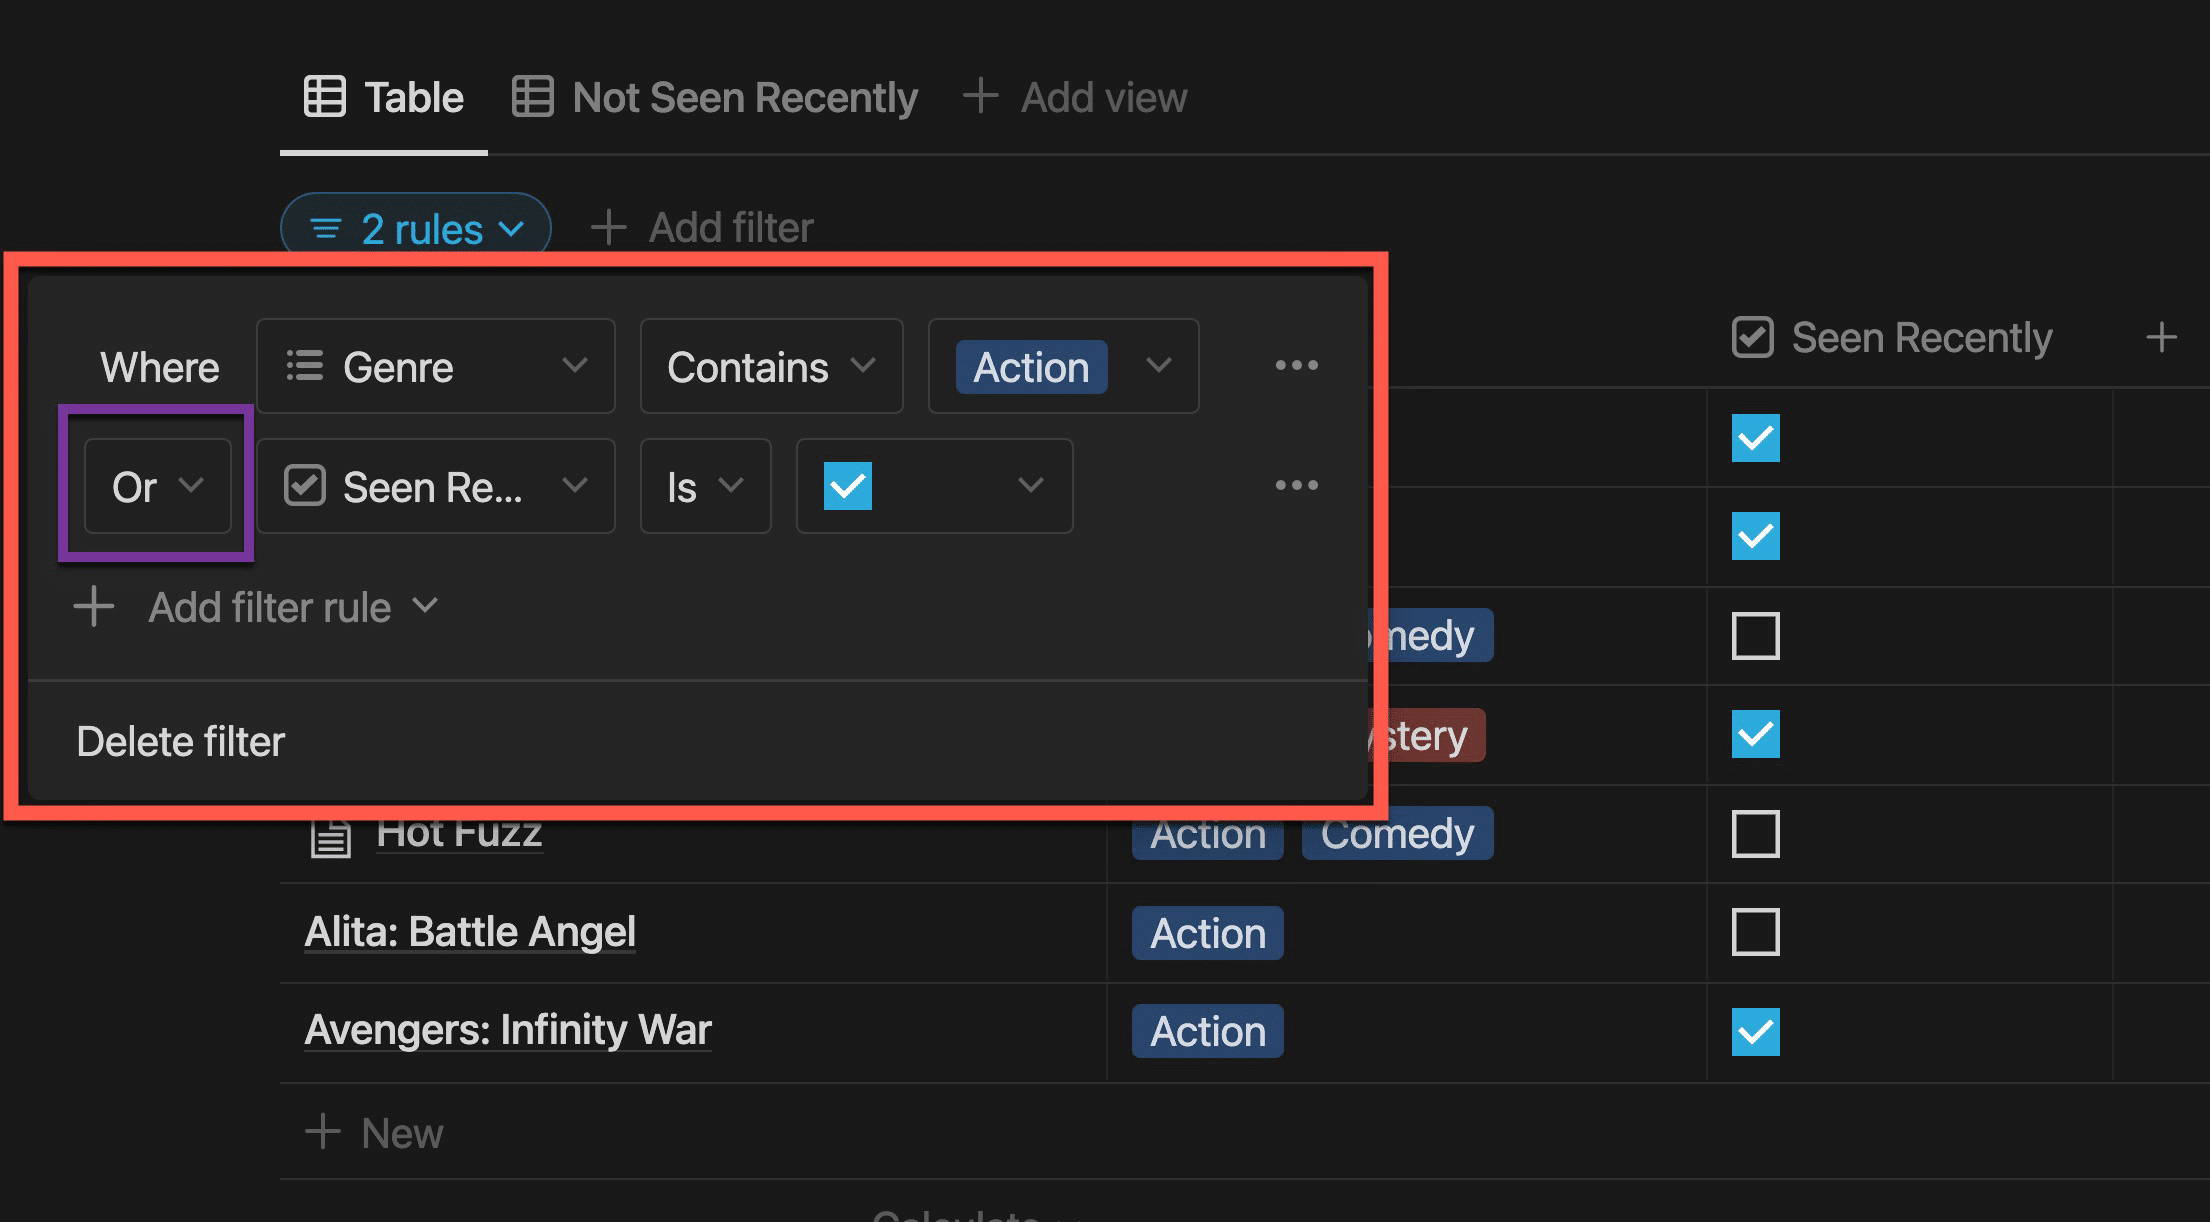
Here’s an example problem: Say I’m a movie buff. I want to watch a movie every night, and I have these preferences:
- I’m an action movie nut, so I might want to watch an action movie even if I have seen it recently.
- For other genres, I only want to watch a movie if I haven’t seen it recently.
Using a filter group, I can create a view that fits both of these preferences. In my Movies database, I’ve created the following set of filters:

If a row contains the Action genre, it’ll always show up. If it doesn’t contain the Action genre, it’ll only show up if Seen Recently isn’t checked.
Here’s another example from my Ultimate Brain template:
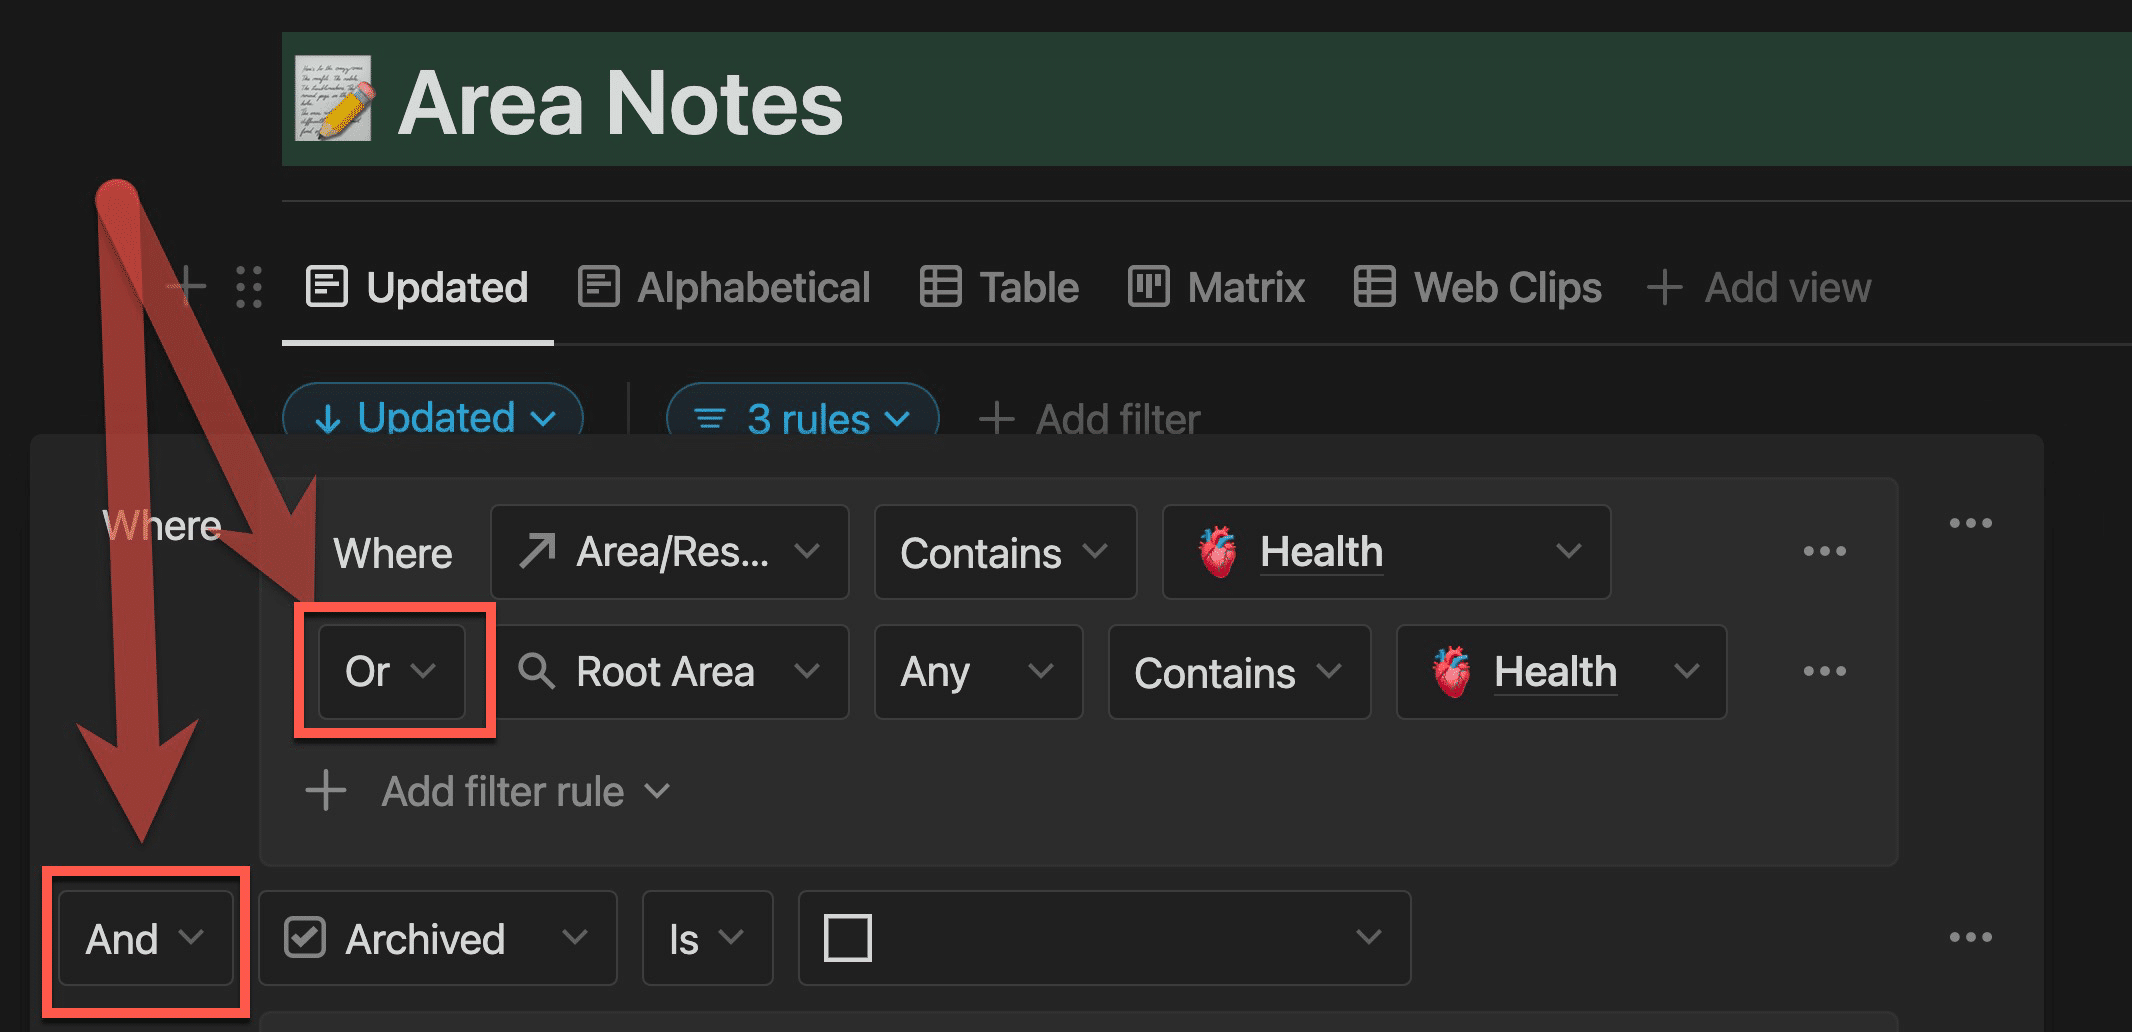
Ultimate Brain has a robust note-organization structure (modeled on Tiago Forte’s P.A.R.A. method) with:
- Higher-level Areas
- Lower-level Resources
Areas can contain Resources, and Notes can exist in Areas or Resources.
This means that within an Area, we’d want to show Notes that exist directly in that Area, or that exist within any Resources underneath that Area.
We also want to make sure those Notes aren’t archived.
Using a filter group, I’ve created a combo of AND and OR operators to meet these criteria.
This example is more complex than the previous one, but I hope that it illustrates how filters can allow you to create truly useful tools directly within Notion!
P.S. – If you’d like to use Notion as a true Second Brain, check out my Ultimate Brain template. It seamlessly combines tasks, notes, projects, goals, and whole-life organization, and it’s what I use as my own productivity system.
Copy link to headingSaving Filters
As with sorts, filters created in shared databases will initially only affect your account and device.
When you create a new filter or change/delete current filters, you’ll see a Save for Everyone button pop up:
You can click that to apply the filter for everyone who has access to the database, hit Reset to erase your changes, or just leave things as they are if you want the filter to only affect you.
Copy link to headingForcing Functions
When you set up a filter in a database view, new rows created in that view must conform to that filter.
As a result, creating a new row in a view with filters will automatically set default property values.
Here’s an example: In this view of the Movies database, I’ve created the following filter: Seen Recently is Checked.
Note how the new row I’ve added automatically has its Seen Recently checkbox property checked.
When filters are used in this way, I call them forcing functions. You can use these in all sorts of ways – here are just a few ideas:
- Add tasks to a task view with a due date set to Today
- Add notes to a filtered notebook view with a specific tag, such as Lecture or Book
- Add tasks to a shared task database with a specific Assignee (person property)
I’ve made an entire video explaining how these work (and how to use them to your advantage) in a lot more detail:
Grouping
Notion lets you group rows in a database view based on common values in nearly any property type.
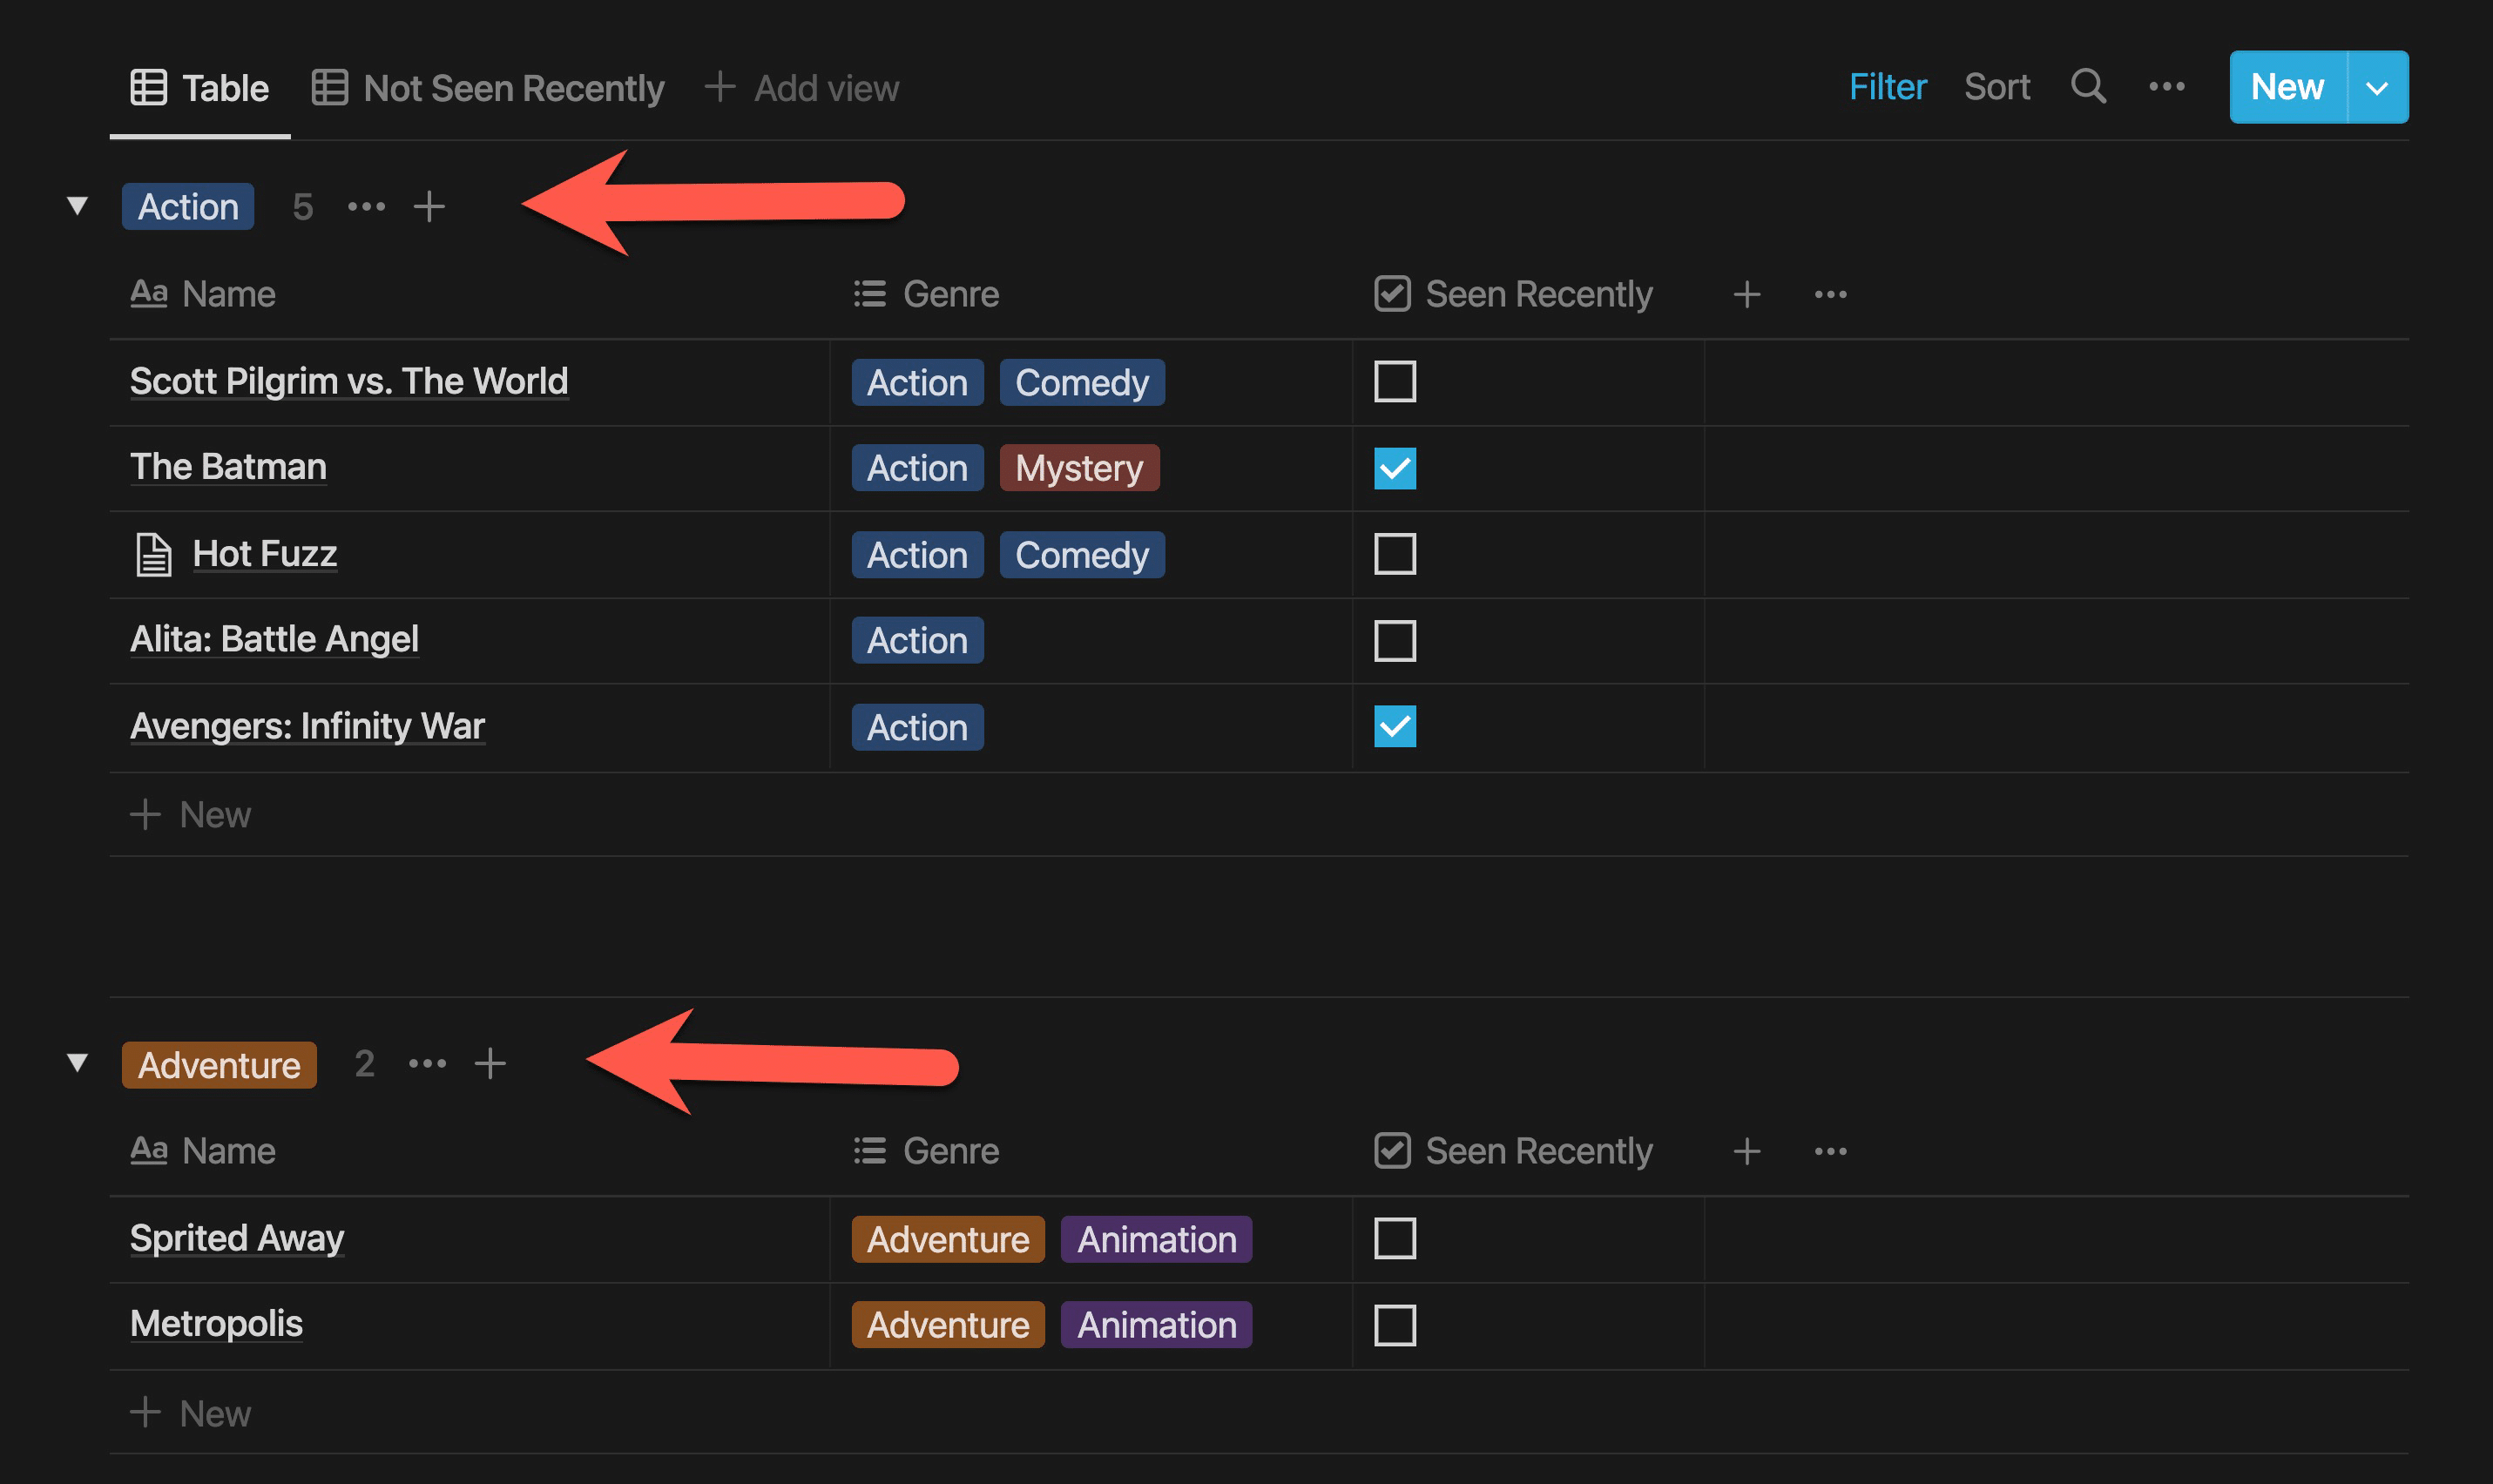
Here, I’ve grouped my Movies database view by the Genre property. Now my movie rows are grouped by genre:
You can add Grouping to any view layout (except for Calendar) by going to View Options → Grouping.
From there, you’ll be able to select the property you’d like to use for grouping:
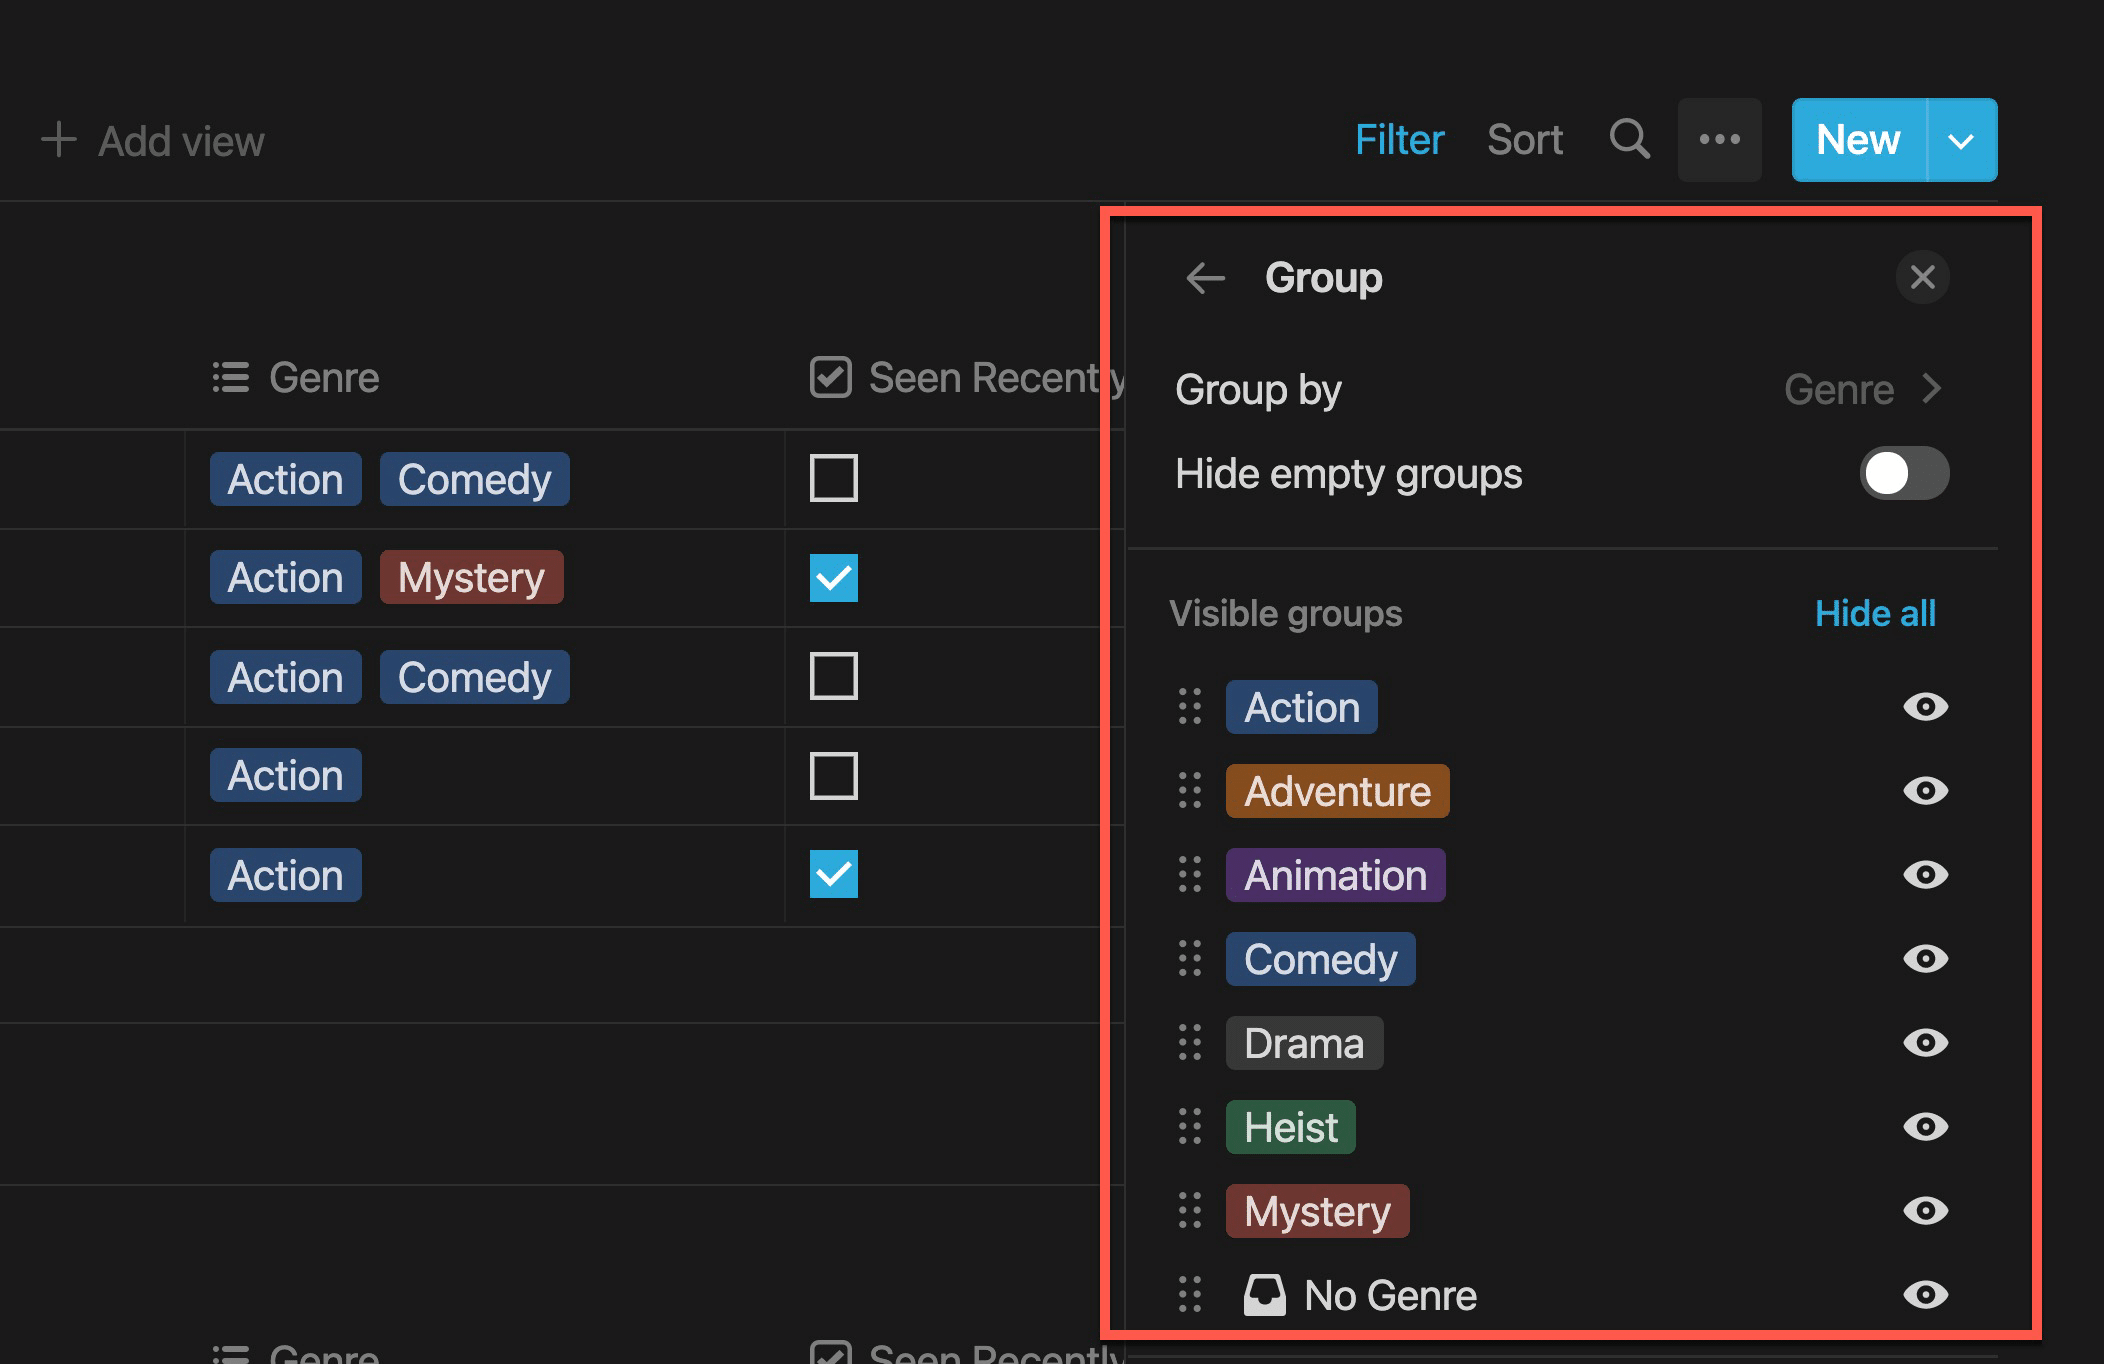
You’ll also find a few other options, such as Hide Empty Groups.
Copy link to headingSub-Grouping
Notion’s Board layout has a unique feature: In addition to Grouping, it can have Sub-Grouping as well.
Normally, a Board view will display its groups as columns. This is the classic “Kanban” style of grouping that has its origins in Japanese manufacturing, and which was popularized in the U.S. by apps like Trello.
By adding sub-grouping, you can group a board view into distinct rows.
In this case, the rows aren’t actual database rows (as in a Table view); they’re sub-groups based on another property.
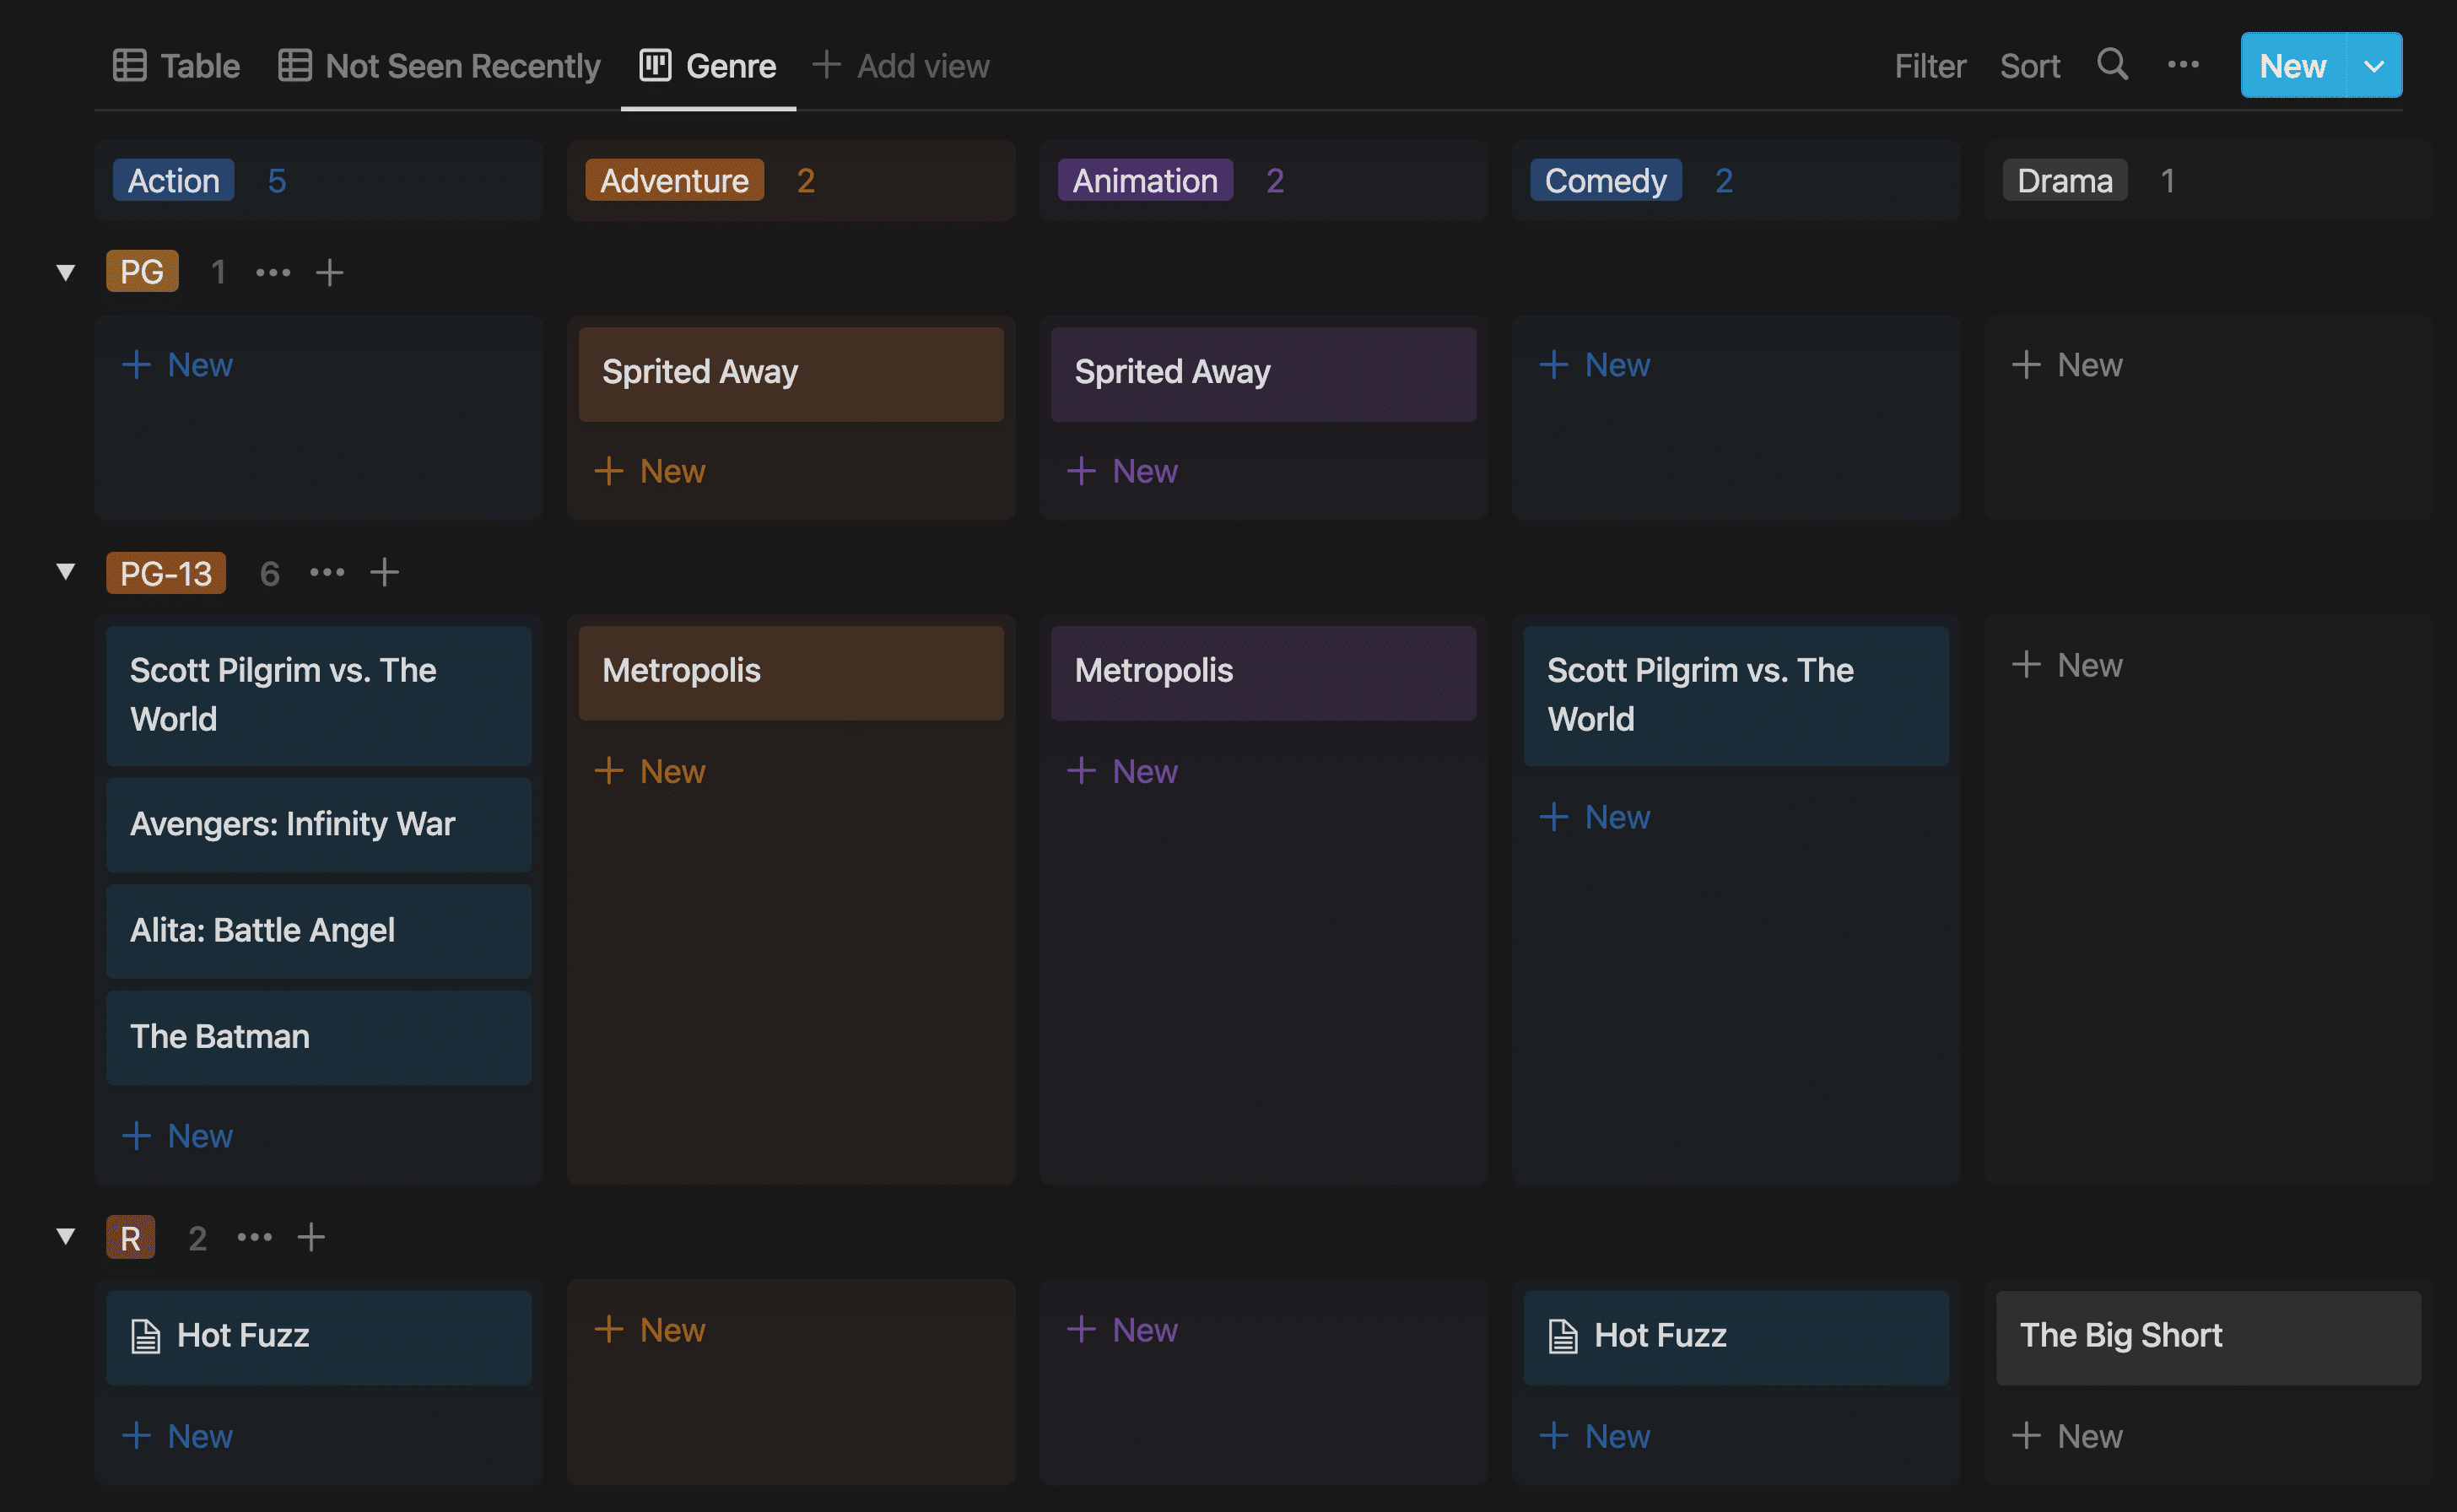
In the screenshot above, I’ve grouped the Board view by Genre, and then sub-grouped it by a new Select property called Rating. Movies are grouped by their ratings – PG, PG-13, R, etc.
You can add sub-grouping to a Board view in nearly the same way you’d add grouping – simply navigate to View Options → Sub-Group.
Copy link to headingRelations
The Relation property type allows you to relate database rows to each other. These relations can be created:
- Between rows in the same database
- Between rows in separate databases
This concept can take a bit of time to fully grok, so let me start out with an example.
Copy link to headingExample 1: Parent and Child Tasks
Task managers often have a sub-tasks feature, which lets you nest sub-tasks underneath a top-level “parent” task. Here’s a task with a couple of sub-tasks in Todoist:
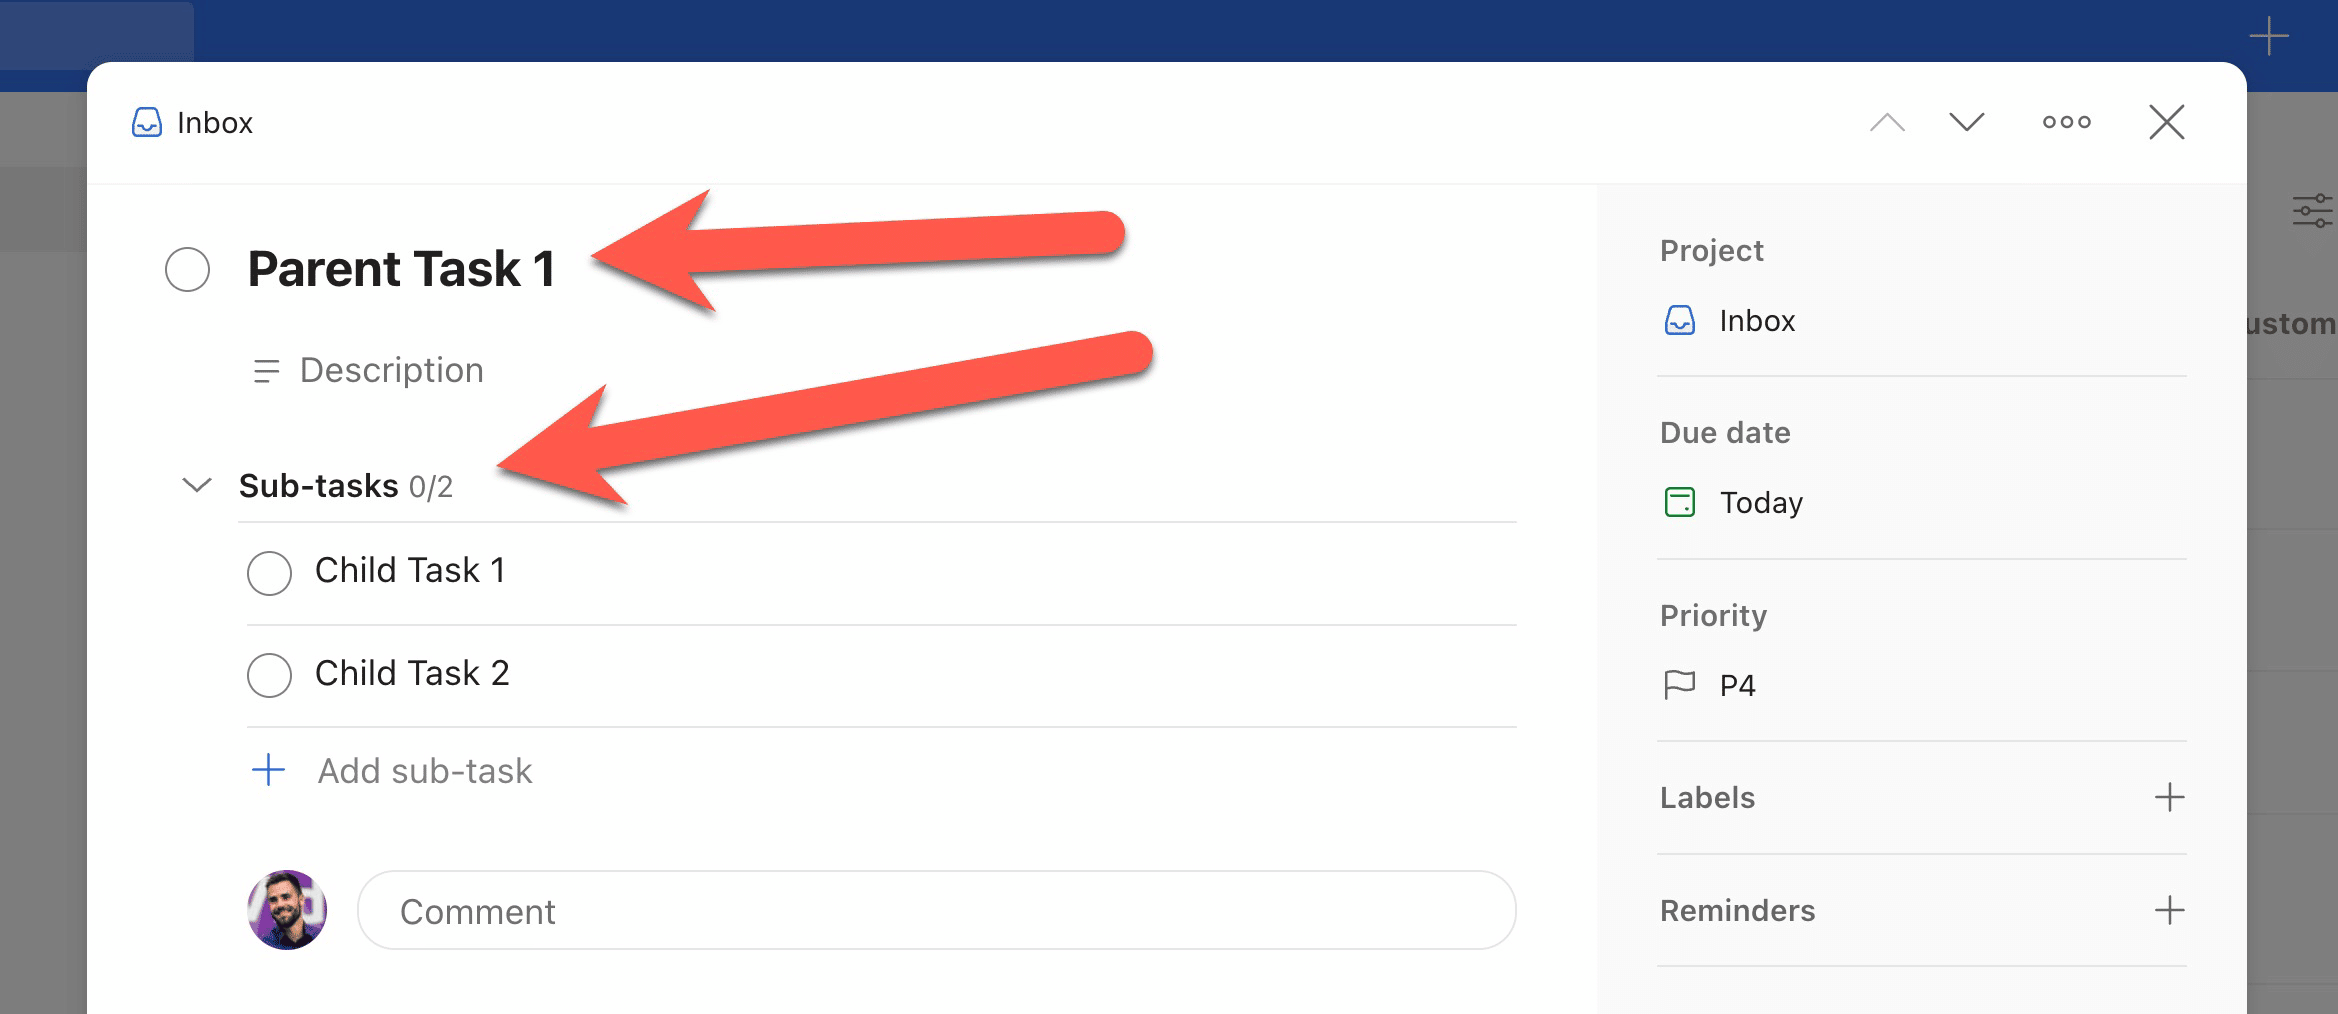
When you open the Parent Task 1’s window as in the image above, how does Todoist know to show you two sub-tasks – and not show you any other tasks?
Behind the scenes, there’s a Relation set up in Todoist’s database. This Relation consists of two properties, which you could think of as columns in a table:
- Parent Task
- Sub-Tasks
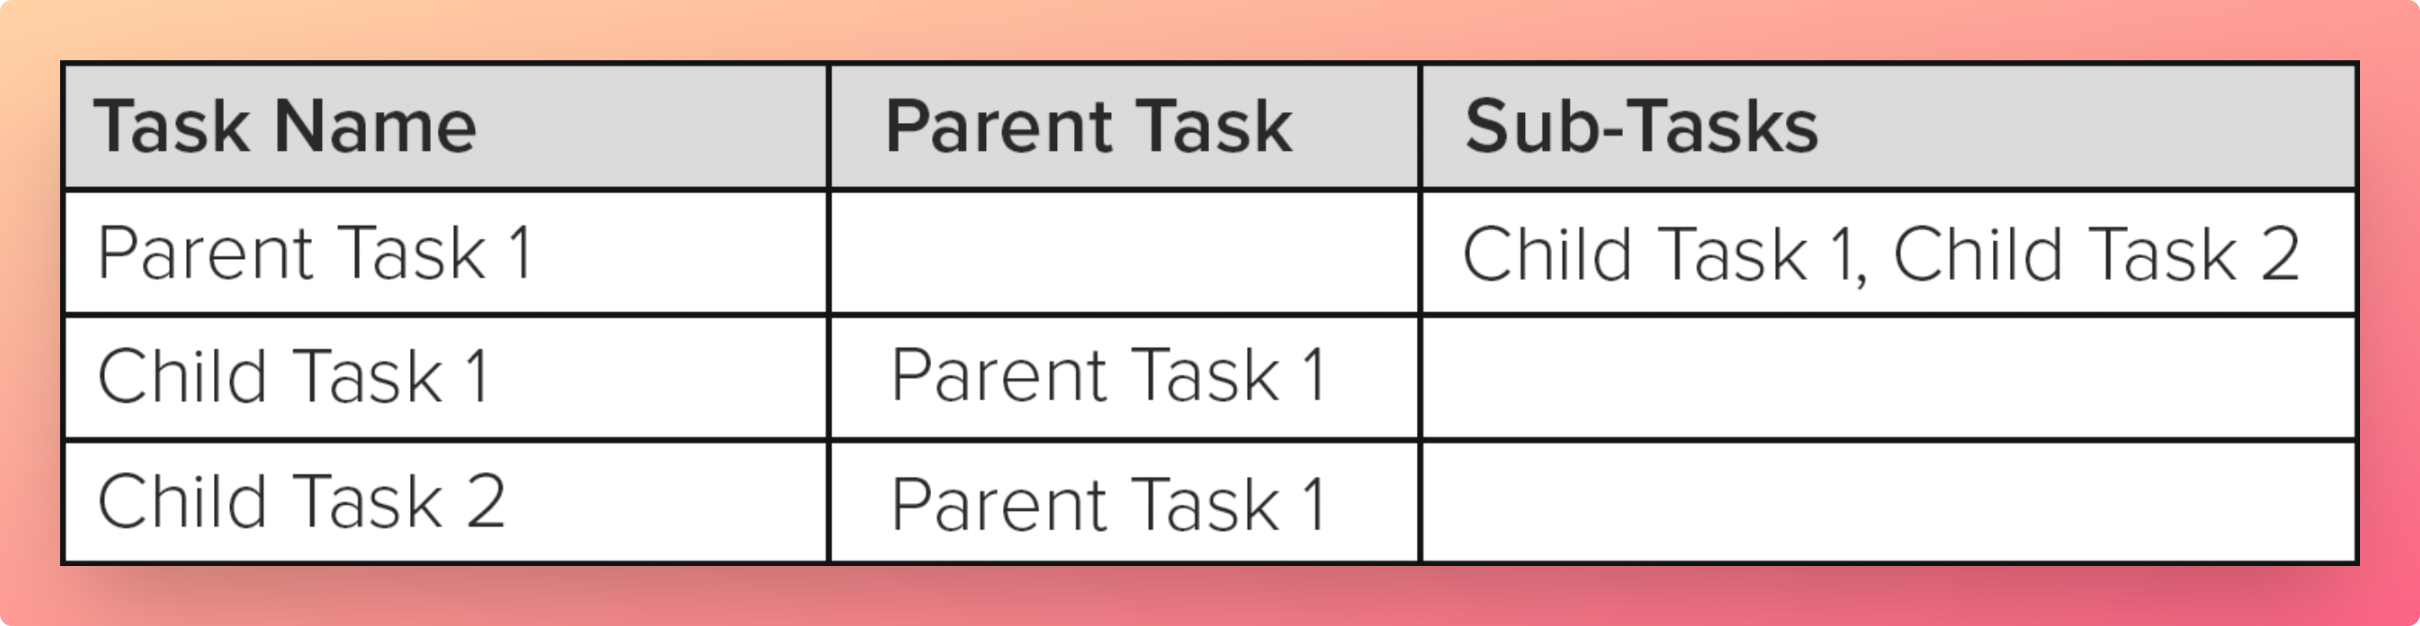
The Parent Task 1 database row has its Sub-Tasks Relation property filled with links to two other database rows:
- Child Task 1
- Child Task 2
Likewise, each Child Task has its Parent Task Relation property filled with a link to the Parent Task 1 row.
In this way, Parent Task 1 is related to the two Child Tasks.
With this Relation set up, Todoist can simply use a filter (also behind the scenes) to display the correct Child Tasks. Essentially, that filter would read:
- Where Parent Task contains “Parent Task 1”
This filter ensures that only the two Child Tasks show up.
If that makes sense so far, let’s create it in Notion!
Copy link to headingHow to Create a Single-Database Relation
A Relation is a type of property, so you can add one to your database by:
- Adding a new property
- Selecting the Relation type
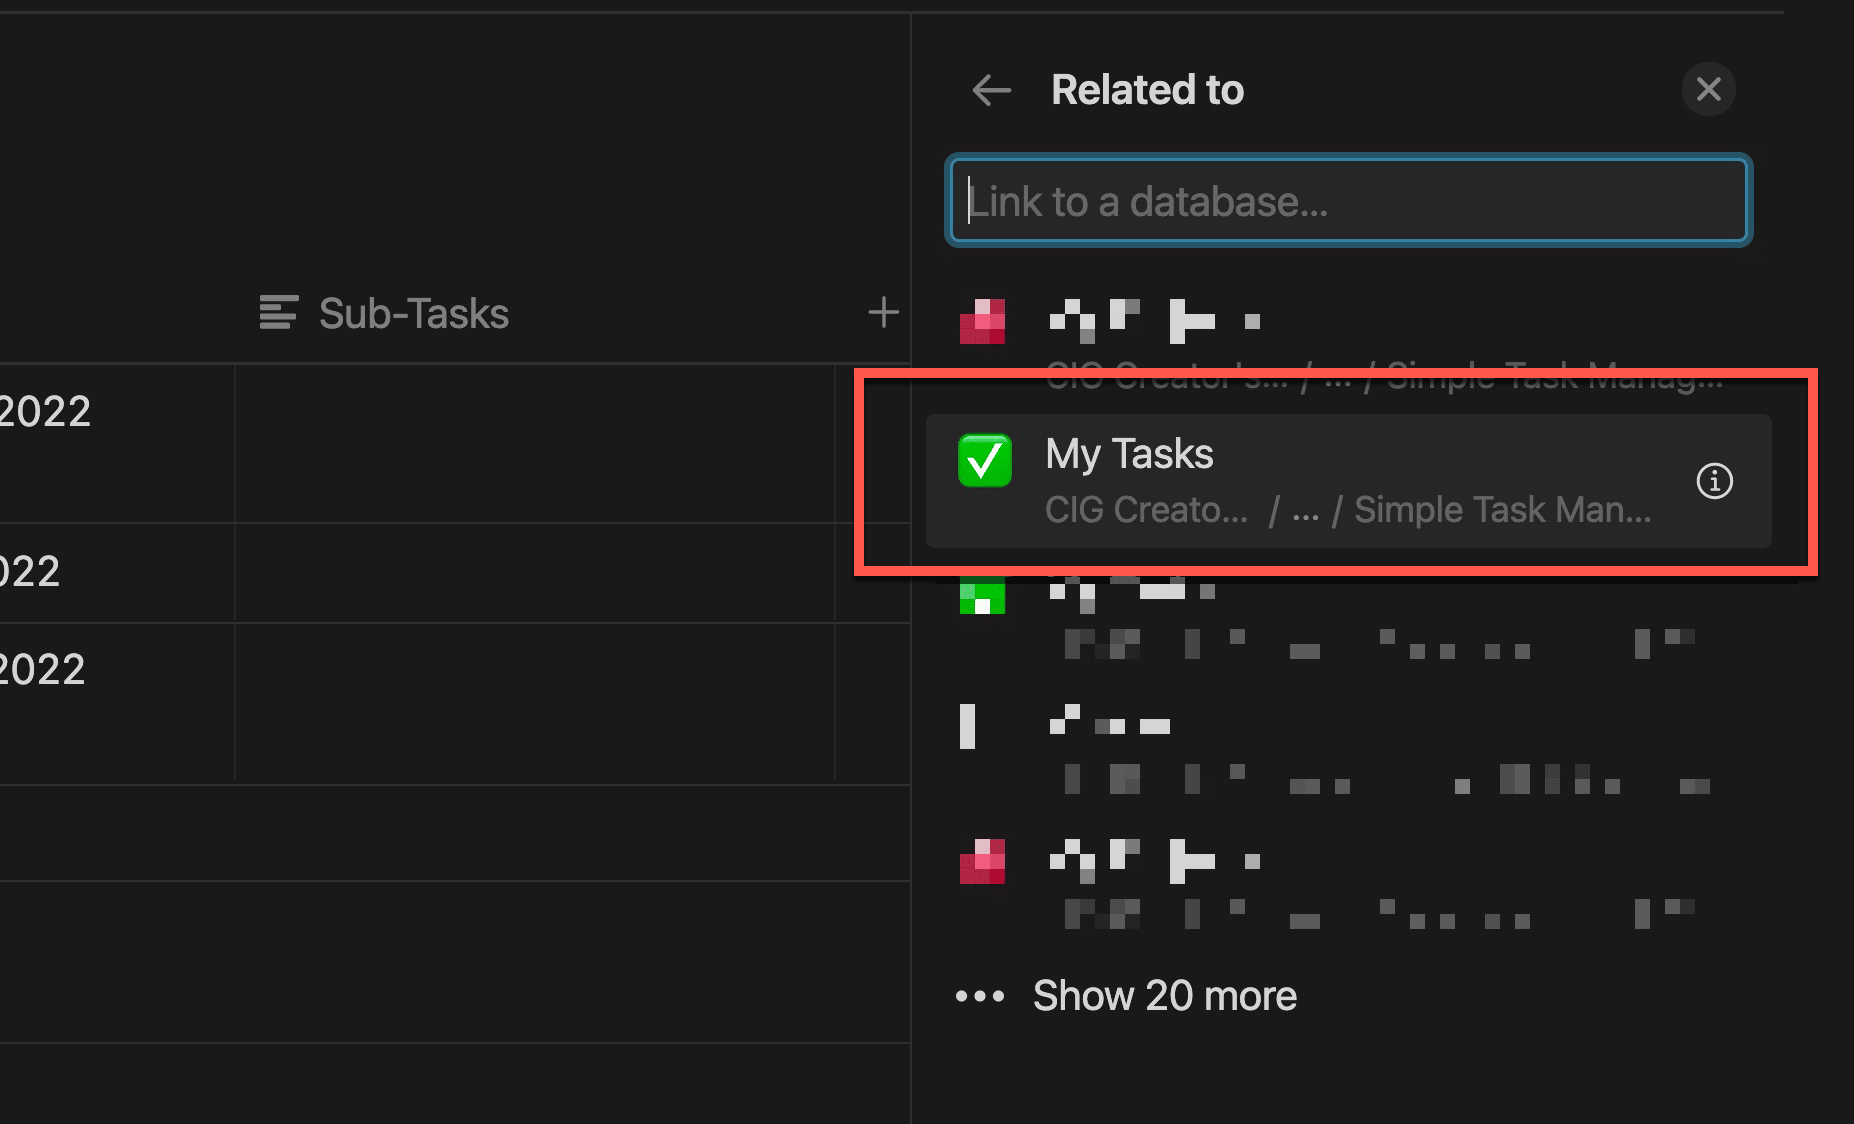
- Selecting the Database you’d like your Relation property to point towards
- Choosing whether the Relation should have separate properties
Since I’m creating a Parent Task ⬌ Sub-Tasks relation, I want to make sure I choose the same database that I’m currently working with – in this case, My Tasks.
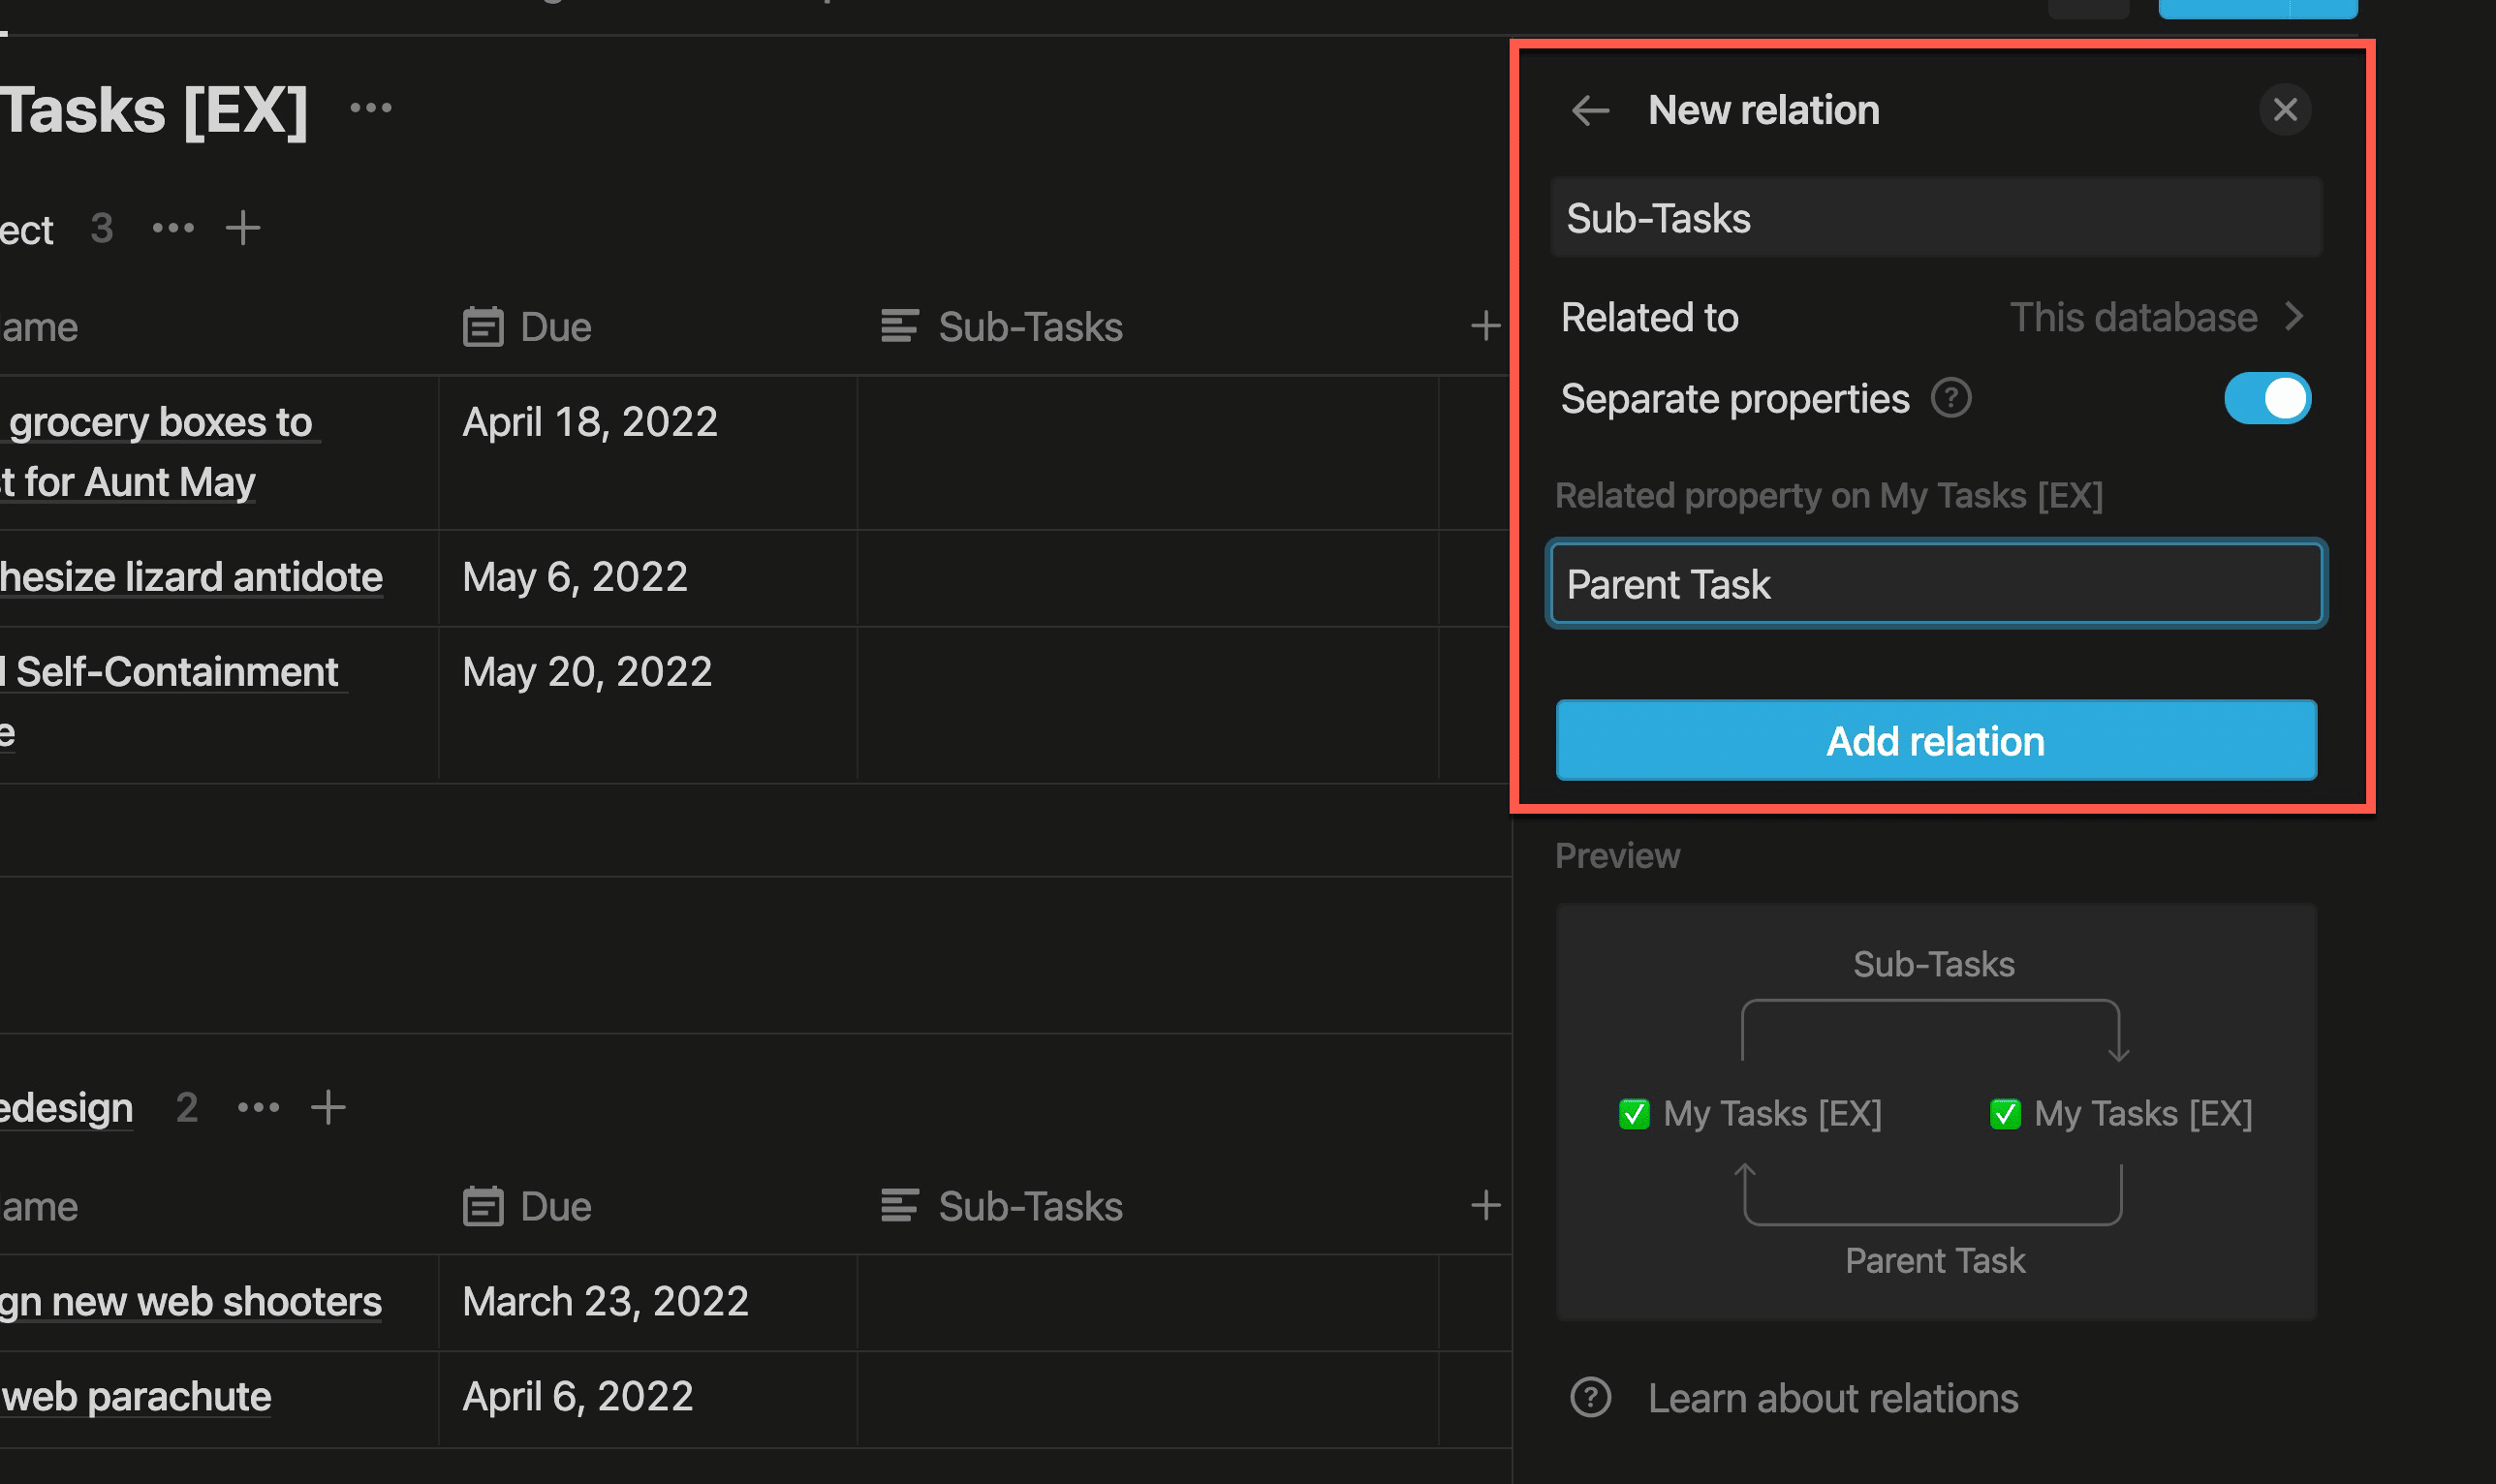
Next, I’ll choose whether or not I want to create Separate Properties.
If I don’t, I’ll just get a single Relation property called Sub-Tasks. If I do turn it on, I’ll get a second property.
Since I do want a second property called Parent Task, I’ll turn on the Separate Properties option and give my second property the correct name:
Now that I have my Relation properties, I can model Parent Tasks and Sub-Tasks just like we did earlier with Todoist.
Here, I’ve clicked into the Sub-Tasks property within the “Take Grocery Boxes…” row, and set two other rows as sub-tasks:
- Build grocery boxes
- Get rain covers
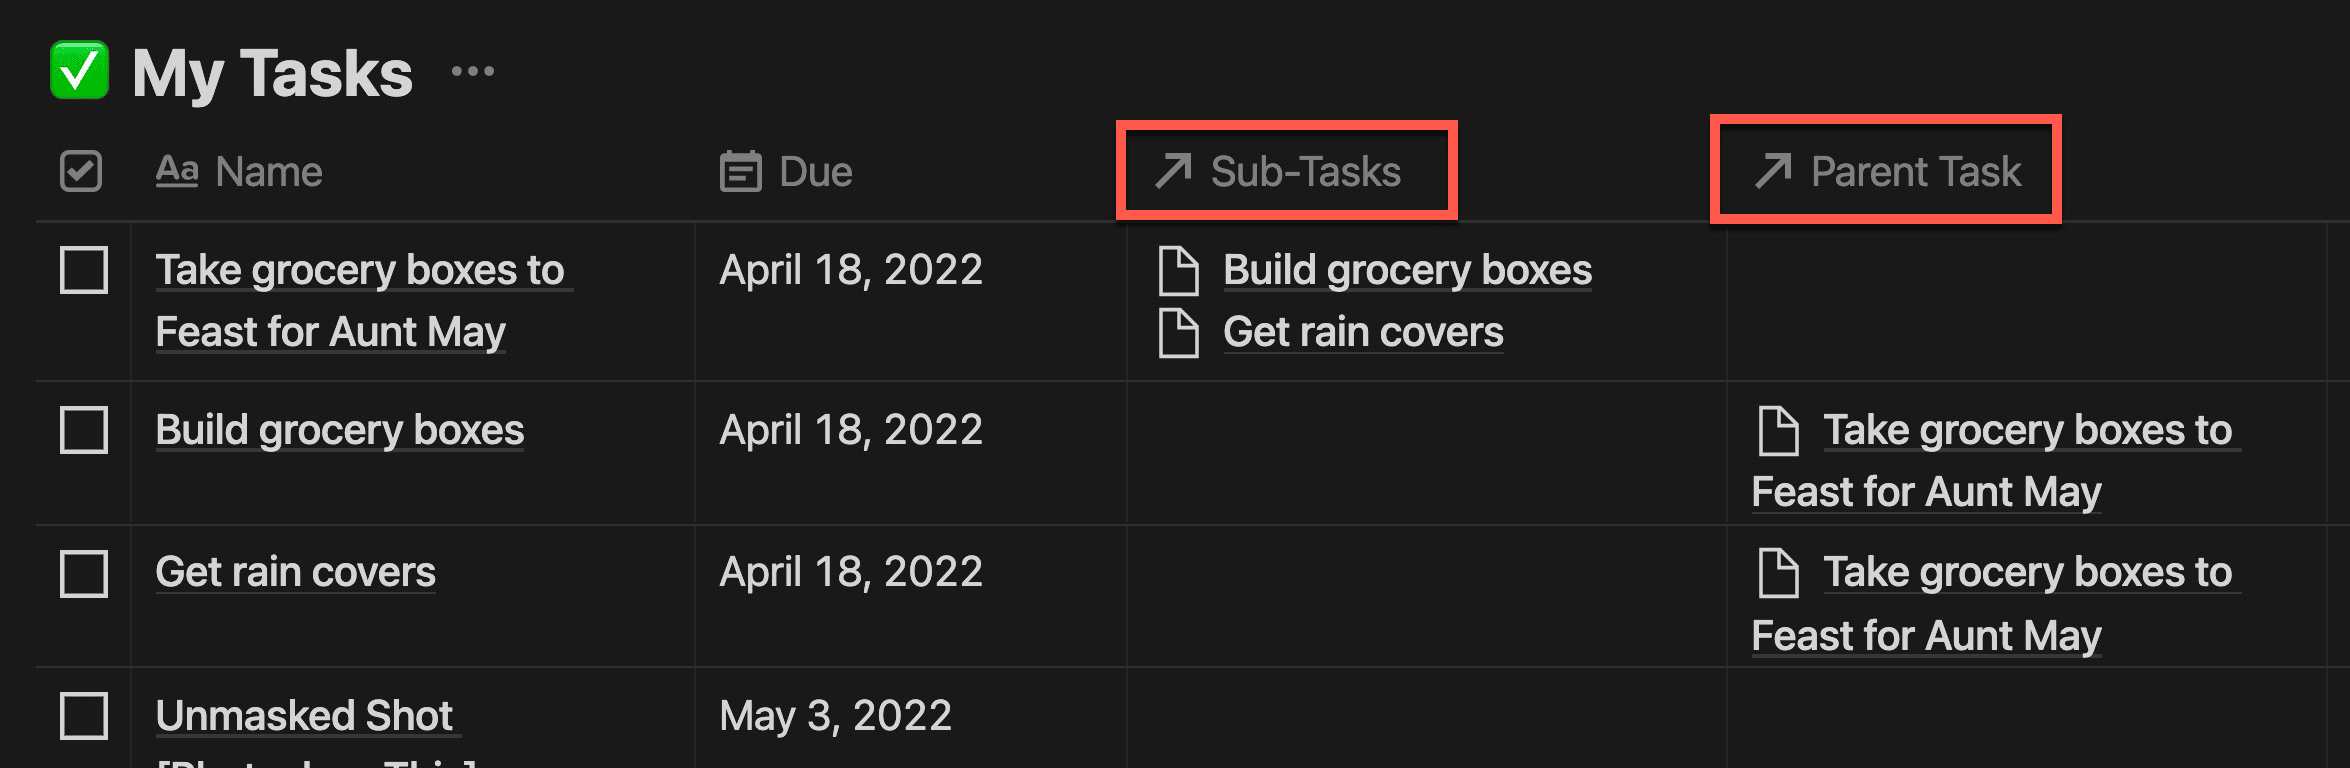
Note how “Take Grocery Boxes…” automatically shows up in the Parent Task property for each of these sub-tasks.
Now that we have these Relations set up, we can do some useful stuff! Here’s a basic example. I’ve set up a simple filter that says:
- Where Parent Task contains “Take Grocery Boxes…”
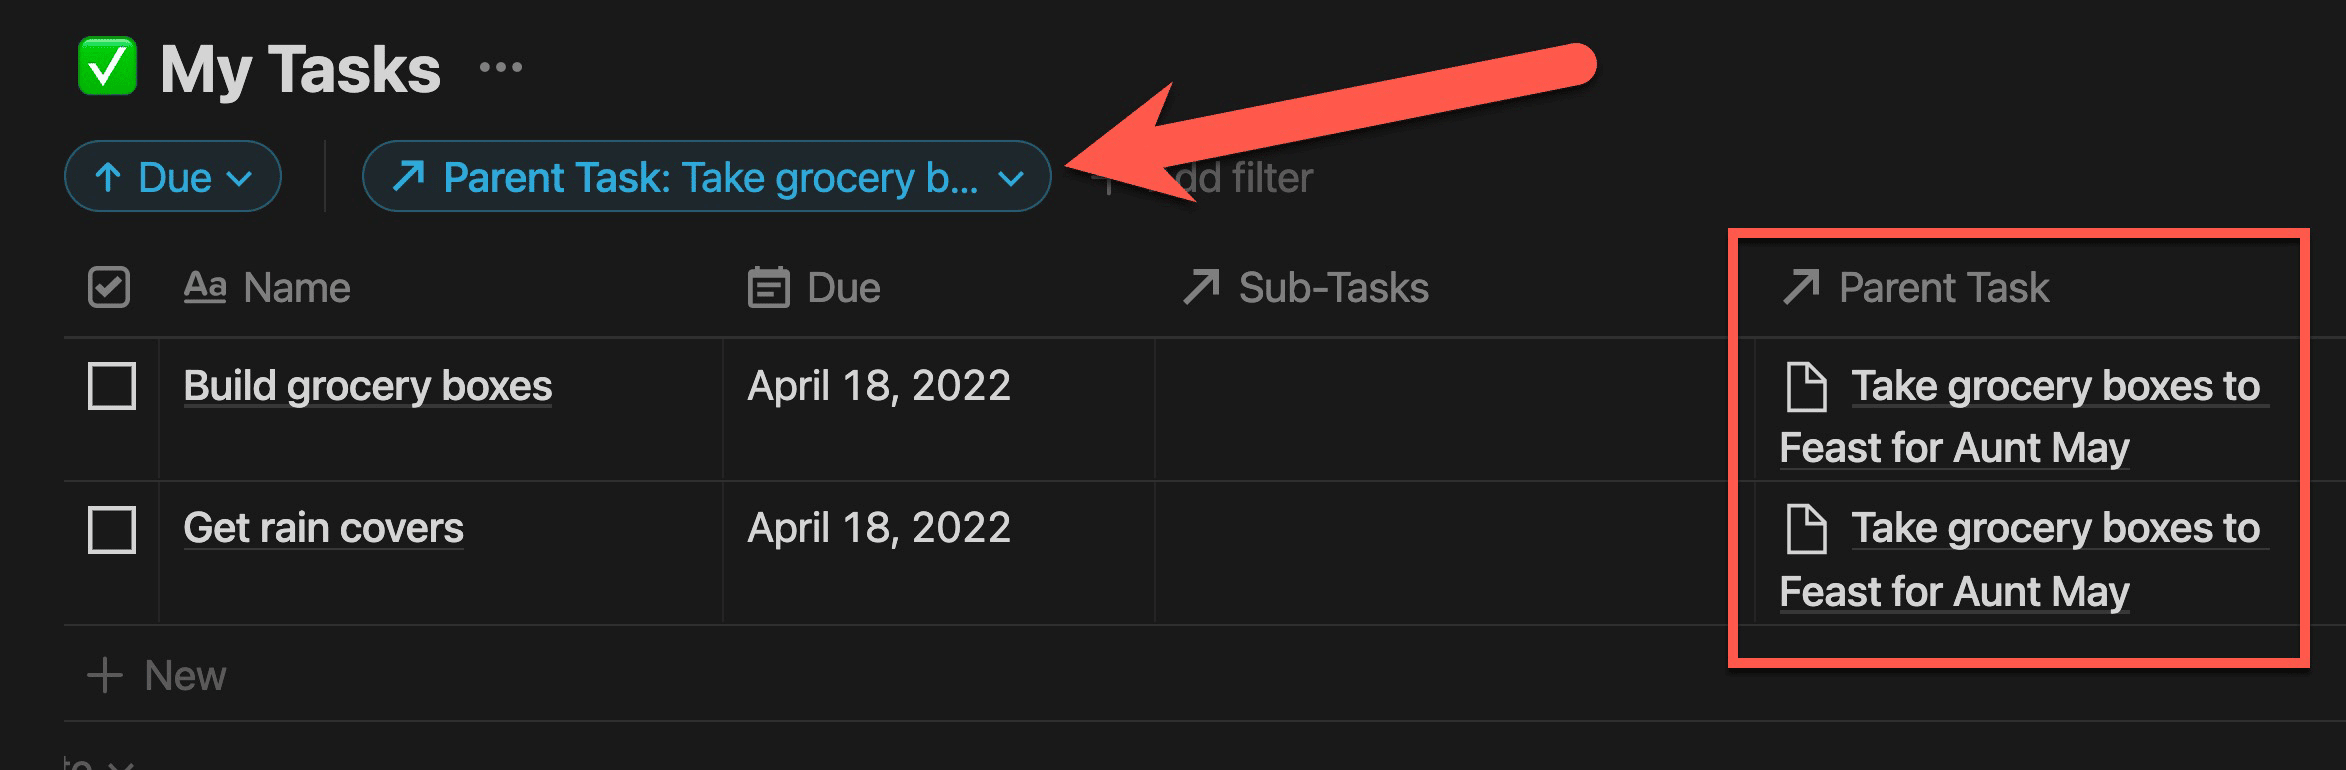
With this filter in place, I can only see the two sub-tasks I created earlier.
In the Linked Databases section of this guide, I’ll show you how to set up this same filtered view inside the Parent Task’s page. This is far more useful, and it models the Todoist example above perfectly.
For now, let’s take Relations one step further by relating two separate databases together.
Copy link to headingExample 2: Tasks and Projects
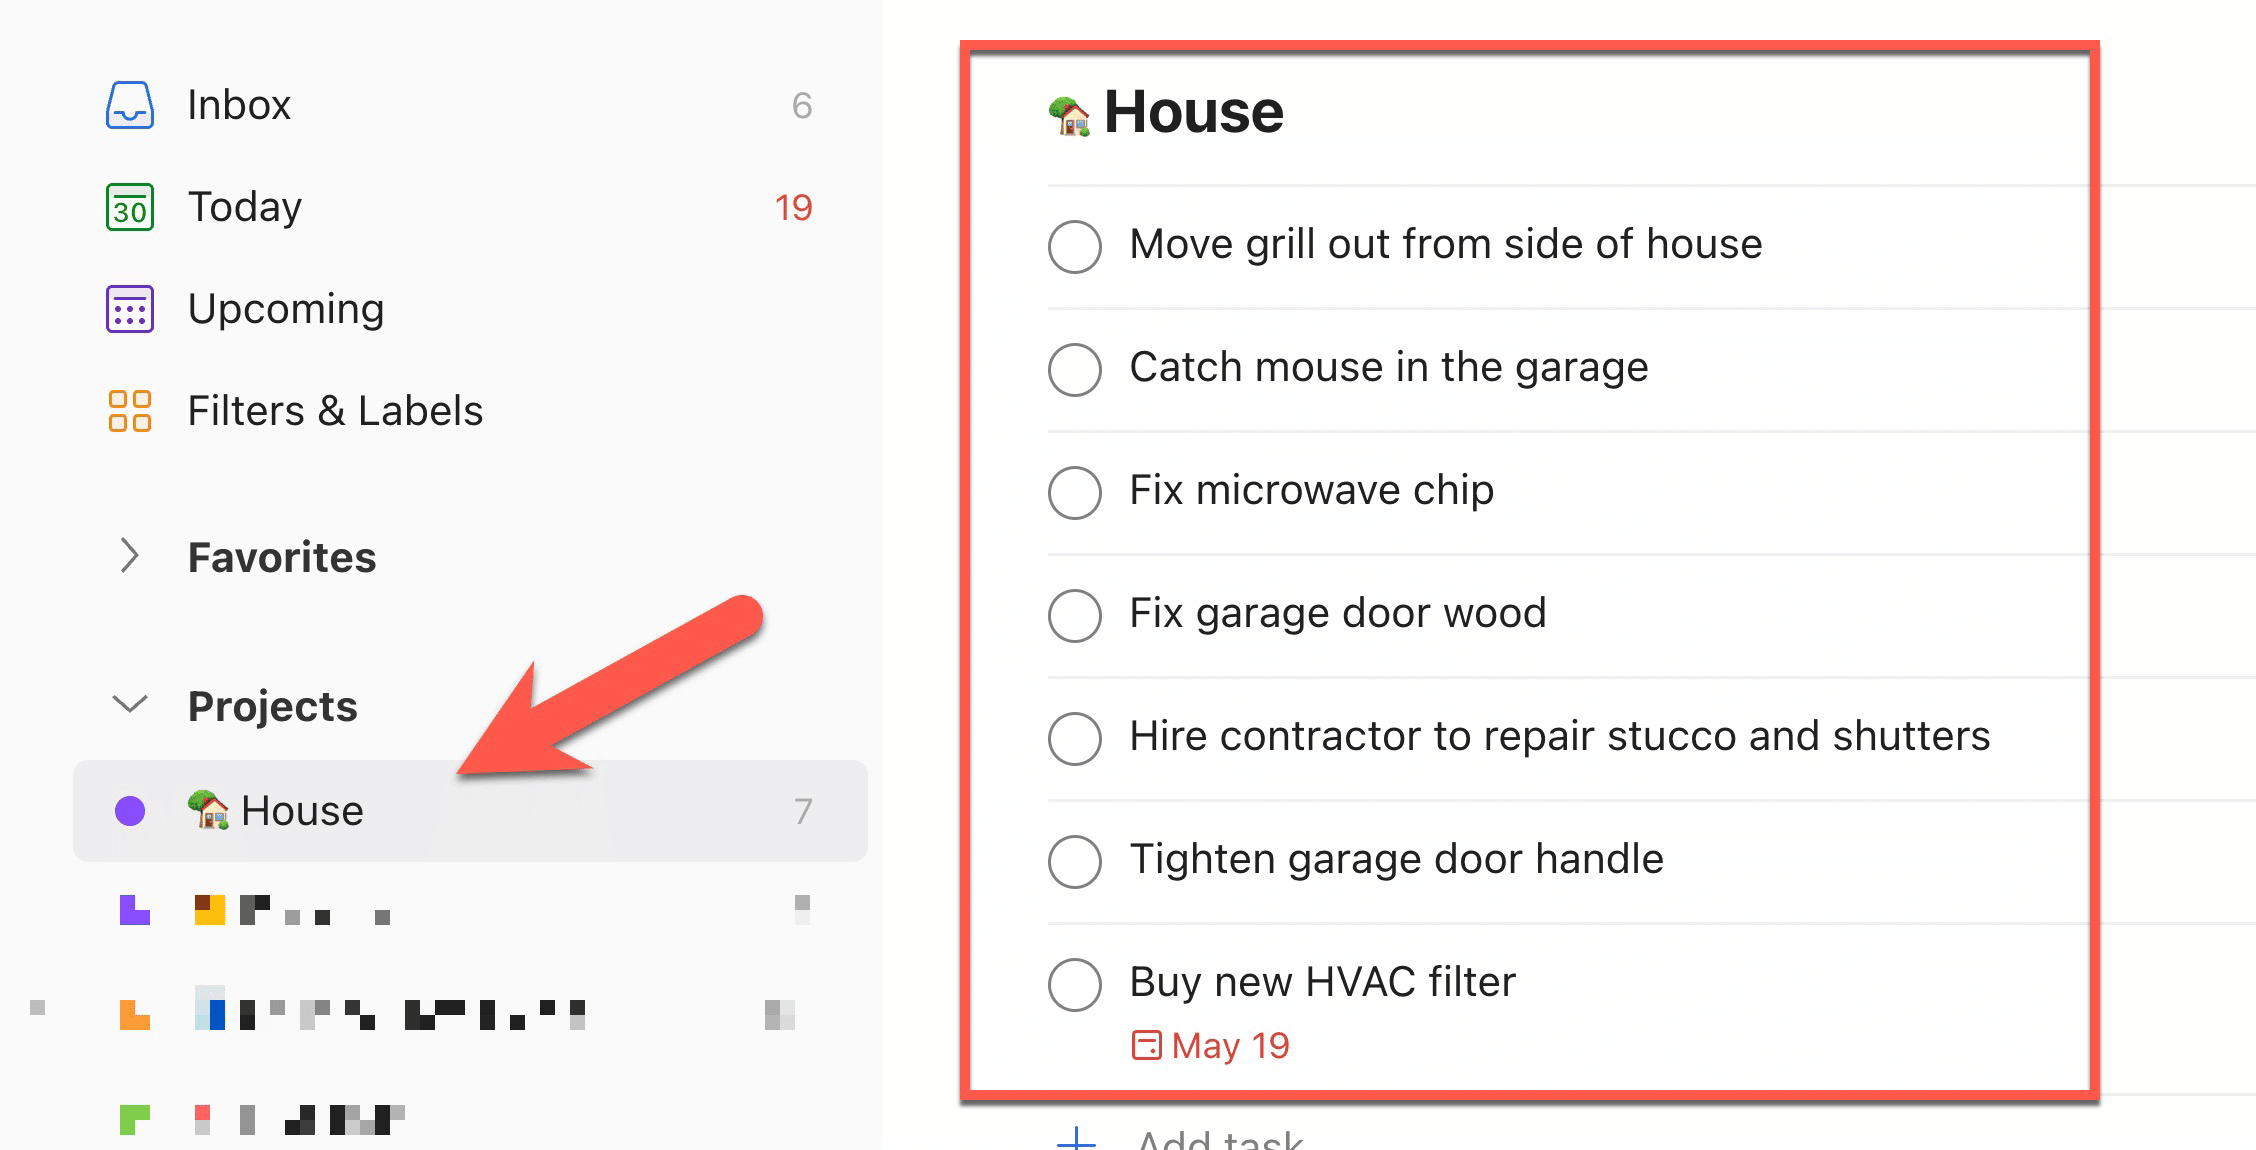
Task managers also tend to have Projects or Lists that are useful for grouping multiple tasks together. You can see this in Todoist:
If we think about the databases that run everything behind the scenes, we realize that there are actually two main databases:
- Tasks
- Lists
These databases are related to one another. This means that a single row in the Lists database can be related to many rows in the Tasks database. Then, using filters, Todoist can show you a tidy view of the tasks in a specific list, such as House.
Guess what? You can do the exact same thing in Notion by creating a multi-database Relation!
Copy link to headingHow to Create a Multi-Database Relation
To create a multi-database Relation, we’ll first need two databases to work with. Fortunately, the Simple Task Manager example template already has two:
- My Tasks
- My Projects
I can create my Relation in either database, but I’m going to create it in My Tasks. Adding a new Property, I’ll:
- Name it Project
- Select the Relation property type
- Select the My Projects database for the database connection
- Toggle Show on My Projects to the On position
- Name my Related Property with the My Projects database as “Tasks”
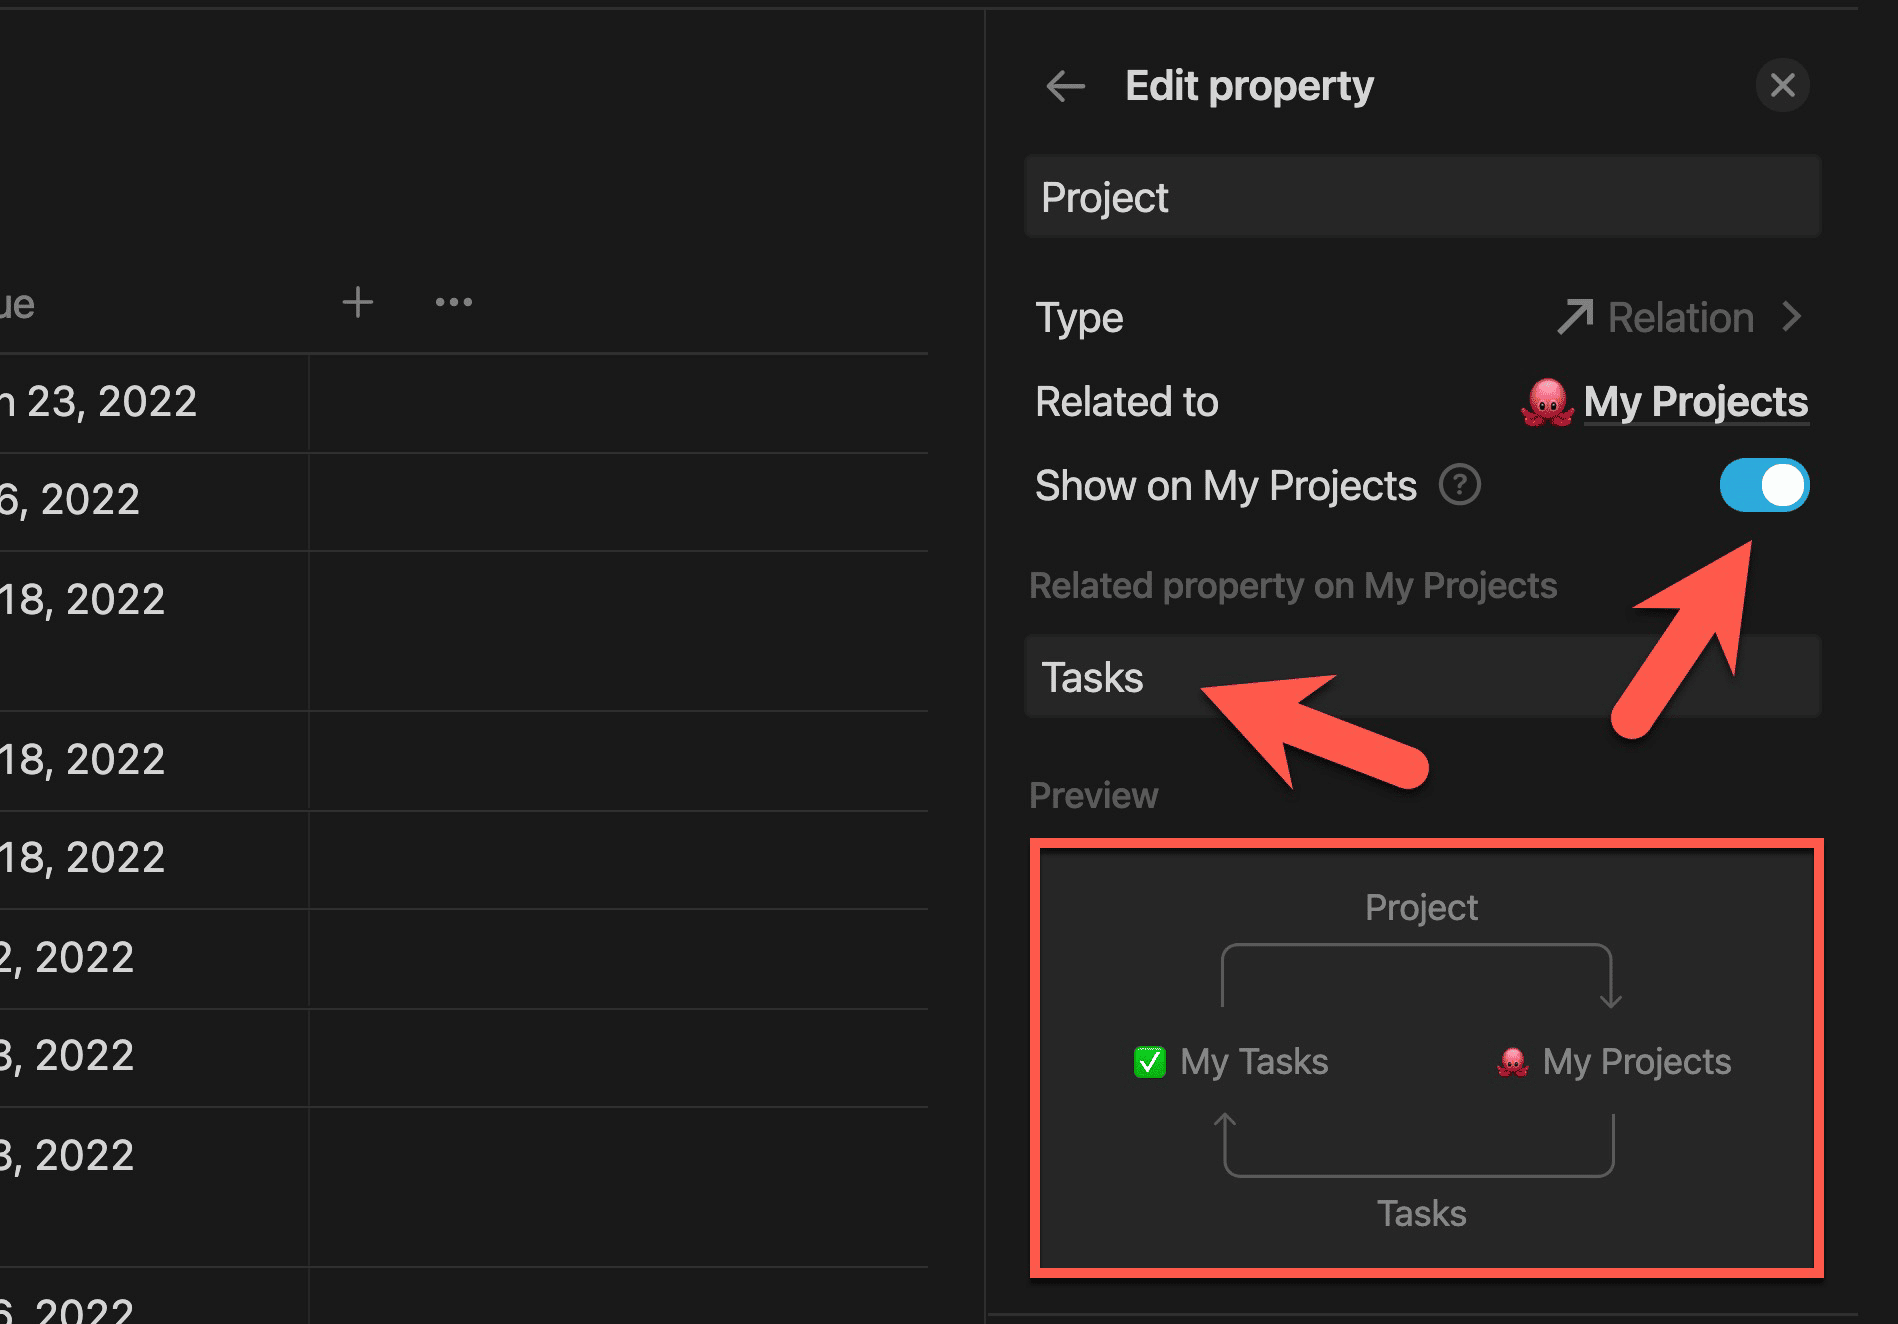
Note how the Relation builder also gives you a preview of what your Relation looks like. Here, you can see that two properties are being created:
- “Project” within the My Tasks database – which points to the My Projects database
- “Tasks” within the My Projects database – which points to the My Tasks database
These two properties are reciprocal, meaning that setting a related row in one will affect the other.
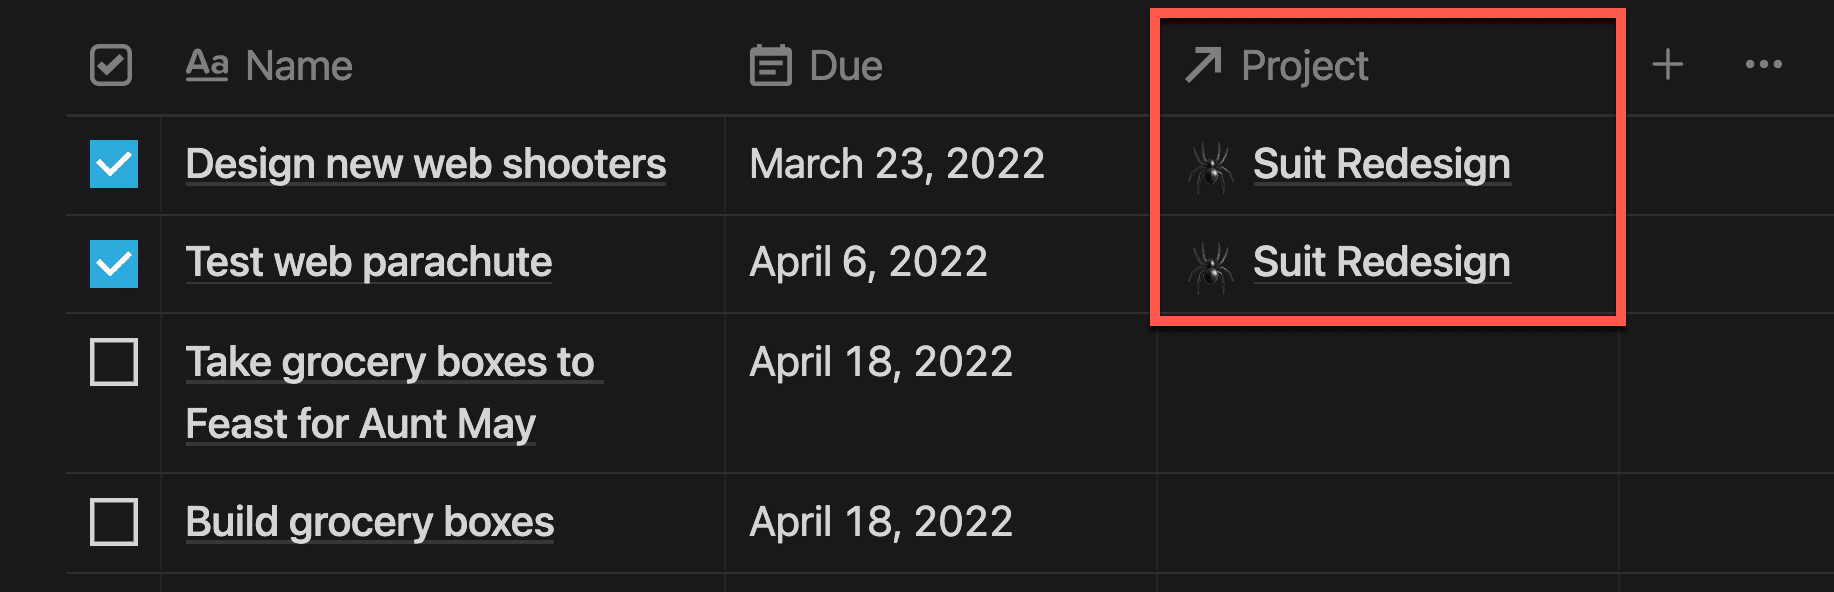
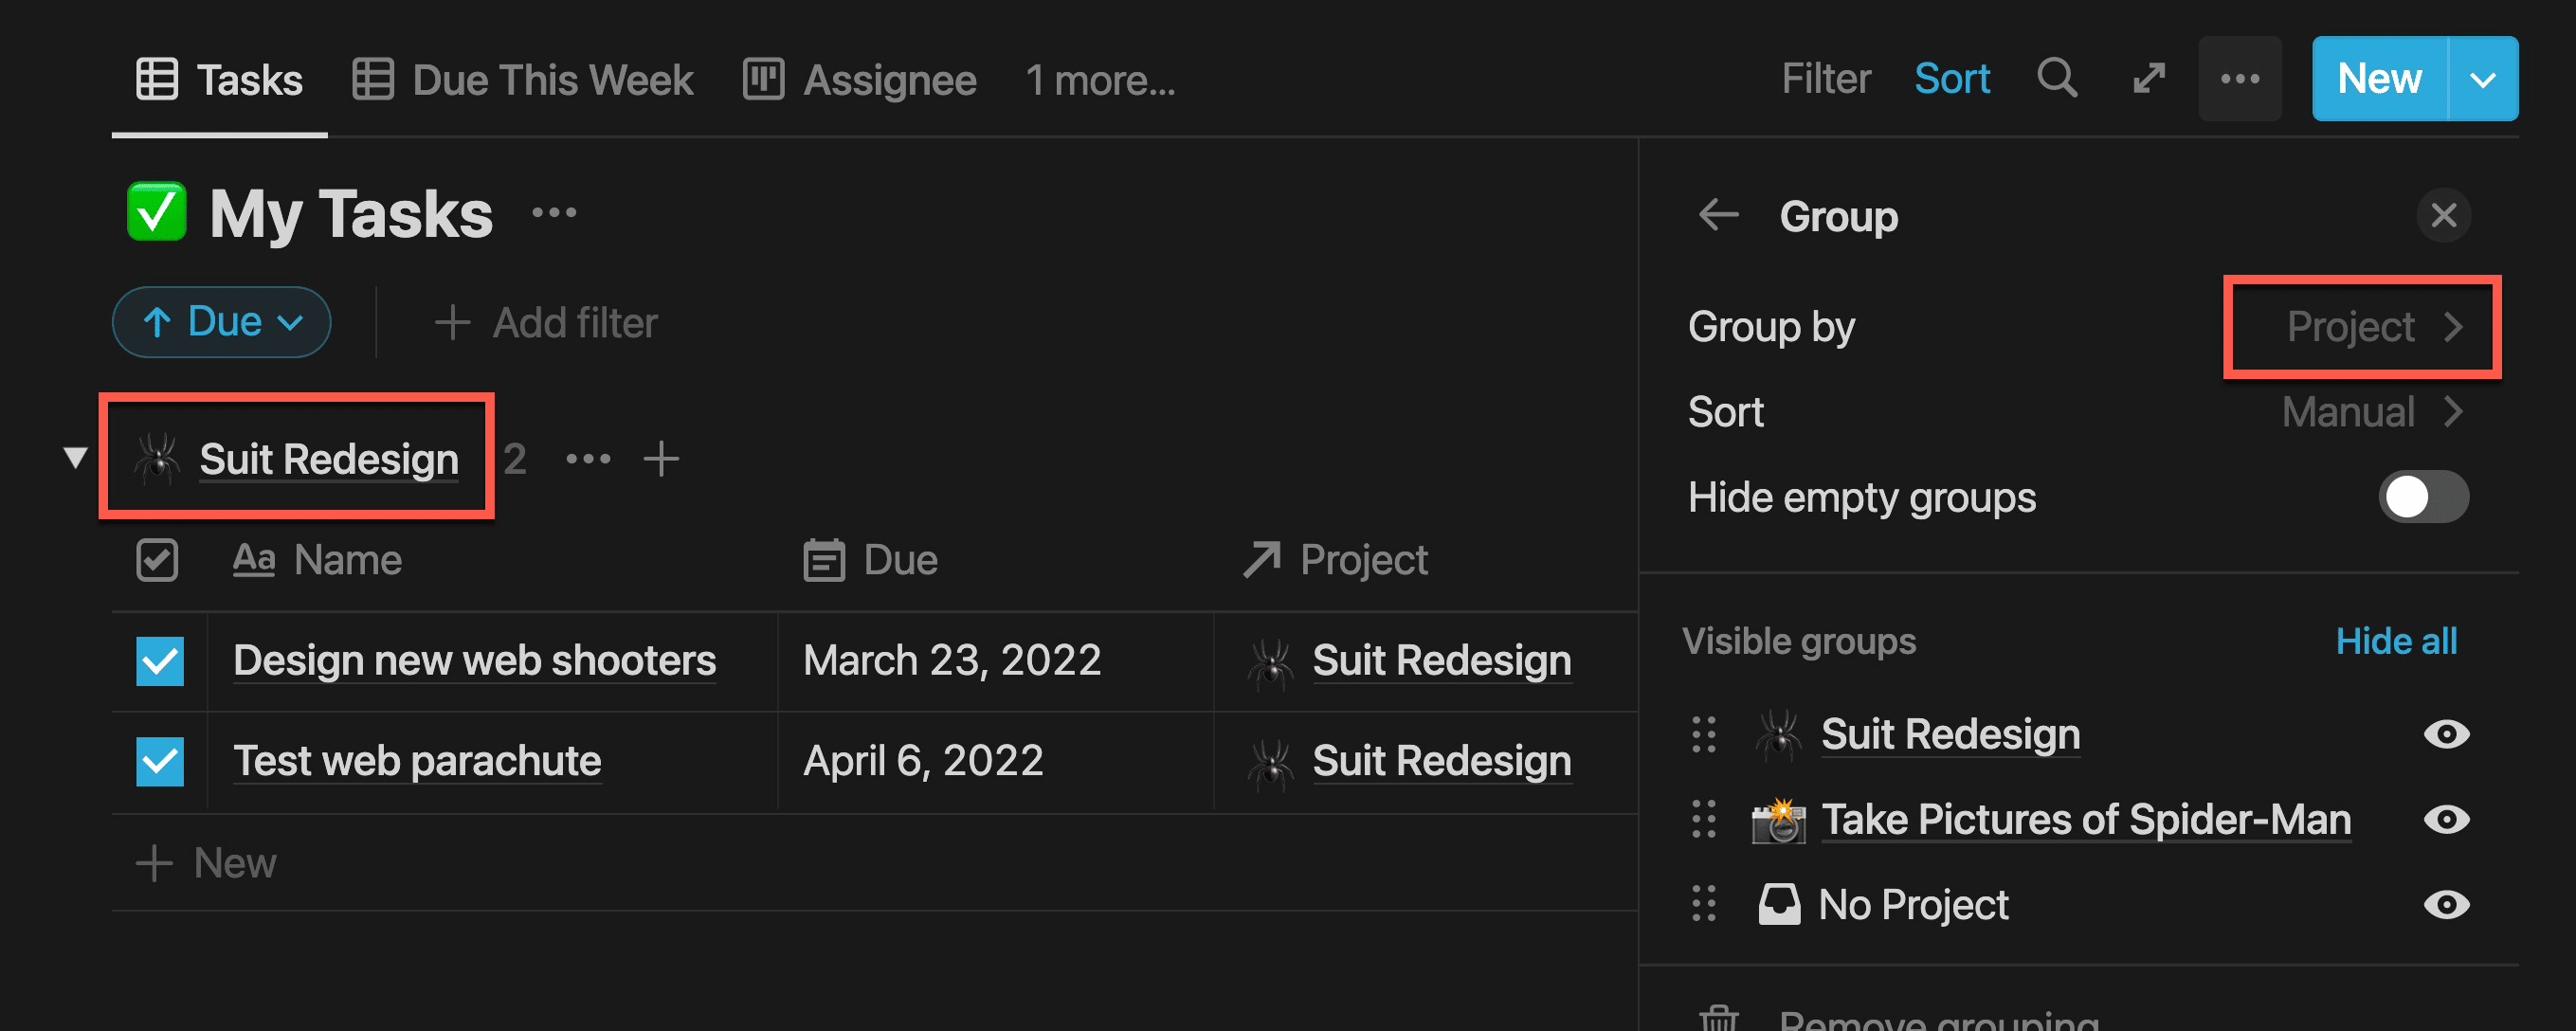
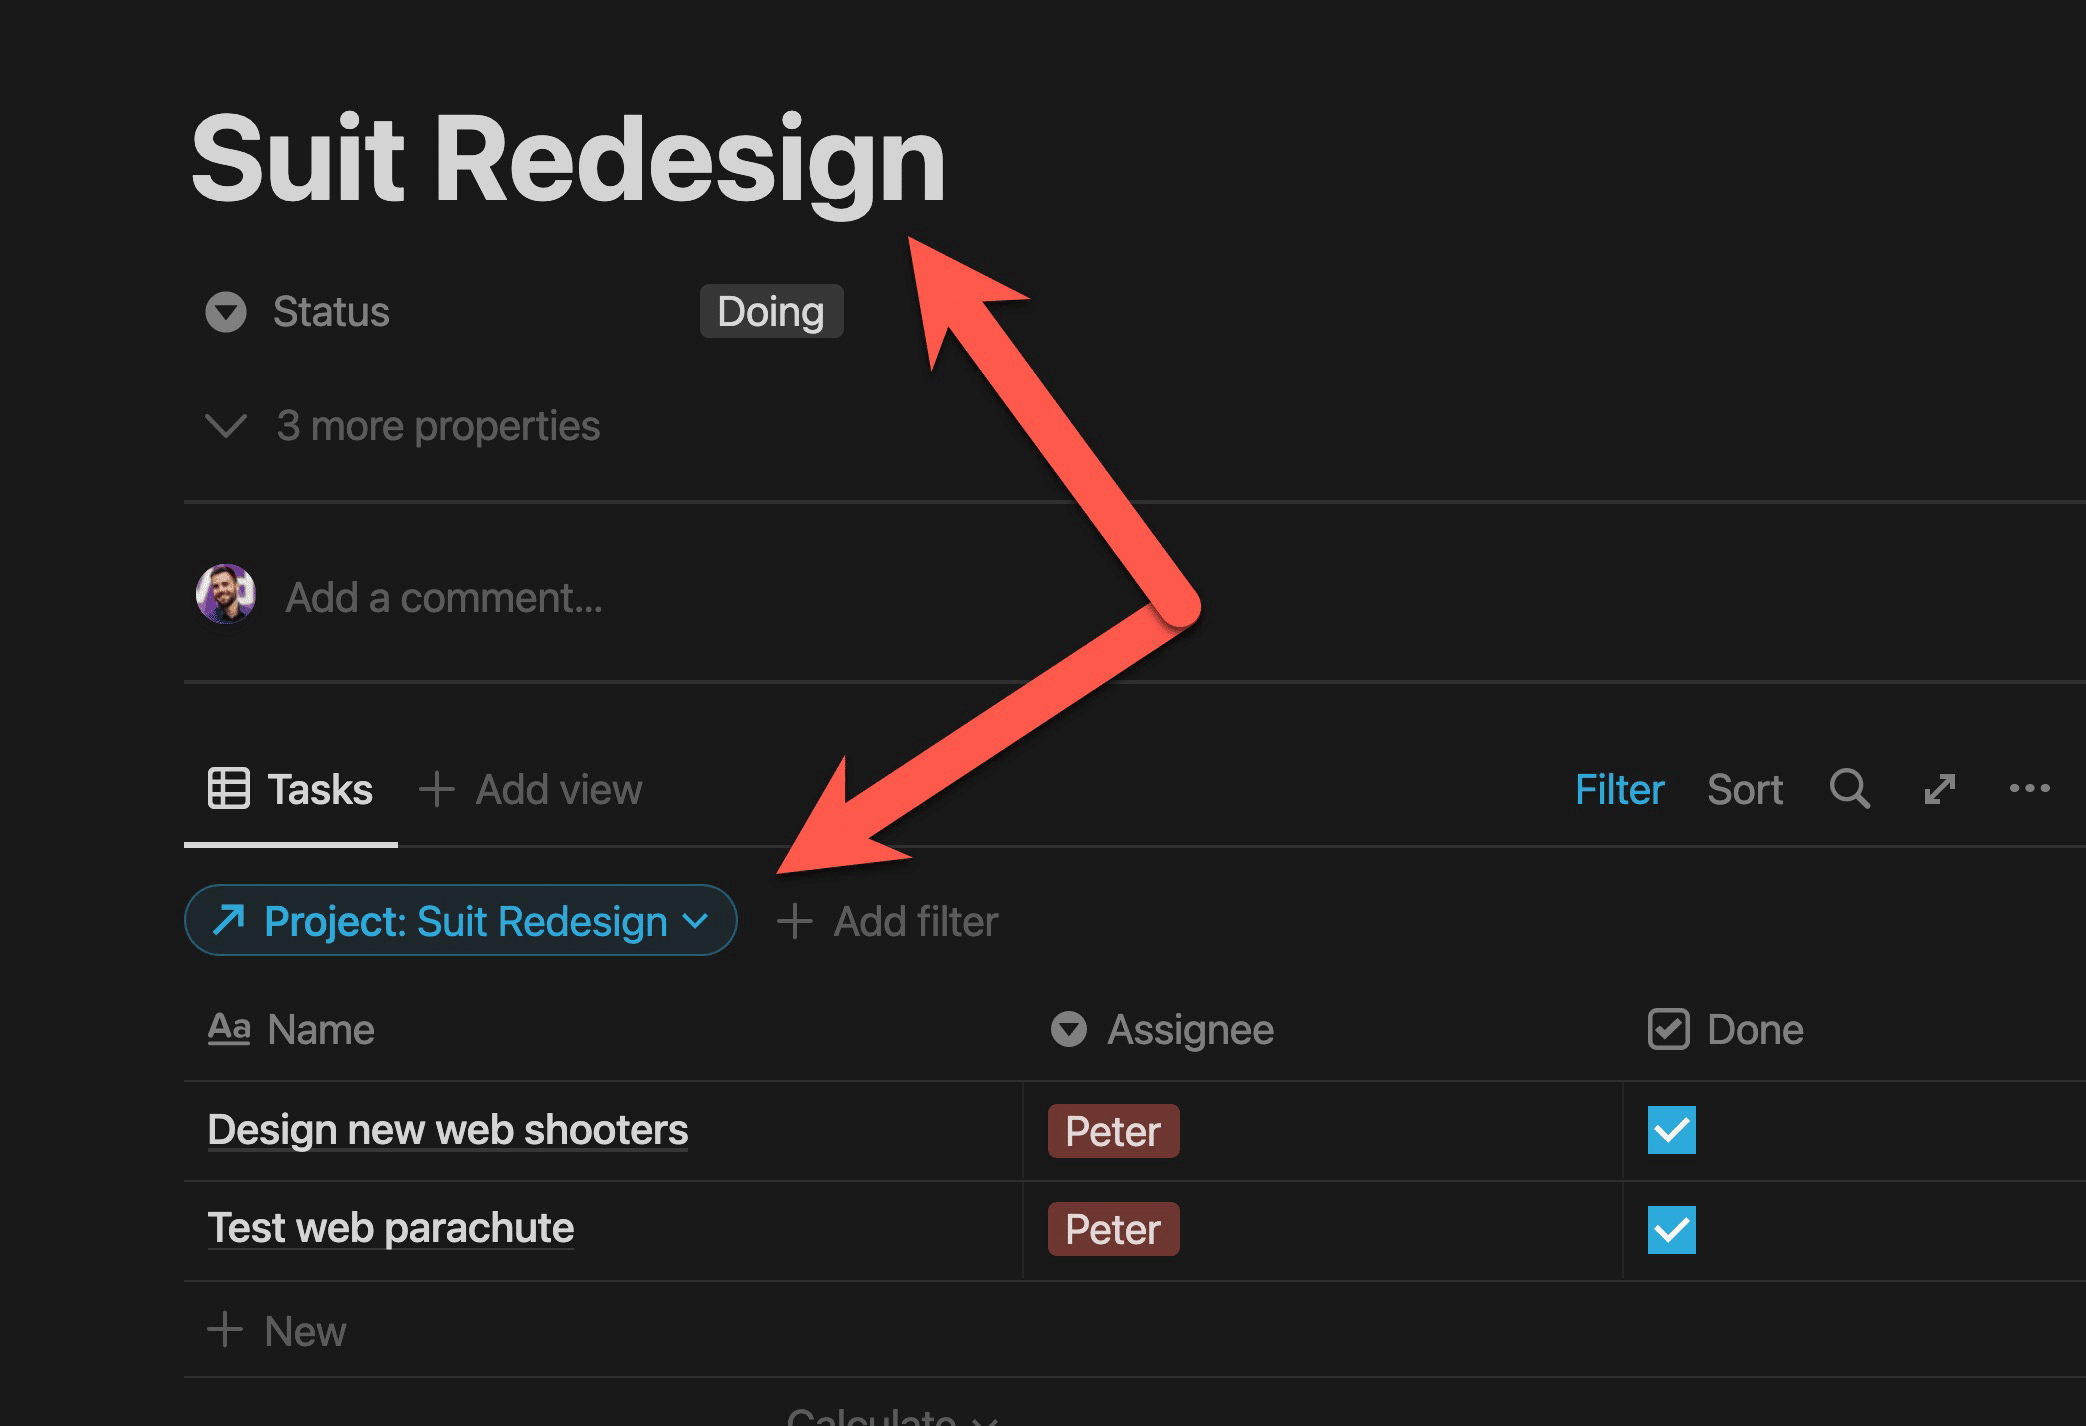
In My Projects, the Suit Redesign project contains two related rows from My Tasks:

Going over to My Tasks, we can see that both of these rows – Design new web shooters and Test web parachute – contain Suit Redesign in their Project property.
With this Relation set up, I can do some very useful things. For example, I can group this view by my Project property.
I can also set up a database view within a Project’s page that shows only its related tasks. To do that, I’ll need to use a Linked Database.
Copy link to headingLinked Databases
Linked Databases allow you to create a database block that pulls data from an existing source database, which can live elsewhere in your Notion workspace.
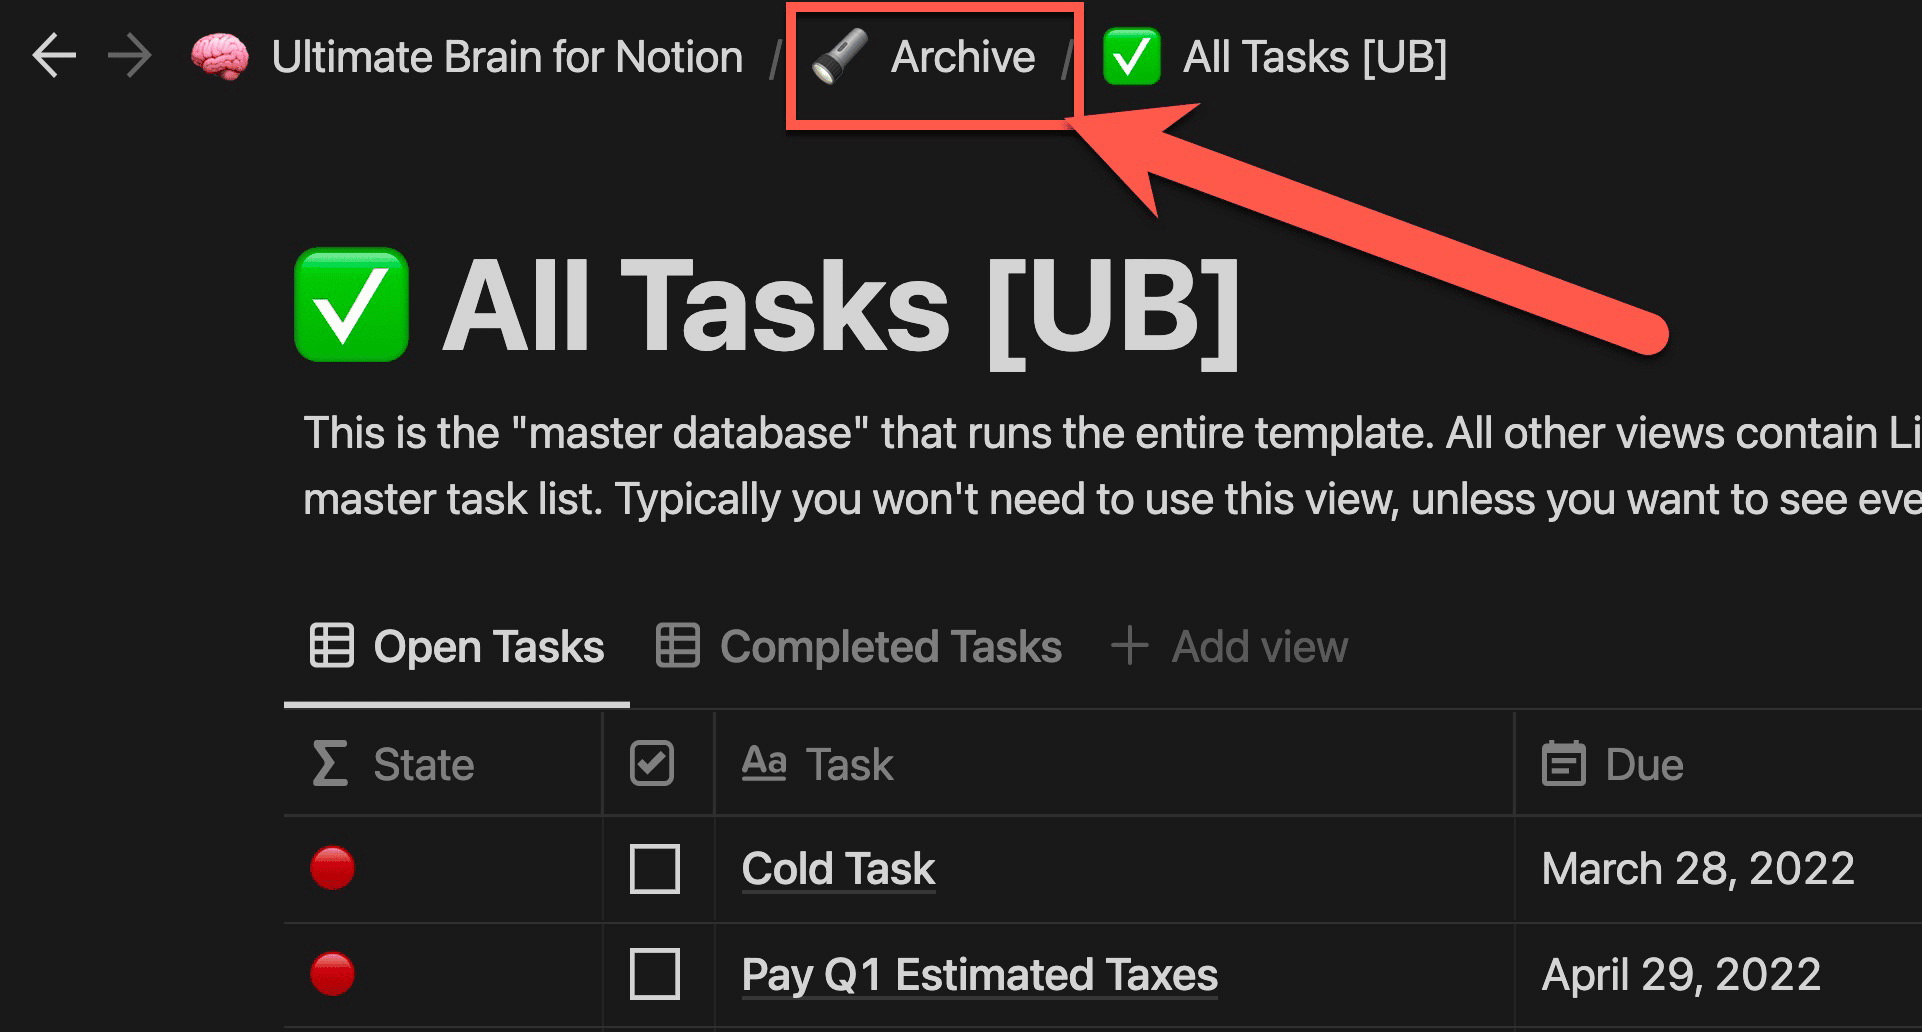
For example, the main All Tasks database inside my Ultimate Brain template lives inside the Archive:
On Ultimate Brain’s Quick Capture page, there’s a Linked Database block that uses All Tasks as its source:
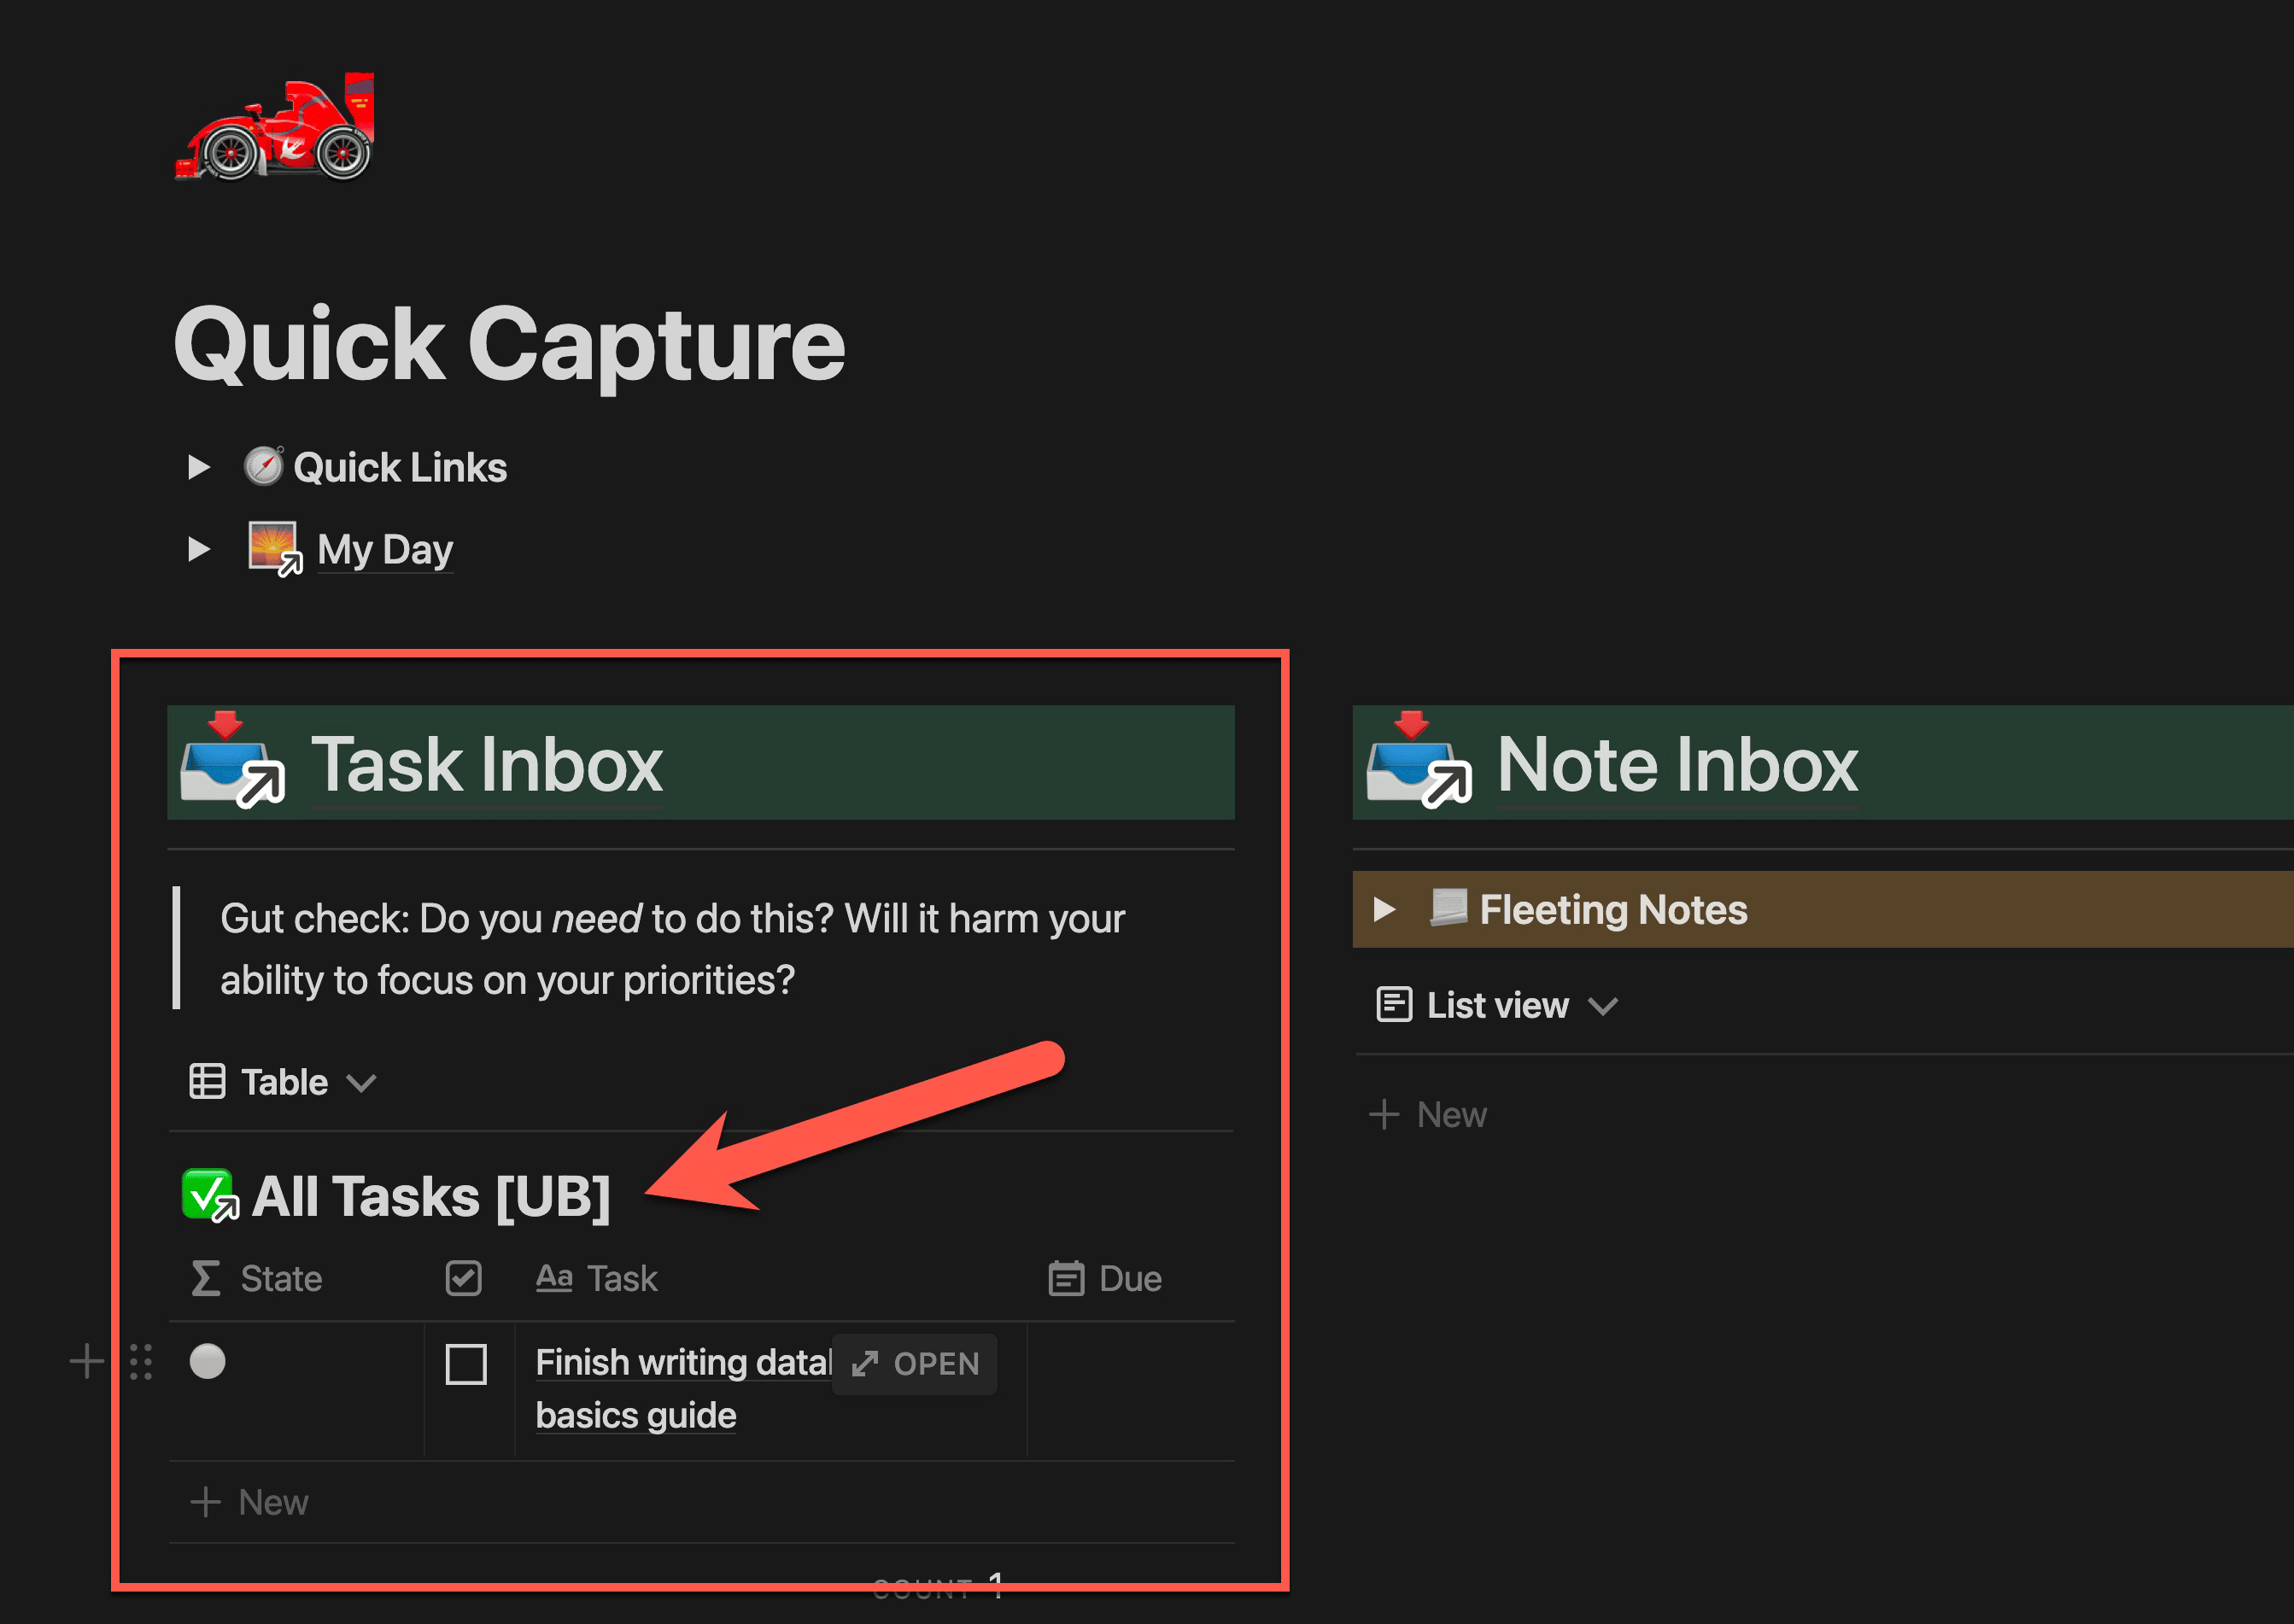
This means that any rows I add to this linked database view will end up in the All Tasks database.
Essentially, you can think of Linked Databases as collections of Views for a database that can live elsewhere in your Notion workspace.
Linked Databases are immensely useful. They allow you to create pages and dashboards in Notion that are driven by source databases, but that serve specific contexts.
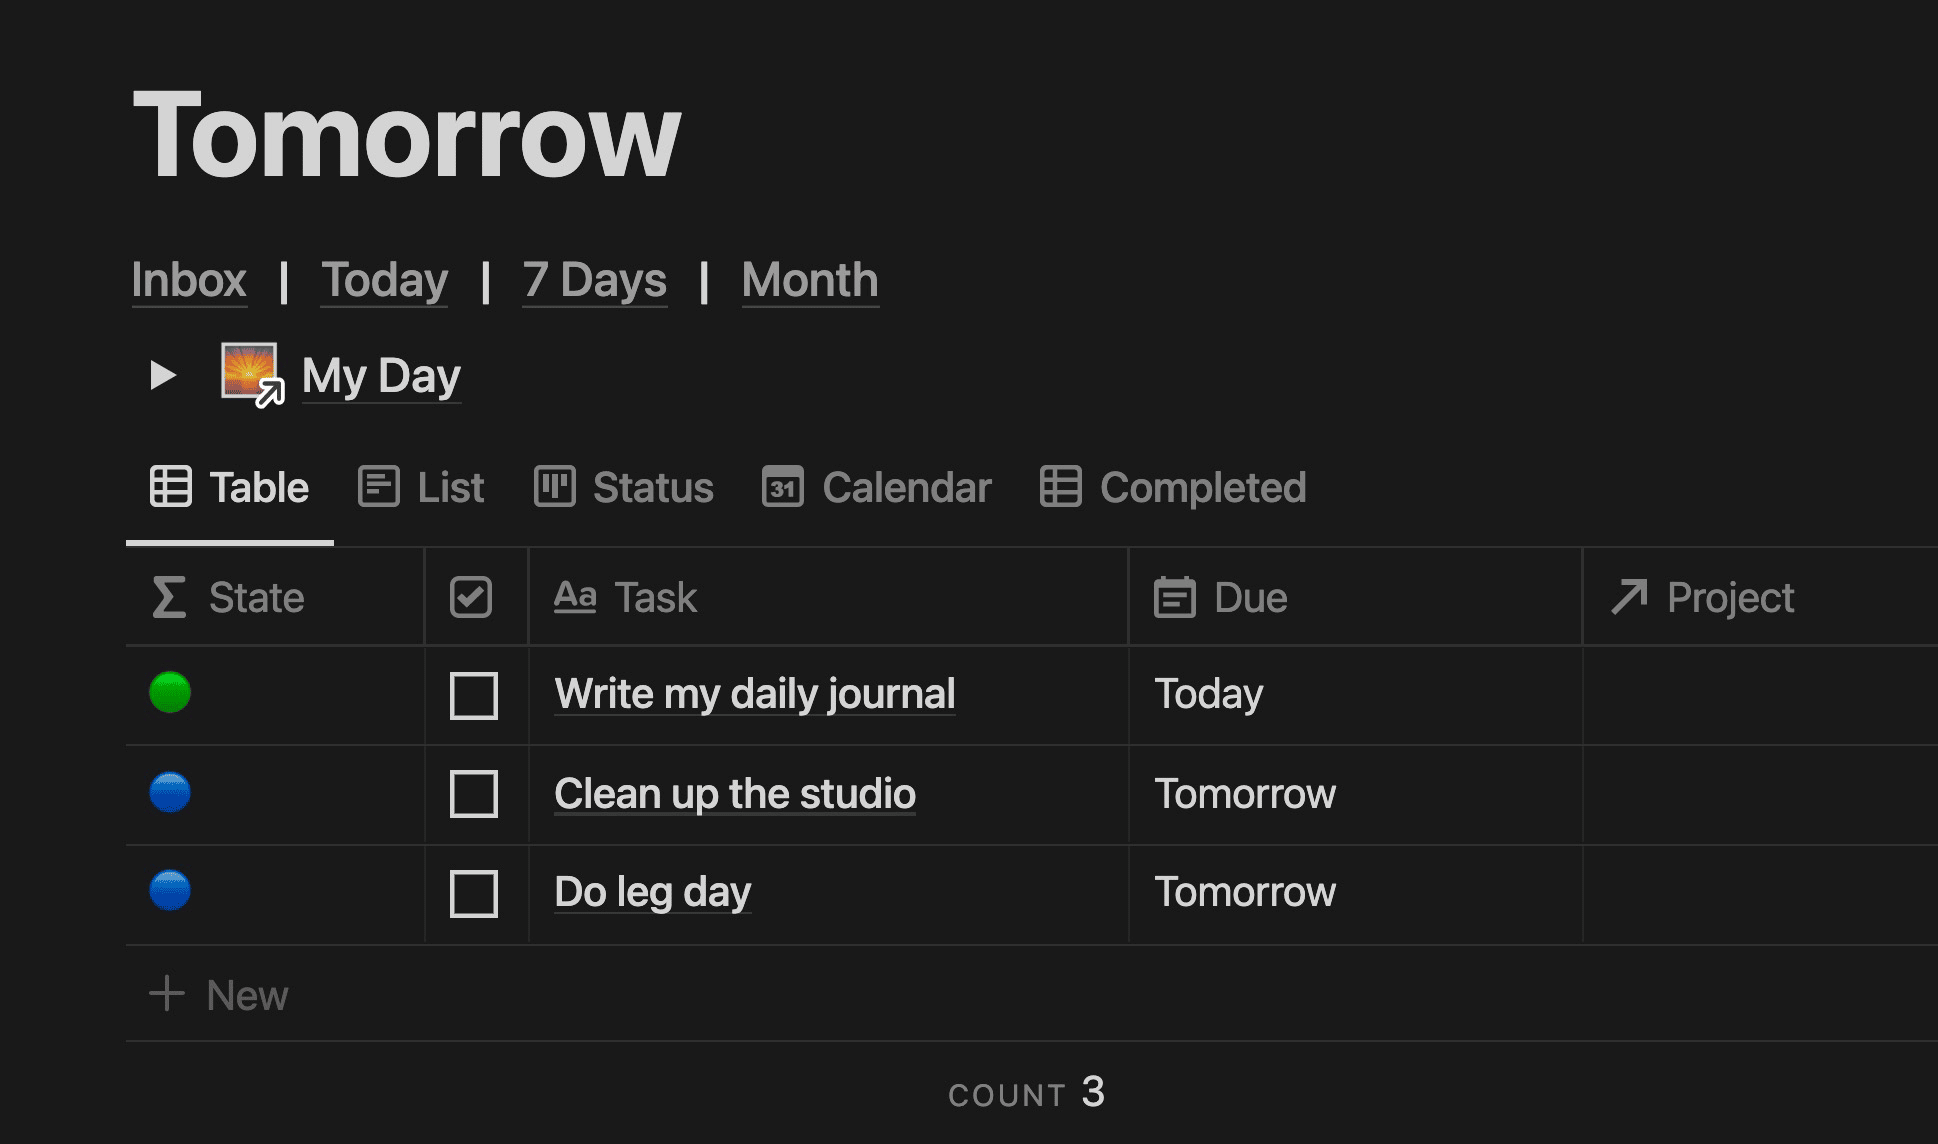
The Quick Capture page shown above is just one example of a context-specific page. Here’s another one – this page only shows tasks that are due on or before tomorrow:
How to Create a Linked Database
You can create a Linked Database in Notion either by typing /Linked view of a database or by typing any of the following options:
/Table view/Board view/Gallery view/List view/Calendar view/Timeline view
I’ll go with /Linked view... inside the Suit Redesign project in the My Projects database. That way, I’ll be able to get a view of all the tasks related to this project.
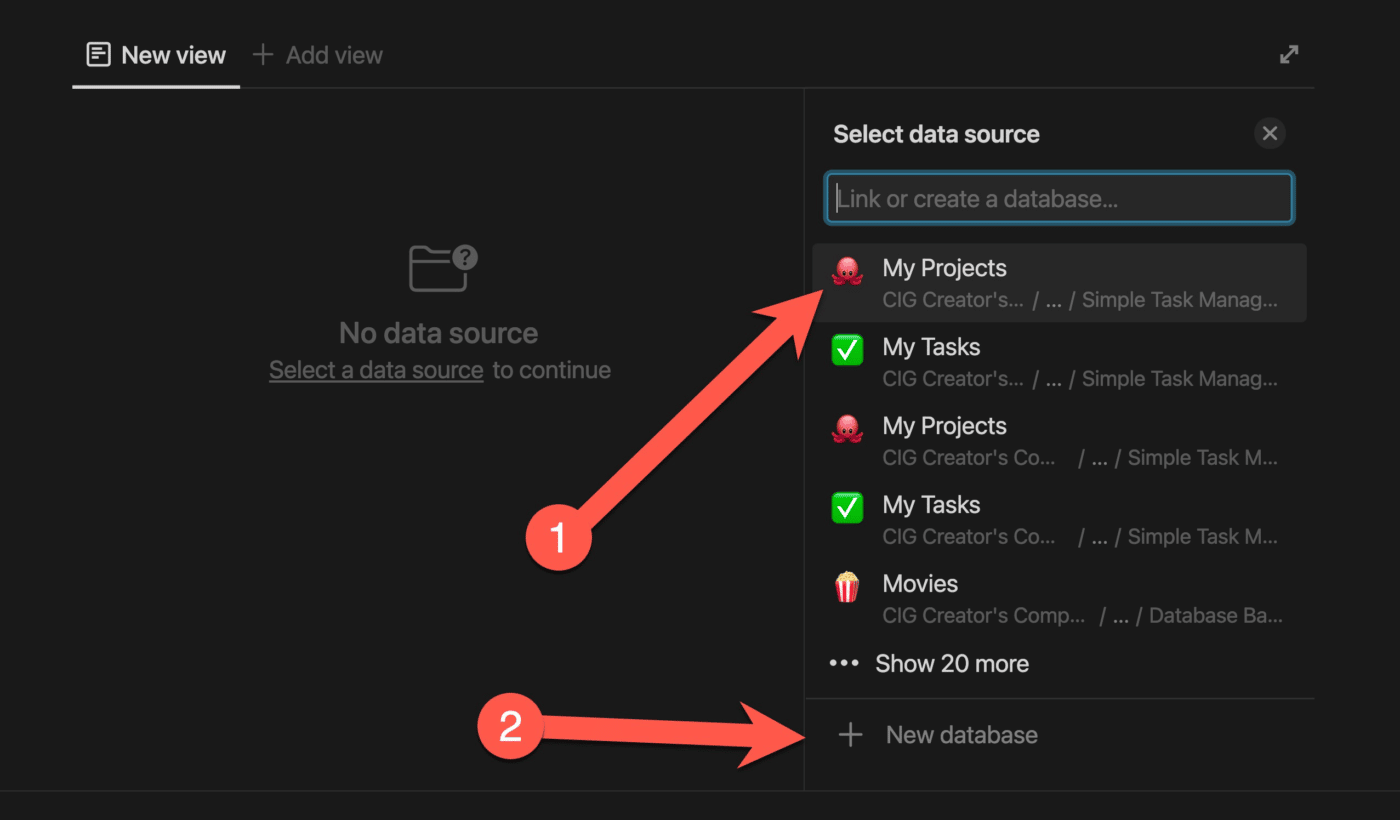
The first thing I have to do is select a data source. This is the source database that I want to pull from. In this case, I want to select My Tasks:

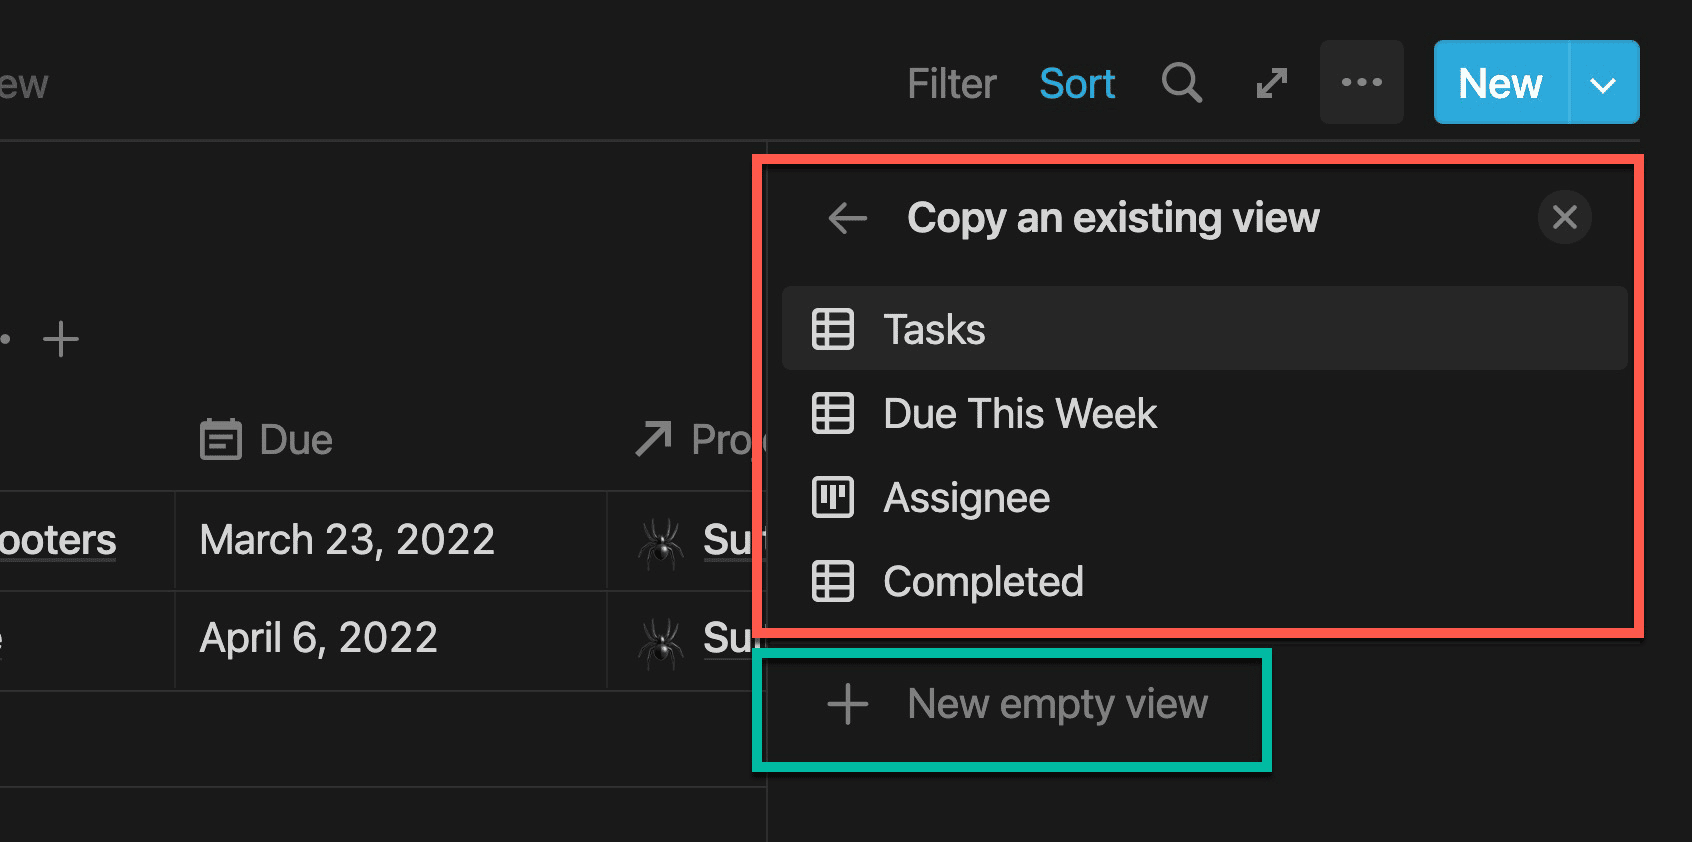
Next, I’ll be given the option to either copy an existing view from the source database or to create a new empty view. I’ll do the latter so I can completely customize it:
From here, I can customize my view just like I would with a normal view inside the source database. All of the options are exactly the same.
The only difference is that the Linked Database view comes with the option to show or hide the source database title. Here, I’ve hidden it in order to make my database view look cleaner:

The last thing I’ll do here is add a filter to my linked view:
- Project contains Suit Redesign
This will ensure that only tasks related to my Suit Redesign project show up. It also creates a forcing function, ensuring that new rows I add to this view will automatically be related to the Suit Redesign project!
With this simple filter in place, my Project page works just like a List in Todoist (or any other task management app).
Copy link to headingDatabase Templates
Pages inside a Notion database act just like normal Notion pages – they give you a blank canvas on which you can add any combination of blocks.
But you won’t always want to start from scratch; sometimes, you’ll want to have a common starting point for certain pages in a database.
That’s where database templates come in. By creating templates in your database, you can automatically generate any page content you want with just one click.
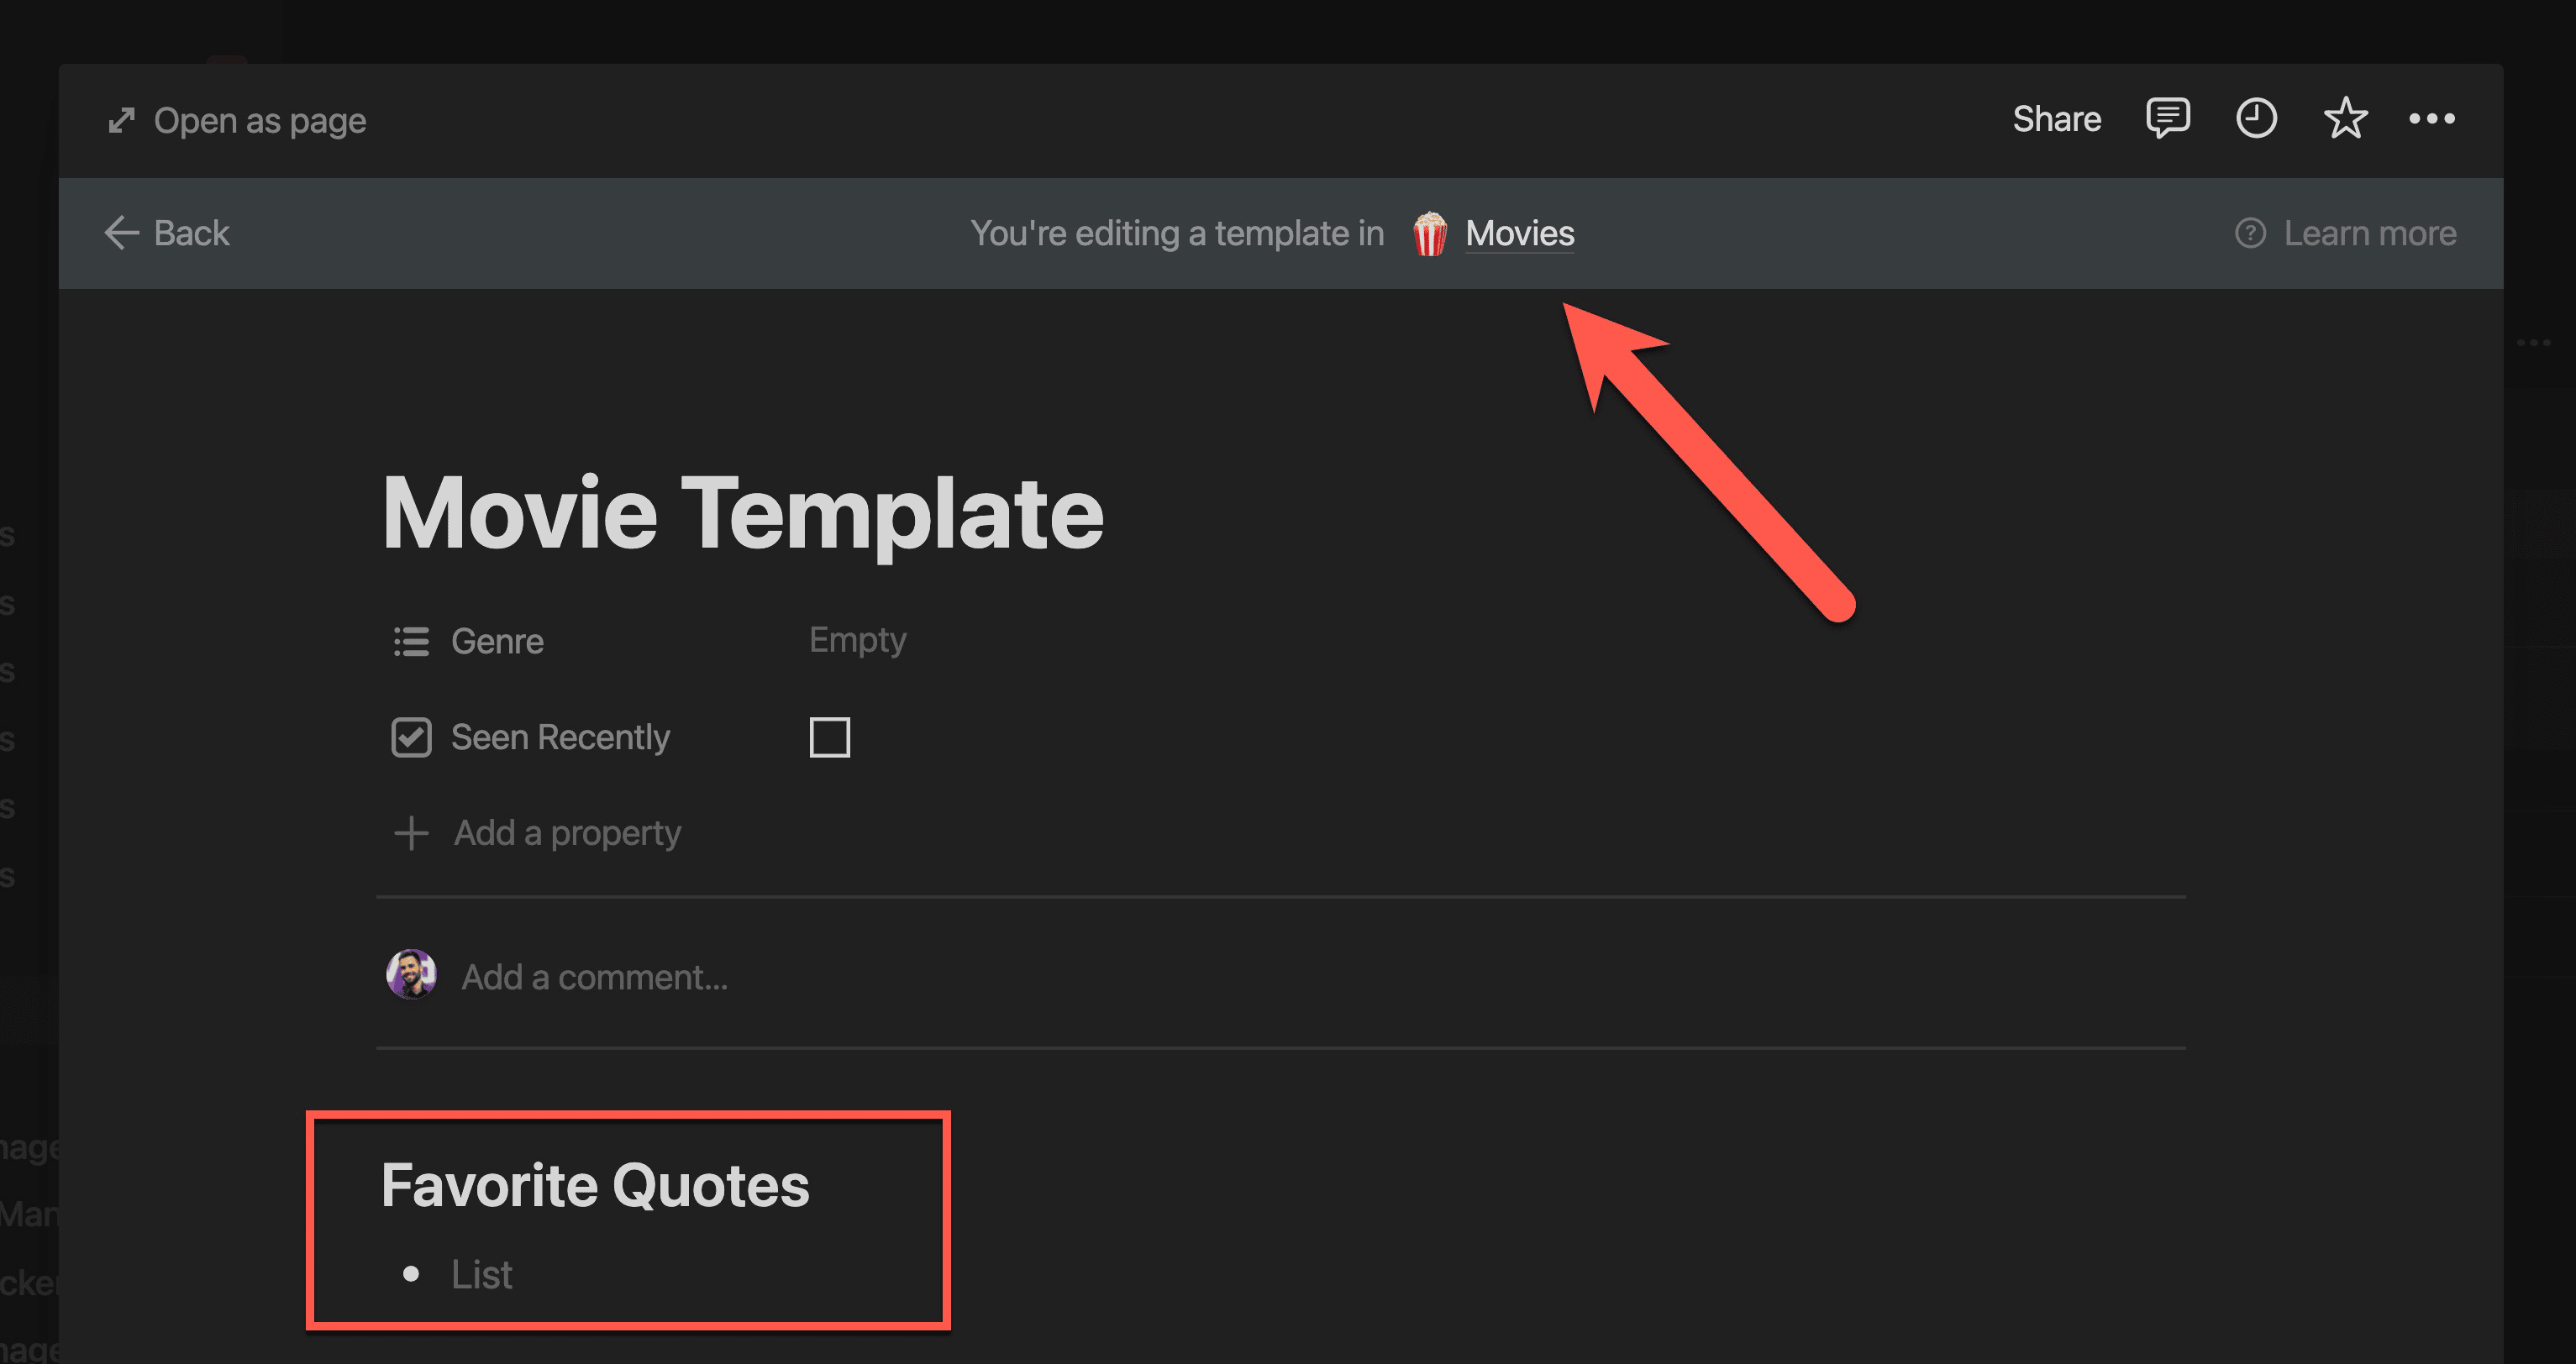
Templates can be as simple or as complex as you want them to be. Here’s a very simple template within my Movies database:
…and here’s the comprehensive Content Project Template that I use for all of my YouTube videos. In one click, it generates a task list, shot list, script page, research area, multiple checklists, and more:
Note how it also sets default values on some of my database’s properties – including the Status, Channel, and #No properties.
If you’re a content creator, you can get access to this template – along with a whole suite of dashboards and tools to aid your creation process – in my Creator’s Companion template. It’s the exact system I use to run my YouTube channels and blogs (including this one).
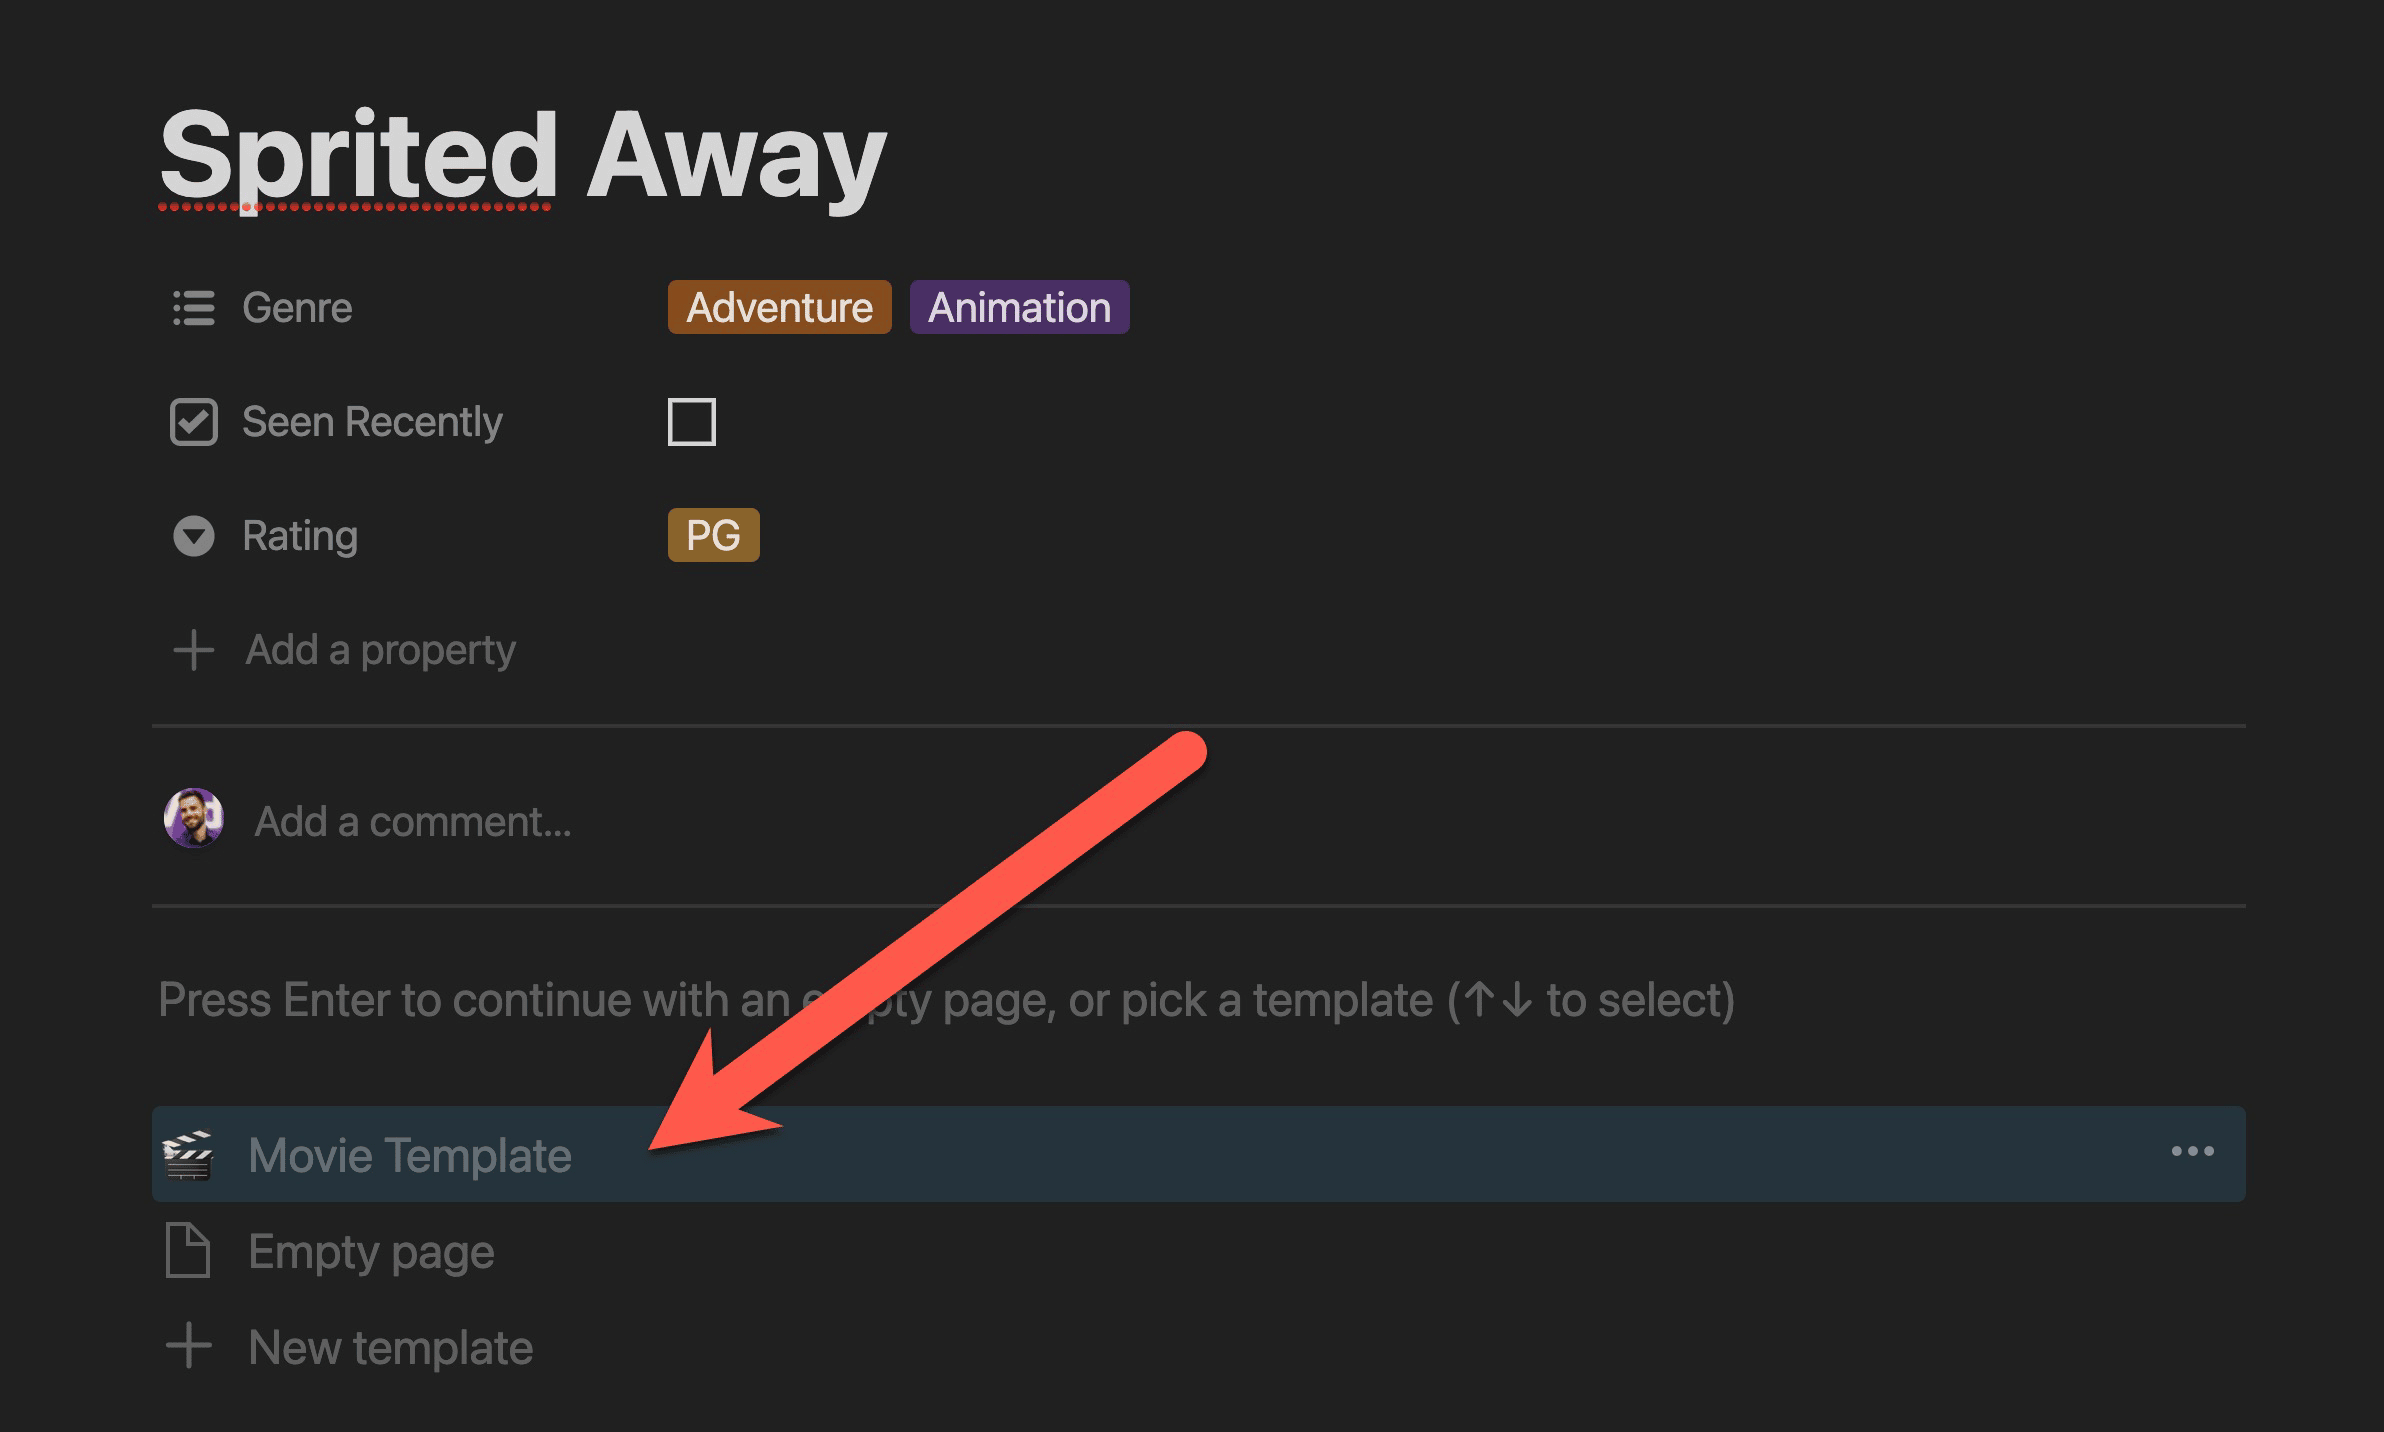
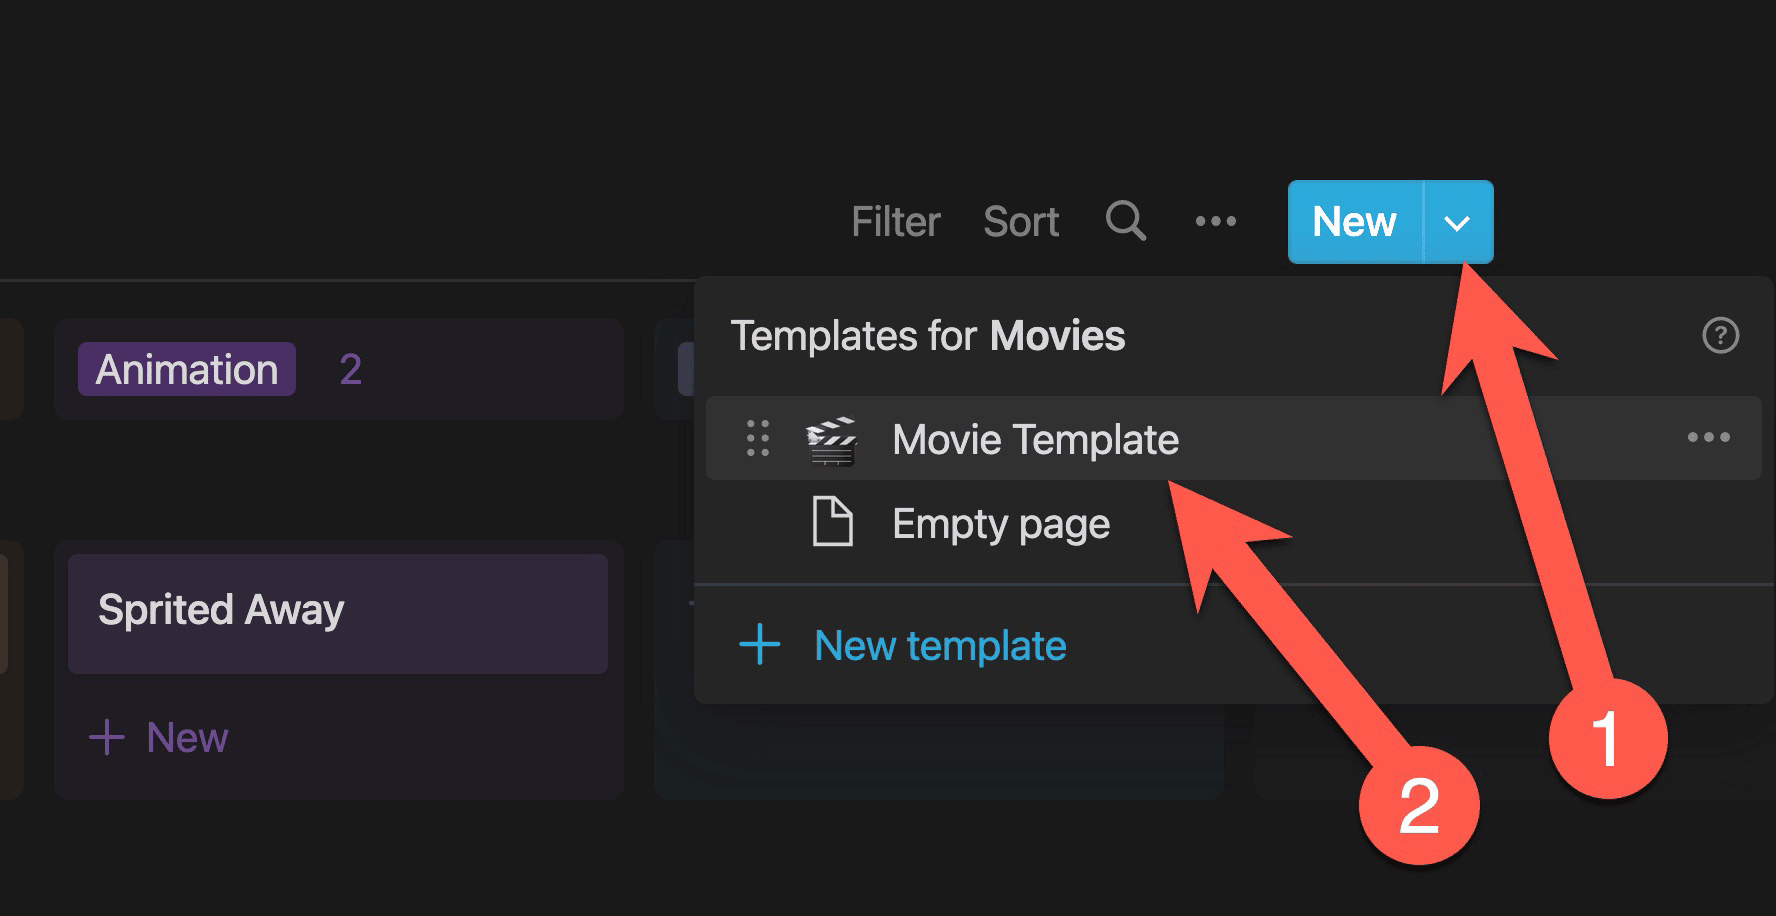
When you have a template created within a database, you’ll see an option to use it whenever you create a new page in that database and open and open it:
You can also create a page from an existing template by clicking the arrow next to the blue New button in your database’s top-right corner, then selecting a template:
How to Create a Database Template
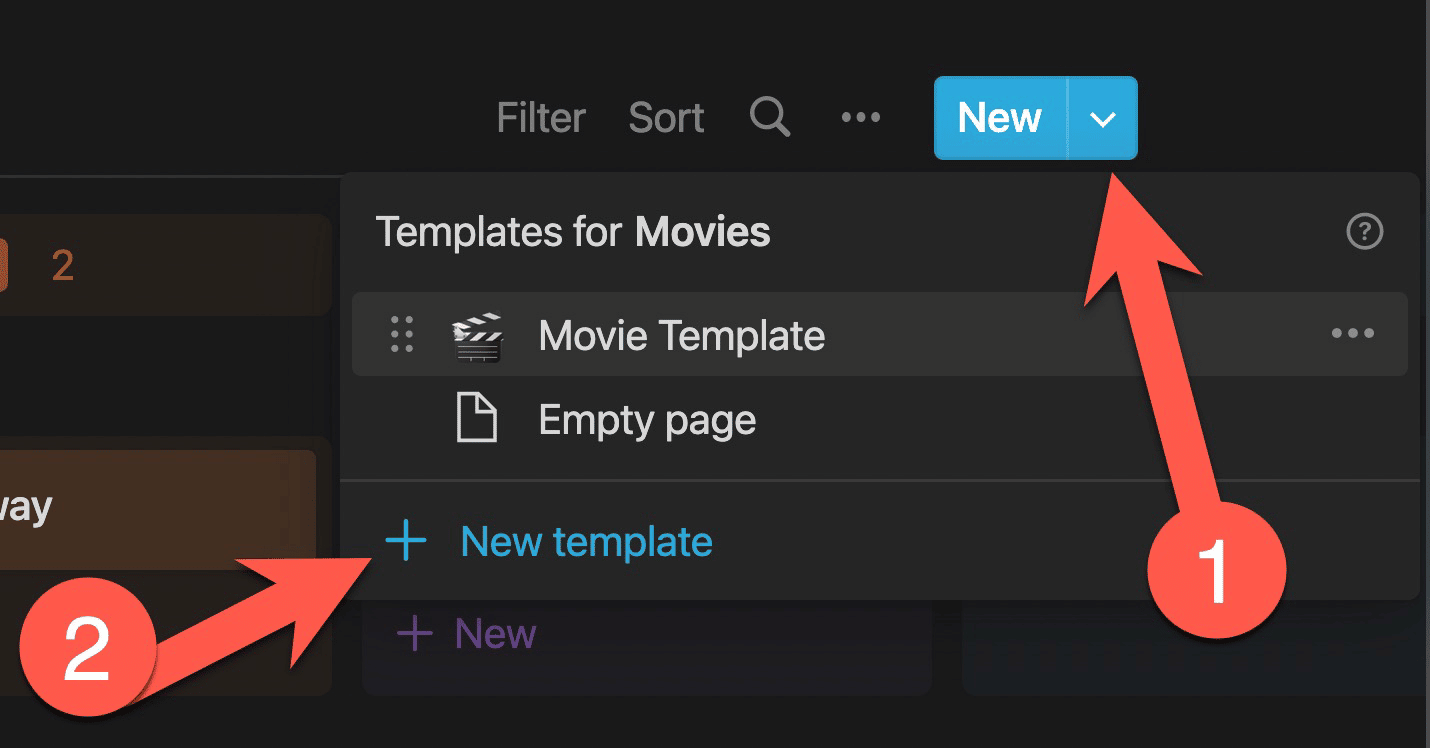
You can create a new template by clicking the arrow next to the blue New button in the top-right corner of your database, then clicking New Template.
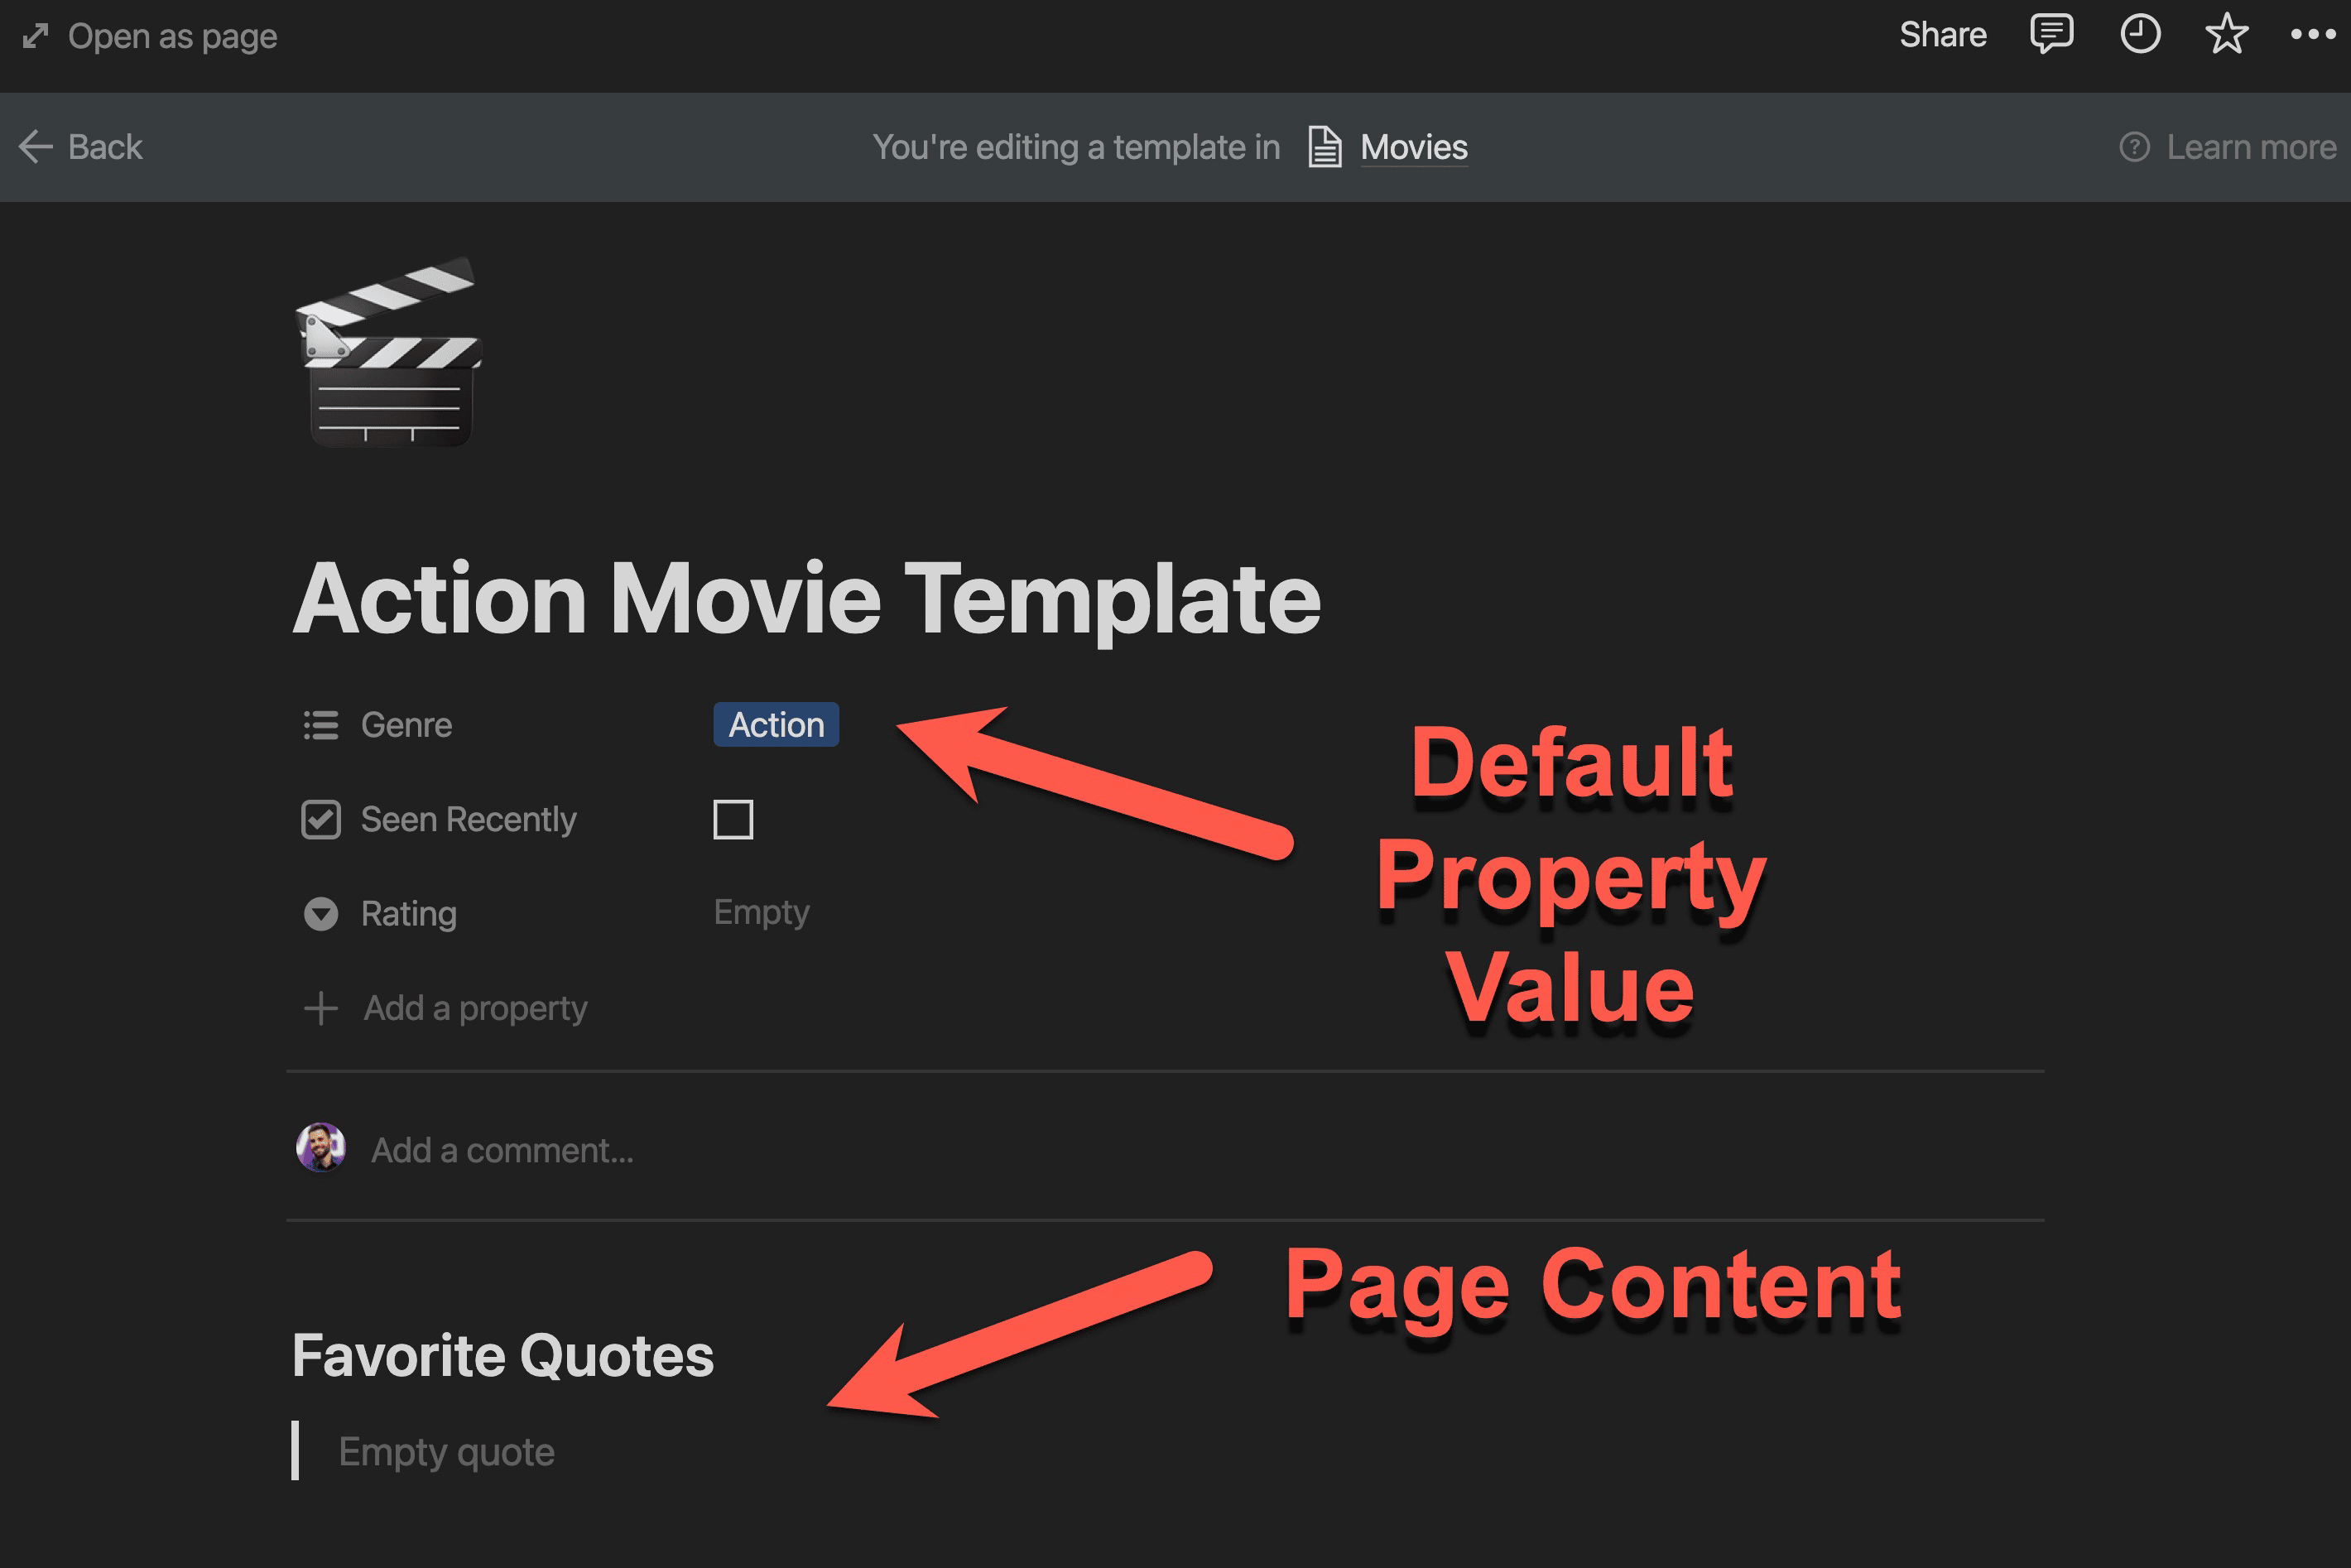
From there, you can add any content you want to the template.
You can also set default values in properties, which will be applied to any new page that you generate from the template.
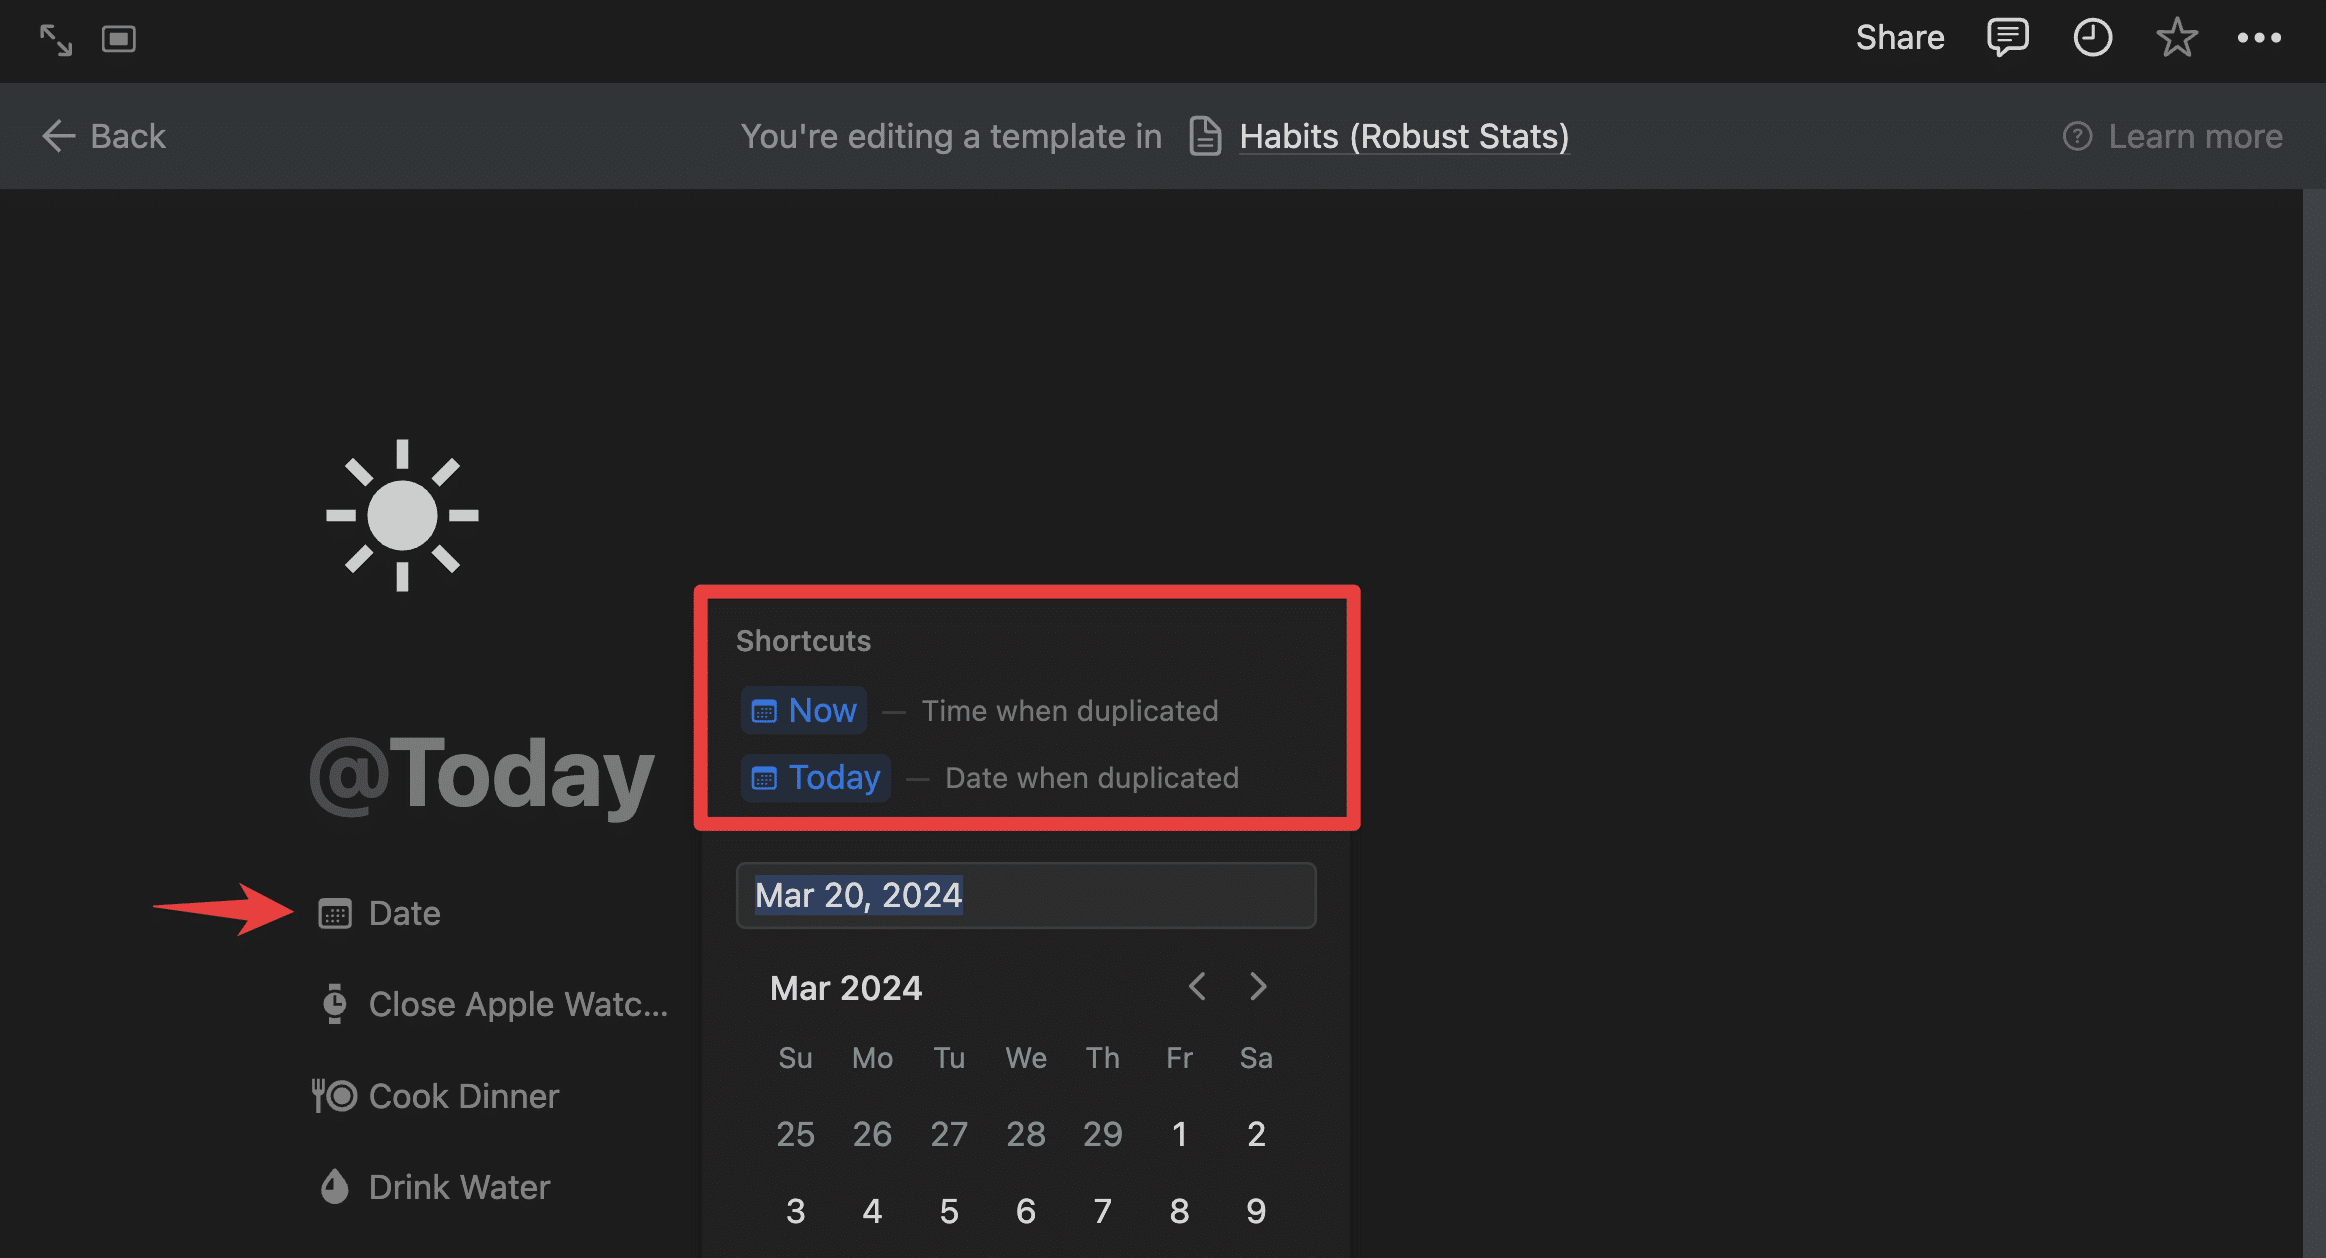
Dynamic Properties in Templates
Certain property types can be set with dynamic values that are determined when a template is applied to a new page. These property types include:
- Date – can be set to
Now, the date and time when the template is duplicated, orToday, the date (without the time) when the template is duplicated. - Person – can be set to
Person who duplicated the page.
Currently, these dynamic values are the only option we have. Hopefully we’ll be able to define more flexible dynamic date values in the future!
Copy link to headingDefault Templates
After you’ve create a database template, you can choose to have that template automatically applied to any new pages you create.
You can do this in two different ways:
- Set the template to be applied only on new pages in the current database view
- Set the template to be applied on pages created in all views of the database
To set a template as a default, click the blue arrow next to the New button and find your template. Then click the ••• menu next to the template and choose Set as Default.
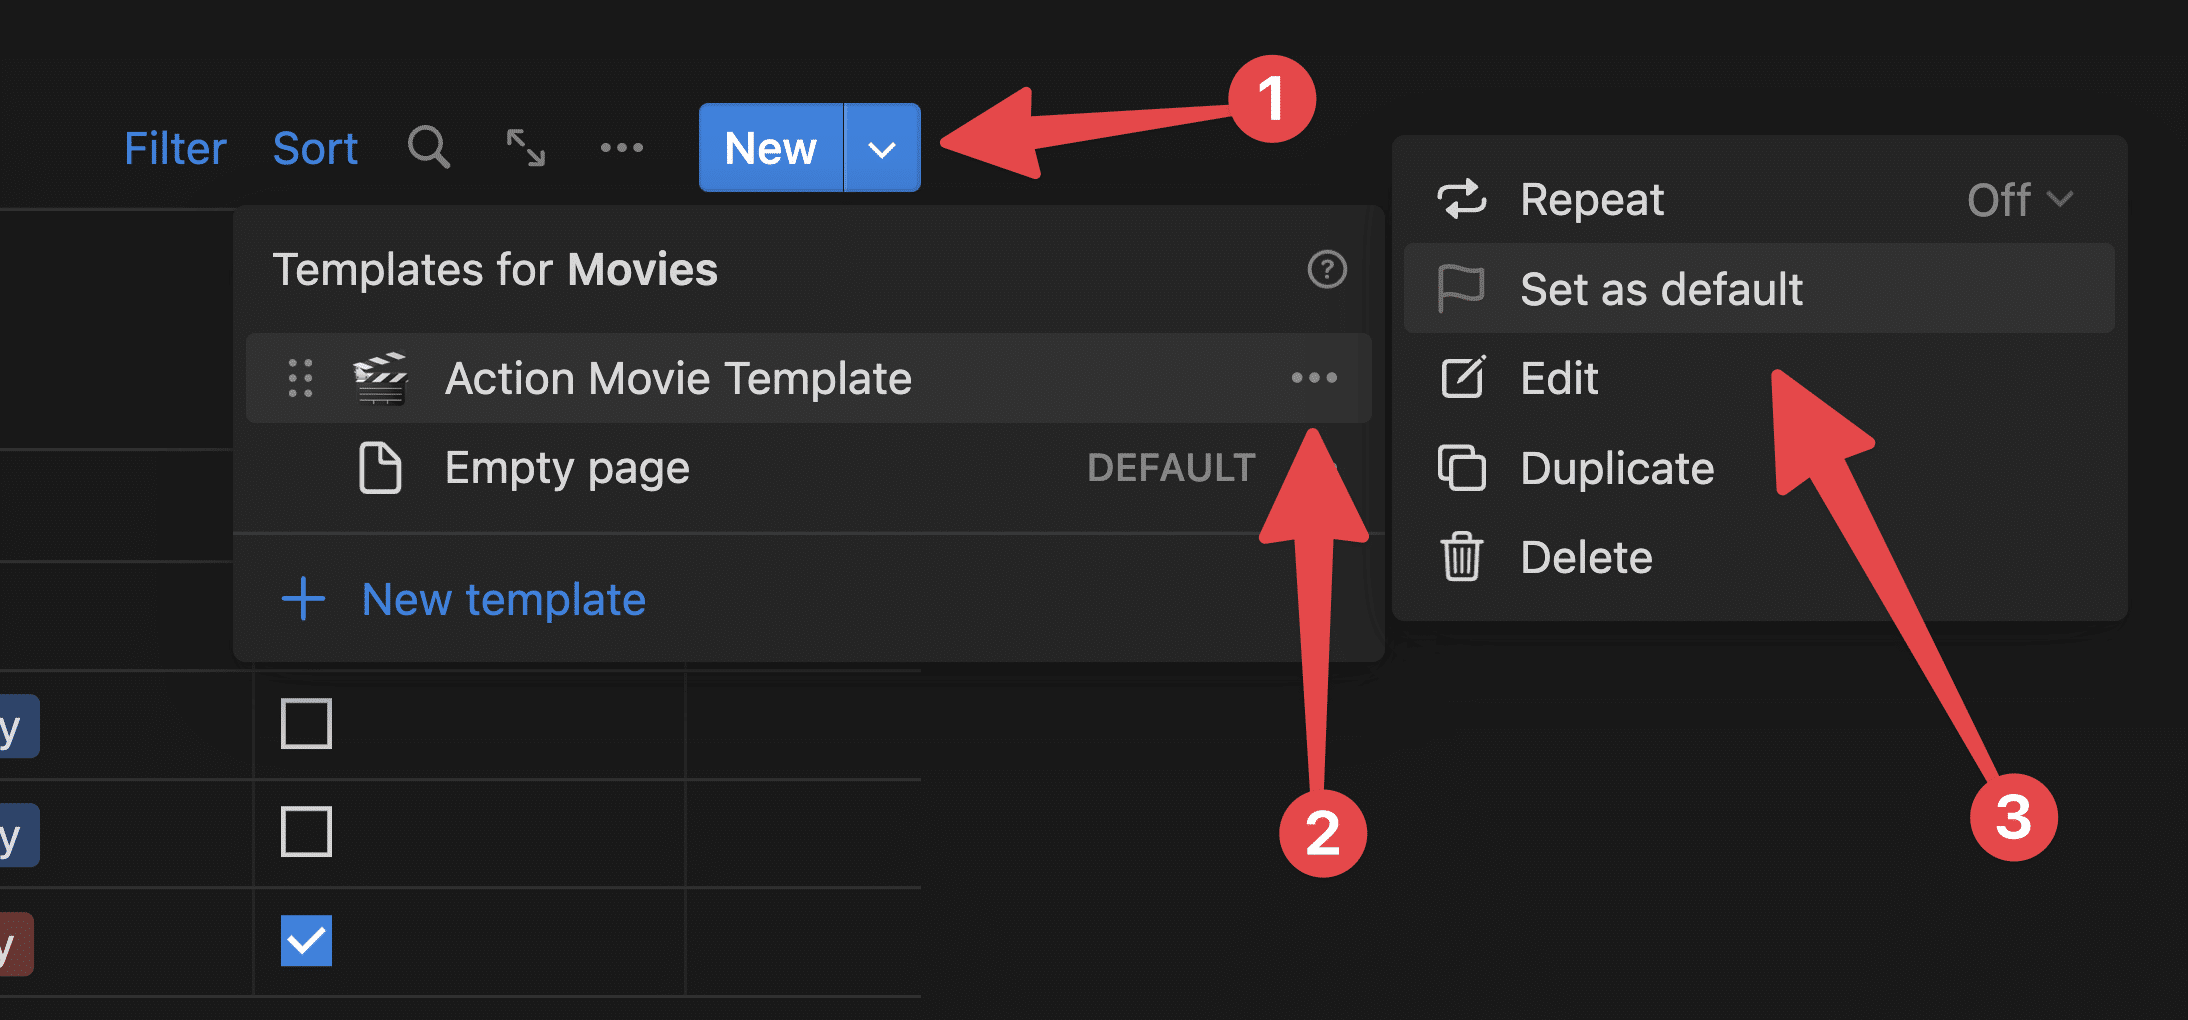
Once done, you’ll see the options I mentioned above:
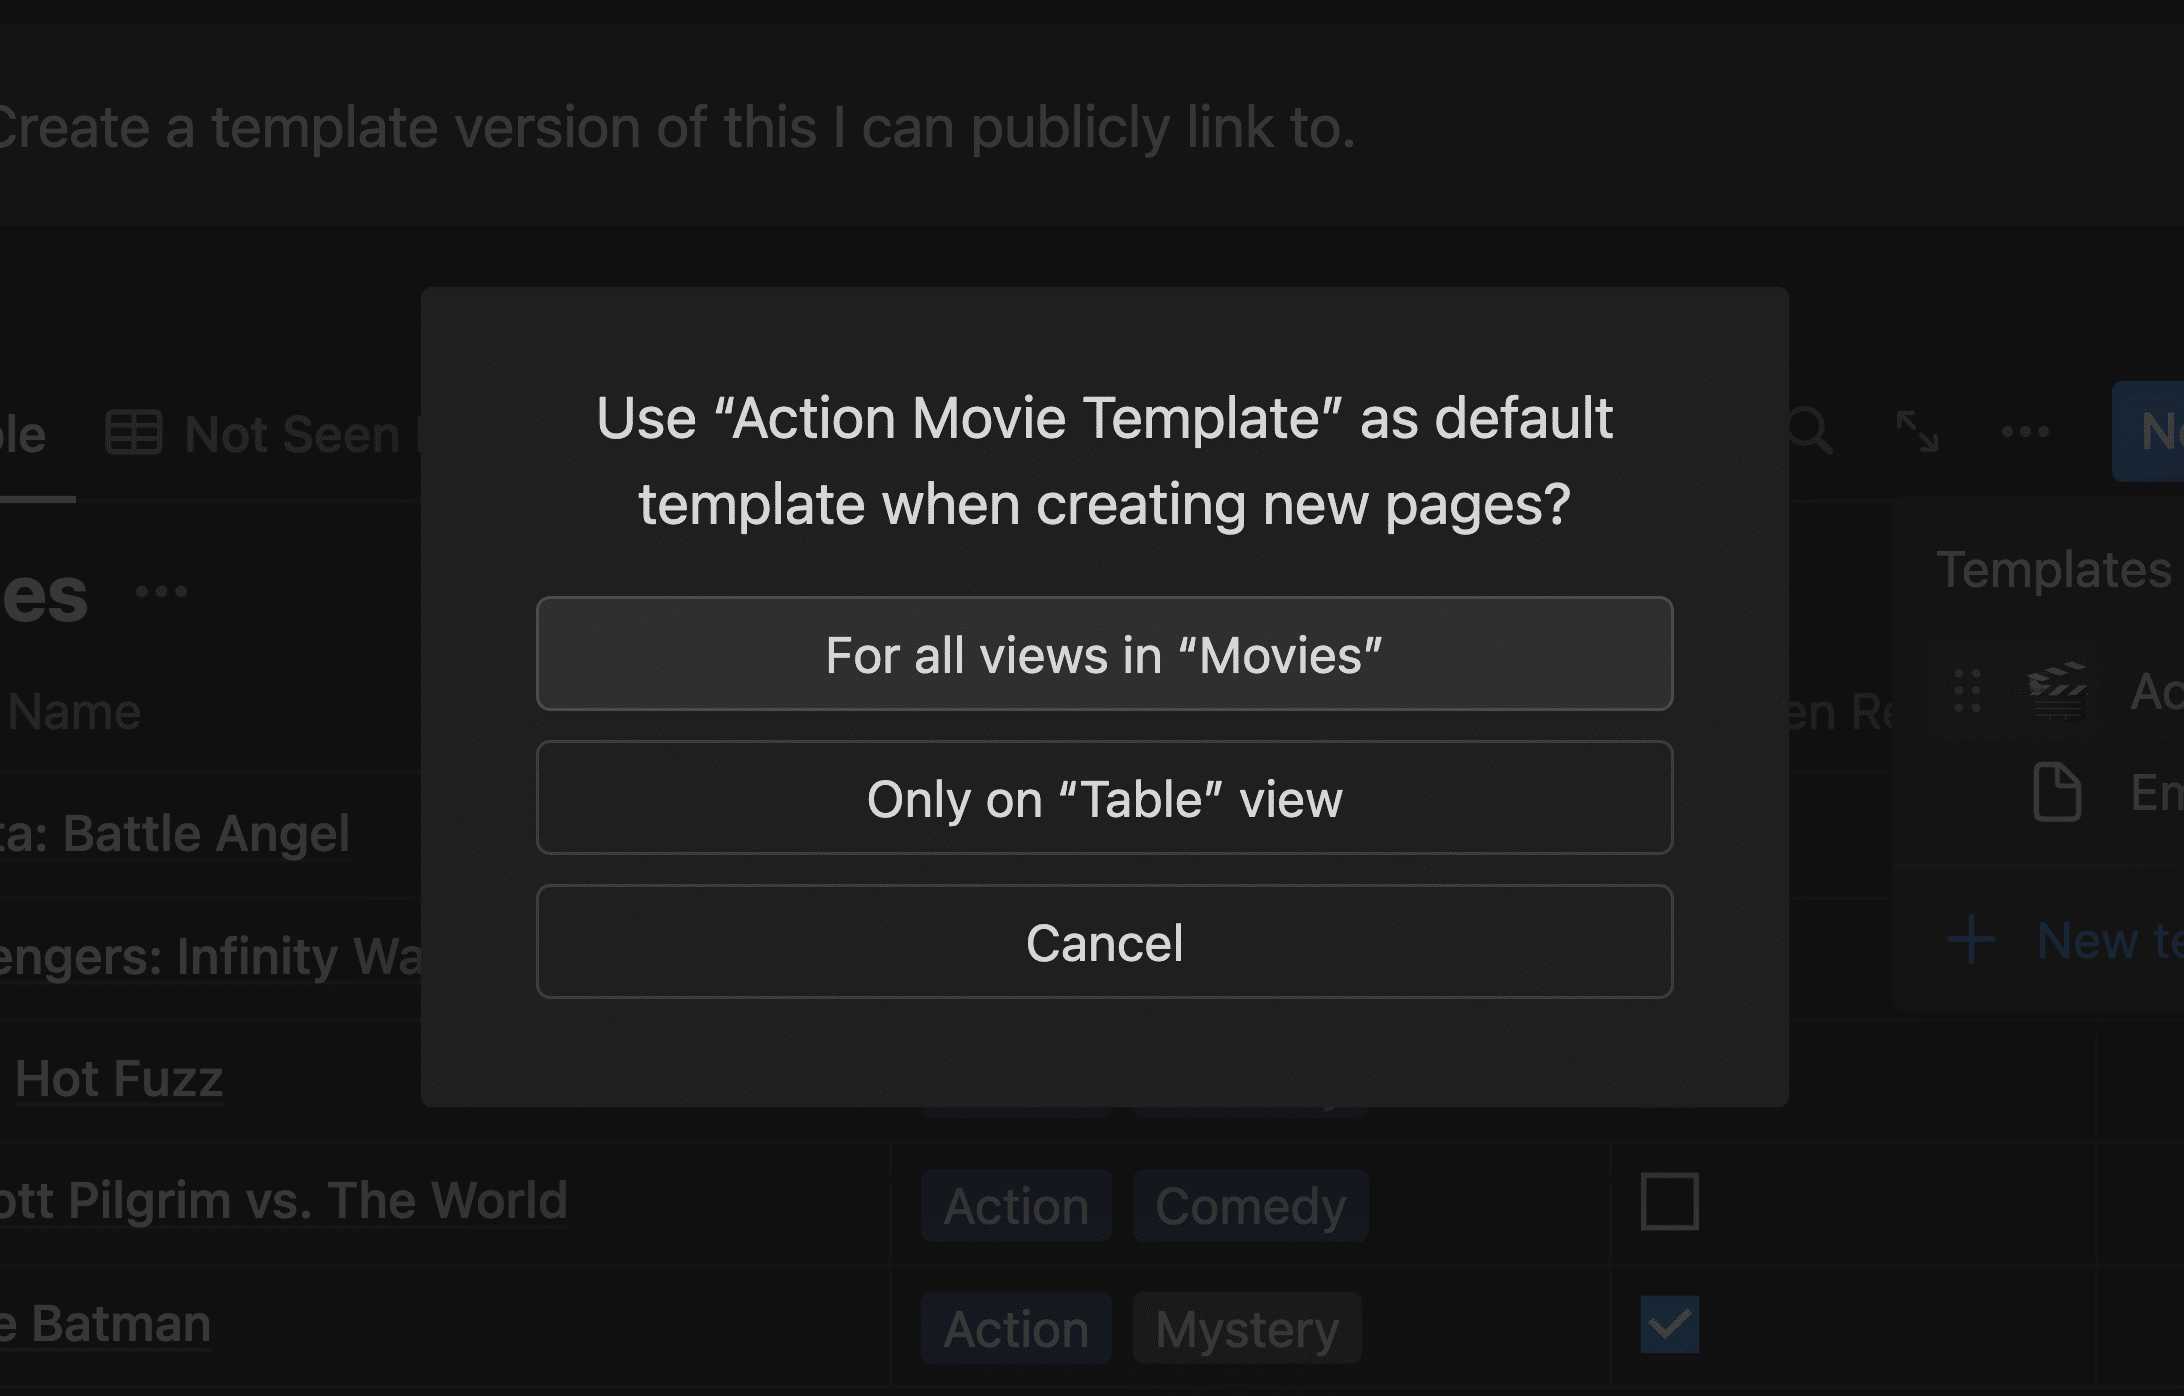
Choose “For all views” if you want the template to be applied in all views of the database (i.e. it will always be applied). Choose “Only on…” if you want the template to only be applied on the current view of the database.
Copy link to headingRepeating Templates
Database templates can also be automatically created on a schedule with the Repeat feature. This can be very useful in certain types of databases, including:
- Habit trackers
- Meeting notes databases
- Journal databases
Anytime you need a database to create pages whether you remember to do so manually or not, this feature comes in handy.
Important note: This feature is not good for recurring tasks. Pages are created on the schedule you set, which means you can’t see them ahead of time. If you want to add recurring tasks to Notion, check out our automated recurring tasks tutorial.
To set a database template to repeat:
- Click the arrow next to the blue New button in the top-right corner of the database block.
- Click the
•••menu for the template you want to set to repeat. - Choose the Repeat option, set your schedule, and click Save.
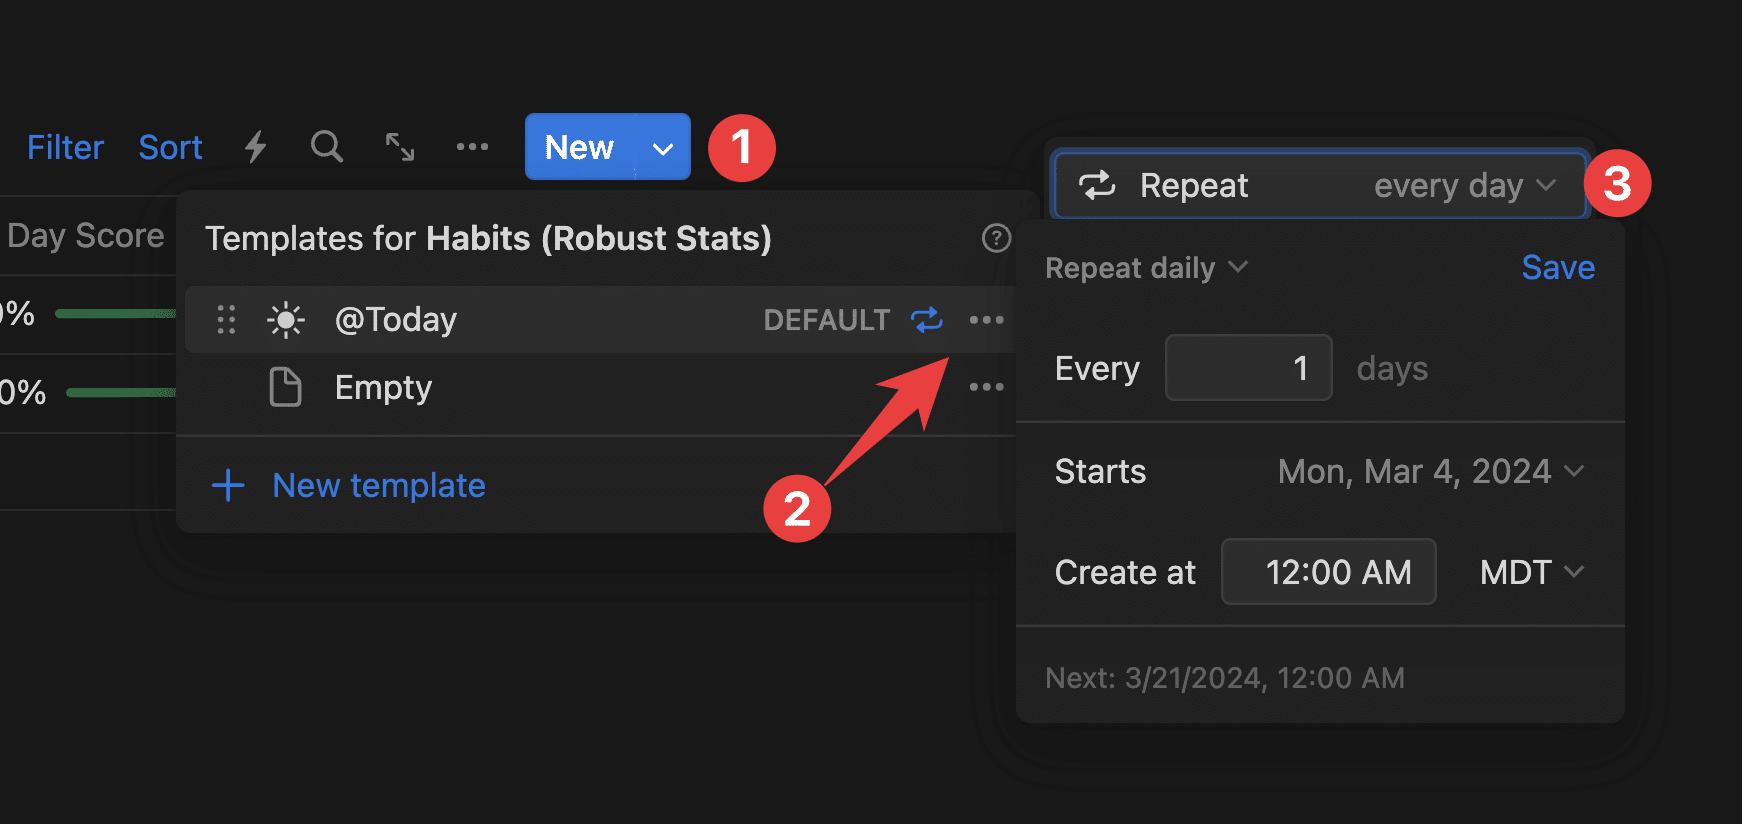
You can choose from the following recurrance intervals:
- Daily
- Weekly
- Monthly
- Yearly
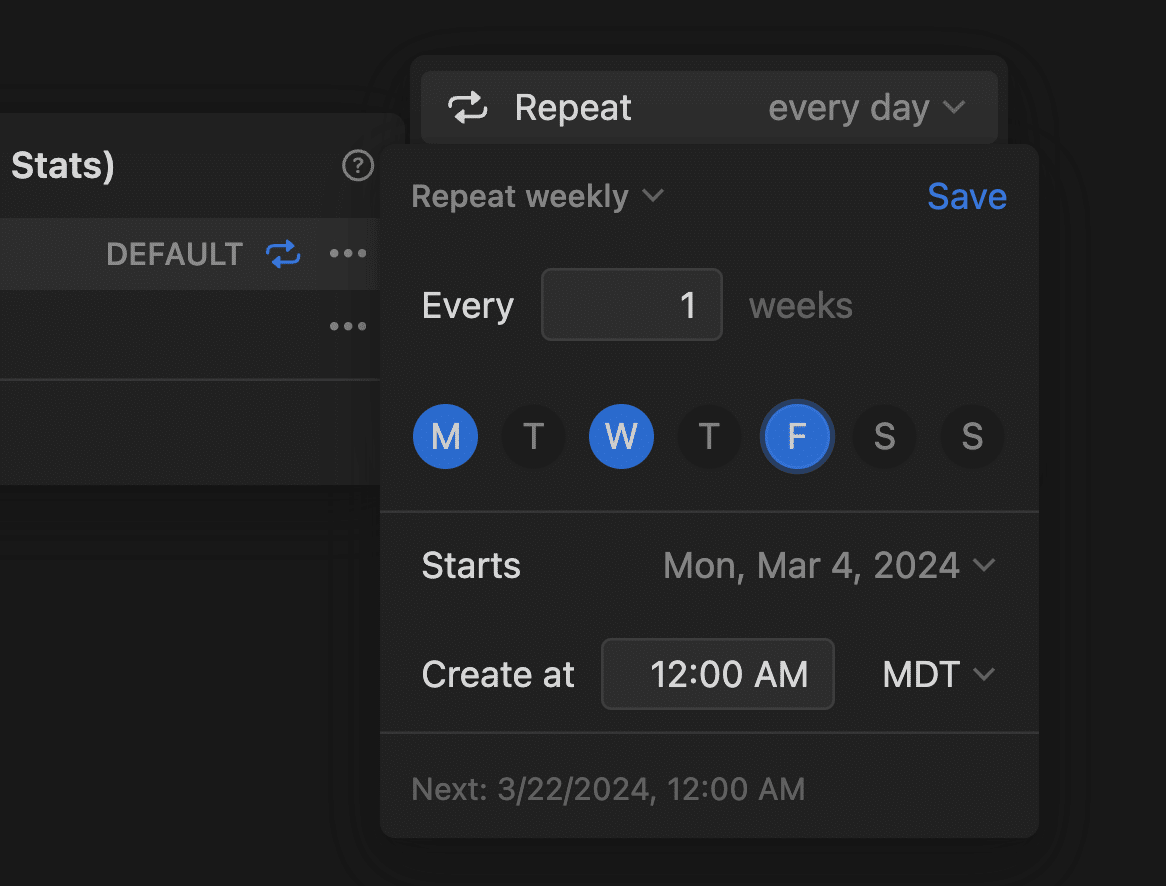
Each option will let you define the interval’s number (e.g. “Every 3 days”), but the Weekly option will also let you choose specific days of the week.
Self-Referential Filters
One of the most useful things you can do with a database template is to combine it with a Linked Database and set up what’s called a self-referential filter.
If you wanted to create a database template inside a Projects database, which shows all the tasks related to the current project, you’d use a self-referential filter for that.
Note: Self-referential filters are tools for Notion power users. You should be familiar with Relations and Linked Databases before worrying about them.
A self-referential filter is a filter inside a database template that updates itself when you create a new page from that database template.
Specifically, a self-referential filter:
- Is set on a Linked Database that is placed within a database template.
- Filters a Relation property, which targets the database that contains the database template.
- Targets the database template itself.
Essentially, a self-referential filter helps you filter a linked database view so that it only shows rows that are related to the page that contains that linked database.
When you set it up in a database template, you set it to target the template itself – but when you create a page from that template, the filter updates itself!
Here’s a look at one in action. Here, I’m editing the Project Template in the My Projects database. I’ve created a linked database, which points to the My Tasks source database.
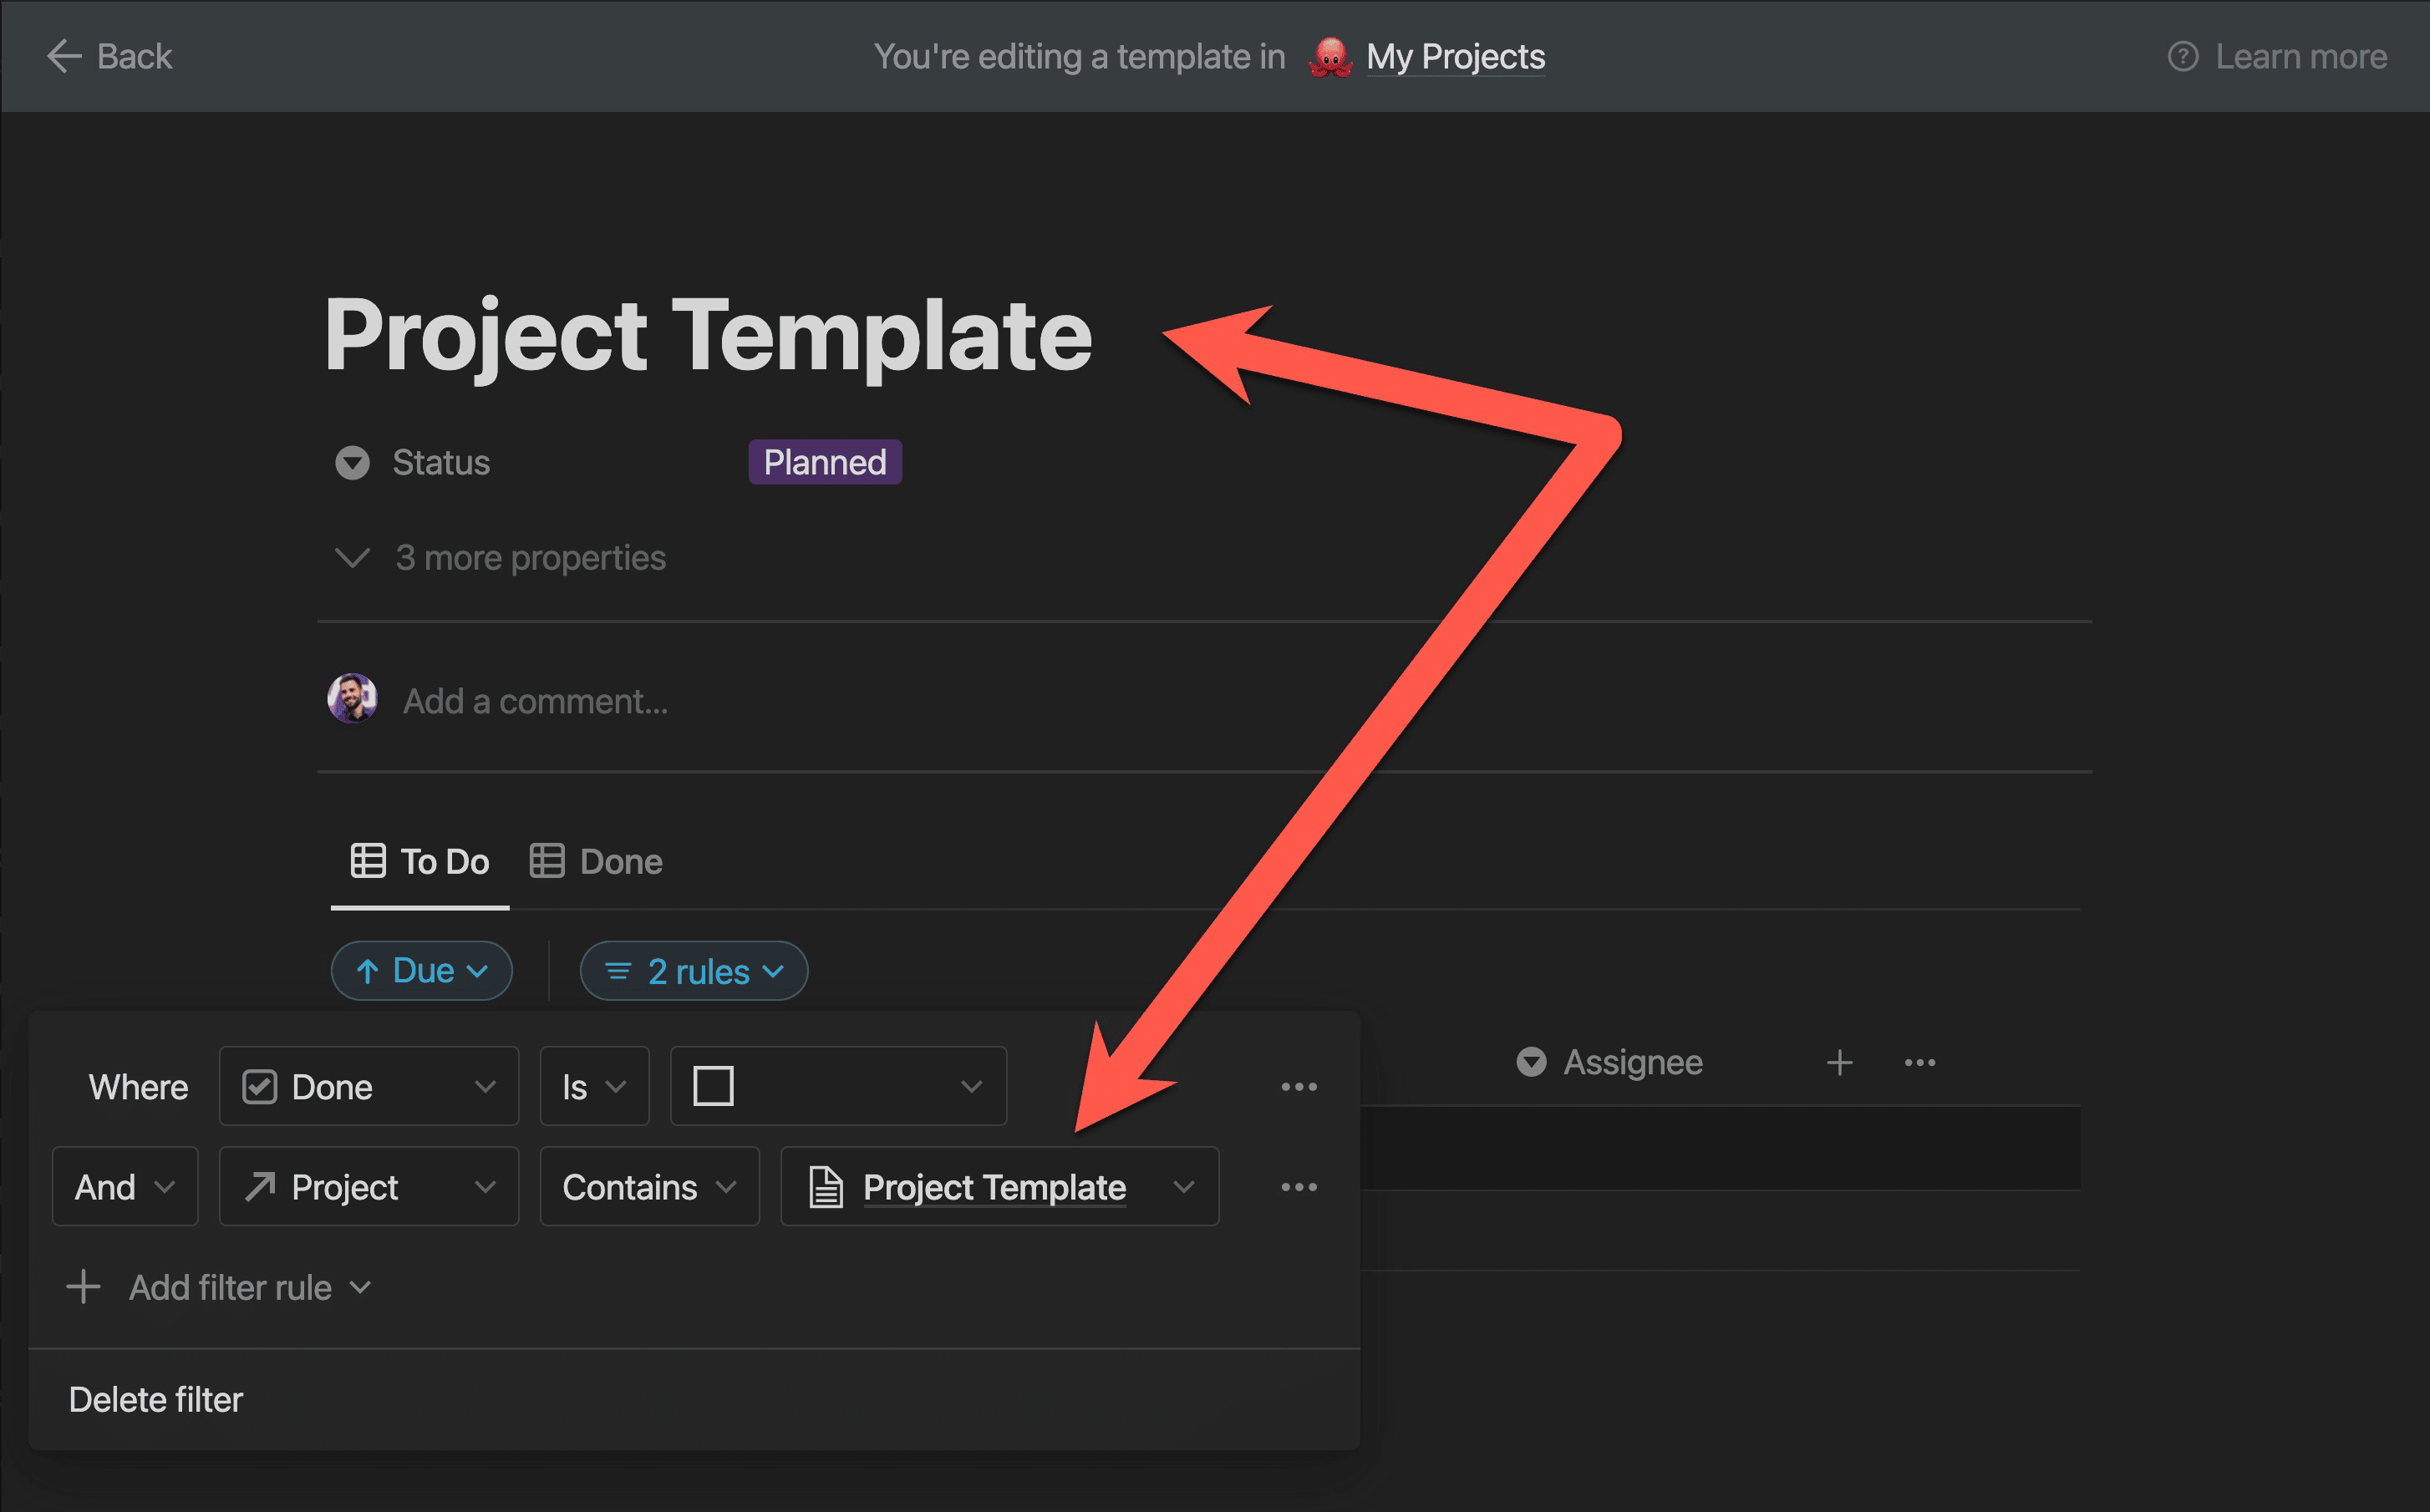
In the filters, I’ve set up a filter that states:
- Project contains Project Template
This means that only rows with Project Template set in their Project Relation would show up here.
Of course, filtering for Project Template wouldn’t be very helpful. It’s a template, not an actual project.
But watch what happens when I create a new project – Suit Redesign – and generate its page content from the Project Template:
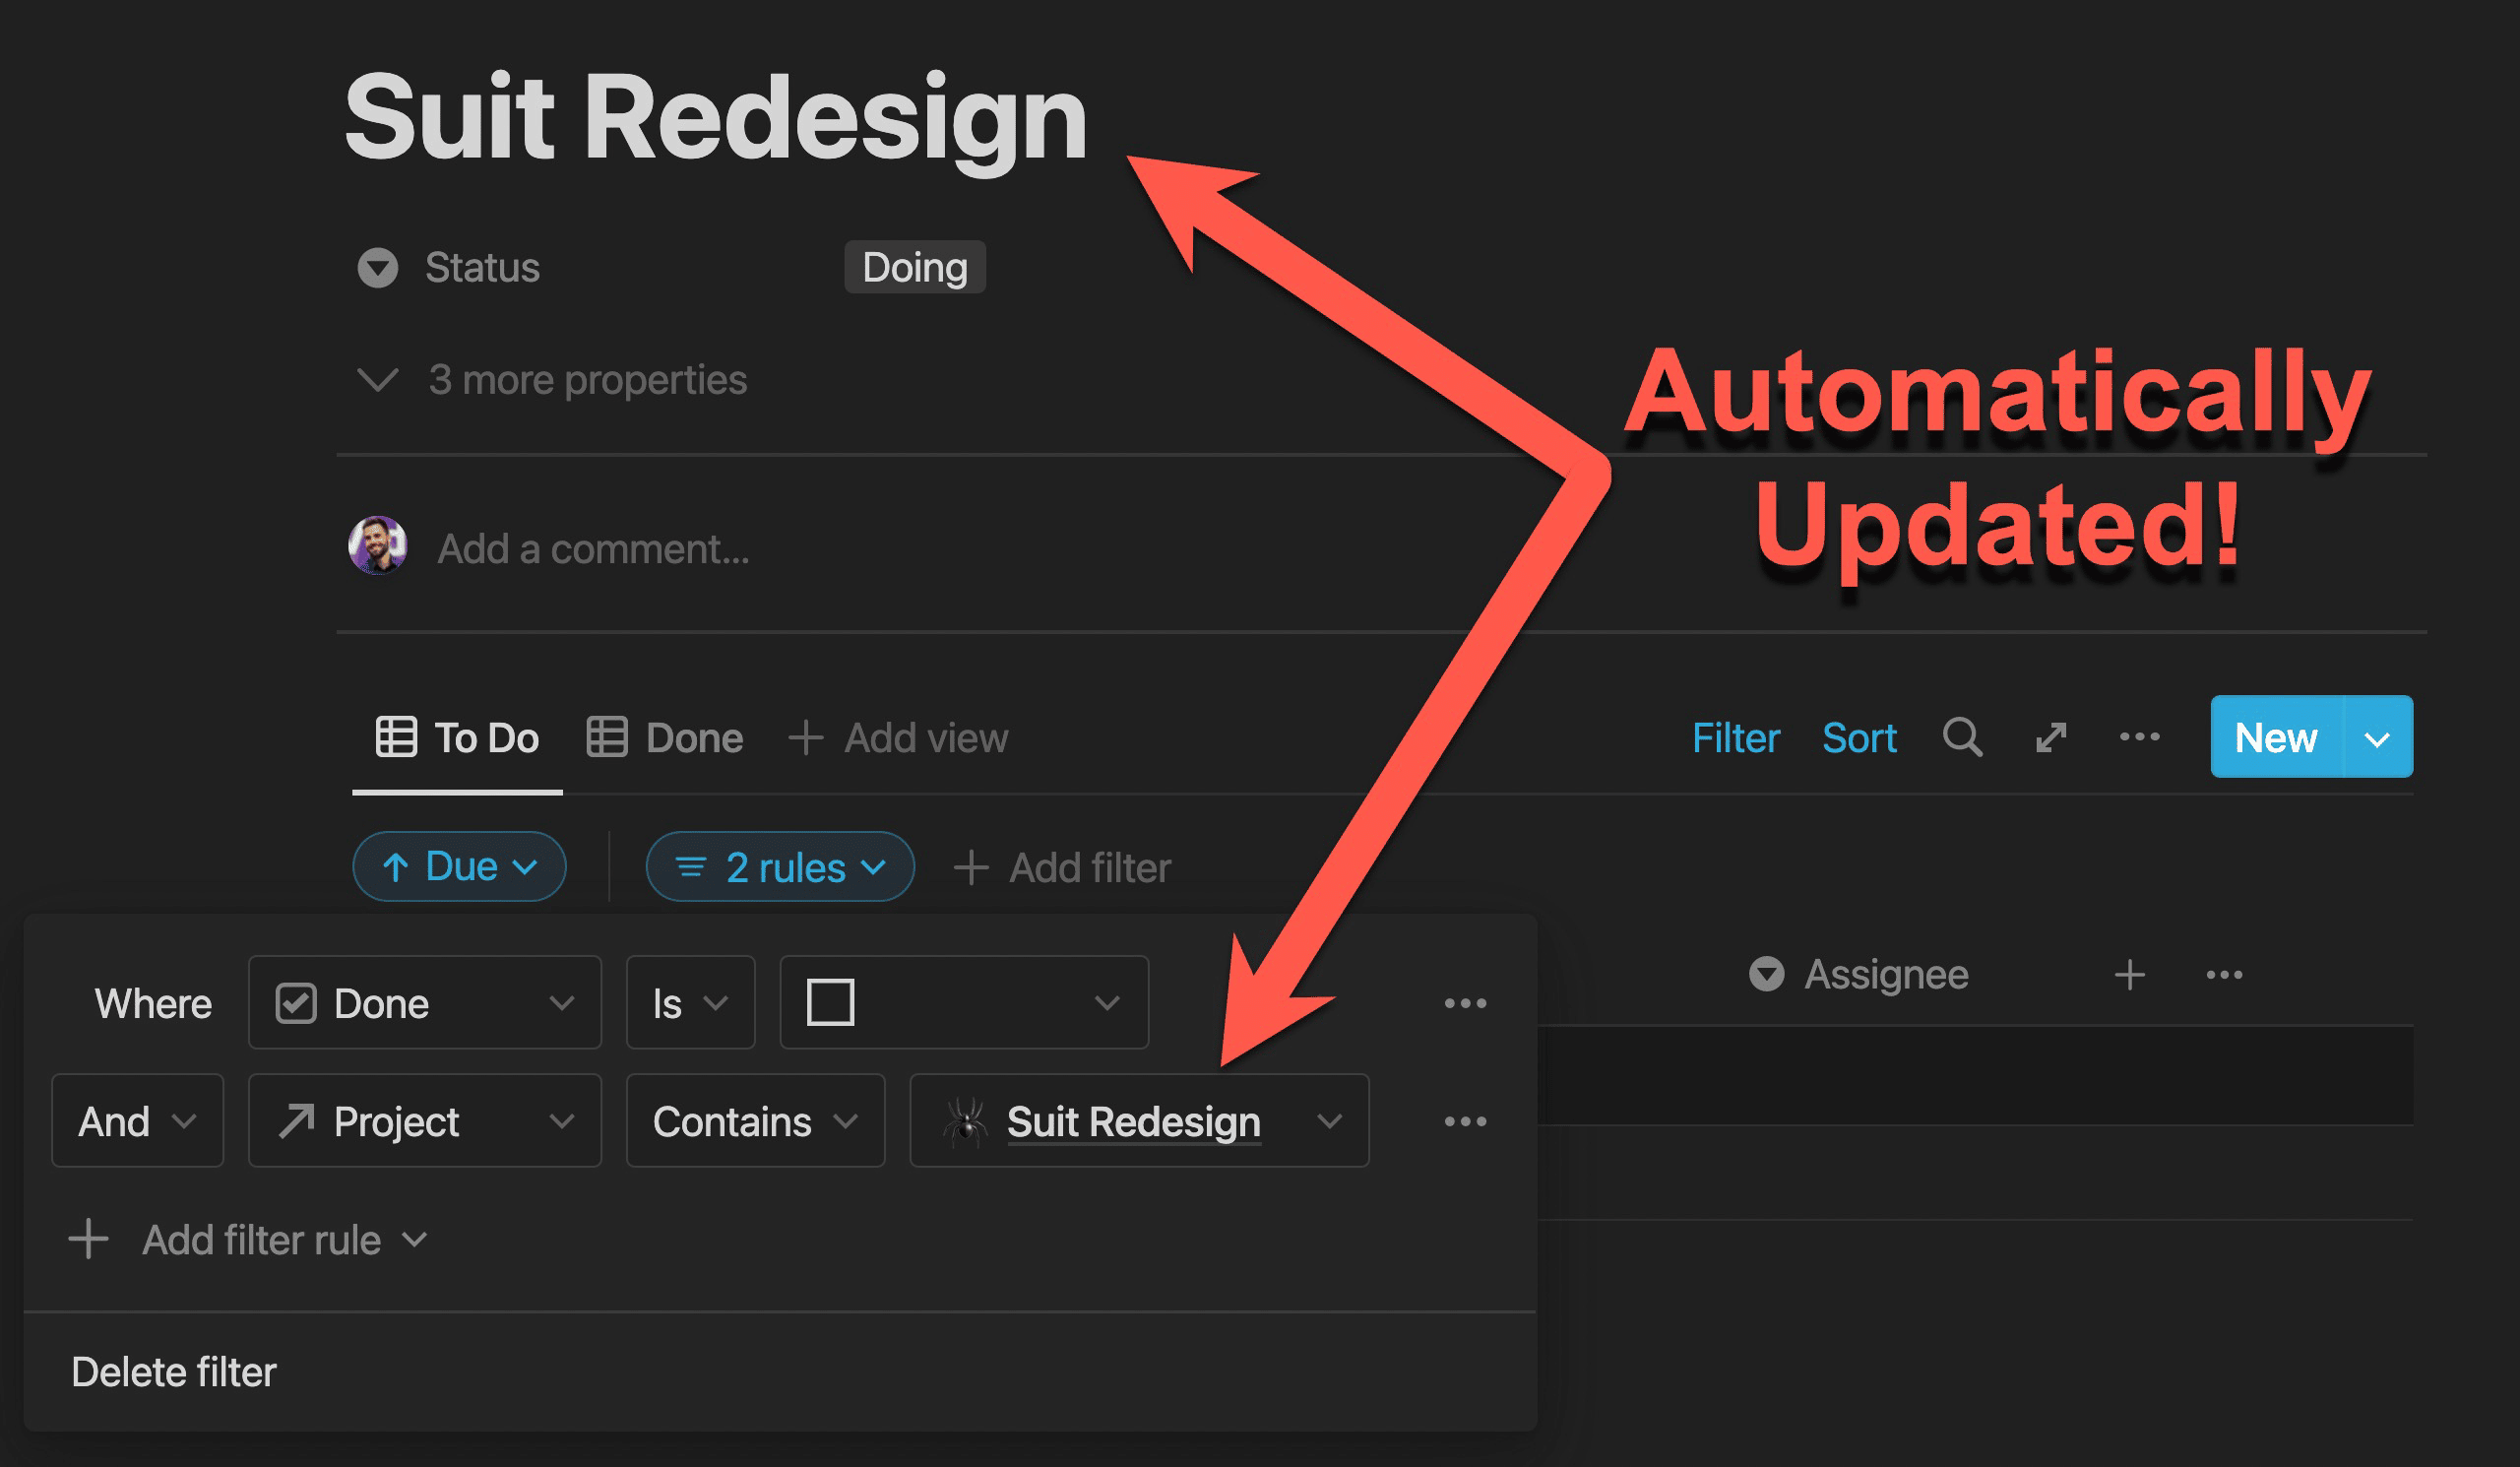
As you can see, my filter has automatically updated itself! Now it reads:
- Project contains Suit Redesign
Crucially, I didn’t have to edit the filter myself. That’s the beauty of a self-referential filter; it auto-updates so that it targets your current database page instead of the database template.
Copy link to headingRollups
The Rollup property type allows you to pull property information from any rows that are connected to your current row through a Relation. You can also perform calculations on that information.
To create a Rollup, add a new property just as you’d do for all other property types. Then set the Relation, Property, and Calculate options (explained below).
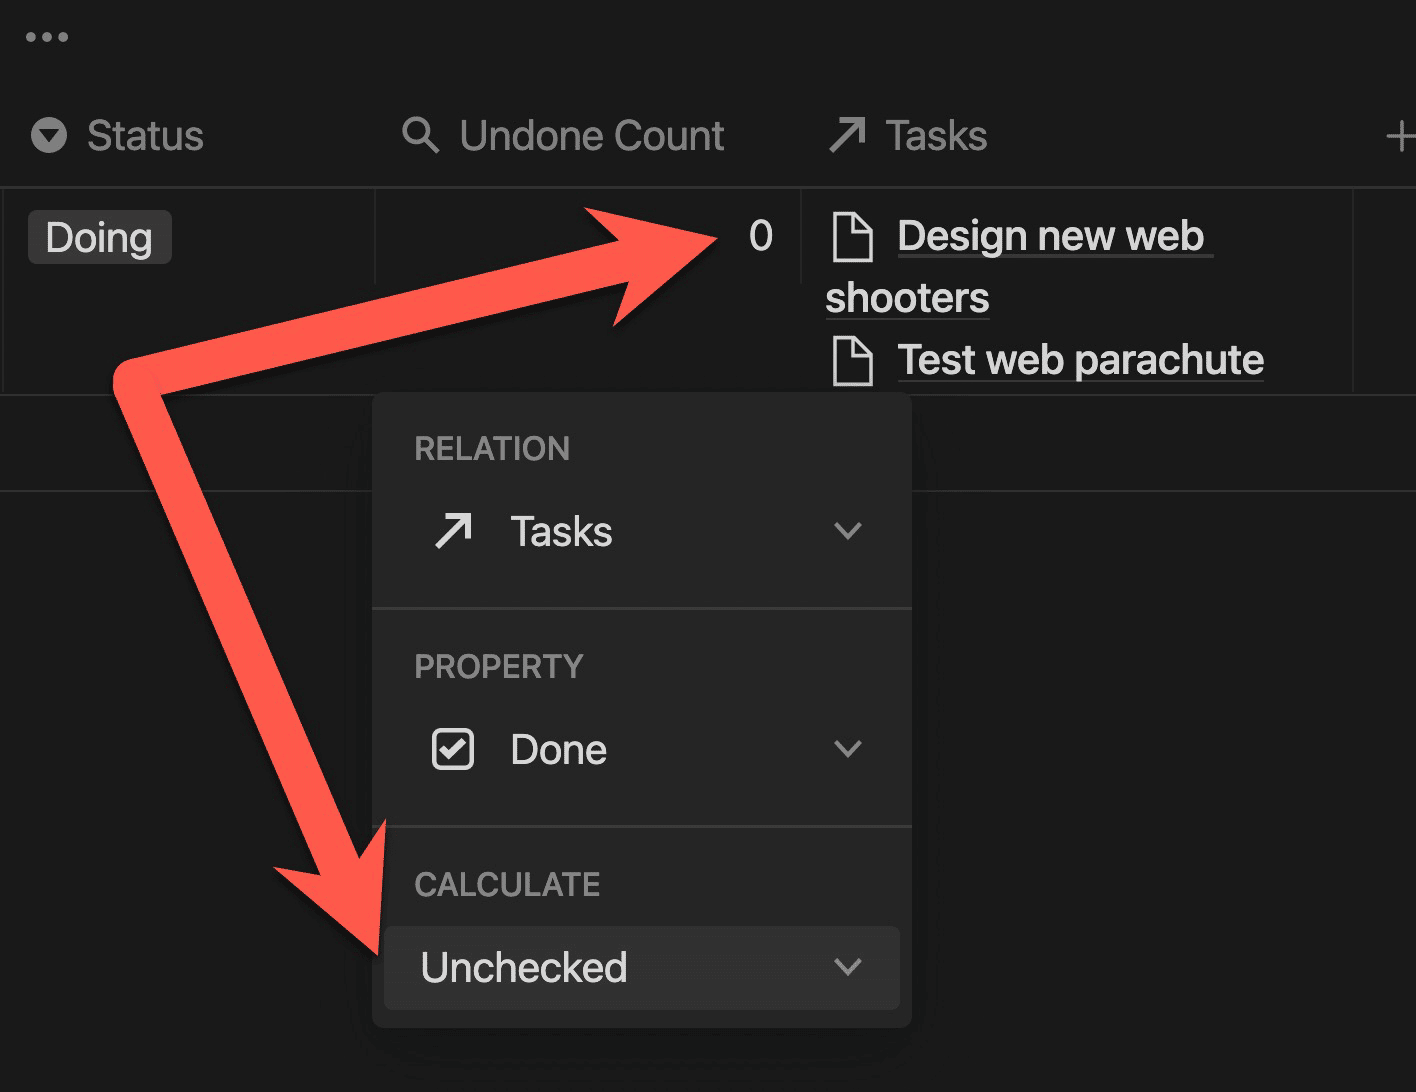
Here, I have a Rollup called Undone Count in the My Projects database.
It’s configured to show the state of the Done property for each of the rows that are related to my Suit Redesign row:

See how the Rollup essentially allows me to pull information about the properties in these related rows? Not only that, but it collects this information in a single area; in other words, the information is “rolled up”!
Rollups have three configuration options:
- Relation – the Relation property in your current database that you’d like to “reach through”
- Property – the Property in the database where the other side of the Relation exists (e.g. my Tasks Relation points to the My Tasks database, so it’s targeting the Done property of the rows there)
- Calculate – the way in which you’d like to display the information
By default, Rollups will use the Show Original setting within the Calculate dropdown. However, you’ll find lots of other choices depending on the property type that you’re rolling up.
If I set Calculate to Unchecked, I get a count totaling all the unchecked rows related to this project. In this case, both of the related tasks have been done, so the count is 0.
Formulas
Learn even more about formulas in my comprehensive Notion formula reference guide. Or, if you’re short on time, check out my one-page Notion formula cheat sheet.
The Formula property type allows you to write formulas that can:
- Pull in data from other properties
- Format and change data
- Do complex calculations
- Run if-then scenarios with multiple potential outcomes
Notion’s formula property is by far its most complex, and there’s essentially no limit to what you can do with it.
Fun fact: My Ultimate Brain template contains a 10,000-character formula that does complex recurring-date calculations directly in Notion!
You can create a formula property in Notion in the same way that you’d create any other property. From there, you can click the property’s content area to open up an editor where you can write formula code:

Underneath the editor, you’ll find a list of properties, functions, and more that you can use to create your formula. These include:
- Properties – includes all the properties in your current database
- Constants – such as e, pi, true, false
- Operators – if, add, subtract, greater than, less than, etc.
- Functions – join, slice, format, toNumber, etc.
Since this is an overall guide to Notion databases, I won’t delve too deeply into how to write formulas here – check out the full formula reference guide for that.
For this post, I’ll share two example formulas and explanations that will help you get started with writing your own formulas. Both of these can be found in the Simple Task Manager example template!
Copy link to headingFormula Example 1
The first formula we’ll cover can be found in the My Projects database within the Simple Task Manager template.
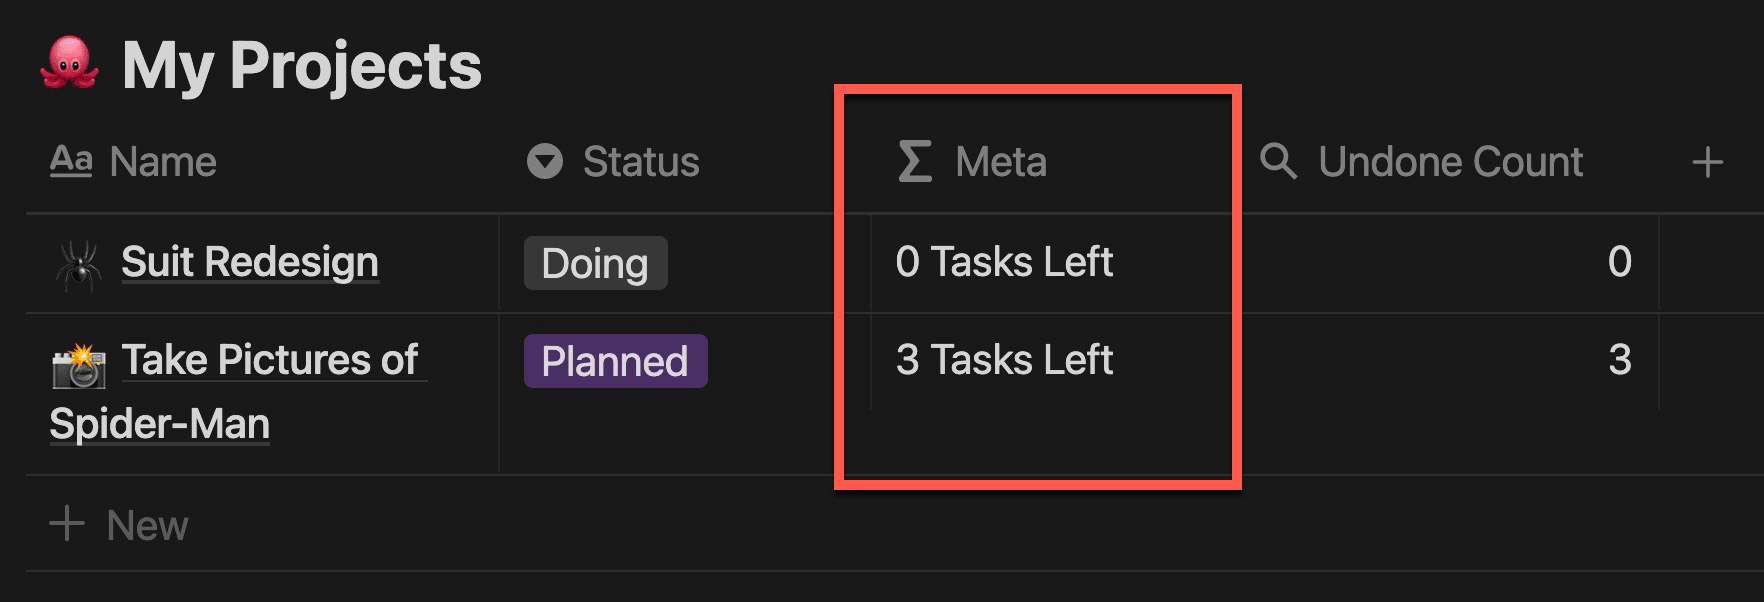
The property is called Meta, and it simply takes the number from the Undone Count property and formats it to look nicer.
Here’s the “compact” version of the formula that you can easily paste into Notion:
format(prop("Undone Count")) + " Tasks Left"
Code language: JavaScript (javascript)
Note: If you paste this formula into a brand-new Notion database, you’ll need the Undone Count property to exist first. Otherwise, you’ll get a Property Not Found error.
I prefer to write my formulas in a code editor (such as VS Code) and then make them compact using this Excel Formula Beautifier (which can either “beautify” code or compress it).
As the name implies, it’s meant for Excel formulas – but it works perfectly on Notion formulas as well. In fact, Notion’s formula syntax is extremely similar to Excel’s formula syntax.
Here’s a version of the formula that’s easier to read:
format(
  prop("Undone Count")
) + " Tasks Left"
Code language: JavaScript (javascript)
The first part of this formula is: format(prop("Undone Count")). It uses the prop() function to pull in the value of the Undone Count property, which is a Rollup (see the Rollup section above to learn more about those).
I’m wrapping prop("Undone Count") within the format() function in order to turn it into a String (which is basically just text).
Notion formulas can output four different data types:
- String (plain text)
- Number
- Date
- Boolean (true/false, shown as a checkbox)
However, a single formula can only output one data type. In other words, you can’t mix data types. Instead, you need to convert data types so that all of your output has the same type.
The Undone Count Rollup property outputs a number, but ultimately my formula needs to output a string – e.g. “3 Tasks Left”.
To achieve that, I use format() to transform that number into a string. It still displays as a number, but since it’s a plain-text string now, it can no longer be used in calculations (addition, multiplication, etc).
Finally, I use the + operator to add my formatted number to this string: Tasks Left.
Put them together, and you achieve a data-driven final output, such as: 3 Tasks Left!
Formula Example 2
Next, let’s look at how you can create variable output in a formula by using an If-Then statement.
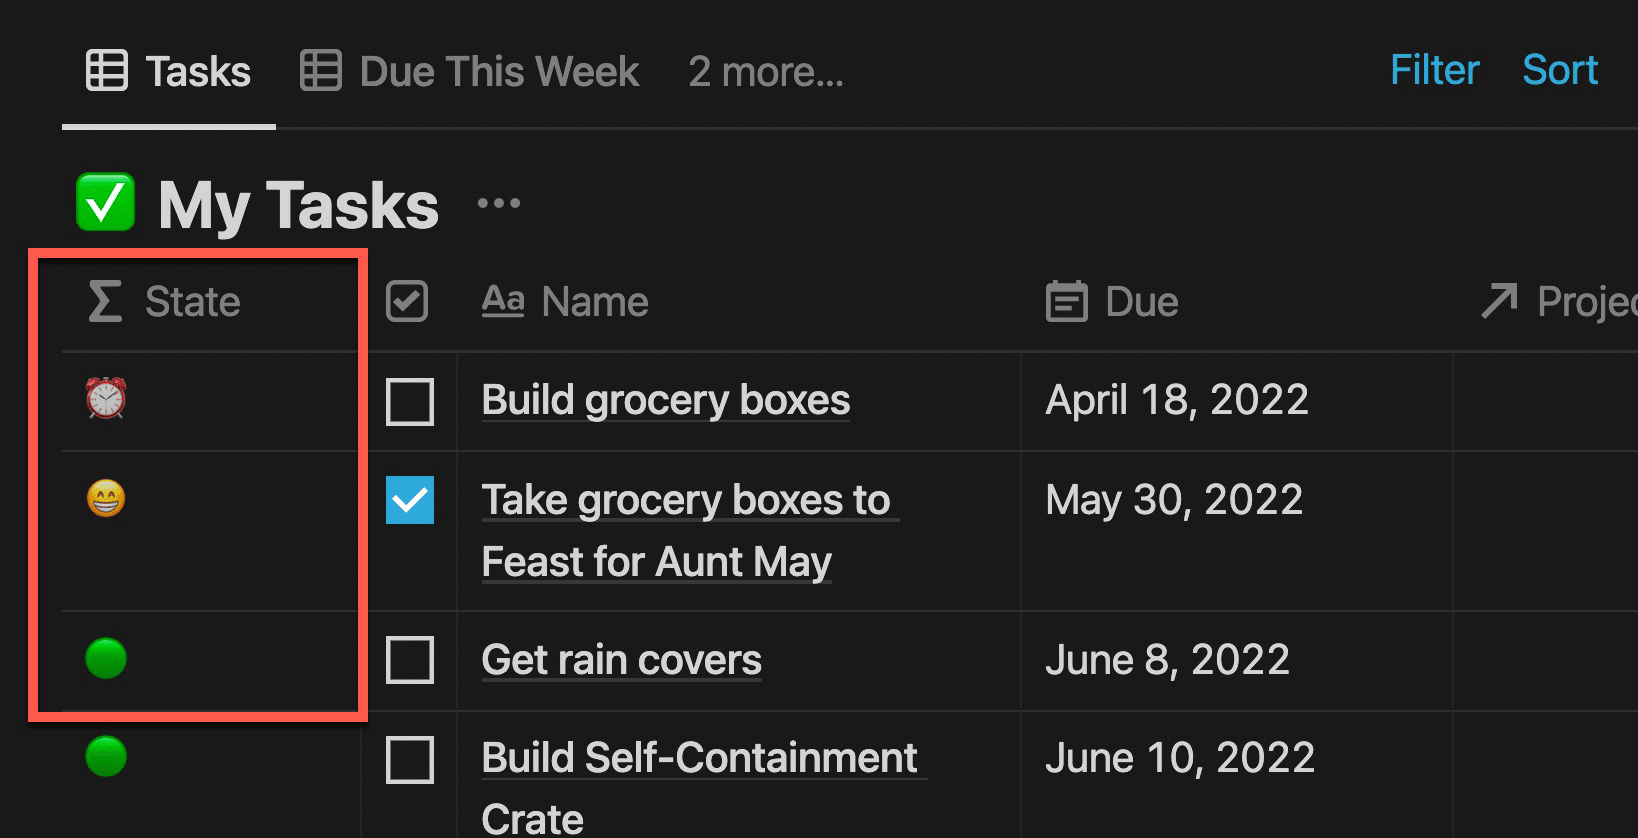
In the My Tasks database within the Simple Task Manager, I’ve created a formula property called State. This property outputs a different symbol based on the status of the task:
- ⏰ = task is overdue
- 😁 = task is done
- 🟢 = task is due today or later
Here’s the compressed formula code, which you can easily paste into Notion:
if(prop("Done") == true, "😁", if(dateBetween(now(), prop("Due"), "days") > 0, "⏰", "🟢"))
Code language: JavaScript (javascript)
Note: If you paste this formula into a brand-new Notion database, you’ll need the Done and Due properties to exist first. Otherwise, you’ll get a Property Not Found error.
And here’s an expanded version of the formula that’s easier to read:
if(
  prop("Done") == true,
  "😁",
  if(
    dateBetween(
      now(),
      prop("Due"),
      "days"
    ) > 0,
    "⏰",
    "🟢"
  )
)
Code language: JavaScript (javascript)
This formula has an if-then statement with another if-then statement nested inside it. By nesting if-then statements, we can create a formula that has more than two possible outcomes.
To help you fully understand this formula, let’s first break down how if-then statements work. The basic syntax for an if-then statement in Notion is:
if([test condition],[outcome if true],[outcome if false])
Code language: CSS (css)
Essentially, we run a test, then define what do to if that test passes, and what do to if it fails. Here’s a bare-bones example:
if(prop("Done") == true,"😁","😡")
Code language: JavaScript (javascript)
The == operator is testing whether the two pieces of information on either side of it are the same. Done is a checkbox property (with the data type boolean), so it outputs true or false.
If the output of Done matches true, then the first option will be output: 😁. If not, Notion will output the second: 😡.
Here’s where things get interesting – either of the output paths in an if-then statement can contain additional functions. This can include more if-then statements!
So let’s walk through the nested if-then statement from our example above:
if(
  dateBetween(
    now(),
    prop("Due"),
    "days"
  ) > 0,
  "⏰",
  "🟢"
)
Code language: JavaScript (javascript)
This statement will only be evaluated if the outermost if-then statement – if(prop("Done") == true – returned false.
This inner if-then statement tests to see whether the task is overdue or not. To do that, it uses the dateBetween() function, which finds the amount of time between two dates.
I’m passing three arguments to this function:
- The
now()function, which is built into Notion and returns the current date and time prop("Due"), which returns the task’s due date"days", which simply specifies the unit of timedateBetween()should count by
Finally, I check if the output of dateBetween() is greater than (>) zero. If it is, then the task is overdue and my formula outputs the ⏰ symbol. If not, the task is not overdue and the formula outputs the 🟢 symbol.
As you can see, Notion formulas are extremely flexible and powerful. It’s also worth noting that practicing with Notion formulas is a good first step into actual programming if that’s something that interests you!
Copy link to headingLocking Databases
Databases can take a long time to configure, and chaos can ensue if someone accidentally deletes a property, changes the settings of a view, or messes with a formula.
Fortunately, Notion allows you to lock your databases in order to prevent these kinds of changes.
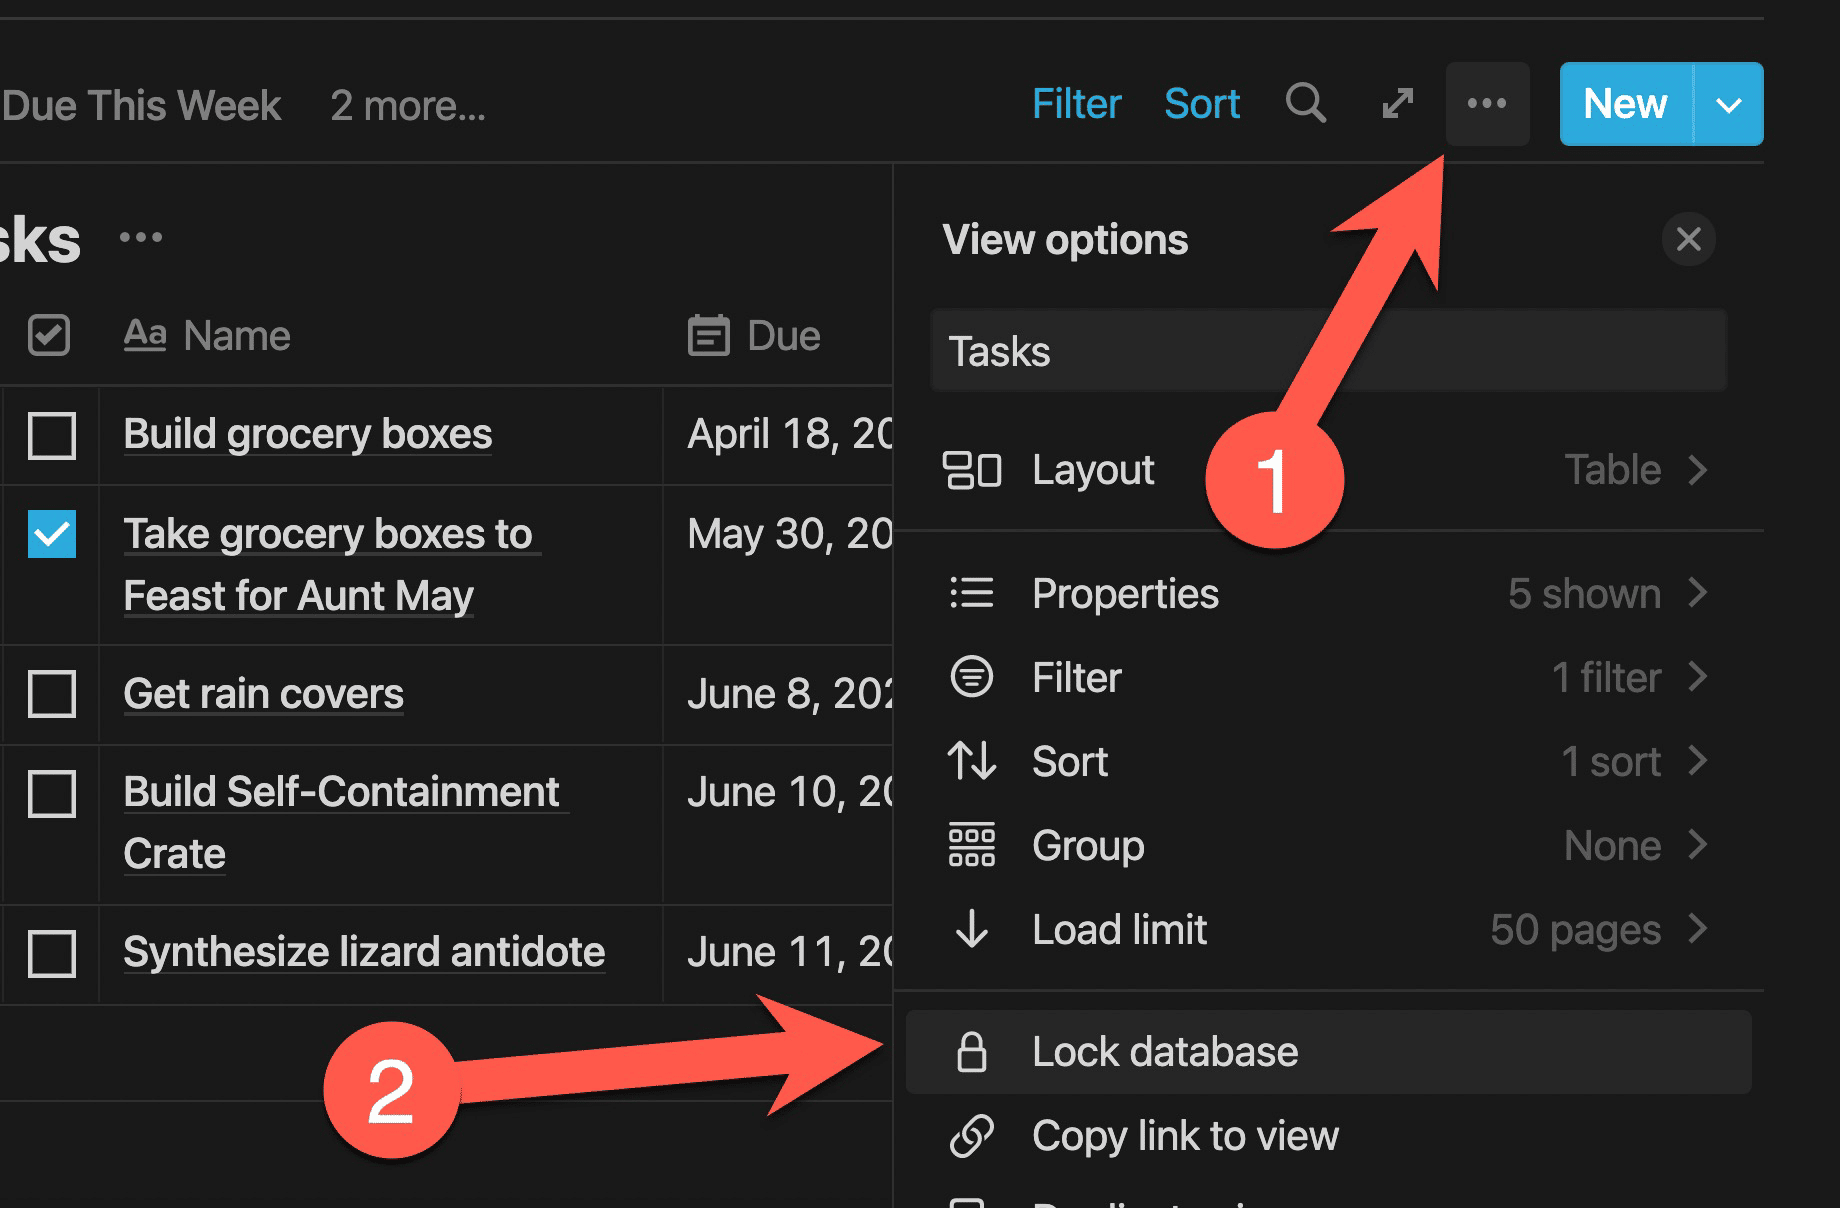
To lock a database, first navigate to its original location. Open up the View Options menu and click Lock Database:
When a database is locked, you won’t be able to make changes to its structure.
You’ll still be able to create new rows and set property values, but you won’t be able to:
- Add new properties
- Delete properties
- Change property settings (e.g. change a formula)
- Add/edit/delete options from a Select or Multi-Select property
Fortunately, if you need to make a change, you can easily unlock the database by clicking the Locked button at the top.
Note that you’ll need to navigate to the original database to find this Locked button; you won’t see it on Linked Databases.
Copy link to headingOffline Mode and Databases
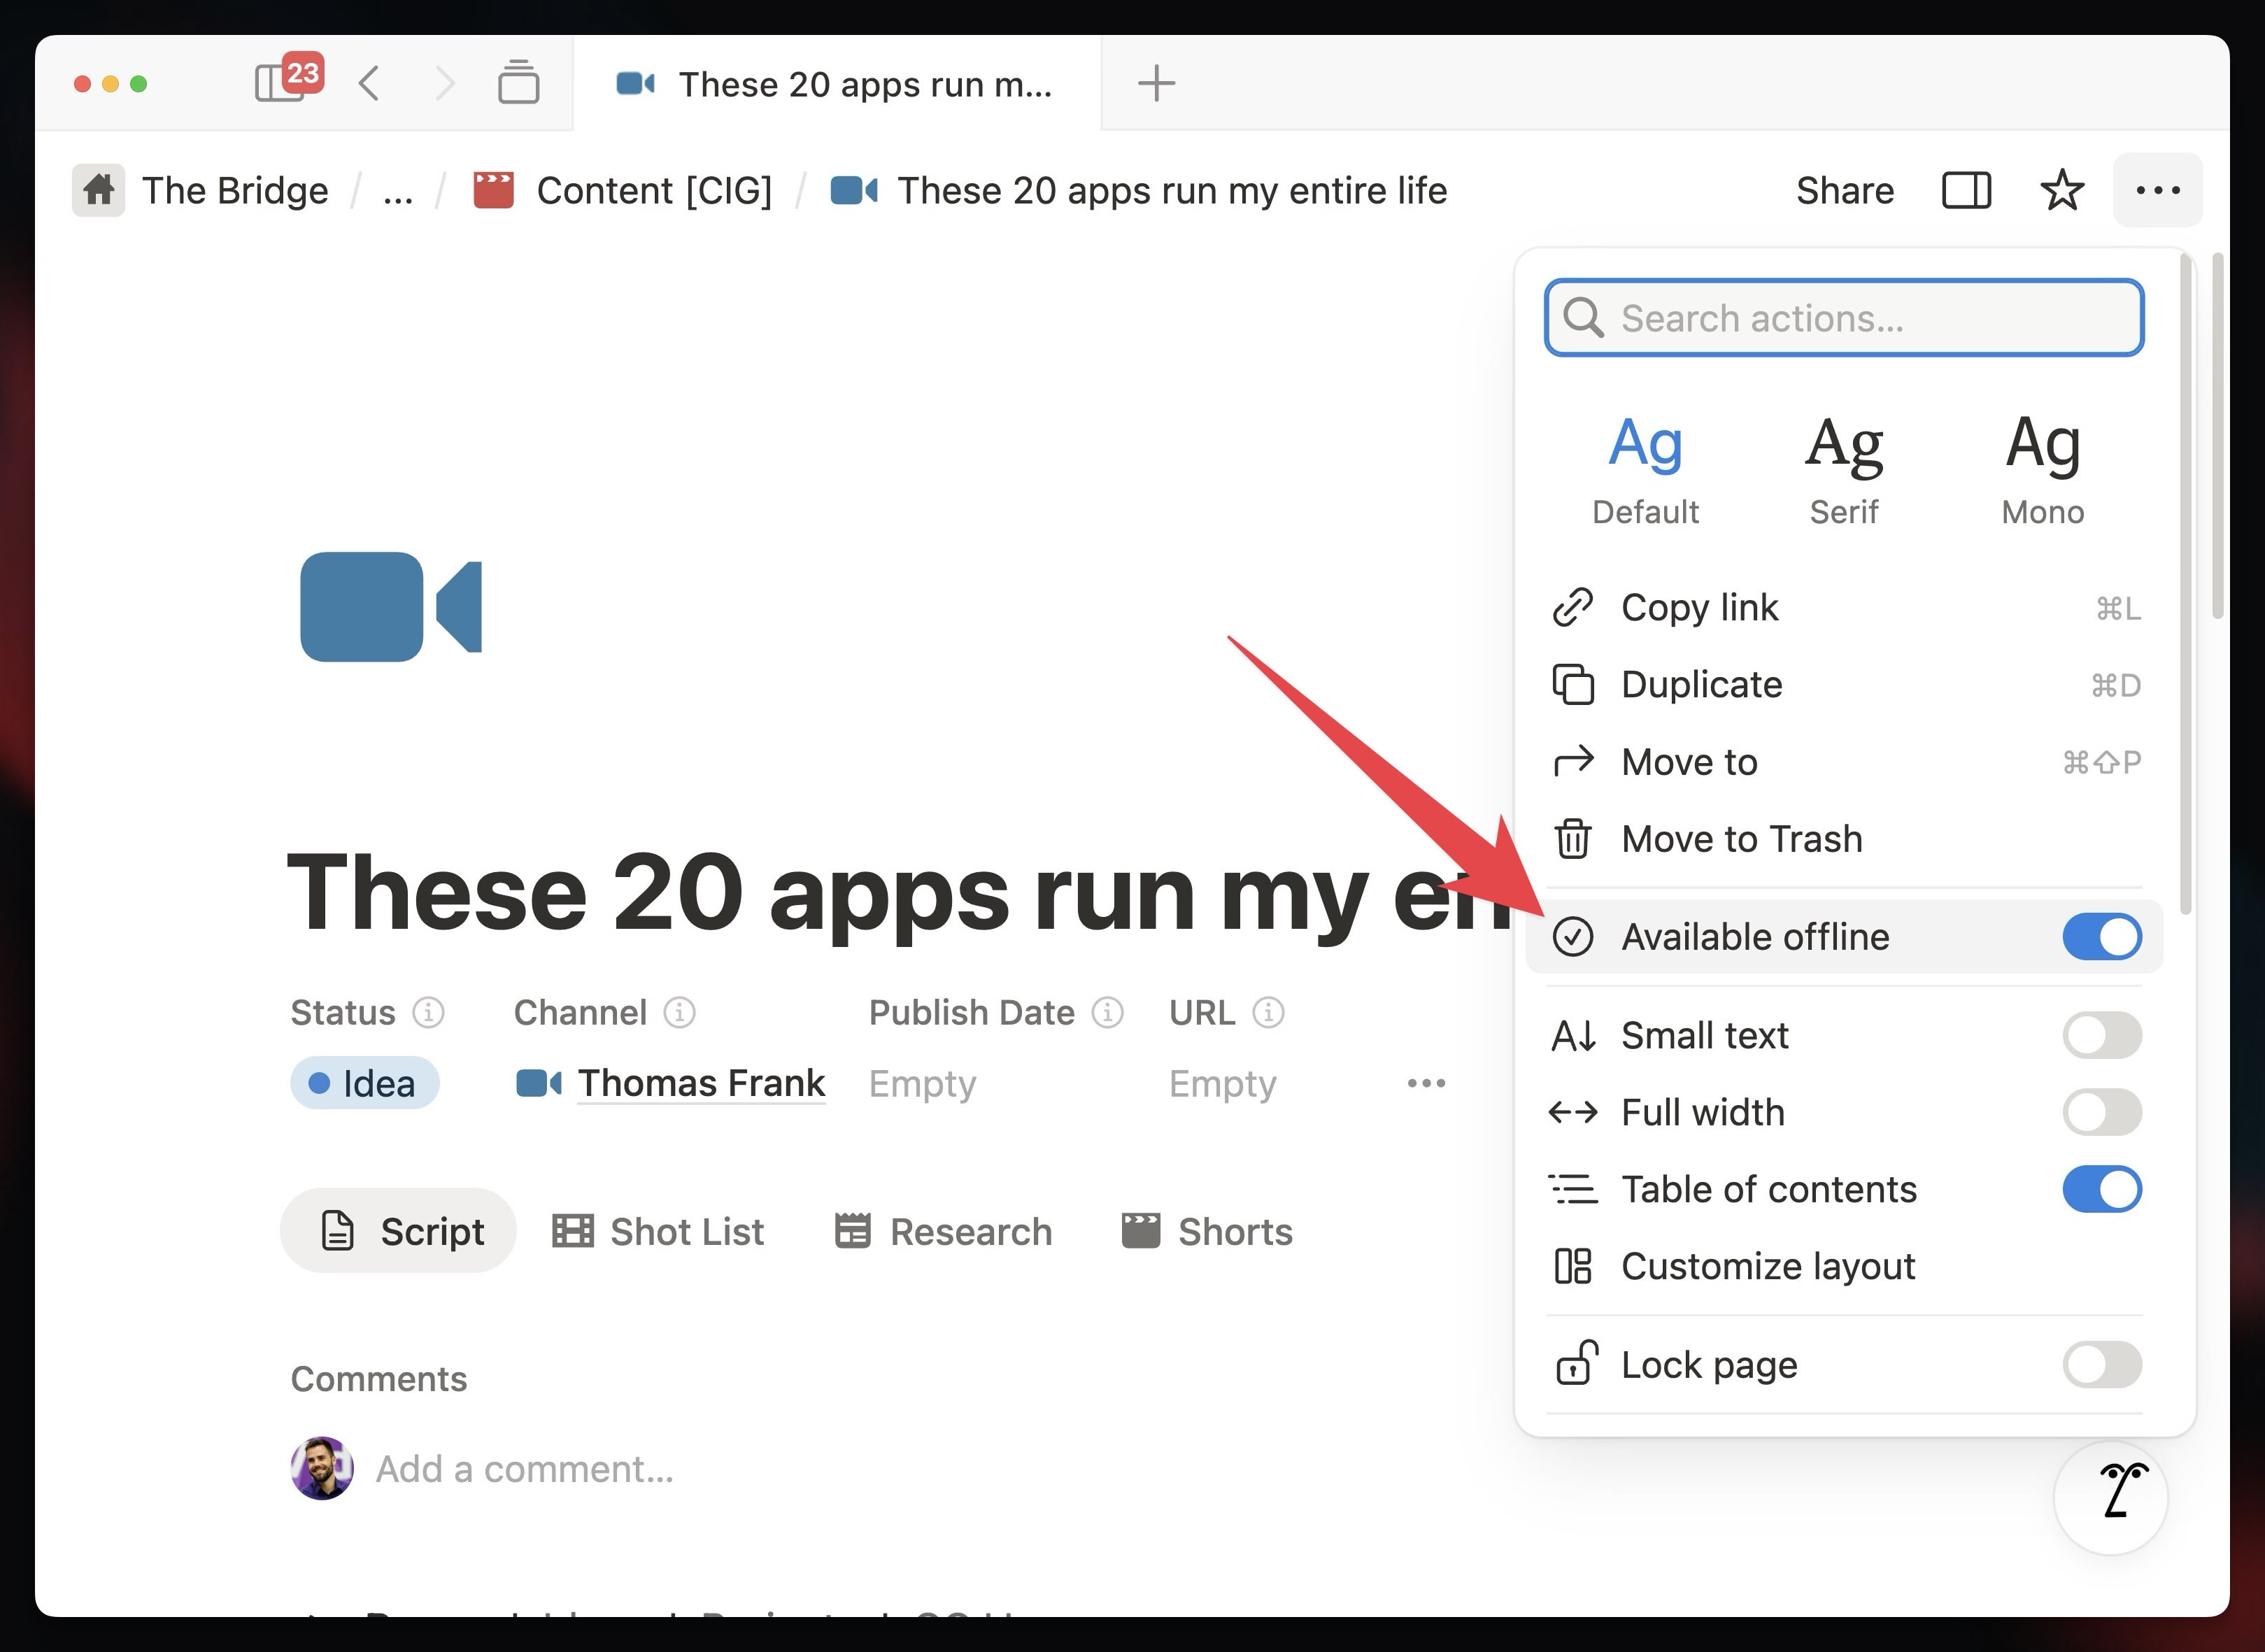
Notion allows you to make pages available for offline viewing and editing. To make a page available offline:
- Click the
•••menu at the top-right corner of the page - Click the Available Offline toggle
Pages can be made available offline on the desktop apps and mobile apps (but not in the browser).
As with normal pages, database pages can be offline-enabled in this way.
Additionally, Notion has a method of automatically making certain pages in databases offline-enabled. Specifically, when you manually make a page offline-enabled, the first 50 pages in the first view of any Database or Linked Database blocks on that page are downloaded.
It’s also possible to make more than 50 pages automatically offline-enabled; if differently-sorted/filtered views of the same database are on multiple offline-enabled pages, different sets of up to 50 pages may be automatically downloaded.
Offline mode is a recent feature, so this automatic download process might not always work as expected. If you want reliable access to a specific page, I recommend manually toggling the Available Offline option for it.
Learn more at my full guide to Notion’s offline mode.
Copy link to headingWrapping Up
Whew – we’re done. In this guide, we’ve covered every main feature you’ll find within Notion databases.
You’re now ready to go out and start creating your own databases. Using the features we’ve covered here, you’ll be able to create useful tools that fit your individual workflows and tasks like a glove – rather than relying on old-school productivity tools that don’t quite match the way you want to work.
To learn even more about Notion, head to the Notion Fundamentals home page to check out all the lessons in this free series.
You can also check out my Notion Templates, which can give you a head start and equip your workspace with an advanced task manager, note-taking system, habit tracker, and more.
If you enjoy this content and want more, consider joining my Notion Tips email list! I’ll keep you up to speed on my Notion courses, but also let you know when I publish new free tutorials and templates:
The Notion Tips Newsletter
Join 50,000+ folks and enjoy your morning coffee alongside my latest Notion guides and templates, delivered hot(?) and steaming(?) to your inbox.