

Notion finally supports native recurring tasks.
You can now set up a task that will repeat on a schedule. When you complete the task, it’ll automatically update the due date and reset the task’s status – just like you’d expect in other task managers like Todoist or TickTick.
This used to require 3rd-party automation apps, but now Notion supports it right out of the box.
Here’s a summary of how you can set up recurring tasks:
- Create a Notion database with a Date property for due dates and a Status property for tracking task status.
- Add a Recur Interval (number) property, which will be used to calculate the next due date.
- Create either a Button property or a database automation to process the task once it’s finished. This should use dateAdd() to add the Recur Interval’s number to your due date property, creating a new due date. It should also reset to task’s Status to “Not Started”, or an equivalent value.
This process is simple enough that I can show it in under a minute. This video also shows how to modify the Recur Interval with a Recur Unit:
This is simplified look at the process. Depending on how advanced you want your recurring tasks setup to be, there may be additional steps you’ll need to take.
In this guide, I’ll first give you step-by-step instructions to set up the simplest version of recurring tasks. Then, I’ll also show you how to add more powerful features:
- Advanced recur intervals – weekly, monthly, last day of the month, etc
- Day-of-the-week intervals – e.g. Mon/Weds/Fri
- Overdue task logic – accurately calculate the Next Due Date even if the task is overdue
- Task History – get a record of each time you’ve completed the task (good for habit tracking)
Don’t want to deal with any of this? Just use one of my templates instead – I’ve done all the work for you.
Copy link to headingNotion Templates with Recurring Tasks
If you want to do the least amount of work possible to get automatic recurring tasks in Notion, just grab one of my Notion templates. Each comes with recurring tasks support, already set up for you.
Note: Using a template also gives you access to database automations I’ve built for you. Creating and editing database automations requires being on a paid Notion plan – but if you’re on the free plan, you can still use database automations that are included in templates.
Copy link to headingUltimate Tasks: Fast, Free Task Manager
Ultimate Tasks is a fast, powerful, and free task management system for Notion. It’s easy to use, comes with Notion’s latest features, and has nearly every task management feature you could need. Get it for free here:
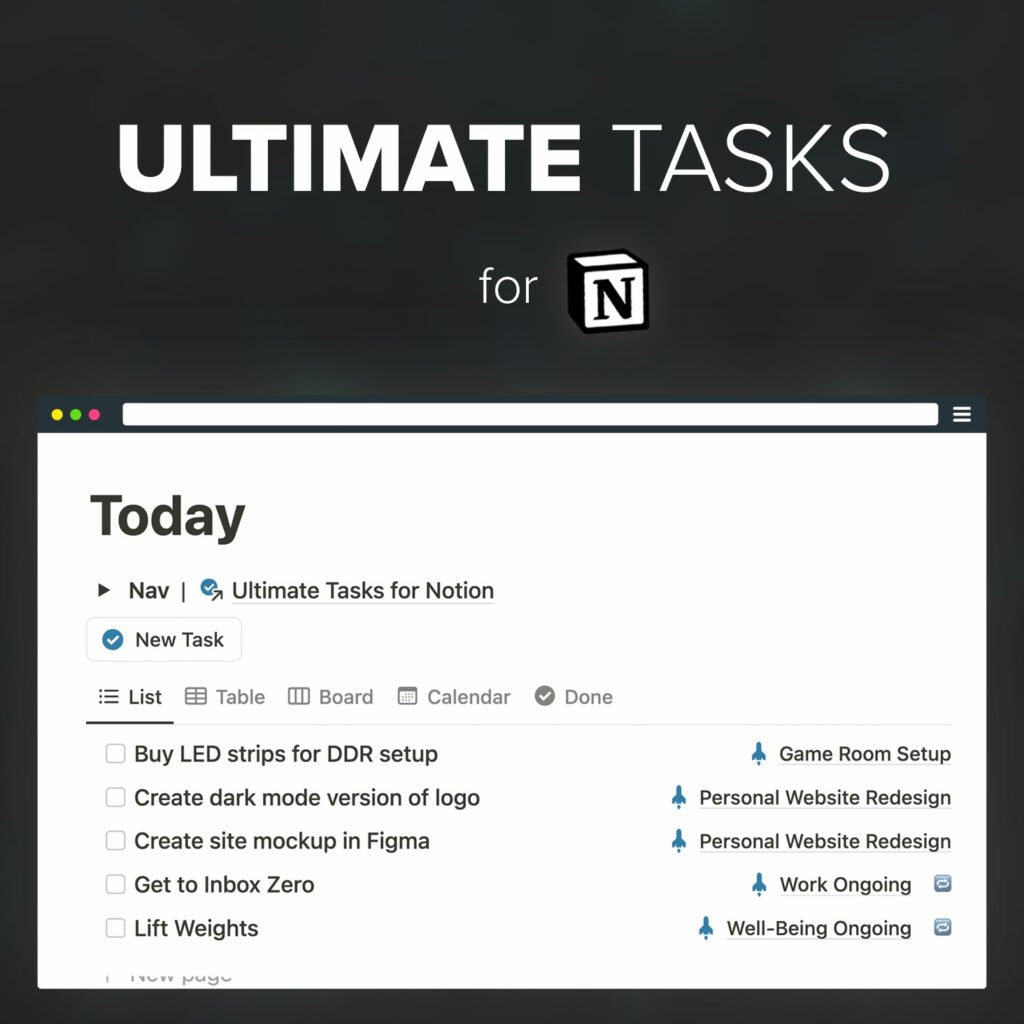
Use this template to move ALL of your task and project management into Notion.
Ultimate Brain: Complete Second Brain for Notion
Ultimate Brain gives you a complete productivity system for Notion. It comes with every feature in Ultimate Tasks, plus advanced task management features:
- Task History for recurring tasks
- GTD features
- My Day dashboard – easily plan your day and avoid overwhelm
You also get a full note-taking system, PARA organization features inspired by the Building a Second Brain book by Tiago Forte, a personal CRM, a recipe tracker, a book tracker, and much more. Get Ultimate Brain here:

Want to turn Notion into a complete productivity system? Ultimate Brain includes all the features from Ultimate Tasks - and combines them with notes, goals, and advanced project management features.
Get $50 off with code SPRING50!
Lastly, if you just want to see how recurring tasks work in action, I’ve created a simple Recurring Tasks template that demonstrates all of the features. You can use it for educational purposes, but I’ll note that it’s not a full-featured task manager.
Copy link to headingHow to Create a Recurring Task
If you’re using one of the templates I’ve shared above, here’s exactly how to create a recurring task:
- Give the task a Due date.
- Give the task a Recur Interval.
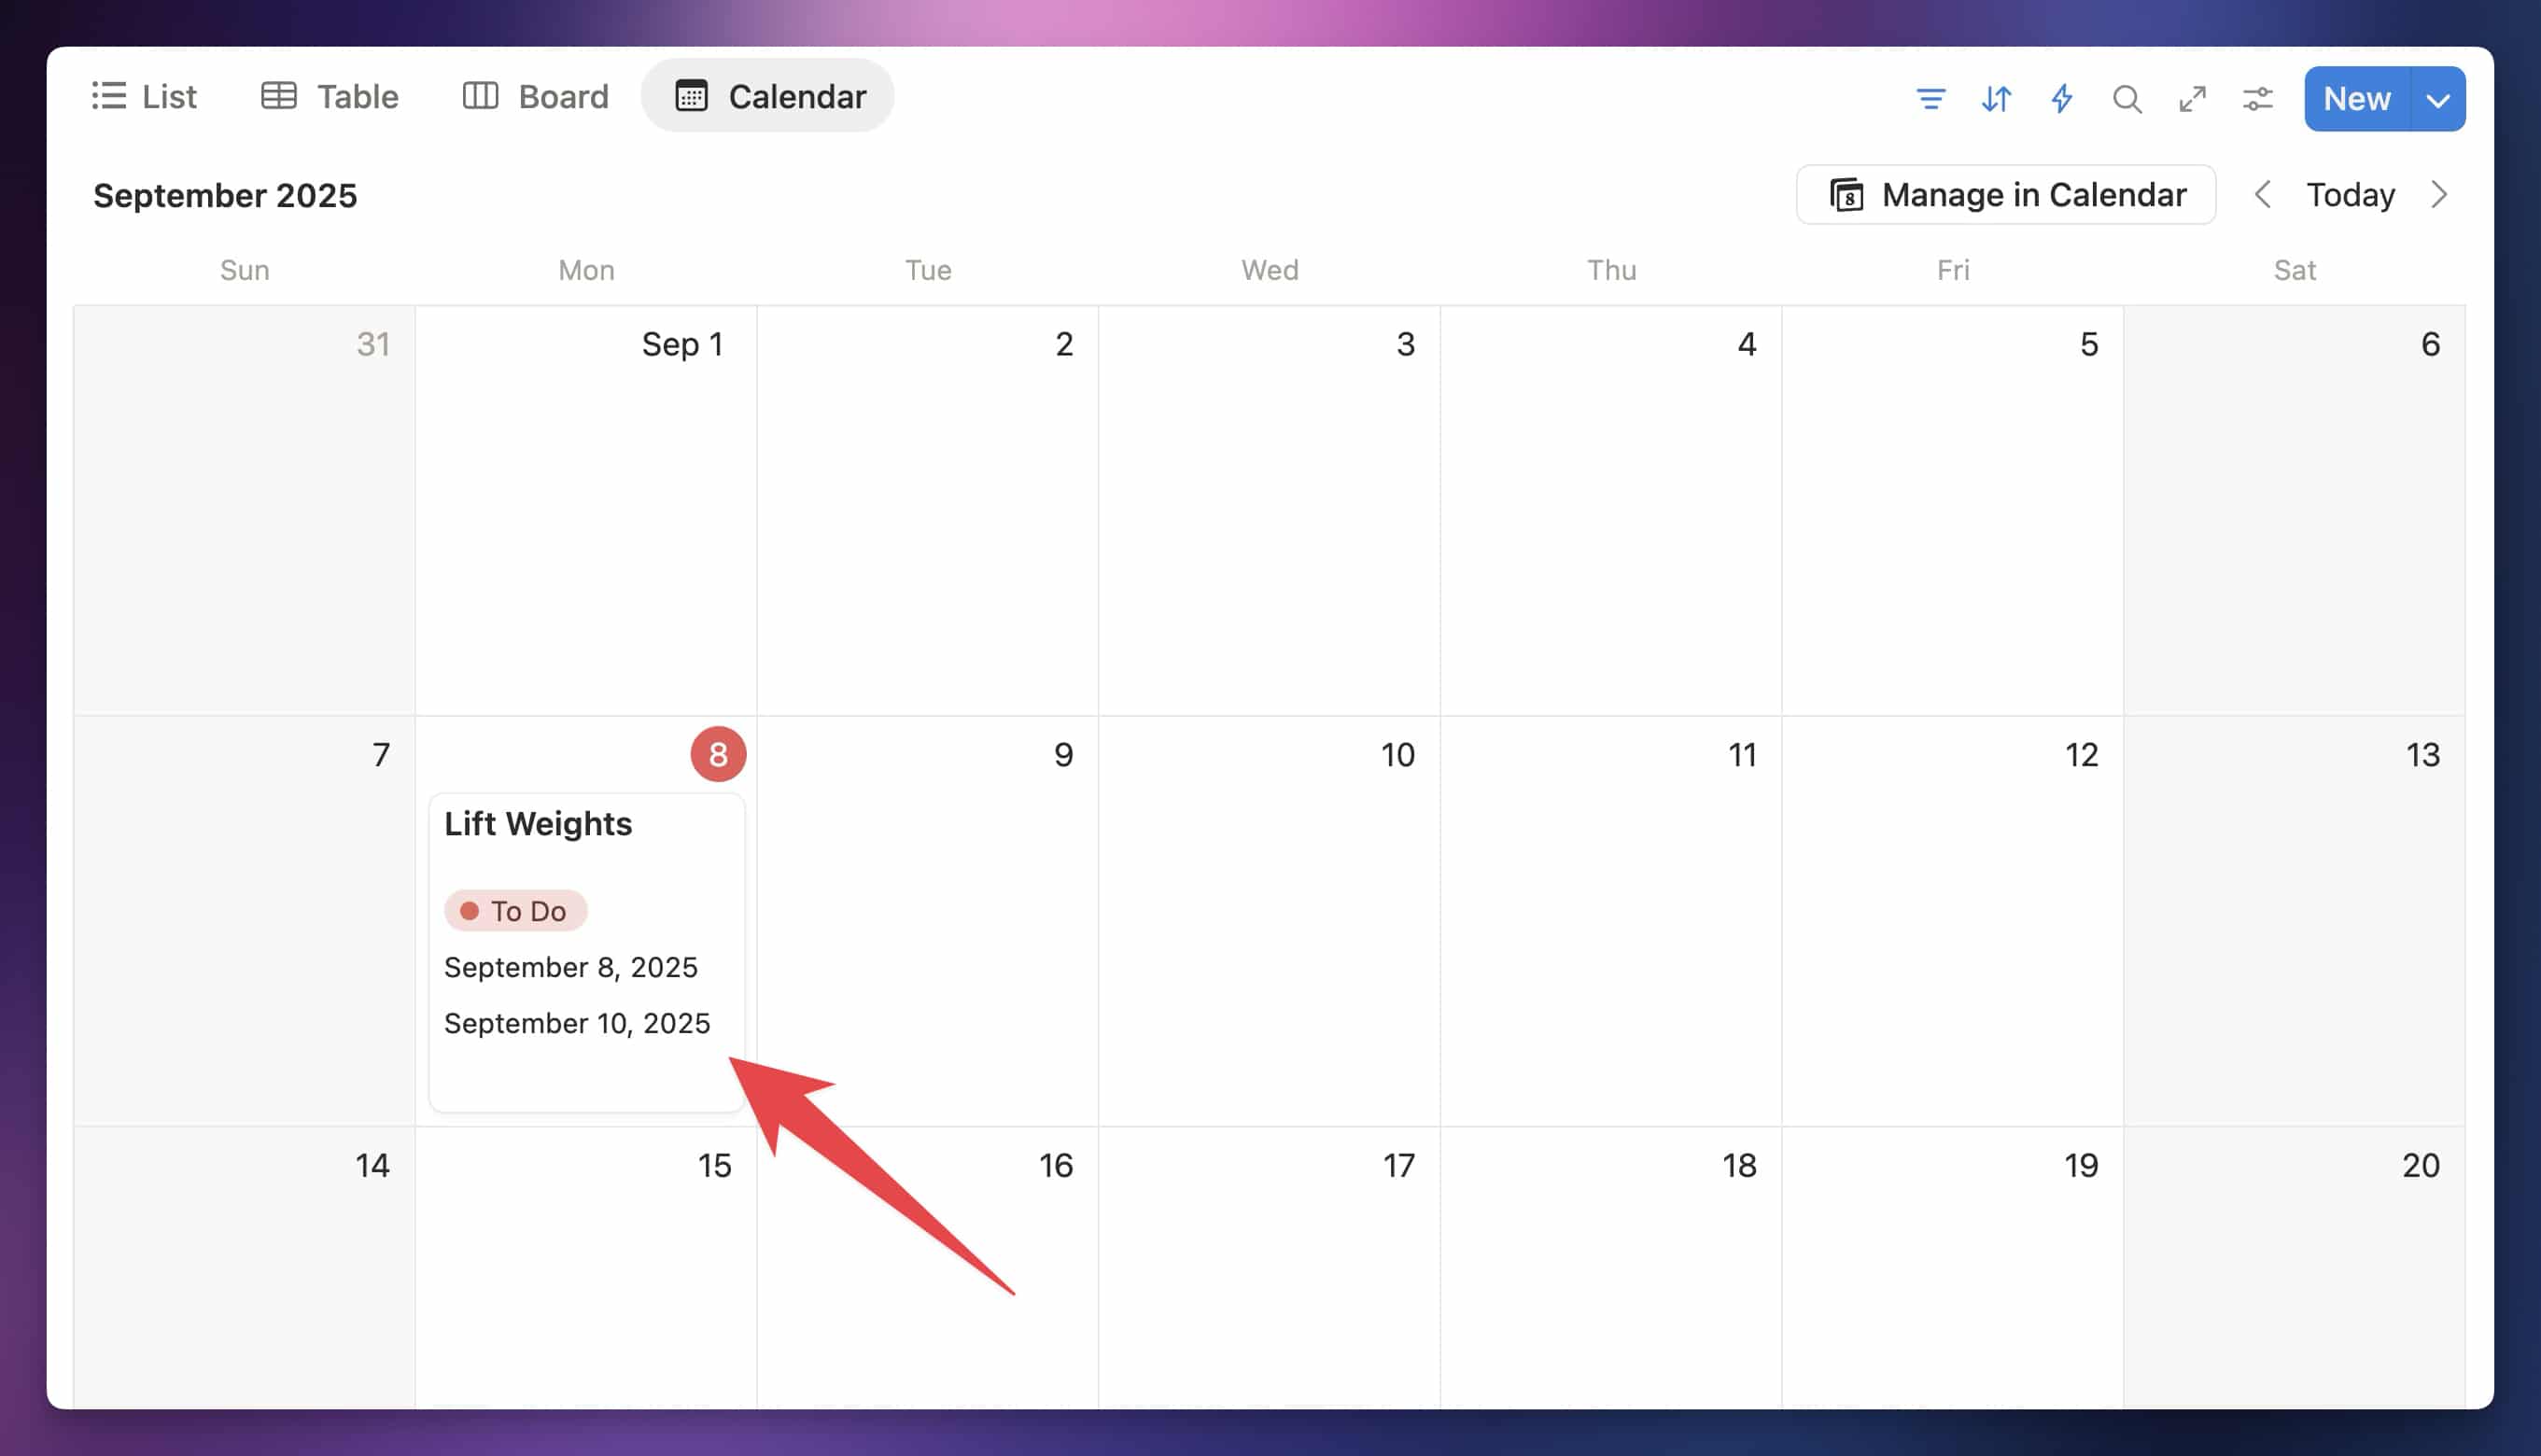
Once a task has values in both of these properties, you’ll see a Next Due date displayed.
Thanks to the built-in automations in my templates, whenever you check off the task (which sets its Status to Done), the Due date will be set to whatever is displayed in the Next Due date property. The Status will also be set back to To Do.
Note: Ultimate Brain also has an advanced automation that enables Task History as well. See the recurring tasks guide in the Ultimate Brain docs to learn how to enable this.
Optionally, you can also set these properties:
- Recur Unit – sets your Recur Interval number to count days, weeks, months, etc. Also includes advanced options, such as “last weekday of the month”.
- Days – allows you to choose specific days for the task, such as Mon/Weds/Fri, when Recur Unit is “Day(s)” and Recur Interval is
1. Also allows for intervals like “3rd Thursday of the Month” when Recur Unit is “Nth Weekday of Month” (only supports a single day of the week in this case).
Here’s a quick video showing how this works. Near the end, you’ll see the Status automatically set itself back to To Do, and you’ll see the Due date change.
How to Add Recurring Tasks Support to Notion
If you’d prefer to manually add recurring tasks support to your own existing task manager in Notion, here’s how to do it.
I’ll split this tutorial up into three parts:
- Set up simple recurring tasks yourself
- Add advanced recur intervals
- Add task history
I’ll also note points at which you can skip to the next section, as I’m trying to balance teaching you how these tools work with giving you the best solution as fast as possible.
Copy link to headingSet Up Simple Recurring Tasks
You can set up “simple” recurring tasks with just a few database properties and either a database automation or a button.
If you need a refresher on Notion databases, check out my full Notion databases tutorial.
First, create a database with these three properties (name them anything you like; these are just examples):
| Property Name | Property Type |
|---|---|
| Status | Status |
| Due | Date |
| Recur Interval | Number |

The Recur Interval specifies a number of days that will be added to the Due date whenever you finish the task. For example, if the Recur Interval is 7, then the task will recur weekly. If you complete it while Due is December 1, we’ll add 7 days, making the next value December 8.
Note: If you’d like to add more advanced recur intervals – e.g. “monthly” – you can skip to the section on Advanced Recur Intervals now. The rest of this current section only supports counting recur intervals by a number of days. It’s mainly here to educate folks on how to create simple automations and/or buttons.
From here, we need to create a way for Notion to automatically change the Due date whenever you complete a task. We can do that in two ways:
- Automations
- Button properties
Automations are absolutely the better way. They’ll allow you to specify a trigger that will carry out the automation. In our case, we want the trigger to be when the Status property is set to Done.
However, creating and editing automations requires you to be on a paid Notion plan. You don’t need to be on a paid plan to use automations that come in templates – another good reason to pick up Ultimate Tasks or Ultimate Brain – but you do need to be on one to create your own.
If you’re on the free plan, the alternative is creating a button property. This will add a clickable button to every page in your database.
Button properties can do almost everything automations can do – they just have to be triggered manually, by clicking the button.
I’ll be focusing primarily on automations in this guide. However, in the toggle section below you’ll find instructions on how to process recurring tasks with a button property.
To create a button property that can process your recurring task, follow these steps.
First, add a button property to your database. I recommend naming it Complete. Next, configure the button with a single action, which sets the Due date property to a Custom Formula value.
In the formula editor, add the following formula. Note that formulas in button properties and automations can’t currently be copied and pasted easily, so you’ll need to type this out yourself:
This page.Due.dateAdd(This page.Recur Interval, "days")
Code language: JavaScript (javascript)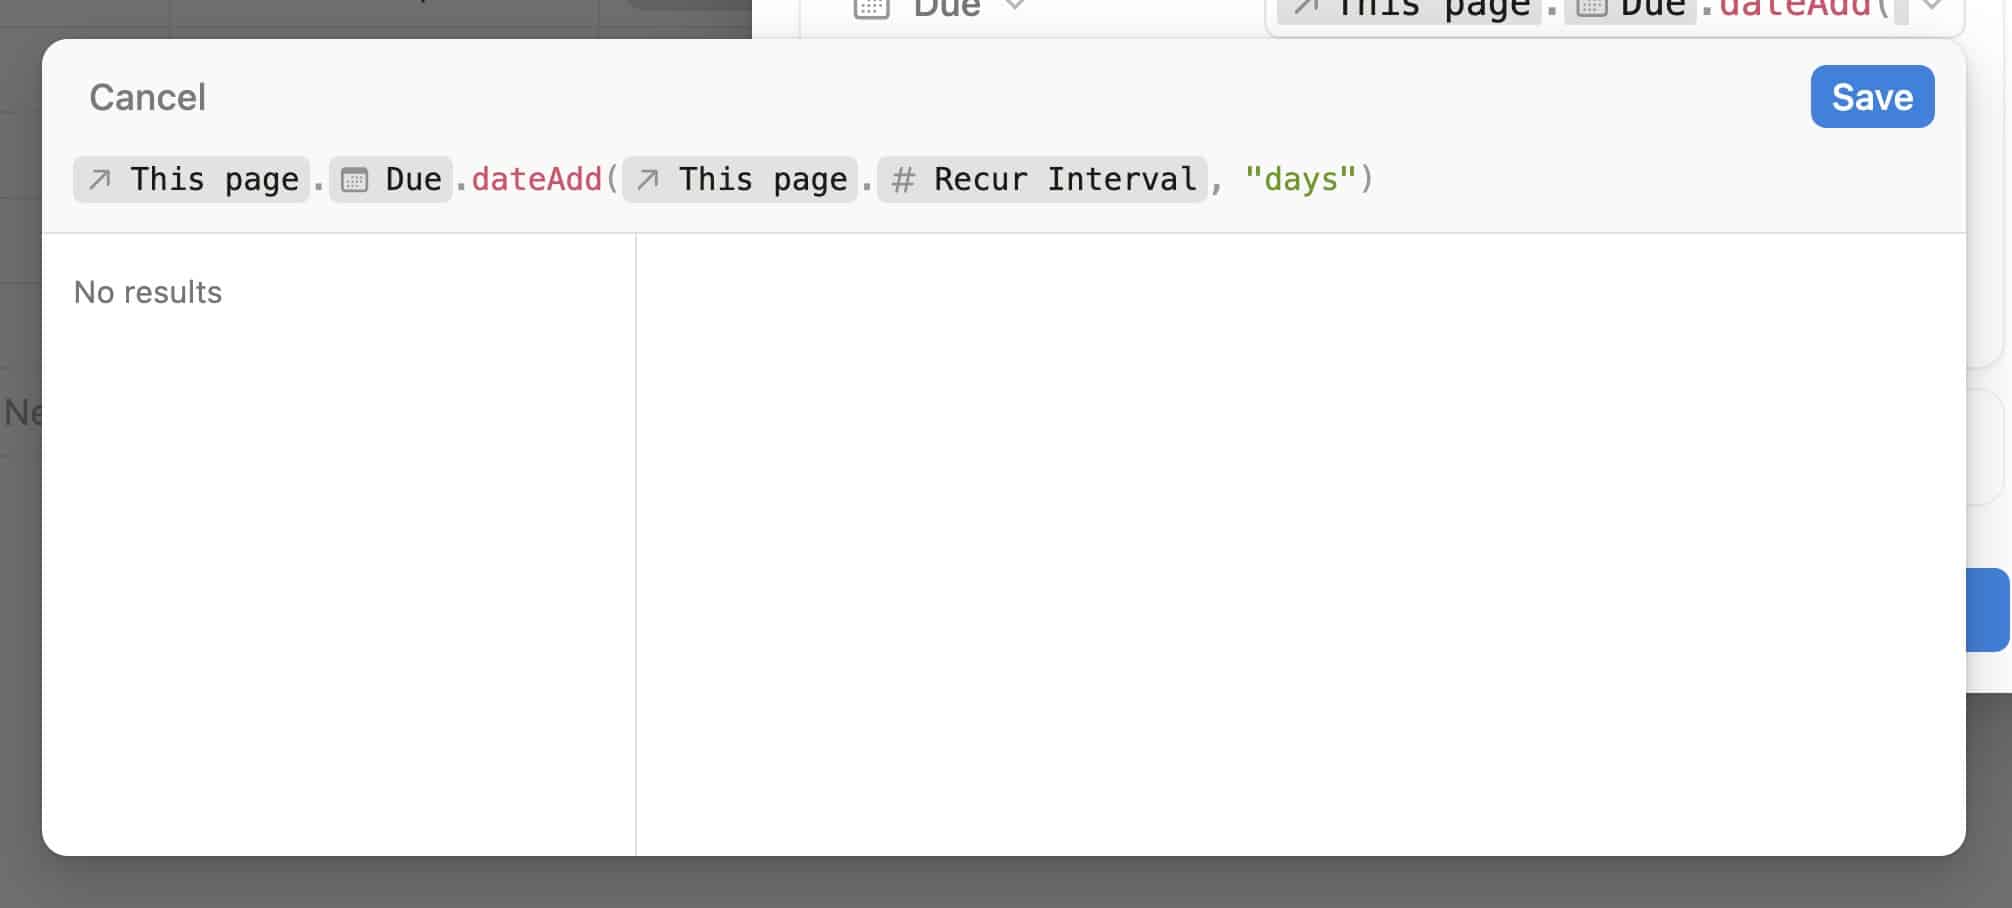
That’s it! With a button property, there’s really no need to mess with the Status property at all. To process the task, you need to hit the button – so setting Status to Done just adds an unnecessary second step.
Also, if you want to learn more about button properties or automations in general, check out the videos in these two toggles:

To create an automation that will process your recurring tasks automatically, you should first create a filtered view of your database that only displays recurring tasks.
Create a new view with a name like Recurring Tasks, then add two filters:
- Due is not empty
- Recur Interval is >=
1

These filters will ensure that only recurring tasks are shown in this view. This is important, as we only want the automation we’ll build to trigger on recurring tasks.
Next, click the ⚡️ (lightning) icon in any view of your database to open the Automations panel. Create a new automation and give it a name, such as Process Recurring Tasks.
Under the title, change the automation so it only triggers in the Recurring Tasks view you created. If you don’t do this, your automation will trigger even on one-time tasks!
In the Trigger section, set a single trigger: Status is set to Complete. Now, the automation will trigger whenever you set any recurring task’s status to a value in the Complete group.
Note: The automation will trigger even if you change a page’s Status value elsewhere in Notion. You don’t have to take the action from your Recurring Tasks view; the page just needs to fit the filter criteria of that view.
In the Do section, create two actions. First, set the Status back to Not Started.
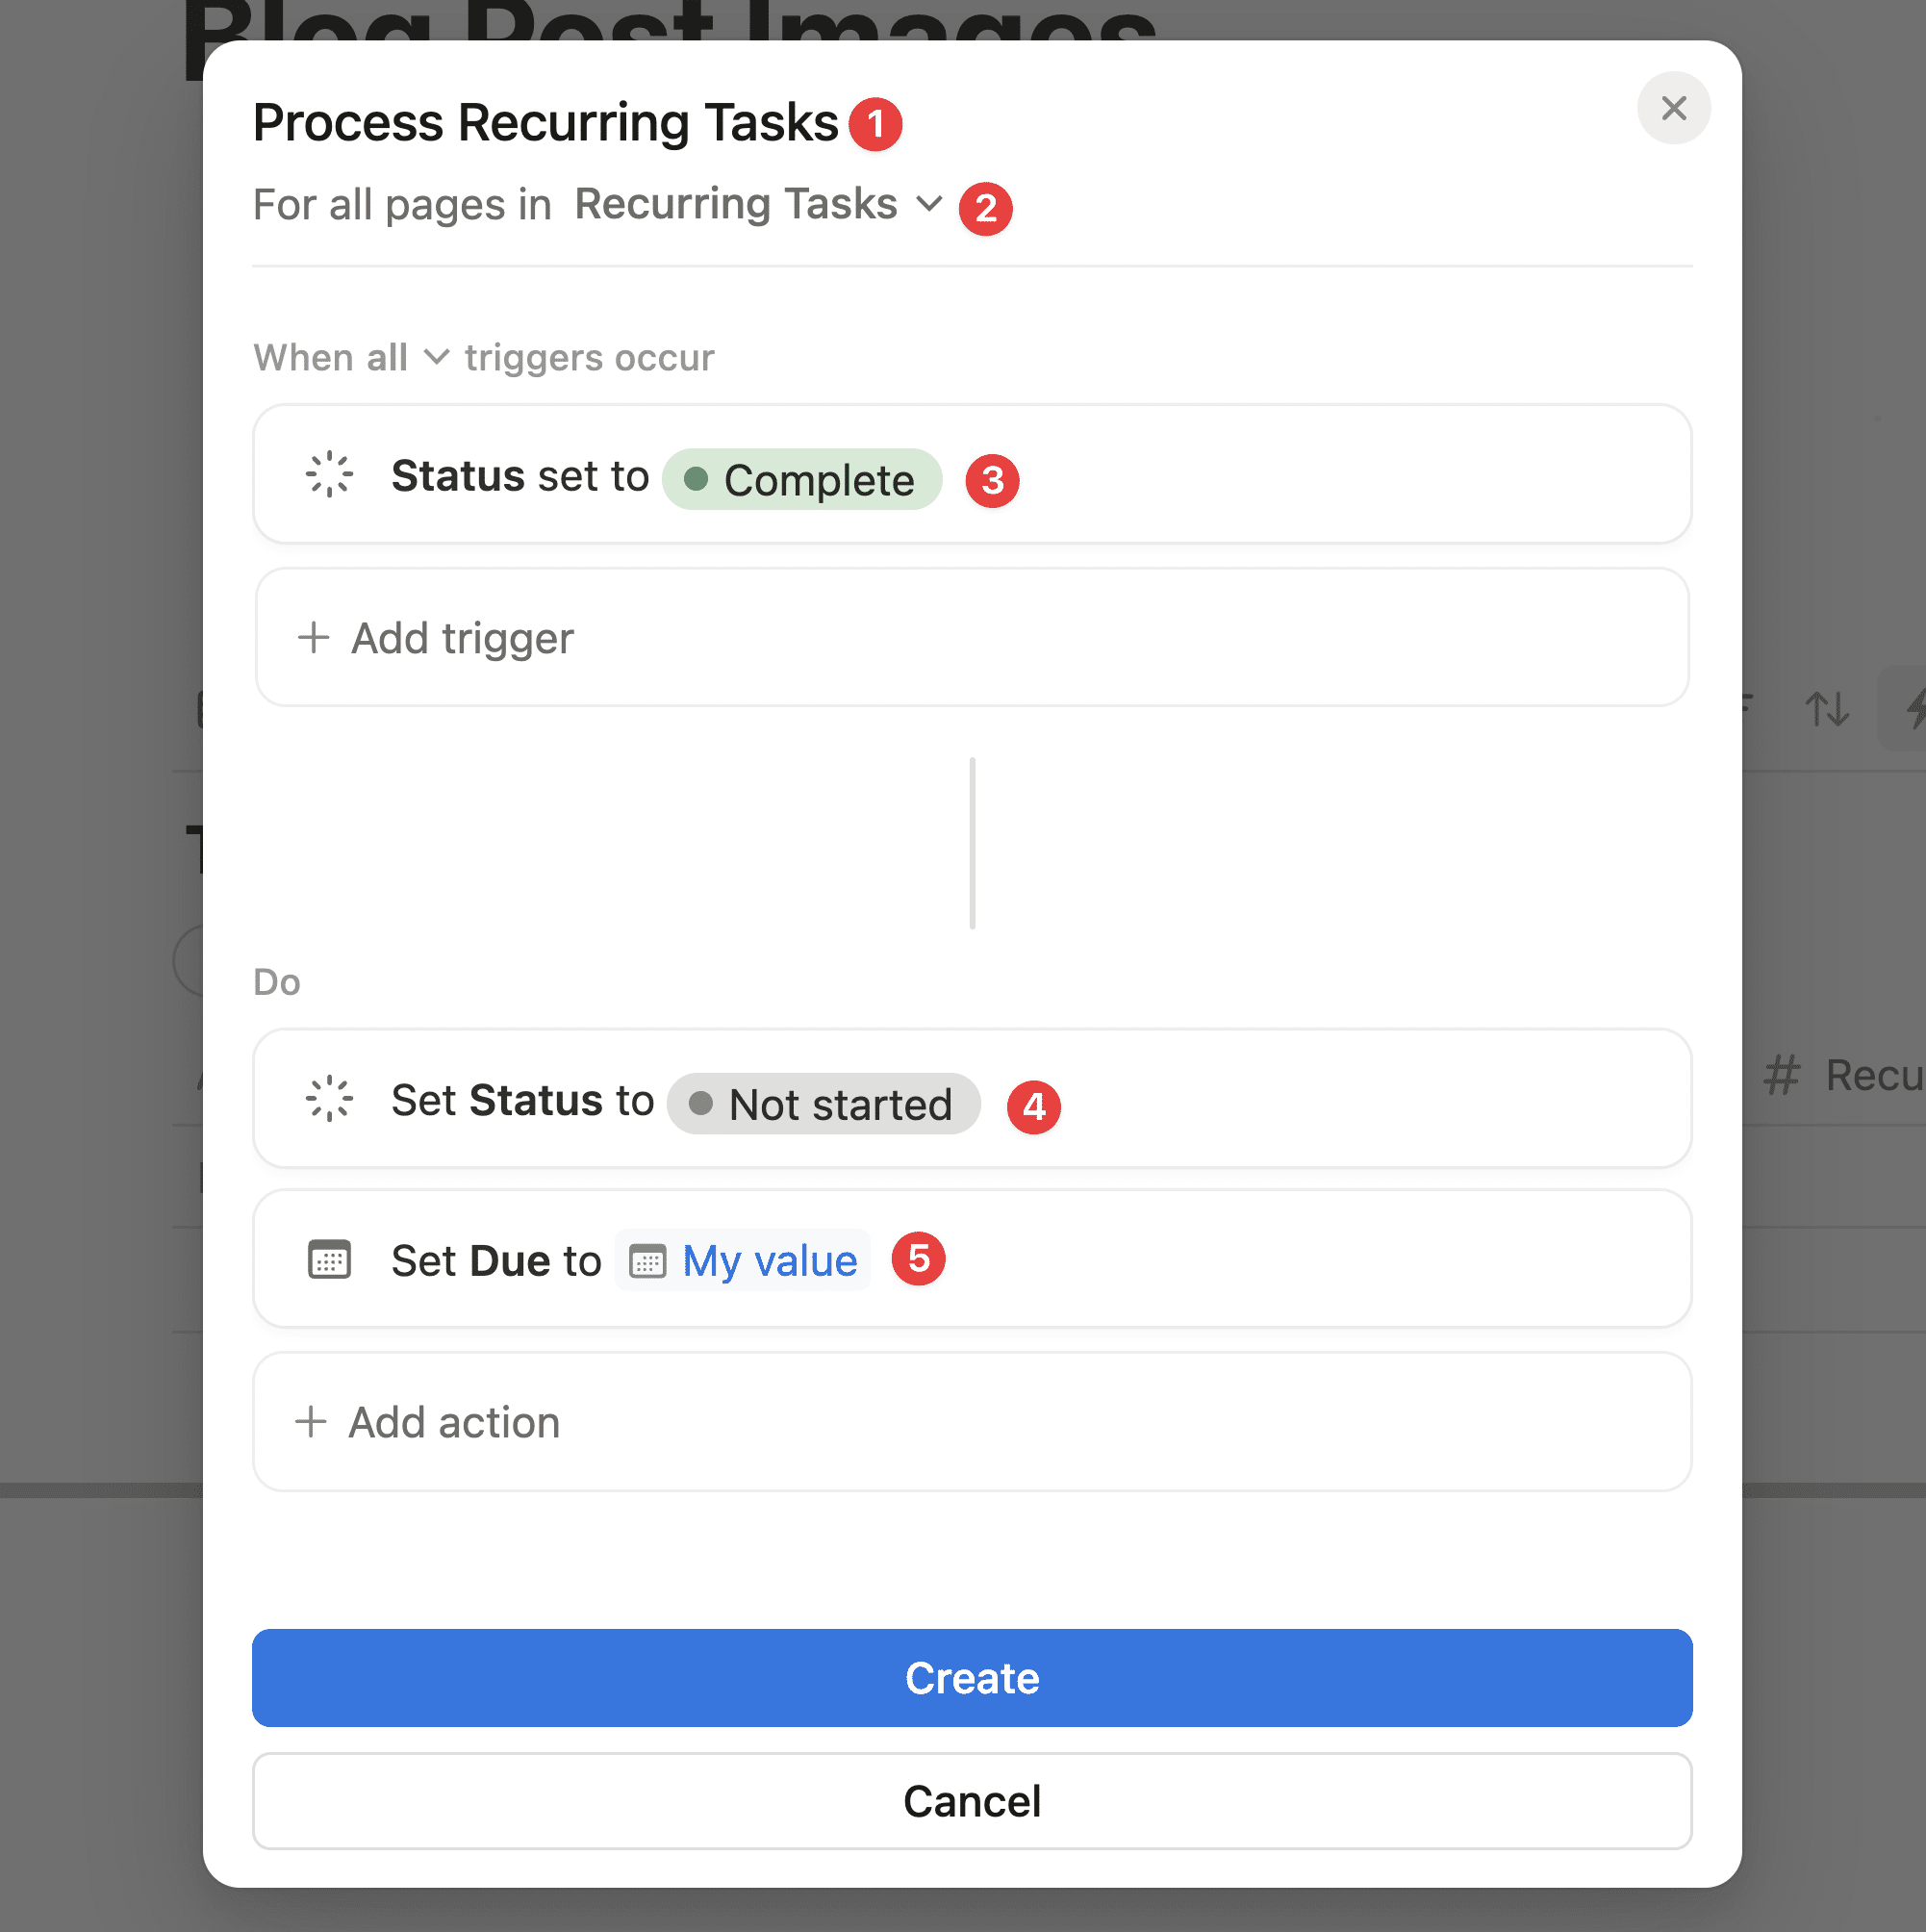
Next, set the Due property to a Custom Formula value. In the formula editor, type out the following formula (copying and pasting formulas in automations doesn’t work right now):
Trigger page.Due.dateAdd(
    Trigger page.Recur Interval,
    "days"
)
Code language: JavaScript (javascript)
Finally, click Save. You’re done!
That said, this is a very basic automation, and it currently has some major limitations. Since the Recur Interval can only count a number of days, it’ll break down if you want something like a monthly recurring task – since months have a variable number of days.
To fix this, let’s get fancier and add some advanced recur intervals.
Copy link to headingAdd Advanced Recur Intervals
In this section, we’ll upgrade our task manager so we can use more advanced recur intervals, such as “monthly” – and even fancier ones, like “last weekday of the month”!
You’ll also be able to choose specific days of the week, such as Mon/Weds/Fri, for recur schedules.

To get started, ensure you have all of the database properties listed in the table below. If you went through the previous section, you should already have the first three; create the other four now.
Important: Make sure to name your properties exactly as I’ve shown here – the formulas below depend on them. If you need a visual guide, you can see me create all of these properties from scratch in the video below. See the FAQ section on changing property names below if you want to change them later.
| Property Name | Type |
|---|---|
| Status | Status |
| Due | Date |
| Recur Interval | Number |
| Recur Unit | Select |
| Days | Multi-Select |
| Localization Key | Formula |
| Next Due | Formula |
In your Recur Unit property, add the following options:
- Day(s)
- Week(s)
- Month(s)
- Month(s) on the Last Day
- Month(s) on the First Weekday
- Month(s) on the Last Weekday
- Year(s)
- Nth Weekday of Month
In your Days property, add the following options:
- Monday
- Tuesday
- Wednesday
- Thursday
- Friday
- Saturday
- Sunday
This property has two functions:
First, it can make a task recur on multiple days of the week – for example, Mon/Wed/Friday. Enable this by setting Recur Unit to Day(s) and Recur Interval to 1, then choosings the days you want for the task.
Second, it can be used with the “Nth Weekday of Month” option in Recur Unit to make a task recur only during a specific week of the month – for example, “Every 3rd Thursday of the month”. You can enable a schedule like this with the following settings:
- Recur Inverval: 3
- Recur Unit: Nth Weekday of Month
- Days: Thursday
For this type of schedule, only a single day of the week is supported. Weekend days are supported; the term “weekday” is borrowed from Excel.
If you’d like to make the task recur on the first week of the month, set Recur Interval to 1. For the last week of the month, set Recur Interval to 5.
Note: In videos on this page, you’ll see that this property is named Days (Only if Set to 1 Day(s)). It has since been updated to the name “Days”, and now supports the Nth Weekday of Month recur unit.
Next, add the following formula to the Localization Key property. This property will allow you to localize your system; if you want to rename the options in the last two properties, you can set those same names in this formula. See the /* comment */ sections within it for examples.
[
/* Rewrite these weekday and recur unit options in your own language, so your second brain can work even better with your first. Make sure to set up the same options in the "Recur Unit" and "Days" properties afterward, so you can select them. Feel free to remove the original names afterward! */

/* ["lunes", "3ª", "mercredi", "木曜日", "piątek", "lørdag", "Double Sunday"] */
["Monday", "Tuesday", "Wednesday", "Thursday", "Friday", "Saturday", "Sunday"],

/* ["Day(s)", "Week(s)", "Month(s)", "Year(s)", "Month(s) on the Last Day", "Month(s) on the First Weekday", "Month(s) on the Last Weekday", "Nth Weekday of Month"] */
["Day(s)", "Week(s)", "Month(s)", "Year(s)", "Month(s) on the Last Day", "Month(s) on the First Weekday", "Month(s) on the Last Weekday", "Nth Weekday of Month"],

/* This final list is for Status option names. */
["To Do", "Doing", "Done"]
]
Code language: JavaScript (javascript)
Finally, add the following formula to the Next Due property.
This is a mega-formula my team and I have spent hundreds of hours developing; it’s what calculates your next due date, using all the other property values you’ve set. It also takes the current date into account, in the case of overdue tasks.
Note: Prior to January 20, 2025, the Days property was called Days (Only if Set to 1 Day(s)). If you are updating your template with this new formula, be sure to rename that property to Days first – otherwise you’ll encounter an error when pasting in the new formula below.
lets(
  version, "2.2.0",

  dueProp, prop("Due"),

  recurIntervalProp, prop("Recur Interval"),

  recurUnitProp, prop("Recur Unit"),

  localizationKeyProp, prop("Localization Key"),

  daysProp, prop("Days"),

  emptyDate, parseDate(""),

  if(!empty(recurIntervalProp) and !empty(dueProp),
    if(recurIntervalProp > 0 and recurIntervalProp == ceil(recurIntervalProp),
      lets(
        recurUnit,
          ifs(
            or(recurUnitProp == at(at(localizationKeyProp, 1), 0), recurUnitProp == "Day(s)"), "days",
            or(recurUnitProp == at(at(localizationKeyProp, 1), 1), recurUnitProp == "Week(s)"), "weeks",
            or(recurUnitProp == at(at(localizationKeyProp, 1), 2), recurUnitProp == "Month(s)"), "months",
            or(recurUnitProp == at(at(localizationKeyProp, 1), 3), recurUnitProp == "Year(s)"), "years",
            or(recurUnitProp == at(at(localizationKeyProp, 1), 4), recurUnitProp == "Month(s) on the Last Day"), "monthsonthelastday",
            or(recurUnitProp == at(at(localizationKeyProp, 1), 5), recurUnitProp == "Month(s) on the First Weekday"), "monthsonthefirstweekday",
            or(recurUnitProp == at(at(localizationKeyProp, 1), 6), recurUnitProp == "Month(s) on the Last Weekday"), "monthsonthelastweekday",
            or(and(!empty(at(at(localizationKeyProp, 1), 7)), recurUnitProp == at(at(localizationKeyProp, 1), 7)), recurUnitProp == "Nth Weekday of Month"), "nthweekday",
            "days"
          ),

        weekdays,
          match(
            [
              if(or(includes(daysProp, at(at(localizationKeyProp, 0), 1 - 1)), includes(daysProp, "Monday")), 1, false),
              if(or(includes(daysProp, at(at(localizationKeyProp, 0), 2 - 1)), includes(daysProp, "Tuesday")), 2, false),
              if(or(includes(daysProp, at(at(localizationKeyProp, 0), 3 - 1)), includes(daysProp, "Wednesday")), 3, false),
              if(or(includes(daysProp, at(at(localizationKeyProp, 0), 4 - 1)), includes(daysProp, "Thursday")), 4, false),
              if(or(includes(daysProp, at(at(localizationKeyProp, 0), 5 - 1)), includes(daysProp, "Friday")), 5, false),
              if(or(includes(daysProp, at(at(localizationKeyProp, 0), 6 - 1)), includes(daysProp, "Saturday")), 6, false),
              if(or(includes(daysProp, at(at(localizationKeyProp, 0), 7 - 1)), includes(daysProp, "Sunday")), 7, false)
            ],
            "[1-7]"
          ),

        dateDue, parseDate(formatDate(dueProp, "YYYY-MM-DD")),

        timeNow, now(),

        dateNow, parseDate(formatDate(timeNow, "YYYY-MM-DD")),

        hasRange, dateEnd(dueProp) > dateStart(dueProp),

        recurUnitLapseLength,
          if(
            includes(["days", "weeks", "months", "years"], recurUnit),
            dateBetween(dateNow, dateDue, recurUnit) / recurIntervalProp,
            false
          ),

        lastDayBaseDate,
          if(
            includes(["monthsonthelastday", "monthsonthefirstweekday", "monthsonthelastweekday"], recurUnit),
            if(
              year(dateNow) * 12 + month(dateNow) - (year(dateDue) * 12 + month(dateDue)) > 0,
              dateSubtract(dateAdd(dateSubtract(dateAdd(dateDue, ceil((year(dateNow) * 12 + month(dateNow) - (year(dateDue) * 12 + month(dateDue))) / recurIntervalProp) * recurIntervalProp, "months"), date(dateAdd(dateDue, ceil((year(dateNow) * 12 + month(dateNow) - (year(dateDue) * 12 + month(dateDue))) / recurIntervalProp) * recurIntervalProp, "months")) - 1, "days"), 1, "months"), 1, "days"),
              dateSubtract(dateAdd(dateSubtract(dateAdd(dateDue, recurIntervalProp, "months"), date(dateAdd(dateDue, recurIntervalProp, "months")) - 1, "days"), 1, "months"), 1, "days")
            ),
            emptyDate
          ),

        firstDayBaseDate,
          if(
            lastDayBaseDate != emptyDate,
            dateSubtract(lastDayBaseDate, date(lastDayBaseDate) - 1, "days"),
            emptyDate
          ),

        firstWeekdayBaseDate,
          if(
            lastDayBaseDate != emptyDate,
            if(
              test(day(firstDayBaseDate), "6|7"),
              dateAdd(firstDayBaseDate, 8 - day(firstDayBaseDate), "days"),
              firstDayBaseDate
            ),
            emptyDate
          ),

        lastWeekdayBaseDate,
          if(
            lastDayBaseDate != emptyDate,
            if(
              test(day(lastDayBaseDate), "6|7"),
              dateSubtract(lastDayBaseDate, day(lastDayBaseDate) - 5, "days"),
              lastDayBaseDate
            ),
            emptyDate
          ),

        nextLastBaseDate,
          if(
            lastDayBaseDate != emptyDate,
            dateSubtract(dateAdd(dateSubtract(dateAdd(lastDayBaseDate, recurIntervalProp, "months"), date(dateAdd(lastDayBaseDate, recurIntervalProp, "months")) - 1, "days"), 1, "months"), 1, "days"),
            emptyDate
          ),

        nextFirstBaseDate,
        if(
          lastDayBaseDate != emptyDate,
          dateSubtract(nextLastBaseDate, date(nextLastBaseDate) - 1, "days"),
          emptyDate
        ),

        nextFirstWeekday,
          if(
            lastDayBaseDate != emptyDate,
            if(
              test(day(nextFirstBaseDate), "6|7"),
              dateAdd(nextFirstBaseDate, 8 - day(nextFirstBaseDate), "days"),
              nextFirstBaseDate
            ),
            emptyDate
          ),

        nextLastWeekday,
          if(
            lastDayBaseDate != emptyDate,
            if(
              test(day(nextLastBaseDate), "6|7"),
              dateSubtract(nextLastBaseDate, day(nextLastBaseDate) - 5, "days"),
              nextLastBaseDate
            ),
            emptyDate
          ),

        firstWeekSpecificDayBaseDate,
          lets(
            baseMonthDate,
              if(
                timeNow > dueProp,
                timeNow,
                dueProp
              ),

            weekday, toNumber(at(weekdays, 0)),

            firstDayOfNextMonth, dateSubtract(dateAdd(baseMonthDate, 1, "months"), date(baseMonthDate) - 1, "days"),

            ifs(
              day(firstDayOfNextMonth) < weekday, dateAdd(firstDayOfNextMonth, weekday - day(firstDayOfNextMonth), "days"),
              day(firstDayOfNextMonth) > weekday, dateAdd(firstDayOfNextMonth, weekday - day(firstDayOfNextMonth) + 7, "days"),
              firstDayOfNextMonth
            )
          ),

        nthWeekdayBaseDate, dateAdd(firstWeekSpecificDayBaseDate, recurIntervalProp - 1, "weeks"),

        nextDueStart,
          ifs(
            recurUnit == "days" and length(weekdays) > 0 and recurIntervalProp == 1,
              if(
                dateNow >= dateDue,
                ifs(
                  includes(weekdays, format(day(dateAdd(dateNow, 1, "days")))), dateAdd(dateNow, 1, "days"),
                  includes(weekdays, format(day(dateAdd(dateNow, 2, "days")))), dateAdd(dateNow, 2, "days"),
                  includes(weekdays, format(day(dateAdd(dateNow, 3, "days")))), dateAdd(dateNow, 3, "days"),
                  includes(weekdays, format(day(dateAdd(dateNow, 4, "days")))), dateAdd(dateNow, 4, "days"),
                  includes(weekdays, format(day(dateAdd(dateNow, 5, "days")))), dateAdd(dateNow, 5, "days"),
                  includes(weekdays, format(day(dateAdd(dateNow, 6, "days")))), dateAdd(dateNow, 6, "days"),
                  includes(weekdays, format(day(dateAdd(dateNow, 7, "days")))), dateAdd(dateNow, 7, "days"),
                  emptyDate
                ),
                ifs(
                  includes(weekdays, format(day(dateAdd(dateDue, 1, "days")))), dateAdd(dateDue, 1, "days"),
                  includes(weekdays, format(day(dateAdd(dateDue, 2, "days")))), dateAdd(dateDue, 2, "days"),
                  includes(weekdays, format(day(dateAdd(dateDue, 3, "days")))), dateAdd(dateDue, 3, "days"),
                  includes(weekdays, format(day(dateAdd(dateDue, 4, "days")))), dateAdd(dateDue, 4, "days"),
                  includes(weekdays, format(day(dateAdd(dateDue, 5, "days")))), dateAdd(dateDue, 5, "days"),
                  includes(weekdays, format(day(dateAdd(dateDue, 6, "days")))), dateAdd(dateDue, 6, "days"),
                  includes(weekdays, format(day(dateAdd(dateDue, 7, "days")))), dateAdd(dateDue, 7, "days"),
                  emptyDate
                )
              ),

            recurUnit == "nthweekday" and length(weekdays) == 1 and recurIntervalProp >= 1 and recurIntervalProp <= 5,
              if(
                month(nthWeekdayBaseDate) == month(firstWeekSpecificDayBaseDate),
                nthWeekdayBaseDate,
                dateSubtract(nthWeekdayBaseDate, 1, "week")
              ),

            recurUnit == "monthsonthelastday",
              if(
                dateNow >= lastDayBaseDate,
                nextLastBaseDate,
                lastDayBaseDate
              ),

            recurUnit == "monthsonthefirstweekday",
              if(
                dateNow >= firstWeekdayBaseDate,
                nextFirstWeekday,
                firstWeekdayBaseDate
              ),

            recurUnit == "monthsonthelastweekday",
              if(
                dateNow >= lastWeekdayBaseDate,
                nextLastWeekday,
                lastWeekdayBaseDate
              ),

            includes(["days", "weeks", "months", "years"], recurUnit),
              if(
                dateBetween(dateNow, dateDue, "days") >= 1,
                if(
                  recurUnitLapseLength == ceil(recurUnitLapseLength),
                  dateAdd(dateDue, (recurUnitLapseLength + 1) * recurIntervalProp, recurUnit),
                  dateAdd(dateDue, ceil(recurUnitLapseLength) * recurIntervalProp, recurUnit)
                ),
                dateAdd(dateDue, recurIntervalProp, recurUnit)
              ),

            emptyDate
          ),

        recurRange, dateBetween(nextDueStart, dateDue, "days"),

        timeNextDueStart, dateAdd(dateStart(dueProp), recurRange, "days"),

        timeNextDueEnd, dateAdd(dateEnd(dueProp), recurRange, "days"),

        nextDue,
          if(
            hasRange,
            dateRange(timeNextDueStart, timeNextDueEnd),
            timeNextDueStart
          ),

        nextDue
      ),
      dueProp
    ),
    emptyDate
  )
)
Code language: JavaScript (javascript)The current version of the Next Due formula (2.2.0) shown above requires a property named Days to be present in your template. Prior to January 20, 2025, this property was called Days (Only if Set to 1 Day(s)).
If you duplicated your template prior to this date, we recommend updating that property name to Days, then pasting in the new formula shown above. It enables the new Nth Week (Specific Day) option in the Recur Unit property.
However, if you need the older version of the Next Due formula for any reason, here it is:
lets(
  dueProp, prop("Due"),

  recurIntervalProp, prop("Recur Interval"),

  recurUnitProp, prop("Recur Unit"),

  localizationKeyProp, prop("Localization Key"),

  emptyDate, parseDate(""),

  if(!empty(recurIntervalProp) and !empty(dueProp),
    if(recurIntervalProp > 0 and recurIntervalProp == ceil(recurIntervalProp),
      lets(
        recurUnit,
          ifs(
            or(recurUnitProp == at(at(localizationKeyProp, 1), 0), recurUnitProp == "Day(s)"), "days",
            or(recurUnitProp == at(at(localizationKeyProp, 1), 1), recurUnitProp == "Week(s)"), "weeks",
            or(recurUnitProp == at(at(localizationKeyProp, 1), 2), recurUnitProp == "Month(s)"), "months",
            or(recurUnitProp == at(at(localizationKeyProp, 1), 3), recurUnitProp == "Year(s)"), "years",
            or(recurUnitProp == at(at(localizationKeyProp, 1), 4), recurUnitProp == "Month(s) on the Last Day"), "monthsonthelastday",
            or(recurUnitProp == at(at(localizationKeyProp, 1), 5), recurUnitProp == "Month(s) on the First Weekday"), "monthsonthefirstweekday",
            or(recurUnitProp == at(at(localizationKeyProp, 1), 6), recurUnitProp == "Month(s) on the Last Weekday"), "monthsonthelastweekday",
            "days"
          ),

        weekdays,
          match(
            [
              if(or(includes(prop("Days (Only if Set to 1 Day(s))"), at(at(localizationKeyProp, 0), 1 - 1)), includes(prop("Days (Only if Set to 1 Day(s))"), "Monday")), 1, false),
              if(or(includes(prop("Days (Only if Set to 1 Day(s))"), at(at(localizationKeyProp, 0), 2 - 1)), includes(prop("Days (Only if Set to 1 Day(s))"), "Tuesday")), 2, false),
              if(or(includes(prop("Days (Only if Set to 1 Day(s))"), at(at(localizationKeyProp, 0), 3 - 1)), includes(prop("Days (Only if Set to 1 Day(s))"), "Wednesday")), 3, false),
              if(or(includes(prop("Days (Only if Set to 1 Day(s))"), at(at(localizationKeyProp, 0), 4 - 1)), includes(prop("Days (Only if Set to 1 Day(s))"), "Thursday")), 4, false),
              if(or(includes(prop("Days (Only if Set to 1 Day(s))"), at(at(localizationKeyProp, 0), 5 - 1)), includes(prop("Days (Only if Set to 1 Day(s))"), "Friday")), 5, false),
              if(or(includes(prop("Days (Only if Set to 1 Day(s))"), at(at(localizationKeyProp, 0), 6 - 1)), includes(prop("Days (Only if Set to 1 Day(s))"), "Saturday")), 6, false),
              if(or(includes(prop("Days (Only if Set to 1 Day(s))"), at(at(localizationKeyProp, 0), 7 - 1)), includes(prop("Days (Only if Set to 1 Day(s))"), "Sunday")), 7, false)
            ],
            "[1-7]"
          ),

        dateDue, parseDate(formatDate(dueProp, "YYYY-MM-DD")),

        timeNow, now(),

        dateNow, parseDate(formatDate(timeNow, "YYYY-MM-DD")),

        hasRange, dateEnd(dueProp) > dateStart(dueProp),

        recurUnitLapseLength,
          if(
            includes(["days", "weeks", "months", "years"], recurUnit),
            dateBetween(dateNow, dateDue, recurUnit) / recurIntervalProp,
            false
          ),

        lastDayBaseDate,
          if(
            includes(["monthsonthelastday", "monthsonthefirstweekday", "monthsonthelastweekday"], recurUnit),
            if(
              year(dateNow) * 12 + month(dateNow) - (year(dateDue) * 12 + month(dateDue)) > 0,
              dateSubtract(dateAdd(dateSubtract(dateAdd(dateDue, ceil((year(dateNow) * 12 + month(dateNow) - (year(dateDue) * 12 + month(dateDue))) / recurIntervalProp) * recurIntervalProp, "months"), date(dateAdd(dateDue, ceil((year(dateNow) * 12 + month(dateNow) - (year(dateDue) * 12 + month(dateDue))) / recurIntervalProp) * recurIntervalProp, "months")) - 1, "days"), 1, "months"), 1, "days"),
              dateSubtract(dateAdd(dateSubtract(dateAdd(dateDue, recurIntervalProp, "months"), date(dateAdd(dateDue, recurIntervalProp, "months")) - 1, "days"), 1, "months"), 1, "days")
            ),
            emptyDate
          ),

        firstDayBaseDate,
          if(
            lastDayBaseDate != emptyDate,
            dateSubtract(lastDayBaseDate, date(lastDayBaseDate) - 1, "days"),
            emptyDate
          ),

        firstWeekdayBaseDate,
          if(
            lastDayBaseDate != emptyDate,
            if(
              test(day(firstDayBaseDate), "6|7"),
              dateAdd(firstDayBaseDate, 8 - day(firstDayBaseDate), "days"),
              firstDayBaseDate
            ),
            emptyDate
          ),

        lastWeekdayBaseDate,
          if(
            lastDayBaseDate != emptyDate,
            if(
              test(day(lastDayBaseDate), "6|7"),
              dateSubtract(lastDayBaseDate, day(lastDayBaseDate) - 5, "days"),
              lastDayBaseDate
            ),
            emptyDate
          ),

        nextLastBaseDate,
          if(
            lastDayBaseDate != emptyDate,
            dateSubtract(dateAdd(dateSubtract(dateAdd(lastDayBaseDate, recurIntervalProp, "months"), date(dateAdd(lastDayBaseDate, recurIntervalProp, "months")) - 1, "days"), 1, "months"), 1, "days"),
            emptyDate
          ),

        nextFirstBaseDate,
        if(
          lastDayBaseDate != emptyDate,
          dateSubtract(nextLastBaseDate, date(nextLastBaseDate) - 1, "days"),
          emptyDate
        ),

        nextFirstWeekday,
          if(
            lastDayBaseDate != emptyDate,
            if(
              test(day(nextFirstBaseDate), "6|7"),
              dateAdd(nextFirstBaseDate, 8 - day(nextFirstBaseDate), "days"),
              nextFirstBaseDate
            ),
            emptyDate
          ),

        nextLastWeekday,
          if(
            lastDayBaseDate != emptyDate,
            if(
              test(day(nextLastBaseDate), "6|7"),
              dateSubtract(nextLastBaseDate, day(nextLastBaseDate) - 5, "days"),
              nextLastBaseDate
            ),
            emptyDate
          ),

        nextDueStart,
          ifs(
            recurUnit == "days" and length(weekdays) > 0 and recurIntervalProp == 1,
              if(
                dateNow >= dateDue,
                ifs(
                  includes(weekdays, format(day(dateAdd(dateNow, 1, "days")))), dateAdd(dateNow, 1, "days"),
                  includes(weekdays, format(day(dateAdd(dateNow, 2, "days")))), dateAdd(dateNow, 2, "days"),
                  includes(weekdays, format(day(dateAdd(dateNow, 3, "days")))), dateAdd(dateNow, 3, "days"),
                  includes(weekdays, format(day(dateAdd(dateNow, 4, "days")))), dateAdd(dateNow, 4, "days"),
                  includes(weekdays, format(day(dateAdd(dateNow, 5, "days")))), dateAdd(dateNow, 5, "days"),
                  includes(weekdays, format(day(dateAdd(dateNow, 6, "days")))), dateAdd(dateNow, 6, "days"),
                  includes(weekdays, format(day(dateAdd(dateNow, 7, "days")))), dateAdd(dateNow, 7, "days"),
                  emptyDate
                ),
                ifs(
                  includes(weekdays, format(day(dateAdd(dateDue, 1, "days")))), dateAdd(dateDue, 1, "days"),
                  includes(weekdays, format(day(dateAdd(dateDue, 2, "days")))), dateAdd(dateDue, 2, "days"),
                  includes(weekdays, format(day(dateAdd(dateDue, 3, "days")))), dateAdd(dateDue, 3, "days"),
                  includes(weekdays, format(day(dateAdd(dateDue, 4, "days")))), dateAdd(dateDue, 4, "days"),
                  includes(weekdays, format(day(dateAdd(dateDue, 5, "days")))), dateAdd(dateDue, 5, "days"),
                  includes(weekdays, format(day(dateAdd(dateDue, 6, "days")))), dateAdd(dateDue, 6, "days"),
                  includes(weekdays, format(day(dateAdd(dateDue, 7, "days")))), dateAdd(dateDue, 7, "days"),
                  emptyDate
                )
              ),

            recurUnit == "monthsonthelastday",
              if(
                dateNow >= lastDayBaseDate,
                nextLastBaseDate,
                lastDayBaseDate
              ),

            recurUnit == "monthsonthefirstweekday",
              if(
                dateNow >= firstWeekdayBaseDate,
                nextFirstWeekday,
                firstWeekdayBaseDate
              ),

            recurUnit == "monthsonthelastweekday",
              if(
                dateNow >= lastWeekdayBaseDate,
                nextLastWeekday,
                lastWeekdayBaseDate
              ),

            includes(["days", "weeks", "months", "years"], recurUnit),
              if(
                dateBetween(dateNow, dateDue, "days") >= 1,
                if(
                  recurUnitLapseLength == ceil(recurUnitLapseLength),
                  dateAdd(dateDue, (recurUnitLapseLength + 1) * recurIntervalProp, recurUnit),
                  dateAdd(dateDue, ceil(recurUnitLapseLength) * recurIntervalProp, recurUnit)
                ),
                dateAdd(dateDue, recurIntervalProp, recurUnit)
              ),

            emptyDate
          ),

        recurRange, dateBetween(nextDueStart, dateDue, "days"),

        timeNextDueStart, dateAdd(dateStart(dueProp), recurRange, "days"),

        timeNextDueEnd, dateAdd(dateEnd(dueProp), recurRange, "days"),

        nextDue,
          if(
            hasRange,
            dateRange(timeNextDueStart, timeNextDueEnd),
            timeNextDueStart
          ),

        nextDue
      ),
      dueProp
    ),
    emptyDate
  )
)
Code language: JavaScript (javascript)If you’re running into any errors while creating these properties and pasting the formulas, it’s likely that there’s a typo in one of your property names or option names. I even had a typo I didn’t notice the first time I tried to record the video below!
In the video below, you can see me build all the properties from scratch, and then copy and paste the formulas directly from the code blocks above. If you’ve run into an error you can’t figure out, watch the video closely to see where your setup differs.
Unfortunately, I cannot provide any additional support beyond this video for free; however, if you’ve purchased one of our paid templates (such as Ultimate Brain), you can ask for support in our customer community.
Note: This video was recorded before we shipped the latest version of the Next Due formula shown above. The latest version requires the “Days” property, which may be called “Days (Only if Set to 1 Day(s))” in your template. To use the latest version, make sure you’ve updated that property’s name to “Days”.
Next, we’ll work through the process of creating an automation to process your recurring tasks when you complete them.
To start, first create a filtered view of your database that only displays recurring tasks.
Note: If you already did this part in the first step, you can skip down to changing the formula value in your automation’s Due property.
Create a new view with a name like Recurring Tasks, then add two filters:
- Due is not empty
- Recur Interval is >=
1
These filters will ensure that only recurring tasks are shown in this view. This is important, as we only want the automation we’ll build to trigger on recurring tasks.
Next, click the ⚡️ (lightning) icon in any view of your database to open the Automations panel. Create a new automation and give it a name, such as Process Recurring Tasks.
Under the title, change the automation so it only triggers in the Recurring Tasks view you created. If you don’t do this, your automation will trigger even on one-time tasks!
In the Trigger section, set a single trigger: Status is set to Complete. Now, the automation will trigger whenever you set any recurring task’s status to a value in the Complete group.
Note: The automation will trigger even if you change a page’s Status value elsewhere in Notion. You don’t have to take the action from your Recurring Tasks view; the page just needs to fit the filter criteria of that view.
In the Do section, create two actions. First, set the Status back to Not Started.
Next, set the Due property to a Custom Formula value. In the formula editor, type out the following formula (copying and pasting formulas in automations doesn’t work right now):
Trigger page.Next Due
Code language: JavaScript (javascript)
If you already went through building a custom formula for the Due property in the last step, you’ll notice that this one is much simpler! That’s because we’re simply referencing the value of the Next Due formula property, which is doing all the heavy lifting for us.
In general, it’s better to use formula properties for extremely complex formulas, instead of trying to build those formulas directly in an automation. A major reason for this is that you can always see the immediate output of a formula property. Formulas in automations won’t show you a preview of the output, so testing them can take a lot longer.
Once you’ve entered that formula, hit Save. Now you’re done!
At this point, you have a fully functional recurring tasks system. If you’d like to add task history to it, continue to the next part.
Copy link to headingAdd Task History to Recurring Tasks
Notion’s new automation features are really powerful, and we can use them to actually keep track of each time we’ve done a recurring task in the past.
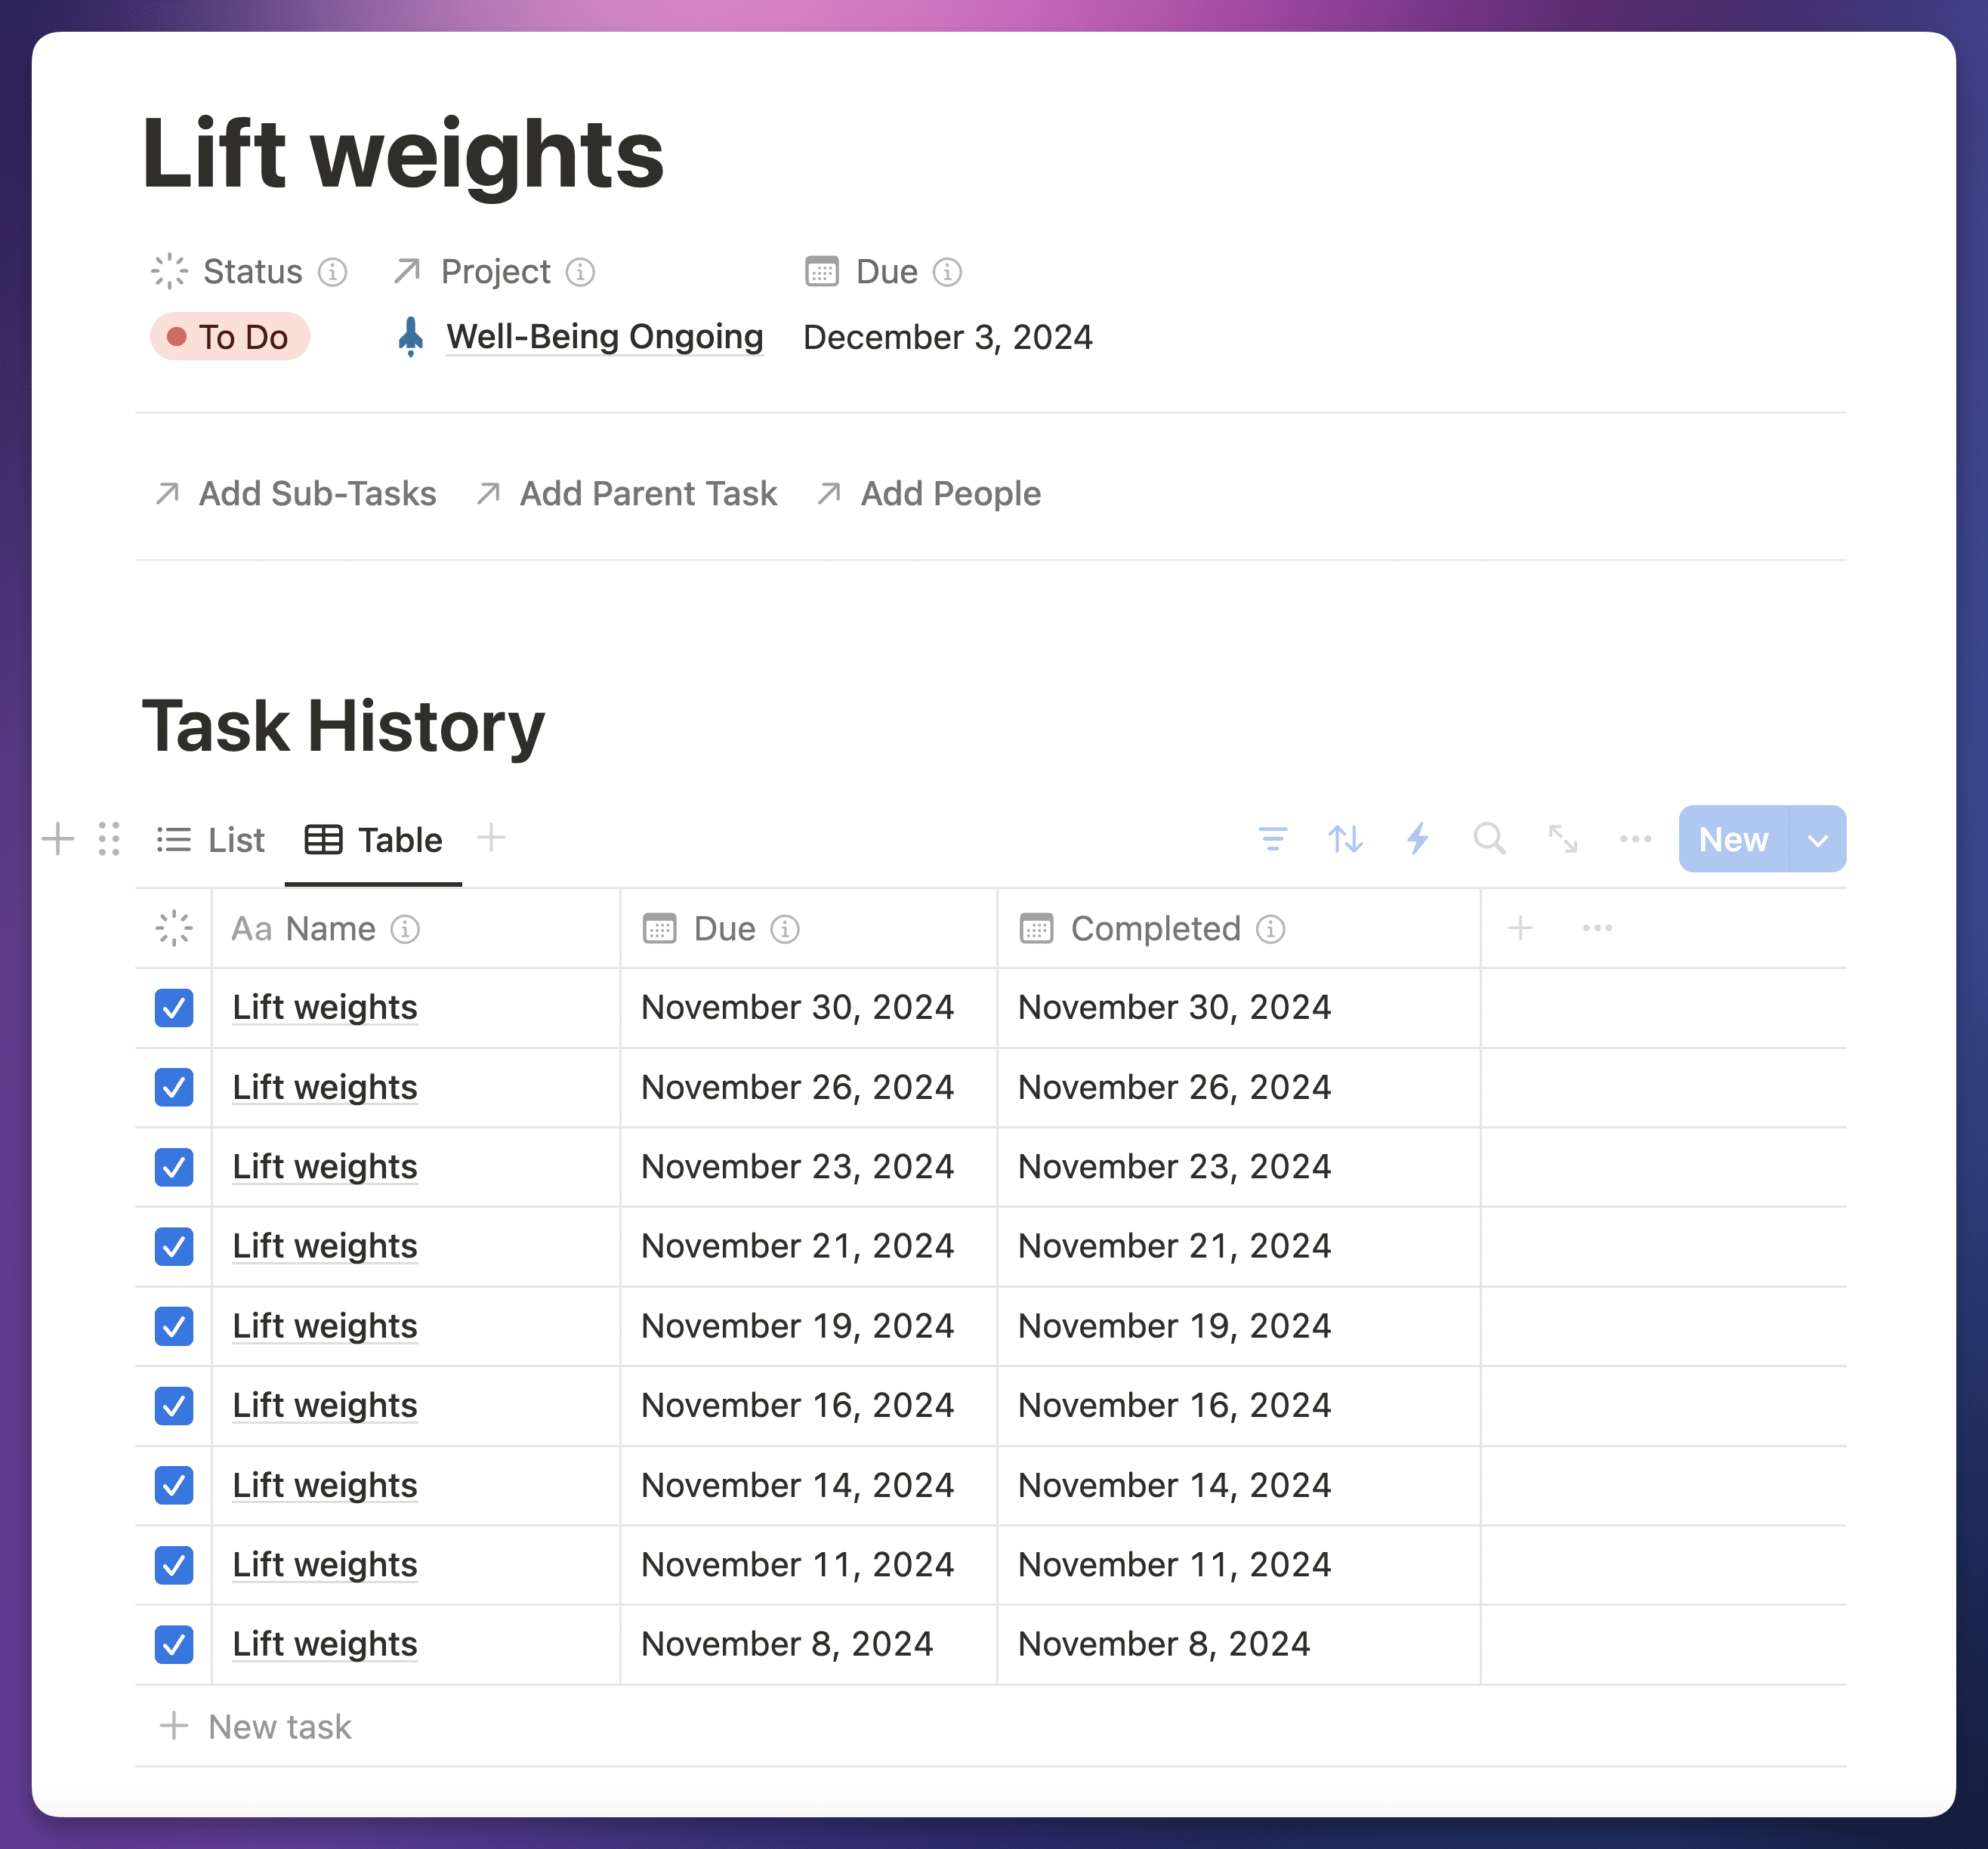
I call this “task history” and it’s a feature that not many other task management apps have. This is the beauty of Notion – it gives us flexibile tools that let us create useful features that other apps don’t have!
Here’s how this feature will work at a glance:
- The Process Recurring Tasks automation will still set the recurring task’s Status back to Not Started and move its Due date, as normal.
- In addition, it will create a duplicate of the task. This duplicate will be the historical record; it will have the original due date, and will be set to Done.
- Within the recurring task’s page body, we’ll create a view that shows the task history for that task.
To start, add two more properties to your tasks database:
| Property Name | Type |
|---|---|
| Completed | Date |
| Occurrences | Relation (connects to the same database, Two Way Relation off) |
Next, create a database template called Recurring Task w/ History in your tasks database. If you don’t know how to do this, learn how to create database templates here.

In this template, create a linked database view with a self-referential filter, where Occurrences contains Recurring Task w/ History.

I recommend displaying the Completed property in this view.
Finally, update your Process Recurring Tasks automation.
The trigger can stay the same as before. In the Do section, add a new action and drag it so it is in first position. Choose the Add Page To action, and ensure you’re adding a new page to your Tasks database.
Set the following property values. For most of them, choose the Custom Formula option. This will allow you to “transfer” the value from the recurring task to the new historical record you’re creating.
Remember that you’ll need to type the formula values manually, as copying and pasting doesn’t currently work.
| Property Name | Value |
|---|---|
| Name | Trigger Page.Name |
| Due | Trigger Page.Due |
| Status | Done |
| Completed | Date Triggered |
| Occurrences | Trigger page |
| Additional Properties | Trigger page.[property name] |
Here’s a look at how I’ve set up this automation step in my own copy of Ultimate Brain. I’ll note that this automation is already included in Ultimate Brain; here’s how to enable it.

Once you’re done, click Save.
Now, when you create a new recurring task, you can apply the Recurring Task w/ History page template in order to see the Task History view.
Each time you set the recurring task to Done, the automation will trigger, creating a historical record that will show up in that view.
If you want to take things a step further, you can create a Chart in your page template in order to show the number of times you’ve completed the task each week or month. Check out my in-depth guide to Notion Charts in this video:

FAQs
When you create a recurring event in a calendar app, like Google Calendar, you see that event each time it’s set to occur.
Naturally, you’d expect to see the same thing in Calendar views within Notion when you create a recurring task. But instead, you only see the recurring task on the next day it’s due. What gives?
This comes down to a fundamental difference between how calendar apps work compared to other apps, like Notion, that merely offer a calendar view in addition to other types of views (e.g. Table, Board).
In both types of apps, each event/task is a row in the app’s backend database. That database row stores information about the event/task’s date.
But here’s where calendar apps go a step further. Calendar apps, like Google Calendar, Apple Calendar, and Outlook Calendar, implement something called RRULES (or Recurrence Rules).
These essentially tell the calendar app’s UI how to show a single database row in multiple slots on the calendar. Here’s an easier-to-read blog post on how RRULES work if you’re curious.
The upshot is that Notion can’t show recurring tasks on multiple days because Notion doesn’t support RRULES. Most task management apps don’t.
Additionally, even Notion Calendar won’t show your recurring tasks from Notion across multiple days. This is because the data is still coming from Notion itself, meaning it lacks RRULES.
However, Notion Calendar will show recurring events from your Google Calendar account across multiple days, because those are actual calendar events with full RRULE support.
So here’s my recommendation:
- If it’s a recurring event, and you want to see it on the calendar across every occurrence, create it in Google Calendar.
- If it’s a recurring task, and all that matters is that you know when it’s due next, create it in Notion.
Luckily, you can use Notion Calendar to view both types of entries in one place!
If you want to change the names of your database properties, or of the options in your Select and Multi-Select properties, this section for you.
The main problem you’ll run into when doing this has to do with the Next Due formula I’ve shared above. This formula expects certain properties to exist, so if you paste it into your formula editor without them, it’ll throw an error.
For this reason, you must create all the properties I described above, with their exact names, before pasting in that formula.
However, after you’ve pasted in the Next Due formula, you can change any of the property names as you like. When you do, they’ll be automatically updated in the Next Due formula.
Changing the option names in Select and Multi-Select properties is trickier, though. They will not auto-update in the formula, so if you wanted to change the option Monday to 月曜日, for example, you would also need to update the Localization Key formula to match.
Localization Key enables this kind of localization (or any name changes) by establishing arrays of values that the Next Due formula can use. Let’s take a look at it:
[
/* Rewrite these weekday and recur unit options in your own language, so your second brain can work even better with your first. Make sure to set up the same options in the "Recur Unit" and "Days (Only If Set to 1 Day(s))" properties afterward, so you can select them. Feel free to remove the original names afterward! */

/* ["lunes", "3ª", "mercredi", "木曜日", "piątek", "lørdag", "Double Sunday"] */
["Monday", "Tuesday", "Wednesday", "Thursday", "Friday", "Saturday", "Sunday"],

/* ["Day(s)", "Week(s)", "Month(s)", "Year(s)", "Month(s) on the Last Day", "Month(s) on the First Weekday", "Month(s) on the Last Weekday"] */
["Day(s)", "Week(s)", "Month(s)", "Year(s)", "Month(s) on the Last Day", "Month(s) on the First Weekday", "Month(s) on the Last Weekday"],

/* This final list is for Status option names. */
["To Do", "Doing", "Done"]
]
Code language: JavaScript (javascript)
The entire formula returns an array, which is simply an ordered list of values.
Each value in the array is an array itself, making the entire return value a multi-dimensional array. The values are:
- List of days of the week
- List of recur unit names
- List of status option names
The Next Due formula looks for specific names, such as Monday, when calculating its final date. However, if that term is not found, it looks at the position where Monday should be in the Localization Key formula.
So all you need to do is replace Monday with 月曜日 in Localization Key, and you’re good to then rename the option in the Days (Only if Set to 1 Day(s)) property as well.
In technical terms, the position of “Monday” in Localization key is “second value of the outer array, first value of the inner array”. In a coding language, if the whole return value was stored in a variable named outer, we might reference it like outer[1][0].
Wrap-Up and More Resources
That’s the end of this tutorial, but if you want to learn more and take your Notion workspace to the next level, check out some of my other tutorials:
- Notion Databases: The Ultimate Beginner’s Guide
- How I Take Perfect Notes in Notion with My Voice
- 5 Ways to Build a Habit Tracker in Notion
Also, if you enjoy this content and want more, consider joining my Notion Tips email list! I’ll keep you up to speed on my Notion courses, but also let you know when I publish new free tutorials and templates:
The Notion Tips Newsletter
Join 50,000+ folks and enjoy your morning coffee alongside my latest Notion guides and templates, delivered hot(?) and steaming(?) to your inbox.