
Want to record voice memos, automatically transcribe them (a.k.a. speech to text), summarize them, and send the transcripts and summaries to Notion?
This tutorial will teach you exactly how to do that.
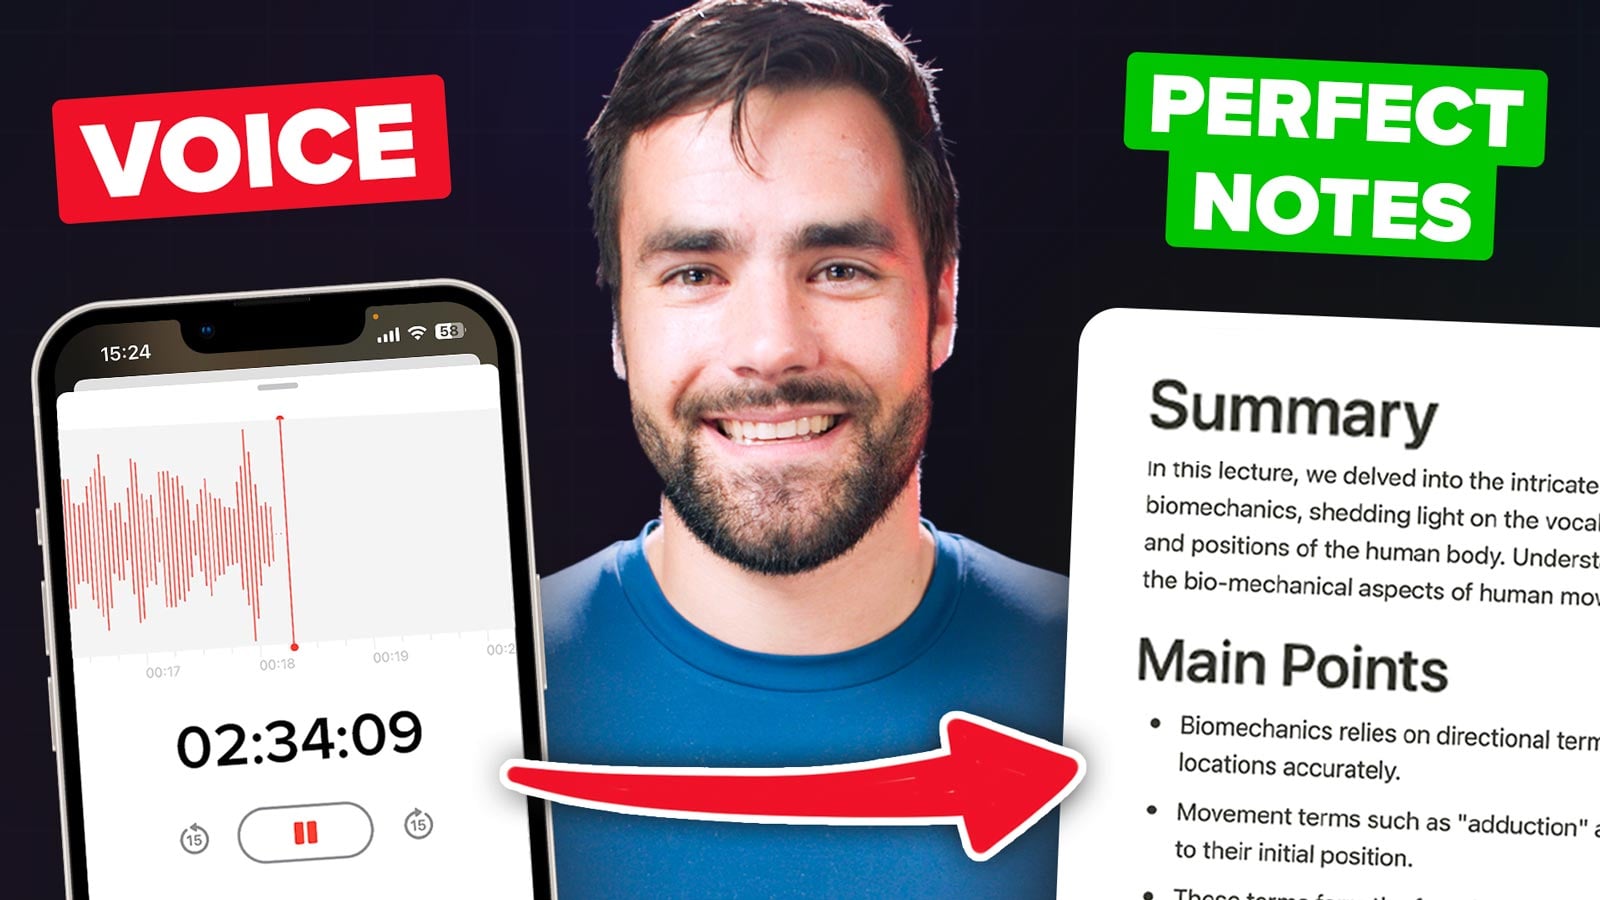
Here’s a 14-minute voice note I took recently, in which I brain-dump some thoughts on a video idea:
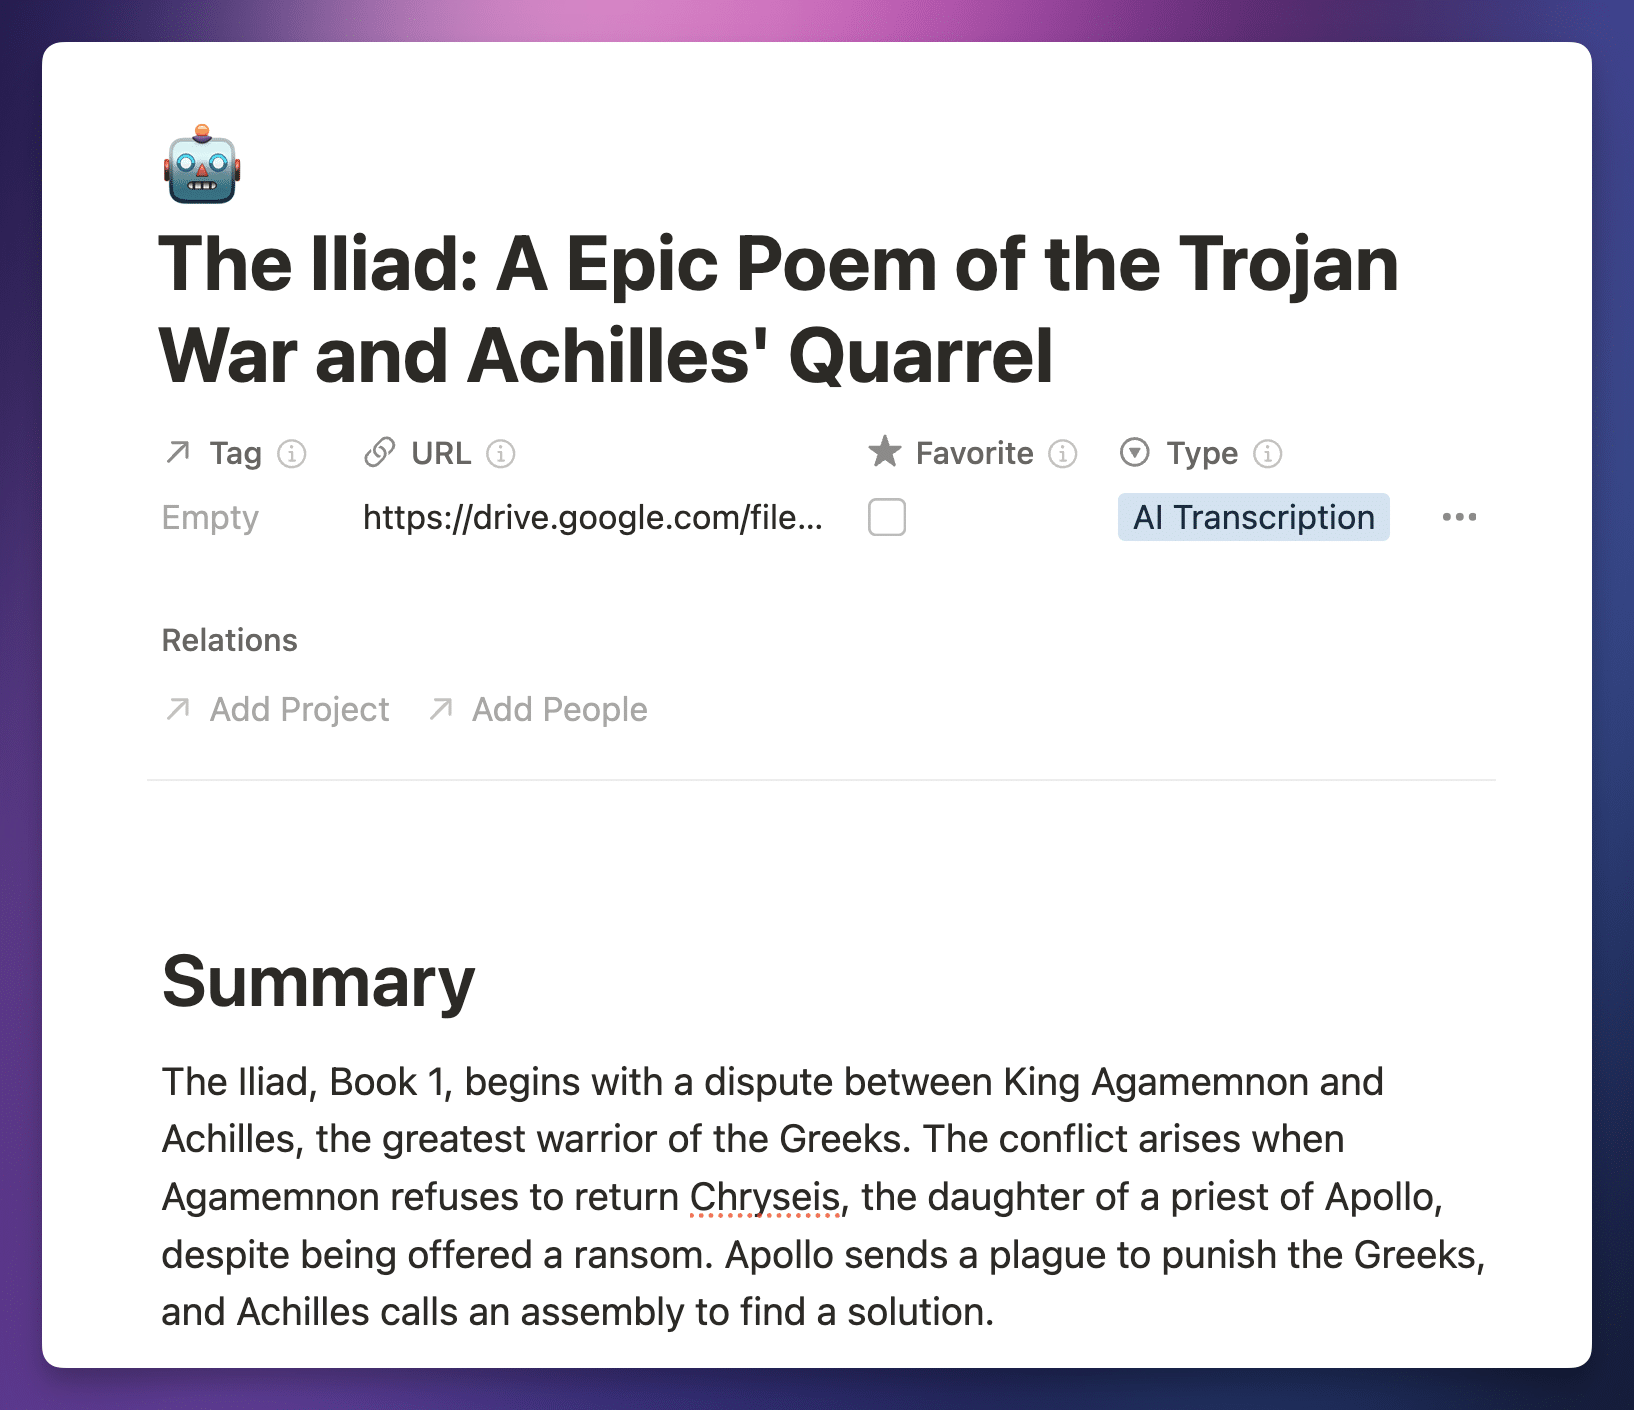
After I stopped recording, my transcript and summary showed up in Notion in just 90 seconds. The cost? $0. That’s right – free, as in beer. $0 for near-perfect transcription of 14 minutes of audio, plus a summary.
You can see the entire thing here.
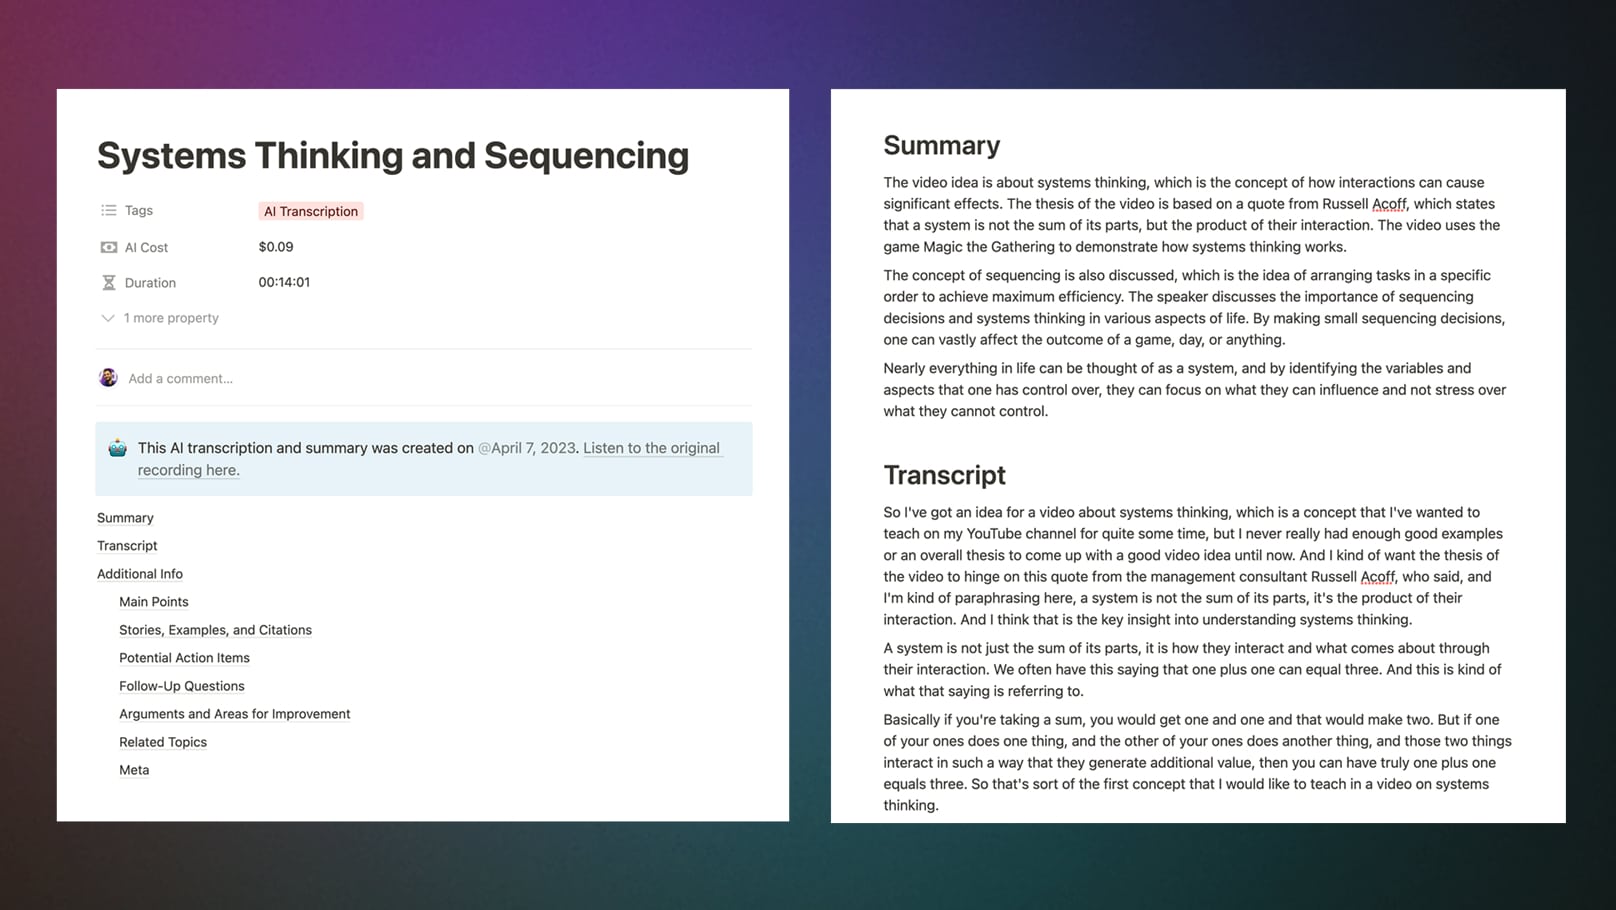
I’m not just getting a summary and transcript, either.
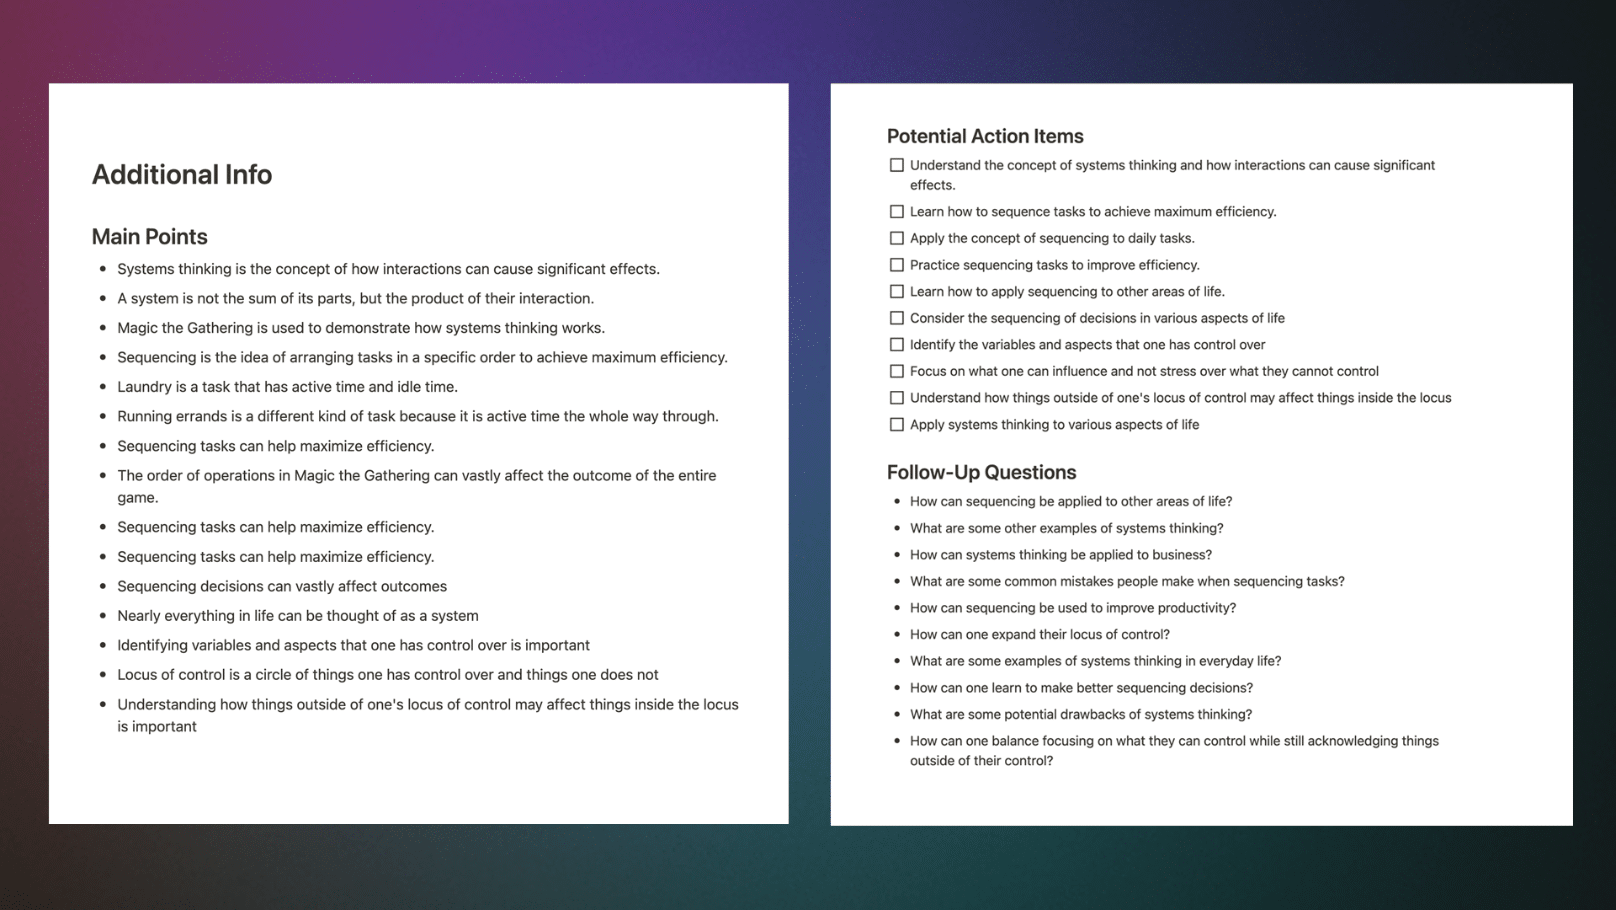
I’ve also set the automation up so that an AI model creates some useful lists:
- Main points
- Action items
- Stories, examples, and citations
- Follow-up questions
- Potential arguments against my transcript
- Related topics
In short, I can now brain-dump an idea as a voice note on my phone, upload it to Google Drive or Dropbox, and quickly get a fleshed-out document with a transcript and a ton of other useful information.
In this tutorial, I’ll show you how you to set up the same workflow for yourself.
Specifically, we’ll create a speech-to-text automation that:
- Lets you quickly record a voice note and upload it to Google Drive, Dropbox, or OneDrive
- Uses a speech-to-text model to convert the audio into a near-perfect transcription.
- Summarizes the transcript and pulls out key points using an AI model (ChatGPT, Claude, Gemini, etc)
- Sends the transcript, summary, and points directly to your Notion workspace
This is one of the most powerful and seemingly magical workflows I’ve ever built. It feels like I have a superpower now.
The best part is that once you’ve uploaded your audio file, it’s completely hands-off.
Want to use this yourself? You’re in luck – I’ve made the workflow public and extremely easy to set up. In the next sections, I’ll show you how to get it set up in less than 10 minutes.
And if you never want to miss when I post new Notion tutorials like this one, you should join my free Notion Tips newsletter:
The Notion Tips Newsletter
Join 50,000+ folks and enjoy your morning coffee alongside my latest Notion guides and templates, delivered hot(?) and steaming(?) to your inbox.
Video Tutorials
You can use the written guide below to set up the workflow quickly, and you’ll need to head down to the Copy My Workflow section to access my one-click automation template links.
However, I’ve also created two video setup guides for the automation – both a short setup guide, as well as a more detailed long version.
I created both of these tutorials for folks who have purchased my Ultimate Brain template for Notion, but I’m sharing them here since Ultimate Brain isn’t required – you can use any Notion database you want.
Here’s the short version, which you should watch if you want to go through the basic setup quickly (though the written guide below is likely even faster!)

And here’s the long version, which takes time to explain everything in detail. This version also covers a few tricks you can do with this workflow:
- Adding a custom prompt to your AI summary
- Translating the transcript to another language
- Skipping the Notion step altogether and saving the transcript to Google Drive
Tutorial Overview
Here’s a quick look at how this automation will work.
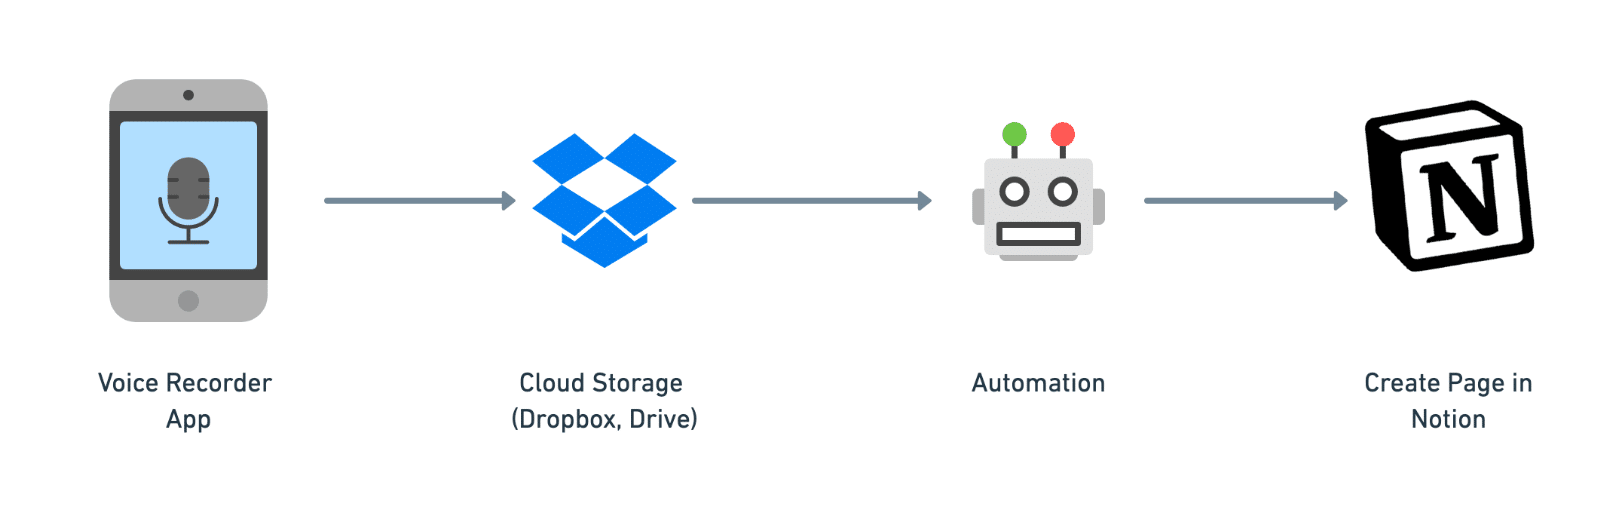
When you take a voice recording, you’ll upload it to a cloud storage app like Dropbox, Google Drive, or Microsoft OneDrive (this tutorial will show you how to use all three.)
Once your audio file gets uploaded, our automation will trigger. Your recording will be transcribed by your chosen speech-to-text service and summarized by your chosen AI model (i.e. an LLM, or large language model).
Optionally, you can also:
- Use AI to translate the transcript to another language
- Write a custom prompt (e.g. “Turn my voice memo into a blog post draft”)
Finally, the automation will package up the transcript and summary, and then it’ll send them to a new page in your Notion workspace using the Notion API.
First, I should note that we’ll be building and deploying this automation on Pipedream, which is an automation-builder that is similar to Make.com and Zapier. It’s also my favorite of those platforms.
Here’s a look at how our
- When a new audio file is uploaded to Dropbox, Google Drive, or OneDrive, the automation is triggered.
- The audio is downloaded into your
Pipedream account’s temporary storage. - We get the duration of the audio.
- The audio is fully transcribed using one of several available speech-to-text models.
- We send the transcript to one of several available LLMs to get a summary, title, list of action items, etc.
- The transcript and LLM response are formatted and checked for errors.
- We send everything to a new page in Notion.
10-Minute Setup Guide
I’ve built this automation in Pipedream, an automation-builder platform that allows me to share my automations.
In the Copy My Workflow step below, you’ll find links that will copy and automatically set up the automation for you. It works a lot like a Notion template, and should only take about 10 minutes to full set up.
As a primer, here’s everything you’ll need to set up the workflow.
- A Pipedream account (free)
- An account with your chosen speech-to-text and AI providers. I recommend Groq, which has a generous free usage tier.
- A cloud storage account – we’ll cover Google Drive, Dropbox, and OneDrive here. (all have free tiers)
- A Notion account (free)
You’ll also need to create API keys for your chosen speech-to-text and AI services, but I’d encourage you to create them later in the tutorial when they becomes relevant.
This workflow is free to set up, and be used for free within certain limits. In most cases, you’ll be able to process up to 10 audio files per day for free. Learn more in the Cost Information section.
Copy link to headingChoose Your Notion Database
This workflow will work with any Notion database. You can even use a completely new database with only the default Name property.
However, this workflow work especially well with my Ultimate Brain template, which comes with the best note-taking system you’ll find in a Notion template.
Ultimate Brain is my all-in-one productivity template for Notion, and it combines tasks, notes, projects, goal-tracking, daily planning, journaling, and more to form a complete second brain in Notion.
You can get it here:
Want to turn Notion into a complete productivity system? Ultimate Brain includes all the features from Ultimate Tasks - and combines them with notes, goals, and advanced project management features.
Get $50 off with code SPRING50!
Alternatively, I’ve created a simple Notes template that you can use along with this tutorial. Grab it here.
That simple template has a couple of useful properties baked in:
- Duration
- Duration (Seconds)
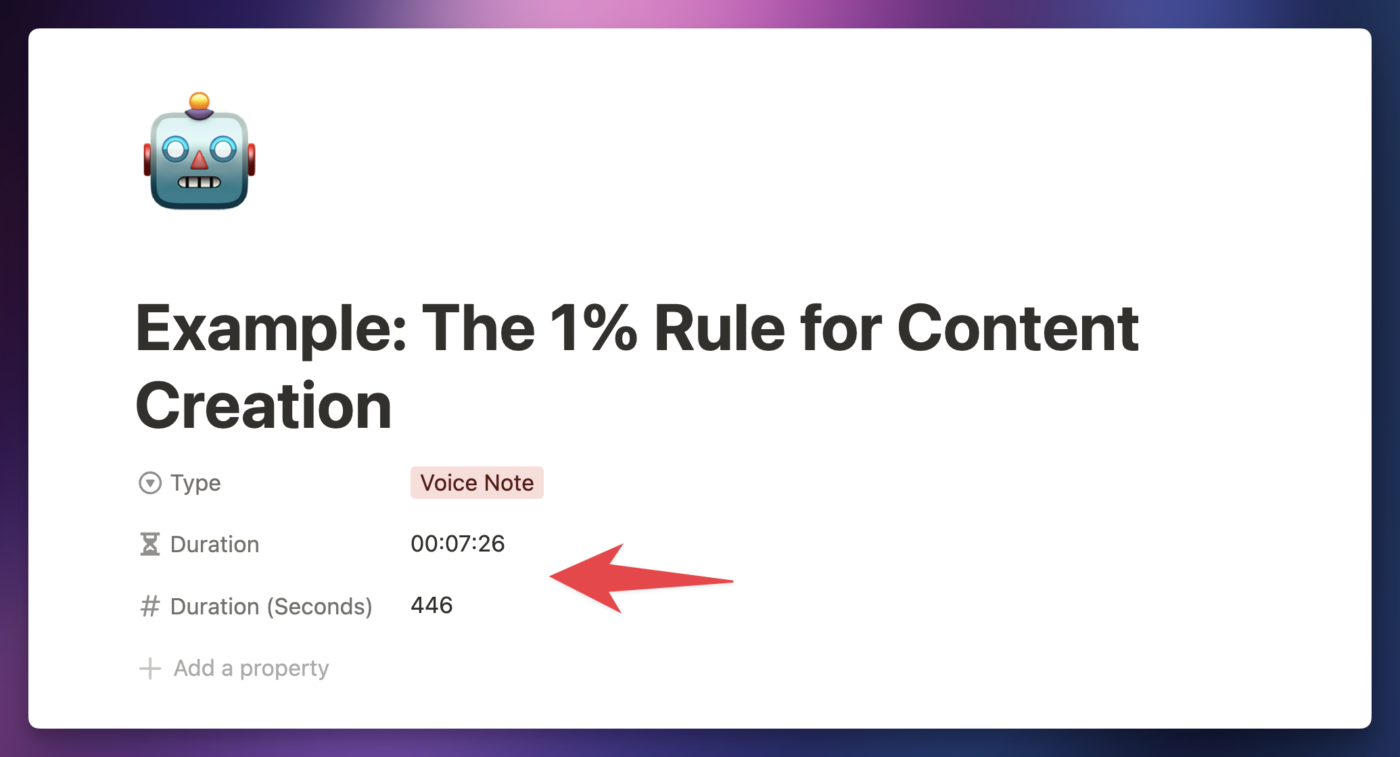
The Duration property is a formula, which takes in a number of seconds from the Duration (Seconds) property and formats it as a timestamp – e.g. 00:00:00.
If you’d like to add these properties to your own Notes database, check out the toggle below.
If you want to store and display the duration of your recording, add the following properties to your notes database:
| Property Name | Property Type |
|---|---|
| Duration (Seconds) | Number |
| Duration | Formula |
Then add the following formula in the Duration property’s formula editor:
if(floor(prop("Duration (Seconds)") / 3600) < 10, "0", "") + format(floor(prop("Duration (Seconds)") / 3600)) + ":" + if(floor(prop("Duration (Seconds)") % 3600 / 60) < 10, "0", "") + format(floor(prop("Duration (Seconds)") % 3600 / 60)) + ":" + if(floor(prop("Duration (Seconds)") % 3600 % 60) < 10, "0", "") + format(floor(prop("Duration (Seconds)") % 3600 % 60))
Code language: JavaScript (javascript)
This will take the number of seconds in the audio file and show it in hours:minutes:seconds format (e.g. 00:00:00).
With these properties set, we’ll be able to calculate the full cost and duration in our
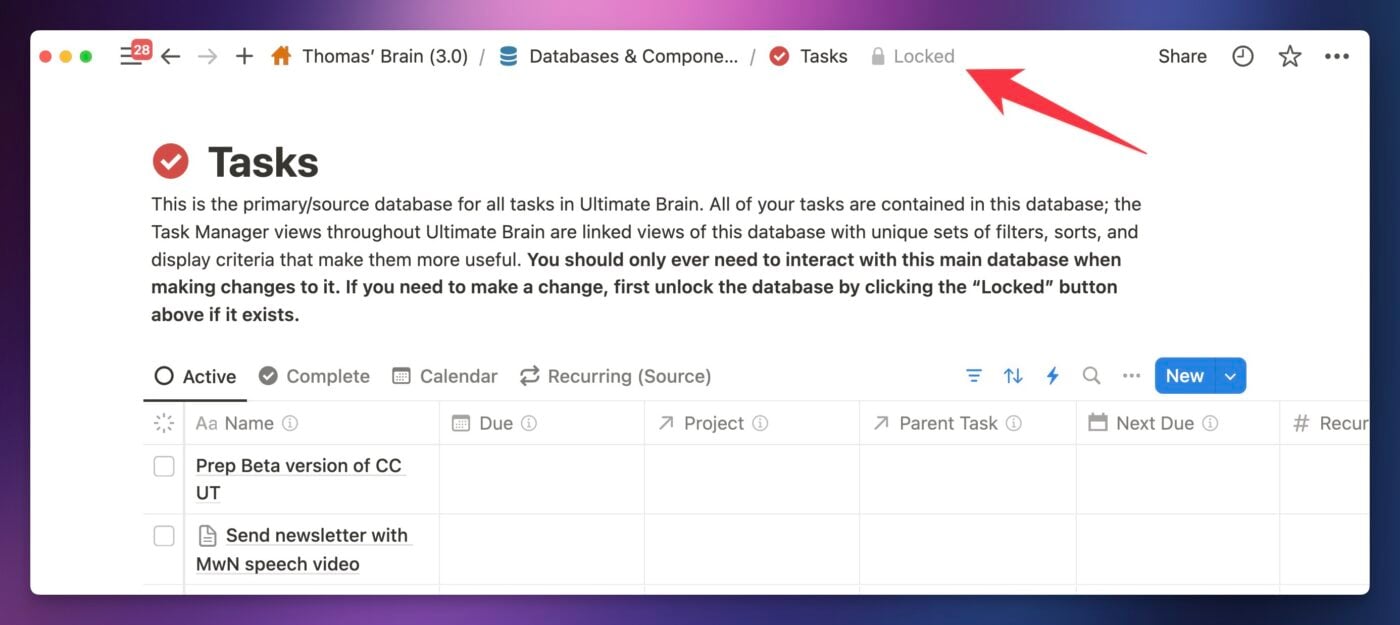
If you’re unable to add or edit properties in your database, make sure the database isn’t locked:

And if you want to learn more about Notion formulas, check out my comprehensive formula guide:
And if you want to create your own Notes database and need a refresher on Notion databases, you can check out this guide:
Copy My Workflow
I’ve created a version of this workflow for each of the major cloud storage apps: Google Drive, Dropbox, and Microsoft OneDrive.
Click the workflow link for the app you want to upload your audio files to, and it’ll copy my pre-built workflow into your

Upload mp3 or m4a files to Dropbox, and this workflow will automatically transcribe and summarize them, then send the results to Notion.
This workflow is 100% free to use. If you do choose to upgrade to a paid Pipedream account, I'll earn a commission (at no extra cost to you).
Upload mp3 or m4a files to Google Drive, and this workflow will automatically transcribe and summarize them, then send the results to Notion.
This workflow is 100% free to use. If you do choose to upgrade to a paid Pipedream account, I'll earn a commission (at no extra cost to you).

Upload mp3 or m4a files to Microsoft OneDrive, and this workflow will automatically transcribe and summarize them, then send the results to Notion.
The workflow links above are my
You don’t need a paid account to run this workflow at all. In fact, I spent hours optimizing it so that the Free
Why
Pipedream is hands-down my favorite automation platform.
I love it, use it every day, and constantly talk about it online. I use it to build all of my automations. Reasons I love it:
- It is the only platform I know of that allows for npm imports. So not only can you write JavaScript code, but you can use any npm package.
- The free tier is incredibly generous. You can do so much more on
Pipedream for free than on Make, Zapier, or other traditional no-code platforms. It’s not even in the same league. - The team is incredibly responsive and helpful.
- As a creator, I can share workflows with my audience, removing 95% of the setup for you.
It’s a product I am extremely proud to be an affiliate for; in fact, I was the one who asked them to build an affiliate program.
I wanted a way to justify making more tutorials, and to be able to share workflows like this one (which took over 200 hours to build and is actively updated) for free.
Again, you can use this workflow on the free plan – and if you choose the speech-to-text and AI providers that offer free plans, you can use the entire workflow for free!
But if you do choose to upgrade, thank you. 🙂
Create a Project and Workflow
From here, I’ll use the Google Drive version of the workflow as the example in this setup guide. The Dropbox and OneDrive versions are nearly identical. I’ll note their minor differences where applicable.
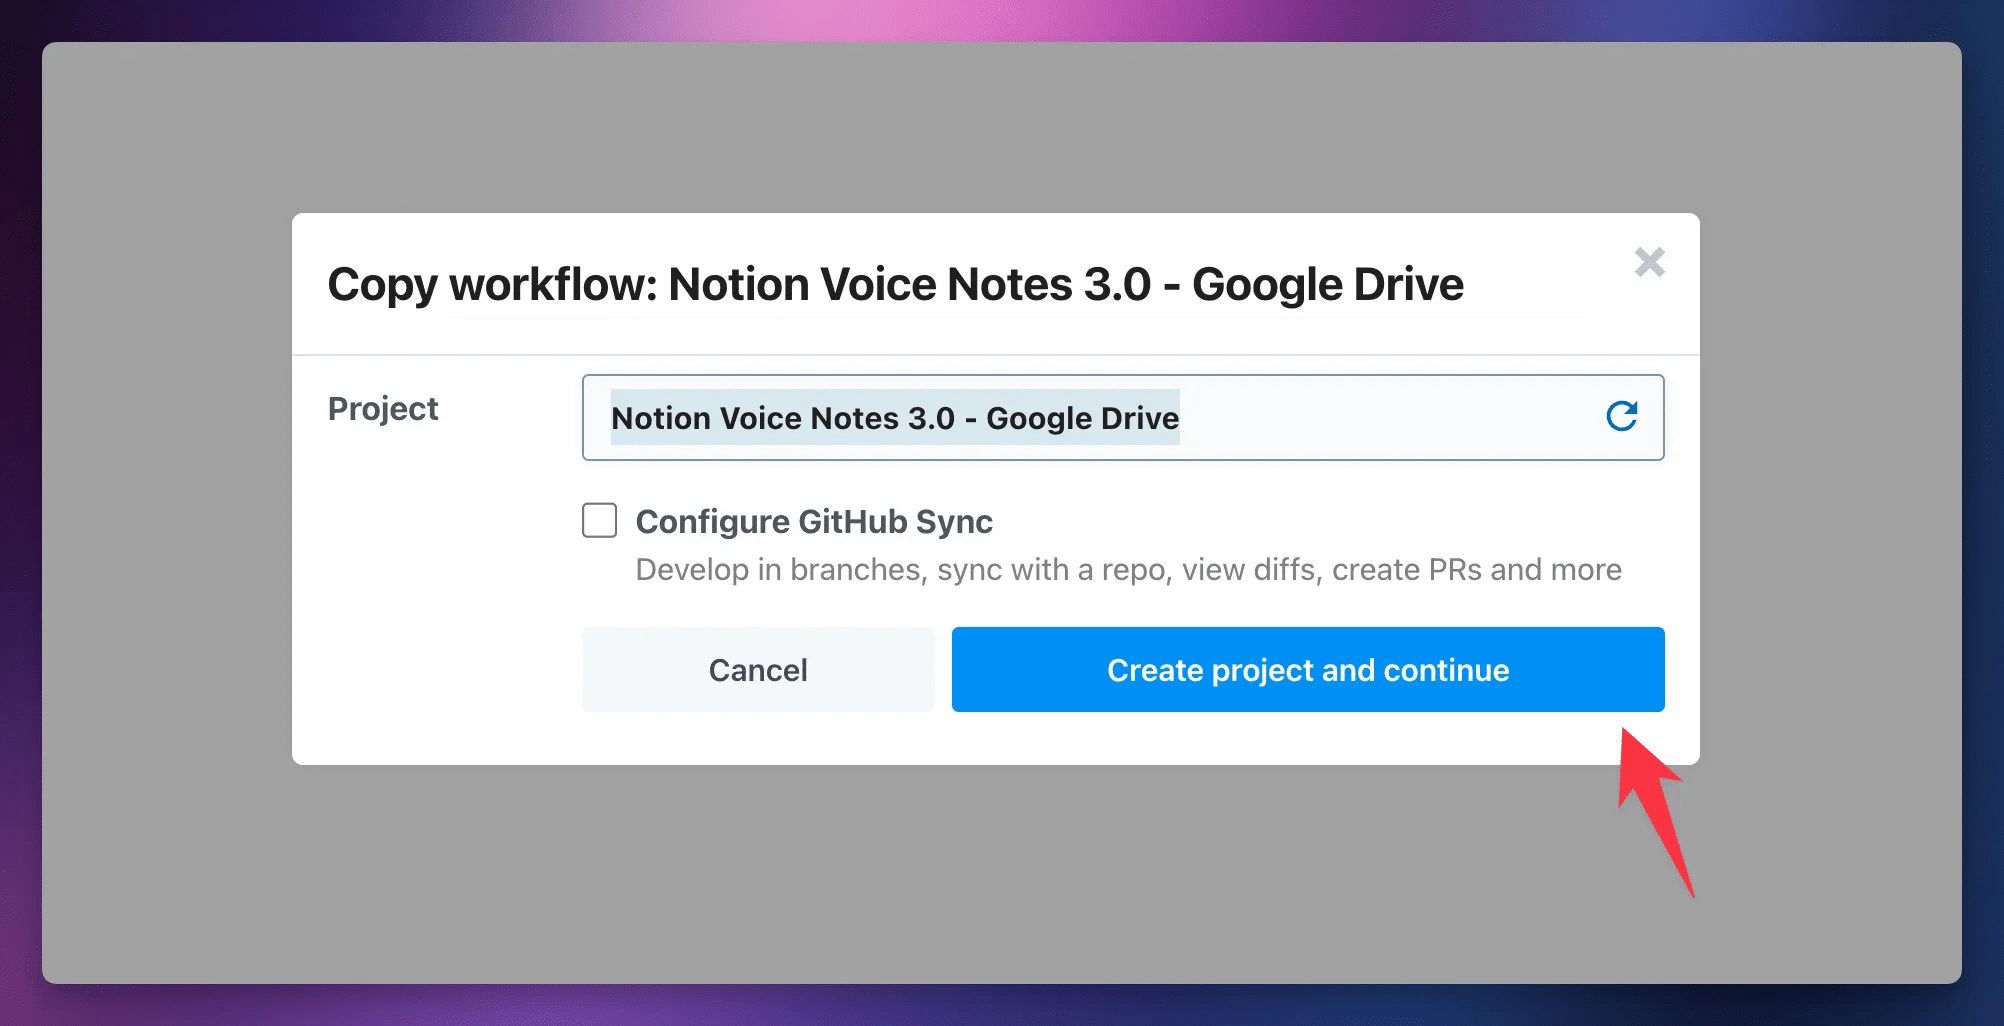
After clicking your chosen workflow link above, click Create a New Project:
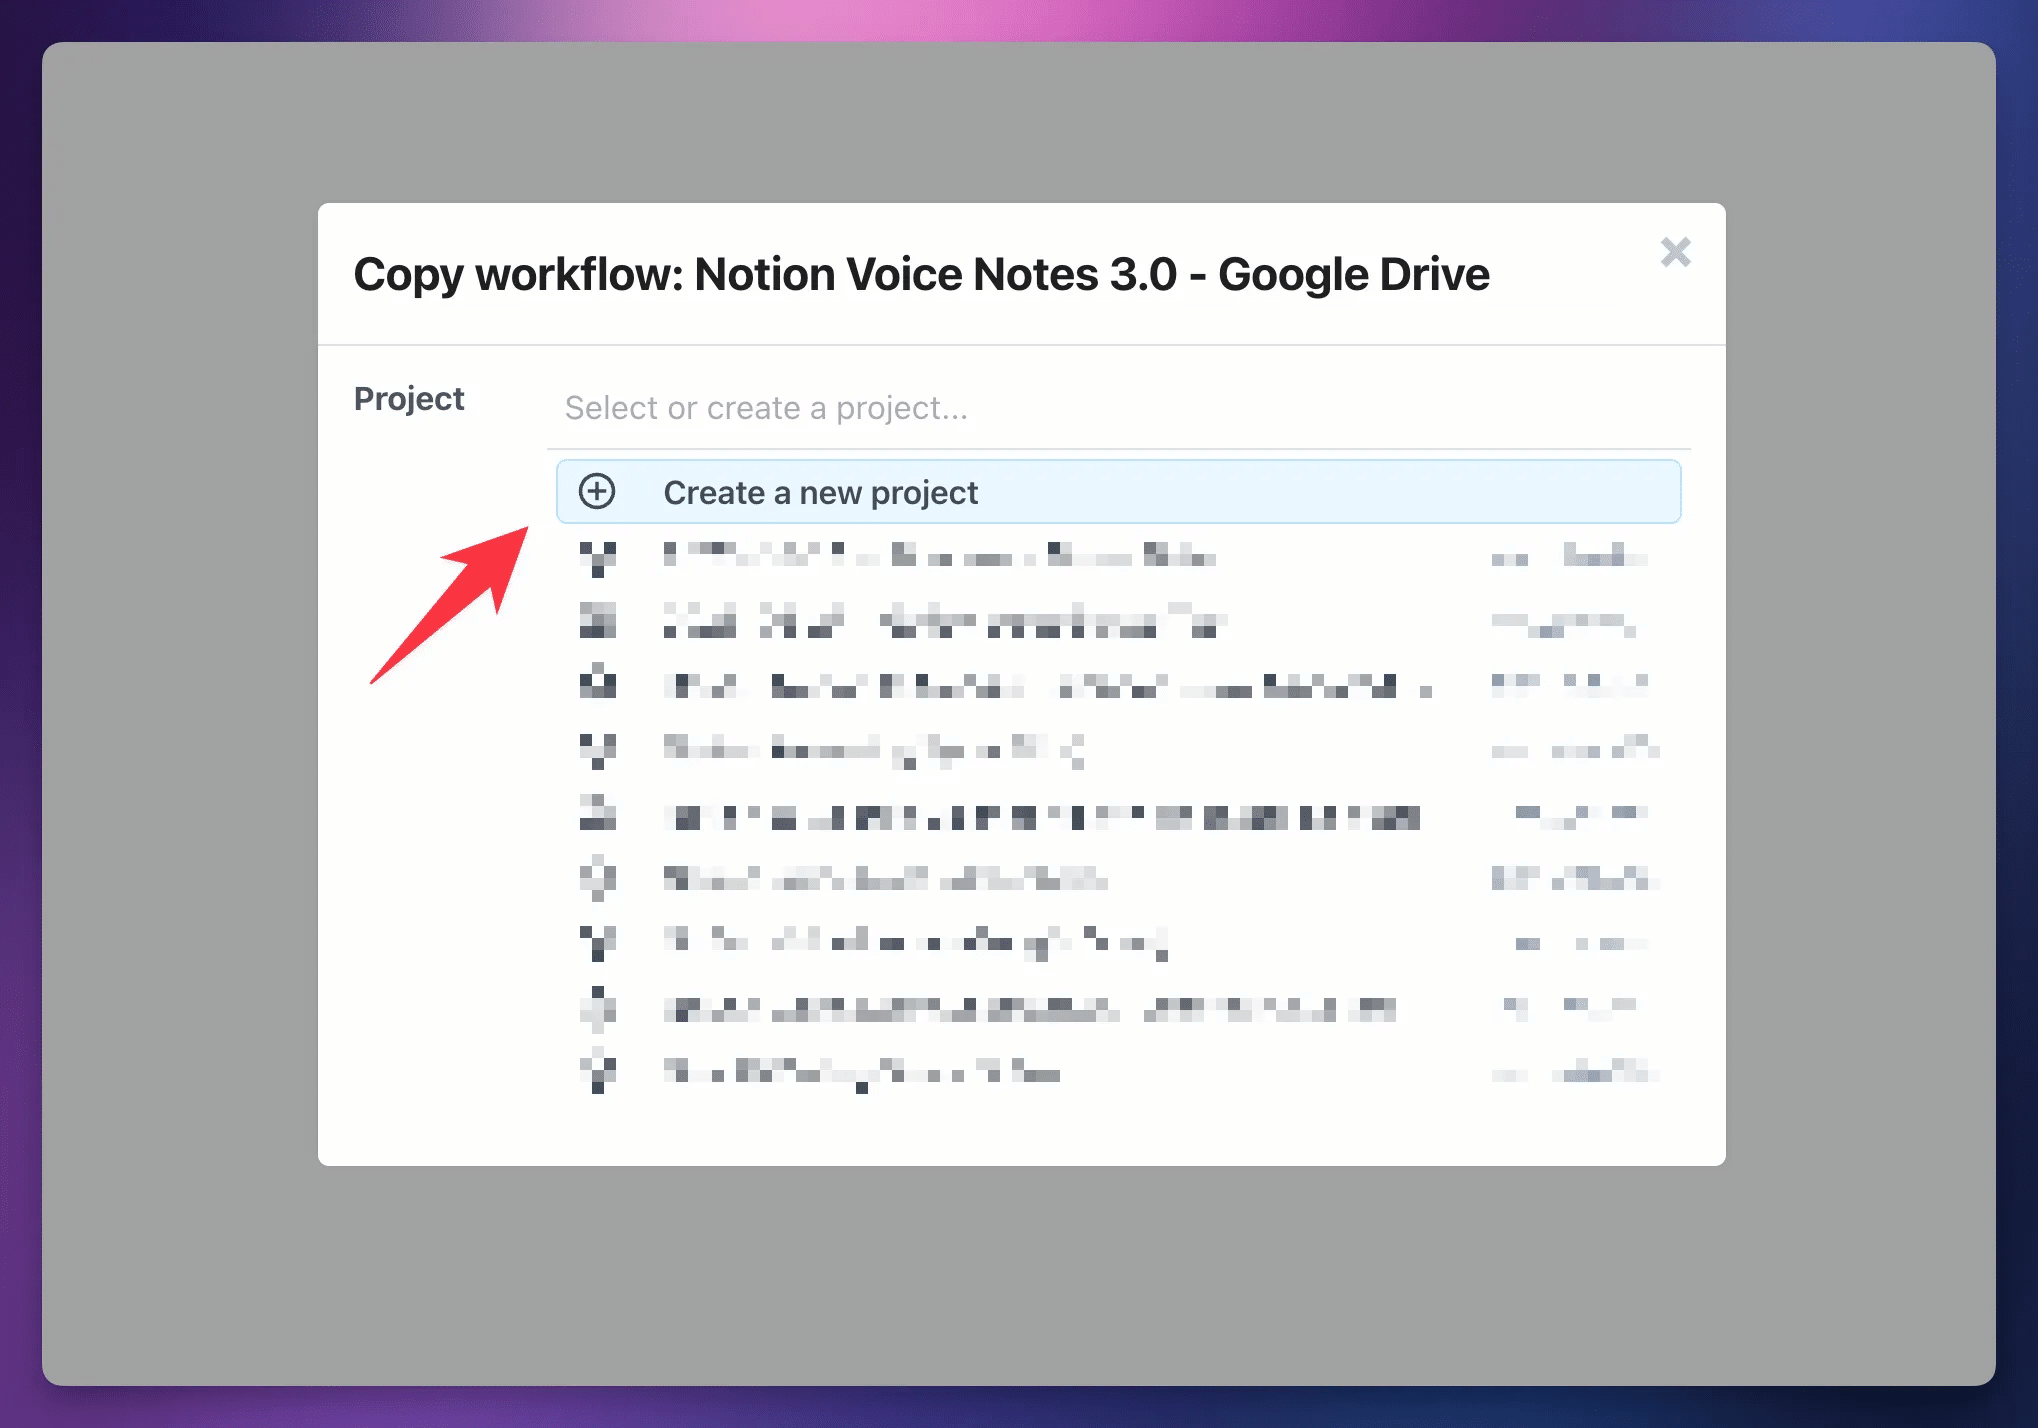
Click Create Project and Continue.
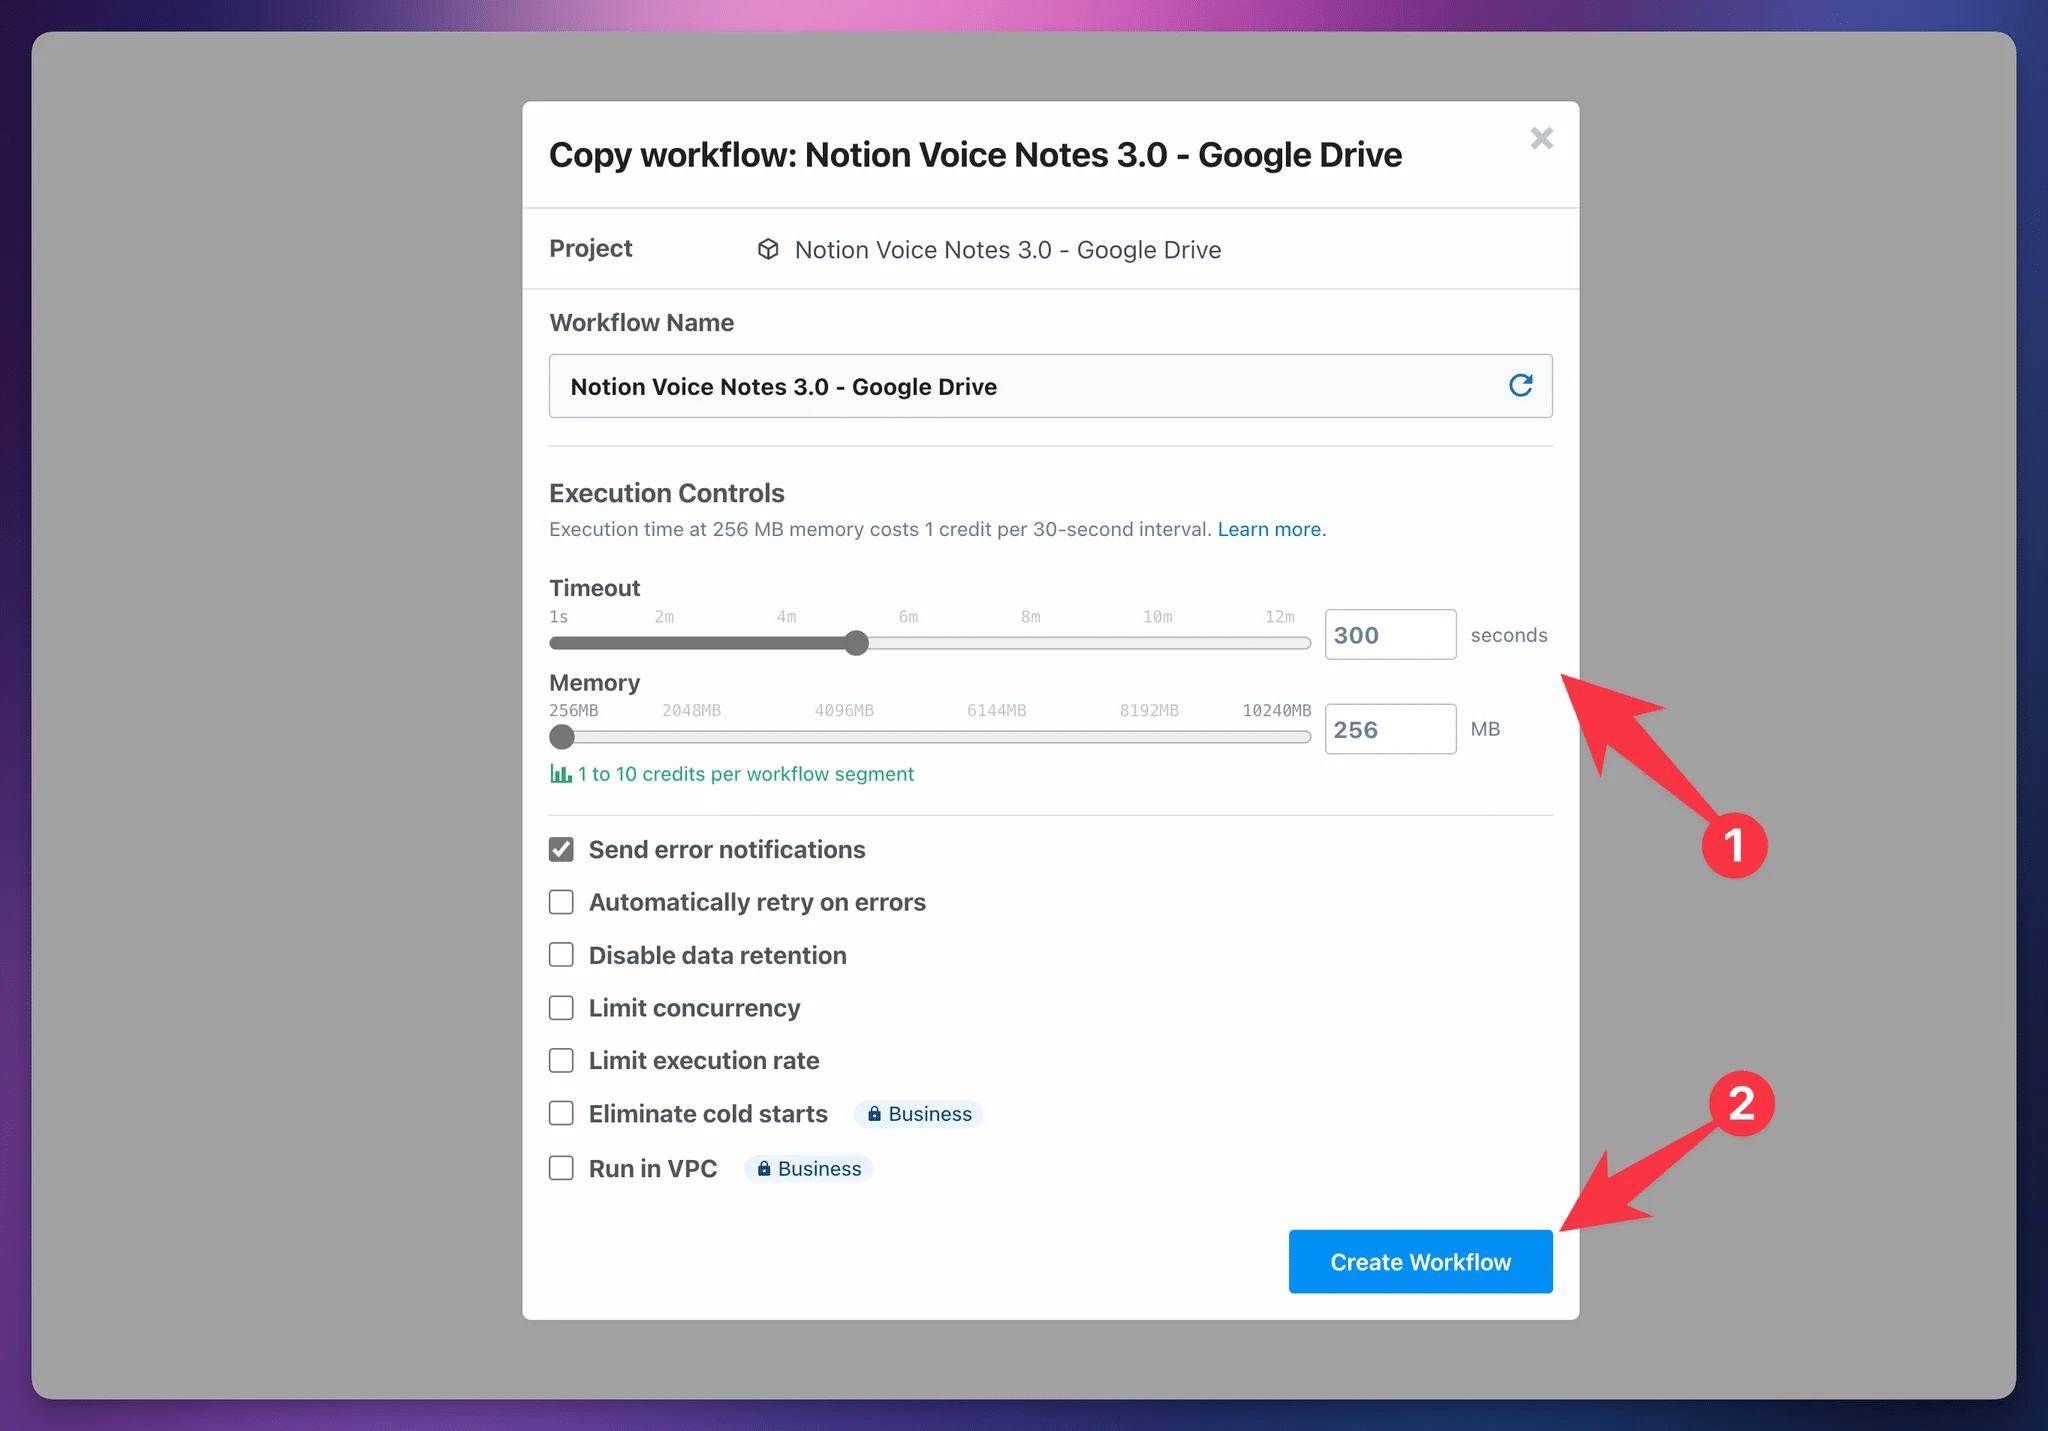
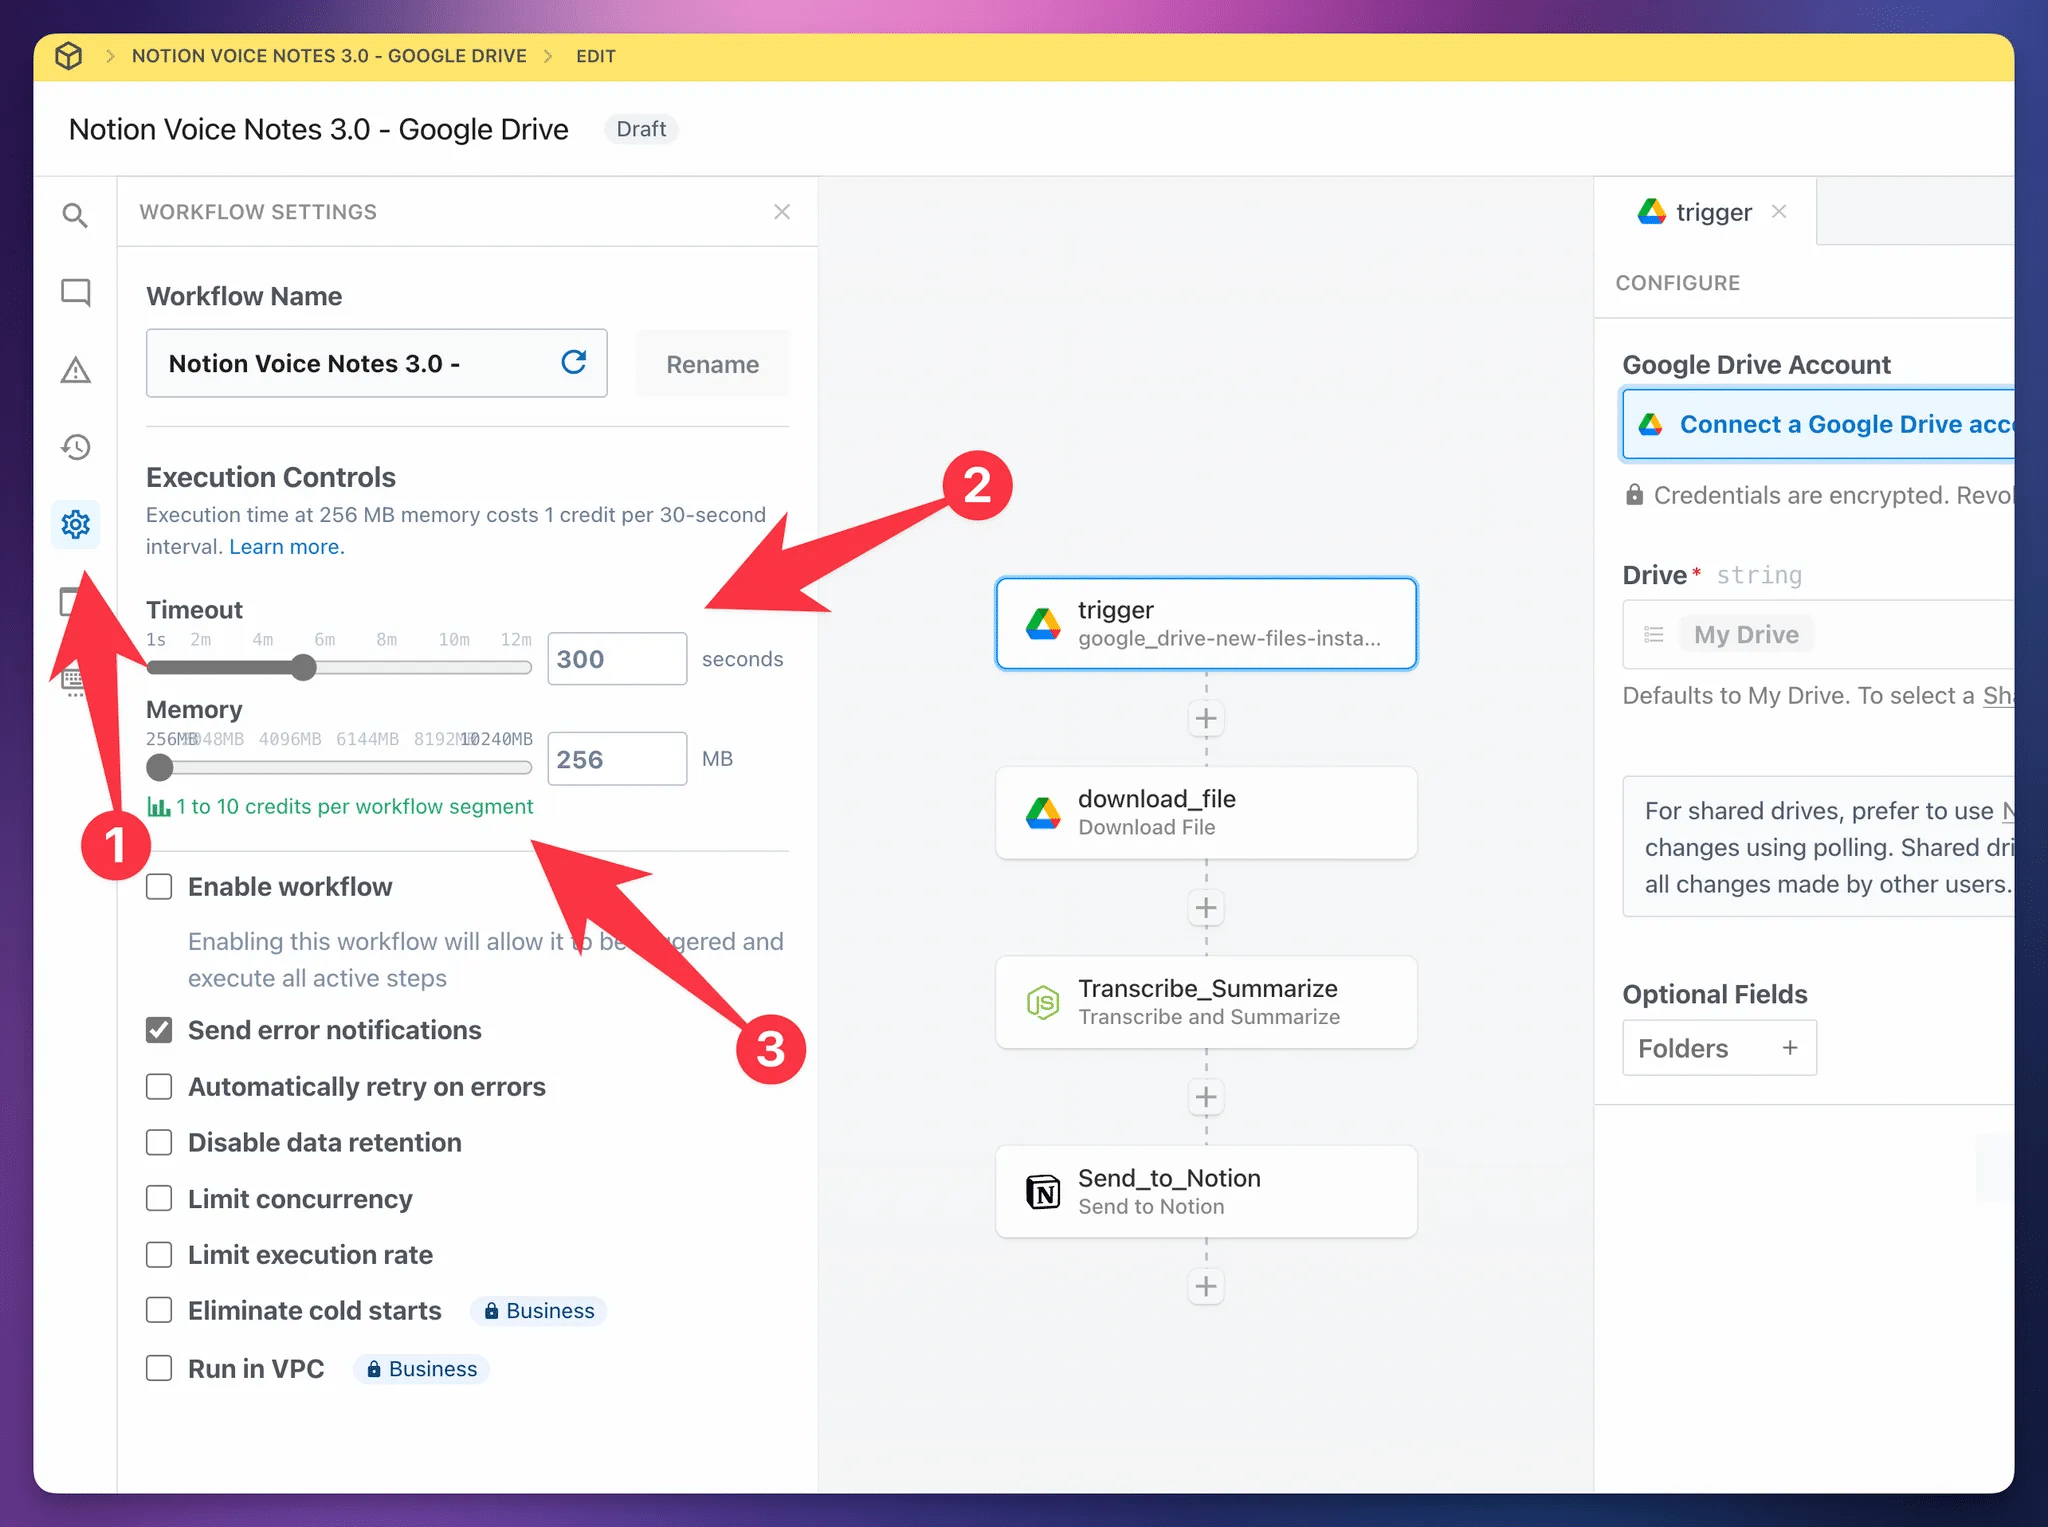
Finally – and this important – set the Timeout to 300 seconds. This sets the maximum time the workflow is allowed to run before failing.
Shorter audio files will usually finish in less than 30 seconds, but setting a higher Timeout allows you to successfully process longer files.
Once done, click Create Workflow.
Set Up the Trigger
No matter which version you choose, the workflow has one trigger and three action steps:
- Download File – downloads the audio file to
Pipedream ‘s temporary storage - Transcribe and Summarize – transcribes the audio file and optionally provides a summary, translation, etc.
- Send to Notion – creates a new page in a Notion database with the transcript, summary etc.
To configure the workflow, you’ll first want to set up the trigger.
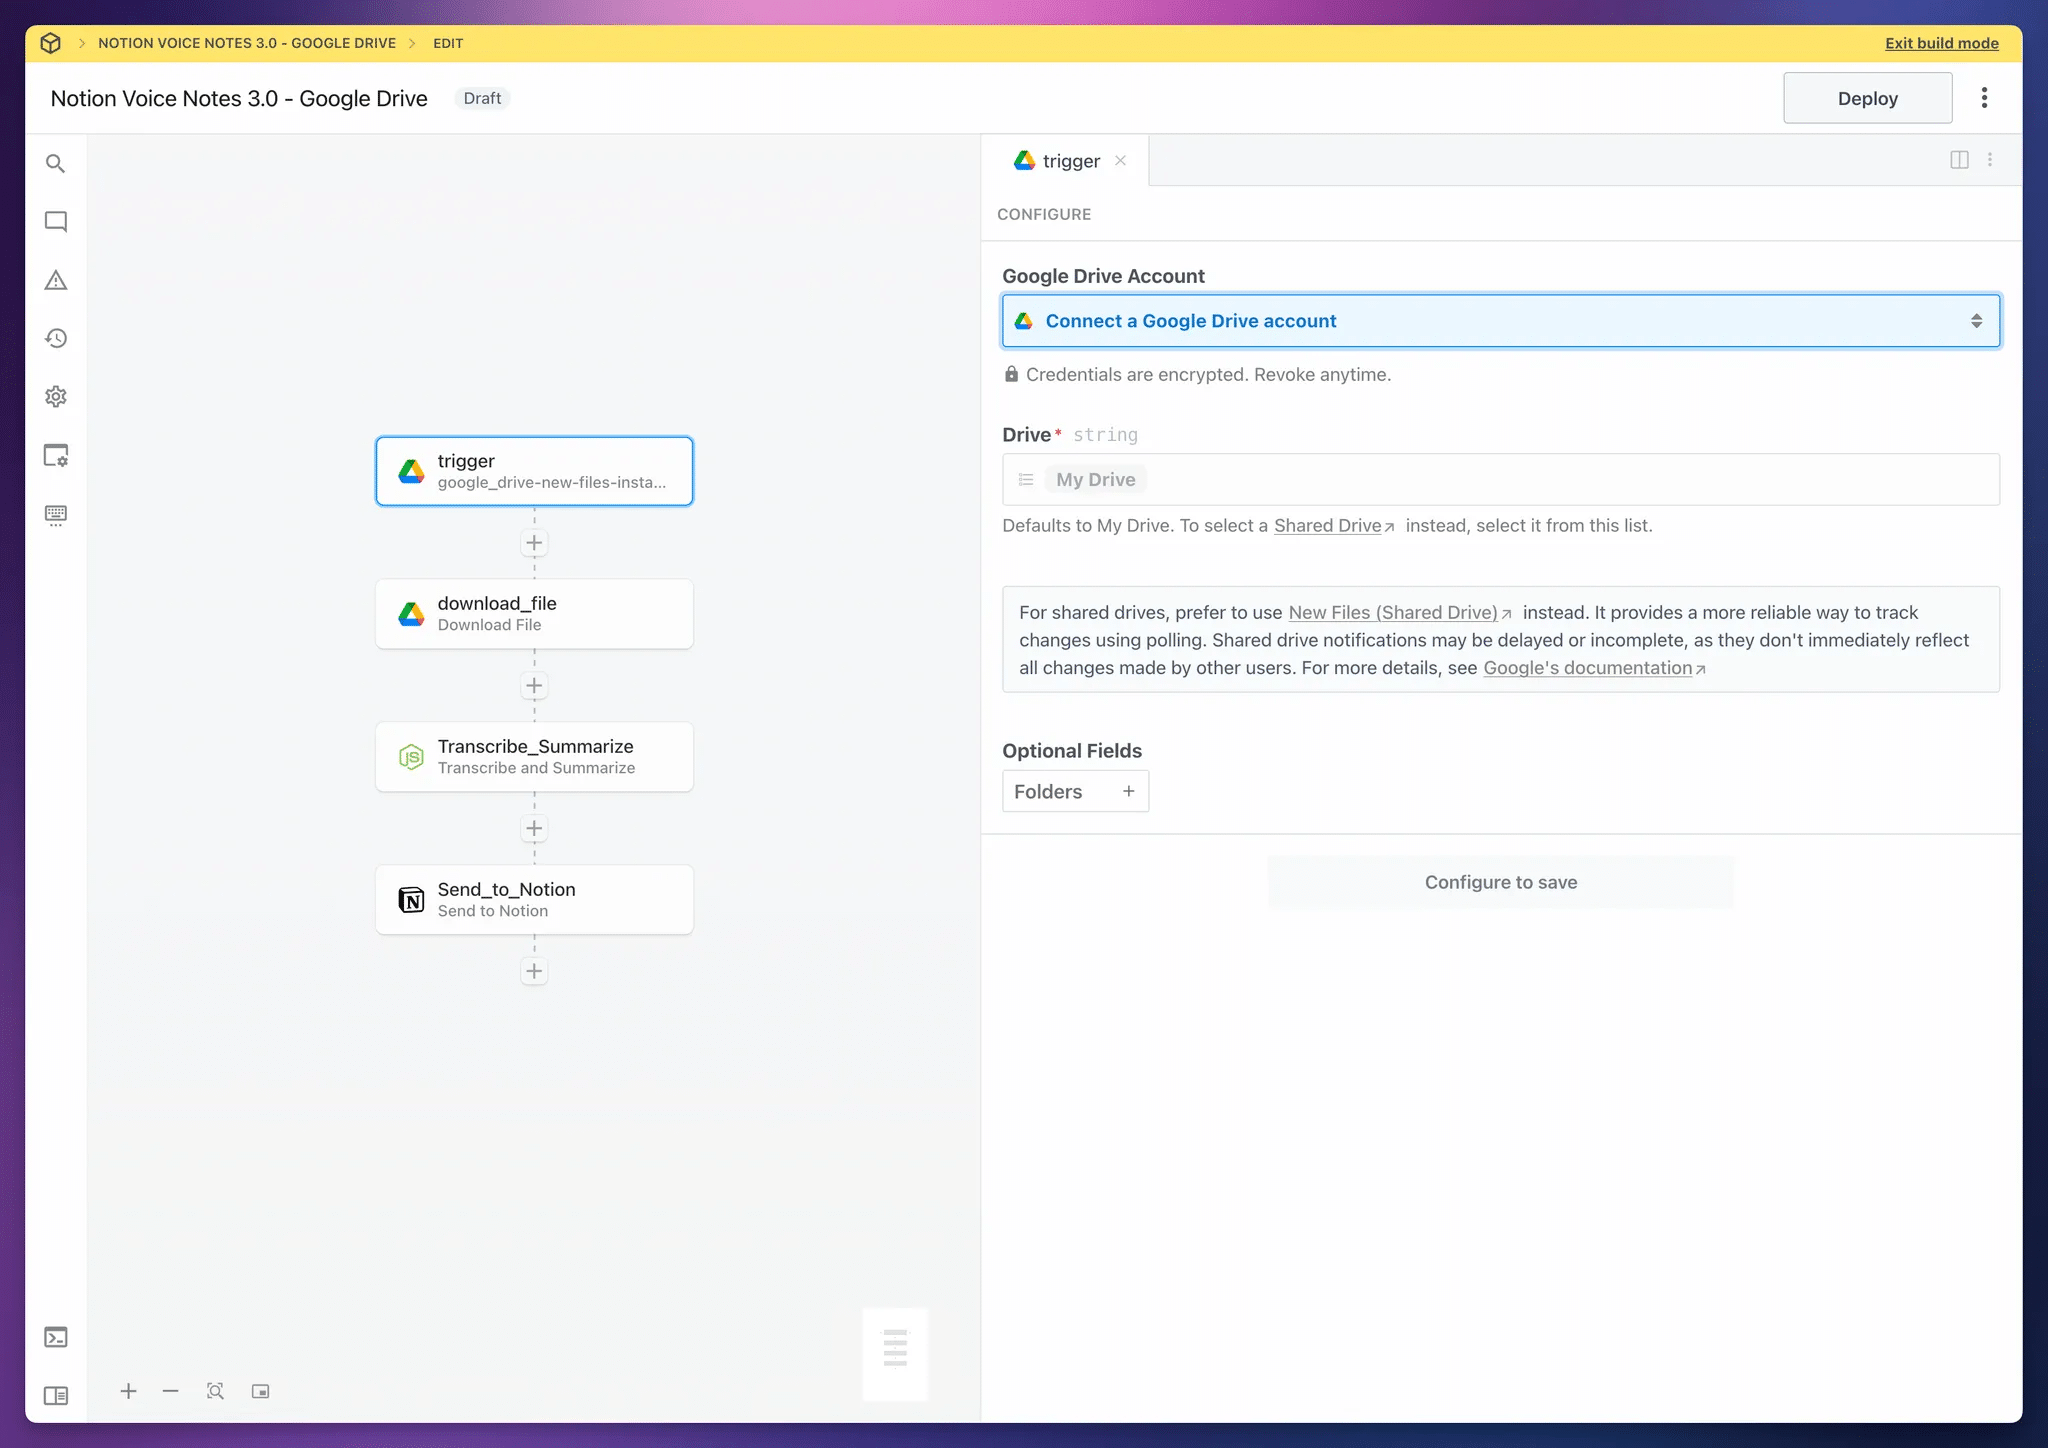
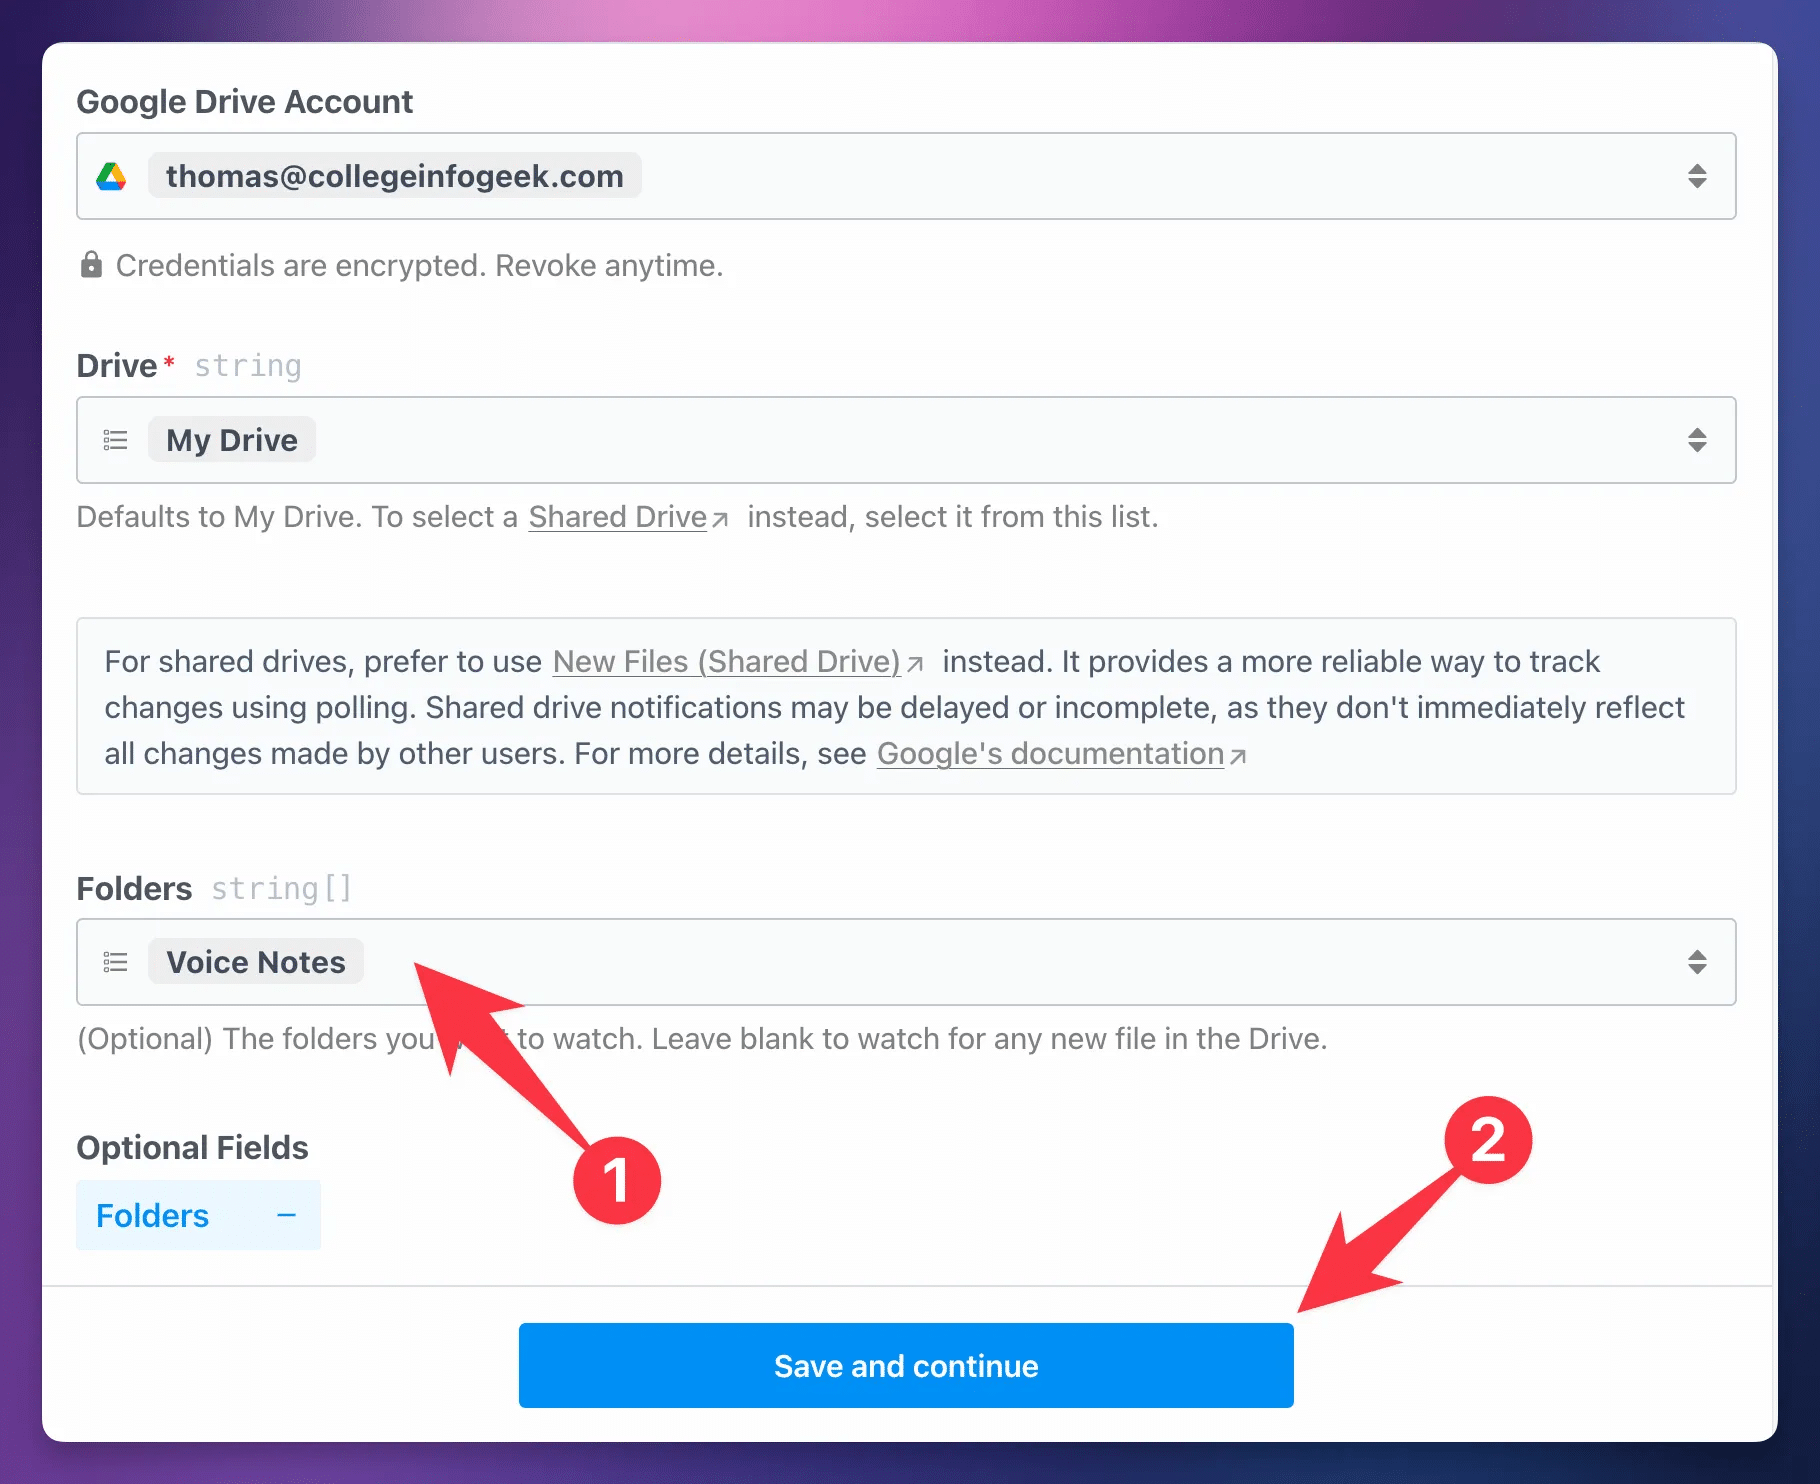
First, Connect your Google account (or Dropbox/OneDrive account).
Choose the Folders option from Optional Fields, and choose a folder for your audio files. When you upload new audio files to this folder, your automation will run.
Click Save and Continue.
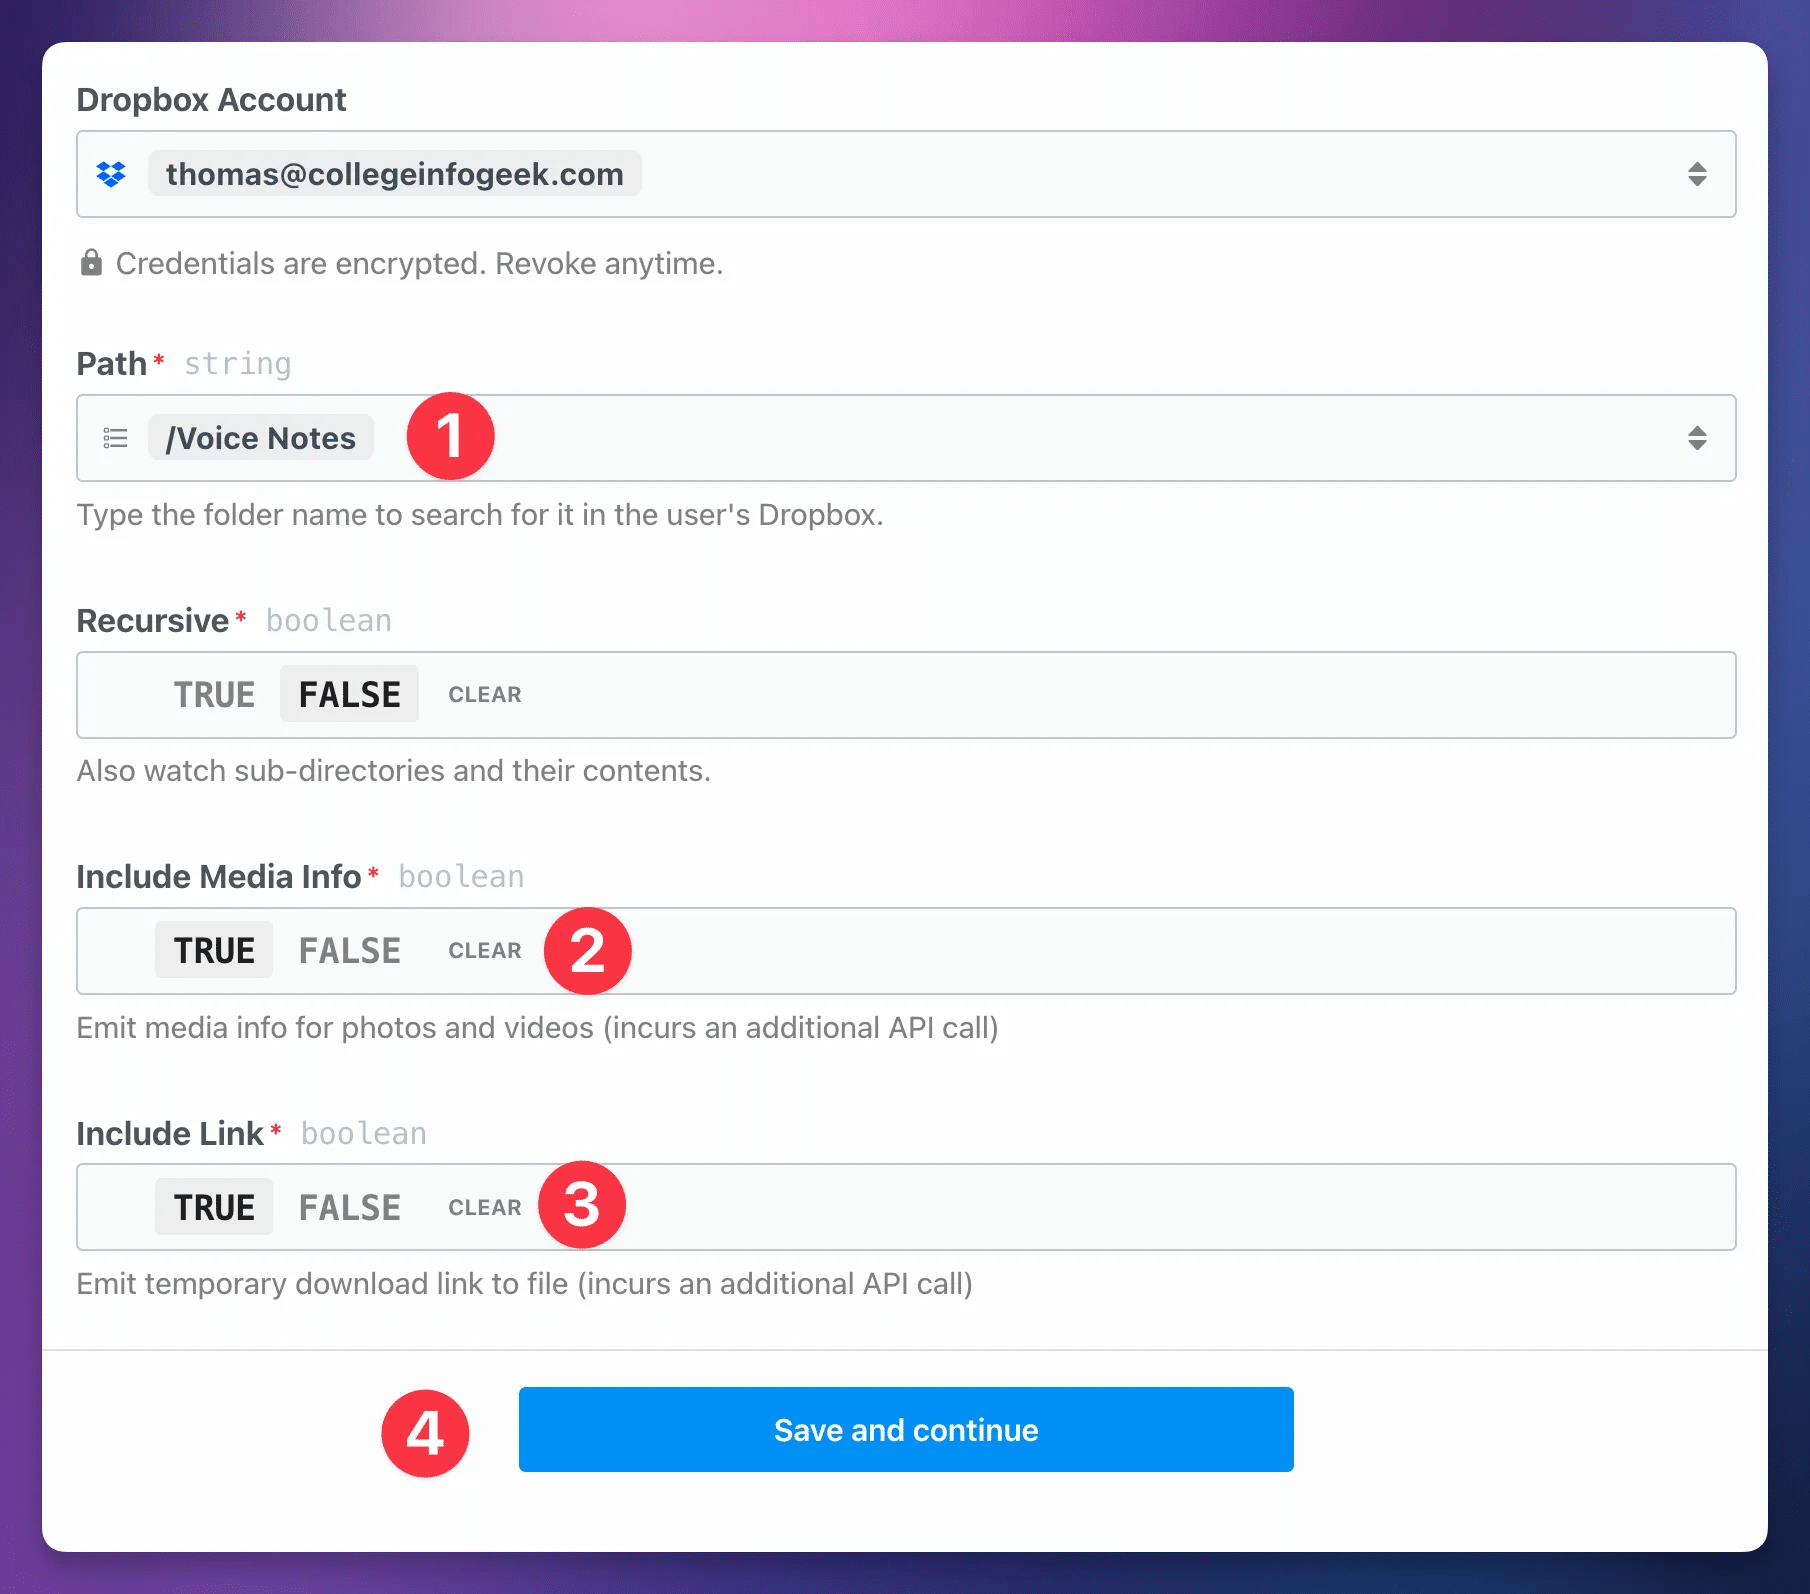
When setting up the Dropbox version of the workflow, follow these steps to set up the trigger:
- Set your Path to the folder in Dropbox you want to use. You’ll likely need to type to search for it;
Pipedream doesn’t pull many folders by default. - Ensure Include Media Info is set to True.
- Ensure Include Link is set to True.
After hitting Save and Continue, you’ll follow the same instructions as detailed outside of toggle for the Google Drive version.
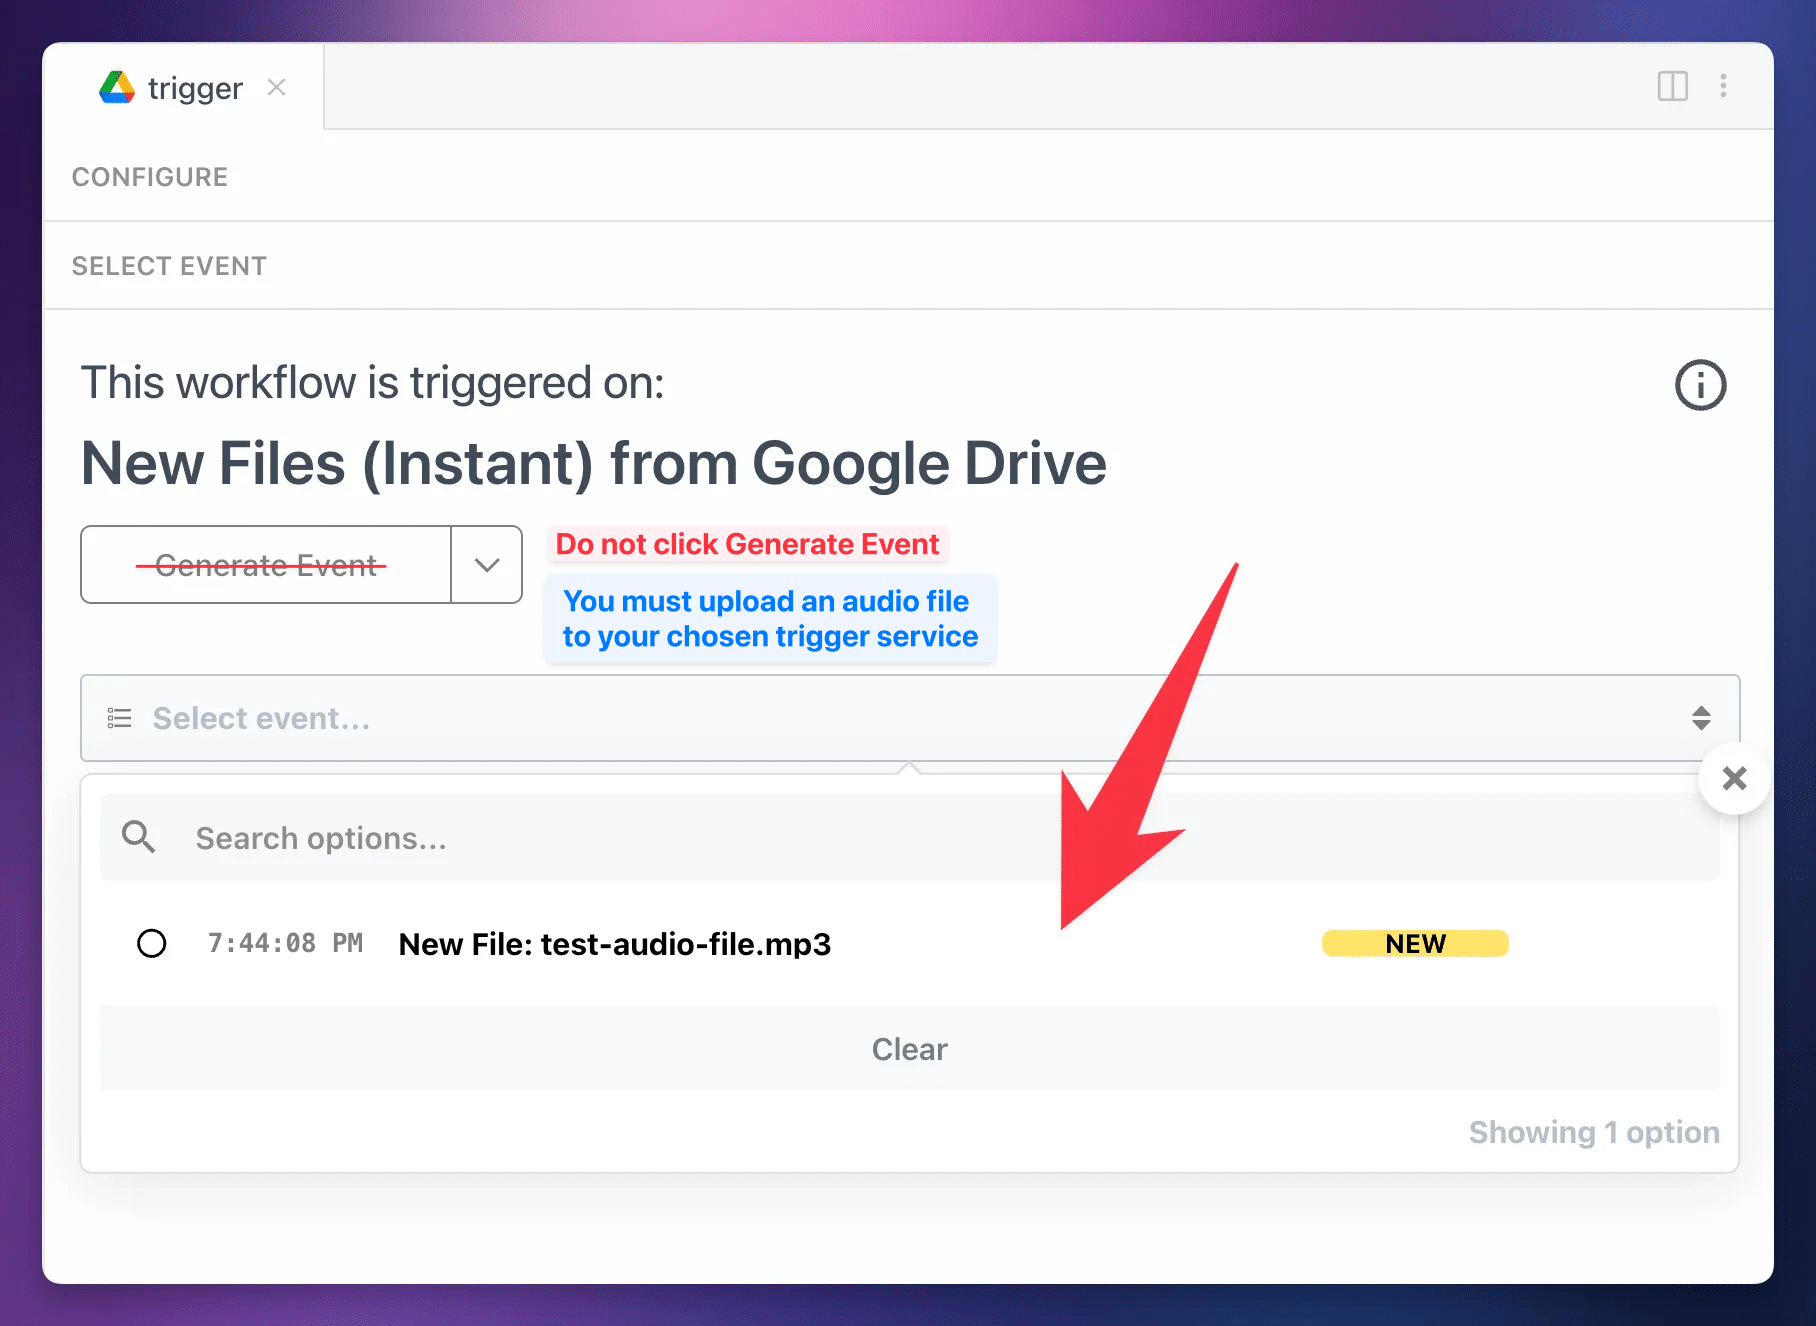
You’ll need to upload an audio file to your chosen Dropbox folder to create a valid test even (do not click the Generate Test Event button), then continue on and set up the Download File to TMP action.
When setting up the Dropbox version of the workflow, follow these steps to set up the trigger:
- Click Folder from Optional Fields and choose a folder in your OneDrive account. You’ll upload audio files to this folder.
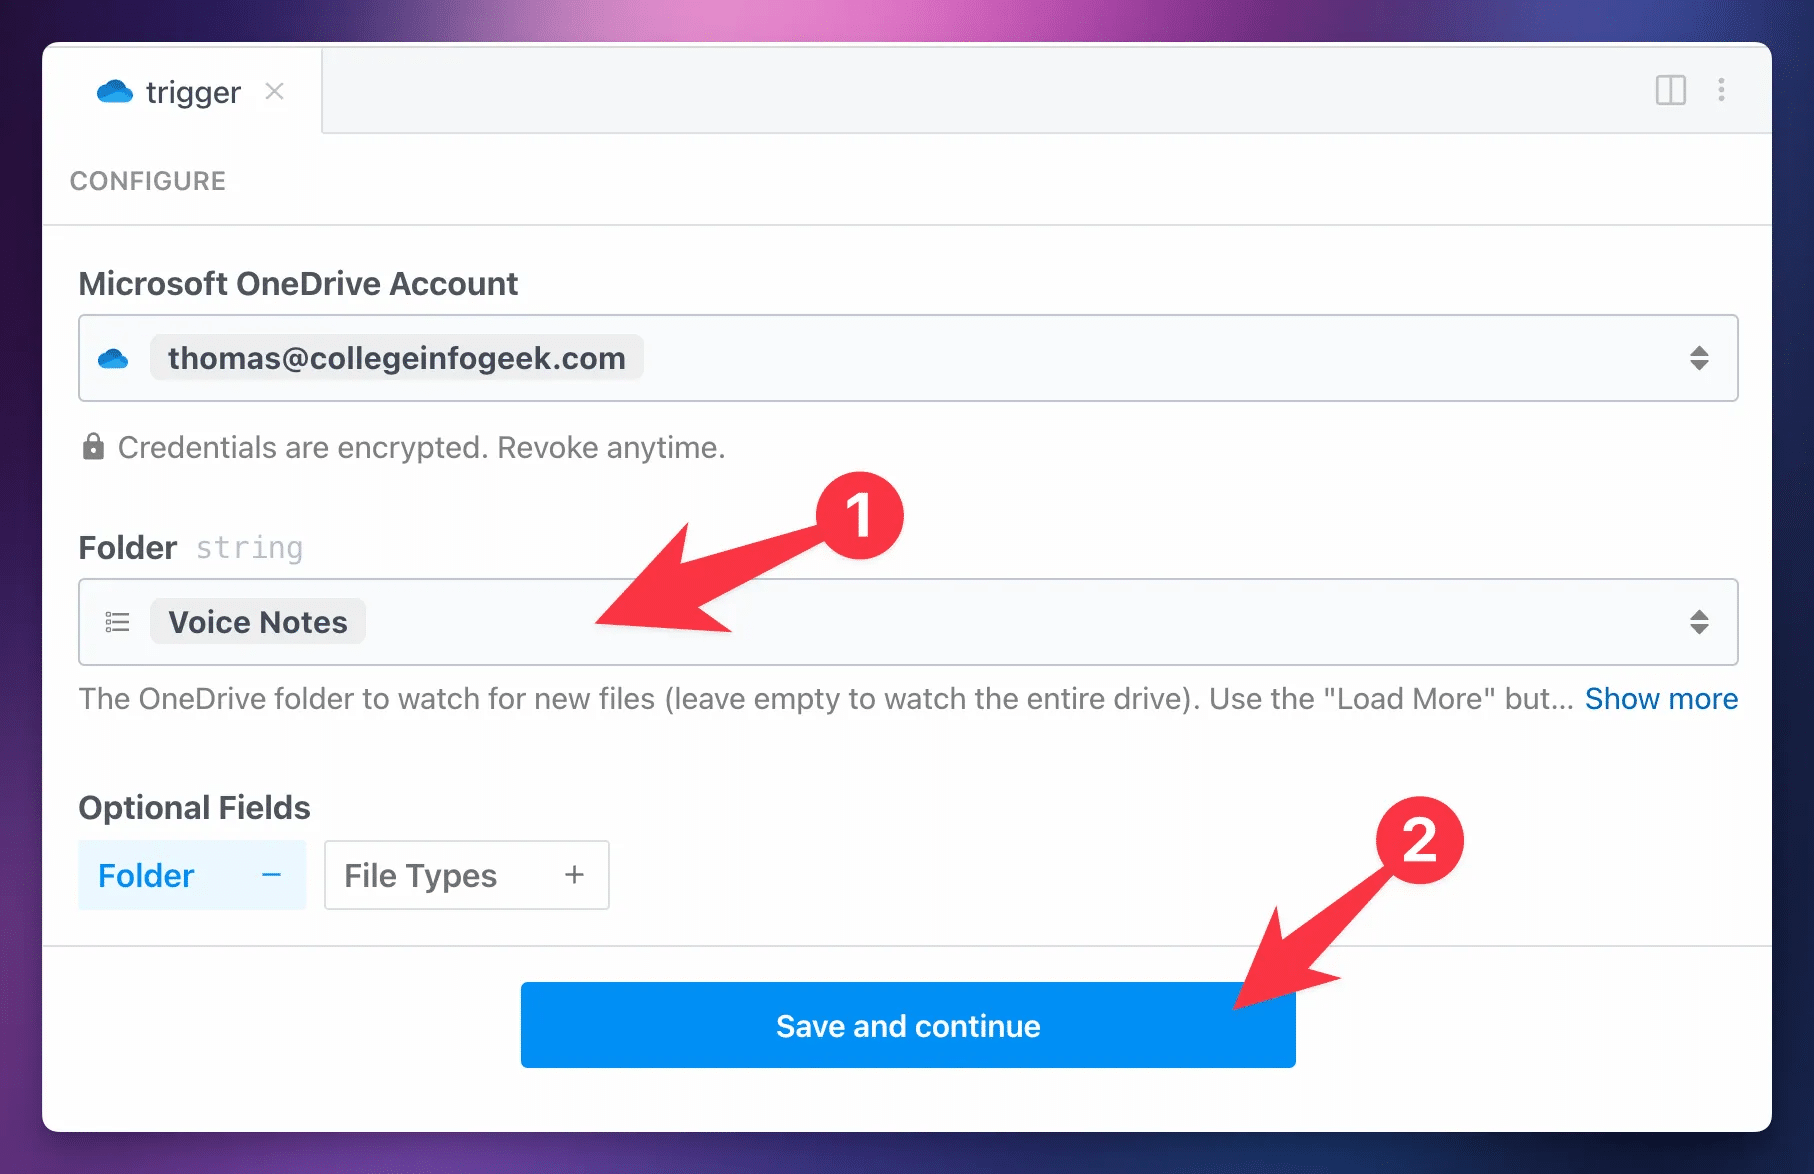
After hitting Save and Continue, you’ll follow the same instructions as detailed outside of toggle for the Google Drive version.
You’ll need to upload an audio file to your chosen OneDrive folder to create a valid test even (do not click the Generate Test Event button), then continue on and set up the Download File action.
Upload a Test Audio File
Next, you’ll need to upload an audio file to your chosen cloud storage folder. This will create a Test Event, which you’ll be able to use to finish setting up and testing the automation.
Here’s a sample file you can download, then upload to your folder. Click here to download it.
Alternatively, you can record a voice note now!
Most audio-recording apps will let you upload files to your cloud storage app once you hit the Share button on a recorded file.
If you are using Dropbox and have an iOS device, you can also use the RecUp app:
It is currently the only app I can find that will automatically upload files to Dropbox after you finish recording.
I haven’t been able to find any app that will do this for Google Drive or OneDrive, though most voice-recorder apps (including the default ones in iOS and Android) provide Share buttons that will allow you to manually upload files.
Copy link to headingSelect a Test Event
When
Hit Continue.
Download the File to Temp Storage
Next, you’ll use the Download File action to download the audio file from Google Drive to
In the download_file action, connect your Google account once again.
Note: Do not rename this step, or any other step in the workflow. My custom actions expect each prior step to be named exactly as they are, so changing a step’s name can break the workflow.
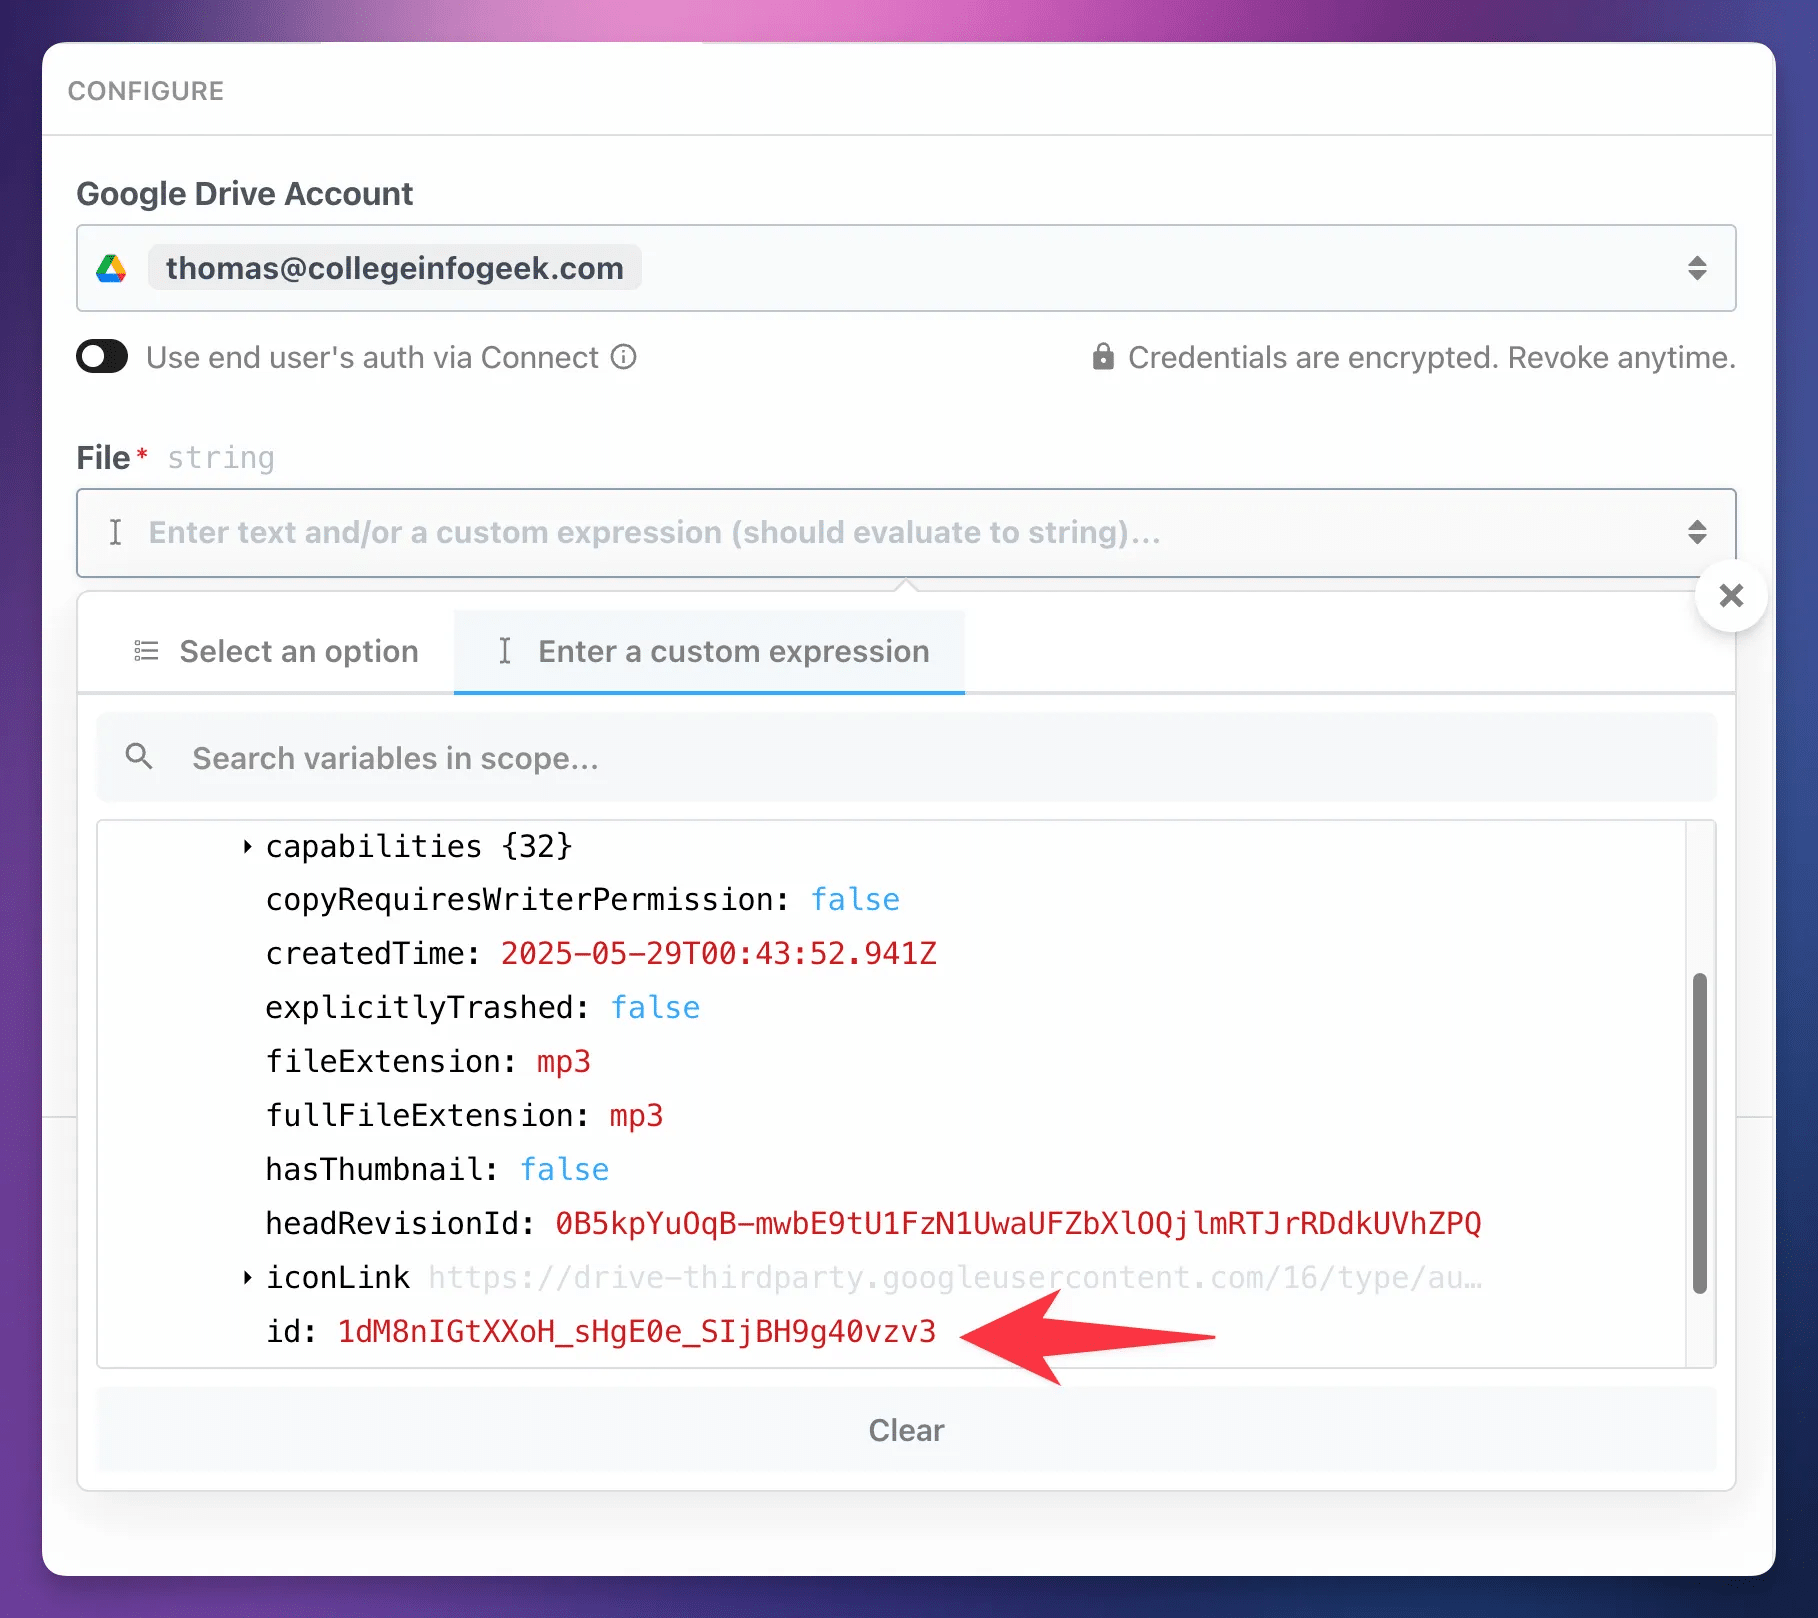
In the File field, go to the Enter a Custom Expression tab to access all of the objects and properties from previous steps. Drill down to steps → trigger → event and click Select Path next to id.
Alternatively, you can simply paste {{steps.trigger.event.id}} in the File field.
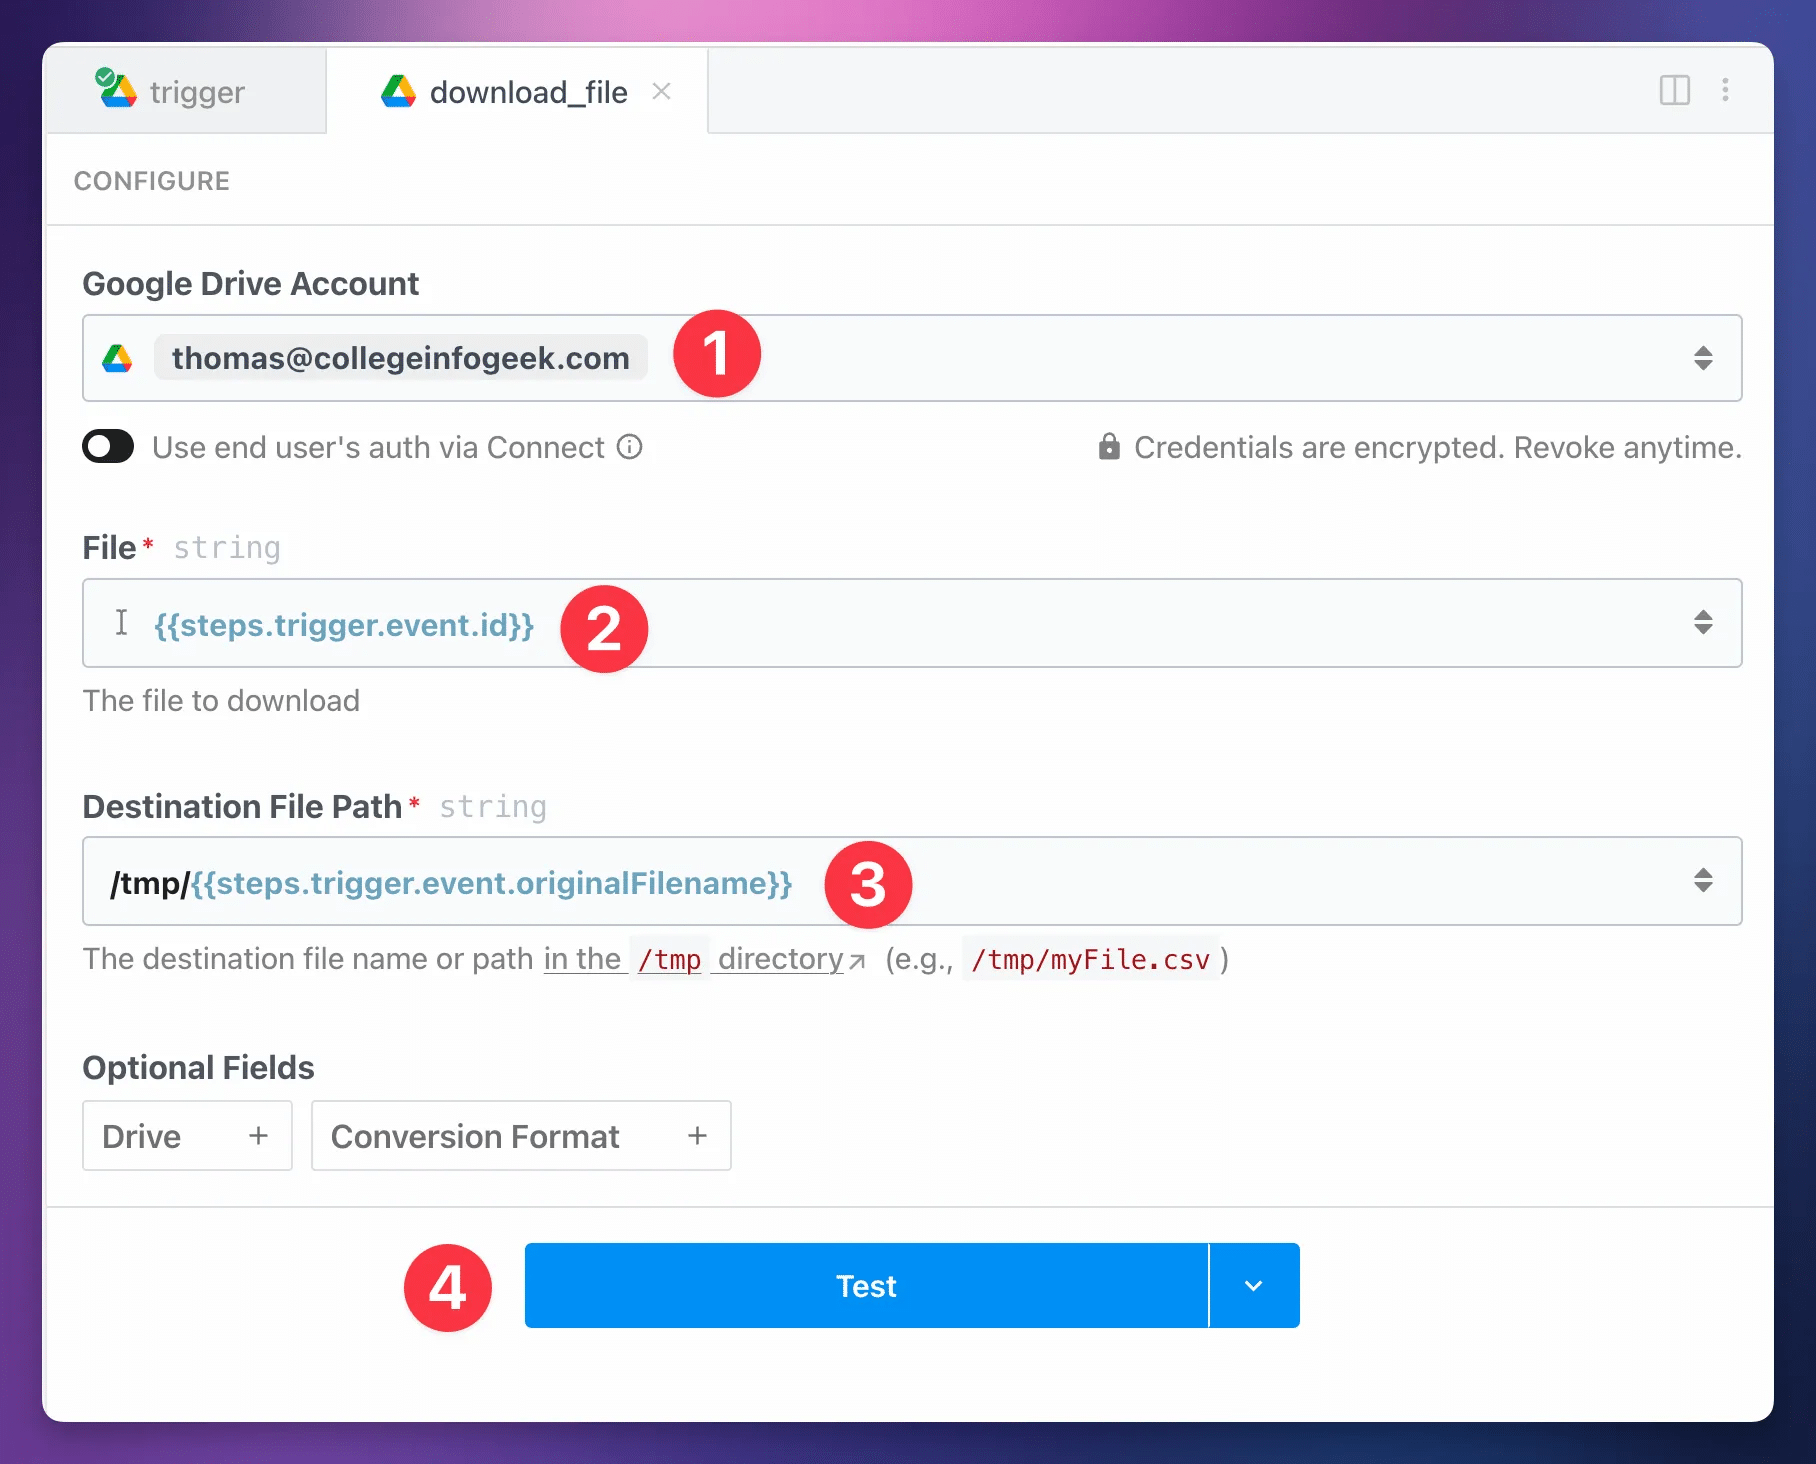
Once you’ve done this, your download_file step should be configured like so:
- Google Drive Account: Your connected Google Drive account
- File:
{{steps.trigger.event.id}} - Destination File Path:
/tmp/{{steps.trigger.event.originalFilename}}(this should be set up for you)
Notice how we’re able to combine a static string – “/tmp/” – with a variable (the path to the original file name) in the Destination File Path field.
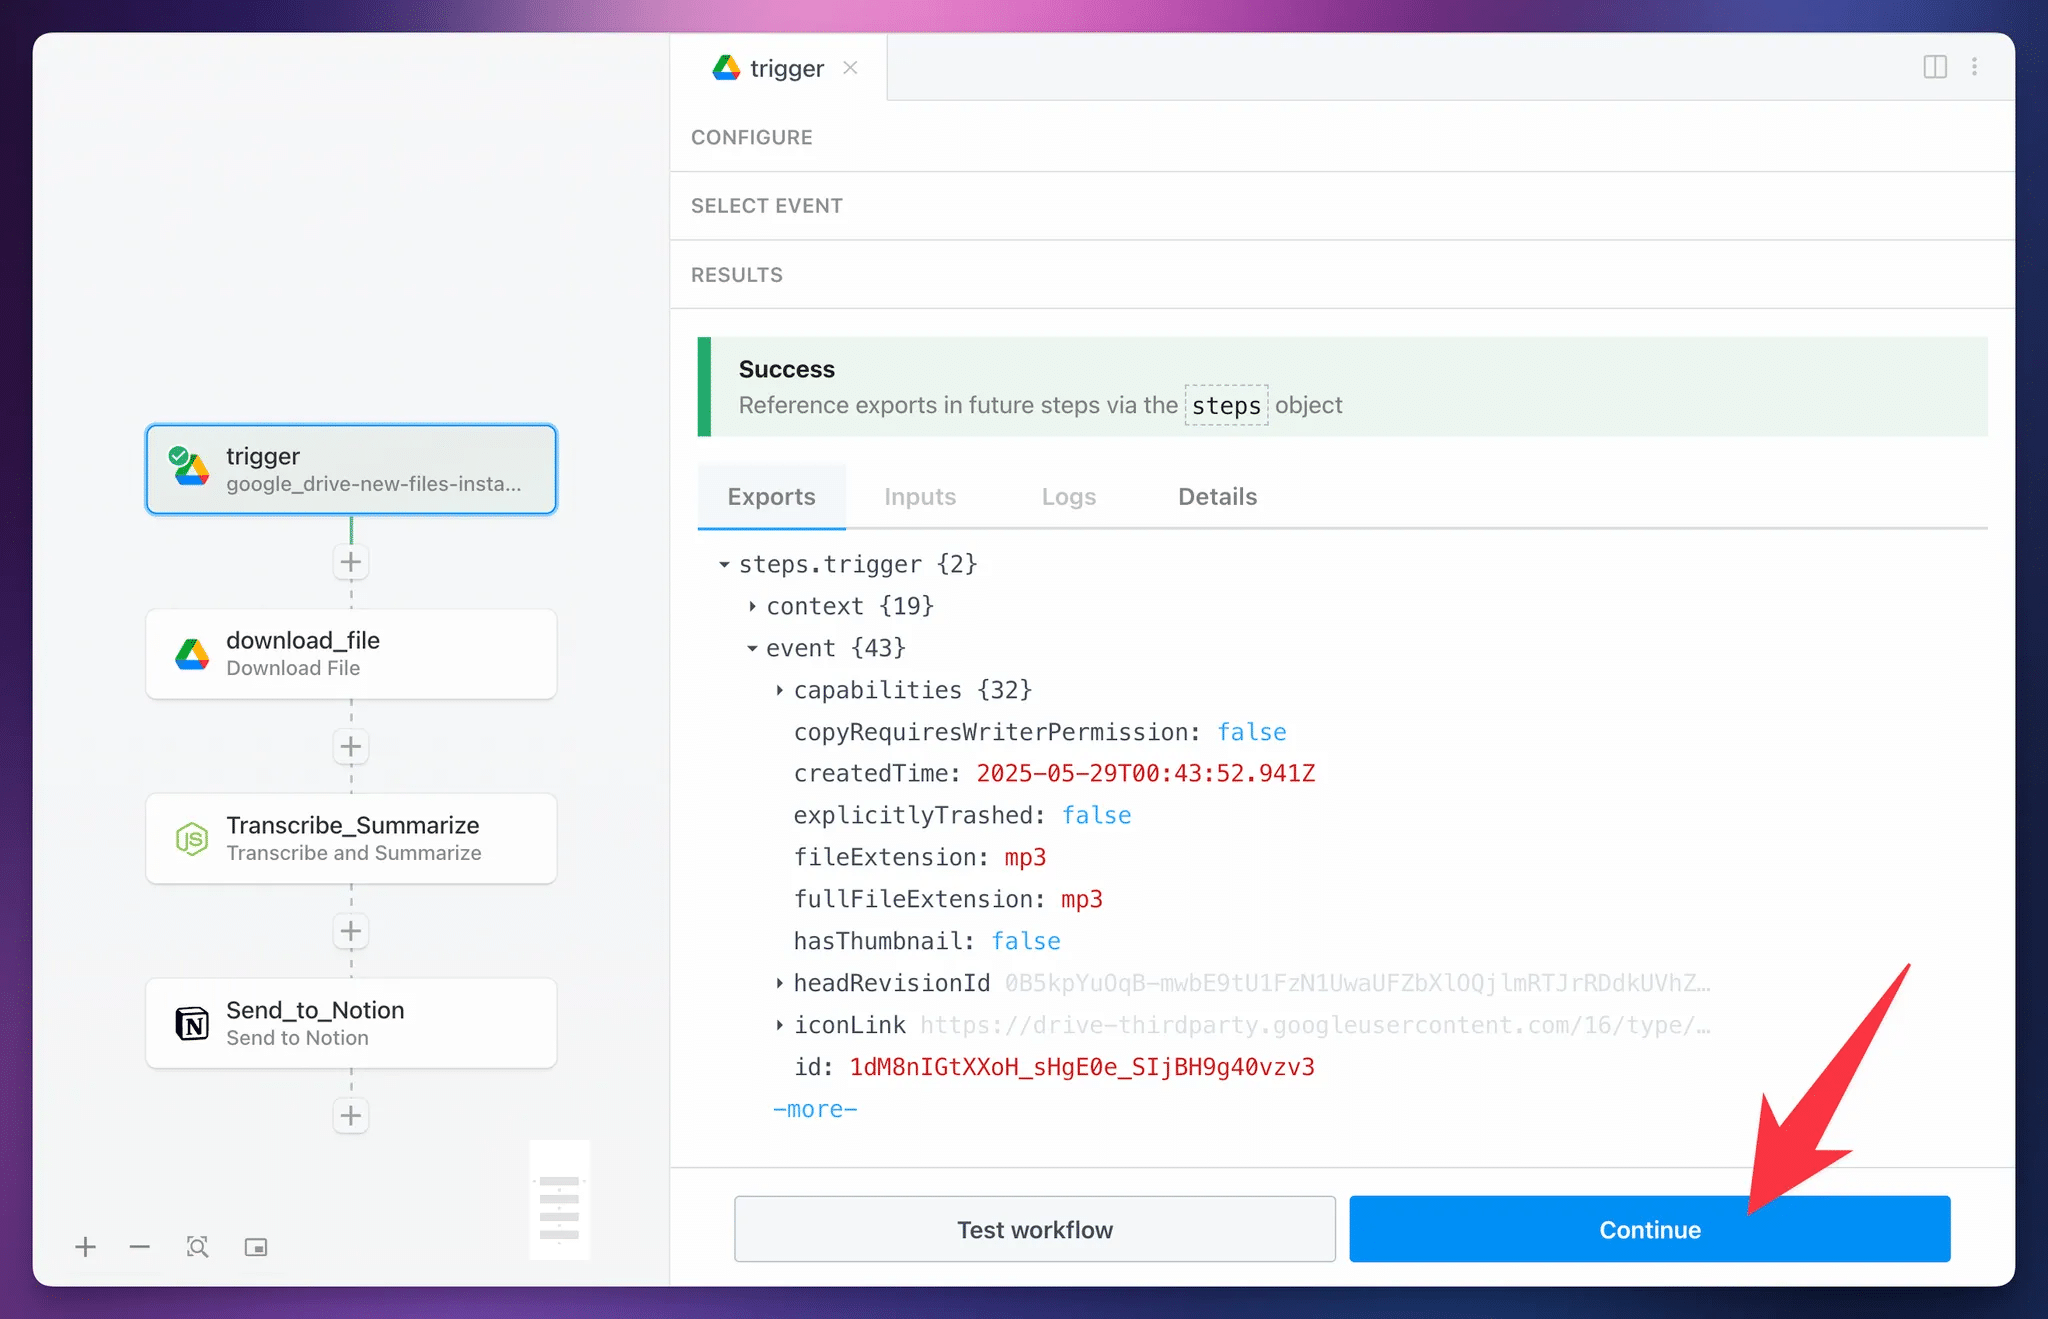
Next, hit Test:
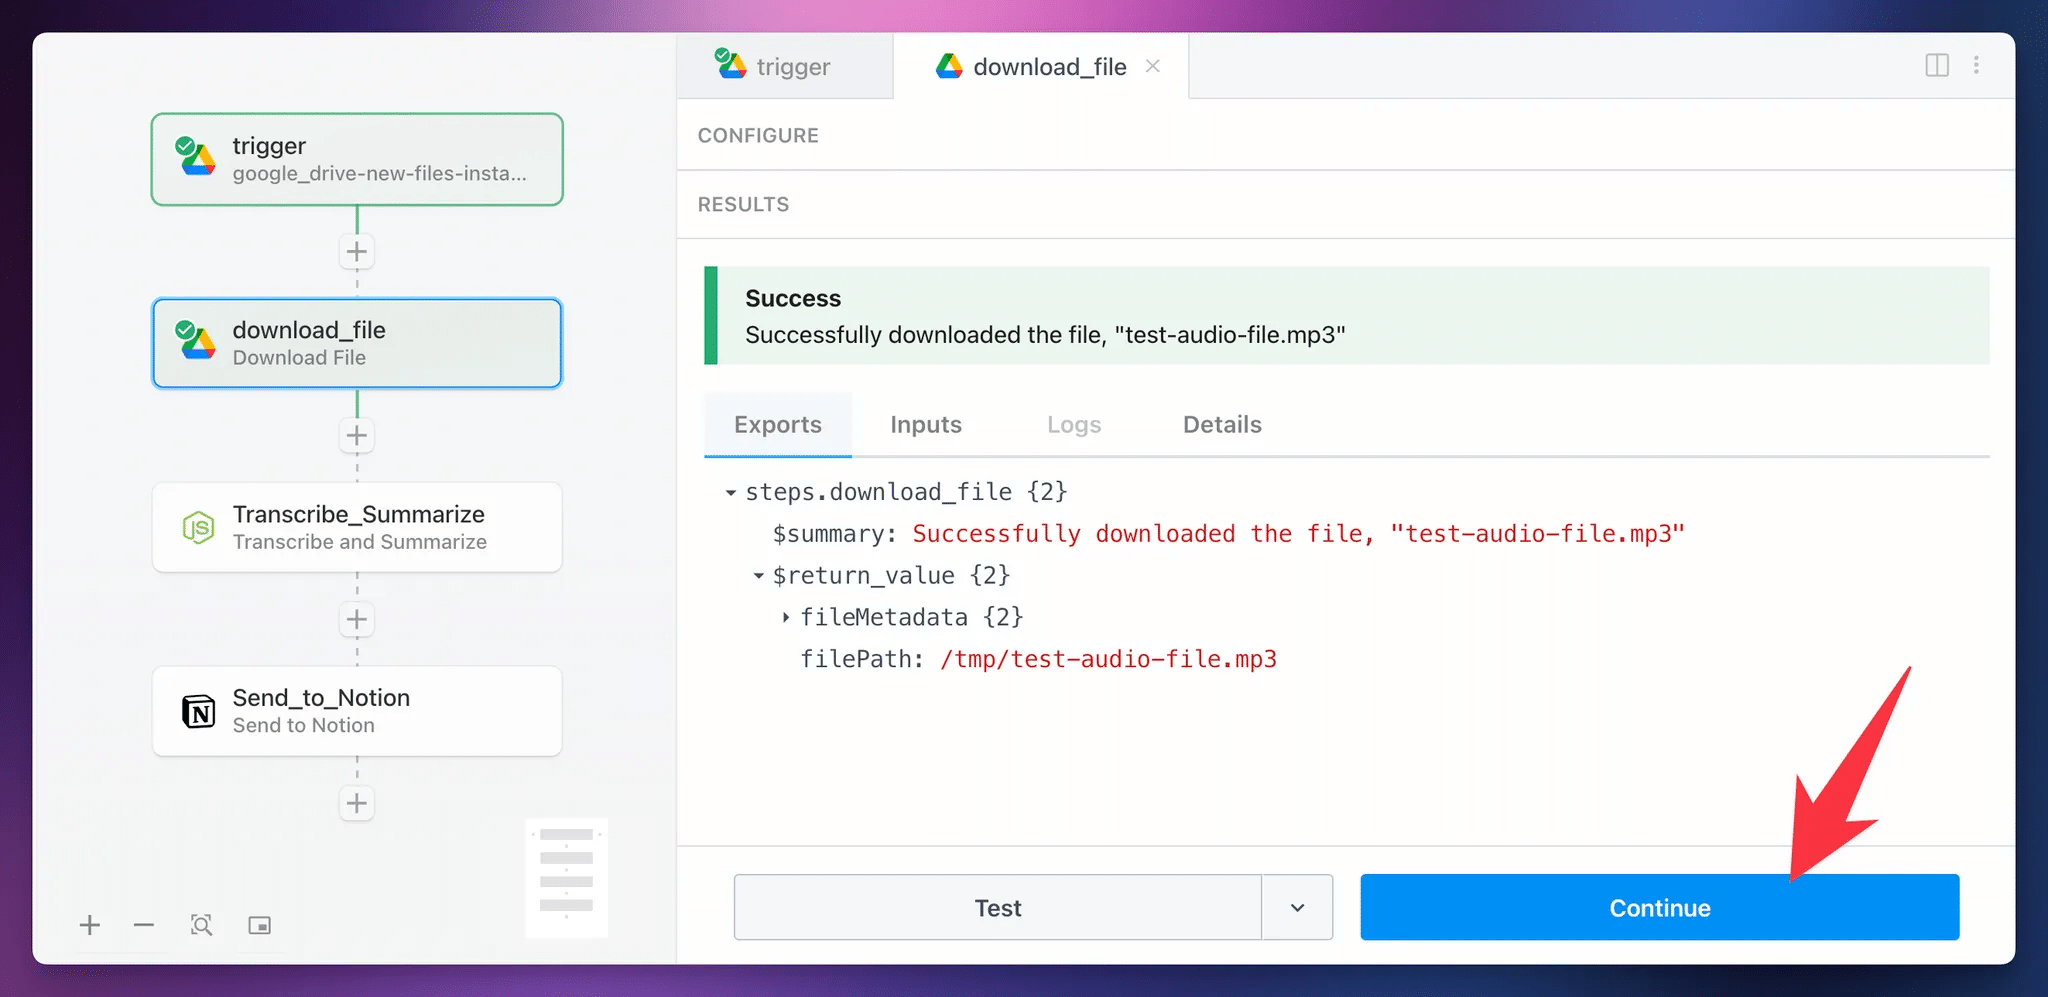
Once the test finishes, you’ll see a Success message, along with the return value of the action.
You don’t need to do anything with this return value yet, but it’s useful to know what the step has done. In short, it has temporarily downloaded the file from Google Drive to Pipedream’s temporary file storage.
Your /tmp/ storage, which is great for workflows where you need to download and manipulate data.
It’s important to know that this storage is temporary, (as opposed to their File Stores, available on paid tiers but not needed here) and /tmp/ has been cleared too quickly.
If this happens, simply re-test this step and click Continue again.
For now, just hit Continue.
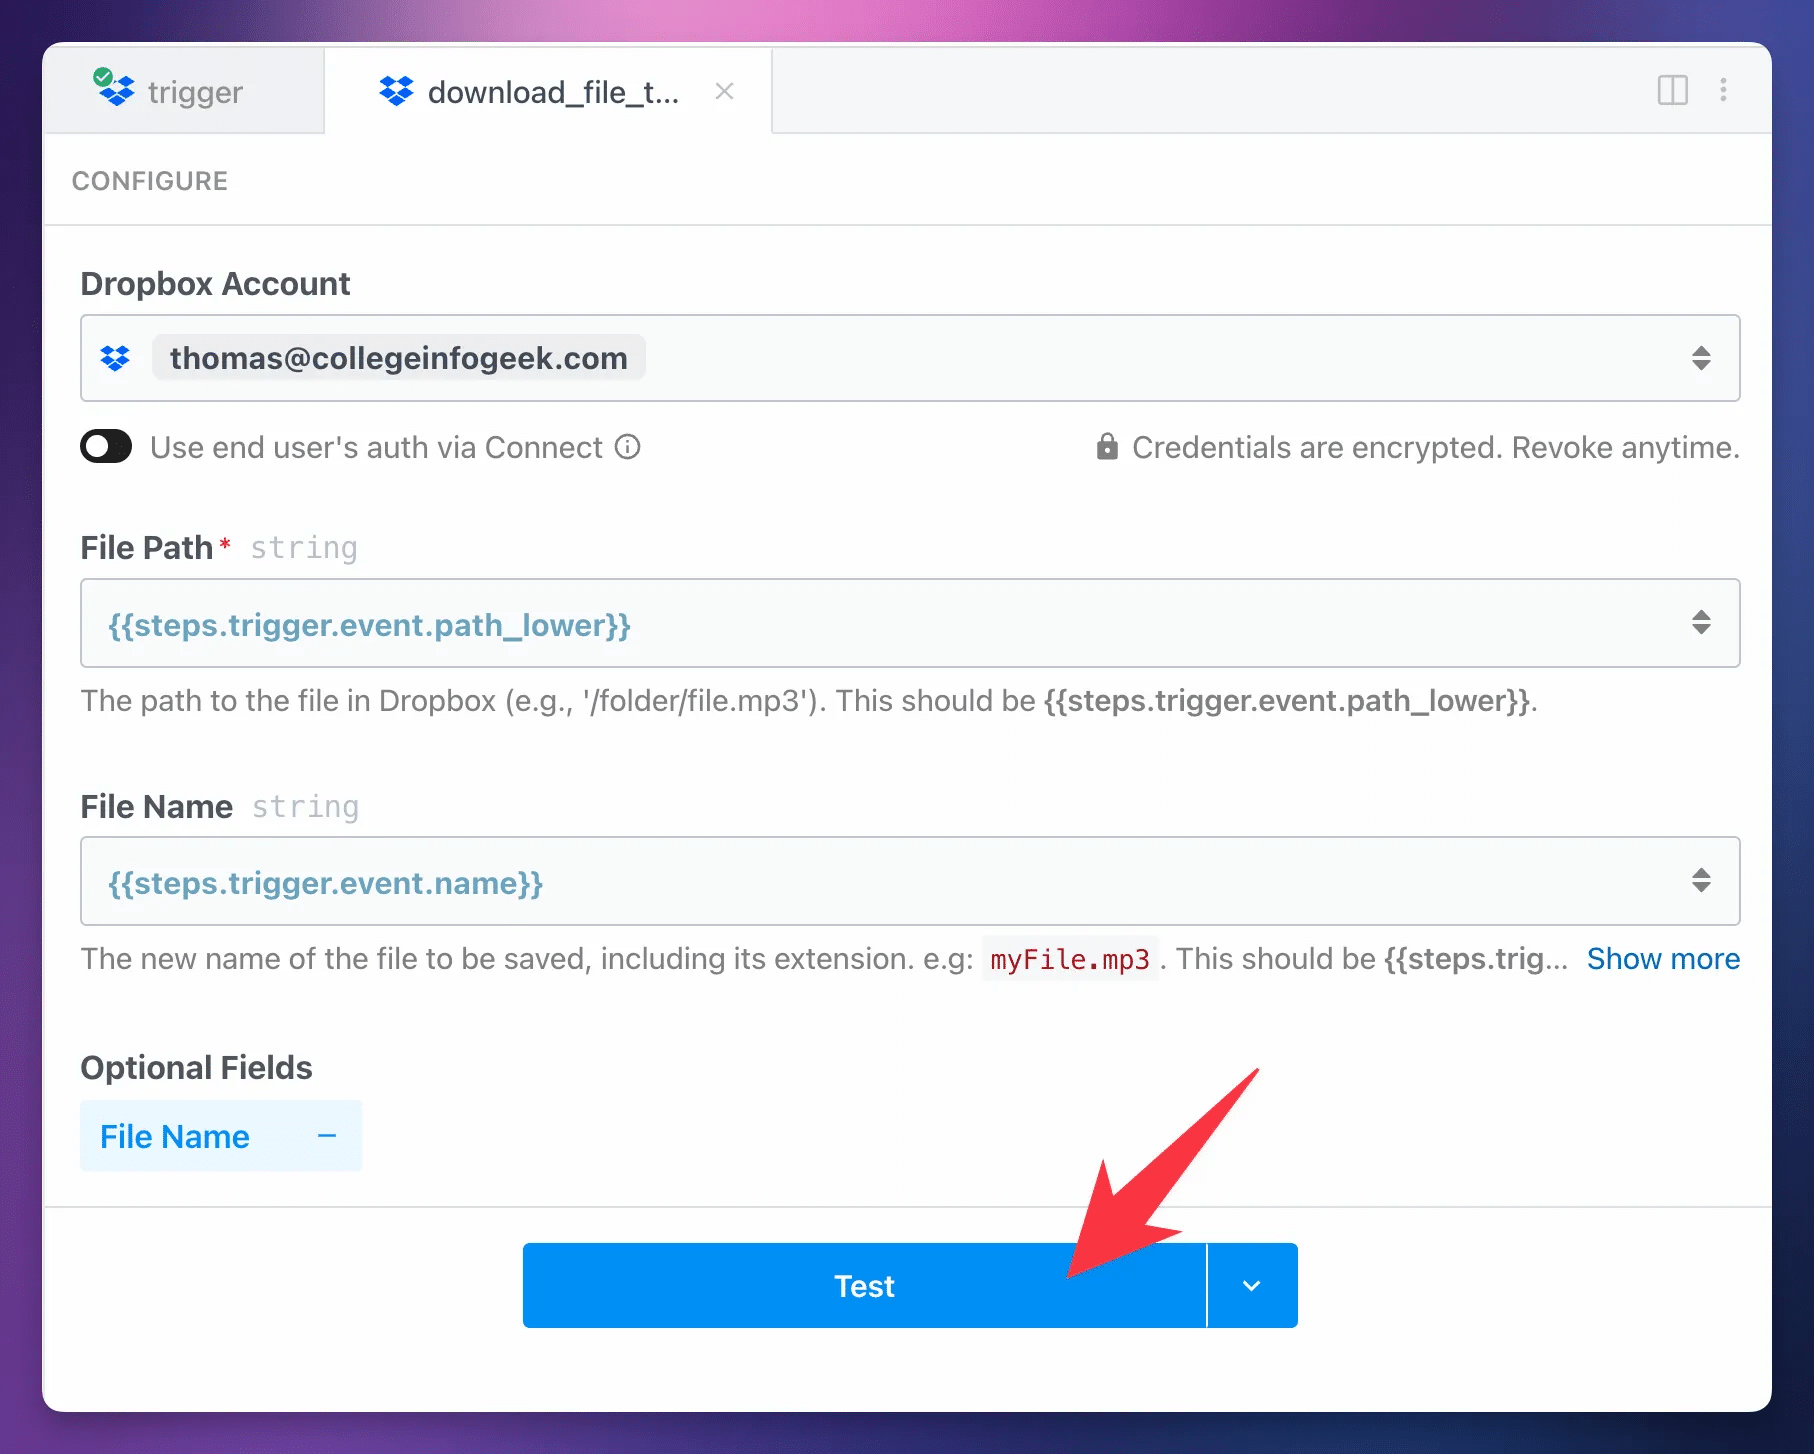
If you’re using Dropbox, your download step should be called download_file_to_tmp.
Important: Do not rename this step. The following steps in the workflow expect this step to have that exact name. Changing the name will break the workflow.
Note that while
To set up your download_file_to_tmp step, set up these fields:
- Dropbox Account: Add your previously configured Dropbox account.
- File Path:
{{steps.trigger.event.path_lower}}(set for you) - File Name:
{{steps.trigger.event.name}}(set for you)
Hit Test.
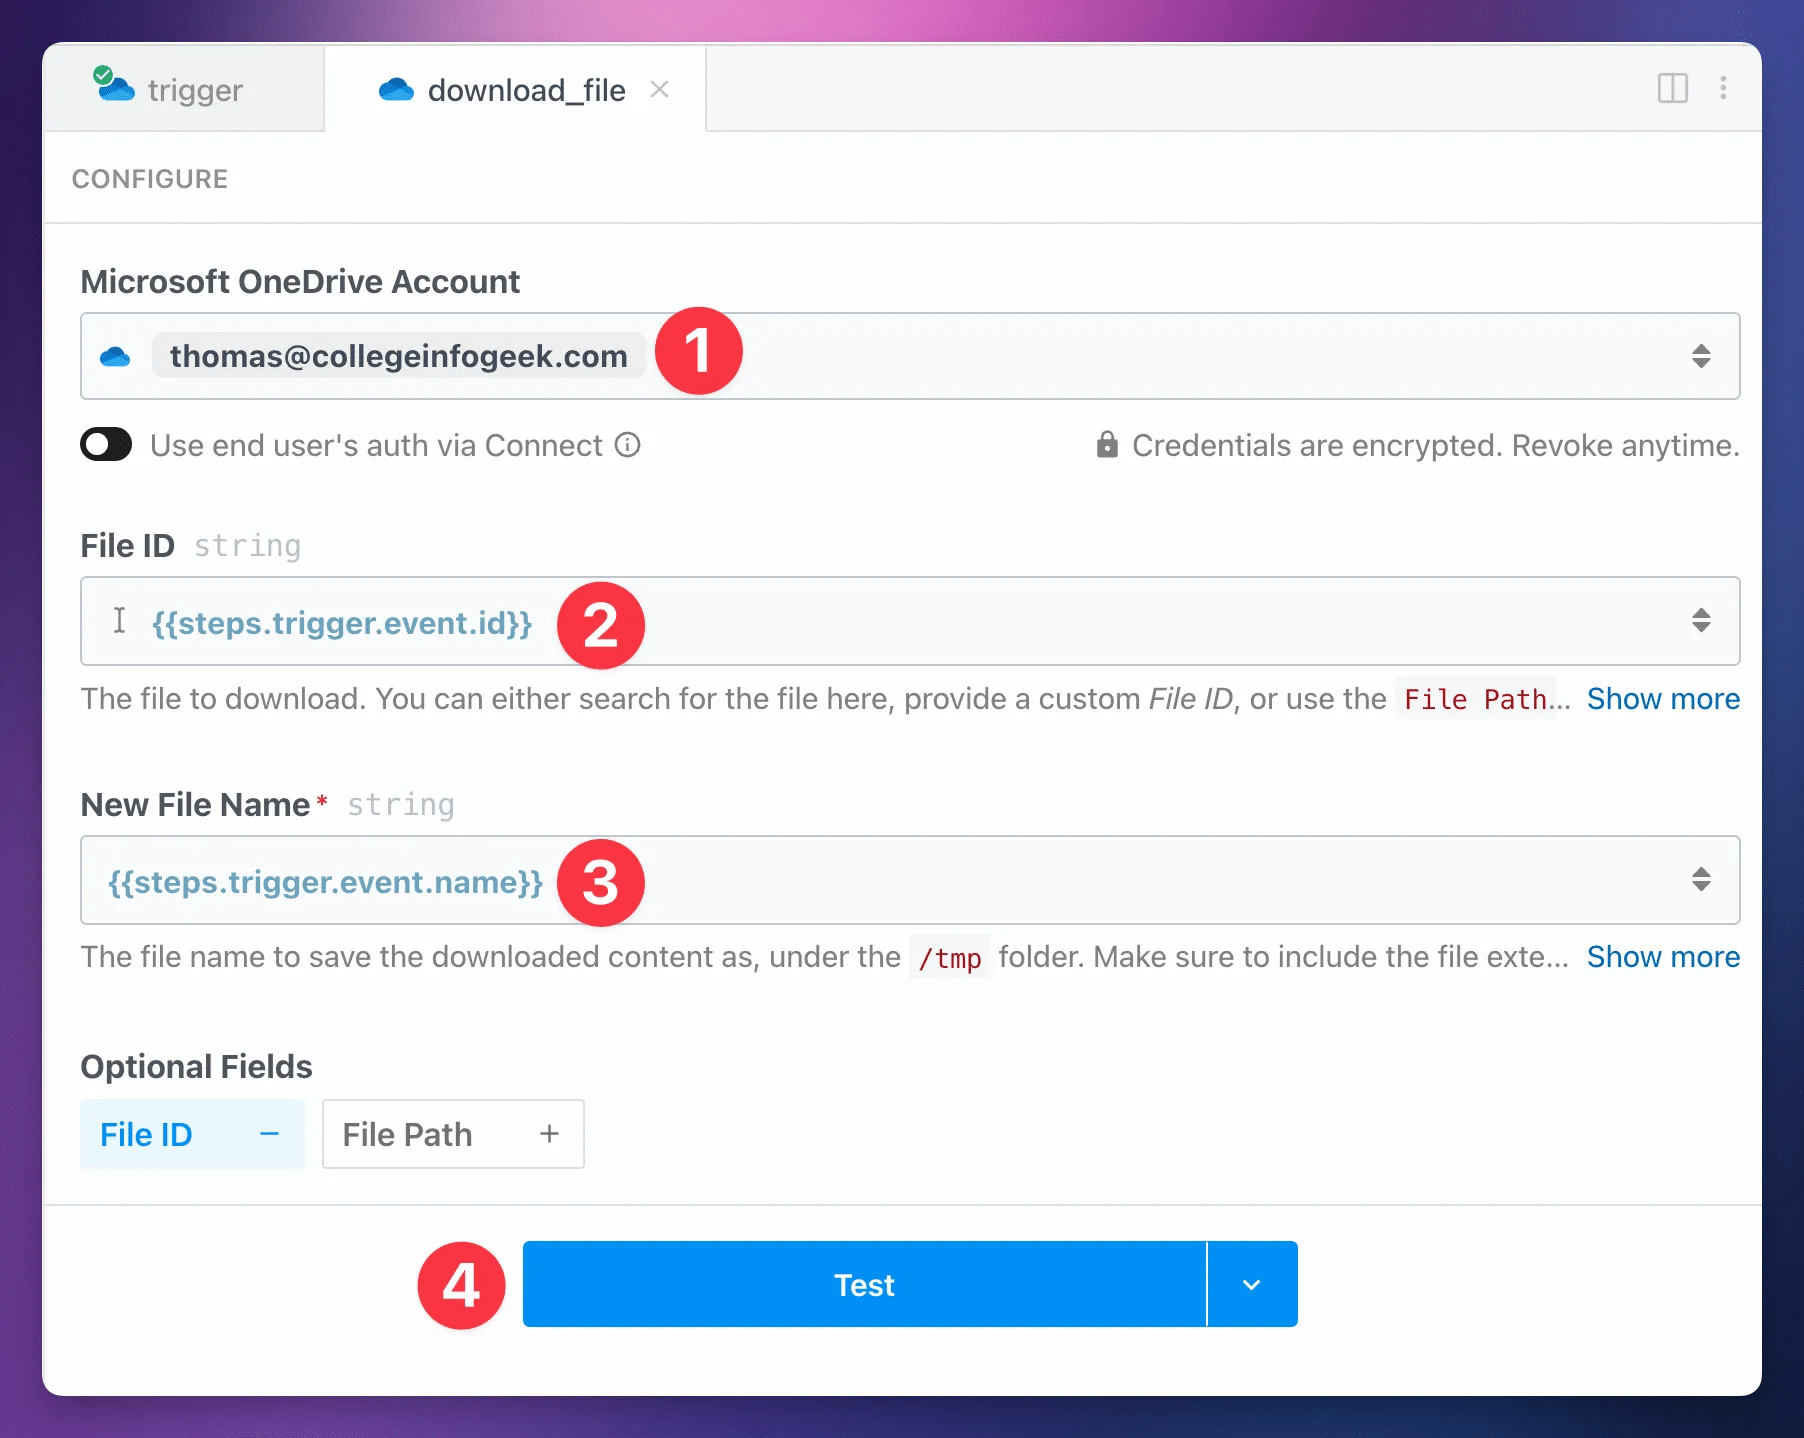
If you’re using Microsoft OneDrive, your download step should be called download_file.
Important: Do not rename this step. The following steps in the workflow expect this step to have that exact name. Changing the name will break the workflow.
The OneDrive version of this workflow uses
To set up your download_file step, set up these fields:
- Microsoft OneDrive Account: Add your previously configured Microsoft OneDrive account.
- File ID:
{{steps.trigger.event.id}}(set for you) - New File Name:
{{steps.trigger.event.name}}(set for you)
Hit Test.
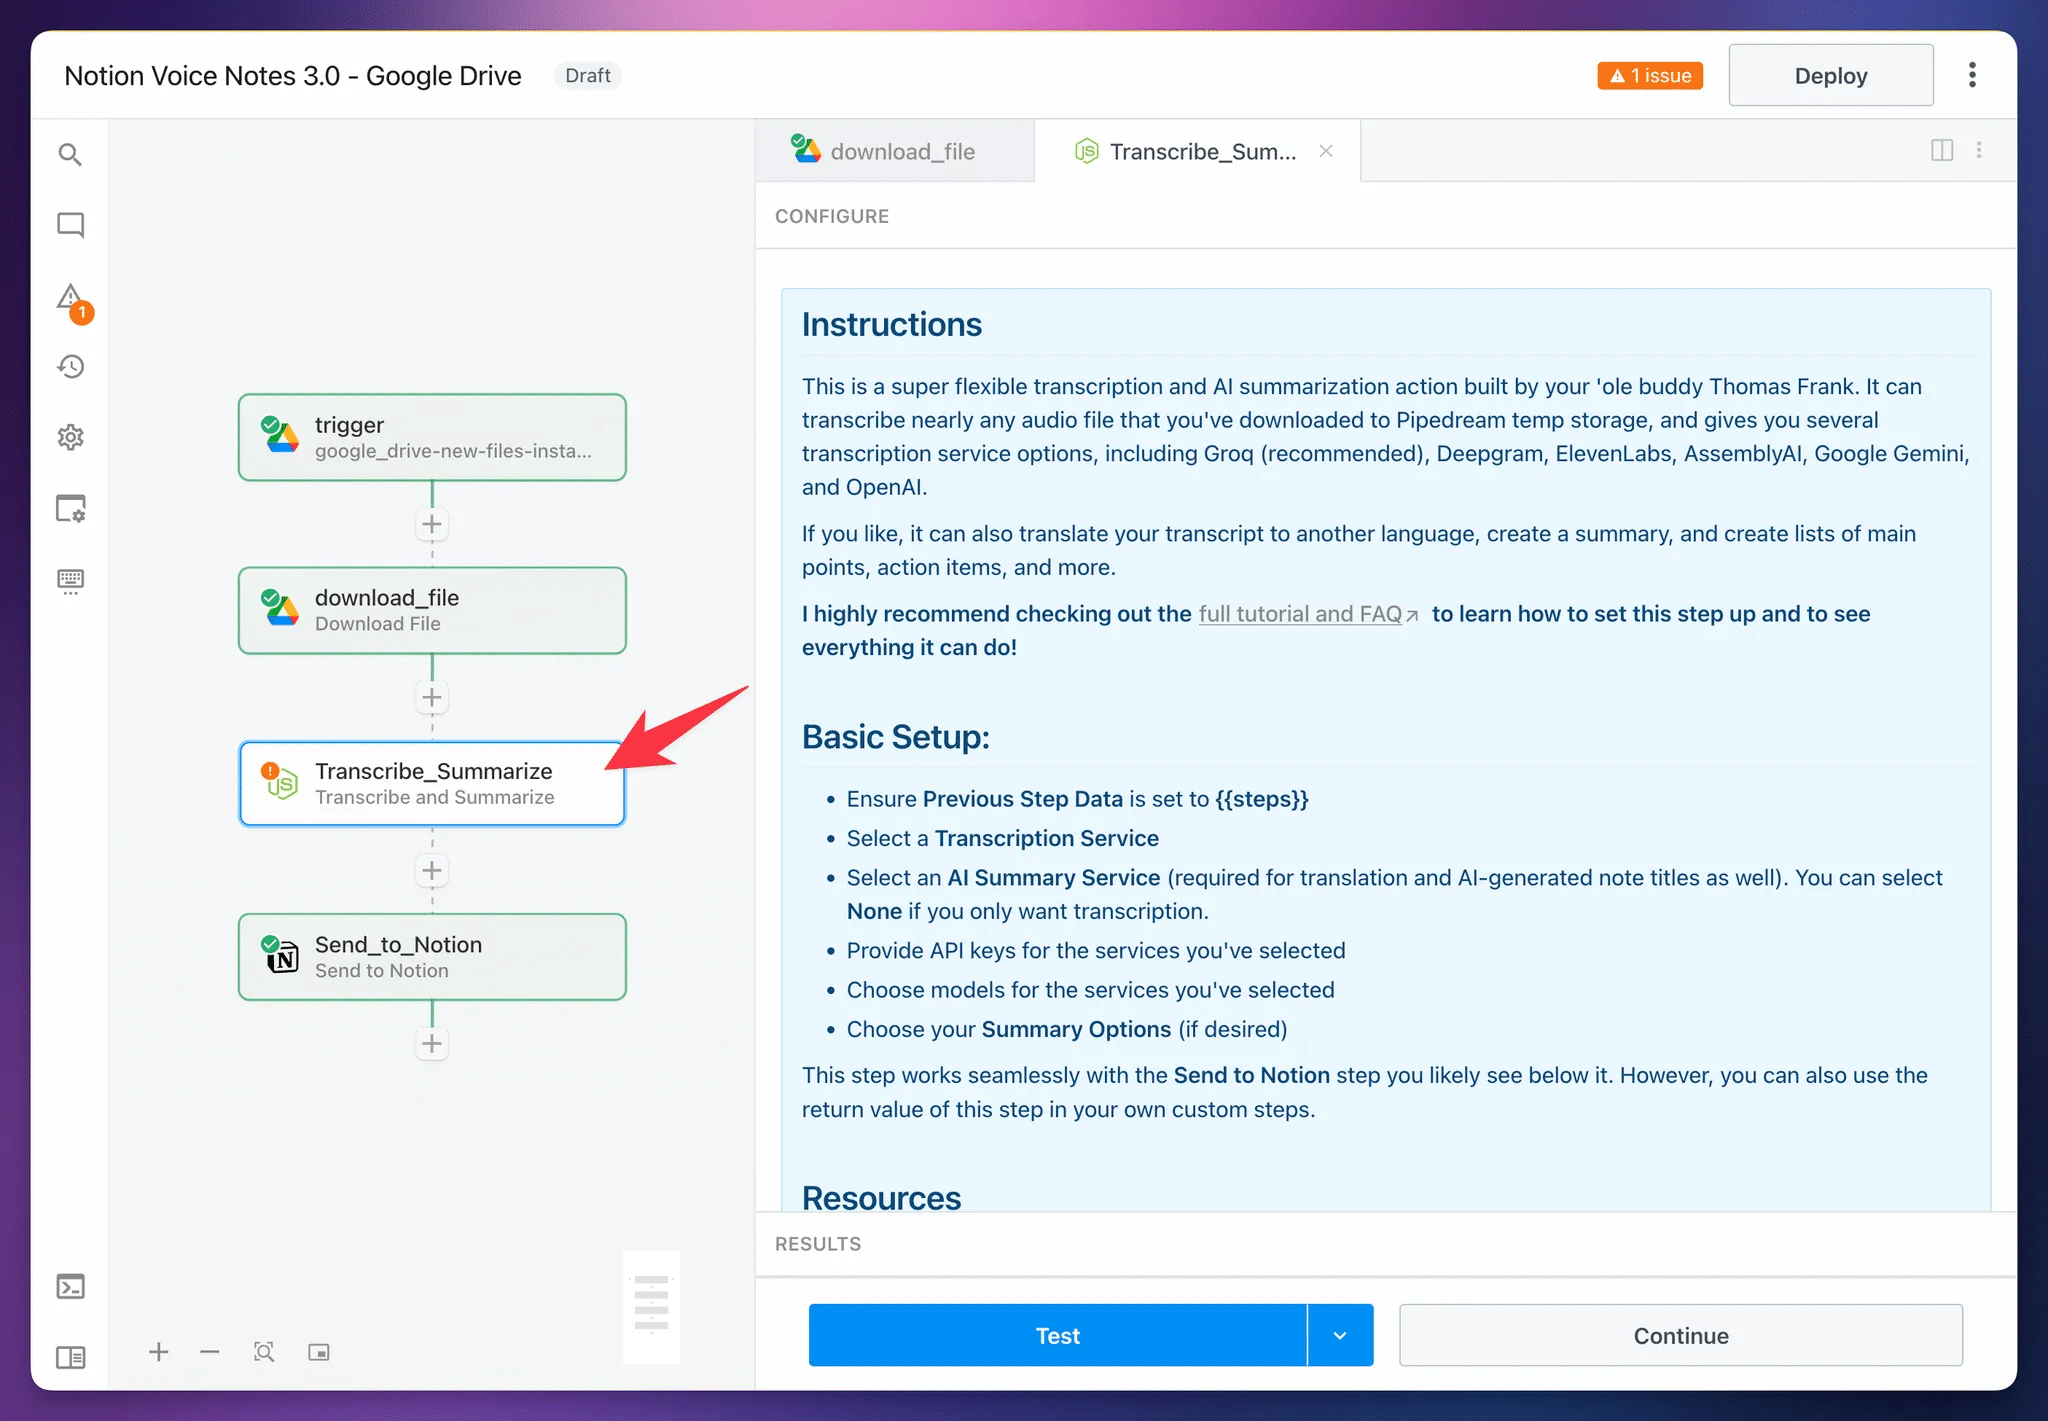
Set Up the Transcribe and Summarize Step
Now it’s time to set up the Transcribe_Summarize step. This action is the heart of the entire workflow – it uploads your audio file to a speech-to-text service to generate a transcript, and it can optionally do several other things:
- Generate a summary with AI
- Generate lists – e.g. Main Points, Action Items, Follow-Up Questions, etc.
- Translate the transcript to another language
- Clean up the transcript with AI
- Run a custom prompt on the transcript (e.g. “Write a strong argument against the transcript’s point of view”)
This is a custom
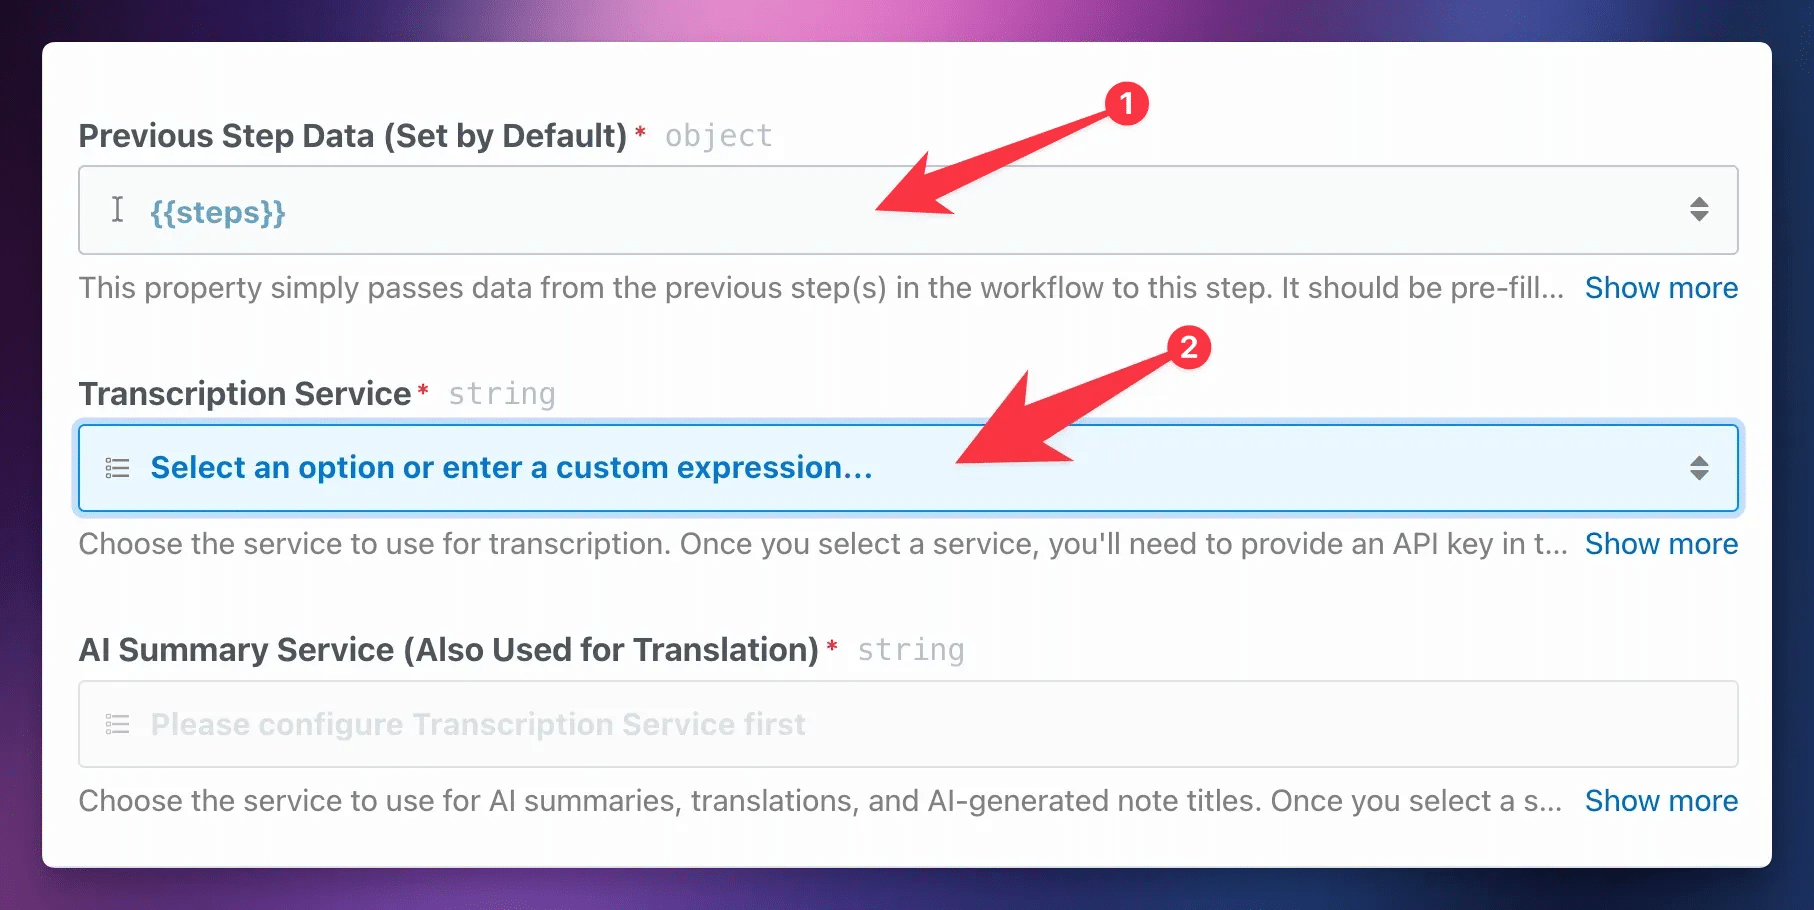
First, make sure the Previous Step Data property has a value of {{steps}}. This gives the custom action access to all of the data from previous steps in the workflow.
Next, choose your Transcription Service. This workflow allows you to choose from several.
Below, you’ll find a table listing each service and its available models. You’ll need to have an account and an API key for your chosen service.
Note: You will always need an API key for your chosen service. Being subscribed to a non-API service like ChatGPT Plus is irrelevant for this workflow.
Some services have a free tier, which I’ve marked with a ✅ in the Free Tier column. Others offer limited free trial credit, which I’ve marked with a ⏳ icon.
| Service | Models | Free Tier | Lowest Paid Tier | API Key |
|---|---|---|---|---|
| Groq | Whisper | ✅ | $0.04/hour | Get API Key |
| Deepgram | Nova | ⏳ | $0.25/hour | Get API Key |
| AssemblyAI | Slam-1, Nano, Universal | ⏳ | $0.12/hour | Get API Key |
| ElevenLabs | Scribe | ⏳ | $5/mo (12.5 hrs) | Get API Key |
| Google Gemini | Gemini | ✅ | Hard to calculate | Get API Key |
| OpenAI | Whisper, GPT-4o-Transcibe | ❌ | $0.18/hour | Get API Key |
Google’s Gemini models can do speech-to-text natively – you don’t need a specific speech-to-text model.
Due to this, Gemini lists their pricing in token costs, and doesn’t provide per-hour costs for audio. Therefore, it’s difficult to calculate Lowest Paid Tier cost for the service. It’s likely very cheap if you select an older model like Gemini 1.5 Pro.
Note that Google explicitly does train their models on free-tier user input.
I personally use Groq, and recommend it for most people. They provide a free tier for both speech-to-text and large language models, and their service is fast. They also don’t retain inputs or use them to train models.
Currently, the free tier will let you transcribe 2 hours of audio every hour, with a cap of 8 hours of transcription per day. The upshot is that you can send a file up to 2 hours long to Groq for free – multiple times a day.
Once you’ve chosen your Transcription Service, you should choose an AI Summary Service as well. This service can be used to:
- Generate a title for your transcript
- Create a summary
- Create lists – e.g. Main Points, Action Items, References, Stories, etc
- Run a custom prompt
- Translate the transcript to another language
- Clean up the transcript (grammar, spelling, key terms)
Note: If you only need transcription, you can set AI Summary Service to None.
Below, you’ll find a table listing each AI Summary Service. You’ll need to have an account and an API key for your chosen service.
Note: You will always need an API key for your chosen service. Being subscribed to a non-API service like ChatGPT Plus is irrelevant for this workflow.
Some services have a free tier, which I’ve marked with a ✅ in the Free Tier column. I’m not listing pricing here, as it’s likely to change quickly. In general, the AI Summary step is extremely cheap when not free.
| Service | Models | Free Tier | API Key |
|---|---|---|---|
| Groq | Llama family | ✅ | Get API Key |
| Anthropic | Claude family | ❌ | Get API Key |
| Google Gemini | Gemini family | ✅ | Get API Key |
| OpenAI | GPT family | ❌ | Get API Key |
| Cerebras | Llama family | ✅ | Get API Key |
As with transcription, I personally use Groq for my summary service. Their free tier is more than enough, and I find their open-source Llama models to be more than capable of handling summary tasks.
Note: If you’re on
Once you’ve chosen your services, the workflow will reload and you’ll see an Account property for each chosen account. If you chose the same service for both Transcription and AI Summary, you’ll only see one account field.
In this field you’ll need to connect an account for each of your chosen services. This is similar to how you connected Google Drive, but instead of an authentication flow, you’ll simply need to enter an API key. Use the Get API Key links in the tables above to get keys for your chosen services. Follow Pipedream’s docs on connected accounts if you need more guidance.
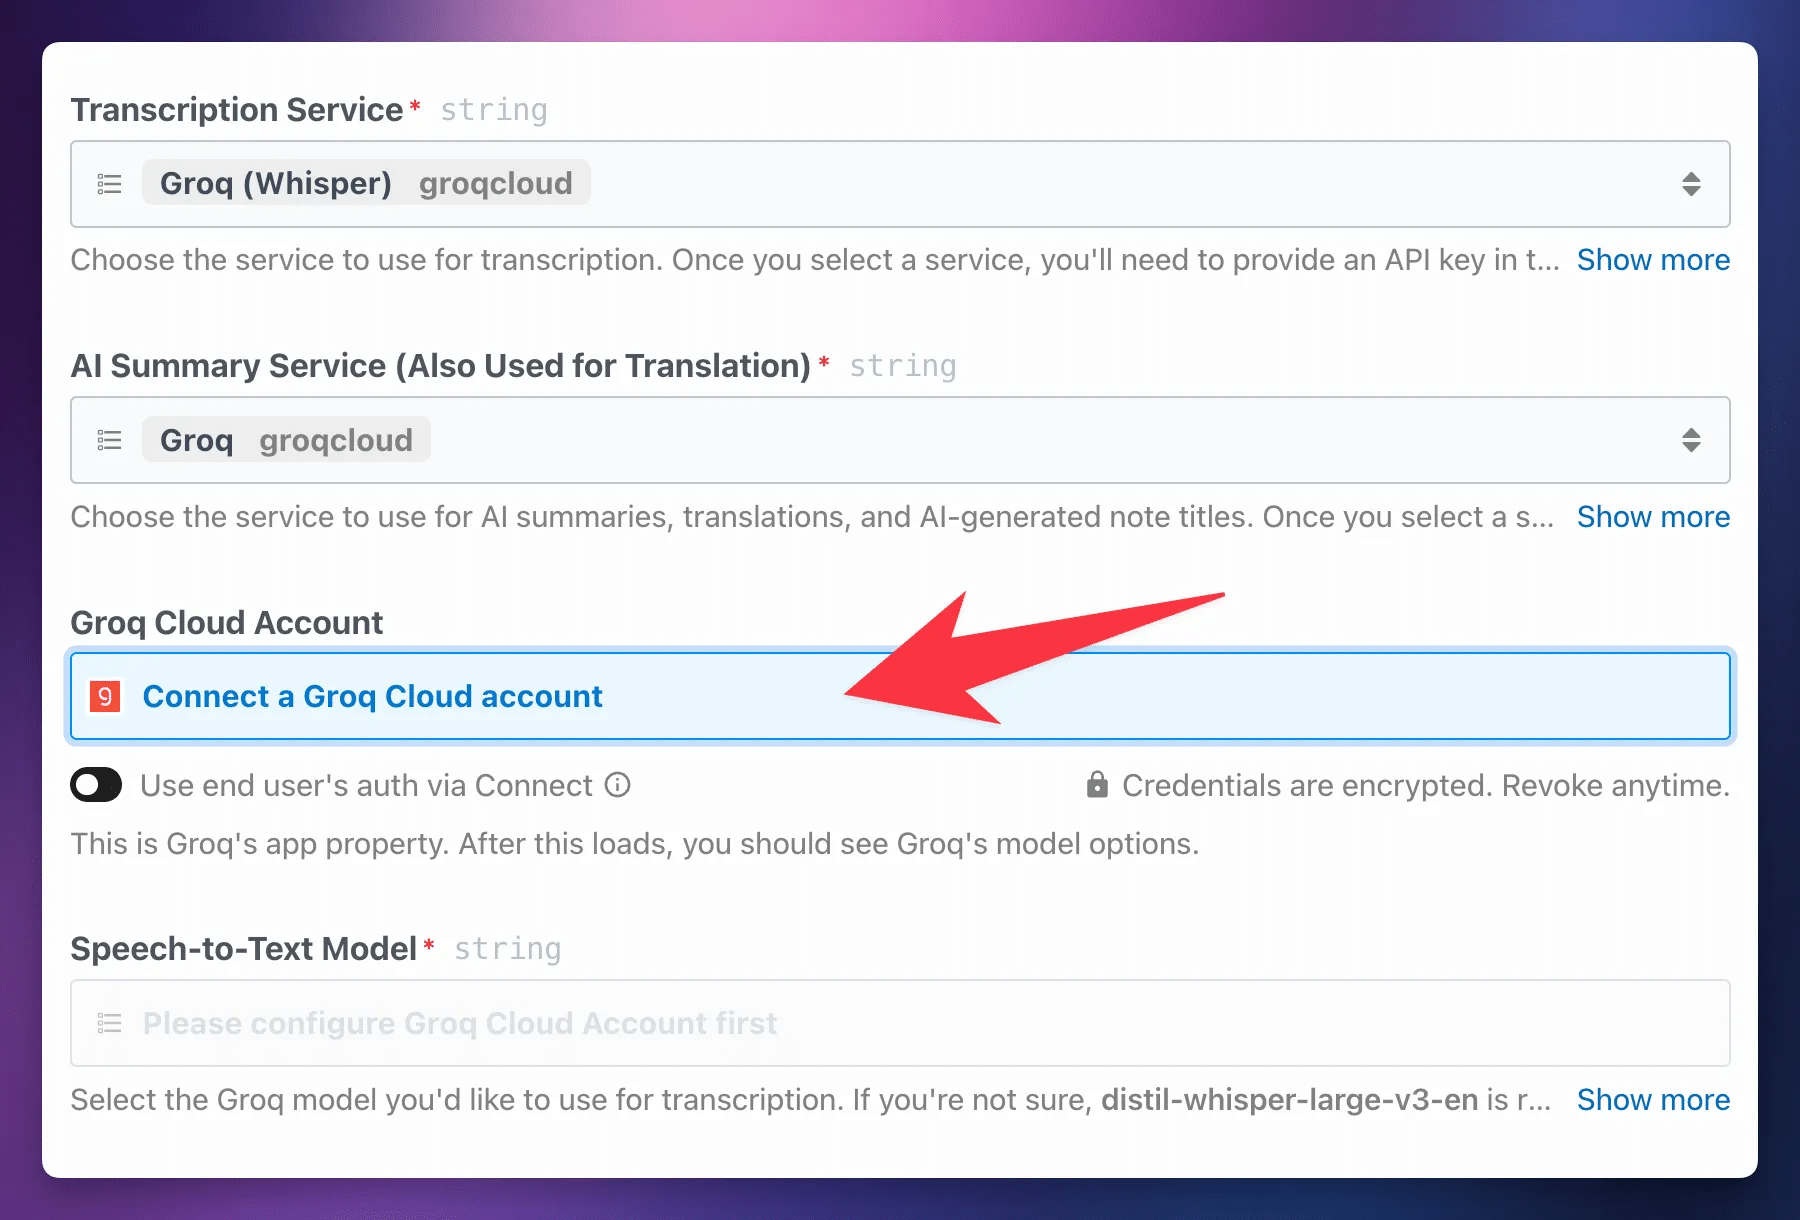
Here’s how you’d obtain an API key with Groq. Head to the Groq Console and create an account if you haven’t done so already.
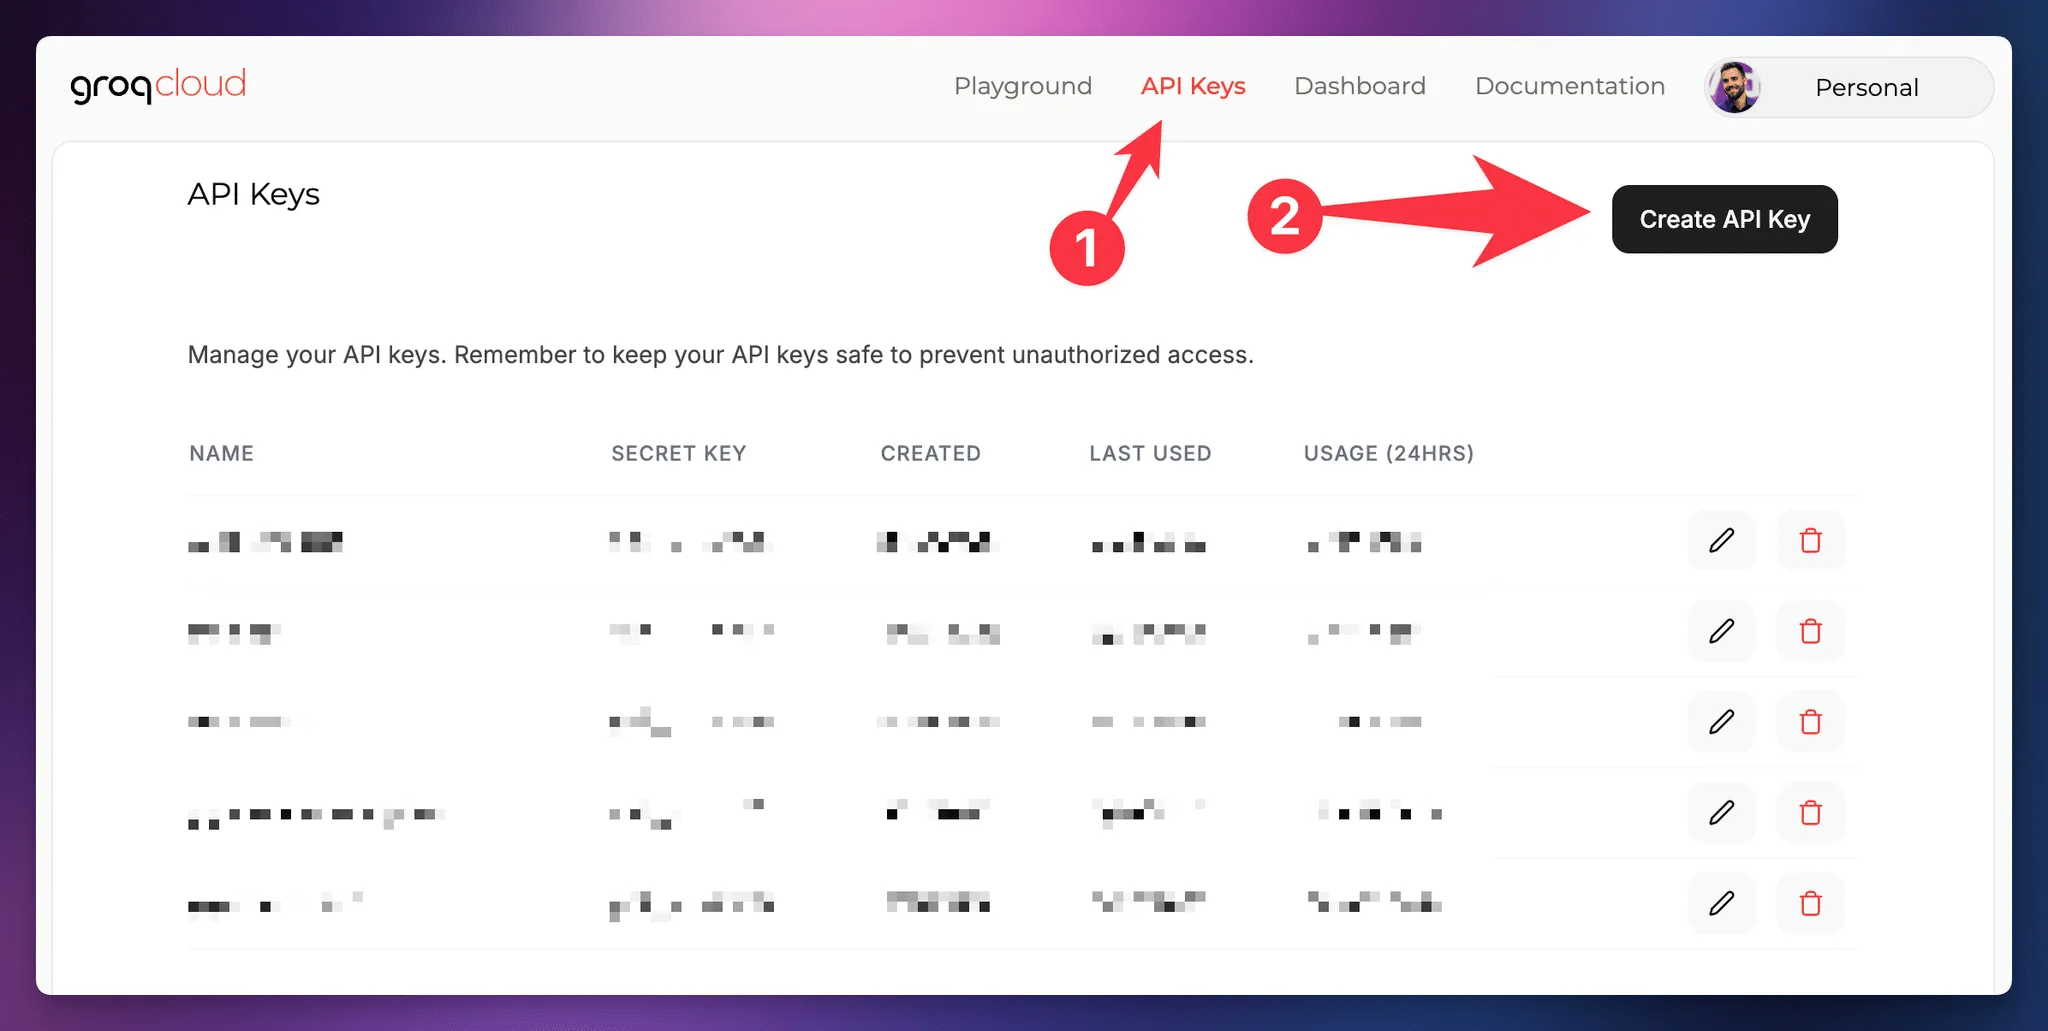
On the API Keys page, click Create API Key.
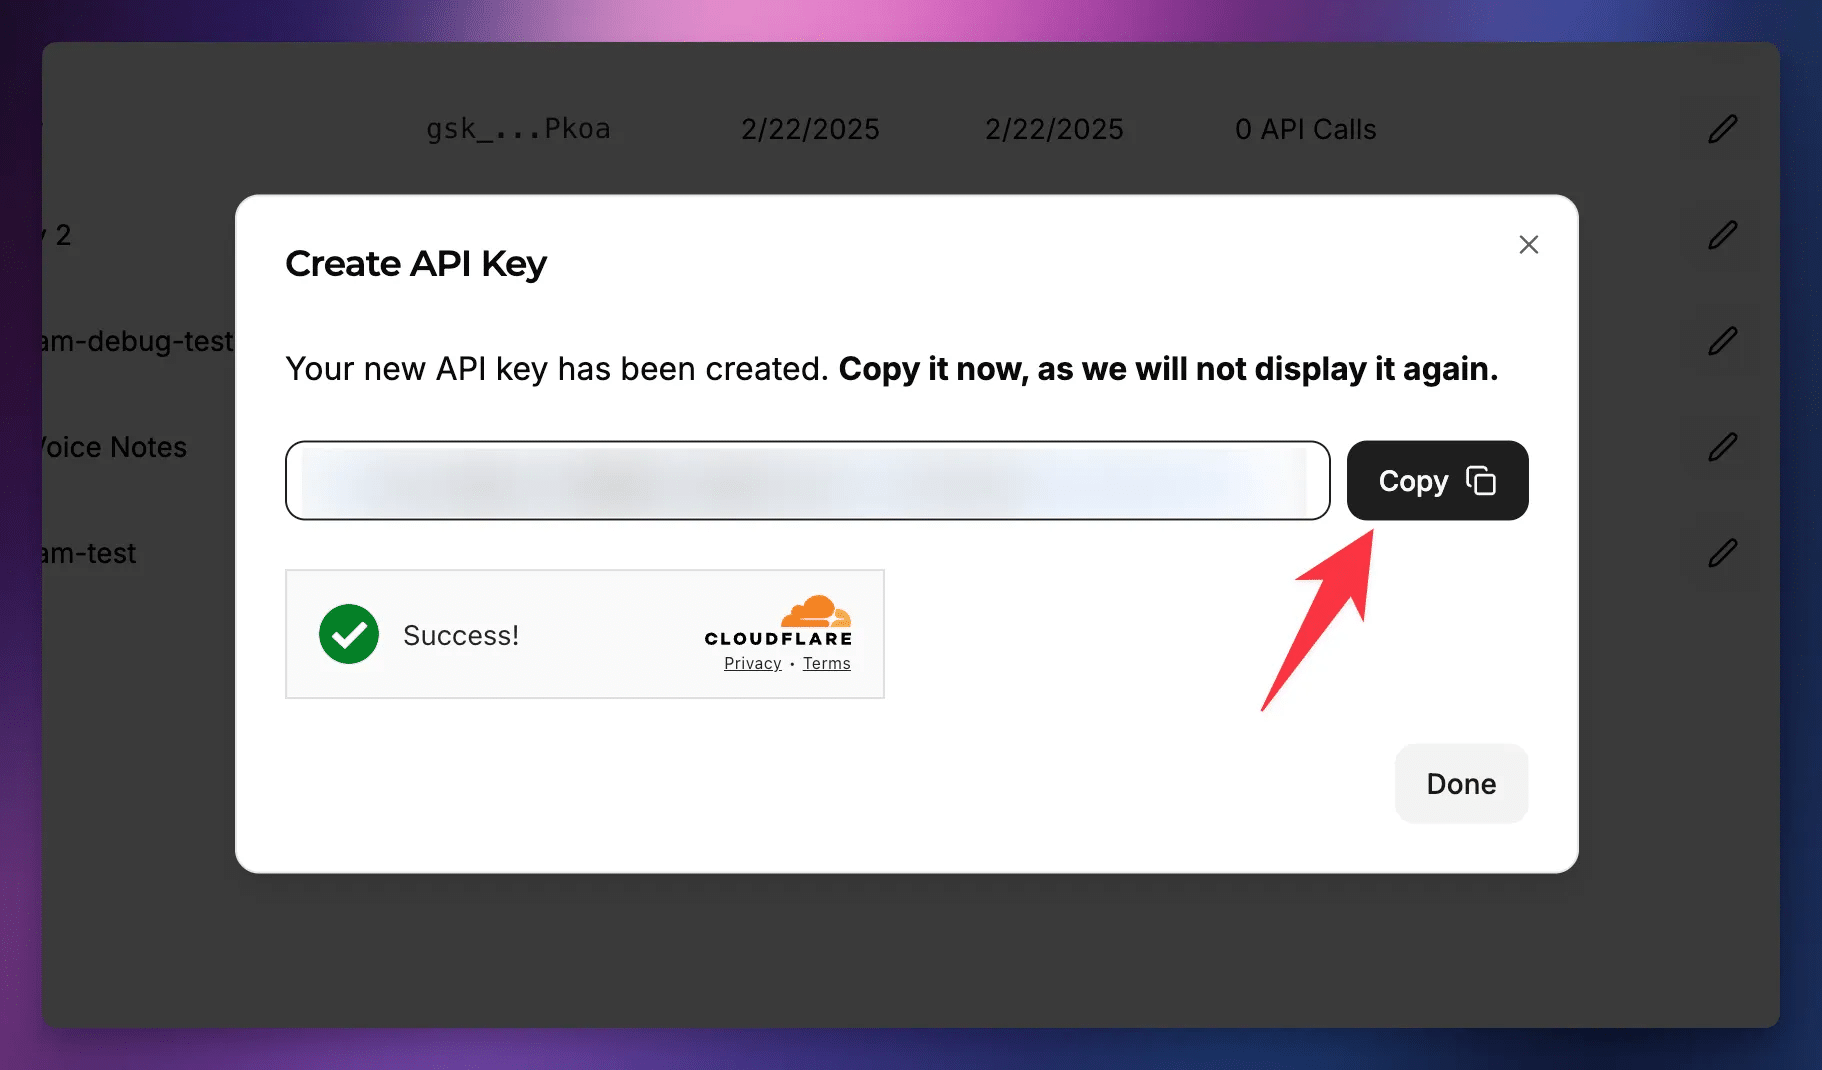
Give your key a name, then click Submit.
When the key is generated, click Copy. You won’t be able to access this key in the future. It’s a secret; treat it like a password. If you’re on a paid tier, this key can be used to make requests to Groq that will result in charges. Always keep API keys secret; keep them safe!
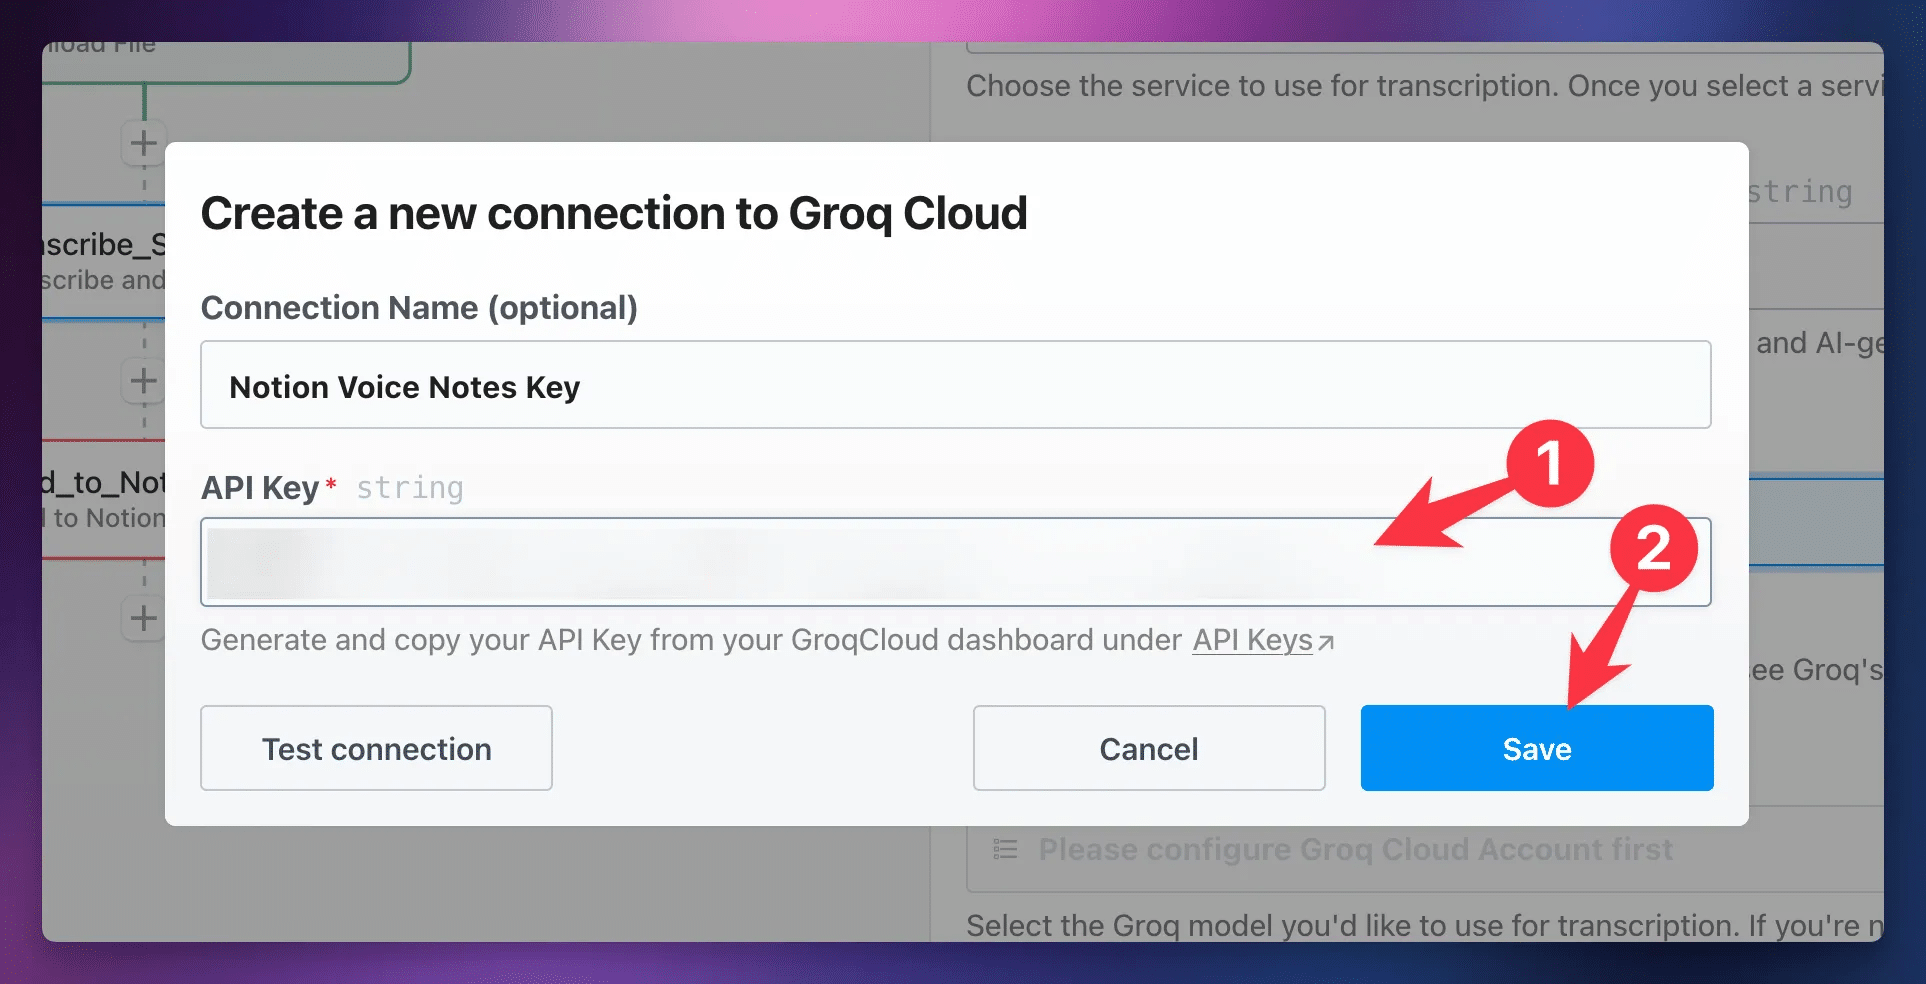
Back at
Next, you can finish the basic configuration of the Transcribe_Summarize step. To do so:
- Choose a Speech-to-Text Model. If you’re not sure, check this property’s description for a recommendation.
- Choose an AI Model. Again, if you’re not sure, check the property’s description for a recommendation.
- Set your Summary Options. Each box you check (Summary, Main Points, etc) will tell the model to generate a list for that category, if applicable.
Note: For speech-to-text model, I use Groq’s distil-whisper-large-v3-en model, which is fantastic for English-language audio. If you’re uploading audio in a non-English language, I would avoid this model. Instead, try the whisper-large-v3-turbo model.
You’ll also see Custom Prompt and Advanced Options properties. Feel free to play around with them, or check the Features section of this guide below for guidance. For now, we’ll ignore them and continue with the basic setup.
Hit Test.

The first time you test this step, it’s very likely you’ll encounter an error like this one:
Audio file does not exist at path:
/tmp/audio_file.mp3. If you’re testing this workflow, it’s like thatPipedream has cleared your temporary storage directory…
As I mentioned earlier, the download_file step downloads your audio file into Transcribe_Summarize step.
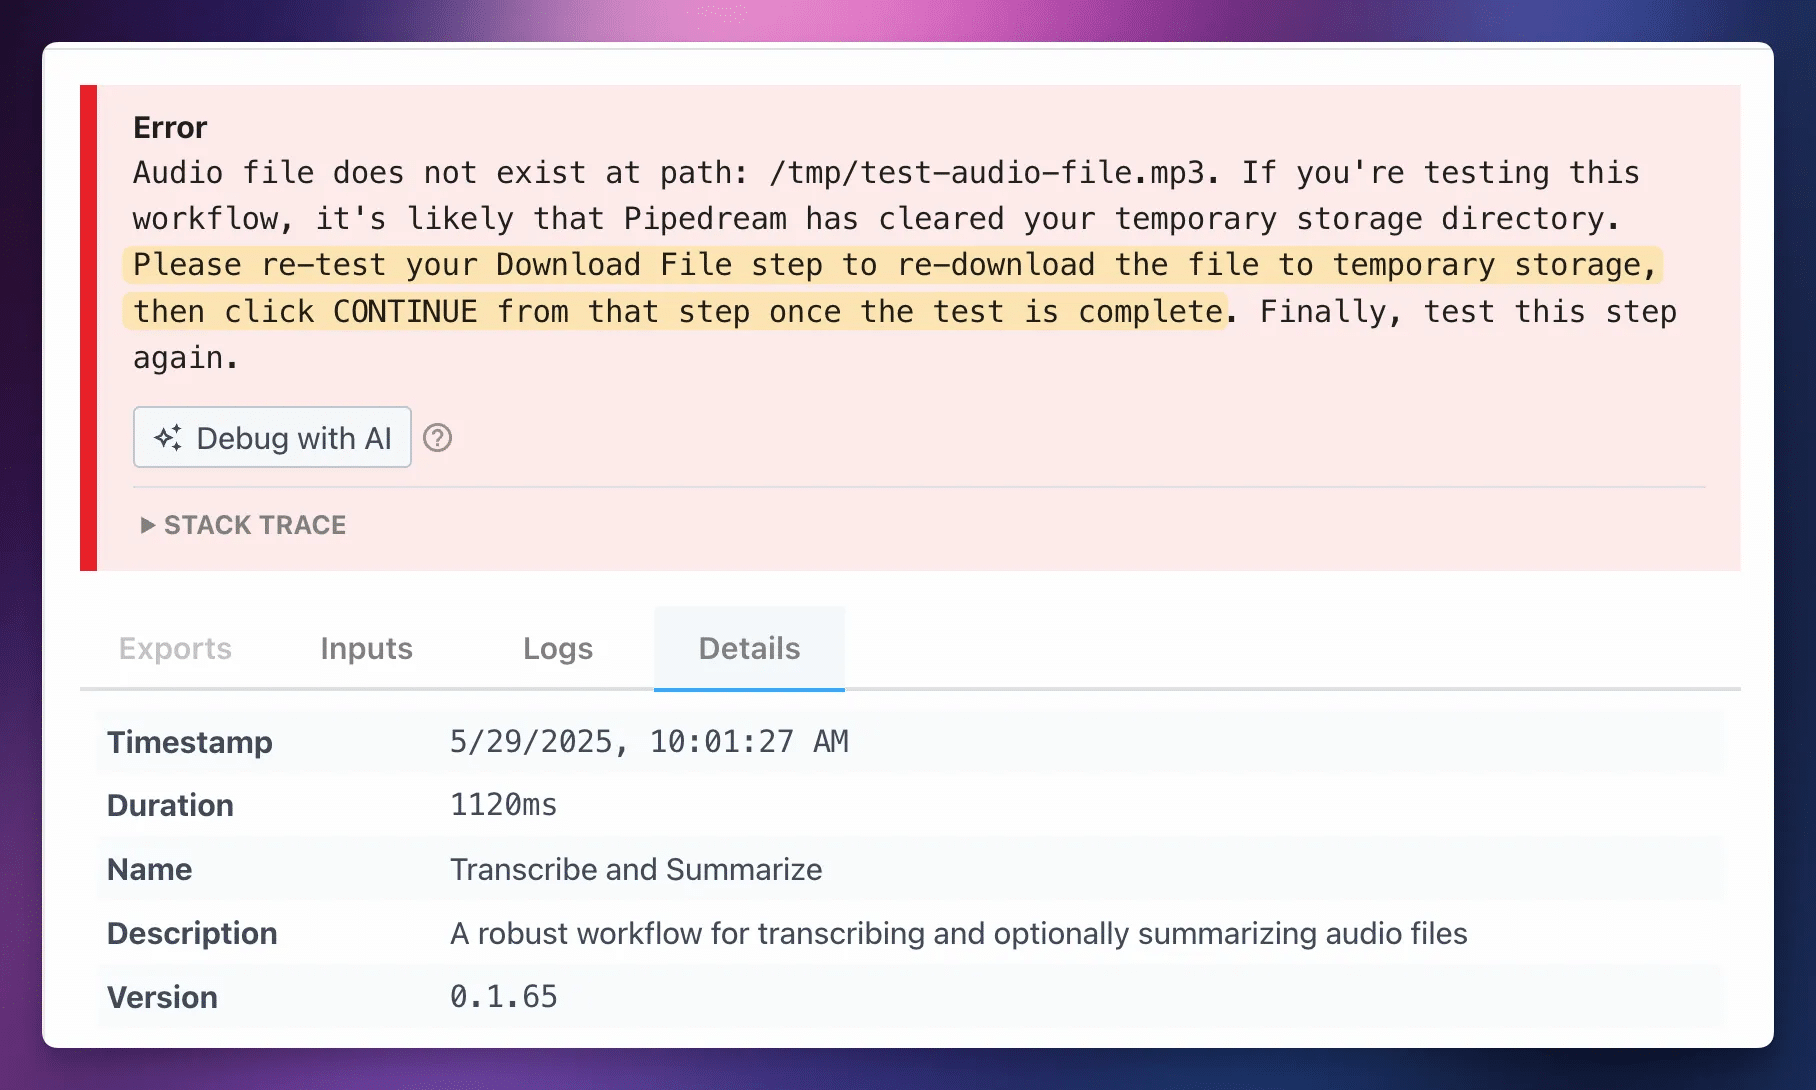
To fix this:
- Go back up to the
download_filestep. - Test it again.
- Hit Continue after the test completes successfully.
Sometimes I have to do this twice.
Fortunately, you’ll never run into this issue when you’re actually using the workflow. Once it’s set up, the workflow will run so fast that the transcription step will always be able to access the downloaded file well before it’s clear. This is only ever an issue when you’re slowly setting up the workflow for the first time.
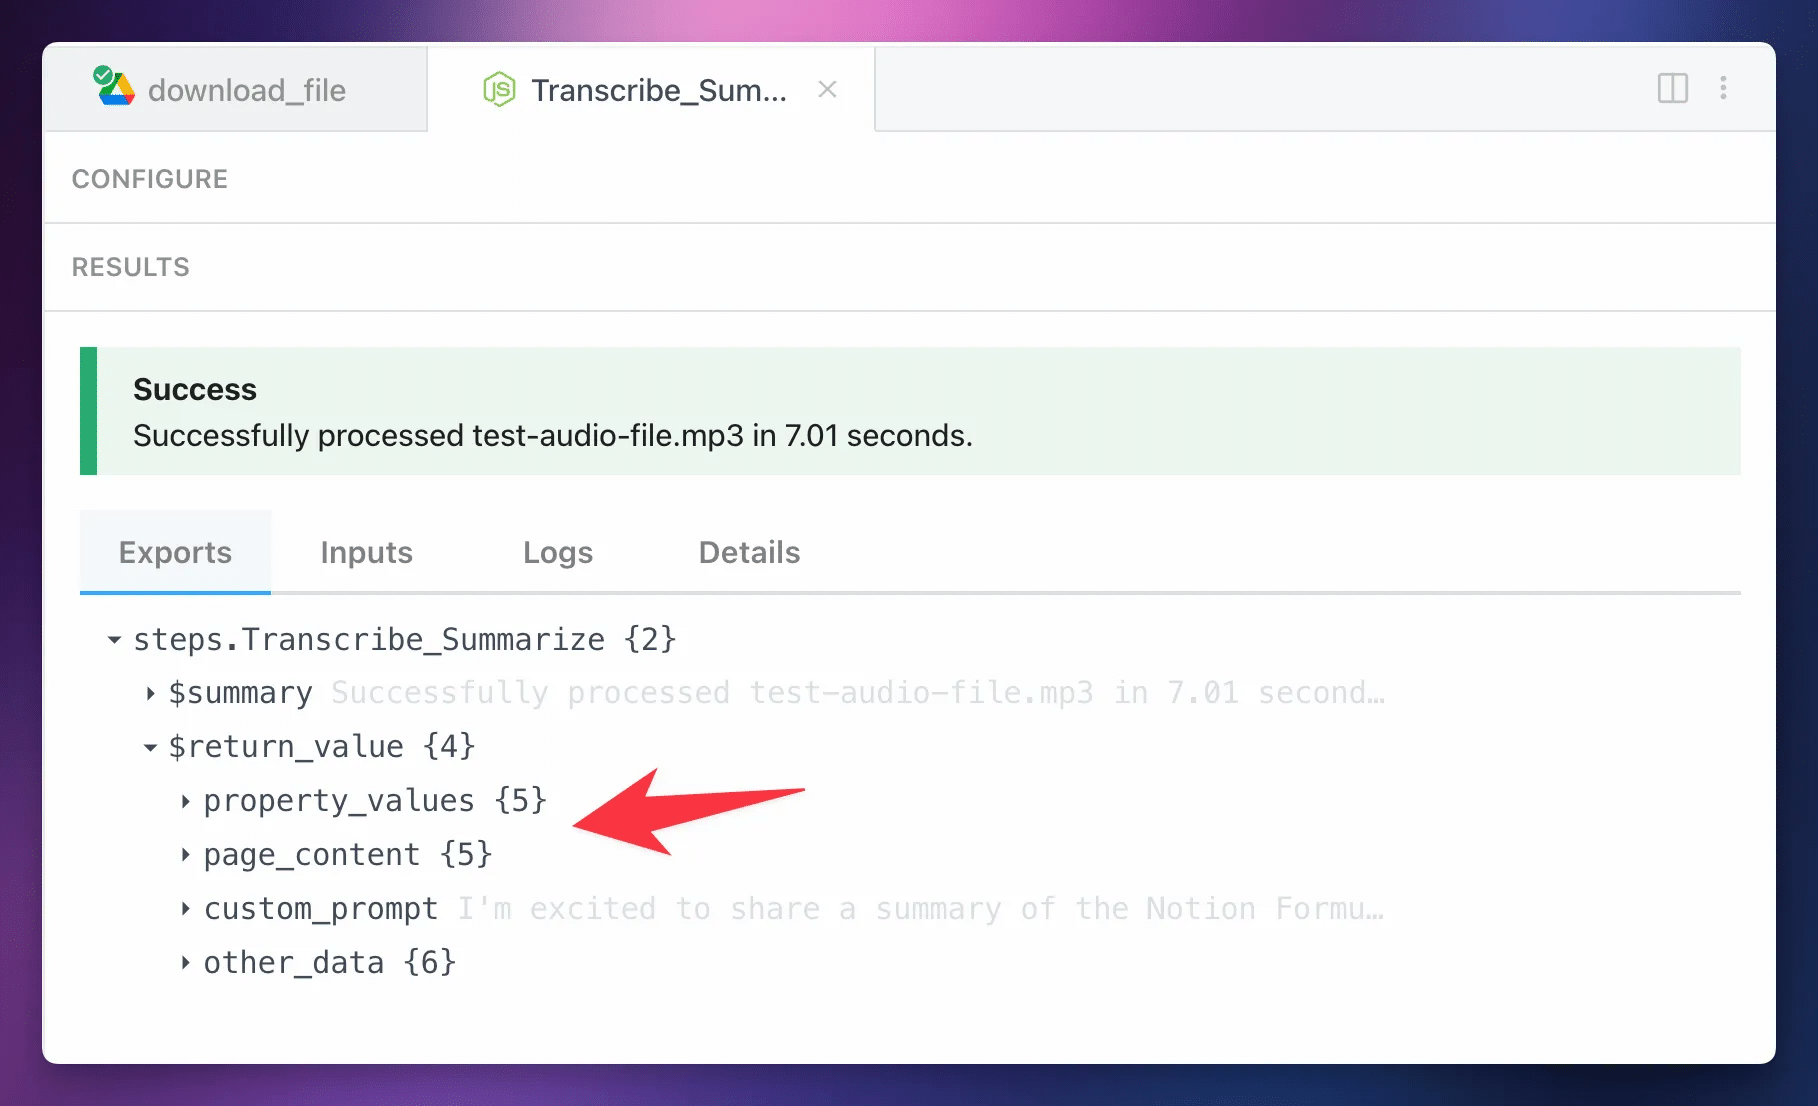
Once you’re able to successfully test the Transcribe_Summarize step, you’ll see a $return_value object containing all of its output.
The next step will use this data automatically, but feel free to explore it. If you take the time to learn
Set Up the Send to Notion Step
Now we’ll set up the Send to Notion step. This step takes all of the output from the previous step and creates a new page in a Notion database with it.
As with the previous step, this is a custom step that I built. You can read the code in the Github repo.
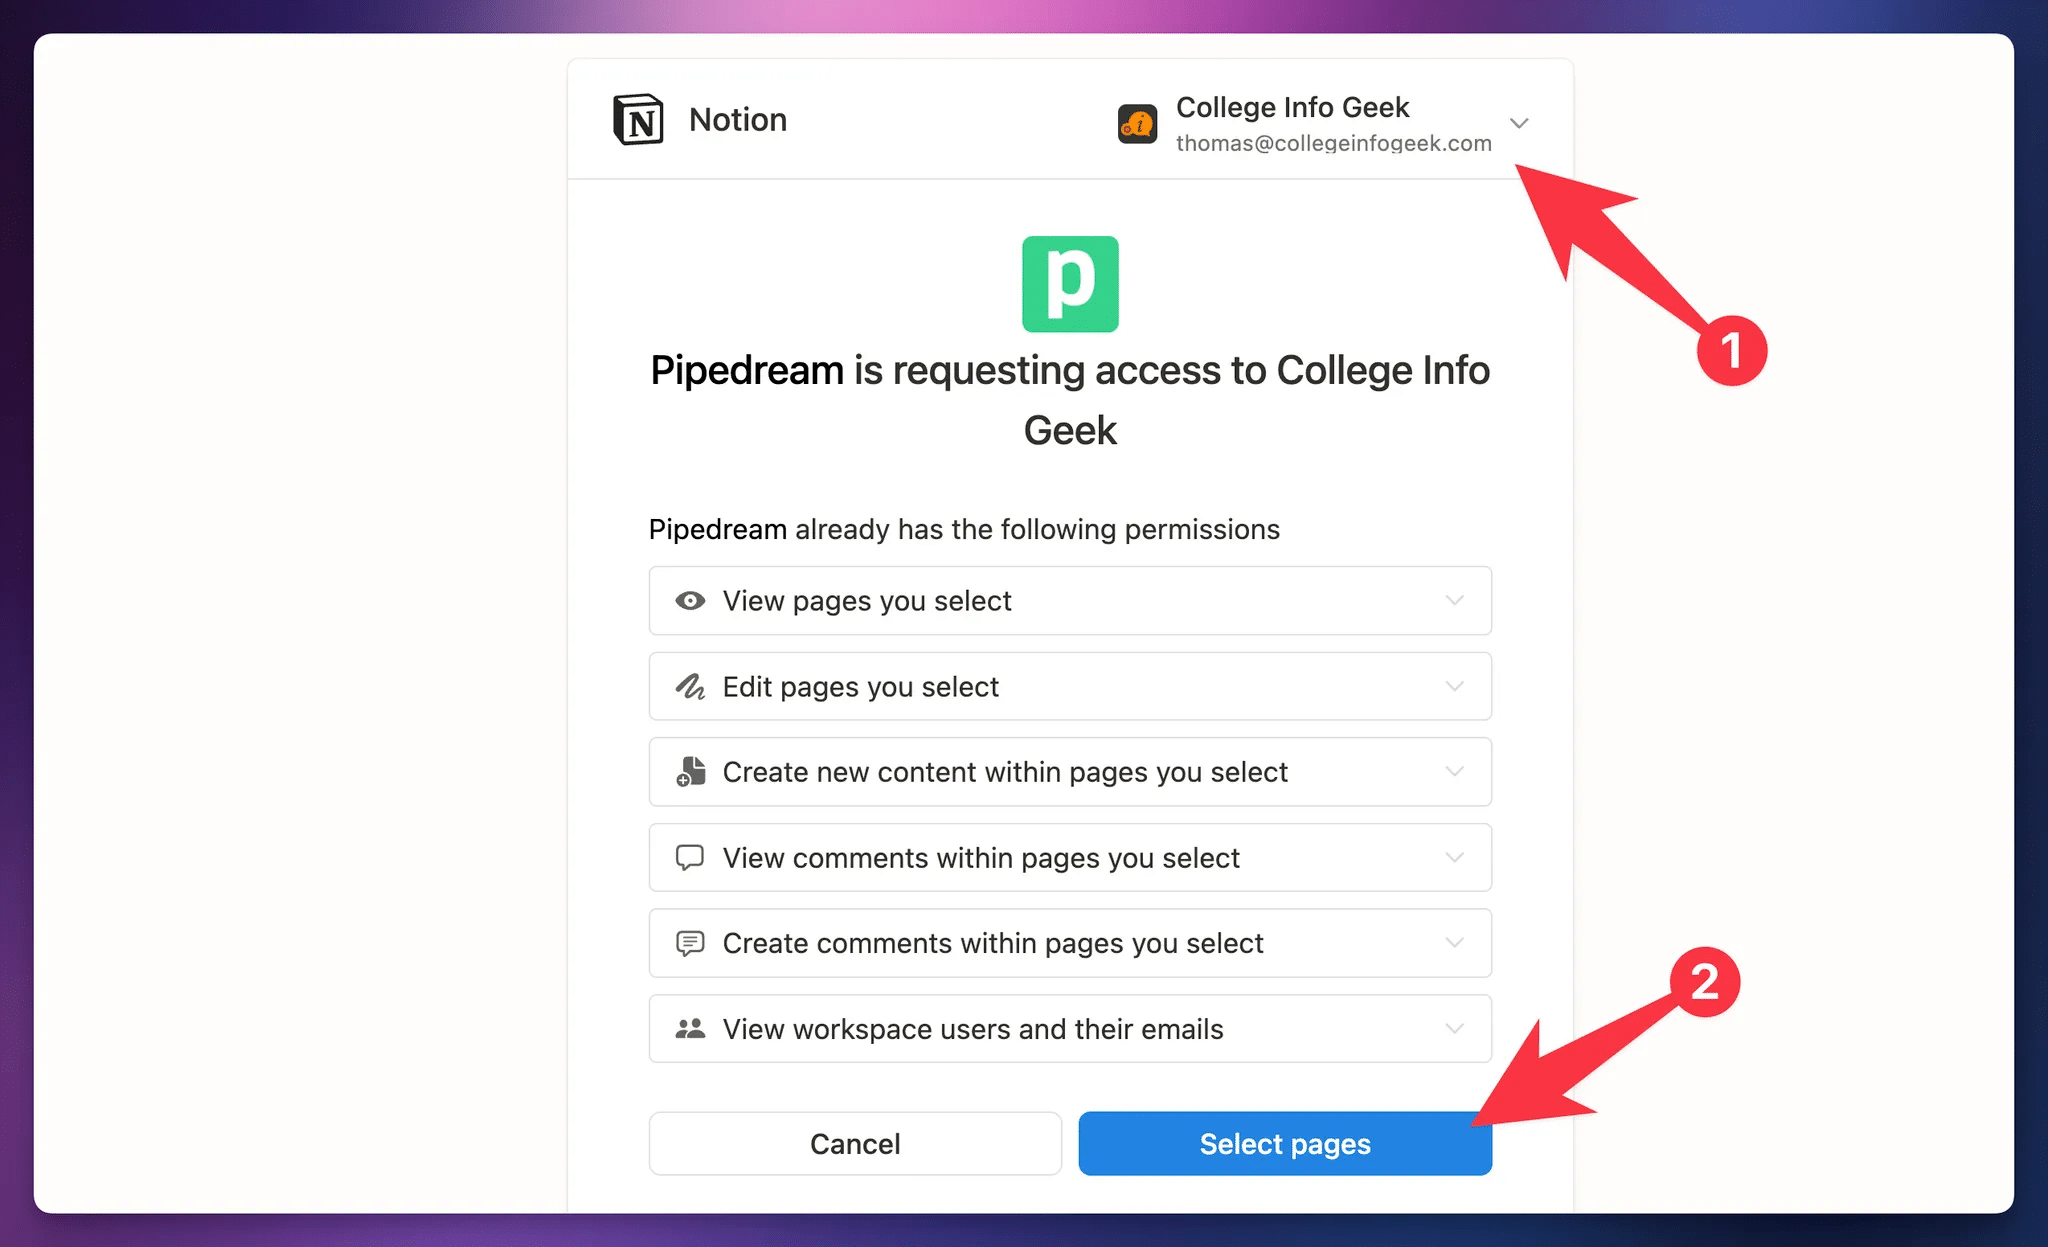
To get started, connect your Notion account in the Notion Account field.

When you’re going through the authoritization workflow, make sure that you select the workspace you want to use.
You may be signed into an account that contains multiple workspaces, so it’s good to double-check! Once you’ve selected the right one, hit Select Pages.
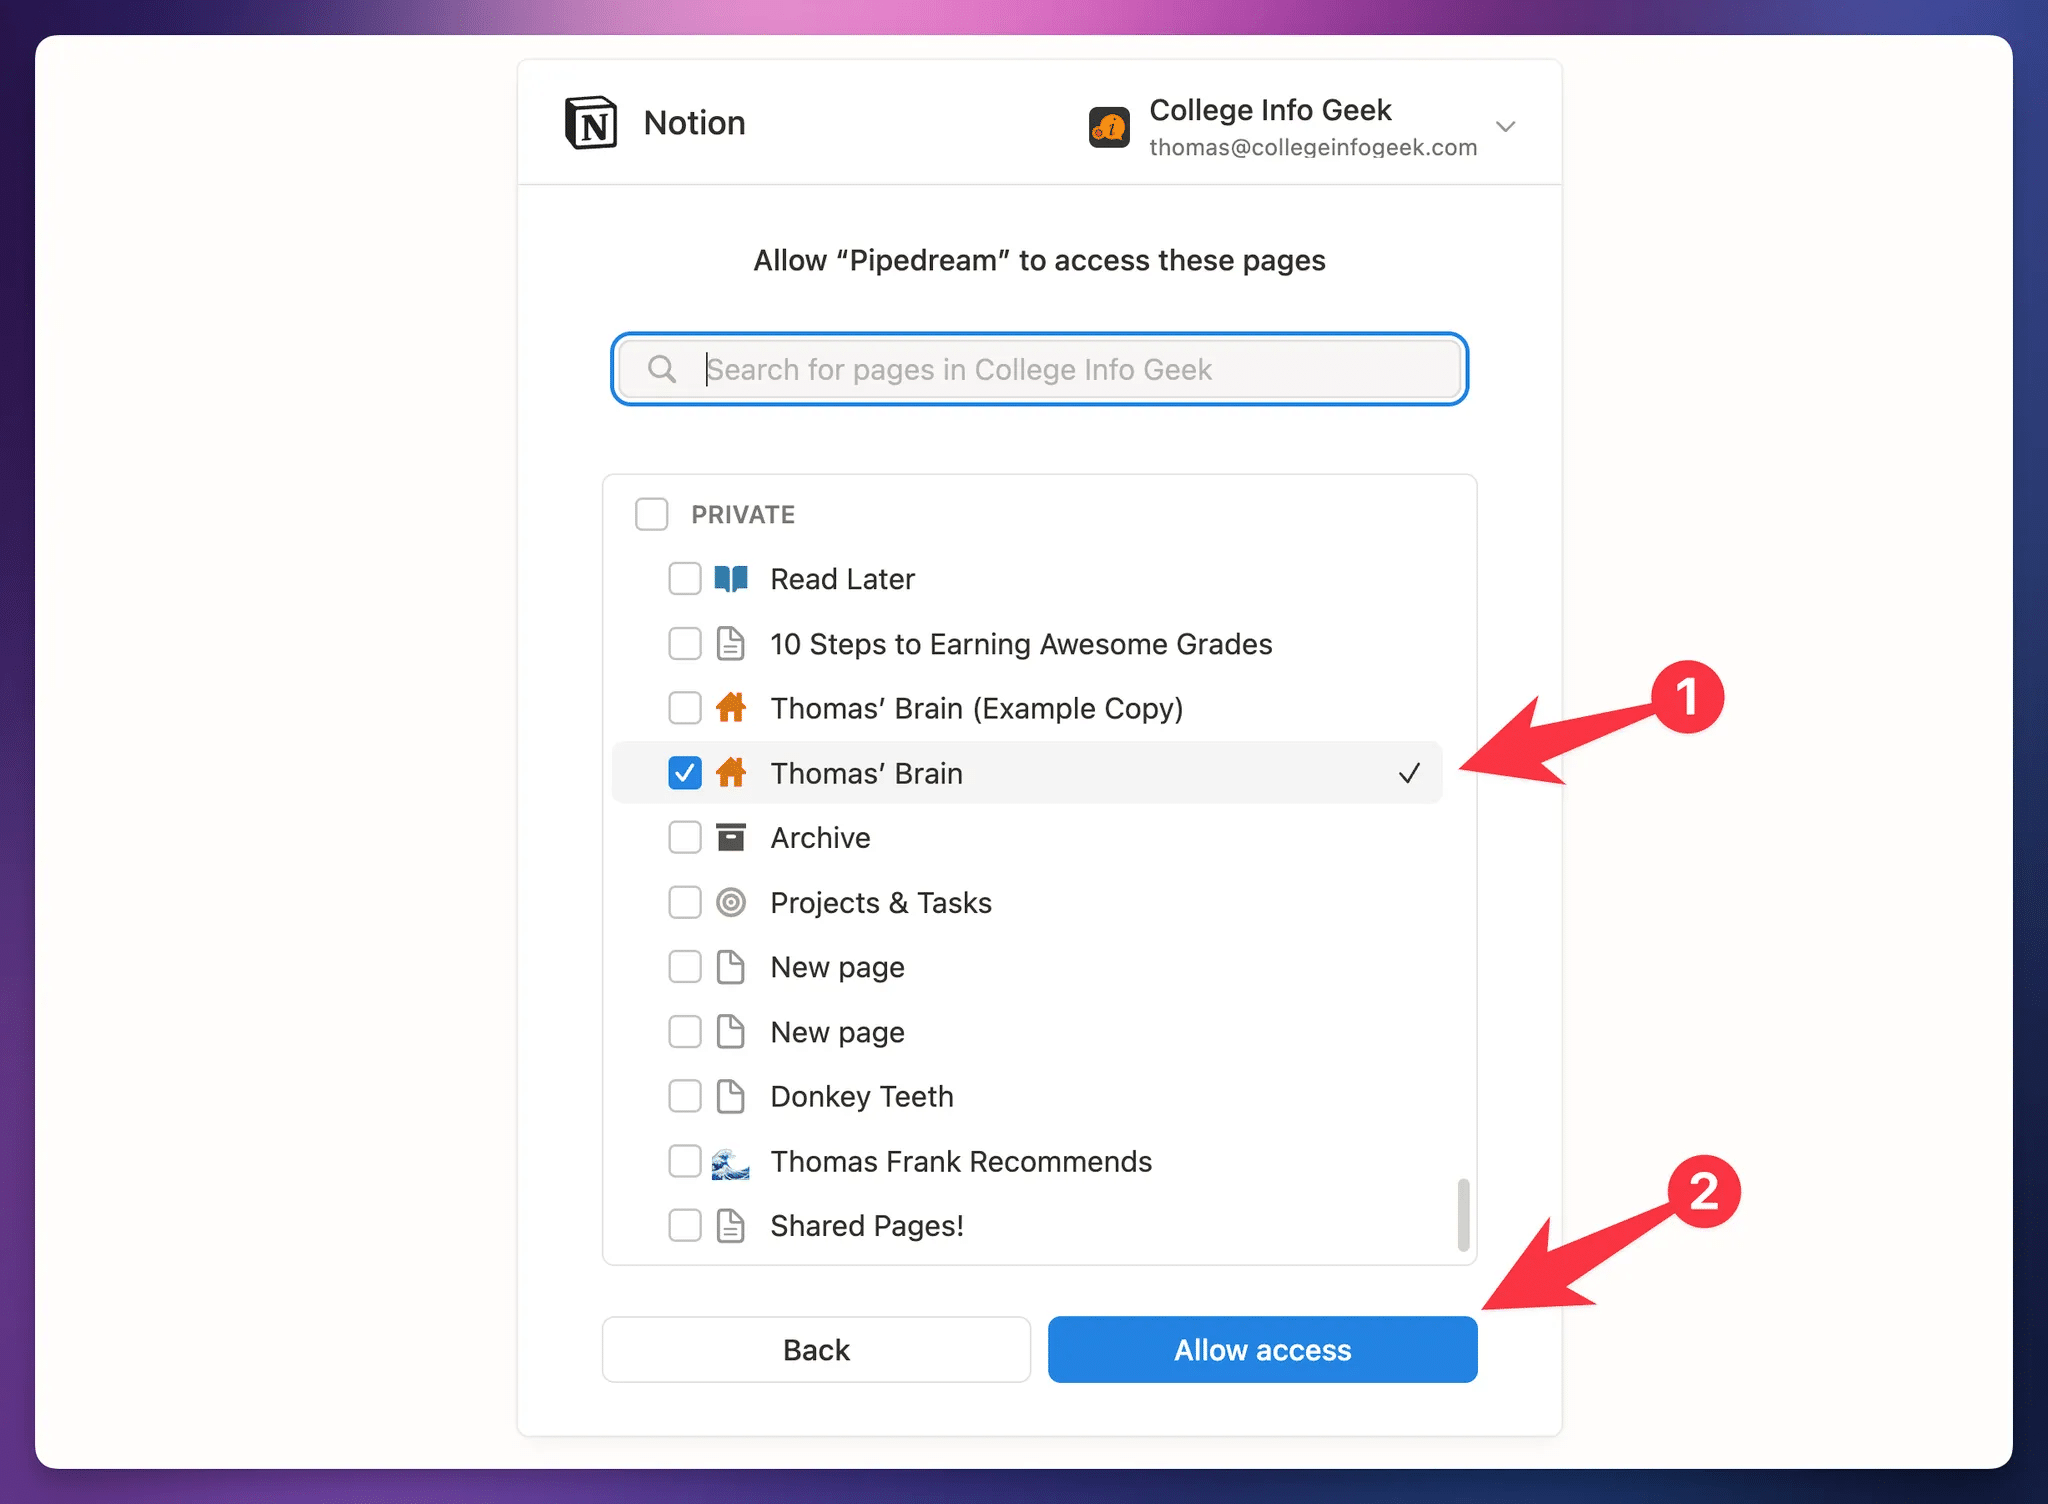
This next part is important!
You need to give
- Finding the database itself and checking it
- Checking a page that contains the database (even if it’s several levels deep in that page’s hierarchy)
As you might know, Notion has a “permissions cascade” where sub-pages (and databases) inherit permissions from their parent pages. Therefore, granting
If you’re using my Ultimate Brain template, I recommend simply finding your copy of Ultimate Brain and checking that in this stage. And if you’re not, check it out! It pairs extremely well with this workflow, and gives you a full productivity system in Notion.
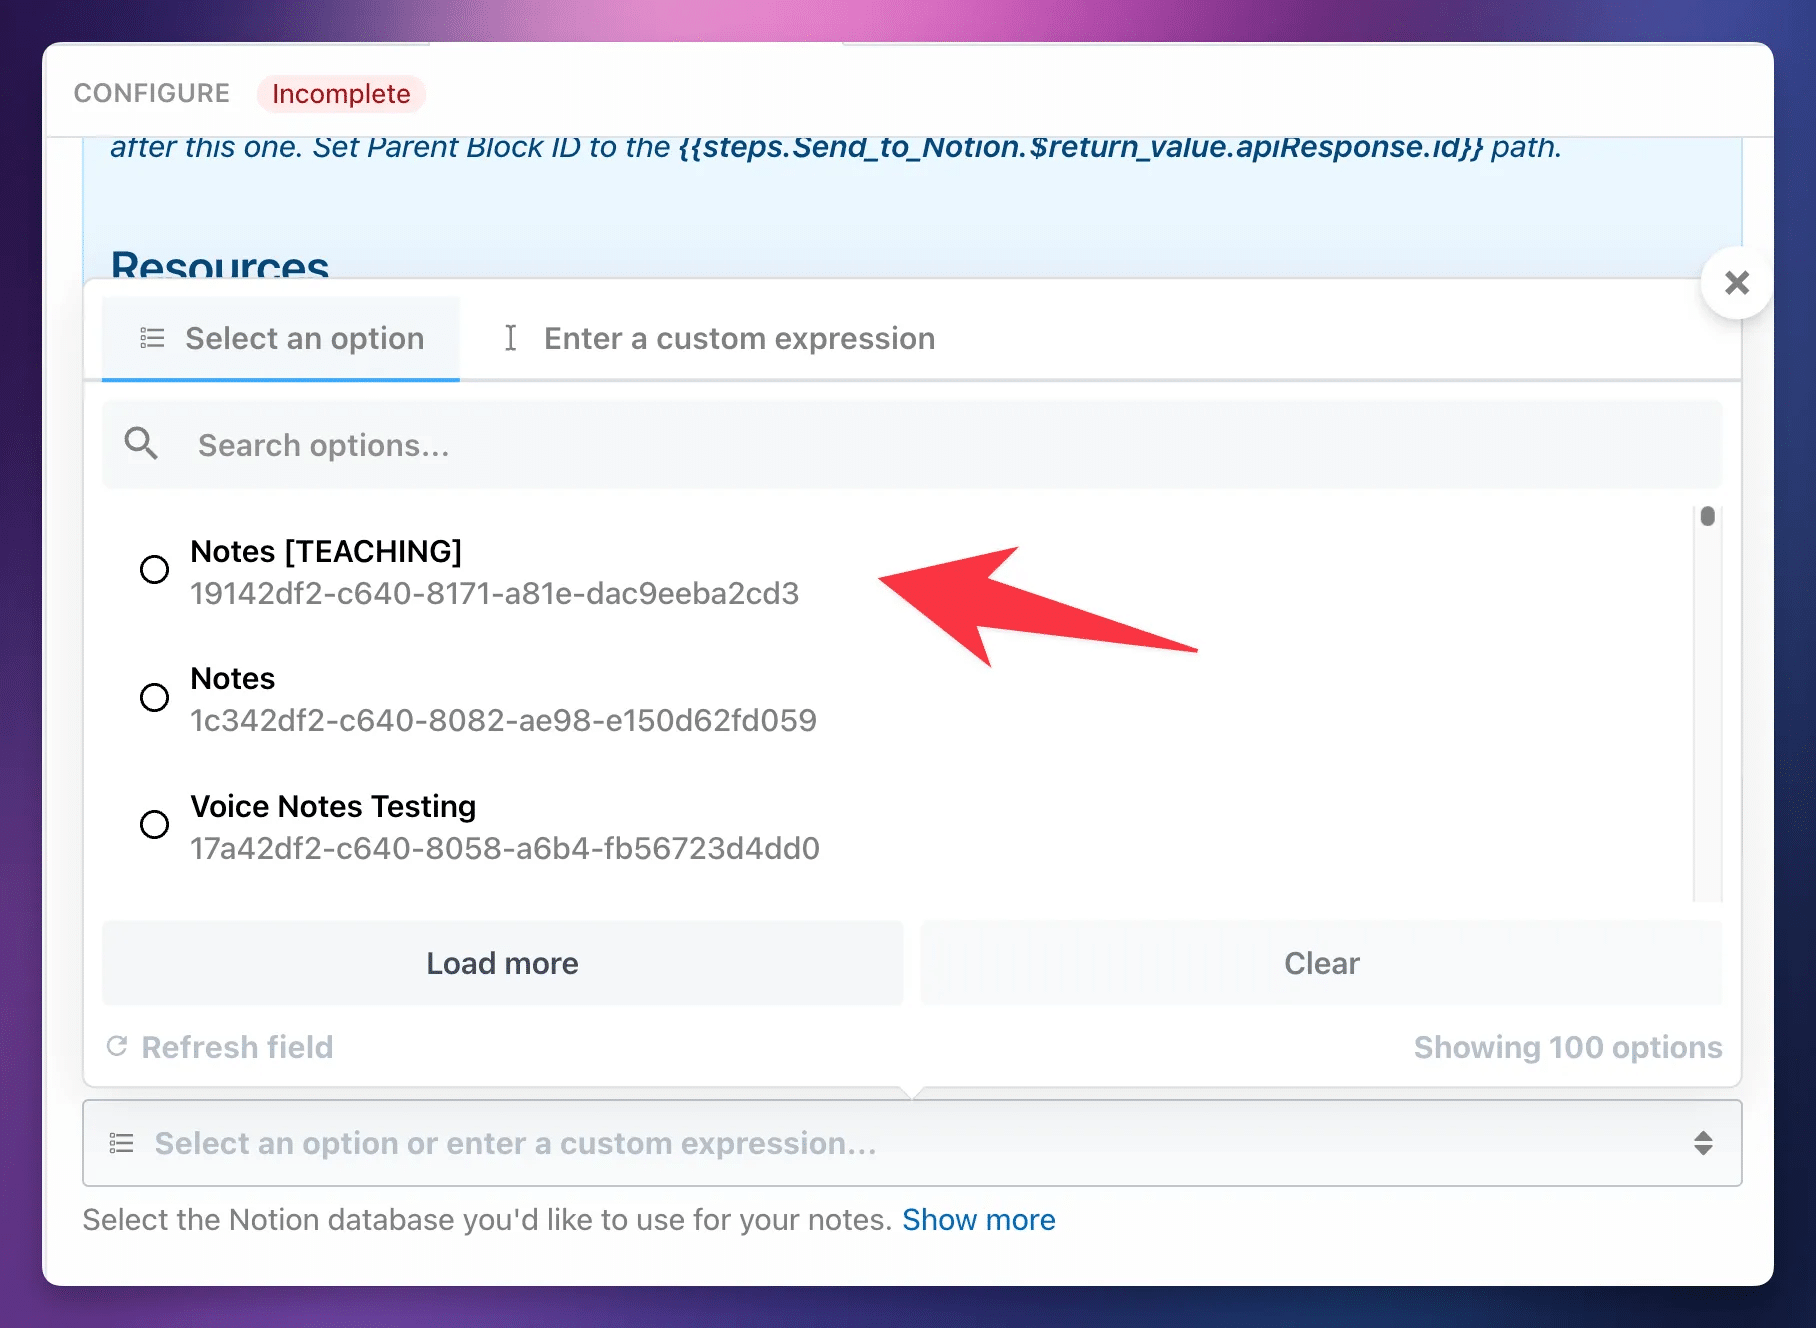
Once you’ve connected your Notion account, choose the database you’d like to use in the workflow.
Pro-tip: If you have multiple databases with the same name, you can temporarily add a suffix to one as I have here (with “Notes [TEACHING]”).
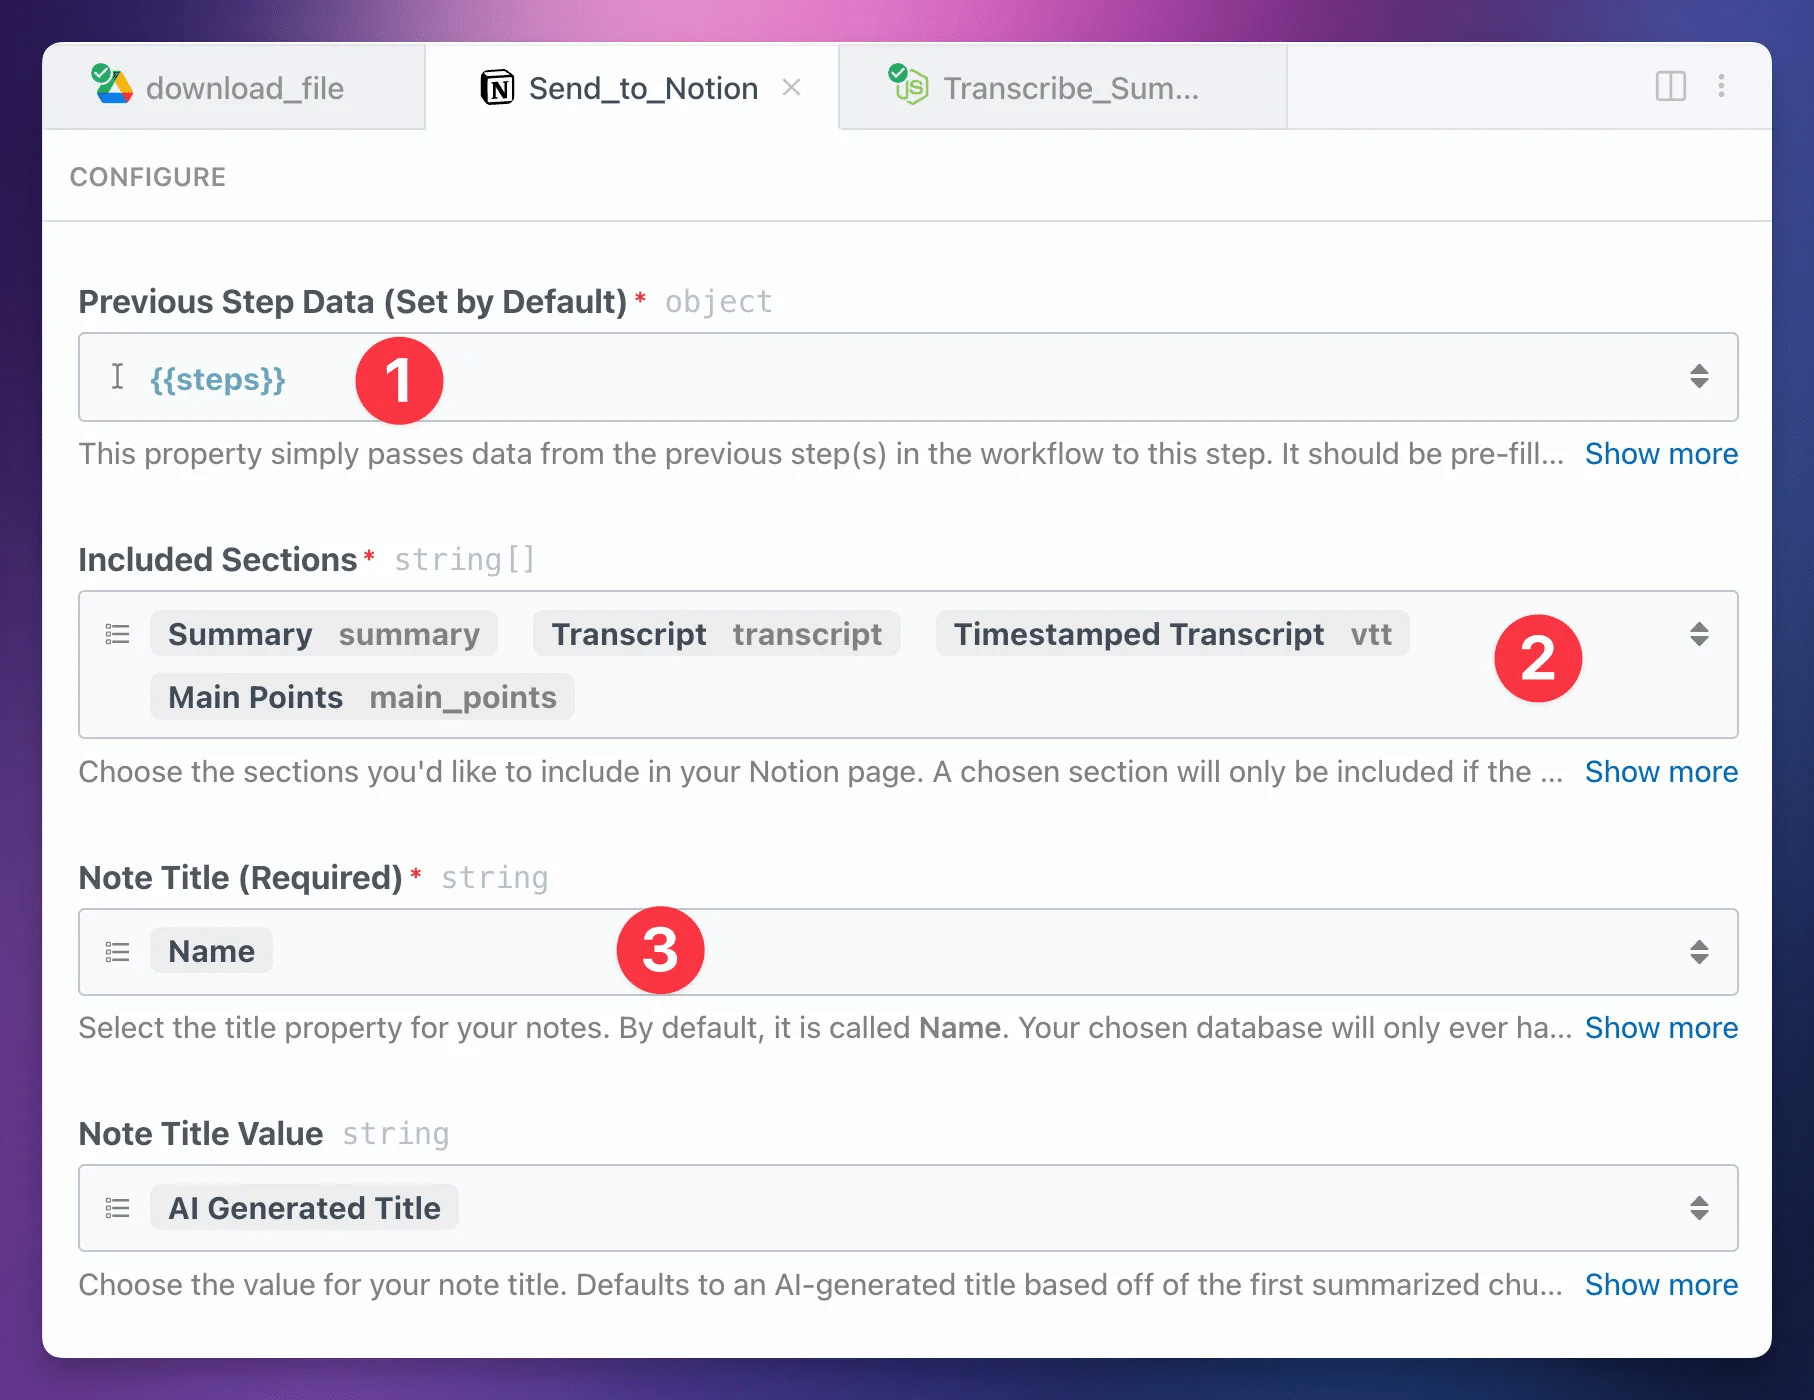
After you select your database, the step will load additional properties. There are only three other properties you have to set:
- Steps: This should be pre-filled for you. Make sure it has a value of
{{steps}}. - Included Sections: Choose the sections from the
Transcribe_Summarizestep that you want to include on the Notion page. - Note Title: Choose the Title property of your database. Every Notion database has one – and only one – Title property. Yours will likely be called “Name”.
You’ll see several other properties as well. Some of these will allow you to choose specific properties from your connected Notion database, if they exist. These include:
- Note Tag (select)
- Note Duration (number)
- Note Date (date)
- Note File Name (text)
- Note File Link (URL)
- Note File (files)
If your database contains a property of the specified type, that property will show up as an option. If not, you won’t see any options. Not to worry – only the Note Title is required!
There are several other properties as well; you can see what they do in the Send to Notion Options reference section below.
For now, hit Test. If the test is successful, hit Deploy.
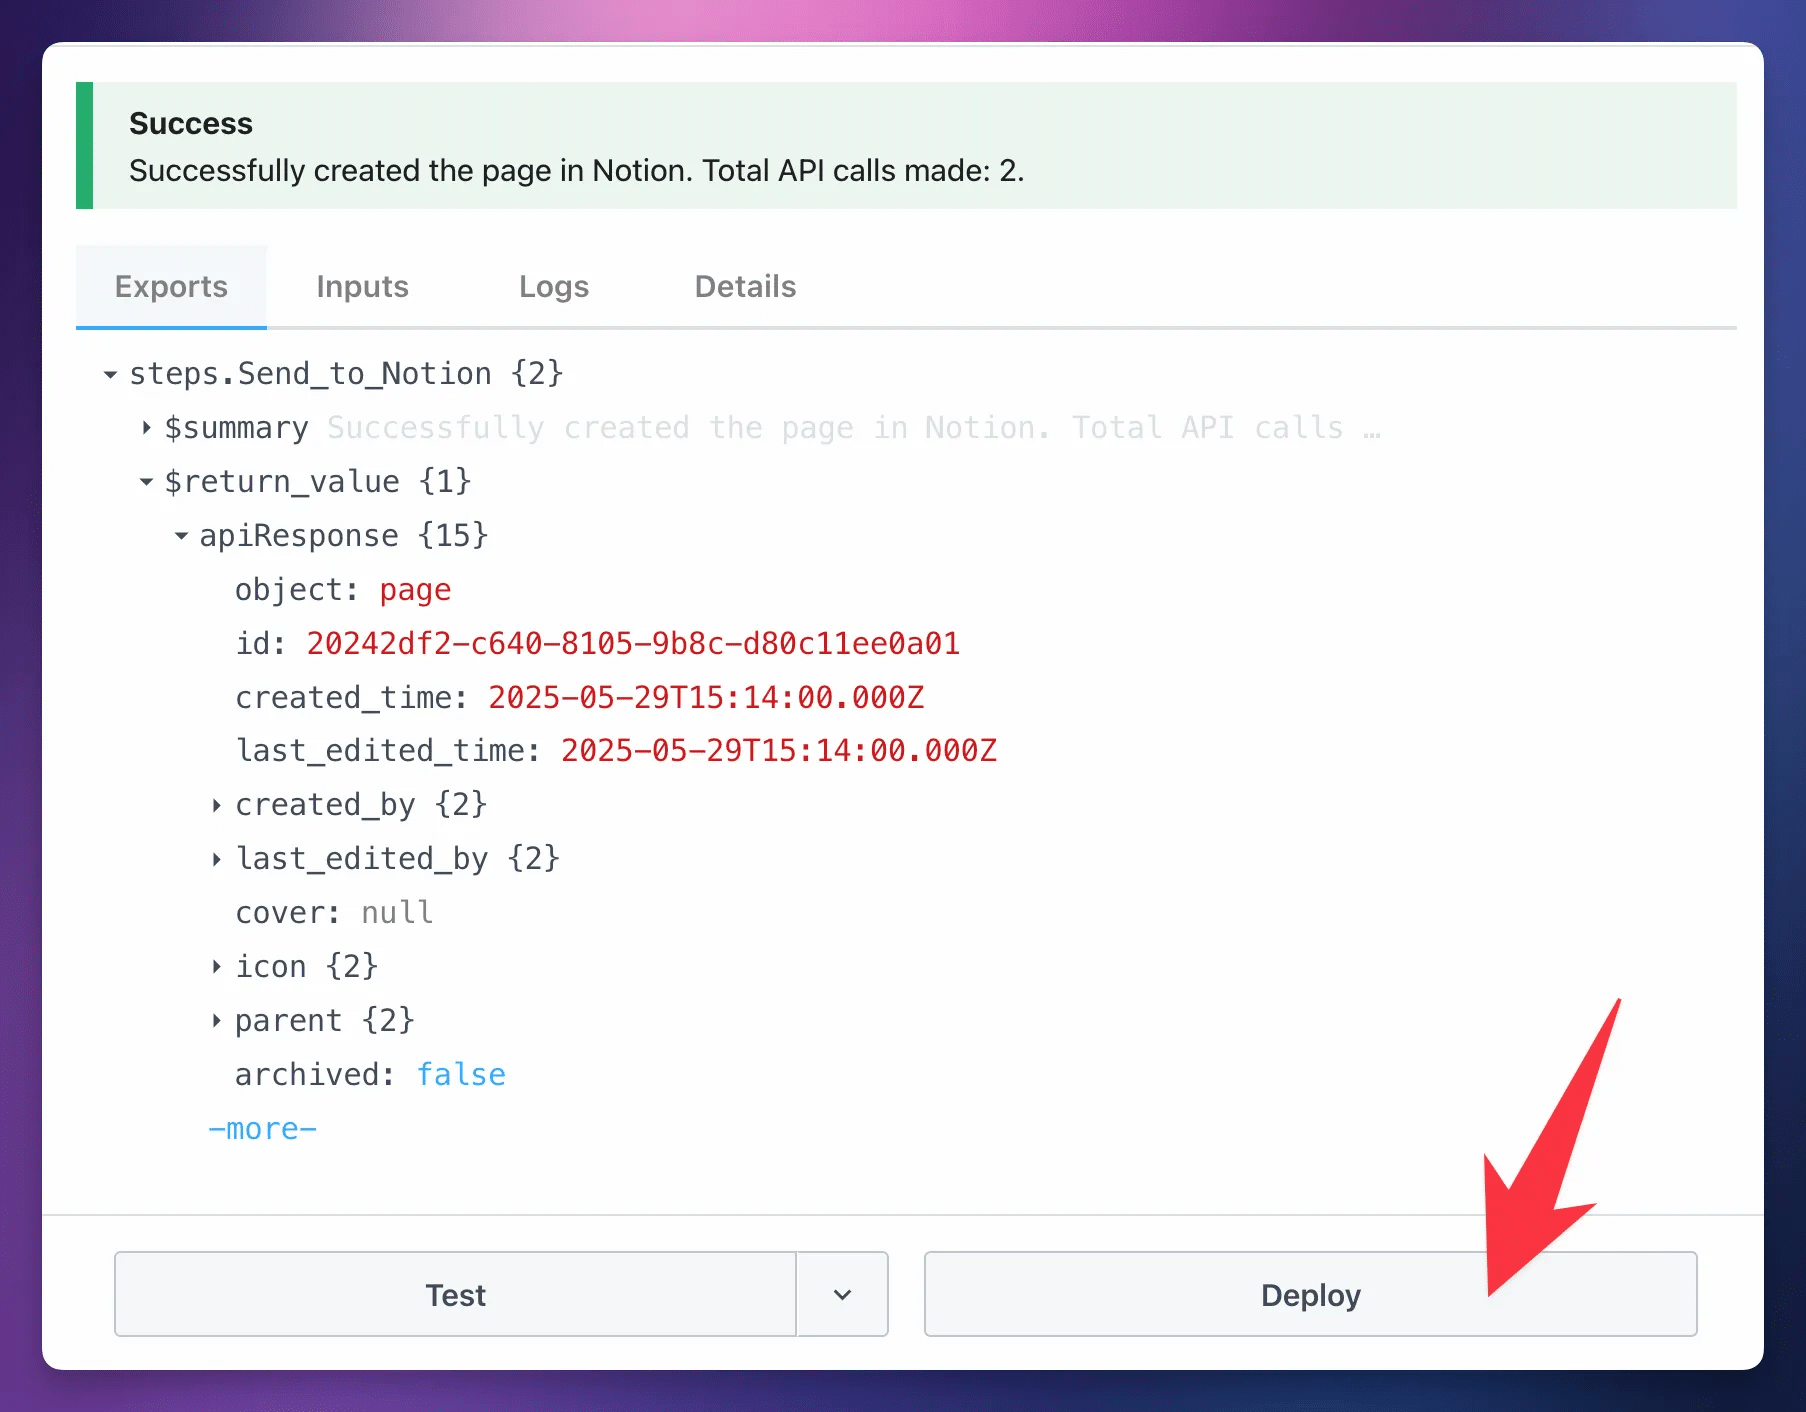
Congratulations – your workflow is now live!
At this point, you can start uploading audio files to your chosen cloud storage folder, and they’ll be automatically processed by the live workflow.
Copy link to headingUpdating Your Workflow
I’m able to ship new versions of the Transcribe_Summarize and Send_to_Notion steps in this workflow when I fix bugs and add improvements.
These new versions won’t automatically apply to your copy of the workflow, but you can easily update your workflow to use them with just a click.
To check for new updates, first find your workflow in
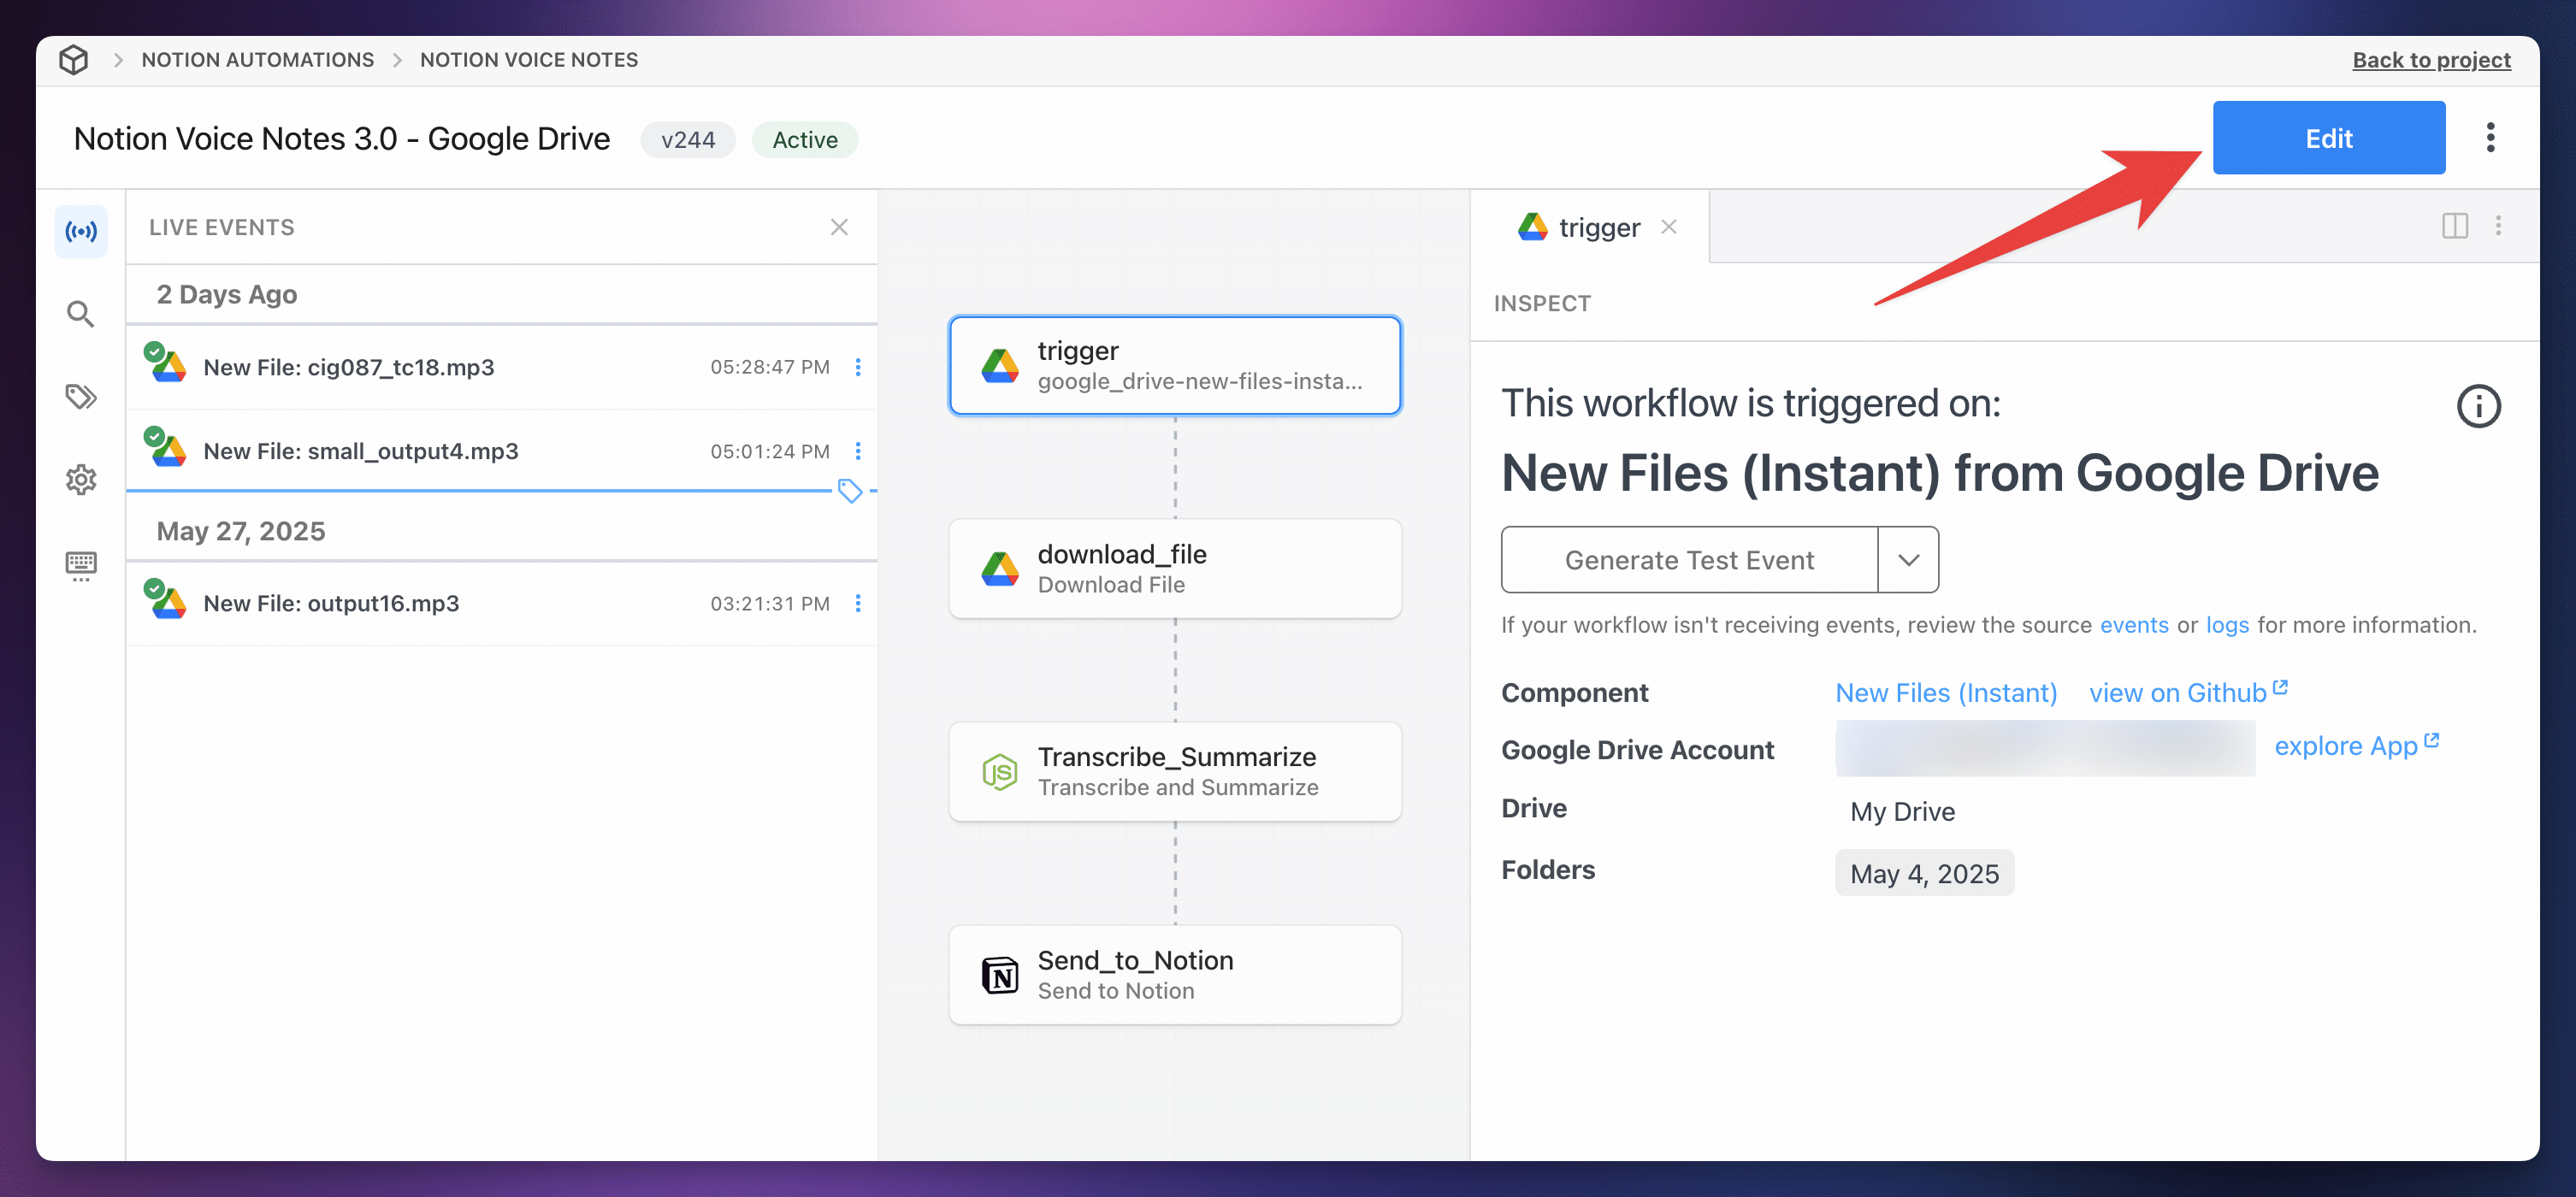
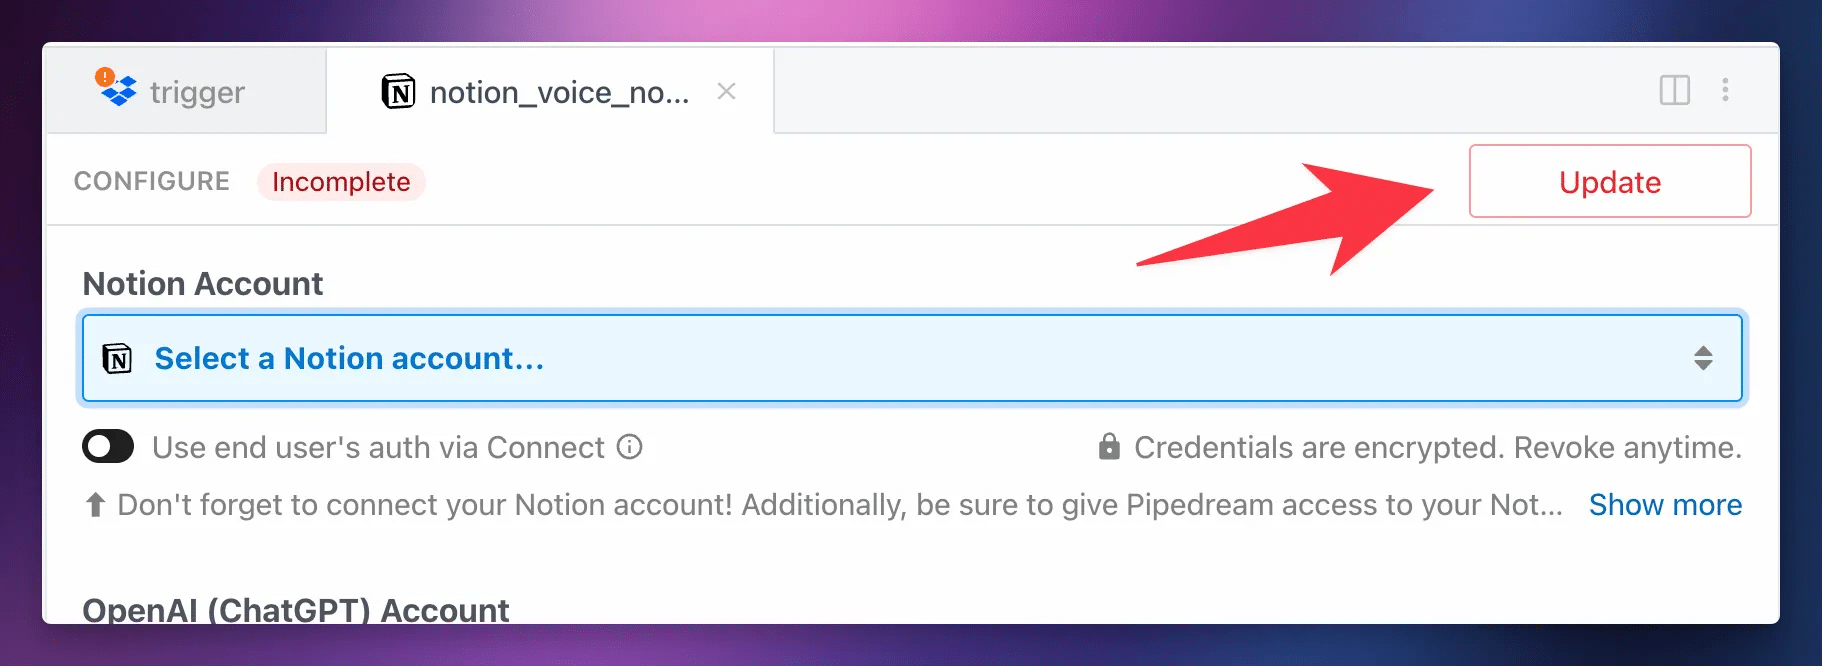
Once you’re in the workflow editor, refresh the page. You need to do this in order to see the Update button.
Afterwards, you should see a red Update button on each action if there’s an update available.
You likely won’t need to check for updates very often, as I’ve already put hundreds of hours into building this workflow, adding tons of requested features, and testing.
Copy link to headingCost Information
TL;DR on this section: For most people, this workflow is free to use – so long as you pick either Groq or Google Gemini for your transcripts and summaries. If you need to use it a lot, or if you need specific, powerful AI models, it may cost money.
I’ve gone to great lengths to make this workflow as ✨ free ✨ as possible. I’ve also gone to even greater lengths to squeeze as much dang performance as possible out of it, while still keeping things free. Playing the cost/speed/resource optimization game is very much my jam, which is probably why I majored in business but spend most of time wearing an engineer hat.
So here’s the deal with costs:
First, every cloud storage provider I included here (Google Drive, Dropbox, OneDrive) has a free tier that will give you more than enough space for many, many audio files. Cloud storage should cost you nothing – and if it does, you’re already paying for it for other reasons.
As I mentioned earlier, there are a few speech-to-text and AI services that currently have free tiers – namely Groq, Google Gemini, and Cerebras. I personally use Groq, which is not only free but also doesn’t retain prompts nor train on user input (see the Privacy Information section below).
If you want to use different services, or go beyond the free tiers of the ones listed above, you’ll pay by the minute (for audio) or by the token (for LLM use). This is generally very cheap, and costs are trending downward. I used to include cost calculation in this workflow, but now that it supports so many models, that became infeasible. Just know that costs keep going down, and you’re only likely to spend a lot if:
- You’re transcribing a huge amount of audio (and/or you choose a more expensive provider)
- You choose a really powerful AI Service model, like Claude 4 Opus
I trust you to be a responsible adult and review the pricing of any API and model you choose to use.
That leaves Pipedream, which makes this whole thing possible.
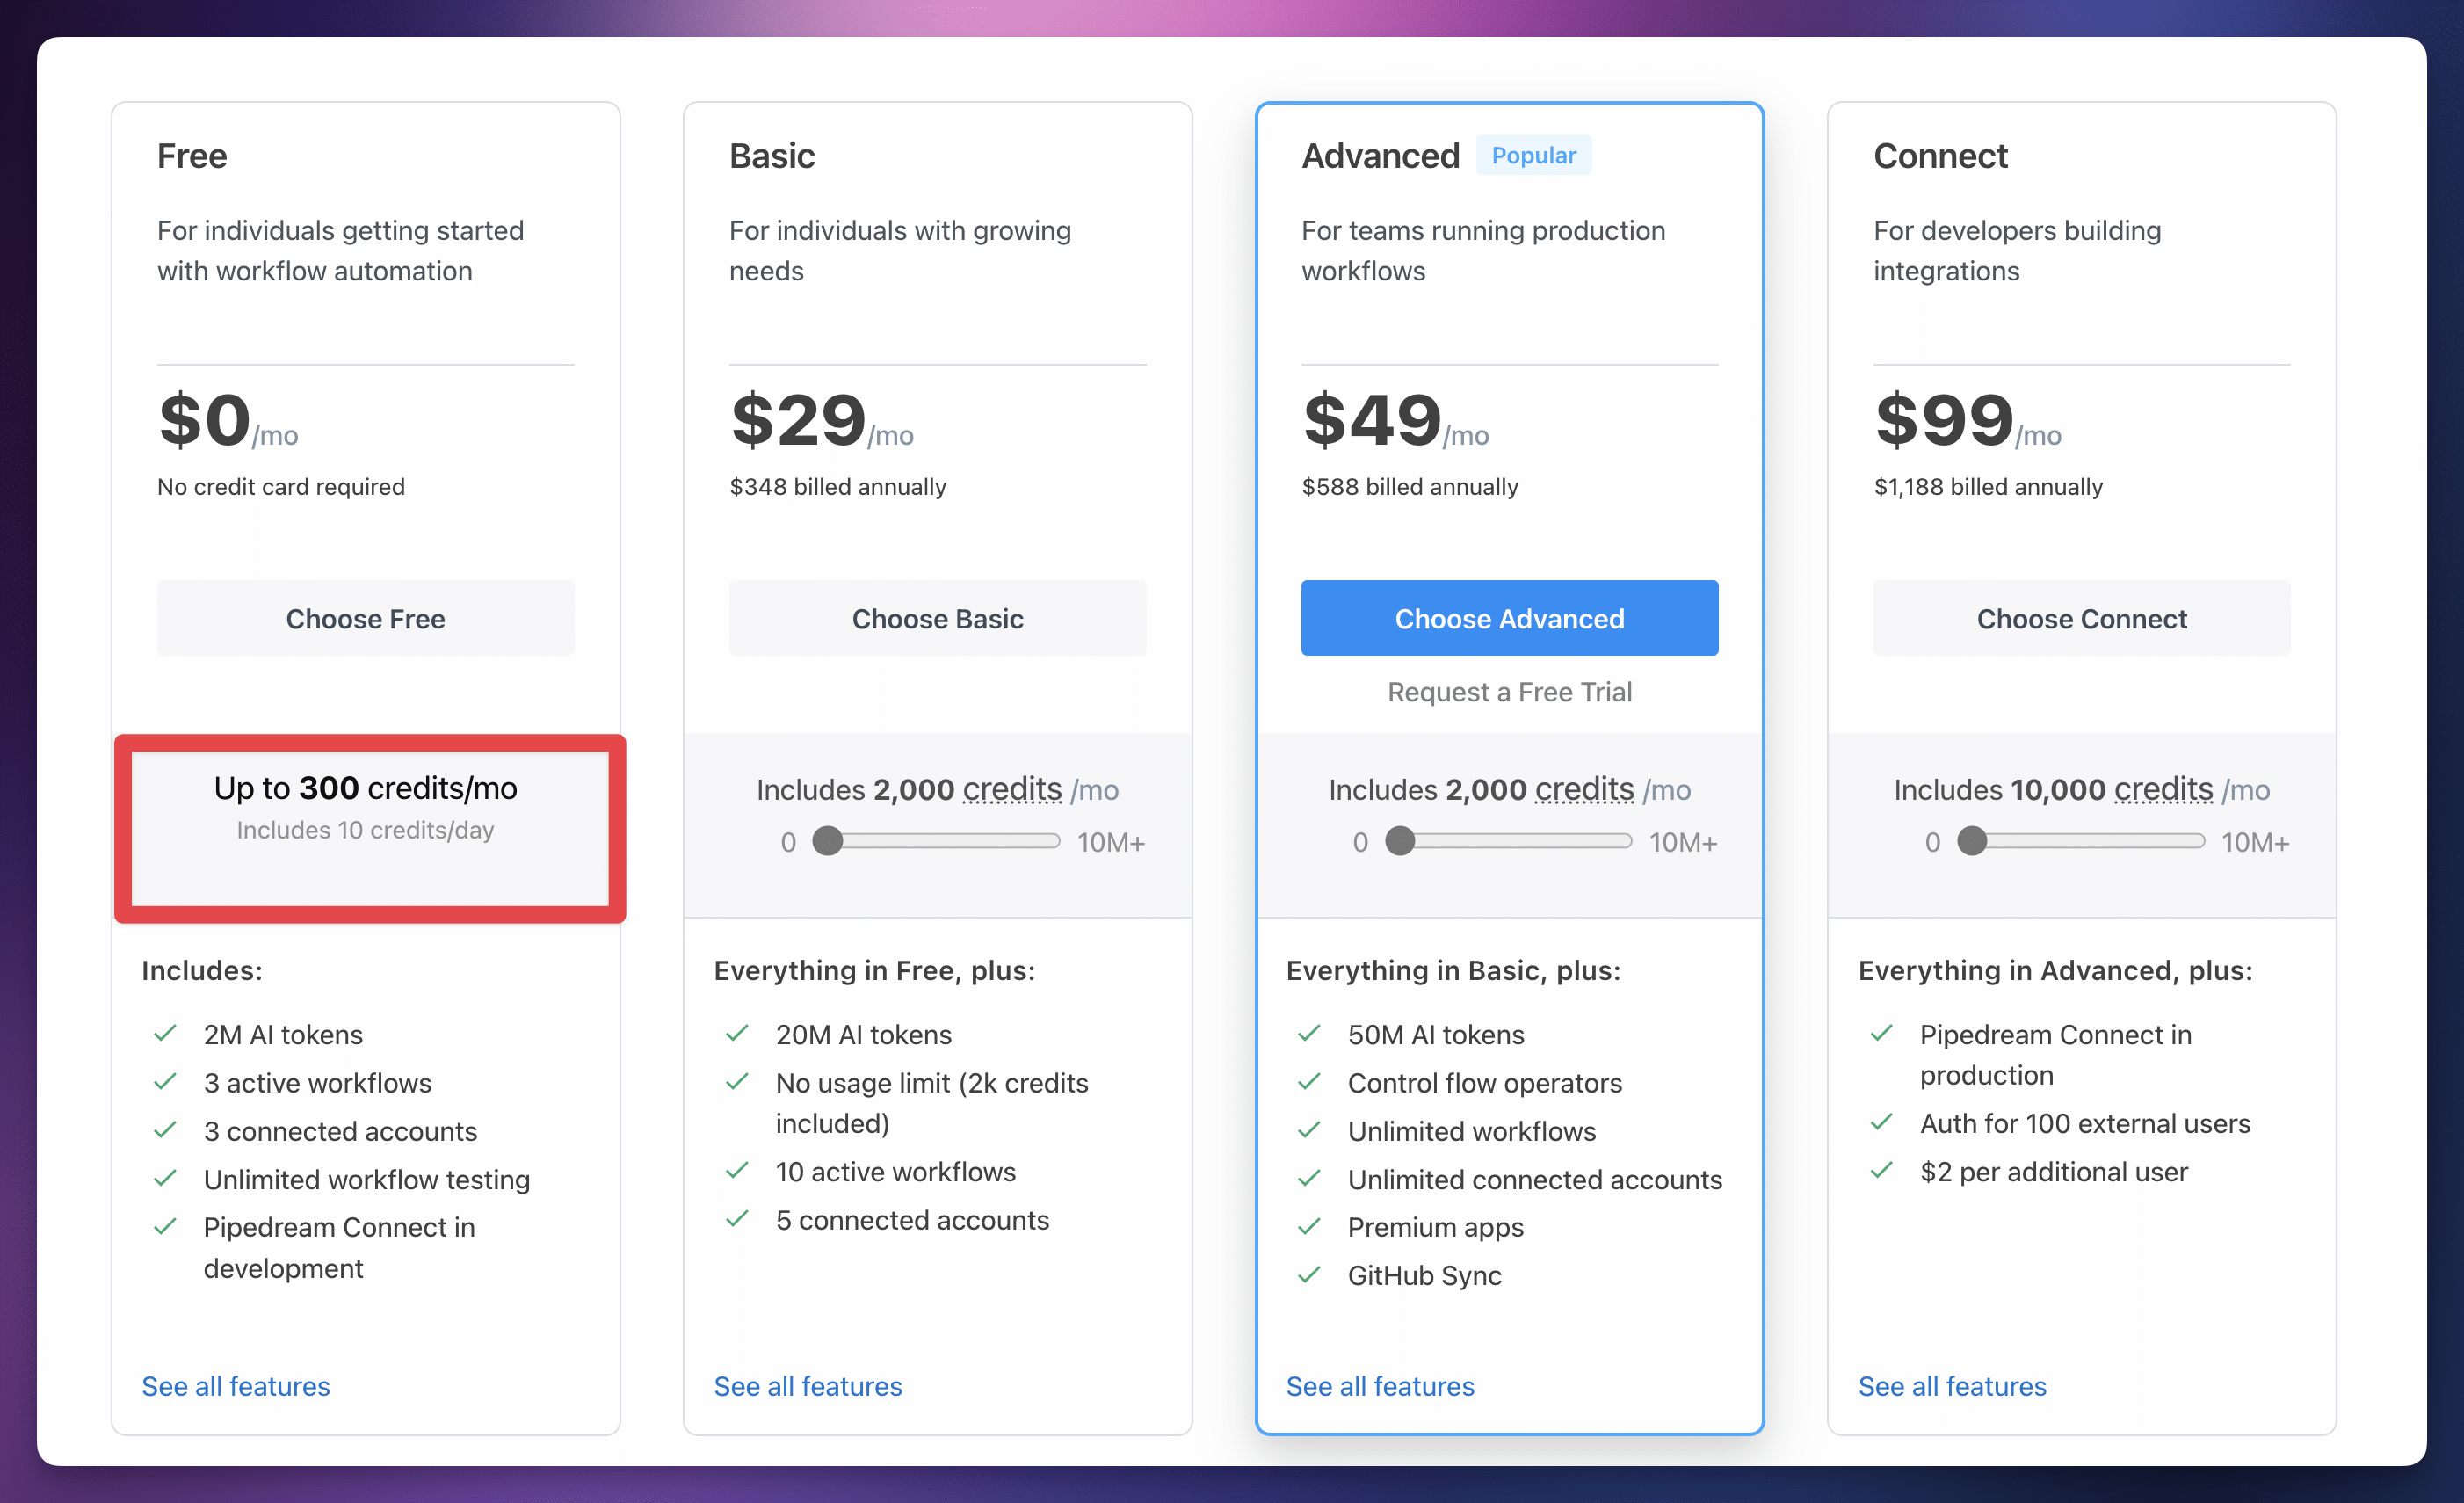
A credit on
- 30 seconds of compute time…
- …per 256mb block of memory allotted to the workflow
This means a workflow set to the default 256mb Memory setting will cost 1 credit if it completes in 30 seconds or less. For most shorter audio files, the cost will be one credit.
Even for longer files, this workflow is pretty quick. I’ve gotten an 8-hour recording of The Iliad to run through this workflow in 90 seconds, costing 3 credits (30 seconds x 3) on the 256mb memory setting.
As long as your recording needs don’t consume more than 10 credits per day, you’ll be fine on their free plan.
I will note that the free plan also limits you to 3 connected accounts, which means you’ll need to use the same service for Transcription and AI Summaries. This will cause the workflow to use 3 services:
- Cloud storage service (Google Drive, Dropbox, OneDrive)
- Transcription/AI Summary Service (Groq, Gemini, OpenAI)
- Notion
If you want to use a different AI Summary service, that’ll bump you up to 4 connected services, for which you’ll need to upgrade to a paid plan.
In the future, my team and I hope to offer this voice notes service in Flylighter, once we get our mobile app built. This will be a paid service, but will cost far less than the $29/mo
Privacy Information
TL;DR on this section: When you interact with any remote transcription or AI provider, your data likely isn’t 100% private. Keep this in mind when uploading audio recordings.
I’d like to mention this up-front before we get too far into the tutorial:
This automation should not be used for data that you want to be sure is 100% private.
Since this automation utilizes cloud storage services,
That said, different providers have different privacy policies. These policies can also vary based on service tier.
Here are a few points worth noting:
- Groq explicitly states that they do not retain prompt/context data, and do not train models on your data.
- Google Gemini explicitly states that data submitted on the free usage tier IS used to train models. They state that data submitted on the paid tiers is not used to train models.
- Certain providers may offer business or enterprise-level service tiers with zero-retention policies. It’s up to you to familiarize yourself with these offerings.
It’s up to you to be aware of the privacy policies and practices of the online services you use – especially if you plan on submitting potentially sensitive information. If you’re submitting private information about a company you work for, be extra careful and vigilant about these policies, as well as the policies and restrictions of your own company.
Local transcription and AI models have come a long way since I wrote the first version of this guide in 2022! It’s now possible to build some powerful speech-to-text workflows that work directly on a desktop computer.
I’ll note that local transcription on a mobile device is still not super powerful. There are apps that can do it (such as Hello Transcribe), but Whisper models can be tough on a phone’s battery life, so I don’t yet find them ideal for very long transcriptions.
On a desktop computer, though, you can do a lot. On my Mac computers, I use MacWhisper to both:
- Transcribe long files and create captions (for my YouTube videos)
- Quickly write with my voice in any text field using their Dictation feature (I often use this to take notes in Flylighter, our Notion web clipper!)
On Windows computers, I forked a project called whisper-writer and added a ton of capabilities. My fork allows me to “write with my voice” using the dictation tool, and even has AI cleanup and prompting features. I added the ability to use both remote services and local services; I can even use local Ollama models for AI cleanup, making the entire process 100% free, local, and private.
My fork requires some setup to get working, so it is only recommended for technical folks right now. I also can’t provide any support for it whatsoever (truly zero, you’ve been warned!), but I did want to note that it exists.
Why Not Use Notion AI?
Notion AI is a powerful suite of generative AI tools baked right into Notion. I covered a lot of what you can do with it in this post:
I’ll also be making a lot more content around Notion AI in the future.
There’s even a new AI Meeting Notes feature that will transcribe meetings in Google Meet, Zoom, and more. However, Notion doesn’t provide an actual voice-recorder feature, nor do they provide a general transcription feature for existing audio files.
Moreover, Notion AI is only accessible once you’re on Notion’s Business plan, which is currently $20/user/month (charged annually).
My workflow is free, so long as you’re able to stay within the limitations of
Features
This workflow has come a long way since I first built it in 2022. We’re now on the third major version, and it now packs a lot more power and additional features.
Here, I’d like to highlight a few cool things you can do with it!
Copy link to headingAudio File Uploads
The Notion API finally supports uploading files! I’m incredibly excited about this – I’ve been asking Notion for this capability for years.
Now, this workflow will upload your audio file directly to your Notion page if you want. You’ll see it at the top of the Notion page, and you can also choose to upload it to a Files & Media property if one exists in your database.
Note: The file upload API has the same limits as the native app. If you’re on a free Notion workspace, you can only upload files that are up to 5mb. Larger files won’t be uploaded. If you’re on a paid workspace, you can upload files up to 5gb, which is far beyond what this
Super-Long Audio Files
In the past, this workflow struggled with lengthier files. This was one of the primary areas of improvement I focused on with this latest build.
Now, the workflow can handle very long files. I’ve successfully had it process an 8-hour recording of The Iliad without issue. (The file was compressed to around 106mb before being uploaded.)
The main reason for that is massive improvement to the code that splits audio files into smaller chunks. It’s now much, much more memory-efficient.
Note: On the default 256mb Memory setting, the workflow can still struggle with audio files over 150mb. If you need to upload very large files, try increasing the Memory setting.
The Send_to_Notion step also does a lot to push this workflow’s ability to handle long files. First, it uses my notion-helper JavaScript library to handle the Notion API’s many limitations.
It can also compress long transcripts. This can be quite helpful for extremely long files, since the Notion API will only accept up to 100 paragraph blocks in a request. A multi-hour transcript may have hundreds in the transcript, and thousands in the VTT/caption section! This can cause the API requests to take a very long time, which can either cause a timeout error or make the workflow consume more credits than is necessary.
However, the Compress Transcripts option will convert paragraph blocks into extremely efficient blocks, often leading to a 97% reduction in block count. It simply constructs new paragraph blocks, stuffed to the gills with rich text objects. The result is that the transcript is just as readable, but it can be sent to Notion in far fewer API calls – making the whole process much, much faster.
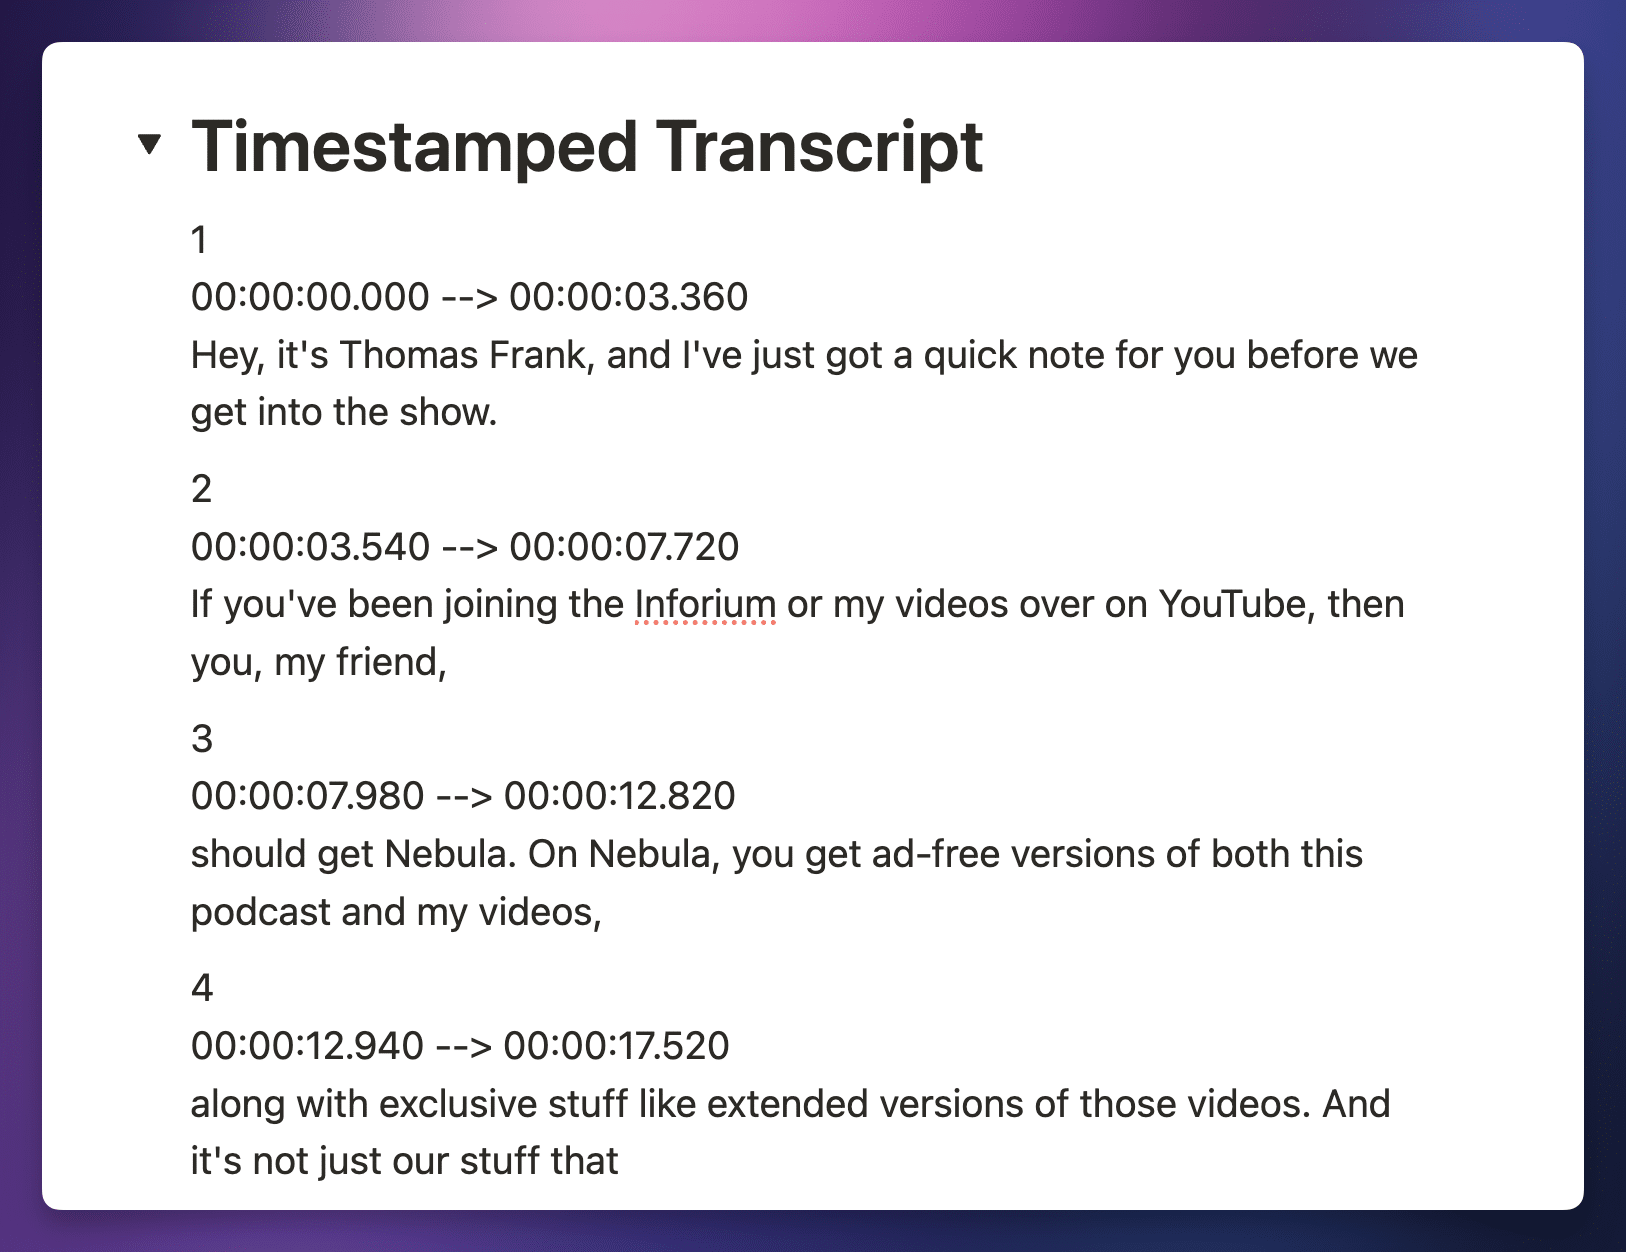
Copy link to headingTimestamps and Caption Files
By default, the workflow now includes a timestamped transcript! This means you can generate caption files for YouTube, and you’ll also get a Timestamped Transcript section in your Notion page.
This can be super-useful if you’re an interviewer or researcher who needs to reference specific sections of recordings.
Note: All transcription services will return accurate timestamps except for Google Gemini. If you ask Gemini for timestamps, it’ll happily return them… but they’ll be all wrong. If you need timestamps, I recommend using another service.
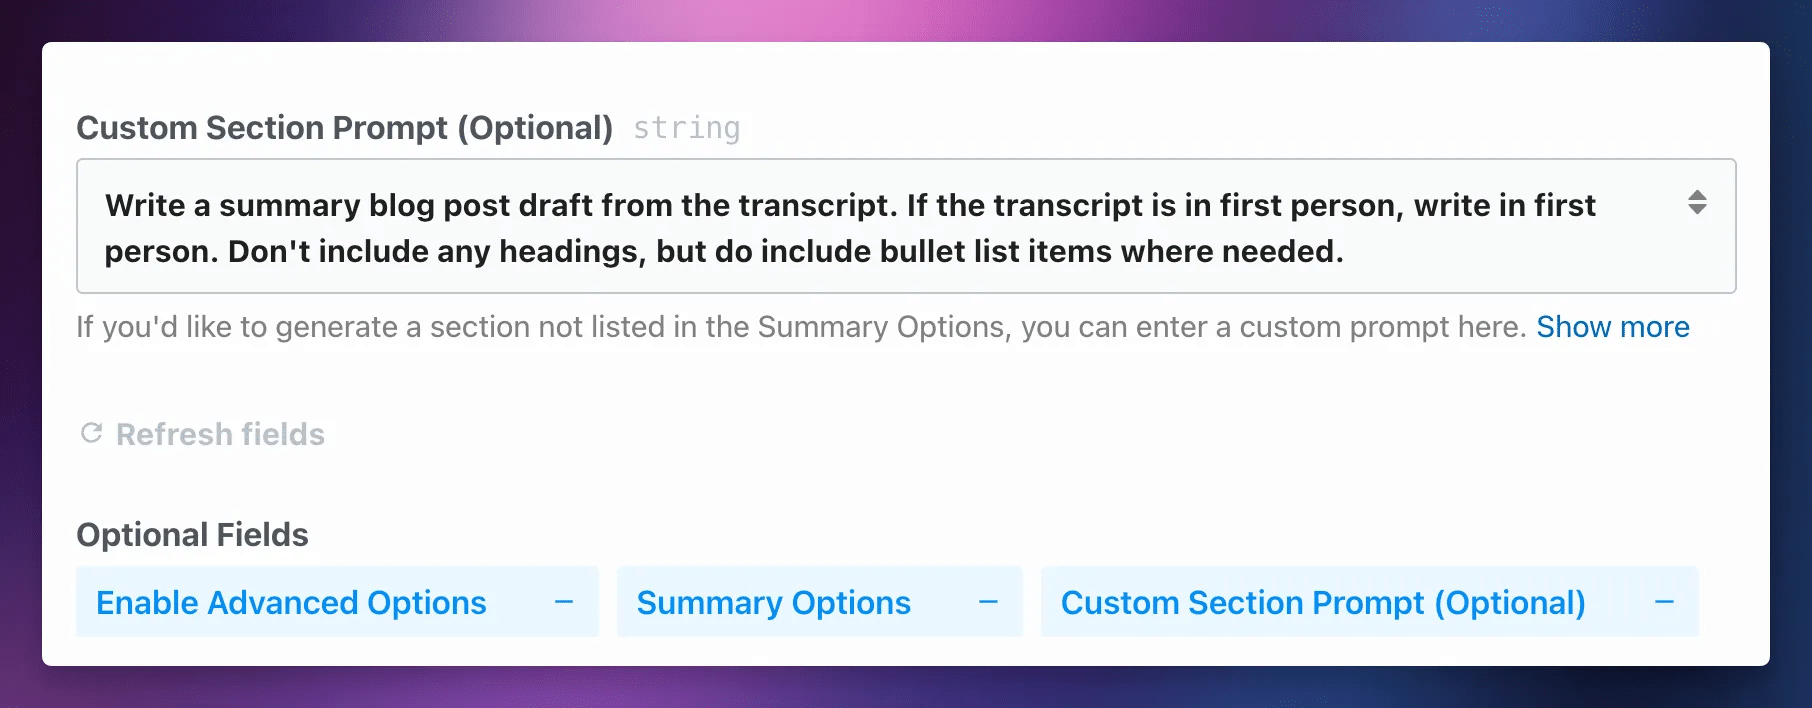
Custom AI Prompts
The Transcribe_Summarize step now has a Custom Section Prompt property.
Customize Your Notion Page
The Send_to_Notion step gives you a lot of control over the structure of your Notion page. Try playing with the following settings:
- Included Sections – include or exclude sections generated by the transcription step as you please.
- Custom Section – if you added a Custom Prompt in the transcription step, you can include it in the Notion page here.
- Use Toggle Headers – choose which sections should have Toggle Headers.
- Give Me More Control – unlocks additional settings for even more customization.
Going Beyond Notion
A huge reason for why I chose to split the Send_to_Notion action into its own discrete step is so you can choose not to use it.
Since that step entirely handles Notion page creation, the Transcribe_Summarize step is entirely focused on handling transcription, summarization, translation, etc. It’s a powerful Swiss-army knife for processing audio files.
It also gives you access to every useful piece of data you could want.
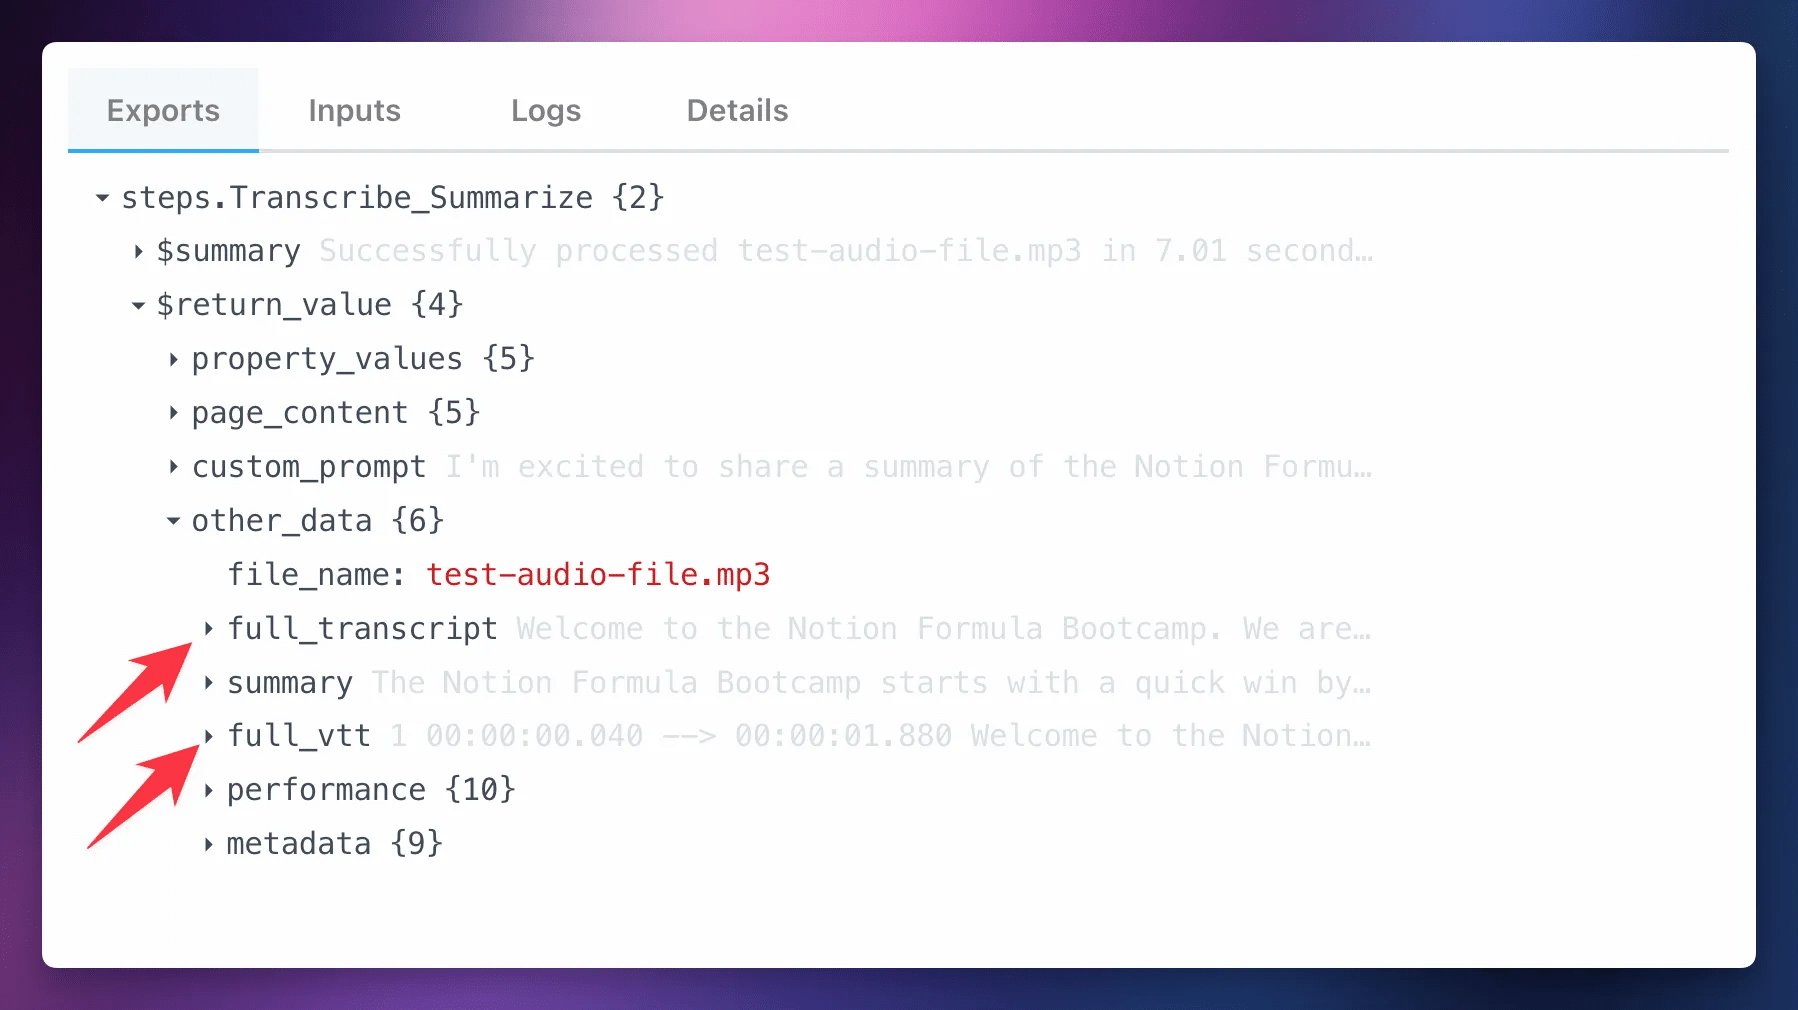
Within the $return_value object, you’ll find several useful objects you can explore:
property_values– this contains the file name, AI-generated title, duration, and file link.page_content– here, you’ll find all the data that ends up on the Notion page by default. You’ll find arrays containing the transcript paragraphs, timestamp lines, and summary lists.custom_prompt– if the step returned a custom prompt section, you’ll find it here.other_data– here, you’ll find lots of other stuff. Namely, you’ll find the full transcript and full VTT for the audio file. These are both singular, giant strings of text. You’ll also find performance data and metadata.
Since you have direct access to this information, you can do whatever you want with it. Here are some ideas:
- Send the transcript to an AI provider using one of
Pipedream ‘s actions in order to do something that theTranscribe_Summarizestep doesn’t support - Email the transcript to yourself
- Connect to the YouTube API and upload the
full_vttas a caption track
Reference
Below, you’ll find reference guides for each custom action step in the workflow.
Copy link to headingTranscribe-and-Summarize Options
This section provides a reference for all of the properties you’ll find in the Transcribe_Summarize action. Note that you may not see all of these properties initially; many are loaded dynamically only after other criteria are met.
This property should always have a value of {{steps}}. It simply provides the Transcribe_Summarize step with access to the return values of the previous steps.
Allows you to select the transcription (speech-to-text) service you want to use. Current options include:
- Groq
- Deepgram
- AssemblyAI
- ElevenLabs
- Google Gemini
- OpenAI
I personally use Groq with the distil-whisper-large-v3-en model, and recommend it for most people who are uploading English-language audio files.
Once you select a service, its corresponding App property will be dynamically loaded. I haven’t included those App properties in this reference.
Allows you to select the AI summary service you want to use. Current options include:
- Groq
- Anthropic
- Google Gemini
- OpenAI
- Cerebras
- None
I personally use Groq with the meta-llama/llama-4-scout-17b-16e-instruct model, and recommend it for most people.
Once you select a service, its corresponding App property will be dynamically loaded. I haven’t included those App properties in this reference.
You can set this to None if you only need transcription. However, you’ll need to select a service here if you want:
- AI-generated title
- Summary
- Summary lists (Main Points, Action Items, etc)
- Custom prompt
- Translation
- AI cleanup
Set this to True in order to unlock several advanced options.
This is set to False by default in order to keep the basic setup from being overwhelming to users who don’t need advanced options.
Allows you to select the specific speech-to-text model that will transcribe your audio file.
Options are dynamically set based on the Transcription Service you’ve chosen. Current options include:
• OpenAI: whisper-1, gpt-4o-transcribe, gpt-4o-mini-transcribe
• Deepgram: nova-3, nova-2, nova
• Groq: whisper-large-v3-turbo, distil-whisper-large-v3-en, whisper-large-v3
• Google Gemini: gemini-2.0-flash, gemini-2.0-flash-lite, gemini-1.5-flash
• ElevenLabs: scribe_v1
• AssemblyAI: best, slam-1, nano, universal
Allows you to select the specific large language model (LLM) that will perform all LLM functions, including summary generation, translation, etc.
Options are dynamically set based on the AI Summary Service you’ve chosen. Current options include:
• OpenAI: gpt-4.1-nano, gpt-4.1-mini, gpt-4.1, gpt-4o-mini, gpt-4o
• Anthropic: claude-3-5-haiku-latest, claude-3-5-sonnet-latest, claude-sonnet-4-0, claude-opus-4-0
• Google Gemini: gemini-2.0-flash-lite, gemini-2.0-flash, gemini-1.5-flash
• Groq: llama-3.1-8b-instant, llama-3.3-70b-versatile, meta-llama/llama-4-scout-17b-16e-instruct
• Cerebras: llama-4-scout-17b-16e-instruct, llama3.1-8b, llama-3.3-70b
If you’ve enabled Advanced Options, you can override your choice here using the Custom AI Model property.
Each option you choose here will instruct your AI Model to generate a specific list – except Summary, which will simply generate a paragraph summary.
Current options include:
• Summary
• Main Points
• Action Items
• Follow-up Questions
• Stories
• References
• Arguments
• Related Topics
• Jokes
• Chapters
Each chosen option here will add a new line to the system instructions that are sent along with each chunk of your transcript. If your transcript is split into multiple chunks, the model will generate a summary and list for each chunk – though all chunks will be merged into singular, final lists.
This property allows you to write a custom prompt that will be applied to the entire transcript.
For example, you could write:
Write a blog post draft based on the transcript. If the transcript is in first person, write in first person. Don’t include headings, but do include bullet list items and numbered list items where applicable.
Or you could do something like:
Generate a strong argument against the argument made in the transcript.
This property allows you to go beyond the more limited options in the Summary Options property.
Note that this prompt will be run once, and your entire transcript will be sent to your AI Model along with it. It will not be applied to transcript chunks.
Since you can write anything in this prompt, my workflow isn’t able to specify quite as rigid of a format for the return values as it can for the summary options. It simply instructs the model to return a markdown string.
Therefore, you may wish to add additional instructions about formatting to your prompt, like I did in the blog post prompt example above.
Finally, note that your custom prompt can be found at {{steps.Transcribe_Summarize.$return_value.custom_prompt}} if it exists. The workflow is designed to continue running if the Custom Prompt step fails, so that you still get your transcript and additional summary lists.
Most transcription services limit the size of uploaded audio files. To deal with this, larger audio files are split into chunks (using ffmpeg), and then those chunks are sent concurrently to the transcription service.
This has the additional benefit of speeding up the workflow. Instead of sending one long audio file in a single request, we can send many small audio files, all at the same time. This allows the transcription service to transcribe the chunks in parallel.
By default, this workflow will split files into chunks of 10mb each, even though the smallest file size limit of any service is 24mb. We do this to gain that speed advantage. You can change this setting to anywhere between 4mb and 24mb; however, chunks will always be limited to 10 minutes in length.
When set to False, audio files will always be split into chunks – even if your chosen Transcription Service can handle large uploads (e.g. Deepgram can handle 2gb files, although this workflow itself has a hard cap of 700mb, and will fail on even smaller files unless the Memory setting is increased).
Set this to True to disable audio file chunking.
When set to True, the Transcribe_Summarize step will not automatically clear the audio file out of
This allows the Send_to_Notion step to upload the audio file to Notion, as long as it is within your workspace’s file upload limits.
Defaults to True.
Note: Even with this setting set to True, /tmp before the Send_to_Notion step can access it. This typically happens when processing longer files. If you run into issues around this, you can duplicate your Download step and drag the copy right before the Send_to_Notion step. This will make the workflow re-download the file, thus allowing it to be uploaded to Notion.
When enabled, this will downsample your audio file to 16kHz mono and convert it to M4A format (32kbps) before transcription.
You probably don’t need this.
If you’ve downloaded your audio file to temporary storage and know the path to it, you can enter it here. You can use this if you’re downloading your file to temp storage using another type of action step (e.g. another cloud storage service).
Path should start with /tmp/ and include the file name. Example: /tmp/my-audio-file.mp3
If a previous step has provided the entire path to the file, you can reference that step’s path here.
If a previous step has provided the file name, you can reference it like so: /tmp/{{file_name_variable}}
If you have a value here, it will override the default behavior of the workflow, which looks for specific download_file action steps for Google Drive, Microsoft OneDrive, and Dropbox.
If you’ve provided a custom Path to File, you can also provide the link to the file from your trigger step here. If you don’t provide a value here, your final Notion page may not contain a link to the audio file.
When enabled, this will enable debug mode, which will cause this step to return the full JSON objects for each transcript and summary response.
This will increase workflow memory usage, so you should only use it when testing workflow steps manually. In Build mode, workflow steps have far more memory available than the default 256mb that deployed workflows have.
Set this to the stage you’d like to stop at. This setting should only be used for debugging purposes.
Enter an array of key terms that the transcription model may need help with.
If you’re using AssemblyAI as your transcription service with the slam-1 model and an English-language audio file, these terms will be included in the key_terms parameter of the transcription request. No other transcription services or models currently support this feature within this workflow.
If you’ve enabled AI Cleanup, these key terms will be included in the system prompt for the LLM that cleans up the transcript.
You can enter a prompt here to help guide the transcription model’s style. This prompt will only be used if you’ve chosen a Whisper model.
It might be useful to set a prompt here if you are uploading files in a non-English language. Occasionally, Whisper models will automatically translate non-English audio into English text. While you can more strongly prevent this by setting a specific language in the Transcription Language property, writing a prompt here in your chosen language may also help.
You might want to use this instead of the Transcription Language property if you’re hoping to use one instance of this workflow for audio files in multiple different languages. This is because if you set a transcription language, the model will always try to output text in that specific language.
Set the temperature for the transcription model. Valid values are integers between 0 and 20 (inclusive), which are divided by 10 to achieve a final value between 0 and 2.0.
This value is only used for Whisper models.
This property sets the language for the transcription model. It instructs the model to output text in the specified language.
If you’re uploading non-English audio and you’re having problems with the model translating your audio into English, you can set a specific language here to prevent that from happening.
If you set a language in this property, your transcript and your chosen summary options will be translated into that language, if it differs from the original language of the transcript.
You’ll only see this property if you have set an AI Service, as a LLM is needed to do the translation.
If you do translate your transcript into another language, the workflow will provide the original language transcript as well.
This option will use your chosen AI model to clean up the transcript. If you’ve provided an array of terms in the key terms property, those terms will be included in the system prompt for the AI model that cleans up the transcript, which you can help with ensuring proper spelling and capitalization for proper terms.
This option sets the maximum number of paragraphs for each chunk of your transcript, and therefore the max number of paragraphs that will be sent to your chosen AI service in each summarization request.
If you set a smaller number here, that’s going to result in a more dense summary, as the same summarization prompt will be run for a smaller chunk of the transcript, and hence more requests will be made as the transcript will be split into more chunks.
Splitting the transcript into chunks will also slightly speed up the workflow as each chunk will be sent to the AI service in parallel except for the first chunk. It is sent ahead of time allowing its summary to be included in the system instructions for all other chunks in order to improve summary quality.
By default, this option will split your transcript into 20 paragraph chunks, where each paragraph is three sentences each.
You can set this property as low as one paragraph per chunk and as high as 5000 paragraphs per chunk, which is effectively the limit of the models themselves, given that current large language models will likely not be able to handle 5000 paragraphs of text.
This option sets the verbosity of your summary and the generated lists for each transcript chunk. It defaults to Medium.
Here’s what each setting does:
• High – Summary will be 20-25% of the transcript length. Most lists will be limited to 5 items.
• Medium – Summary will be 10-15% of the transcript length. Most lists will be limited to 3 items.
• Low – Summary will be 5-10% of the transcript length. Most lists will be limited to 2 items.
Sets the temperature for the AI model. Valid values are integers between 0 and 20 (inclusive), which are divided by 10 to achieve a final value between 0 and 2.0.
If you’d like to use a custom AI model, you can enter the model name here. This will override the default model for the AI service you’ve chosen.
This feature is experimental. You must provide the model name exactly as it appears in the AI service’s API documentation. This feature will only work for models provided by your chosen AI Service.
Example: gemini-2.5-flash-preview-04-17
You’ll still need to select a default AI Model as well.
Send-to-Notion Options
This section provides a reference for all of the properties you’ll find in the Send_to_Notion action. Note that you may not see all of these properties initially; many are loaded dynamically only after other criteria are met.
The
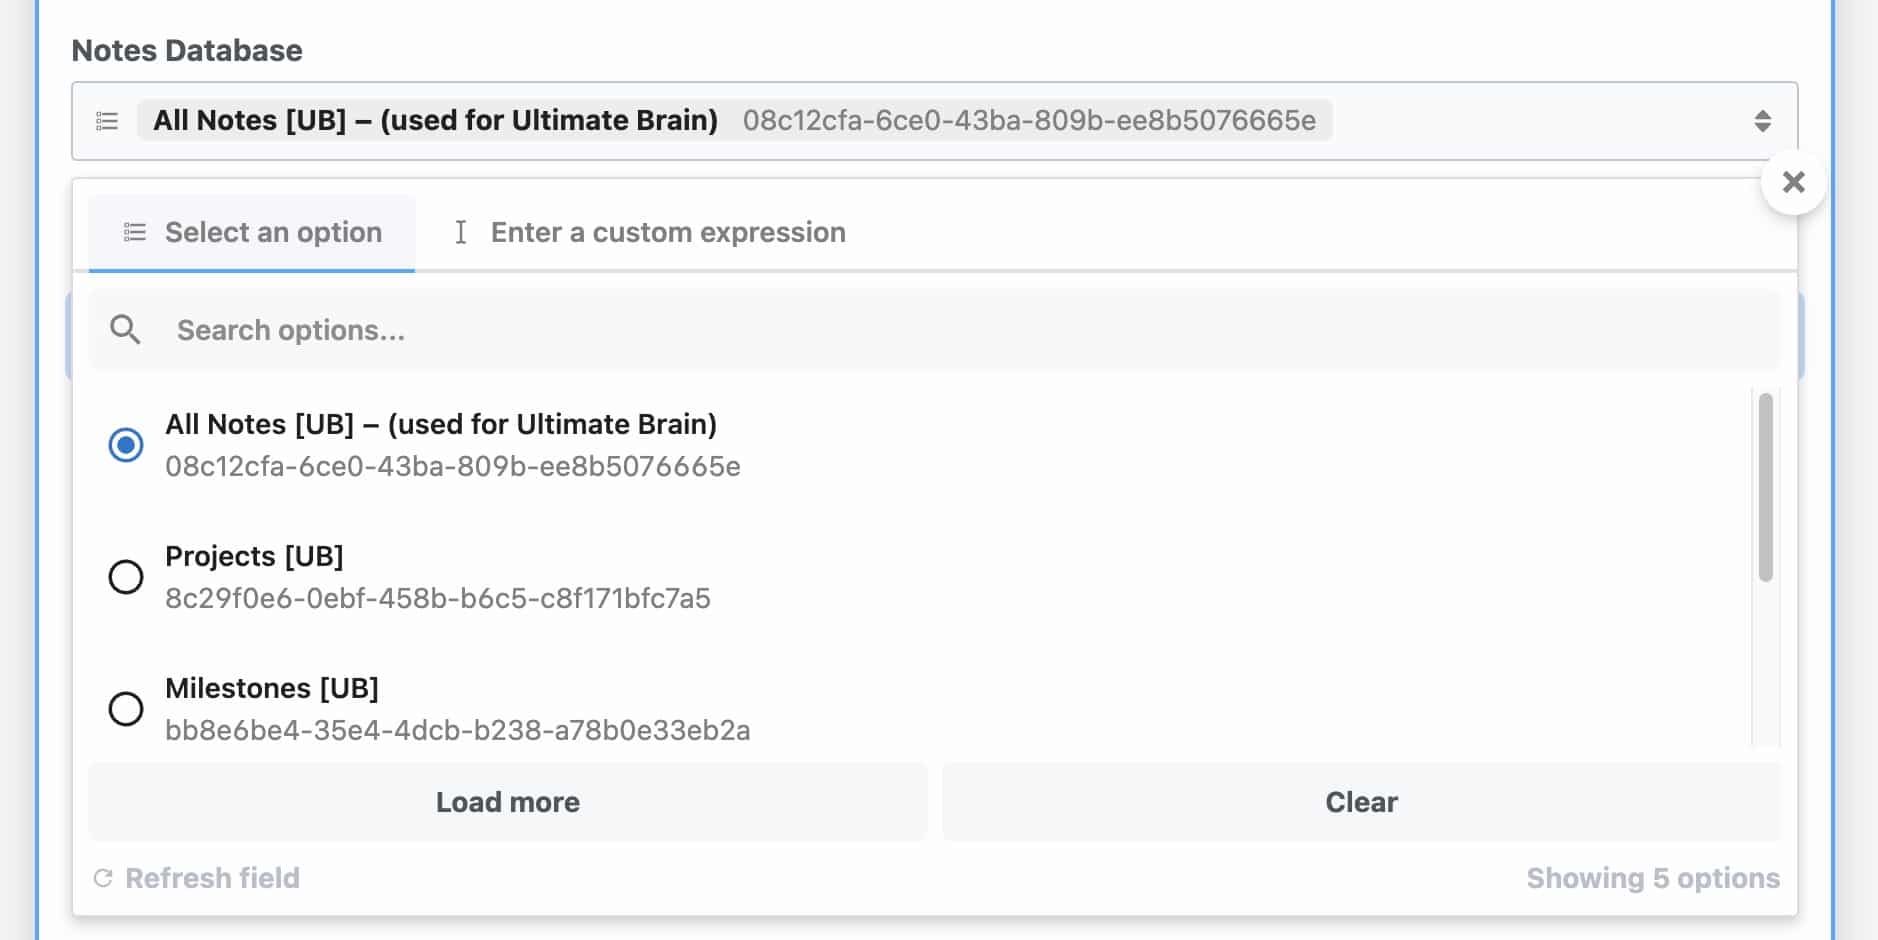
Use this property to select the Notion database in which your new note pages will be created.
If you don’t see the database you’re looking for, refer to the troubleshooting section below.
This property should always have a value of {{steps}}. It simply provides the Send_to_Notion step with access to the return values of the previous steps.
This property lets you choose the sections from the Transcribe_and_Summarize step that you’d like to include in the Notion page.
This property gives you a lot of control over how you use this particular Notion step. For example, you can use this step to only create a new page with the transcript and reference additional sections in new action steps that you add yourself to this workflow.
Select the Title property for your notes. A Notion database will always have one Title property, so you should only ever see a single choice here.
By default, it is called Name.
Choose the value for your note title. Defaults to an AI-generated title based off of the first summarized chunk from your transcription. You can also choose to use the audio file name, or both. If you pick both, the title will be in the format “File Name – AI Title”.
Note: If you didn’t set an AI Service in the Transcribe_Summarize step, your title will be the audio file name even if you choose “AI Generated Title” here. Without an AI Service, the previous step is unable to generate a title.
Advanced: You can also construct a custom title by choosing the Enter a custom expression tab and building an expression that evaluates to a string.
Select the duration property for your database. This must be a Number-type property. Duration will be expressed in seconds.
Note: You can easily create a formula-type property to format the duration into HH:MM:SS format. See this example for the formula code.
If you don’t see an option here, it means your Notion database does not have a Number-type property.
Choose a Select-type property for tagging your note (e.g. tagging it as “AI Transcription”).
Note: This option only supports Select-type properties. If you want to set other property types, such as a Multi-Select or Status property, add a Notion → Update Page step after this step. Set the Page ID value to the {{steps.Send_to_Notion.$return_value.apiResponse.id}} path.
If you don’t see an option here, it means your Notion database does not have a Select-type property.
Choose the value for your note tag. You can choose an existing select value from your database or have this workflow automatically create a new custom value that you enter here.
Choose an emoji to use as the icon for your note page.
Defaults to 🤖. If you don’t see the emoji you want in the list, you can also simply type or paste it in the text box.
Select a date property for your note. This property will be set to the date the audio file was created.
If you don’t see an option here, it means your Notion database does not have a Date-type property.
Select a text-type property for your note’s file name. This property will store the name of the audio file.
If you don’t see an option here, it means your Notion database does not have a Text-type property.
Select a URL-type property for your note’s file link. This property will store a link to the audio file.
If you don’t see an option here, it means your Notion database does not have a URL-type property.
If you’ve used the Custom Section Prompt option in the Transcribe_Summarize step, you can link it here.
Click the field, click Enter a Custom Expression, then find steps → Transcribe_Summarize → custom_prompt.
Alternatively, you can reference a variable from any other custom step you’ve added. The variable’s content must be a string containing plain text or Markdown text.
Set a title/heading for your custom section. Defaults to Custom Section.
If true, this step will attempt to upload the audio file to Notion.
Note: If your workspace is on the free plan, file uploads are limited to 5MB. If your file is larger than this, it will not be uploaded.
Select a Files-type property for your note’s uploaded file. This property will store the uploaded audio file.
You may also leave this blank and solely create an Audio block on the page using the property below.
If you don’t see an option here, it means your Notion database does not have a Files-type property.
If set to True, adds a Callout block near the top of the created Notion page that contains a link to the audio file at your chosen cloud storage service.
If set to True, this step will create an Audio block at the top of the page containing the uploaded audio file.
Select the sections for which you’d like to use toggle heading blocks. These will be toggled closed by default on the page, making the overall page length shorter until you open the toggle that you want.
If True, content in the Transcript and Original-Language Transcript (if present) sections will be compressed into as few blocks as possible, resulting in far fewer calls to the Notion API.
When disabled, each paragraph in the Transcript and Original-Language Transcript sections will be its own block.
This option can be useful if you’re transcribing very long audio files. If you’re running into timeout issues with this Send to Notion step, try setting this to True.
If True, content in the Timestamped Transcript section will be compressed into as few blocks as possible, resulting in far fewer calls to the Notion API.
When disabled, each paragraph in the Timestamped Transcript section will be its own block.
This option can be useful if you’re transcribing very long audio files. If you’re running into timeout issues with this Send to Notion step, try setting this to True.
Set this to True to activate a bunch of additional settings. Defaults to False.
If set, the Compress Transcripts and Compress Timestamps options will only be used if the section’s content contains more than this many blocks.
Example: If set to 100, only a transcript that originally has more than 100 blocks will be compressed.
Leave this blank or set it to 0 to disable the threshold.
Choose the type of header block to use for each section. Defaults to Heading 1.
If set, the order of the sections in the note will be as specified in the object. Keys must be the section names, and must match the section names shown below. Values must be the section order number, starting with 1. Defaults to the canonical order of sections, which is the following:
• summary
• transcript
• original_language_transcript
• vtt
• main_points
• action_items
• follow_up
• stories
• references
• arguments
• related_topics
• chapters
• custom_section
Example: If you wanted your Custom Section at the top of the page, add an entry with custom_section as the key (left text box) and 1 as the value (right text box).
If True, the step will not create a Callout block at the top of the page in the case of a failed audio file upload.
If True, the step will construct the Notion page object, but will not send it to Notion. Instead, it will return the constructed object itself. This can be useful for testing and debugging.
Workflow Limits
In this section, I explain several of the limitations of this workflow.
This workflow can handle very long files. I’ve successfully used it to transcribe an 8-hour public-domain audiobook recording of The Illiad in testing, using the default 256mb Workflow Memory setting.
There are two primary limiters to the length of audio files this workflow can handle:
- Workflow Memory
- Notion API speed
Pipedream runs on top of AWS Lambda, which means that the “Workflow Memory” setting (which defaults to 256mb) also controls the amount of CPU power the workflow gets.
Through extensive testing, I’ve learned that the ffmpeg process that splits the audio file into chunks it extremely memory-efficient, but it can get hindered by limited CPU resources when handling large files. Things get even worse when a file is large and long in duration – though the reasons aren’t clear to me.
If you need to transcribe extremely long files, you’ll likely need to increase the Workflow Memory setting. You may be able to squeeze extra performance from the default 256mb setting by compressing your audio file (e.g. using a local ffmpeg command like ffmpeg -i file.mp3 -vn -c:a libmp3lame -ar 16000 -b:a 32k file_compressed.mp3 – assuming the input file is called file.mp3), but this can only go so far.
The other limitation is the Notion API. When transcribing audio or running LLM operations, we can split the audio file or transcript into chunks, and concurrently run operations on each chunk.
However, when we’re creating the final Notion page, we have to make API calls sequentially. When you make concurrent API calls (multiple at once), you can’t be sure that they’ll be completed in the correct order. Some may fail and require retries, or may just be completed more slowly.
For this reason, the Send to Notion step must make a request, get confirmation that it succeed, and only then make the next request. Otherwise, you’d run the risk of seeing your transcript out of order.
The limitation here is the Workflow Timeout setting. By default,
- 5 minutes max on the free plan
- 12.5 minutes max on paid plans
Keep in mind that each increment of 30 seconds will cost 1 credit (for each 256mb of Memory you’re using – e.g. 60 seconds + 1024mb memory = 8 credits).
I’ve set a hard cap of 700mb for file uploads to this workflow. That said, unless you change the default workflow memory setting, the workflow will likely fail, even on smaller files.
In my testing, I found the default 256mb Memory setting will easily handle files up to around 150mb. After that, things start getting a bit dicey.
There also seems to be a relationship between the size of the audio file and the length of the audio file, which I believe has to do with the amount of work FFmpeg has to do to split longer audio files up into chunks, regardless of their size.
This is an area where further testing would be needed for it to be fully understood, and it seems that, so far, nobody on the internet has done this type of testing.
The upshot is that if you would like to upload very large audio files to this workflow, you’ll likely need to increase the workflow Memory setting. Be aware that each increment of 256mb that you add will cost one additional credit per 30 seconds of compute time.
Supported audio file formats depend on the transcription service you choose. In general, this workflow will handle all the typical formats, including mp3, m4a, acc, ogg, wav, flac, etc.
If you upload a file with an unsupported type, the workflow will attempt to convert it to an m4a file before sending it off for transcription. However, the workflow currently will not upload the converted file to Notion.
In general, I recommend uploading files that have a supported file type.
Common Errors and Issues
As with any multi-step workflow (especially those involving code), these workflows can sometimes run into unexpected errors.
In this section, I’ve collected some of the most common errors, along with their likely fixes.
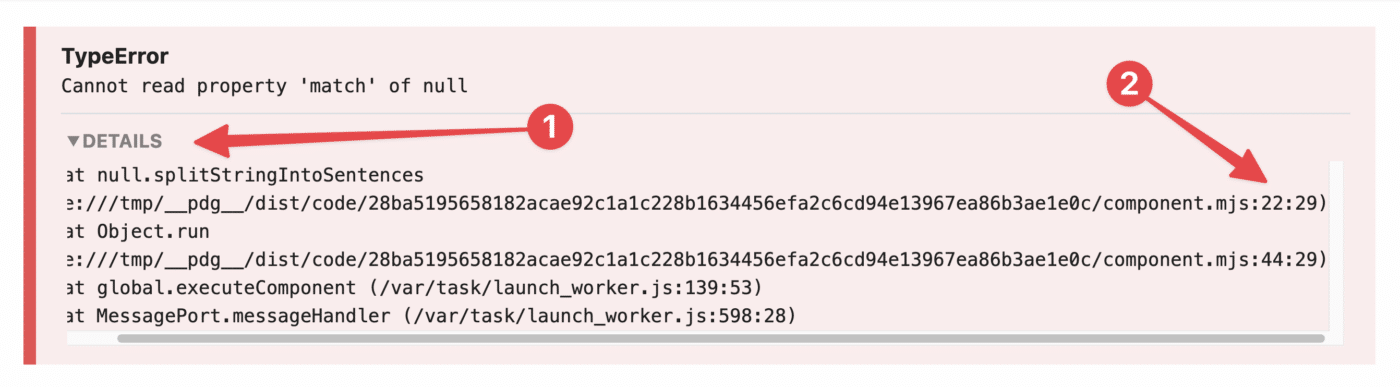
Before digging into the actual errors, I want to give you a few tips for debugging an errors you run into.
First, open up the toggle in your error message. If you’re working with a code step, the first line inside the toggle will usually tell you what line the error is occurring on.
Second, ask for help in the Pipedream community.
Finally, if you think you’ve encountered a true bug, please open an Issue in this workflow’s GitHub repo.
When opening your issue, please provide as much detail as possible. If you see an error message, please include it as a screenshot or as copied text.
It can also be extremely helpful to go to the Logs tab of the failed step and copy as least the last 4-5 lines of logs. This can help to illuminate where something might have gone wrong.
Each time the Transcribe_and_Summarize step runs, it deletes the downloaded audio file from /tmp/ directory once it’s no longer needed. (It does not delete the file from your cloud storage app.) This is good practice, as it keeps your /tmp/ directory from filling up.
Additionally, /tmp/ directory occasionally.
If you’re testing the workflow and hit an Audio file not found error, it means the file has been cleared from the /tmp/ directory one way or the other.
The fix is simple; just re-test your Download File step, hit Continue on that step, then test Transcribe_and_Summarize again.
Additionally, don’t rename the workflow steps. The Transcribe_and_Summarize step expects the Download File steps to use their default names. They should be:
- Google Drive → Download File:
download_file - Microsoft OneDrive → Download File:
download_file - Dropbox → Download File to TMP:
download_file_to_tmp
These are the step names that Transcribe_and_Summarize step’s logic.
If you want to rename steps, you’ll need to enabled Advanced Options in the Transcribe_and_Summarize step, then set the Path to File and File Link properties manually.
If you’ve connected your Notion account, but your desired notes database isn’t showing up in the Notes Database field, here’s the fix.
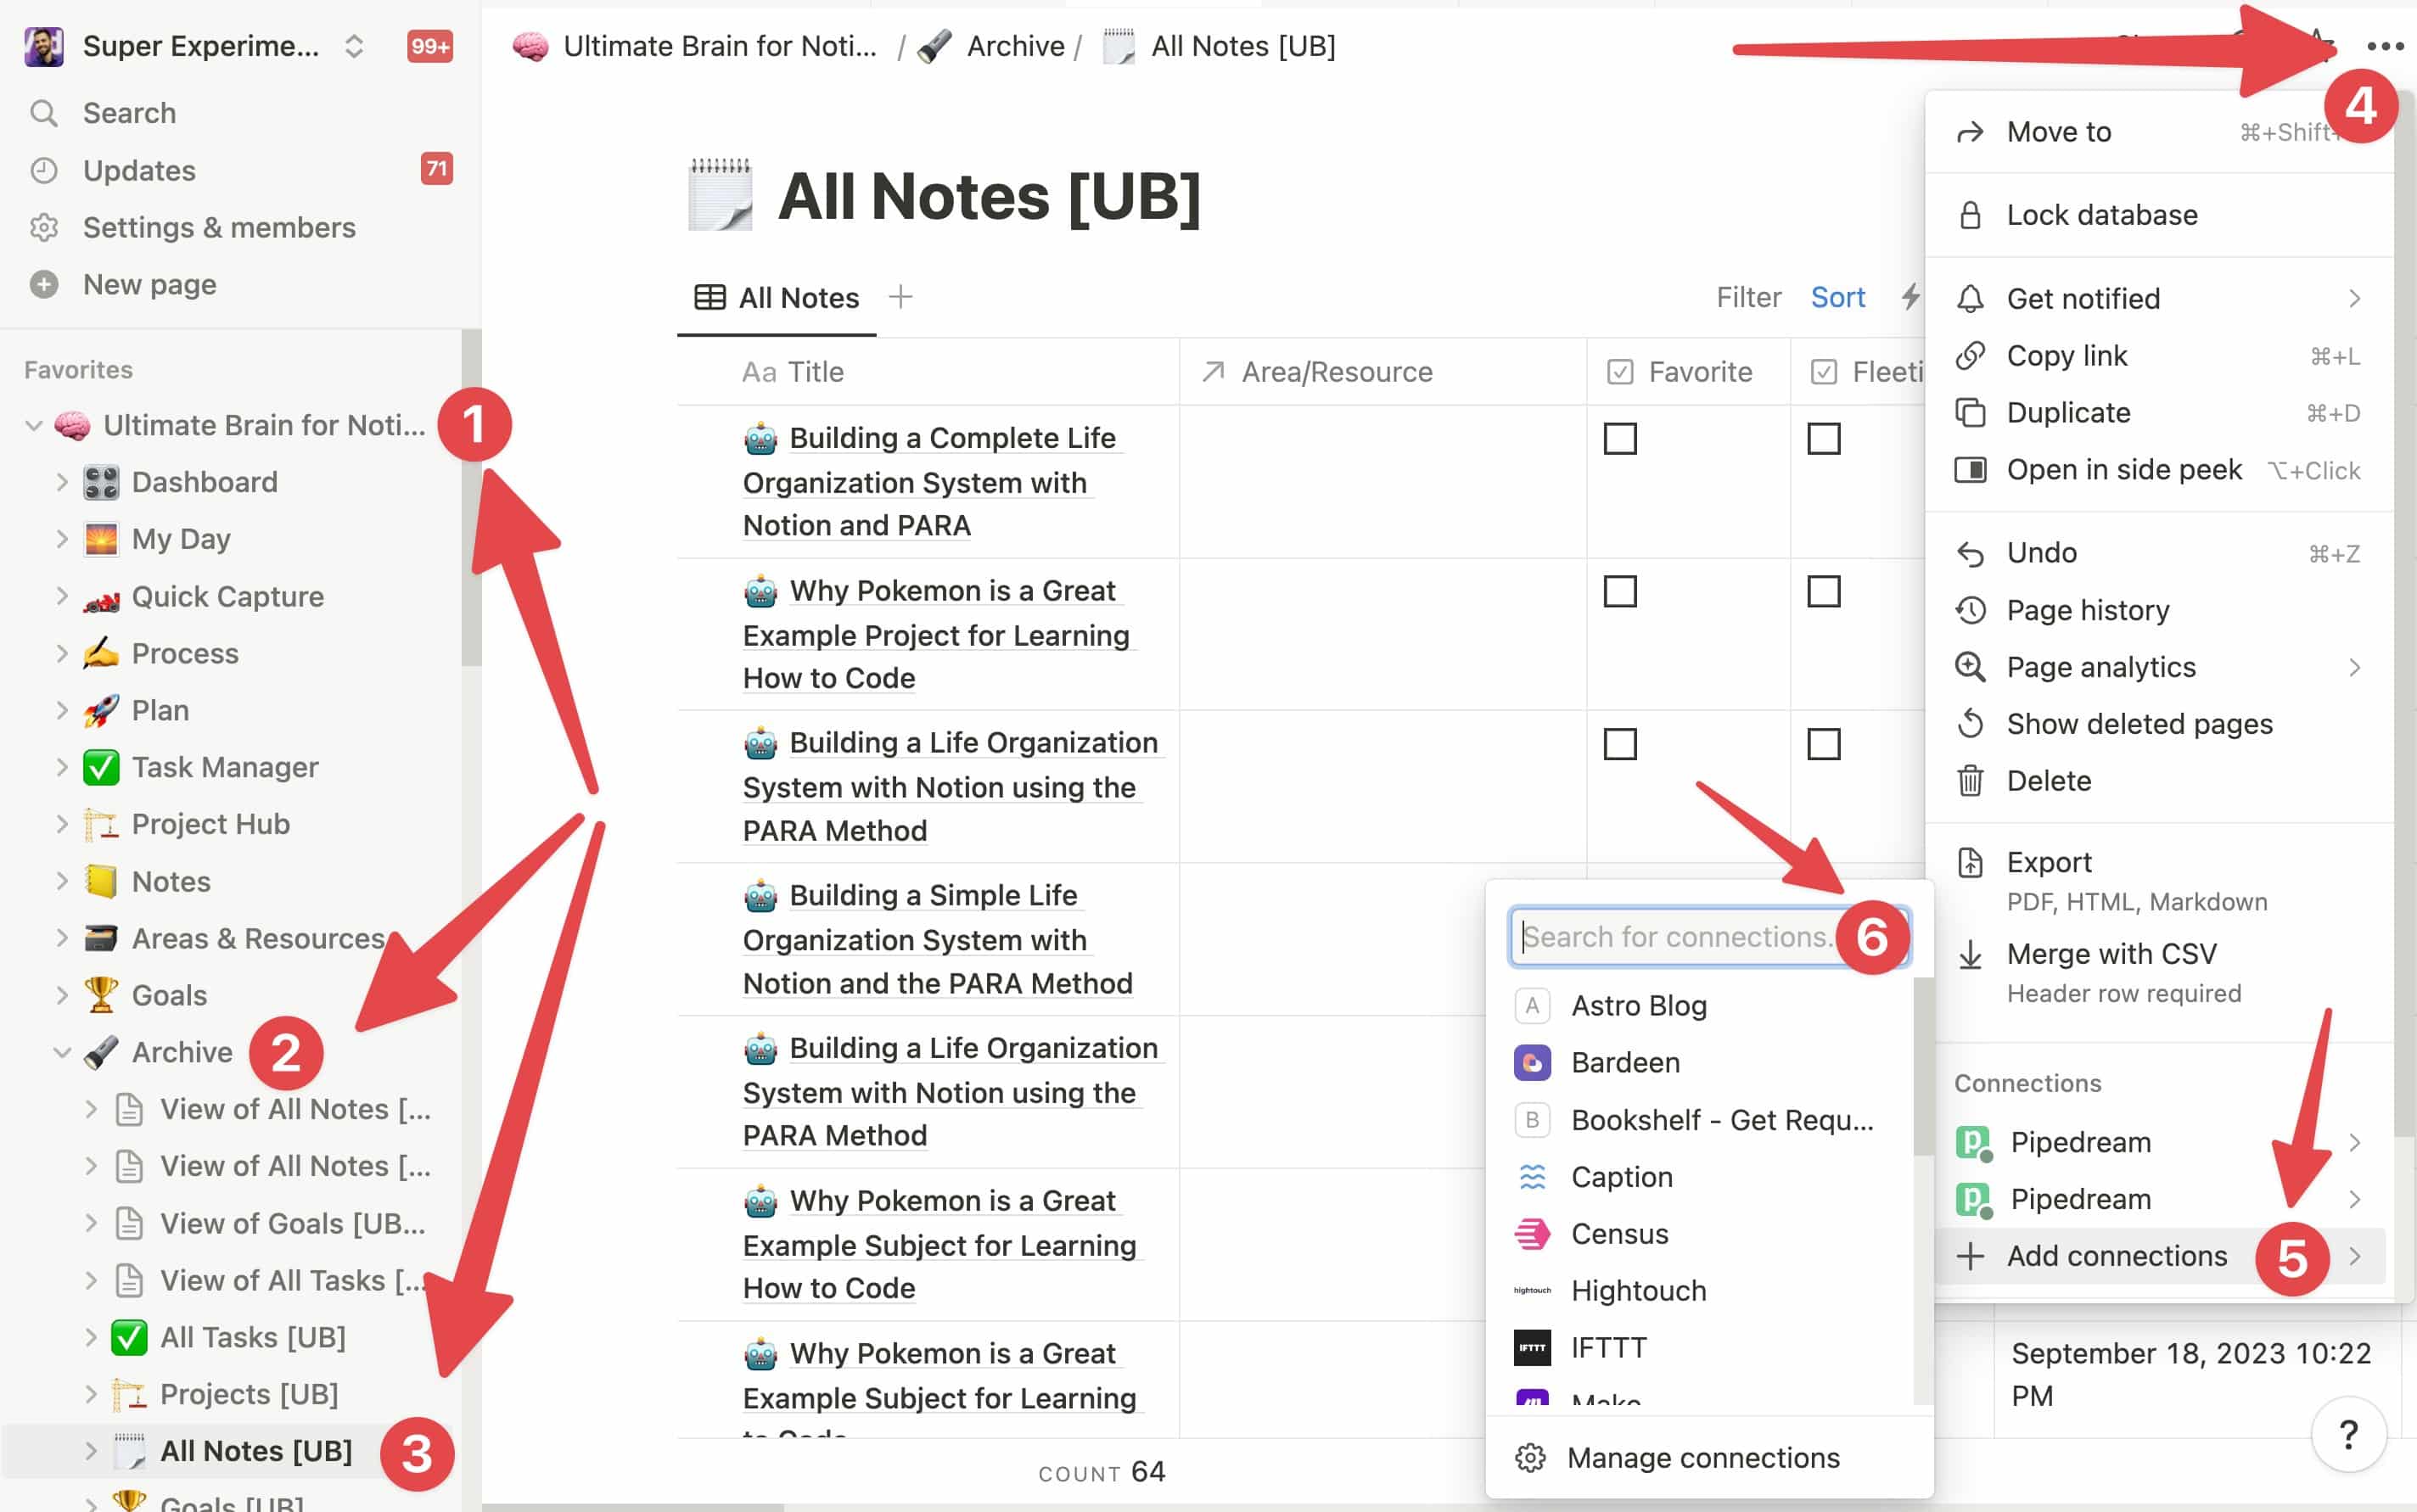
- Navigate to your desired Notion database (go to the actual database, not a page that contains it or a linked view of it)
- Click the ••• menu in the top-right corner.
- Under Add Connections, find and add Pipedream.
If you’re using Ultimate Brain, this screenshot shows the location of the All Notes database: Ultimate Brain → Archive → All Notes [UB].
Once that’s done, head back to
If you’re working with a different database, here’s a trick for making sure you actually navigate to the database itself.
Open any page within that database (e.g. an existing note), then make sure it’s open as a full page (not Side Peek or center modal).
In the breadcrumbs, you’ll see a link to the database directly to the left of the current page’s title. Click that, and you’ll find yourself at the database.

If your workflow runs too long, it may hit a timeout error and fail. By default,
If you’re on the free plan, you can increase this to 300 seconds (5 minutes), which is my recommendation. If you’re on a paid plan, you can increase it as high as 750 seconds (12.5 minutes)
Workflow runs will only consume more credits if they actually take longer, so simply increasing your timeout setting won’t automatically make workflows cost more credits. But it can prevent longer files from failing due to timeouts.
One of the biggest causes of increased workflow time is slow responses from the Notion API. The API doesn’t always respond at the same speed, so it’s good to have a higher timeout setting to compensate.
If you try to upload an audio file that’s too big or too long, you may get an Out of Memory error. I’ve found that I sometimes hit this when uploading files larger than 200mb when my workflow is set to the default 256mb Memory setting.
Pipedream runs on AWS Lambda, which ties workflow memory to CPU power. When you increase the Memory setting, you get more CPU power as well.
This can be helpful for handling very large audio files. The workflow is already extremely memory-efficient, but if you haven’t disabled chunking, ffmpeg needs to split the file into chunks, and bigger files take more CPU power for ffmpeg to handle.
If you get an Out of Memory error, try the following:
- Compress your audio file before you upload it. I had to bump my workflow memory up to 1024mb (1gb) to handle an 8-hour recording of The Iliad at its normal 283mb.
- But by running the command
ffmpeg -i iliad.mp3 -vn -c:a libmp3lame -ar 16000 -b:a 32k iliad_compressed.mp3in my local computer’s terminal (withffmpeginstalled already), I compressed it down to 106mb. - My workflow was able to handle that 106mb compressed version just fine, even though it’s the same length. This is how I discovered that
Pipedream workflows need additional CPU power for larger files.
- But by running the command
- You can also simply increase your workflow’s Memory setting. Keep in mind that this will increase the number of credits you use per workflow run.
- I’ve noticed that even some smaller files will cause Out of Memory errors on the 256mb setting, so you may need to bump it up.
- Alternatively, can try using a transcription service like Deepgram or AssemblyAI. These services don’t have free tiers, but they can handle much larger uploads. This can allow you to disable chunking, which is the main reason workflow runs will hit Out of Memory.
Even if you have the Keep File option set to true in Transcribe_and_Summarize, /tmp directory before the Send_to_Notion step can access it and upload it to Notion. This typically happens on longer workflow runs, processing longer audio files.
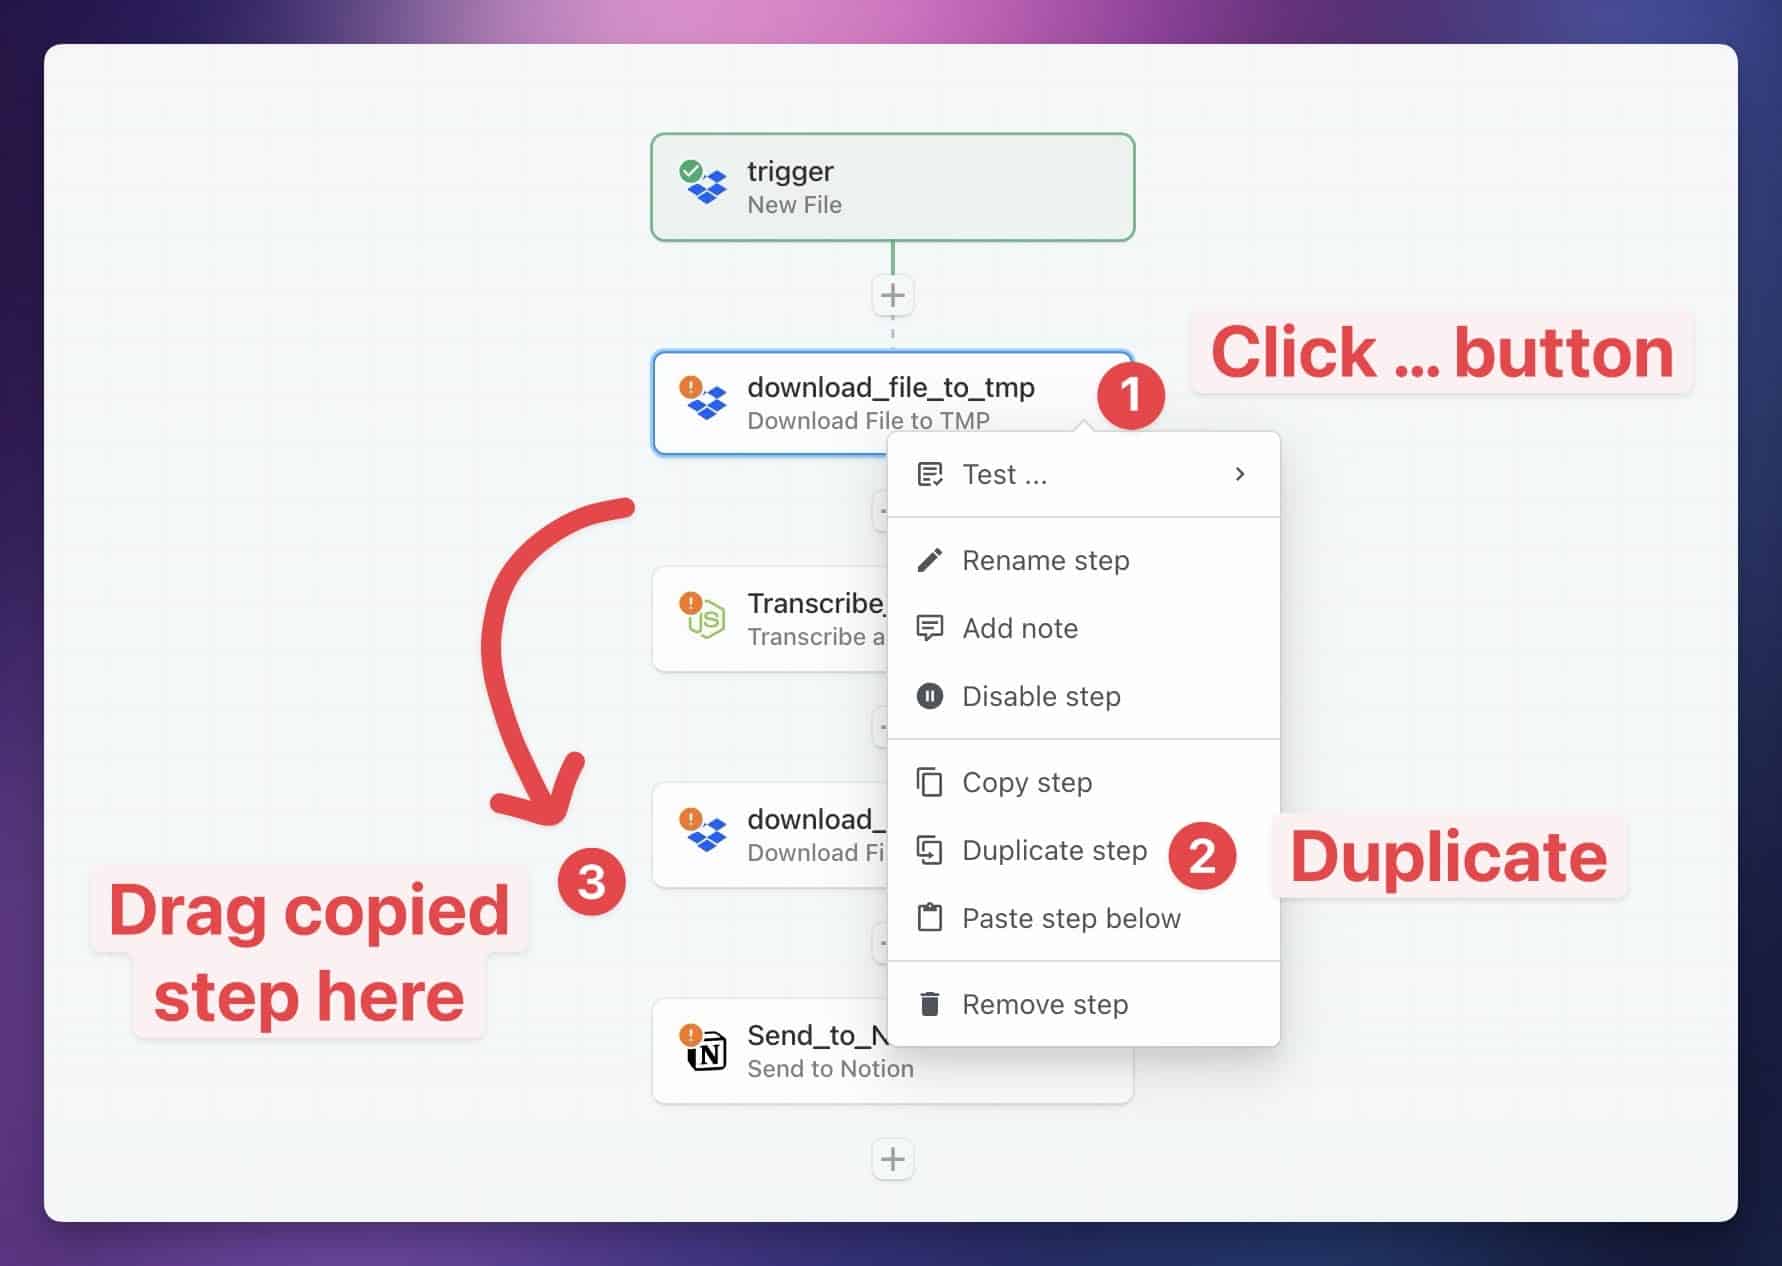
If you’re running into this issue, I recommend duplicating your file-download step, then dragging the duplicate directly before the Send_to_Notion step. You shouldn’t need to make any changes to the settings of this duplicated download step.
Working with Non-English Languages
If you want to use this workflow with a language besides English, you’re in luck! I’ve built several translation features directly into the Transcribe_Summarize step.
Both the transcription services and AI services can work in other languages – though the all will have varying degrees of usefulness depending on what language you pick. More commonly-spoken languages will be better represented in the training data of each AI model.
In this section, I’ll cover the languages you can work with, and show you how to tweak your workflow in order to use a specific language.
Here’s the short version of how to do it.

First, note that you’ll need to set Enable Advanced Options to True to access any of these settings. You’ll also need to set an AI Service if you want to translate the transcript.
If you’re having issues with your speech-to-text model automatically translating non-English audio to English, try the following:
- Use the Transcript Prompt property to write a prompt to guide the model. It should be in the same language as the audio. Example: “Transcribe the audio into its native language” (but translated to your language, of course).
- Set the Transcription Language.
You can also have the entire transcript translated to another language. For example, you could upload a Japanse-language audio file, get an original Japanese transcript, and then translate that to Spanish.
To do so, choose a Translation Language. This requires setting up an AI Service; you won’t see this option if you set AI Service to “None”.
Copy link to headingFAQ
In this section, I answer some frequently asked questions about this workflow.
I originally released this tutorial in April 2023 with this video:

The version of the workflow shown in this older video had way lower capabilities, less customization, was more error-prone, and required tons of manual setup.
Therefore, I highly recommend using the new versions I’ve shared above. They take care of nearly everything for you.
If you want to access to old tutorial, however, you can find an archived version here.
You might be wondering if you can build a similar workflow on another automation platform, such as:
The answer is yes! However, none of these platforms will allow you to make it anywhere near as capable.
Pipedream’s superpower is that it offers developers much more low-level control over the workflows we build. A huge part of that is support for nearly any NPM (Node Package Manager) package, which allows you to bring in powerful libraries and packages that can enhance your own code.
It’s due to NPM support, along with the ability to write complex, multi-file code steps, that I’ve been able to optimize this workflow and add so many features. NPM support also means I can use my own notion-helper JavaScript library, which is the only tool I know of that automatically handles all of the Notion API’s many limitations for you. Without it, handling long transcripts is quite difficult.
I’ve also been able to write code to give you options that would normally require paid “if/then” routing features in most no-code apps. In truth, Notion Voice Notes is closer to a custom app than a no-code workflow.
That being said, you can build a slower, more barebones version on other platforms that may still meet your needs. The overall design of the workflow is simple:
- Trigger when a new file hits a specific folder in your cloud storage app
- Download that file
- Upload it to a speech-to-text service
- Upload the response to an AI service for summarization
- Combine the transcript and summary, then send them to Notion
I use
If you have an idea for a feature or improvement, open a Github issue about it so we can discuss it!
I’ve done my best to add as many commonly-requested features as possible in the latest build, and I’ve also architected the latest build in a way that makes it easy to add new features.
That said, Notion Voice Notes is a passion project for me, and I can only work on it when I have free time and the desire to do so. I may not always be able to accommodate feature requests in a timely manner, or at all.
However, all of the code that powers my
If you make modifications, you can publish them as your own custom
- Follow the Action Development quickstart guide
- Install the Pipedream CLI and publish your actions with it (these actions span multiple files, so the CLI is required to publish them. You can’t use the in-app editor for them)
Wrap-Up and More Resources
Congrats! You’ve now got a totally hands-off automation that will turn your voice notes into well-formatted Notion pages containing a summary, transcript, and useful lists.
If you’re curious, I built this automation using the Notion API and a lot of JavaScript. Building it has been an intensely rewarding learning experience.
If you want to learn the Notion API as well so you can realize your own ideas, start with my Notion API Beginner’s Guide:
This is a truly comprehensive introduction to coding with the API, and even features a 2-hour video tutorial. And it’s 100% free.
You can also find other no-code tutorials at my Notion Automations hub:
You might find these guides helpful as well:
I’d also recommend checking out the Pipedream docs if you want to work more with the platform.
Copy link to headingSupport My Work
This workflow and tutorial took well over 250 hours to research, test, debug, and write. I’ve been working on it continually for over 2 years.
If you’d like to support my work, the best way is to share it. So if you enjoyed this tutorial, please share it on Twitter, LinkedIn, or with a friend 🙂
I’ll also note that this automation works extremely well with Ultimate Brain, my all-in-one productivity template for Notion.
If you want a complete, done-for-you second brain in Notion, give it a shot:
Want to turn Notion into a complete productivity system? Ultimate Brain includes all the features from Ultimate Tasks - and combines them with notes, goals, and advanced project management features.
Get $50 off with code SPRING50!
Finally, if you want to get notified when I release new tutorials (like this one) and templates, join my free Notion Tips newsletter:
The Notion Tips Newsletter
Join 50,000+ folks and enjoy your morning coffee alongside my latest Notion guides and templates, delivered hot(?) and steaming(?) to your inbox.