
Many productivity apps are designed for a single user, but Notion is inherently about collaboration. While you can keep things private, anything and everything in Notion can also be shared – with people on your team, guests, or even the entire internet.
In this Notion Fundamentals lesson, I’ll give you a crash course on Notion’s sharing and permissions tools. We’ll cover:
- Page permissions
- User roles – Workspace owners, Members, Guests, etc.
- Teamspaces
- Groups
- How to share (or stop sharing) pages
- Publishing pages to the web
- Connections and integrations
- Quirks and limitations around permissions
In the video version above, you’ll get to see many of these tools in action as I set up an example workspace meant for a team that both works with external collaborators and has a public homepage for a fictitious event.
The article below serves as more of a reference guide, explaining all of these settings and how you can use them to create a perfect permissions structure for your workspace.
Copy link to headingHow to Share a Page in Notion
Let’s start out very simply.
If you want to share a page with another person in Notion, you can click the Share button in the top-right corner of the page. This brings up the Share menu.

If the page is currently in the Private section of your sidebar, you’ll see only a few options. In the text field, you can start typing to invite another person to access the page.
You can also change page’s default availability:
- Invite only – the default for Private pages. Others must be invited directly using the text field above.
- Anyone with link – anyone who has the link can access the page.
- Everyone at your workspace – all members will be able to access the page, and search for it.
Note that changing this setting won’t move the page out of your Private section in the sidebar; it’ll just make it available via sharing the link directly (e.g. in Slack), through page links, and via Search if you choose the “Everyone” option.
You’ll also notice a Publish tab; you can use this to publish the page directly to the web.
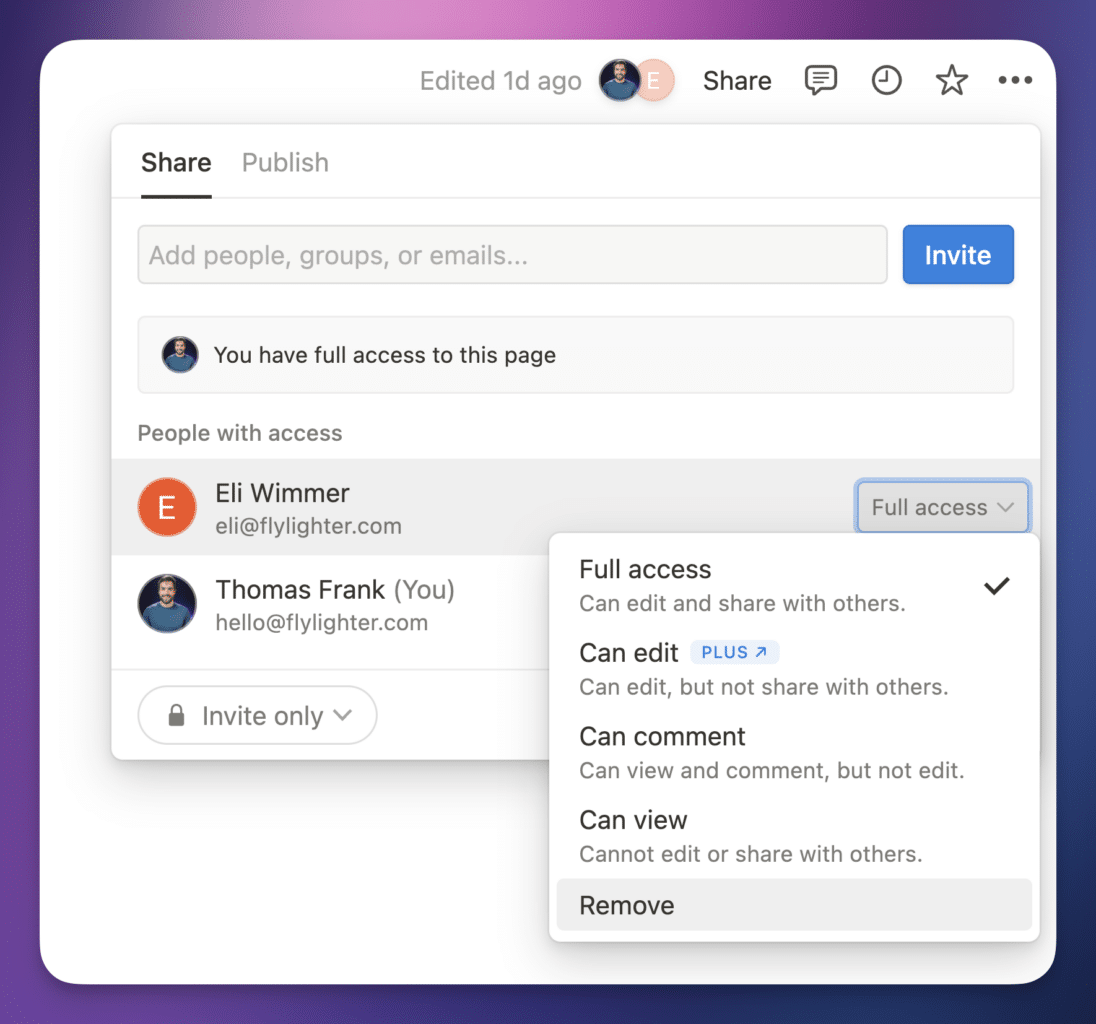
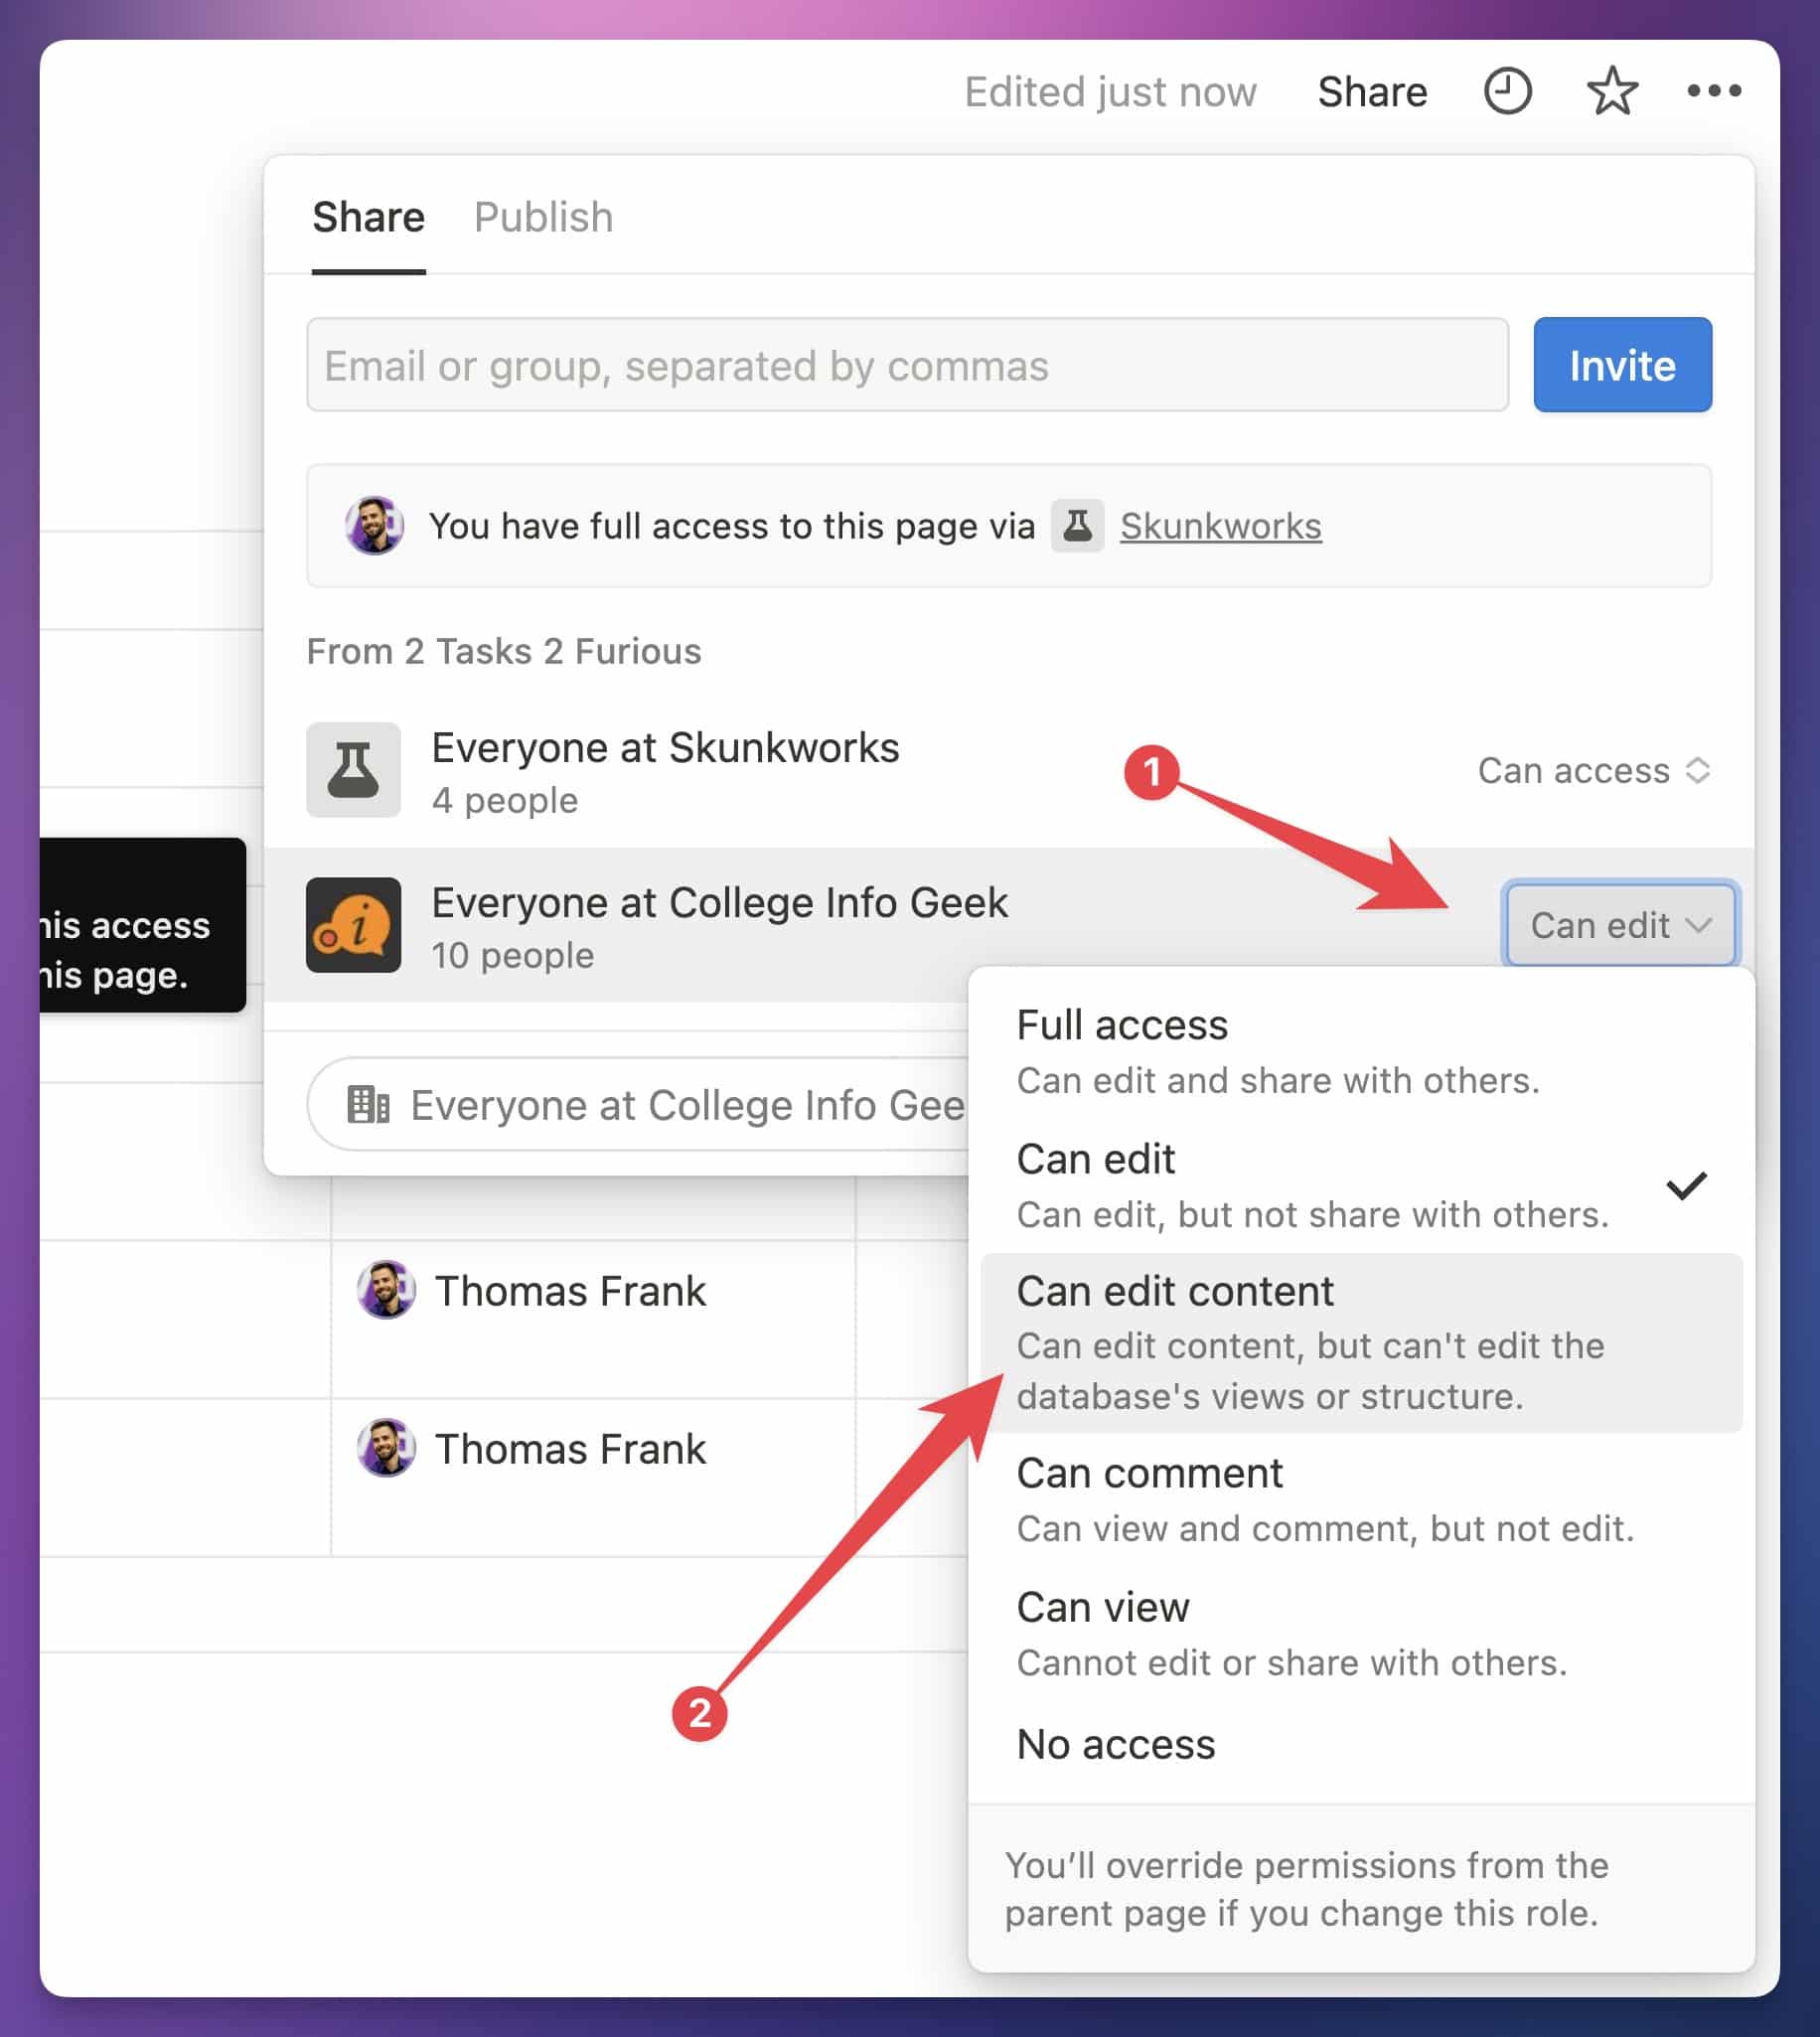
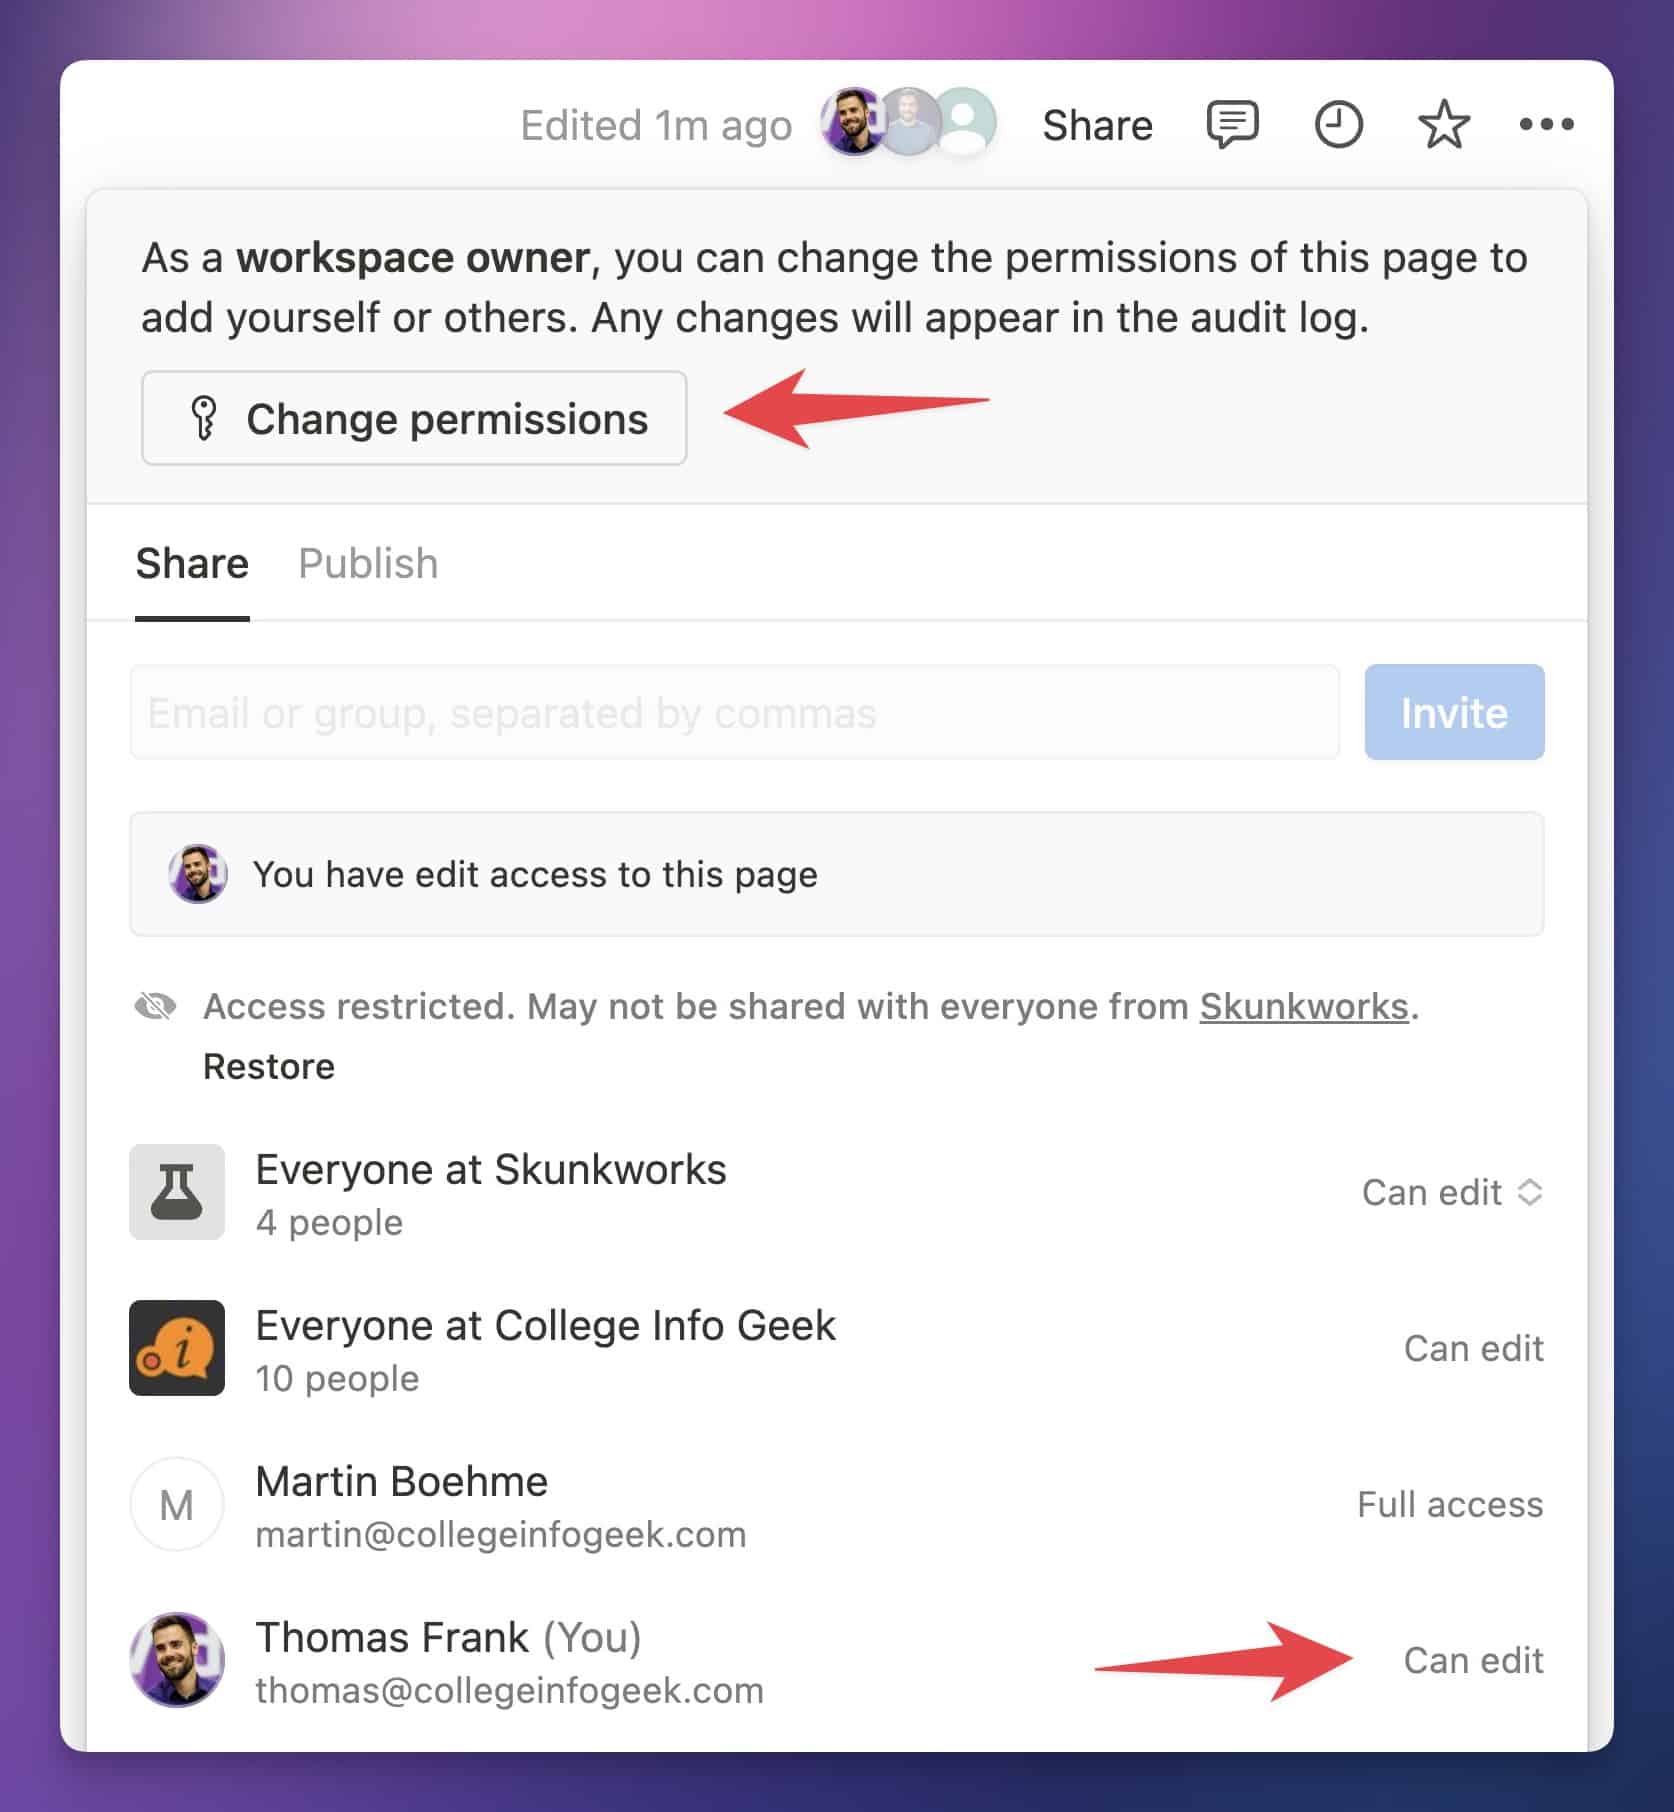
If you add a person to the page, they’ll be added to the People with Access list. At this point, you’ll see the permission level for each person who has access to the page.
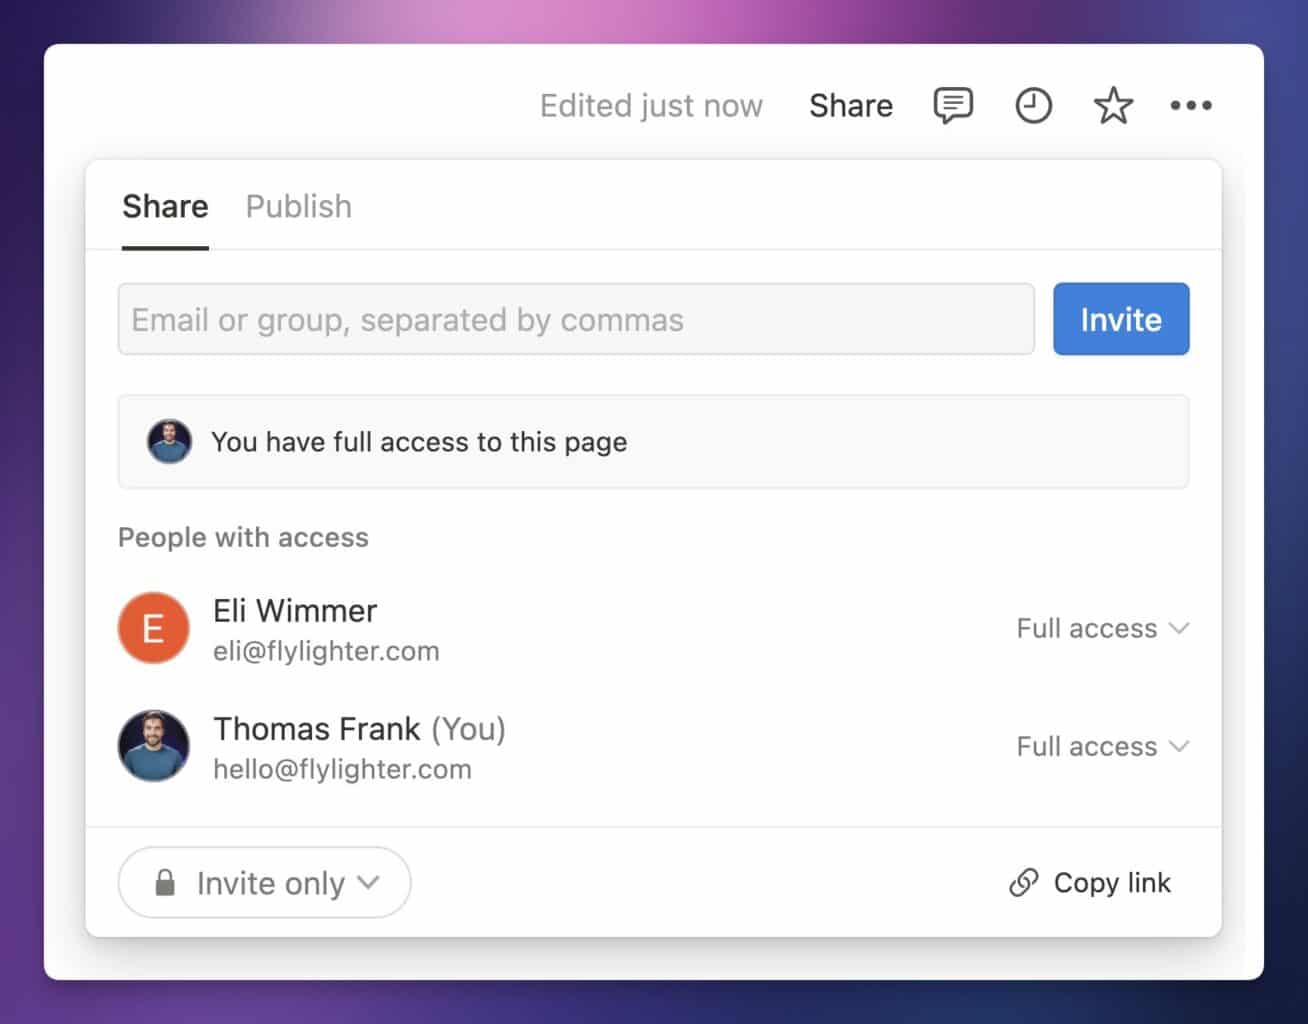
As you can see, both Eli and I have Full Access to this page, meaning we can edit its content and share it with others. We’ll cover the other access levels – Can Edit, Can Comment, and Can View – in the next section.
Once at least two people are listed in this People with Access section, the page will also move to the Shared section of your sidebar.
If the page you’re sharing is in a Teamspace, you’ll also see a list of rules that apply to user roles.
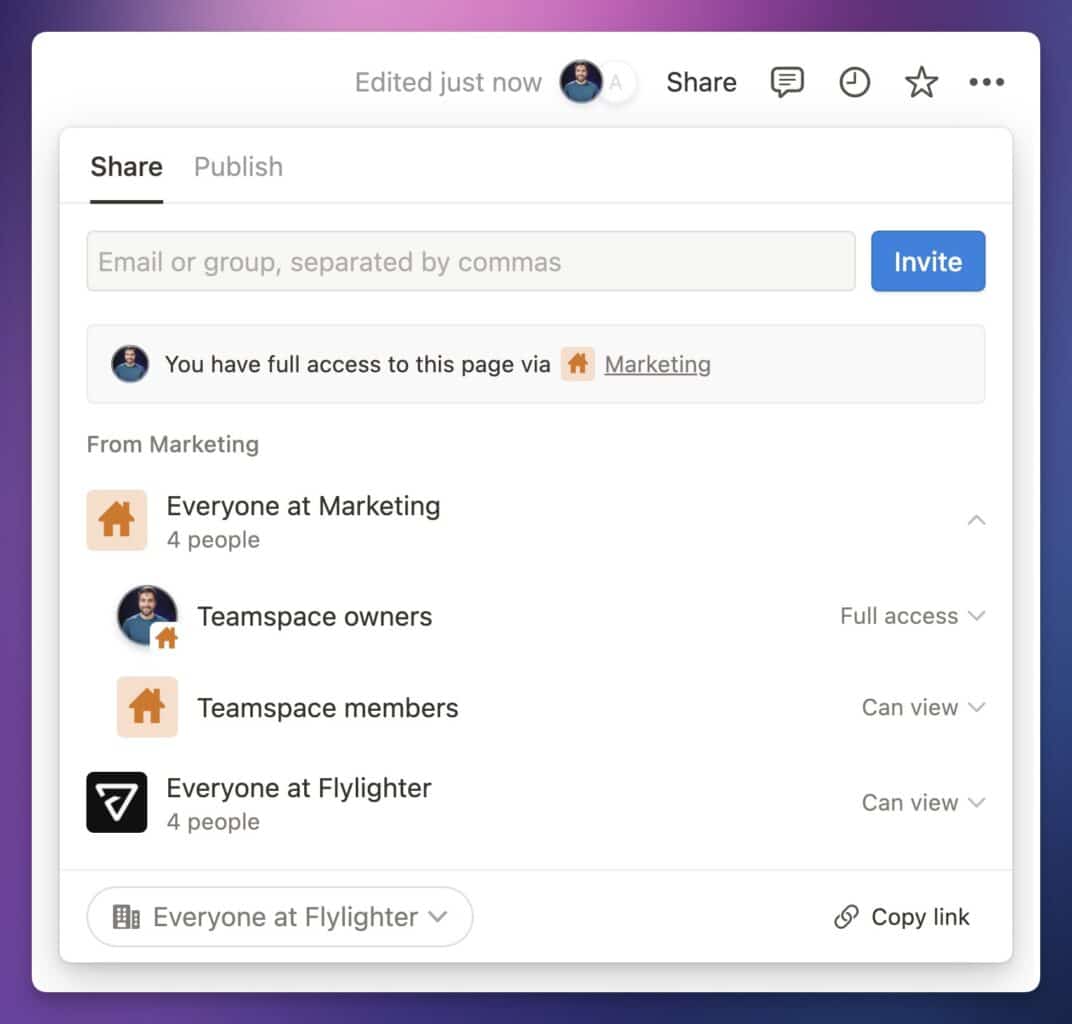
We’ll cover these roles in more detail later, but something to note right now is that I (Thomas) have access to this page through multiple roles.
I’m a Member of the Flylighter workspace, so I have Can View access through that rule. I’m also a Teamspace Member of the Marketing Teamspace, so I have Can View access from that rule.
Finally, I’m a Teamspace Owner of the Marketing Teamspace, so I have Full Access through that rule.
In Notion, the highest permission rule wins. When a person has access to a page through multiple rules, their level of access is defined by the rule that gives them the greatest amount of permissions (to be clear, “highest” doesn’t mean the highest position in the list).
In the screenshot, you can see this spelled out: “You have full access to this page via Marketing“.
Copy link to headingAllow Teammates to Join Your Workspace
In addition to sharing individual pages with other people, you can also allow people to join your entire workspace. There are four main ways to do this:
- Invite new Members from Settings and Members → People
- Import members from Slack
- Create an Invite Link, which will anyone with that link to join as a Member
- Allow automatic joining when someone signs up to Notion with an allowed email domain
Here’s a rundown on each of these methods.
To invite new Members manually, head to Settings and Members → People. From there, you can click Add Members to invite people via their email address.
If you have Guests in your workspace, you’ll see them while typing and will have the option to convert them to full Members as well.
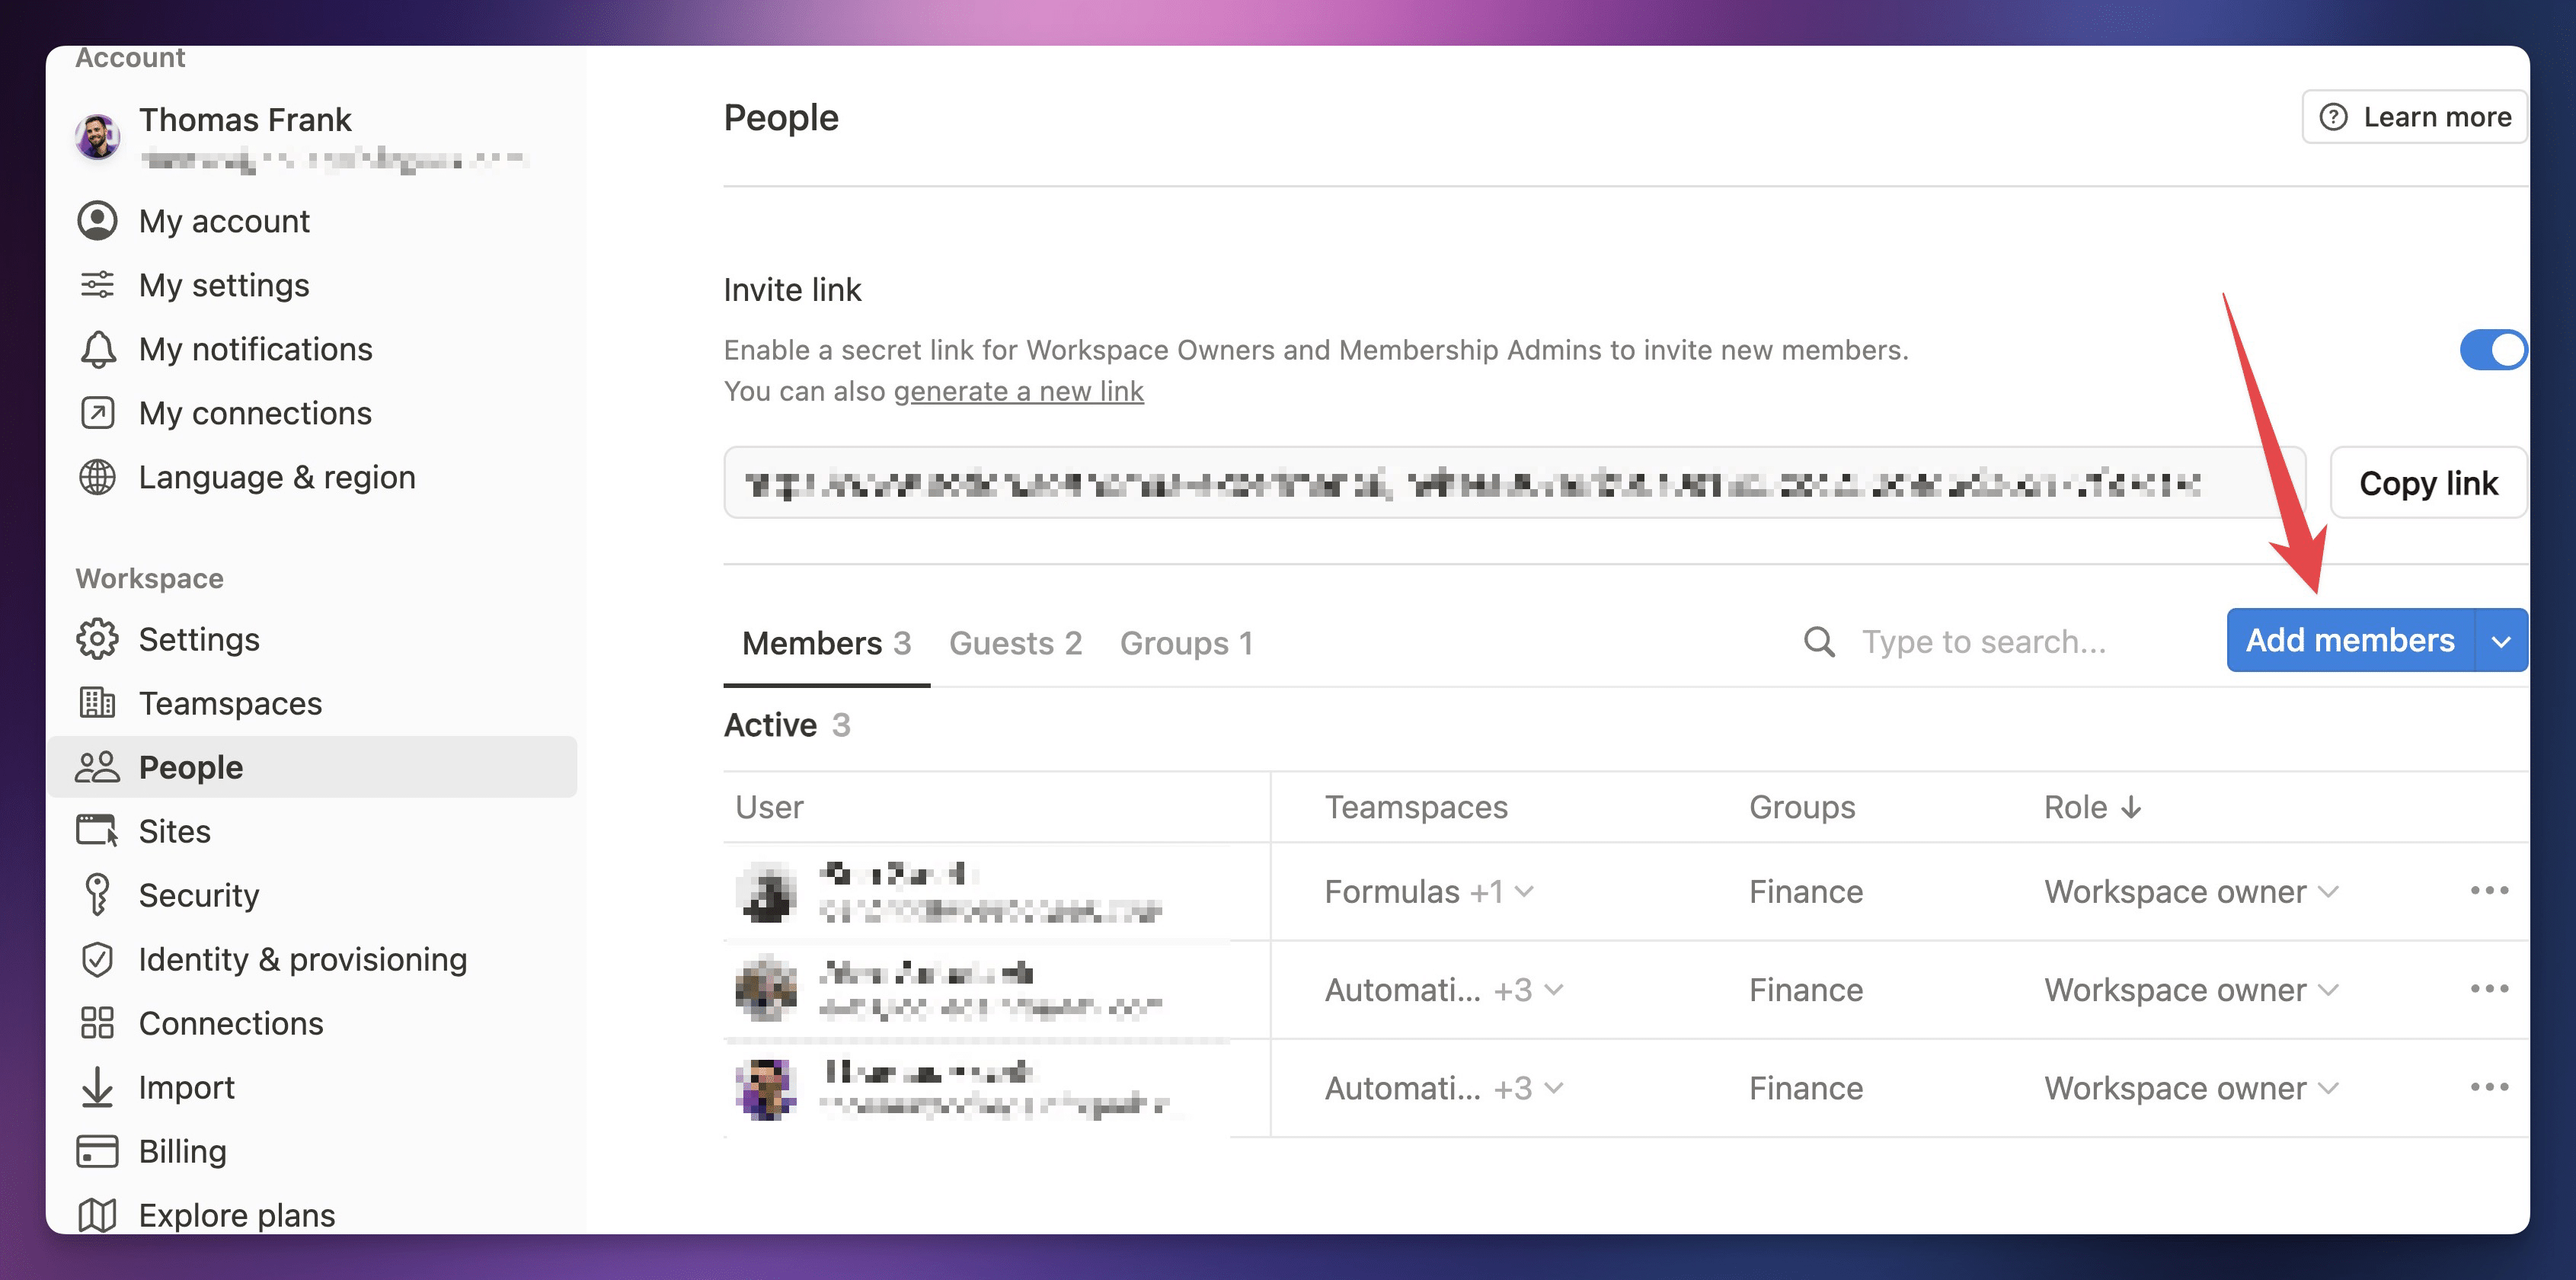
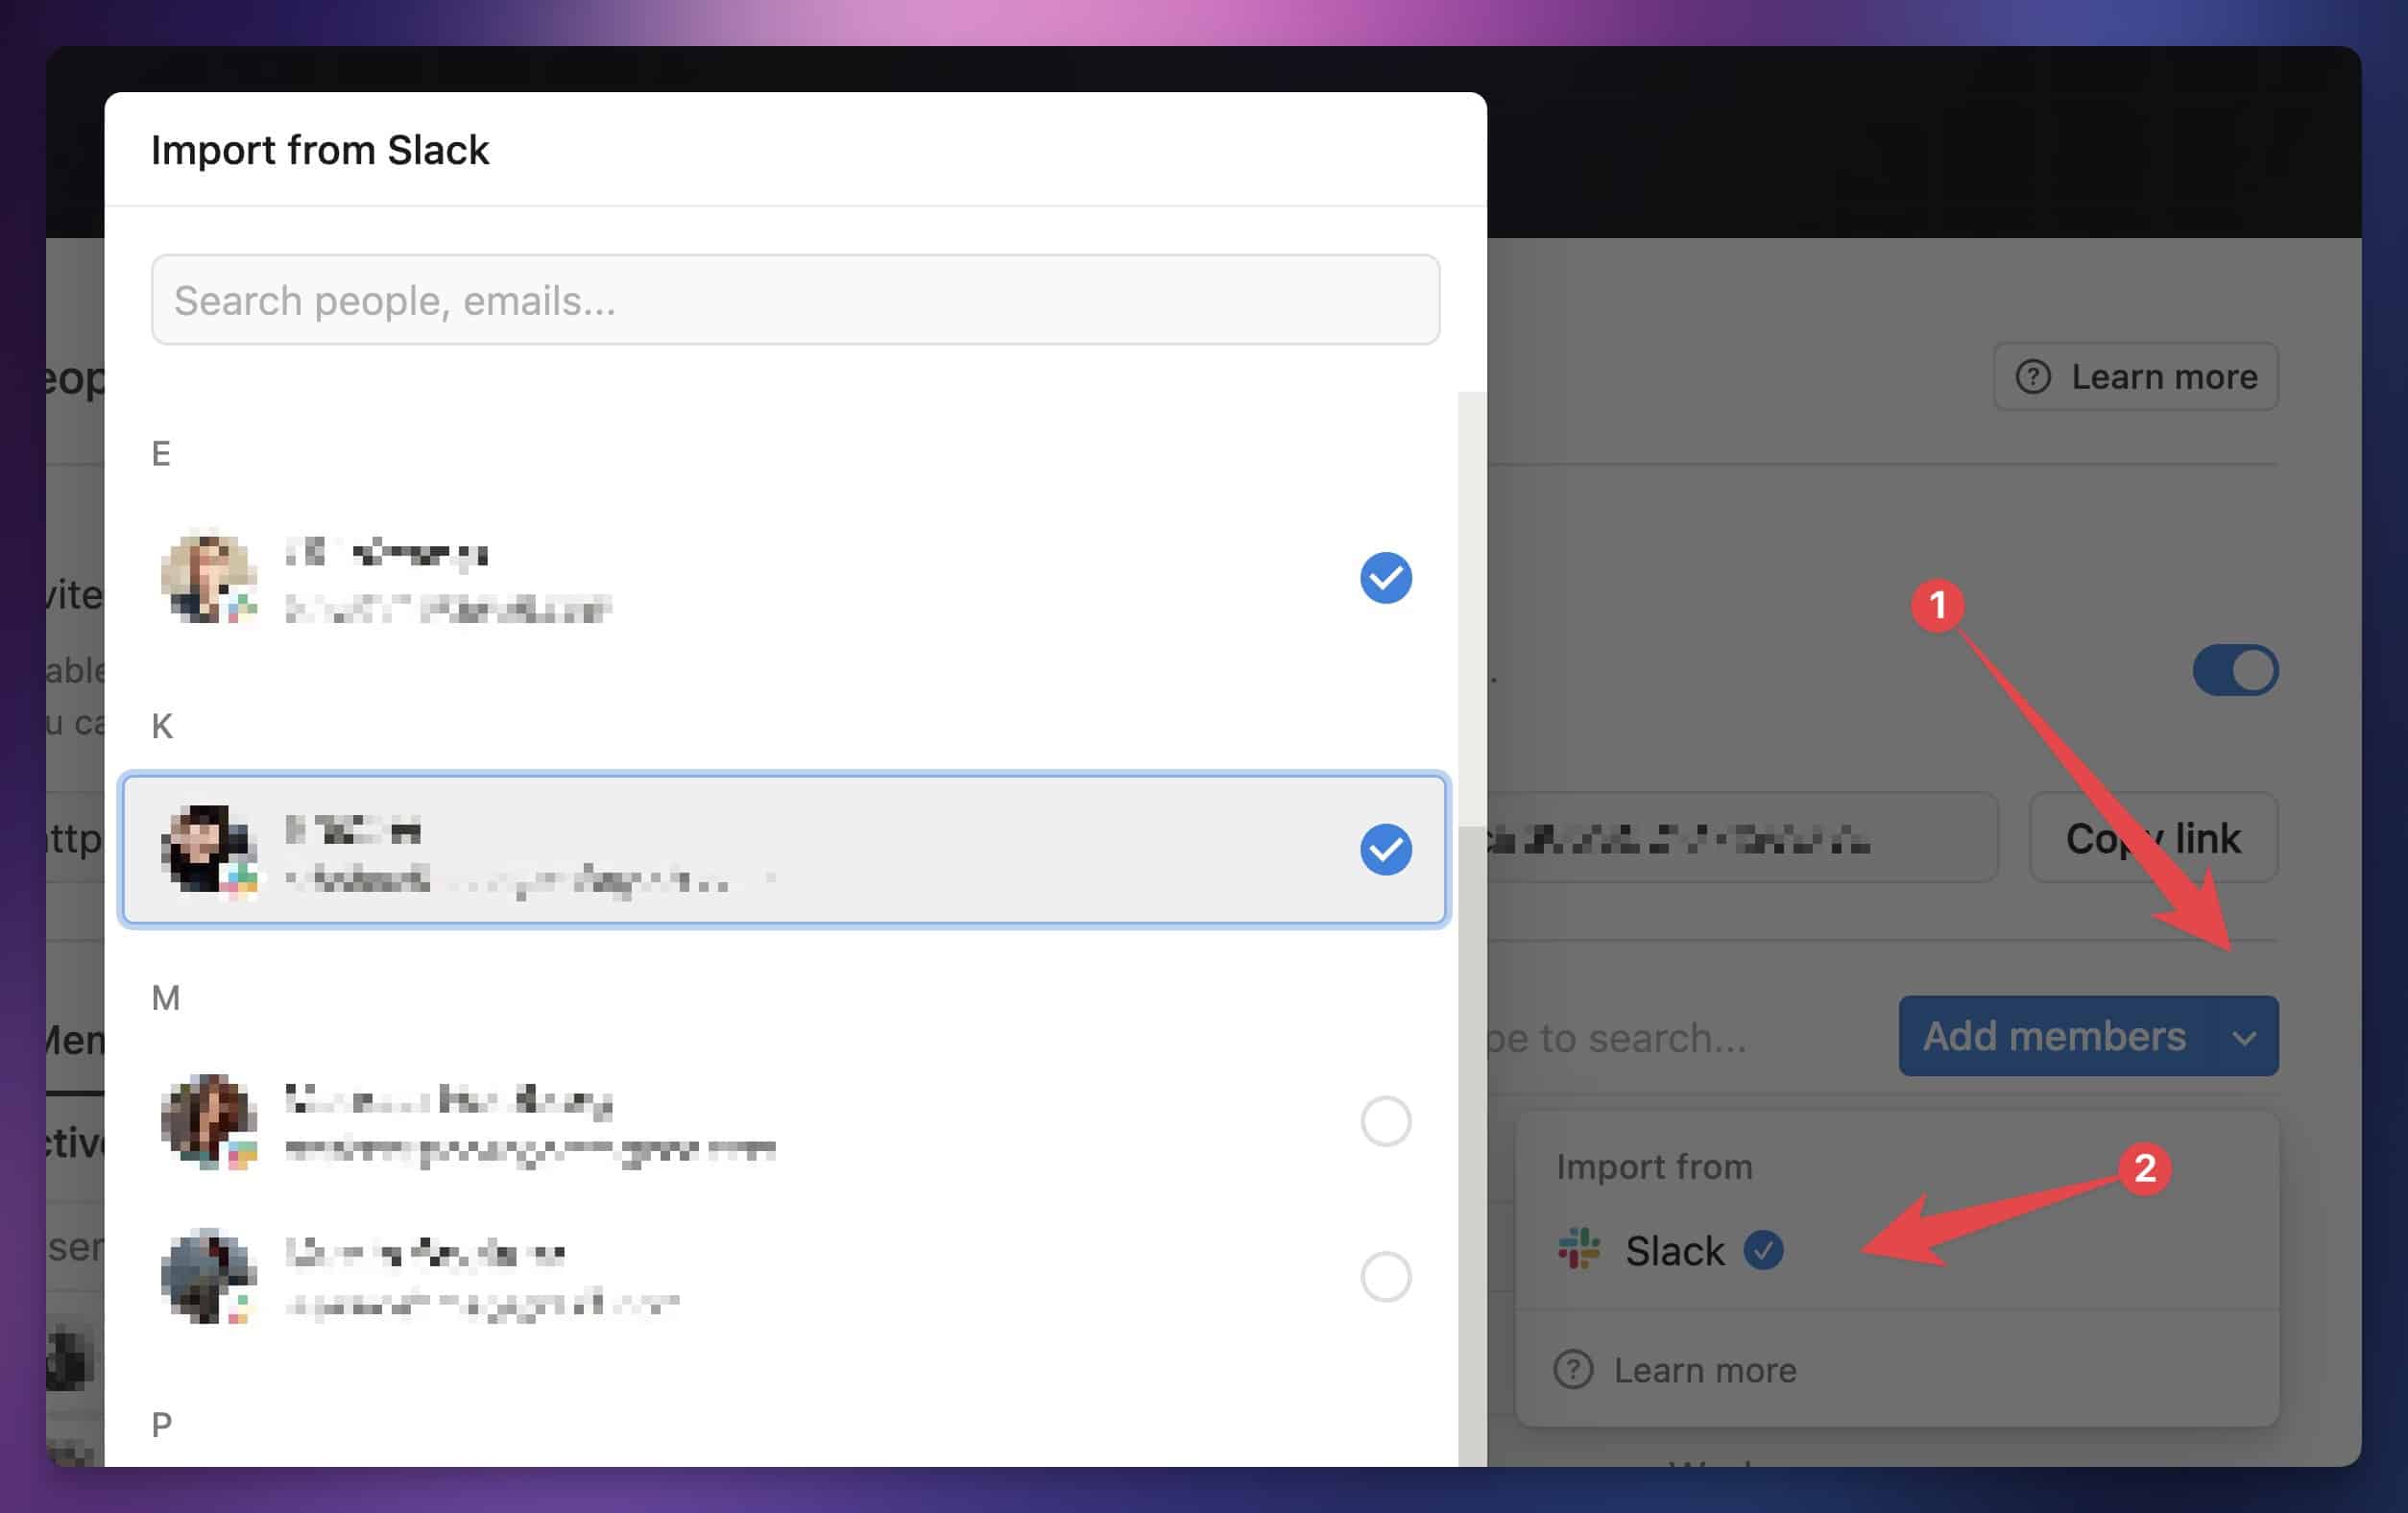
If you click the blue arrow next to Add Members, you’ll see the option to import members from Slack. The first time you click this, you’ll need to authenticate Slack with Notion.
Afterward, you’ll can click the same button one more time to bring up a list of everyone in your Slack workspace. Here, you can select specific people to add to your Notion workspace.
In your Slack workspace, you’ll also see Notion pop up in the Apps section, and you’ll be given a unique invite link you can share to let people in Slack join on their own.
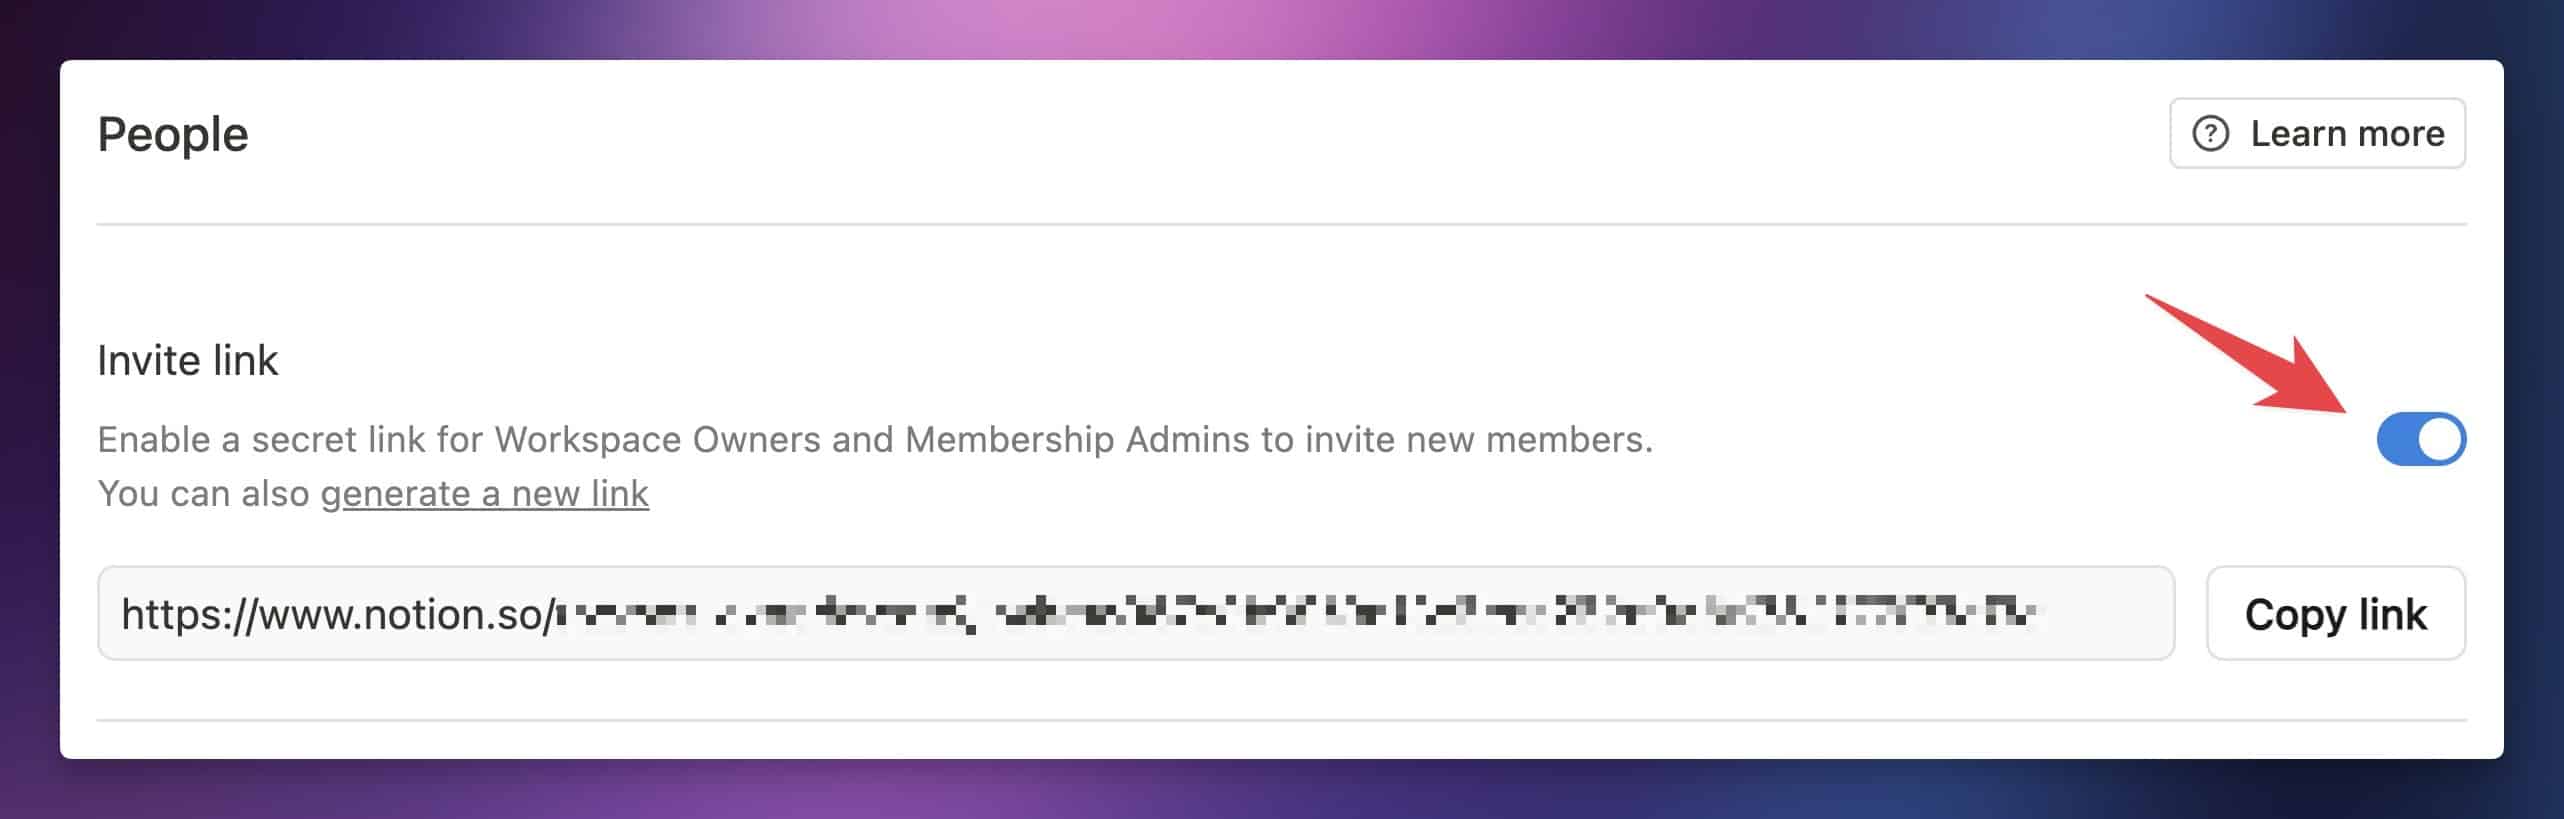
In this same People section, you’ll see an option to enable/disable an Invite link. If enabled, anyone with this link will be able to join your workspace as a Member.
If you’d like to keep this feature enabled, but disable a previously-shared link, click the Generate New Link option.
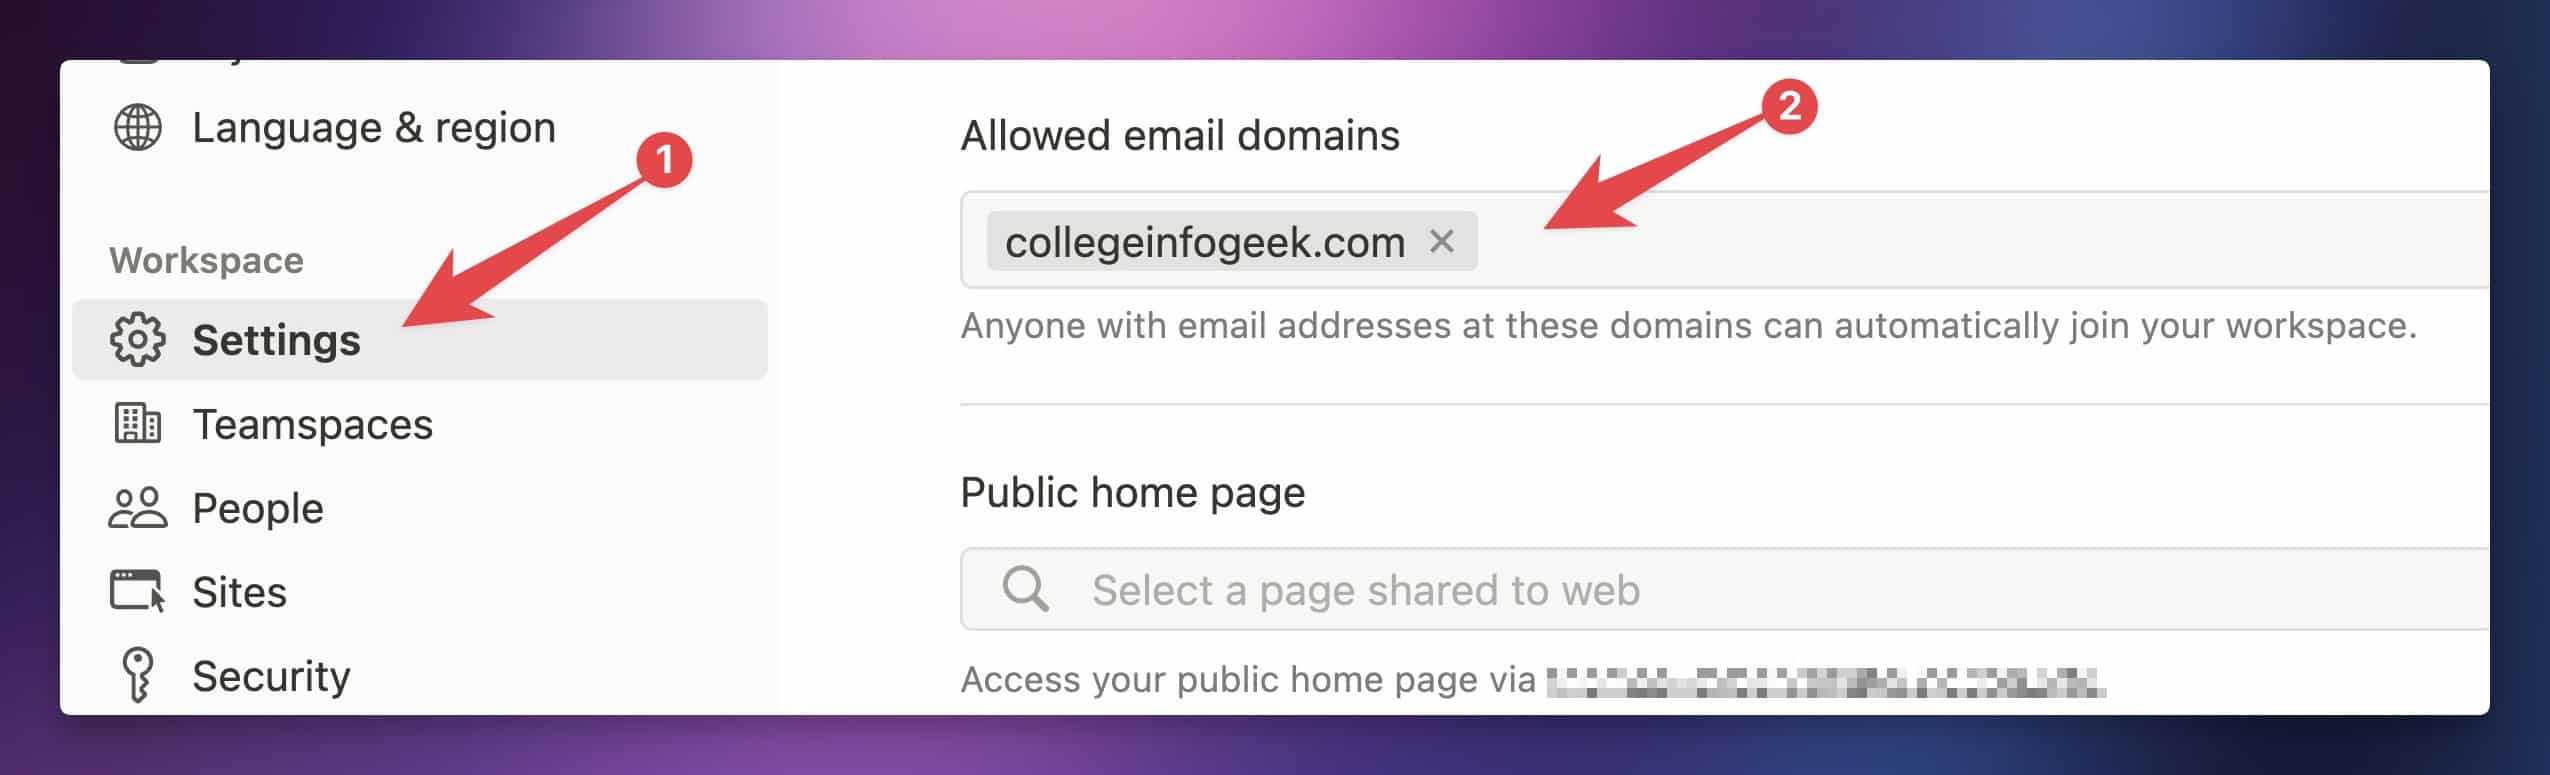
Finally, if you head to Settings & Members → Settings, you’ll see an option for Allowed Email Domains.
If you enter a domain here, anyone who signs up to Notion with an email address with that domain will have the option to automatically join your workspace. You can only add domains that are already used by a current Member in the workspace.
Since I’m running a small team, I tend to keep my Invite Link disabled. I typically add new Members manually as part of my new-hire onboarding process.
If you’re running a larger team, you might find it more convenient to lean on the Allowed Email Domain and Invite Link features. Just keep in mind that if you’re on a paid Notion plan, adding new Members will immediately affect your bill!
If you just need to share a specific set of pages with someone (e.g. a contractor), adding them as a Guest might make more sense. See the section on User Roles later on in this guide for more advice on what roles to give people.
Copy link to headingPermission Levels
In Notion, there are six permission levels that you choose from when sharing access to a page or database. Here they are, from most to least permissive:
| Level | Permissions |
|---|---|
| Full Access | User can edit the page, share it with others, remove/modify access of other users, and delete the page (under certain conditions) |
| Can Edit (paid plans only) | User can edit the page, and can delete it (under certain conditions). They can’t modify permissions or share it with new people. |
| Can Edit Content (paid plans only) | Only applies to databases. User can create new pages in the database and set/remove property values. User cannot add/remove/edit properties or property values, change view settings, or create new views. |
| Can Comment | User can comment on the page and on its content. |
| Can View | User can view the page. |
| No Access | User has no access to the page. |
You’ll need to have Full Access to a page in order to change these settings for other users. Also good to keep in mind:
- At least one person must have Full Access to a page. You can remove your own access, but only if someone else has Full Access.
- Anyone with Full Access can change your access, up to and including removing you from a page. Notably, a Guest with Full Access can remove all Members (and even Workspace Owners) from a page!
Permission Level Capabilities
Here’s a more detailed table breaking down the capabilities granted to users at each permission level. The capabilities in this list deal specifically with actions a user can take on a page or database, since that’s where these permission levels are granted.
I’ve left No Access out of the table, since a user with No Access cannot do anything – with the one exception of submitting a Form connected to a database they can’t access (guests can only do this if the Form is public).
For Can Edit Content, note that this setting is applied at the database level, but it grants Can Edit to pages in the database. I’ve only made the distinction here so the differences between Can Edit and Can Edit Content at the database level are clear.
| Capability | Full Access | Can Edit | Can Edit Content | Can Comment | Can View |
|---|---|---|---|---|---|
| Access page | ✅ | ✅ | ✅ | ✅ | ✅ |
| Make page available offline* | ✅ | ✅ | ✅ | ✅ | ✅ |
| Export page* | ✅ | ✅ | ✅ | ✅ | ✅ |
| Change notification settings (for yourself) | ✅ | ✅ | ✅ | ✅ | ✅ |
| Translate page (in local device) | ✅ | ✅ | ✅ | ✅ | ✅ |
| Favorite page | ✅ | ✅ | ✅ | ✅ | ✅ |
| Click Button blocks* | 🟡 | 🟡 | 🟡 | 🟡 | 🟡 |
| Create comments (page, block, text-level, and in existing threads) | ✅ | ✅ | ✅ | ✅ | ❌ |
| Edit/delete own comments | ✅ | ✅ | ✅ | ✅ | ❌ |
| Suggest edits | ✅ | ✅ | ✅ | ✅ | ❌ |
| Reject own Suggested edits | ✅ | ✅ | ✅ | ✅ | ❌ |
| Add Reactions | ✅ | ✅ | ✅ | ✅ | ❌ |
| Resolve comment threads | ✅ | ✅ | ✅ | ❌ | ❌ |
| Accept/reject all Suggested edits | ✅ | ✅ | ✅ | ❌ | ❌ |
| Add new blocks to page | ✅ | ✅ | ✅ | ❌ | ❌ |
| Edit blocks on page | ✅ | ✅ | ✅ | ❌ | ❌ |
| Configure Button blocks | ✅ | ✅ | ✅ | ❌ | ❌ |
| Delete blocks on page | ✅ | ✅ | ✅ | ❌ | ❌ |
| Duplicate blocks on page | ✅ | ✅ | ✅ | ❌ | ❌ |
| Move blocks into sub-pages* | ✅ | ✅ | ✅ | ❌ | ❌ |
| Edit page property values | ✅ | ✅ | ✅ | ❌ | ❌ |
| Add/edit page cover and icon | ✅ | ✅ | ✅ | ❌ | ❌ |
| Change page display settings (font, font size, width) | ✅ | ✅ | ✅ | ❌ | ❌ |
| Customize non-database pages (backlinks, table of contents, comment visibility) | ✅ | ✅ | ✅ | ❌ | ❌ |
| View page updates | ✅ | ✅ | ✅ | ❌ | ❌ |
| View page analytics | ✅ | ✅ | ✅ | ❌ | ❌ |
| Opt-out of page analytics tracking | ✅ | ✅ | ✅ | ❌ | ❌ |
| View version history and restore versions | ✅ | ✅ | ✅ | ❌ | ❌ |
| Lock page | ✅ | ✅ | ✅ | ❌ | ❌ |
| Create/edit personal database filters & sorts | ✅ | ✅ | ✅ | ❌ | ❌ |
| Copy a Data Source ID | ✅ | ✅ | ✅ | ❌ | ❌ |
| Create/edit linked database views* | ✅ | ✅ | ✅ | ❌ | ❌ |
| Duplicate page/database to Private | ✅ | ✅ | ✅ | ❌ | ❌ |
| View and apply database templates | ✅ | ✅ | ✅ | ❌ | ❌ |
| Move page/database to Trash (aka delete page)* | 🟡 | 🟡 | 🟡 | ❌ | ❌ |
| Click Button properties in databases* | 🟡 | 🟡 | 🟡 | ❌ | ❌ |
| Create, edit, delete source database views | ✅ | ✅ | ❌ | ❌ | ❌ |
| Create, edit, delete data sources | ✅ | ✅ | ❌ | ❌ | ❌ |
| Link existing data sources to database | ✅ | ✅ | ❌ | ❌ | ❌ |
| Create, edit, delete properties | ✅ | ✅ | ❌ | ❌ | ❌ |
| Lock/unlock database | ✅ | ✅ | ❌ | ❌ | ❌ |
| Merge with CSV | ✅ | ✅ | ❌ | ❌ | ❌ |
| Enable/disable sub-items & dependencies | ✅ | ✅ | ❌ | ❌ | ❌ |
| Create, edit, delete Connection properties* | ✅ | ✅ | ❌ | ❌ | ❌ |
| Customize page layout* | ✅ | ✅ | ❌ | ❌ | ❌ |
| Edit Forms | ✅ | ✅ | ❌ | ❌ | ❌ |
| Toggle anonymous responses on Forms | ✅ | ✅ | ❌ | ❌ | ❌ |
| Delete a Form | ✅ | ✅ | ❌ | ❌ | ❌ |
| Create, edit, delete automations | ✅ | ❌ | ❌ | ❌ | ❌ |
| Invite users to page | ✅ | ❌ | ❌ | ❌ | ❌ |
| Edit permissions on page for other users | ✅ | ❌ | ❌ | ❌ | ❌ |
| Edit General Access permissions | ✅ | ❌ | ❌ | ❌ | ❌ |
| Create, edit, delete page-level access rules | ✅ | ❌ | ❌ | ❌ | ❌ |
| Publish, unpublish page | ✅ | ❌ | ❌ | ❌ | ❌ |
| Edit public settings of published page | ✅ | ❌ | ❌ | ❌ | ❌ |
| Create a Form | ✅ | ❌ | ❌ | ❌ | ❌ |
| Change “Who Can Fill Out” and “Access to Submission” options on Forms | ✅ | ❌ | ❌ | ❌ | ❌ |
| Move data sources | ✅ | ❌ | ❌ | ❌ | ❌ |
| Move page* | ✅ | ❌ | ❌ | ❌ | ❌ |
| Move blocks outside of page* | ✅ | ❌ | ❌ | ❌ | ❌ |
| Add/remove Connections* | ✅ | ❌ | ❌ | ❌ | ❌ |
- Make page available offline: Only members can do this, and only on desktop/mobile (not in browser). Guests cannot make pages available offline.
- Export page: Members can export pages with Can View permission and higher. Guests must have Full Access.
- Click Button blocks: Whether or not a user can click a Button block depends entirely on what the button does. For more information, see the section on Buttons Blocks and Properties.
- Move blocks into sub-pages: This will be possible as long as the user also has Can Edit (or higher) on the sub-page. Sub-pages are, by default, part of the “block tree” of their parent page, which is why it’s possible to move blocks from the parent into them. It’s no different than making a bullet list block a child of another above it by indenting it. One additional note: If the block being moved is also a page block, the user needs Can Edit (or higher) on that page block in order to move it.
- Create/edit linked database views: A user with Can Edit Content on Database A can still create another database block (Database B), elsewhere in the workspace, that links to a data source in Database A. They still cannot edit properties or the page layout of the data source, but they can customize their linked view all they like – including setting different filters! If you’re currently using filters to try to restrict access to pages, use page-level access rules instead.
- Move page/database to Trash (aka delete page): This is a huge point of confusion for a lot of folks. See the Who Can Delete a Page? section for a full explanation.
- Click Button database properties: Button properties are inherently more restrictive than Button blocks, requiring at least Can Edit Content in the database or Can Edit on a database page via a normal permission rule or a page-level access rule. However, certain buttons still may not be clickable by certain users if they perform actions that require additional permissions. For more information, see the section on Buttons Blocks and Properties.
- Create, edit, delete Connection properties: For users with Can Edit, the corresponding Connection must be set up beforehand by a user with the ability to add Connections.
- Customize page layout: When setting up Tabbed layouts, a user must have access to connected databases in order to customize a Tab’s view.
- Move page: This refers to using the “Move To” action. One exception is moving a page block into another page block on the current page, or into a database this is, itself, a child of the current page. See “Move blocks into sub-pages” higher up in this list for info on that case. Note that moving pages is also more restrictive than moving pages to the Trash (aka deleting pages).
- Move blocks outside of page: This means moving blocks to another location that is not within the current page’s set of “branches” – e.g. its sub-pages, or their sub-pages. All the same logic from the section above applies here too.
- Add/remove Connections: Enterprise plans can further restrict this in Settings → Connections.
Who Should Have Full Access?
A great rule of thumb to follow is to limit Full Access only to those who need it.
In general, it’s a good idea to approach permissions with the Principle of Least Privilege in mind. This means providing each person only with the access they actually need to do their work.
If you’re working with a team and you’ve upgraded to one of Notion’s paid plans, it’s a good idea to only give Full Access to company leadership, along with whomever is the “Notion Architect” on the team.
Other folks should generally be given lower permissions, based on what they need to do. See the section further down on Recommended Permissions for Teams for more detail on this.
As I mentioned in the previous section, these permission levels can be granted to roles, in addition to individual users. Roles include Groups, Teamspace Members, Teamspace Owners, and Workspace Members.
You can use these roles to more efficiently control permission levels for many people at once. For example, you could create a Group for a certain committee in your organization that needs higher-than-normal permissions on a set of pages.
We’ll cover these roles soon; for now, I’d like to cover one more important concept.
When you set a permission level for a user or role on a page, that level will be automatically applied to a any sub-pages or databases that are contained within it.
I call this the permissions cascade. Child pages inherit the permission rules set on their parent pages – unless you override them.
This concept is so important that I’ve dedicated the next section to it.
Copy link to headingPages and Sub-Pages: The Permissions Cascade
If you want to gain a true, intuitive understanding of permissions in Notion, then you need to understand Notion’s block model and how permissions are set within it.
The key concept (TLDR version): Permissions are set on pages. A user’s ability to view and edit any block is determined by the permissions settings of the page that block lives on. Pages are blocks, too, so this concept applies to them as well – a page inherits its permissions from the nearest parent page that has its own custom permissions set (except in Teamspaces, where top-level pages inherit permissions from Teamspace settings). Those permissions can be overridden if you set custom permissions on the page itself.
As we discussed in the Block Basics lesson, nearly everything in Notion is a block. This includes pages and databases!
To be a bit more specific:
Pages are a special type of block. They’re rendered in the Notion app as a canvas that displays any child blocks contained within the page, and they have some other special properties, such as cover images and icons.
Databases are also blocks, because they are a special type of Page. They do have some key differences from normal pages, namely that they contain data sources, which are special non-block entities that contain pages.
But from a permissions standpoint, databases behave like pages.
This is important, because the last special aspect of pages and databases is that you can control their permissions settings. (You can’t set permissions directly on blocks that aren’t pages/databases. You also can’t set permissions directly on data sources, with the exception of page-level access rules – AKA row-level permissions – but I’ll cover those later, as they’re an edge case, only apply to Business/Enterprise plans, and will likely just confuse you now.)
The permissions you set affect the page, but they also affect all of the blocks that live on that page – all of the text blocks, headers, images, embedded media, and more.
And because pages are blocks themselves, these permissions affect sub-pages – pages that live on another page.
In other words, pages inherit the permissions of their parent page. This goes beyond a single level, too. If you have a page at Level 1 (the top level) with some permissions settings, then a Level 2 page that lives on it will inherit those permissions.
Since the Level 2 page has those permissions, a Level 3 page that lives on the Level 2 page will also inherit those same permissions – and so on.
I call this cascading permissions. Pages inherit the permissions from their parents.
In the case of databases, there is technically a Database → Data Source → Page structure, which makes the database the grandparent of the page. But the page still inherits its permissions from the database, since data sources don’t have their own permissions rules.
However, since each page has its own permissions controls in the Share menu, you can override those inherited permissions and set custom ones.
You can do this in two ways:
- Add a permission rule that gives greater access than the inherited rule (e.g. a Group has view-only access to a sub-page due to an inherited rule, but you give one person in that Group full edit access).
- Remove or change the inherited rule directly (e.g. on the sub-page, you change the Group rule so that everyone in it has full edit access – or so that they have no access!)
So, to sum up the fundamental principle of permissions in Notion:
Sub-pages inherit permissions from their nearest parent by default. You can add new rules directly to the page, including ones that override those inherited permissions, or you can change the inherited permissions directly.
As for top-level pages in the Sidebar:
- Pages in Teamspaces inherit their permissions from the Teamspace’s settings.
- Pages in the Private and Shared sections are truly “top-level”; they only have explicitly-set permissions.
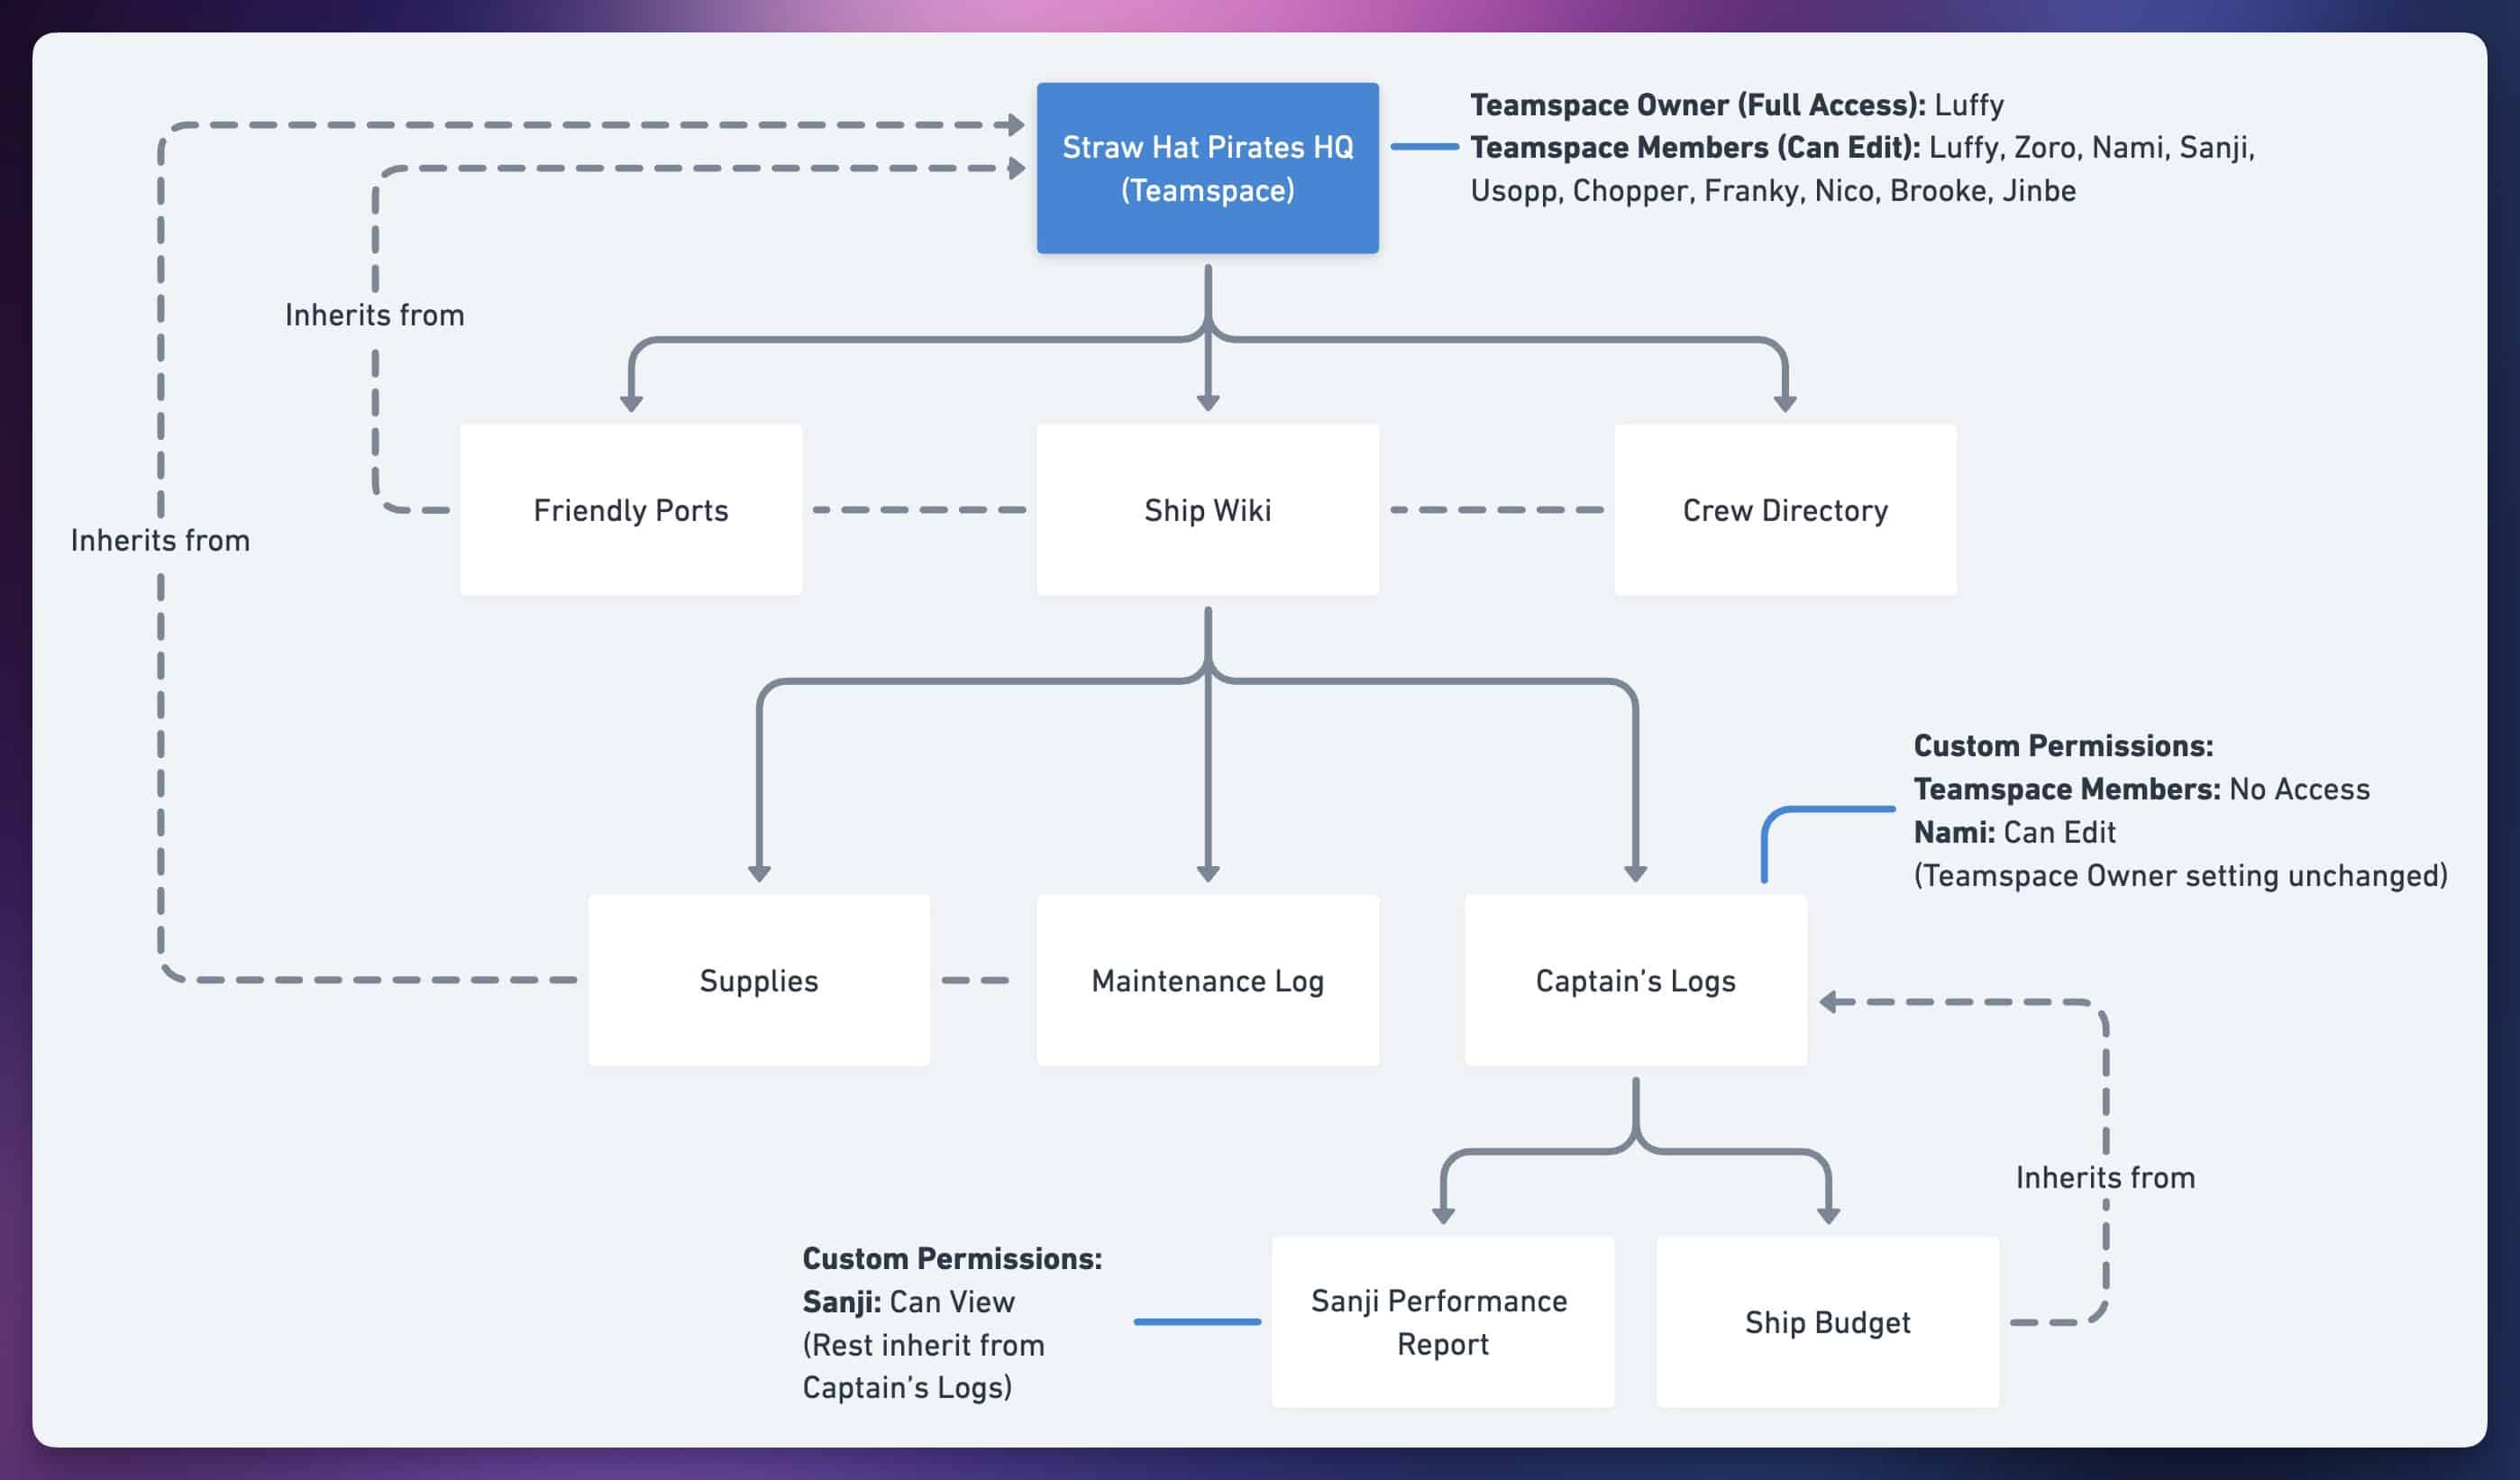
Here’s an example diagram the shows the inheritance structure of a set of pages in a Teamspace:
Databases and “Can Edit Content”
Notion databases have a special type of permission level called Can Edit Content, which is not available for normal pages.
This special level allows a user to work with pages in a database without being able to change the settings of the database itself or the structure/settings of its data sources. In general, it’s a good idea to restrict most users to Can Edit Content (or lower) on important databases in your workspace.
Most users do not need to regularly change the structure of a database or its data sources, and setting this permission level helps to prevent accidental changes, property deletions, etc.
Here’s a breakdown of what a user can and cannot do when their permission level is set at Can Edit Content:
| User Can: | User Cannot: |
|---|---|
| Create new pages | Add or delete properties |
| Edit the content of existing pages | Change property settings (e.g. add new options to a Select property) |
| Edit property values of pages (e.g. change a Date or choose an option in a Select property) | Create new views in the database |
| Delete existing pages | Change view settings of existing views |
| Create, move, edit, or delete data sources |
Using this permission level wisely can help to keep your workspace organized and resistant to accidental changes.
You can set it on both source databases and Linked Views of databases – and note that setting it on a source database won’t automatically set it on Linked Views! You’ll need to do that manually.
Additionally – and this is important – note that you cannot use this permission level in combination with filters to limit a user’s access to a certain subset of a database.
I’ve written more about this in the Granular Database Permissions section below, but the TL;DR version is that while a user with Can Edit Content can’t change any view settings in the source database, they can just make their own Linked View of the same database – which will have no filters by default. They can also simply search for pages not shown in a filtered view.
To actually set up granular database permissions, also known as row-level security, you’ll need to create page-level access rules, which require your workspace to be on the Business or Enterprise plan.
Copy link to headingPage Locations: Private, Shared, Teamspace
The sidebar in your Notion workspace organizes pages into three main sections:
- Private
- Shared
- Teamspace(s)
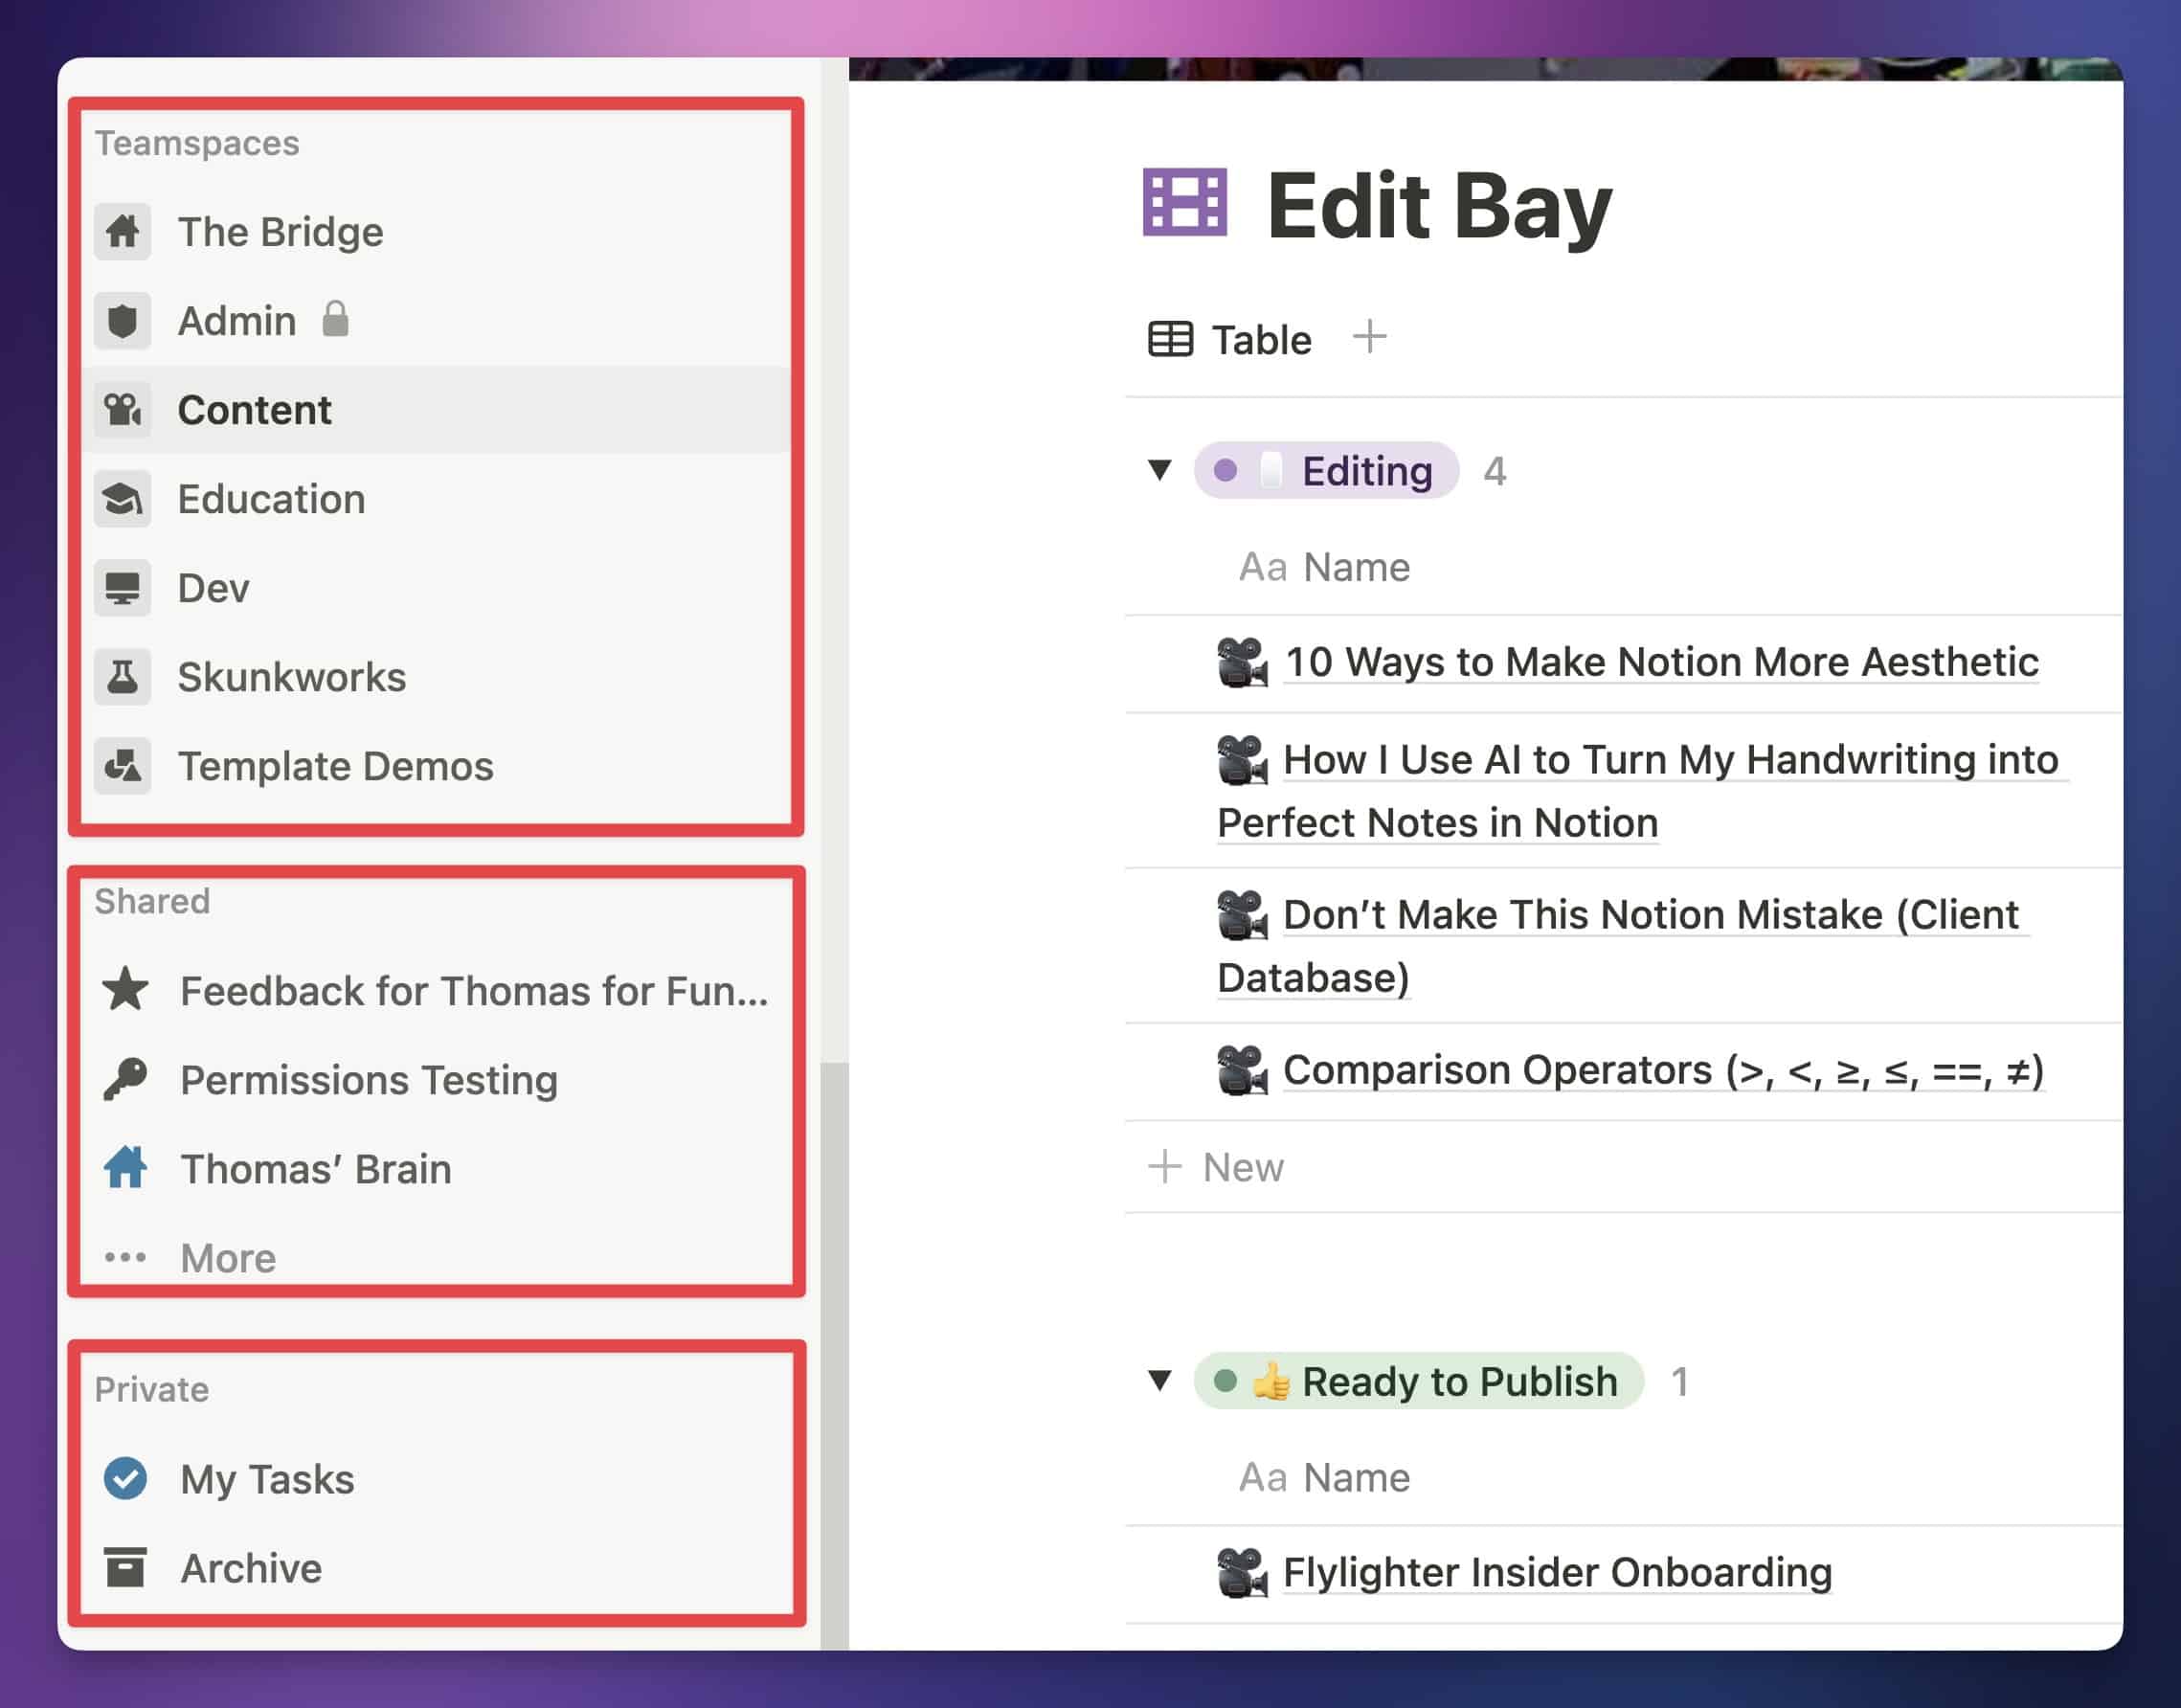
There’s also a Favorites section that will show up after you click the Star (⭐️) icon on any page, but pages aren’t moved to this section. It’s more like a list of shortcuts.
Every page in your Notion workspace lives in one of those three main sections – either as a top-level page which is visible in the sidebar, or as a sub-page/database within one of those top-level pages.
As I covered in my section on page nesting in the Pages lesson, you can open the toggles on the pages in the sidebar to “drill down” and find sub-pages – but note that you can’t drill down into databases in the sidebar.
So what determines whether a top-level page lives in Private, Shared, or a Teamspace? In short, it’s all about who has explicit access to the page.
If you manually invite a Member, Guest, or Group to a Private page, it will automatically move to the Shared section.
However, if you simply set a page’s access to “Anyone with the Link” or “Everyone at Workspace”, the page will stay in the Private section. It only moves to Shared if you explicitly send an invite.
The Shared section can expand quickly, so the sidebar will only show a few Shared pages by default. You can click the More button at the bottom of that section to see all of your Shared pages. If you want to see a certain page directly in the sidebar, you can click the Pin icon next to it.
As for Teamspaces: Pages created in a Teamspace will be in that Teamspace. Pages will never automatically move from Private or Shared to a Teamspace, but you can manually move a page into a Teamspace by dragging it in the Sidebar or by using the Move To command.
Here’s a handy cheat sheet for these sections:
| Section | Description |
|---|---|
| Private | Pages you own, where you are the only one with explicit access. You can still grant workspace-wide access to pages here by choosing the “Anyone with the Link” or “Everyone at Workspace” settings. |
| Shared | Pages shared directly with more than one Member, Group, or Guest. Pages will show up here even if you’ve only shared them with Guests. |
| Teamspace(s) | Pages created in the Teamspace (or moved to it). These pages inherit the Teamspace’s permission settings by default. Pages will not automatically leave the Teamspace, even if you remove everyone’s access except your own. |
User Roles
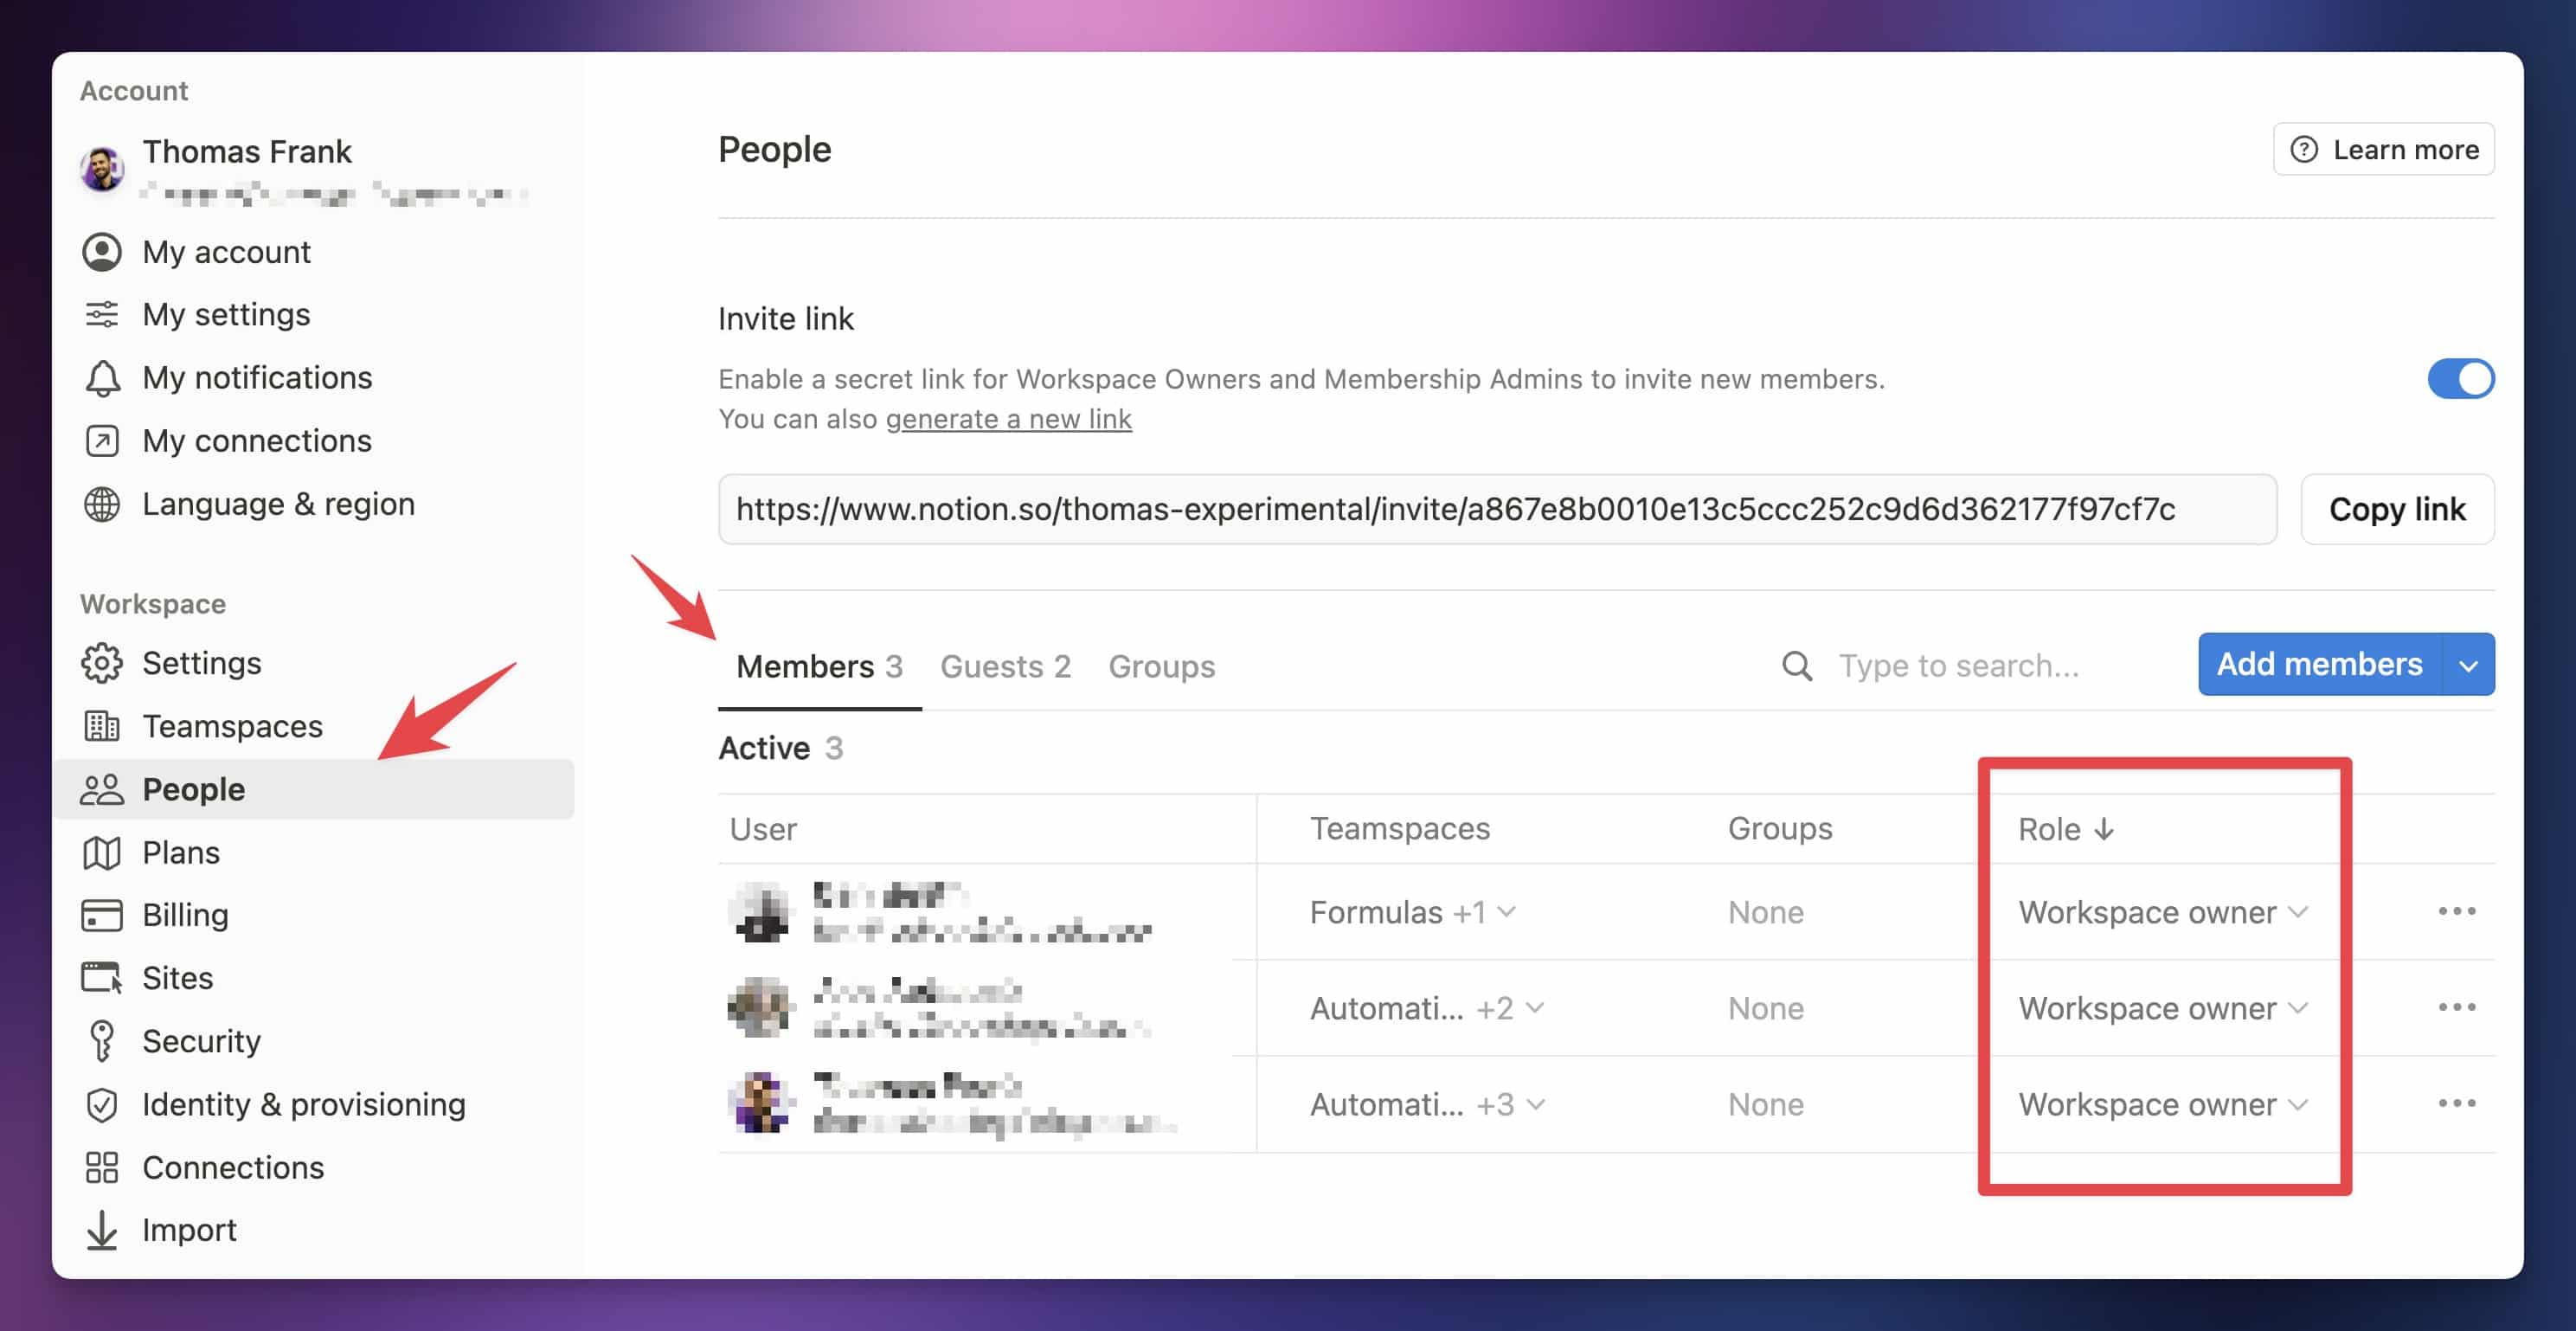
Your Notion workspace has several user roles, which you can see and edit (if you’re a Workspace Owner) by going to Settings & Members → People. For each Member in your workspace, you’ll see their role listed under the Role column.
You’ll also be able to see all guests within your workspace in the Guests tab.
There are five different roles:
- Workspace Owner: Owners or “admins” of the workspace. Can add/remove users, change Member roles, change workspace settings, and delete the workspace.
- Membership Admin (Enterprise plans only): Can add/remove users, as well as add/remove Members from Groups.
- Member: Can create/edit pages and access the default Teamspace and all non-restricted Teamspaces.
- Restricted Member: Can only see/edit content that either they created, or that was explicitly shared with them. No access to the default Teamspace.
- Guest: Can only access pages that have been explictly shared with them (and sub-pages of those pages).
For the purposes of differentiating Members and Guests, Workspace Owners and Membership Admins are also Members themselves.
Copy link to headingUser Role Capabilities
Here’s a capabilities chart covering each role. For page-specific capabilities, we’ll assume that Full Access has been granted:
| Capability | Workspace Owner | Membership Admin | Member | Restricted Member | Guest |
|---|---|---|---|---|---|
| Create sub-pages | ✅ | ✅ | ✅ | ✅ | ✅ |
| Create/edit/delete most normal blocks | ✅ | ✅ | ✅ | ✅ | ✅ |
| Invite Guests | ✅ | ✅ | ✅ | ✅ | ✅ |
| Share pages internally | ✅ | ✅ | ✅ | ✅ | ✅ |
| Publish pages to the web* | ✅ | ✅ | ✅ | ✅ | ✅ |
| Duplicate pages to owned workspaces* | ✅ | ✅ | ✅ | ✅ | ✅ |
| Create Private pages | ✅ | ✅ | ✅ | ✅ | ❌ |
| Join Teamspaces* | ✅ | ✅ | ✅ | 🟡 | ❌ |
| Be in a Group | ✅ | ✅ | ✅ | ✅ | ❌ |
| Use Notion AI features | ✅ | ✅ | ✅ | ✅ | ❌ |
| Make pages available offline | ✅ | ✅ | ✅ | ✅ | ❌ |
| Export page contents | ✅ | ✅ | ✅ | ✅ | 🟡 |
| View page analytics | ✅ | ✅ | ✅ | ✅ | ❌ |
| Use non-public Notion Forms | ✅ | ✅ | ✅ | 🟡 | 🟡 |
| Add Connections* | ✅ | ✅ | ✅ | ❌ | ❌ |
| Add/remove Members | ✅ | ✅ | ❌ | ❌ | ❌ |
| Add/remove Members to/from a Group | ✅ | ✅ | ❌ | ❌ | ❌ |
| Upgrade/downgrade member permissions | ✅ | ❌ | ❌ | ❌ | ❌ |
| Change workspace settings | ✅ | ❌ | ❌ | ❌ | ❌ |
| Change workspace security settings | ✅ | ❌ | ❌ | ❌ | ❌ |
| Delete comments made by others | ✅ | ❌ | ❌ | ❌ | ❌ |
| Change Identity/Provisioning settings (Enterprise) | ✅ | ❌ | ❌ | ❌ | ❌ |
| View Audit Log (Enterprise) | ✅ | ❌ | ❌ | ❌ | ❌ |
| Delete workspace | ✅ | ❌ | ❌ | ❌ | ❌ |
On Join Teamspaces, I marked the Restricted Member column with a 🟡 because Restricted Members must be added to a Teamspace by someone who is already in the Teamspace. They will never see Teamspaces they’re not a part of, meaning they cannot join them on their own. They are also not added to the workspace’s default Teamspace, as normal Members are.
On Use Non-Public Forms, I marked the Restricted Member and Guest columns with a 🟡 because it depends on whether or not they can access the database connected to the form. If they have at least Can View access to the full database, they can access and use a Form connected to it. If not, they cannot access the Form.
This differs from Members (and higher), who can access and submit to Forms that have the default “Anyone in [workspace] with the link” setting – even if they have No Access to the connected database.
On Export Page Contents, I marked the Guest column with a 🟡 becuase the guest must have Full Access to a page in order to export it. Members can export a page even if they only have Can View.
Items marked with a * can be restricted further with Workspace or Teamspace settings. Some settings are only available on Enterprise plans – see the Enterprise section for more info.
It’s also worth noting that Workspace Admins can do nearly anything in an Enterprise workspace, including changing their permissions on individual pages, setting themselves as Teamspace Owners, and searching through private content. In non-Enterprise accounts, however, they won’t be able to take these actions.
Copy link to headingMembers vs. Guests
Workspaces can contain both Members and Guests.
Members can be given access to entire Teamspaces, and they must be added to at least one (the Default Teamspace). They’ll also get their own Private section within the workspace where they can create private pages. Members can also be part of Groups, use available Notion AI features, add Connections (apps with Notion integrations), make pages available offline, and request to add new members.
Some of the above Member capabilities don’t apply to Restricted Members. See the chart above for full details.
Finally, Members affect your workspace’s bill. Once you have more than one Member, the free plan is restricted to 1,000 blocks. Paid plans (Plus, Business, Enterprise) are have per-member pricing.
Guests are users who have been granted access to specific pages. Due to the permissions cascade I covered earlier, they’ll also have access to child pages of those pages by default. However, they can’t create new pages outside of the pages to which they’ve been given access, nor can they be part of Groups or add Connections.
Guests also cannot make pages available offline, use Forms that you haven’t made public (unless they have at least Can View access to the connected database), or use any Notion AI features.
Adding Guests to your workspace is free; however, each Notion plan has a guest limit (see the section below).
This leads to a common question: Who should be a Member, and who should be a Guest?
Typically, Members should be people on your team, or folks who should have access to the majority of the pages in your workspace.
Meanwhile, the Guest role is perfect for people outside of your team or organization. This could include:
- Contractors who are only working on a single project
- Clients who need to review and approve work you’ve done
- A friend or family member with whom you’re planning an event
However, if a person in one of these roles also needs access to Notion AI features, or should have the ability to create Private pages, you can consider making them a Restricted Member instead of a Guest. Keep in mind that Restricted Members are billed just like regular Members.
Copy link to headingGuest Limits and Capabilities
As mentioned above, Guests are given access to specific pages in your workspace. A guest can be given access to a page by Workspace Owners, Members, and even other Guests that have Full Access to a page.
Of course, a Member or Guest will need Full Access to a page in order to invite Guests to it.
Guests will see the pages that have been shared with them in their Sidebar. They can also access those pages by searching – keep this in mind when sharing databases. If you’re on Notion’s Business plan or higher, consider using page-level access rules to set up granular database access. This can help ensure Guests are only allowed to see database pages that are relevant to them.
If a Guest has Full Access to a page, there are cases where they can change the access level of other users on that page. They can even remove everyone else, including Workspace Admins! I call this “siloing” a page.
These cases are:
- Workspace-level pages outside of a Teamspace (e.g. pages that were initially created in the Private section)
- Child pages of a Workspace-level Shared page, only if the Guest has Can View or higher on the Workspace-level page. If the Guest has no access to the Workspace-level page, they can’t remove permissions from a sub-page at any level. I find this to be a weird distinction, but that’s how it is.
Guests can’t silo a page that’s in a Teamspace, because they can’t be part of a Teamspace itself – meaning they don’t have access to the Workspace-level “entity” that forms the top permission level in the page’s permission chain.
However, with Full Access, a Guest could move a page currently in a Teamspace over to a Workspace-level Shared page, if there is one they can currently access. From there, they can silo the page.
Two other small details to note about this:
- Guests can’t access the workspace-wide sharing setting, nor can they see it. Therefore, if a page is set to Anyone with the Link or Everyone at Workspace, it’ll still be accessible to other Members even if the Guest removes everyone listed in the Share tab.
- If you’re in an Enterprise workspace, Workspace Admins can find any page via the Content Search feature, and they can change all permissions settings on every page in the Workspace.
Still, it is technically possible for a Guest to create a “secret” page in your workspace. If they have Full Access and the page is set to Invite Only, they can remove everyone else and create their own secret little fiefdom in your workspace. You’d have to upgrade your workspace to the Enterprise plan to undo this.
For this reason, be careful about giving Guests the Full Access permission level, especially for pages that contain important data.
Depending on your workspace’s plan, it’ll be subject to limits on how many Guests you can invite. This limitation is workspace-wide; it doesn’t just apply to individual pages.
| Plan | Guest Limit |
|---|---|
| Free | 10 |
| Plus | 100 |
| Business | 250 |
| Enterprise | 250 (limit can be raised by contacting Notion’s Sales team) |
You can remove Guests from you workspace by going to Settings & Members → People, clicking the Guests tab, then clicking the ••• menu next to a guest and hitting Remove from workspace.
Teamspaces
Teamspaces are sections of your workspace that let you set up more granular permissions for Members. They form individual sections in the sidebar of your workspace, and they’re great for splitting your workspace into “departments” – think Marketing, Finance, Owners, Product Team, etc.
Each Teamspace can have different Members, visibiltity, access levels, and default page access settings.
Once you add a second Member or Workspace Owner to your workspace, a default Teamspace will be created. All workspace Members must be members of the default Teamspace, though once you’ve created multiple Teamspaces, you can change which one is the default by going to Settings & Members → Teamspaces. You can also set multiple default Teamspaces.
Note: If you’re on the free plan, adding a second Member will convert your workspace to “Team Trial” mode, which will impose a 1,000-block limit on the whole workspace. If you need to do so, check out our article on how to revert back to the free plan.
Teamspaces can have the following permission levels:
- Default – Every Member in the workspace must be a member of this Teamspace. New workspace Members will automatically be added as Teamspace Members when they join.
- Open – All workspace Members can see this Teamspace in the sidebar, and can join it at will.
- Closed – Workspace Members can see this Teamspace, but must request to join it and be approved by the Teamspace Owner.
- Private (Business Plan or higher) – Only Members who have joined this Teamspace can see that it exists.
Within each Teamspace, there are two Teamspace-specific roles. These roles are separate from workspace roles.
- Teamspace Owner – Can change Teamspace role of other Teamspace members/owners, as well as change all Teamspace settings
- Teamspace Member – Can view/edit Teamspace pages, based on the page access settings set by the Teamspace owner(s). Can’t change any Teamspace settings.
Teamspace Owners have Full Access to all pages in the Teamspace by default, and this settings can’t be changed. However, Teamspace Owners can change the default access level for Teamspace Members to any level (Full Access, Can Edit, Can Comment, or Can View).
Open/Default Teamspaces will also have a page-access setting for workspace Members, since Members do not need to join the Teamspace in order to view the pages in it. This setting can’t be higher than the one for Teamspace Members.
Finally, Enterprise workspaces get some additional Teamspace options that Teamspace Owners can change. Public page sharing, guest access, and exporting can be disabled for individual Teamspaces, Workspace Owners can give themselves access to Closed/Private Teamspaces (and even the Teamspace Owner role), and custom permissions can be given to individual Teamspace Members.
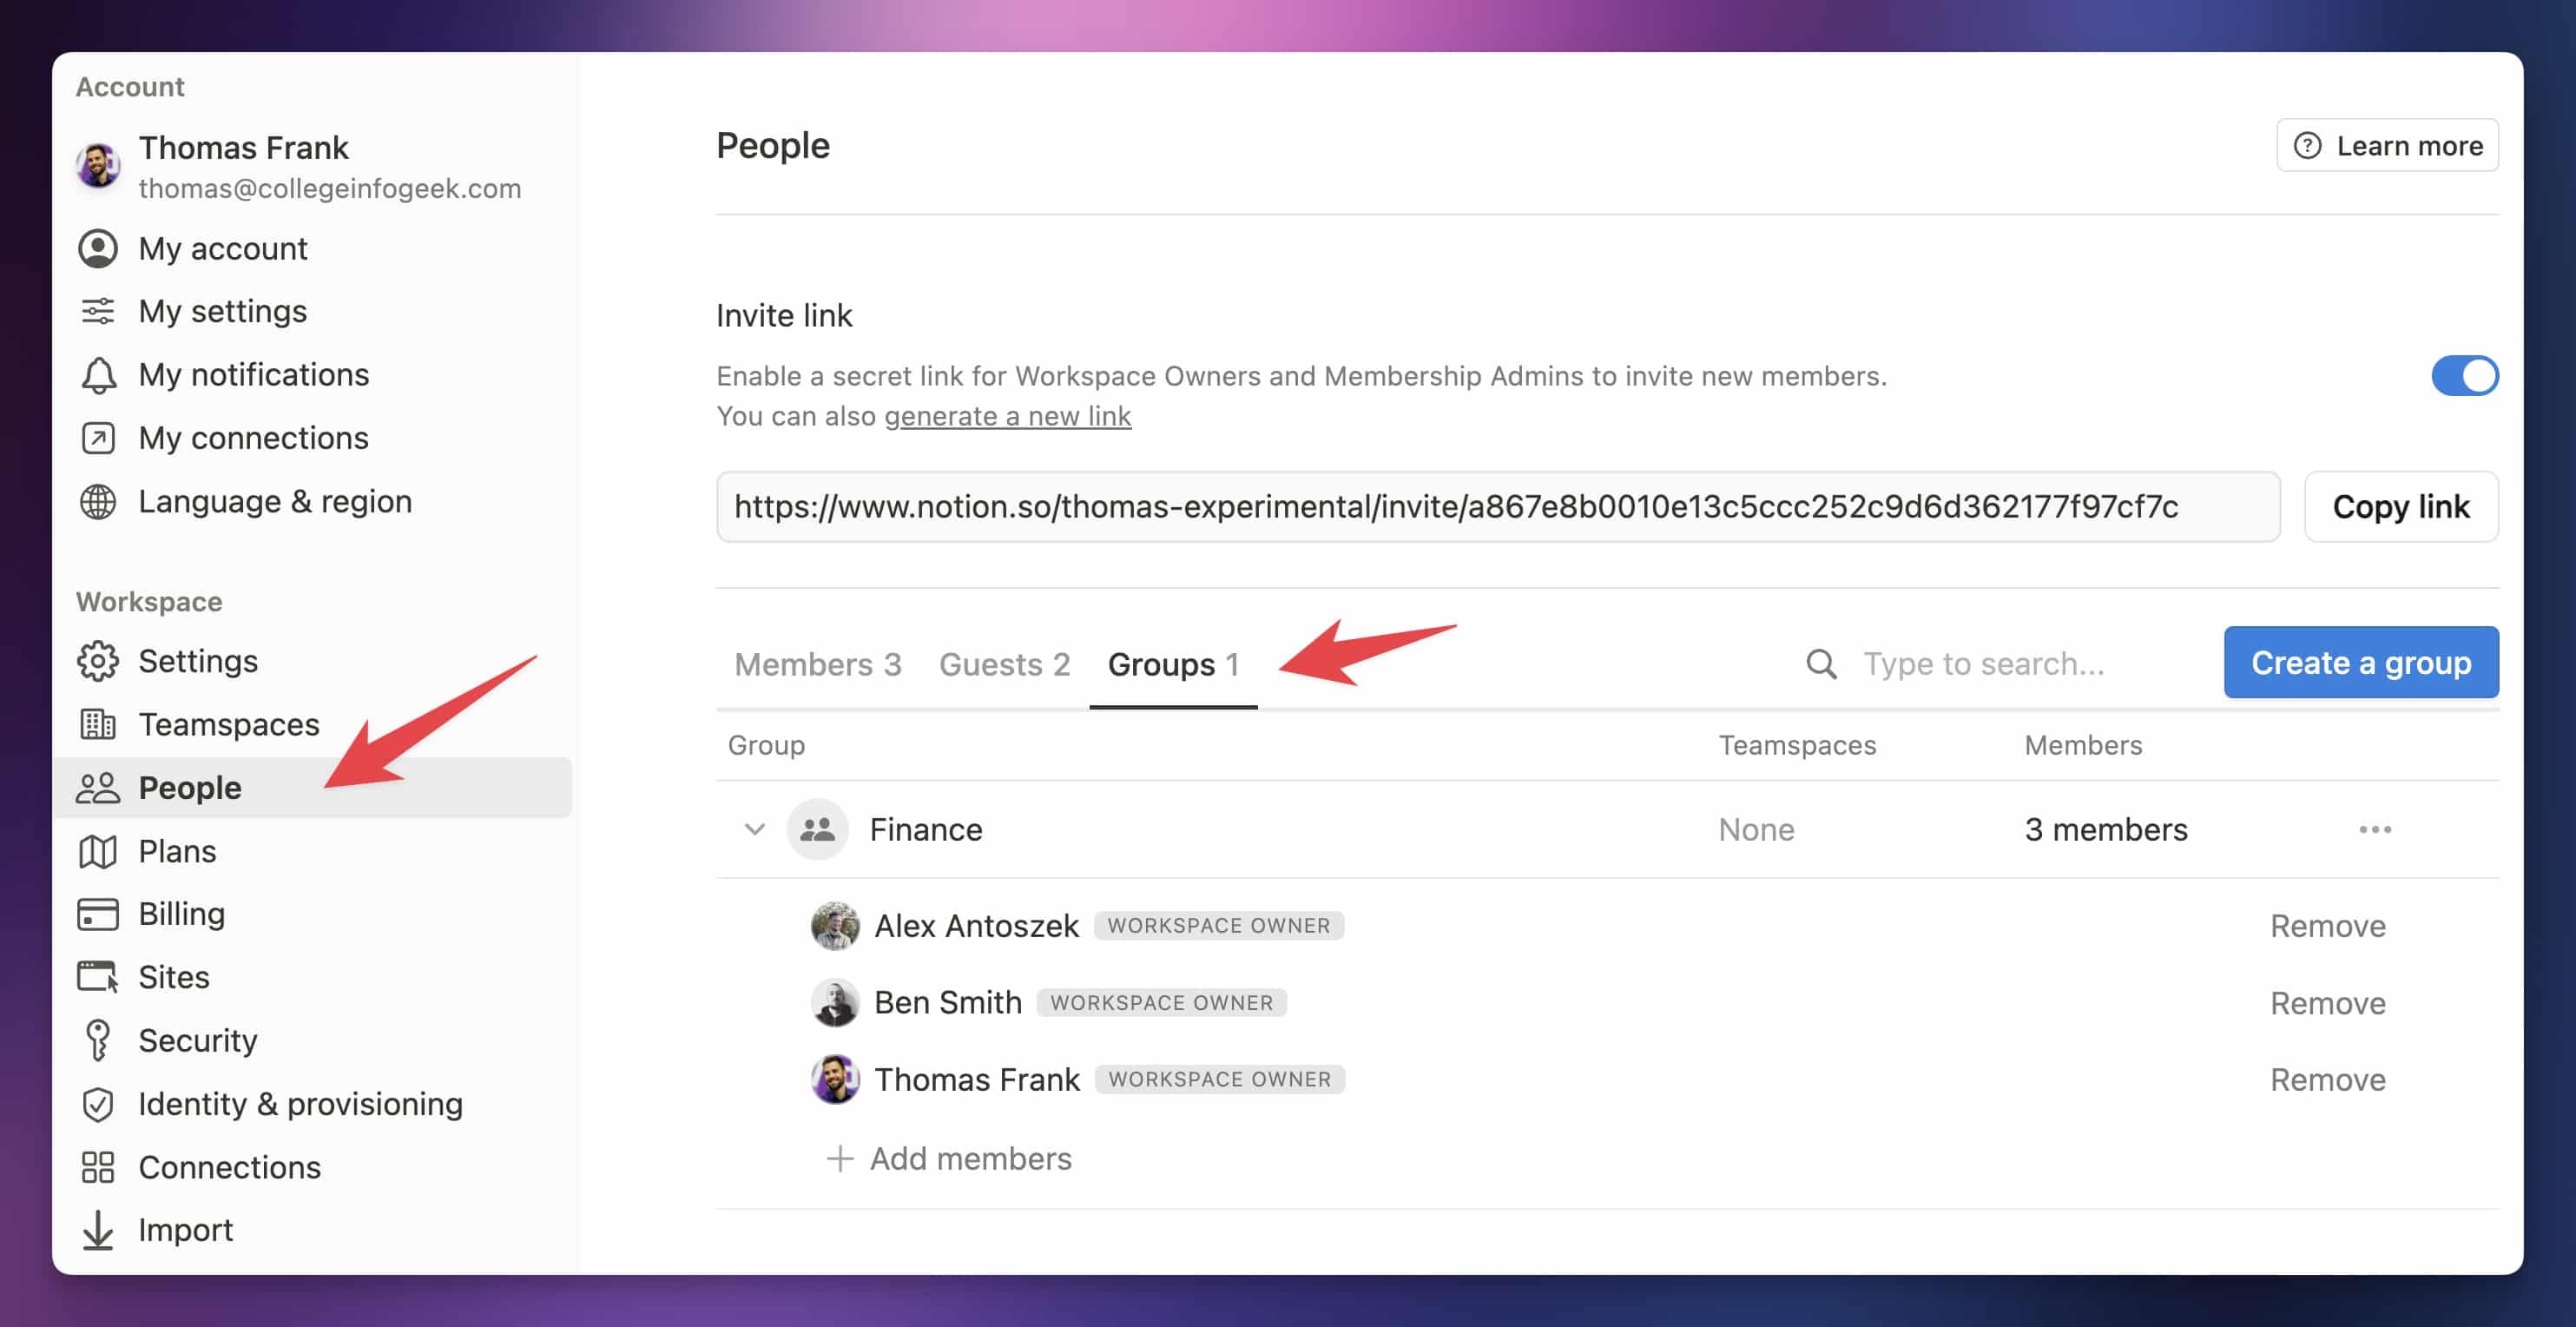
Copy link to headingGroups
If your workspace is on the Plus plan or higher, you can create Groups and add any workspace Members to them (Guests can’t be in groups). Groups give you a convenient way to grant customized page access to multiple people at a time.
For example, let’s say you have a Finance team at your company with three people in it. These three people aren’t executives, so you haven’t added them to your workspace’s Executive Teamspace.
However, you do want to add them to a Financial Projections page within that Executive Teamspace. You also want to add them to an even-more-important page with details on your company’s upcoming Pokemon tournament.
Instead of individually adding each person to each page (which would be six separate actions), you could instead create a Group called Finance, then add that Group to each page. Each person in the Group will then be able to access the page with whatever level you’ve provided to the Group.
You can create Groups by going to Settings & Members → People, then clicking the Groups. From there, you can create new Groups and add Members to them.
It’s useful to note that you can’t downgrade a Group member’s permissions, making them lower on a page than the rest of the Group. Remember: In Notion, the highest permission wins.
If I have Can View access to a page directly, but also Can Edit via my membership in a Group, then my access level will be Can Edit.
Due to this, if you want to “restrict” a specific Group member’s access to a page, you should either:
- Set the Group’s permission level to whatever the Member with the lowest level should have, then give other Members higher permissions individually
- Create a second Group, leave that person out of it, and grant the higher permission level to that new Group
Groups can also be added to Person-type properties in databases, which means they’ll work with page-level access rules that can add row-level security to a database.
One quirk to keep in mind, though; database views that are filtered by a Person property containing the dynamic value of Me won’t show pages containing a Group to which the current user is a member. It’ll only show pages containing that user’s actual profile in the Person property. Keep this in mind when using the Me variable to build out team-focused dashboards.
Restricting Access to Pages
As I mentioned earlier, pages inherit the permissions of their parent page if they are not already a top-level page in the sidebar – and top-level pages in Teamspaces inherit their permissions from the Teamspace’s settings.
However, you can easily click the Share button on any page and change its permission settings (if you have Full Access to it). If you change a page’s permissions in any way that reduces access compared to the page’s parent, that page becomes Restricted. You’ll see a “Restricted” label at the top of the page:
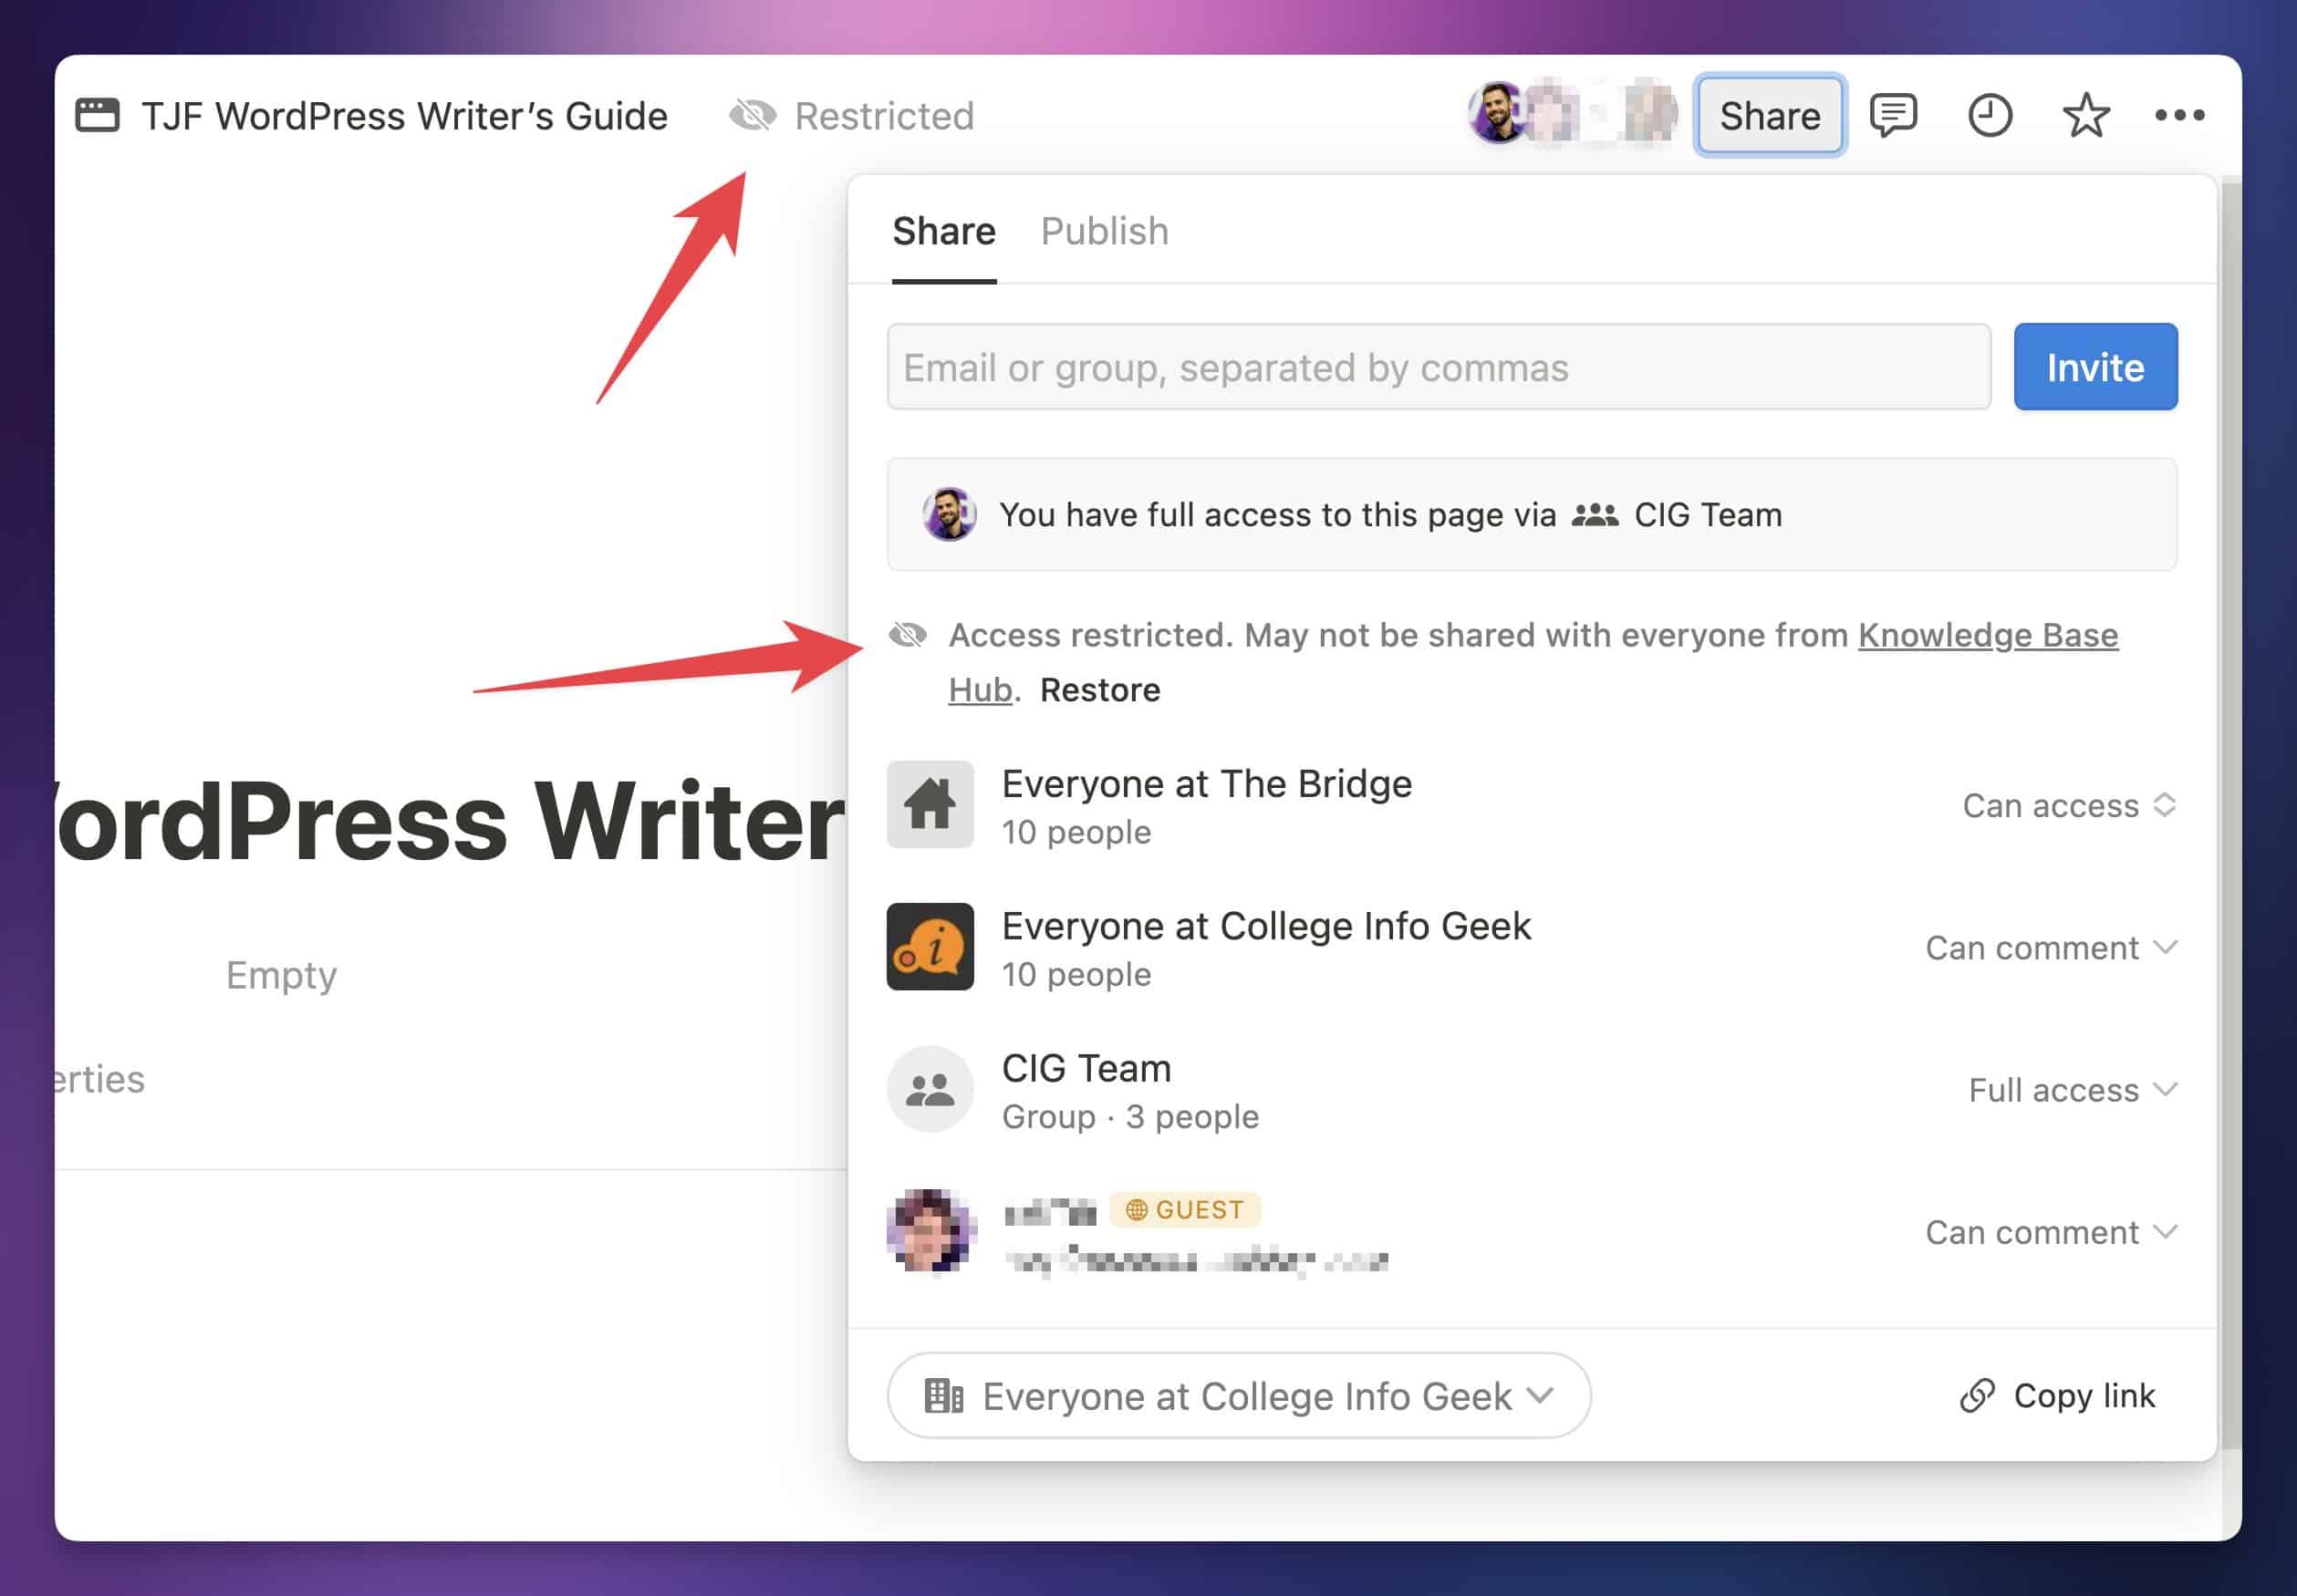
If you’d like to revert the change and have the page inherit permissions from its parent again, you can click the Share menu once again, then click the Restore link at the end of the “Access Restricted” line.
One exception to this rule: If you have page-level access rules set up, a user may still have access to a page directly within a database – even if you downgrade/remove their individual access in the Share menu. As I mentioned before, when multiple permissions rules affect a user, the most permissive rule wins.
For example, if a user is set as the Assignee for a task page, and a page-level access rule grants Can Edit to Anyone in Assignee, they’ll retain that level of access until you remove them from the Assignee property.
Copy link to headingPublic Pages and Notion Sites
On the complete opposite end of the spectrum from restricting pages, you can also make Notion pages completely public and open on the web.
This is a really powerful feature, and you can use it to:
- Get feedback from folks not in your workspace on your writing, proposals, etc
- Create public pages for events
- Build and share Notion templates
- Create your own website
To make a page public, click the Share button and then head to the Publish tab. Once you hit the Publish button, the page will be live on the web, and you’ll see a public URL you can copy and share.
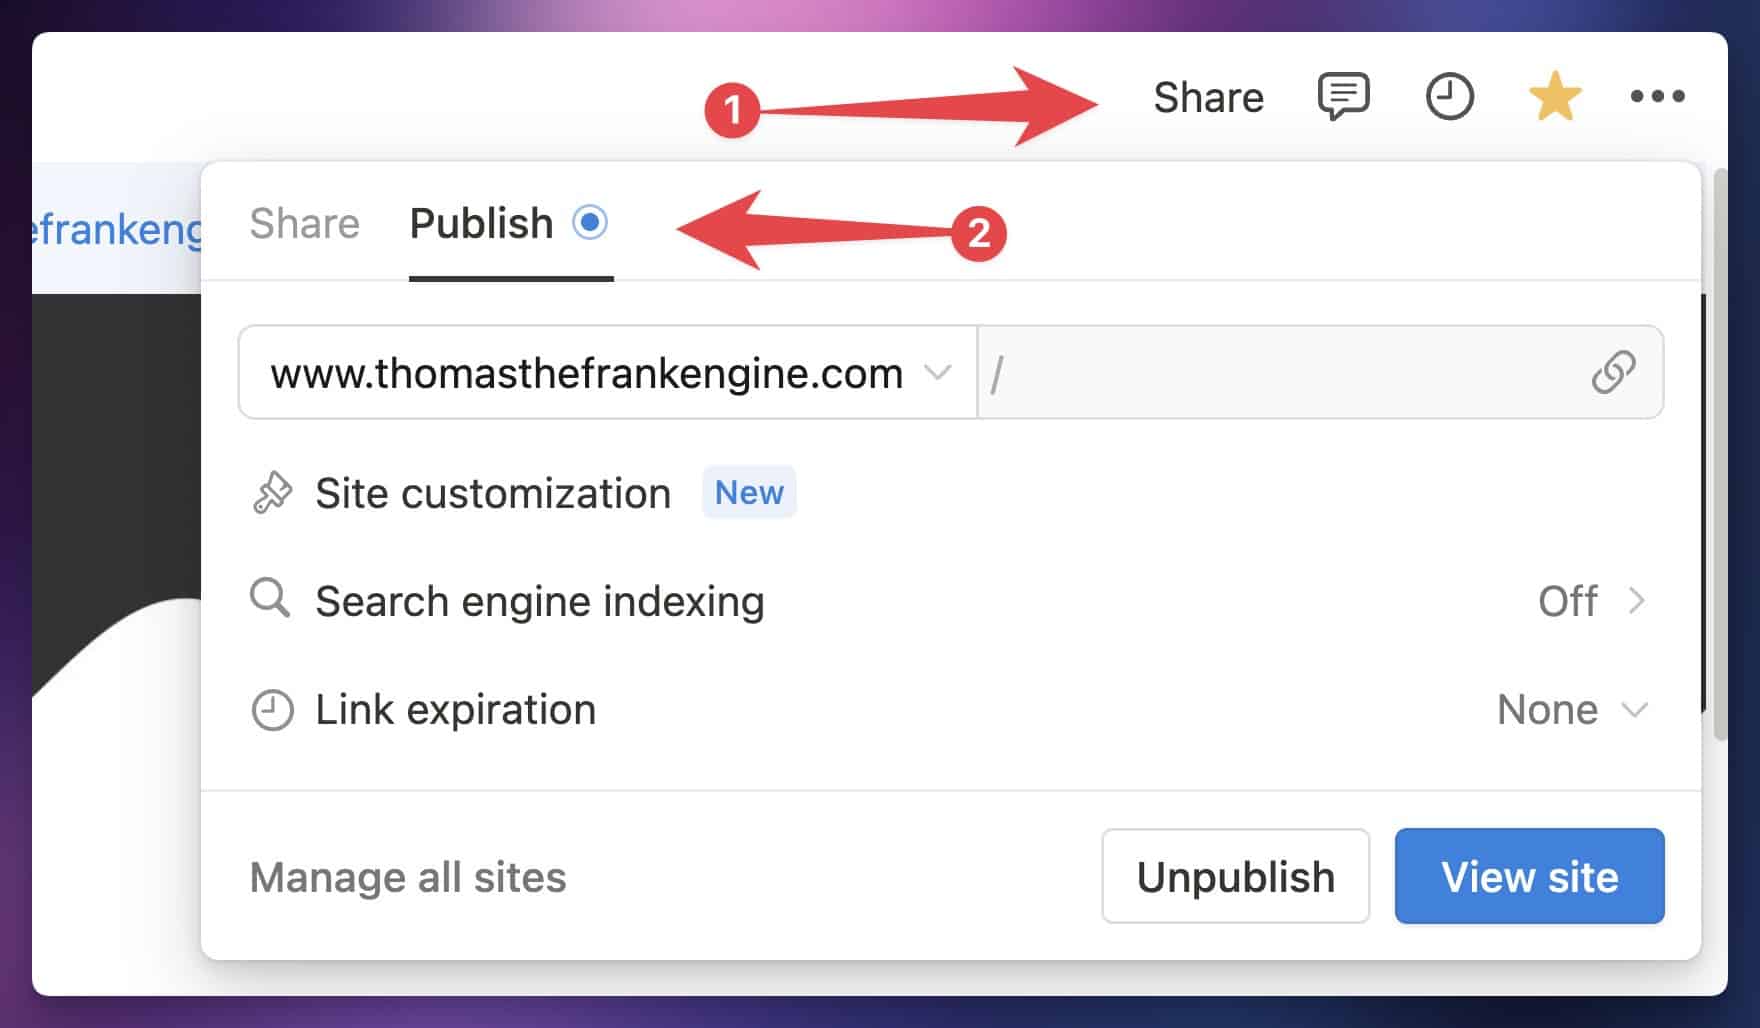
You’ll also see the following options:
- Site Customization: This section will let you customize how your site looks – I’ll cover these options below.
- Search Engine Indexing: If turned on, your page will be able to appear in search results on Google, Bing, and other search engines.
- Link Expiration (Plus plan or higher): Set the public link to expire after a certain amount of time.
You’ll also see an Unpublish button you can use the make the page private again.
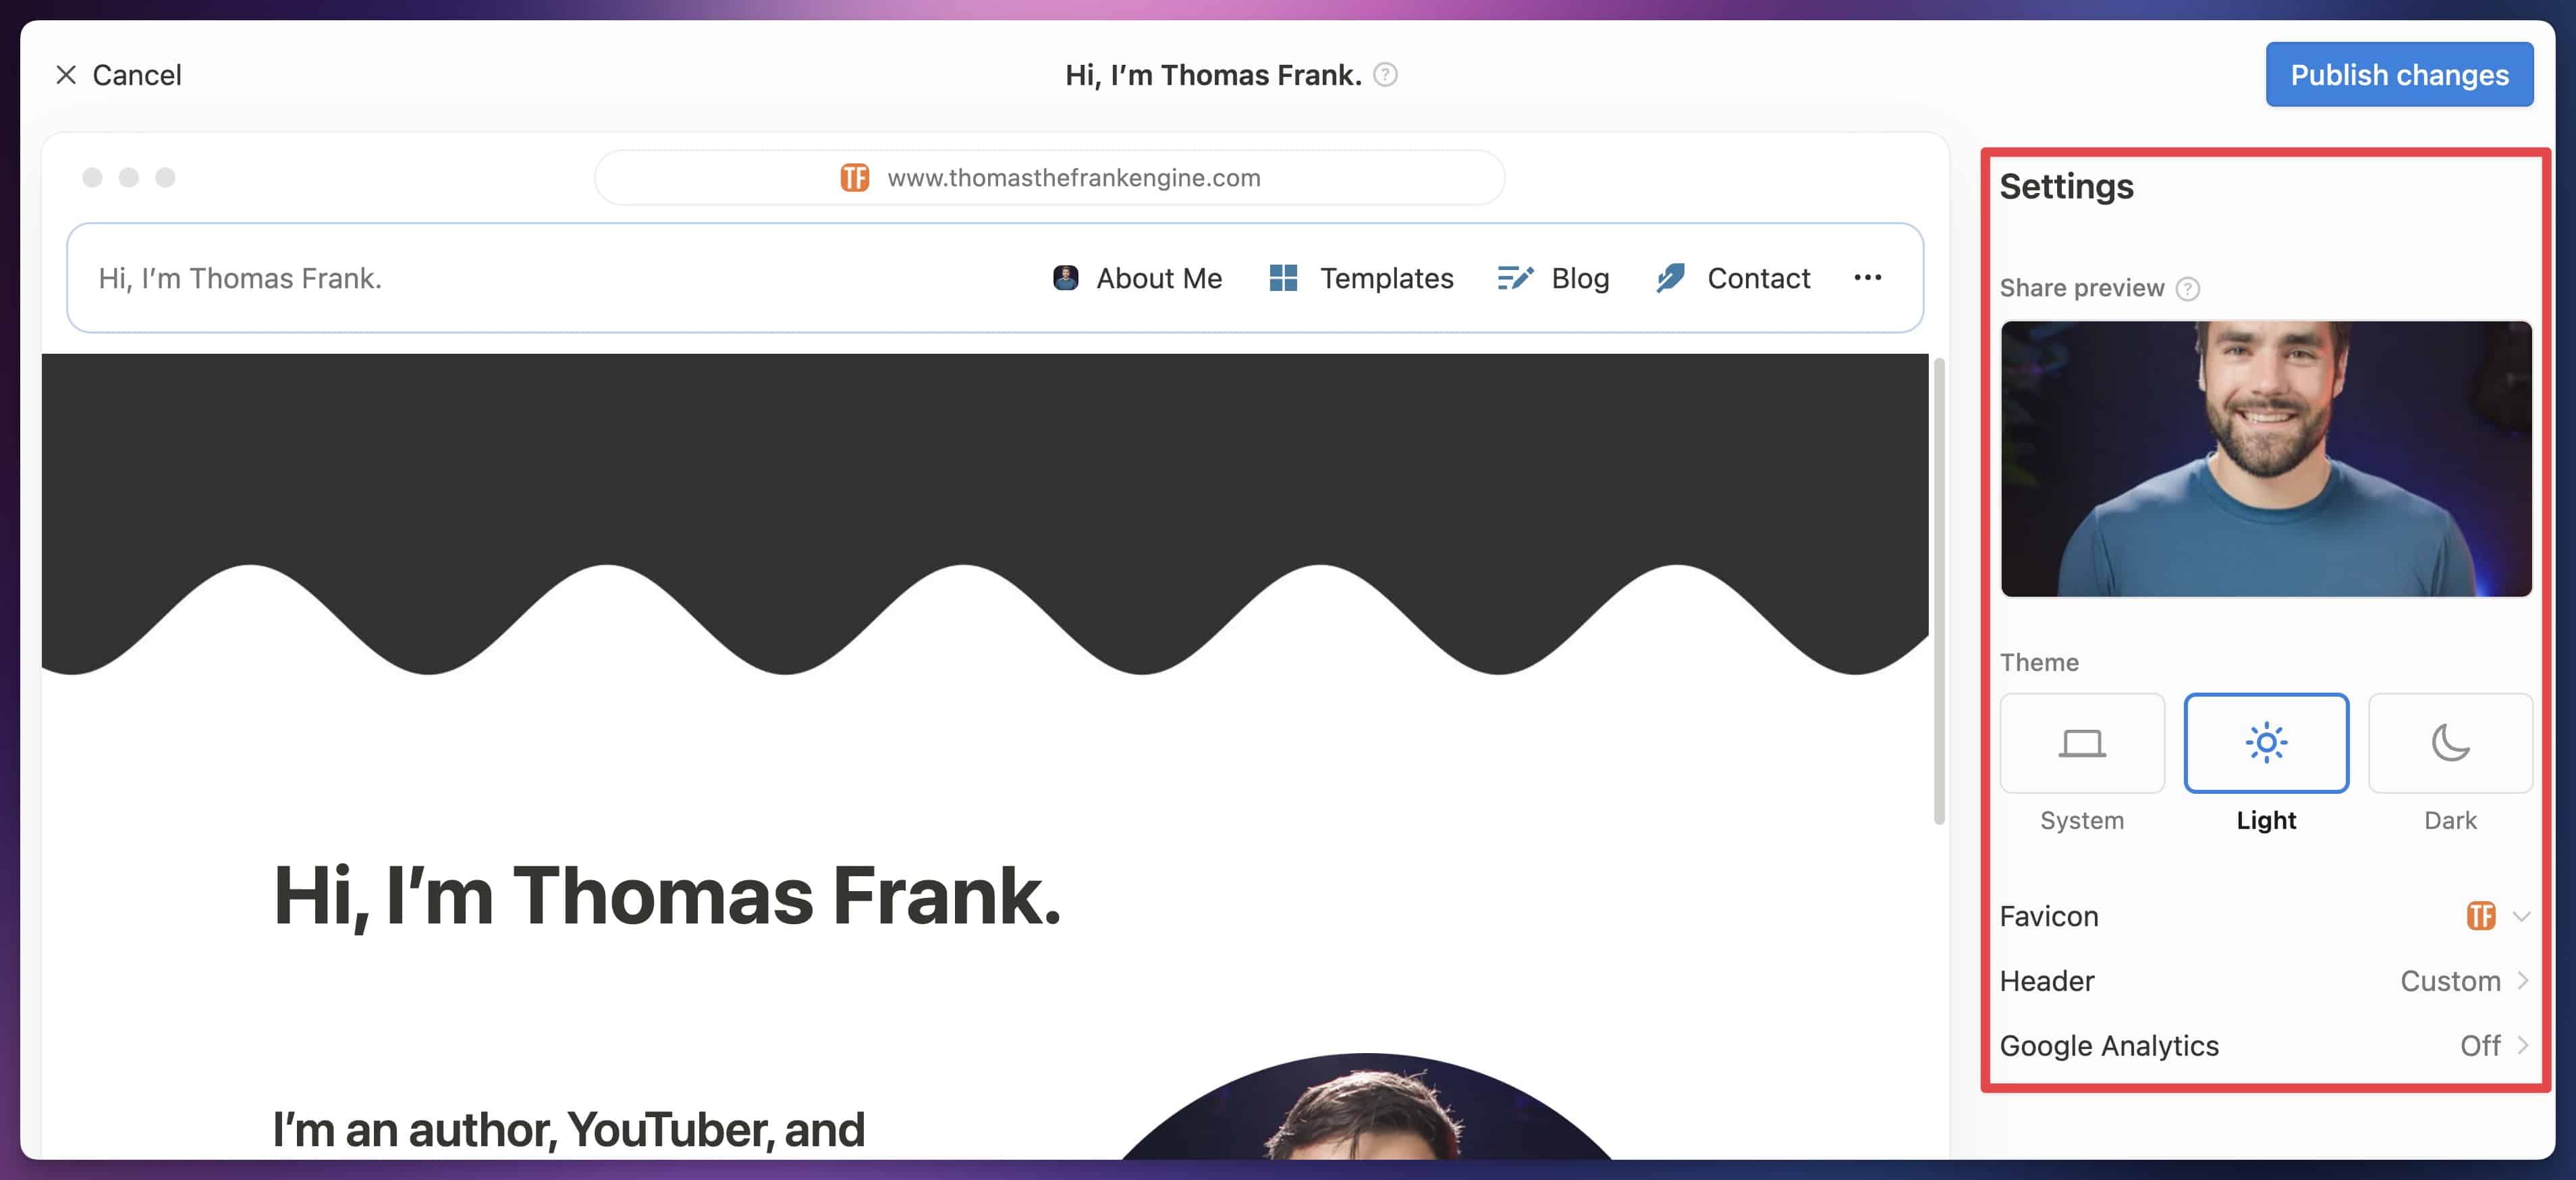
In the Site Customization area, you’ll see multiple options for customizing the way your public page looks and functions. Note that these settings will also affect any public pages within the page you’re currently customizing, but won’t affect other public pages in your workspace.
If you’re on Notion’s free plan, you won’t have many options here. Under Header, you can turn Duplicate as Template on or off – turning it on will allow others to create a perfect copy of the page (and all sub-pages) in their own Notion account. This is exactly how I share my Notion templates.
If you’re on Notion’s Plus plan (or higher), you can set all of the other options as well. These include:
- Share Preview: Upload an image that will show up as the share image on Facebook, Twitter/X, etc.
- Theme: Explicitly set your site to light or dark mode, or have it respect the user’s current OS setting.
- Favicon: Use the page’s current icon, or upload a custom favicon for the whole site
- Header: Enable/disable breadcrumbs, site search, template duplication, and Notion watermark (only if you have a custom domain for this site). You can also add sub-pages to the header here.
- Google Analytics: Add a Google Analytics Measurement ID to track your site’s analytics.
Most of these features were newly added in the Notion Sites release in June 2024. Here’s a full video covering everything you need to know:
Back in the main Share menu, if you switch over to the Share tab, you’ll see a new access level called Anyone with Published Link. Here, you can set an access level for the public, much like you can for Members, Guests, Groups, etc. You can allow anyone with the link to view, comment, and/or edit the page.
Note: Be careful with setting “Can Edit” permissions on a public page! Anyone with a Notion account will be able to edit a page with this setting. I do not recommend ever allowing this, especially in any workspace where AI Agent functions are not locked down, as it creates a prompt injection risk.

Build a Website in Notion
Public pages essentially allow you to create a free website, and Notion has finally acknowledged this though the release of their Notion Sites features. They form what just might be the easiest way to build a website in the entire world, and you can even add a custom domain for an extra monthly fee.
Here’s a video tutorial I made that shows how you can make a portfolio website with Notion:
You can also see the resulting example portfolio if you like.
One downside of Notion Sites is that you can’t add custom themes or CSS. If you need those features, check out tools like Super and Notaku – these are website builders that use Notion pages as a base.
If you’re curious, this website uses WordPress. Check out my website speed guide for full details on this site’s tech stack. My app Flylighter’s website is built on Framer, which I also highly recommend. In general, I think Notion’s public-page feature is great for beginners who don’t want to invest in a website builder with a higher learning curve – or for “expiring” websites, such as those for events.
Copy link to headingRecommended Permissions for Teams
If you’re building out a Notion workspace for your team, how should you set up the permissions structure? In this section, I’ll give you a few pointers and best practices.
There are two primary ideas you should keep in mind when tackling this task.
The first is the Principle of Least Access that I mentioned earlier: Each person on your team should have the access they need to do their work unimpeded, but no more.
This principle is especially important when it comes to granting permissions that would allow a person to change the structure of your Notion workspace – e.g. adding or removing database properties, inviting new Members, etc. Notion differs from other productivity software in that is essentially lets you build your own software within it.
This can be a double-edged sword when you’re working with a team. It’s easy to build up your workspace and tailor it to your needs, but it’s also easy for a team member to inadvertently make changes that are harmful or that confuse everyone else.
The second idea has to do with communication. It’s not enough to change some settings in Notion; you need to talk with your team and ensure that everyone understands how to use the structure you’ve set up – and that it’s clearly understood who maintains the Notion workspace (a role I’ll call the Notion Architect on your team).
With that in mind, here are my general recommendations for setting up a team workspace:
- Keep Workspace Owners to a minimum. The only Workspace Owners should be the Notion Architect(s), along with any key leadership figures who need/demand admin access.
- Set up Teamspaces to compartmentalize information by team/department.
- Don’t store highly sensitive information in Notion (e.g. passwords)
- Lock pages and Linked Database views that don’t need to be edited often.
- Lock all source databases once they are set up.
- Most Members should only have Can Edit Content access to databases, not Can Edit.
- On the Business plan (or higher), use page-level access rules to create row-level security where needed.
- On Enterprise plans, change additional settings to further lock down the workspace as needed.
- Be aware of AI Agent risks.
Let’s briefly touch on teach of these principles in a bit more detail.
Keep Workspace Owners to a Minimum
Remember that the Workspace Owner role grants true admin power. Workspace Owners can change the roles anyone else in the workspace, remove members, add new members, create new Teamspaces, etc.
Therefore, you should be thoughtful about who in your workspace is a Workspace Owner. In my team’s workspace, there is only one (me). A couple other key members of my team have the Membership Admin role, since we’re on an Enterprise plan – this gives them the ability to add new Members, which aids in onboarding new hires.
On our team, I am the main Notion Architect, as well as the CEO of our company. Since I have both of these roles, no one else needs to have Workspace Owner permissions – and granting them would violate the Principle of Least Permission.
Now, we’re a team of <10 people, and our workspace settings almost never need to be changed. In a larger company, it might make sense to built in some redundancy by appointing multiple Workspace Owners.
However, once you do this, you need all Workspace Owners to be on the same page about how the workspace is supposed to be set up. The last thing you want is different admins making sweeping changes at their own whims without consulting other people who will be affected.
Set Up Teamspaces
Teamspaces let you create different “departments” in your workspace – and in fact, “departments” are a good initial mental model for setting up Teamspaces.
In our company, we have three primary “teams” – Content, Education, and Development. These teams correspond to our main activities:
- Content – focuses on developing new YouTube and Nebula videos, blog posts, newsletters, and social media content.
- Education – focuses on Notion templates, customer support, and creating course materials.
- Development – focuses on building Flylighter and our Notion automations
Each department has a Teamspace dedicated to it, with a set of pages that are unique to that Teamspace’s needs. For example, the Content Teamspace contains our team’s copy of Creator’s Companion, the system we developed to plan and track all of our content.
These Teamspaces are set to Closed mode, with the following permissions:
- Teamspace Owners: Full Access
- Teamspace Members: Can Edit
- Everyone Else: Can Comment
By setting the Teamspace to Closed, but giving non-Teamspace-Members the Can Comment ability, we keep the majority of the information in the Teamspace “open”.
This can be useful when someone who isn’t in the Teamspace needs to reference a piece of information. They can find it (or be linked to it by another team member in Slack), but they would have to request to join the Teamspace before they could make changes to it.
Aside from our three “team” Teamspaces, we have two others.
First, we have our Default Teamspace, which we call The Bridge. All workspace Members are also members of this Teamspace, and it contains our general Knowledge Base.
Finally, we have a Admin Teamspace that is set to Private mode. Workspace members who have not been invited cannot see that this Teamspace exists. We use this Teamspace for information that should only be seen by company leadership.
This structure is merely a suggestion, and keep in mind that you can further customize permissions at the page level. For example, you might have a Teamspace that’s fairly open to all workspace Members, but within it, you might have a page where most Members only have Can View permission. It’s up to you!
Don’t Store Highly Sensitive Information in Notion
Don’t store passwords in Notion. It’s not the right tool for that job. Similarly, don’t store other highly sensitive information in Notion.
Notion has a strong set of industry-standard security practices, including SOC 2 Type 2 compliance, HIPAA compliance, encrypting data at rest and in-transit, etc. From the perspective of its infrastructure and policies, it’s pretty much on the same level, security-wise, as other business productivity software like Slack, Google Drive, etc.
But there are certain types of information that demand an even higher level of security. Passwords are a good example. If password data is to be stored in a cloud service, it should:
- Be encrypted end-to-end
- Have encryption keys controlled only by the end user and/or company IT admin
Your company may have the same stringent requirements for other types of data that it stores and processes.
If you’re curious, the diagram below outlines the difference between true end-to-end encryption and at-rest/in-transit encryption, the latter of which is used by Notion:
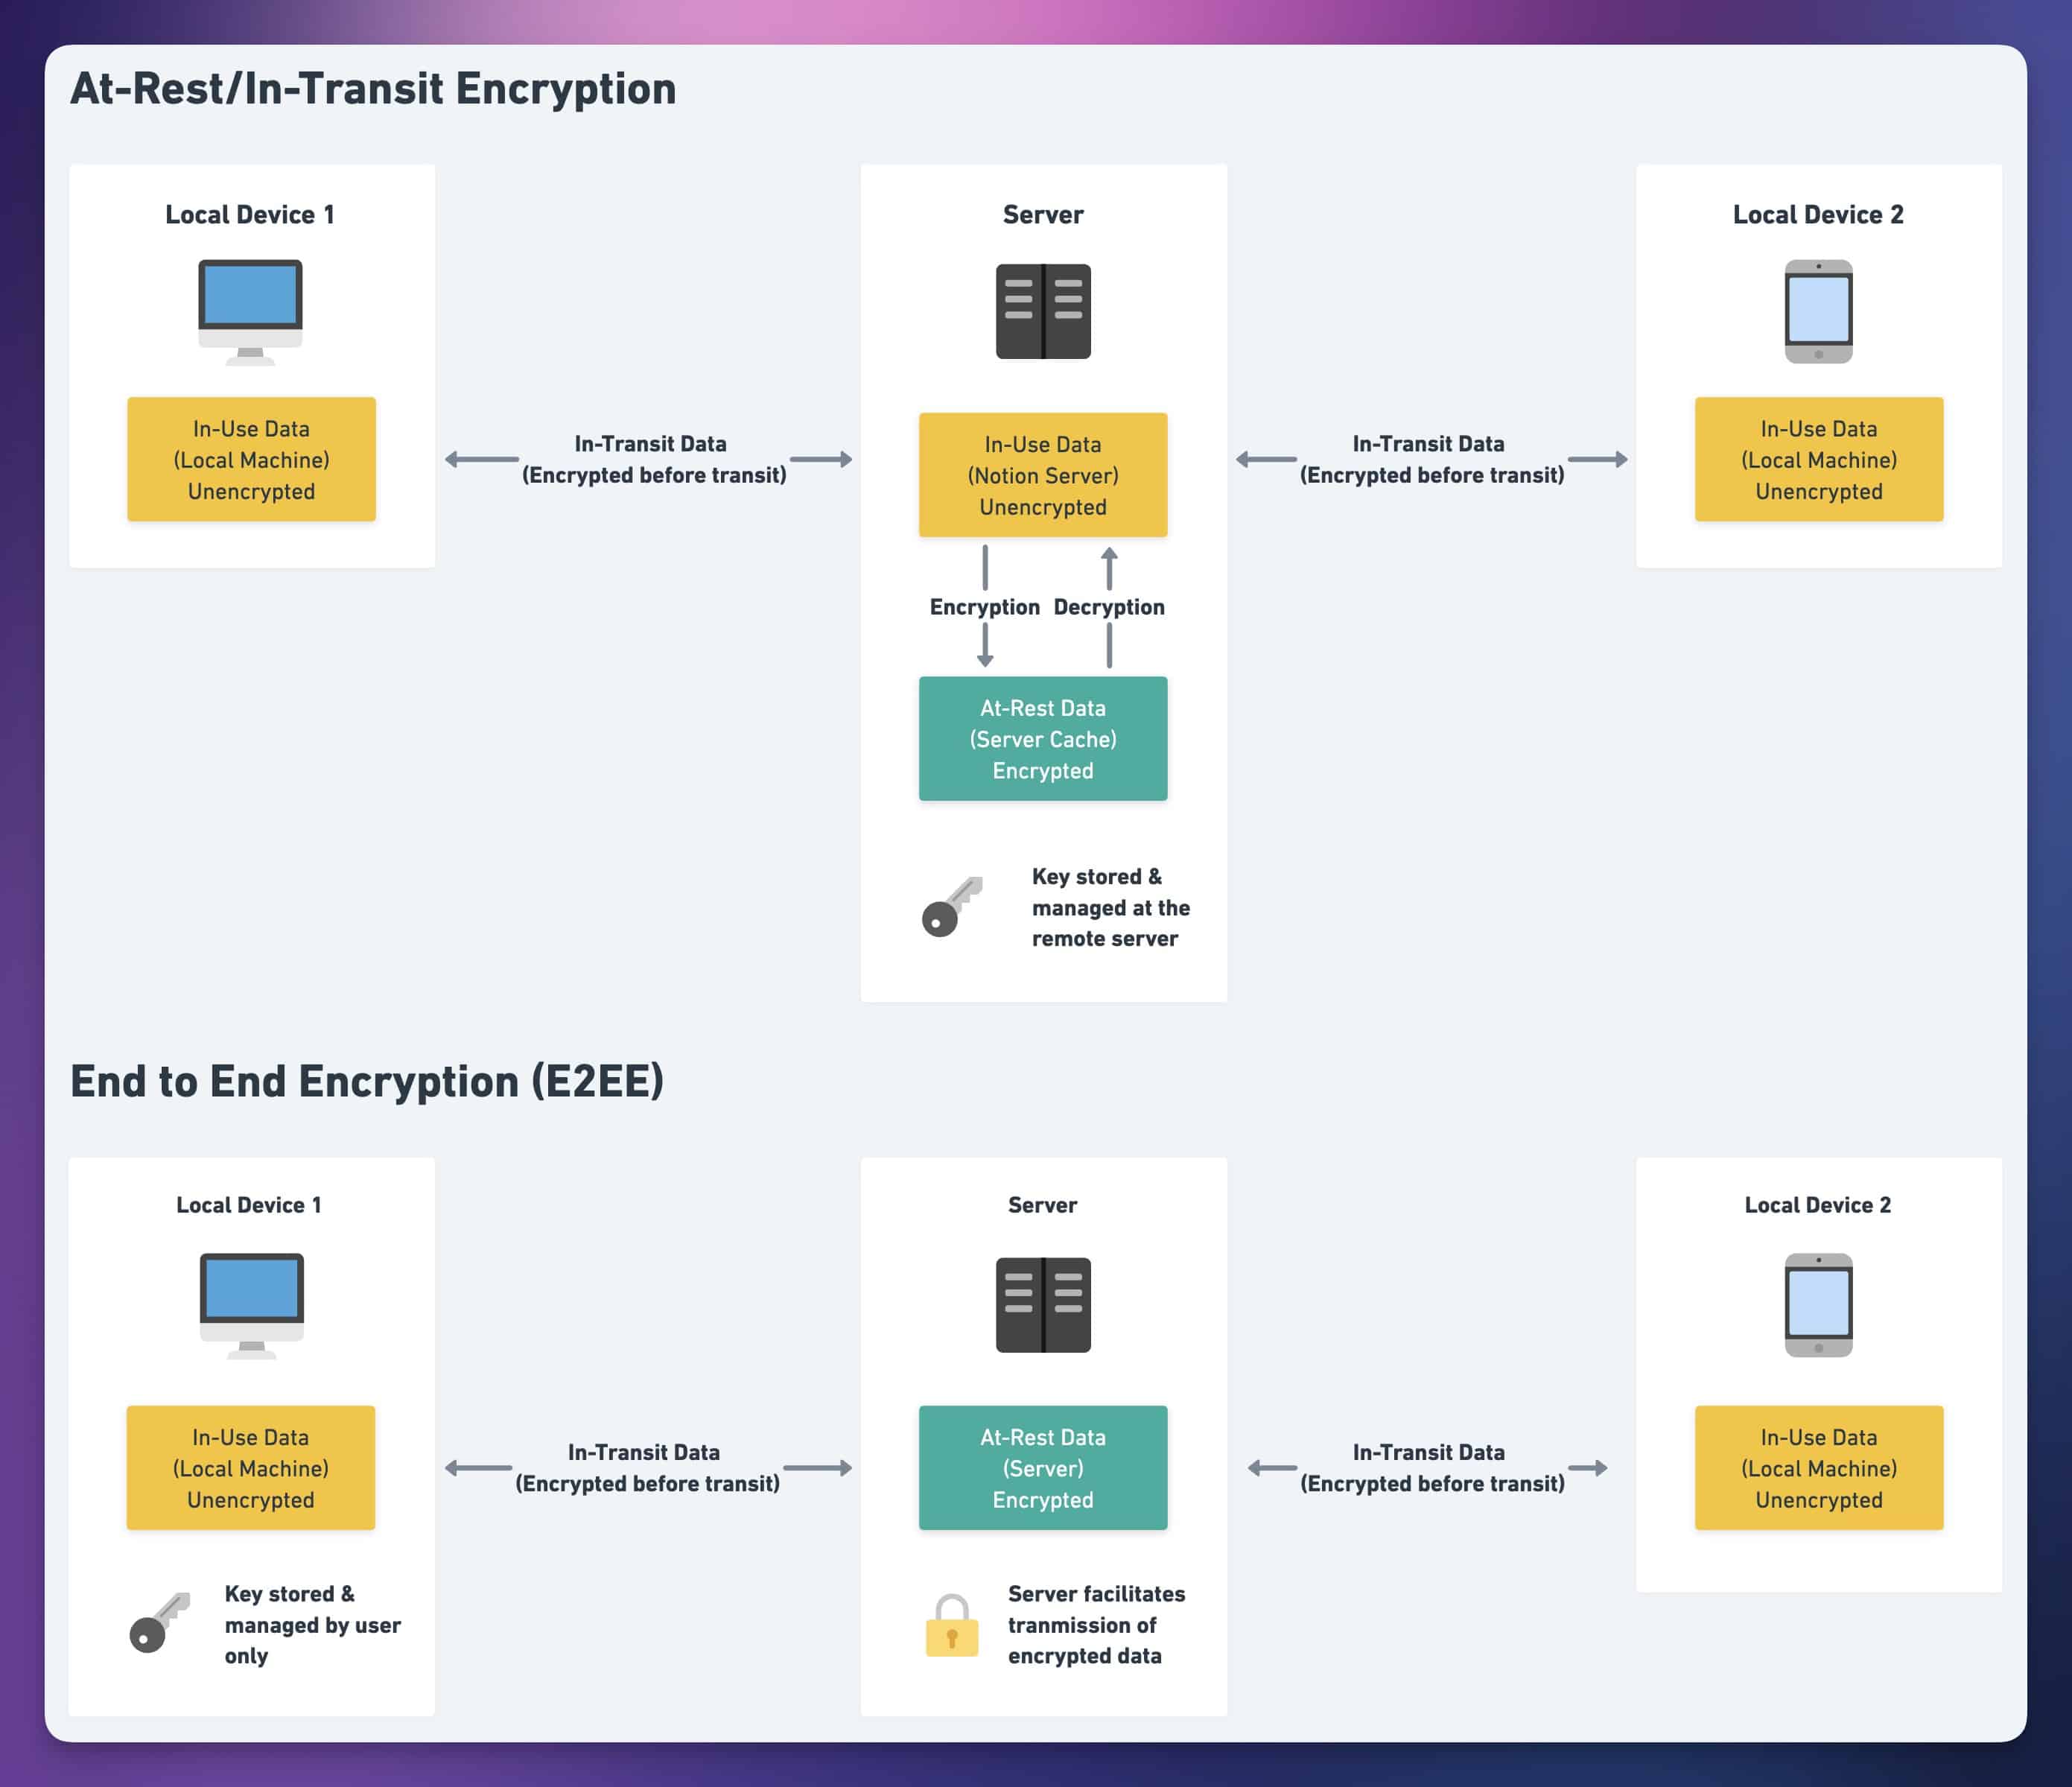
The main difference is that data remains full encrypted when it’s on the remote server; the server acts only as a “ferry” to get the data between multiple local client devices.
While this is a more secure approach, it also prevents the server from providing useful services – e.g. allowing users to collaborate on pages in real-time. This is why collaboration-focused apps like Notion don’t (and really can’t) use end-to-end encryption.
Lock Pages and Linked Databases
When Members in your workspace have Can Edit permission on a page, they can edit the structure of that page however they like. They can even delete content.
I’ve seen and heard about plenty of instances where a Member has accidentally deleted content from a page or database. And while you can use the Page History feature to undo some changes, sometimes these deletions can go undetected for a long time – meaning that undoing them through Page History will undo subsequent changes as well.
Therefore, I recommend locking important, commonly-used pages that don’t need to be edited very often. This can include:
- Hub pages – Knowledge Bases, Meeting Notes dashboards, etc
- Documented processes and SOPs
- Company reference information1
Additionally, I’d recommend locking the views of Linked Databases that you embed in these commonly-used pages.
I fully cover the Lock feature in the next section, but it’s important to remember that locking only prevents unintended changes. Anyone with Can Edit or Full Access to a page can unlock it, allowing them to once again make changes.
But keeping important pages locked by default helps prevent the majority of those “oopsie” moments that can cause major headaches down the road.
Lock All Source Databases
While I believe it’s useful to lock commonly-used pages, I think it’s crucial to lock your important databases.
Database may end up containing thousands of pages, and each of these pages can have its own unique property values. That last thing you want if for another team member to unwittingly delete a property, remove an important option from a Select or Status property, etc.
Therefore, I highly recommend locking all important databases in your workspace. As with pages, it’s easy to unlock them if changes need to be made. But keeping them locked by default helps to prevent accidental changes.
“Can Edit Content” Permissions for Members
When setting up important databases in your workspace, you should click the Share menu on the database itself and change most people’s access from Can Edit to Can Edit Content.
Alternatively, fully remove access to databases and use page-level access rules to create row-level security for your users. See the section below for more on this.
You have to do this manually on each database; since Pages don’t have this permission option, a database that you create within a page can never inherit it by default.
Here’s why you want to do this: Anyone with Can Edit permissions on a database can change that database’s structure. They can add new properties, delete properties, and change property options.
The majority of the Members in your workspace do not need these capabilities, and granting them puts your databases (and their data) at risk.
Think about software other than Notion – the vast majority of software your team uses does not grant everyone access to change the structure of their databases under the hood. In fact, most software that you use doesn’t even let you mess with those databases.
Notion is uncommon in this regard; it lets you act as the software developer, creating and customizing databases that assist your workflows. However, only the Notion Architect(s) on your team should retain this ability.
By setting everyone else to Can Edit Content, they’ll still be able to work with the database in all the ways that matter:
- Creating new pages
- Editing and deleting existing pages
- Changing property values on individual pages
This is exactly how they would interact with a database in any other app.
Set Up Granular Permissions
Notion’s new page-level access rules (Business & Enterprise plans only) allow you to create granular permissions in databases. If you’ve worked with actual database software before, you might know this as row-level security.
With page-level access rules, you can fully restrict users from being able to access databases, and allow them to only access pages where their user accounts are set in Person or Created By properties. This allows you to create rules like the following:
“Thomas can only access pages where he is the Assignee”
This feature is quite new, and has certain limitations that don’t make it suitable for all situations. I anticipate that it’ll become my default recommendation for team setups once those limitations are addressed by the Notion team.
I recommend checking out the granular permissions section of this guide for more detail.
Change Enterprise Settings
If your workspace is on the Enterprise Plan, there are some other settings you can tweak to further lock down the workspace. These include:
- Disabling public pages
- Disabling members from duplicating pages/content to other workspaces
- Disabling exports
Additionally, Enterpriser Workspaces get access to more admin features such as Content Search, the Audit Log, Identity Provisioning, SSO, and more. See the Enterprise section for full details on these features.
Use these features and settings at your own discretion. The larger your company is, and the more sensitive the information you’re dealing with, the more useful they’ll likely be.
Be Aware of Notion AI Risks
With Notion’s “3.0” release, they unveiled a more capable version of AI Agent that can take direct action in your workspace. Notion has essentially stated that anything you can do, your personal AI Agent can do.
This means AI Agent has a lot of power, but also that there are potential risks to be mitigated.
It’s important to realize what that “anything you can do” statement means: your personal AI Agent has the same permissions you do. If you’re working in a team workspace, the same is true for every member in the workspace (guests can’t use AI features).
This means it’s doubly important to ensure that each member has the smallest level of access they need. Notion AI can do a lot in a workspace, and the actions it takes can sometimes be unpredictable and destructive when prompts aren’t worded carefully.
Unlike most MCP tools, Notion’s AI Agent doesn’t ask for user confirmation before taking actions on prompts. For users who are not Notion experts, this can lead to the AI Agent doing things that the user doesn’t fully understand, and that may become hard to undo depending on other factors.
You can mitigate this problem by ensuring team members don’t have the ability to modify important databases and pages. I also recommend training your team on acceptable uses of Notion AI, if you decide to allow use of it at all.
Additionally, AI Agent uses LLMs (large language models, like GPT-5) at its core, and LLMs are vulnerable to prompt injection – meaning that they can be tricked into following instructions hidden within the content they are supposed to be simply processing.
They are, more or less, just like humans – who are vulnerable to social engineering. This is a fundamental difference from normal “deterministic” automations, which have set processing logic that can’t be influenced by any input data.
Programmer and AI researcher Simon Willison has talked about the lethal trifecta problem – a potentially dangerous situation where an AI agent has access to private information, has the ability to communicate externally, and is exposed to untrusted external content (which may contain content designed to attempt prompt injection). While Notion likely has internal safeguards to guard against and mitigate this problem, the problem itself is unsolved.
Your workspace may have several methods by which untrusted external content can make its way into the context window of the AI Agent. Forms, public pages with Can Edit permission, and data from other apps (accessible through AI Connectors) are all examples.
Web search is another example, but you can turn it off in the Notion AI section of Notion Settings. I recommend doing so, and also recommend requiring confirmation for web requests.

Alternatively, you can fully disable Notion AI in a workspace. If you’re on the Enterprise plan, you’ll see the option to do so in that same Notion AI section of Notion Settings.
If you’re on a lower-level plan, you can reach out to Notion support and ask them to fully disable AI in your workspace.
Copy link to headingLocking Pages and Databases
If you hit the ••• menu at the top-right corner of a page or database, you’ll find an option to Lock that page/database.
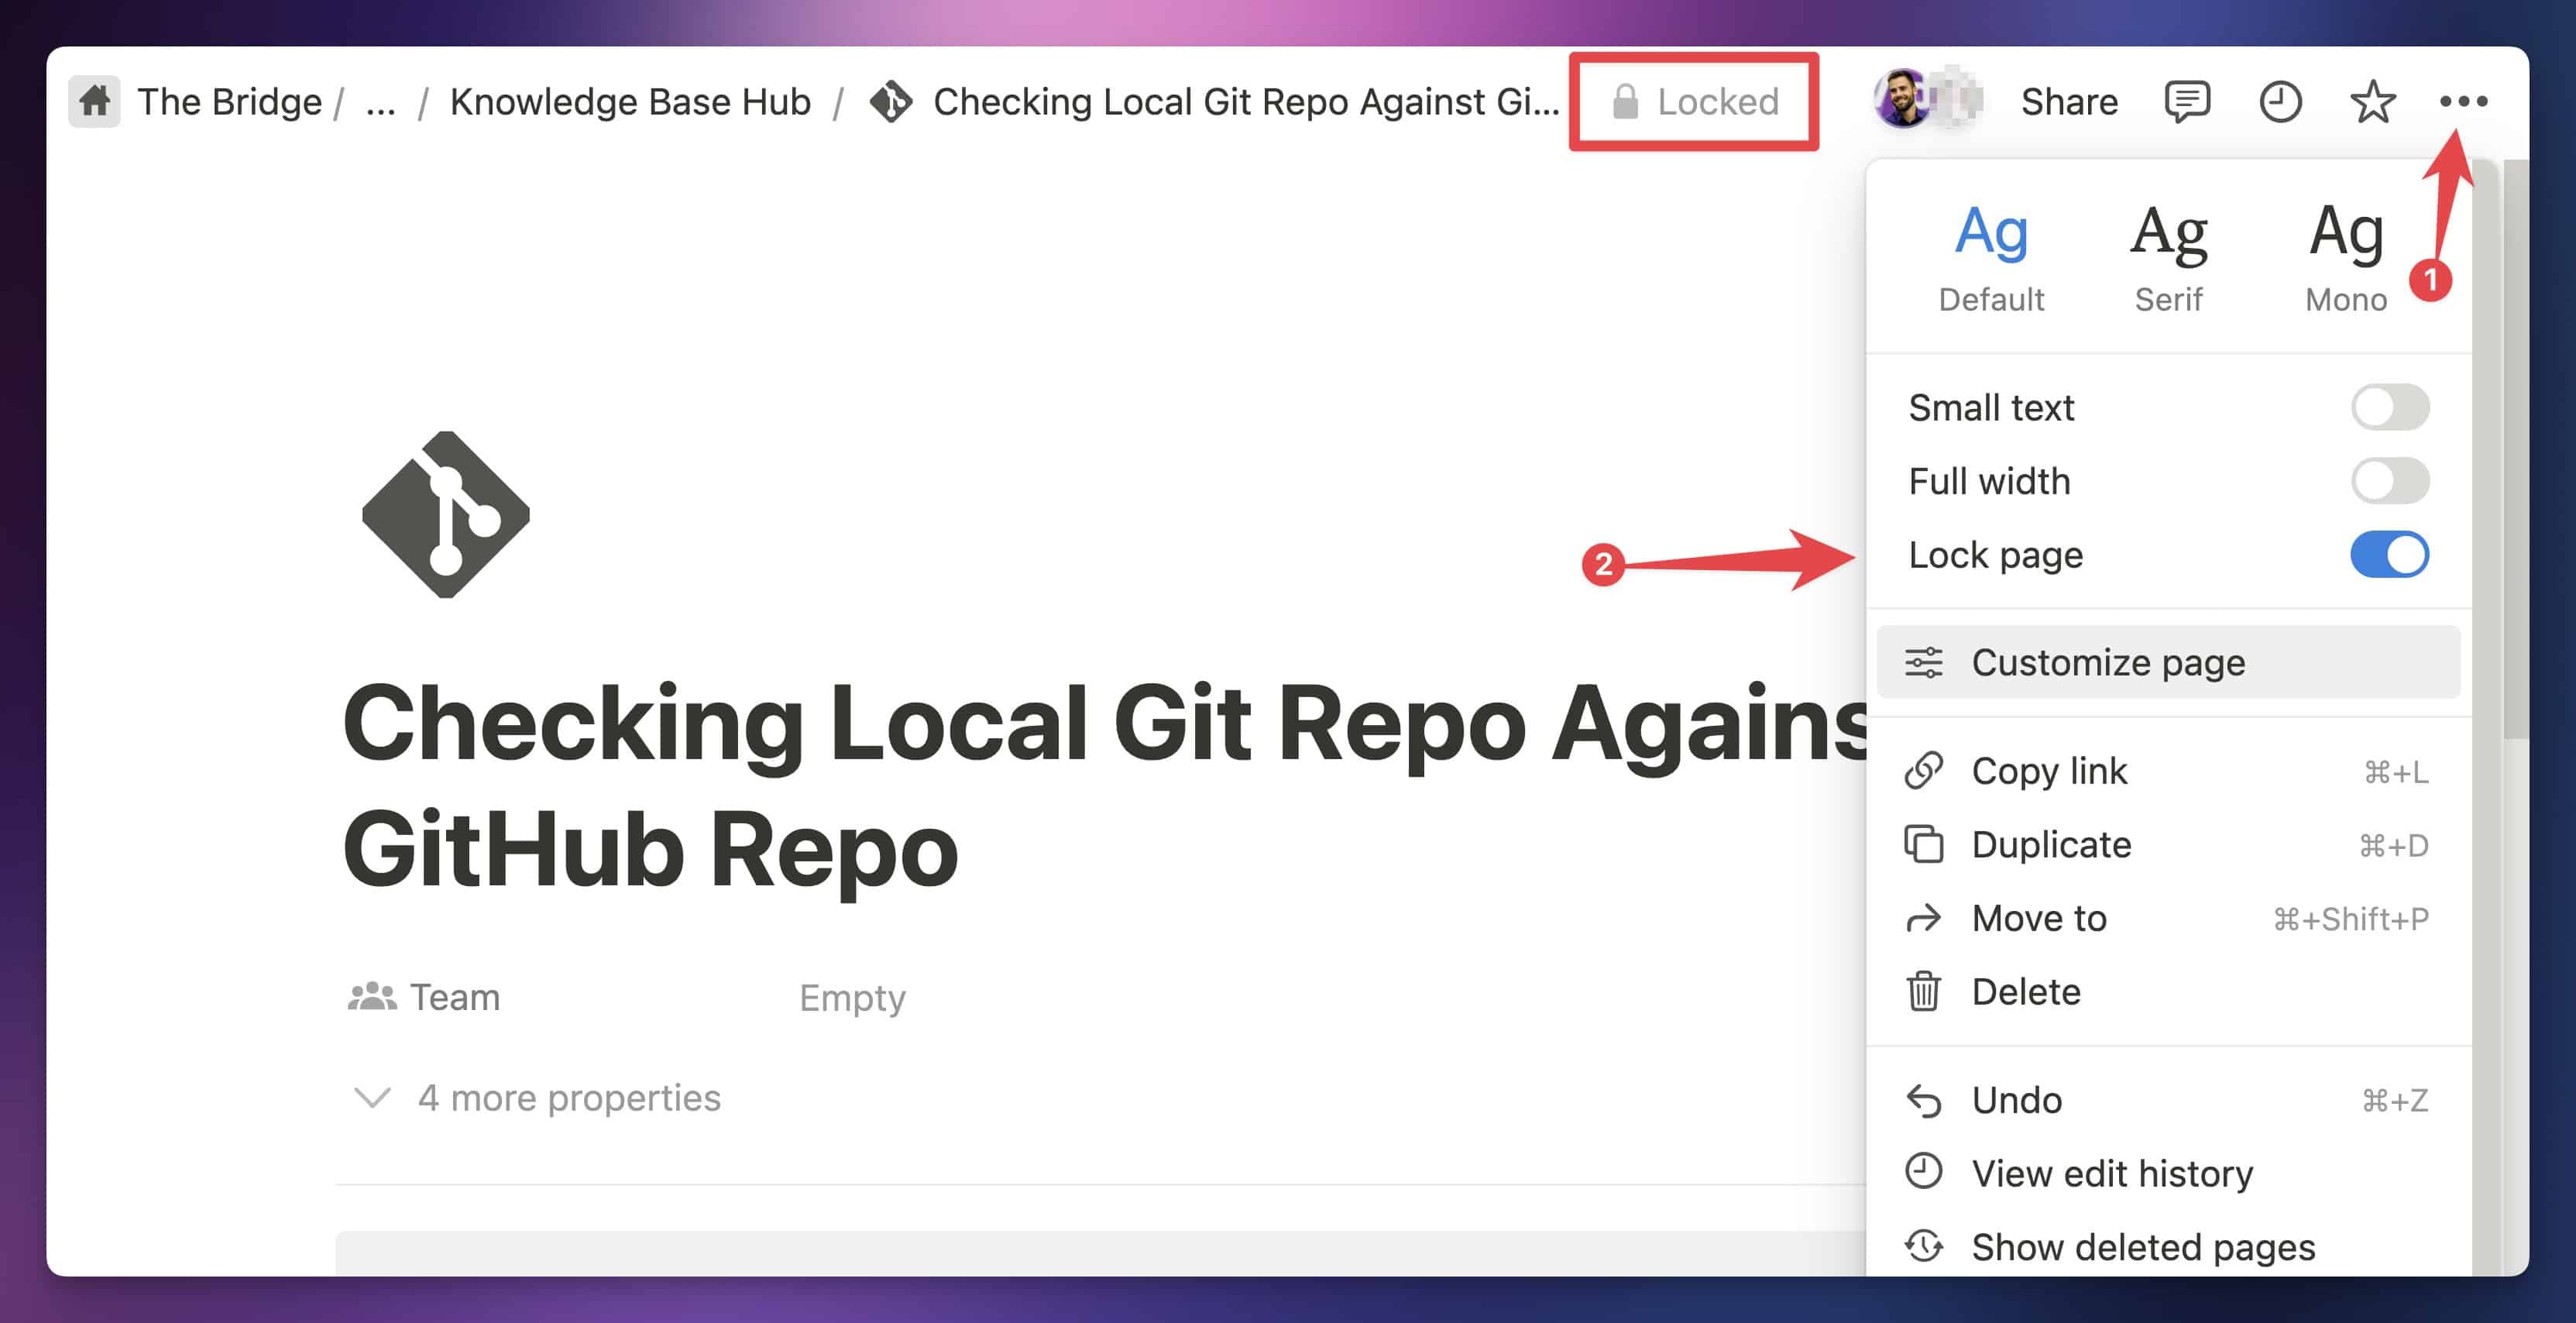
This is a handy setting for preventing unintentional edits to a page or database. The most important thing to know about locking pages/databases is that anyone with Can Edit access or higher will be able to unlock the page/database.
Thus, locking pages is not a good way to set permissions in your workspace. It’s only good for hardening a page against unintentional changes.
For example, if you’ve got a Team Knowledge Base page that should remain static most of the time, keeping it locked is a good idea. If someone needs to make a change, they can quickly unlock it.
When a page is locked, no edits can be made to it, and linked database views on the page will be locked as well. No one will be able to create new pages in them.
One quirk with locked pages: Users with Can Comment access will still be able to add comments at the top of the page, as well as comments on text selections. However, they won’t be able to add comments on blocks.
Copy link to headingLocking Databases
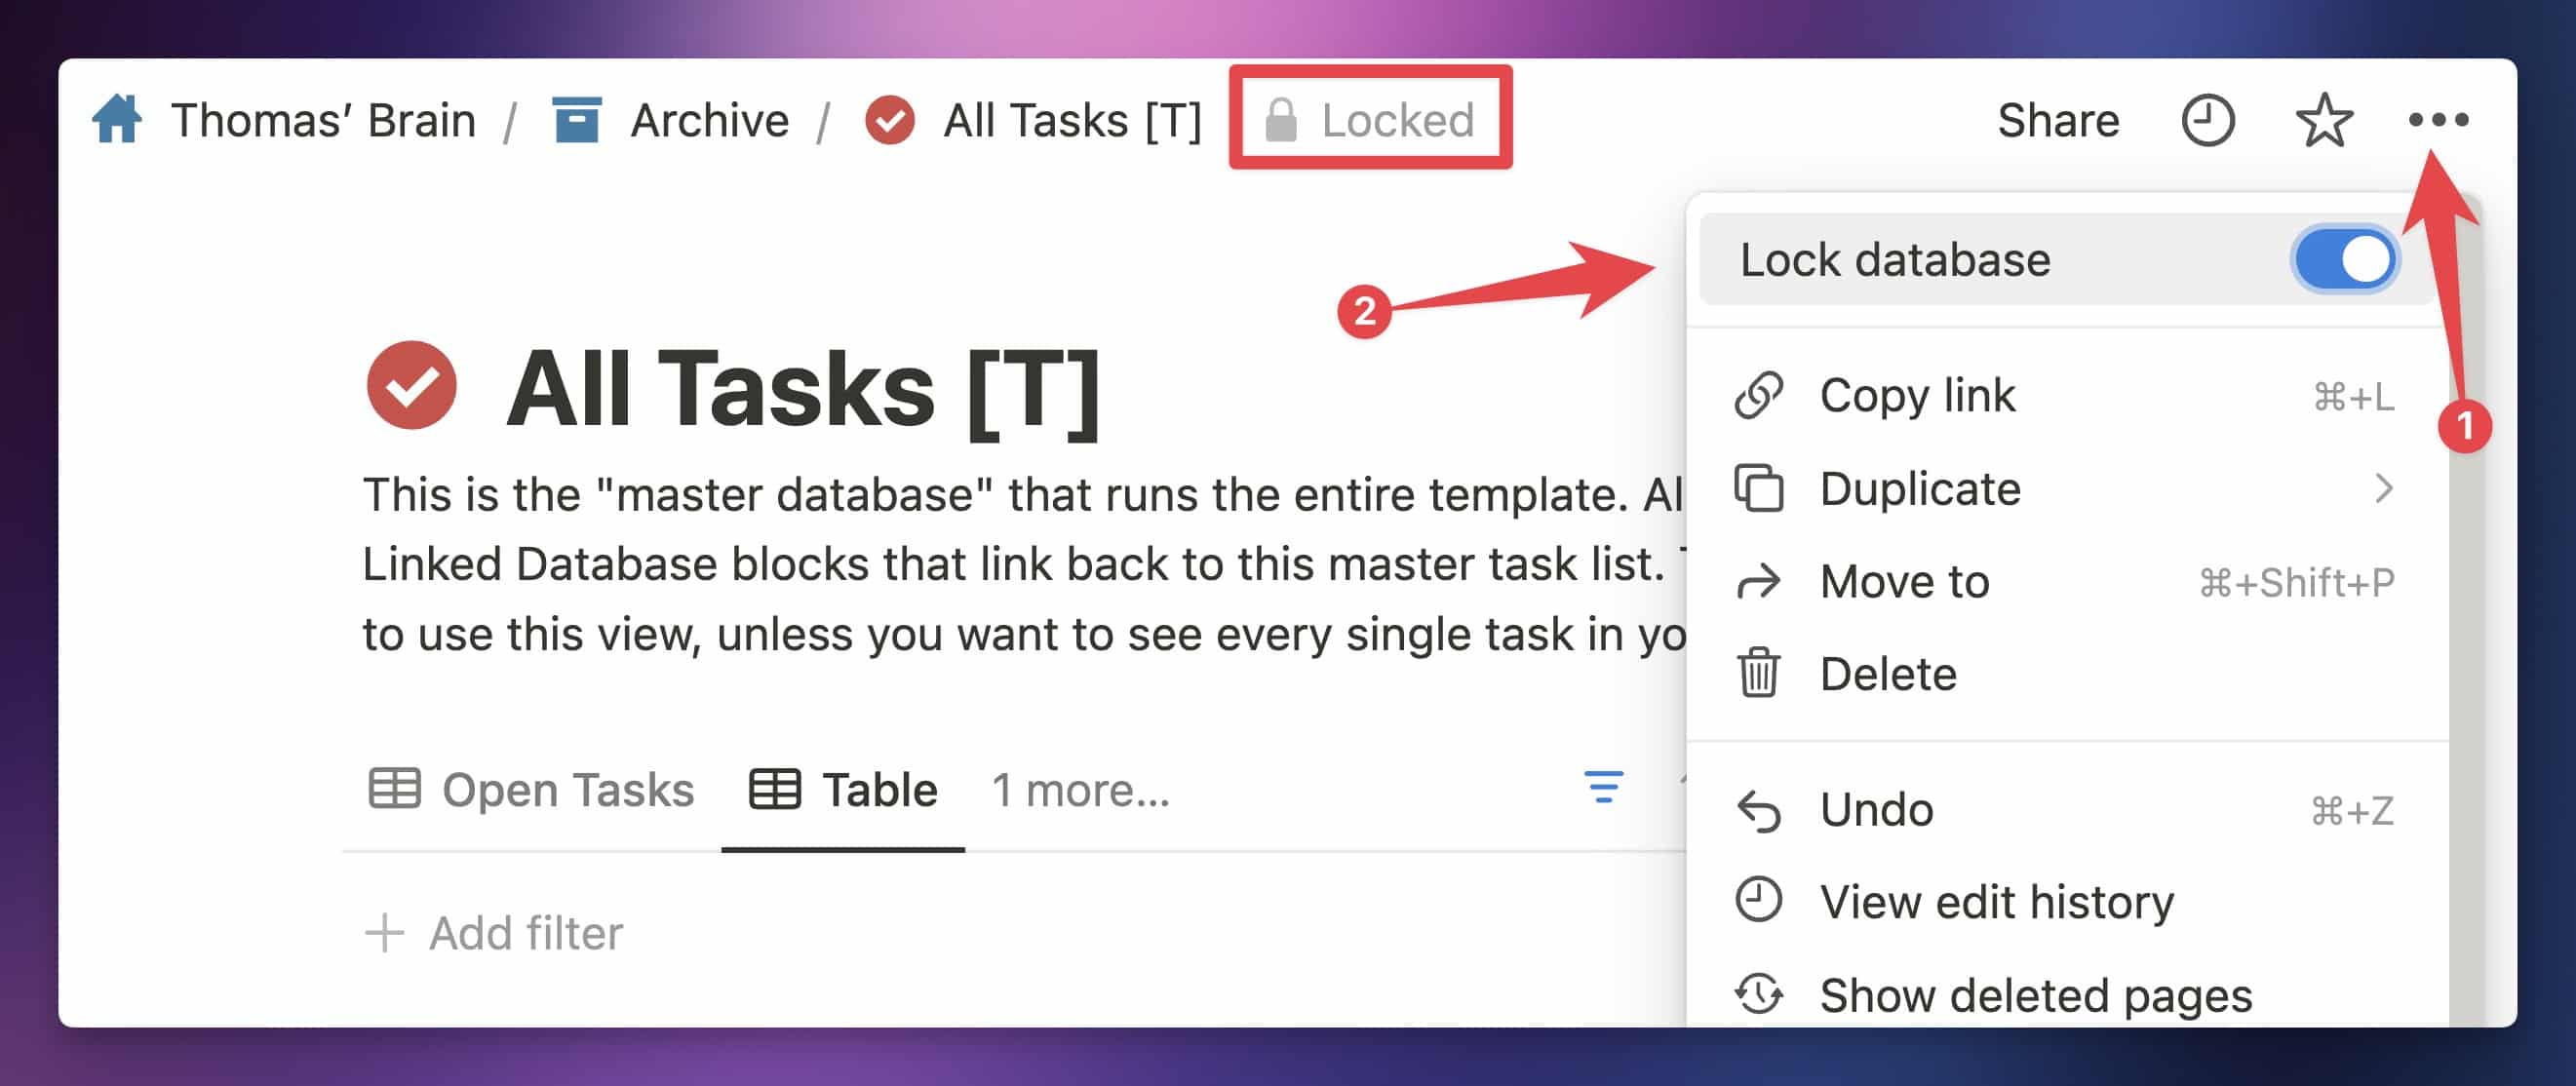
When a database is locked, you can’t change its structure. This includes:
- Creating new properties
- Deleting properties
- Changing properties
- Adding/changing/removing property options – e.g. options in a Select or Status property
- Adding or deleting views in the database itself
- Changing existing view options (users can still add their own filters/sorts, but cannot save them for everyone)
- Adding/changing/deleting/moving data sources
In general, I think it’s a good practice to keep all databases in your workspace locked by default. I even ship my Notion templates with locked databases. This is especially important when you’re working with a team – it’s easy for team members without a lot of Notion knowledge to make accidental changes to databases. Locking your databases helps to prevent that.
Note that locking a database will prevent people from making changes to its properties in any location, including on Linked Database views. However, locking a database does not prevent people from making new Linked Database views, nor will it prevent changes to existing Linked Database views.
Copy link to headingLocking Linked Database Views
You can also lock the views in a Linked Database block. To do so, click the View Options button (•••) on any view in a Linked Database block, then click Lock Views.
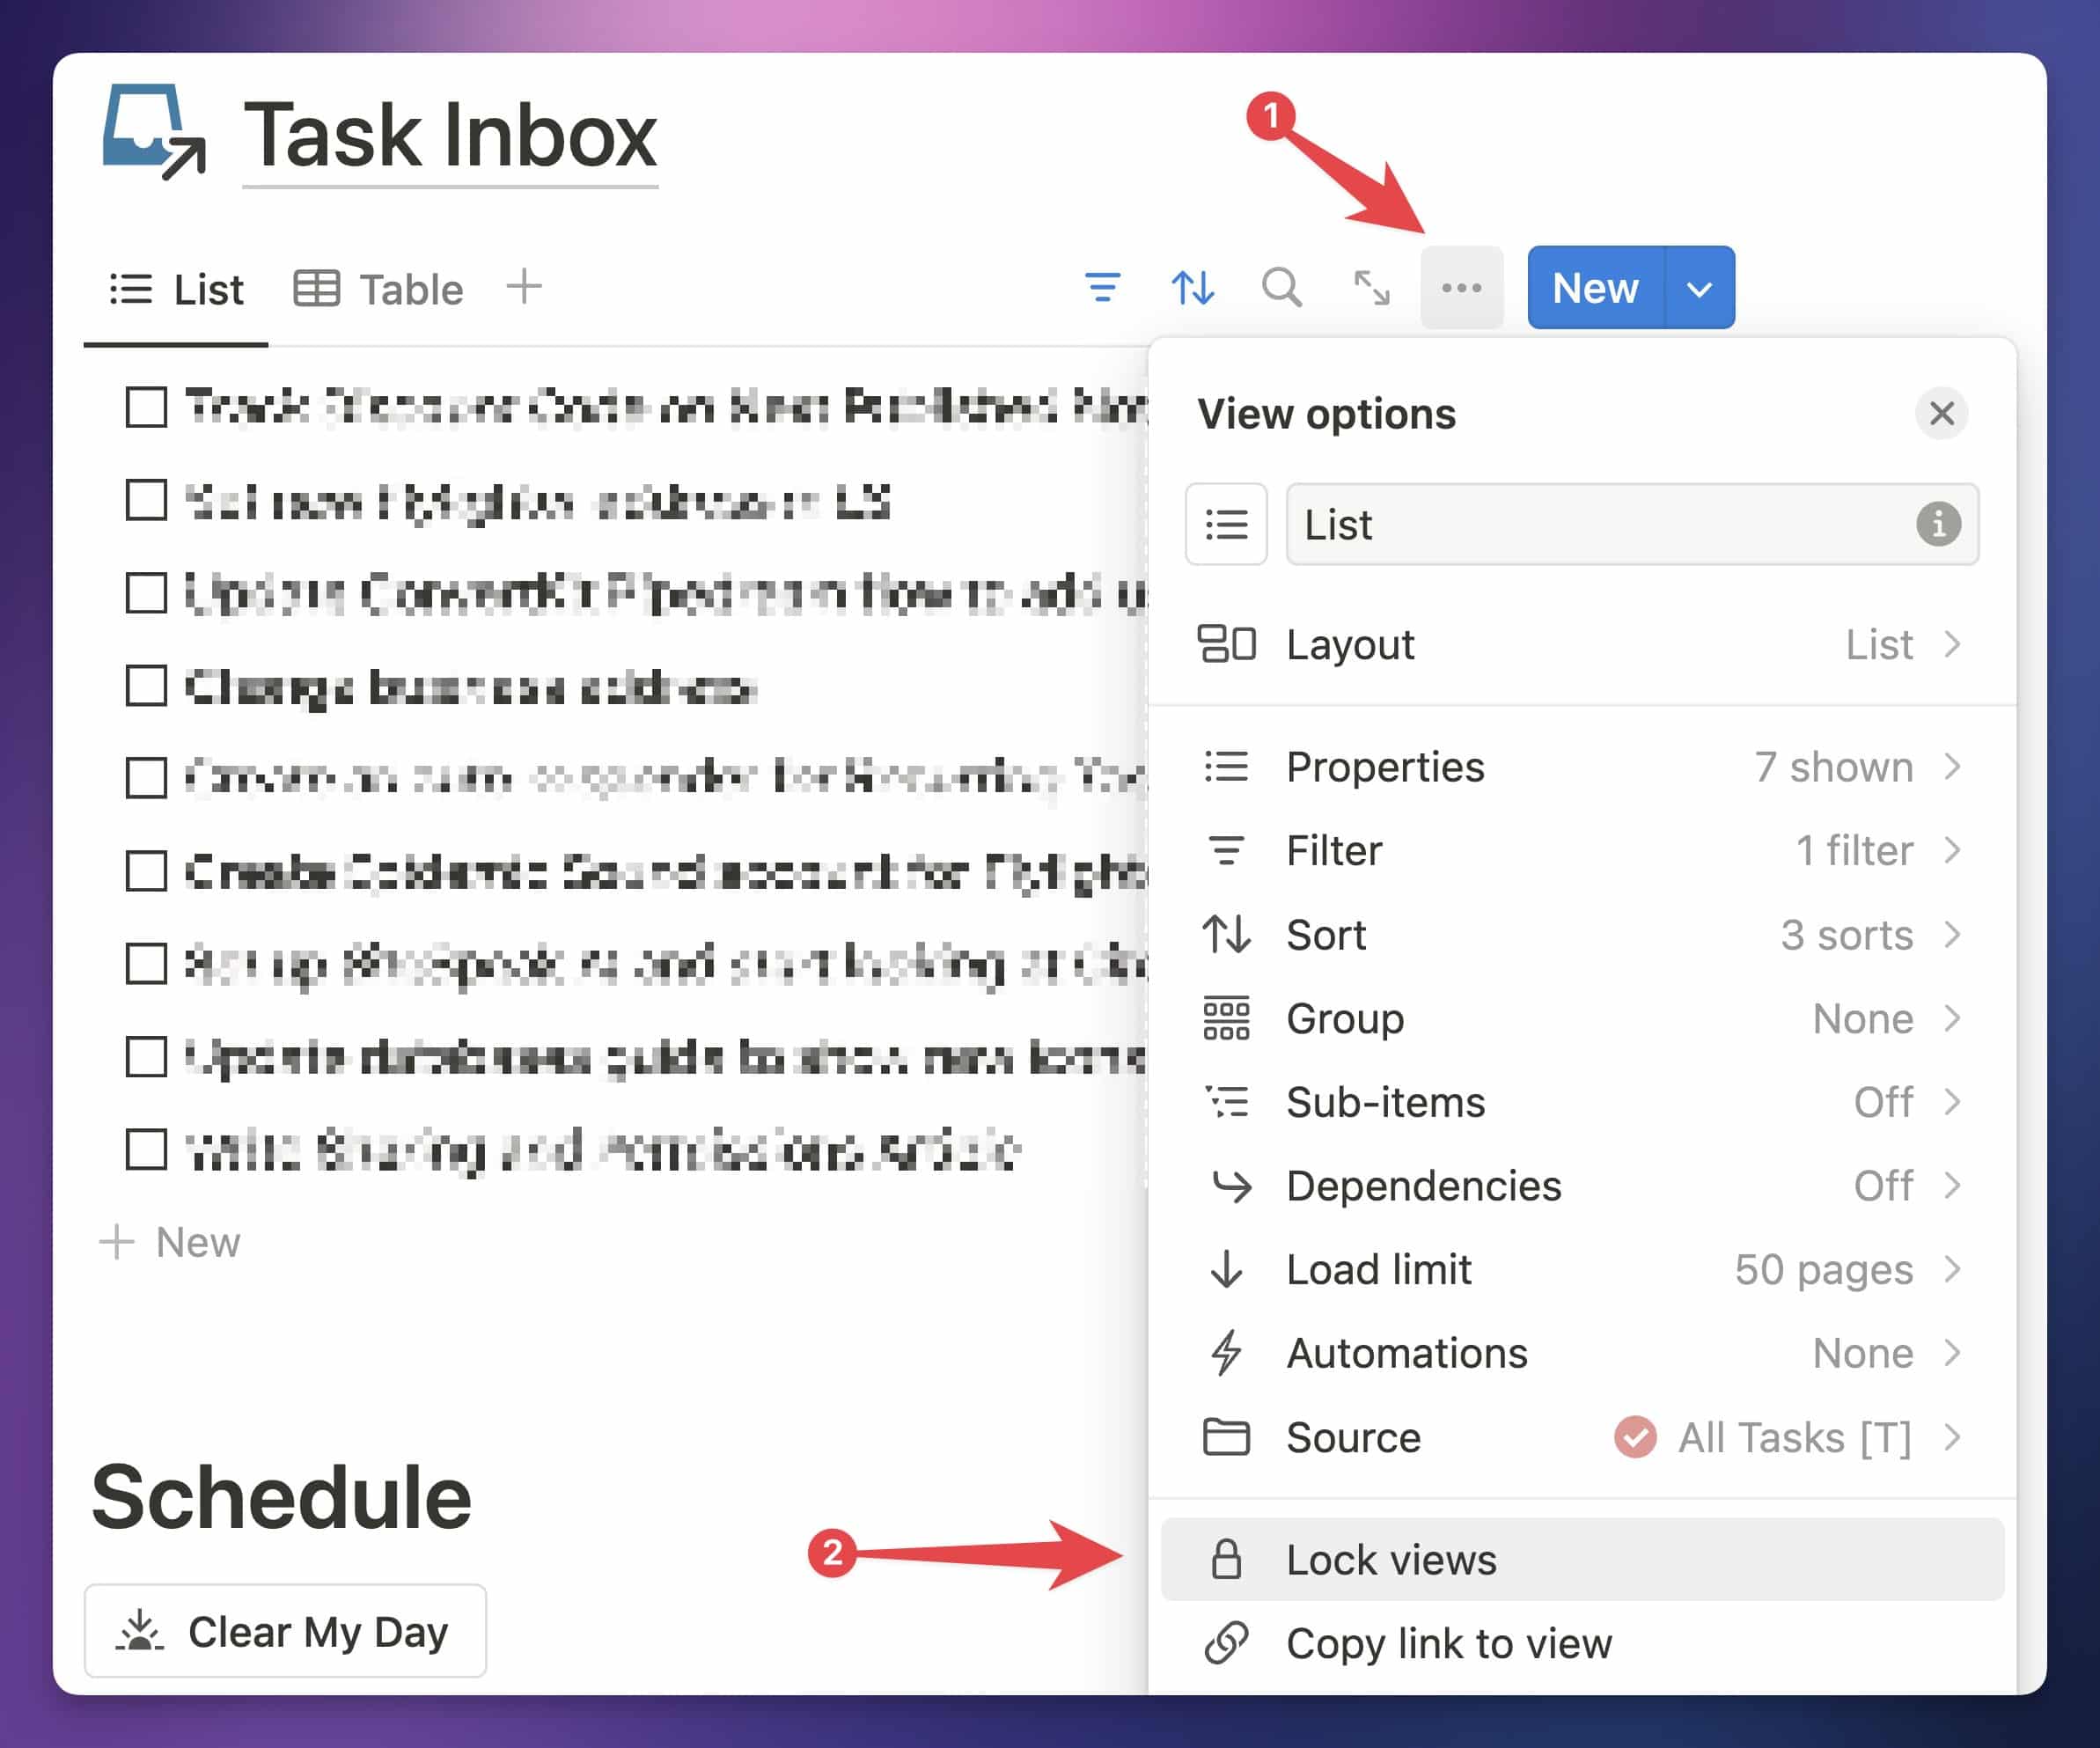
This will prevent changes to all of the views (tabs) in that Linked Database block.
It’s important to know that this setting only prevents changes to settings that affect these views; anyone with Can Edit/Full Access to the source database itself can still make changes to properties if the source database isn’t locked.
When you locked a Linked Database view, users with Can Edit access or higher can still create new pages within it. This differs from what happens when you lock a page that contains a Linked Database block; in that case, new pages can’t be created in that Linked Database block’s views.
There are also a few quirks around locking Linked Database views I’d like to point out:
- Even when views are locked, users with Can Edit access or higher can change the Source of a view in a Linked Database block. I personally don’t understand why this is allowed, but it is.
- Automations can be created in locked views; this is possible because Automations can be set to trigger in any view of the source database.
- Users can still create their own personal filters and sorts; they just won’t be able to click Save for Everyone within shared views.
- Simple filters can be modified and removed in locked views, though this will only affect the view for the person making the change. Advanced filters cannot be modified or removed at all when the view is locked.
Offline Mode Permissions
All Members in your workspace will be able to toggle Available Offline on any page they can access.
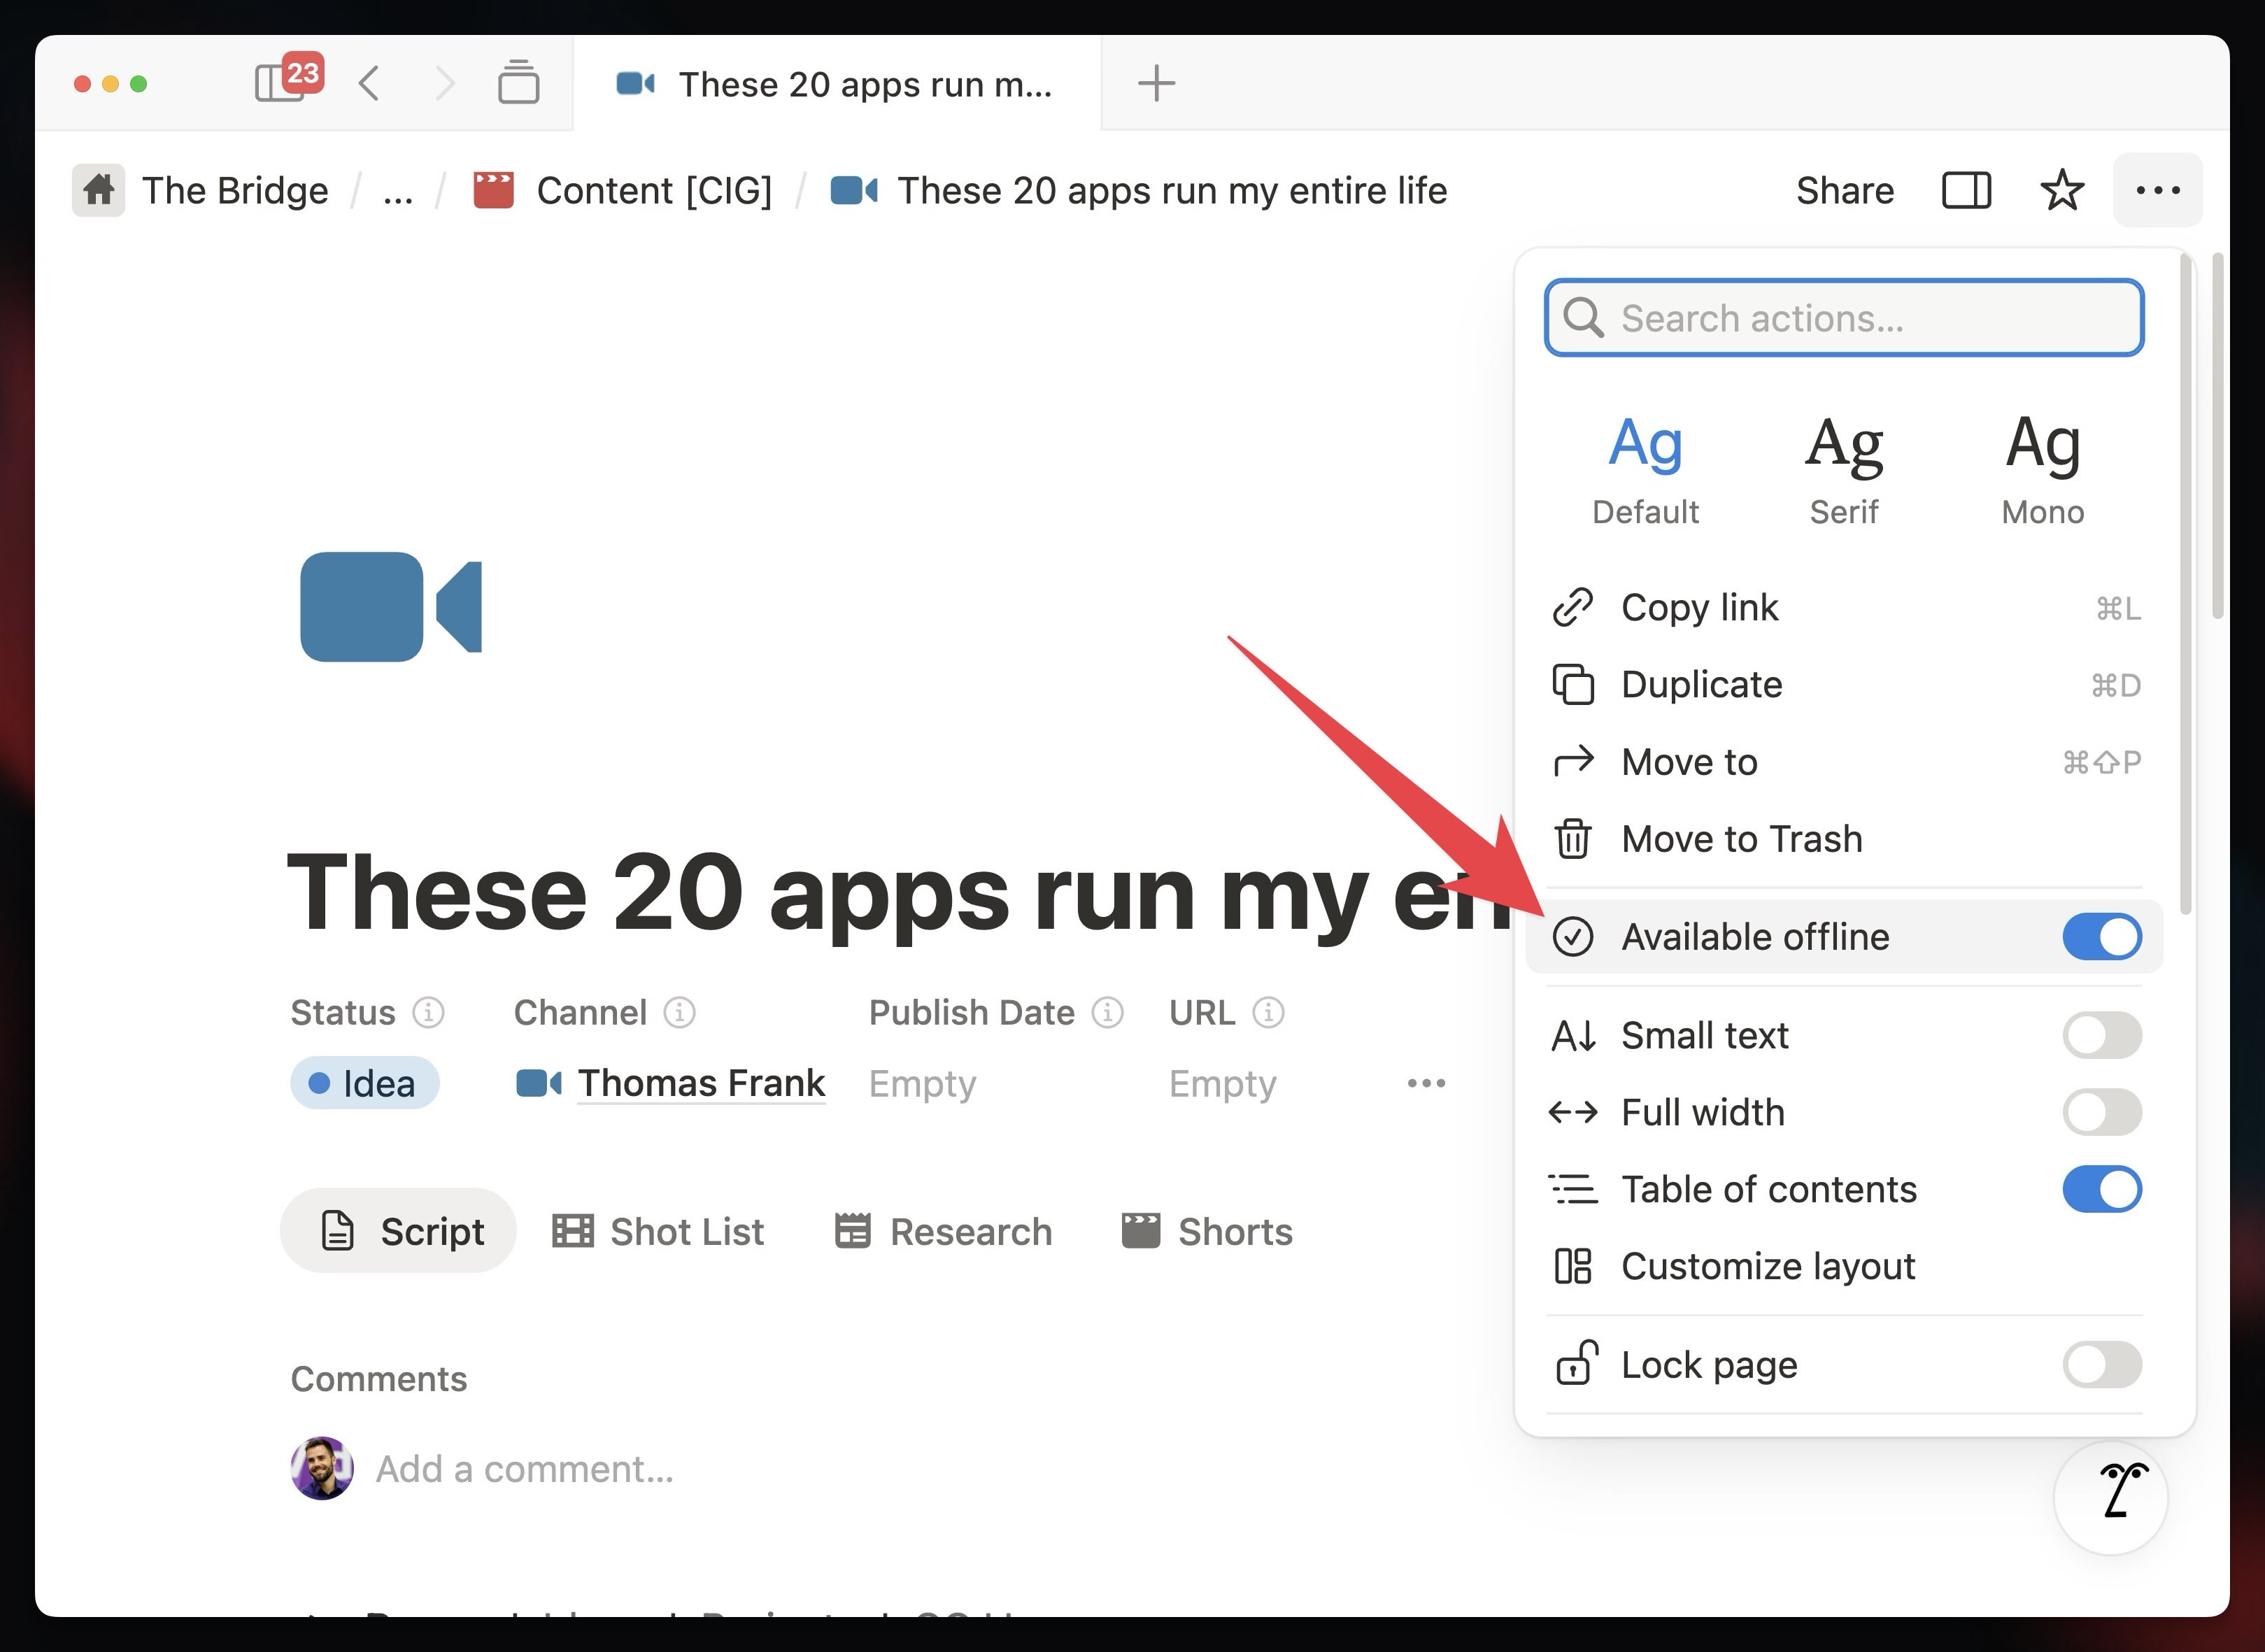
Permission level doesn’t matter; even a Member who has Can View access to a page will be able to make it available for offline access.
Guests cannot make pages available offline. Even if a Guest has Full Access to a page, they will not be able to do so. Offline availability is a perk reserved exclusively for workspace Members (including Members with higher roles, like Workspace Owner and Membership Admin).
When a user goes offline, their level of access will not automatically change. A user with Can View access to a page will not be able to edit or comment on that page while offline.
Notably, a user’s device that is offline will retain access to a page even if you revoke that user’s access – since the device is offline, the Notion client can’t recieve any updates. However, once the device goes back online, it will sync with Notion’s servers, and any permission changes will take effect.
To learn more, check out my full guide to Notion’s offline mode.
Copy link to headingConnections and Integrations
You can make Notion even better by connecting other apps to your workspace.
For example, my team and I built a tool called Flylighter – it’s the most powerful web clipper for Notion, allowing you to capture web pages, highlights, and full articles at the speed of thought. You can set database property values, add auto-fill settings, set keyboard shortcuts to instantly capture resources, and much more. Soon, you’ll be able to capture voice notes, build automations, bring in AI models, and more. Check it out!
In Notion, external apps like Flylighter that integrate with your workspace are called Connections when they’re in your workspace. Outside your workspace, they’re typically called integrations. There are three types:
- Link Preview
- Public Integrations
- Internal Integrations
There are hundreds of integrations that have been built by many developers, and you can see 80+ of them in Notion’s official Integrations Gallery.
Link Previews are quite different from the other two categories; they’re integrations that allow you to bring dynamic data from other apps into Notion. For example, the Whimsical integration lets you embed and view Whimsical boards in a Notion page. P.S. – Whimsical is my favorite tool for building mind maps and flowcharts.
This means that you actually authorize a Link Preview integration at the external app’s website, not within Notion. The integration won’t be able to access any information about your workspace; Link Preview integrations simply allow you to embed dynamic views of data from external apps in Notion pages.
Public and Internal integrations are the exact opposite; you grant them access to your Notion workspace, which allows them to access workspace data and take actions.
The capabilities of an integration are set by the developer. These can include:
- Read content
- Update content
- Insert content
- Read comments
- Insert comments
- Read user information without email addresses
- Read user information including email addresses
You can’t change or customize these capability settings when adding an integration to your workspace. However, you can exercise fine-grained control over which pages and databases the integration can access.
Copy link to headingIntegrations and Page Access
Just as with normal users, integration permissions follow the same cascading model mentioned earlier in this guide. If you give an integration access to a top-level page, it’ll gain access to all sub-pages within that page by default.
As an example, if I give Flylighter access to my copy of Ultimate Brain, it’ll get access to all of the pages and databases within it – my Dashboard, Task Manager, all databases, etc.
Usually, this is desirable. When I give Flylighter access to my Ultimate Brain copy, it allows me to build Flows (forms for quickly capturing articles and highlights) that can capture to any of the pages or databases within it. I might want one Flow to capture to my Notes database, while another captures to Tasks. So granting this “blanket” permission is useful.
However, just as with user permissions, you can override the cascade on individual pages. With integrations, you can do this by clicking the ••• menu on a page or database, then checking the Connections section near the bottom.
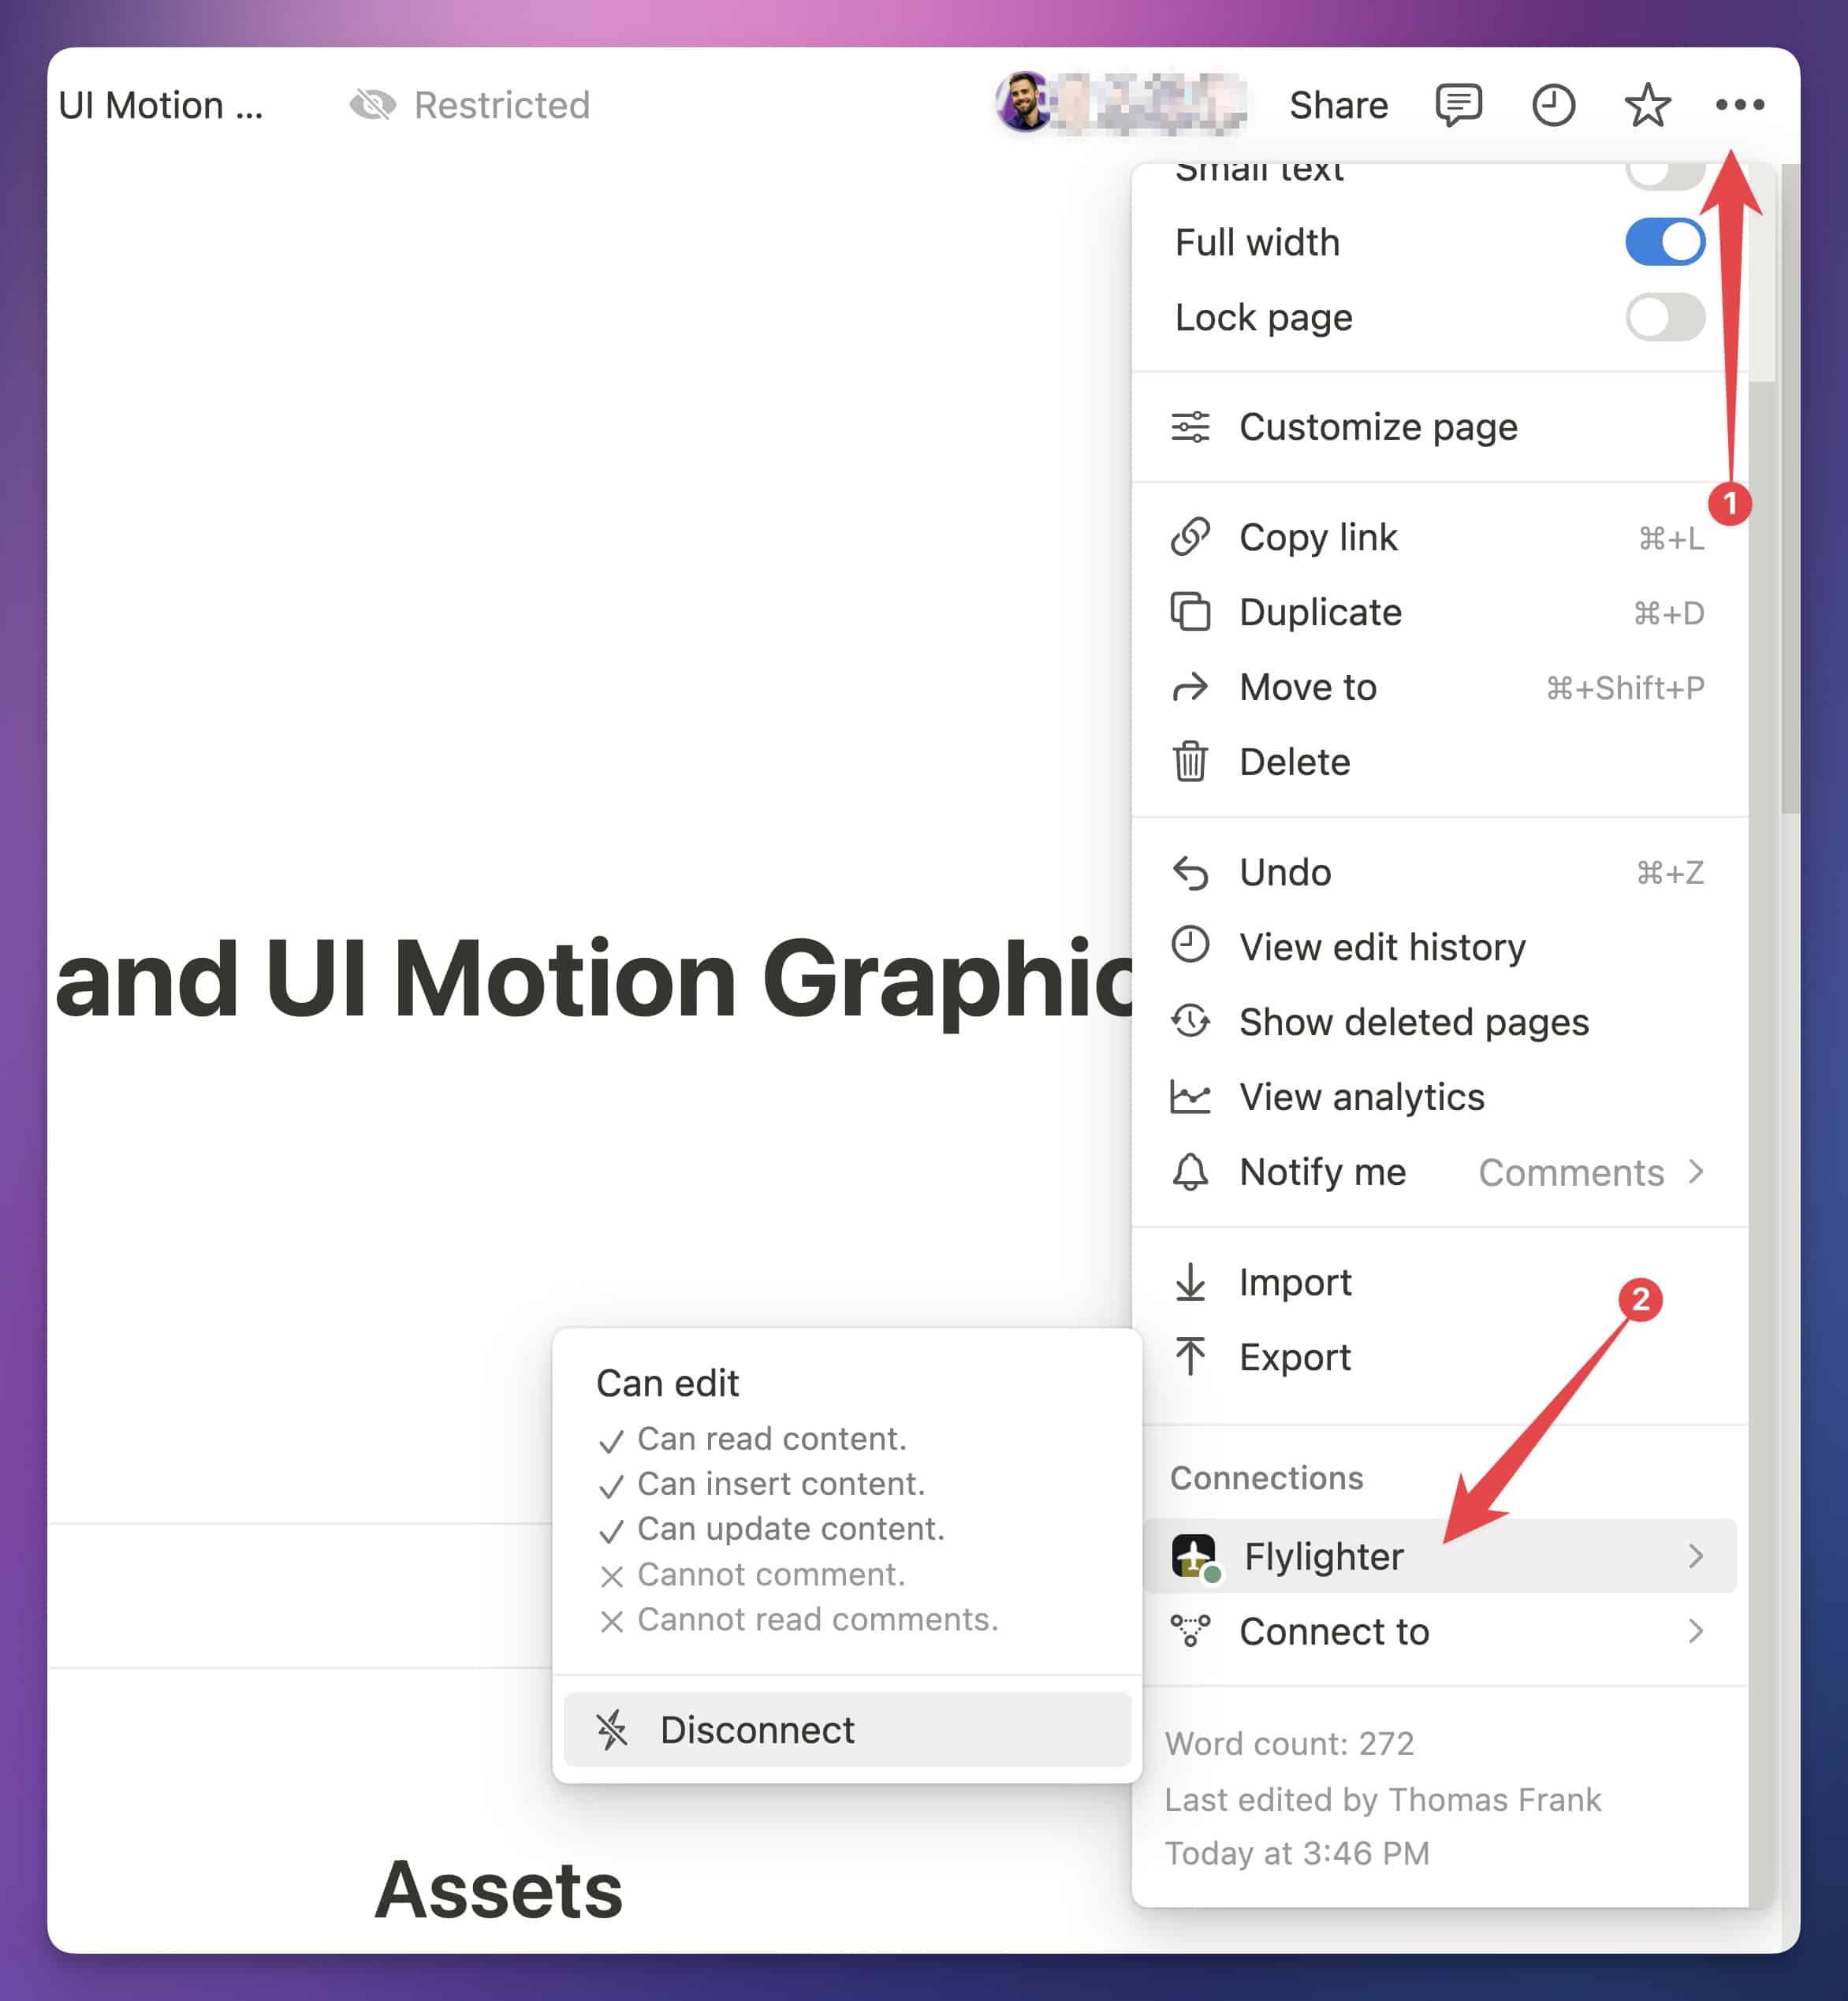
Here, you can see any integrations that have access to the page, and you can mouse over them to see their access level and capabilities. You can also click Disconnect, which will remove the integrations access from the current page and all of its sub-pages.
Copy link to headingMy Connections
In Settings & Members, you’ll see a My Connections menu under your Account section. Here, you can see any integrations you’ve added to the current workspace.
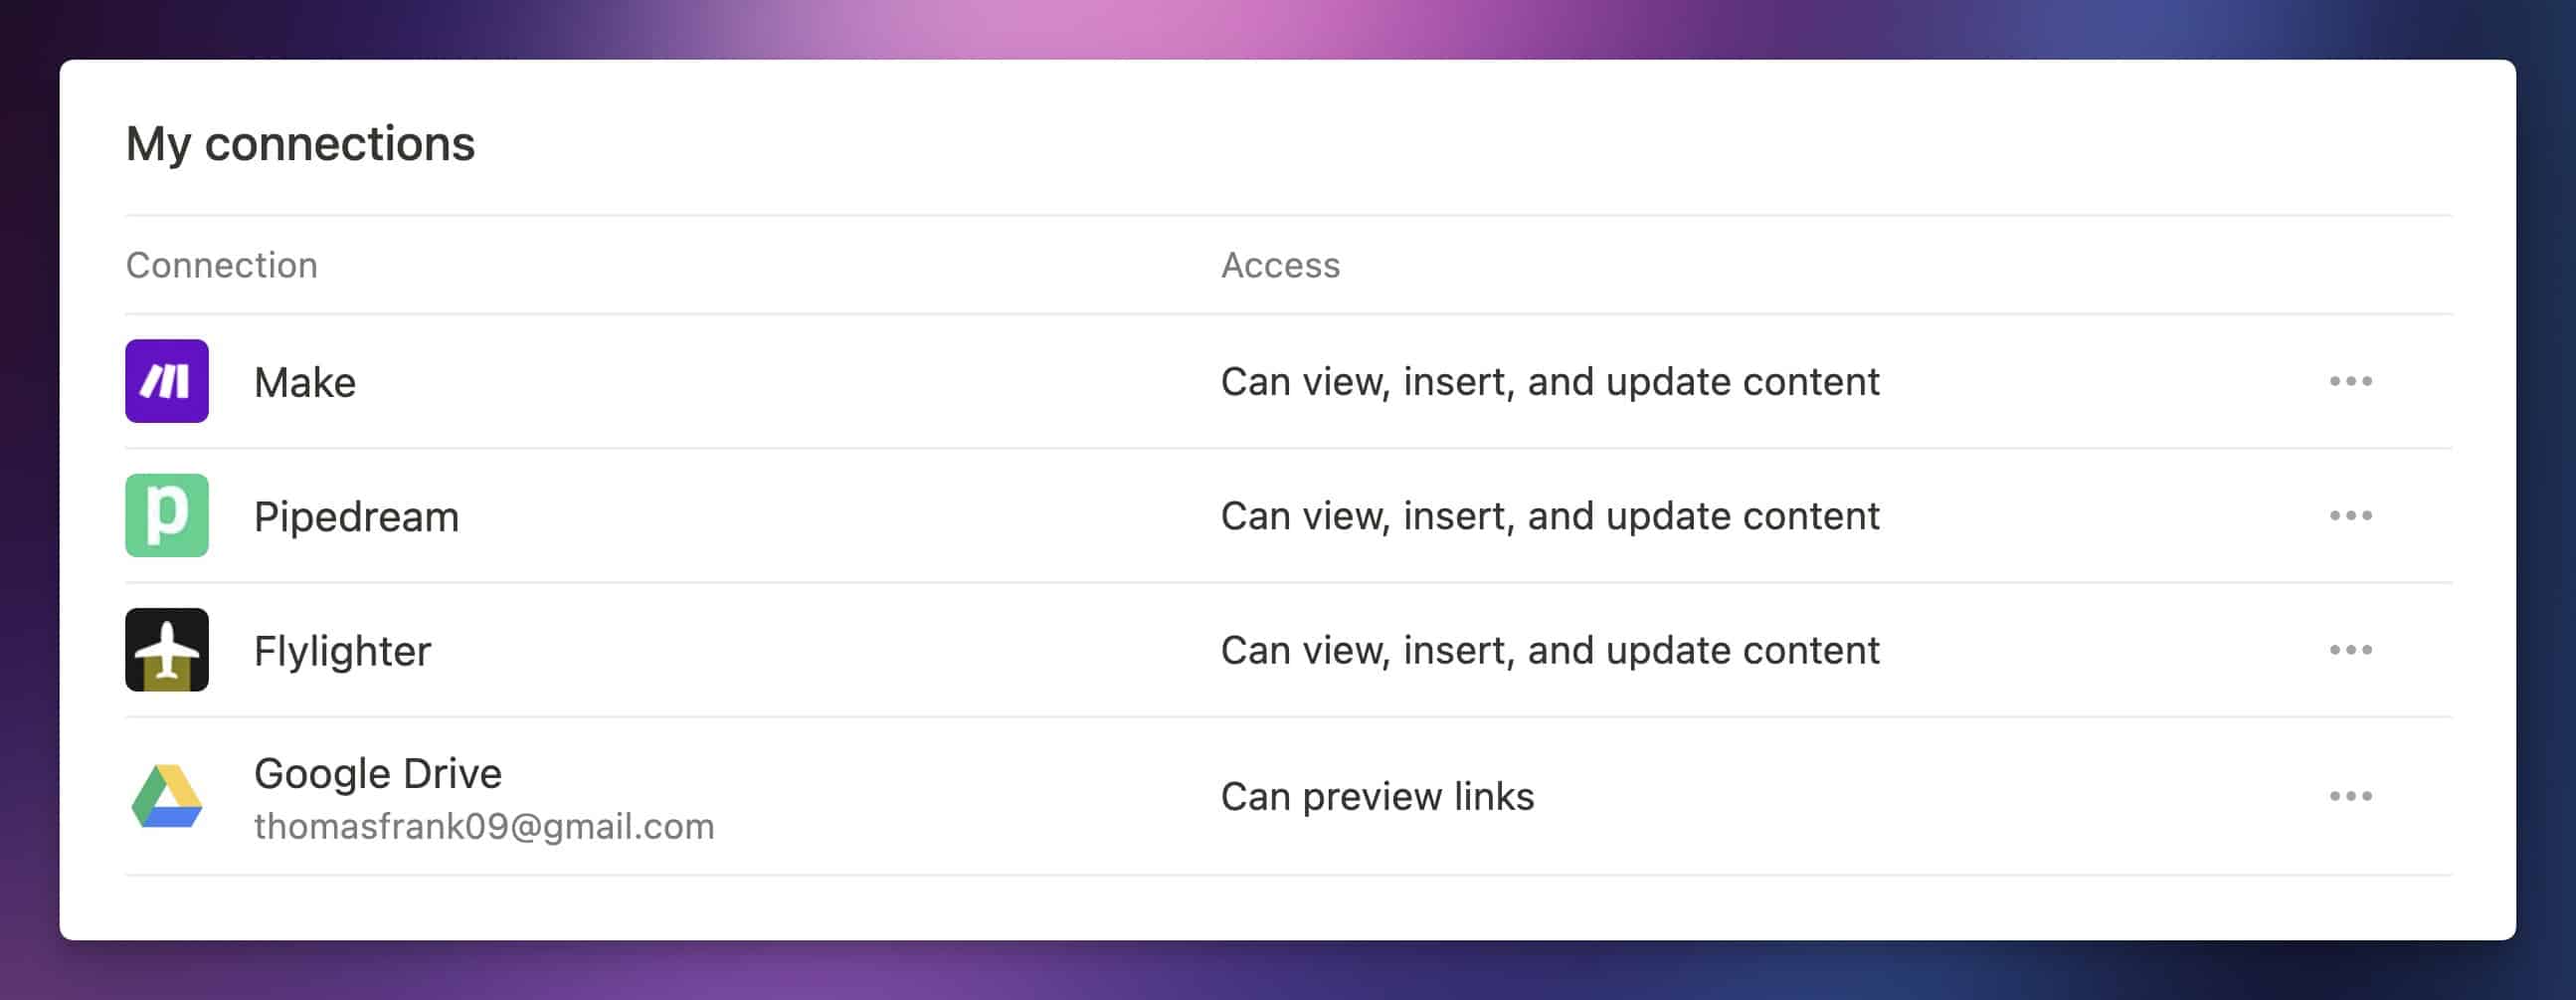
For each integration, you can see its capabilities. If you click the ••• menu next to an integration, you can either fully disconnect it or change which pages it can access.
Connections (Workspace-Level)
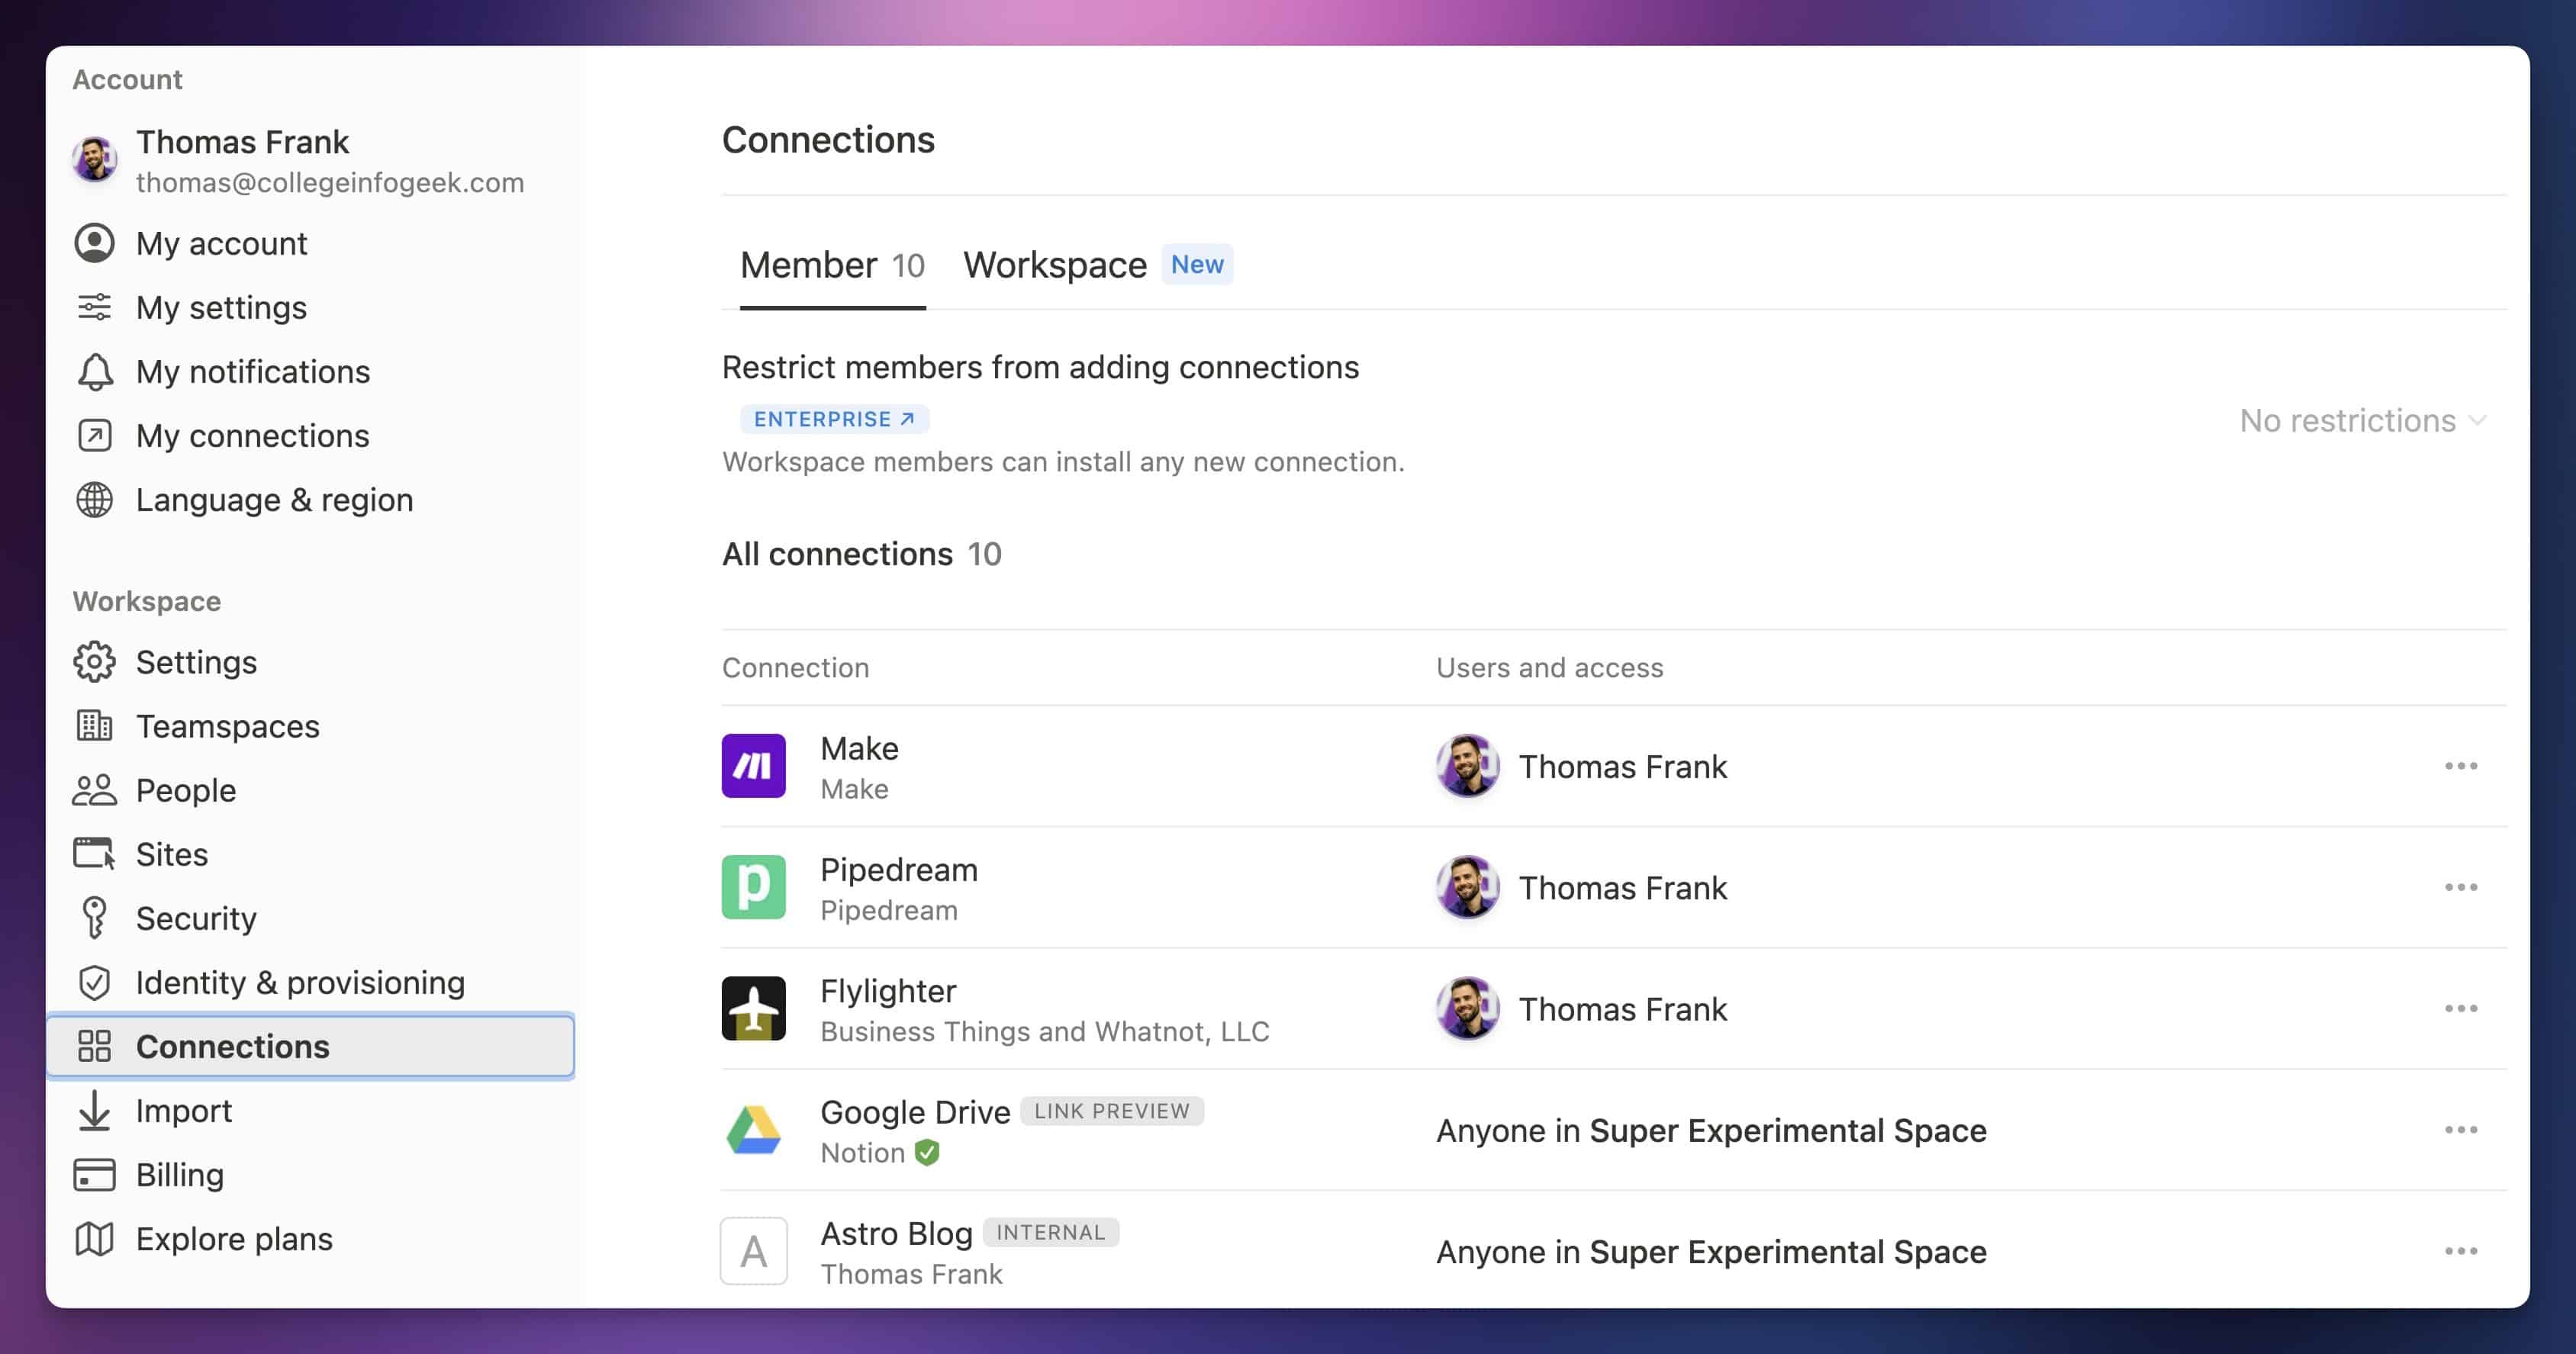
If you’re a Workspace Admin, you’ll also see a Connections menu under the Workspace section in Settings & Members.
Here, you’ll see all integrations that have been added to the workspace, regardless of who added them.
While you can’t edit the specific pages each integration can access here, you can click the ••• menu next to any integration in order to disconnect it for all users.
Enterprise-Level Permissions
If you (or maybe your leadership team) is paying for the Enterprise plan in your Notion workspace, then Workspace Owners in that workspace will have access to some additional capabilities and options compared to other plans. Within this section, I’ll assume you’re a Workspace Owner at your company and will use the term “you”.
These features will let you exercise even more fine-grained control over who can access what. They also give you a “skeleton key” of sorts – Enterprise-level Workspace Owners can give themselves access to any page, change anyone’s access level (including their own), search through private user content, and more.
In short, think of Enterprise-level workspaces like any other corporate-controlled software tool; anyone working in an Enterprise-level workspace should be aware that Workspace Owners technically have the ability to monitor and control any page in the workspace.
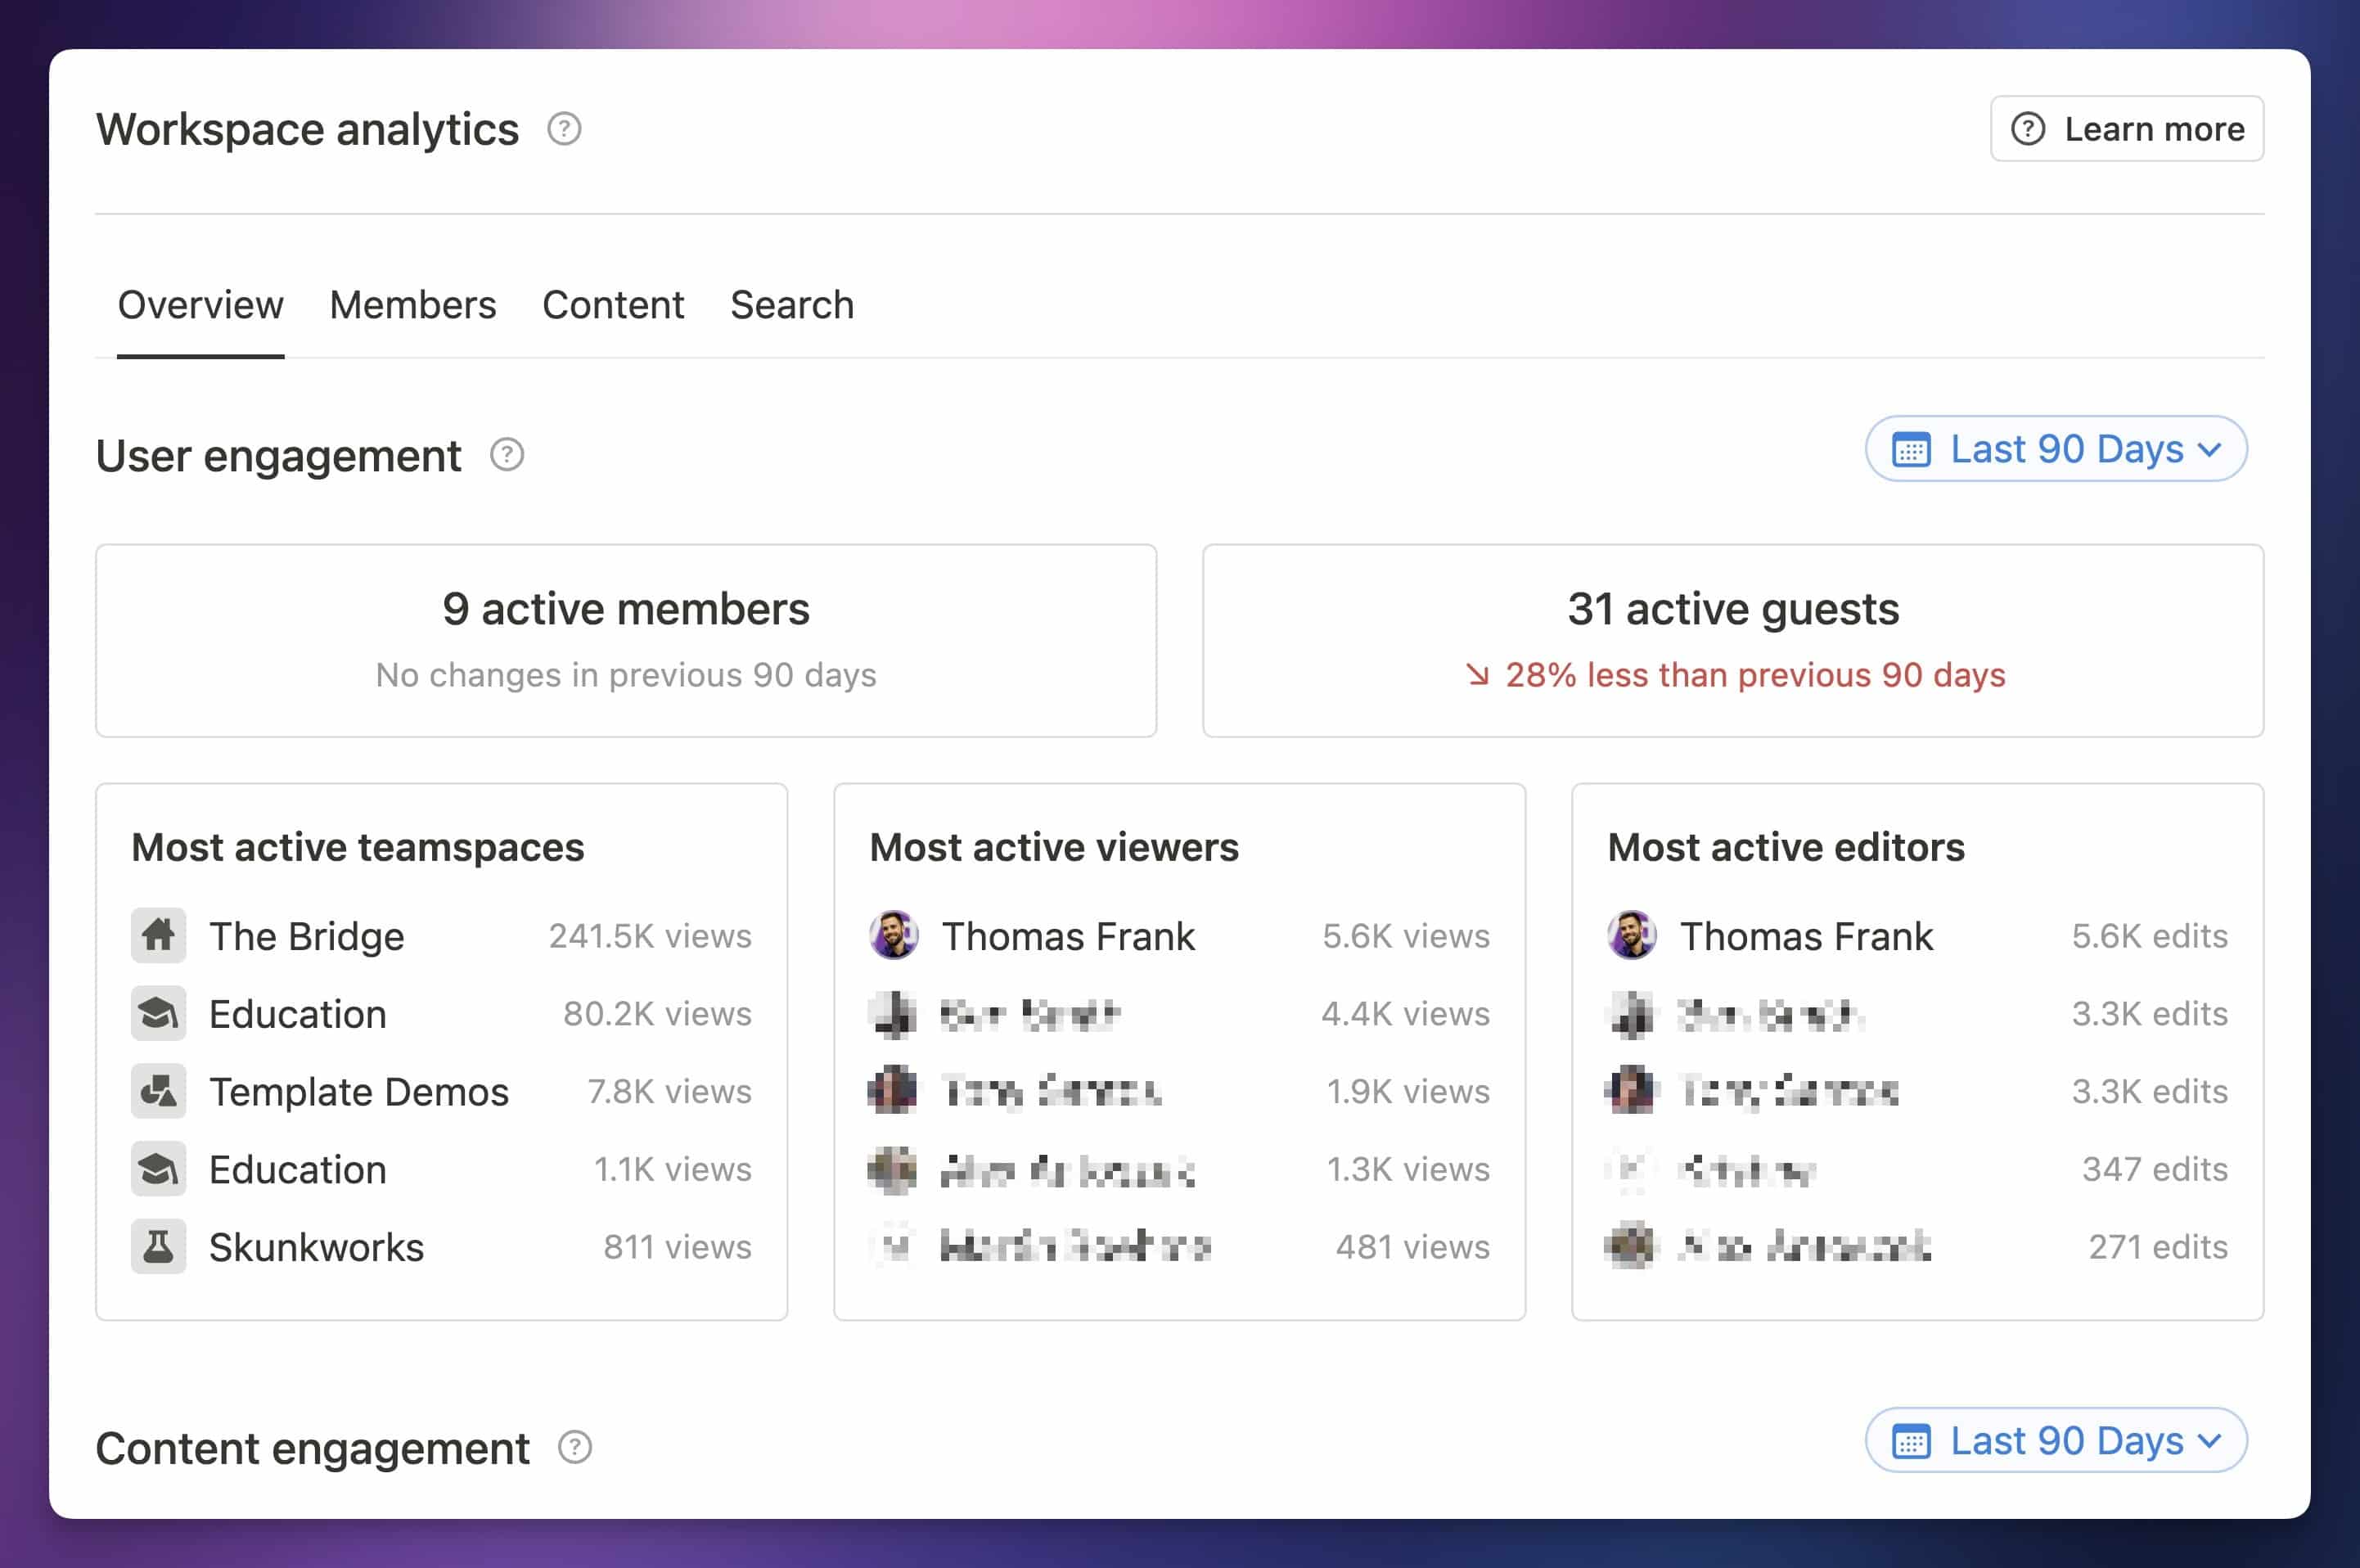
Enterprise-level workspaces also get access to an Analytics section in Settings & Members. While this dashboard isn’t directly related to security or permissions, it will show how many Page View and Page Edits each user in the workspace has made. It also shows who in your workspace is the most active in terms of viewing and editing pages.
Covering all of the privacy and security-related Enterprise plan features would likely require an entirely separate article, so here I’ll simply list them with a brief description of what each one does.
Copy link to headingSettings & Members Sections for Enterprise Workspaces
Enterprise workspaces have several sections within the Settings & Members panel that other workspace plans don’t have.
First, Enterprise workspaces allow the Membership Admin role to be assigned. You can do this in the Members tab (in non-Enterprise workspaces, this tab is called People. Perhaps Notion will make these labels match in the future.)
Membership Admins can add and remove Members, and they can also add/remove Members from Groups. They can’t change workspace settings like Workspace Owners can.
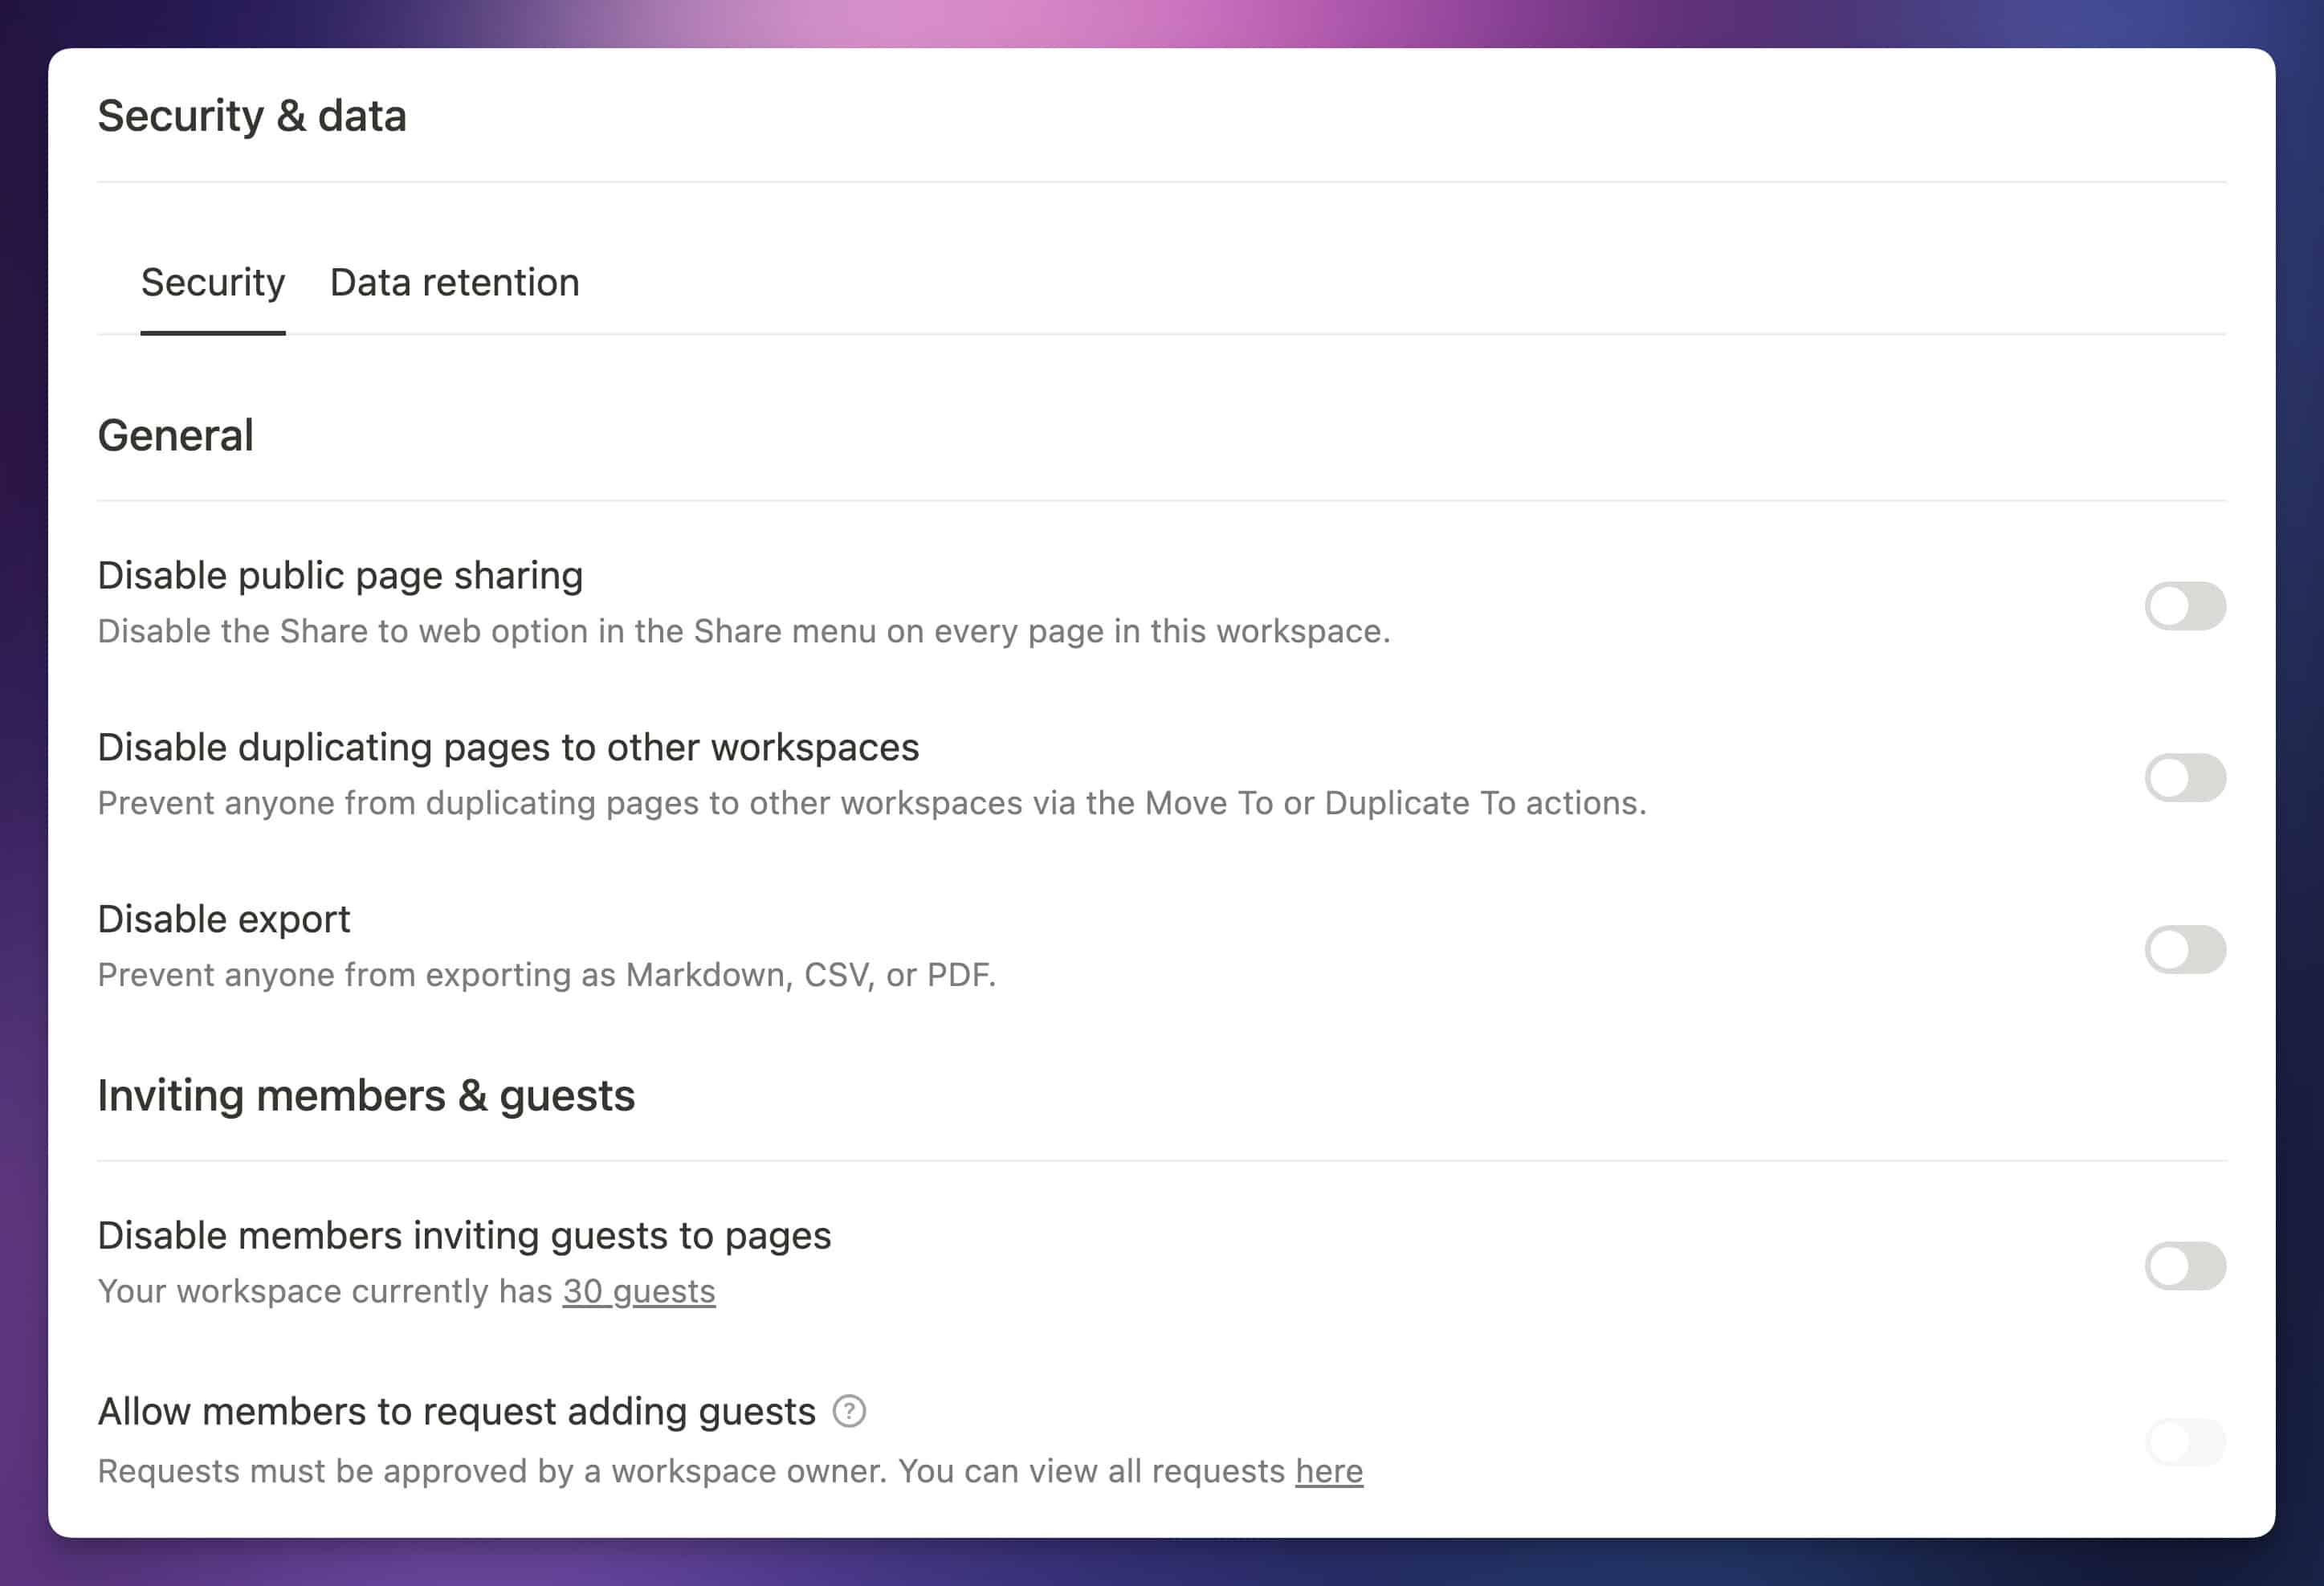
Next, there’s the expanded Security & Data section. Replacing the normal Security tab in non-Enterprise plans, this section will let you:
- Disable public page sharing, duplicating pages into other workspaces, and/or exporting content
- Disable Members’ ability to invite Guests
- Allow/disallow Members to request adding new Members (Members can never add new Members without approval)
- Allow any user to request to be added to the workspace
- Change data retention settings, including how long pages stay in the Trash (where anyone with Can Edit or higher can restore them), and how long pages are retained after they’re deleted from the Trash (after this, they can only be restored from Content Search)
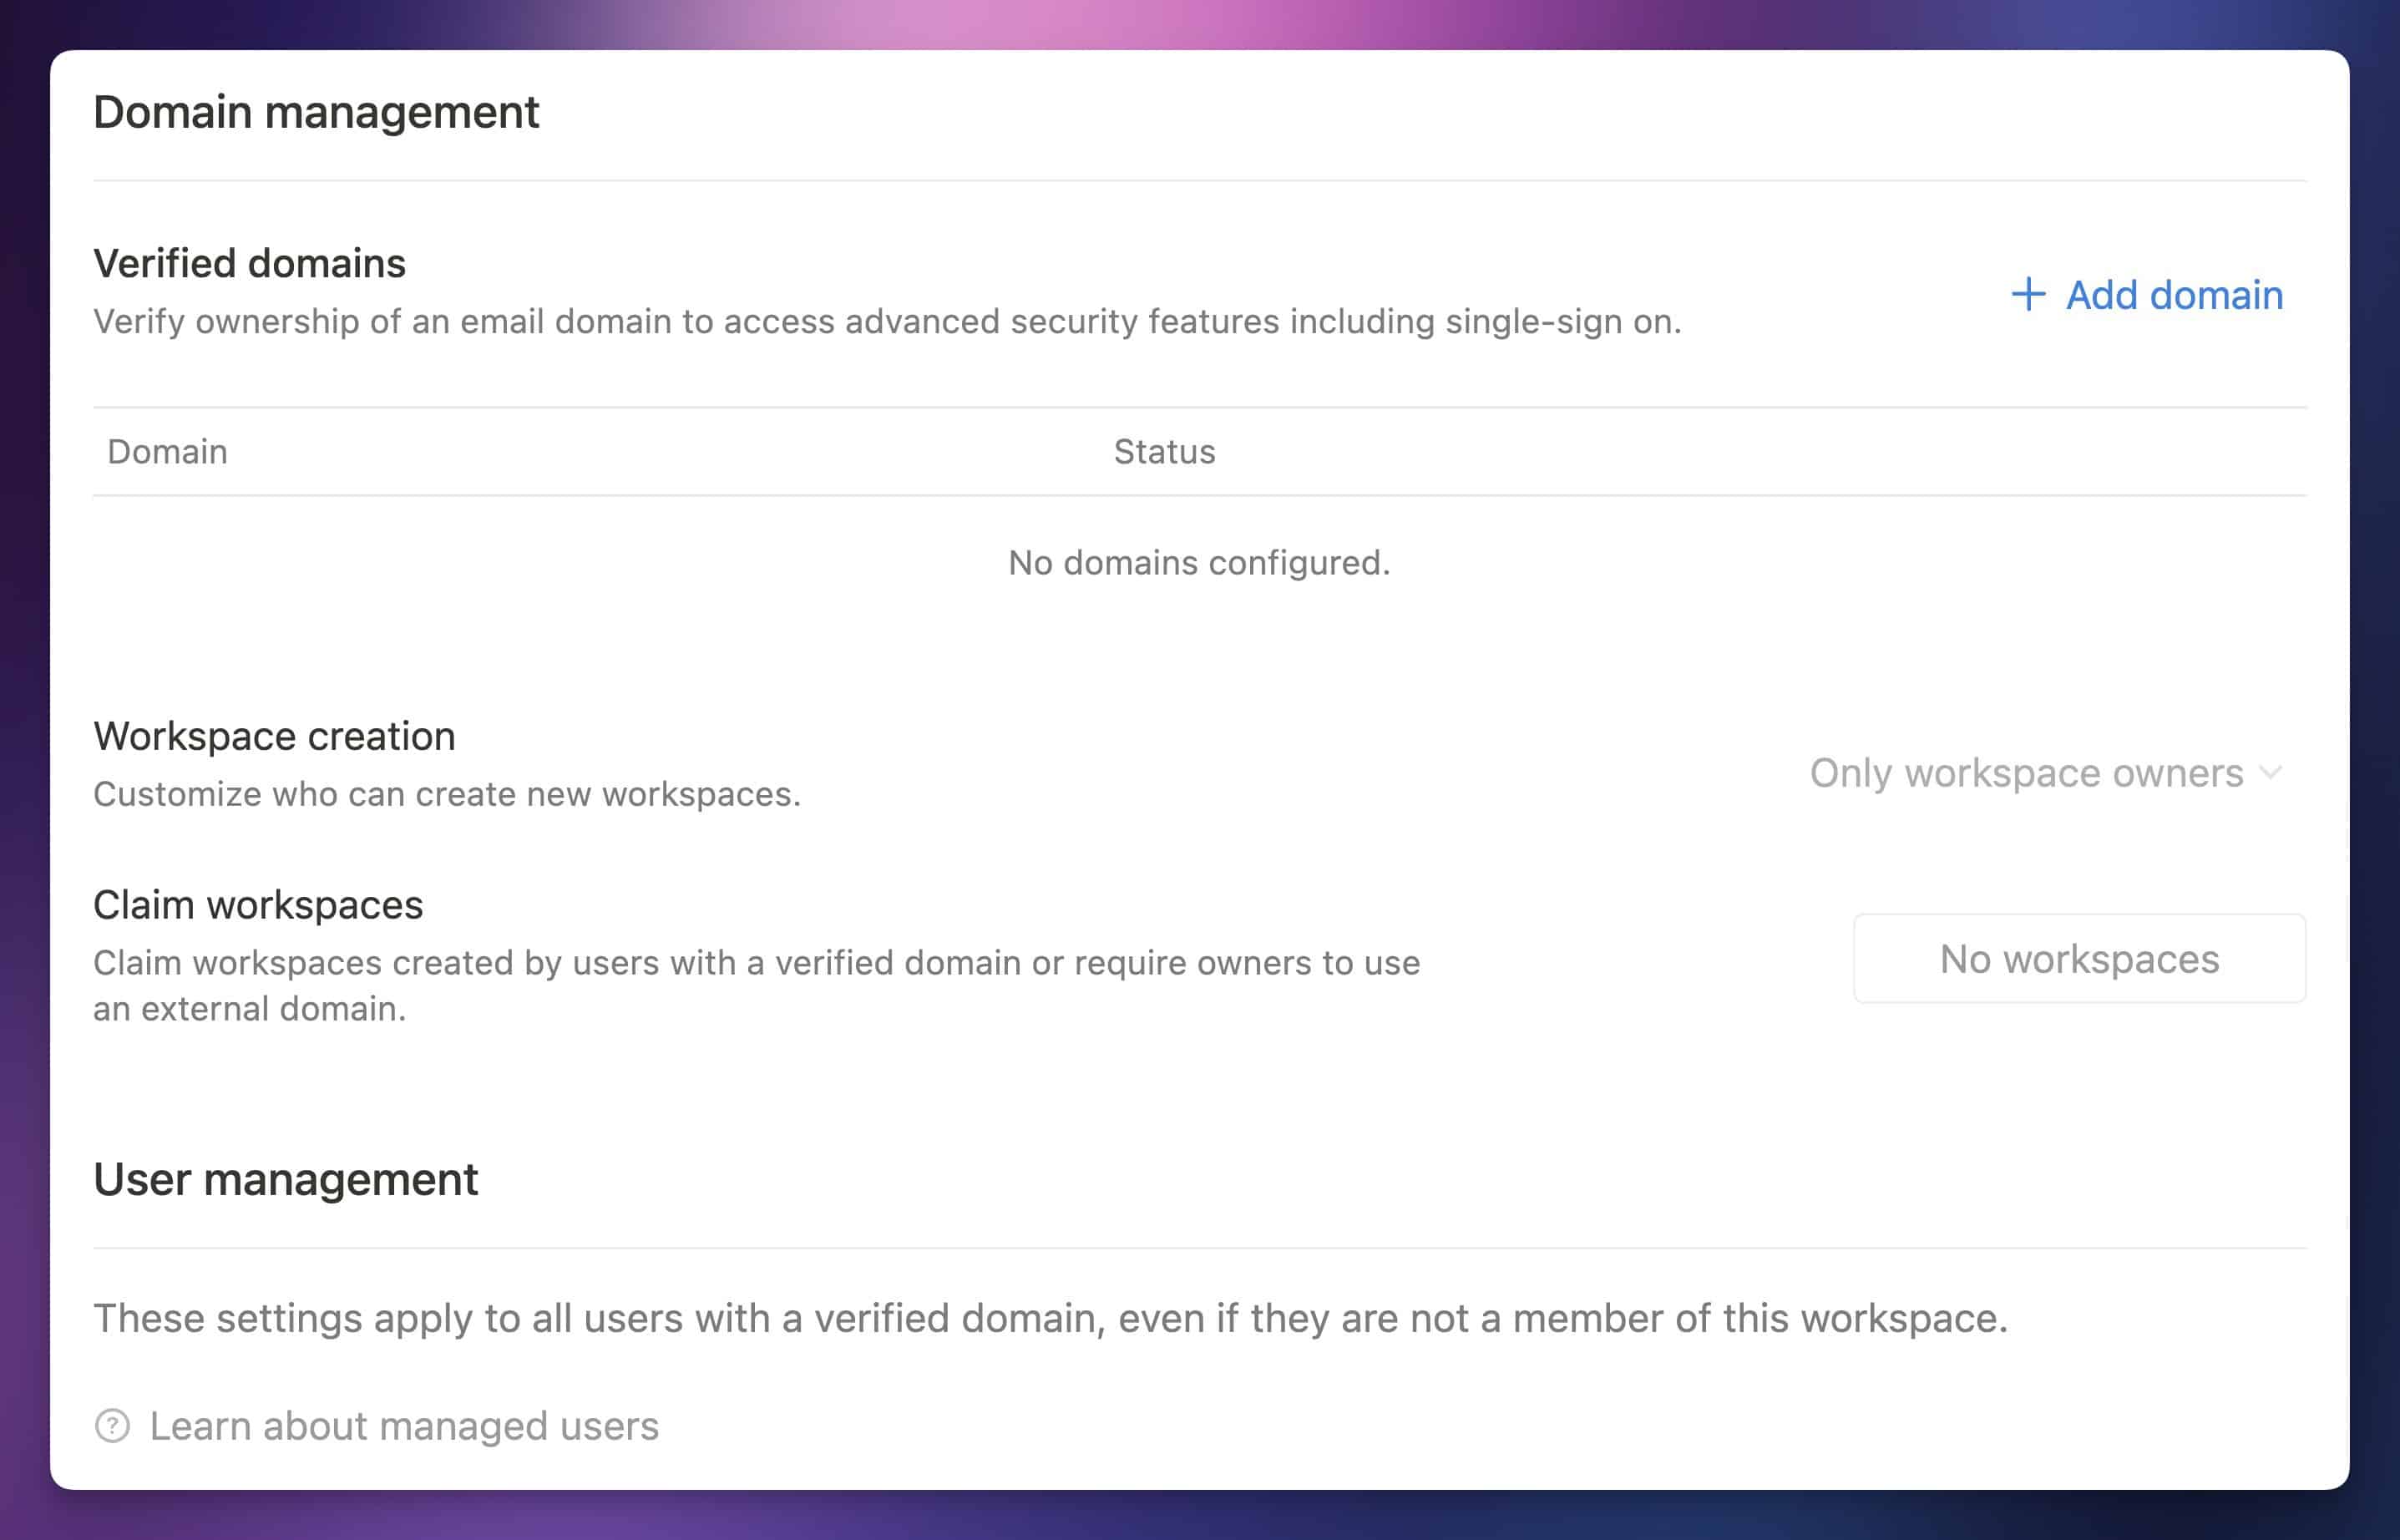
In the Identity & Provisioning section, you’ll be able to:
- Verify your company’s domain – and afterward, limit who can create new workspaces within that domains, as well as claim existing workspaces using it
- Control settings related to Managed Users
- Configure SAML SSO (Single Sign-On) and SCIM (System for Cross-domain Identity Management)
- SAML SSO is also available on the Business Plan, but SCIM is not.
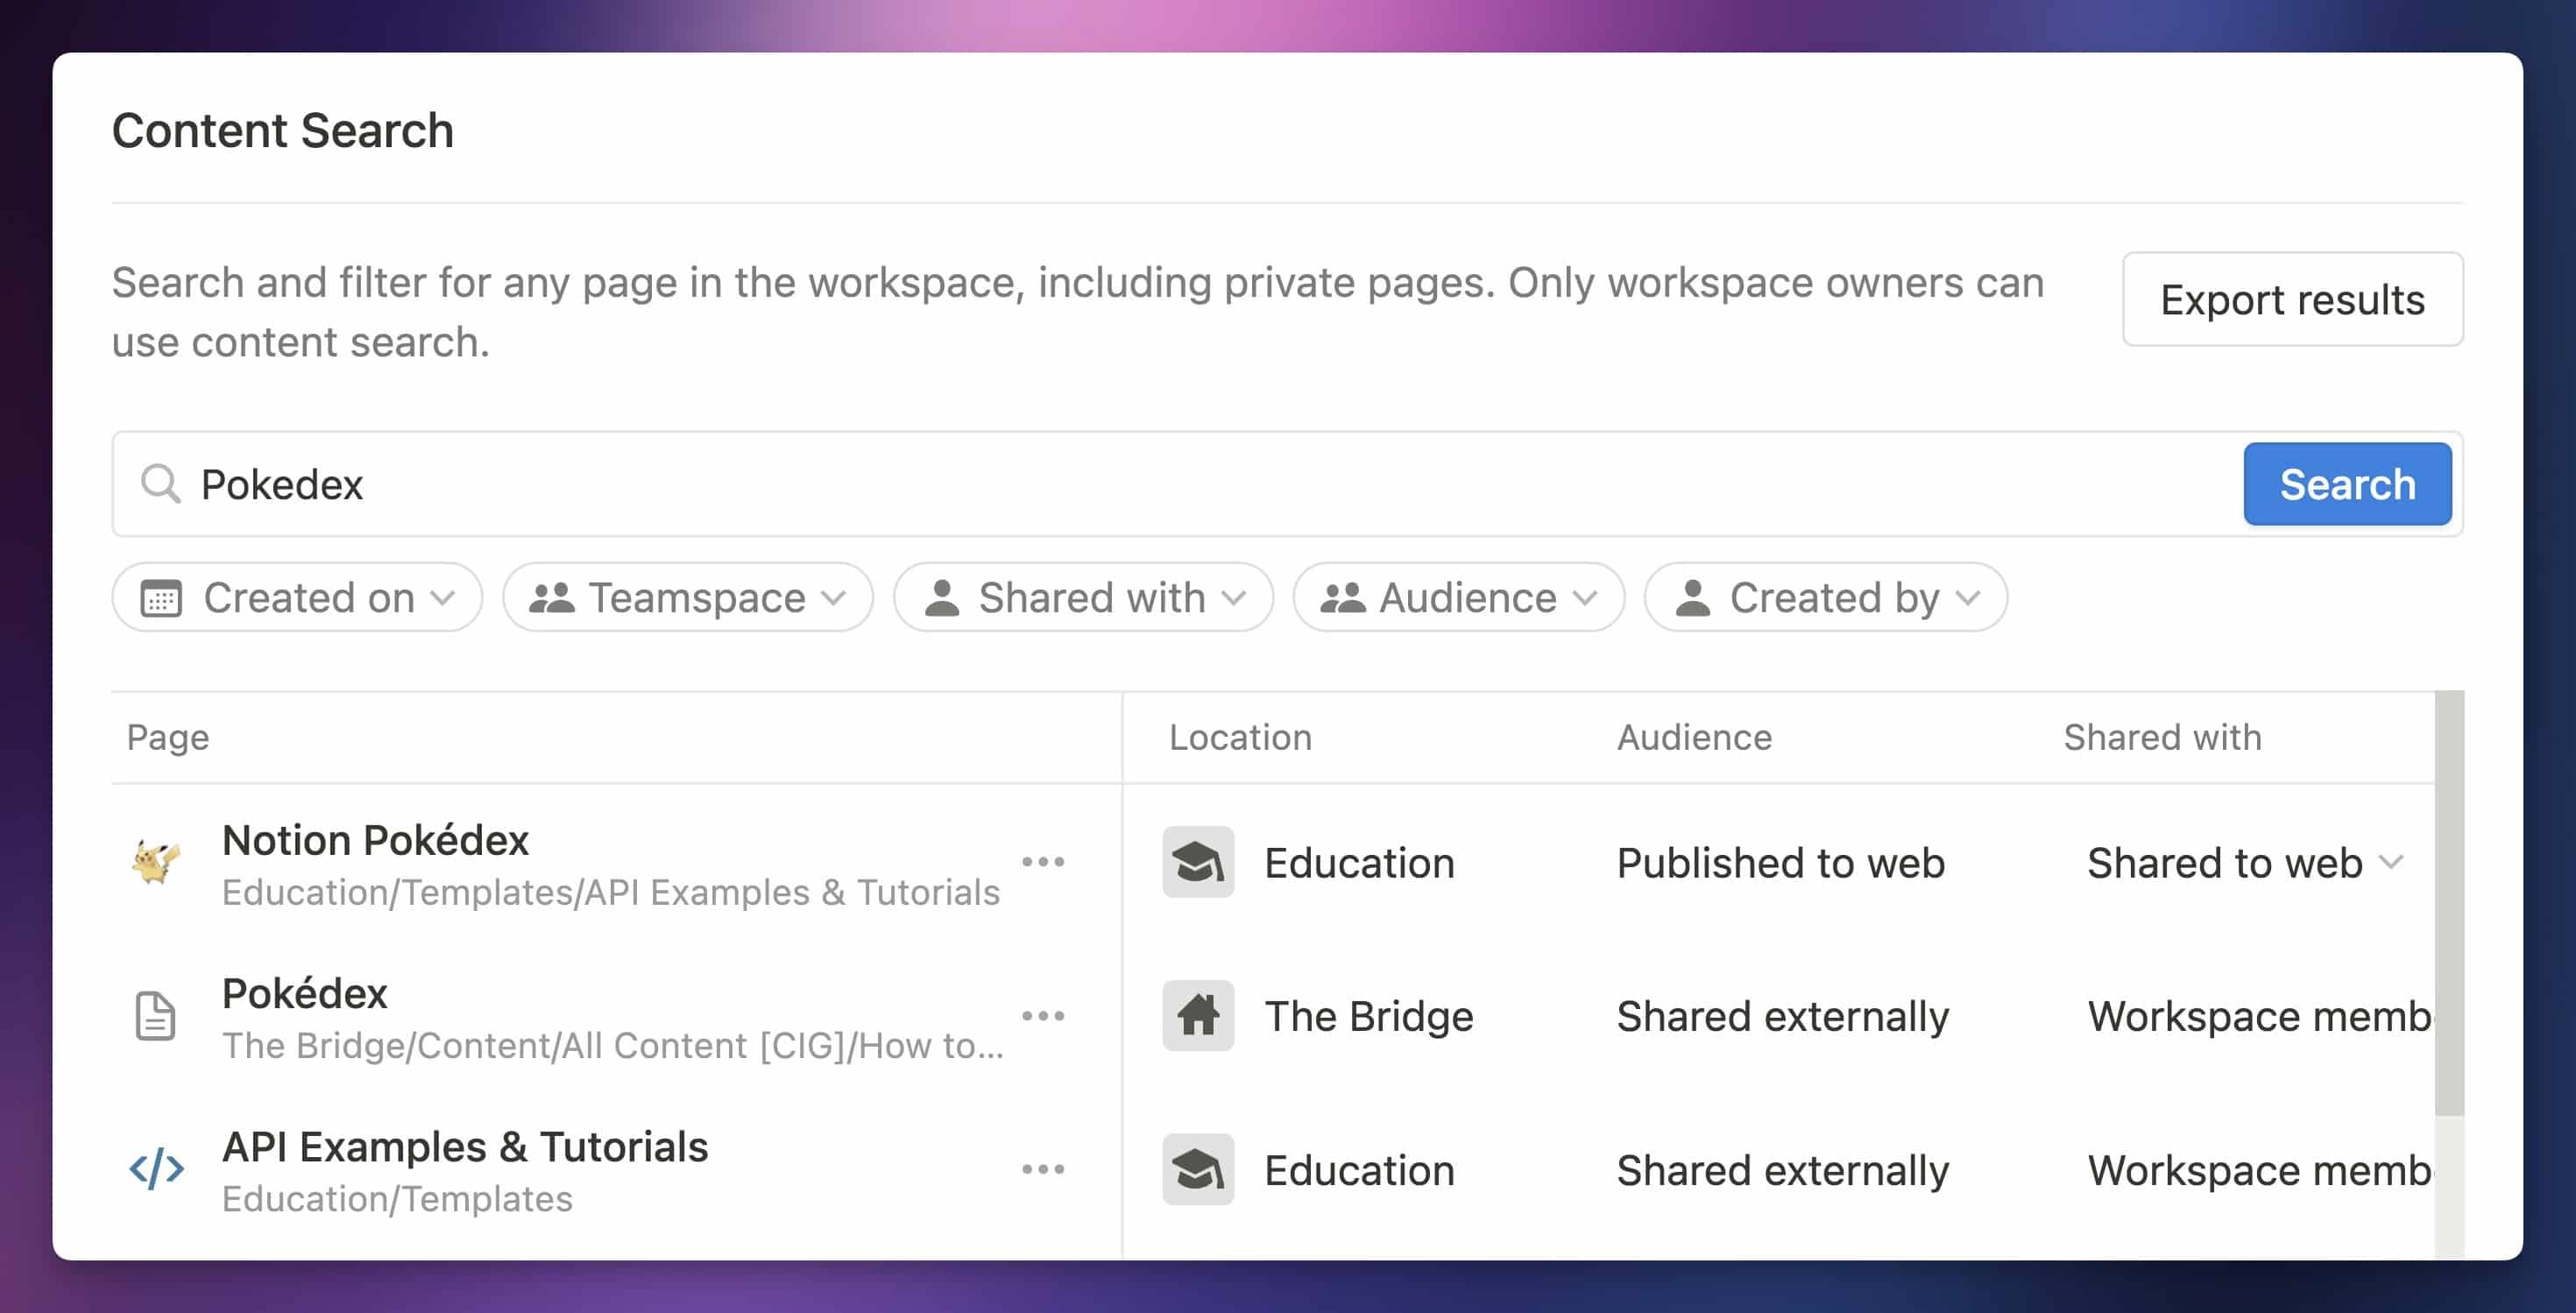
The Content Search section is one of the most important in Enterprise plans. This feature allows Workspace owners to search for any page in the workspace. This includes Private pages created by any Member or Guest.
Note that any searches performed here will show up in the Audit Log.
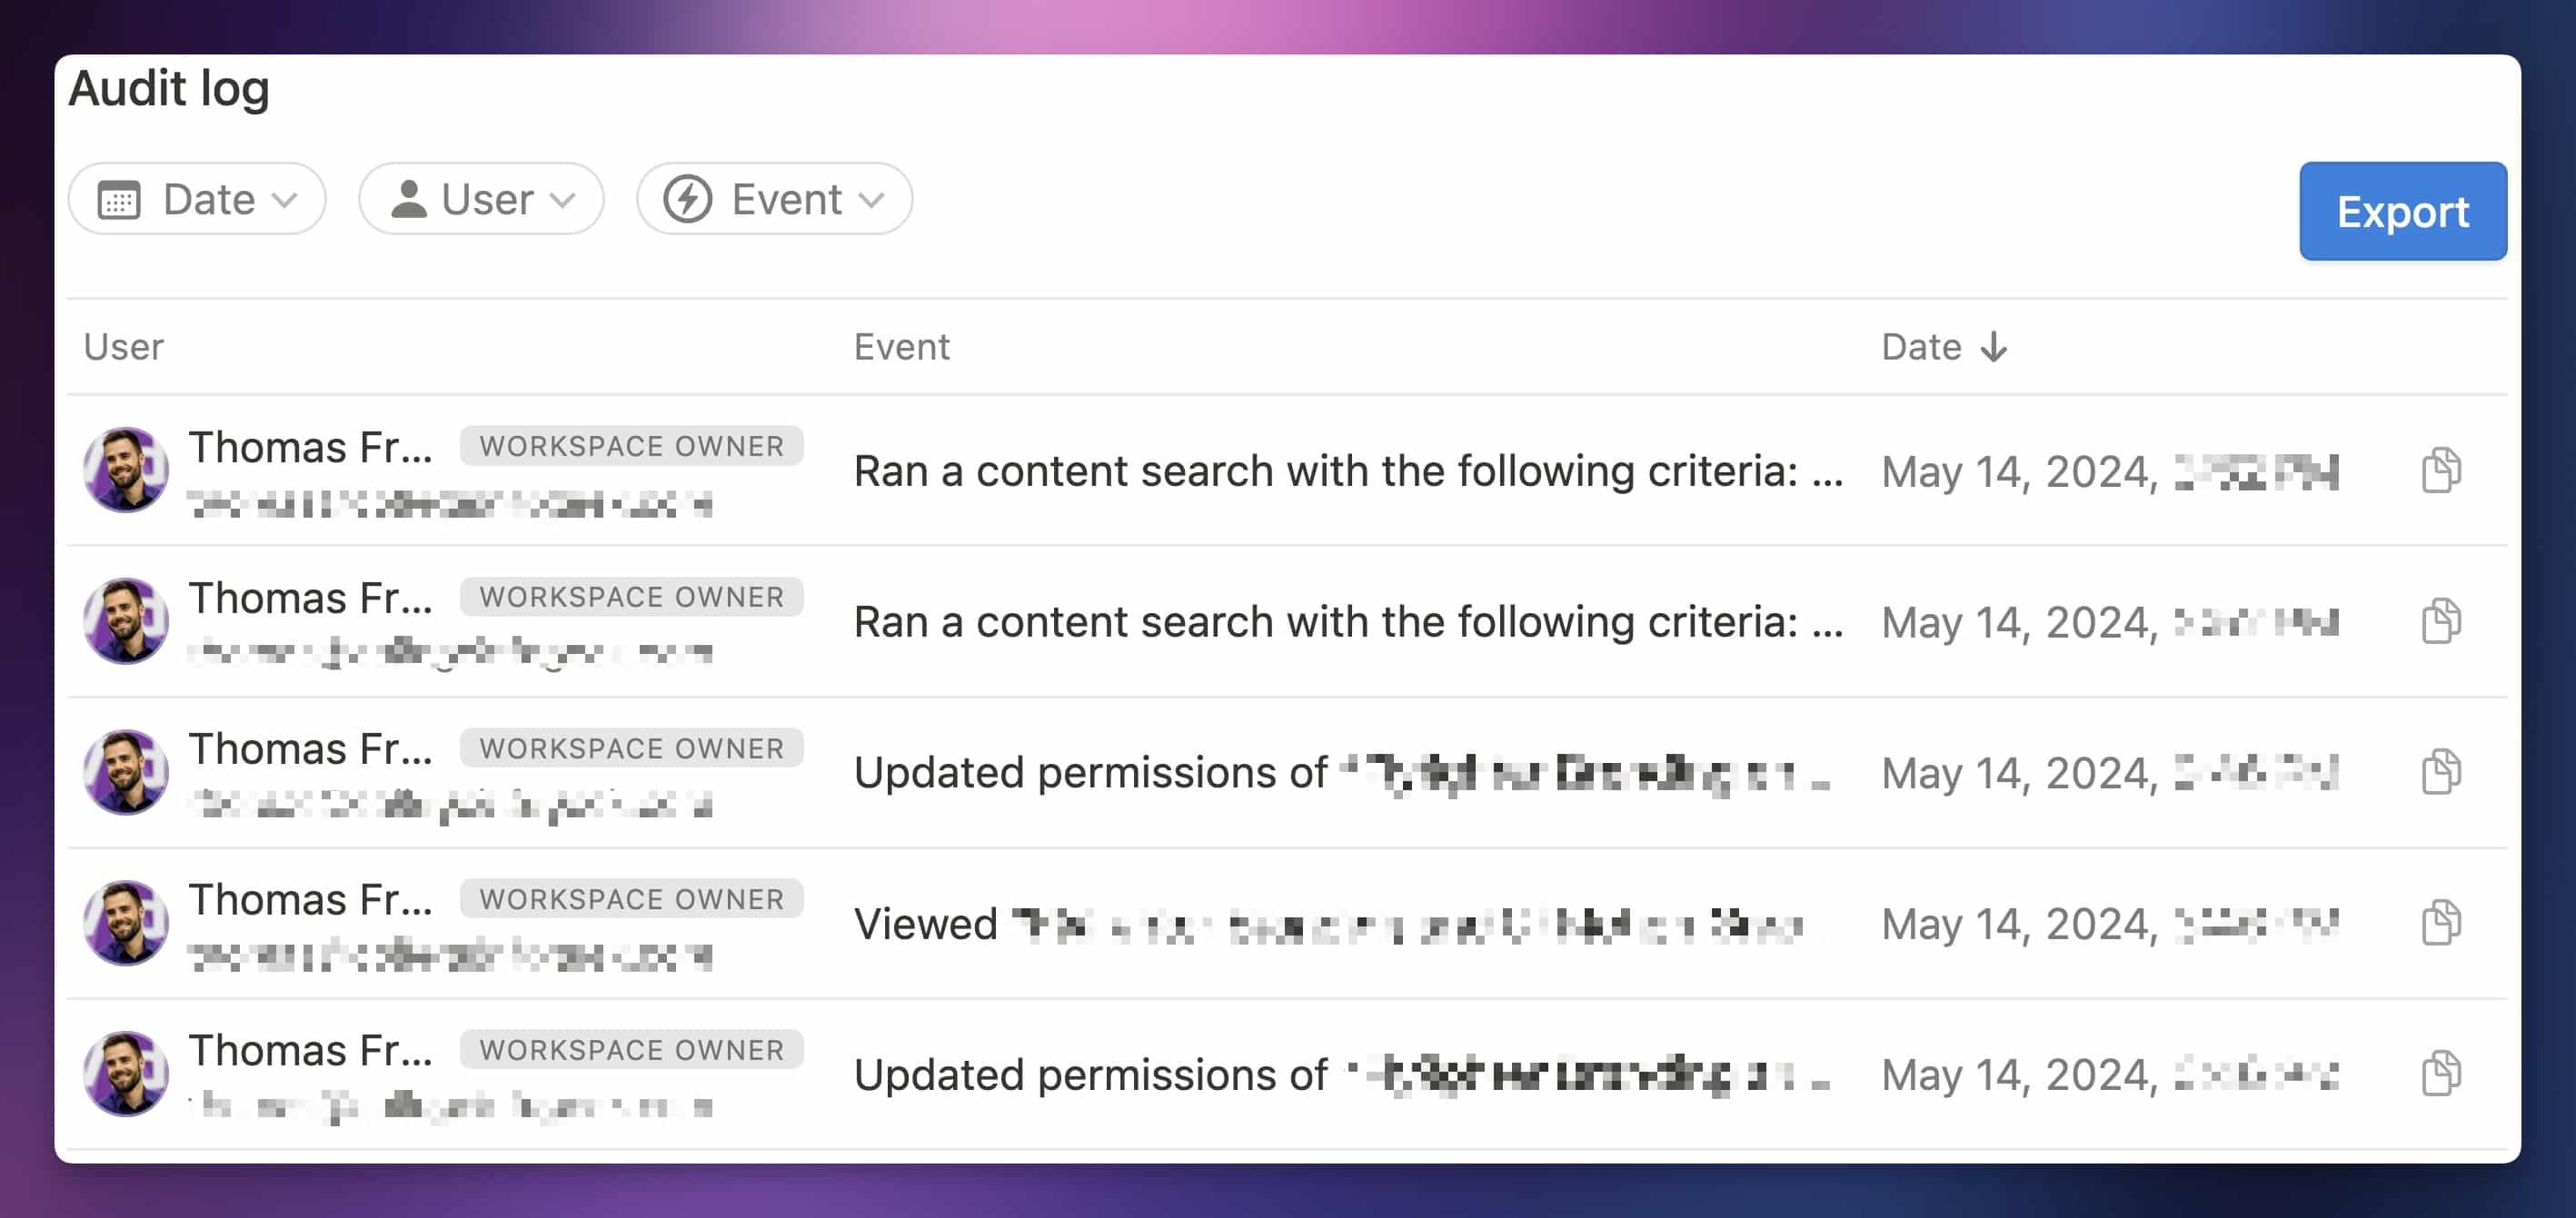
Speaking of the Audit Log, it’s a feature that logs nearly every action taken in your workspace. You’ll be able to see the user, date and time, and a description of the action. Log items can also be filtered by Date, User, and Event Type, and the log can be exported as well.
There are a couple other scattered features within Settings & Members that are reserved for Enterprise workspaces:
- Export Members (Settings)
- Restrict Members from adding Connections (Connections)
- If Connections are restricted, you can also choose to auto-approve Connections with the “Built by Notion” badge.
- Become an Teamspace Owner (Teamspaces → Click
•••next to Teamspace, click Become Owner)
Other Enterprise-Level Capabilities
Outside of the Settings & Members menu, the most notable thing a Workspace Owner in an Enterprise workspace can do with their god-like power is change permissions on pages where they don’t have Full Access.
If you’re a Workspace Owner, you can click Share, then click Change Permissions on any page where you don’t have Full Access.
From there, you can change your own access, along with the access of anyone else listed. When Change Permissions is enabled, you essentially have Full Access to the page. You can change your own access to Full Access for that access level to persist.
Even if another user fully removes you from a page, you can still find it in Content Search. If you want to access it, you can click the ••• menu next to the page, and then click Change Permissions. You’ll see pretty much the same UI:
Finally, Enterprise workspaces allow Teamspace Owners to batton down the hatches within individual Teamspaces. In the Security tab of a Teamspace’s settings, you’ll be able to:
- Disable public page sharing
- Disable guests
- Disable exporting content
These options are identical to the workspace-wide options found in Settings & Members (also Enterprise-only), but they’re limited to a specific Teamspace.
They’re good to use if you’d like to keep these options open in non-confidental Teamspaces, locking down only the Teamspaces that contain sensitive info, like your company’s secret plan to install Doom on the Vanguard I satellite. Yes, I know about that, Terry! I call next game.
Copy link to headingQuirks and Limitations
In this section, I’d like to cover some of the lesser-known limitations around permissions in Notion. I’ll also cover some “quirks” – things that do make sense within the context of Notion’s permissions model, but that can be initially confusing.
Copy link to headingWho Can Delete a Page?
TL;DR: To delete sub-pages, users must have Can Edit, Can Edit Content, or Full Access to both the sub-page and its parent page. Top-level pages in Teamspaces can only be deleted by Teamspace Owners, and optionally Teamspace Members. Top-level Private/Shared pages can be deleted by any Member with Full Access or Can Edit. Guests cannot delete top-level pages, nor pages shared directly with them (they can delete sub-pages within those pages, though).
Even if a user has Can Edit or Full Access permissions on a page, they may not be able delete that page.
By “delete”, here I’m actually referring to archiving a page – the menu option will say Delete, but deleted pages initially go to the Trash and stay there for at least 30 days. You can restore them until they’re automatically removed from the Trash.
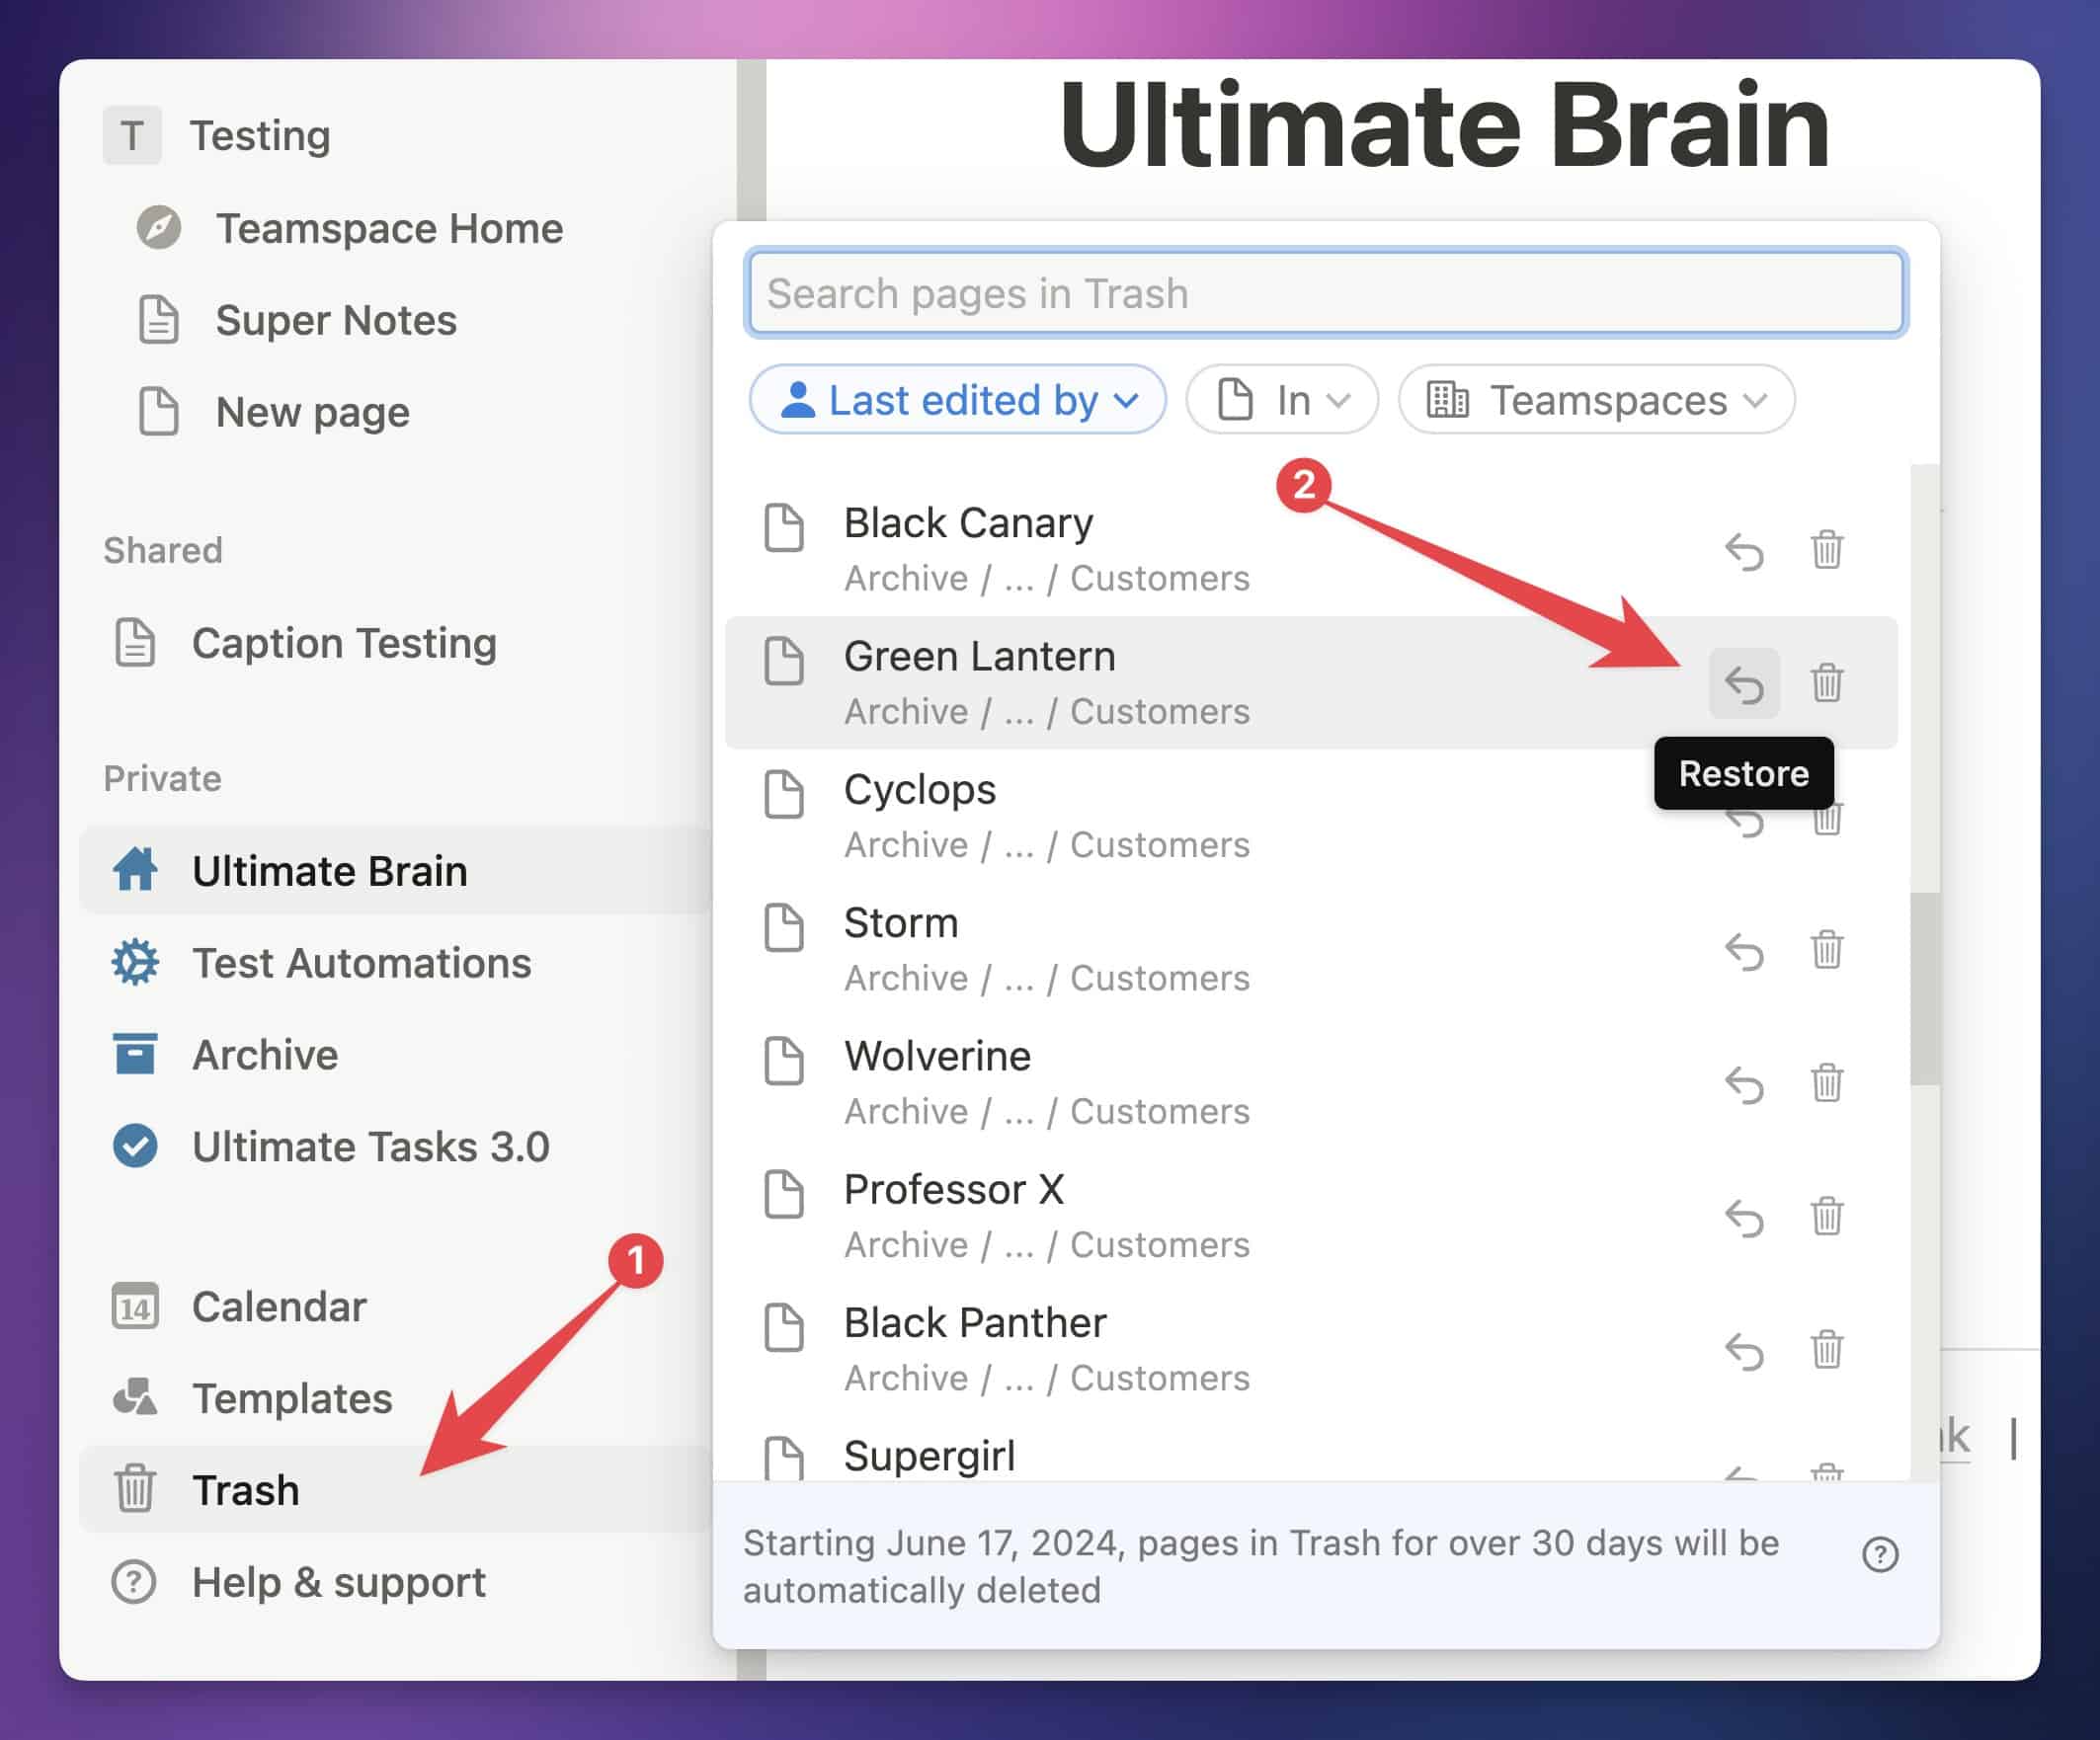
There are several non-obvious rules that determine whether or not a user can delete a page.
First, a user must have either Can Edit or Full Access permissions in order to delete a page. Within databases, users with Can Edit Content can also delete pages – but they can’t delete the actual database itself.
Even with this level of access, however, there are some other criteria a user must meet. The fundamental concept here is that the user must also be able to edit the page’s “parent”.
This is because, in Notion’s hierarchical block model, deleting a page means you’re making a edit to the page’s parent.
There are a few things that can be considered a “parent” in this case:
- For any sub-page, the parent is the page or database that contains it. For pages in databases, the parent is technically the data source; however, data sources don’t have their own permissions settings. Therefore, the database (technically the grandparent) is treated as the parent for permissions.
- For top-level pages in a Teamspace, the Teamspace itself is the parent.
- For top-level pages in Private/Shared, the entire workspace is the parent, which simply enforces a rule that only a member with Full Access or Can Edit can delete the page.
First, let’s talk about sub-pages. As we covered earlier, sub-pages are blocks that exist within the content of their parent page, or within a data source inside a database.
Therefore, a user must have Can Edit, Can Edit Content, or Full Access permission to the parent page AND the sub-page if they want to delete a sub-page.
In the case of database pages, a user must have Can Edit Content access to the database in order to delete a page within any of its data sources.
When it comes to top-level pages (pages shown directly in the Sidebar), there are a couple of other rules to note.
If a top-level page exists in the Private or Shared section, then any Member with Can Edit or Full Access permissions will be able to delete it, regardless of whether or not they created the page. A couple of notes on this:
- Private pages can actually be shared – without leaving your Private section – if you change the General Access setting to grant access to other members. If you grant Can Edit in this way, other members can delete the page.
- Pages in the Shared section of the sidebar will always appear to be top-level… but they may actually be sub-pages of pages to which you don’t have access. For this reason, you may see pages in your Shared section that you cannot delete, even if you have Full Access.
Pages in Teamspaces can only be deleted by Teamspace Owners and Teamspace Members by default. Teamspace Owners can also disable deletion by Teamspace Members in the Security tab of a Teamspace’s settings, using the Who Can Edit Teamspace Sidebar setting.
Finally, Guests can only delete sub-pages. This rule applies to sub-pages with respect to the page(s) that have been shared with them. If you share a deeply-nested page with a Guest, it will appear as a top-level page in their Sidebar, and they won’t be able to delete it. Likewise, Guests can’t delete actual top-level pages, either.
Copy link to headingGranular Database Permissions
One of the most common questions from Notion users – especially those managing a team or working with external clients – is this:
“How can I share only part of a database with someone?”
This is called granular database permissions – or if you’re a database nerd – row-level security.
Luckily, Notion finally supports this! The feature is called page-level access, and is available if you’re on the Business or Enterprise plan.
With this feature, you can restrict access to databases, and only grant access to specific pages based on whether or not a user is set in a Person or Created By property.
You can create page-level access rules by:
- Going directly to a database’s actual, full-screen page (not a linked view)
- Clicking the Share button
- Creating a rule in the new page-level access section
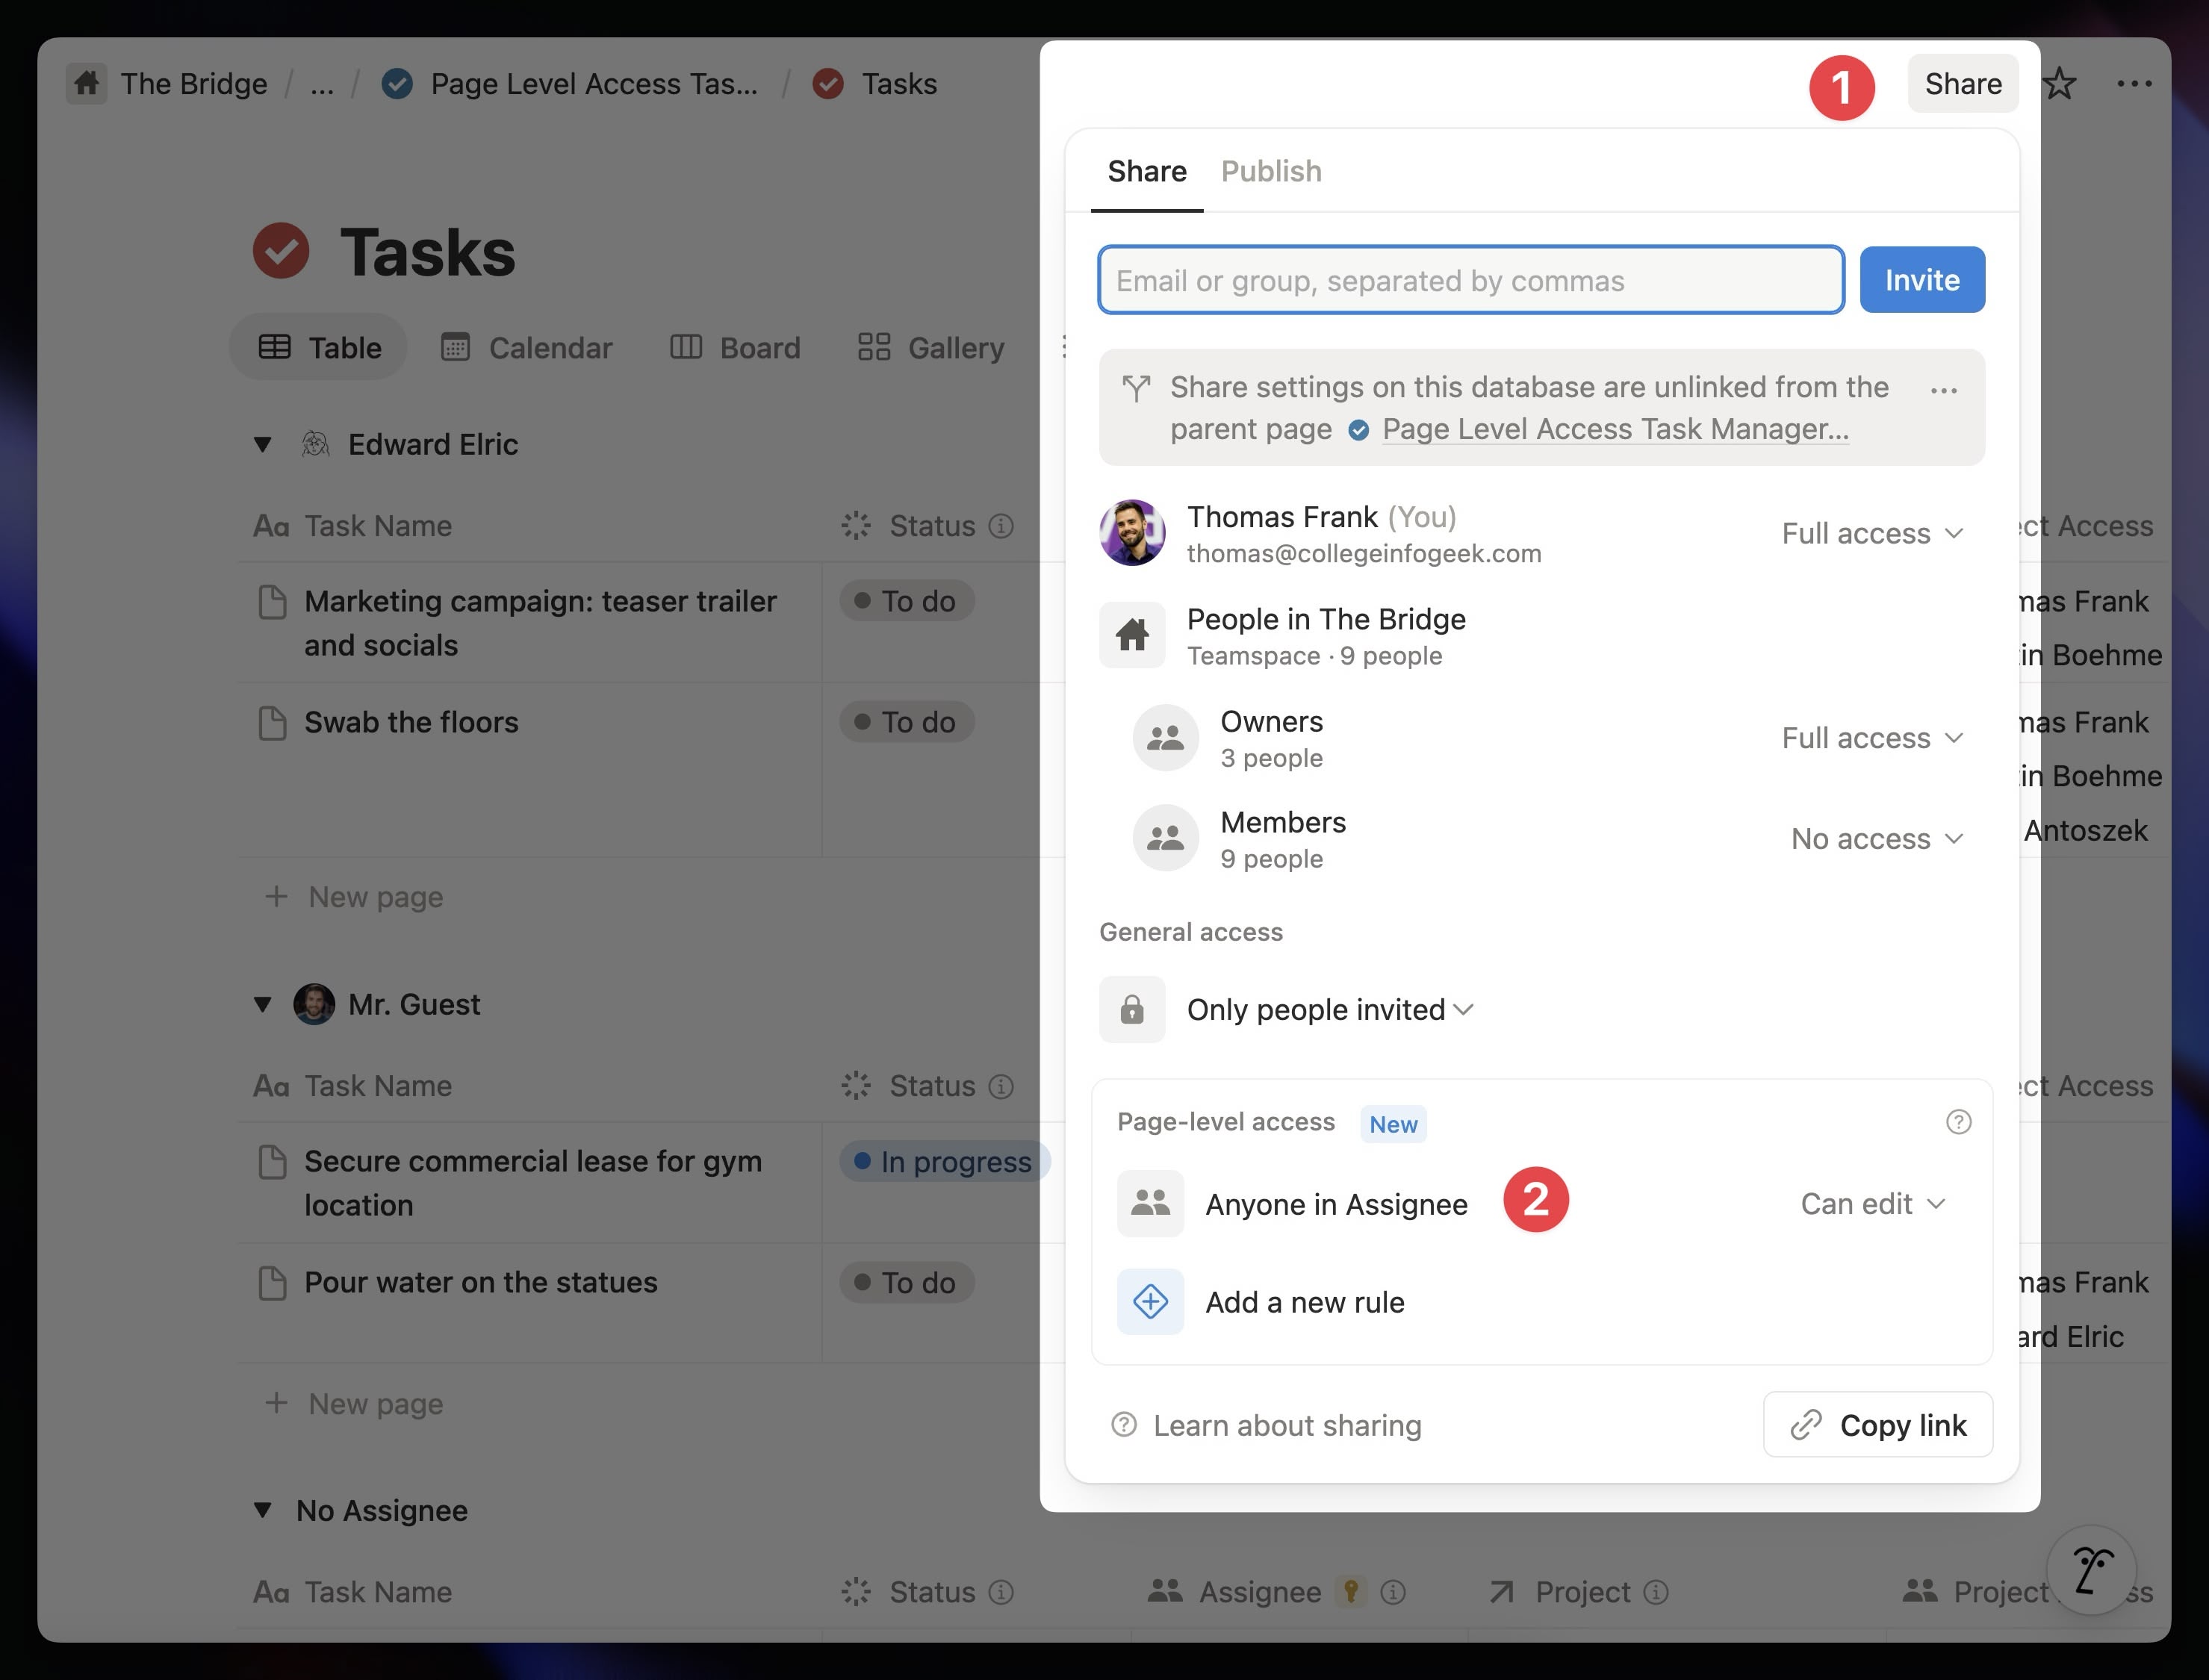
This feature is complex enough that I’ve written a separate guide on it. Read it here: Notion Granular Database Permissions: The Complete Guide
For client management: If Notion’s page-level access rules still don’t fit your needs, you might want to check out true client portal tools such as Queue, ManyRequests, or Zendo.
Copy link to headingSharing Only Specific Properties
It’s also not possible to share only some of the properties in a Notion database with certain people. This is another very common request from Notion users, but it’s not a reality just yet.
As with granular database permissions, the only way to truly share a sub-set of a database’s permissions is to build an automation that duplicates content from a source database to a copy of that database, omitting whichever properties that should not be shared.
Copy link to headingButton Blocks and Properties
Button blocks and button properties in databases allow users to click a button in order to run an automation. These buttons have a similar set of capabilities to database automations – the main difference being that they are triggered by a click, rather than by an indirect trigger action (such as a Status property being updated).
Both are similar in functionality, but their required base permissions differ.
For Button blocks: If a user can see a Button on a page, they can click that button… unless the button would do things they can’t do. This means that a user who has Can View is even able to click a button, so long as that button wouldn’t perform an action the user couldn’t do themselves.
For Button properties in databases, a user must have Can Edit Content (or higher) access to the database, or be granted Can Edit (or higher) access via a page-level access rule. This forms the base access requirement; the button’s actions may require other permissions.
This is why you may see certain buttons in your workspace that you can’t click. Even if you seem to have the necessary base permissions, the button may be configured to do something you’re not allowed to do. You’ll need Can Edit (or higher) access to
Here’s a breakdown of each button action and the permissions required for a user to click a button that uses it:
| Button Action | Needed Permission |
|---|---|
| Show Confirmation | No additional permissions needed** |
| Send Notification | No additional permissions needed** |
| Send Mail From | No additional permissions needed** |
| Send Webhook | No additional permissions needed |
| Send Slack Notification | No additional permissions needed** |
| Define Variables | No additional permissions needed** |
| Insert Blocks | Can Edit on the current page |
| Add Page To* | Can Edit Content on the target data source** |
| Edit Pages In* | Can Edit Content on the target data source** |
| Open page, form, or URL | Can View for a target Notion page. Forms must be accessible to current user via Form permissions. |
*Users granted access to specific databases via a page-level access rule still cannot click buttons with Add Page To or Edit Pages In actions. The former creates a new page, while the latter queries the entire database. A user must have Can Edit Content (or higher) on the database itself to click a button that contains one of these actions.
**These actions can use custom formulas to set dynamic values. If a custom formula references another data source via a Relation property, the user will need Can View (or higher) permission on the database that contains that data source in order to click the button.
Copy link to headingSynced Block Permissions
Synced blocks inherit the permissions of their original page. If you Copy and Sync a synced block to another page, it may appear blank for certain users in your workspace if they don’t have access to the original page.
If you run into problems around this, there are two solutions to choose from:
- Adjust the permissions of the original page
- Navigate to the original page, click the block menu to the left of the synced block, and move it to another page with the correct permissions. You can then Copy and Sync it back to the previously-original page if you need.
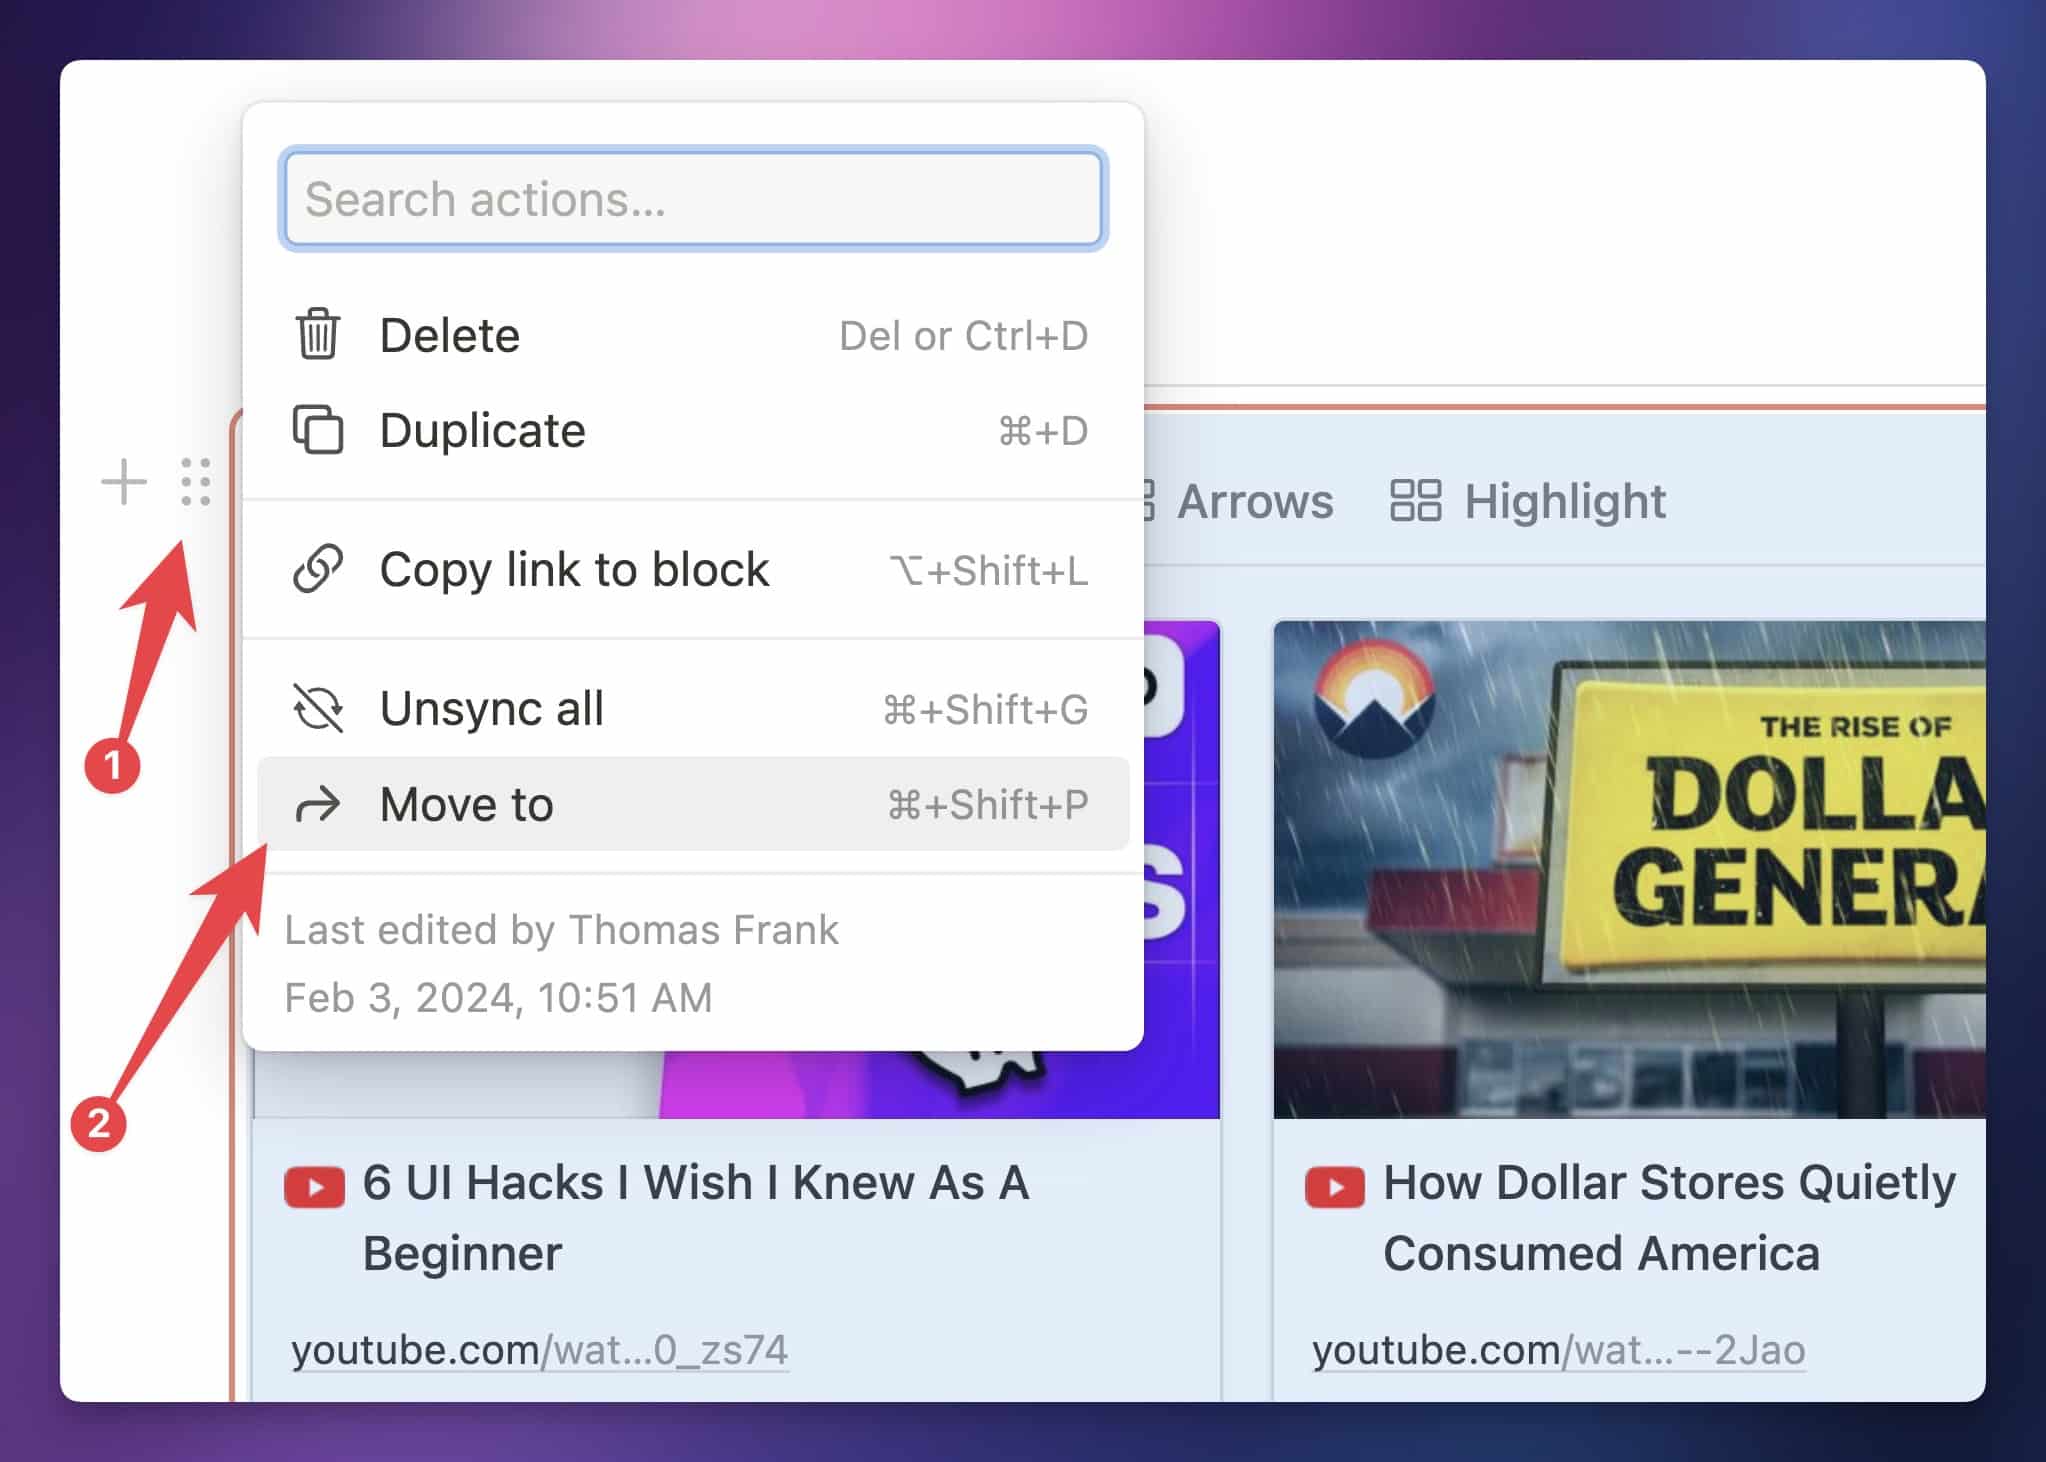
Keep in mind that you can also use this to your advantage. For example, you could create a “universal footer” with links or other information, store it in a page only you can edit (but everyone else can view), then use a Synced Block to paste it on many other pages.
This trick allows you to embed read-only content on pages where everything can be edited by most users.
I use it to add universal footers to my Notion templates. While people can easily delete the Synced Blocks from their own copies, those who leave them as-is benefit from having the most up-to-date links to tutorials, our support center, etc.
Copy link to headingRelation Properties and Permissions
Let’s say a user named Sanji has access to a database called Tasks.
Tasks has a Relation property that connects to another database called Projects, but Sanji does not have access to Projects.
In this situation, the following will be true:
- If the Relation property is displayed on Tasks, Sanji will be able to see that it exists. If not, Sanji won’t see it at all.
- If the Relation property is displayed on Tasks, it will always appear empty on every page – even if some of the pages do have pages from Projects set. Since Sanji doesn’t have access to Projects, he won’t be able to see those pages.
- Likewise, any Rollups that pull from the Projects relation will also appear blank for Sanji. Since he doesn’t have access to the Projects database, he can’t see any of the pages in it, nor their property values.

Relation Properties in the Notion API
Relations are even more locked down when it comes to integrations. If an integration is in the same situation as Sanji – it has access to the Tasks database, but not the Projects database – then it will not be able to see that the Projects relation property exists at all. This will be true even if the Relation property is set to be visible in the Tasks database.
This limitation can sometimes create confusion when users are trying to connect their Notion workspace to integrations such as Flylighter, the Notion web clipper my team and I built.
Imagine a user has a Read Later database, which is related to a Tags database. When they connect Flylighter to Notion, they might only give Flylighter access to the Read Later database, since they want to capture articles for later reading to that database.
When they go to set the properties when capturing an article, the Tags relation won’t appear. This is because, due to the limits of the Notion API, the integration (Flylighter) cannot see that the Tags relation exists. The API simply doesn’t return it in the list of properties in the Read Later database.
To fix this, the user needs to grant the integration access to the Tags database as well.
A useful tip for dealing with this limitation: When adding an integration such as Flylighter to your workspace, give it permission to a parent page that contains your databases.
For example, Ultimate Brain contains several databases – Tasks, Notes, Areas & Resources, etc. By granting an integration access to the main Ultimate Brain page, it’ll get access to all of those databases. As a result, it’ll be able to see any Relation properties, and allow the user to set them when working with the integration.
Copy link to headingRemoving Users from the Workspace
If you’re on one of Notion’s non-Enterprise plans – Free, Plus, or Business – removing a Member or Guest from your workspace means losing access to their private pages. These plans don’t even provide a way for you to restore access to those users. Be very careful when removing people from your workspace.
If you’re on an Enterprise plan, things change.
First, when Members are removed from a workspace, you’ll see their accounts listed in the Recently Left tab within Settings → Members. Here, you’ll find a Transfer Private Pages button. This allows you to transfer ownership of all pages to which the user had sole access. You can transfer to any other Member.
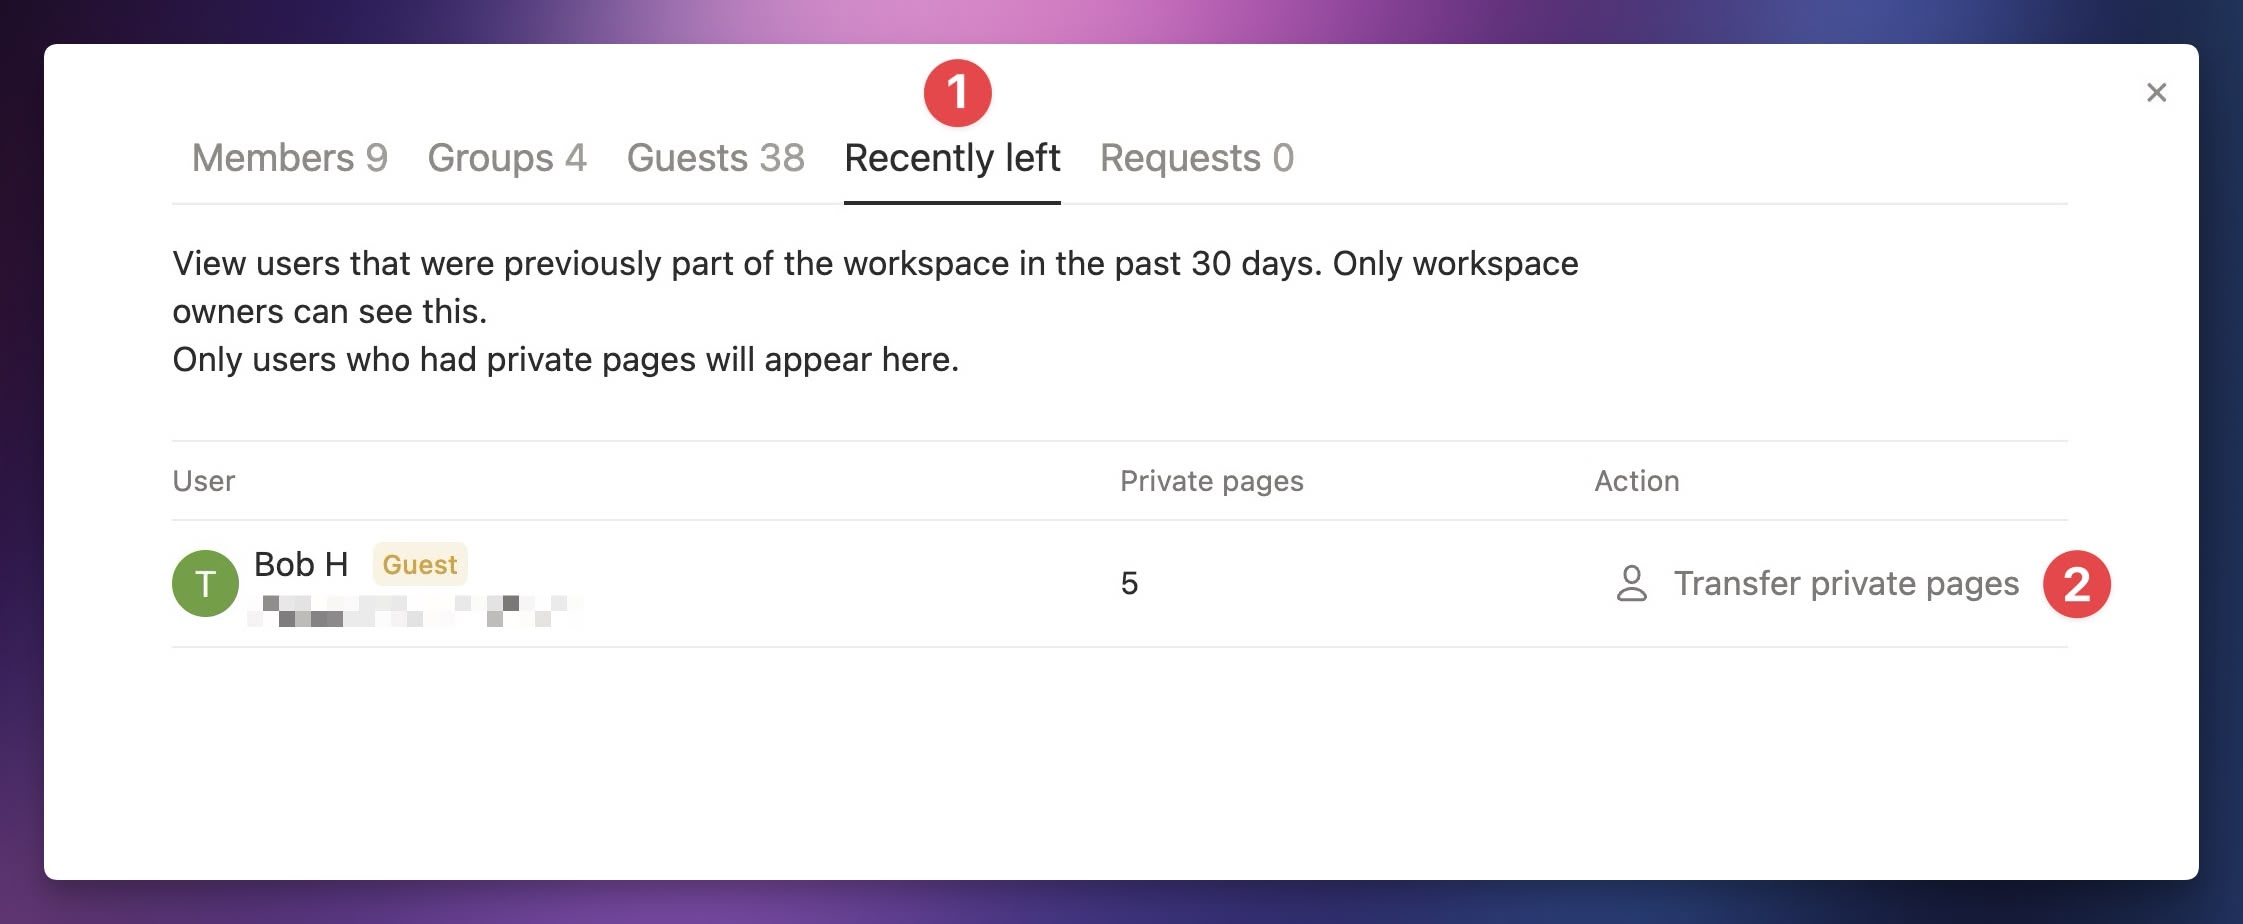
When you do, the recipient Member will find a new top-level page in their Private section called “Private Pages of [Removed Member]”. This page will:
- Directly contain all of the Member’s private pages
- Link to any “siloed” pages in shared places (Teamspaces, shared pages) where the Member had removed everyone else’s access, but hadn’t moved the page to their Private section. On these, the recipient will now have Full Access, and the pages will remain in their original locations.
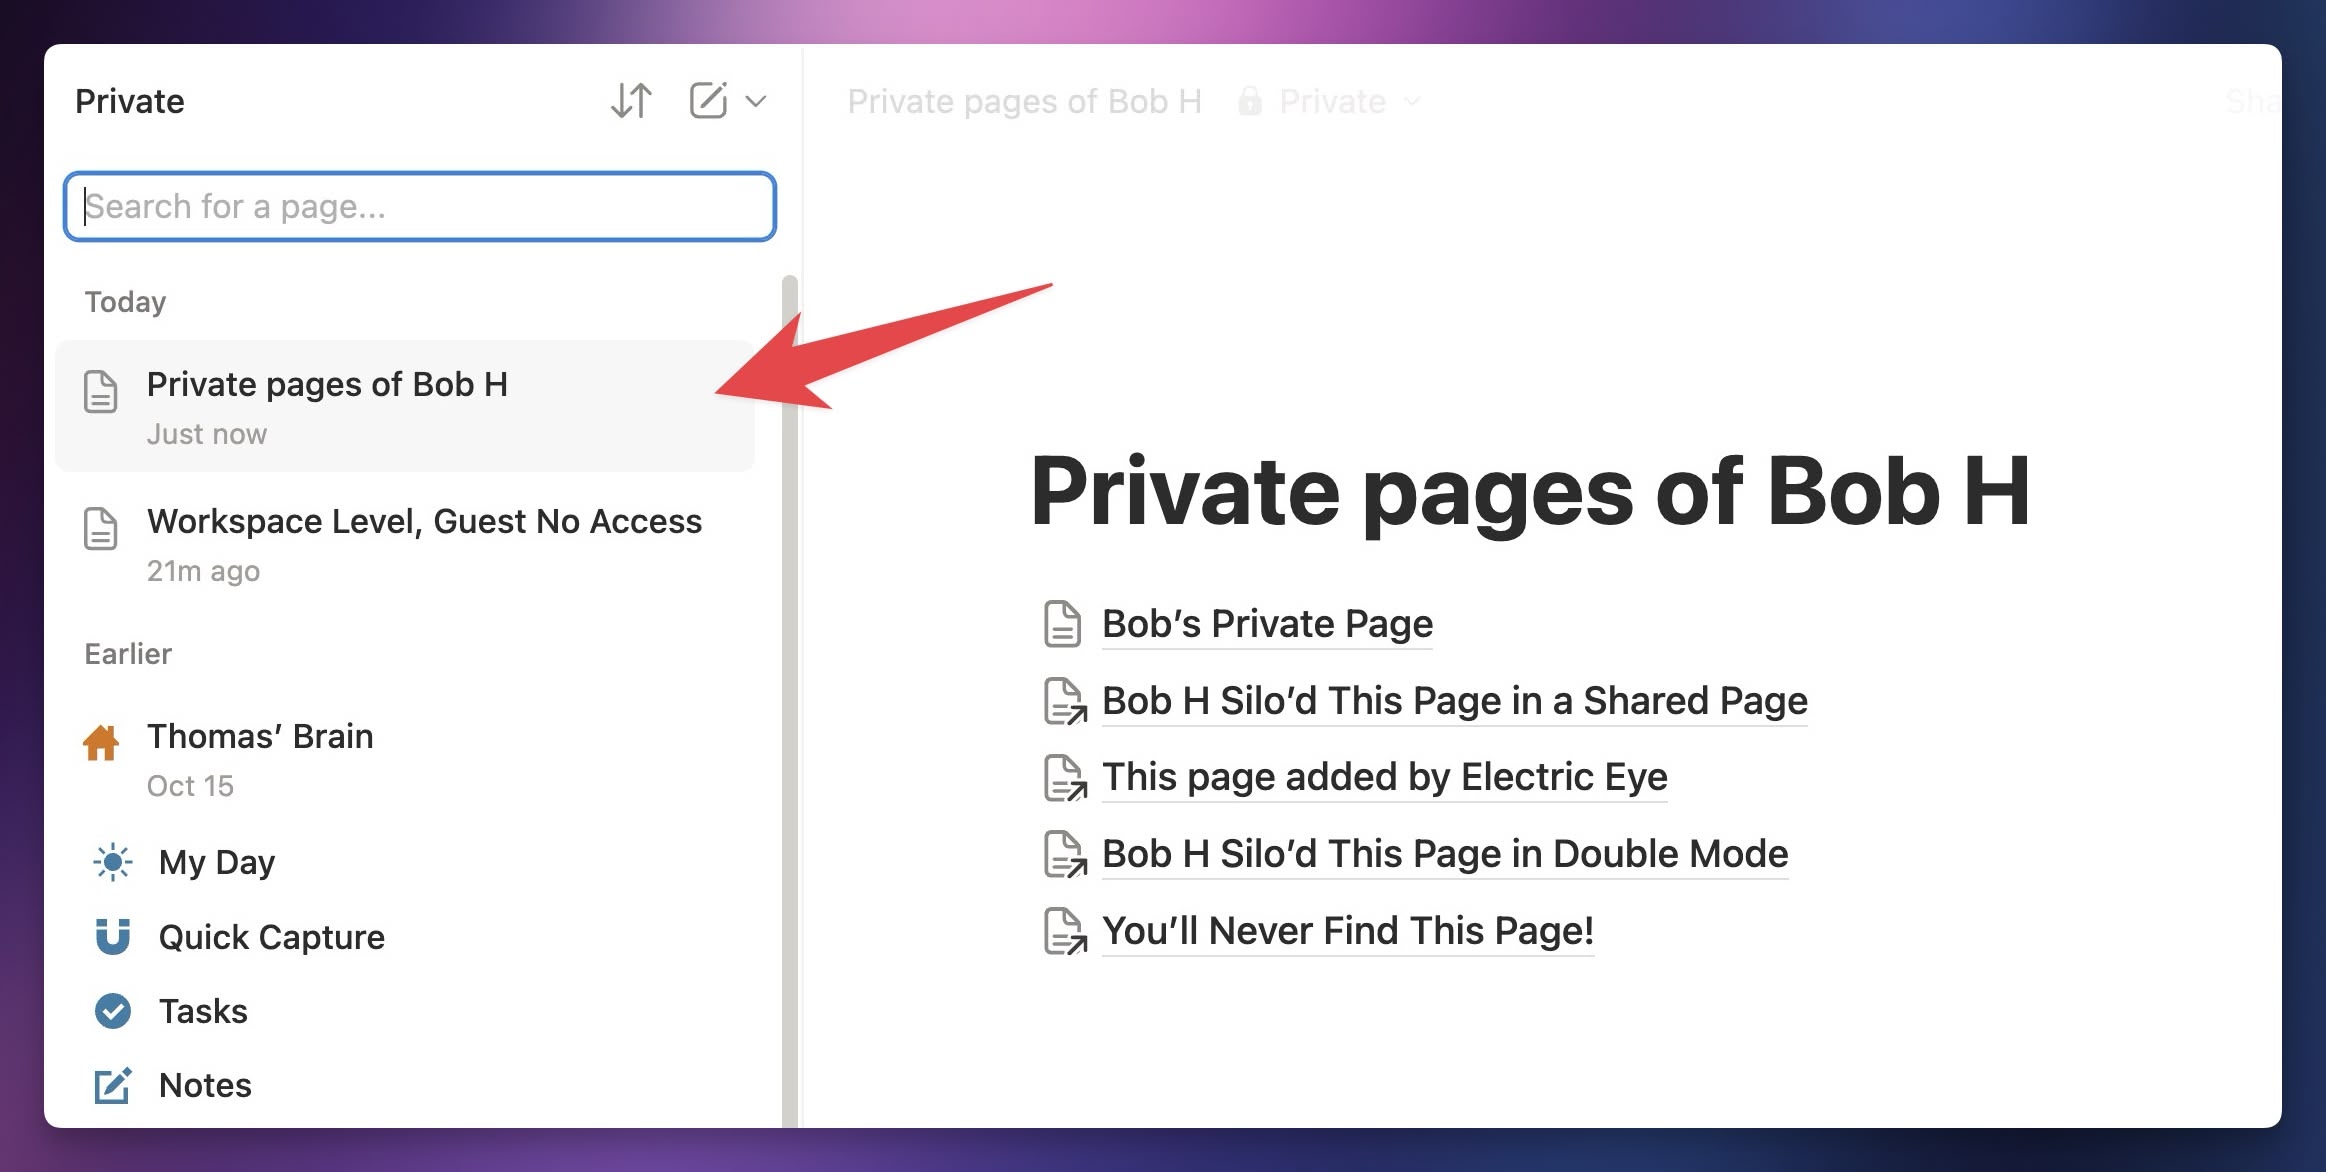
Additionally, if you decide to invite the user back to the workspace as a Member within 30 days of their removal, you’ll see a Restore Access button next to their name in the Members tab of Settings.
You can use this to fully restore their pages, groups, and teamspace access. This also means you can more easily filter using Shared With in Content Search (more on that below).
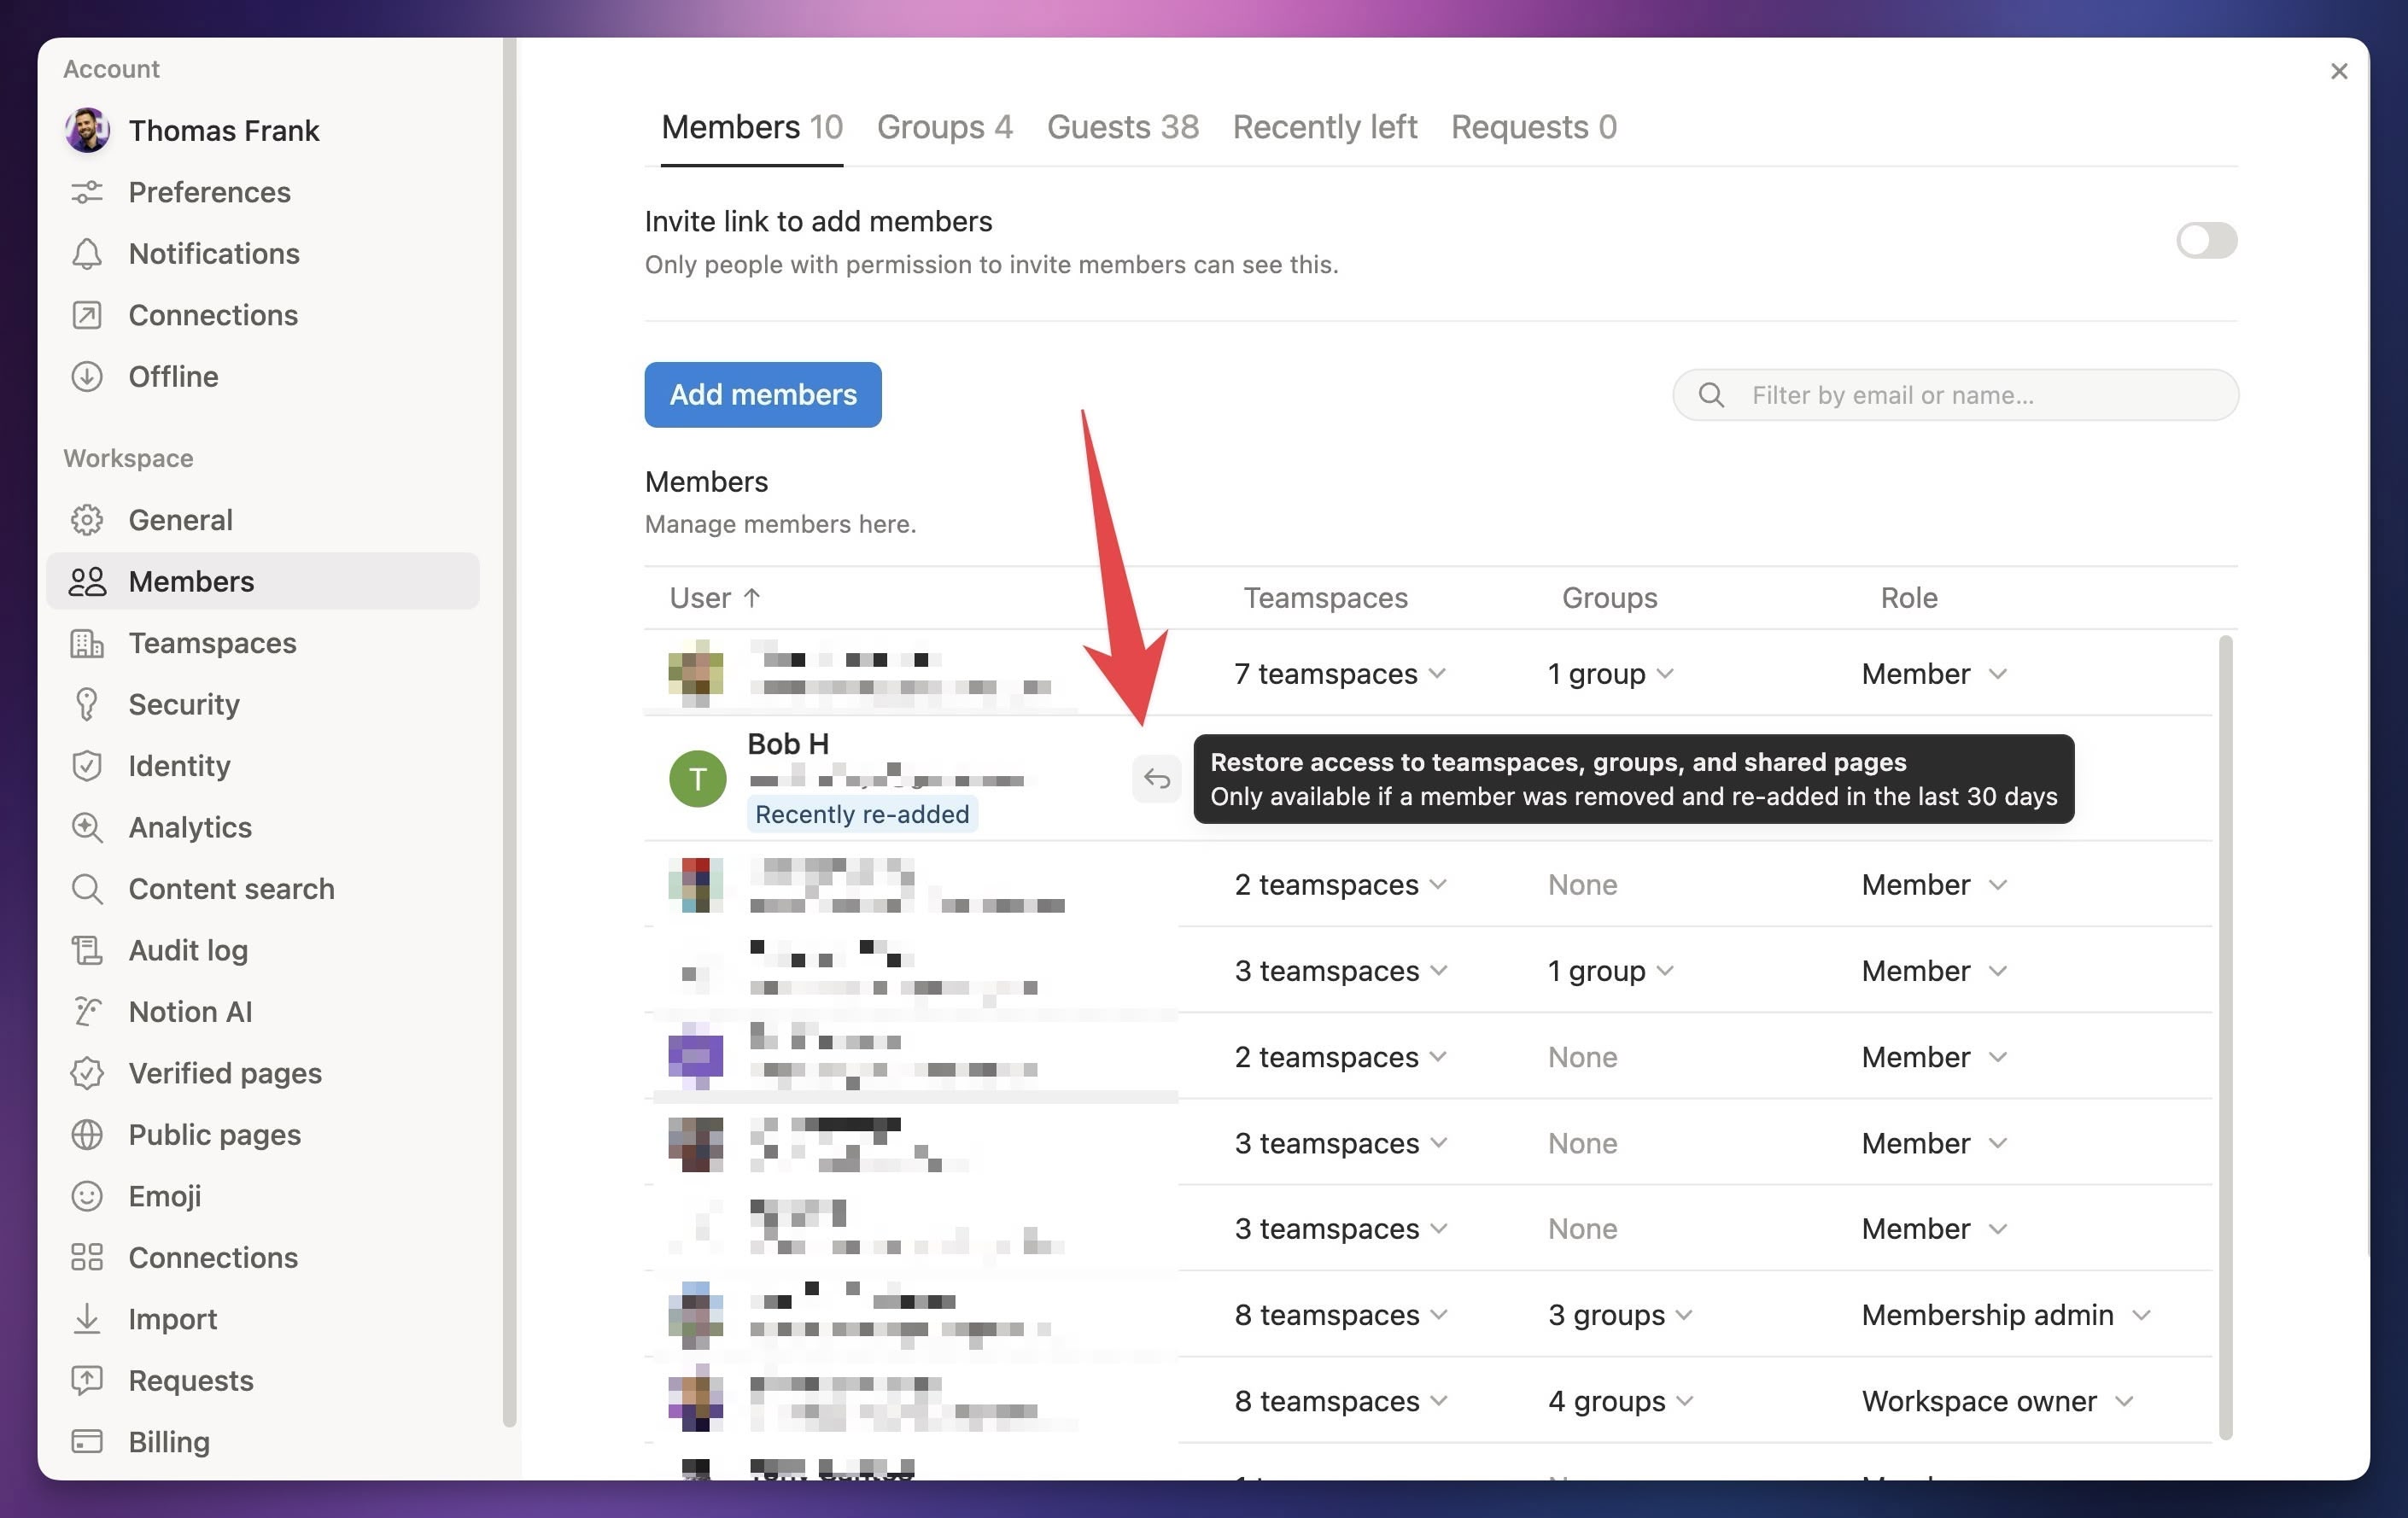
It’s important to note that all of the above applies only to Members.
If you remove a Guest from your workspace, you won’t be able to transfer their pages so easily. Also, even if you re-invite the same user to a new page (thereby making them a Guest again), they won’t automatically regain access to any of the pages to which they had access before they were removed.
This usually won’t matter, since Guests can’t create Private pages, but – as I noted in the section on Guest Limits – they can silo pages in certain circumstances, removing everyone’s access but their own.
So what do you do in order to find these siloed pages?
Allow me to introduce two other powerful tools you (as the Workspace Owner) can access within an Enterprise Plan: Content Search and Audit Log. You can access both of these in Settings.
First, Content Search lets you search through all content in the entire workspace, no matter where it’s located or who can access it via normal permissions.
If a user is still in your workspace, you can also make it easier to find all of their pages by using the filters in Content Search. For example, you could filter by Shared with → [Guest User] to see all of a Guest’s accessible pages before you remove them from the workspace.
If you alread removed them, you could re-add them and at least filter to see pages they created.
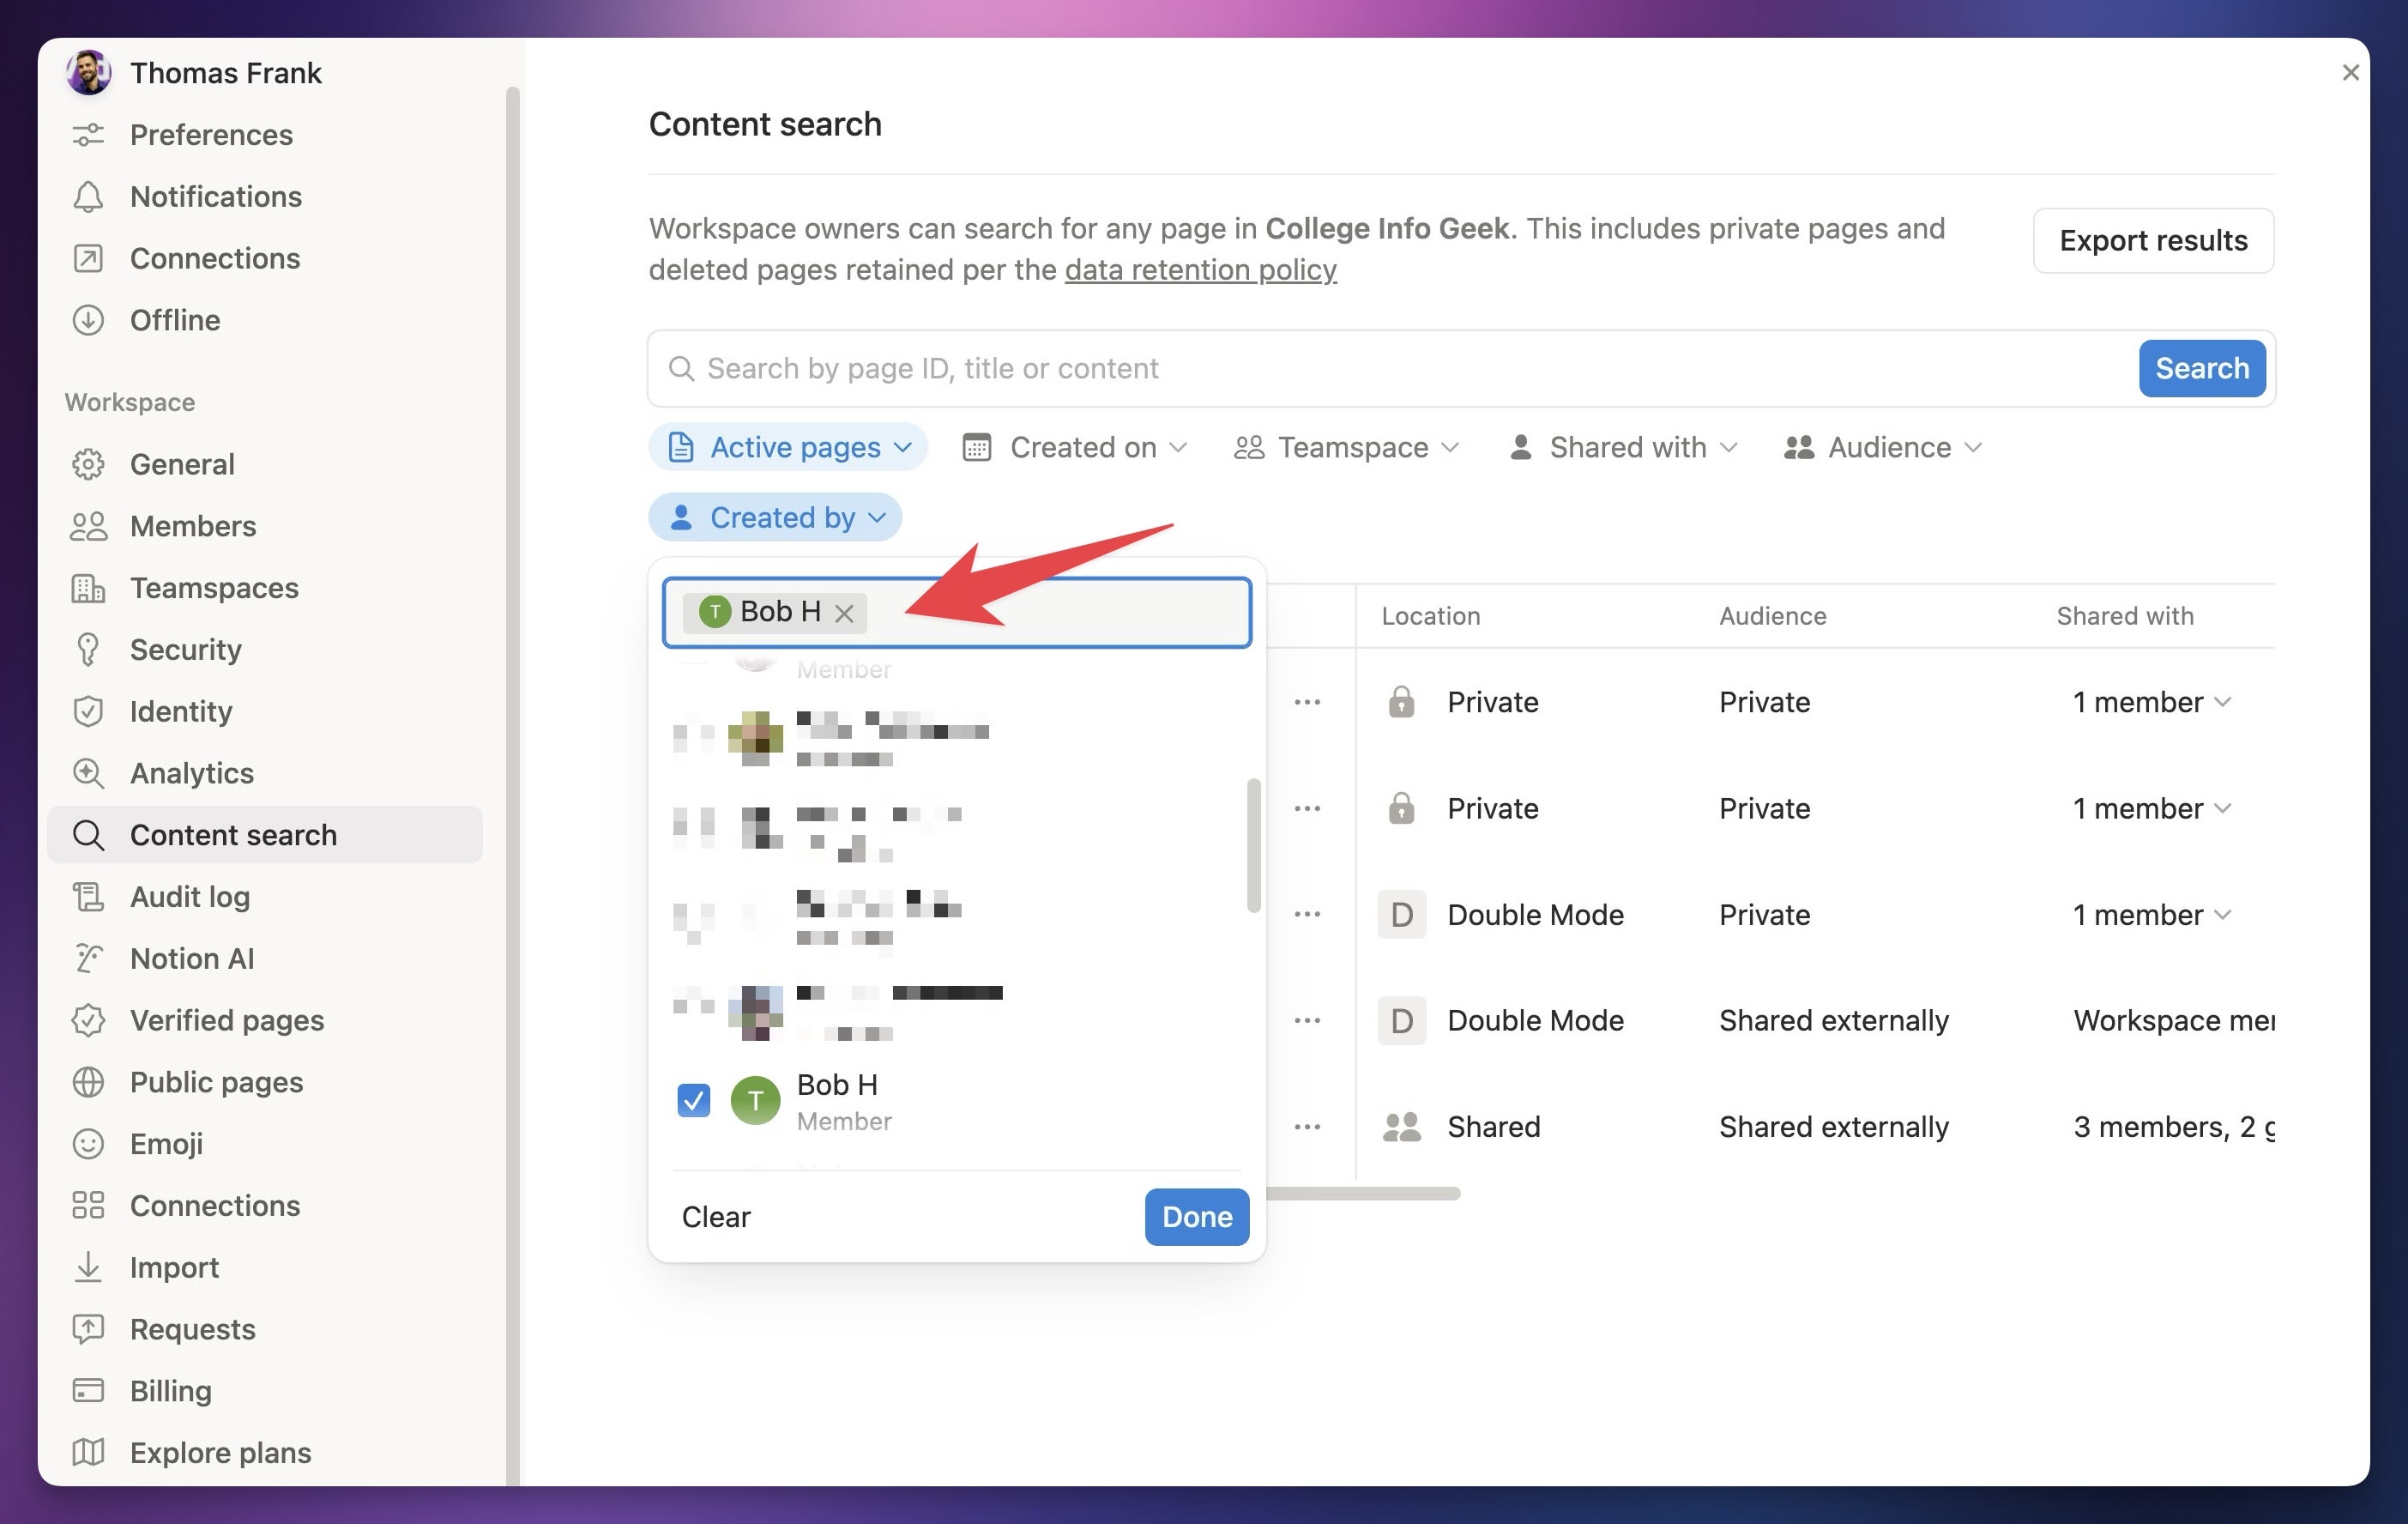
When you find a page you’re looking for in Content Search, you may noticed that you can’t access it by normal means.
To bypass this, you can hit the ••• menu next to the page name, hit Change Permissions, and grant yourself access.
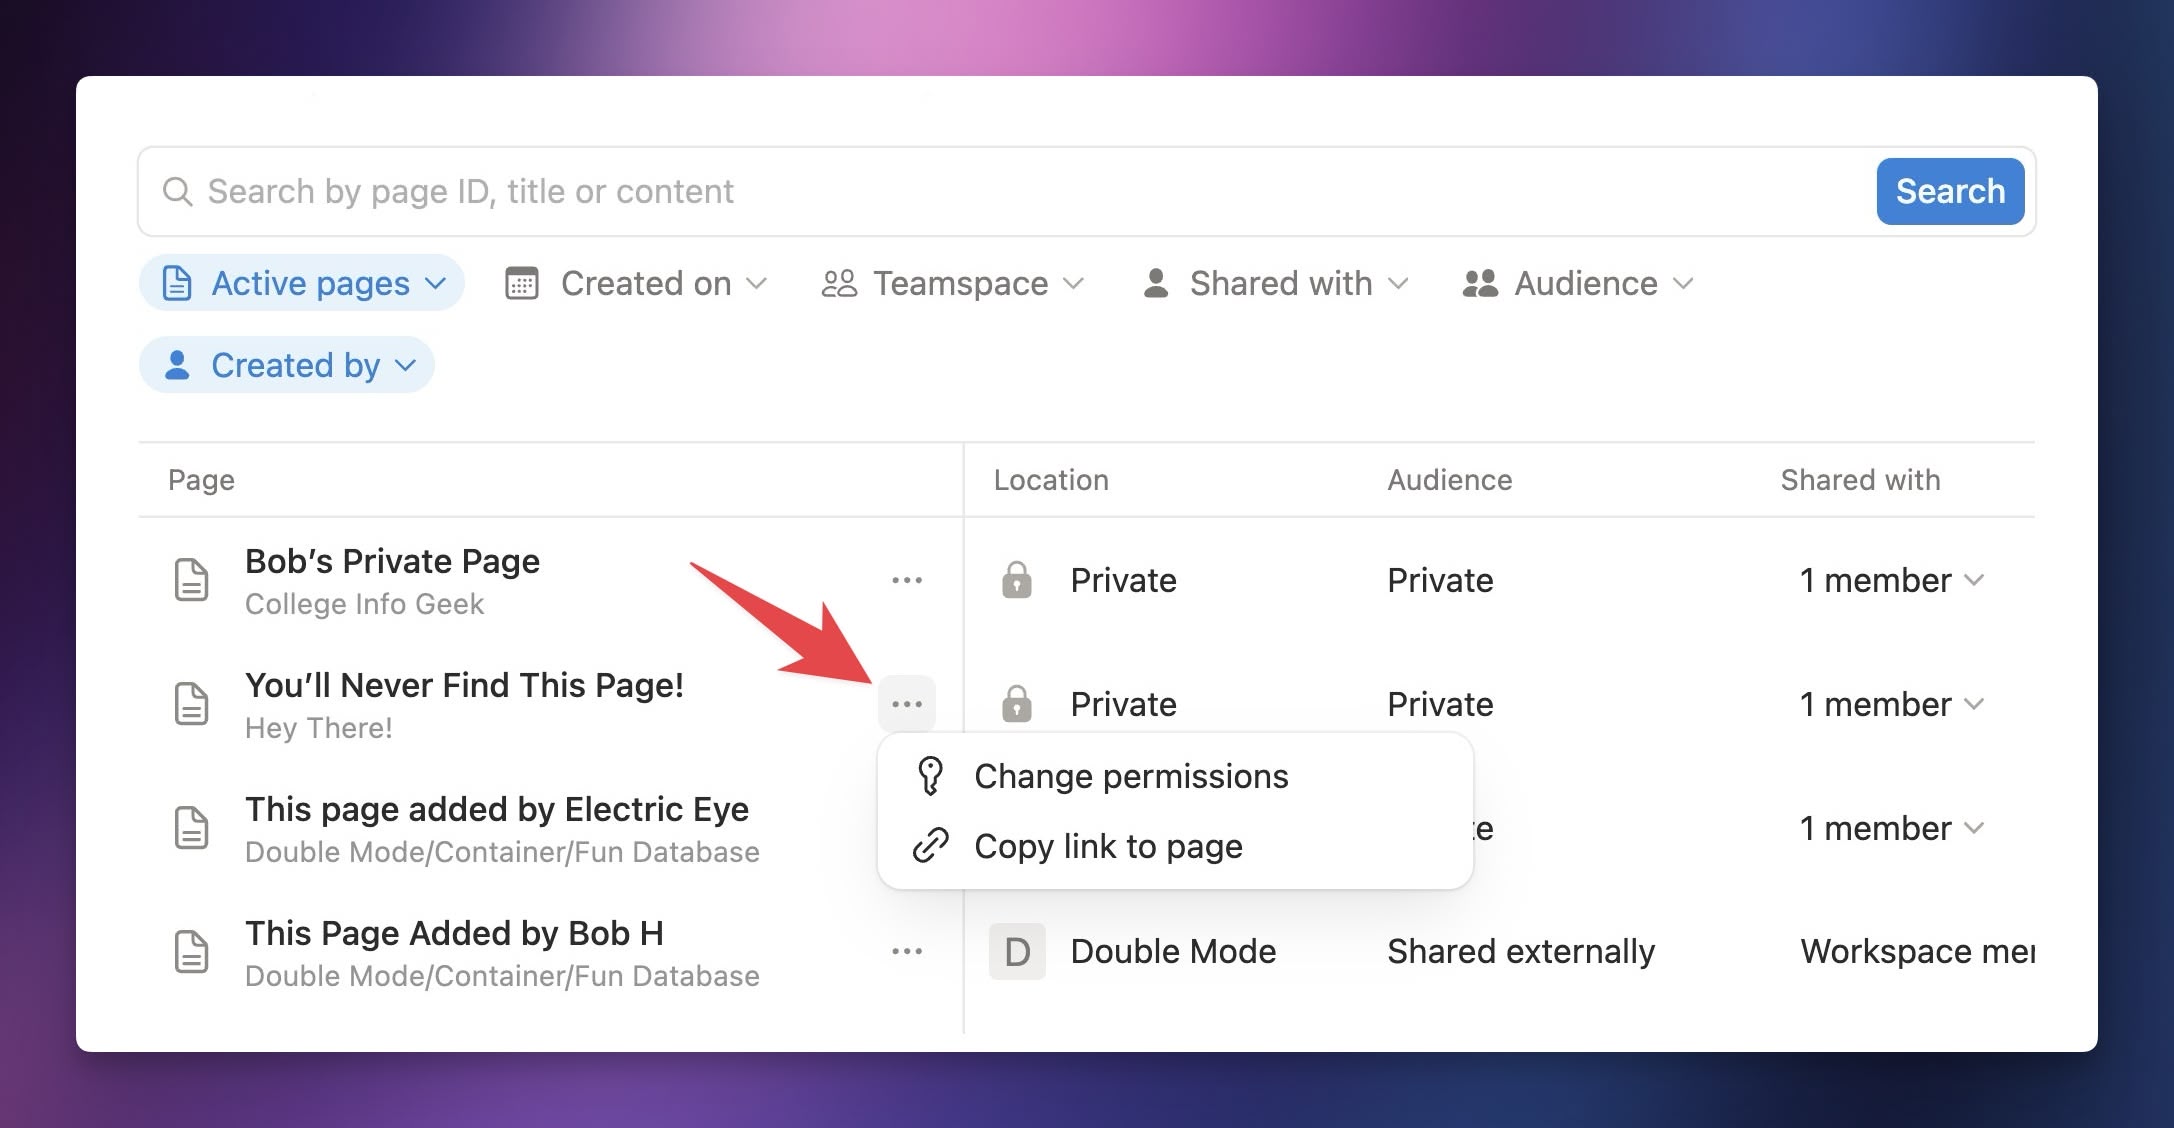
If a user has been removed from your workspace, you can still use Content Search to find page they created – but you won’t be able to filter by their user account. Content Search only lets you filter by active users.
If you want to filter by deactivated users (even Guests), head to Audit Log. This gives you a log of nearly every action taken in your workspace by every user.
This view doesn’t give you the ability to change page permissions directly, but you can click on a page viewed or edited by a deactivated user:
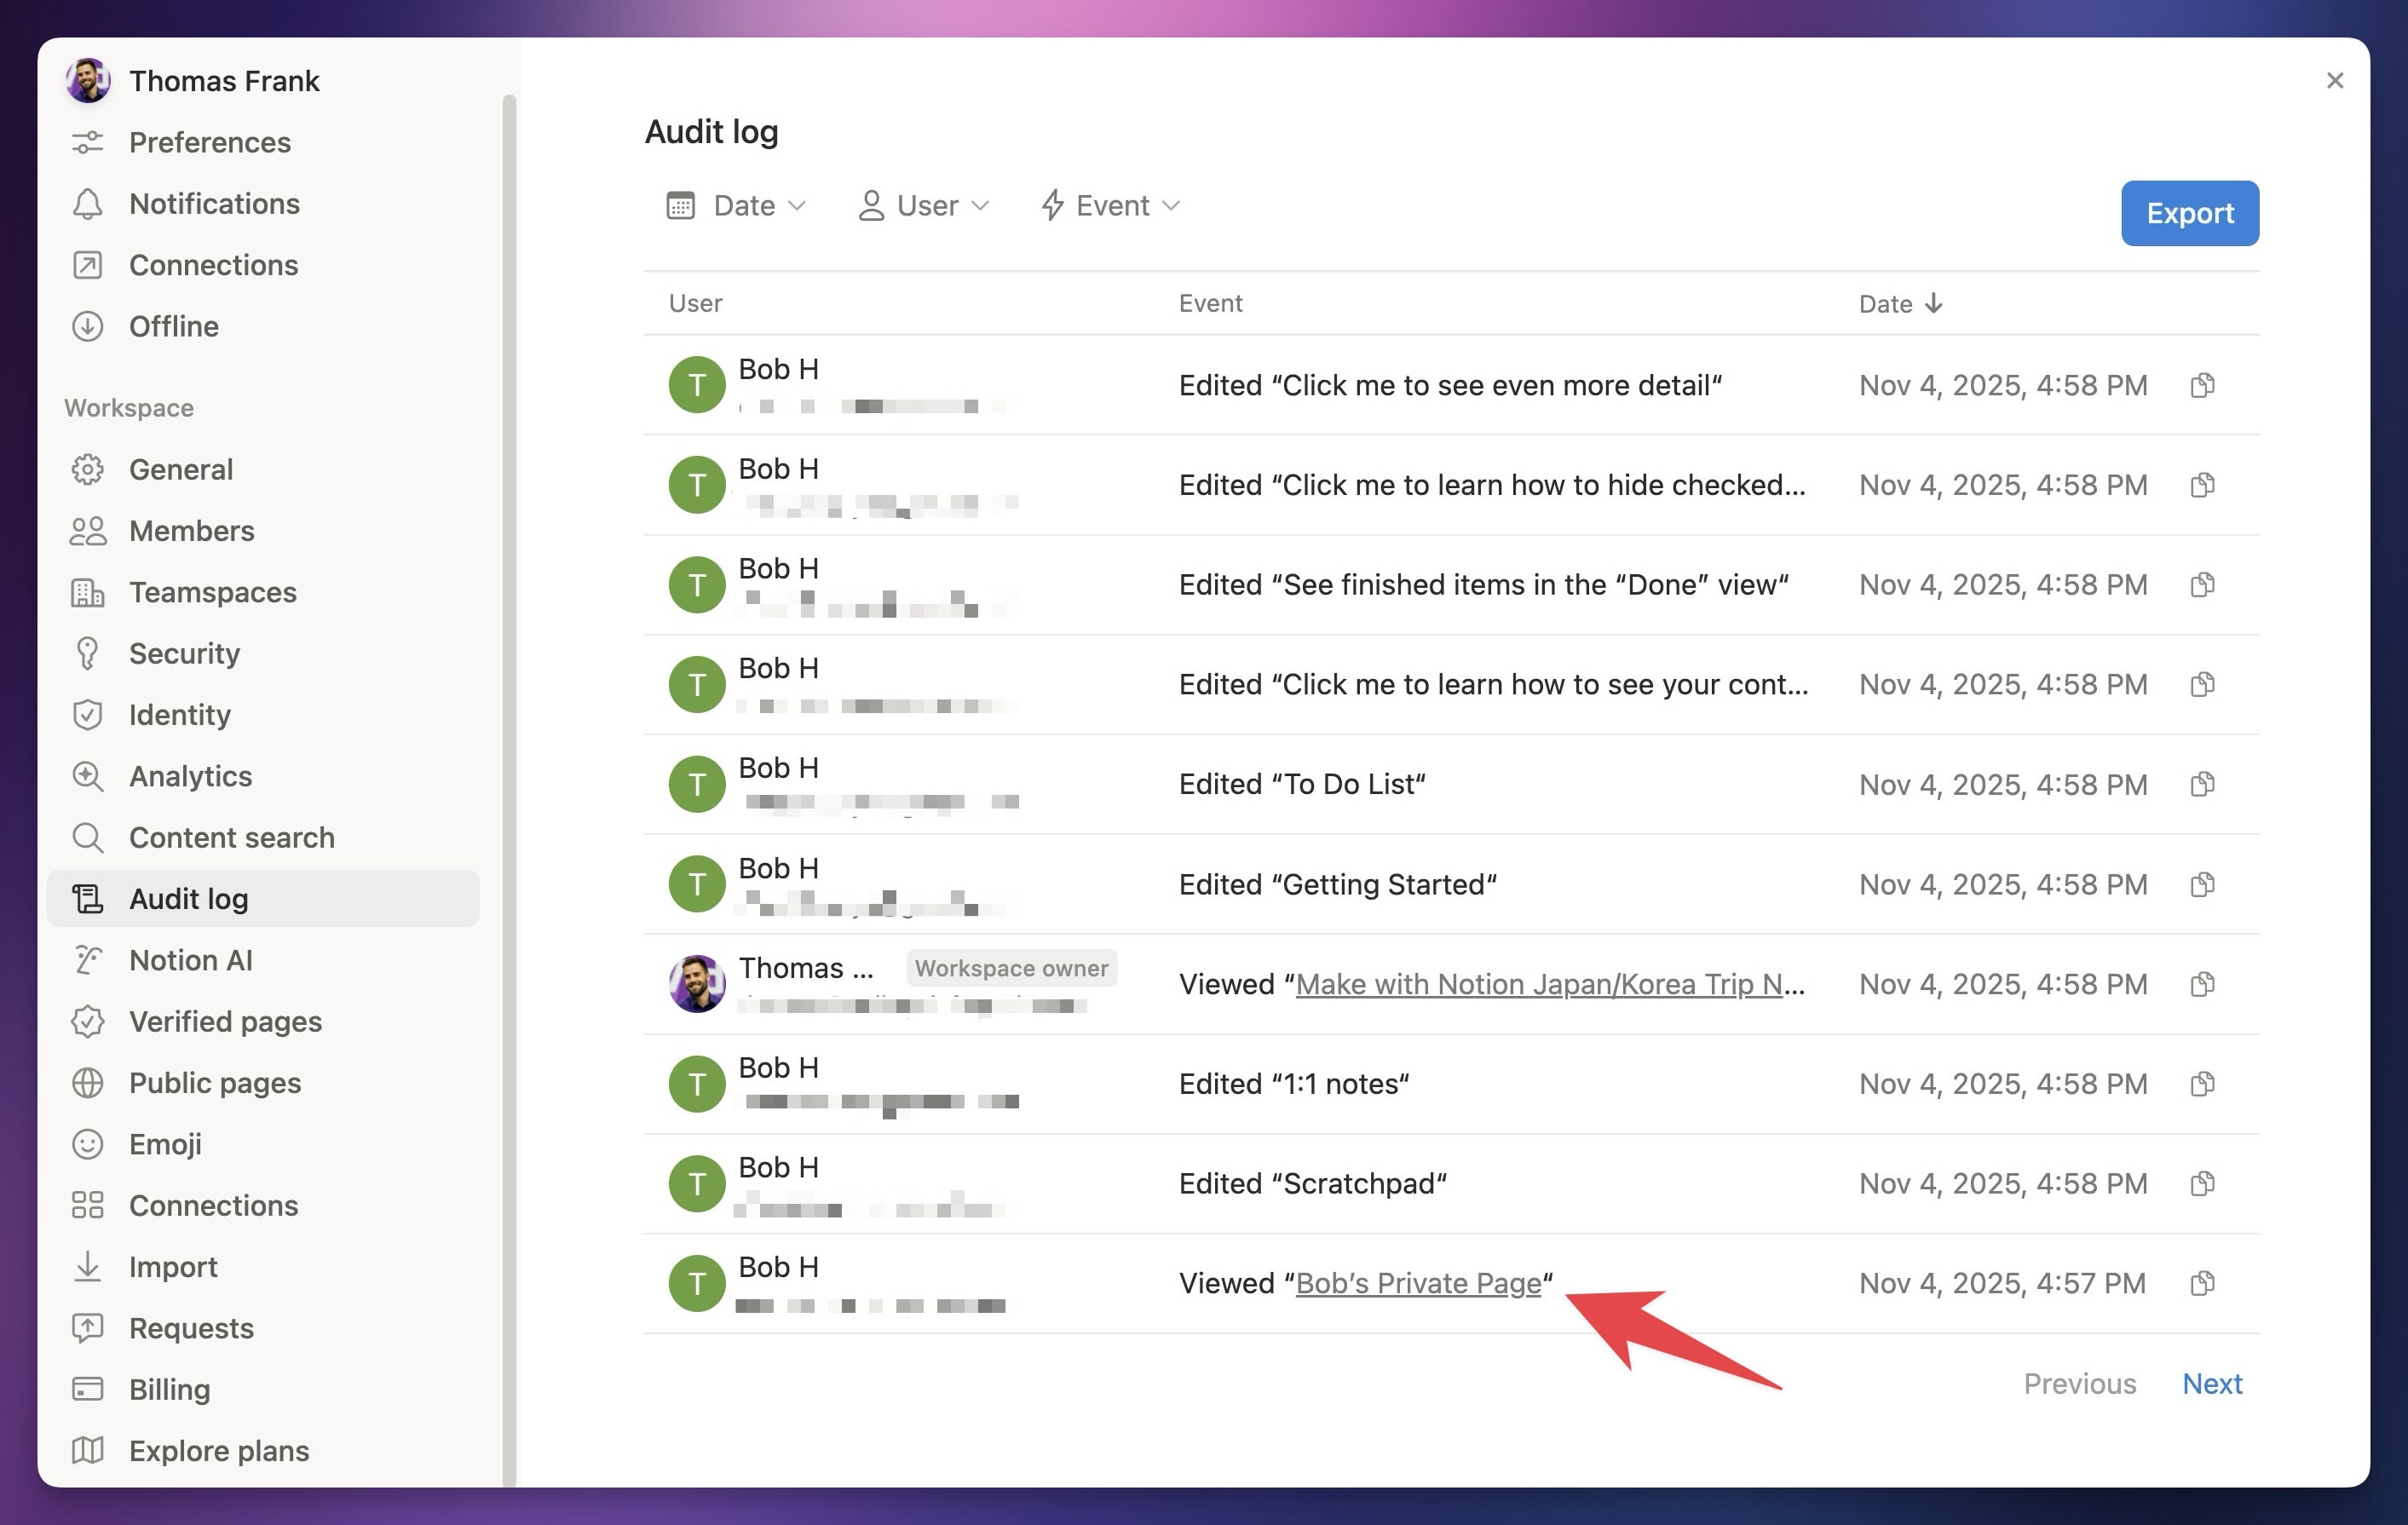
When you do, you’ll see a “No Access” popup. In all other Notion plans, the only option here would be to Request Access.
However, on an Enterprise plan, workspace owners can also change permissions directly, as shown below:
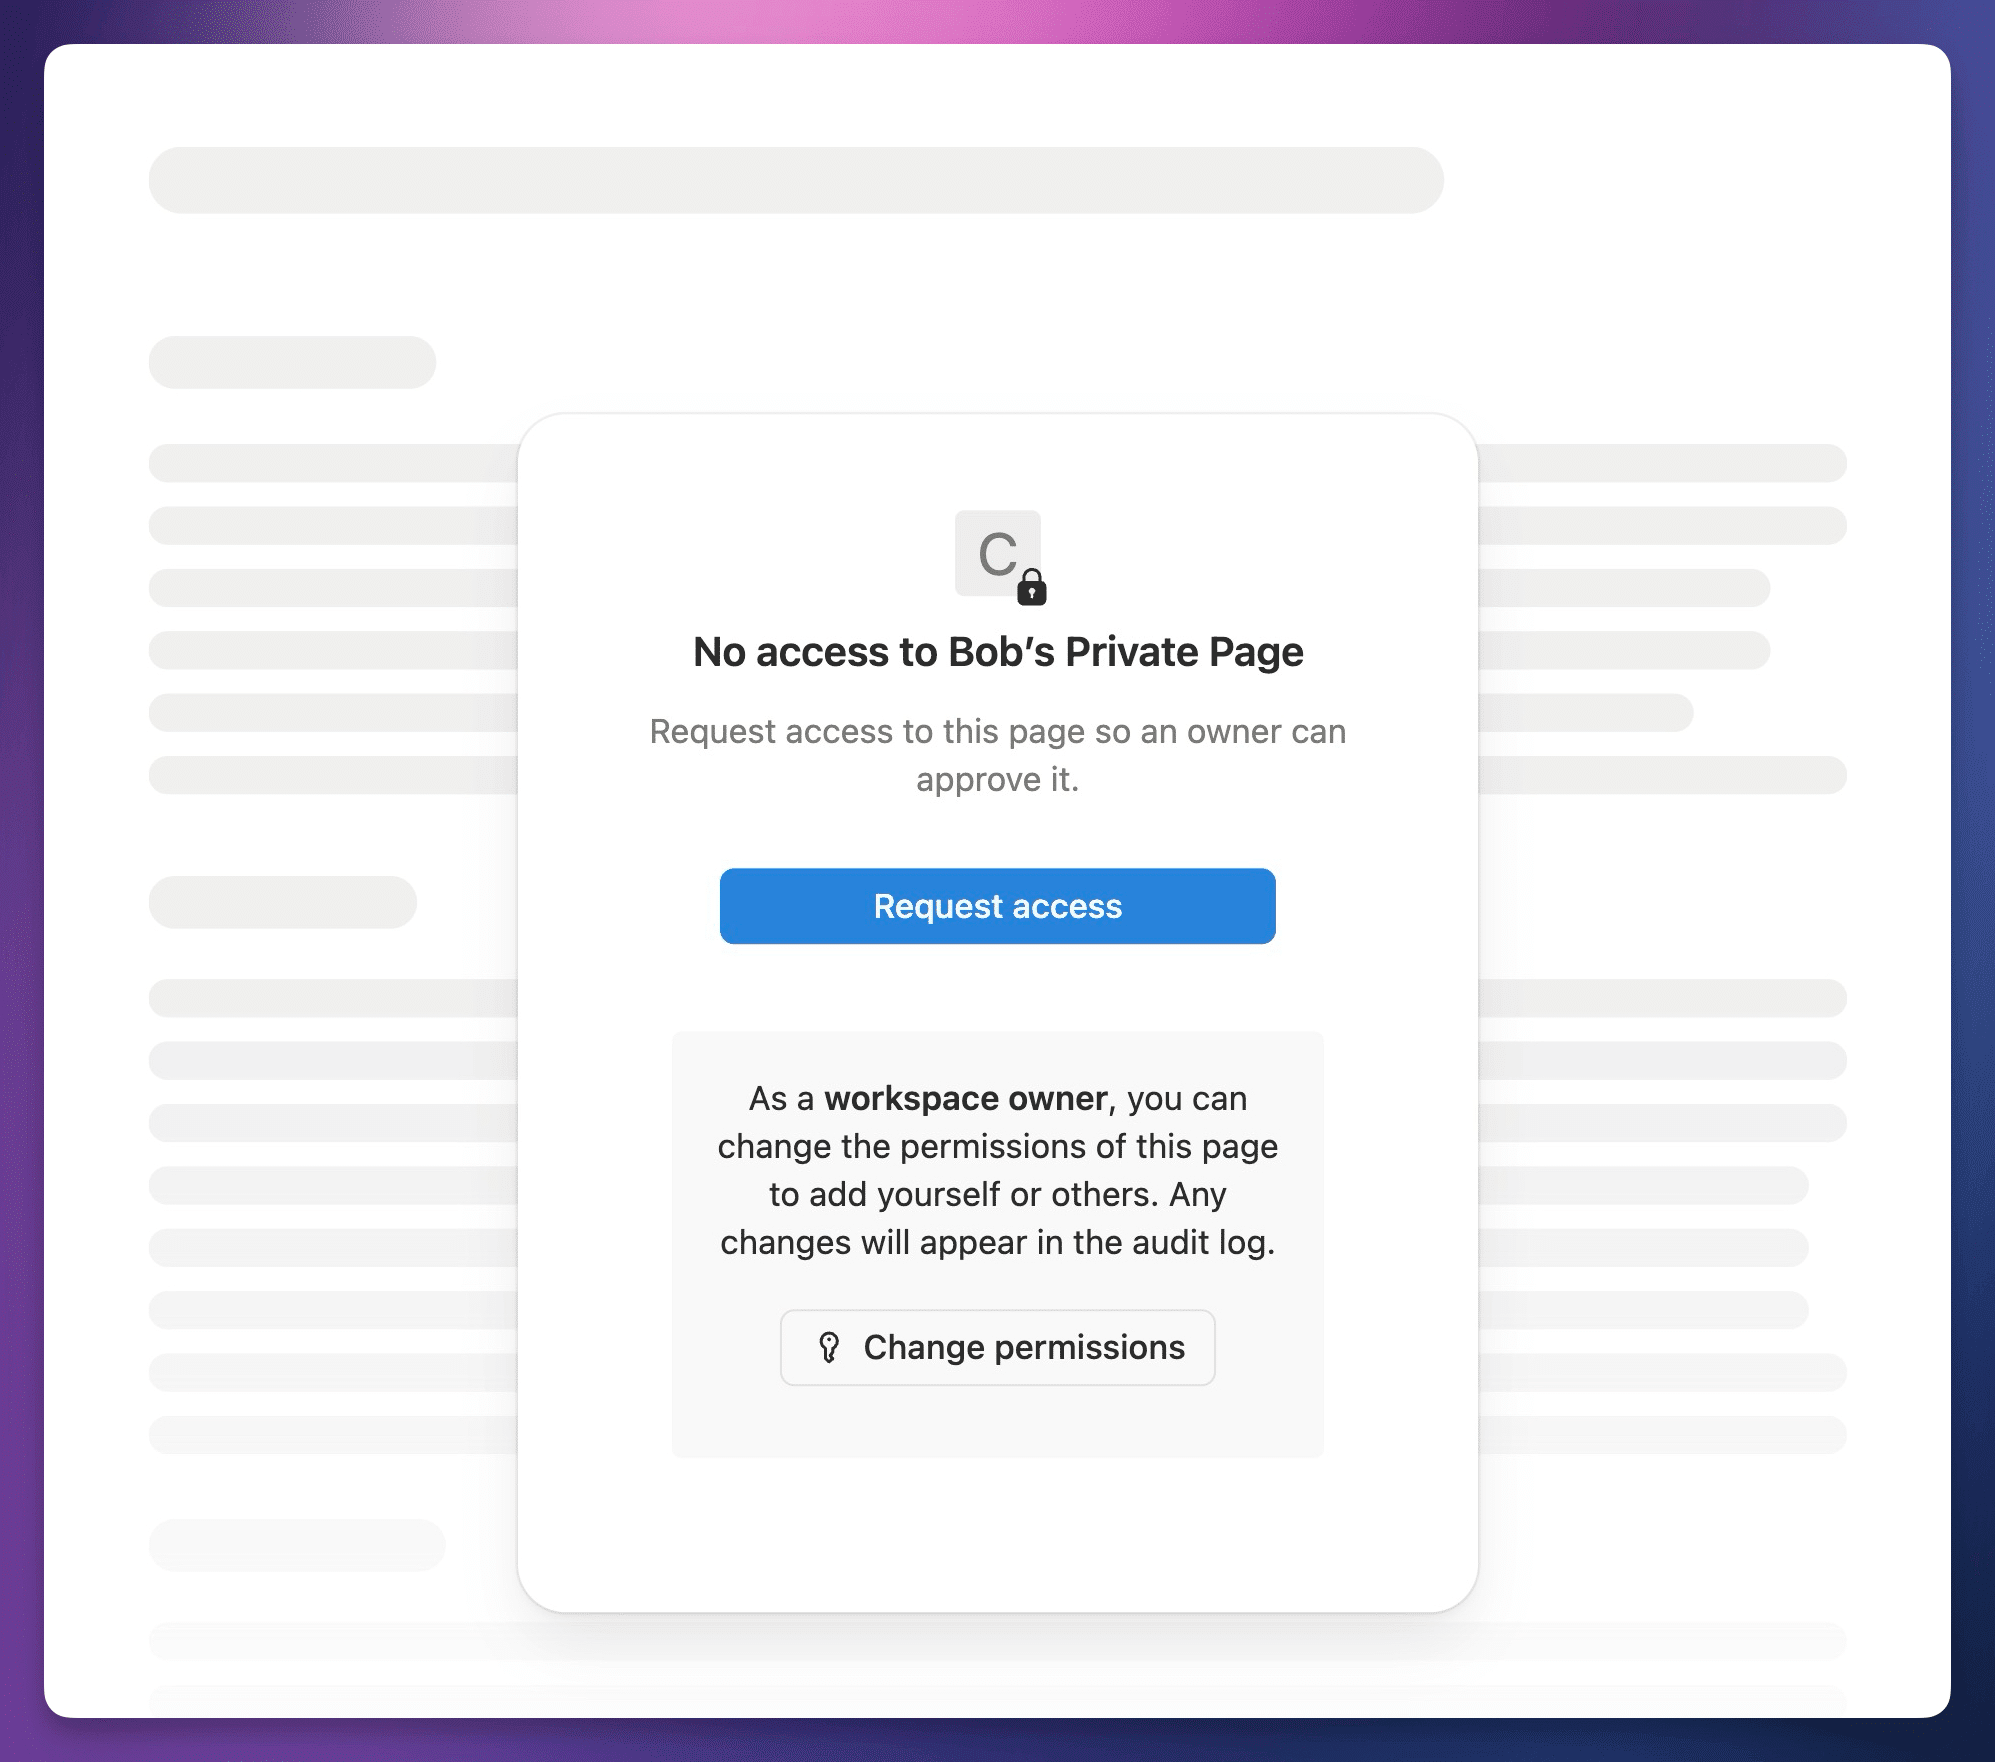
Wrapping Up
If you’ve read everything up to this point, you should now be an expert when it comes to sharing and permissions in Notion. Still, the details of Notion’s permissions model can sometimes be hard to remember – so feel free to bookmark this page and come back to reference it when you need.
To learn even more about Notion, head to the Notion Fundamentals home page to check out all the lessons in this free series.
You can also check out my Notion Templates, which can give you a head start and equip your workspace with an advanced task manager, note-taking system, habit tracker, and more.
If you enjoy this content and want more, consider joining my Notion Tips email list! I’ll keep you up to speed on my Notion courses, but also let you know when I publish new free tutorials and templates:
The Notion Tips Newsletter
Join 50,000+ folks and enjoy your morning coffee alongside my latest Notion guides and templates, delivered hot(?) and steaming(?) to your inbox.