
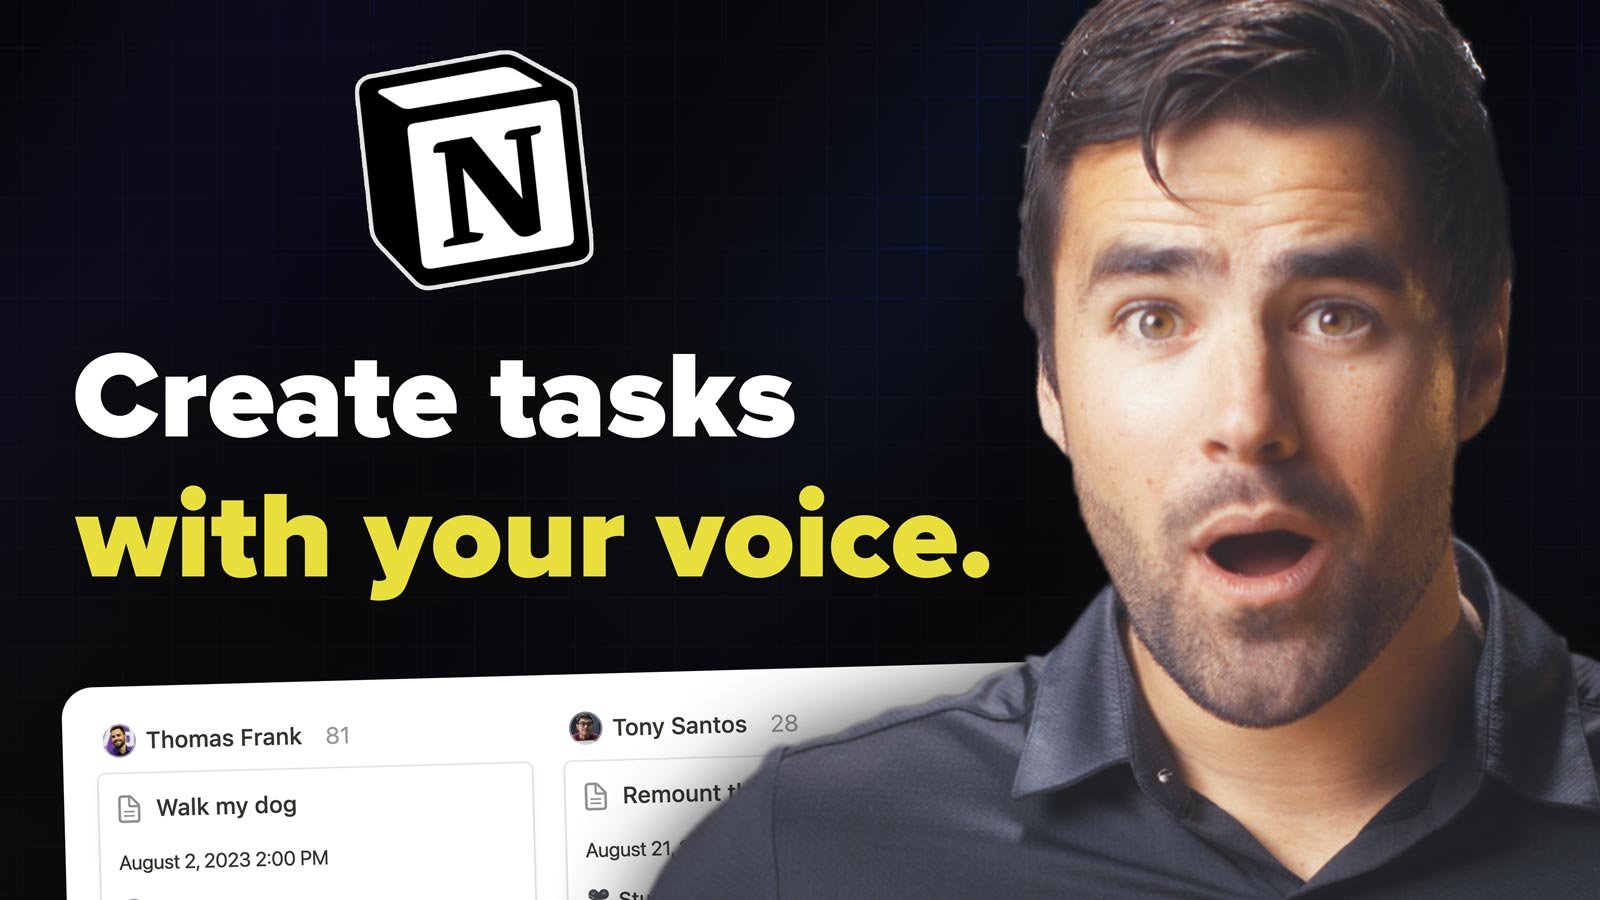
Want to create tasks and to-do’s directly in Notion using your voice? In this guide, I’ll teach you exactly how to do that.
The workflow we’ll build today will let you quickly tap a shortcut on your phone, brain-dump a bunch of tasks, and instantly send them to Notion. It also:
- Works on iOS (iPhone, iPad, and Apple Watch), MacOS, and Android
- Can create multiple tasks in a single voice command
- Can automatically set assignees, due dates, projects, and more
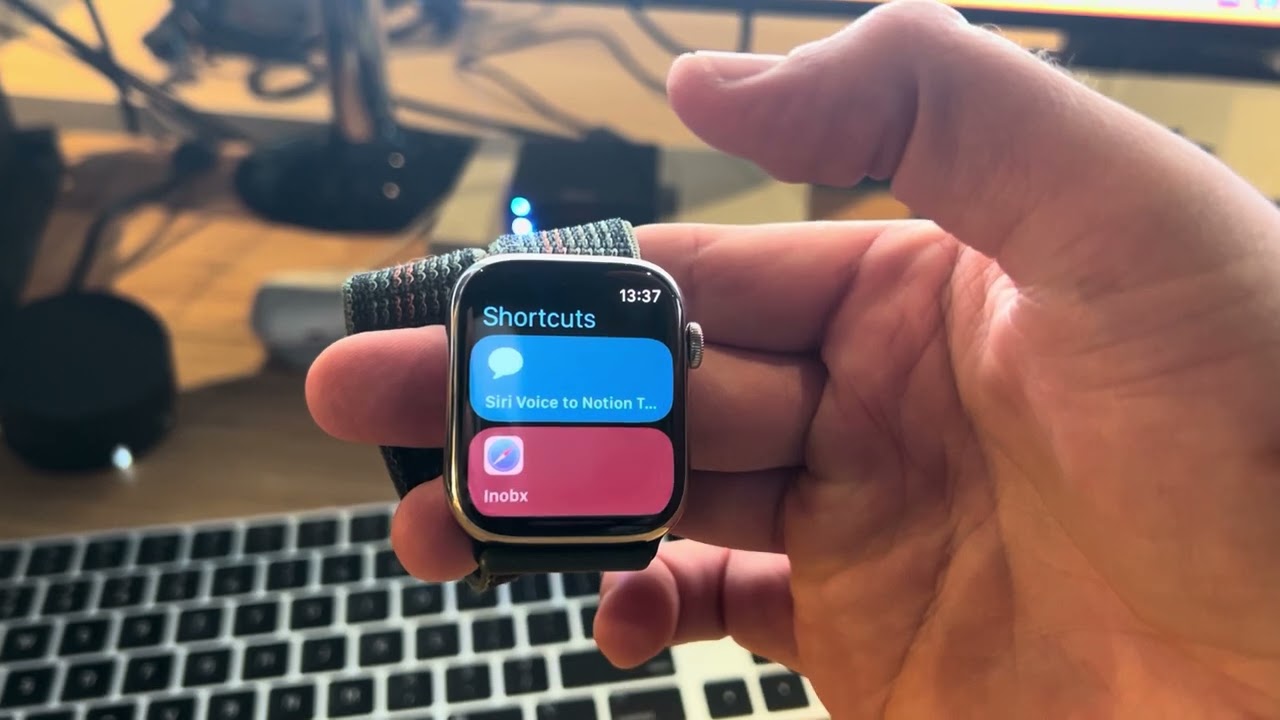
Here’s a 30-second video where I create a task in Notion directly from my Apple Watch:
Best of all, I’ve taken care of 95% of the work for you.
I’ve created a free template link that will automatically build the workflow for you in
From there, all you’ll need to do is:
- Set up a way to transcribe your voice and send the text to your automation – I’ll show you how to do this via Siri/Shortcuts on iOS, as well as Google Assistant/Tasker on Android
- Change a few settings (I’ll guide you through every step)
As a result, this workflow should take you no more than 15 minutes to set up.
It also requires zero coding and minimal technical skill. If you can follow along with this article, you’ll be able to set it up easily.
This is just one of many tutorials I’m working on that can help you build useful automations for Notion. If you’d like to become a Notion power user, consider joining my free Notion Tips newsletter so you don’t miss out on future guides and templates:
The Notion Tips Newsletter
Join 50,000+ folks and enjoy your morning coffee alongside my latest Notion guides and templates, delivered hot(?) and steaming(?) to your inbox.
Tutorial Overview
This section explains how this automation works at a high level. If you want to skip and it just start building, click there to go to the next section.
At a very simple level, this automation takes advantage of the voice dicatation features that are built into both iOS and Android.
On your phone, we’ll build a workflow that does three things:
- Records your voice
- Transcribes your voice to text
- Sends the text to
Pipedream (along with the current date and your name)
From there, our
It’ll use the ChatGPT API to convert your text into a list of tasks, then create a new page in your Notion workspace (ideally in a task database) for each task.
If you included a due date, assignee, and/or project, it’ll add those details as well.
This workflow can be used on platforms beyond iOS and Android as well if you have a bit of tech skill. If you’re curious, jump to this FAQ section for details.
Here’s a quick look at how the entire automation works:
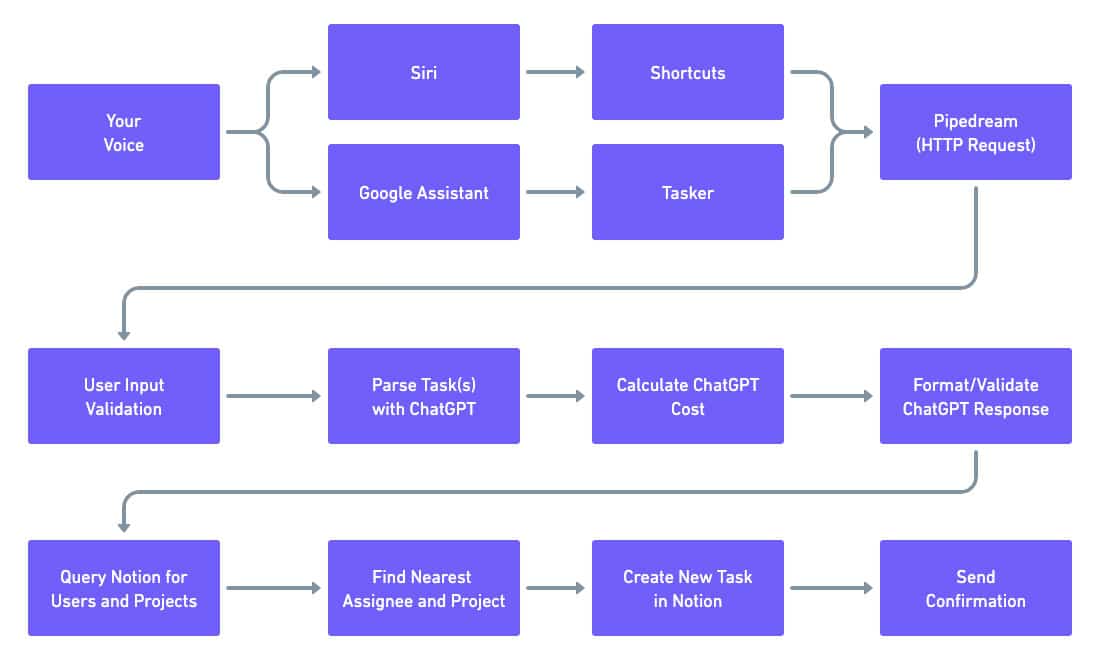
Let’s break it down in a bit more detail. First, this is what happens on your phone:
- Your voice is transcribed, either by Siri on iOS or Google Assistant on Android.
- An on-device automation app (Shortcuts on iOS, Tasker on Android) packages your dictation with your name and the current date. Sending your name allows you to assign tasks to yourself.
- Shortcuts/Tasker sends the data as an HTTP request to your workflow in
Pipedream , which will handle eveything else.
Once the data hits your
- Validate the user input, making sure it doesn’t contain disallowed characters.
- Craft a user message and send it to ChatGPT, which is instructed to act as a natural language task parser. It returns an group of task objects.
- Calculate the cost of the ChatGPT request (typically around $0.003).
- Validate the response from ChatGPT, making sure that it’s valid JSON (and attempting to repair it if not).
- Query Notion for a list of users and projects (in your chosen Projects database)
- For each task with an assignee and/or project, match the nearest user/projet from Notion. If there’s not a good match, we don’t include it.
- Create a task object for each task, formatted in the way thet Notion API requires
- Create a new page in your Notion tasks database for each task
- Send a confirmation back to your phone
What You’ll Need to Get Started
To successfully build this automation, you’ll need a few things:
- A Pipedream account (free)
- An OpenAI account (usage-based pricing. $5 in credit can handle thousands of tasks.)
- A Notion account
- One of the following:
Android doesn’t come with a built-in automation app like iOS does, so you’ll need to purchase Tasker in order to send your task details to
For both iOS and Android, I’ve provided ready-made workflow templates you can import – so setup on your phone will be super-quick. You’ll find those links later in the guide when they become relevant.
You’ll also need an OpenAI API key, but I’d encourage you to create that later in the tutorial when it becomes relevant. You’ll only be able to see the key once on your OpenAI dashboard.
Additionally, you’ll need to add your billing info in your OpenAI Dashboard. As of May 2025, OpenAI no longer offers promotional credit for new accounts.
By default, this workflow costs about $0.003 (1/3rd of a cent) per run (or even less with newer models), even if you create multiple tasks in that run. Check out the cost FAQ for more info on costs.
Feel free to sign up for any/all of these accounts now, but I’ll also link to them later in the guide when they become relevant.
Finally, you’ll need a database in your Notion account; this will be where the automation creates your tasks. Any database will work, and you can read my guide to Notion databases in order to learn how to create one.
You can also use a template, such as my Ultimate Brain template – which comes with an advanced task manager that supports recurring tasks, sub-tasks, projects, priority levels, and more:
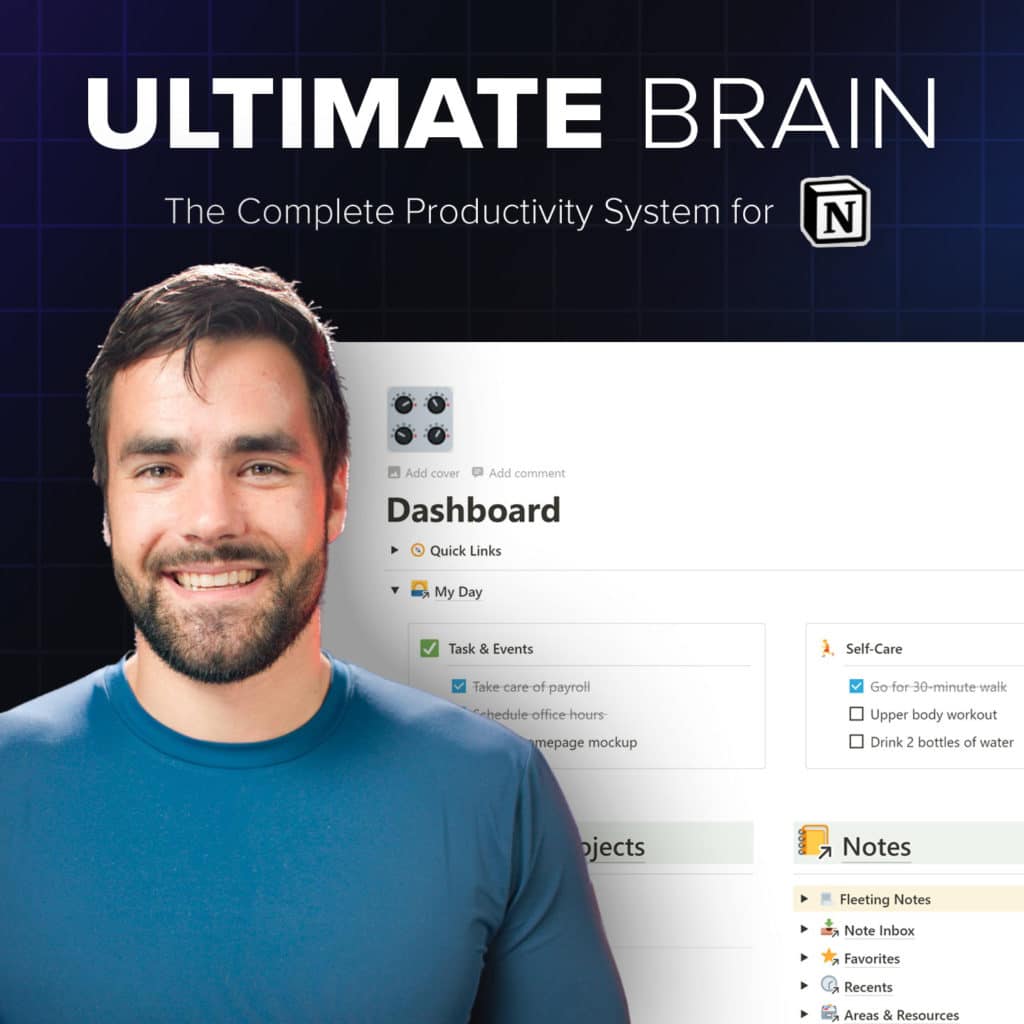
Want to turn Notion into a complete productivity system? Ultimate Brain includes all the features from Ultimate Tasks - and combines them with notes, goals, and advanced project management features.
Get $50 off with code SPRING50!
Assuming you’ve got a database picked out for your tasks, we’re ready to start setting up the automation. However, if you have additional questions about cost, privacy, or source code, click here to jump to FAQ section.
Copy link to headingSet Up Your Pipedream Workflow
We’ll start things off by setting up your workflow in
If you’re not familiar,
- The free plan is way more generous than what other platforms offer
- Pipedream is built for coders, so you can easily write your own code
Pipedream does also offer many no-code actions, so you can do a lot even if you don’t know how to code.
But more importantly, I recently parterned with them to offer a new feature: shared workflow links. These are links you can click that will automatically set up an entire workflow for you.
This mean that in addition to offering Notion templates, I can now share
And that’s exactly what I’ve done here. You can click the link below to add the full workflow to your

A full workflow for creating new tasks in Notion using voice assistants on iOS or Android.
This workflow is 100% free to use. If you do choose to upgrade to a paid Pipedream account, I'll earn a commission (at no extra cost to you).
Note: This is my referral link. If you do choose to upgrade to a paid plan, I’ll earn a commission. However, you can use the free plan for this workflow and lots more.
If you do choose to use my link, thank you! I spent over 100 hours and wrote well over 2,000 lines of code for this automation, so using my link is a great way to support my work.
Once you’ve clicked the template link, you’ll hit a login page if you’re not already logged in. If you don’t have a
Next, choose a name for your account’s main workspace (you can create more down the road if you ever want to keep specific sets of workflows separate and organized).

You may see a prompt to invite team members to your workspace after that. Feel free to invite your teammates if you’re working with a team; otherwise, click Skip.
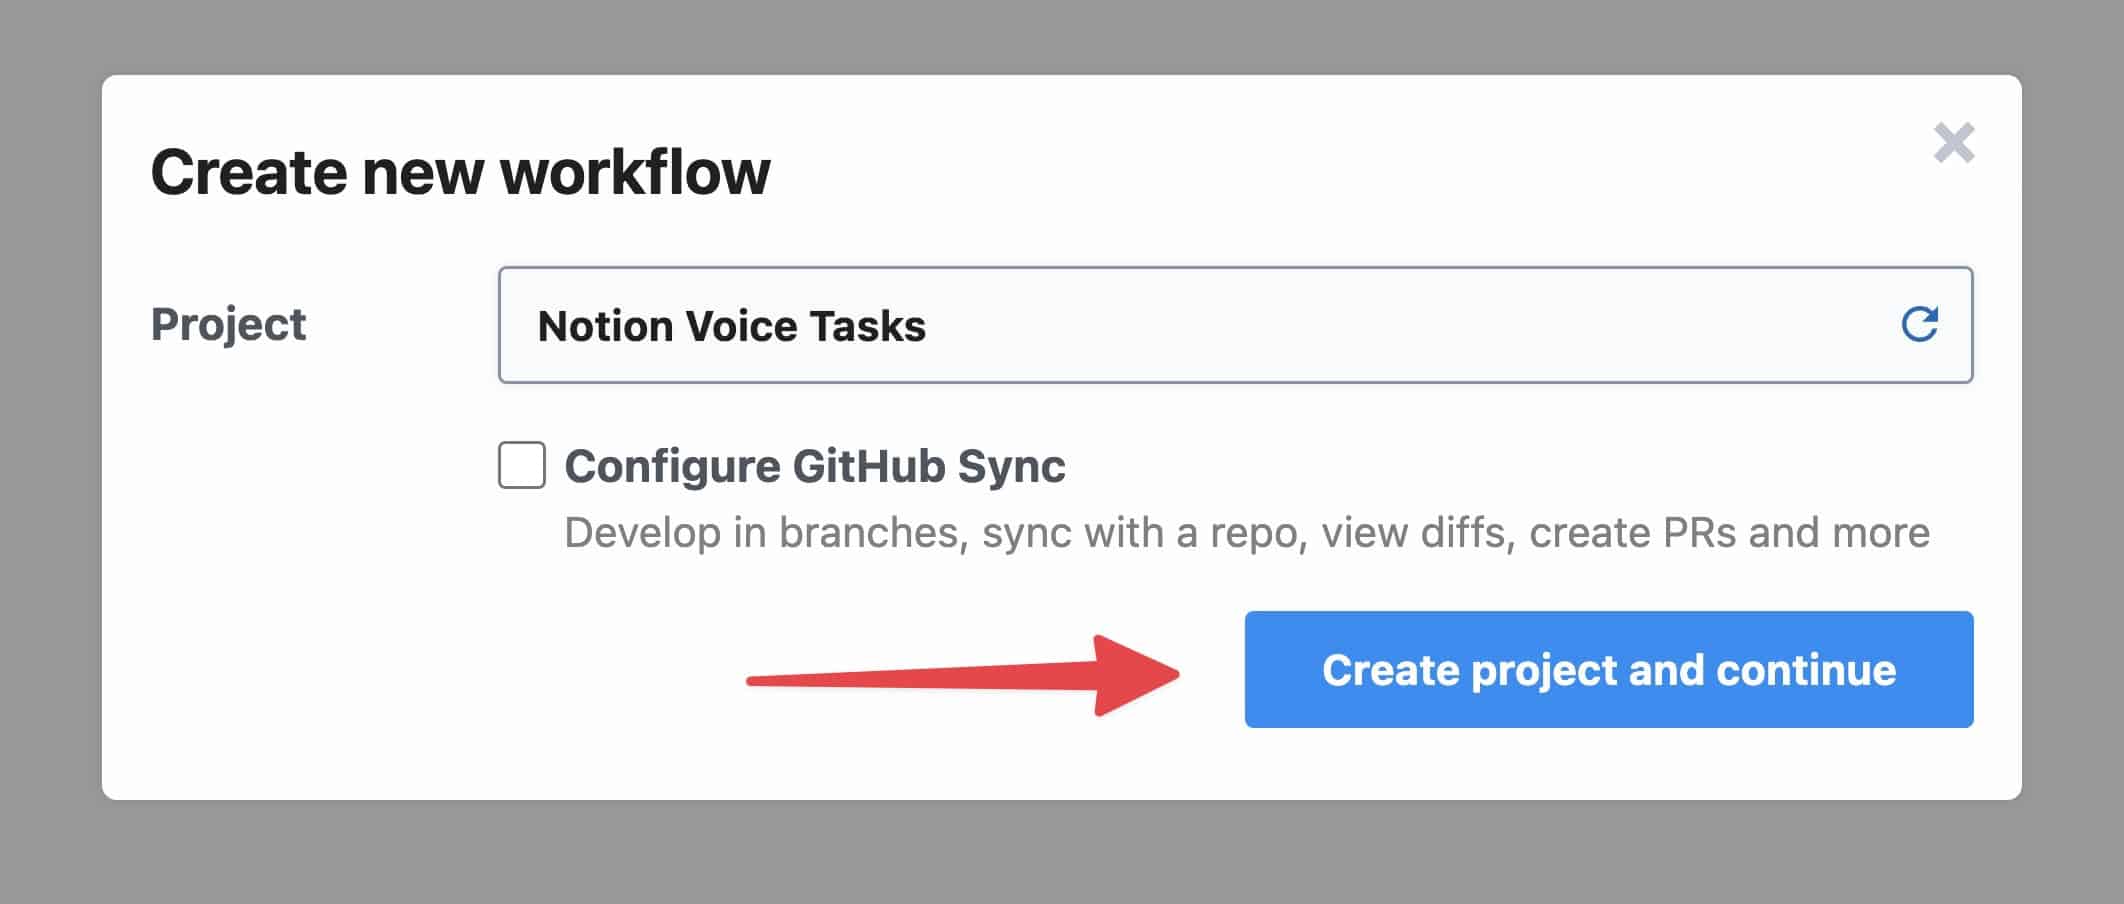
On the next screen, you can keep the default Project name and click Create Project and Continue.
Projects are a very new feature in
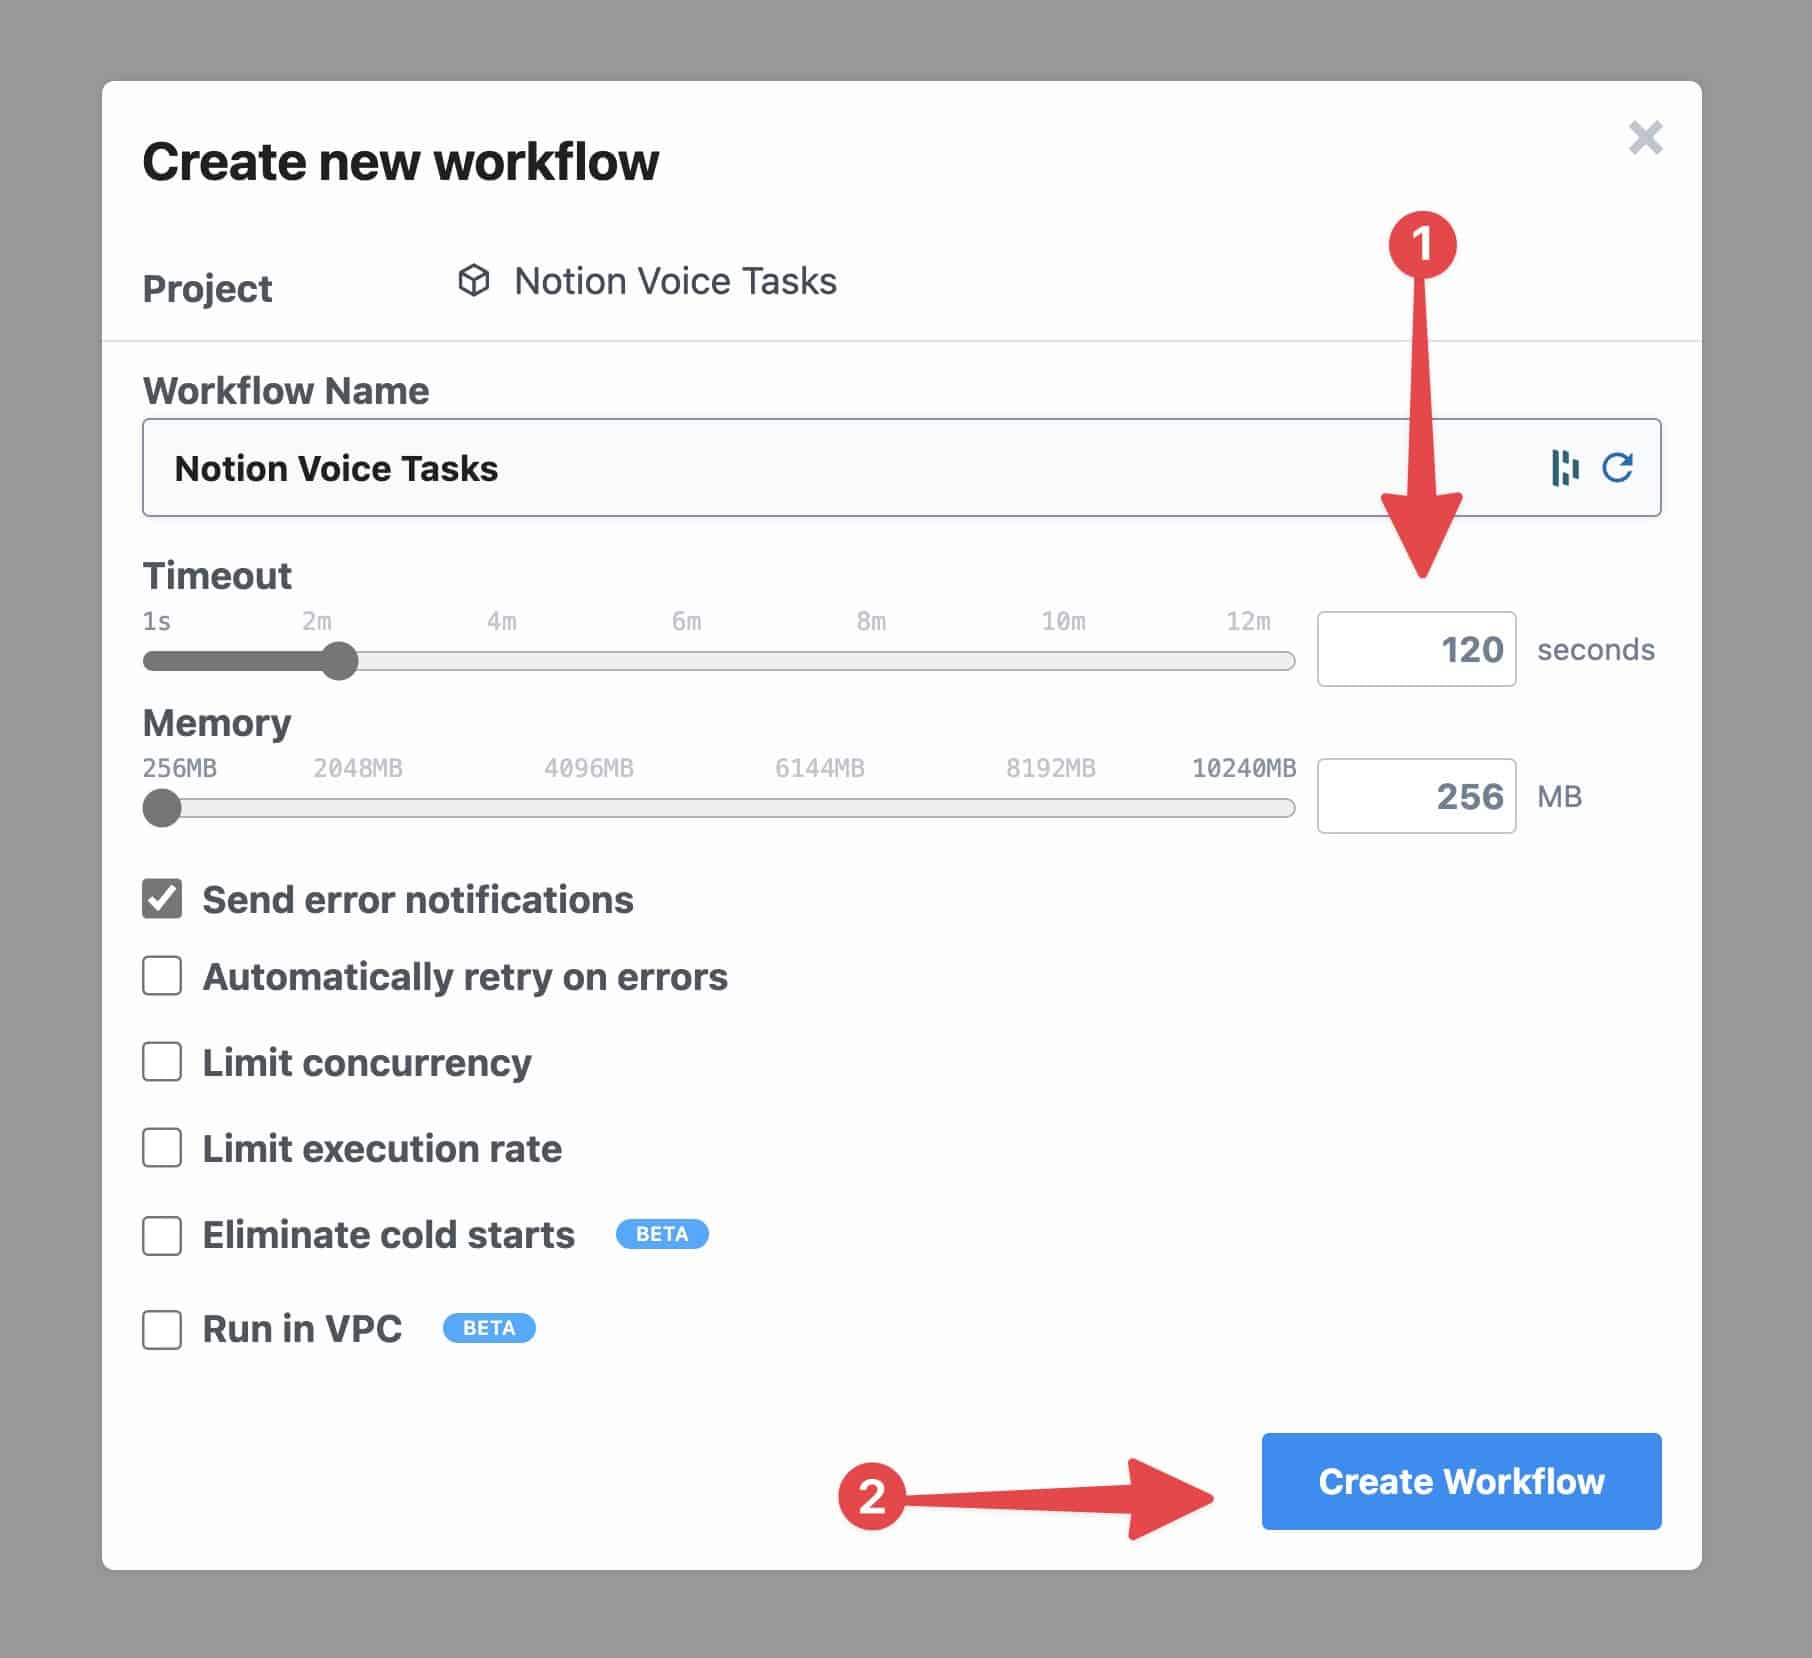
On the next screen, do the following:
- Ensure the Timeout setting is set to at least 120 seconds. Most runs of this workflow should take under 30 seconds, but ChatGPT can occasionally be a bit slower. For this reason, we want to make sure the workflow is able to run a bit longer before timing out.
- Click Create Workflow.
You can leave all the other settings as-is unless you know what you’re doing and want to change them. If you’re curious, you can learn about Pipedream workflow settings here.
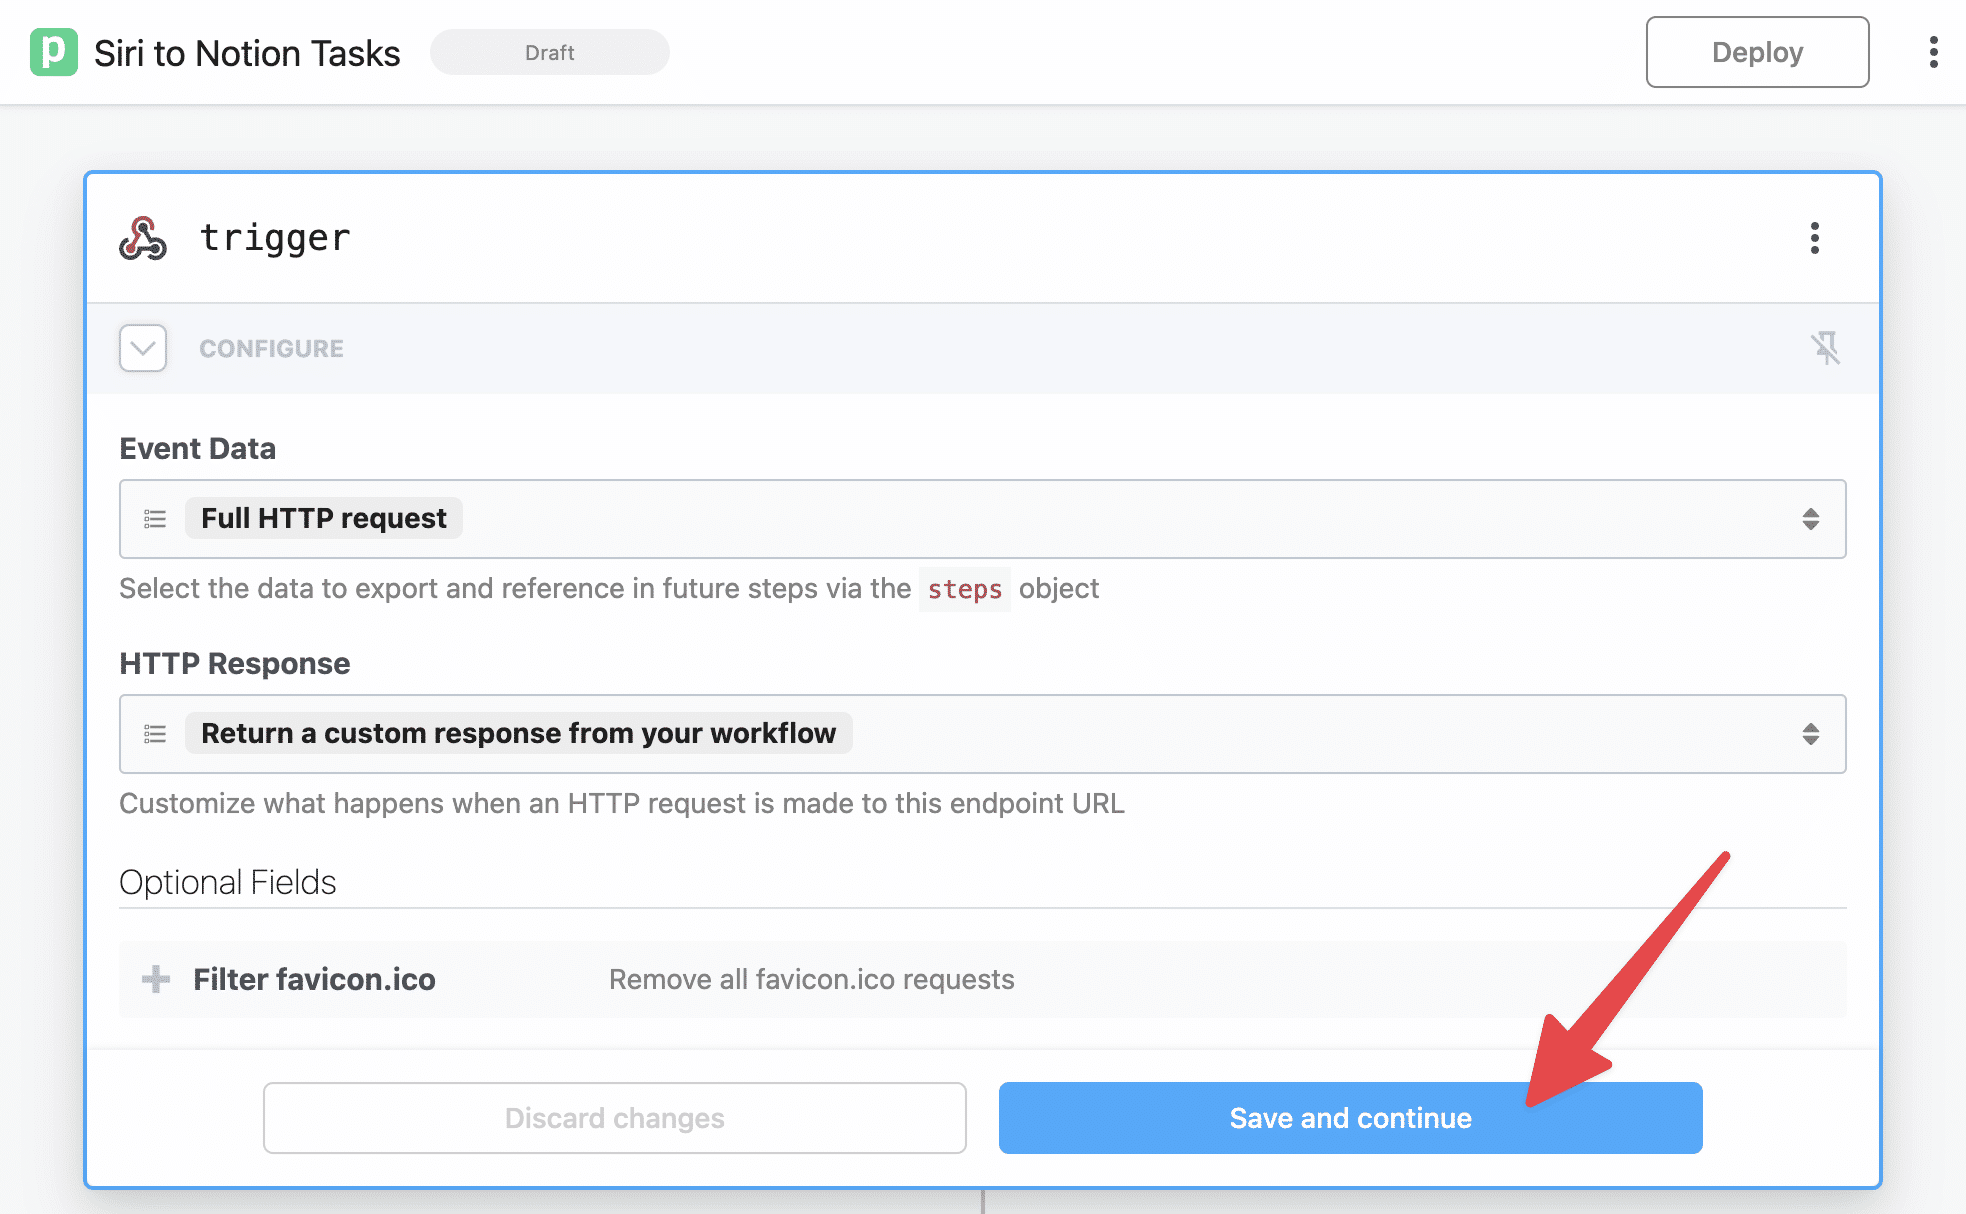
With that done, you should see your workflow fully set up. Once you do, click the Save and Continue button.
Note: If this trigger step shows an Authorization field, leave it set to None. You’ll set up a passphrase for your tasks in a later step.
Once done, you’ll see a unique URL for triggering the workflow.
When you send a request to this unique URL from your phone, it’ll trigger your workflow.
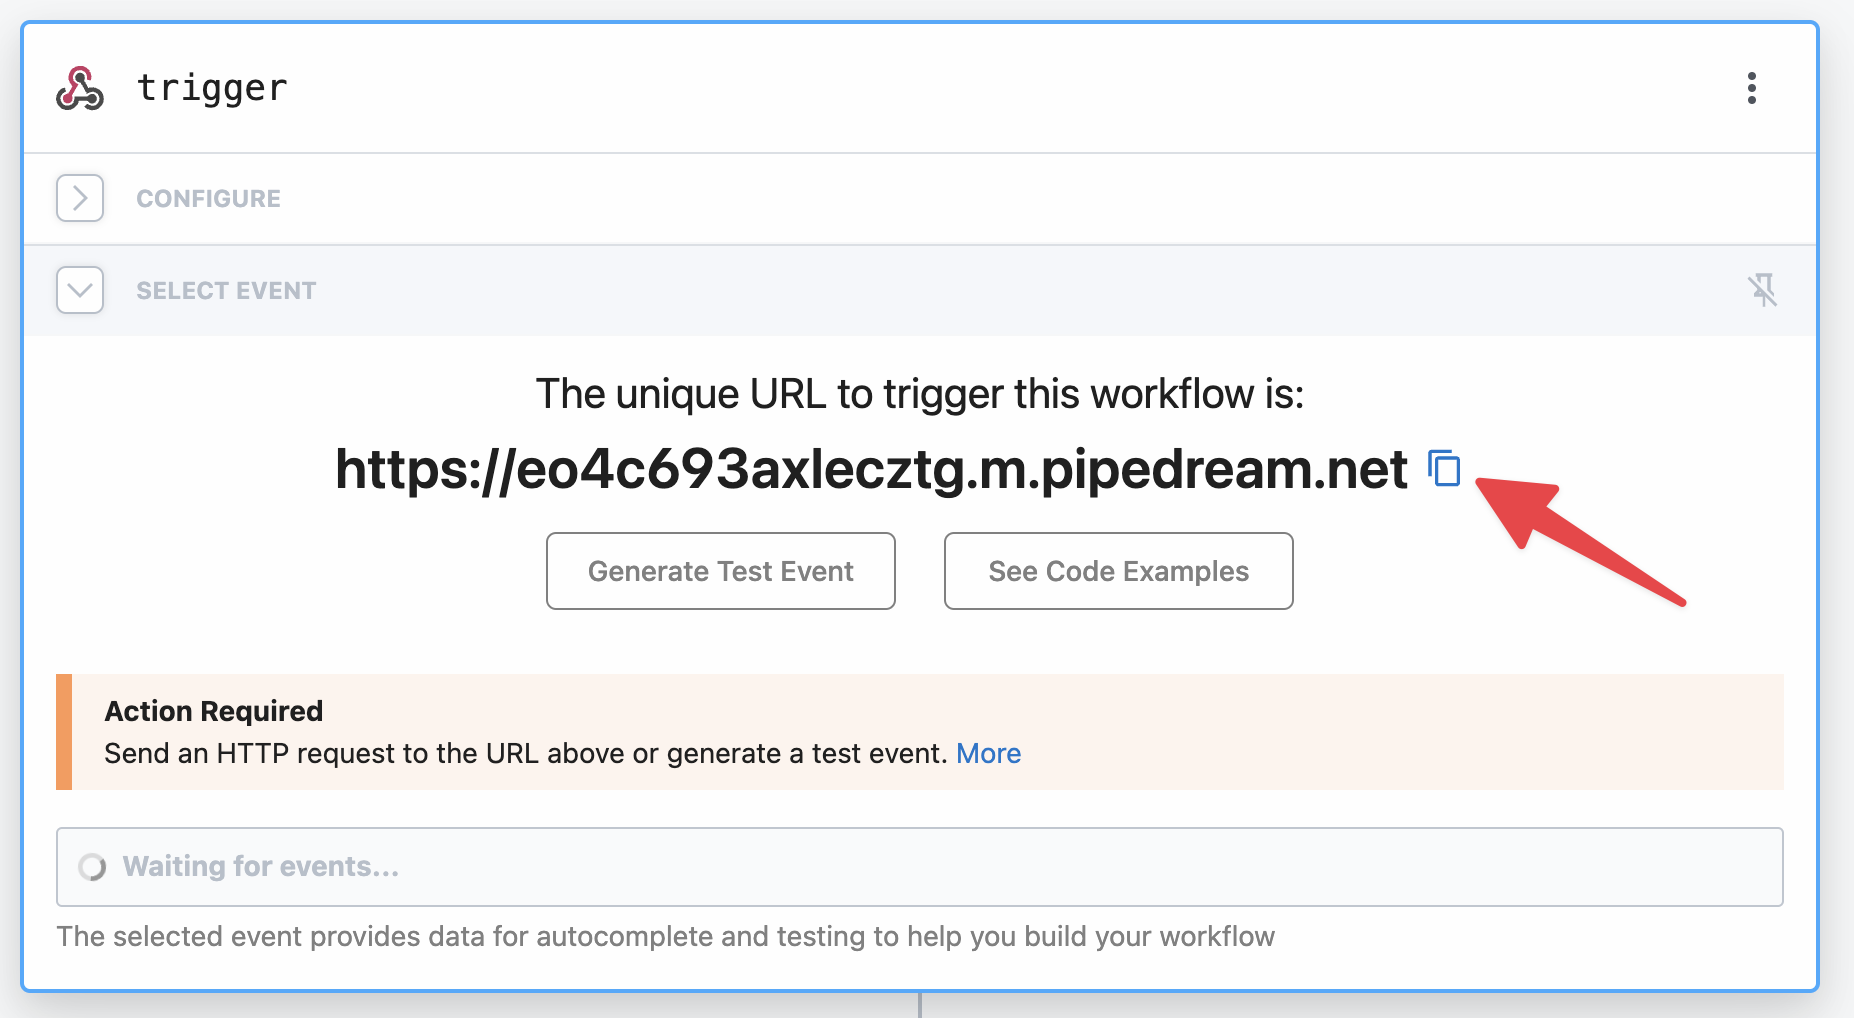
For now, click the Copy button next to that URL to copy it to your clipboard. You’ll need it in the next section.
Important: Don’t hit “Generate Test Event”. The test event it creates won’t contain the data needed in the next step. Instead, just copy that URL and head to the next step, where you’ll send a proper test event via your phone or computer.
To finish setting up this workflow, we’ll need to go through a few more quick steps. In total, this should take about 10 minutes.
Here’s your to-do list – these links will take you to the instructions for each task:
- Set up your voice capture workflow on your phone
- Get an OpenAI API key (needed so ChatGPT can parse your tasks)
- Set your options and deploy your Pipdream workflow
In the next few sections, I’ll show you exactly how to complete each of these tasks. Let’s go!
Copy link to headingSet Up Voice Capture on Your Phone
I’ve created free, pre-made workflows you can import for iOS (via the Shortcuts app) and Android (via the Tasker app). Click either of those links to jump straight to that section.
Before
Both iOS and Android have voice assistants that can record your voice and transcribe your speech to text – iOS has Siri, and Android has Google Assistant.
Each platform also has at least one automation app that will allow you to build custom, multi-step workflows right on your phone.
iOS has the Shortcuts app, which is free and comes pre-installed on iOS devices (iPhones and iPads) and Mac computers.
Android doesn’t have a native, built-in automation app – however, we can use Tasker, which is an immensely powerful automation app that has been around for over a decade.
Using your phone’s voice assistant along with Shortcuts/Tasker, we can do the following:
- Record your voice, allowing you to simply talk about the task(s) that needs to be done
- Get the current date and time, with your timezone included (this is important)
- Set your name, which will allow you to assign tasks to yourself
- Send the task(s), name, and current date in an HTTP POST request to your
Pipedream workflow
In the next two sections, I’ll show you how to set up the automation on Shortcuts (iOS) and Tasker (Android) respectively.
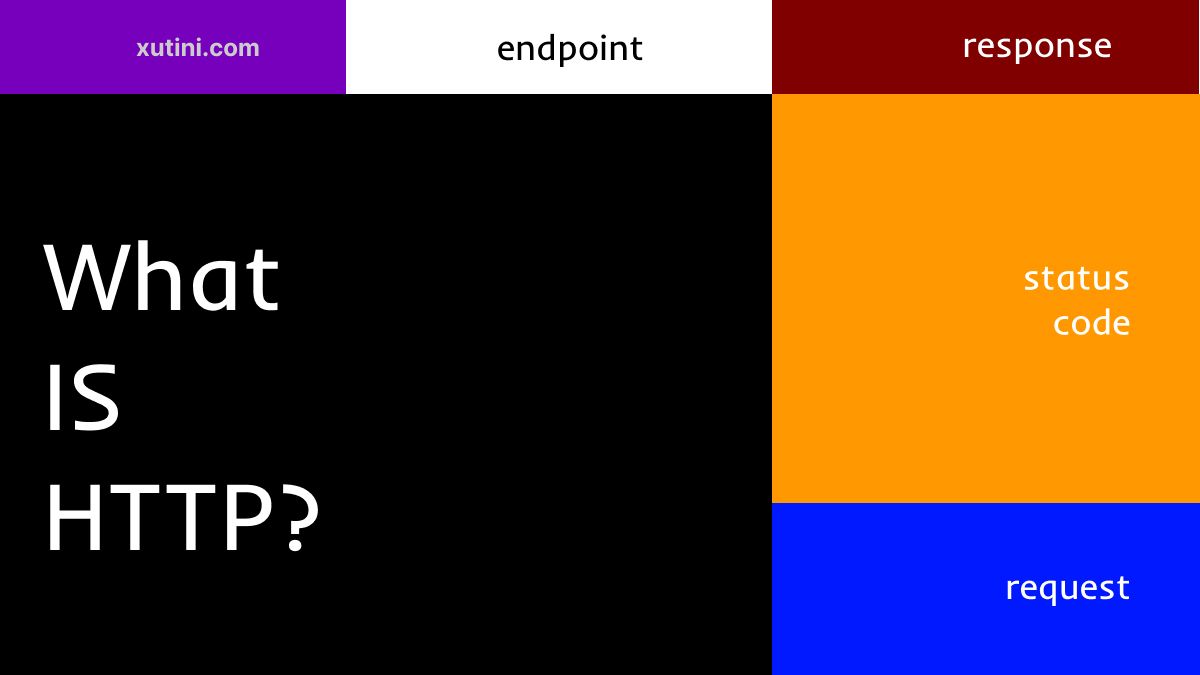
In short, a POST request is a type of request that one computer sends to another where the intention is to send data. Data is sent over HTTP (HyperText Transfer Protocol), which is essentially what allows the internet to work.

Often, POST requests are send in order to create something new at the destination. For example, the Create_Notion_tasks step in our pre-built
Most of the requests you make from your computer (or phone) to other computers (usually servers) are GET requests. These are requests for the server to send something back, like a web page.
There are five main types of HTTP request methods:
- GET – used for reading data from the application. It is read-only, so it has no risk of modifying any data.
- POST – sends data to the application to create something new.
- PUT – sends data to the application to update an existing resource. Contains a full updated copy of the resource.
- PATCH – also updates an existing resource, but only contains the changes to be made instead of the entire updated resource.
- DELETE – sends an instruction to the application to delete an existing resource.
In our workflow, we’re sending a POST request from your phone to
If you’d like to learn more about HTTP and its methods, here’s a great video:
iOS: Set up a Shortcut with Siri
If you’re using an iPhone, iPad, or a computer running MacOS, then we can use the Shortcuts app to build the mobile portion of this workflow.
Fortunately, Shortcuts comes pre-installed on iOS and MacOS!
I’ve also built and shared the shortcut we’ll need for this workflow for you. From your iOS or MacOS device, click this link to import it:

Imports my Notion Voice Tasks shortcut to your iOS or MacOS device.
On rare occasions, Apple’s Shortcut-sharing feature goes down due to server issues on their end. I ran into one such occasion shortly after publishing this guide, which prevented people from importing the shortcut above.
If you experience this issue, here are instructions on how to build the shortcut from scratch.
- Find the Shortcuts app on your iOS device or MacOS computer. If you’re using MacOS, the UI will still be very similar to what is shown here.
- Tap the
+icon in the top-right corner. - You’re now in the shortcut builder. Tap the “New Shortcut” name at the top of the screen and hit Rename if you want to give your shortcut a custom name. Then hit the Search for Apps and Actions bar near the bottom of the screen.
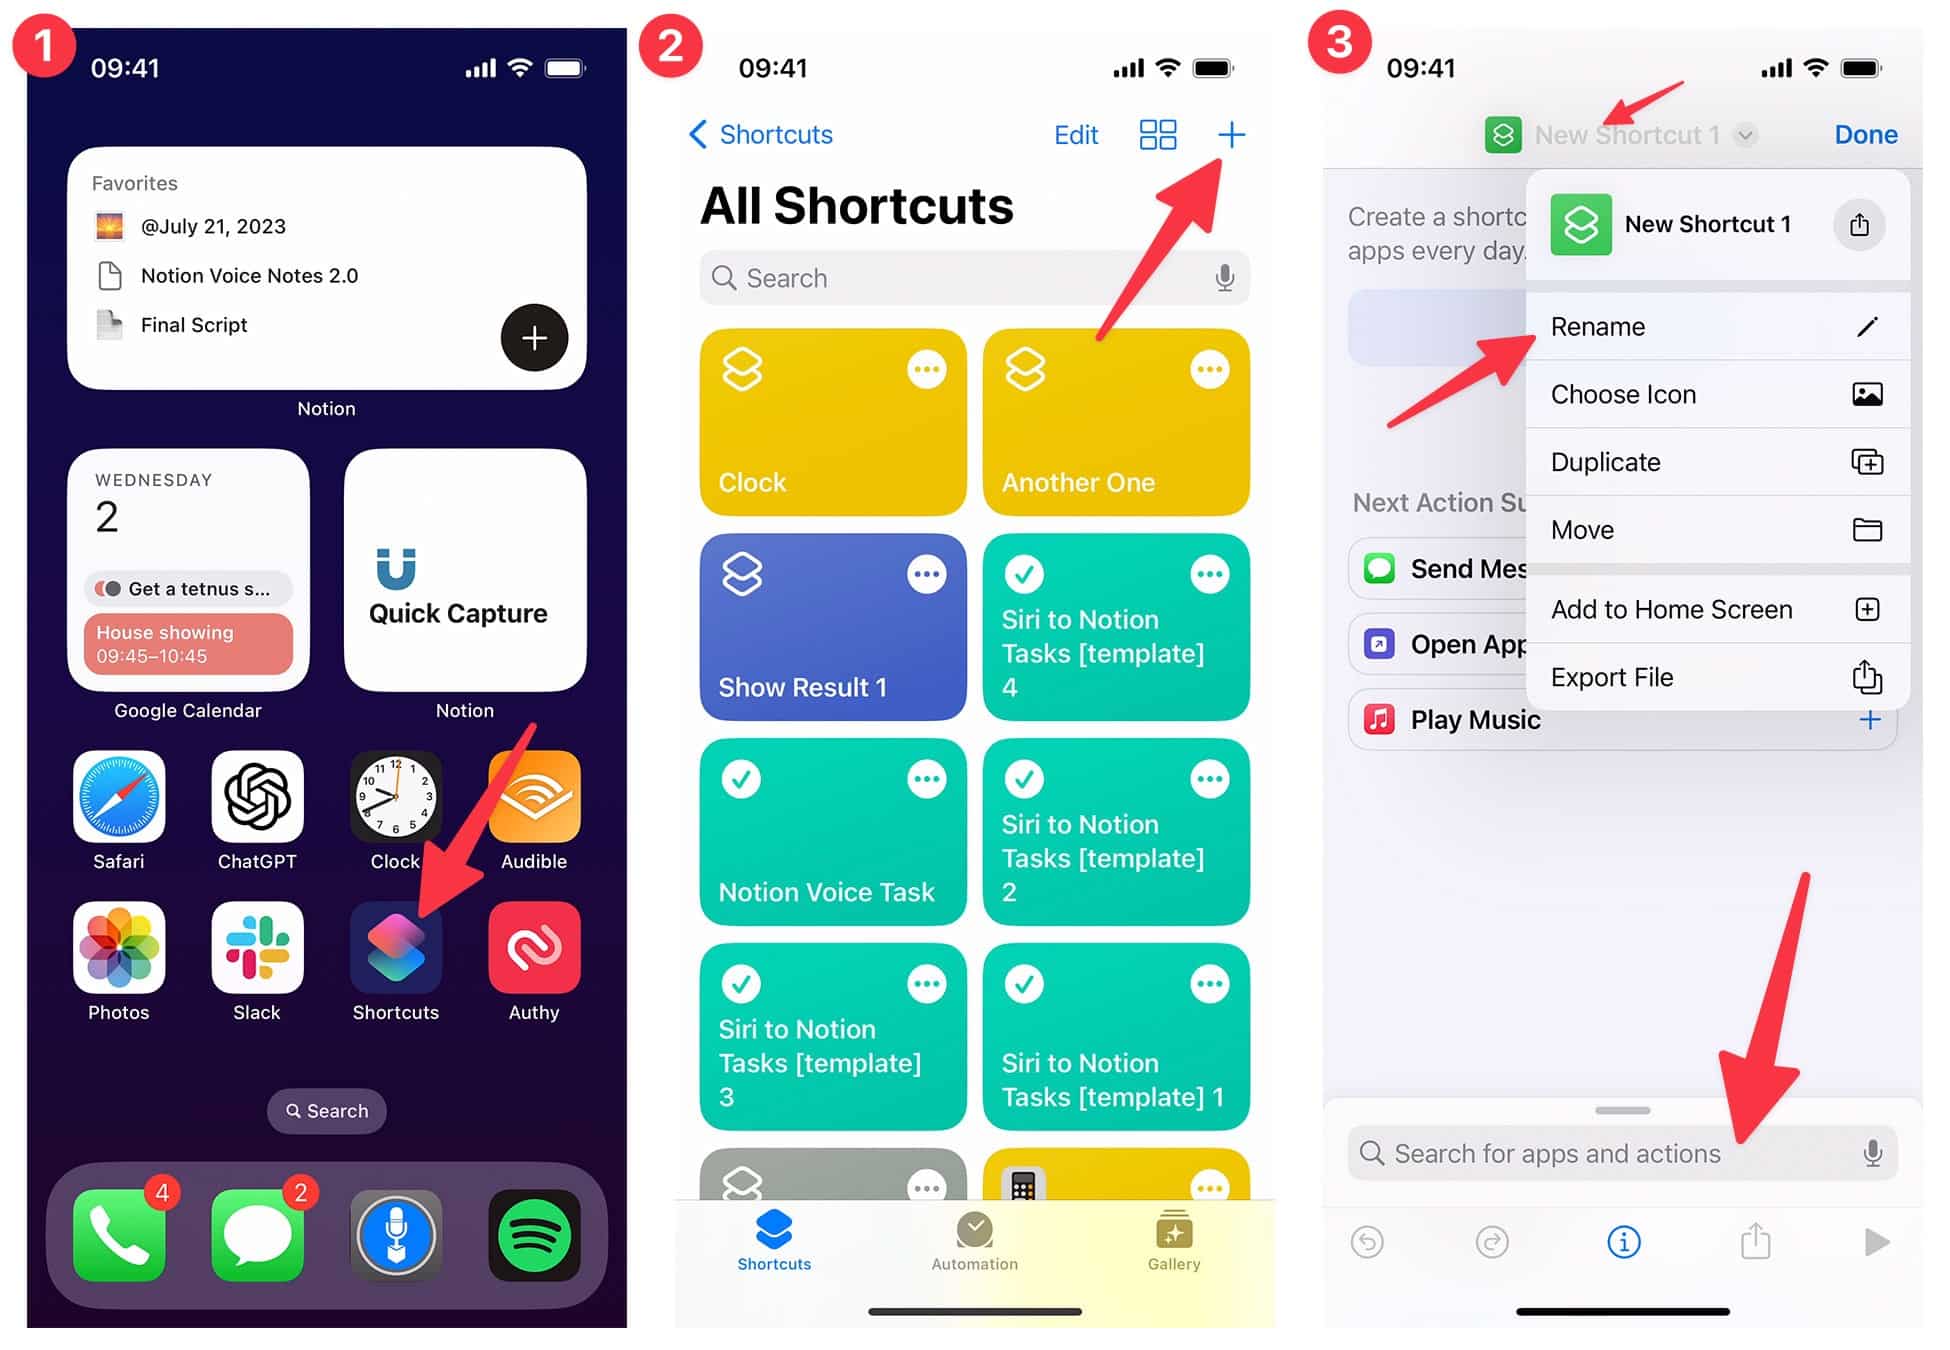
Next:
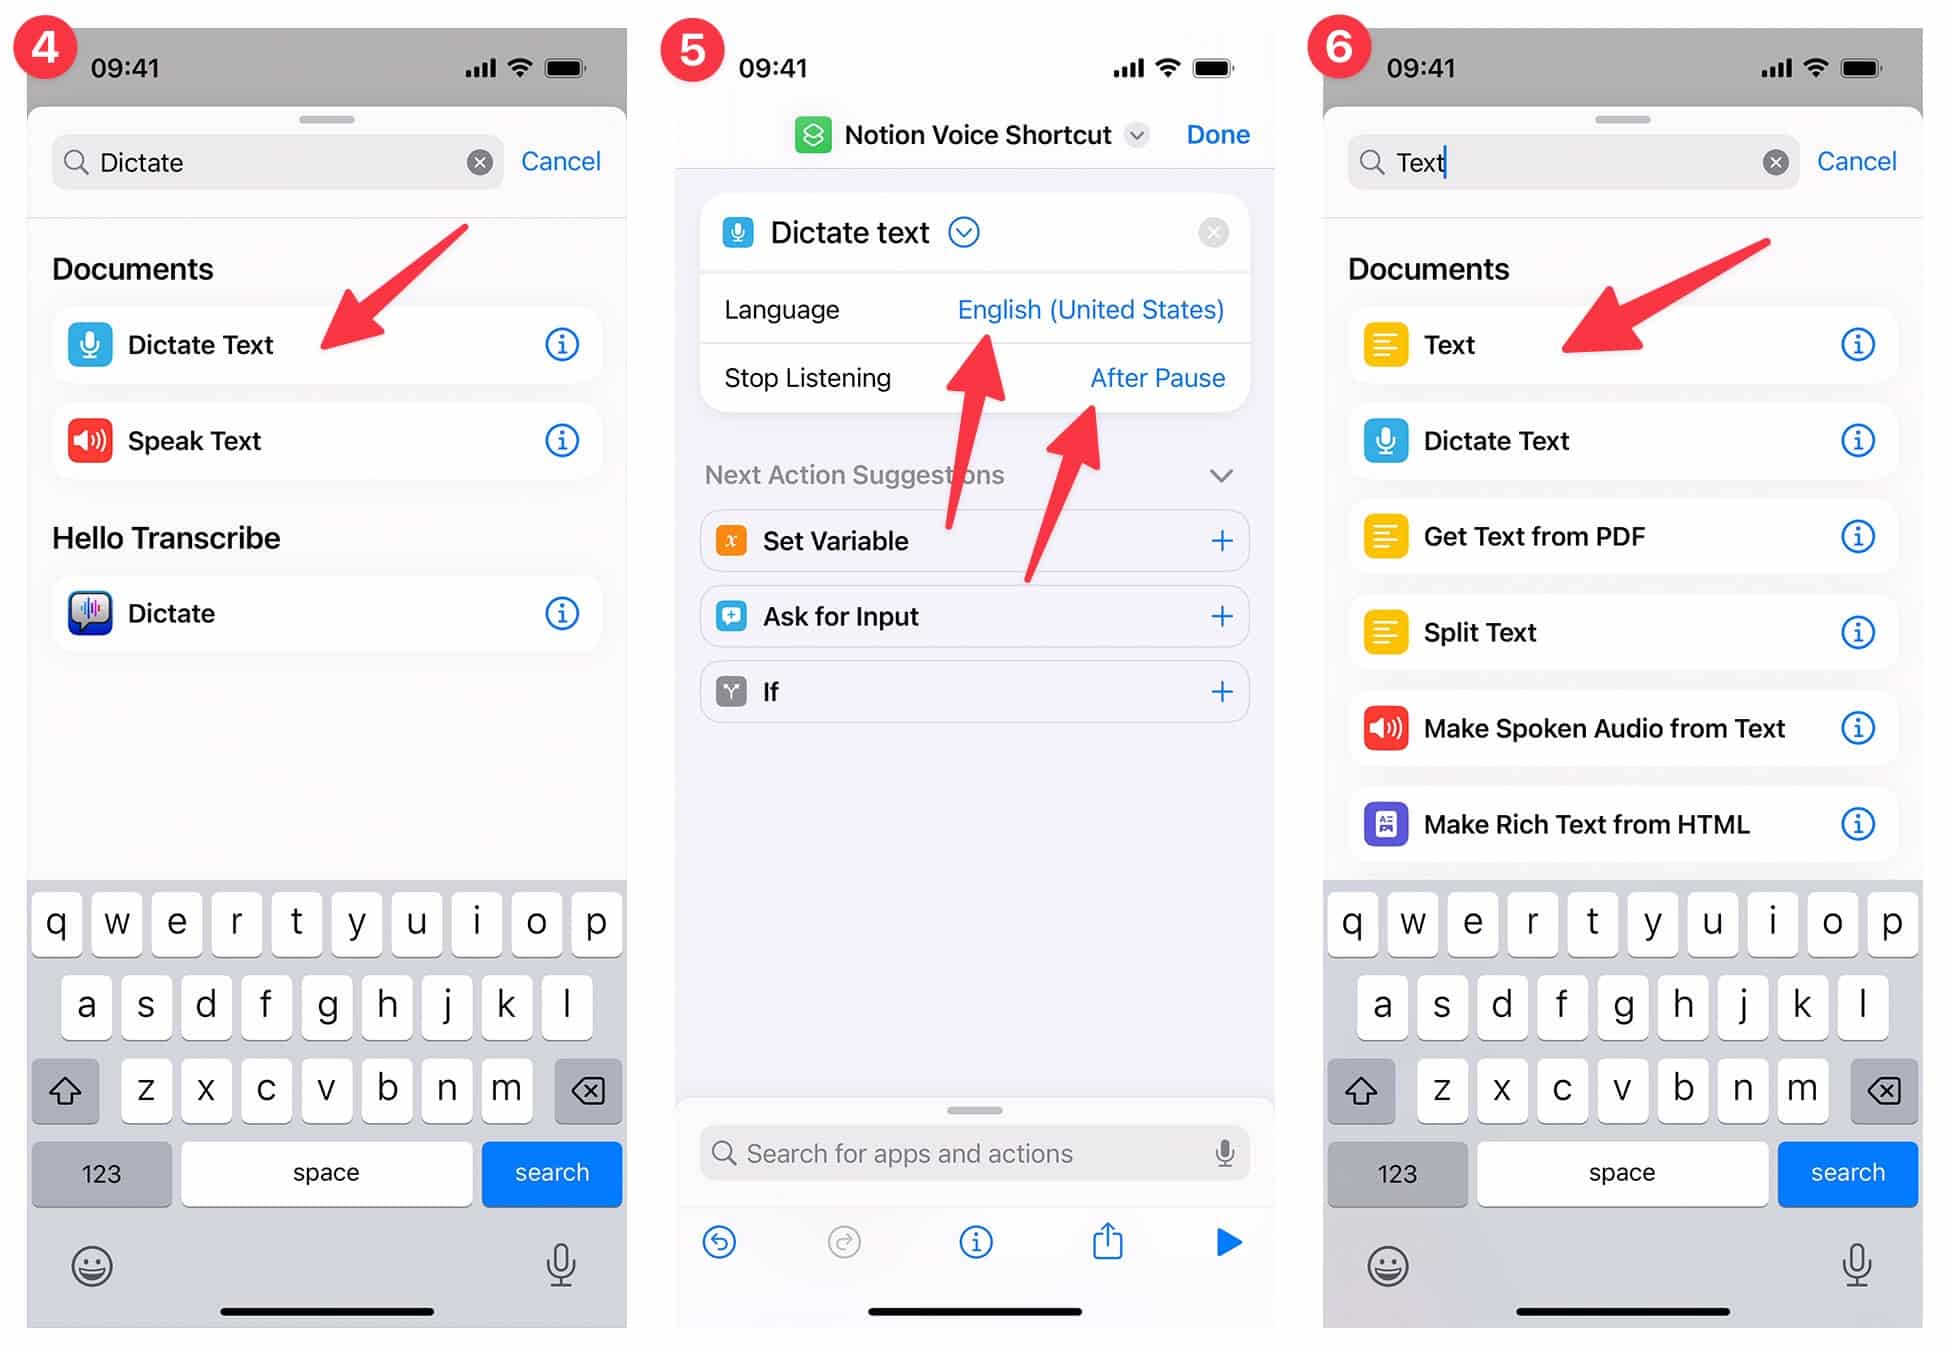
- Search for Dictate Text and add it as your first step.
- Make sure your language is set, then choose your Stop Listening mode. I prefer After Pause, which automatically stops listening after you pause speaking for long enough.
- Add another action. Search for and choose Text.
Next:
- In the Text action’s field, enter your
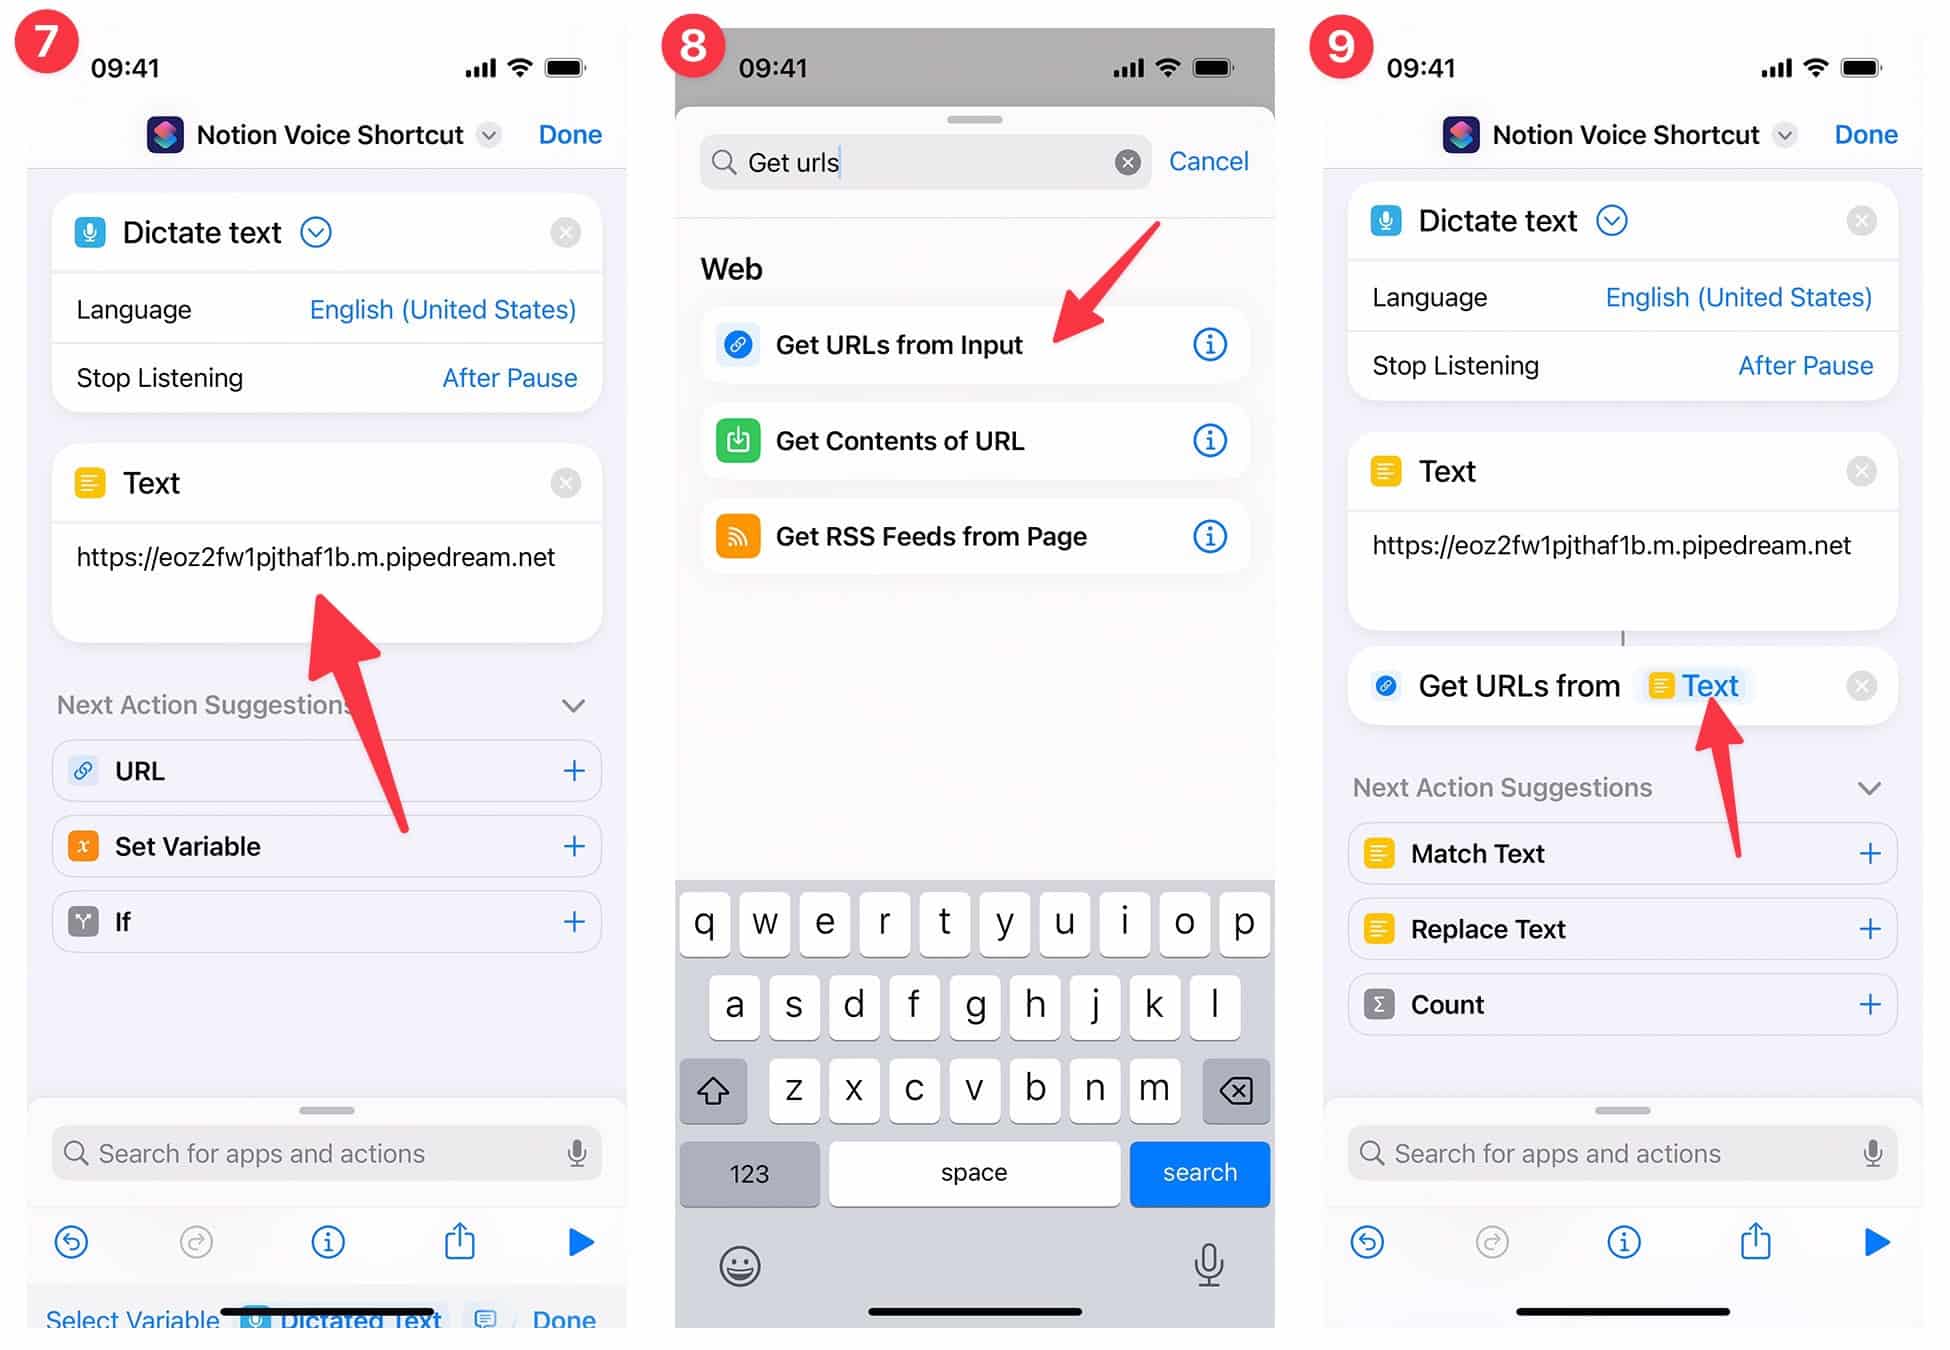
Pipedream trigger URL. Click here to jump back to the earlier instruction if you don’t know how to find it. - Add another action. Search for and choose Get URLs from Input.
- In the variable selector for that action, choose your Text action.
Next:
- Add another action. Search for and choose Date.
- Make sure the Date action is set to Current Date.
- Add another action. Search for and choose Format Date.
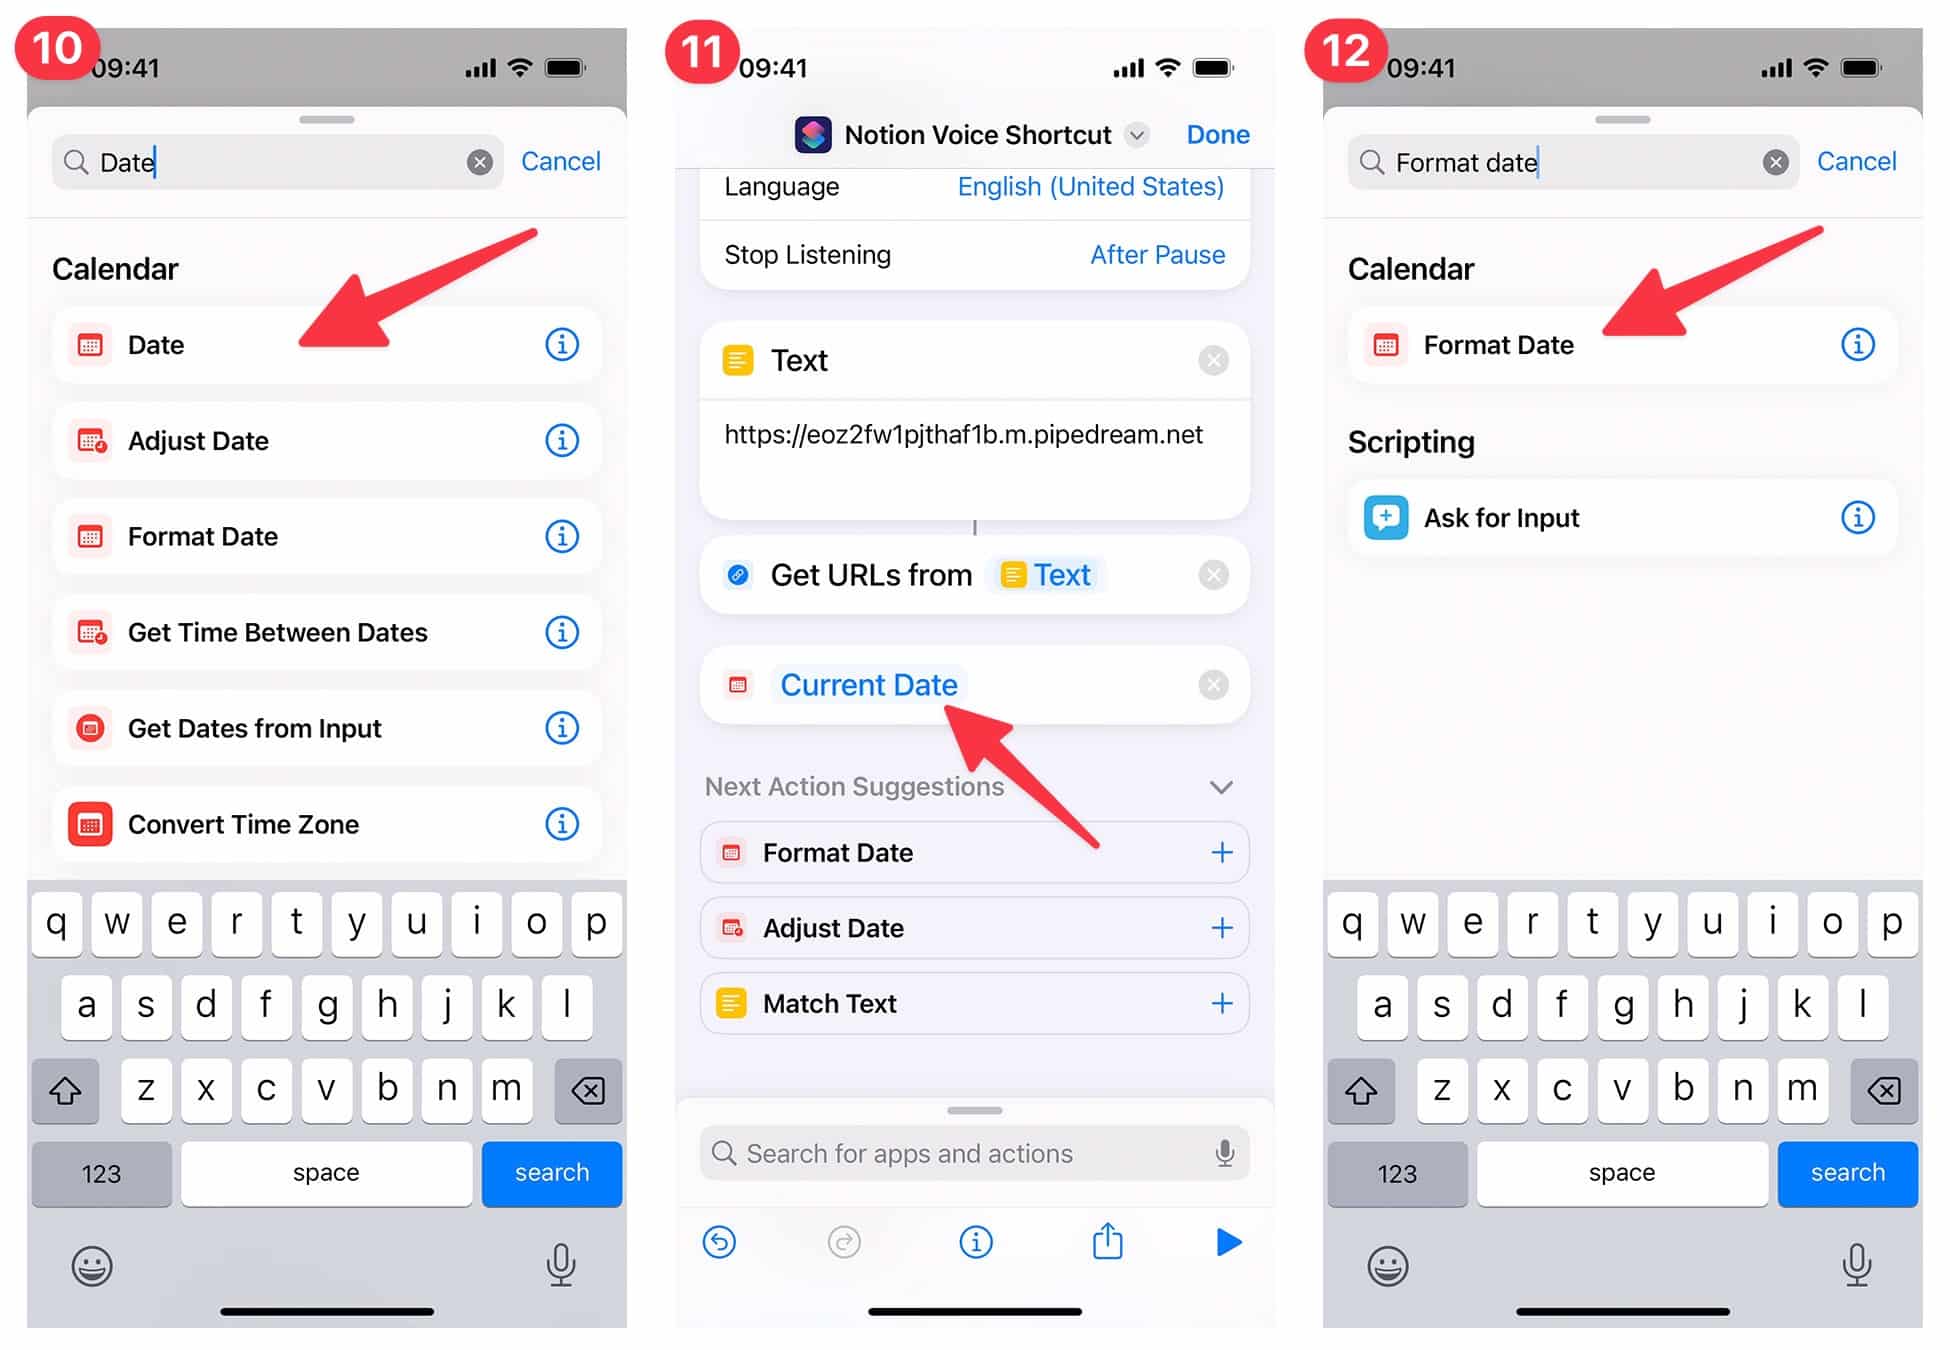
Next:
- Set the Format Date action’s Date Format to ISO 8601, and make sure “Include ISO 8601 Time” is checked.
- Add another Text action. In this field, enter your name as it is displayed in Notion. This allows you to do self-assignments – e.g. “I need to buy groceries” instead of “Thomas Frank needs to buy groceries”.
- Add a new action. Search for Set Variable, name the variable
nameand ensure its value is set to Text (which should be the default).
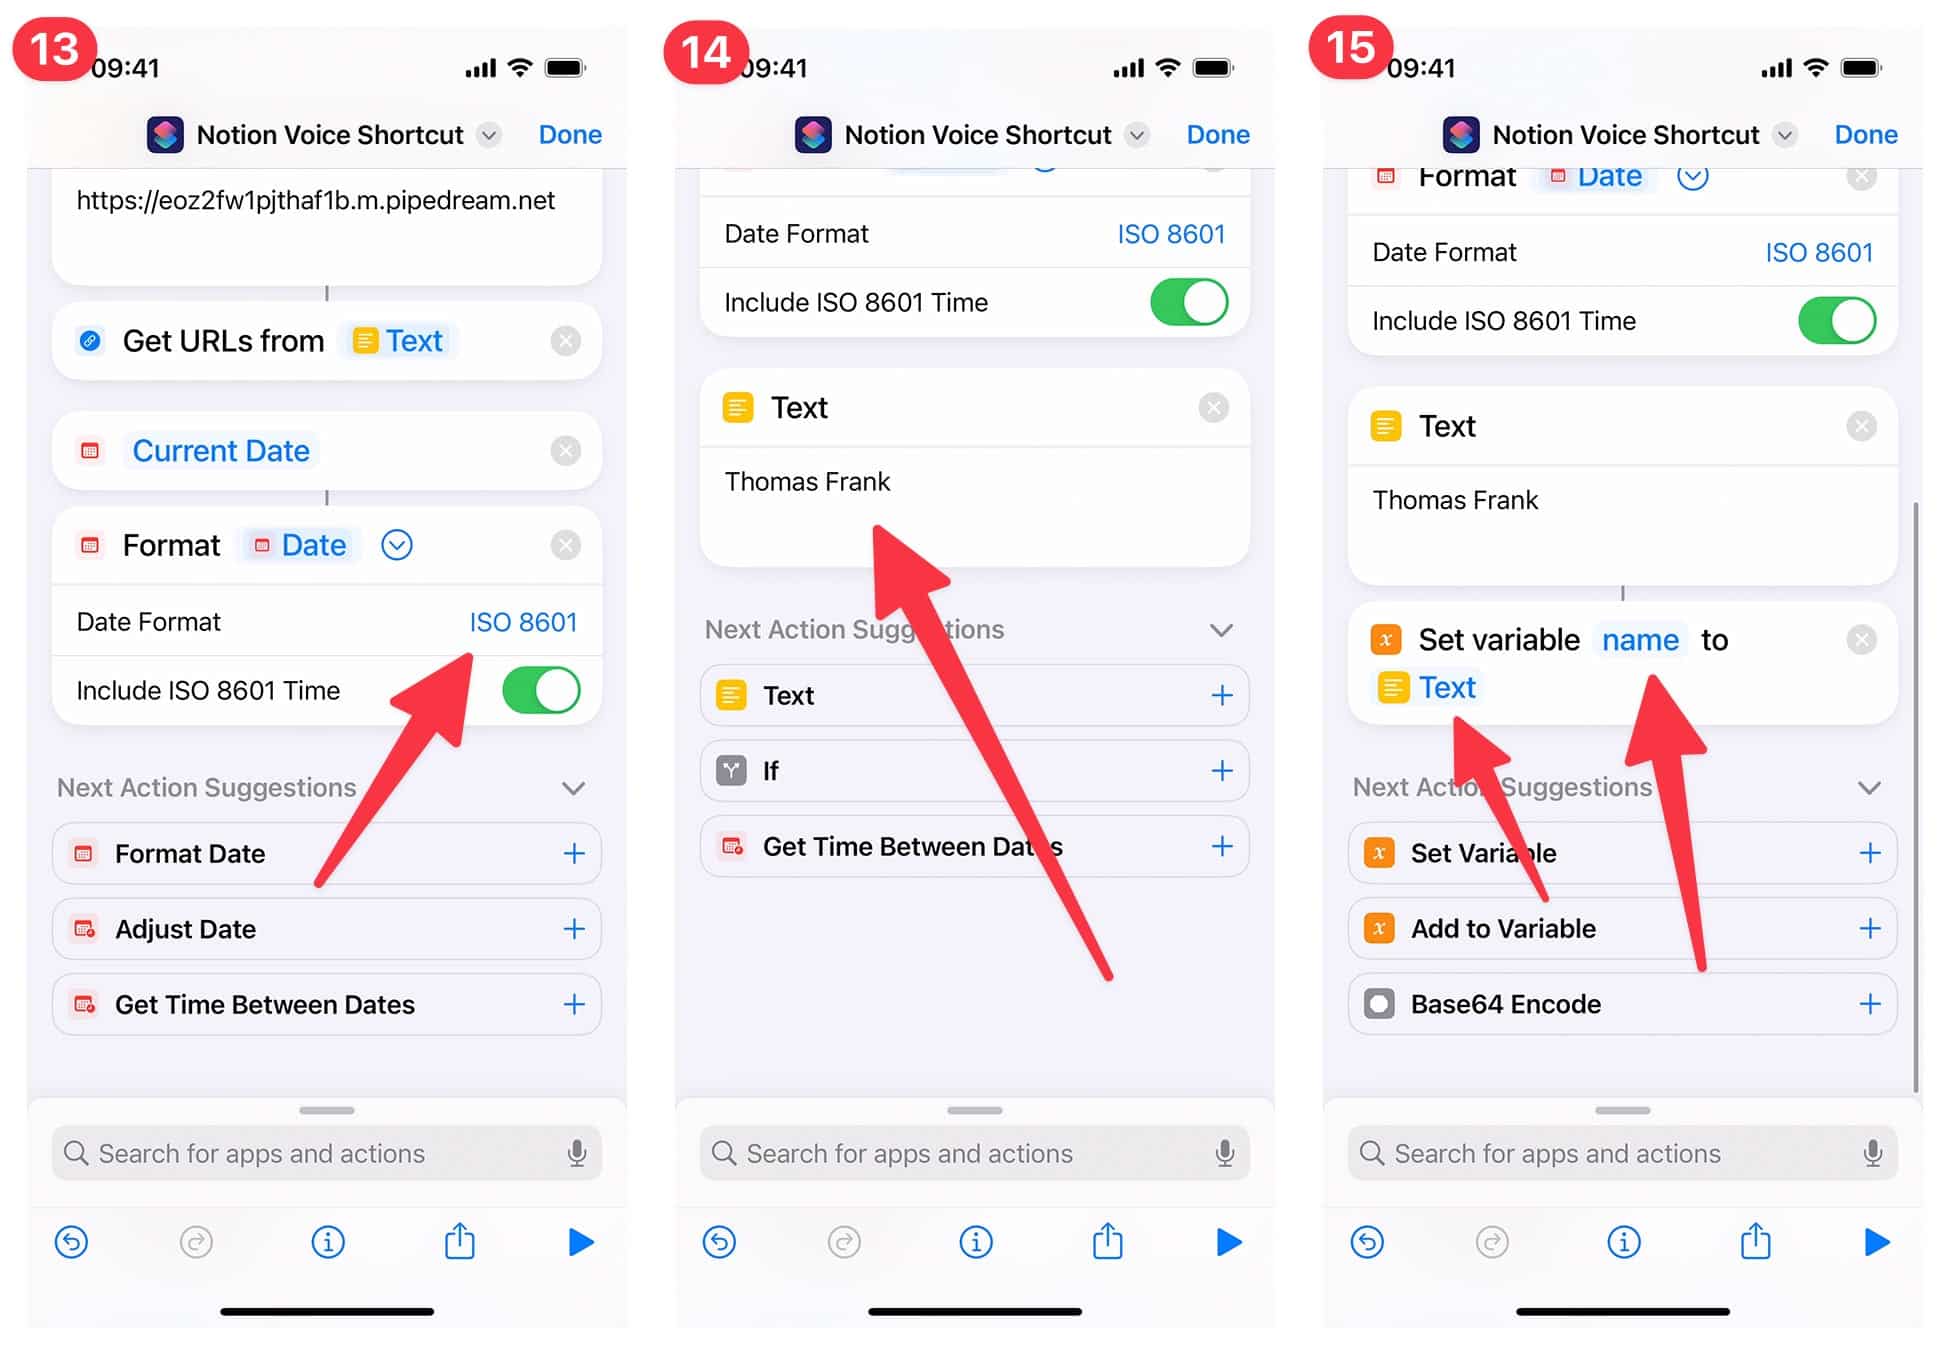
Next:
- Add another Text action. In the field, enter a unique passphrase. You’ll need to enter this same passphrase in the settings of your
Pipedream workflow later. This helps prevent others from using your workflow, even if they knew your trigger URL. (Still, don’t share your trigger URL nor this passphrase). Learn more about this in the security FAQ section. - Add another Set Variable action. Name this one
secretand ensure its value is set to Text. This will refer to the Text action directly above it, which is what you want. - Add another action. Search for and add Get Contents of URL.
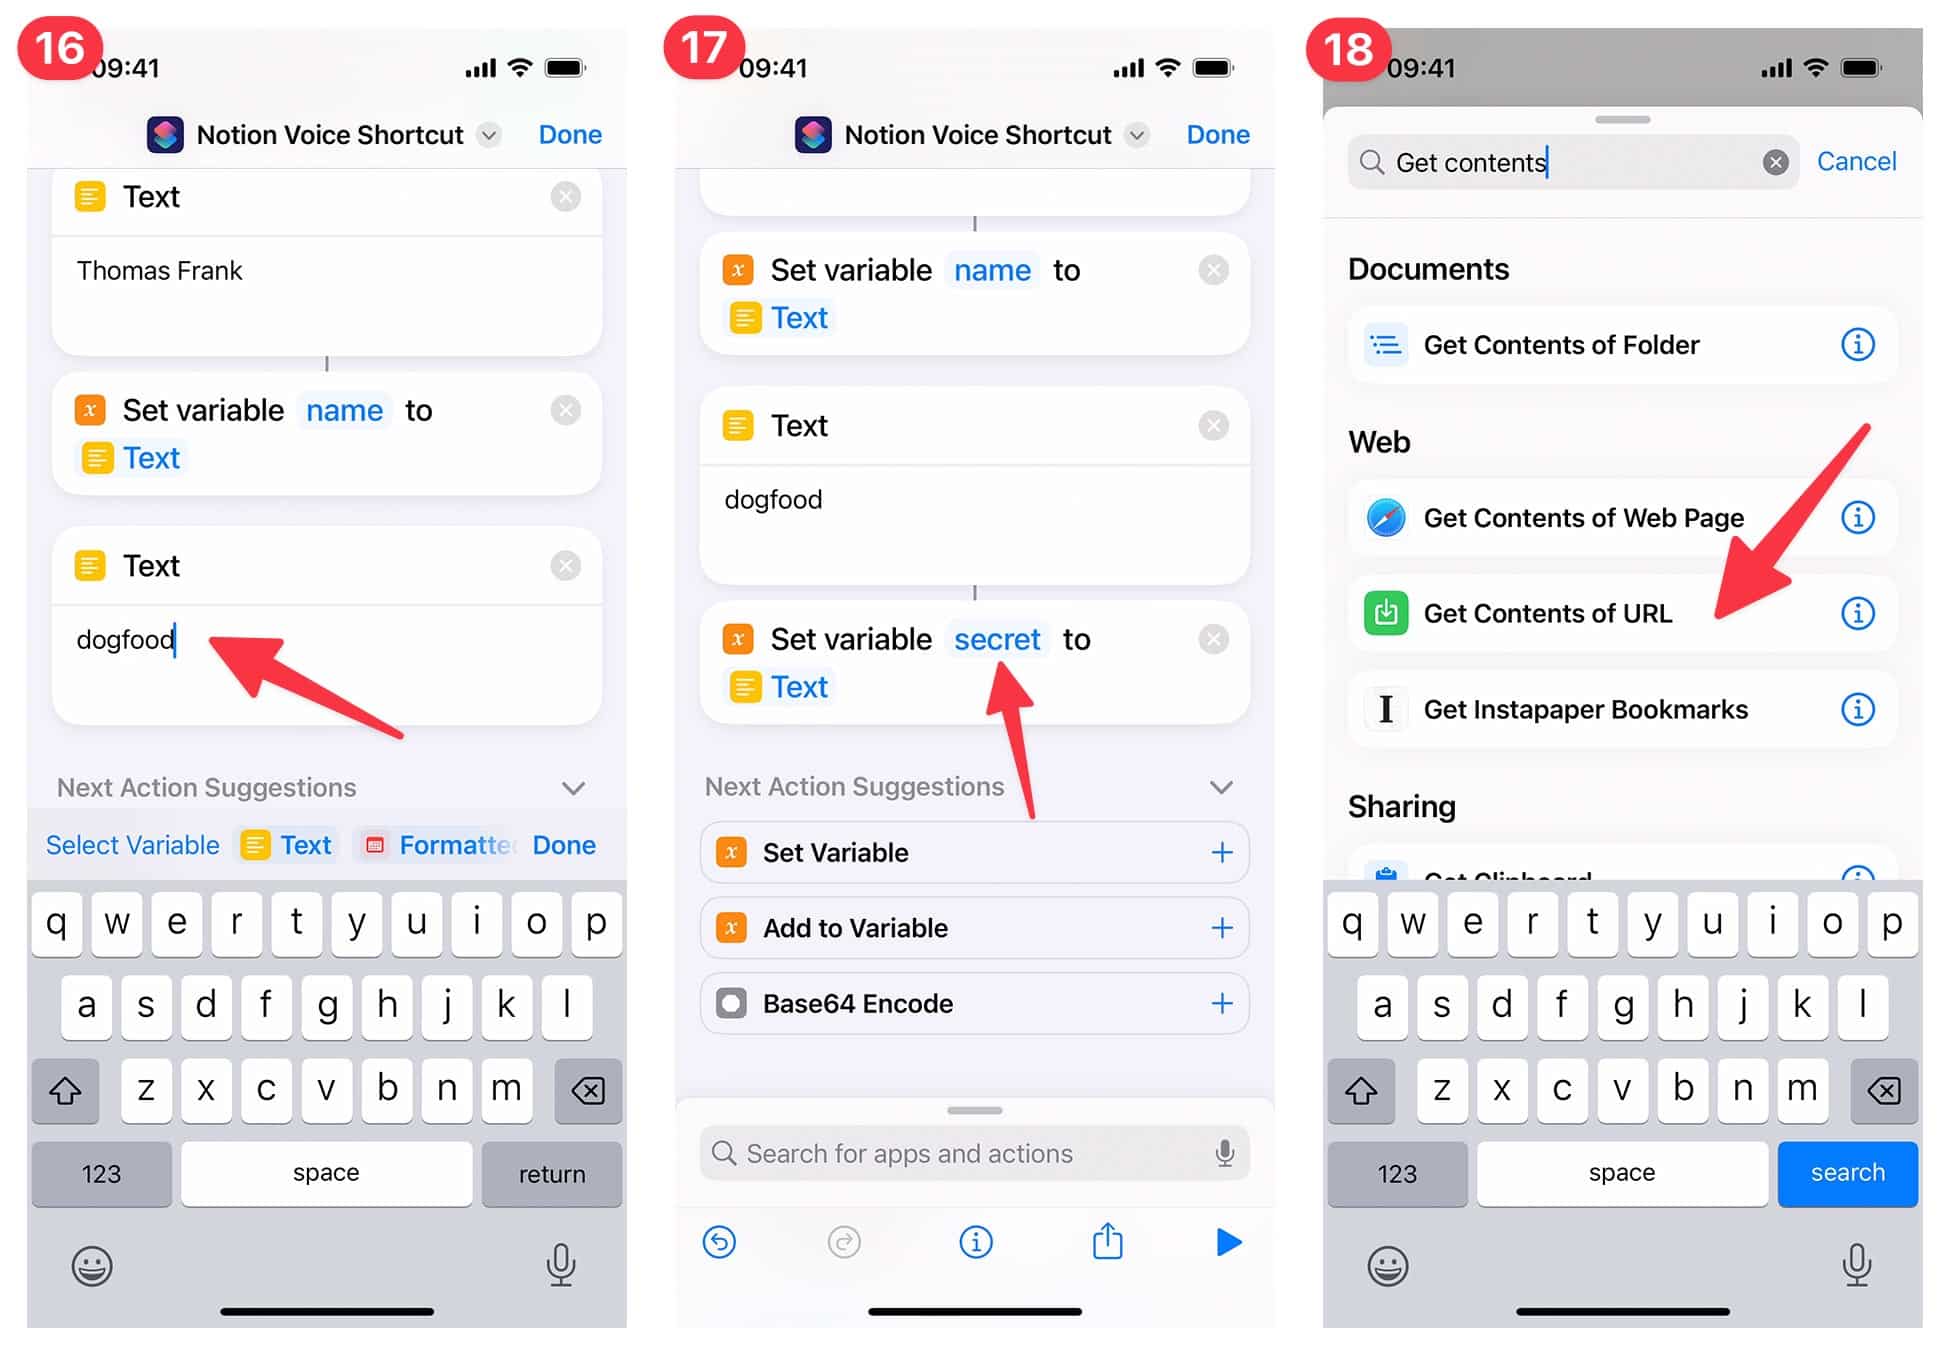
Next:
- Tap to set the cursor the blank
URLfield, then tap Select Variable. - In the “Select a Magic Variable” screen, find and tap the URLs variable beneath your Get URLs from Text step.
- Open the settings of your Get Contents of URL action. Set the Method to POST and make sure the Request Body is set to JSON.
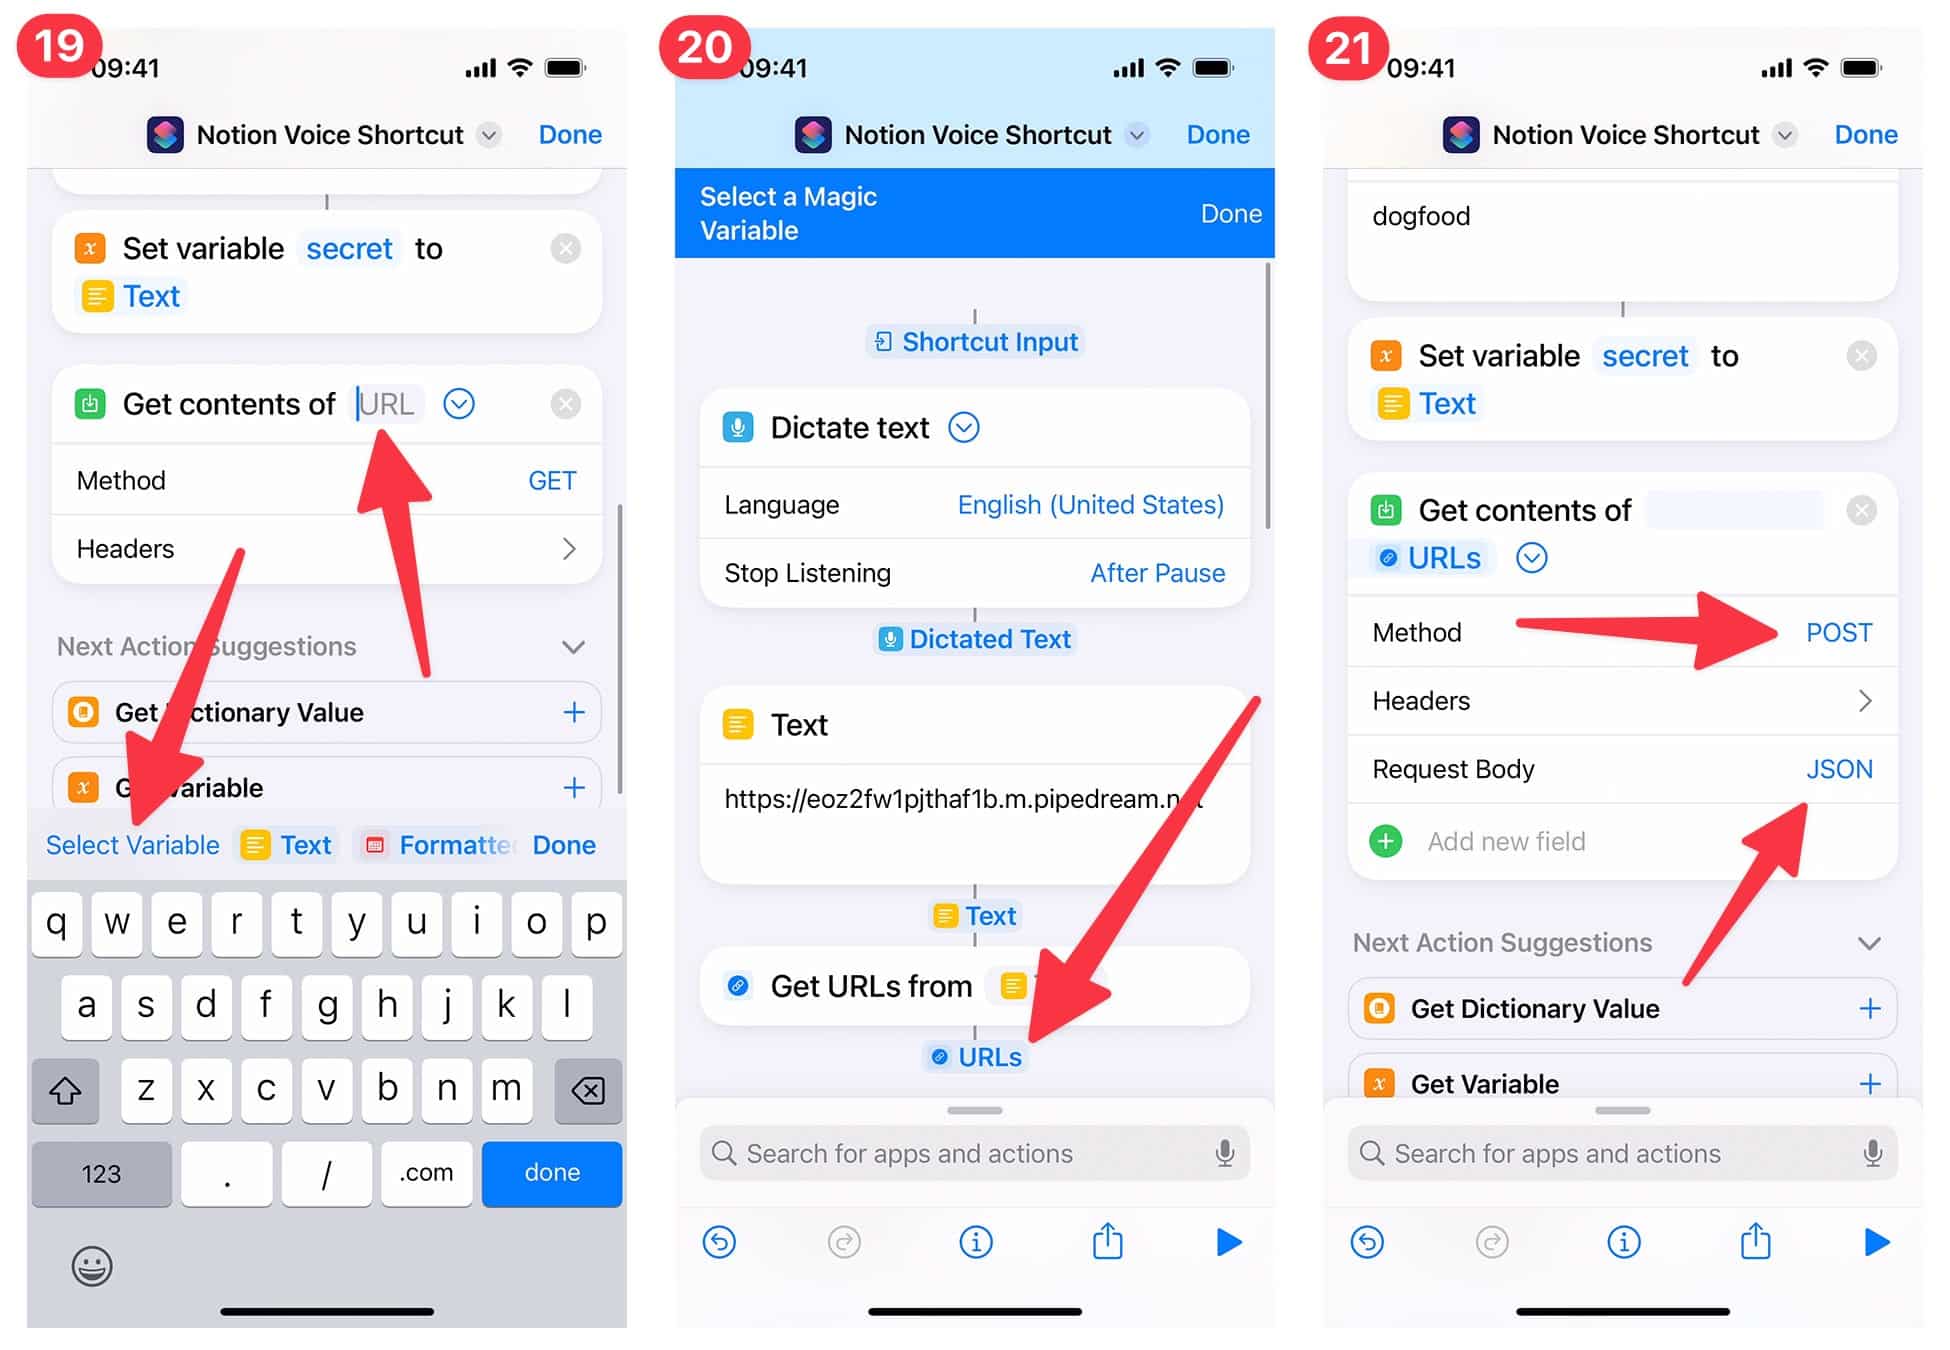
Next:
- Tap Add New Field to add fields to the request body. Create four fields, all with the Text data type. For each field, give it the name shown below and then either tap Select Variable or scroll sideways to find the correct variable:
task– set to Dictated Textname– set to thenamevariable you createddate– set to Formatted Datesecret– set to thesecretvariable you created
- Add a new action. Search for and tap Show Result.
- Set the Show Result action’s value to Contents of URL.
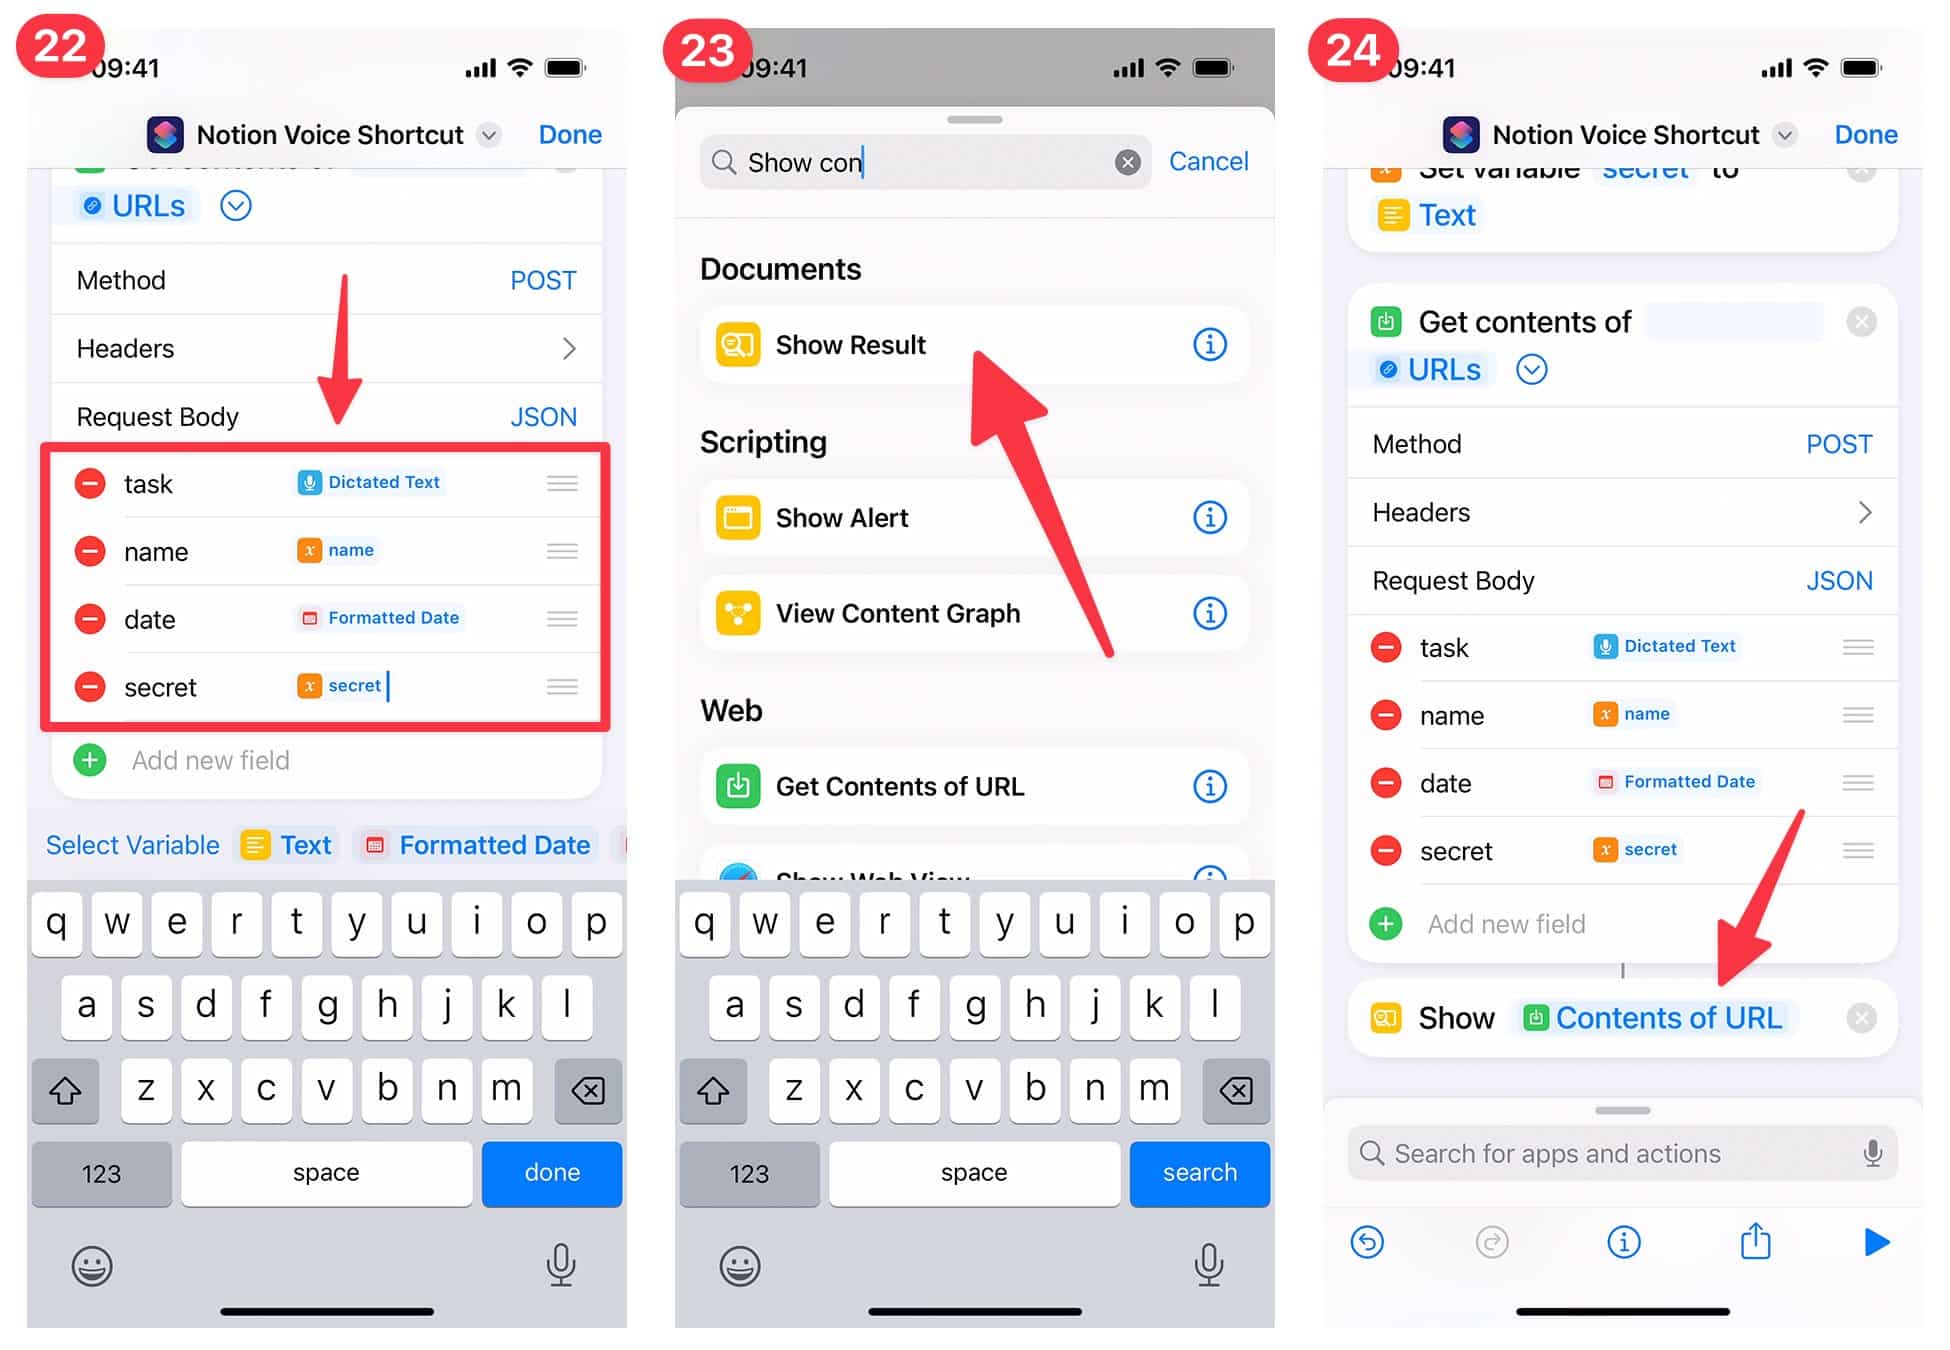
Now you’re done! You can now hit the Done button and run your shortcut. Make sure to hit Always Allow when asked about sending data to your
If you need more help with Apple Shortcuts, here’s the official user guide:
You may also find the Shortcuts subreddit helpful:
After clicking that shared Shortcut link:
- Click Set Up Shortcut.
- Choose your spoken language, then click Next.
- Enter your name as it is displayed in Notion. This will enabled self-assignments, such as “I need to walk my dog” being assigned to “Thomas Frank”.
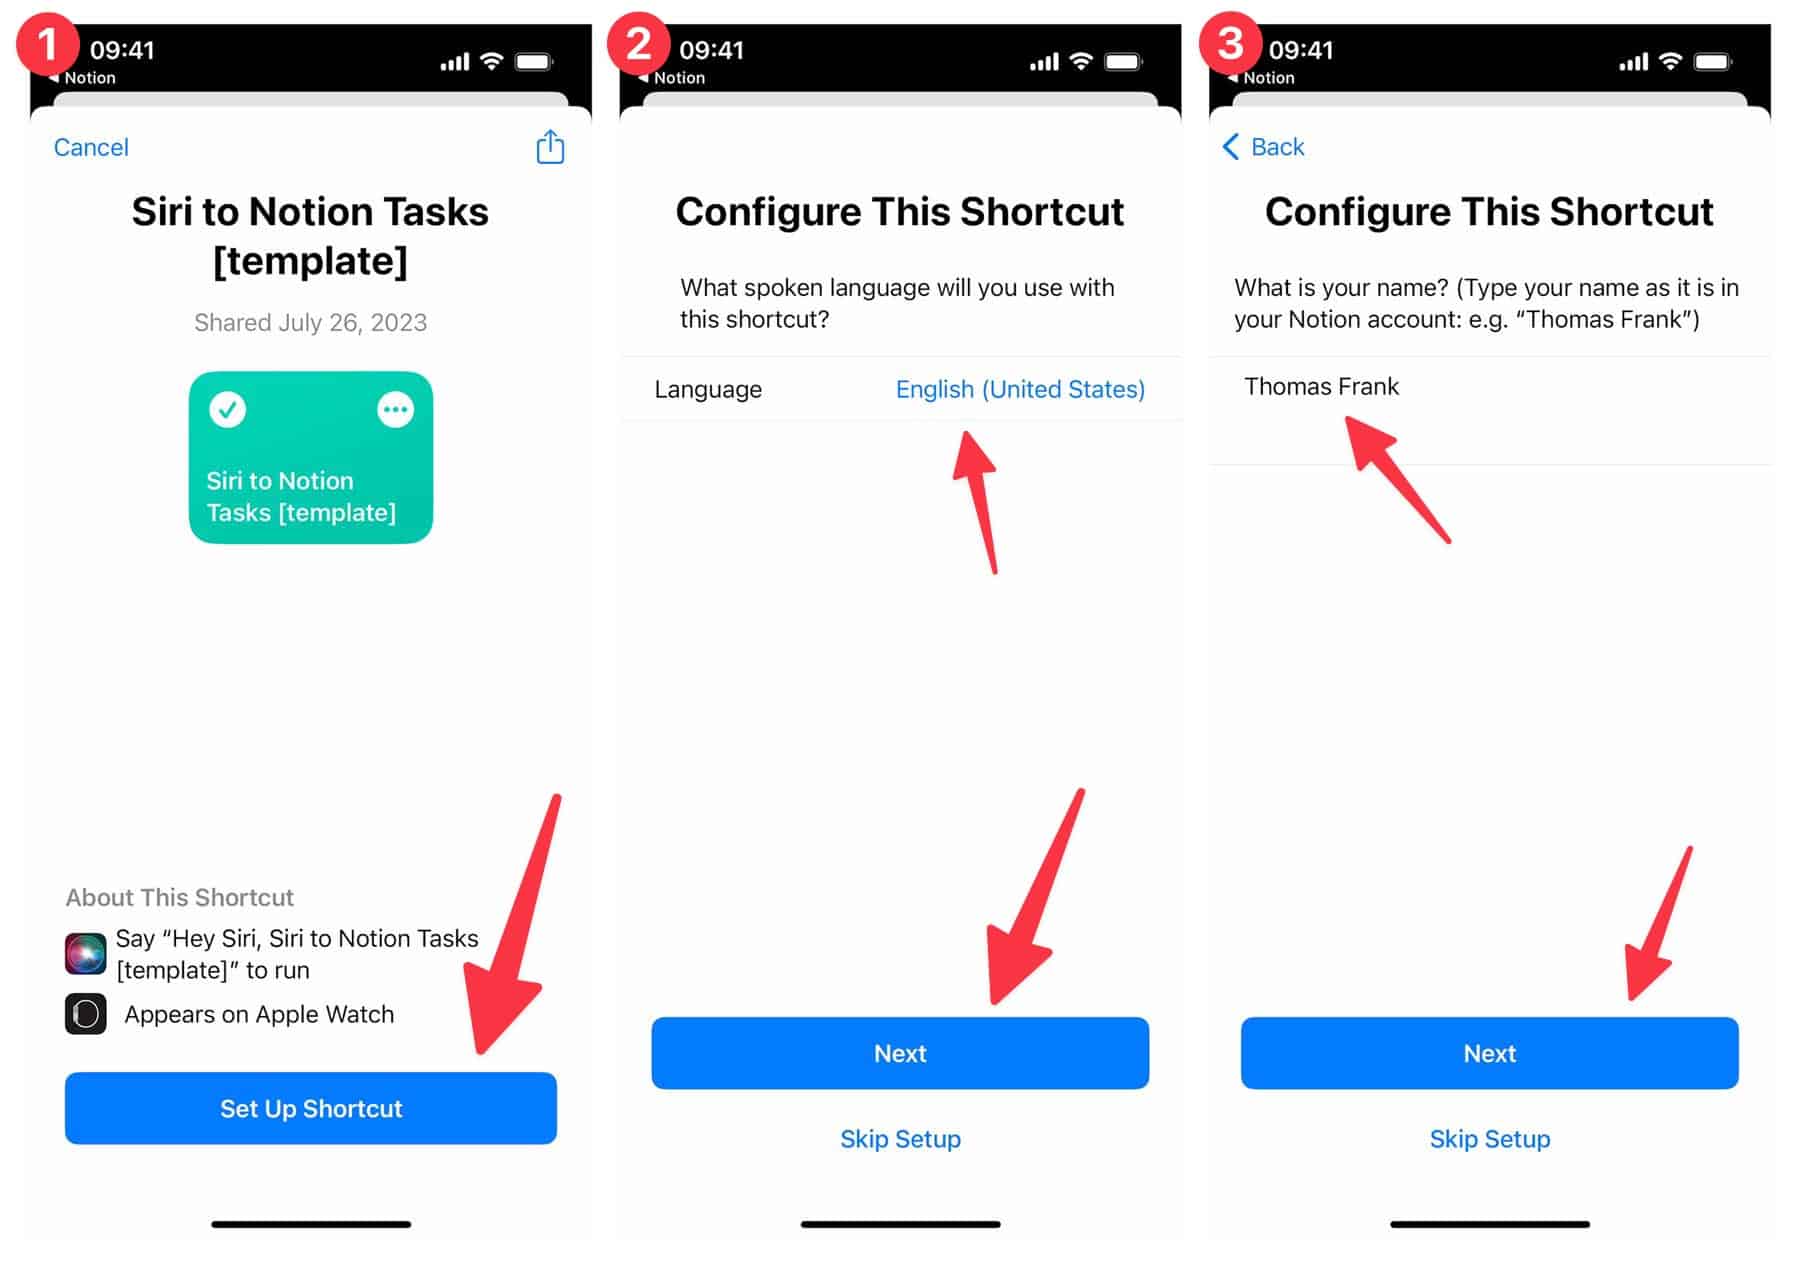
Next:
- Set a unique passphrase. Later, when you’re setting up your
Pipedream workflow, you’ll need to enter this exact passphrase in the settings there. This helps to prevent others from sending requests to your workflow. You can learn more about this in the security FAQ section. - Enter the unique trigger URL from your
Pipedream workflow, then click Add Shortcut. (If you need a reminder on how to get your trigger URL, click here to jump back up to that section.) - If you’d like to add a widget to your home screen so you can quickly run the shortcut, tap and hold anywhere on the home screen, and then click the
+icon in the top-left corner.
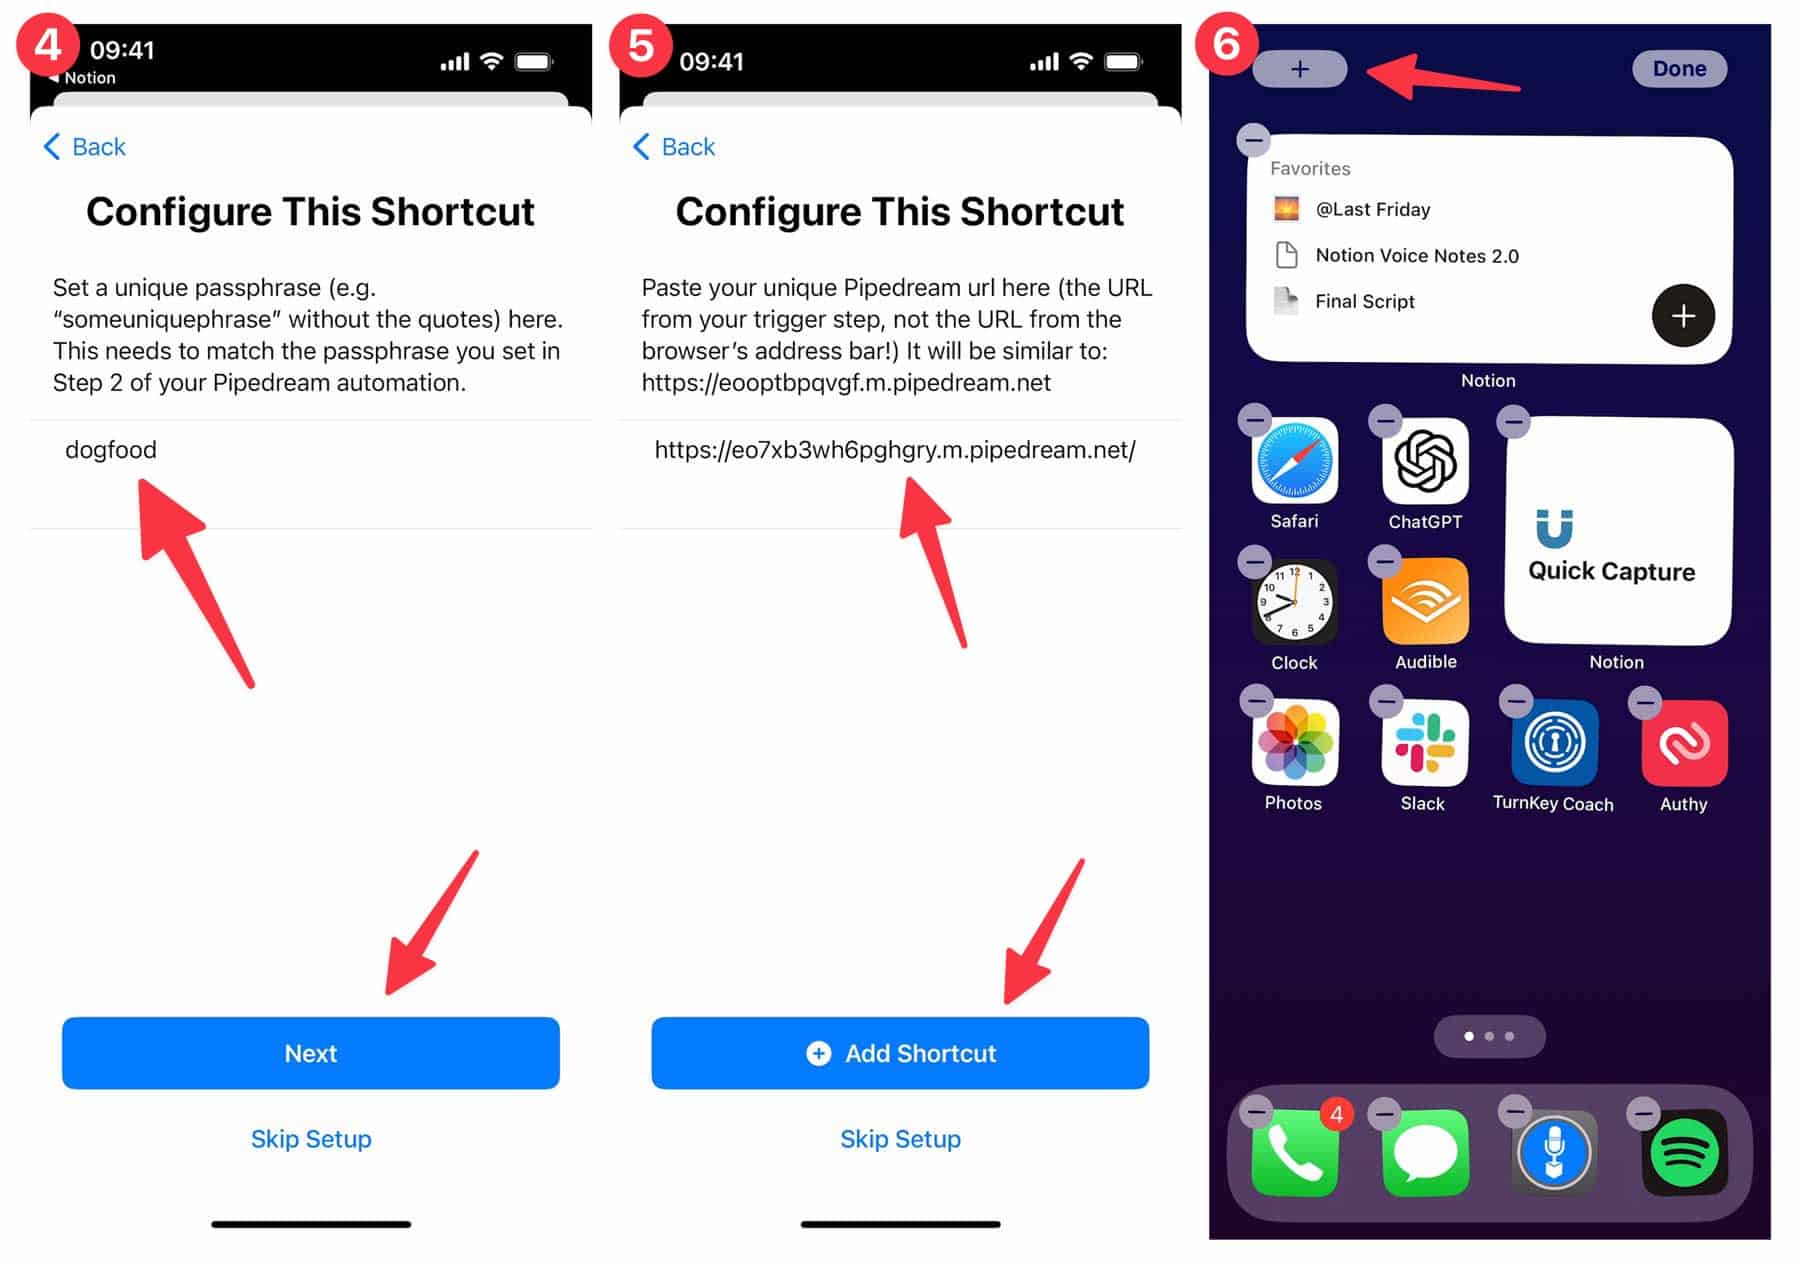
Continue setting up the widget:
- Search for “Shortcuts” in the search bar, or scroll to find it.
- Hit Add Widget.
- Tap the widget if it’s not displaying the correct shortcut.
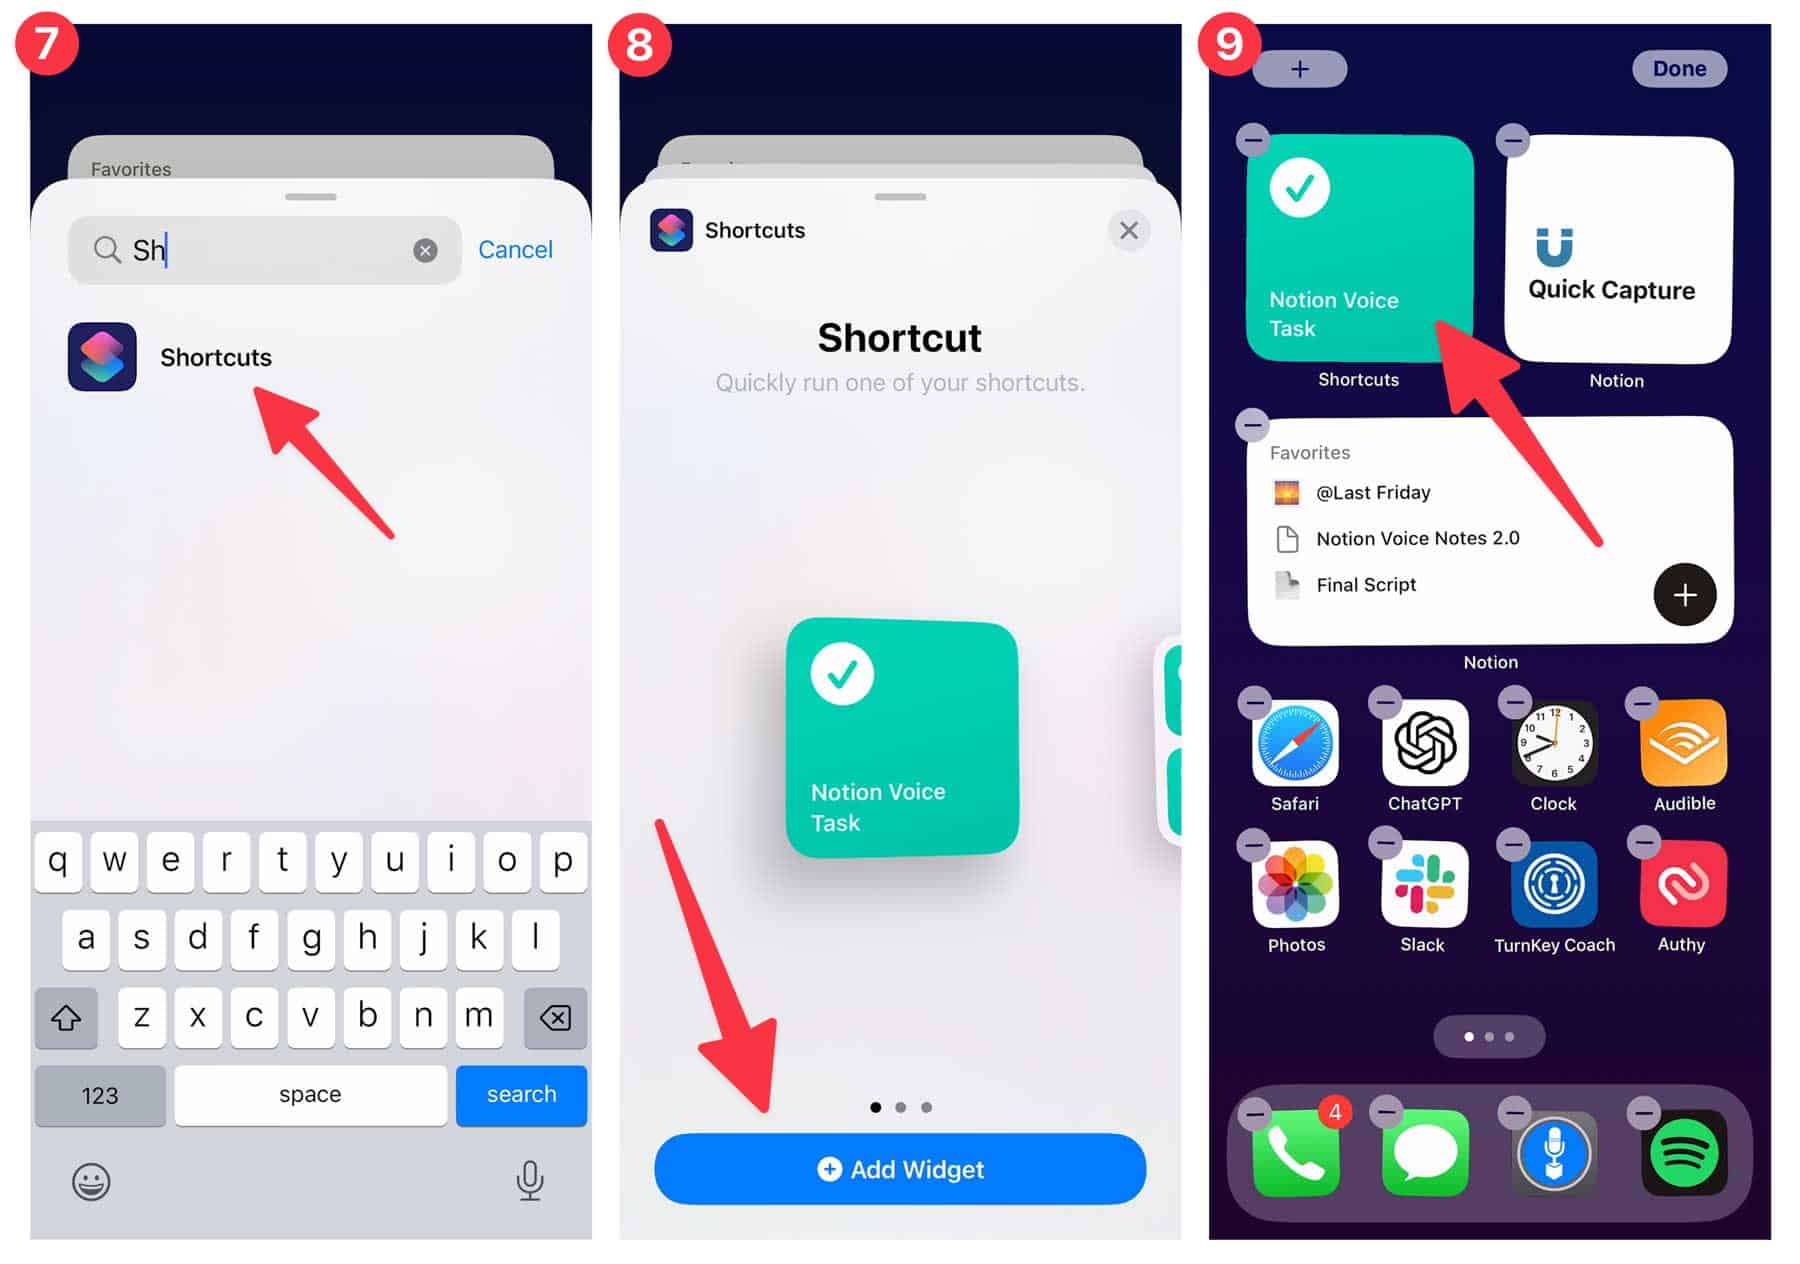
After tapping the widget, you can select the listed shortcut and change it to another one.
After that, tap the shortcut to do a test run. Hit Allow when asked if you want the shortcut to access Speech Recogition.
Finish running your test:
- Speak a test task, like “I need to walk my dog by tomorrow”.
- Hit Always Allow when asked to send the text item to your
Pipedream trigger URL. - Hit Done when you see the success response.
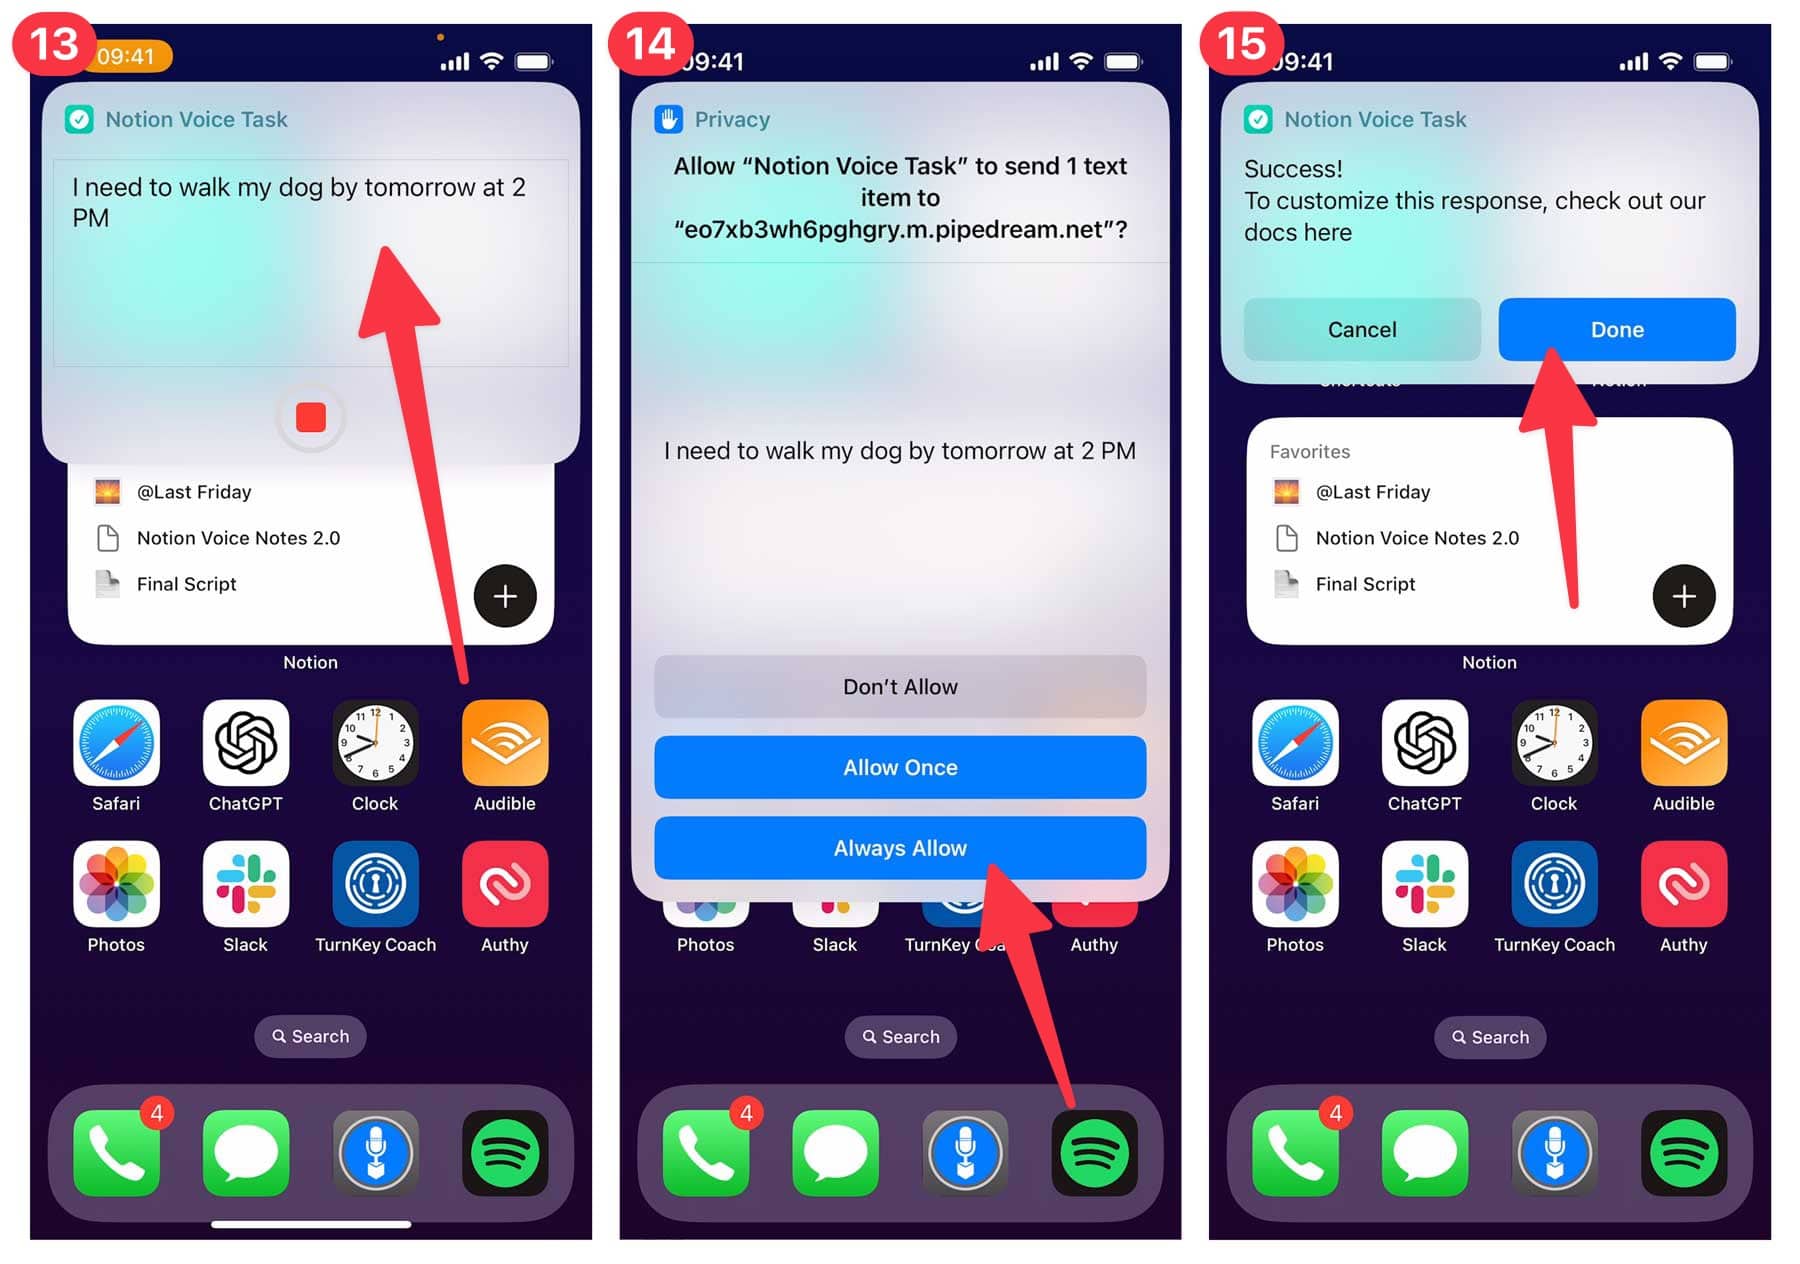
That’s it! You’ve successfully set the shortcut up on your iOS or MacOS device.
If you want to run this shortcut from your Apple Watch, simply add a Shortcut complication to your watch face and select your Notion Voice Tasks shortuct for it. Read this article for more details.
Next up, let’s get an OpenAI API key so we can have ChatGPT parse your transcribed voice tasks.
Copy link to headingAndroid: Set up a Voice Command with Tasker
If you’re using an Android device, then we’ll need to use the Tasker app to transcribe your voice and send requests to
Tasker is a $3.49 (USD) one-time purchase with no recurring subscription. From the research I’ve done, Android doesn’t have a built-in automation app (like iOS does with Shortcuts), nor does there seem to be a free app that can do everything needed here.
Tasker is an extremely powerful app, and like Shortcuts on iOS, it allows people to build and share workflows with others – which I’ve done for you!
From your Android device with Tasker installed, click this link to start importing the workflow:

Imports my Notion Voice Tasks shortcut to your Android device via the Tasker app.
I’ve not seen any reports of this import workflow failing, but just in case, I’ve written up instructions on how to create this workflow from scratch as well.
When you first install Tasker, you may be asked to go through several setup steps before you can start creating or importing workflows.
Below, you’ll find screenshots and instructions taken from my team’s own experiences in testing this workflow.
I’ll note that Tasker is a complex app, and Android itself is an OS with many device/manufacturer-specific quirks and customizations. It’s possible that your device will show something different than what is shown below.
If you need additional help, consult the official Tasker website.
When you install Tasker, make the following choices if asked:
- Choose the full Tasker experience, not Tasky.
- Check all boxes as needed.
- Disable battery optimizations as needed.
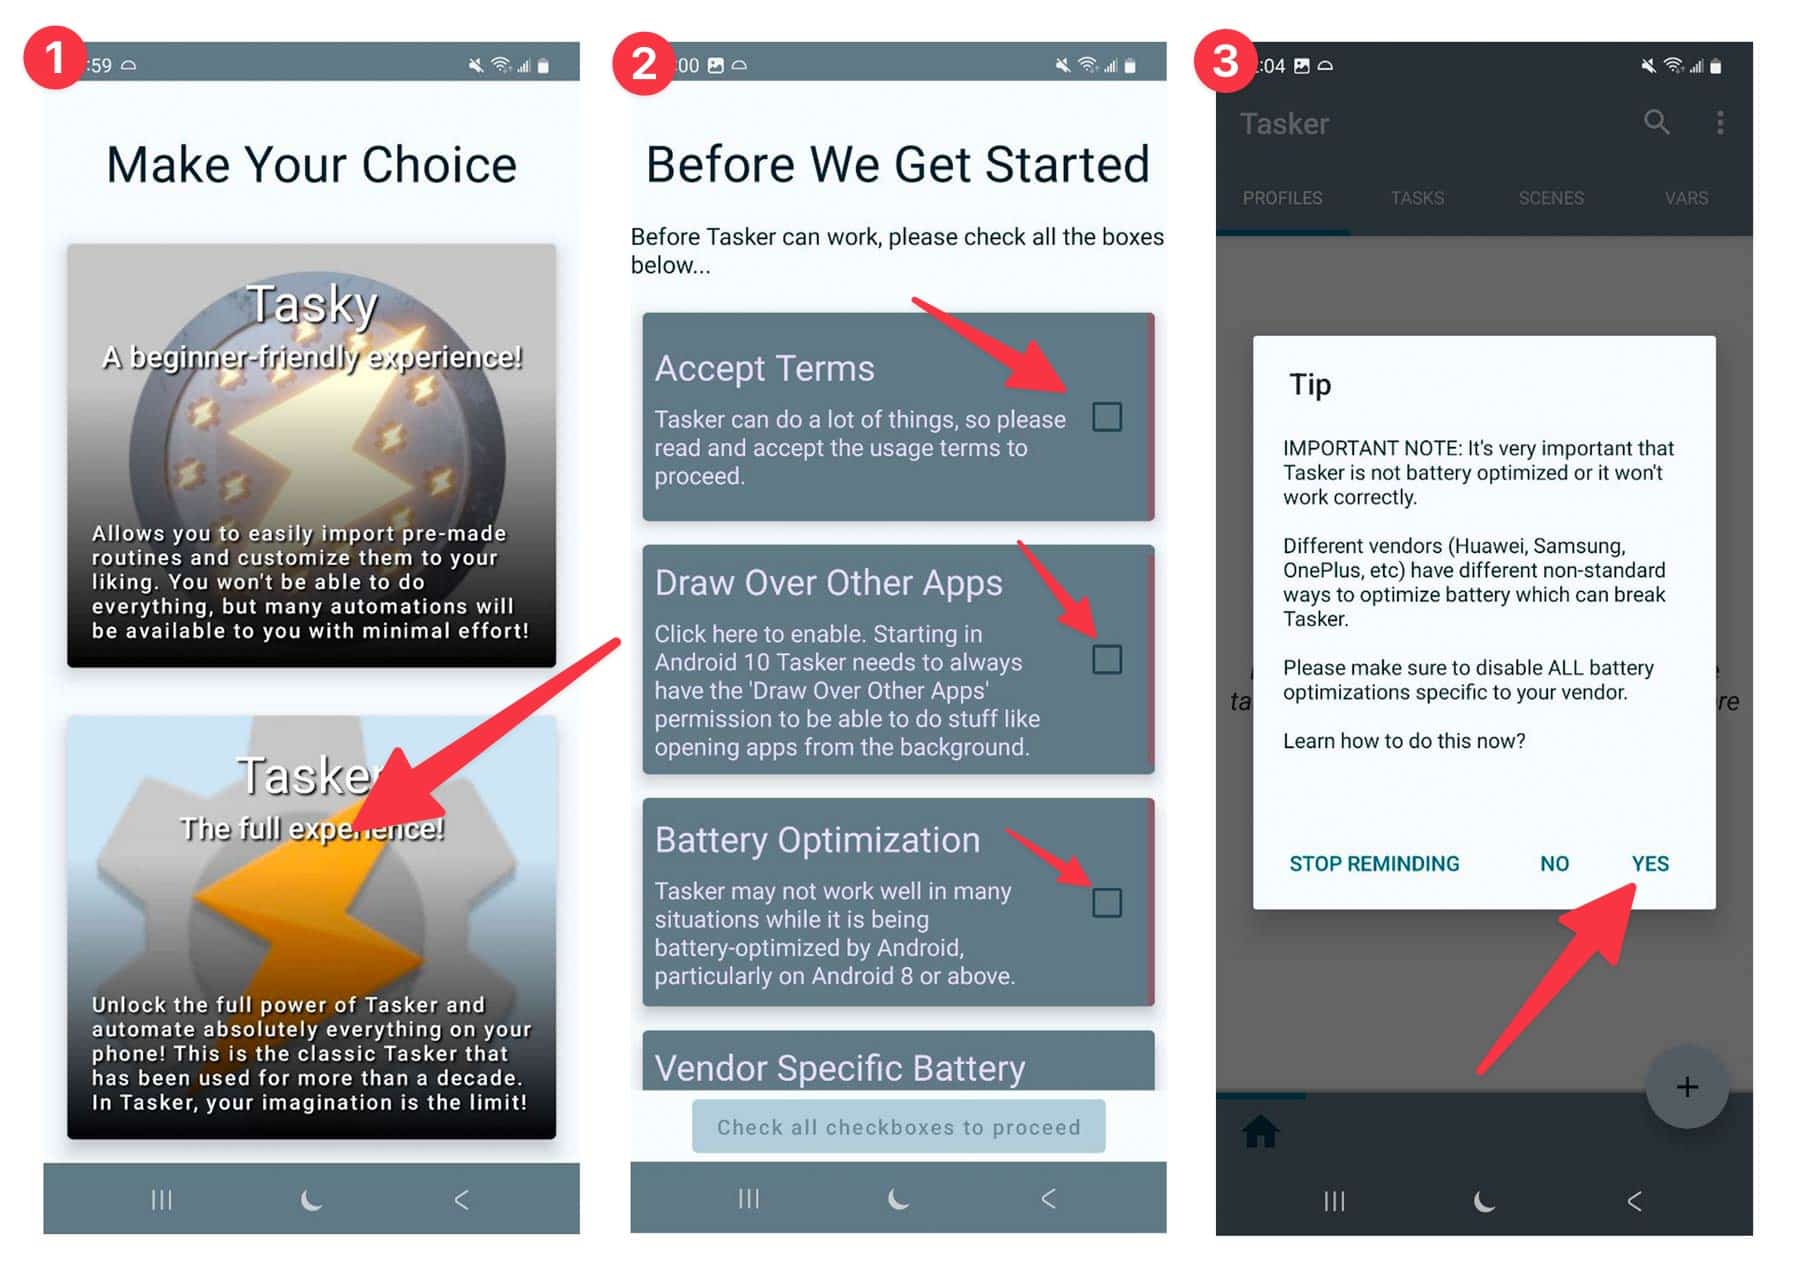
Tasker may require you to disable certain vendor-specific battery optimization options. We only have one Android phone (a Pixel 7) in the office to test workflows, so we can’t provide instructions for every possible Android device. Please refer to this Tasker doc page if you get stuck.
Next:
- If asked to create a profile, you can create one. We created one called Base.
- You may also be asked to enble Usage Data Access. If so, tap Ok.
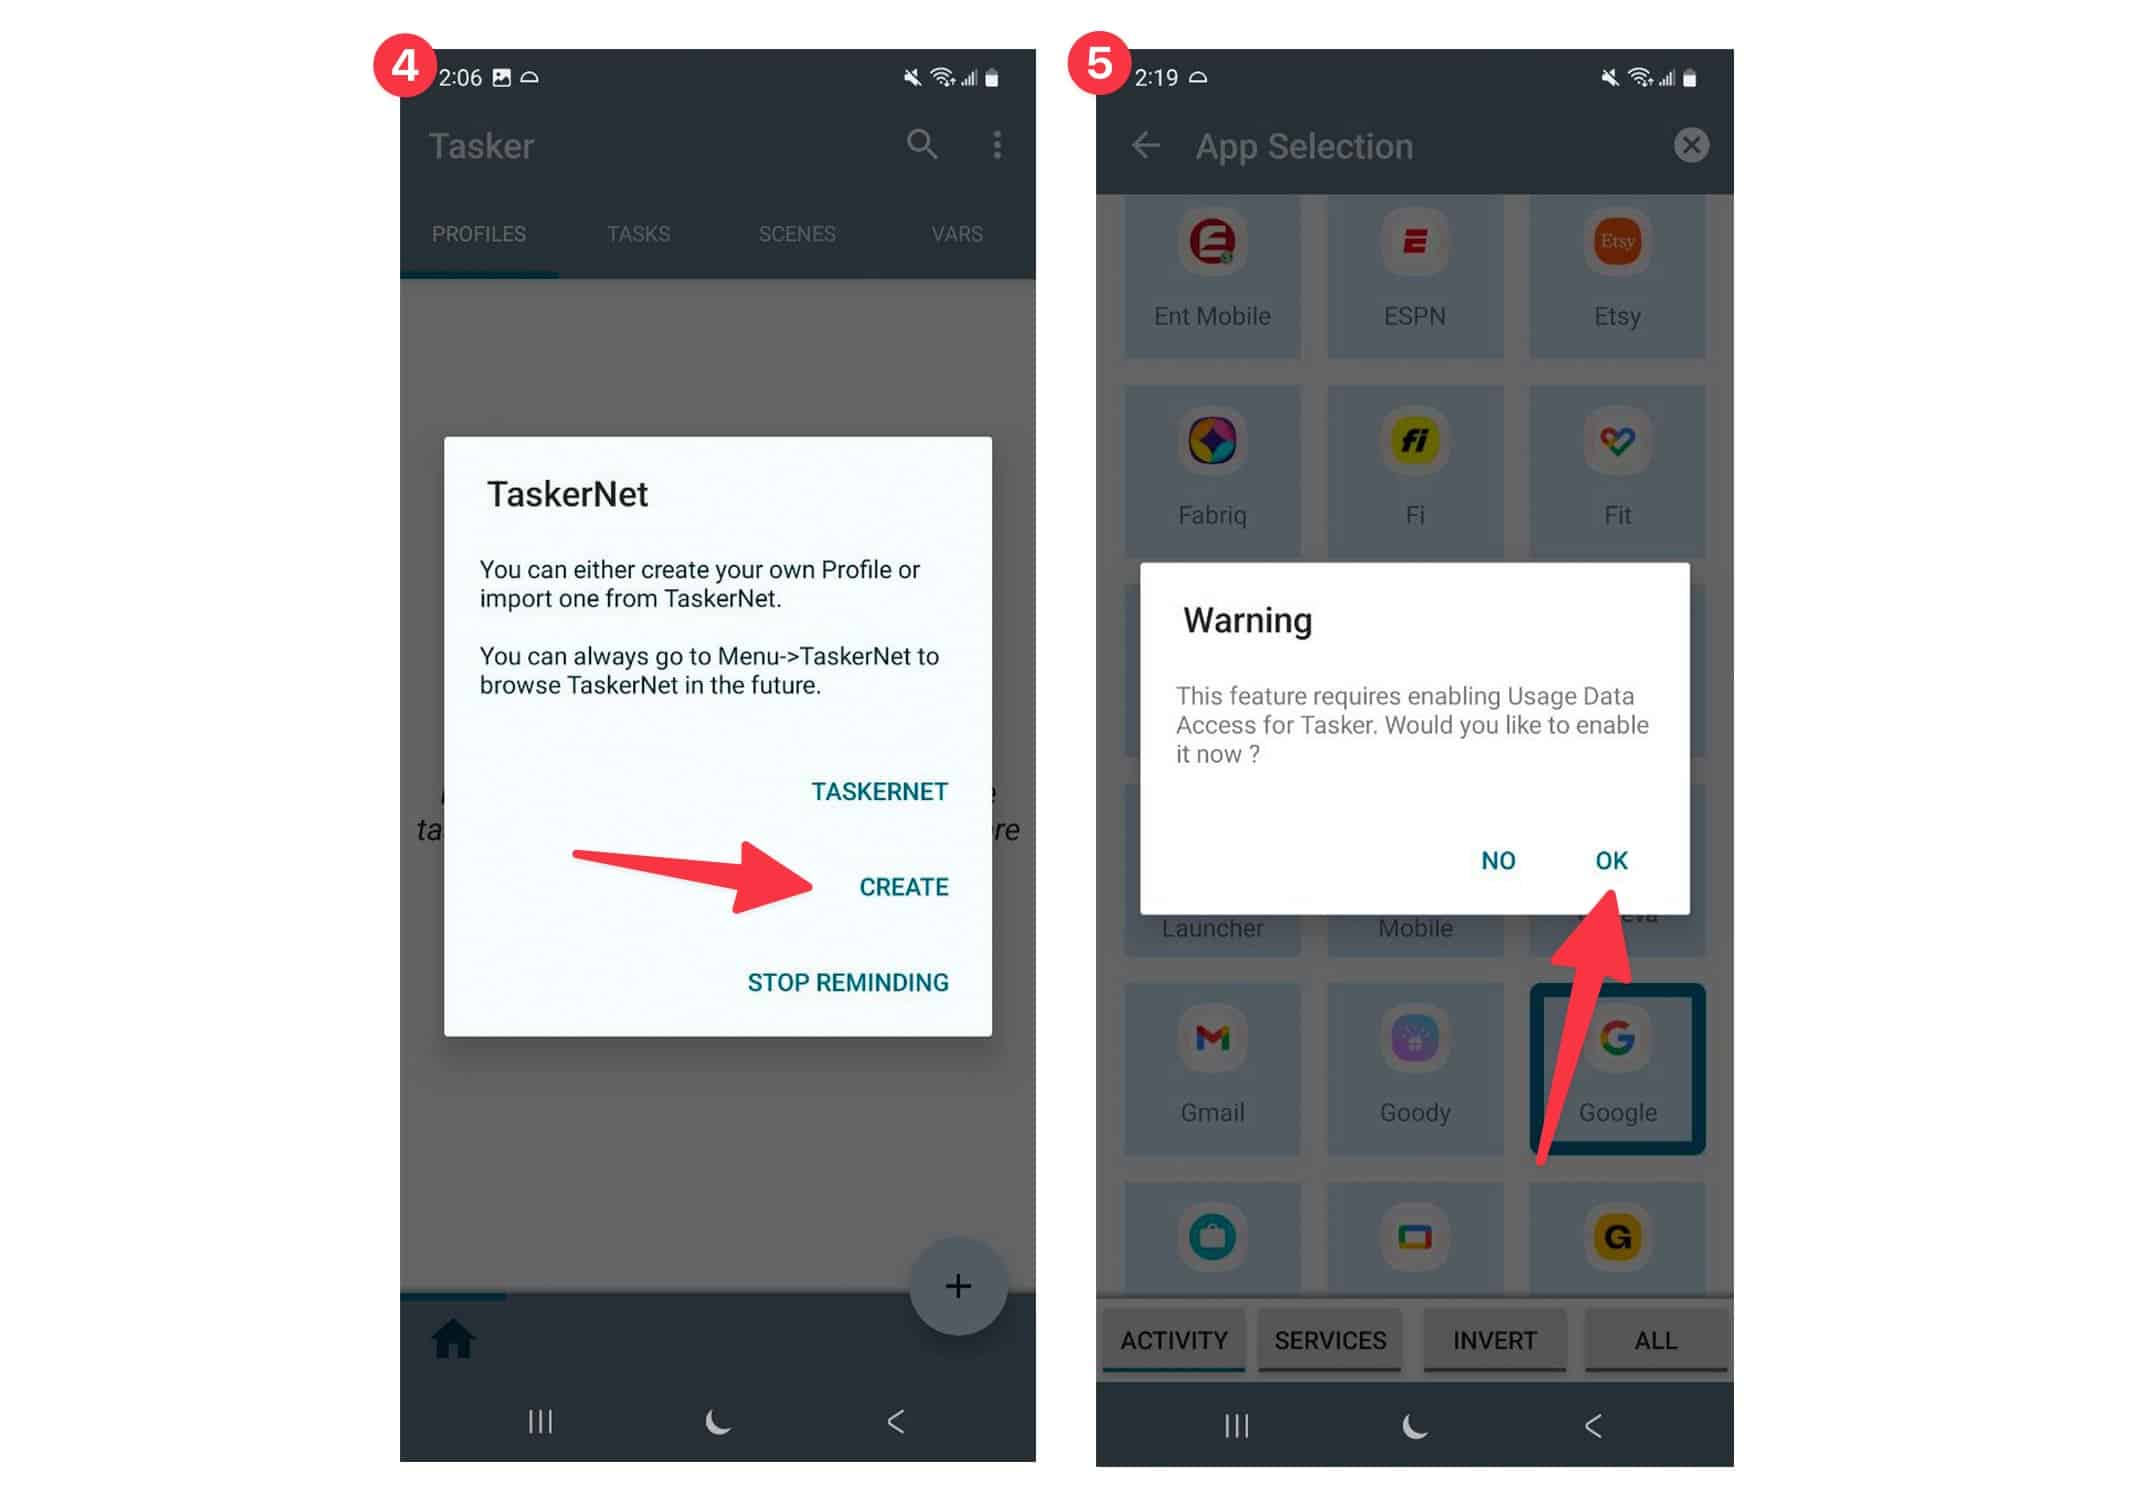
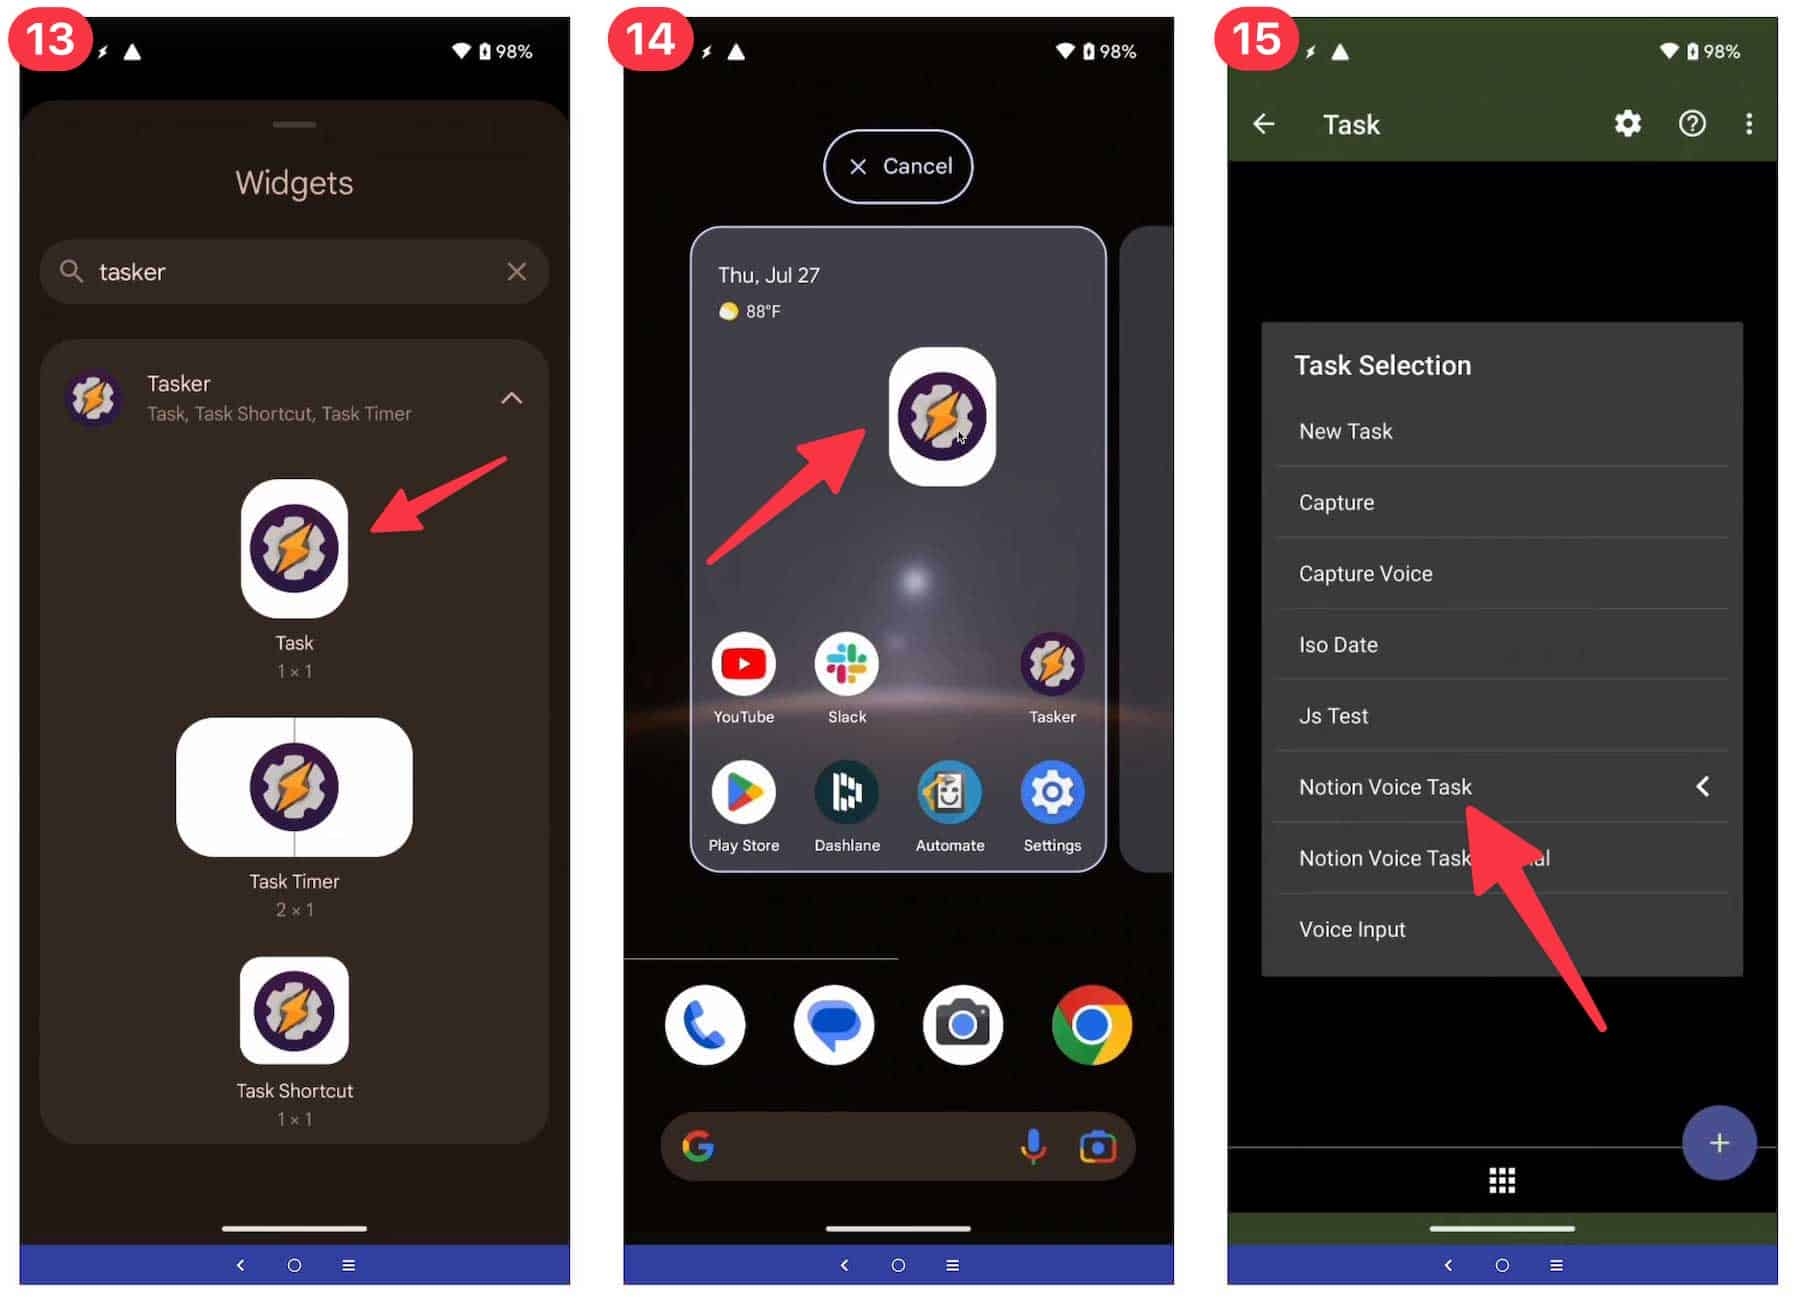
Next, follow these steps to import and configure it with your details:
- Make sure you have Tasker installed before importing the workflow.
- Click the Import button on the Notion Voice Task workflow page.
- Hit Yes at the Import Data screen.

Next:
- Import to the Base project, unless you have another project you’d like to use.
- Don’t run the workflow right away. You’ll need to configure it with your details first. Click No, then go to the Tasks tab and tap your new Notion Voice Task workflow to configure it.
- Note the three steps in the workflow that have
Steplabels. You’ll need to tap each one in order to set its detail. You can also tap the circle/dot icon near the bottom of the screen to set a custom icon for this workflow. If you’re going to create a home screen widget for this workflow, I recommend doing that.

Next:
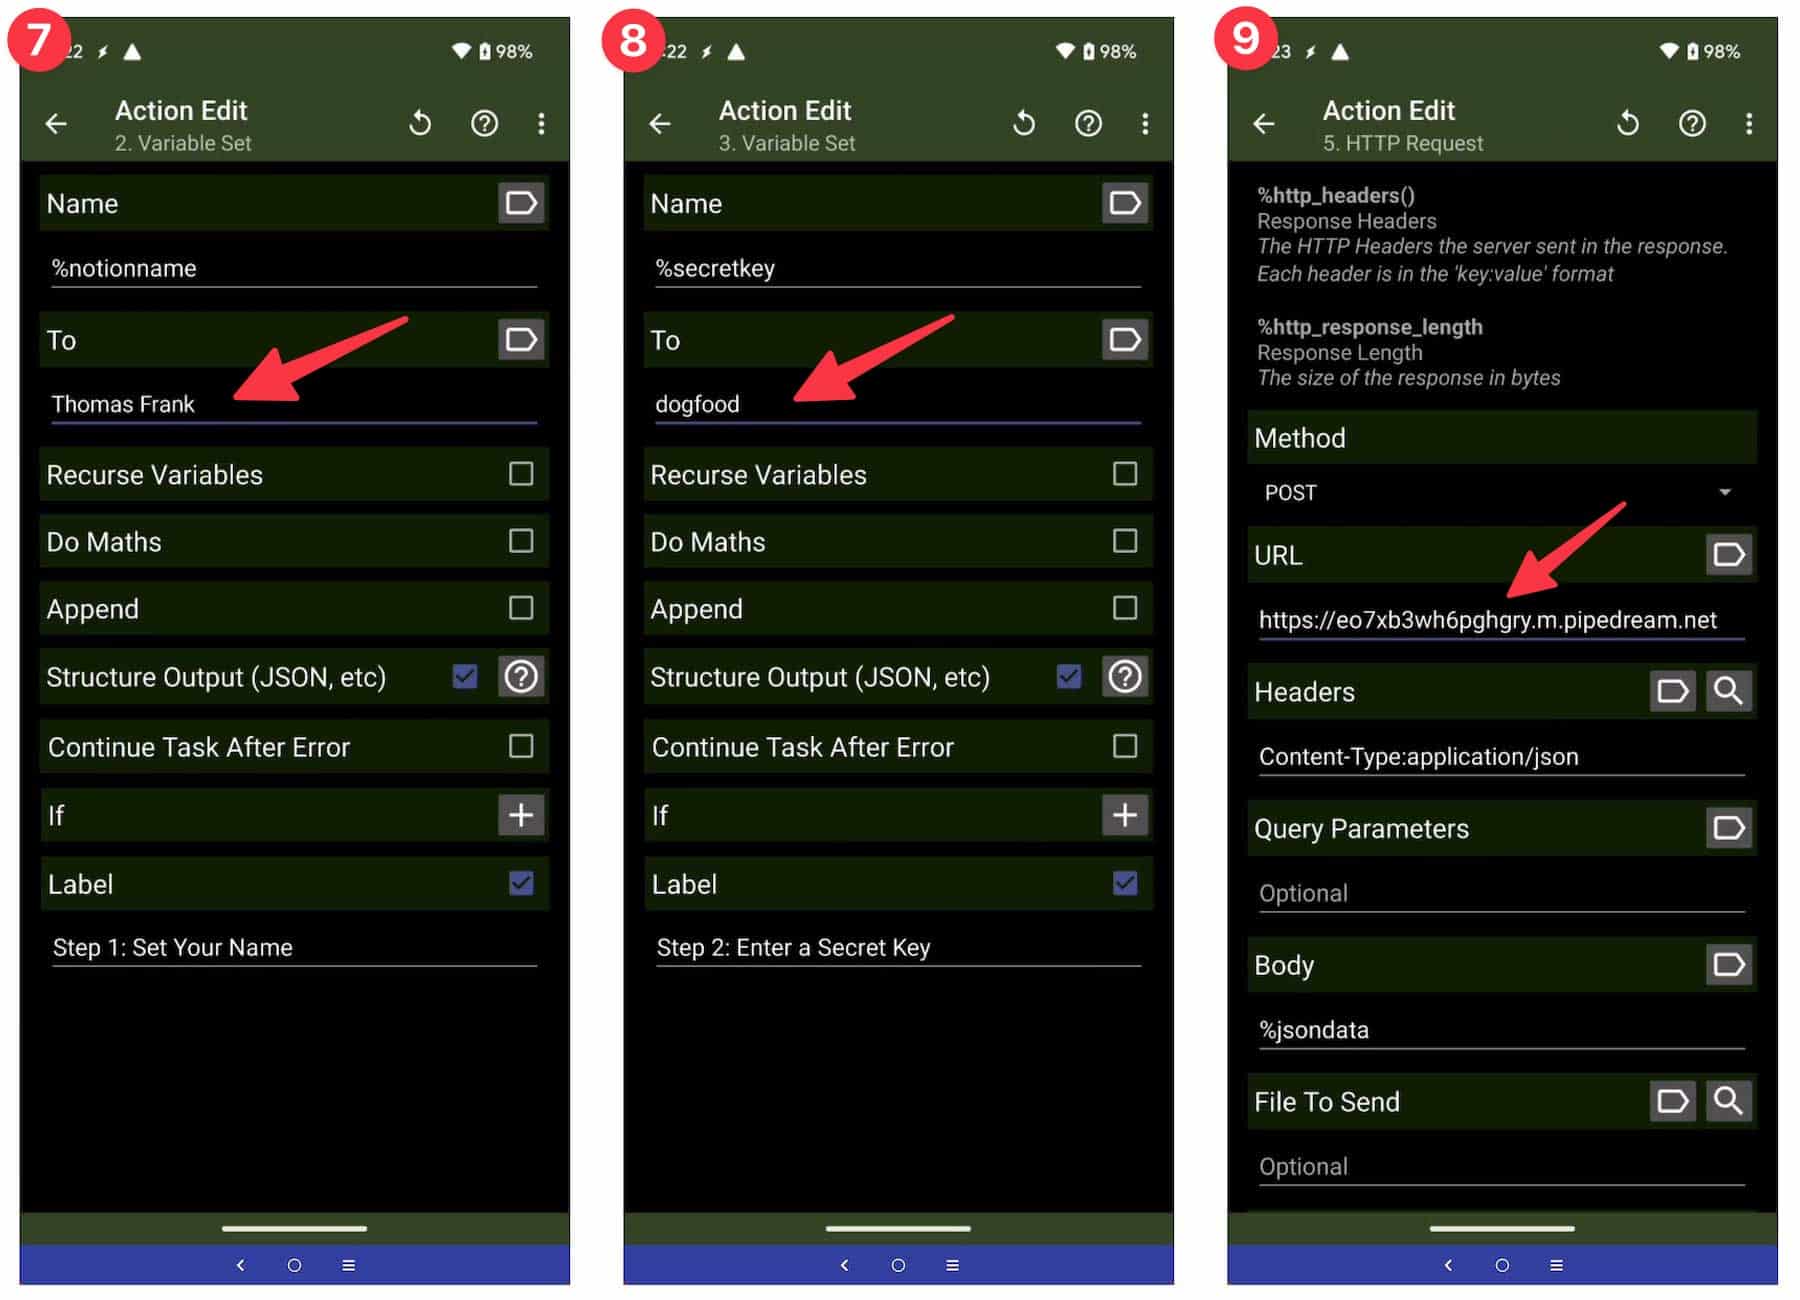
- Tap the first Variable Set step labeled “Step 1”. In the To field, enter your name as it is displayed in Notion. This will enabled self-assignments, such as “I need to walk my dog” being assigned to “Thomas Frank”.
- Go Back, then tap the second Variable Set step labeled “Step 2”. In the To field, enter a unique passphrase. Later, when you’re setting up your
Pipedream workflow, you’ll need to enter this exact passphrase in the settings there. This helps to prevent others from sending requests to your workflow. You can learn more about this in the security FAQ section. - Go Back, then tap the HTTP Request step labeled “Step 3”. Enter the unique trigger URL from your
Pipedream workflow, then click Add Shortcut. (If you need a reminder on how to get your trigger URL, click here to jump back up to that section.)
Next:
- Go back twice to back out of the workflow settings. This should save all the changes you made. If you see a “Missing Permissions” popup, you can click No (though I believe this only comes up when controlling an Android device via a computer, as I was doing when creating this tutorial).
- Hit Back one more time, so you end up back at your list of Tasks. You may see a “Just a Moment” modal as the app applies all your changes.
- If you would like to add a widget to your phone’s home screen so you can quickly trigger your workflow, tap and hold the home screen. Then select Widgets.

Next:
- Search for Tasker.
- Tap, hold, and drag the Task icon onto your home screen. You may be prompted to open Tasker again and then back out of it. If so, do that before moving on.
- When prompted, choose your Notion Voice Task workflow.
Next:
- Hit the Back button once more. This is required to “lock in” the workflow choice for the widget.
- Now you can tap your widget to run the workflow. Do so now so you can sent a test request to
Pipedream . - Speak a task like “I need to walk my dog tomorrow”, and let it send the request to your
Pipedream URL.
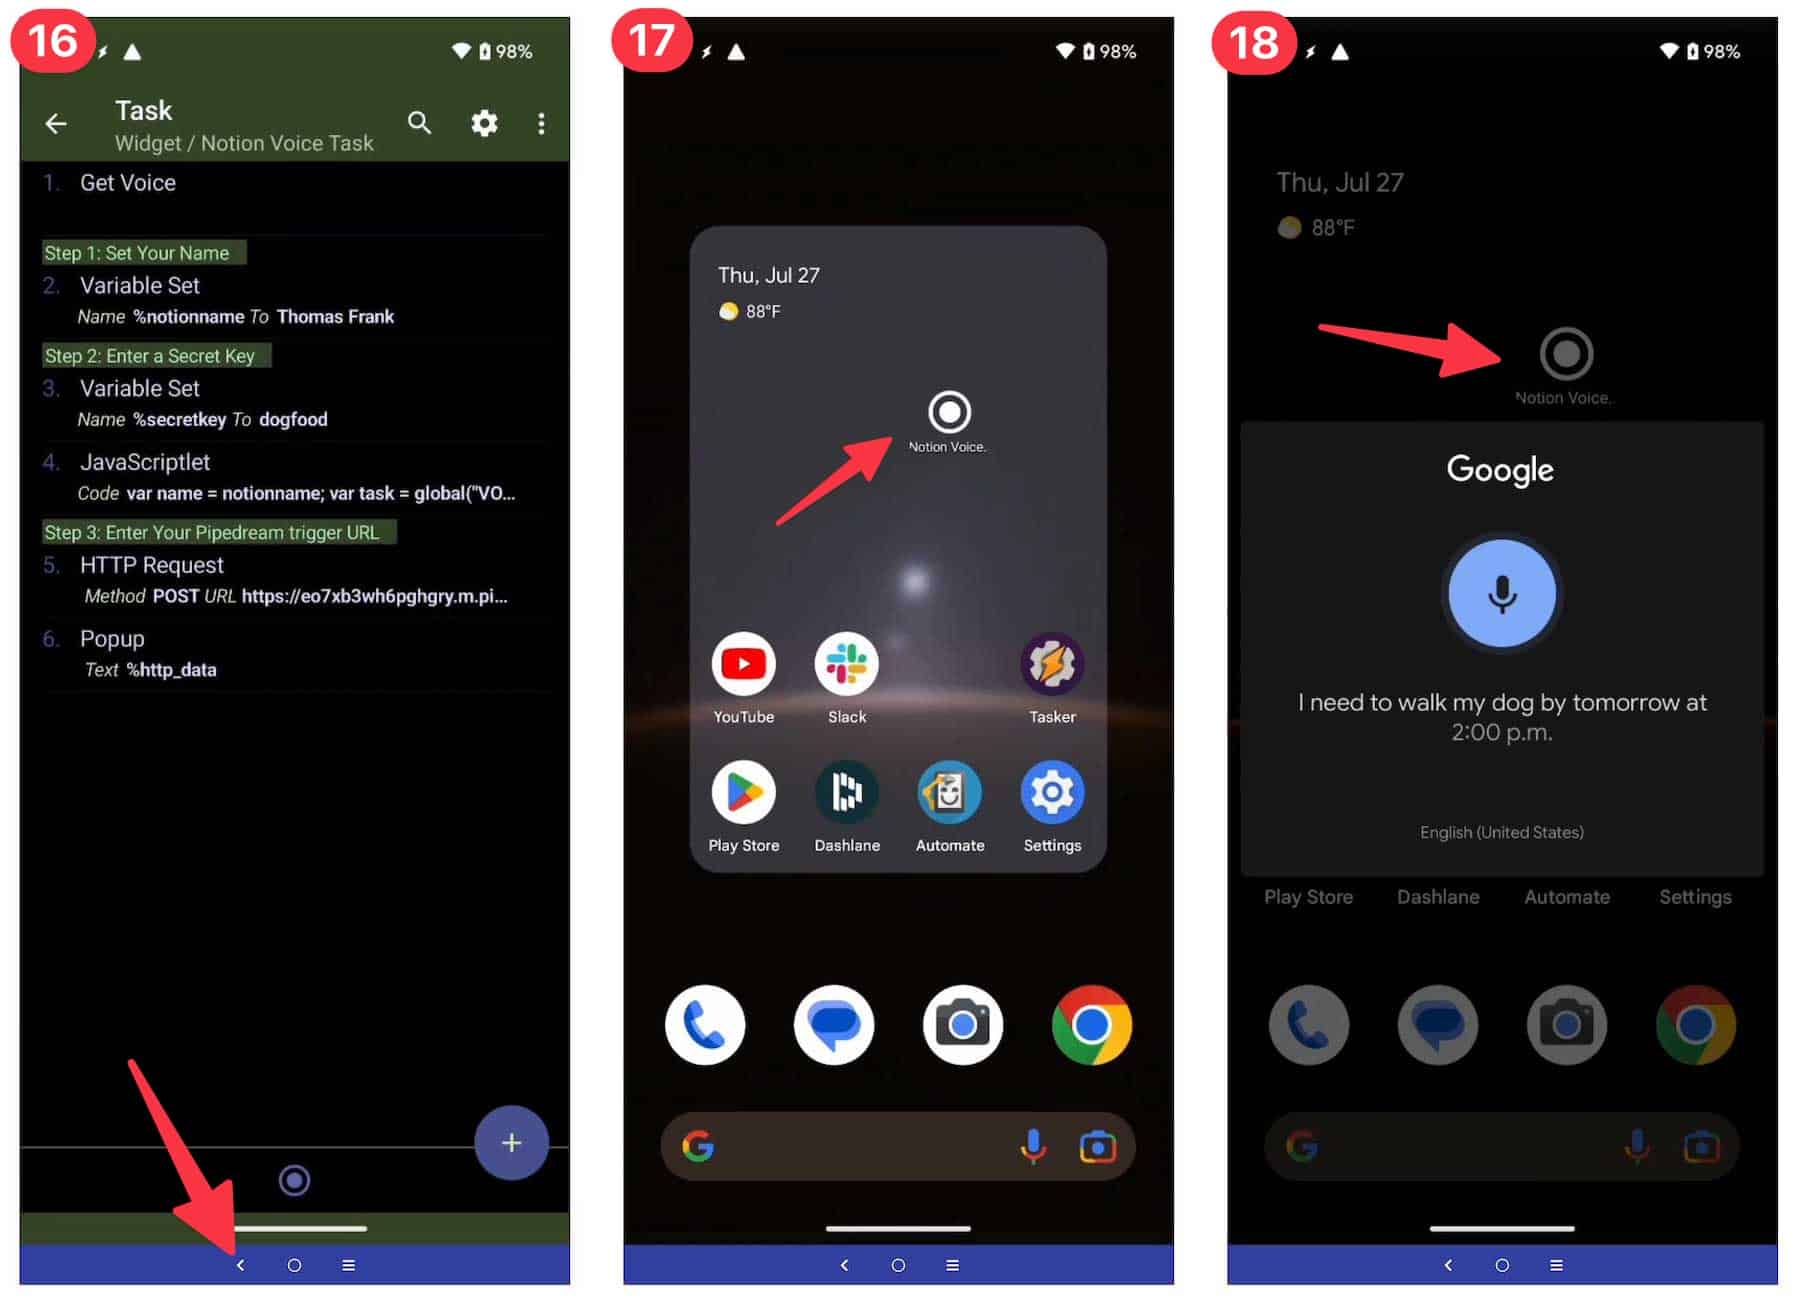
That’s it! You’ve successfully set the shortcut up on your Android device.
Next up, let’s get an OpenAI API key so we can have ChatGPT parse your transcribed voice tasks.
Copy link to headingGet an OpenAI API Key
This workflow sends your transcribed voice recording to the ChatGPT API, which is instructed to act as a natural-language task parser. It’s what allows this whole automation to work!
To make requests to ChatGPT, you’ll need an OpenAI API Key. To get one, head to the API Key dashboard at OpenAI.
If you don’t already have an OpenAI account, create one. New accounts get $5 in free credit that lasts for 3 months (as of this writing), meaning you can test this workflow out using that free credit if you’re creating a new account.
After the free credit expires or is used up, you’ll need to add your billing details to your account.
Important: Once you add your billing information to your OpenAI account, you’ll likely need to generate a new API key, as keys that are generated during the trial-credit period seem to stop working and throw a 429 error after billing info is added. After you generating a new key, edit your
Once that’s set up, hit the Create New Secret Key button in the API Keys section of the dashboard:
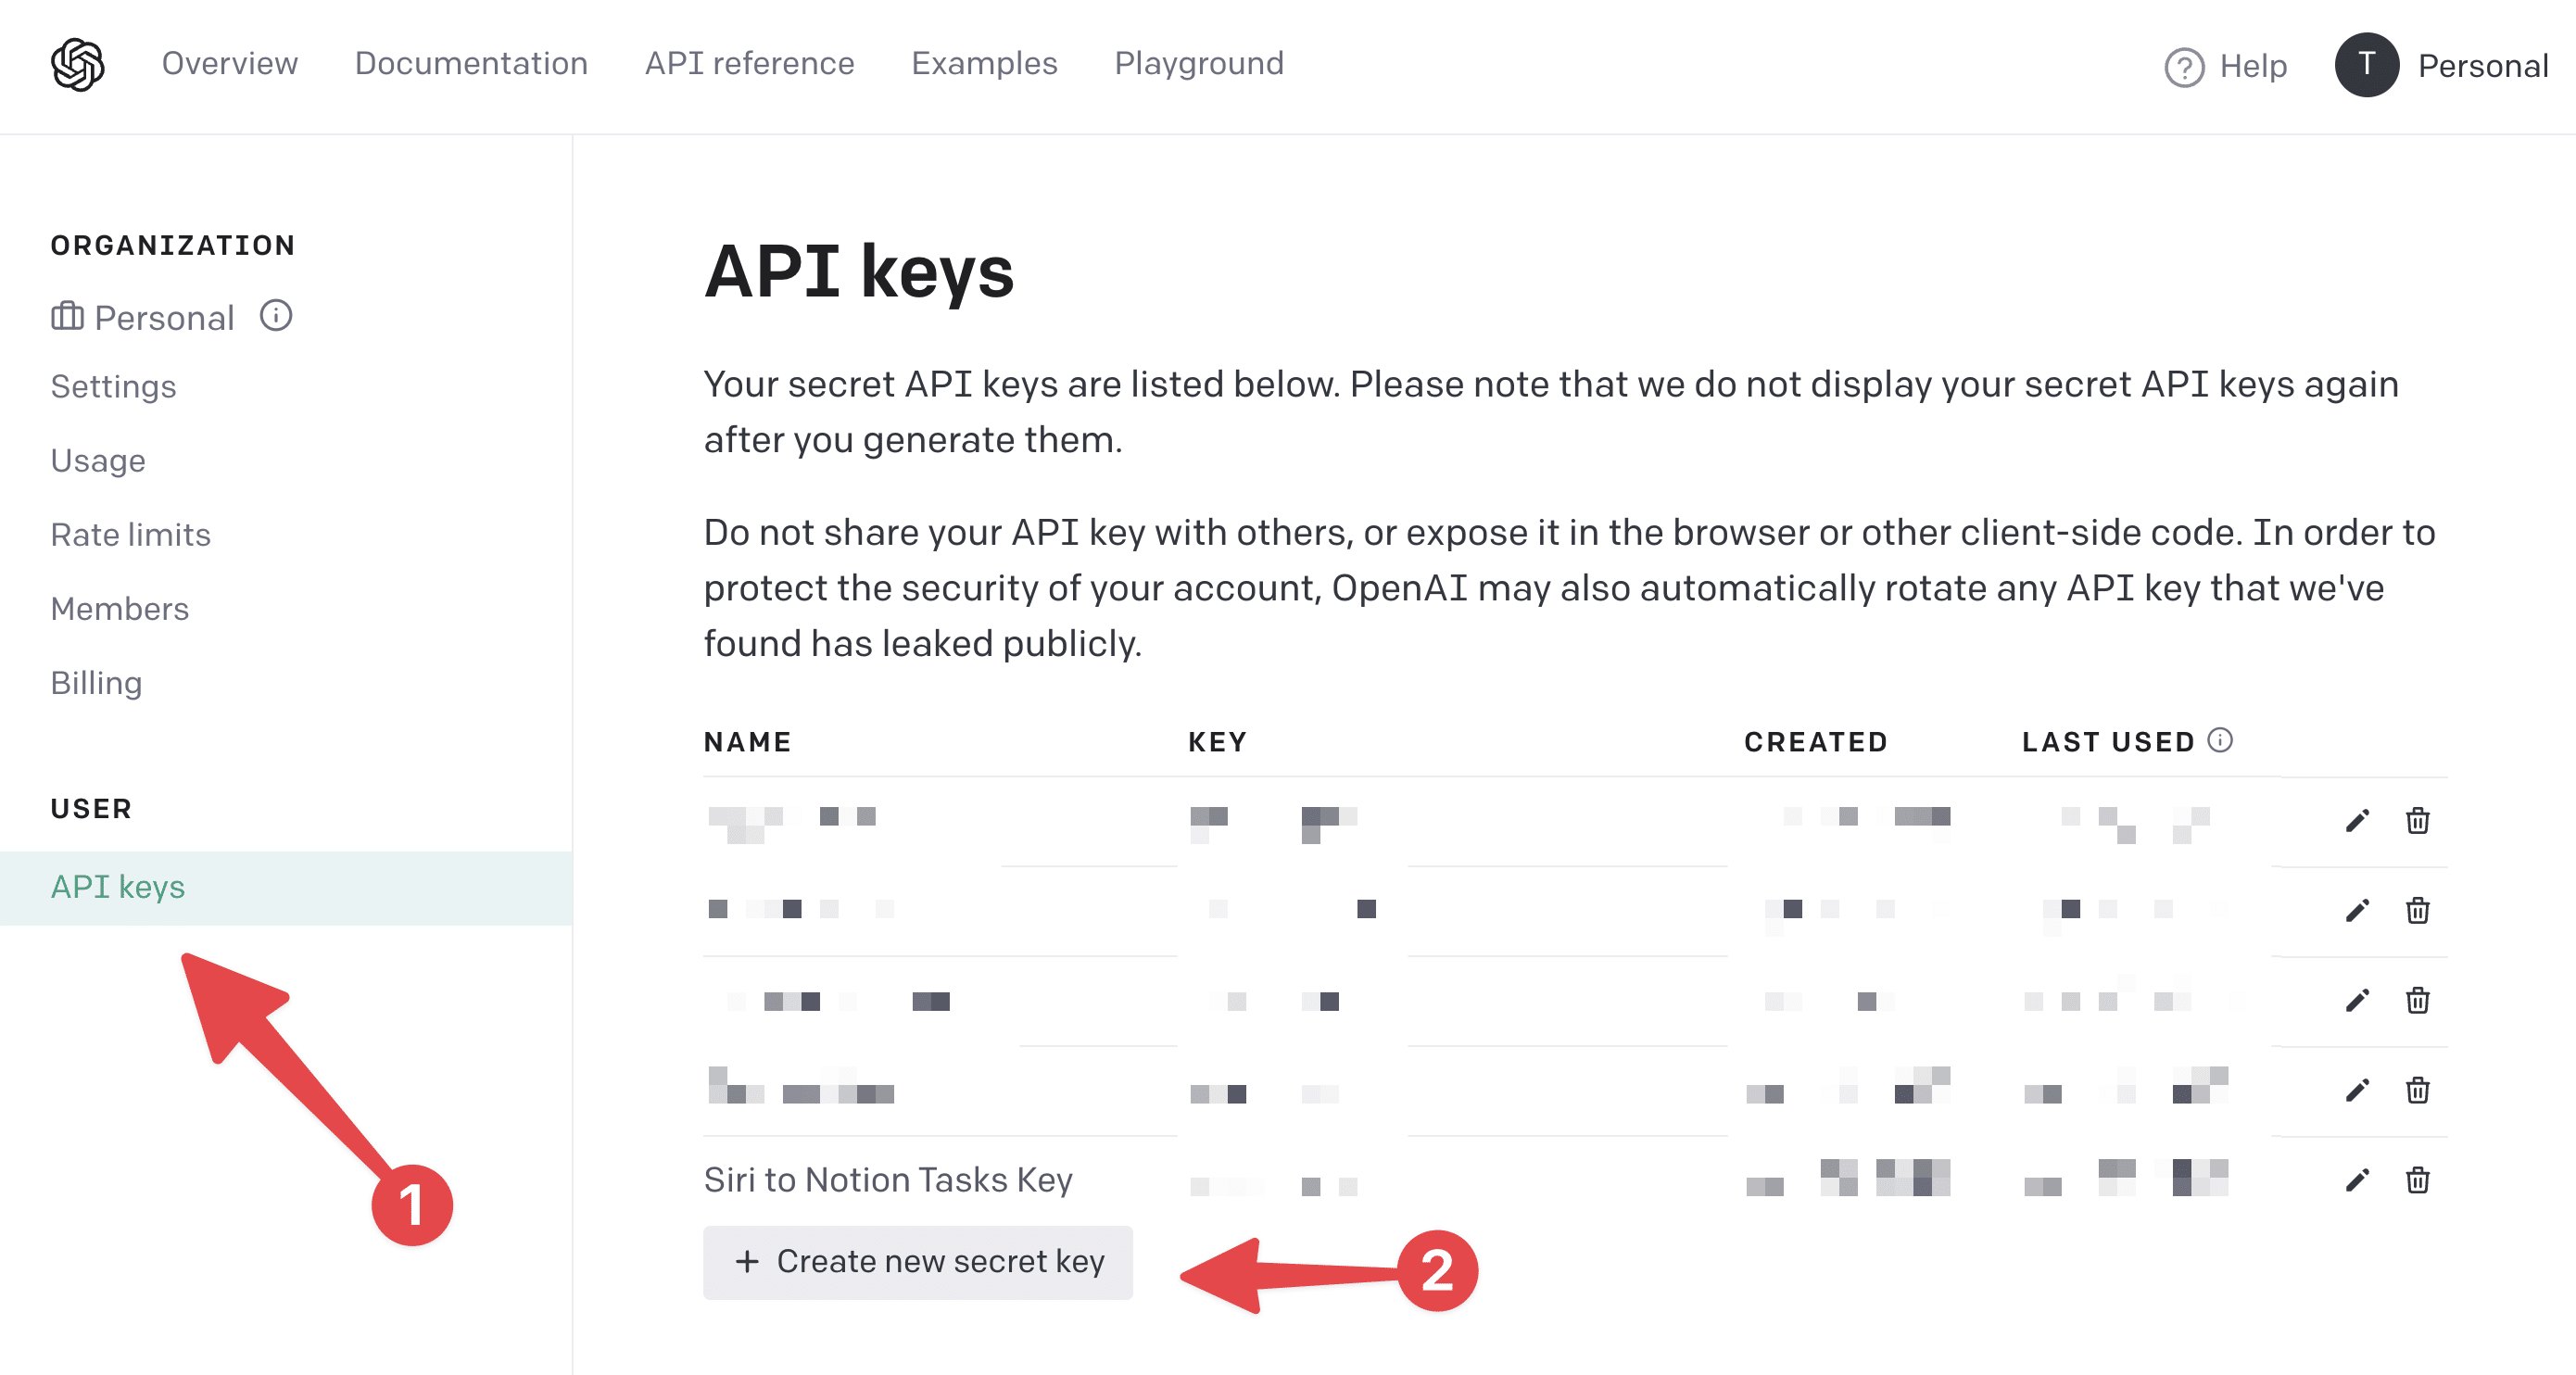
When you create your key, copy it to your clipboard. You won’t be able to access it here again (this is for security reasons).
Treat your API key like a password. Your API key is what allows you to make requests to the ChatGPT API – and that costs money! Do not share your key. If it is ever leaked, delete it from the API Keys dashboard and make a new one. As noted before, using this workflow normally has a negligable cost (~$0.003 per run), but if the wrong person got ahold of your key, they could use it to make many more requests and eat up your budget.
After you get your API key, it’s a good idea to head to Billing → Usage Limits and review your limits. By default, you account should have a Hard Limit of $120 and a Soft Limit of $96.
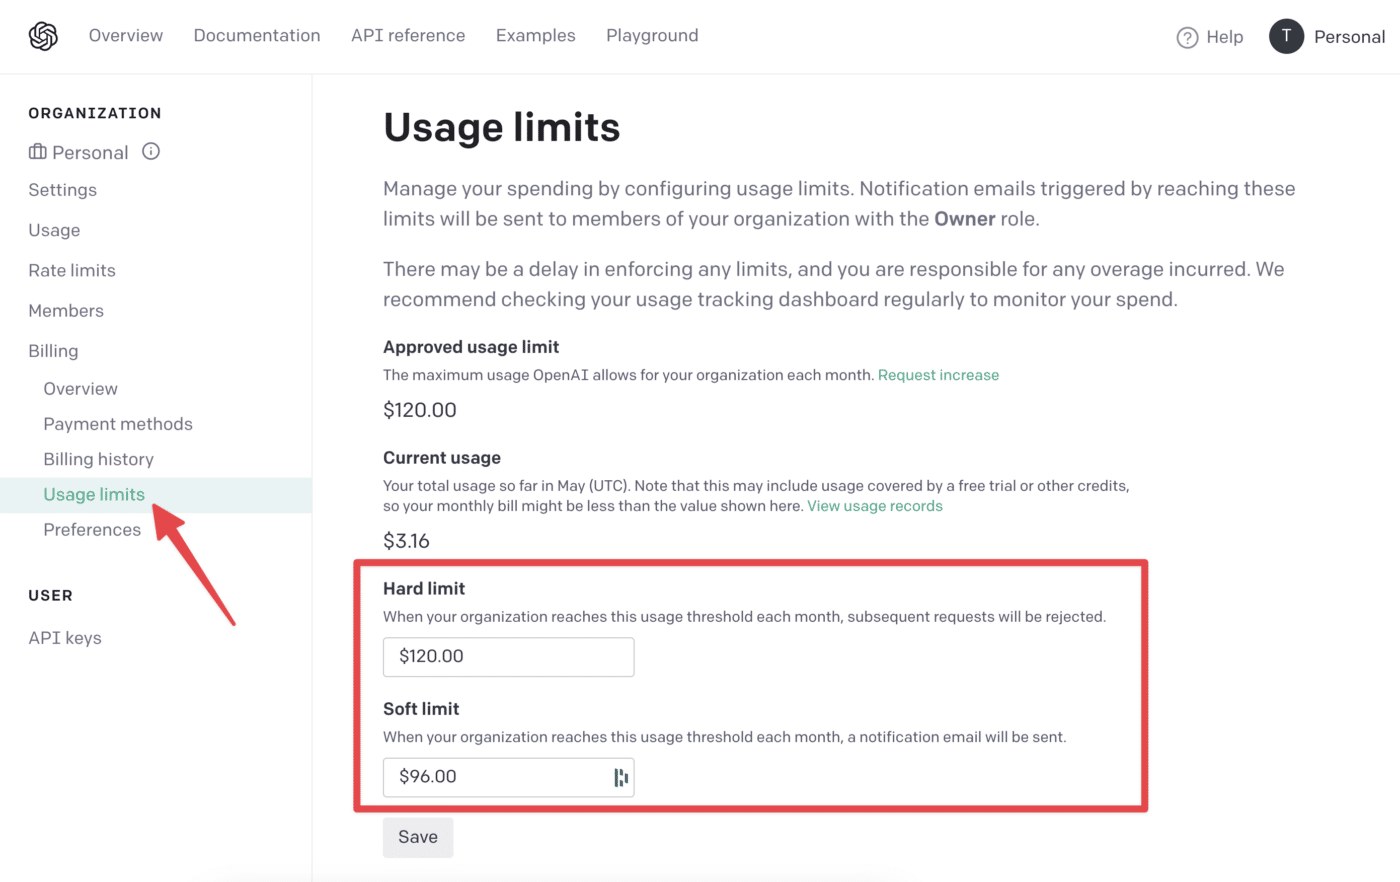
I recommend changing these values, as you’re unlikely to need this high of a budget unless you’re doing other things with your API key. A $10 hard limit should be more than enough, and ensures that even if your API key leaks, the most that could be charged is $10. (A leak is extremely unlikely unless there is user error, as
These are still way higher than I need; the most I’ve ever spent in a month is $9, and the vast majority of that usage came from my much more token-heavy voice notes automation, which transcribes long voice recordings and summarizes them.
With your API key copied to your clipboard, let’s head back to
Test and Deploy the Pipedream Workflow

Note: Pipedream’s UI has changed since I wrote this guide, and I’ve also updated and improved the workflow. I recommend watching the new setup video (filmed January 2026) I’ve added above this callout – the instructions below are slightly out of date! When I get a chance, I’ll update them.
The last thing we need to do is configure the rest of the
The video above shows the entire
Open up the Configure menu in the Parse_and_Create_Tasks action. This is where you’ll set all your options.
Note: You will not find the Parse_and_Create_Tasks action in
First, click the OpenAI (ChatGPT) Account field and paste in your OpenAI API key. You can also give the key a nickname if you want, but it’s not necessary.
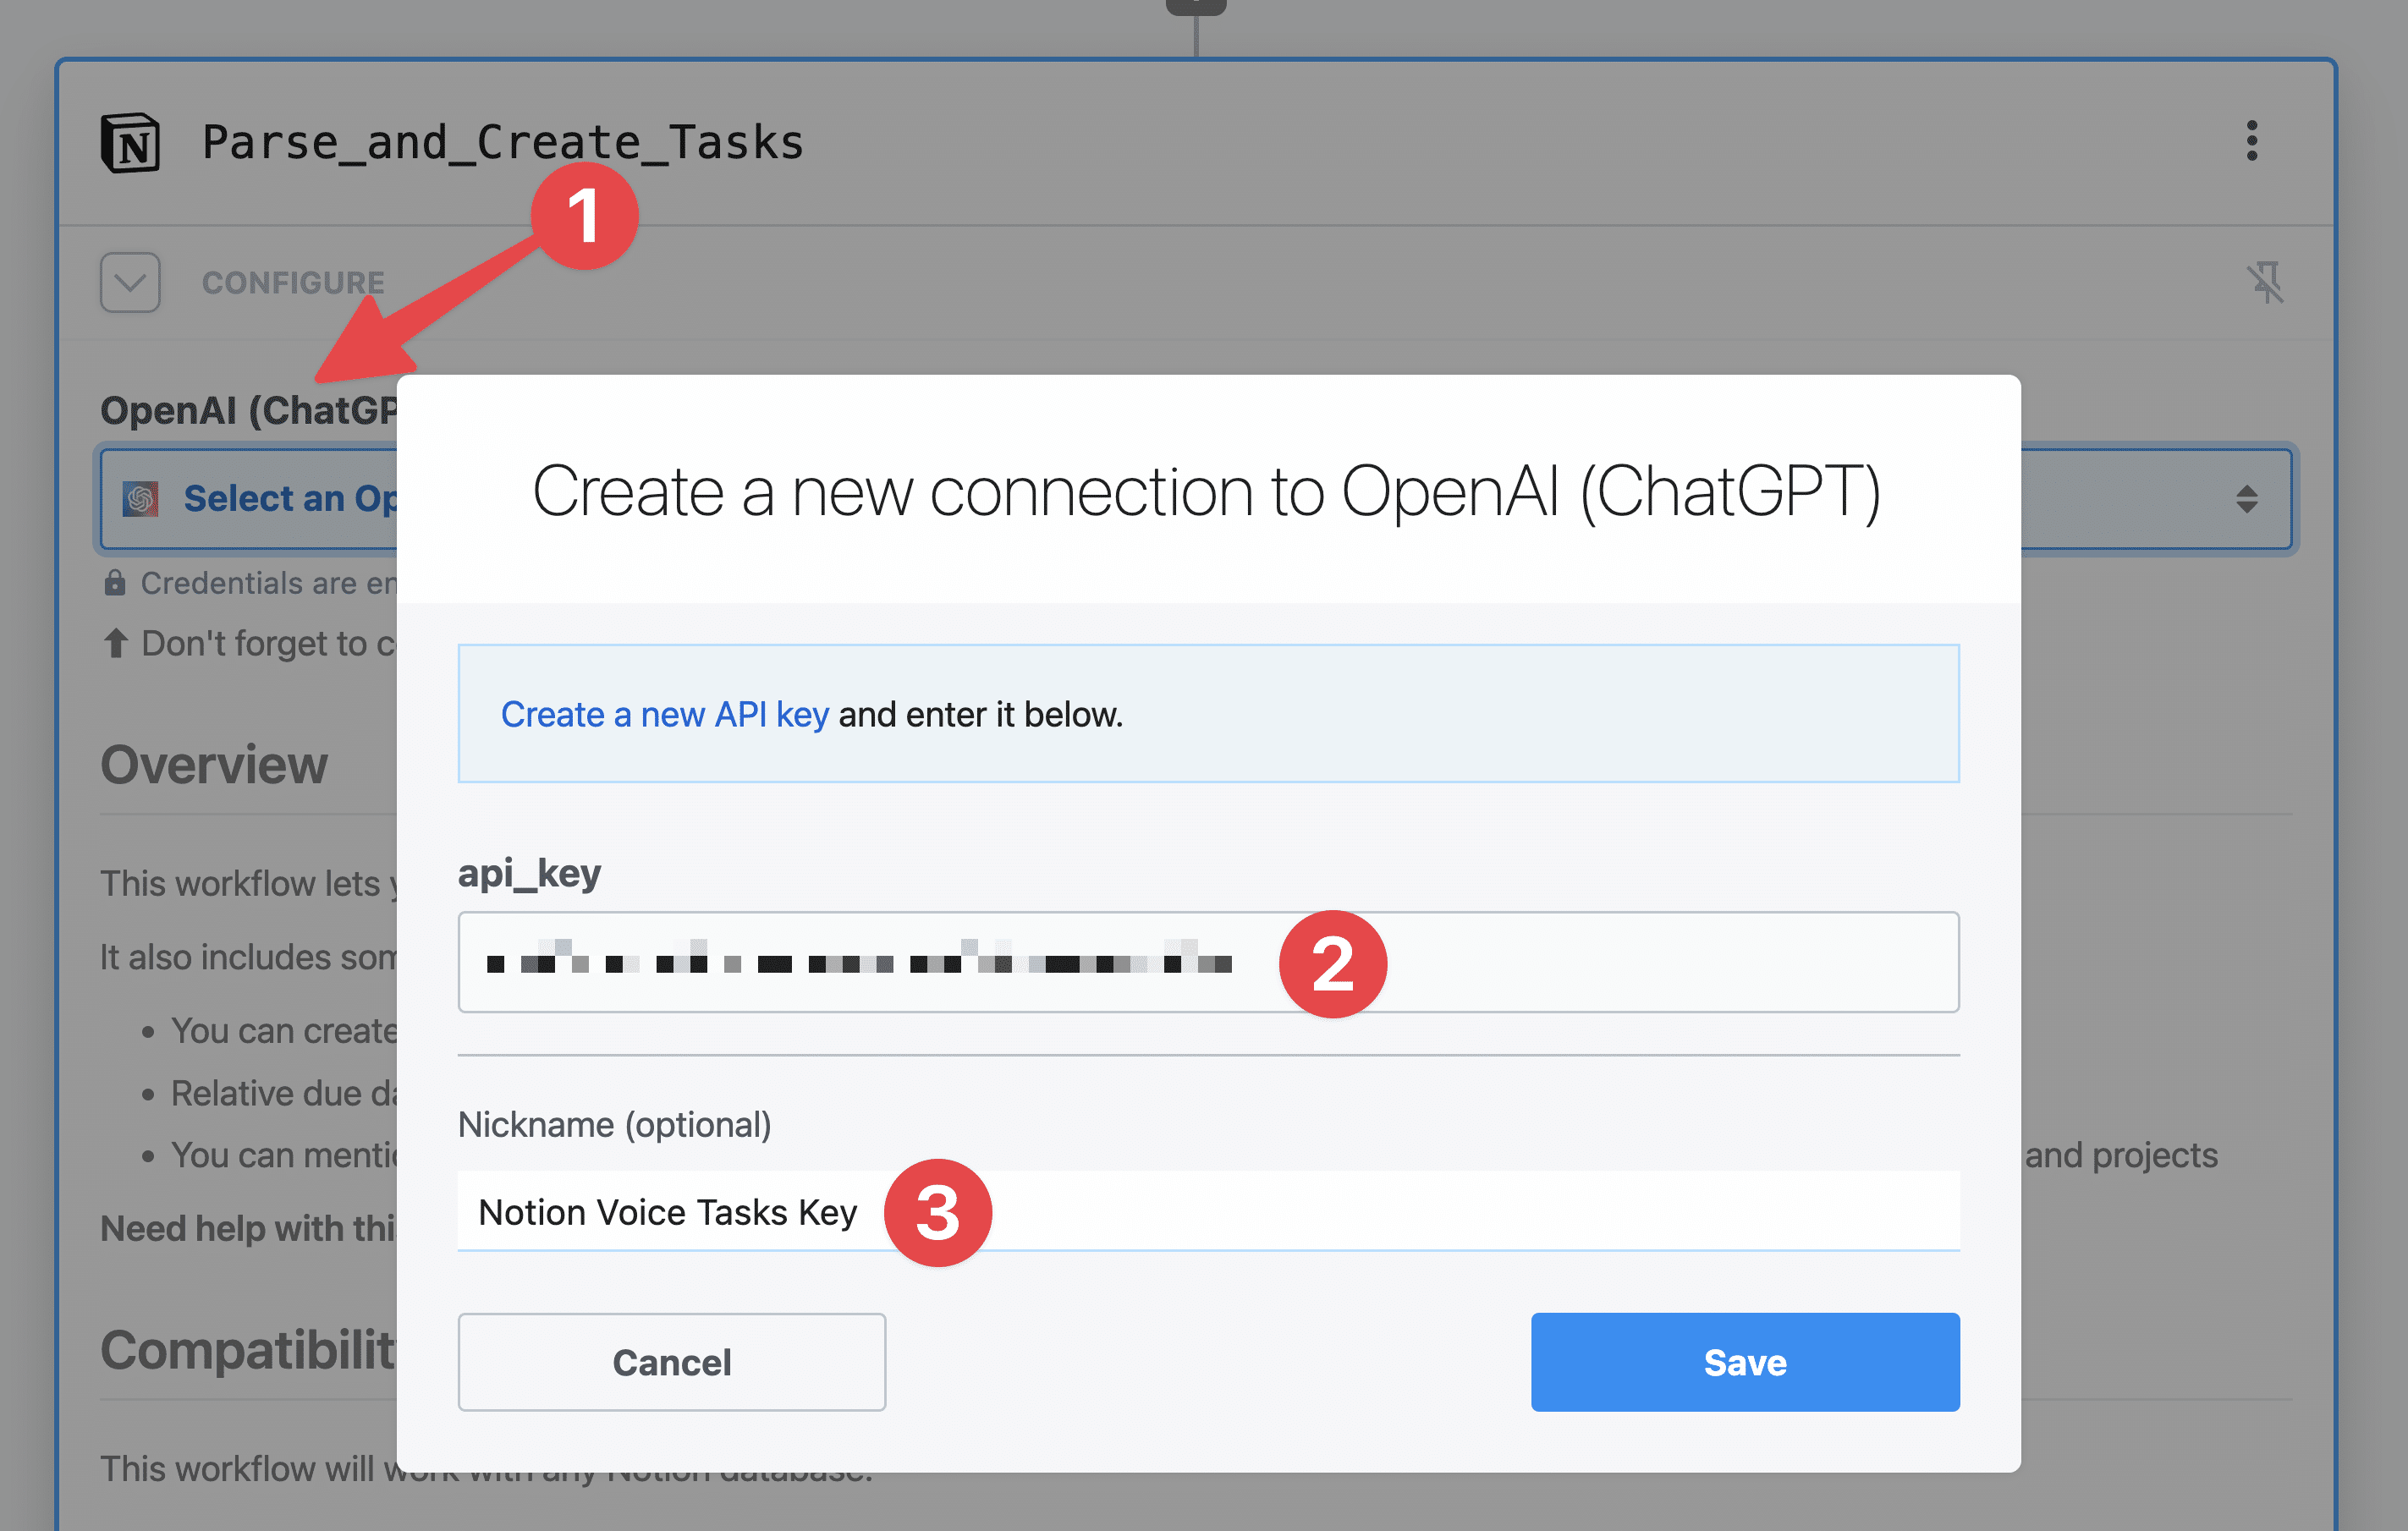
Important: If you’re currently using OpenAI’s 3-month trial credit, once you add your billing information to your OpenAI account, you’ll likely need to generate a new API key. Keys that are generated during the trial-credit period seem to stop working and throw a 429 error after billing info is added. After you generating a new key, edit your
Scroll past the rest of the instructions and connect your Notion Account.
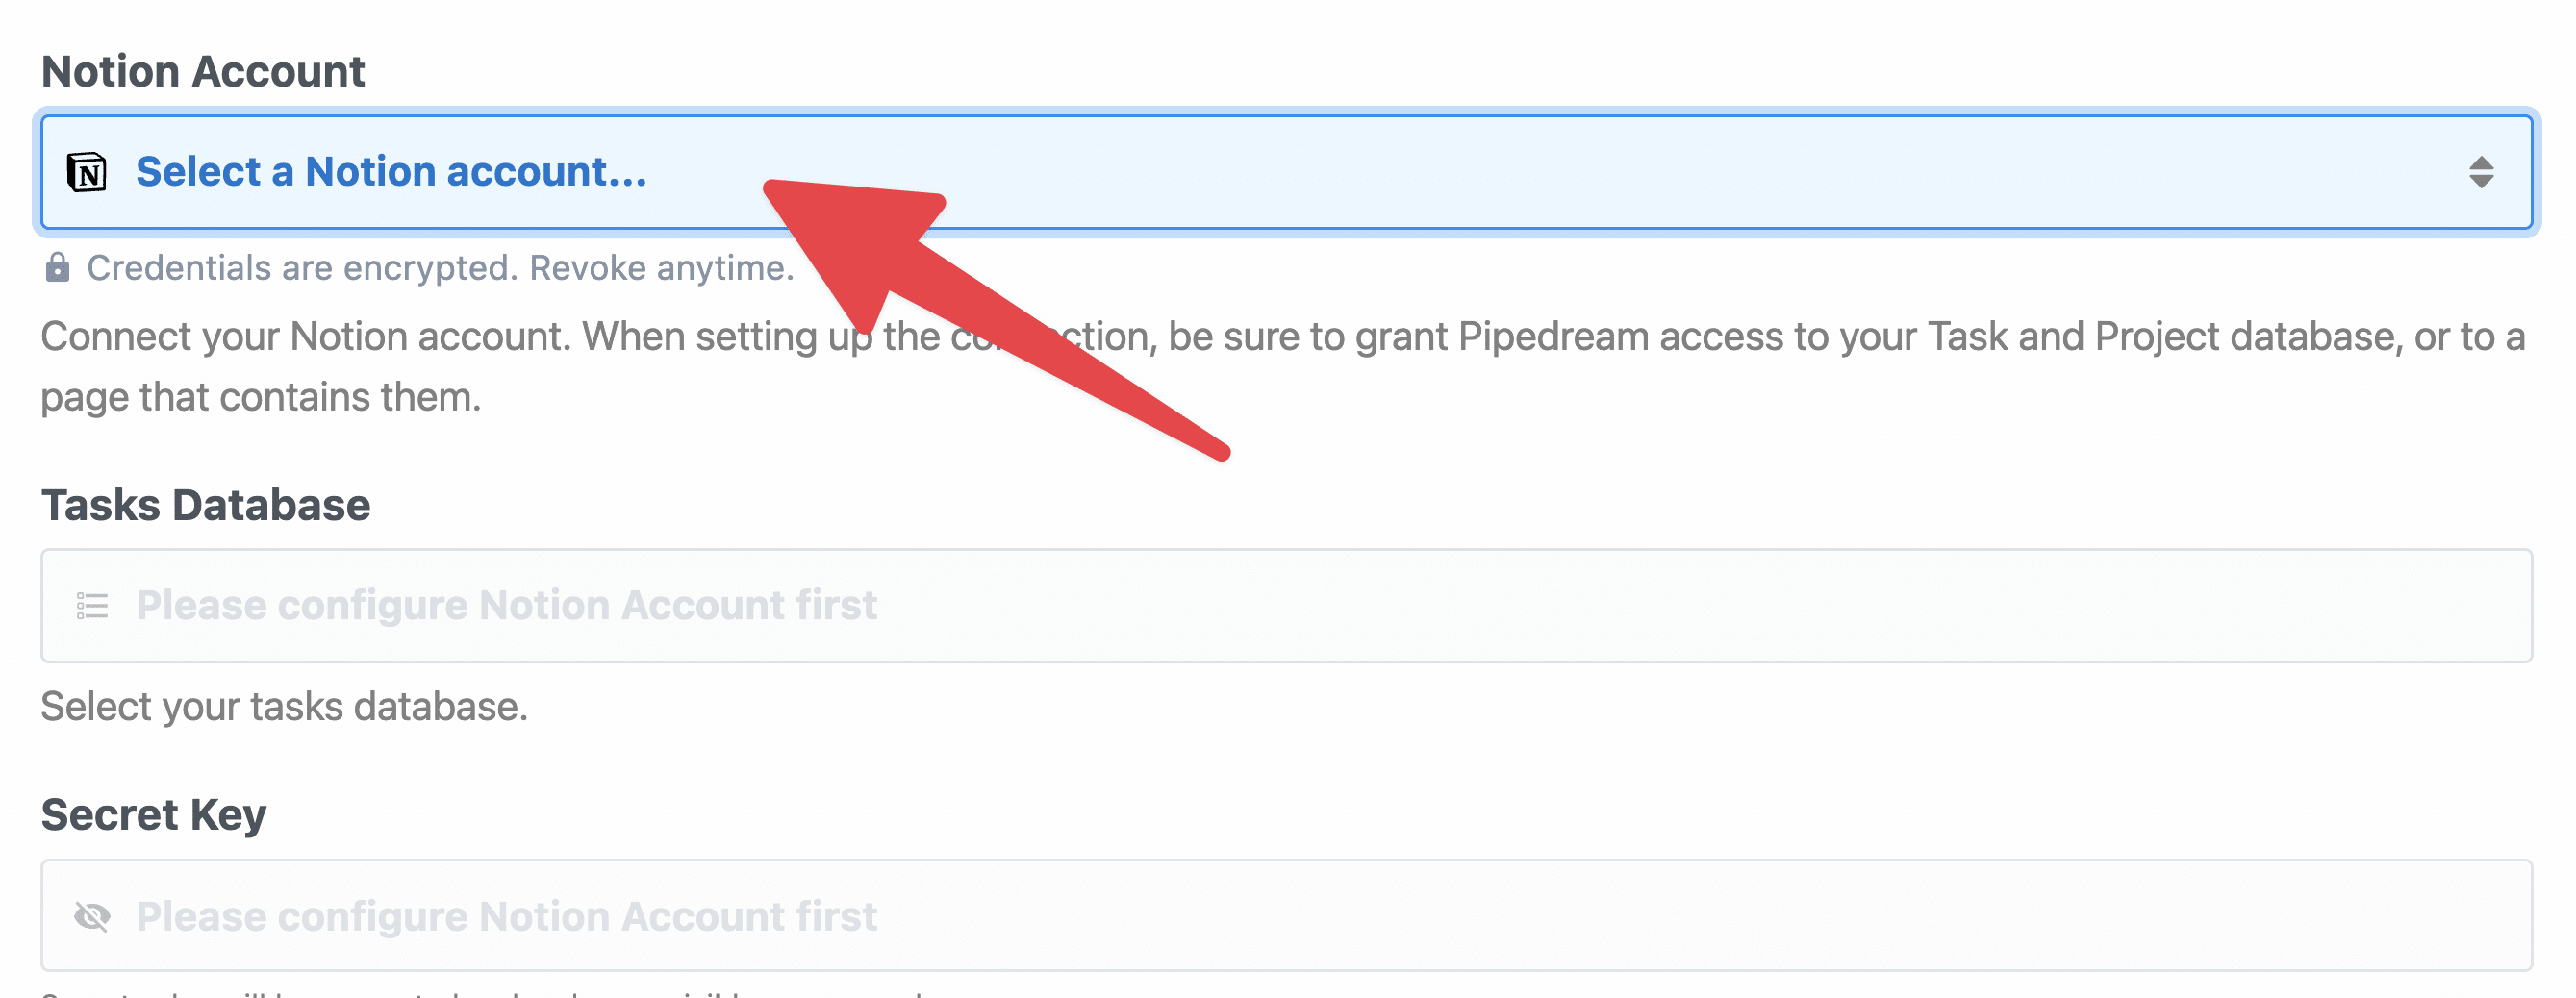
If you haven’t configured a Notion account in
- Select the Notion workspace you want to use.
- Click Select Pages.
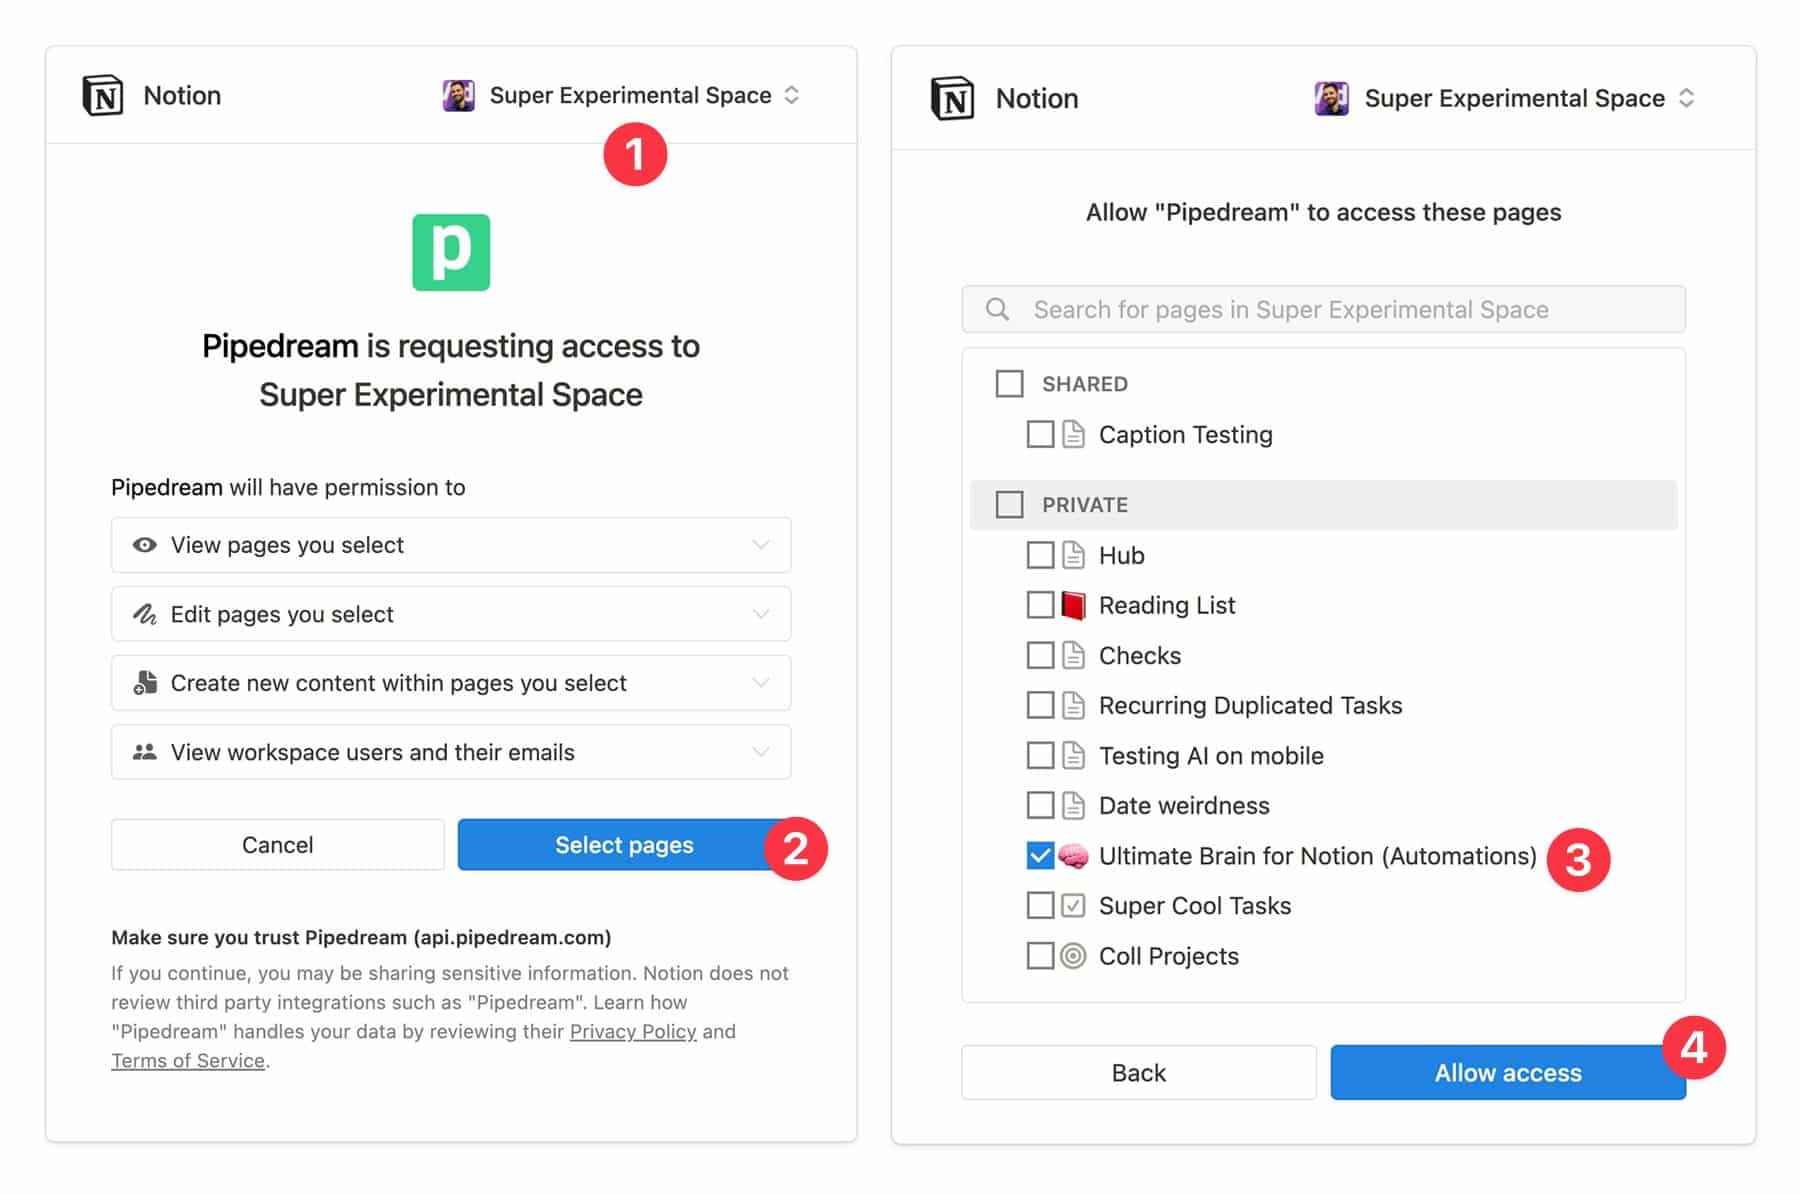
- Allow
Pipedream to access a page that contains all the database you want it to have access to. For this workflow, that likely includes a Tasks database and a Projects database. If you’re using Ultimate Brain, I recommend simply choosing the Ultimate Brain page itself – it contains all the databases relevant to this workflow. - Click Allow Access.
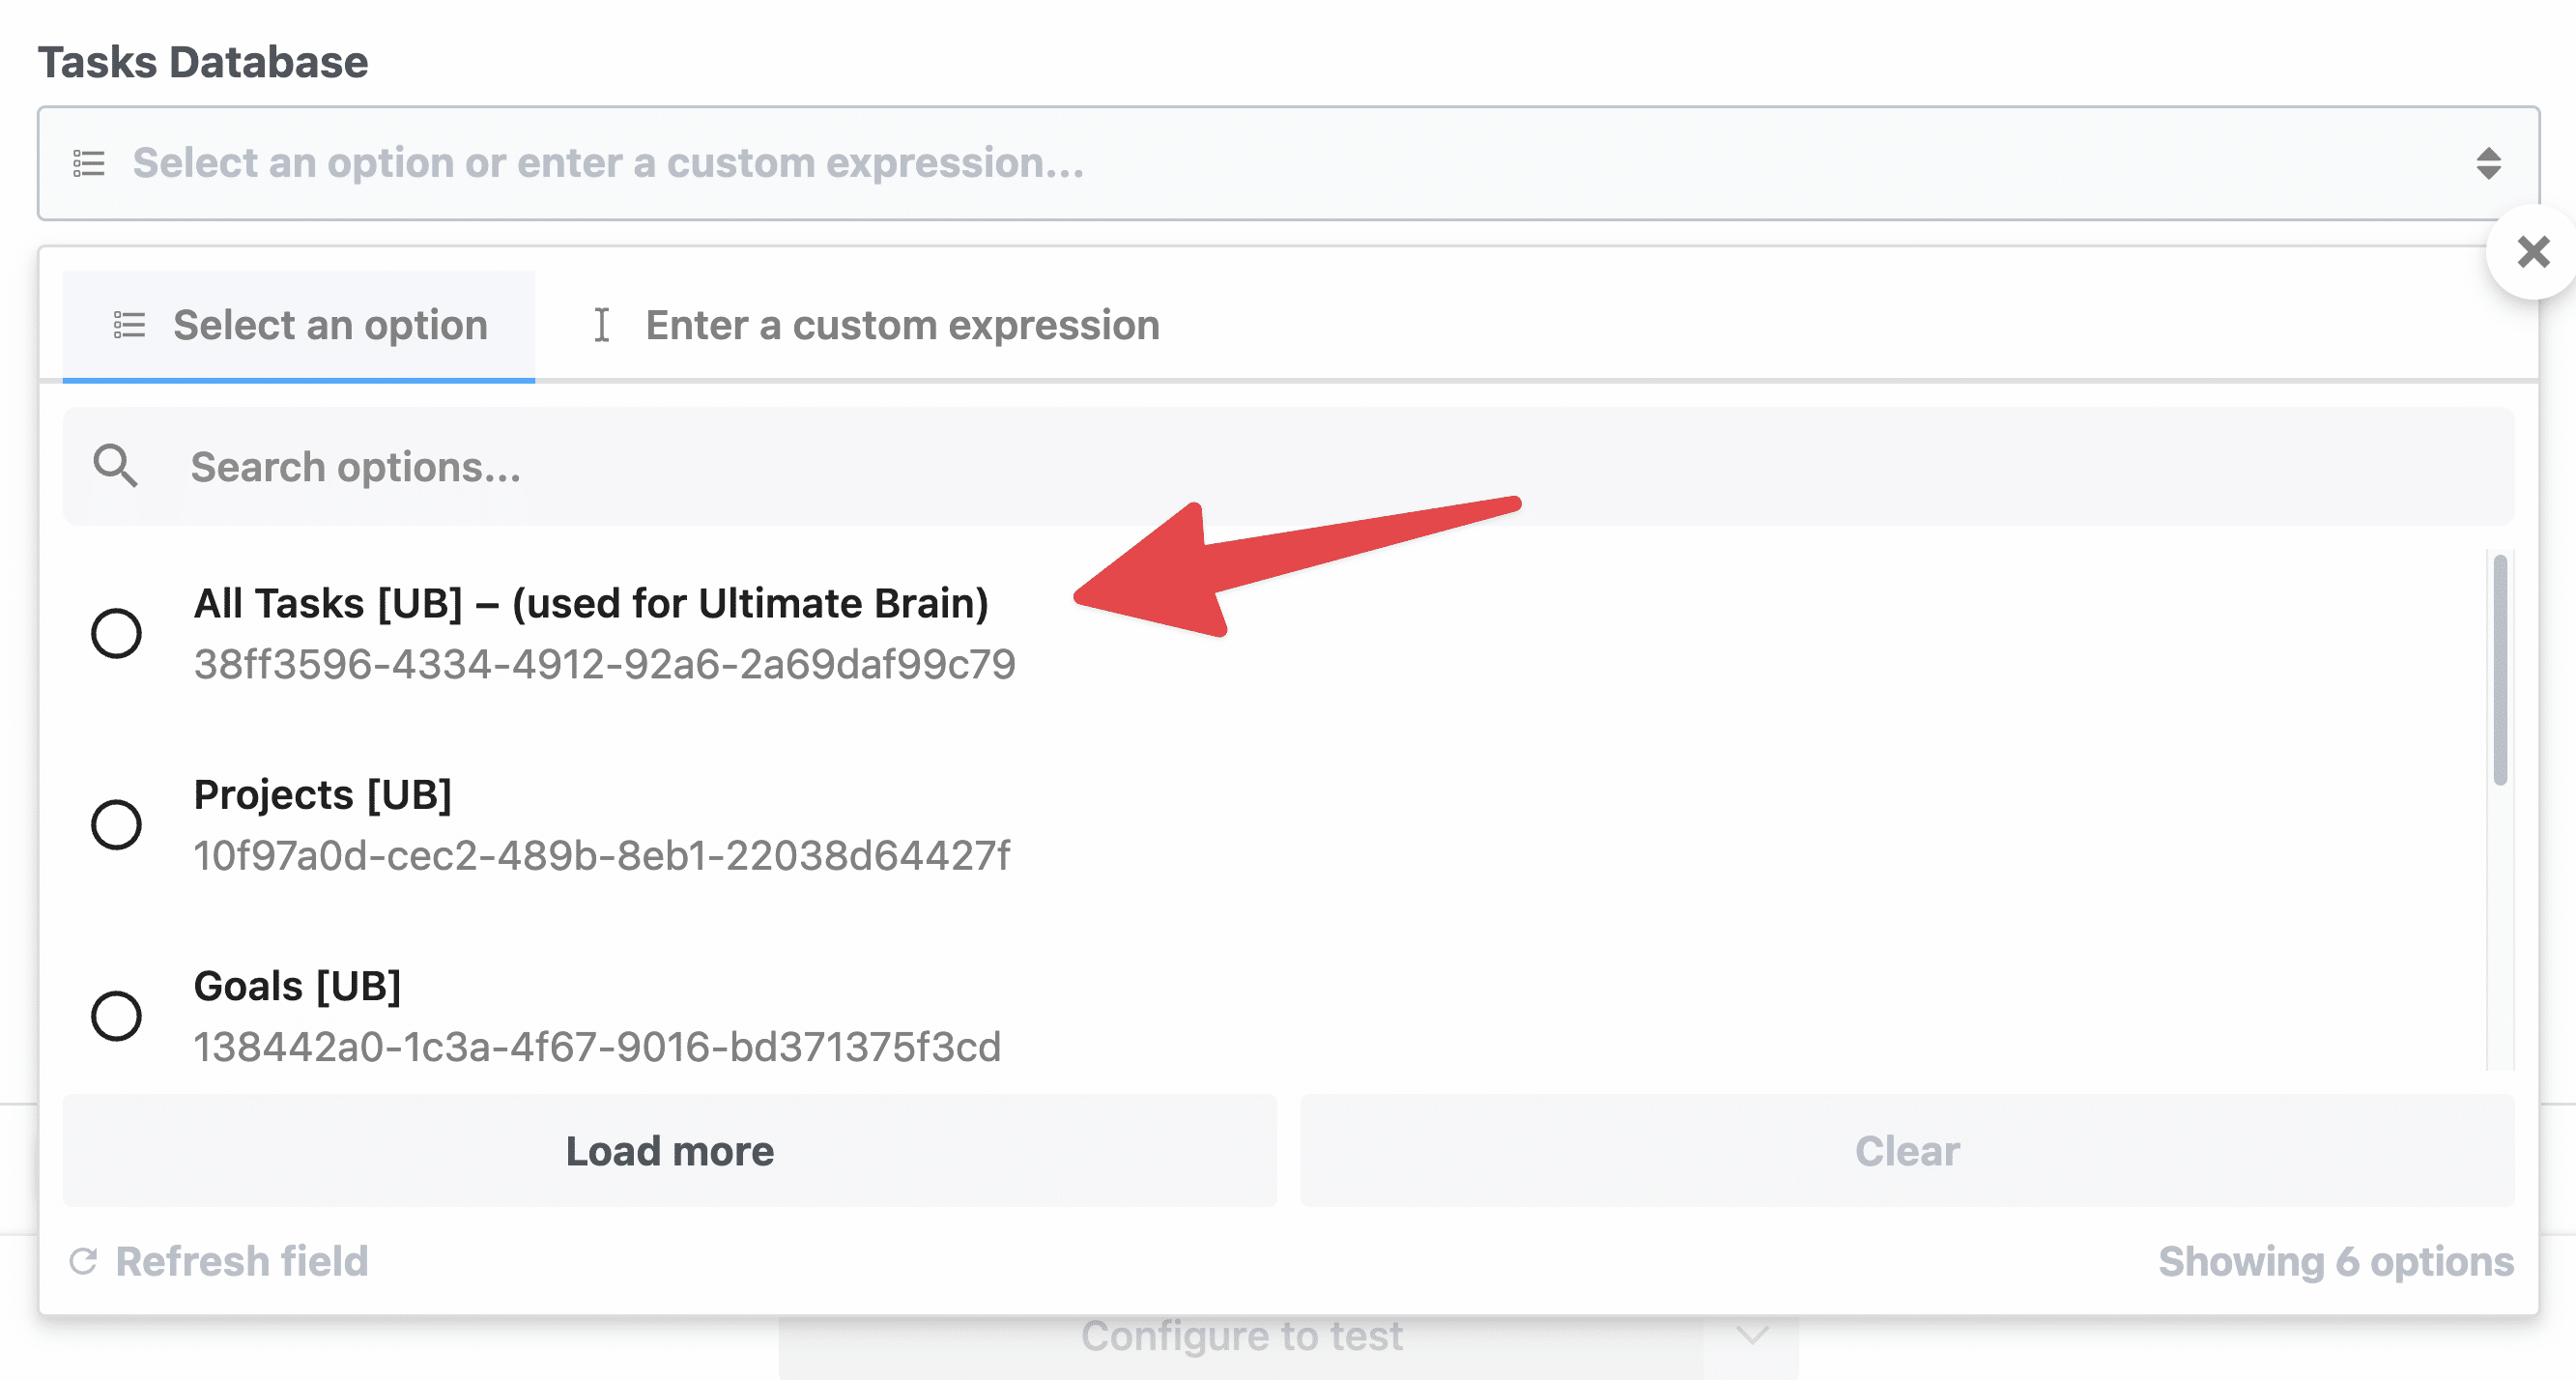
Next, select your Tasks database.
If you’re using Ultimate Brain, you should see the All Tasks [UB] database listed at the top. If you’re not (or if you want to use a different database), you can type in the Search Options field to filter the list.
Note: Most databases should show up right away, provided you gave the integration access to them. However, brand-new databases can take around 5 minutes to be indexed by the Notion API. If you just created a database, feel free to go make a coffee and then refresh the
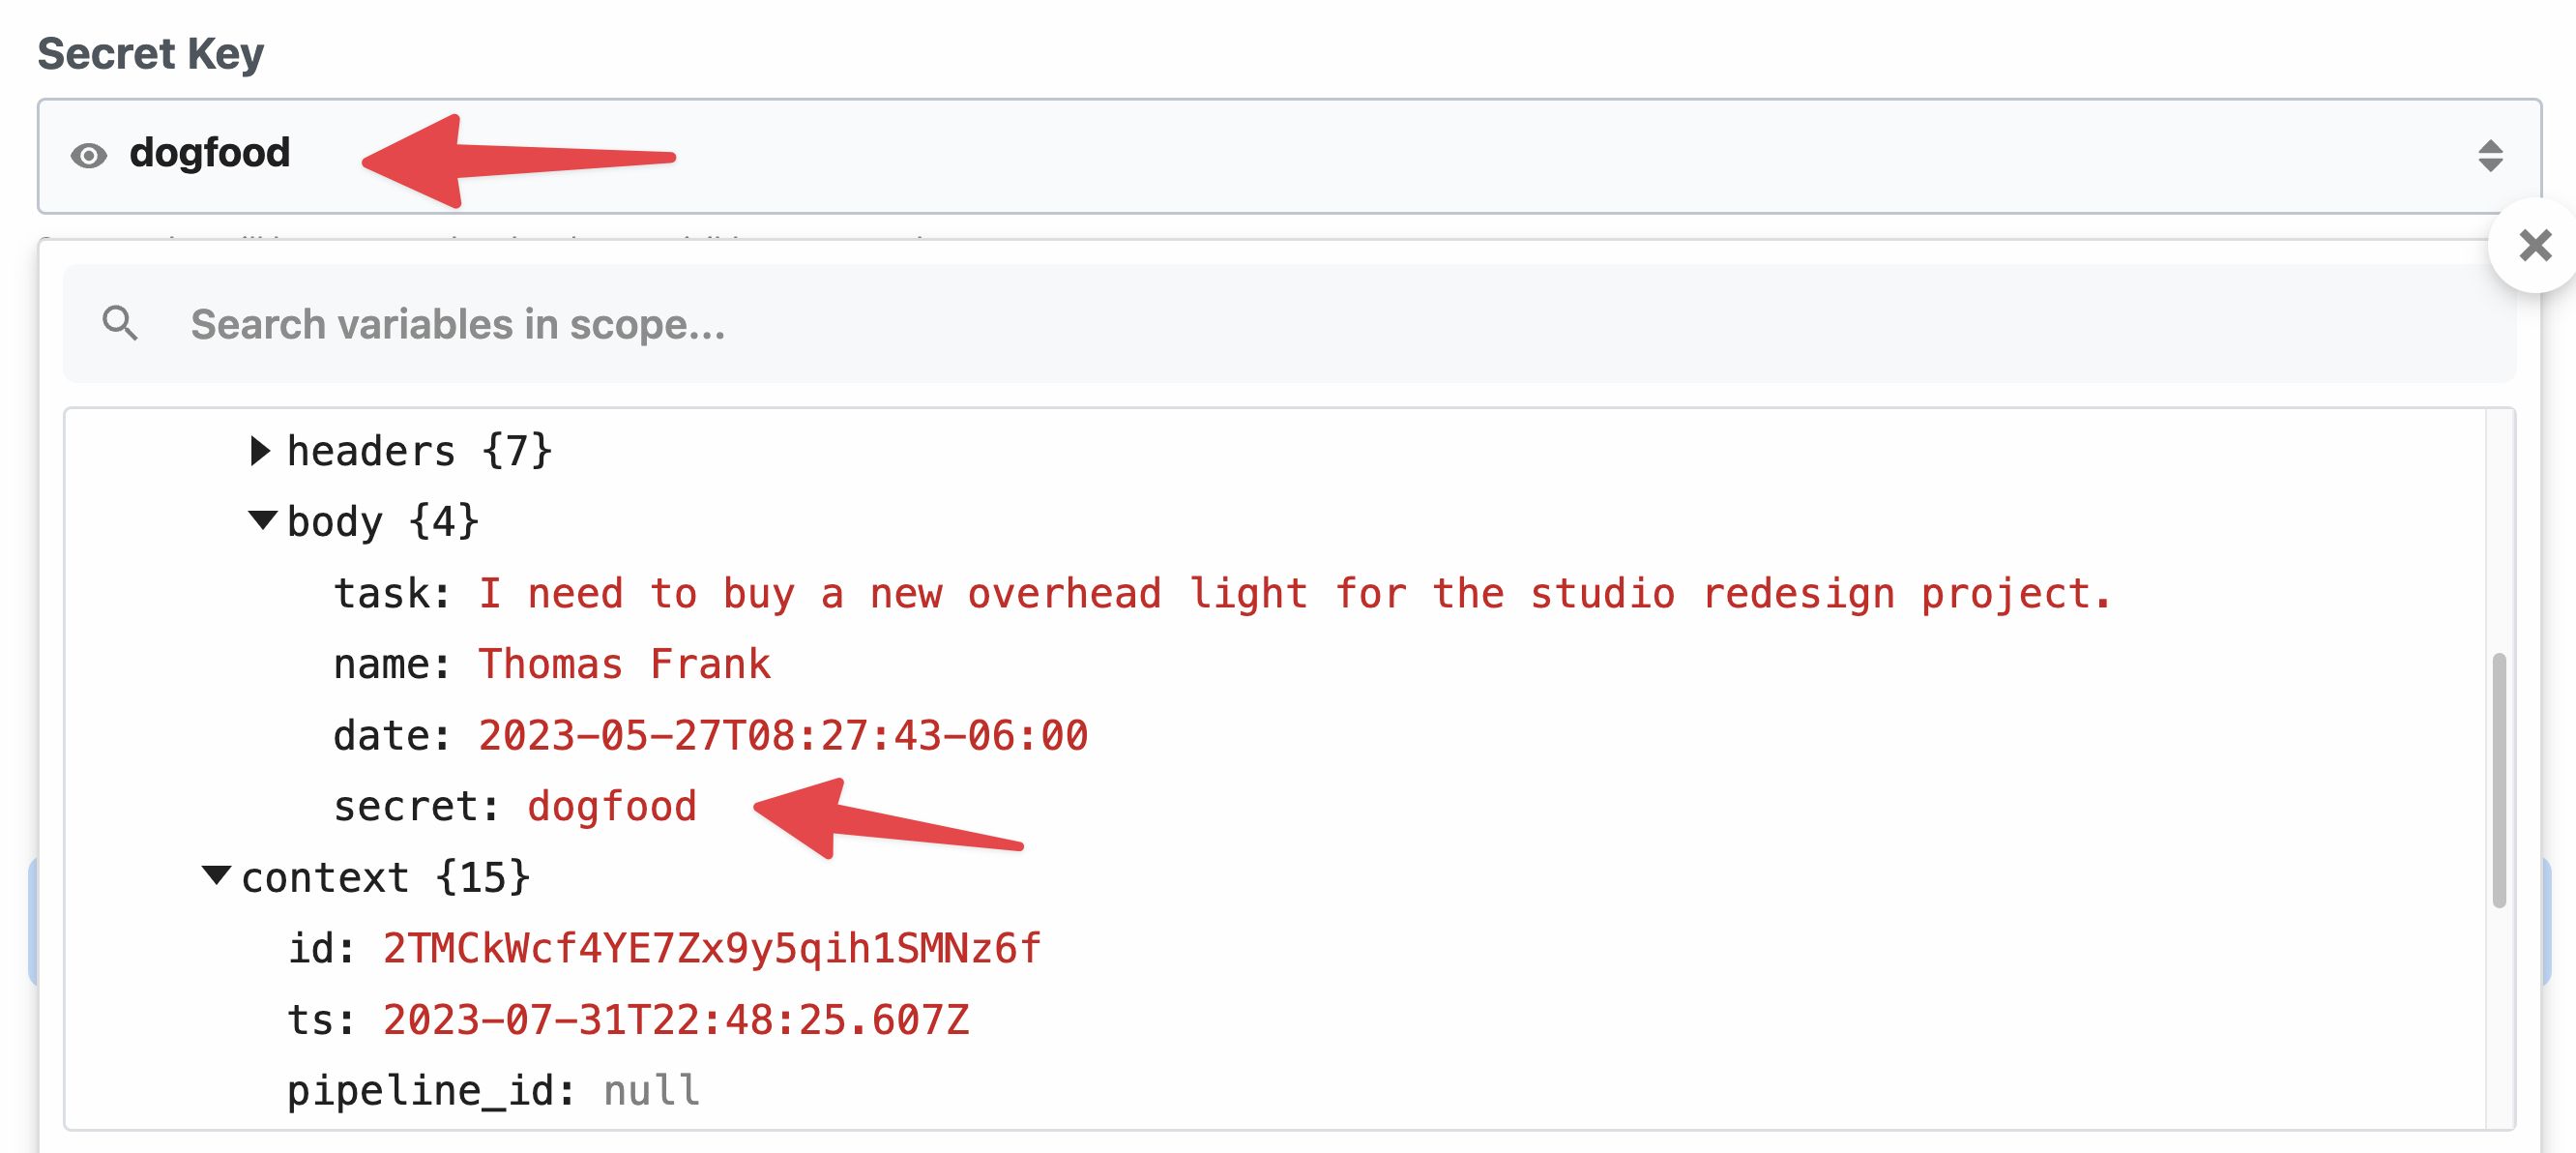
Next, type in the exact secret key you set up in you iOS or Android workflow in the Secret Key field.
If you scroll to the steps → trigger → event → body → secret key in the dropdown, you can see the key you chose. Make sure the key you type matches it exactly. Do not click the “select path” option next to that listed value. You need to type out your key.
Reminder: New requests from your mobile workflow need to contain this exact key. This is a security feature that helps prevent others from using your workflow. Make sure to never share this key, nor your trigger URL, with anyone else. You can learn more about this in the security FAQ section.
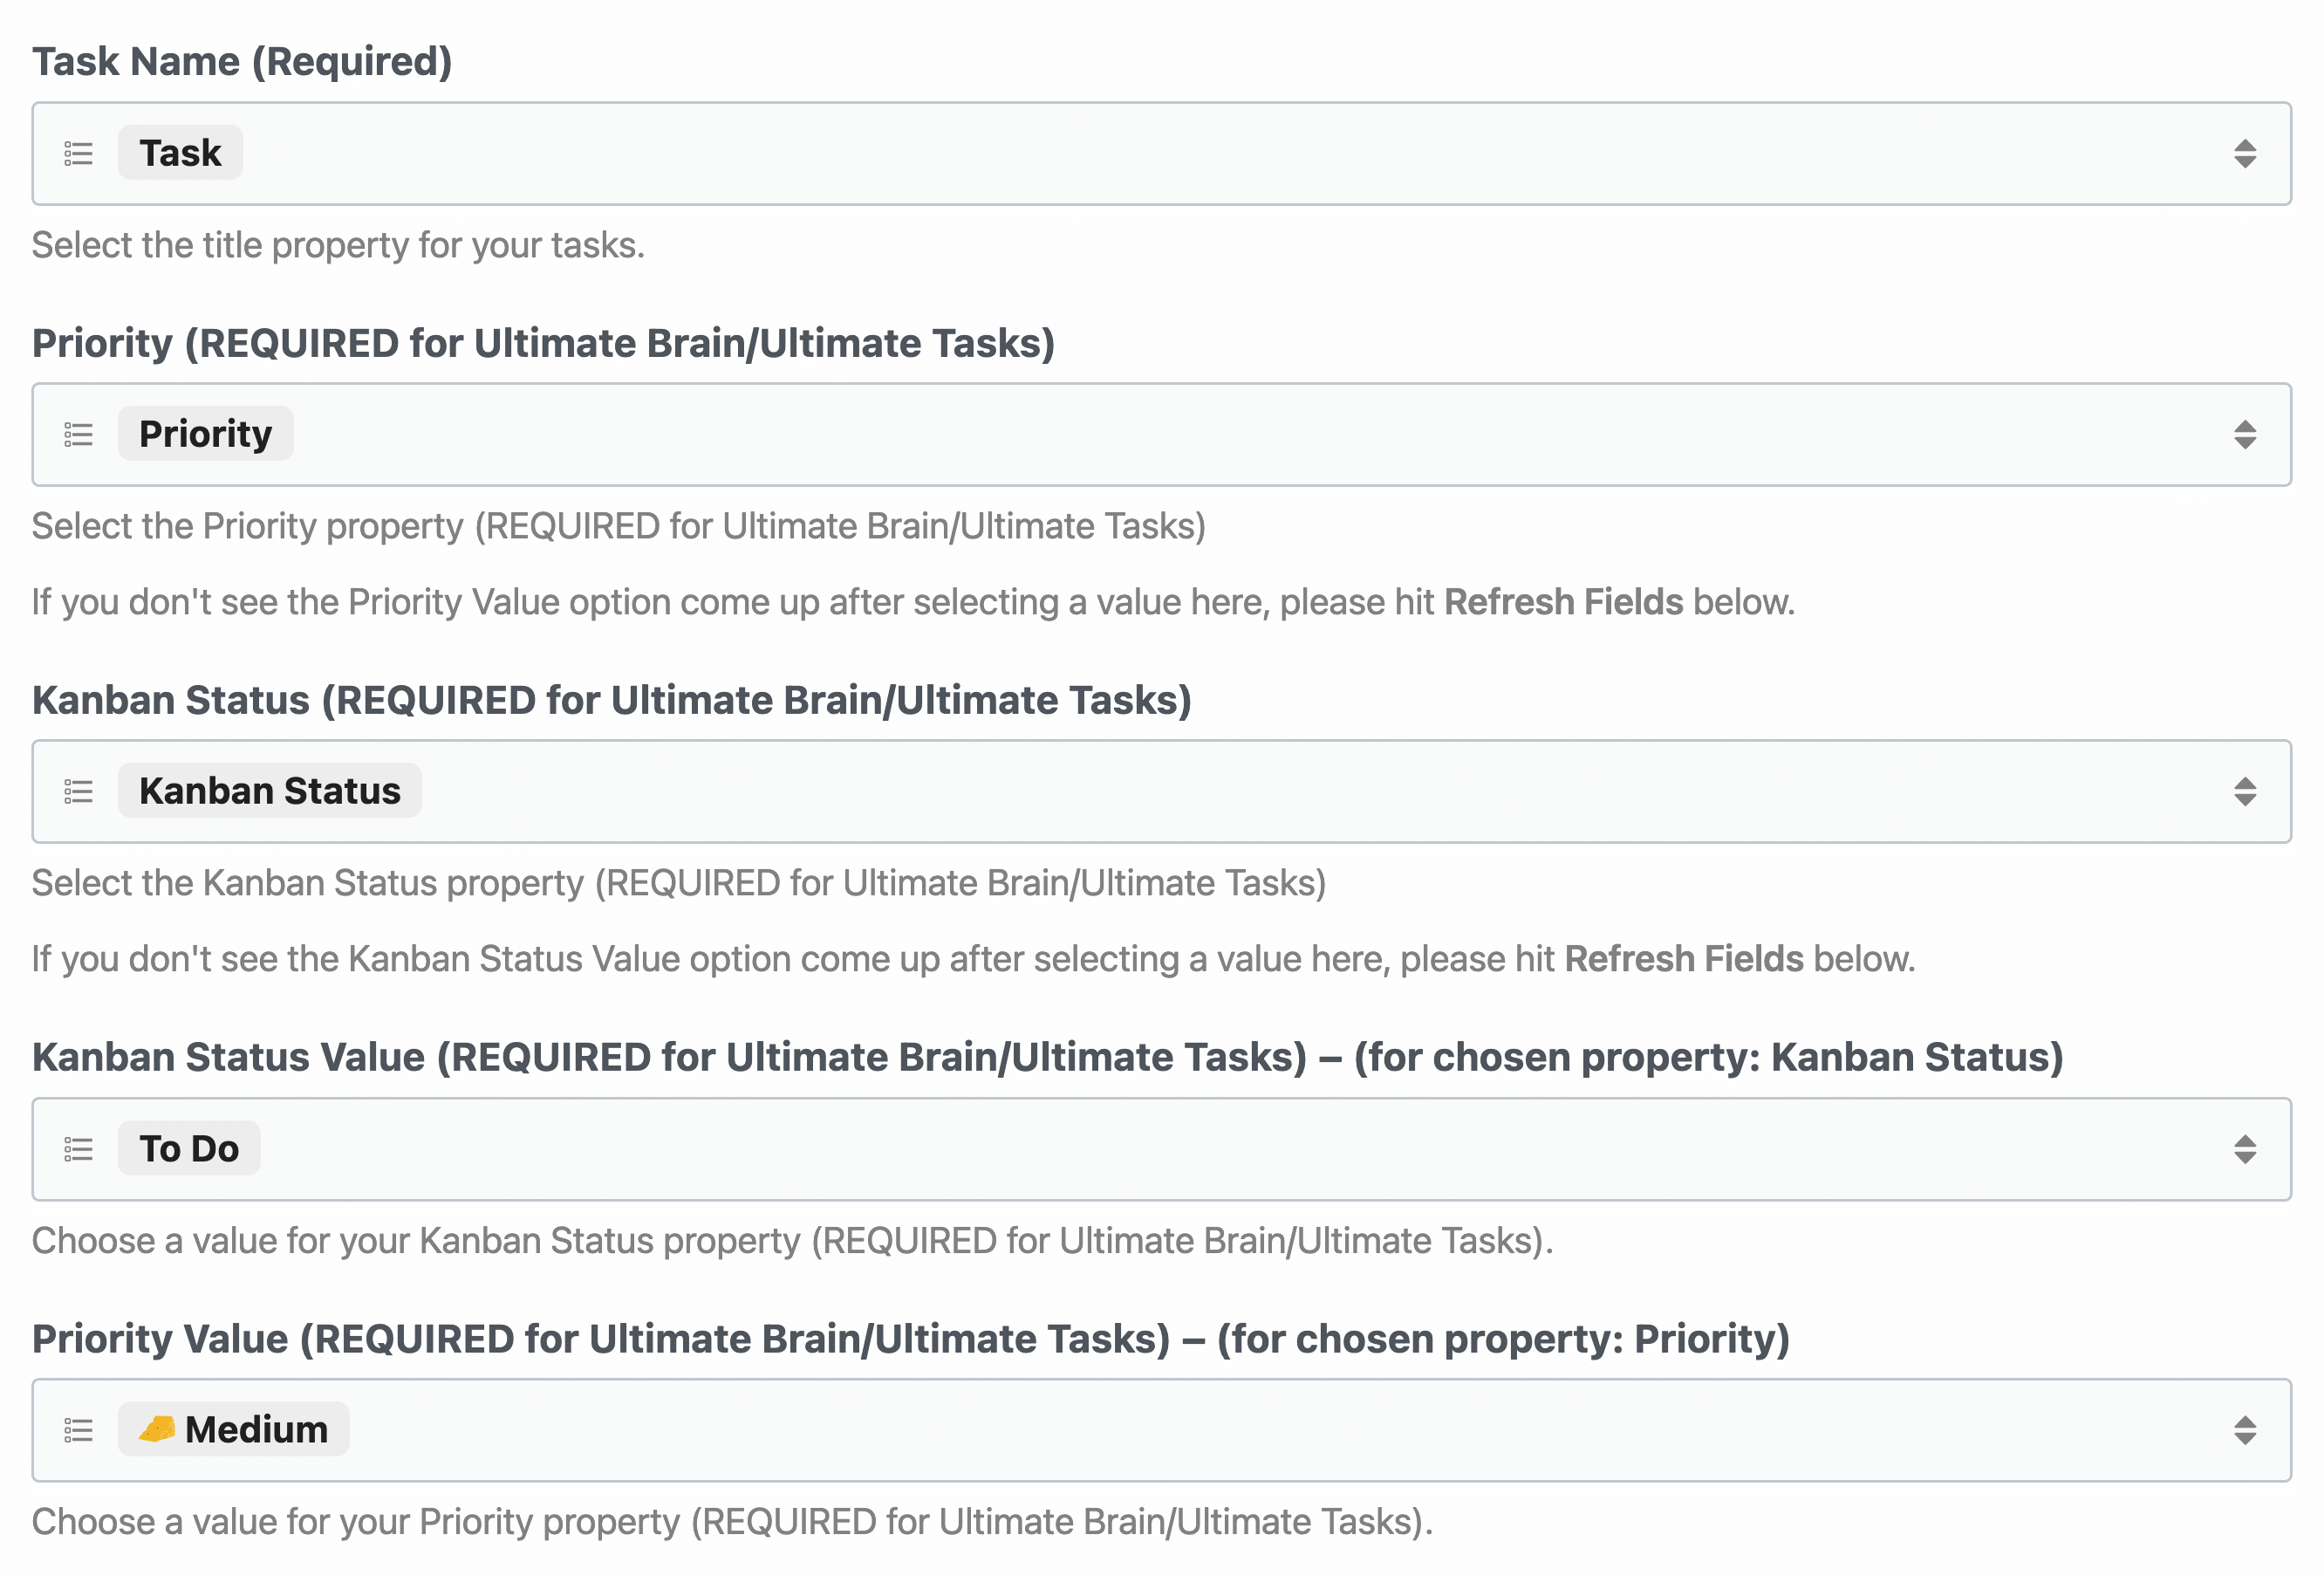
Next, fill out any required fields that are showing. Most of these correspond to properties in your tasks database. Here’s a refresher on Notion database properties if you need it.
- Task Name will always show and will always be required.
- If you’re using Ultimate Brain or Ultimate Tasks, you’ll also see required options for Priority and Kanban Status. These must be set, as they’re properties that always have to have a default value in those templates.
Finally, you’ll see some more choices in the Optional Fields section. None of these are required, but you’ll likely want to set a few of them:
- Due Date: Sets the database propety for due dates (must be a Date-type property).
- Assignee: Sets the database property for assignees (must be a Person-type property).
- Project: Sets the database property for project relations (must be a Relation-type property).
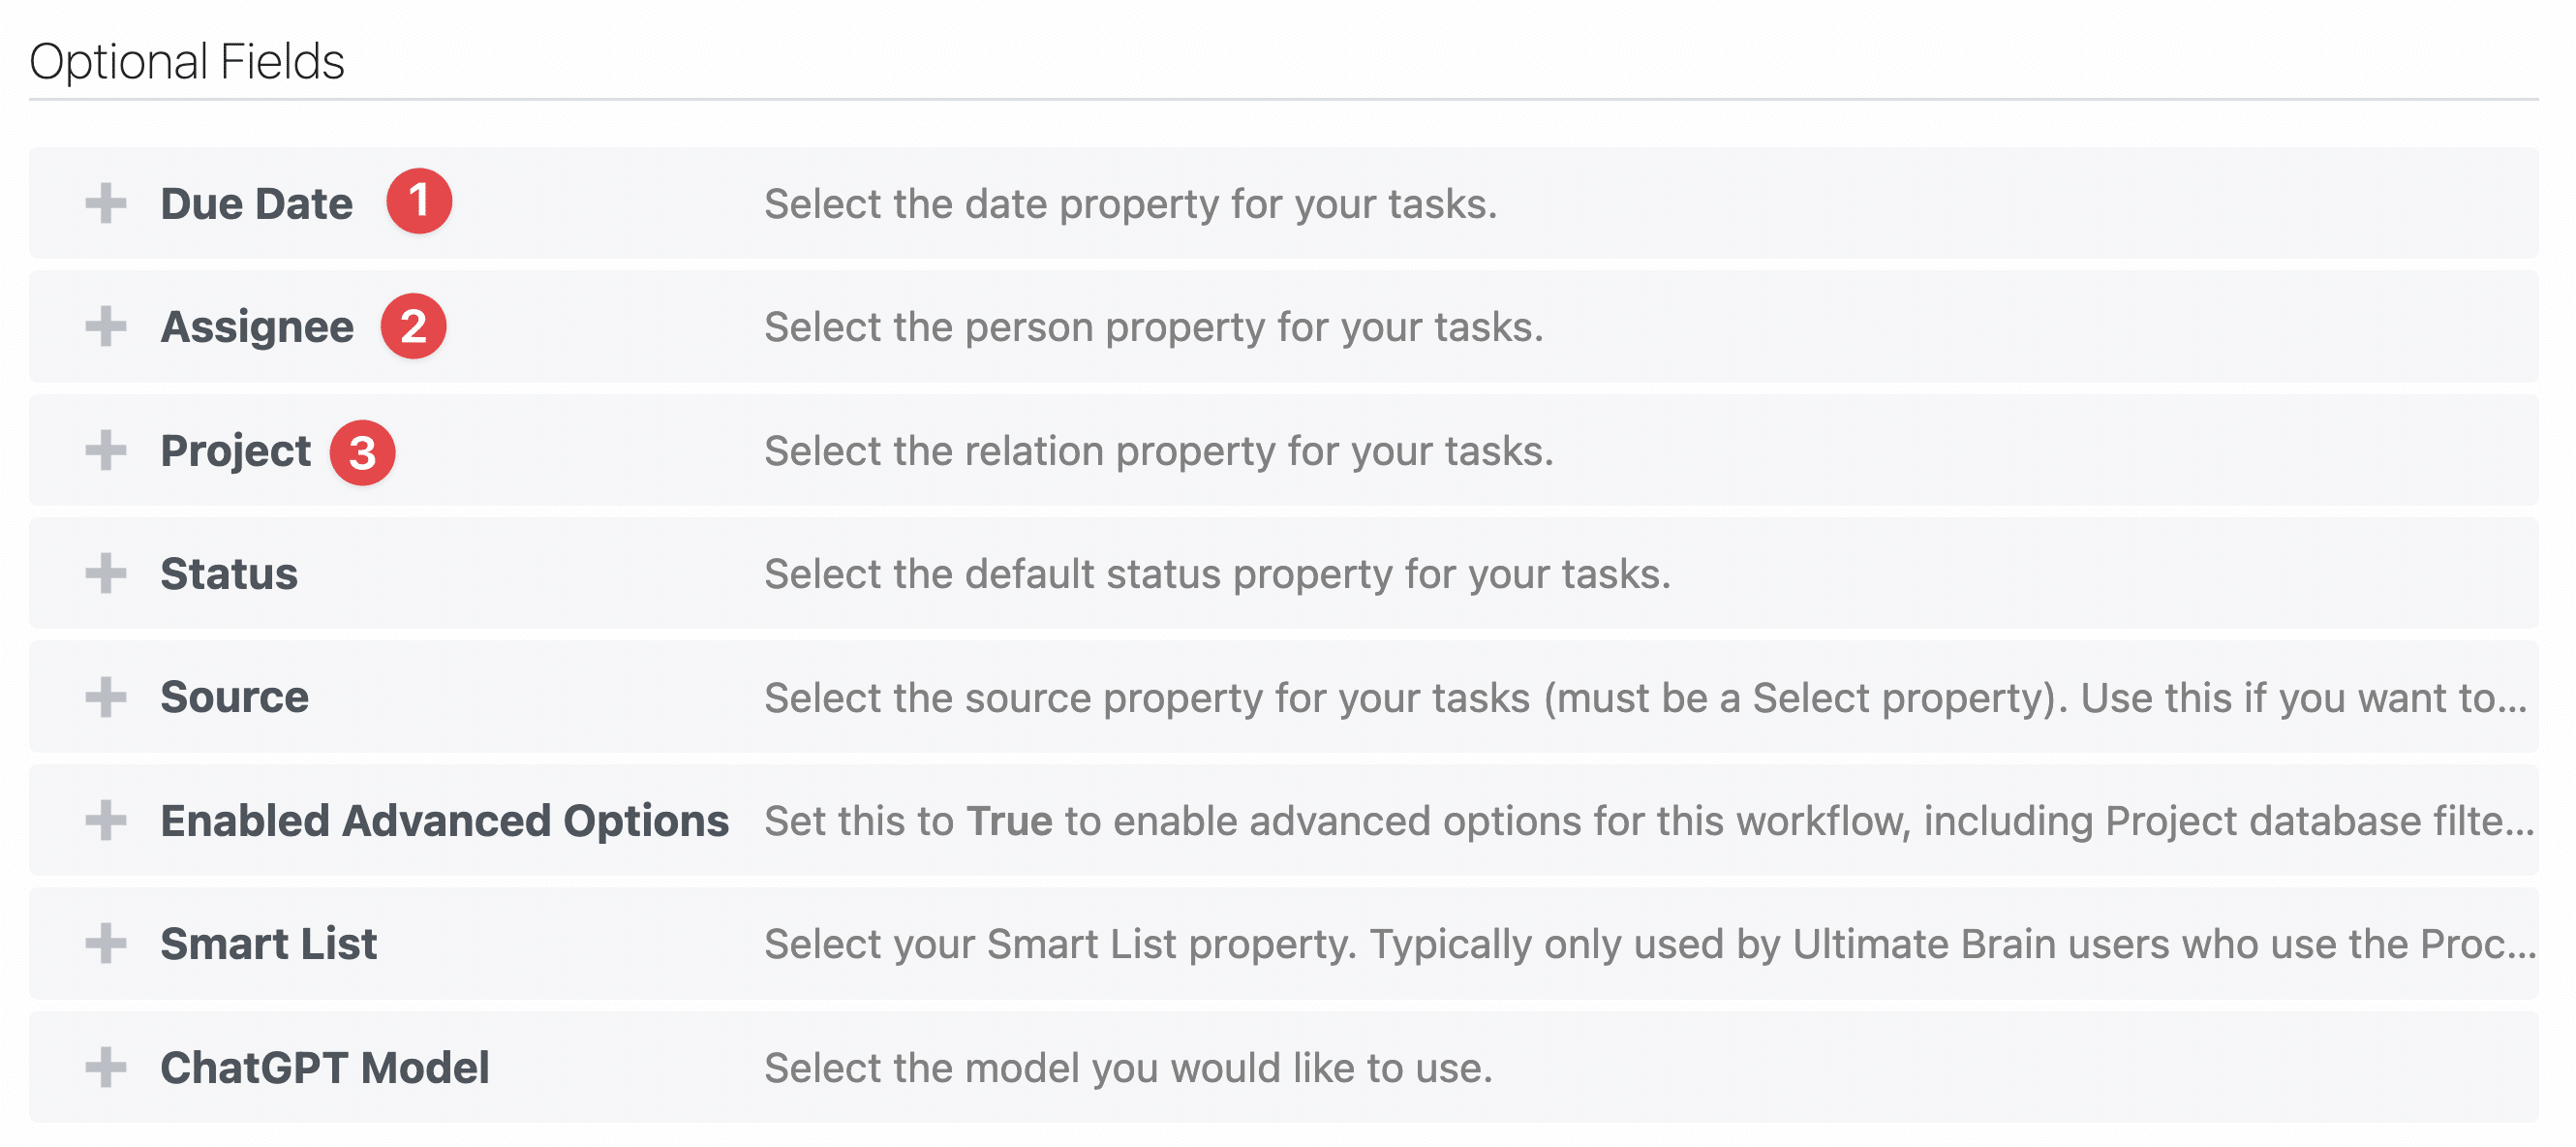
The other options fall into two categories:
- Options for setting additional properties in your Notion database (e.g. the Smart List property from Ultimate Brain, which is used for GTD workflows)
- Settings for power users. Most people should ignore these.
All options have directions and explanations beneath them, and I’ve also covered them all in the video at the top of this section.
Once you’ve set the options you want, hit the Test button. If all goes well, you’ll see a Success message and you’ll see your test task show up in Notion!
From there, you can hit Deploy to activate your workflow.
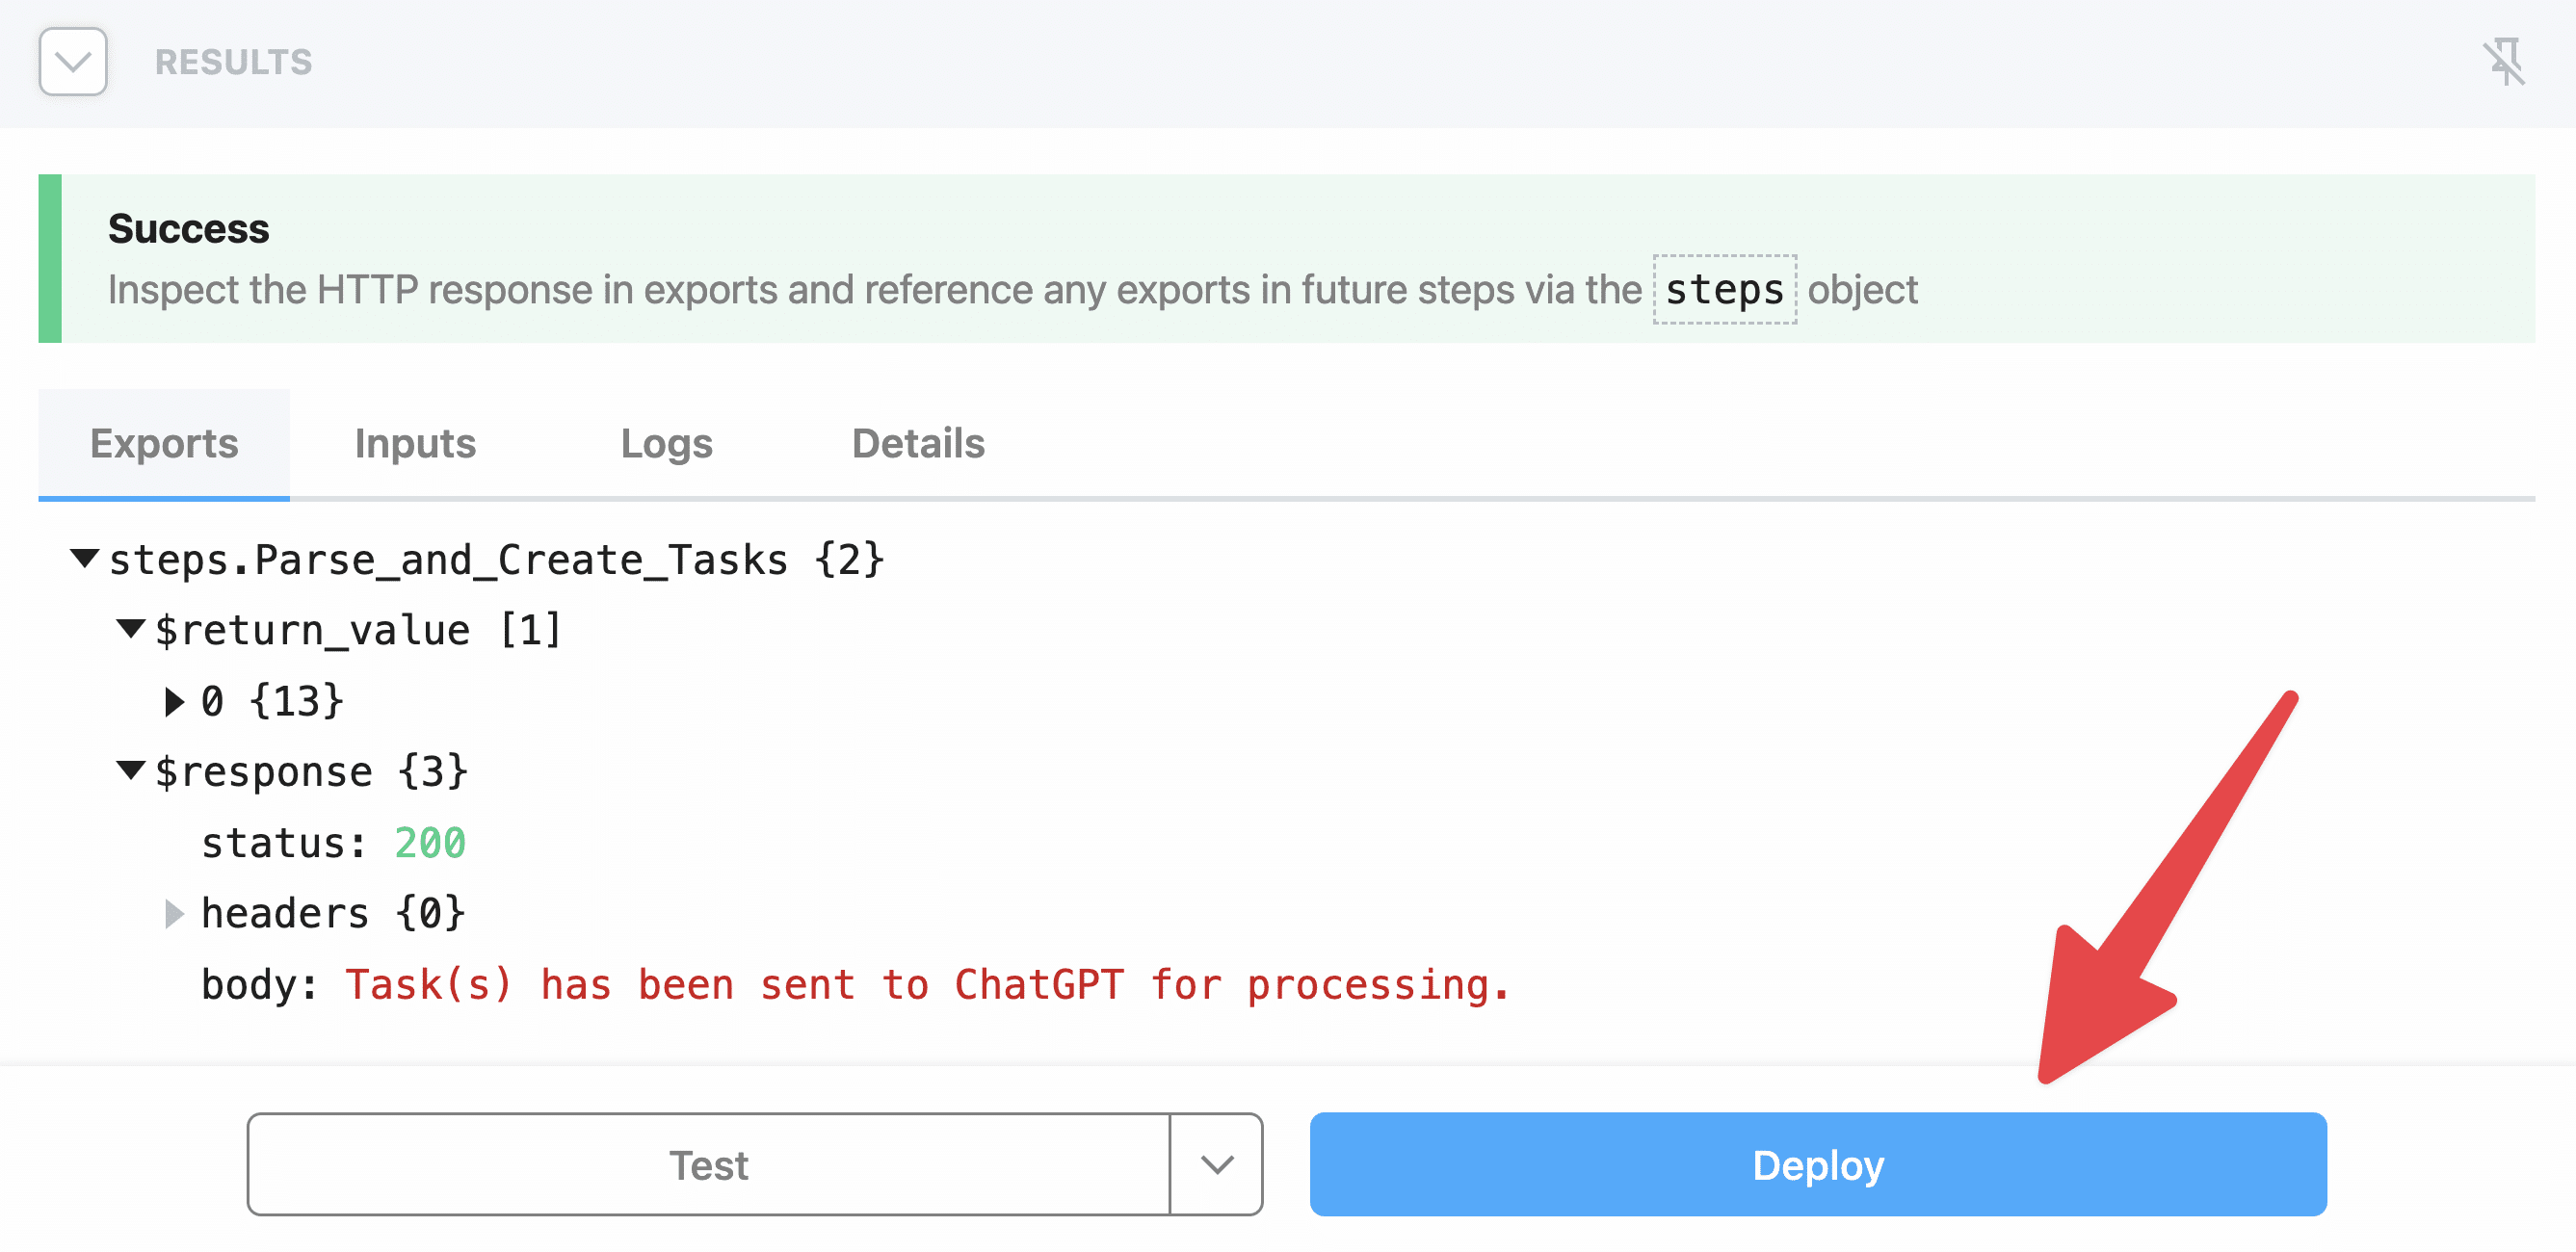
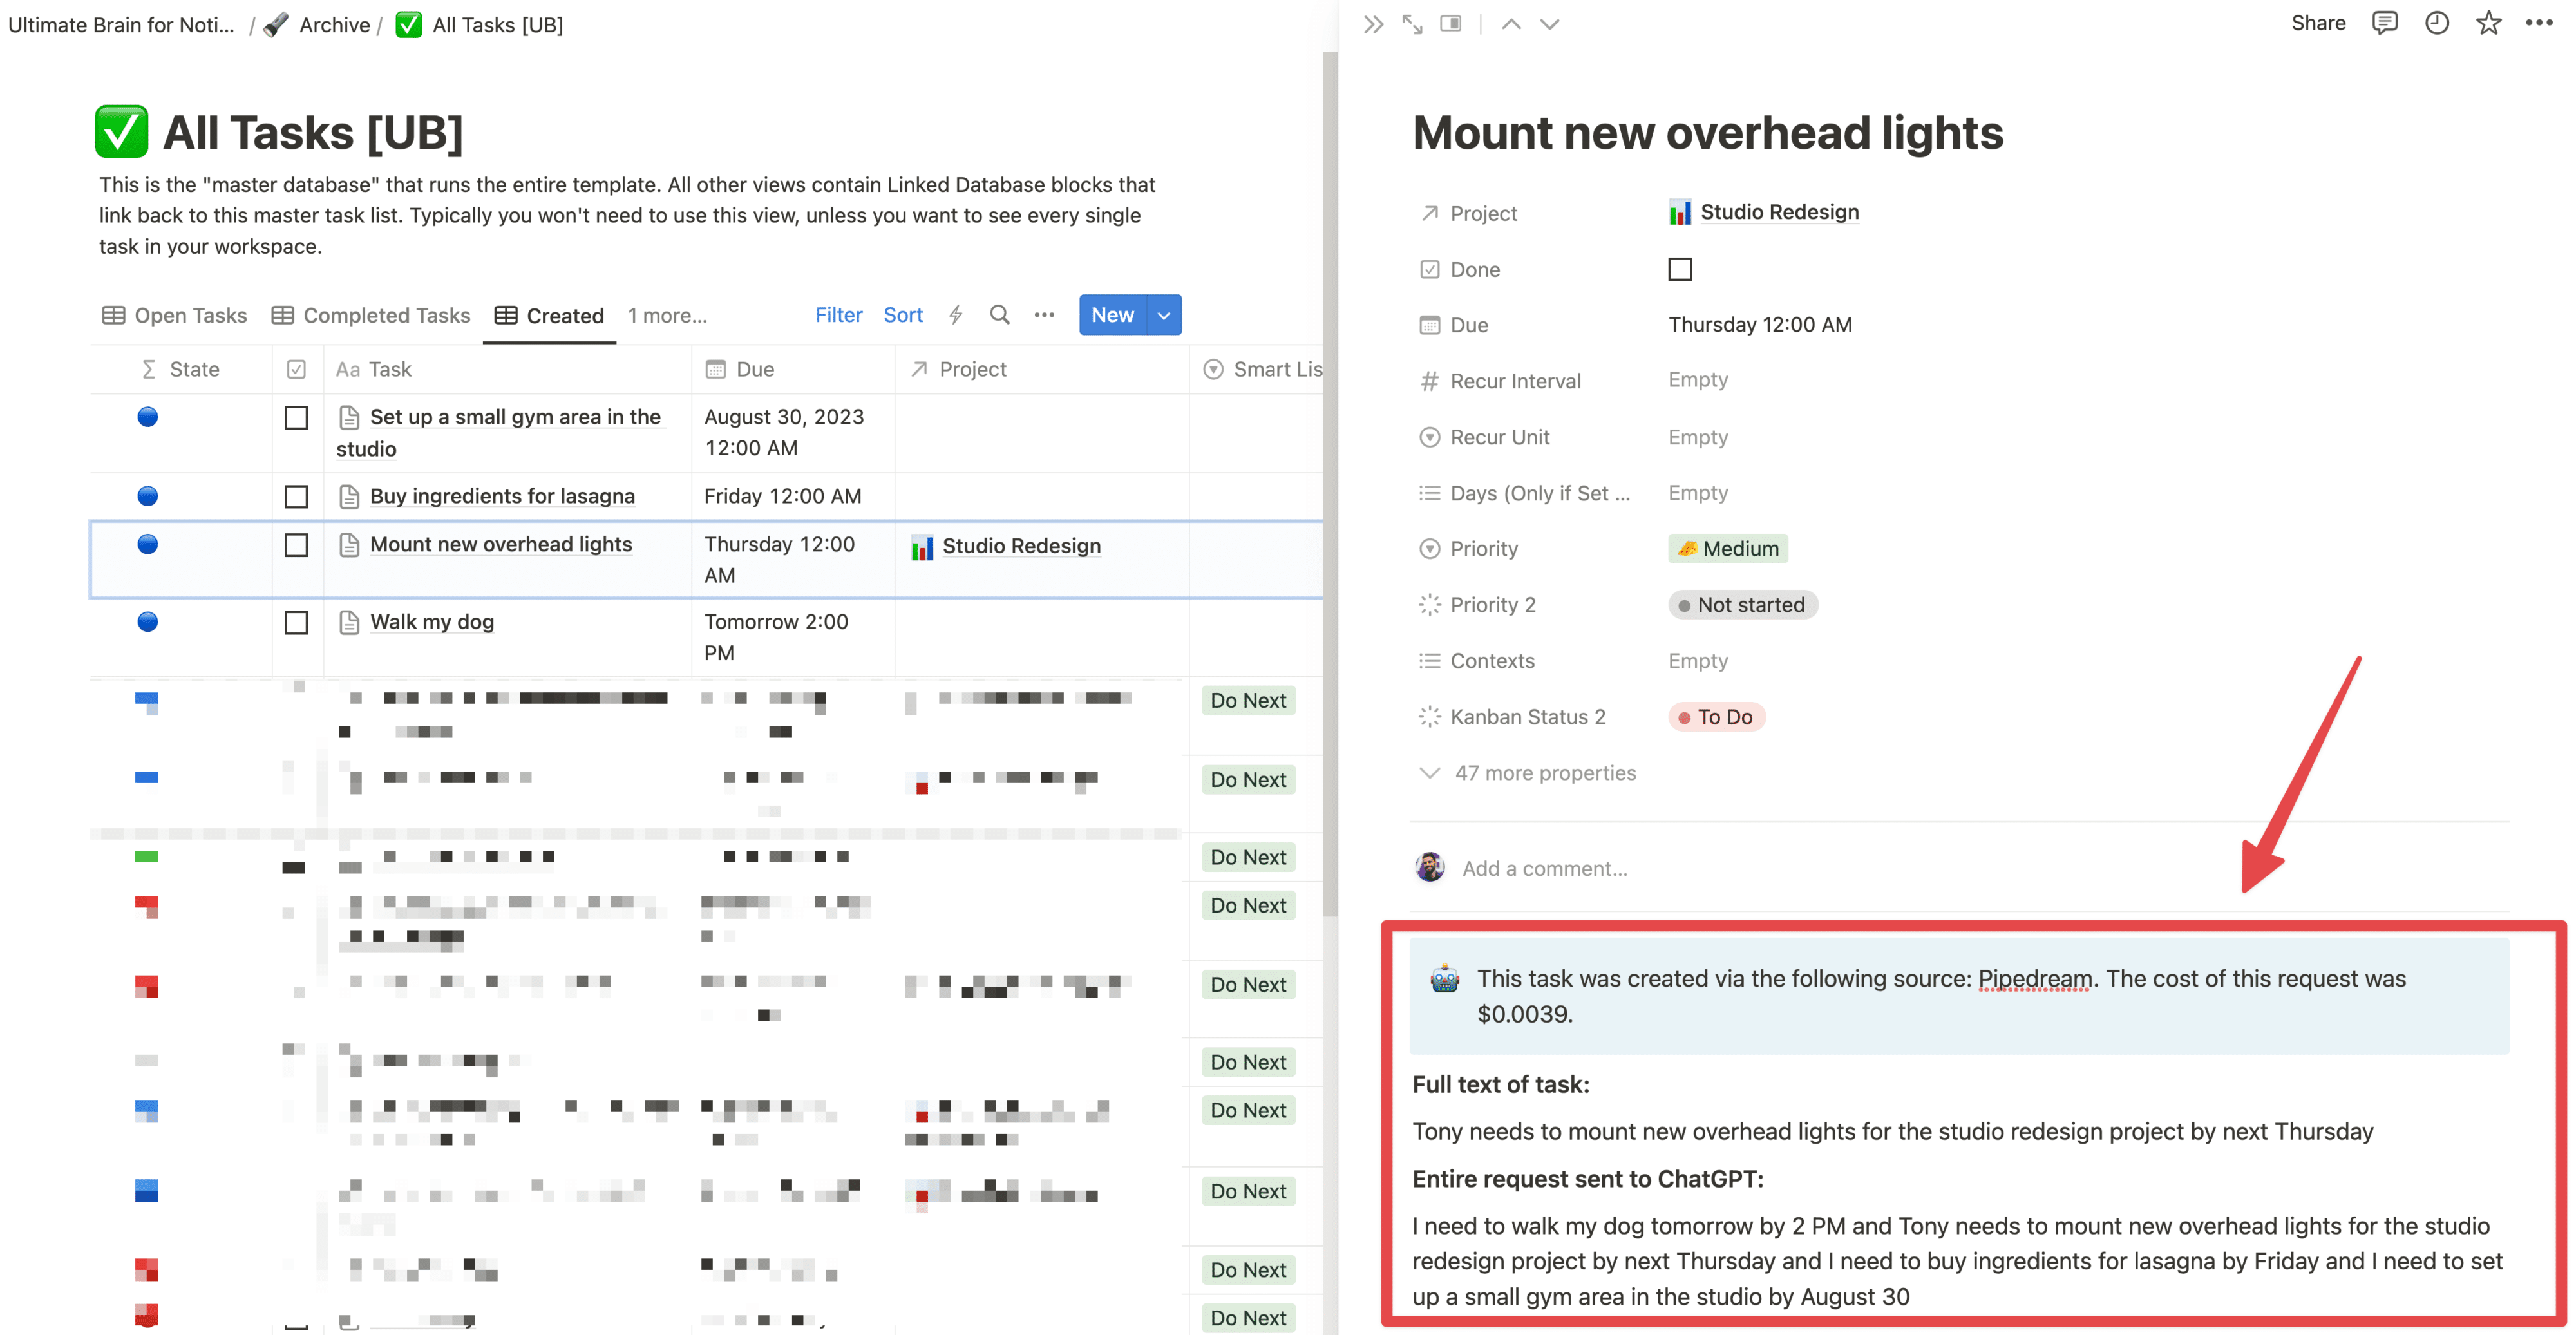
Here are the results of a test I ran with four tasks in my voice command. Here are a few things to note:
- You can see that each task has a due date, and the one that mentions a project has been matched to an existing project.
- Inside the body of each task, you can see the cost of the task, the full text of the individual task, and the entire text of the transcribed voice recording.
At this point, you’re all set up!
To finish up, I recommend skiming over the best practices for your voice commands in the next section.
Copy link to headingVoice Task Best Practices
ChatGPT is powerful, so you have a decent amount of flexibility with how you word your commands. Still, there are a few best practices you’ll want to follow in order to get the most accurate results.
Here are the most important ones.
Copy link to headingSetting Projects
To set a project in a task, you must say the word “project” after the name of the project.
Example:
- “I need to buy lights for the studio redesign project.“
This rule is in place so that ChatGPT doesn’t accidentally set projects on tasks that don’t actually have one (e.g. a task that references an event).
The
If you need, you can set Enable Advanced Options to true, then change the value in Project-matching Search Score Threshold if you need tighter or looser matching. You can also set up filters, so that only certain projects are in the pool of potential matches (e.g. only projects that are do not have a “Done” status value).
I’d recommend leaving these settings at their defaults unless you run into issues.
The settings are fairly conservative by default, as matching the wrong project would be much worse than failing to match a project at all.
If the wrong project is matched, the task would likely leave your Task Inbox (assuming you’re using Ultimate Tasks or Ultimate Brain, or have your task manager template set up in a similar way), and you could potentially lose the task.
If no project is matched, the task would go to your inbox and you’d see it quickly.
Setting Due Dates
To set a due date, use one of the following:
- “[date] I need to…” (e.g. start the task phrase with the date word)
- “…by [date]”
- “…due [date]”
Examples:
- “Tomorrow I need to film a video.”
- “Tony needs to set up the green screen by next Tuesday“
- “Brian needs to finish modeling the 3D assets due August 20“
Beyond that, you can use pretty much any date language you want. You can use both relative date-words like “tomorrow” and “two Sundays from now”, and you can also use absolute dates like “August 30”.
Tasks can have a due date, but they can also reference event dates that are not the due date. Consider these tasks:
- “I need to prepare my slides for the Friday meeting.”
- “I need to prepare my slides for the Friday meeting by Wednesday.”
Friday is not the due date for either of these, and it’s pretty obvious that it’s not. But what about this task?
- “I need to prepare my slides for the meeting Friday.”
If Friday the day of the meeting here? Is it the due date for the slide-preparation task?
This phrasing does not make the due date clear to me, and so we can’t expect it to be clear to ChatGPT either.
And indeed, my testing shows that ChatGPT (especially the cheaper gpt-3.5-turbo model) is not very accurate at determining due dates from ambiguous phrasing like this.
For that reason, it’s best to be clear about what is a due date and what is not.
Setting Assignees
The main thing to remember here is to specify an assignee’s last name if you have multiple people with the same name in your Notion workspace.
For example, if your workspace has two people named Tony, then you should mention last names for any Tony-related task:
- “Tony Santos needs to finish setting up the green screen by Thursday.”
With that, you’re all finished! Told you it wouldn’t take long 😉
Below, you’ll find a FAQ section with extra information and answers to common questions – including questions about cost, privacy, and the code behind this workflow.
Feel free to browse that section, or jump directly to the wrap-up where you’ll find links to more automations, Notion templates, and other helpful resources.
Copy link to headingFrequently Asked Quesitons (FAQs)
Below, you’ll find additional information about this workflow, including cost details, privacy information, and more.
Copy link to headingCost Information
This workflow is free to set up. Since it uses OpenAI’s ChatGPT API, it does cost a bit of money to use.
However, it is extremely cheap. How cheap?
TL;DR – using the default gpt-3.5-turbo model, each run usually costs around $0.003. That’s under 1/3rd of a cent, meaning you can run this workflow 300 times for under $1/month. If you use the newer gpt-4.1-mini or gpt-4.1-nano models, it’ll be even cheaper. I’m no longer bothering to estimate costs as of 2025, since they’re trending toward zero.
Unlike my Voice Notes to Notion tutorial, here we aren’t using Whisper to transcribe long audio files. We’re just using ChatGPT to format your task text in a way that the rest of the code can understand.
For more details, check out the ChatGPT API’s pricing.
Since task descriptions are usually quite short, your token usage should be very small.
In fact, the system instructions (which you can read here) that tell ChatGPT how to parse your tasks are much longer than the average length of a task description itself. You can read more about what system messages do here.
This means you can brain-dump multiple tasks in a single run without increasing the cost by much.
As of 2025, I do recommend switching to the gpt-4.1-mini or gpt-4.1-nano models. Nano in particular is even cheaper than gpt-3.5-turbo.
You can easily make this change in the workflow settings. I haven’t made them the default yet simply because doing so would require more thorough testing that I currently don’t have time to do.
If you do end up having issues, try using gpt-4 or customizing your system instructions (advanced).
It would now be possible to run this workflow for free using the LLMs on GroqCloud, which provides a free tier.
My workflow code currently isn’t set up to support Groq, though, and I don’t currently have the time to add support. This project is one of the most complex I’ve ever built, and I’ve poured hundreds of hours into it – but at the moment, I have other priorities and can’t actively update it.
However, all of the code is on GitHub, and you’re welcome to use it to develop your own custom Pipedream actions.
Privacy Information
TL;DR on this section: When you interact with OpenAI’s services, your prompts are retained for 30 days by OpenAI. They are not used to train OpenAI’s models. Existing info in your Notion account is not sent to OpenAI when using this workflow.
Please keep this in mind when setting up this workflow:
If you/your company is not using ChatGPT Enterprise, this automation should not be used for data that you want to be sure is 100% private. If you’re looking to use this automation for work purposes, make sure your company doesn’t have policies against sending potential sensitive data (task names, references to projects, employee names) to third-party services.
ChatGPT Enterprise is a recent service level that was announced after this tutorial went live. It is an enterprise-level offering intended to, in part, address these privacy concerns for enterprise users. Pricing is not currently public (you have to contact their sales team), but most things with the “Enterprise” label are not cheap. A presumably less expensive ChatGPT Business plan is on its way, but it hasn’t been released yet. The rest of this section will assume you’re using the normal ChatGPT tier.
I’ll also note that this applies to nearly all the cloud services you use, including Notion, Google services, etc. There’s more public concern around OpenAI right now, but nearly every cloud service technically has access to your data, and only company policy/laws prevent access. I call this “security through policy, not math” (e.g. encryption with user-controlled keys).
If you have data that you need to be sure cannot be accessed by anyone else, you need to use an encrypted service where only you hold the key. Most password managers operate this way, but most other cloud apps don’t.
When using this automation, the following data is sent to, and processed by, OpenAI:
- Anything you dictate when using the automation (e.g. whatever you say to create your tasks)
- Your name (or whatever name you set up in your automation)
- The current date
To make things abundantly clear, here’s an example. If I run my automation and say:
I need to buy a new overhead light for the studio redesign project.
…then this is the exact piece of information that will be sent to the ChatGPT API:
{
  task: 'I need to buy a new overhead light for the studio redesign project.',
  name: 'Thomas Frank',
  date: '2023-05-27T08:27:43-06:00'
}
Code language: JSON / JSON with Comments (json)
Additionally, the system message is sent to OpenAI. However, this typically just contains instructions on how ChatGPT should respond. If you don’t modify the system messages I’ve provided in this workflow, no additional personal data beyond what was explained above will be sent.
Beyond that, this automation does query your Notion workspace to get both a list of workspace users and a list of projects in your Projects database. None of this information is sent to OpenAI; it is used directly in the automation’s code itself to determine the correct assignee and Project for each task.
Here’s what Open AI’s API data usage policy states:
Starting on March 1, 2023, we are making two changes to our data usage and retention policies:
OpenAI will not use data submitted by customers via our API to train or improve our models, unless you explicitly decide to share your data with us for this purpose. You can opt-in to share data.
Any data sent through the API will be retained for abuse and misuse monitoring purposes for a maximum of 30 days, after which it will be deleted (unless otherwise required by law).
Personally, I am fine with this – but I’d like to make sure you’re aware so you can make your own informed decisions.
To be thorough, here’s a list of the privacy/security pages of each service that processes your information in this workflow:
We may be able to do so in the near future. My team and I are currently researching a few alternative AI options, including using Microsoft Azure’s ChatGPT endpoints and leveraging open-source models like Llama2.
Microsoft Azure
My team and I are currently looking into offering an Azure-based variant of this workflow. If you’re interested in getting updates about it, you can register your interest here.
As Microsoft states in their documentation, Azure’s ChatGPT endpoints also log prompts and completions for abuse monitoring by default. However, customers can apply to have this abuse monitoring disabled for low-risk, privacy-critical purposes.
Microsoft is also far more stringent about who can use their OpenAI endpoints than OpenAI itself is, and there is currently an application/approval process. As of this writing, I’m currently waiting for approval from Microsoft to gain access to the endpoints. If that’s successful, I’ll apply to have monitoring disabled. Assuming that goes well, I’ll start work on developing a privacy-focused Azure variant of the workflow.
Open-Source LLMs
We’re starting to see the emergence of extremely capable open-source LLMs (large language models) that can compete with ChatGPT on certain tasks. Meta’s new Llama 2 model is quite capable, and has produced promising results in my tests. Here’s a demo you can play with on HuggingFace.
Replicate offers this model (in all sizes) on its platform, and Pipedream even has a beta app for Replicate.
It’s possible that the best future option for this workflow would be to fine-tune one of the Llama 2 models using Replicate’s fine-tuning tools, then deploy it to Replicate so you can access it via Pipedream. My intuition says that even a smaller, less computationally-intensive model like Llama 2 7B could handle task parsing with enough fine-tuning.
That said, this is a research avenue I’ve only begun to go down. There are currently a lot of unanswered questions, so I don’t ancipate having anything to show here for a while.
Non-LLM Options
Parsing specific details from natural language is hard. There are currently only a handful of productivity apps that do this well (Todoist, TickTick, Fantastical, iOS Reminders) and even then, you have to speak more precisely than you do with a good LLM like ChatGPT.
At my level of technical ability, I don’t anticipate being able to build a non-LLM version of this workflow anytime soon. I also predict that we’ll see a lot more privacy-friendly LLM tools releasing in the near future, so I don’t even know that it’s worthwhile.
That said, if you’re curious, there are a couple of npm packages I’ll share here:
- Chrono-node – one of the most popular packages for natural-language date parsing.
- Natural – a general language-processing package.
My code already does quite a bit of heavy lifting without relying on ChatGPT – including the fuzzy-matching that allows you to set assignees and projects without needing to say them perfectly.
However, it’s much harder to do things like parsing multiple tasks from a single string, identifying due dates vs. normal date words, etc. That’s why LLMs are such a breakthrough for task processing.
Security Information
The TL;DR here: Use this workflow at your own risk. Do not share your trigger URL or secret key with anyone who should not be using the workflow. I recommend setting your OpenAI Hard Limit to a lower dollar amount for safety. I am providing these instructions and the code behind the workflow and shortcuts free of charge, as-is, and without any warranties.
I’m a bit of a computer security nut – to the point that I often fall asleep listening to the autobiography of the world’s most famous computer hacker.
As such, I’ve done as much as I can to make this workflow as secure as possible given the limitations of the tools we’re working with here. I’ve built in a security-key feature, chosen an automation platform (Pipedream) that is SOC 2 compliant, and have built in error-handling that will send error emails to your Pipedream account’s email. I have also made my code publicly available on Github.
Still, I want to make clear that using this workflow is not completely free of risk, and you need to ensure you mitigate against that risk. You can do that primarily by:
- Keeping your workflow’s trigger URL secret
- Keeping your secret key (the unique word/phrase set in both your iOS/Android workflow and Pipedream settings) secret
- (Optional) – Setting your Hard Limit in your OpenAI budget settings to a low amount, such as $10/mo (remember, this workflow costs around $0.003 per run, so you don’t need a high hard limit).
The primary risk in using this workflow is that we have to make a POST request to your trigger URL. The trigger URL is unique to your workflow, highly random, and isn’t shared outside of your Pipedream account.
However, if another person did know your trigger URL (e.g. if you accidentally shared it online), they could send requests to it.
Since requests to your trigger URL will trigger a new run of your workflow, and since each run makes a request to the ChatGPT, each request has the potential to charge you money. (Again, this is why I recommend setting your hard limit at OpenAI to a low dollar amount, unless you’re using your API key for other workflows that need a higher budget.)
This is why I also built the secret key feature into the workflow. If a request comes in that doesn’t contain a secret key – or that contains one that doesn’t match the one you’ve set in your Parse_and_Create_Tasks action step’s settings – the workflow will throw an error and end before it gets to the ChatGPT step. You’ll also receive an email informing you of the error.
For this reason, it’s also of paramount imporantance that you keep your secret key, well… secret. Treat your trigger URL and secret key like a username and password combo, and don’t share either.
If your secret key ever did leak, you could simply change it. You can also easily duplicate workflows in Pipedream, so if you ever need a new Trigger URL, just do that and then disable the old one.
In the interest of security education and full disclosure, I want to note that this secret-key method, while effective, isn’t as good as if we had something like an app with proper authentication (typically via OAuth). With my Notion Voice Notes workflow, the Pipedream workflow is triggered when a file is uploaded to Dropbox/Google Drive – in that case, the workflow is protected by robust OAuth, and all the security features that Dropbox/Google offer.
Here, the only real way to build this workflow in a frictionless way is to use iOS Shortcuts or Tasker on Android – and with those apps, we don’t have the option of using OAuth. So, for now, using a secret key in the POST request is the best option we have.
I will note that my team and I are working on a new project that may solve this in the future. I’m hoping we’ll be able to ship that in early 2024!
I’ve been told by the Pipedream team that this secret-key method is effective, and that the overall risk for this workflow is low. I’ve also taken steps to minimize that risk as much as possible.
On each workflow run, the maximum number of tokens you can have in your prompt is 500. If we add the system instructions and completions from ChatGPT, the full maximum token consumption for each run is around 5,650.
Using the default gpt-3.5-turbo model, which costs $0.0015 per 1,000 tokens for prompts and $0.002 per 1,000 tokens for completions, the max cost per run would be around $0.01007.
On Pipedream’s Free plan, you get 100 credits per day. Each run typically costs 1 credit, so the maximum daily cost (again, using gpt-3.5-turbo) would be around $1.00.
For gpt-4, the system instructions combined with the max input tokens (500) equal 1,136 tokens, with the completion tokens for a prompt of that size being around 1,550. Since gpt-4 (8k context) costs $0.03 per 1,000 prompt tokens and $0.06 per 1,000 completion tokens, the max cost per run would be around $0.127. This means the max cost per day on Pipedream’s Free plan (limited to 100 credits) would be around $12.70.
Again, the best way to mitigate against this in the case of your URL and secret key leaking is the set your Hard Limit in your OpenAI settings to a low monthly amount, such as $10. Typical use should never come even close to that amount – each run costs around $0.003 on gpt-3.5-turbo, or around 300 runs for $1.
If your credit usage hits 100% on the Free plan, you’ll get an email notification (and the same applies if you hit 80% on a paid plan).
If you’re on a Paid Pipedream plan, you can also set a monthly or daily Compute Budget to limit the number of credits that can be consumed in a specific period. If you’re on their Advanced plan, you can also customize concurrency and throttling settings on a per-workflow basis.
Common Errors
In this section, I’ll include fixes for common errors that users of this workflow may run into.
Part of the reason I spent nearly 3 months building this workflow was to hopefully eliminate as many of these errors as possible. Unlike my previous Pipedream workflows, this one does everything in a single action step, which means you don’t have to go through the hassle of testing multiple steps. I’ll be using that design pattern in as many future workflows as possible.
Additionally, I’ve added very robust error-handling to the code. In the case of a server error – either at ChatGPT or Notion – the code is set up to retry requests multiple times. If a run does fail, the code is set up to send you an email with the details of your tasks. If possible, it will also create a “fallback” task in Notion.
Still, some errors are bound to come up when thousands of people are using a workflow like this. Below, you’ll find fixes for the most common ones.
When setting up the Pipedream portion of this automation, you may run into an issue where you don’t see any databases in the Tasks Database dropdown:
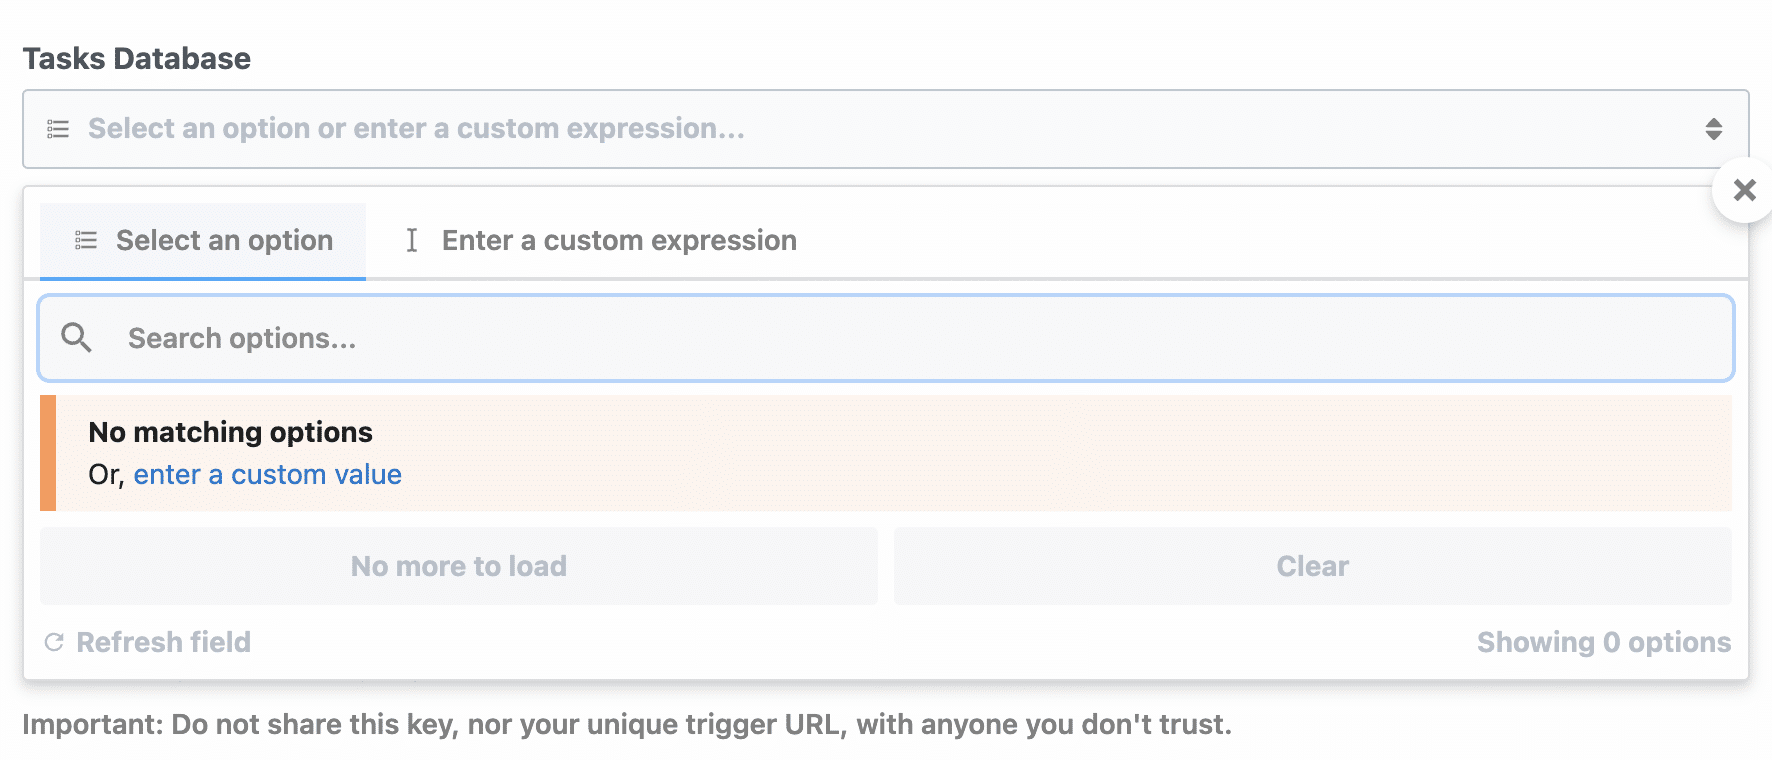
It’s also possible that you’ll see some databases, but not the one you’re looking for.
There are three potential fixes to this problem:
- Fix one: Wait
- Fix two: Ensure permissions are granted
- Fix three: Go directly to each database, remove the Pipedream connection, then re-add it
First, if you’ve just created a brand-new database to use for this automation, it can take up to 5 minutes for the Notion API to index it. In this case, try waiting about 5 minutes and then refreshing the Pipedream page.
If that doesn’t work, then it’s extremely likely that your Notion connection didn’t give Pipedream permission to access your Tasks database.
To fix this, go to either:
- A page that contains your Tasks database, along with any other databases you want to work with, such as your Projects database (recommended)
- Your Tasks database itself
From there, you can go to the ••• menu in the top-right corner, go to Connections, and click Pipedream in order to give it access to that page and all sub-pages/sub-databases.
Good to Know: Notion uses cascading permissions, meaning that page permissions are determined by the nearest parent page that has custom permissions set. If no parent pages have custom permissions, then a page’s permissions are determined by the top-level page, which will be shown in your sidebar. Of course, if you set custom permissions for a page itself, those will override any cascading permissions.
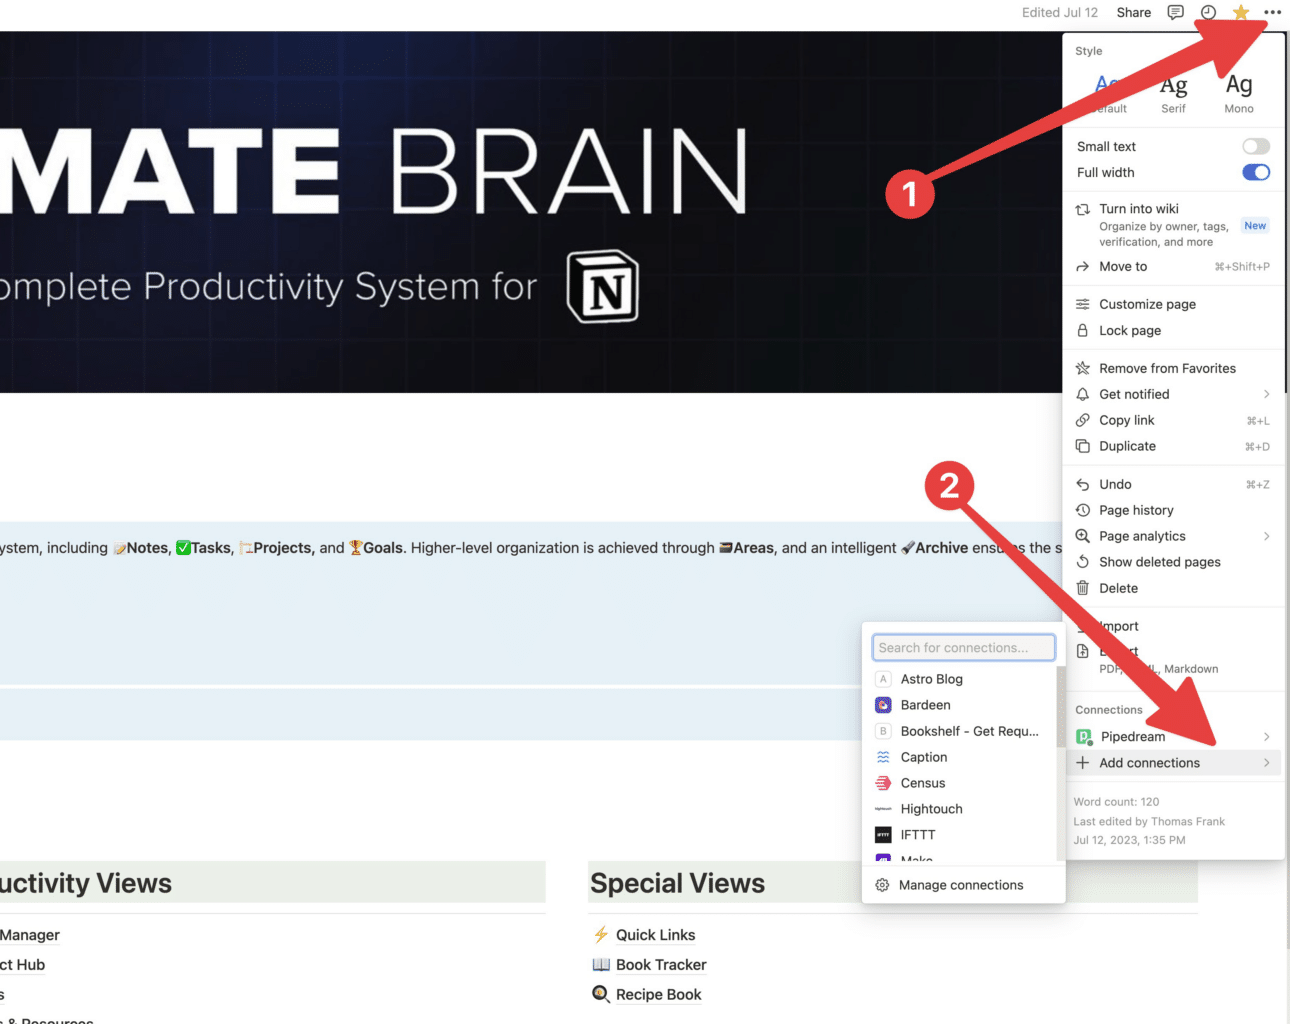
After doing this, your database should show up in the list of choices within the Tasks Database dropdown in the Pipedream automation.
If that doesn’t work, navigate directly to your Task and Project databases. Manually remove Pipedream from the Connetions section on each, then re-add it from the Add Connections menu.
This is typically not needed, but on occasion the Notion API just fails to grant the needed permission even though Pipedream is listed under Connections.
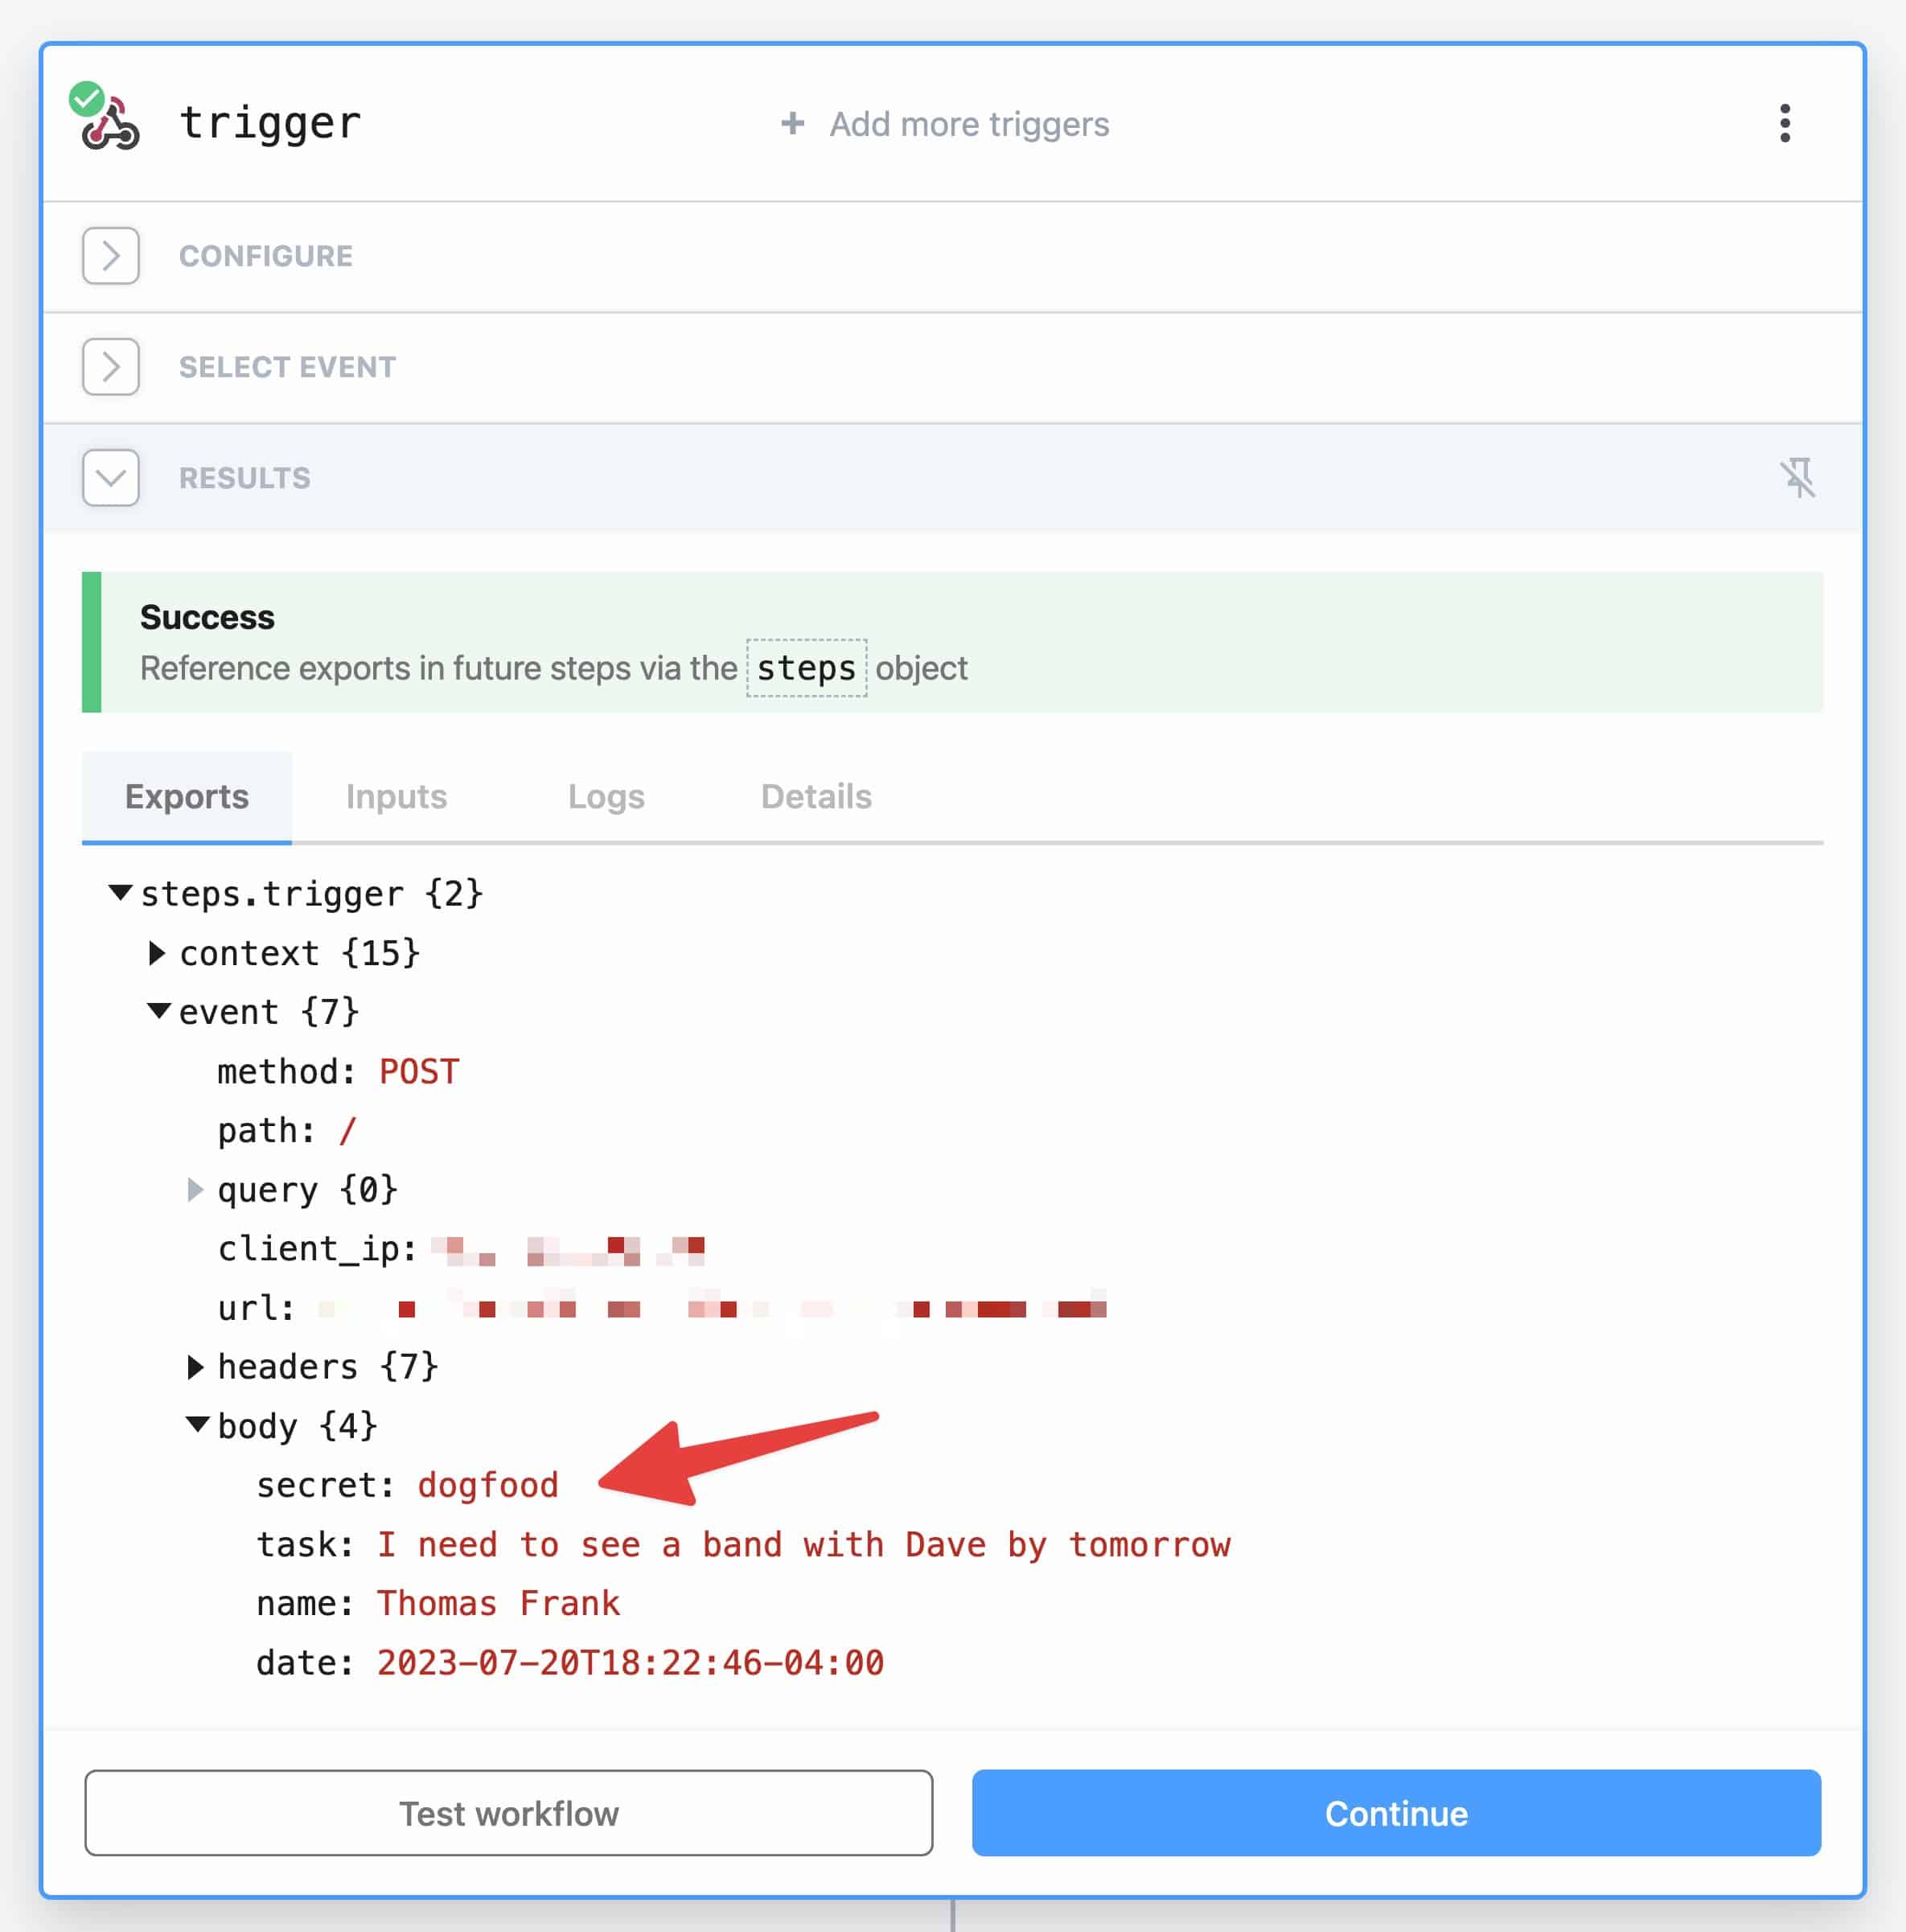
If you recieve the following error:
“Secret key in the request doesn’t match the one set in the workflow settings.”
…it means the secret property in your mobile app’s request body doesn’t match the secret key you set in your workflow options.
To fix this, first verify the secret key sent by your mobile device by following these steps:
- Go to the trigger step at the top of the workflow builder
- In the Exports tab, drill down to
steps.trigger→event→body→secret - Verify the string listed as the
secretproperty’s value
In the screenshot below, you can see that my secret key for this demo workflow is dogfood.
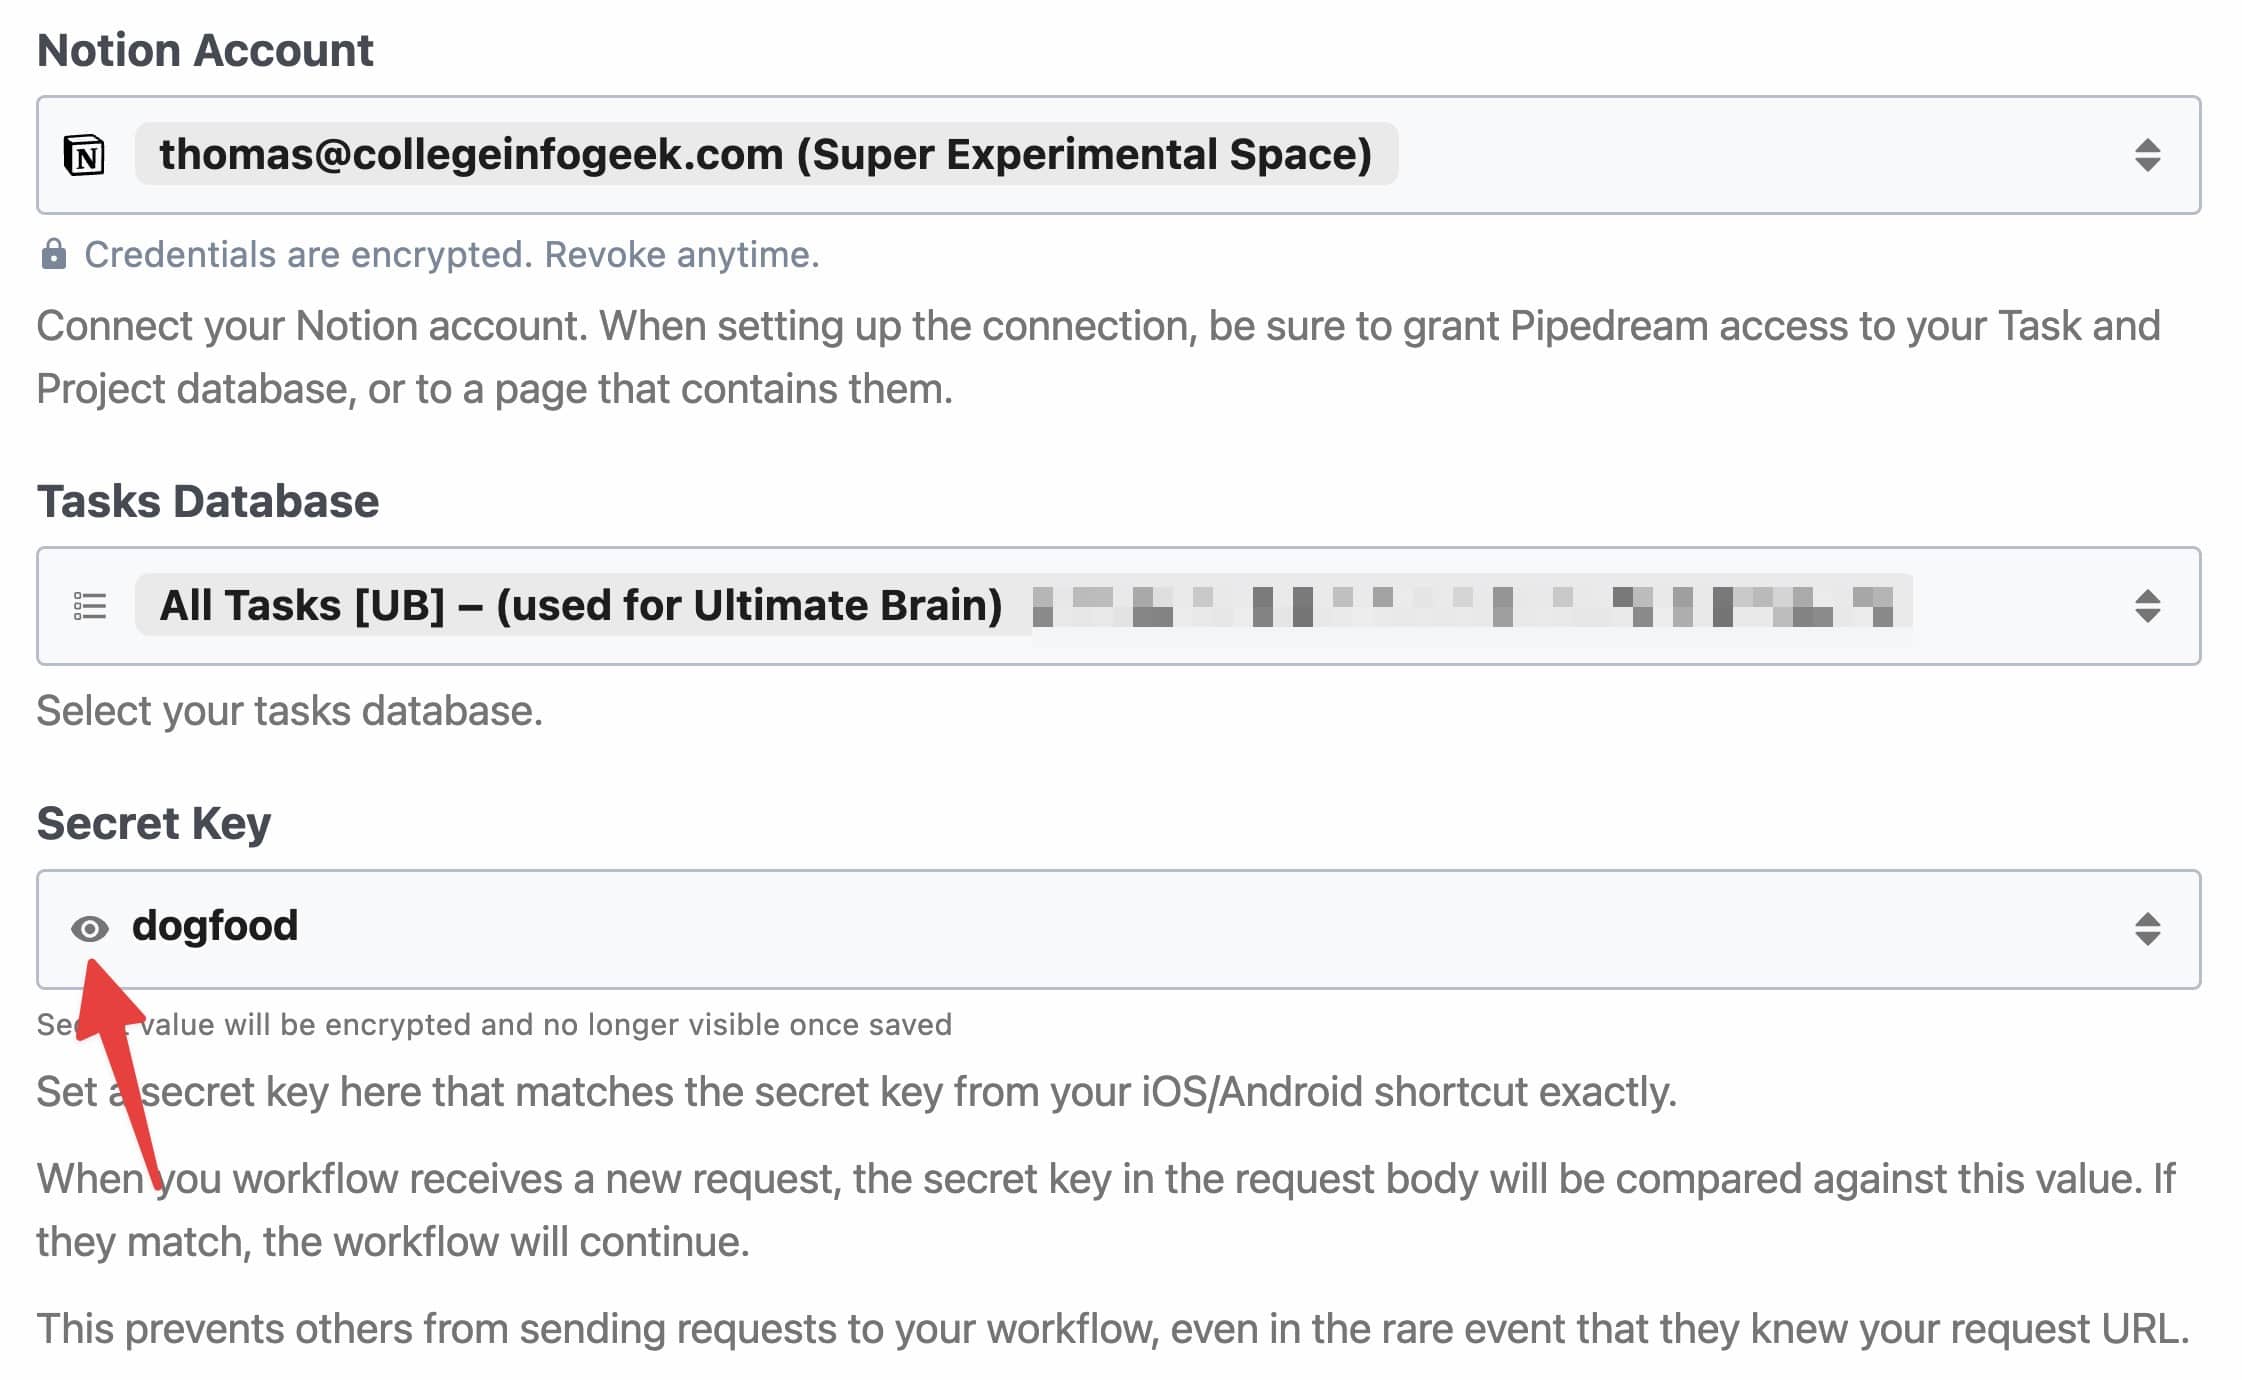
Next, find the Secret Key option in the main Parse_and_Create_Tasks option. This field hides and encrypts your secret key after you type it, so click the eye icon to show the value.
Type in your key, making sure it matches the secret value from the trigger step.
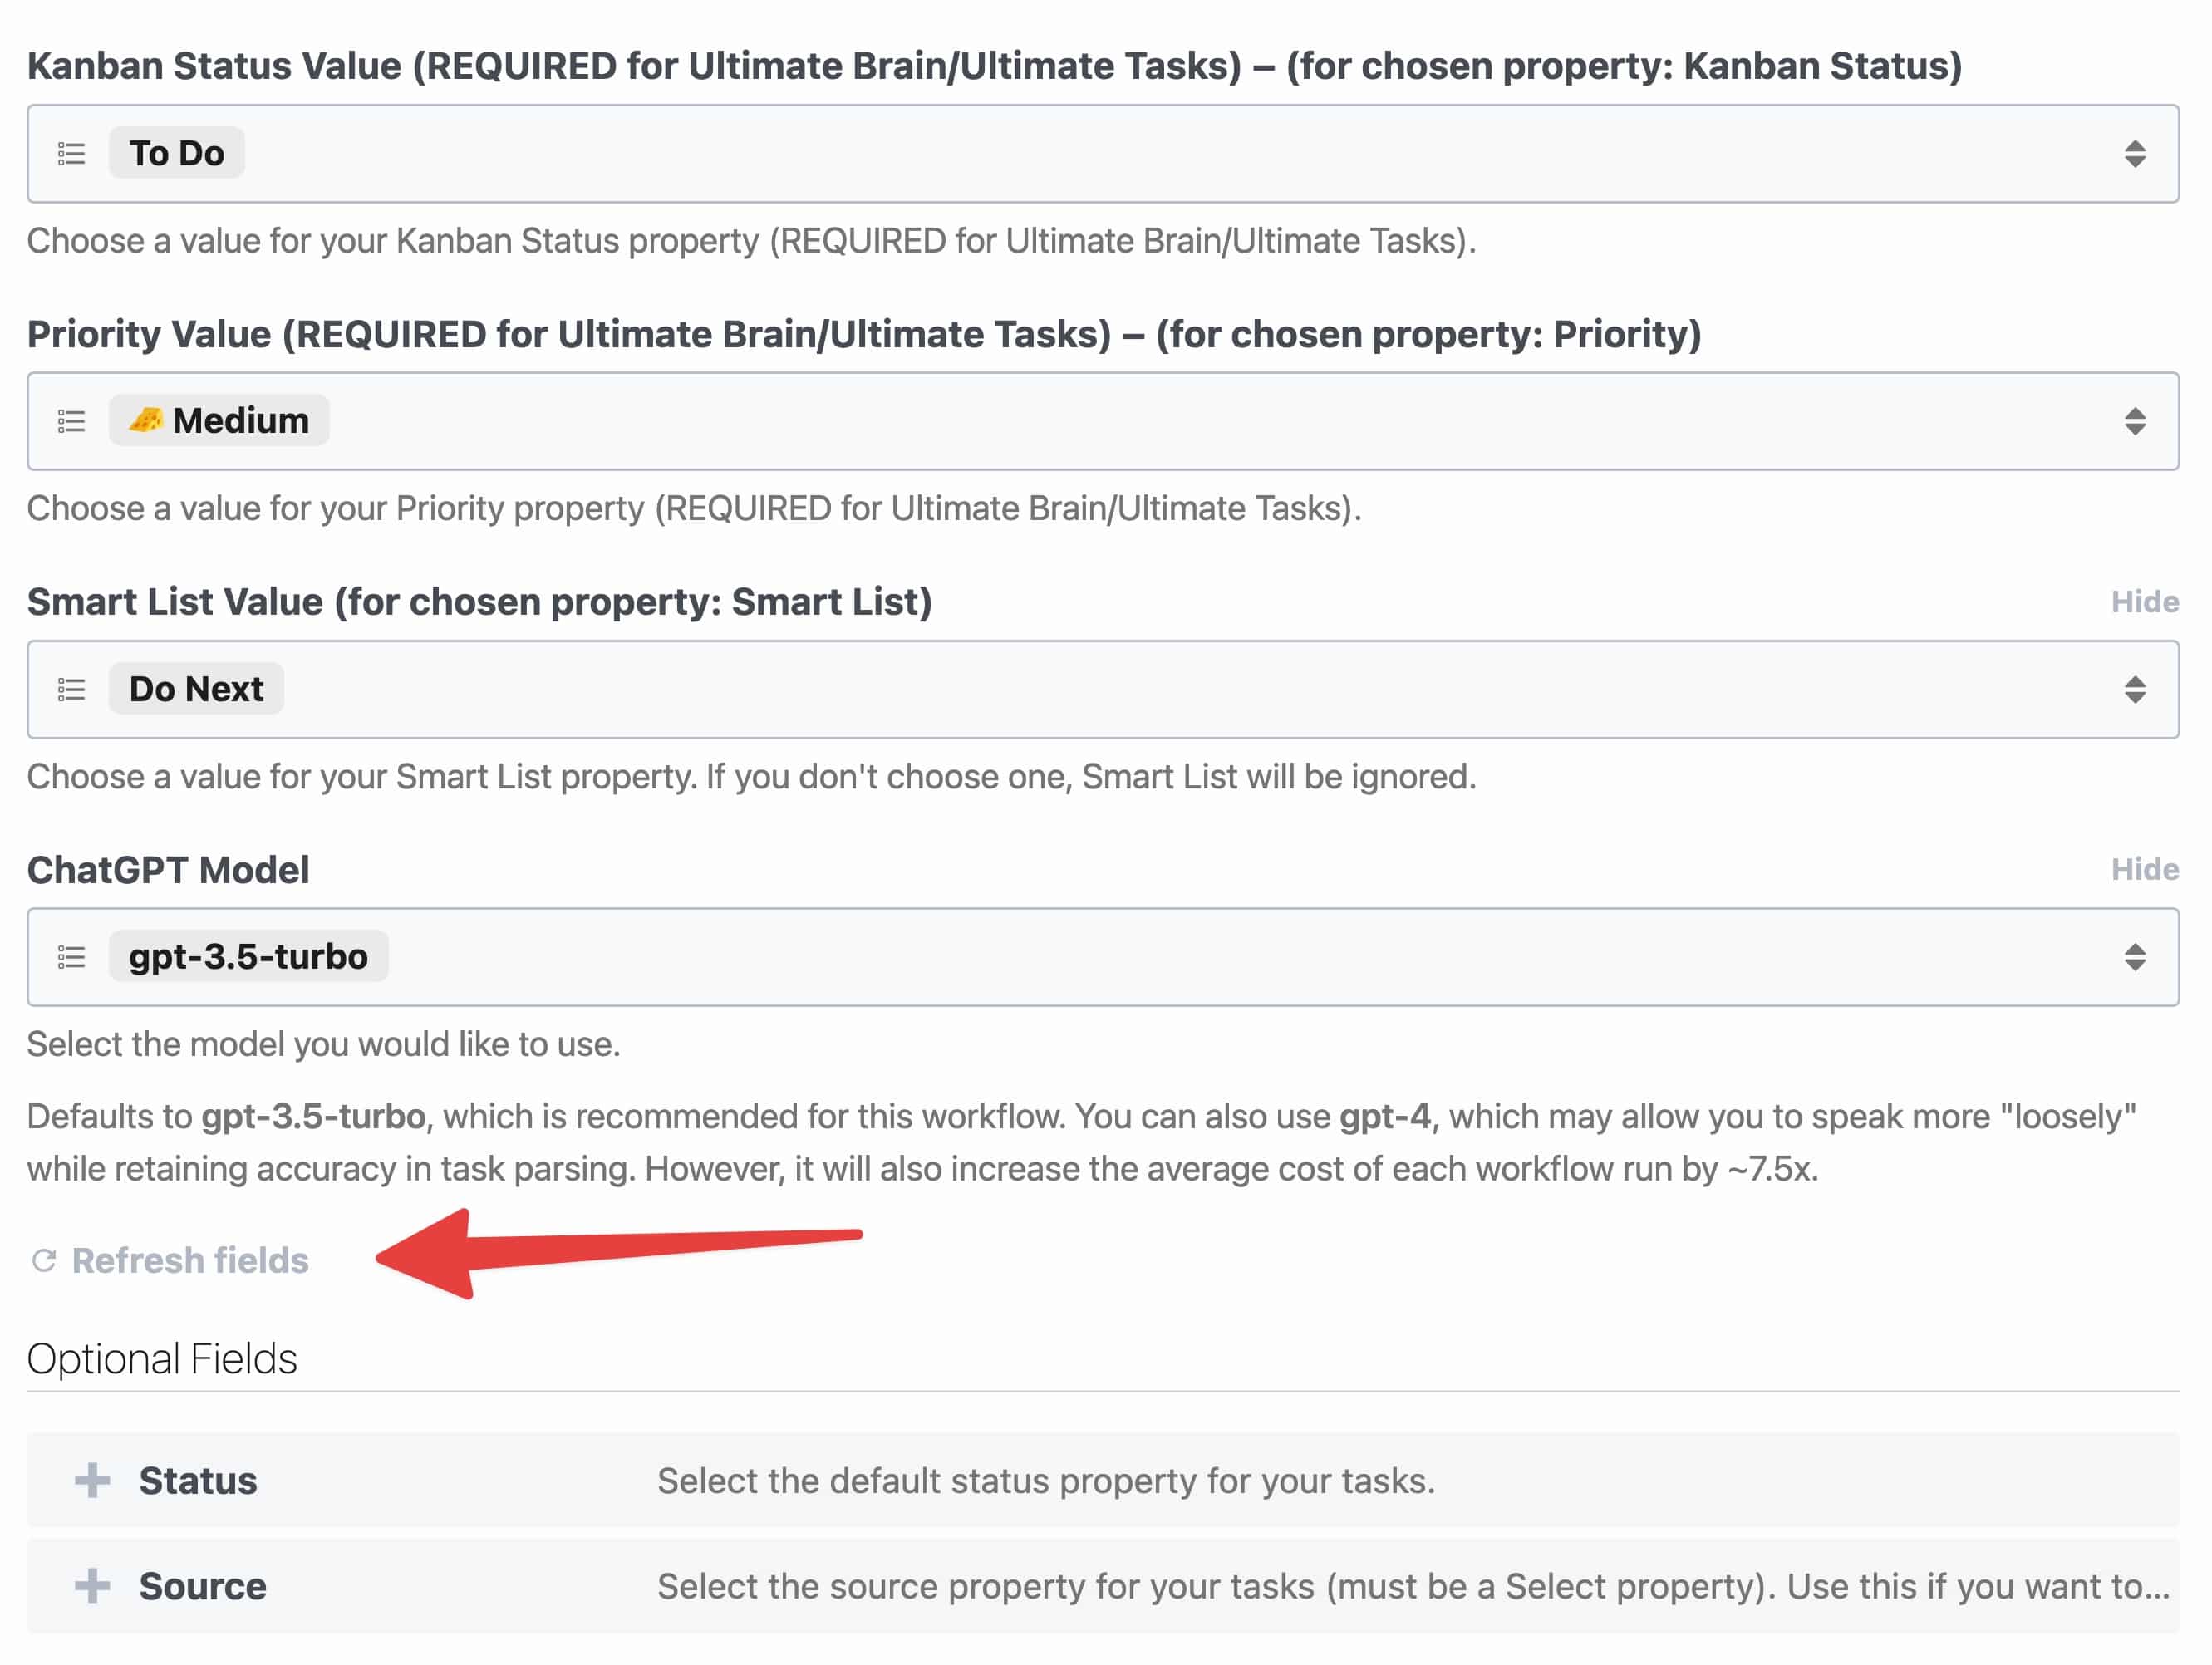
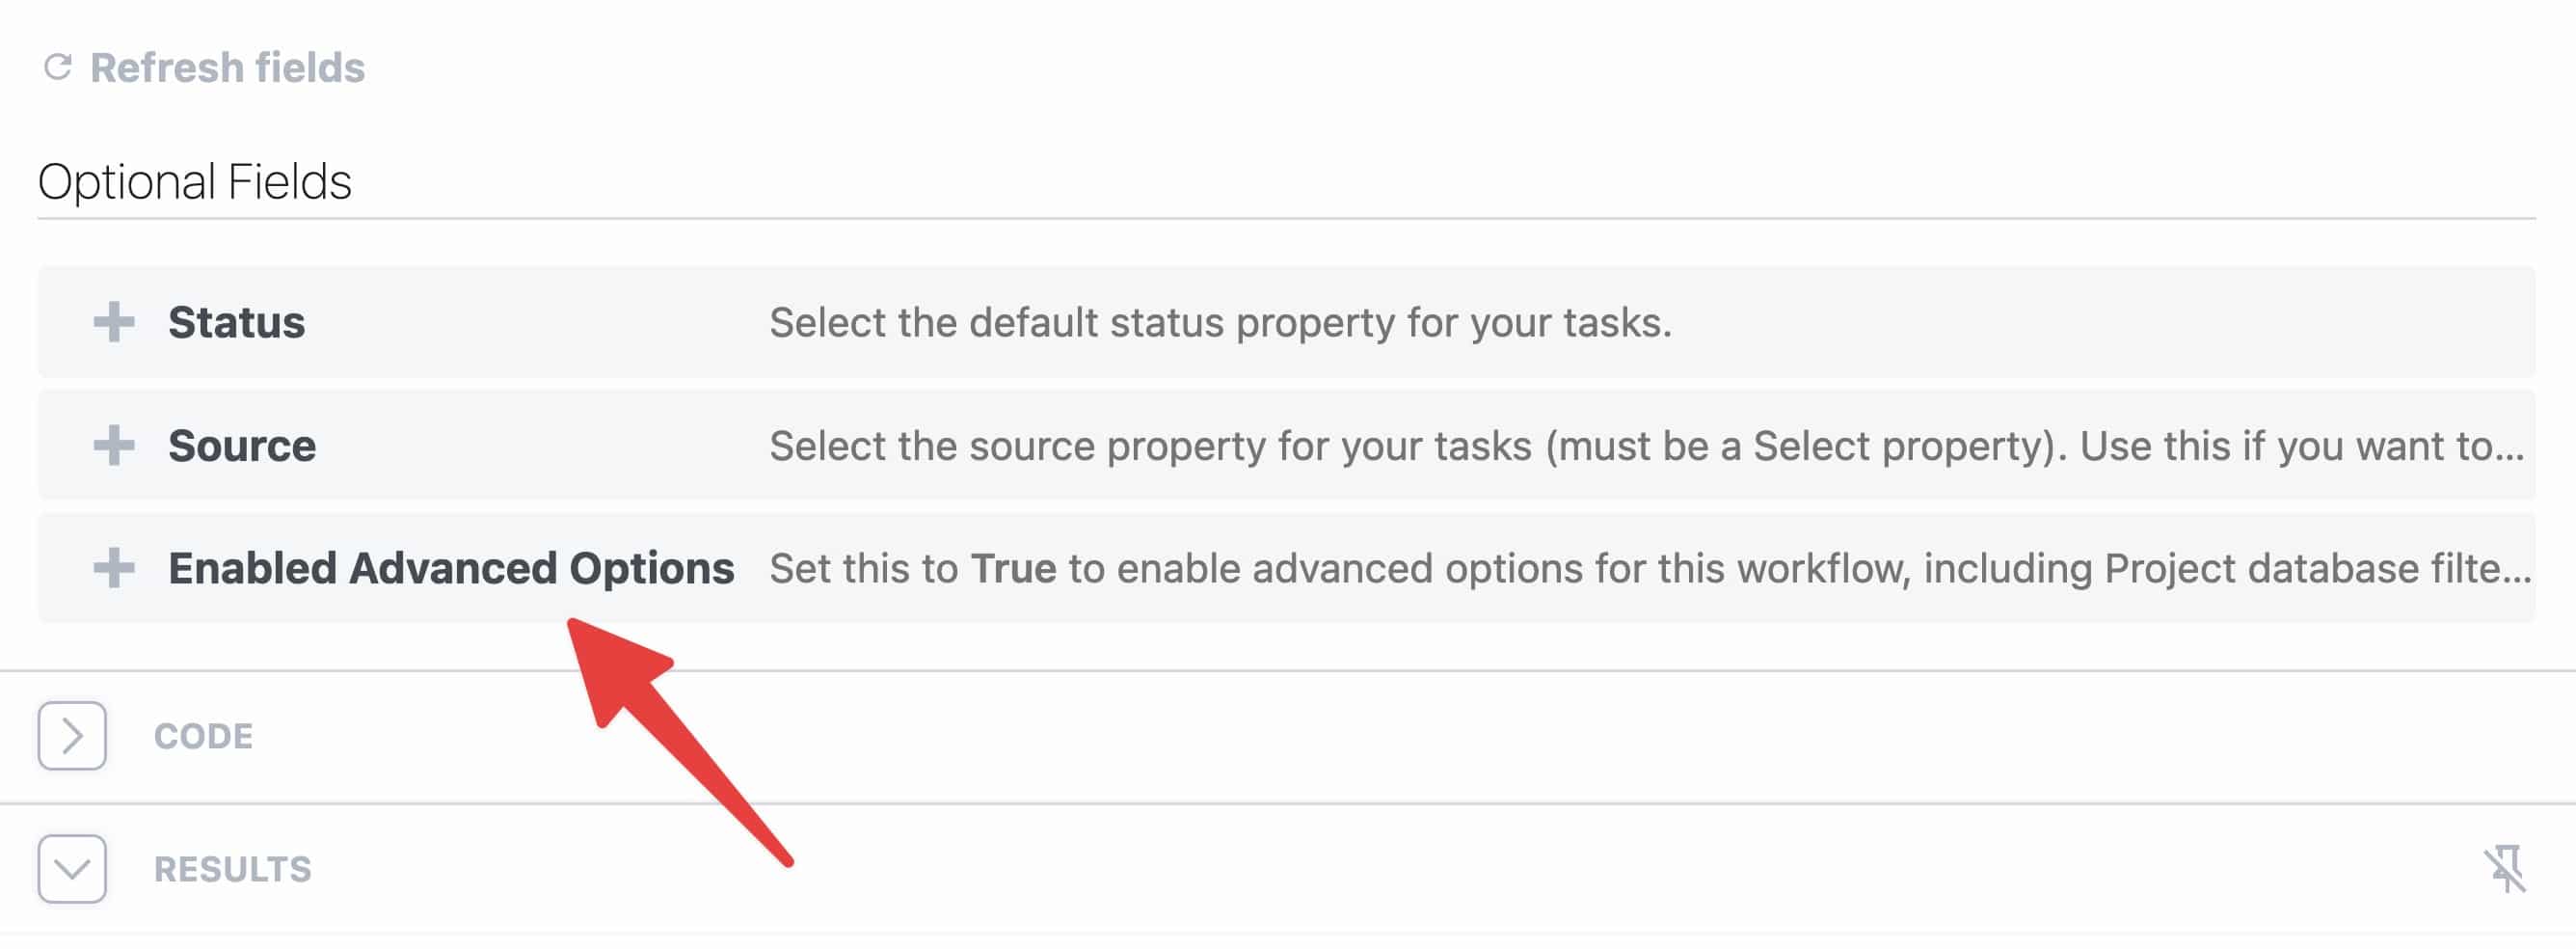
When setting up the workflow, some properties are dynamically loaded after you choose an option for another property.
For example, you won’t see the Kanban Status Value property until you choose an option for the Kanban Status property – after all, the workflow can’t pull the options from your chosen Notion property until you choose that property!
On occasion, one of these dynamic properties can fail to load. I find that this sometimes happens when you set values for both the Kanban Status and Priority properties in quick succession.
Fortunately, the fix is simple – just click the Refresh Fields button, and the property you’re looking for should load.
If you test your Pipedream workflow and recieve and error like “Request failed with status code 429”, it is likely due to an API key issue with OpenAI.
One beta tester reported that this happened when they set their billing details in their OpenAI account. They had a previously-created API key from when they were using OpenAI’s 3-month trial credits. Once they added their billing details, that API key stopped working.
Other people have reported this error here:


And here:


It seems the fix here is simply to go to your OpenAI API key dashboard, create a new key (after setting your billing details), and updating your Pipedream workflow with that new key.
If you do this, I’d recommend deleting the old key as well.
Other Questions
Below, you’ll find answers to additional questions related to this workflow.
Unfortunately, the Notion API doesn’t currently support working with Reminders.
For this reason, this workflow can’t add Reminders to tasks. Hopefully Notion will add this capability to the API in the future; if they do, I’ll add it as an option to this workflow!
Yes, you can!
You can share the iOS and/or Android instructions with anyone on your team, which will allow them to create tasks in your team Notion workspace.
The only change they’d want to make on their own mobile phone is setting their own name in the name field – that will allow them to self-assign tasks by saying “I need to…”
You’re also more than welcome to duplicate the workflow multiple times in your Pipedream account, which would allow you to set different options in each copy.
A couple of things to keep in mind:
- Anyone with an actual user account in your Pipedream account will be able to see the details of any run within that account. This may be different if you’re on Pipedream’s Enterprise plan (see all plans here), but you’d want to reach out to their team to ask.
- In the case of an error in a workflow, an email with the error details and task details will be sent to the main email address of the Pipedream account. So maybe don’t use this to create a task about surprising your boss for her birthday if she controls the Pipedream account 😉
If you’re interested in enterprise-level privacy with respect to ChatGPT, my team is currently looking into creating a Microsoft Azure-based version of this workflow.
Microsoft has a form your team can fill out in order to opt out of the standard 30-day prompt retention policy, meaning your prompts and completions would be immediately deleted and hence not accessible via Microsoft staff. We don’t yet know if this workflow will be viable, but you can register your interest here and we’ll let you know when we find out.
Yes, you can see the entire code that runs this workflow in the GitHub repo.
The code in the Pipedream workflow looks different because it has been minified in order to imporve performance (this is an industry-standard practice, and is often called bundling). I use a two-step minification process:
- First, I run the code through Speedy Web Compiler (SWC) with the Module type set to ES Modules, Source Type set to Module, and Minify, Compress, Mangle, and Env Targets enabled.
- Next, I run the SWC output through Minify JS to minify all the instruction strings.
This workflow is provided free of charge, and currently neither I, nor my team, can provide guaranteed support for it. However, if you find a bug, do please open a Github Issue about it. I’ll do my best to fix those, and I’ll also add fix instructions for common errors to the Common Errors section of this guide.
I’m currently in the process of looking into how I can offer paid support and consulting for companies. If you’re subscribed to my Notion Tips Newsletter, you’ll be the first to know when I have more details about that!
Additionally, my customer community has a AI & Automations space where customers swap tips and help each other out with Notion automations like this. Purchasing any of my premium Notion Templates – such as Ultimate Brain or Creator’s Companion – will get you access. But to be clear, this is one area of our customer community that doens’t get guaranteed support. I pop in to help when I can, but my support team doesn’t have the technical background to help with these advanced automations.
Finally, Pipedream itself has support options, including a community forum and a Slack workspace you can join.
If the workflow is working for you as expected, you shouldn’t need to worry about updates. That said, here’s information on how to update your workflow if needed.
When you click my shared workflow link, a fresh copy of the workflow is created in your Pipedream account. It’s almost exactly like duplicating a Notion template.
This means that you’ll need to click the workflow link in this article again if you want to create a new copy of the workflow. If I update the code at all, that will be the only way for you to get the update. You can see how recently the workflow was updated at the GitHub repo.
There is one exception to this: I’ve set the workflow up so that it will remotely fetch the system instructions for each ChatGPT call from my GitHub repo. If I (or the community) discover a better set of system instructions, I’ll be able to update them there and your workflow will automatically use them on all subsequent runs.
If you enable the Advanced Options in your workflow, you’ll see an option to turn this off. You can also set it to use your own system instructions. See the next toggle for information on that.
By default, this workflow pulls the latest system instructions for ChatGPT from my GitHub repo every time your workflow runs. Here’s the direct link to them. The code also contains “hard-coded” system instructions, and it will fall back on them if you disable the remote fetch or if the fetch operation takes more than 2 seconds.
However, I’ve also included an option for writing your own system instructions.
Note: This option is for experts only. Absolutely no support will be provided for this option.
To enable this option, first enable the advanced options by clicking it in Optional Fields, then scrolling up to it and setting the value to True:
Next, find System Message Source and set it to Write Your Own (Advanced). Then find System Message URL and enter the URL where your system messages are hosted.
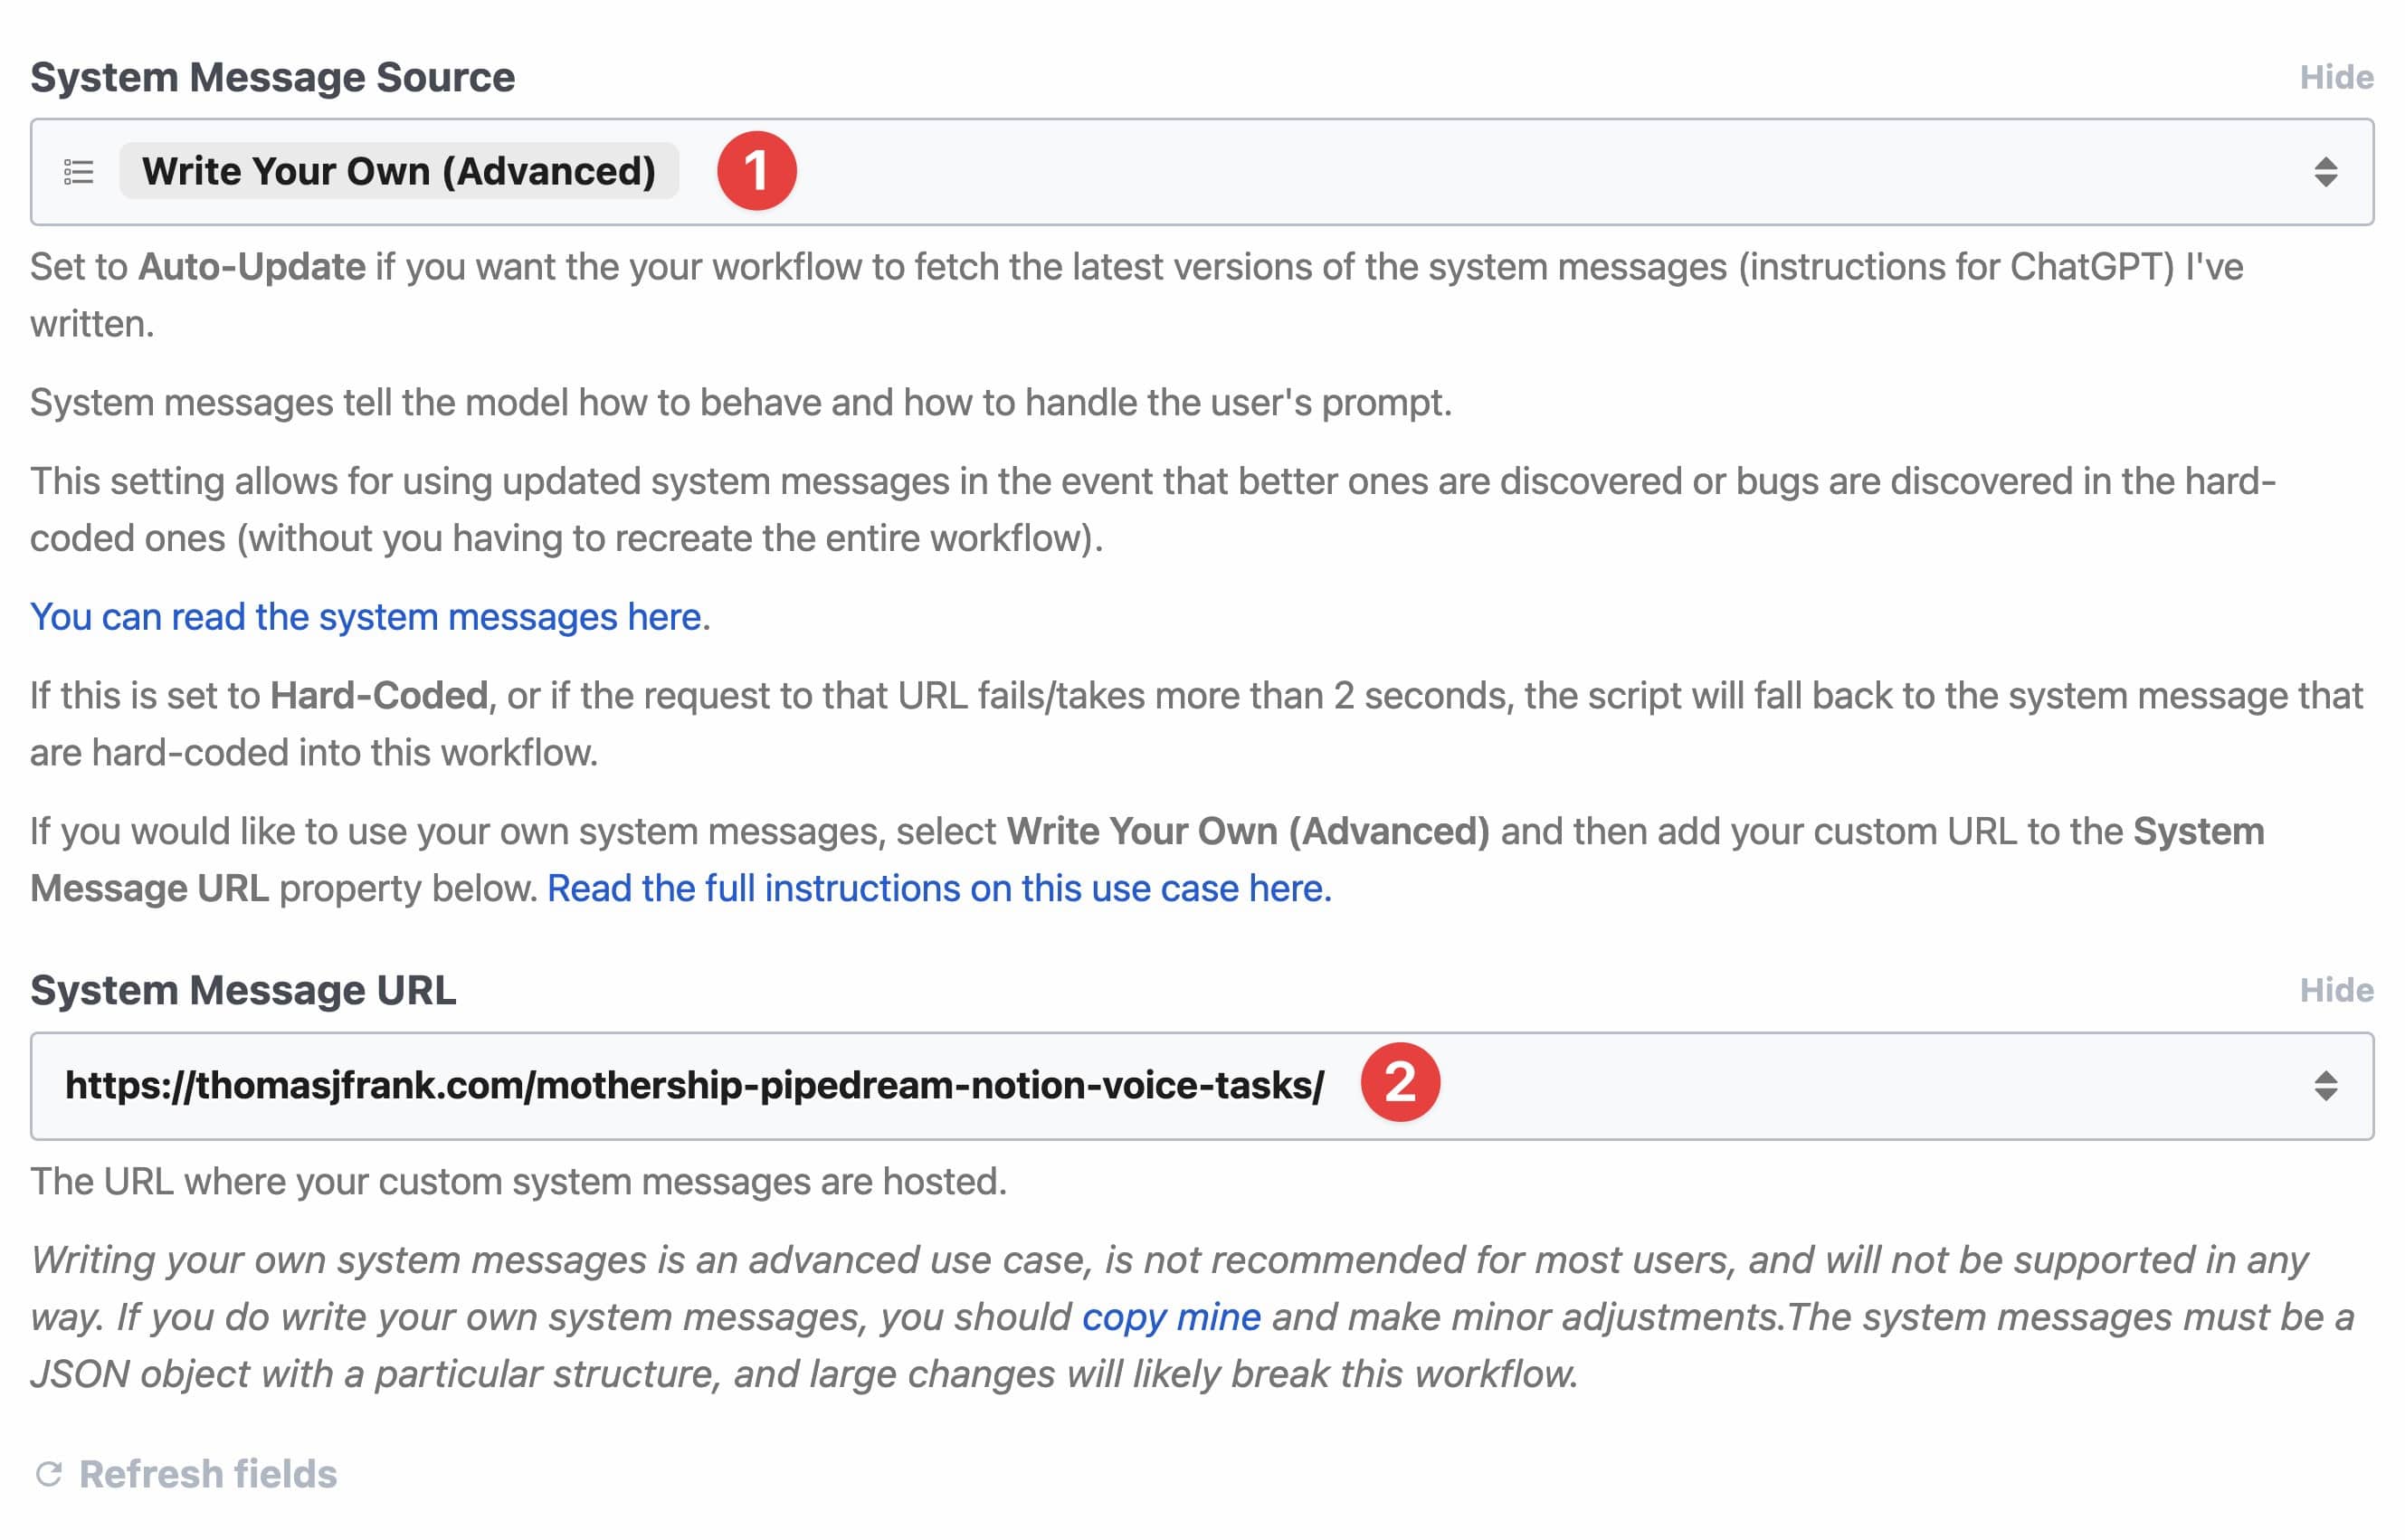
I recommend hosting your system messages in a GitHub repo, since it’s free. You could also choose to host on Amazon AWS or any other hosting platform.
Your system messages should be mostly identical to mine, which you can find here. If they are not, the workflow is likely to break. In particular:
- They must be in a JSON file with a parent property called
en, containing child propertiesround_1,round_2,round_3, andgpt_4. - They must instruct ChatGPT to return data in the exact form that my system messages do.
If you’re going to write your own system messages, I’d recommend first copying mine and then making tweaks. The best way to make tweaks would be to add additional examples that help ChatGPT deal with edge cases you run into, while leaving everything else as-is.
If you’re going to do this, you’re welcome to simply clone my repo (or the system messages section of it), write your messages as text files, and then run system-messages-js.js in a node project.
If you want to adapt this workflow to use a different tool, it’s helpful to understand the fundamental concepts it is using.
At a conceptual level, this workflow is doing a few things:
- Getting text from another source – Siri voice transcriptions, Android voice transcriptions, etc
- Using ChatGPT to turn the natural language of the input text into well-formatted JSON that computers can understand
- Formatting that JSON so it is in a form that the Notion API can understand
- Creating new tasks in Notion
In even simpler terms:
- It accepts text
- It transforms that text into something more useful – first with AI, then with hand-coded functions
- It sends the formatted text to a new destination
If you want to change it so that it support a different tool, you simply need to change part of the workflow to support that tool.
This is actually quite easy if all you want to change is the source. Our Pipedream workflow is triggered when any source sends a POST request to the trigger step’s unique URL, containing a JSON body formatted like so:
{
  task: 'I need to buy a new overhead light for the studio redesign project.',
  name: 'Thomas Frank',
  date: '2023-05-27T08:27:43-06:00'
  secret: 'muffins'
}
Code language: JSON / JSON with Comments (json)
If your chosen source can do that, you’re in business. A great tool for testing out POST requests with this type of JSON body is ReqBin, which I used a lot during the build process.
Example: Building a Slash Command for Slack
To give you an example of how you could build an alternative source for your tasks, I’ll give you a brief look at how I built a custom Slack command for creating new tasks in Notion.
I also have a full tutorial for this workflow, though it’s in what I’ll call “draft” state right now. I’ll likely polish it up and post it to this site in the future.
But to keep things short and sweet, I created a slash command in my team’s Slack workspace that allows us to type commands like this:
/task Mount new overhead light a: @Thomas Frank d: 05/10/23 p: Studio Redesign
Code language: plaintext (plaintext)
You can also get fancy and use interactive modals that contain multiple fields, but I opted to keep things simple and used what I’ll call “colon codes” to label things like assingee (a:), due date (d:), etc.
In Pipedream, I wrote code that uses regular expressions to extract the details of each task. This is where the colon codes come in; my regular expressions look for them, and grab the task details that follow them.
import { axios } from "@pipedream/platform"
export default defineComponent({
  props: {
    slack_bot: {
      type: "app",
      app: "slack_bot",
    },
  },
  async run({ steps, $ }) {

    // Set our Slack bot auth token
    const slackToken = this.slack_bot.$auth.bot_token

    /* Get the entire text from the Slack bot command.
    *  Format any colon keys that use semi-colons back to using colons
    *  (handles potential typos by user)
    */
    const text = steps.trigger.event.body.text.replace(/(a|d|p);/g, "$1:")

    // Define our array, taken from the text of the Slack message
    const arr = text.split(" ")

    // Push a "dummy" element onto the end of the array that contains a colon
    arr.push('e:')

    // Create a test function to use with our findIndex() calls in getTaskDetail()
    function colonTest(element) {
      const regex = new RegExp(this)
      const result = regex.test(element)
      return result
    }

    // Extract Slack User ID and fetch Real Name from Slack API using it
    async function getUserID(str) {
      const regex = /<@(w*)|/
      const user = str.match(regex)[1]
      let realName
      const response = await axios($, {
        method: 'GET',
        url: `https://slack.com/api/users.info`,
        headers: {
          Authorization: `Bearer ${slackToken}`,
        },
        params: {
          user: user
        }
      }).then((response) => {
        realName = response.user.real_name
      }).catch((error) => {
        console.error(error)
        realName = "Error: User not found"
      })

      return realName
    }

    // Create a function to extract each task parameter
    function getTaskDetail(arr, colonKey) {
      const present = arr.includes(colonKey)
      console.log(`Result for ${colonKey} is ${present}`)
      let result

      // If a colon key wasn't included, set its corresponding value to "Detail not included."
      if (!present) {
        result = "Detail not included."
      } else {
        const slice = arr.slice(arr.findIndex(colonTest, colonKey))
        slice.shift()
        const block = slice.slice(0, slice.findIndex(colonTest, '(a|d|p):')).join(" ")
        const bracket = new RegExp('<@')
        if (bracket.test(block)) {
          result = getUserID(block)
        } else {
          result = block
        }
      }

      // Format the date to ISO 8601 if it is present
      if (colonKey === 'd:' && result !== "Detail not included.") {
        result = formatDatetoISO8601(result)
      }

      return result
    }

    function formatDatetoISO8601(result) {
      // We need to convert the MM/DD/YY string to ISO 8601 - YYYY-MM-DD
      // Split the MM/DD/YY string into an array: ['MM', 'DD', 'YY']
      const dueArray = result.split('/')

      // If day is single-digit (e.g. 1), change to 01
      if (dueArray[0].length === 1) {
        dueArray[0] = '0' + dueArray[0]
      }

      // If month is single-digit (e.g. 1), change to 01
      if (dueArray[1].length === 1) {
        dueArray[1] = '0' + dueArray[1]
      }

      // If year is 2 digits, convert to 4 - e.g. 23 to 2023
      if (dueArray[2].length === 2) {
        dueArray[2] = '20' + dueArray[2]
      }

      // Combine the array elements into an ISO 8601 date string
      result = `${dueArray[2]}-${dueArray[0]}-${dueArray[1]}`

      return result
    }

    // Create an object to hold all the task details
    const taskDetails = {
      task: arr.slice(0, arr.findIndex(colonTest, '(a|d|p):')).join(" "),
      assignee: await getTaskDetail(arr, 'a:'),
      due: await getTaskDetail(arr, 'd:'),
      project: await getTaskDetail(arr, 'p:')
    }

    return taskDetails
  },
})
Code language: JavaScript (javascript)
This code returns an object called taskDetails, which is very similar to the JSON object used in the trigger step of the main tutorial above.
From there, I use the object to create the task in Notion. This automation actually doesn’t use ChatGPT (I originally built it for a privacy-concious organization that didn’t want to use ChatGPT).
If you incorporated ChatGPT as we did in the main tutorial above, you wouldn’t even need the colon codes!
As for sending tasks to a different destination… well, that’s a little bit harder, though not impossible. The workflow above structures each task object to fit the requirements of the Notion API.
If you want to create tasks in another tool, you’ll need to get familiar with that tool’s API (if it has one), and write code to format your tasks for it.
I can’t go much further in this section, as adapting this workflow for other tools is beyond the scope of this tutorial. However, I hope this overview at least gives you some direction for any adaptations you want to make!
As always, I’ll note that ChatGPT itself is an excellent tutor for these kinds of projects.
Wrap Up and More Resources
If you’ve followed this guide all the way through, you now have a completely hands-off automation that will let you create new tasks in Notion using your voice.
Congrats! But of course, this is just the tip of the iceberg.
You no doubt noticed that we’re accomplishing all of this by working directly with the Notion API using JavaScript.
If you have more ideas, either for extending this workflow or building new ones, all you need to do is figure out what code you need to write in order to realize them.
To get started down that path, check out my Notion API Beginner’s Guide:

This is a truly comprehensive introduction to coding with the API, and even features a 2-hour video tutorial. And it’s 100% free.
You can also find other no-code tutorials at my Notion Automations hub:
You might find these guides helpful as well:
I’d also recommend checking out the Pipedream docs if you want to work more with the platform.
Copy link to headingSupport My Work
This tutorial took well over 100 hours to research, test, debug, write, and film.
If you’d like to support my work, the best way is to share it. So if you enjoyed this tutorial, please share it on Twitter, LinkedIn, or with a friend 🙂
I’ll also note that this automation works extremely well with Ultimate Brain, my all-in-one productivity template for Notion.
If you want a complete, done-for-you second brain in Notion, give it a shot:
Want to turn Notion into a complete productivity system? Ultimate Brain includes all the features from Ultimate Tasks - and combines them with notes, goals, and advanced project management features.
Get $50 off with code SPRING50!
Finally, if you want to get notified when I release new tutorials (like this one) and templates, join my free Notion Tips newsletter:
The Notion Tips Newsletter
Join 50,000+ folks and enjoy your morning coffee alongside my latest Notion guides and templates, delivered hot(?) and steaming(?) to your inbox.