
Pages in Notion can be simple, single-column affairs – but your pages can also have multiple columns as well. In fact, you’ve got quite a lot of control over how you lay out your pages in Notion!
This allows you to create complex dashboards, wikis and knowledgebases, task management systems (like Ultimate Tasks), and lots of other cool things.
In this Notion Fundamentals lesson, you’ll learn how to create these types of multi-column layouts.
Note: As I mentioned in Page Basics, you can make Notion pages full width on a page-by-page basis. In most cases, you’ll want to do this when creating a multi-column page – however, it’s not required.
Copy link to headingDragging and Moving Blocks
Any block can be dragged and moved around on the page. To drag a block, click and drag the six-dot icon to the left of it. You can also select multiple blocks and drag them all at the same time in this way.
As you drag a block, you’ll see a blue line indicating where it will go. Release the block to drop it wherever you want.
Copy link to headingCreating a New Column
You can create new columns by dragging a block to the left or right of another block. You’ll see a vertical blue line indicating that a new column will be created once you do this.
After you’ve create a new column, you can drag other blocks above or below the first block within that column to add them to it. You can also drag them to the side to create even more columns.
You can create layouts with a lot of columns. In fact, I’m not even sure there’s a true limit to how many you can create:
There’s one caveat to this feature: inline database blocks don’t play nice with it. You can’t drag them to the side of other blocks, nor can you drag other blocks to the side of them in order to create multiple columns. I’m not sure if this is a bug or intended behavior, but it’s been this way for a long, long time.
But fear not! There are a couple tricks for getting inline databases to play nicely with multi-column layouts.
First, you can click the three-dot menu on any inline database and then click Turn into page. This will convert your inline table into a Page block, which can be easily dragged around and used to create columns.

Once you’ve created a column, click the three-dot menu once again and choose Turn into inline. Voilà! You now have a new column with your inline database.
However, there’s another trick I use even more often. Simply create a column using another block (such as a Heading), and when drag your inline database under that block.
This is typically faster, and I usually like to put header blocks at the top of my columns anyway.
Copy link to headingOrganizing with Toggles
One of my favorite blocks in Notion is the toggle block.
Toggle blocks can be used to hide and show other blocks. They’re great for hiding detailed asides within long articles, giving the reader the option to skip over extraneous details if they’re in a hurry, or to open up the toggle if they want to soak up all the details.
In addition to hiding long asides, toggles can hide pieces of multi-column layouts in order to keep them more organized and easier to navigate (especially when you’re using Notion’s mobile apps).
When you’re creating a multi-column layout, try using some toggle blocks to keep things hidden and tidy!
Copy link to headingNested Columns in Notion
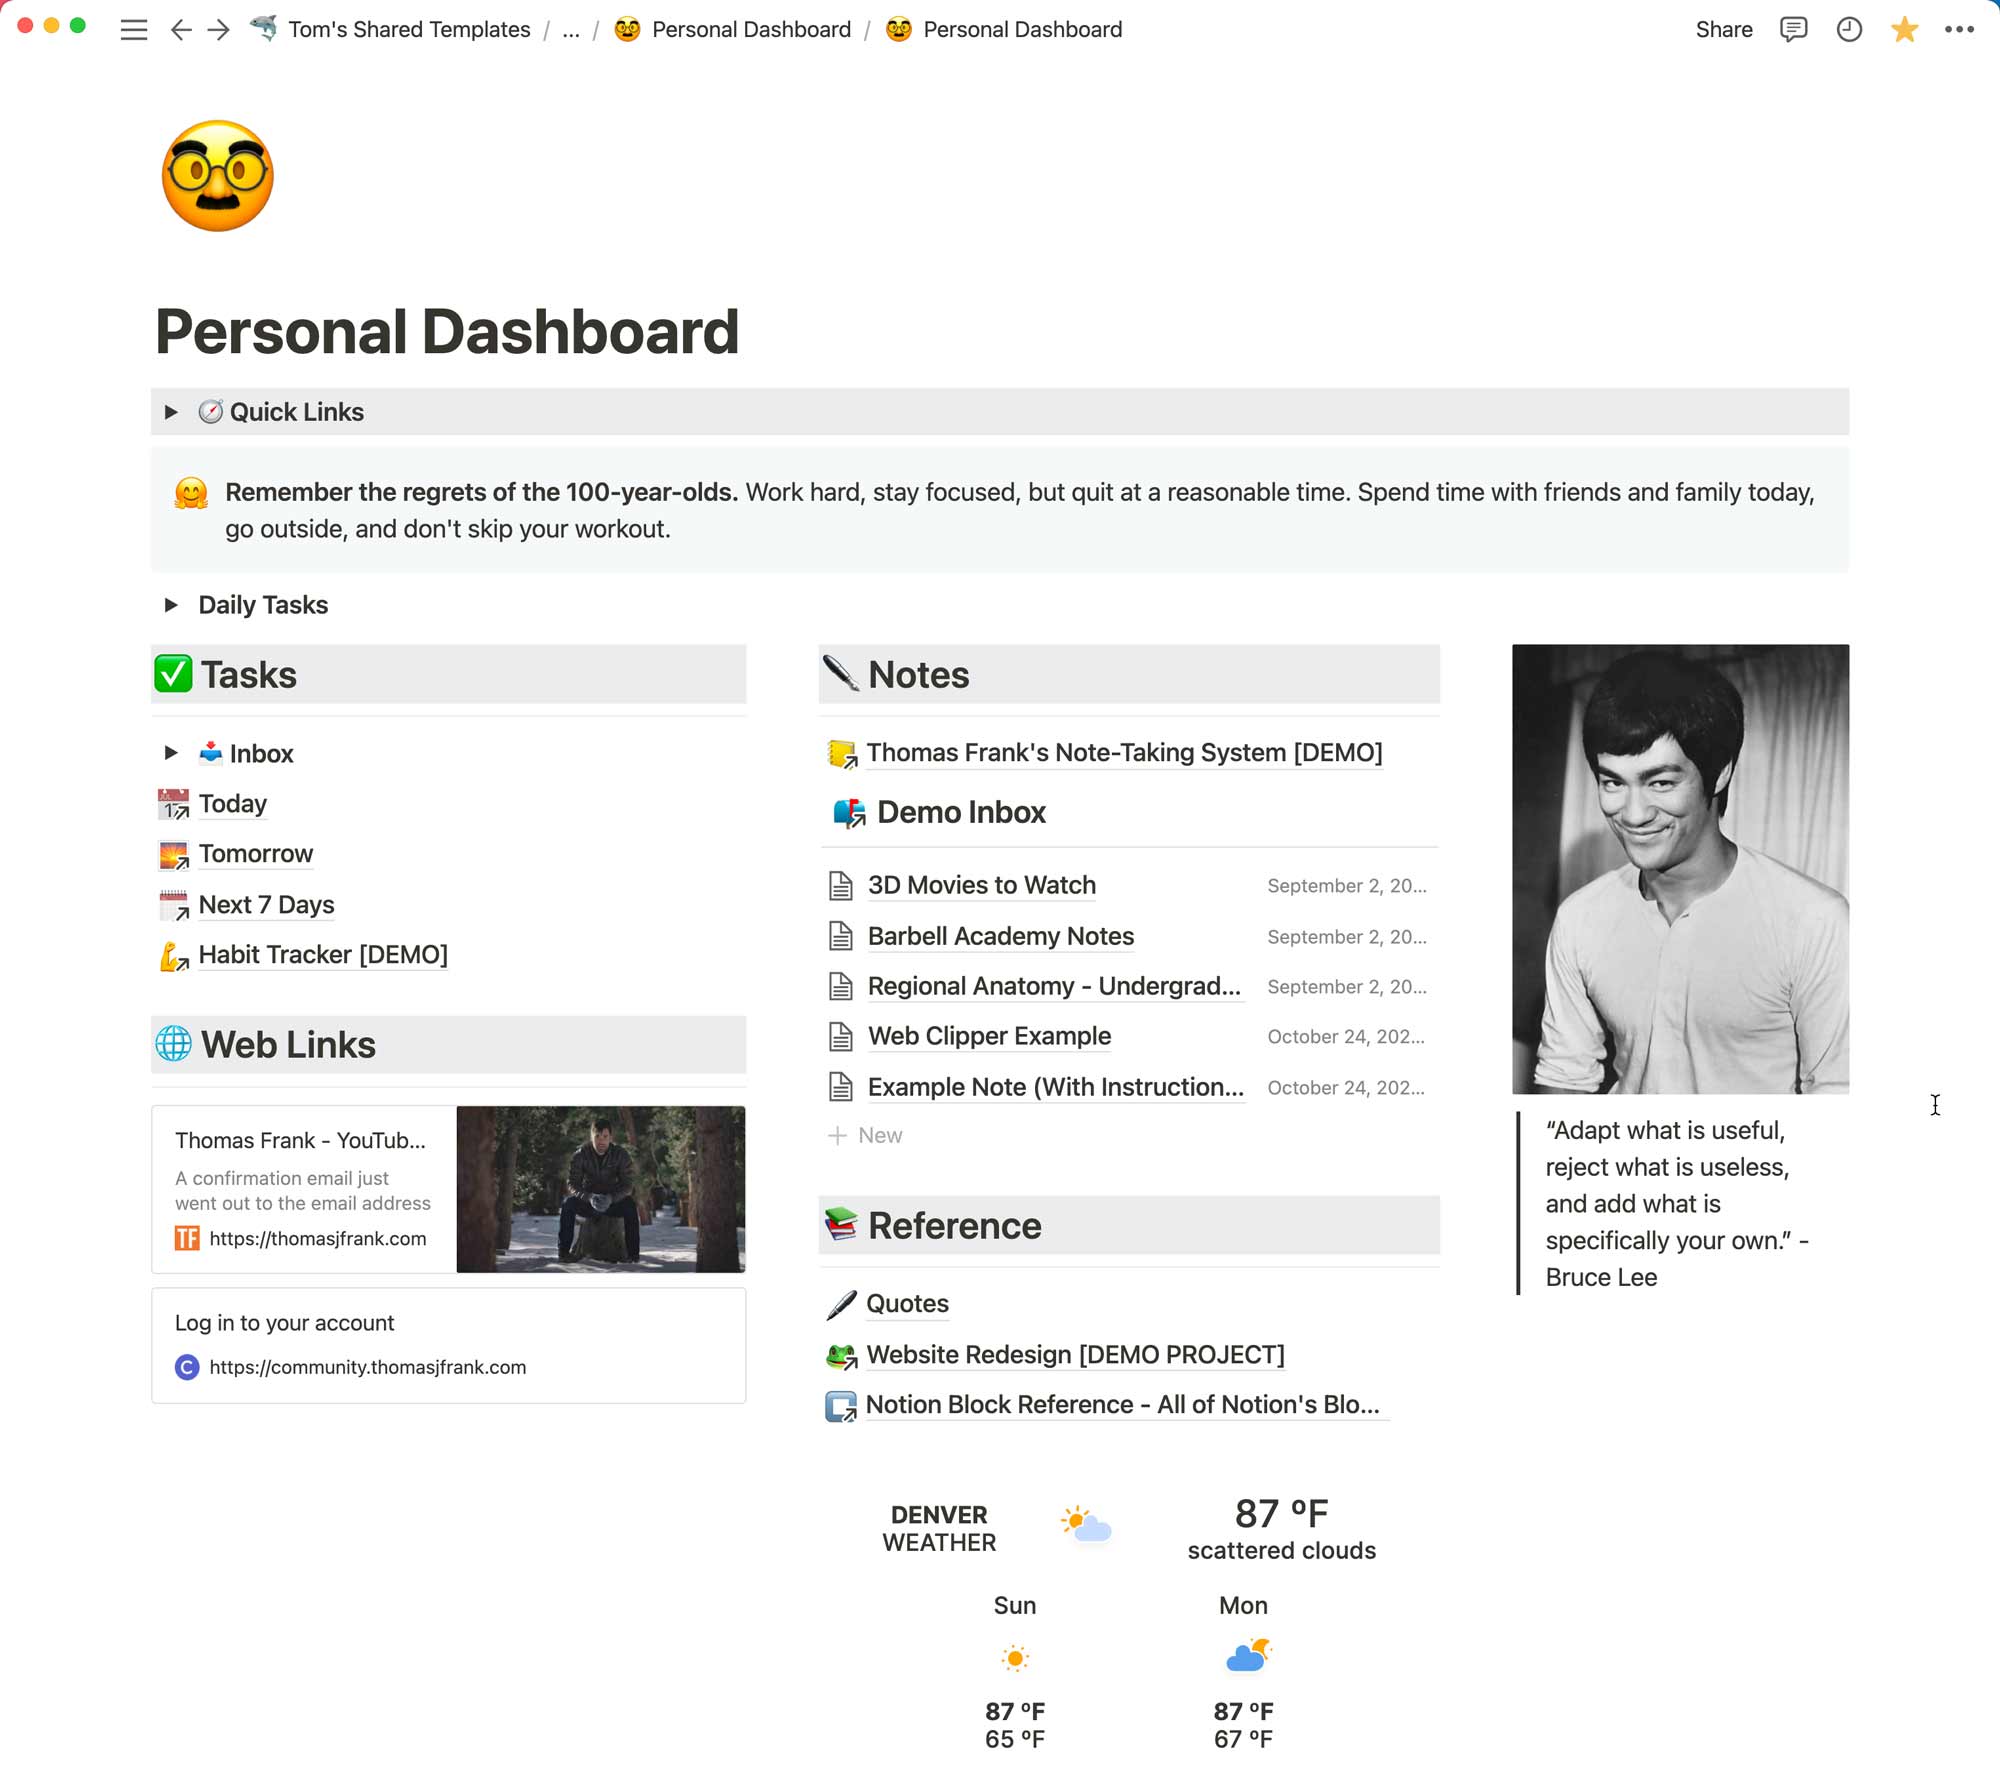
It’s also possible to nest multiple columns underneath an existing column. You can see an example of this in my free Habit Tracker template:
If you try to create this type of layout by dragging and dropping blocks, you’ll find that it’s impossible. By default, you can’t create multi-column layouts within an already-split column. You can make a row of two columns, then a row of three under that – but you’ll find that those rows are very much separate.
In order to create a layout like you see above, you’ll have to use an advanced trick. I know, I know – this is a Notion basics course – but I think we can make time for just one advanced trick!
Here’s the secret: You can paste multiple columns into a Toggle block, then drag that Toggle block and drop it into an existing column.
After doing so, you can then use the Turn Into function to turn the Toggle into a Heading. Once done, your columns will be nested under their parent column normally; you can simply delete the Heading afterwards.
Note that this trick also works with Page blocks – you can create multi-columns layouts in a page, nest that page block under a column, and then turn it into a Heading just like you did with the Toggle block.
Copy link to headingMobile Layout Considerations
Multi-column layouts do not work on mobile phones. Instead, much like most responsive websites do, your columns will stack on top of each other in a left-to-right fashion.
Keep this in mind when designing dashboards and other multi-column pages that will be accessed from a phone. How can you set things up so that you won’t have to do a ton of scrolling on your phone?
Here are a couple tricks I employ.
First, put things in toggles. This allows you to scroll to the section you need quickly, then open up the toggle to find specific content.
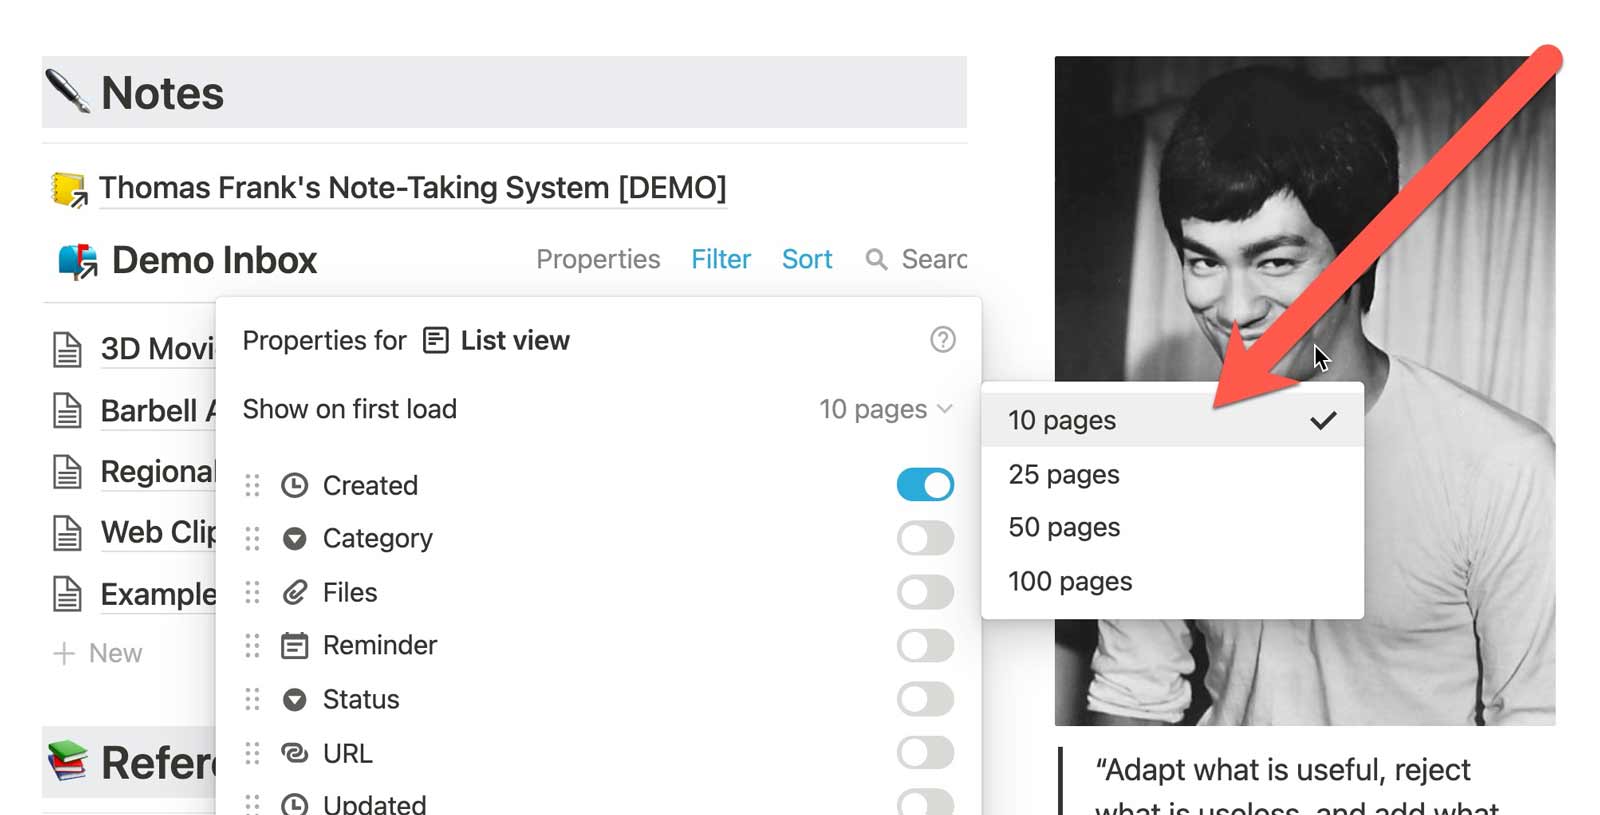
Second, limit the number of rows that are loaded by default in any inline databases. I typically like to limit mine to 10 rows – I can always click to load more if I need.
Finally (and this one is really cool), you use a Table of Contents block to create a list of links to your on-page Headings. Notice how I’ve created a “Quick Links” section at the top of my Dashboard Example. When you tap on these links, they’ll zoom you straight to that block on the page.
This is a design pattern that I use in nearly all my templates, and you’ll likely find it to be very useful in your own workspace.
Now that you understand how to create multi-column layouts, let’s move onto the next fundamental concepts – creating page links and sub-pages!
If you enjoy this content and want more, consider joining my Notion Tips email list! I’ll keep you up to speed on my Notion courses, but also let you know when I publish new free tutorials and templates:
The Notion Tips Newsletter
Join 50,000+ folks and enjoy your morning coffee alongside my latest Notion guides and templates, delivered hot(?) and steaming(?) to your inbox.