Welcome! This doc is a comprehensive guide on getting started with Ultimate Brain 3.0 if you’ve already been using the template before we launched 3.0. 3.0 is a completely redesigned, much upgraded version with an all-new one-column design and a bunch of useful features. Check out this doc to see what’s new. Follow this very guide if you’re an existing Ultimate Brain customer.
As a short summary, you have three options;
- Do nothing – stay on 2.0. (This is totally okay, upgrades are optional).
- Start fresh with 3.0 (Recommended method).
- Transfer 2.0 data to 3.0.
It’s Best To Start Fresh
Due to the below-mentioned quirks and limitations of moving data between sets of interconnected databases in Notion (which is what this process essentially boils down to), transferring data is possible, but time-consuming and error-prone. Because of this, our no.1 recommended path for starting with Ultimate Brain 3.0 is just starting fresh. We recommend using this opportunity to refresh your system, review your commitments, and by starting with a clean slate — get a clearer picture of what is useful in your daily usage. Many of us on the team are starting fresh instead of transferring. Since this guide and the 3.0 template are being released at the end of 2024, we’re also using this timing to start 2025 with a beefed up, clean system. Perfect opportunity for a productivity reset.
That being said, if you do have critical and relevant data in your current Ultimate Brain, feel free to follow the steps below to perform a data transfer.
Copy link to headingWhy Are Transfers Hard?
We’re the only Notion template foundry to provide upgrades for already released templates. Other folks just release new templates with little to no continuity between previous releases. We take pride in going the extra mile and supporting our customers beyond just the original template.
Due to how Notion is currently built, transferring data between sets of interconnected databases (which is what systems like Ultimate Brain are on the back-end) is complex, error-prone and time consuming. We’re in close contact with the Templates team from Notion and providing them with feedback on how to make this easier to do in the future, but since we’re the only template makers providing this, it might take Notion a good while to add better features for upgrading.
Copy link to headingDo I Have To Upgrade?
Short answer: no! Upgrades are completely optional.
Long answer: we provide Ultimate Brain upgrades as an additional perk to existing customers, but those upgrades are completely optional. Each new version comes with improvements and better design, and you’re welcome to upgrade. But, if your existing system is working well for you, and you don’t have ample time to upgrade, it’s completely okay to stay with your current system.
Since Ultimate Brain is a system built on top of Notion, you are already receiving all Notion upgrades, security patches, and so on, over-the-wire. Our “upgrades” are just improvements and additions on the Ultimate Brain level. Safe to miss out on.
Copy link to headingWhat about modified Ultimate Brains?
If you have modified your Ultimate Brain from the “vanilla” version, this process may not be 100% accurate. Since there are so many ways to modify a Notion template, we can’t provide guides or support for every single scenario. If you have modified your system, you may need to undo those modifications before you transfer, or try to add those modifications to your blank 3.0 copy before you transfer. Keep in mind, we won’t be able to provide support for transfers. Best to start fresh in this case.
Copy link to headingTransfer Process
Welcome to the Ultimate Brain 3.0 transfer guide. This page will guide you through the process of transferring your data from your current copy of Ultimate Brain to a new copy of Ultimate Brain 3.0.
Please note that this process is complex, can be time-consuming, and is something we can’t provide active support on. This is simply due to how Notion is built.
While we do our best to answer every question we get, we’re still a very small team with limited time to provide support. Since transfers are so complex, questions about them can easily turn into multi-hour tickets.
Due to the fact that we sell our templates at affordable, one-time prices, we’re simply unable to provide a support guarantee that covers deep support on template transfers.
If you feel you need more hands-on help, we have fantastic, expert-level Notion consultants and coaches with whom we can connect you. Just email here and we’ll happily refer you.
I’m writing this to set expectations up-front. In short:
- Transferring your data is possible.
- If you know what you’re doing, it can likely be done in less than an hour (with some caveats).
- Unfortunately, the process is complex and it’s easy to make errors which can lead to data loss.
To “know what you’re doing” requires deep knowledge of how Notion behaves when you move pages between databases, and there are a lot of little “gotchas” that we’ve only discovered through meticulous testing. If you’re not deeply familiar with Notion, it’s best to just start fresh with 3.0 and forgo the transfer process.
That said, we’ve done our best to make this guide as comprehensive as possible. I wrote this guide while transferring data from my own personal copy of Ultimate Brain 2.0 to a new copy of Ultimate Brain 3.0.
Copy link to headingTransfer Challenges
Some important challenges to mention;
- Relations between databases are not preserved when transferred. This means that your Tasks connected to a Project won’t automatically connect to the same Project in 3.0. You’ll need to manually re-connect every item across the entire system. In the guide, we give you some tips on how to make this easier, but this is still a very significant challenge to the overall process. The amount of work here will grow exponentially with the amount of content you have. If you have 1000s of entries in your UB, re-relating every entry may take a long amount of time. Keep this in mind while deciding to transfer. It might grow into a very long and tedious process.
- Properties can be mismatched across the two copies. We’ve changed, removed, and added properties to 3.0. Be very careful in step 5 (Renaming and Editing Properties) — if some properties are mismatched when you transfer, data may be lost.
- Step 9 — Resetting Template Instances is very important to understand before you undertake this transfer process. Watch this short video;
Preparing for the Transfer
These are the steps required to prep for the transfer. Don’t attempt the transfer process before completing them.
- Do a reset and clean out your template
- Back up your template
- Rename the backup’s databases (if the backup is in the same workspace)
Clean Out Your Template
Before you proceed with the transfer, it’s a good idea to clean out any unnecessary content, old, inactive pages.
Copy link to heading‼️ Back Up Your Template ‼️
This step is very important. In case anything goes wrong in the transfer process, it’s best to make a backup first.
📹 Video Instructions:
This is extremely easy to do:
- Navigate to your main Ultimate Brain home page.
- Click the
••button in the top-right corner of the page. - Click Duplicate.

Once done, the duplication process can take a while – especially if you have a lot of content. When it’s finished, the duplicate will have a (1) at the end of the title, and it’ll be placed directly below your main copy.
By default, both copies will likely be in the Private section of your workspace’s sidebar. If you’ve shared Ultimate Brain directly with someone else, they may be in the Shared section instead. If you’ve deliberately moved it to a Teamspace, both copies will be there. Check out our guide to Page Sections to learn more.
Treat the duplicate as your backup. You’ll want to continue using your original copy, but the duplicate will be there in case you accidentally make changes to the original copy that you don’t like, and can’t easily fix.
Copy link to headingRename the backup’s DBs
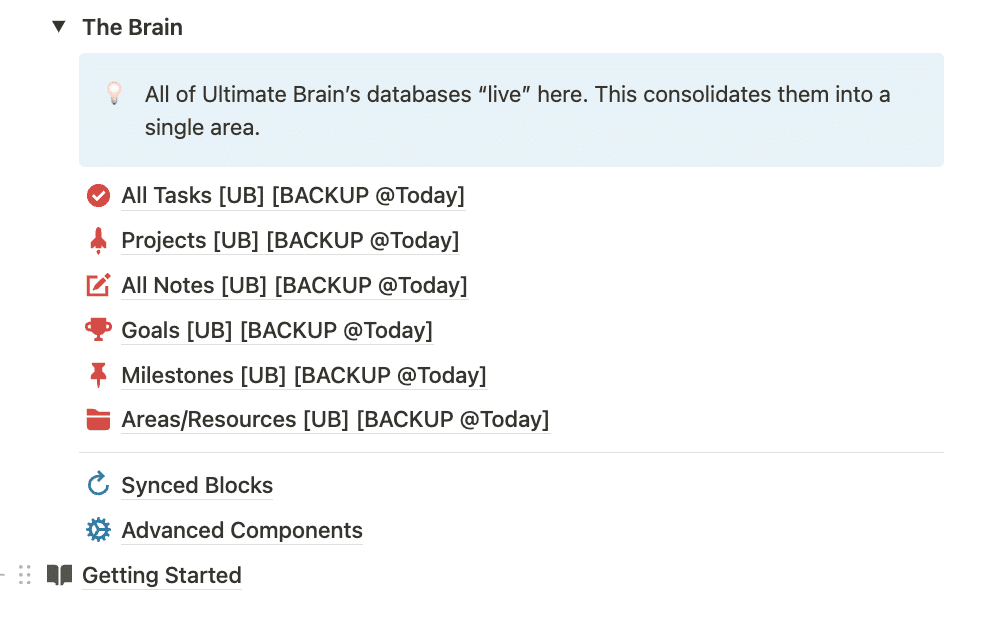
After the backup duplicates, make sure to go into the Archive → The Brain and rename all of the backup’s databases. I like to add a little suffix: [BACKUP {Backup’s date}]. In case the databases are locked, unlock them, and then proceed with the renaming.
Performing the Transfer
Here are the transfer steps. You can write them down as checklist items to check off as you proceed with this guide.
- Step 1: Choose which copy you’d like to transfer
- Step 2: Add Database Suffixes
- Step 3: Set Up the Transfer Center
- Step 4: Rename and Edit Properties
- Step 5: Create Relation Reference Properties
- Step 6: Perform a Test Transfer
- Step 7: Transfer All Pages
- Step 8: Restore All Relations
- Step 9: Reset Template Instances
1. Choosing Your Transfer Copy
📹 Video instructions for Steps 1 and 2:
First, make sure which copy you’d like to transfer from and which copy you’d like to transfer to. This is important, since if anything gets mixed up, or you have multiple copies of Ultimate Brain in your workspace, it’s easy to confuse them and accidentally transfer data to the wrong destination.
If you have multiple Ultimate Brain copies, choose the one that actually contains your content. Then, grab a fresh copy of Ultimate Brain 3.0 from this post on our community.
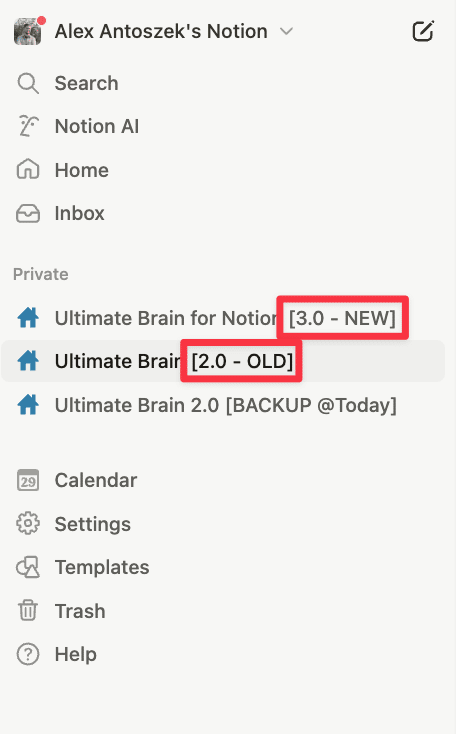
Make sure to add suffixes to both top-level pages so that you can easily spot which one is which;
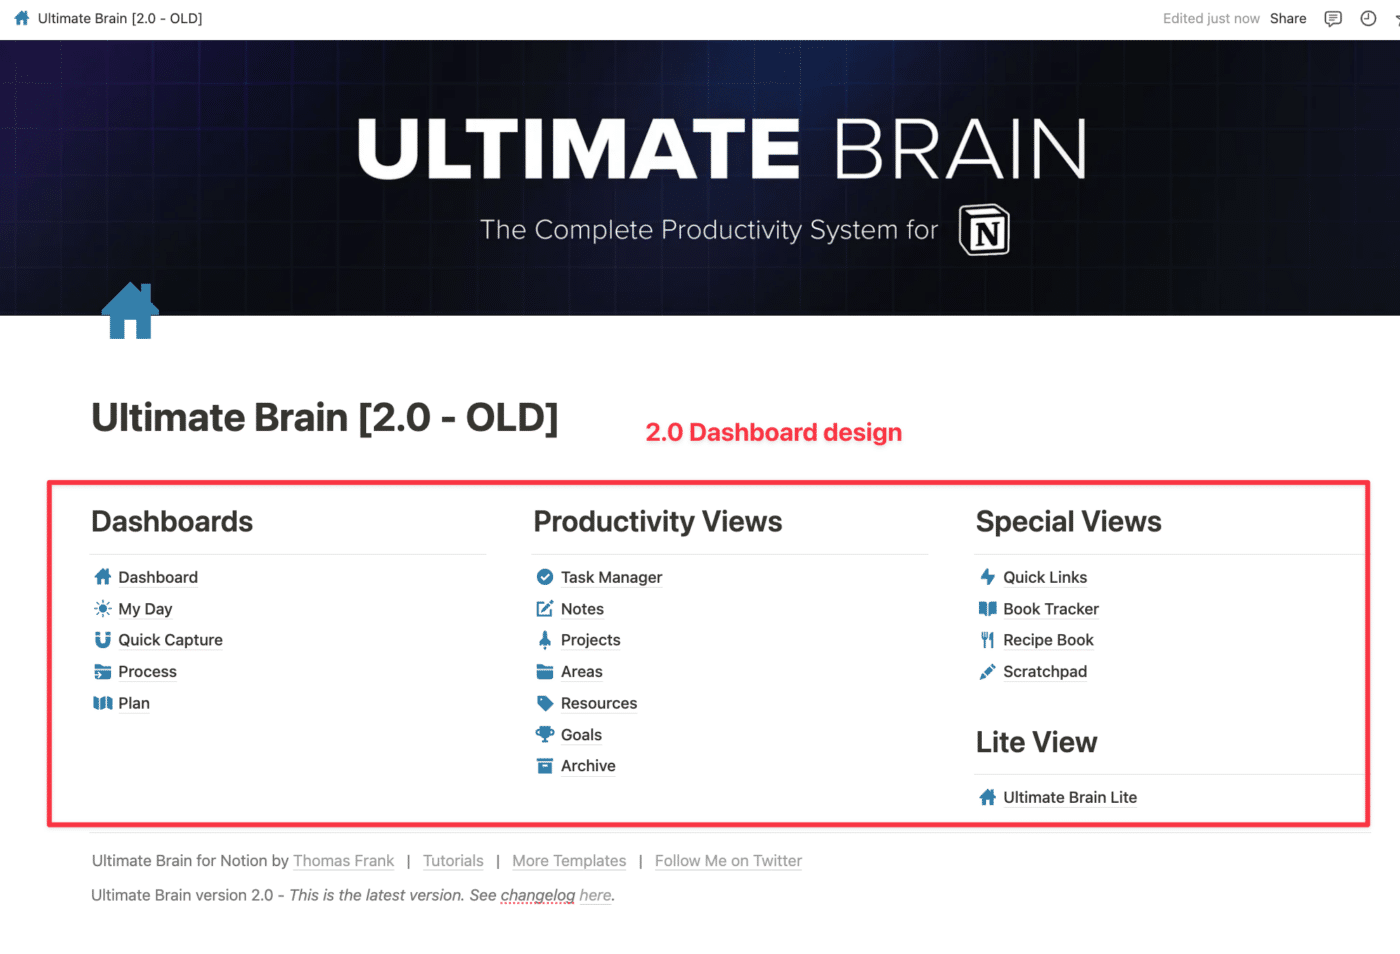
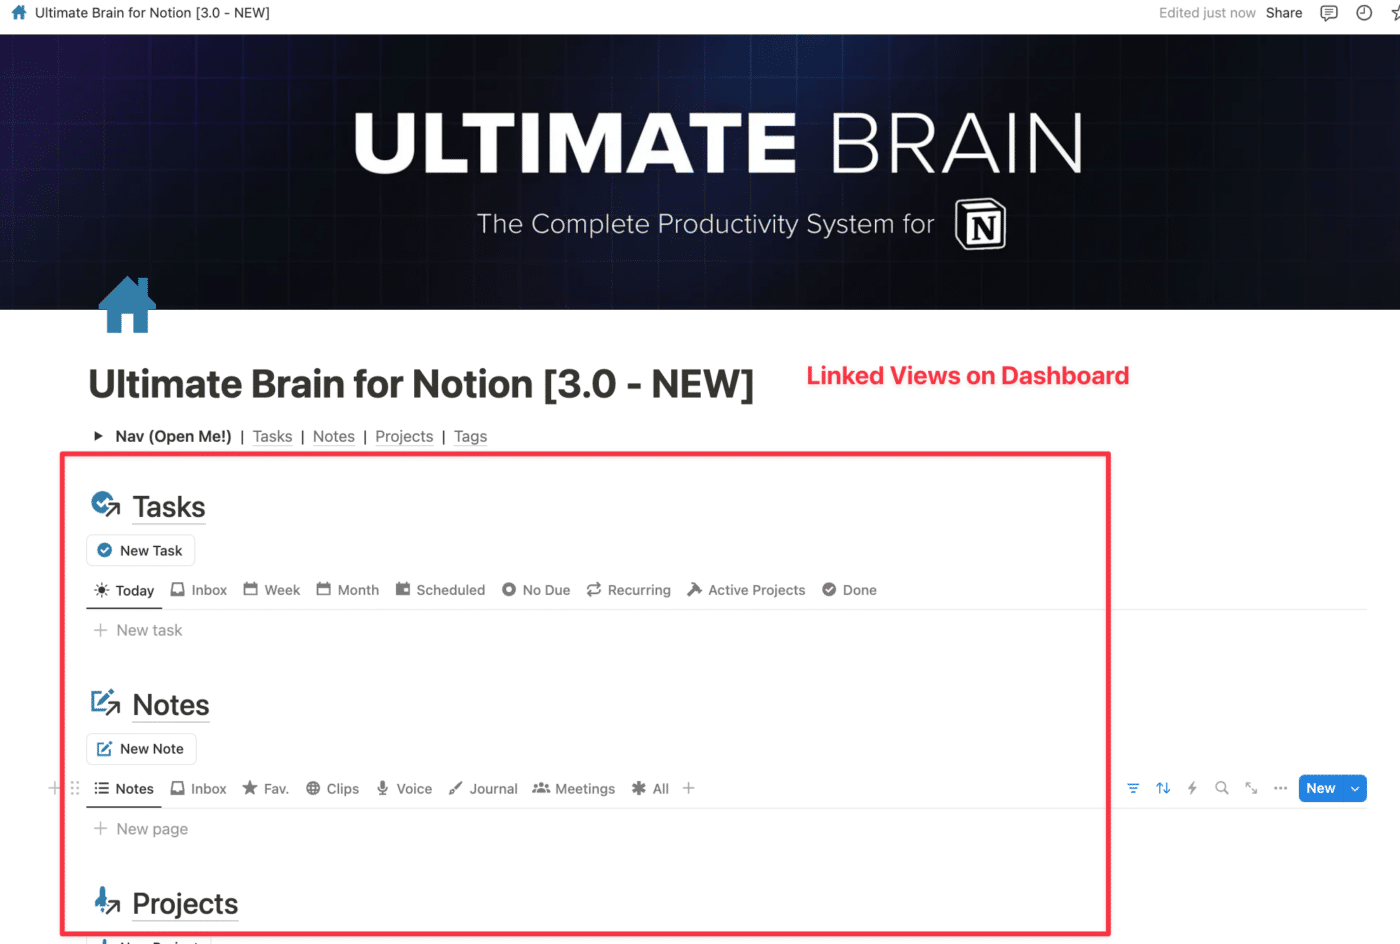
P.S. You can easily differentiate 2.0 and 3.0 by looking at their top-level pages. 2.0 has a three-column layout with no Database views and links to all the pages, while 3.0 directly displays data on the home page and has a single column layout.
2. Adding Database Suffixes
Now, we’ll need to add suffixes to core databases in both Old and New copies. Since the most of the transfer process is around databases, it’s crucial to be able to easily differentiate Old and New databases.
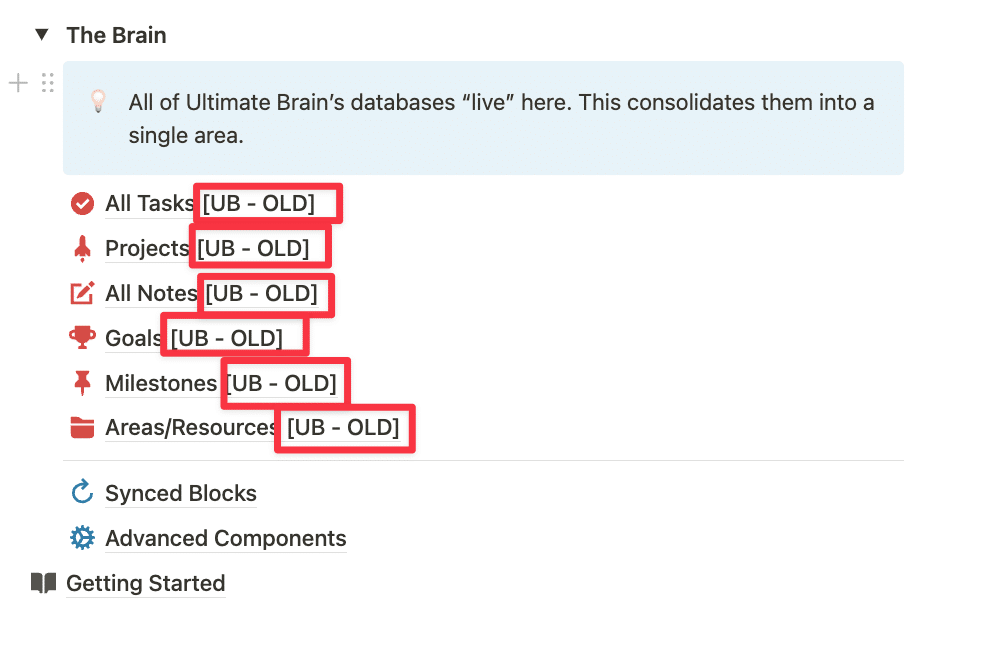
To do this, first go into your existing Ultimate Brain 2.0, open the Archive page, scroll down to the bottom, open The Brain (a toggle), and open each of the following six databases, and add a little suffix, for example, [UB - OLD], to the title. You may need to unlock each database first.
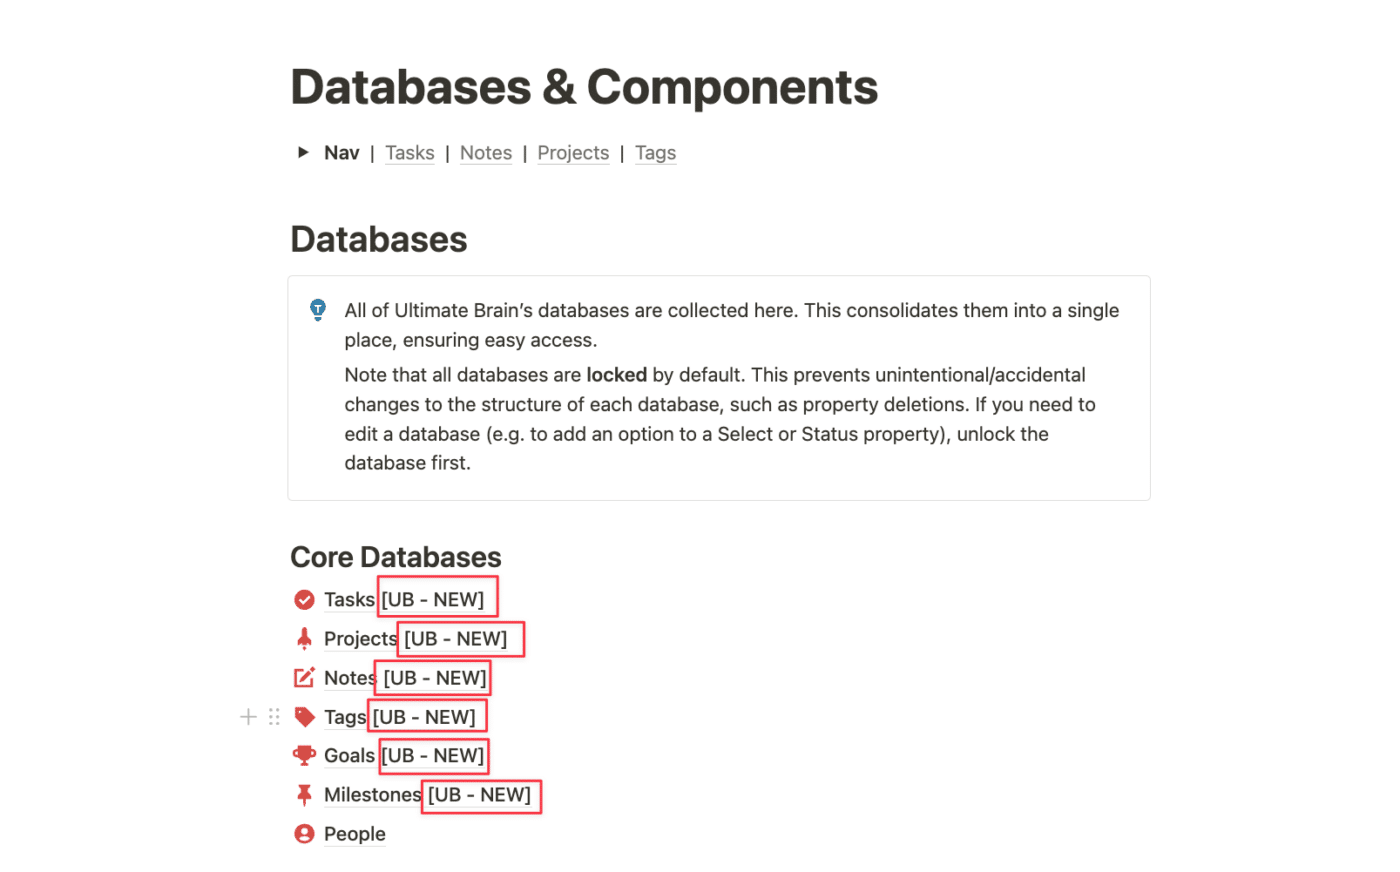
Then, do the same for your freshly duplicated Ultimate Brain 3.0. In this case, just scroll down on the main home page and open the Databases & Components page. Here, we just need to add suffixes to the six databases that also exist in 2.0. Rest can stay as they are, since they are new databases. Rename; Tasks, Projects, Notes, Tags, Goals and Milestones. Add a little suffix to each title, for example, [UB - NEW]. You may need to unlock each database first.
3. Set Up the Transfer Center
📹 Video instructions:
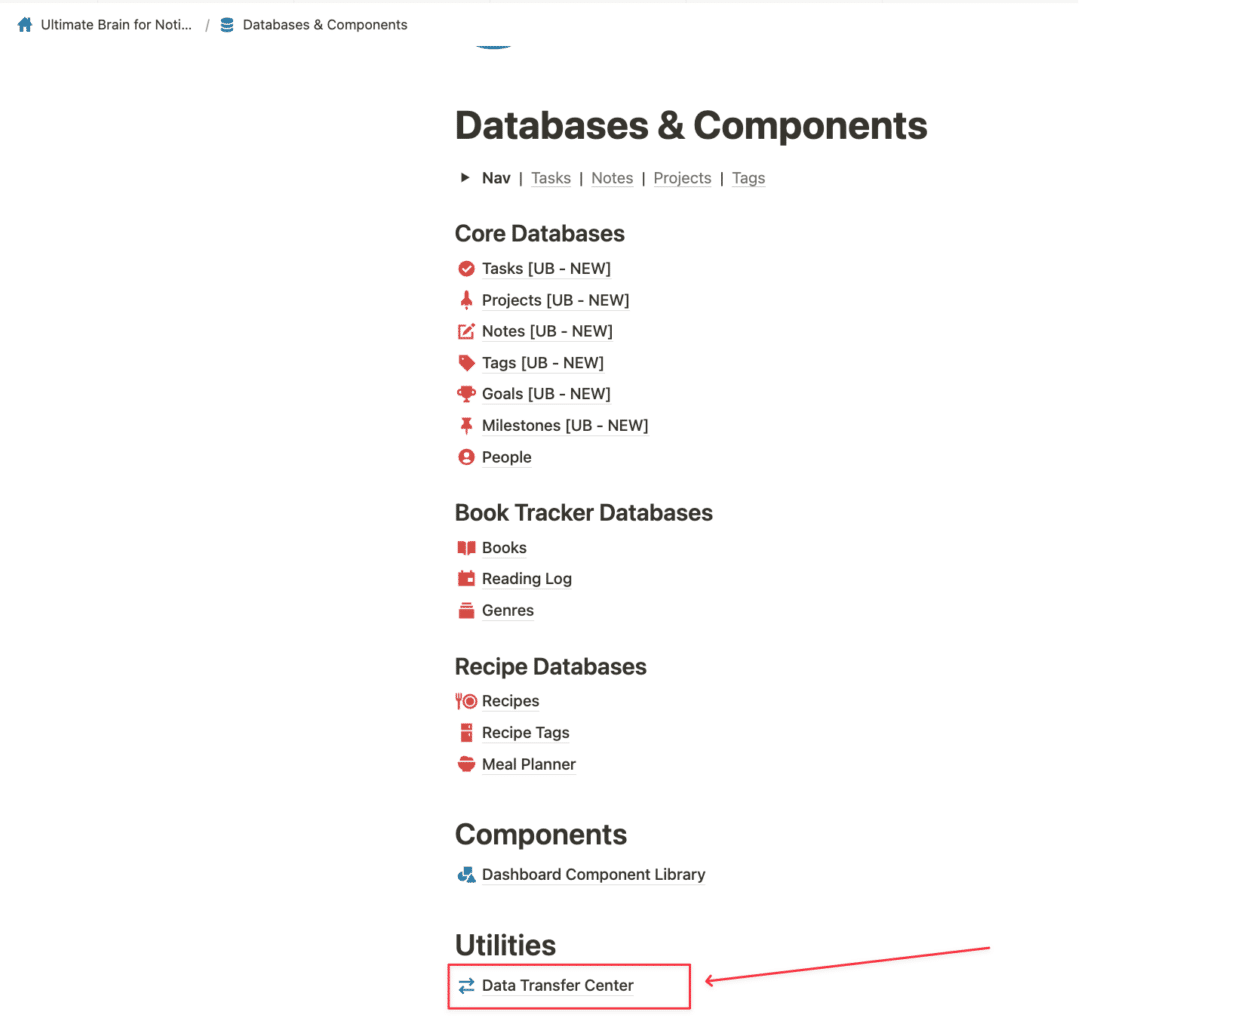
Ultimate Brain 3.0 comes with a handy page titled Transfer Center. You can find it at the bottom of the Databases & Components page;
It’s a helpful utility that makes this transfer process a bit easier to manage. Once you open this page, you’ll see three tools. For now, we’ll focus on the third one, the “Core Data Transfer Tool“.
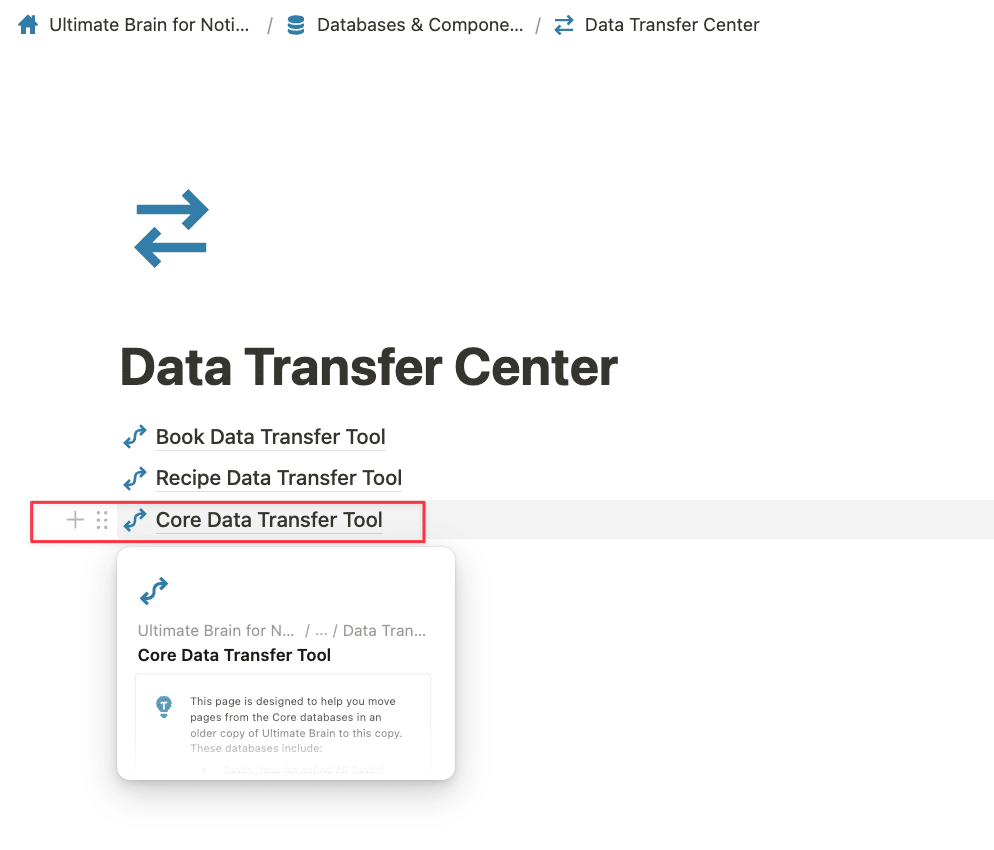
Once you’re in, you’ll see six toggles for transferring your data. Each is reserved for one of the six databases we’ll be transferring. Once you open a toggle, you’ll see the New database already linked at the top. This will be the database we’ll be transferring to.
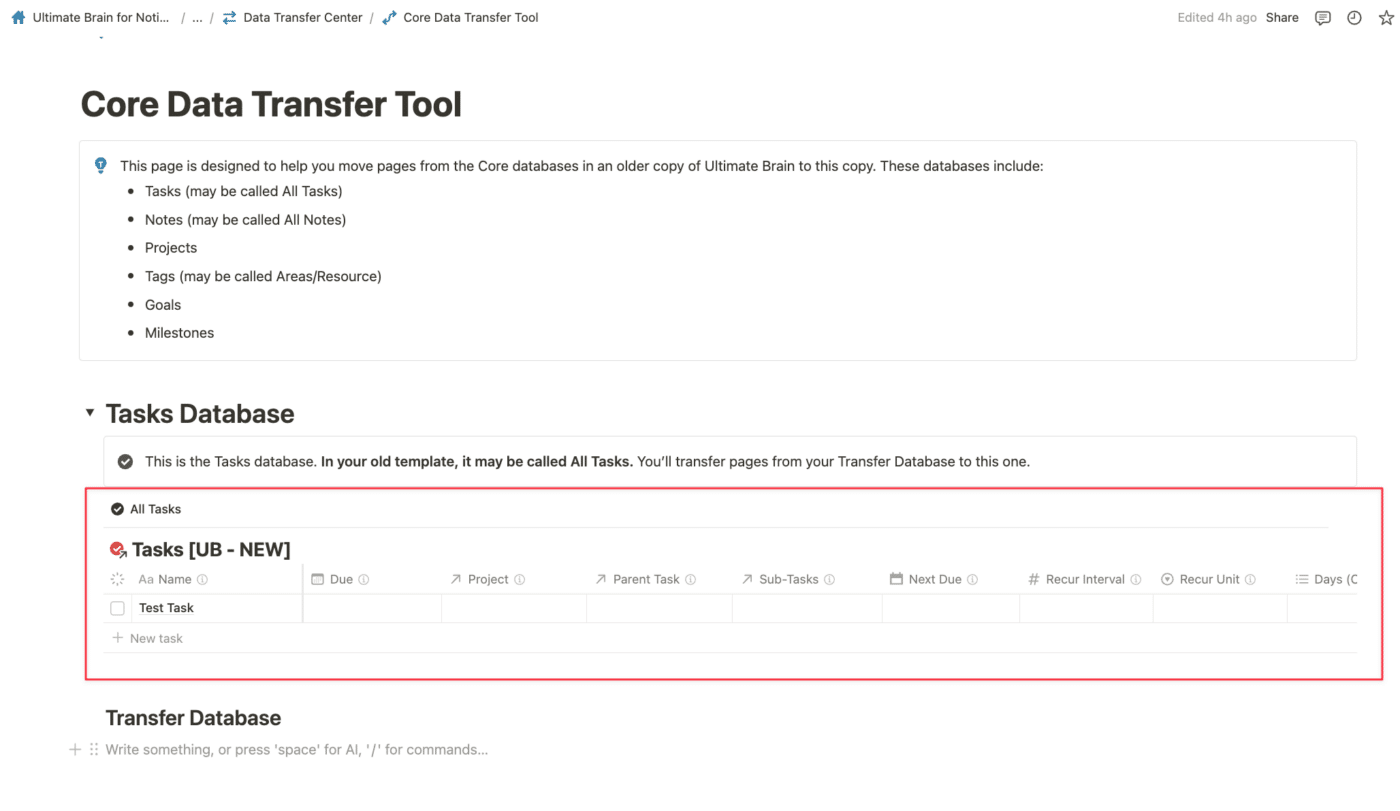
Now, below this New database we’ll need to create Linked Views of each Old database from Ultimate Brain 2.0. To do this, just start typing /linked, choose “Linked View of Database”. Then search “Tasks – Old”, choose your Old database. Now, select “Create new Table view” instead of choosing any of the existing views. We need all Database views to be unfiltered for this transfer process.
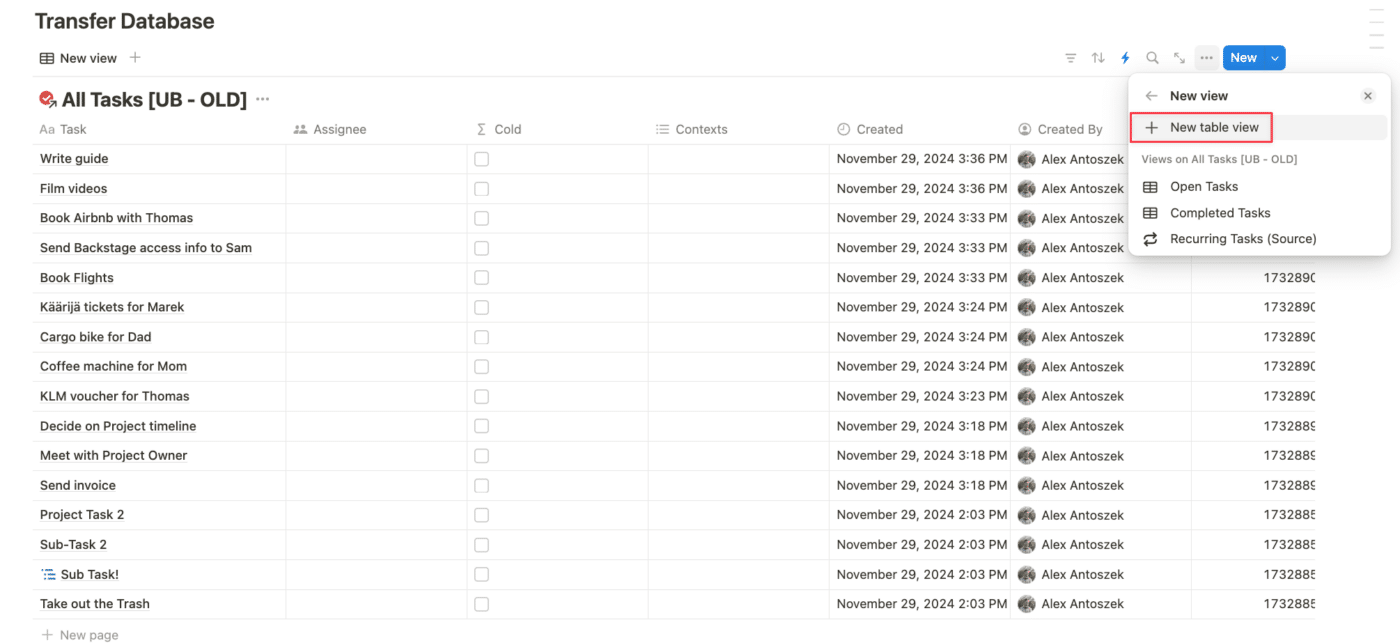
Now, continue with the same process for all six databases and toggles. You can also watch the video above for more help.
Copy link to heading4. Rename and Edit Properties
Now comes the first tricky part. We need to prep our Old (2.0) databases for transfer by removing, editing, and renaming properties so that they match properties in our New (3.0) databases and no data is messed up by transferring.
Updating Properties in Tasks
First, let’s work with the Tasks database:
- We’ll be editing three properties; Done, Kanban Status and Priority
- And removing eleven properties
Video instructions for editing properties in the Task database:
Let’s start by editing Done and Kanban Status.
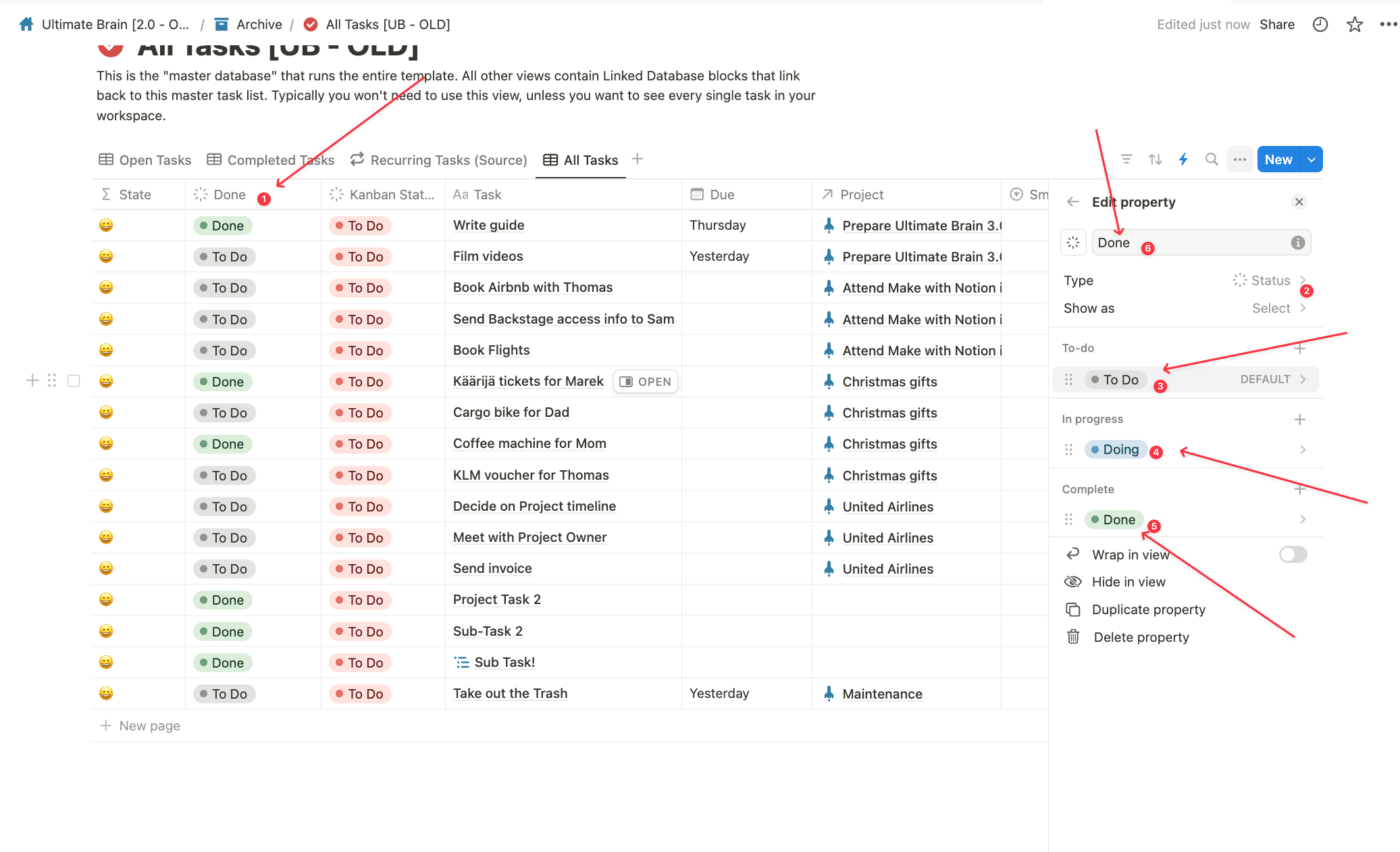
In Ultimate Brain 3.0, we’ve replaced these two 2.0 properties with a single, unified Status property. If you were using either just the Done or the Kanban Status properties to track your Task’s completion, we can just turn either one of those into the new Status property and delete the other. If you were using both properties interchangeably, we’ll need to first update the values from one to the other and then turn into Status.
Updating values from Done to Kanban Status and vice versa:
First, in your All Tasks [OLD] database, create a new Table view with no filter and title it “All Tasks”;
Then, drag the Done and Kanban Status properties next to each other.
If you used Done more often than Kanban Status, go through your task list and update Done values with Kanban Status values. So, if a task has a Done Kanban Status, but is unchecked in the Done property, check Done off.
Similarly, if you used Kanban Status more often and Done occasionally, go through your list and update any task that is checked off in Done with a Done Kanban Status.
Transforming Done or Kanban Status into the new, unified Status property
Once you’ve updated your properties, you need to delete the one that won’t be used anymore – we’ll simply turn the property (Done or Kanban Status) that contains all of your Task’s done status into the new, 3.0 Status property. Delete a property by right-clicking on the title, and selecting Delete property.
To turn Kanban Status into the new Status, just rename it to “Status“. And that’s it. To turn Done into Status, you’ll need to right-click on the property title, then click Edit Property, and change the property type to Status. Then, you’ll need to manually re-name all of the newly created status options to; To Do, Doing and Done. Don’t forget to rename the property to Status!
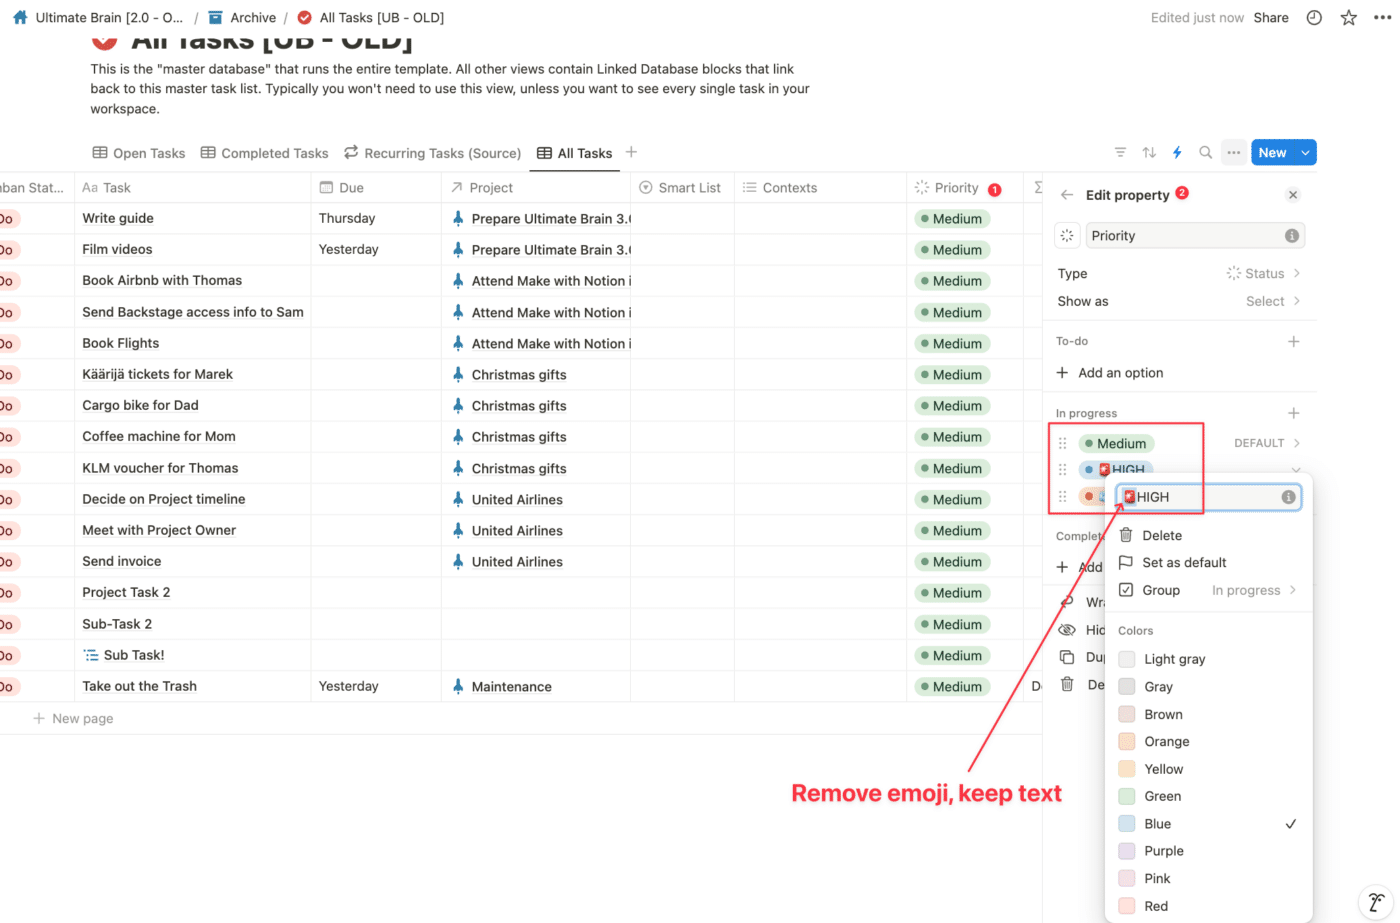
Now, we’ll need to edit the options in Priority. This is a cosmetic change, but it’s important – we need to remove the emojis from each option. To do that, just click on “Priority”, click Edit Property, and then in click on each of the three options and remove the emojis from the text. Make sure to also change “HIGH” into “High”, as we have removed the capitalization in 3.0.
Lastly, we’ll need to remove 11 properties from our All Tasks OLD database. Remove each of the following properties (right click -> Edit property -> Delete property).
- Kanban Tag
- State
- Late
- Sub-Task Count
- Priority Project
- Sub-Task Divider
- Type
- Sub Seed Name
- Sub Seed
- Created Stamp (Parent)
Now, let’s move onto Notes.
Updating Properties in Notes
Notes is a bit simpler to prepare. We’ll simply need to remove these four properties:
- Fleeting
- Root Area
- Project Area
- Resource Pulls
As you might have noticed, in Ultimate Brain 3.0 we have separated out Recipes and Book Notes into their own, separate databases. This means that the book-specific and recipe-specific properties won’t be needed for much longer. Keep them at this point of the transfer process though. After completing the main transfer, you can complete the optional steps at the end of this guide.
Updating Properties in Projects
Projects is also quite straightforward. First (importantly) we need to rename the first option in the Status property from To Do to Planned. Then, we need to remove the Priority property. That’s it!
Updating Properties in Areas/Resources
Now, the 2.0 Areas/Resources database is renamed to Tags in 3.0 and is a bit expanded in its use. To prepare, we’ll first need to add an option to the Type property: Entity. We’ll also need to change Type’s type to Status and put all of the options into the In Progress section:
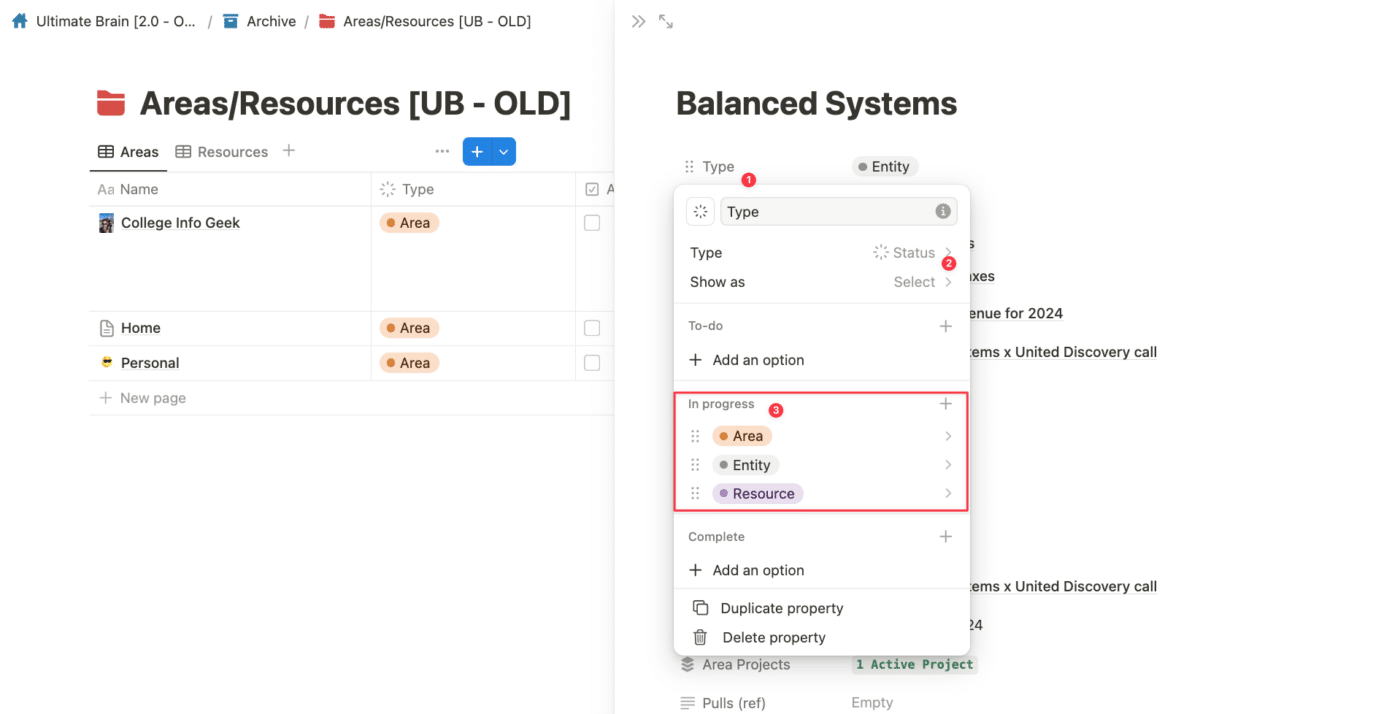
Then, we’ll need to remove the following two properties: Last Note Date and Area Projects.
Updating Properties in Goals and Milestones
Nothing requires updating in Goals, and in Milestones, we just need to remove the Complete property.
Copy link to heading5. Creating Relation Reference Properties
This is a crucial step in the process. Since, as explained in the Transfer Challenges section above, we can’t transfer Relation properties across two sets of interconnected databases without those Relations breaking down, we’ll first need to create Relation Reference Properties which will then help us manually re-relate all of our newly transferred content in Ultimate Brain 3.0. This step involves a lot of manual work if you have a lot of content in Ultimate Brain.
Full video instructions for this step:
The method for this process will be the same for every single Relation property. I’ll illustrate this on the Tasks <-> Projects relation.
There are two types of Relation properties. Two-way Relations and One-way Relations. You can read more about both here. (Again, if you’re not very comfortable with Notion, this transfer process isn’t for you). In this process, we’ll be creating a Text-type Reference property for every single Relation pair (for Two-way Relations), and every One-Way Relation. As an example, the Tasks <-> Relation pair is a Two-way Relation. (You can see this in the settings for each Relation-type property):
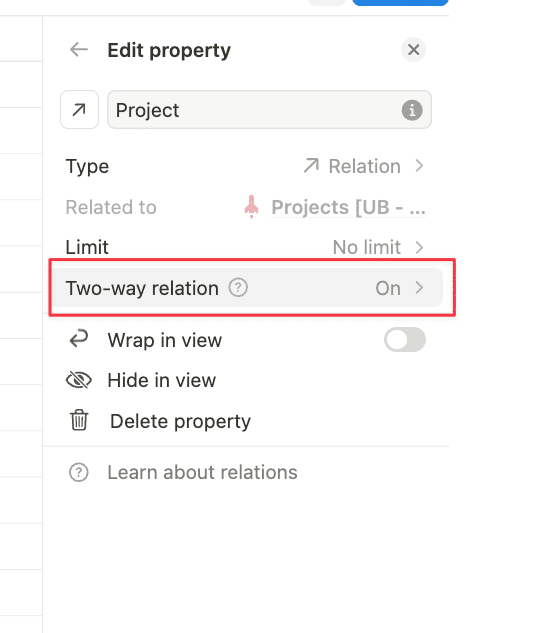
For Two-way Relations, we only need to create one Reference property, ideally from a Many-To-One perspective, i.e. from the side of the Relation that has multiple entries linking to one property from the other database. In this example, Tasks usually have one Project but Projects can have multiple Tasks. It’s easier to link each Task to a single Project than it is a Project to multiple Tasks, so we’ll create our reference property in the Tasks database, and later (in step 8, Restoring Relations), we’ll re-create the links between the pages from this end of the Relation.
Now, we’ll need to create a Text property called Project (ref) (ref stands for reference), right next to our Project property in the Tasks OLD database;
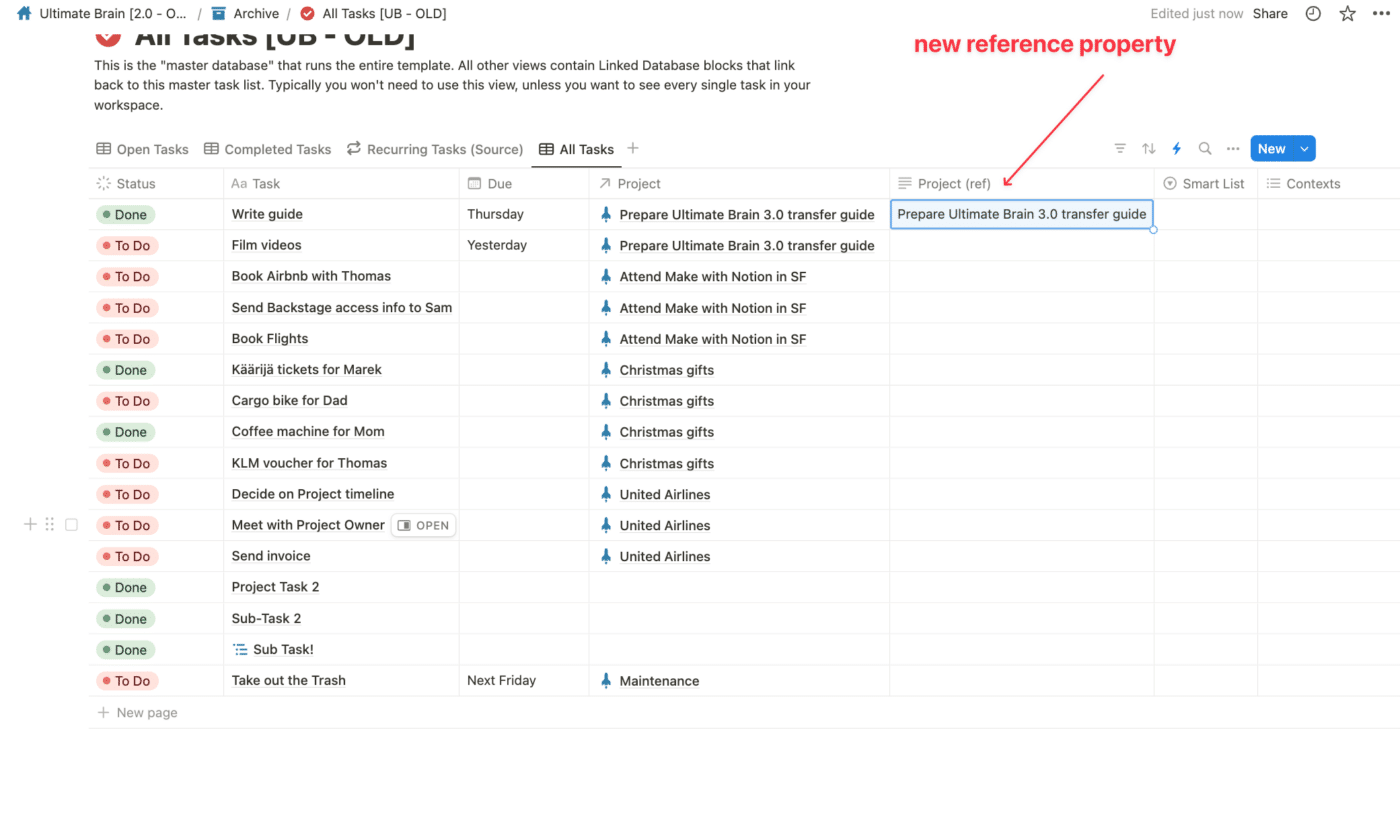
Once that property is created, we’ll need to manually fill it with values corresponding with values from the Relation property right next to it. You can do this a bit faster by first typing out the full name of the Project for the first Project of the list, and then dragging down on the property to fill out those values until the Project changed for tasks below:
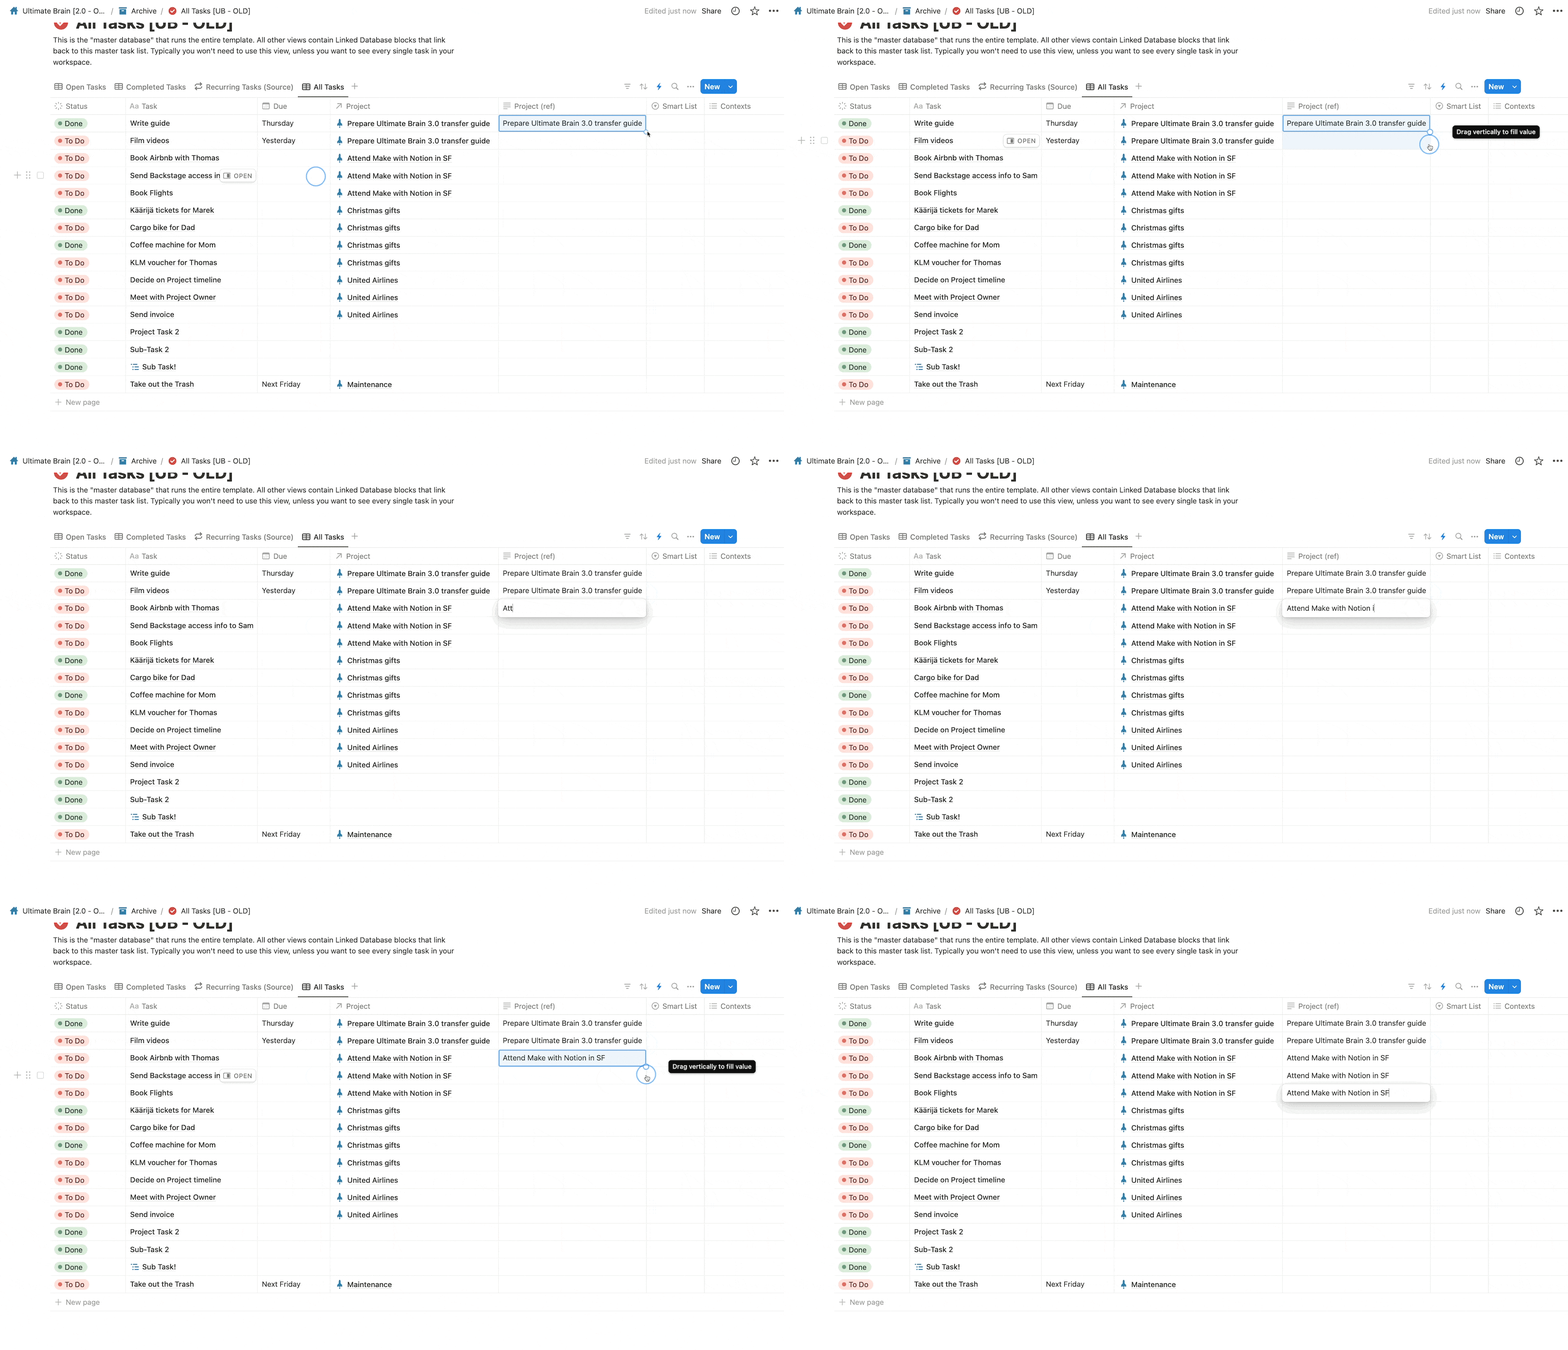
You’ll need to do this for every Relation pair and every One-way Relation across all of your Old databases. I’ve created this handy checklist below for every database and every Relation pair, so you know what you’ll have to go through. You can also watch the video above as I go and create Relation Reference properties for every database.
List of Relation properties in your OLD Ultimate Brain to create Text reference properties for:
| Tasks | Projects | Notes | Areas/Resources | Goals | Milestones |
Project | Goal | Project | Pulls | Area | Goal |
Parent Task | Area | Area/Resource | Root Area | ||
Pulls |
Make sure to also add a little (old) suffix to every Relation property in your 2.0 databases. This will make identifying the old relations easy once we complete the transfer.
Copy link to heading6. Performing a Test Transfer
Here comes the first actual transfer. We’ll perform a test transfer by moving one entry from each 2.0 database (OLD) to its corresponding 3.0 database (NEW). This is an additional safety step just to make sure that everything is moving over correctly, no major property conflicts are happening, and everything is working correctly.
Make sure to Unlock all of your NEW databases if they aren’t unlocked yet.
To do this, just go to your Core Data Transfer Tool you set up before and drag one entry from each of your OLD databases to each of your NEW databases:
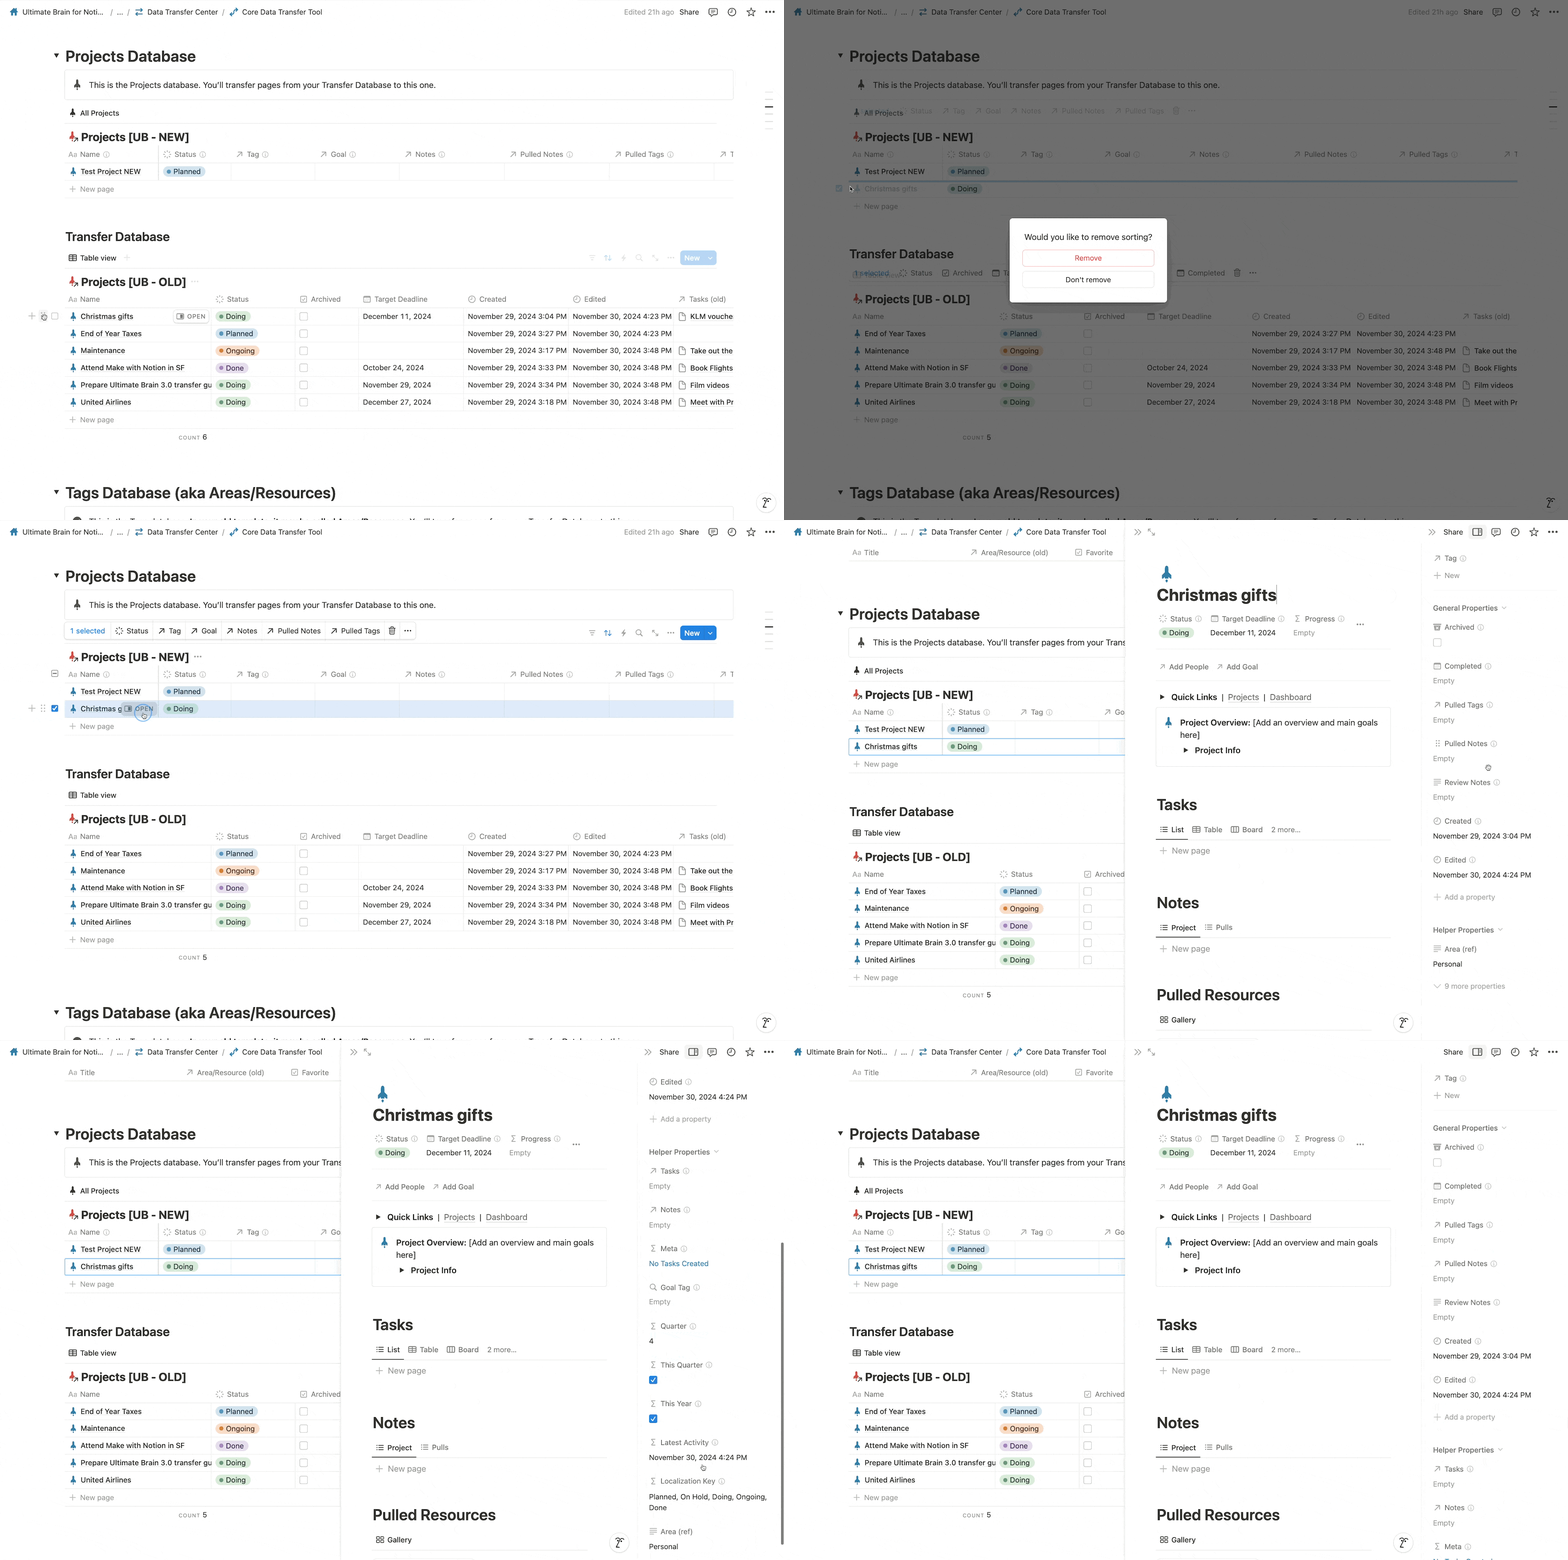
Double-check that all properties correctly move over. Don’t worry about your (old) Relations – they won’t move over, but that’s why we created all of those reference properties.
If all looks good, move over to performing the full transfer.
Copy link to heading7. Performing Full Transfer
This step might actually be one of the easiest from this guide. Now, you just have to drag all of the entries from your OLD databases to your NEW databases. If you have a lot of entries in your old DBs, you might want to drag some at a time, then refresh the page, and move the rest. You can also increase the load limit for any View in its settings:
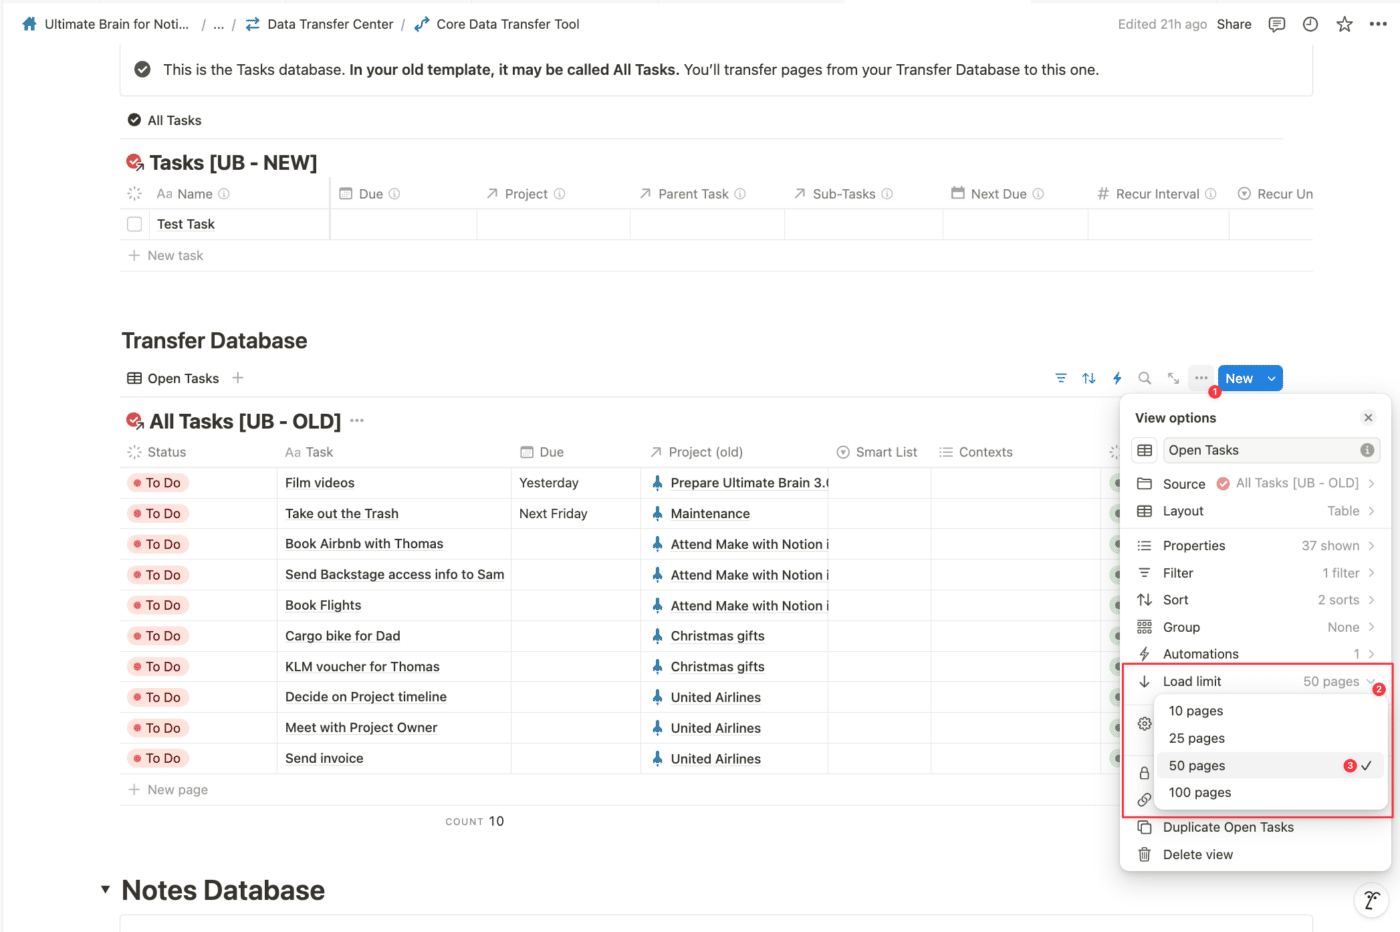
Do this for all of your Databases and all the entries inside. Refresh the page at the end (cmd/ctrl + R), as some more entries might get loaded then. Keep refreshing until your OLD databases views are completely empty.
Video for Performing a Test Transfer and Full Transfer:
Copy link to heading8. Restore All Relations
Here comes another tedious part – we’ll have to manually re-create all of our Relations once all data got moved over. This may take a similar amount of time to Step 5, but since we diligently created Reference properties for every Relation, no data loss should occur.
To do this, simply open each NEW database, create a new view that just shows the New Relations and your text Reference properties, and then fill out every Relation with values from its Reference property:
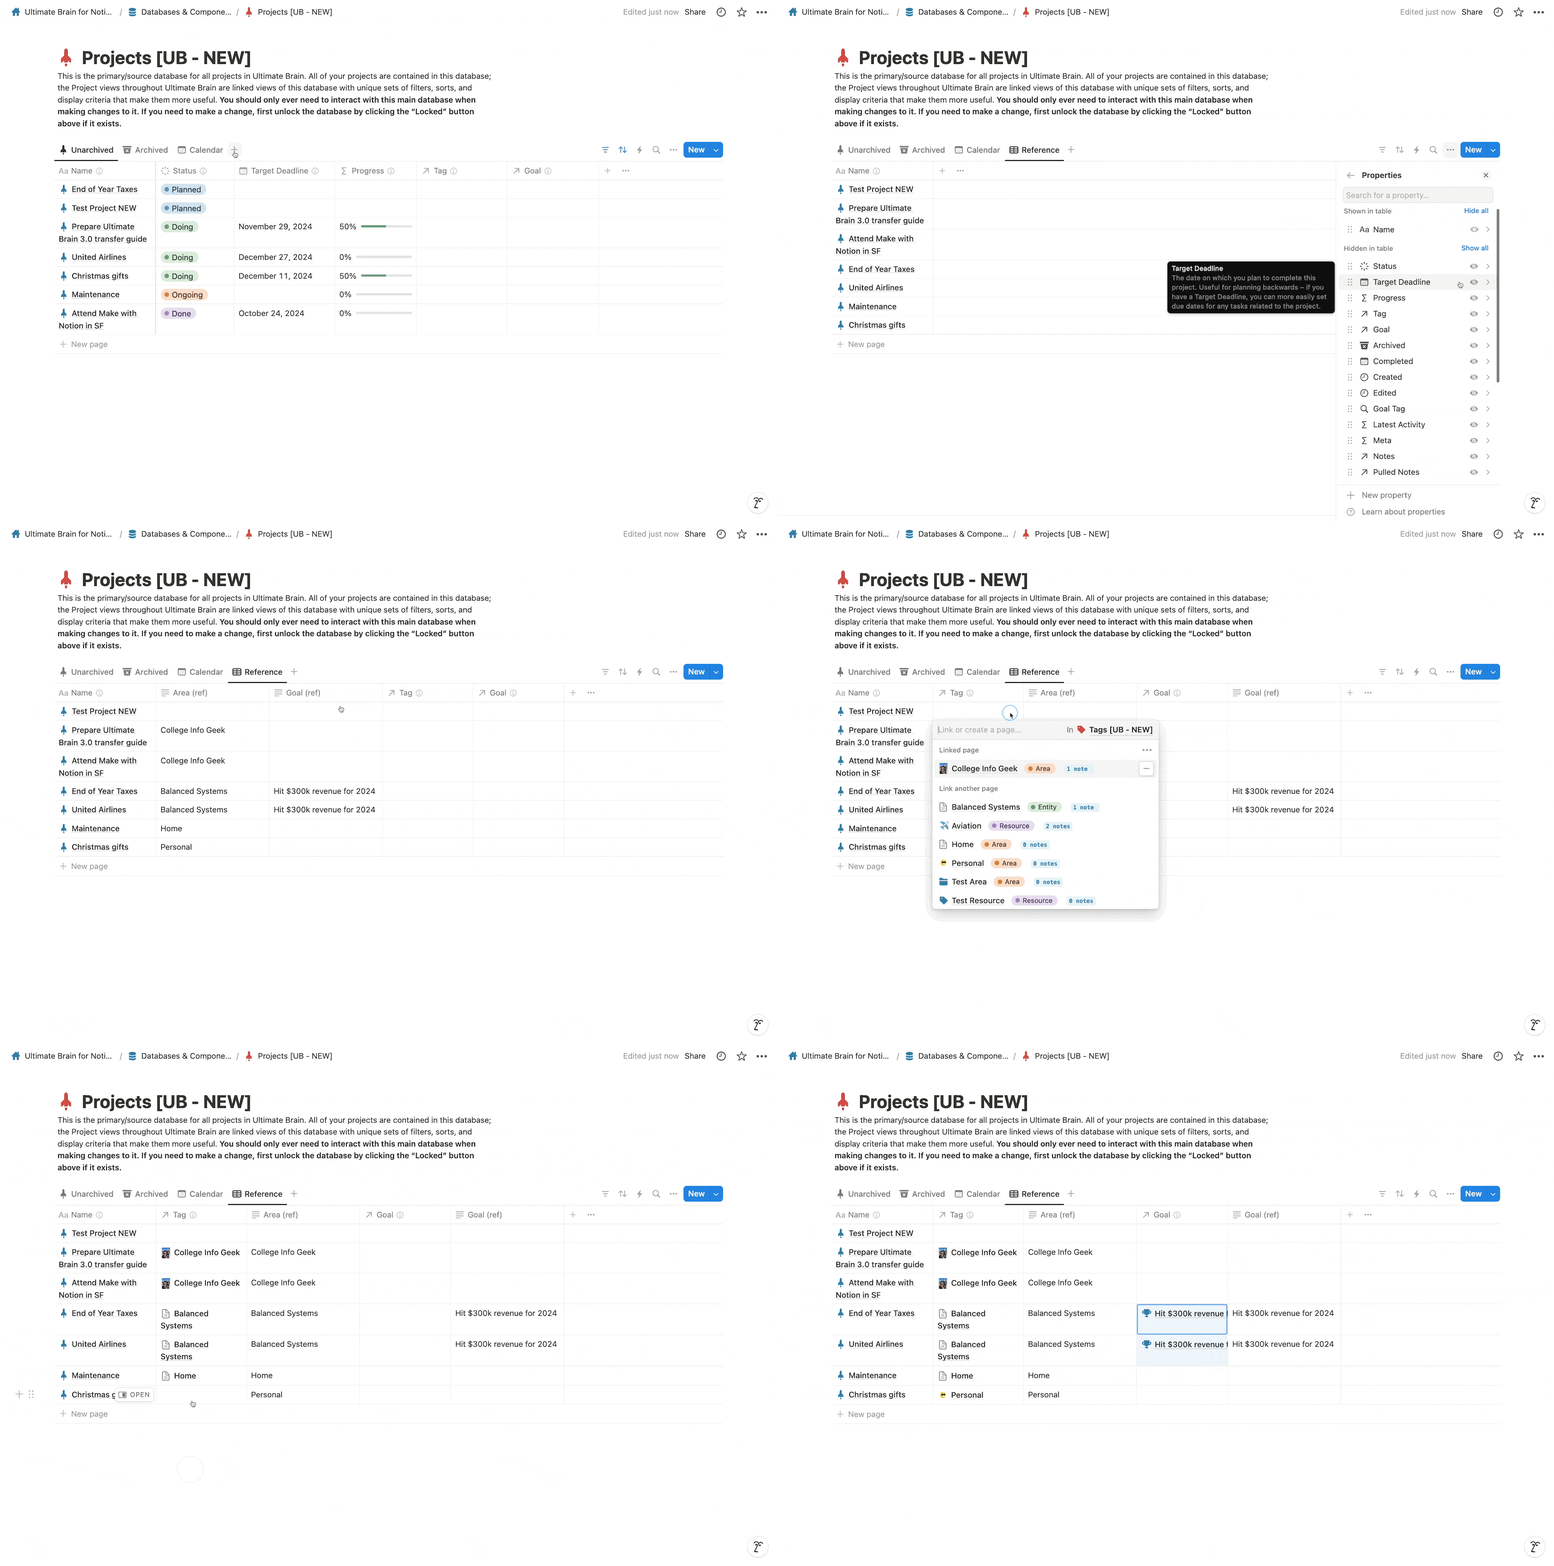
Feel free to remove your Reference properties after this step is done. Double-check all new Relations first. Don’t worry – you’ll always be able to restore these References in case you need them later.
Video instructions:
Copy link to heading9. Restore Template Instances
This last step is pretty crucial and possibly most tedious. I’ve already explained it at the beginning of this guide, but as a quick reminder: Page content created from Database Templates is not automatically updated when moving to a New database. This means that, once you complete the transfer, and you open any of your newly moved Projects, the Linked Views in the page content of that Project will still be pointing to your Old databases and thus completely empty:
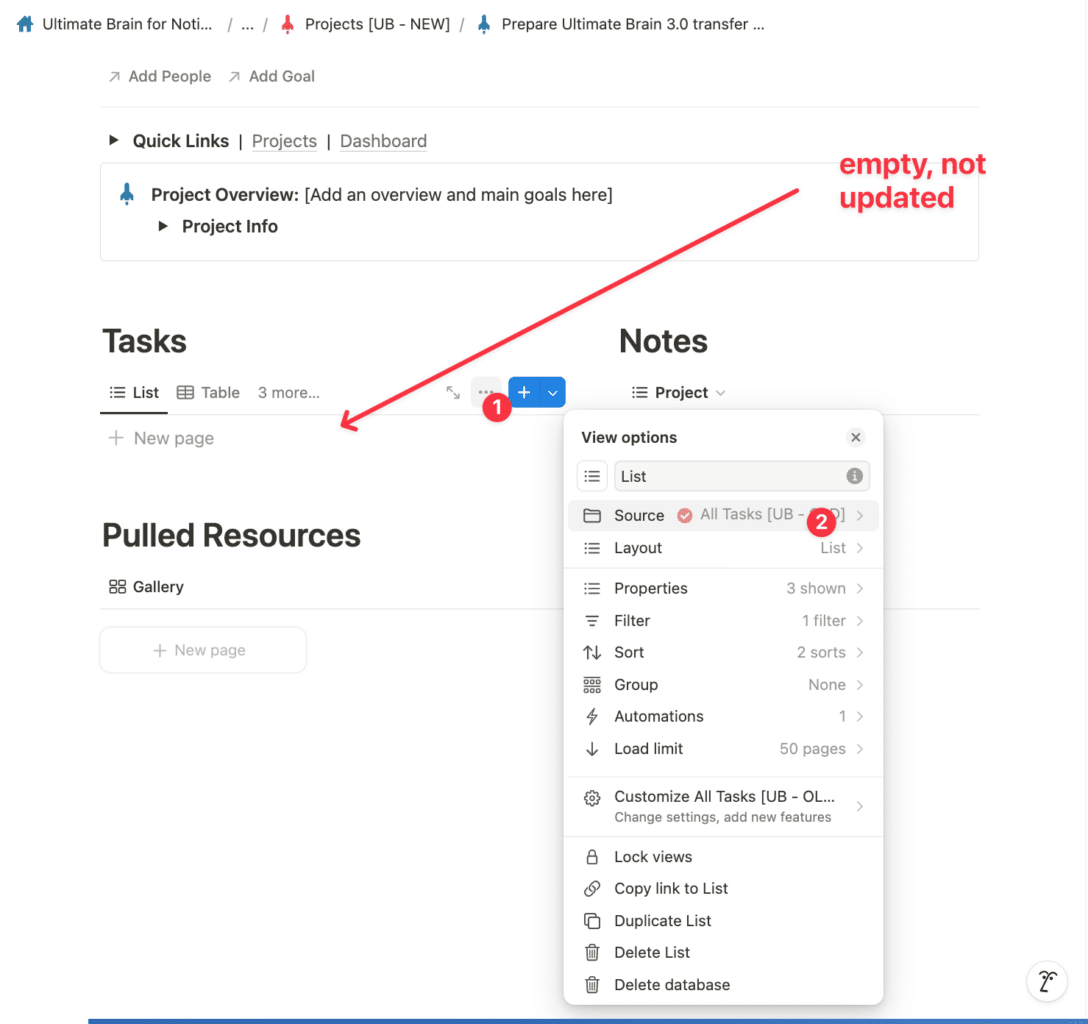
The only way to solve this is manually remove all content from a Project and then “re-generate” that Projects content from a Database Template. You need to do this manually for every single moved Task, Project, Area, Resource and Goal.
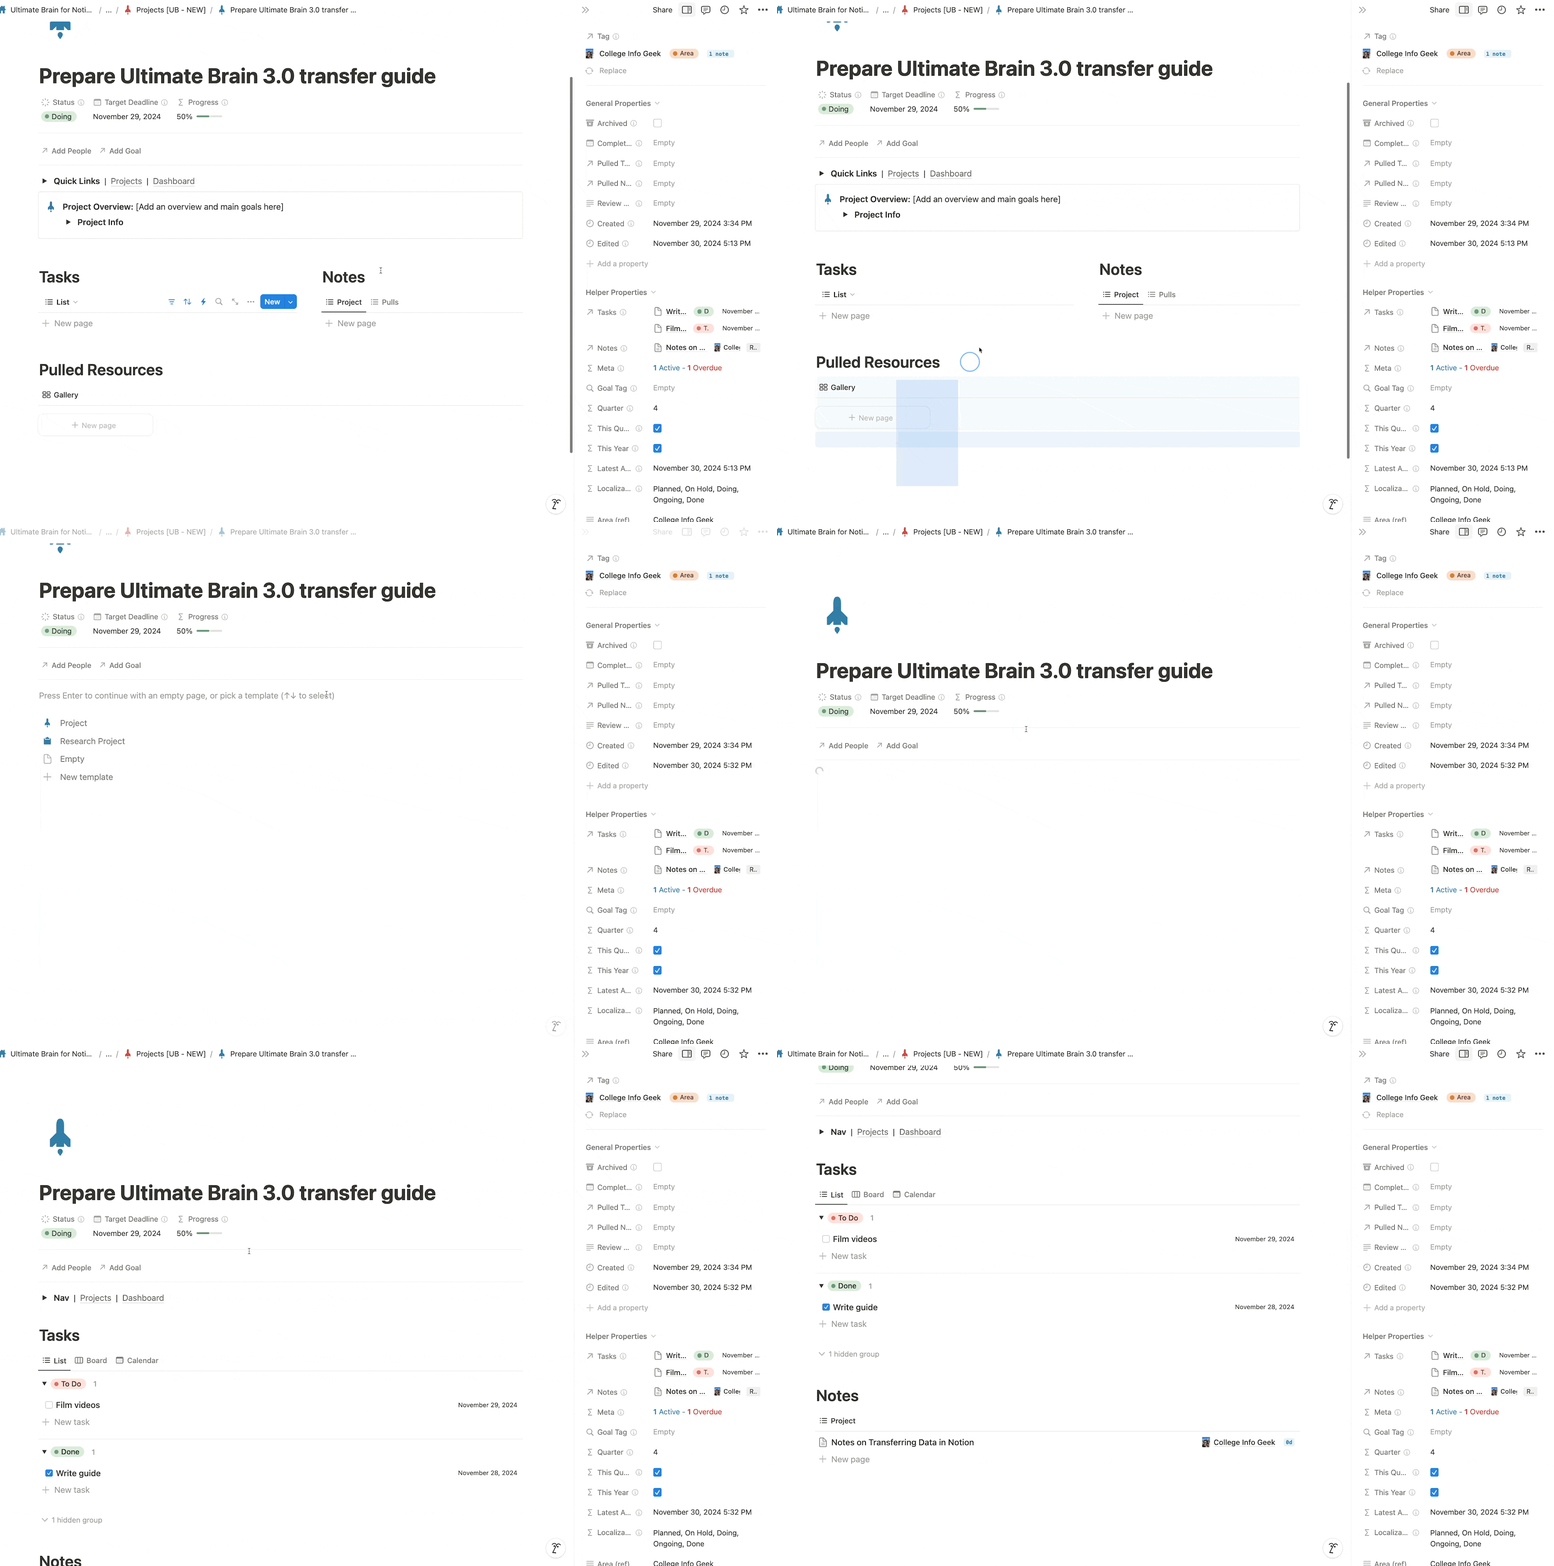
Please note this process may lead to data loss if you have any content that’s not part of a Database Template on a page. If there are any extra notes, paragraphs, images, anything, that’s not part of the Database Template you’ll be using in this step, that content may get irreversibly deleted, if you’re not careful.
The only way to do prevent this is to first copy and paste any non-Template content to a separate page, then re-generate the layout, and paste the content back in. More details below:
Video instructions for Restoring Template Instances:
Copy link to heading10. Finishing steps
Now that the transfer is fully complete, you may want to:
- Hide your former, 2.0 Ultimate Brain somewhere. It’s essentially a “zombie template” by now. No content. Keep your backup in hand, but your former main copy is basically useless.
- Feel free to remove the NEW suffix from all of your databases and pages.
Important: we won’t be able to provide full support for transfers. If something went wrong, first — revisit this guide. Feel free to post a question in our Support space on Circle, but fair warning: we might not be able to help you and close the ticket without a resolution. We do, sincerely, wish that Notion had better tools for doing this, but I wouldn’t bet my money on those coming anytime soon. We are, in the end, the only people who care about our customers so much that we actually provide all of those resources and new template versions at no additional cost. (Humble brag, yes).
Thank you so much for being an Ultimate Brain customer and wish you a wonderful day. Go touch some grass. Enough computer nerd-ery for today.
Copy link to headingAddendum: Books and Recipes transfer
As a bonus to this transfer guide, watch this video on how to transfer your Book notes and Recipes from Ultimate Brain 2.0 to 3.0:


