Ultimate Brain comes with a powerful task and project management system. It’s packed with features, included automated recurring tasks, a custom sub-tasks system, a My Day dashboard for daily planning, and lots more.
If you’re new to Ultimate Brain, I recommend watching the section on task management in the Getting Started the Simple Way video first. Once you’ve gone through that, the 30 minute video above will give you a tour of every task and project management feature the template has to offer.
If you’d like to improve your task management system even further, here are some additional tutorials and resources I mentioned in the video:
- 00:00 – Introduction
- 00:32 – Tasks Area on Ultimate Brain Homepage
- 02:12 – Projects Area on Ultimate Brain Homepage
- 04:15 – Dedicated Pages for Tasks and Projects
- 09:08 – Day-to-Day Task Management
- 09:23 – Capturing Tasks to the Inbox
- 13:57 – Processing Tasks
- 17:52 – Recurring Tasks
- 19:56 – Advanced Recurring Tasks with Task History
- 22:20 – Sub-Tasks
- 24:11 – My Day Feature (Daily Planning)
- 28:08 – Research Project Template and Pulls Feature
- 32:04 – Additional Resources
Below, you’ll find additional sections and videos showing how to set up advanced task management workflows and customizations.
Copy link to headingOrganize Tasks by Context
Ultimate Brain has a useful Context property which allows you to tag tasks with contexts such as High or Low Energy, Errand, Social, Home, and so on.
If you’d like to group tasks in Ultimate Brain by these contexts, you’ll learn how to do it in this video.
In this tutorial, I’ll guide you through the process of creating a By Context Task View in Ultimate Brain. This view allows you to organize your tasks based on their context, such as high-energy vs. low-energy tasks, or location-based contexts like errands, home, or office.
Ultimate Brain comes with a built-in Context property for tasks, which is designed to support a Getting Things Done (GTD) workflow. If you’re already using the GTD method in Ultimate Brain, you can find a pre-configured By Context view in the Do Next sub-page within the Process (GTD) page.
If you want to add a context-based view to another part of Ultimate Brain, such as the main Tasks view on the homepage, follow these steps:
Duplicate an existing view:
- Find a view you want to use as a base, such as the “No Due” view.
- Right-click on the view and select “Duplicate.”
- Name the new view “By Context” (or any name you prefer).
- Optionally, assign an icon to the new view.
- Move the new view to your desired location in the sidebar.
Modify the view settings:
- Open the view options menu (
•••). - Adjust the filters:
- Remove any existing filters that don’t apply to your new view (e.g., “Due is empty”).
- Keep the “Status is not done” filter to ensure completed tasks are removed from the view.
- Update the sort criteria:
- Set “Due Date” to ascending order.
- Add “Sub-Task Sorter” in ascending order.
- Change the grouping:
- Go to the “Group” option.
- Change the grouping from “Smart List” to “Context.”
- Choose whether to show or hide empty groups based on your preference.
Reorder contexts:
- Arrange the contexts in your preferred order (e.g., energy contexts first, followed by location-based contexts).
Add new contexts (if needed):
- Unlock the Tasks database:
- Open any task as a full page.
- Click on the database name in the breadcrumbs.
- Click the lock icon to unlock the database.
- Alternatively, access the database through the “Databases and Components” page at the bottom of the homepage or sidebar.
- Once unlocked, you can add new context options to the Context property.
- After making changes, remember to lock the database again to prevent accidental structural changes.
By following these steps, you can create a customized “By Context” view in Ultimate Brain, allowing you to organize and view your tasks based on their assigned contexts. This can be particularly useful for implementing GTD-style workflows or simply for better task management based on energy levels or locations.
Remember that you can apply this context-based grouping to any view in your Tasks database, including the main Tasks page, Inbox, or Today views. Experiment with different configurations to find the setup that works best for your workflow.
Adding a Timeline View
One of the layout types in Notion databases is the Timeline layout, which is commonly used in project management scenarios.
Here’s how you can add a Timeline layout to a linked database block in Ultimate Brain:
In the video above, I showed you how to create a project-specific timeline view that only shows the tasks in a single project.
I also want to create a more global timeline view that shows all of your tasks. In the video below, I’ll show you how to do that and group all of the tasks on that timeline view by their project.
This is quite easy to do, as you can simply duplicate the active projects view in your tasks page, which already has the Project grouping set up.
Turning on Task Dependencies
Notion has a native task dependency feature which can be useful in project management scenarios. If you want to enable this feature, here’s how to do it:
Copy link to headingAdd a Start Date Filter to Date-Based Views
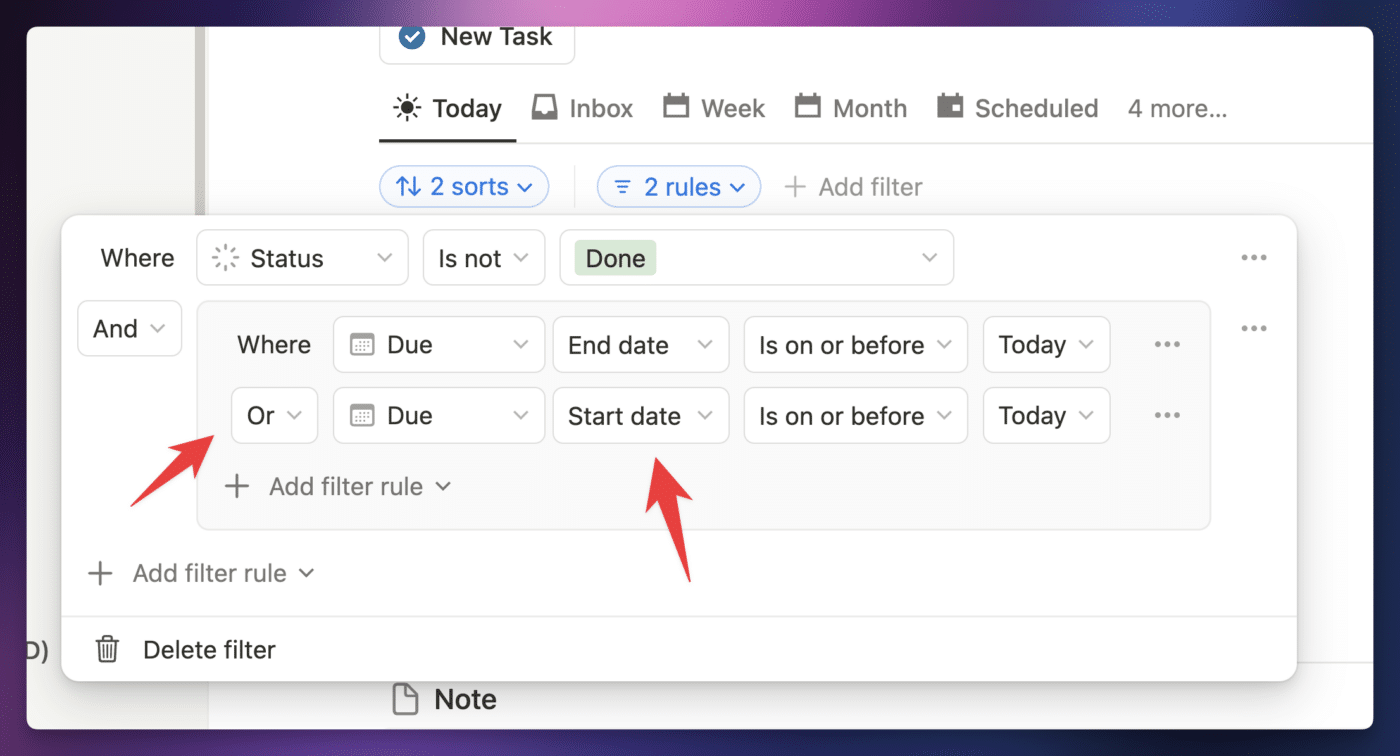
In all date-based task views in Ultimate Brain, such as the Today view and the Scheduled view, the filter targets the End Date of the Due property, which represents the actual due date of a task. In most cases, this setup works for all tasks. If a task does not have a specific end date (in addition to its start date), it is still considered to have an end date. For those tasks, the single Due date is treated as the end date.
However, if you prefer to use separate start and end dates for your tasks and want the date-based views to show tasks when their Start Date matches the view’s date filters, you can make this adjustment.
- Convert the existing Due (End Date) filter into a filter group.
- Add an additional filter where the Due (Start Date) matches the view’s date filters.
- Set the filter group’s chain value to OR instead of AND.
By doing this, tasks will appear in date-based views if their start date or end date corresponds to the view’s filters.

Set Default Reminders for All Tasks
Notion recently added a useful notification feature to Date properties in databases. Now, you can configure a data property to send you a notification at the date property’s time – or even well ahead of time!
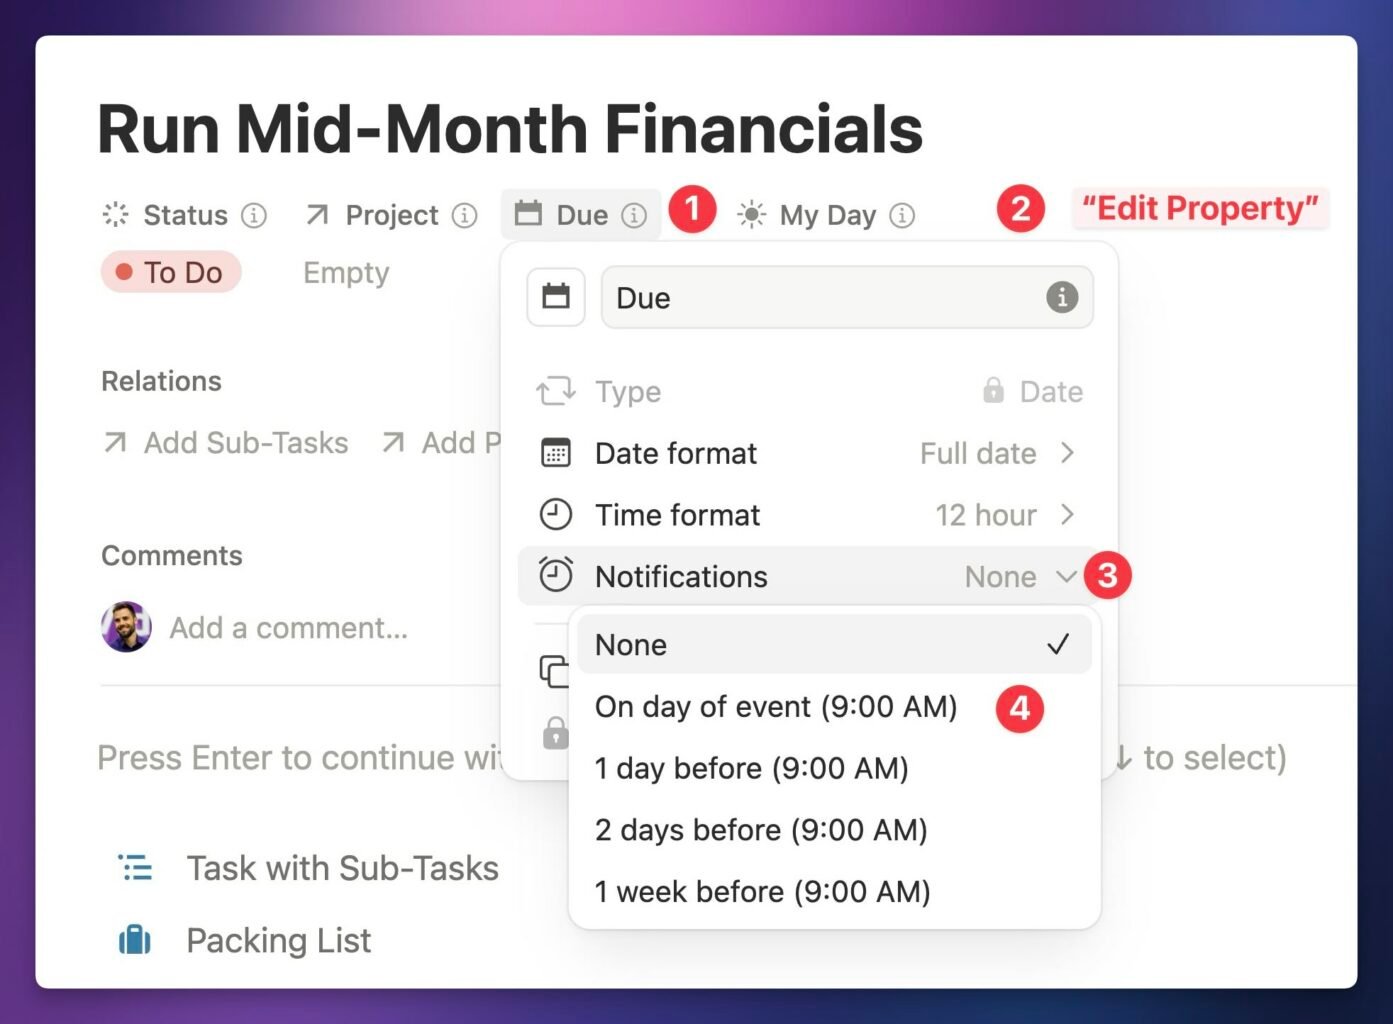
We don’t ship our templates with this feature enabled by default, but you can easily turn it on. First, ensure your Tasks databases is unlocked so you can edit its properties. Once that’s done, find your Due property.
You can open any page and find it near the top (pictured below), or find it directly at Ultimate Brain → Databases and Components (bottom of the page) → Tasks. Once you’ve found it:
- Click the Due property to show its options.
- Choose Edit Property.
- Open the Notifications toggle
- Choose an option.
Once set, you’ll recieve a notification in Notion at the time you’ve set for each Task. This even works for recurring tasks! Once the recurring tasks automation resets the date, the task will be queued up to notify you when that new date comes around.


