One of my main goals with Ultimate Brain is to turn it into a tool that helps me:
- Prioritize my tasks easily
- Stay focused once I’ve started a task
In service of that goal, I’ve added time tracking features to my personal copy of the template. In this doc, I’ll show you how they work and how you can add them to your own copy of Ultimate Brain.
Time tracking is now included in Ultimate Brain as of January 23, 2025! You can see what else is new in the Changelog entry. If you have an older copy, you can use the guide below to add time tracking manually.
Copy link to headingTour of My Time-Tracking Setup
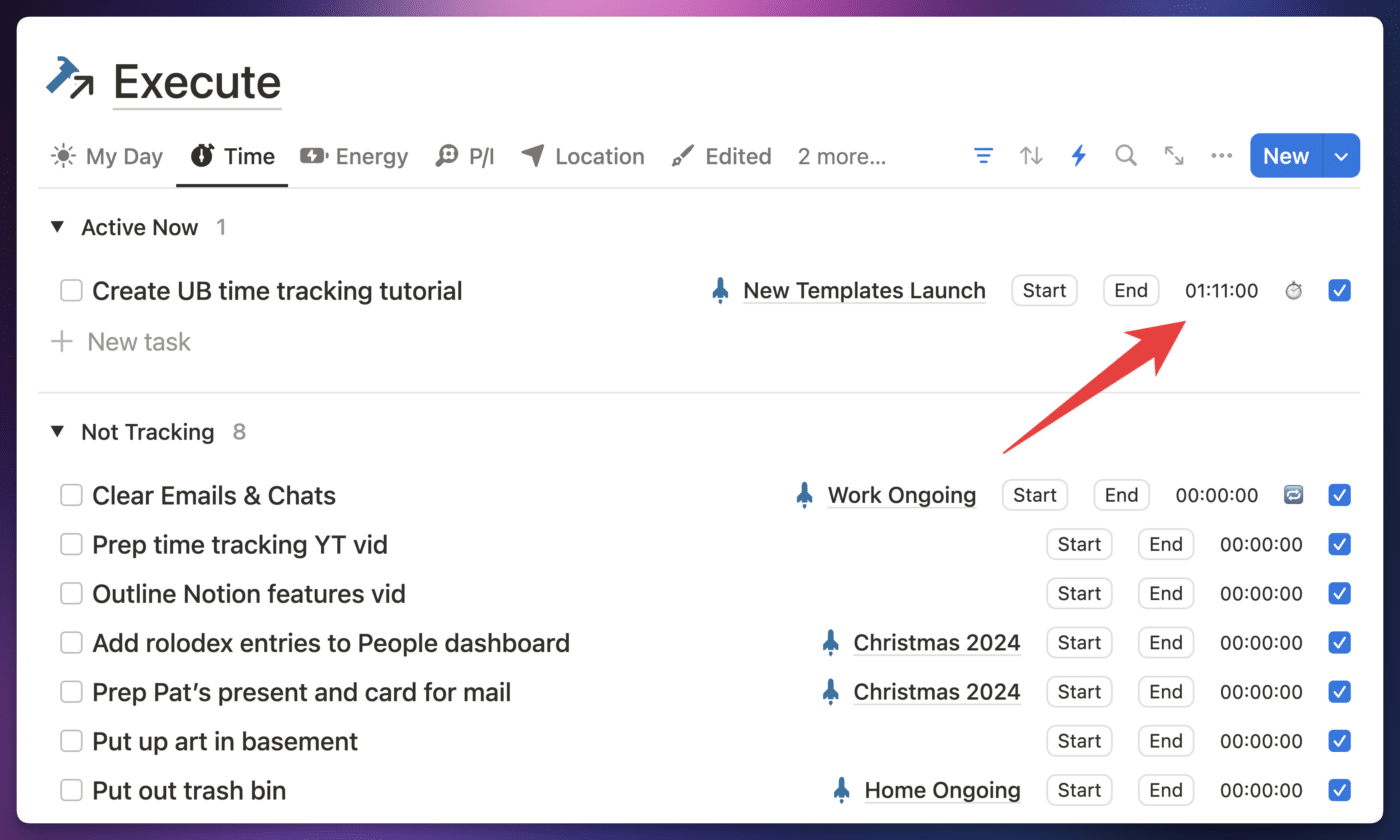
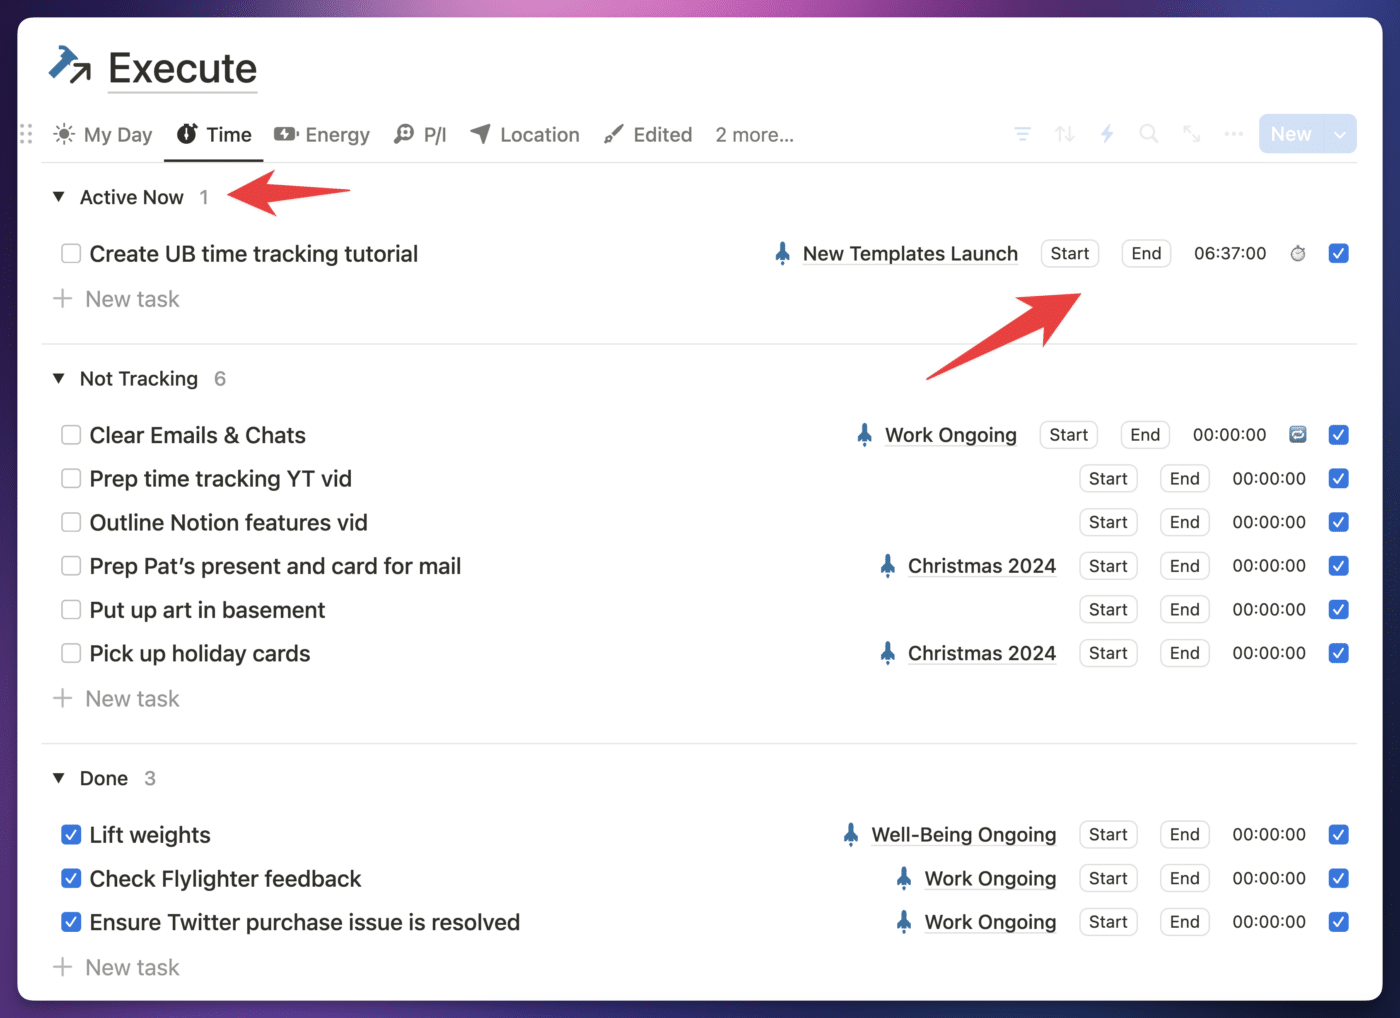
In the Execute section of the My Day page, I’ve created a Time view that allows me to start and end work sessions. It also shows me the total time tracked on the task.
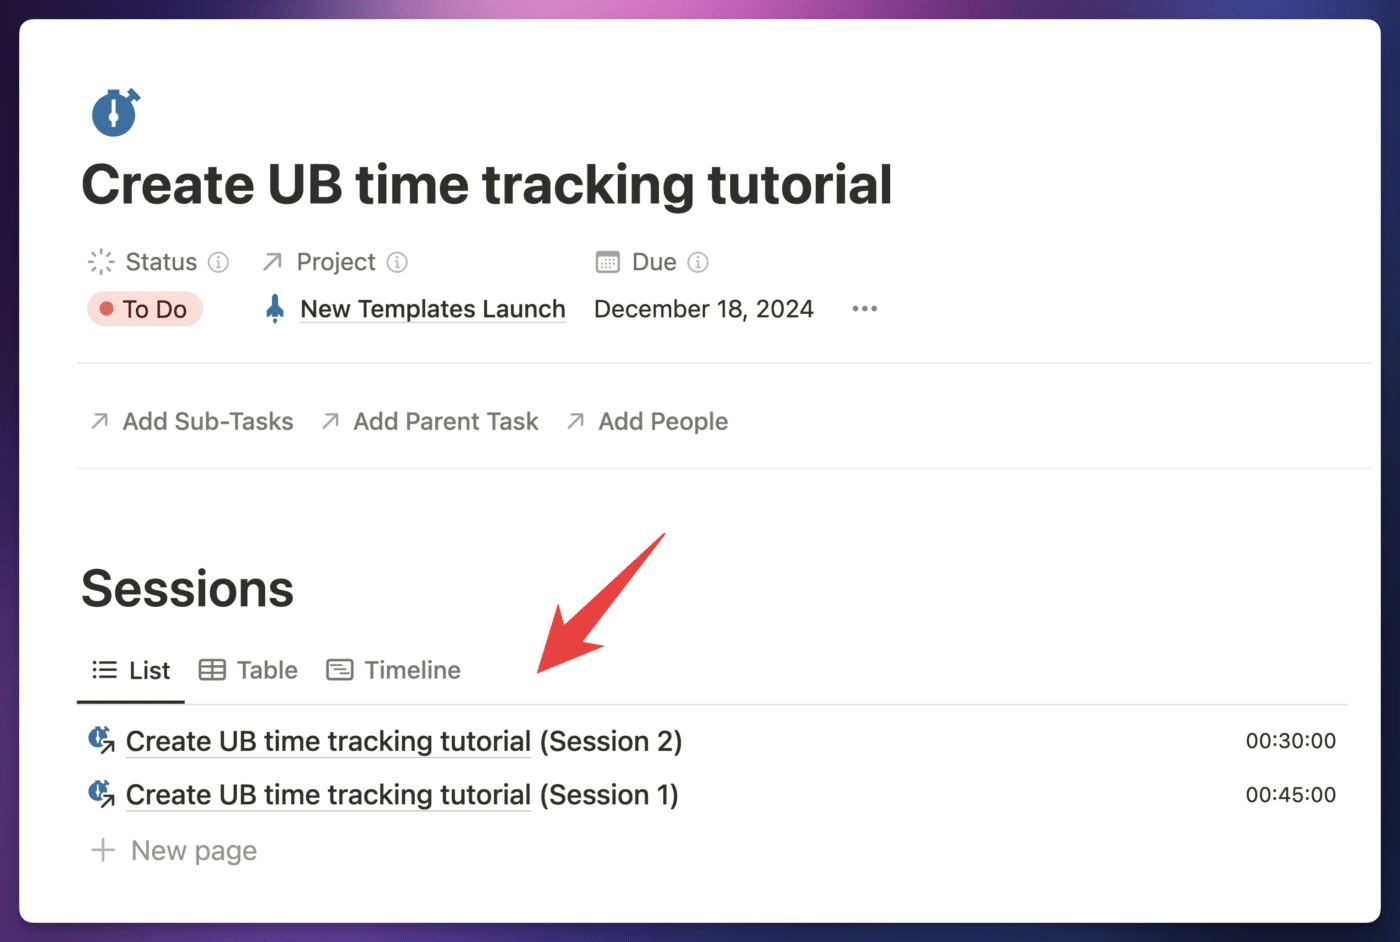
I can also track multiple work sessions on any task, just like I’d be able to do in a dedicated time-tracking app like Toggl.
Within a task’s page, I can apply a Time-Tracked Task page template, which lets me see all of these sessions and how long each one lasted.
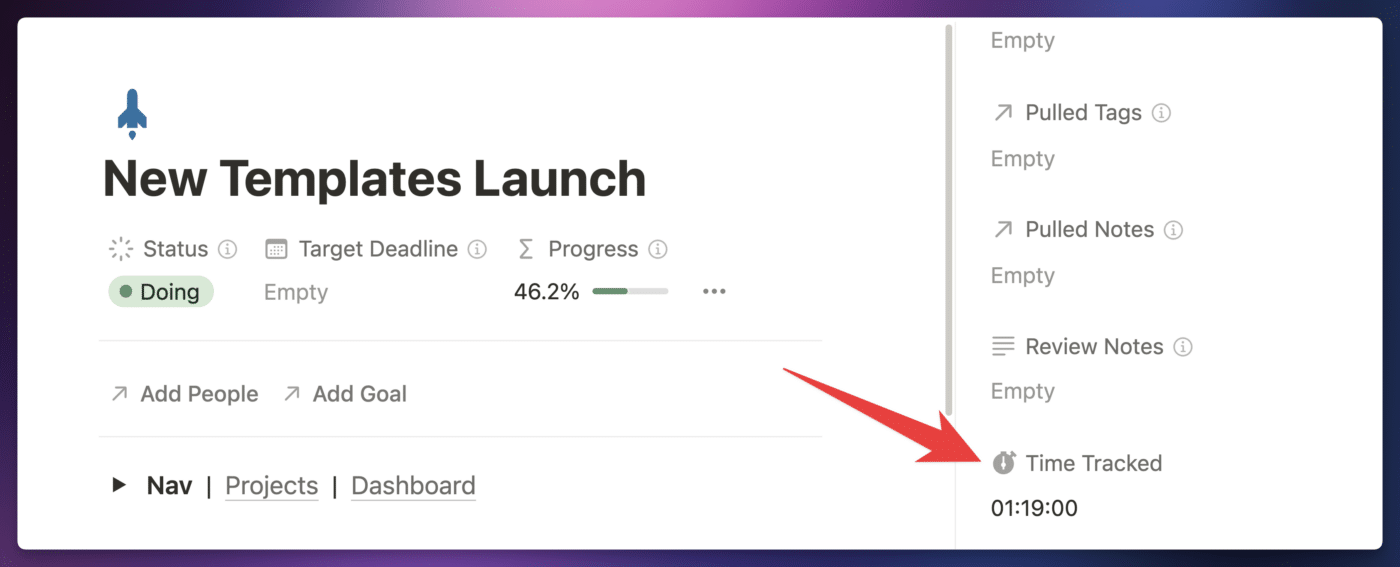
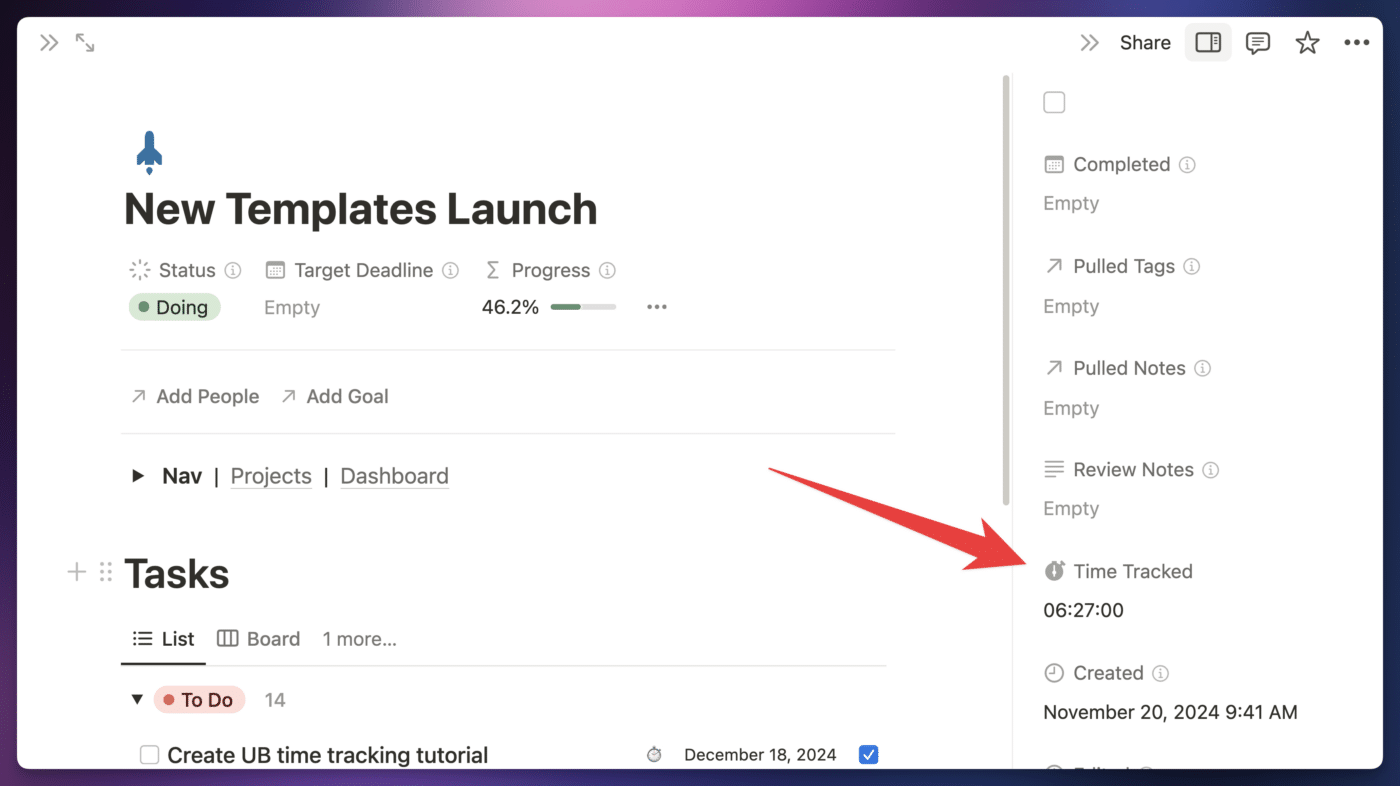
Finally, I’ve integrated these features into the Projects database so I can see the total time tracked across all tasks in a project.
Copy link to headingNotion Time Tracking Explained
Before we get started, it’s useful to understand the structure of the time tracking system we’re going to build.
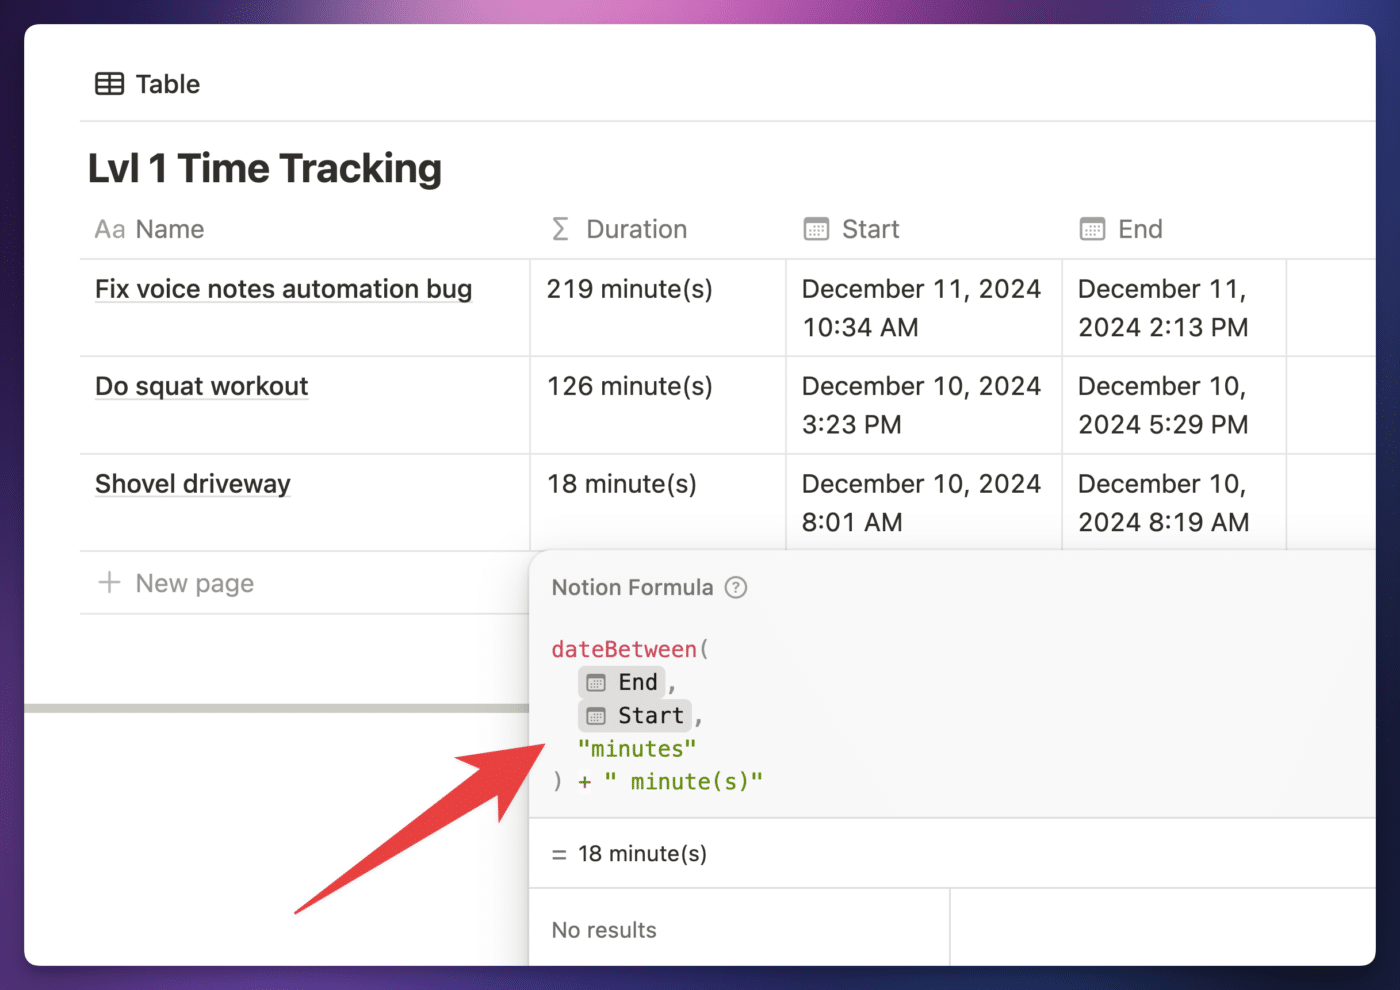
If you wanted to do this very simply, you could easily add a pair of Date properties (Start and End) to your Tasks database. Then, you could create a formula that simply calculates the time difference between their values.
If you did happen to want your time tracking to be this simple, here’s that duration formula that you can easily paste:
dateBetween(
	prop("End"),
	prop("Start"),
	"minutes"
) + " minute(s)"
Code language: JavaScript (javascript)
This method has a disadvantage, though – you can only track a single session! If it you take breaks between multiple work sessions, this setup can’t accurately track that. You only have a Start time and an End time.
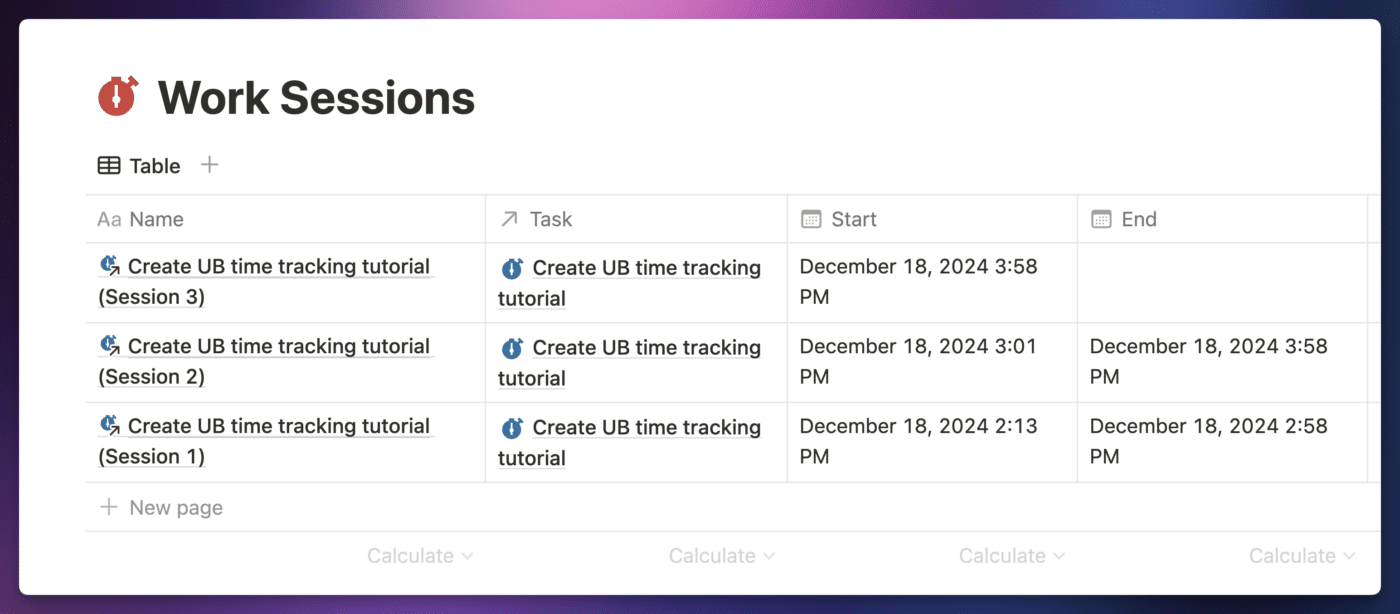
A better way is to create a Work Sessions database. Each entry in this database tracks the start and end of a single session. This database is related to your Tasks database, and each work session entry is associated to a Task.
Fun aside: If you were designing an app, you’d 100% want to do things this way. In database design, it’s important for database table rows to represent a specific entity – and only one. Since a “work session” is an entity, we need a separate table where each session gets it own entry.
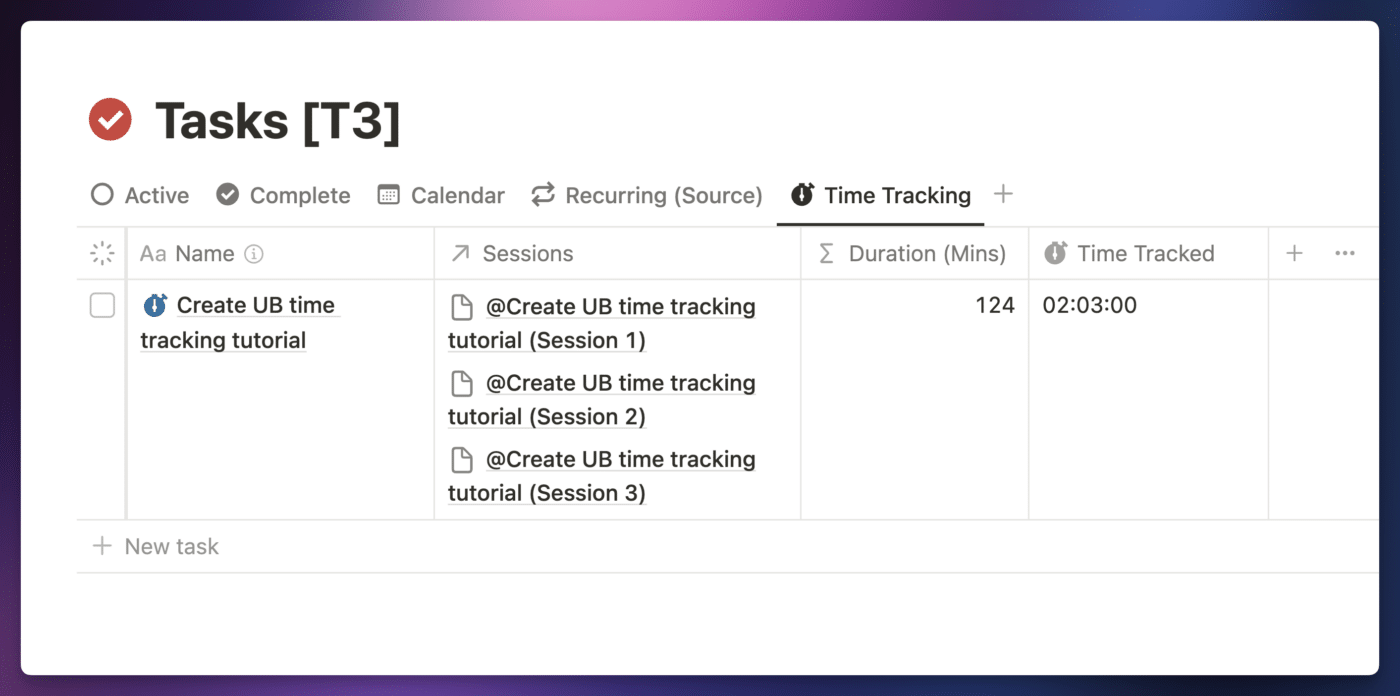
Here, you can see how this looks on in the Tasks database. A single task entry is related to multiple work sessions, creating a one-to-many relationship.
The only other thing you need to know before we start building this is that Notion doesn’t have a specific data type for elapsed time.
This is why we have both a Duration (Mins) property and a Time Tracked property. Duration (Mins) is a formula that calculates the total number of minutes spent on the task, and returns that as a number. Time Tracked uses that number to craft a string (text) value, which formats the number of minutes into the familiar HH:MM:SS format.
Note that we could easily combine these into a single property, but separating Duration (Mins) into its own property allows you to create filters and sorts with it – e.g. a view that shows only tasks that took more than two hours to complete.
Copy link to headingBuilding the Time Tracker
To build this time-tracking setup, we’ll work through 5 main steps:
- Creating the Work Sessions database
- Modifying the Tasks database
- Creating a Time-Tracked Task database template
- Modifying the Projects database
- Adding a Time view to the My Day page
This is a major modification to Ultimate Brain, so it’s a good example project for how you can make other large modifications. Before making any large modification, I recommend backing up your template.
Copy link to headingCreate the Work Sessions Database
In your Databases & Components page, which you can find at the bottom of the main Ultimate Brain homepage, create a new full-page database called Work Sessions. If the Databases & Components page is locked, unlock it first.
Create the following properties. Beneath the table, you’ll find instructions for the ones that need additional configuration.
| Property Name | Property Type |
|---|---|
| Start | Date |
| End | Date |
| Task | Relation (to Tasks database) |
| Project | Rollup |
| End Session | Button |
| Team Member | Person (Limit 1, no default) |
| Start/End | Formula |
| Duration (Mins) | Formula |
| Duration | Formula |
Your Task Relation property should be set up like so:
- Connected to your Tasks database
- Limit: 1 Page
- Two-Way Relation: On – name the related property Sessions
Your Project Rollup property should be set up like so:
- Relation: Task
- Property: Project
- Calculate: Show Original
Here are the formulas for each of the formula properties.
Start/End:
dateRange(
  prop("Start"),
  prop("End")
)
Code language: JavaScript (javascript)
This formula uses dateRange() to construct a date range from the Start and End date properties. You can then show this property in a Calendar view, which will allow you to view all your sessions in Notion Calendar.
Due to limitations in Notion buttons and automations, we can’t just use a normal Date property with a range in this build. We have to use separate Start and End date properties; hence the need for this formula property that aggregates their values.
Duration (Mins):
let(
  duration,
  if(
    empty(prop("End")),
    dateBetween(now(), prop("Start"), "minutes"),
    dateBetween(prop("End"), prop("Start"), "minutes")
  ),
  duration >= 0 ? duration : 0
)
Code language: JavaScript (javascript)
This formula gets the number of minutes between the End and Start dates using dateBetween(). If the number is less than 0 (perhaps because the End property was manually edited with a time before the Start property’s time), then the value will be 0.
If also uses empty() to check if the End date has been filled yet. If not, it’ll calculate the number of minutes between now() and the Start date.
Duration:
lets(
  duration, prop("Duration (Mins)"),
  hours, floor(duration / 60),
  hoursLabel, hours < 10 ? "0" + hours : hours,
  minutes, duration % 60,
  minutesLabel, minutes < 10 ? "0" + minutes : minutes,
  hoursLabel + ":" + minutesLabel + ":00"
)
Code language: JavaScript (javascript)
This formula takes the number of minutes from Duration (Mins) and formats it as an HH:MM:SS string value. Note that Notion has no actual data type for elapsed time, so this is purely a string (text) value for display purposes. However, due to the strict HH:MM:SS format, it can be used for sorting.
This formula creates variables using the lets() function, using them to dynamically determine the values for hours and minutes. Seconds will always be “00”, since Notion can’t count seconds.
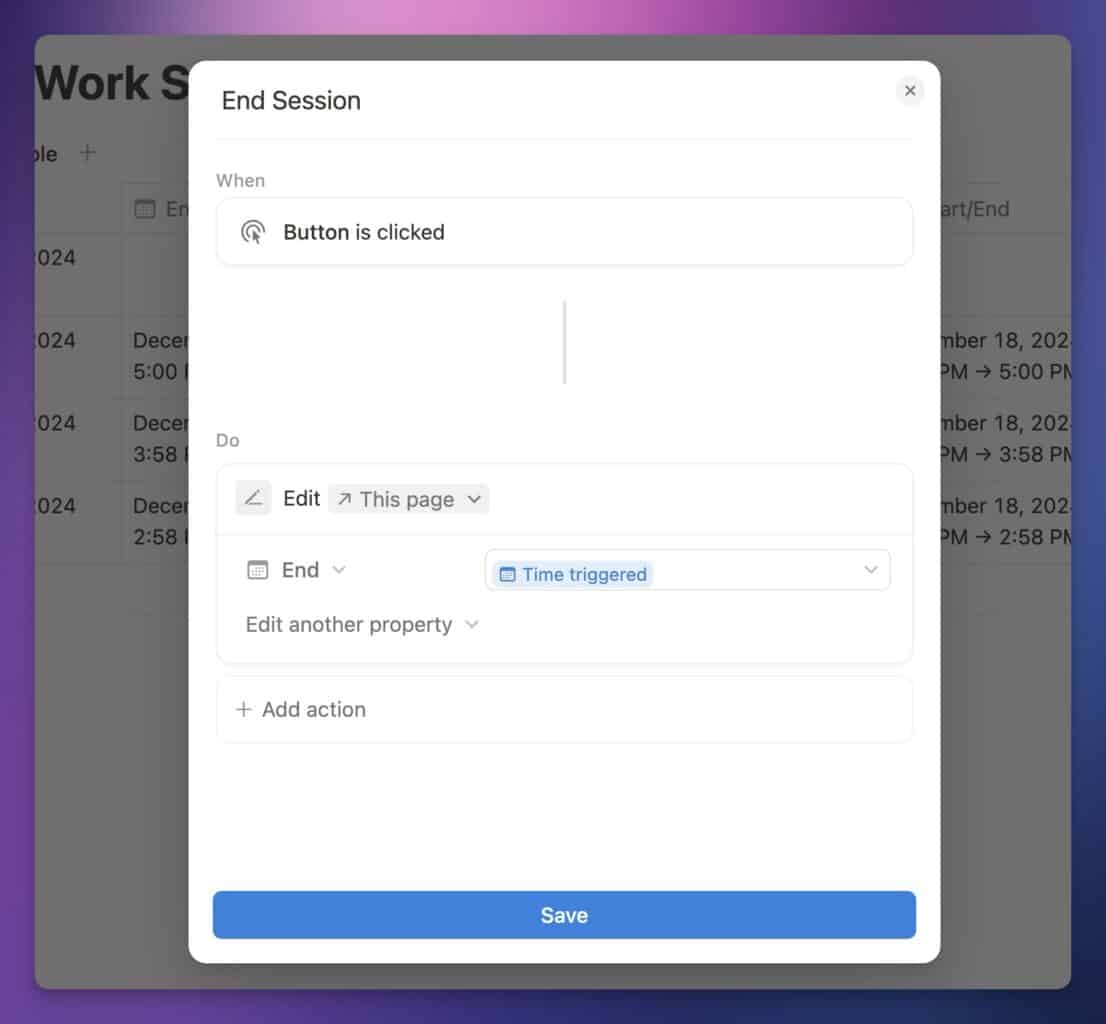
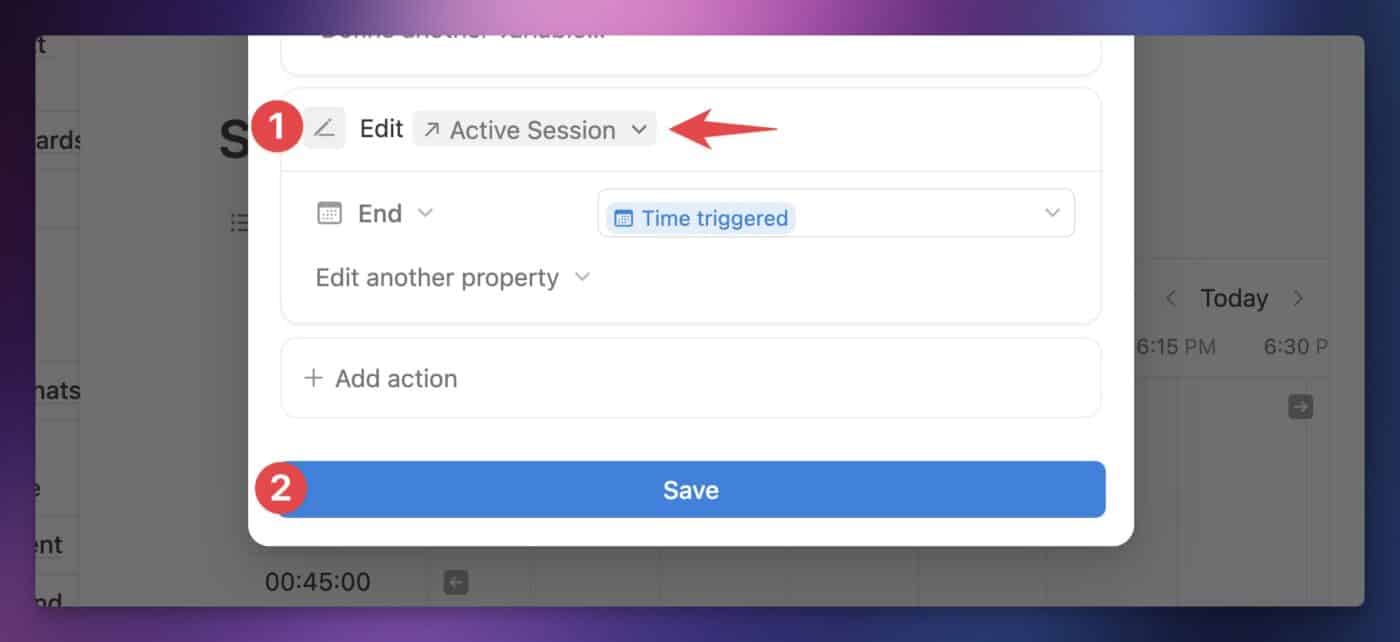
Next, set up your End Session button, creating an Edit Property action that sets the End property’s value to Time Triggered.
Finally, you can customize the layout of your Work Sessions pages if you want. You don’t need to do this, as you likely won’t be visiting these pages directly very often (if ever).
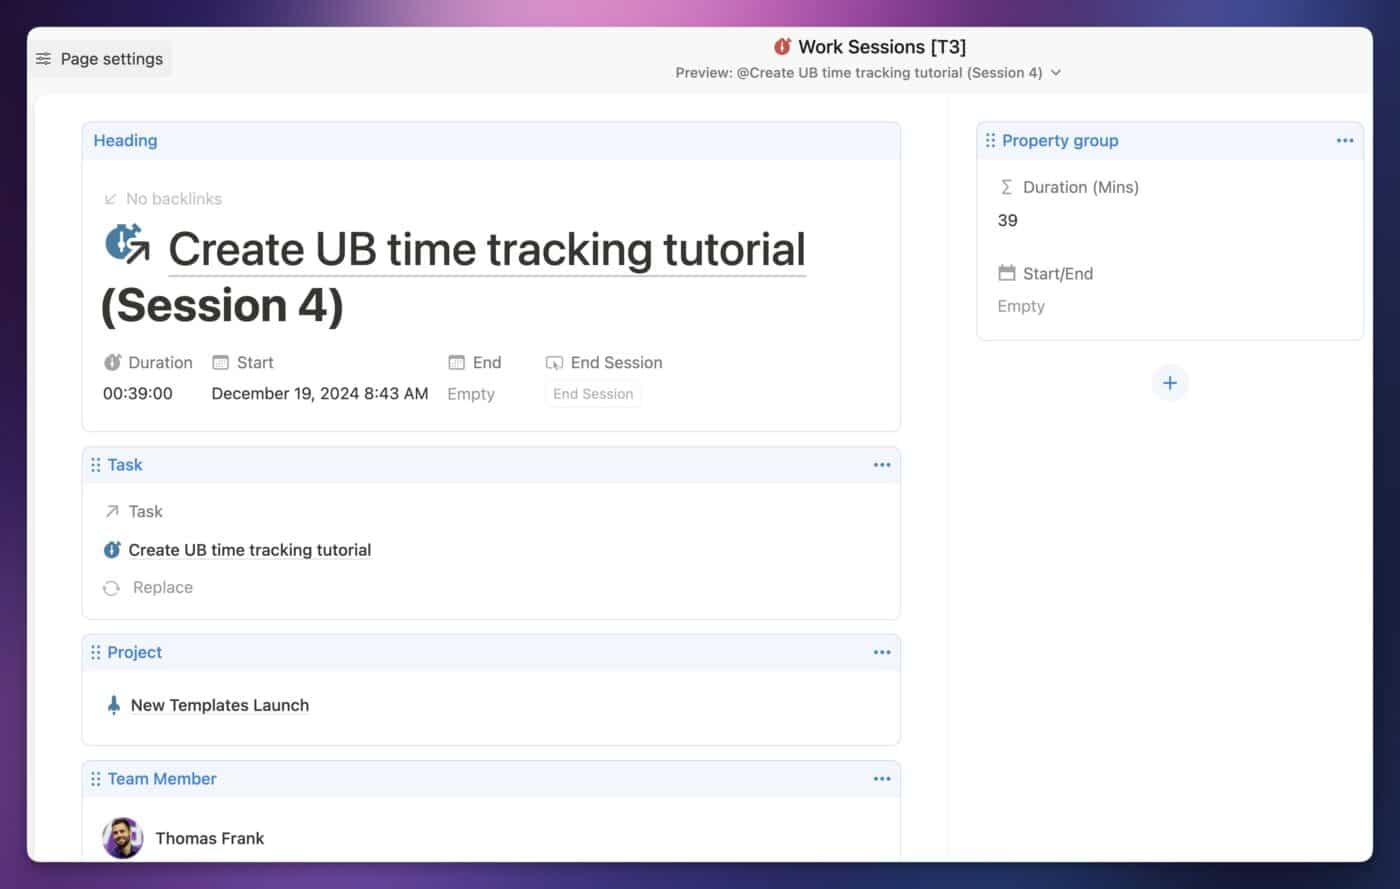
However, if you want to do so, you can open a work session page and click Customize Layout above the page title. Here’s how I set up my custom layout:
- Pinned the Duration, Start, End, and End Session properties
- Moved the Property Group to the side panel
- Added the Task, Project, and Team Member properties to the layout, given each its own section
- Set the Team Member display to Large
Watch my guide to Notion Layouts video if you need a refresher on how to create and edit these layouts.
Copy link to headingModify the Tasks Database
Next, head to your Tasks database (also located in Databases & Components). Here we’ll create a few additional properties that support the time-tracking system.
If your database is locked, unlock it. Then create the following properties. Beneath the table, you’ll find instructions for the ones that need additional configuration.
| Property Name | Property Type |
|---|---|
| Start | Button |
| End | Button |
| Current Session | Formula |
| Time Tracked (Mins) | Formula |
| Time Tracked | Formula |
| Time Tracking Status | Formula |
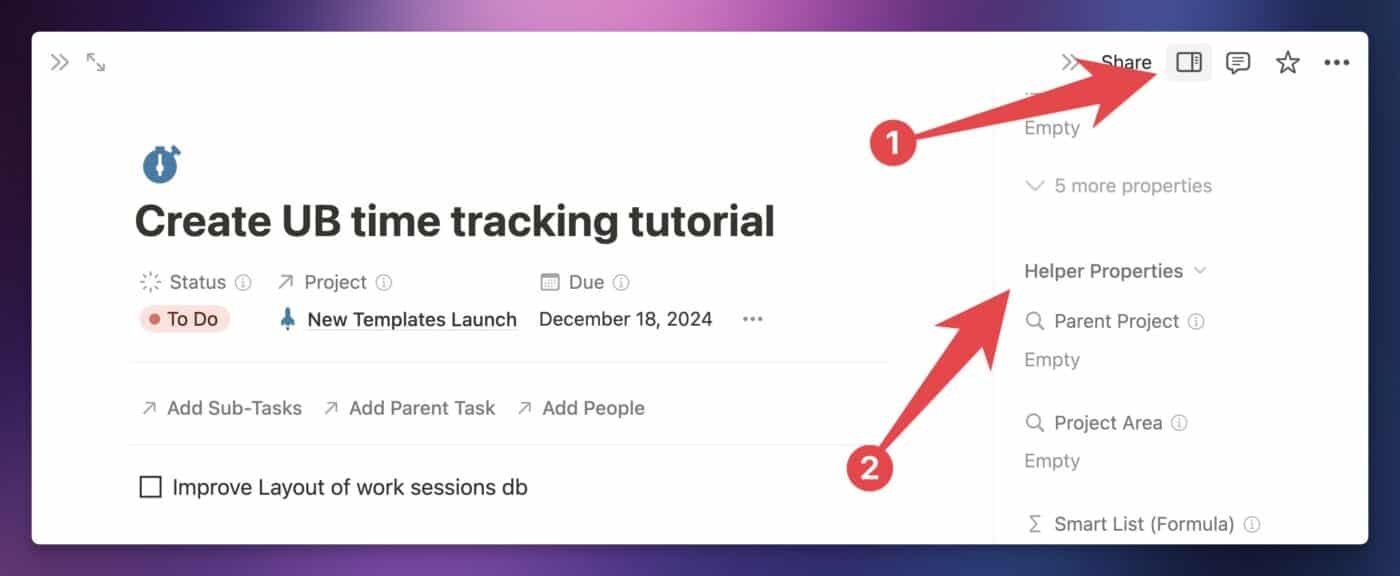
Your Tasks database should already have a new Relation property called Sessions, so make sure that’s present as well. If you open a task’s page and click the View Details button, you’ll find it at the bottom of the Helper Properties section. As long as it’s present, you don’t need to do anything to it now – though I chose to set its visibility to Always Hide.
Let’s now configure your Start button property. Click it, then hit Edit Property → Edit Automation to access the automation builder.
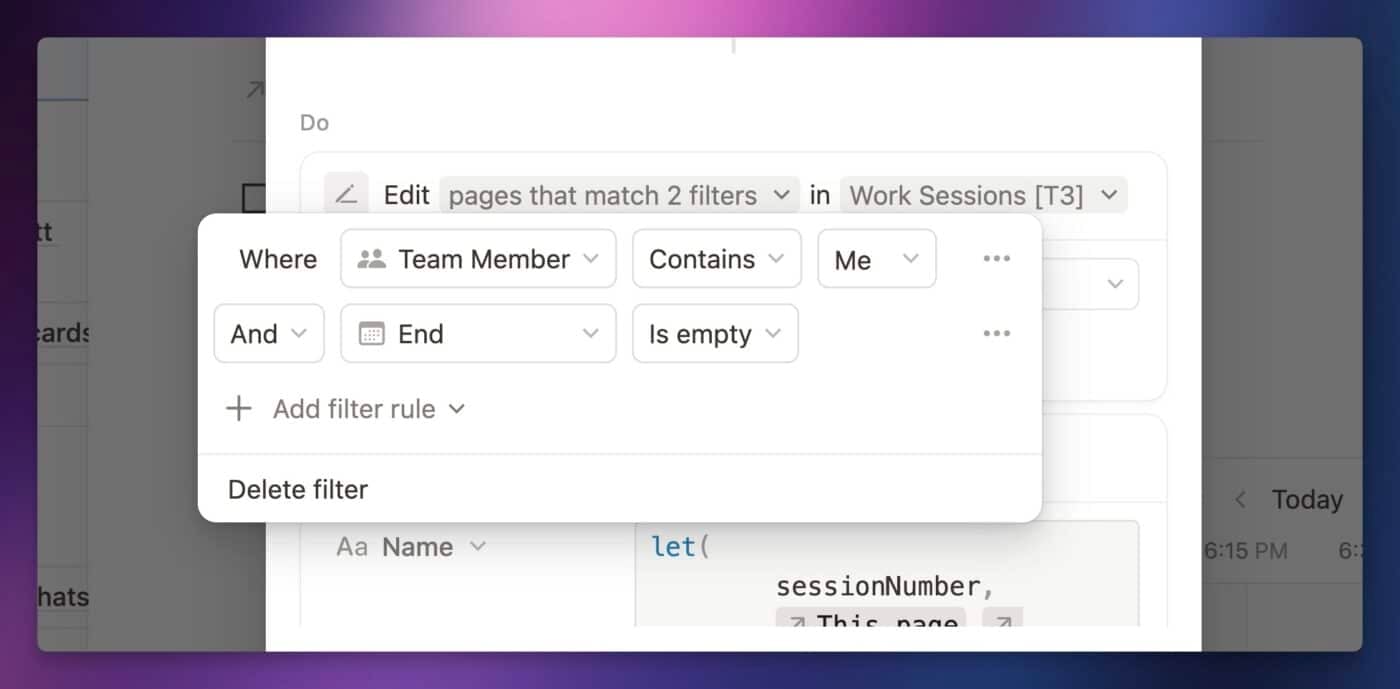
First, create an Edit Pages In… step. Choose your Work Sessions database, then create a filter with the following rules:
- Team Member contains Me
- End is empty
Set the End property to Time Triggered.
This step will end any currently active work session assigned to whoever clicked the button before it starts a new session related to the task where the button was clicked.
This is an important step, as a person can’t do two tasks at once!
Of course, you could just end any open session in the Work Sessions database if you know you’ll only ever use Ultimate Brain by yourself – but the Team Member property helps to future-proof your template, in case it’s ever used by multiple people.
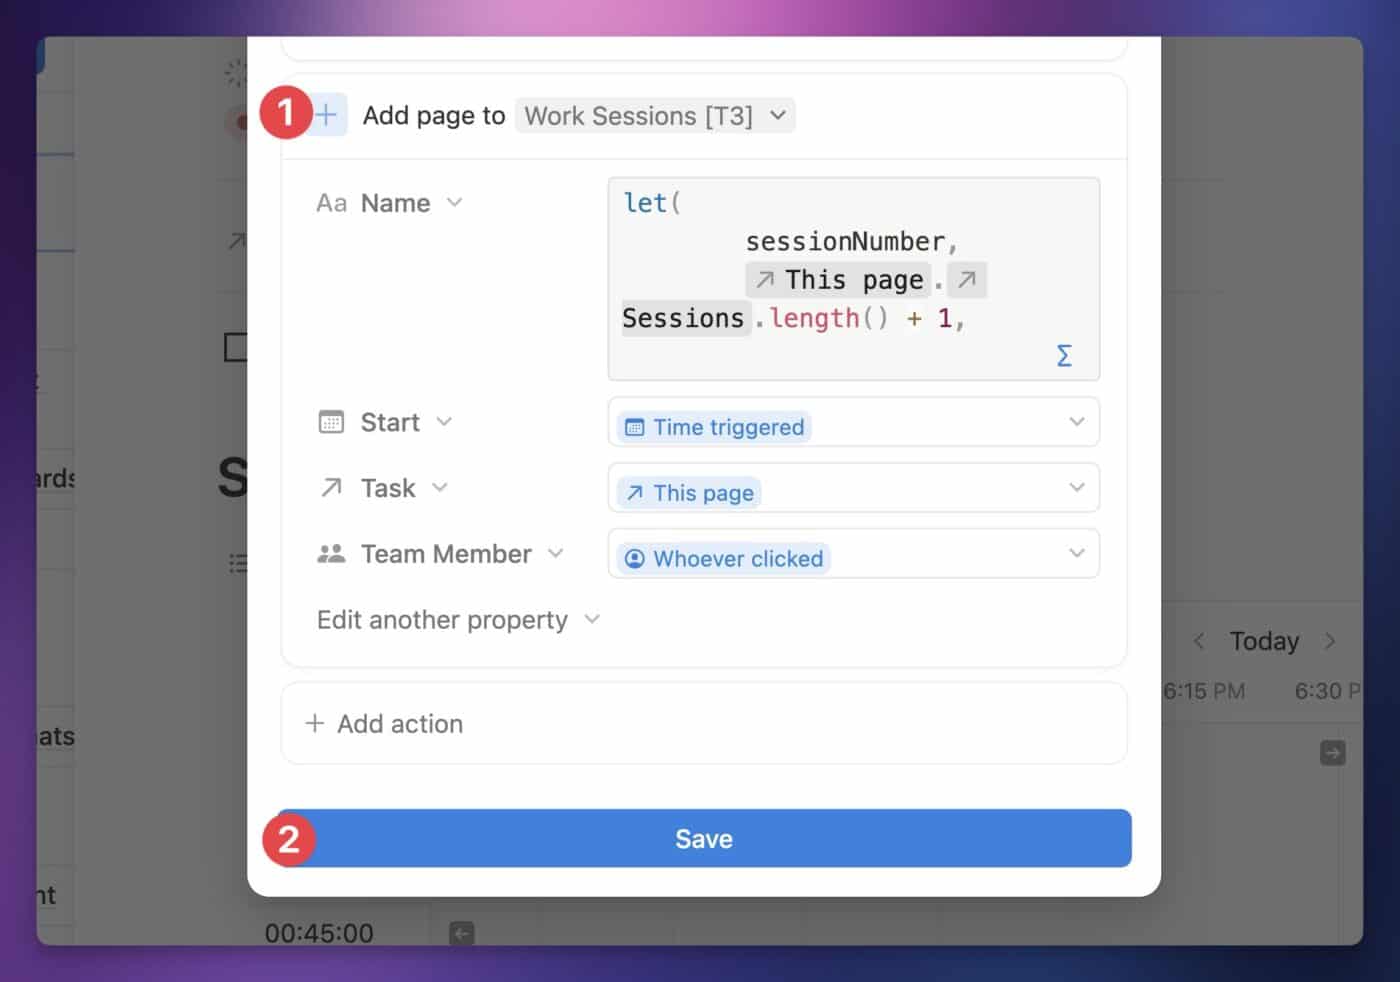
Next, create an Add Page To step, and choose your Work Sessions database. This step will create the new work session entry for this task. Set the following values:
- Name: Custom formula
- Start: Time triggered
- Task: This page
- Team Member: Whoever clicked
In the Name property’s custom formula editor, type out the following formula manually (copying and pasting doesn’t work in buttons and automations yet):
let(
  sessionNumber,
  This Page.Sessions.length() + 1,
  This Page + " (Session " + sessionNumber + ")"
)
Code language: JavaScript (javascript)
This formula will create a clickable link to the task within the session’s page title. If you only want the title to be “Session #”, you can replace This Page + " (Session " + sessionNumber + ")" with "Session " + sessionNumber.
Click Save when you’re done.
Next, edit the automation for your End button:
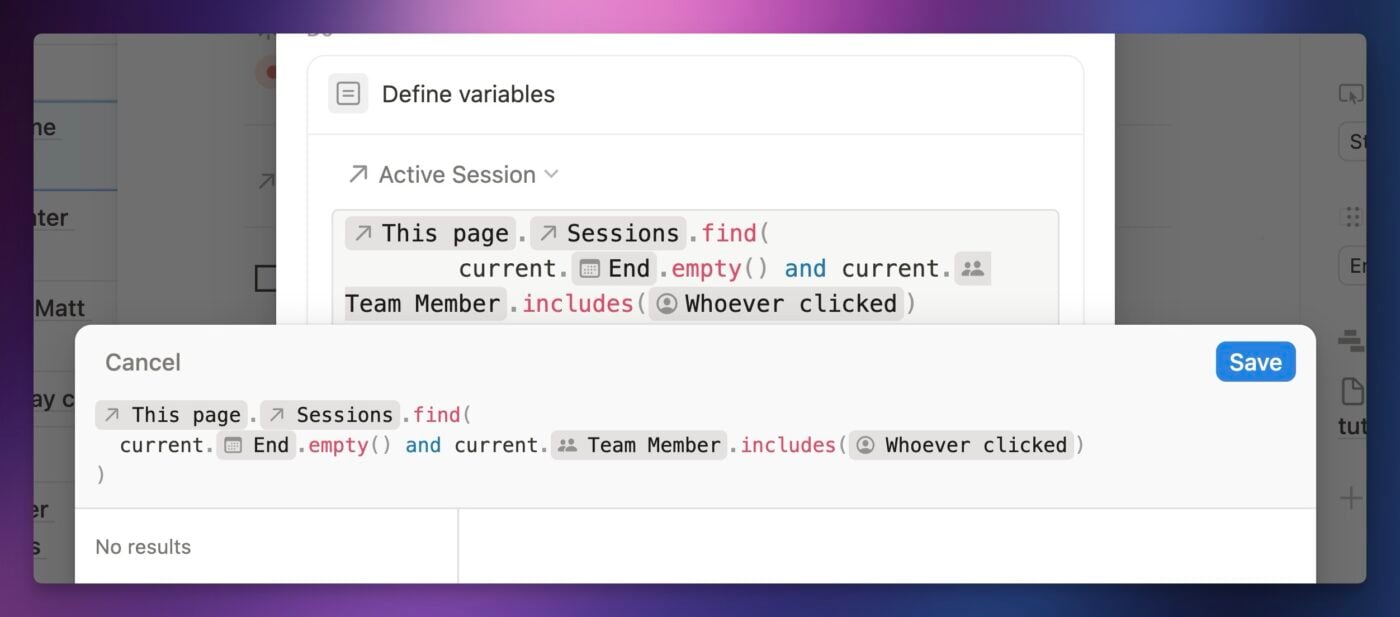
Create a Define a Variable step. Name your variable Active Session, then type out the following formula manually:
This Page.Sessions.find(
  current.prop("End").empty() and current.prop("Team Member").includes(Whoever clicked)
)
Code language: JavaScript (javascript)
Next, create an Edit Pages In step. In the database picker, choose your Active Session variable.
This will allow your button to edit pages within the list of pages returned by the formula, rather than needing a database and filter combo!
In this step, set End to Time triggered.
Click Save.
Next, add each of the following formulas to their properties.
Current Session:
prop("Sessions").filter(
  current.prop("End").empty()
)
Code language: JavaScript (javascript)
This formula simply displays the current active Work Session for this task, if one exists. It can be helpful for quickly telling whether or not a task is active.
It uses the filter() function to return a list of pages from the Sessions relation where the End property is empty (checked with empty()). Ideally, the list should only ever contain single page, and only if the task has a session currently active.
Time Tracked (Mins):
prop("Sessions").map(
  current.prop("Duration (Mins)")
).sum()
Code language: JavaScript (javascript)
This formula gets the Duration (Mins) value from each Work Session associated with this task, and then sums them up.
It uses the map() function to access the Duration (Mins) property on every page in the Work Sessions database that is related to this task. Then it uses the sum() function to get the sum of all of those durations.
You can easily include time tracked on sub-tasks by using this formula for Time Tracked (Mins) instead:
prop("Sub-Tasks").map(
  current.prop("Sessions").map(
    current.prop("Duration (Mins)")
  ).sum()
).sum() + prop("Sessions").map(
  current.prop("Duration (Mins)")
).sum()
Code language: JavaScript (javascript)
This version of the formula sums all the sessions on the main task, just like the simpler formula above. It also maps through the main task’s sub-tasks and does the same thing – then it adds up all the durations to get a final minute count.
Time Tracked:
lets(
  duration, prop("Time Tracked (Mins)").sum(),
  hours, floor(duration / 60),
  hoursLabel, hours < 10 ? "0" + hours : hours,
  minutes, duration % 60,
  minutesLabel, minutes < 10 ? "0" + minutes : minutes,
  hoursLabel + ":" + minutesLabel + ":00"
)
Code language: JavaScript (javascript)
This formula uses the same logic as the Duration formula in the Work Sessions database to format the Time Tracked (Mins) value as an HH:MM:SS string.
Time Tracking Status
ifs(
  prop("Status") == "Done",
  "Done",
  prop("Sessions").filter(
    current.prop("End").empty()
  ).length() > 0,
  "Active Now",
  "Not Tracking"
)
Code language: JavaScript (javascript)
This formula displays one of three statuses on each task: Done, Active Now, or Not Tracking. It’s useful for creating a grouped view of your Tasks database, where the currently active (tracked) task is separated out from all the others. This can help you stay focused on the current task.
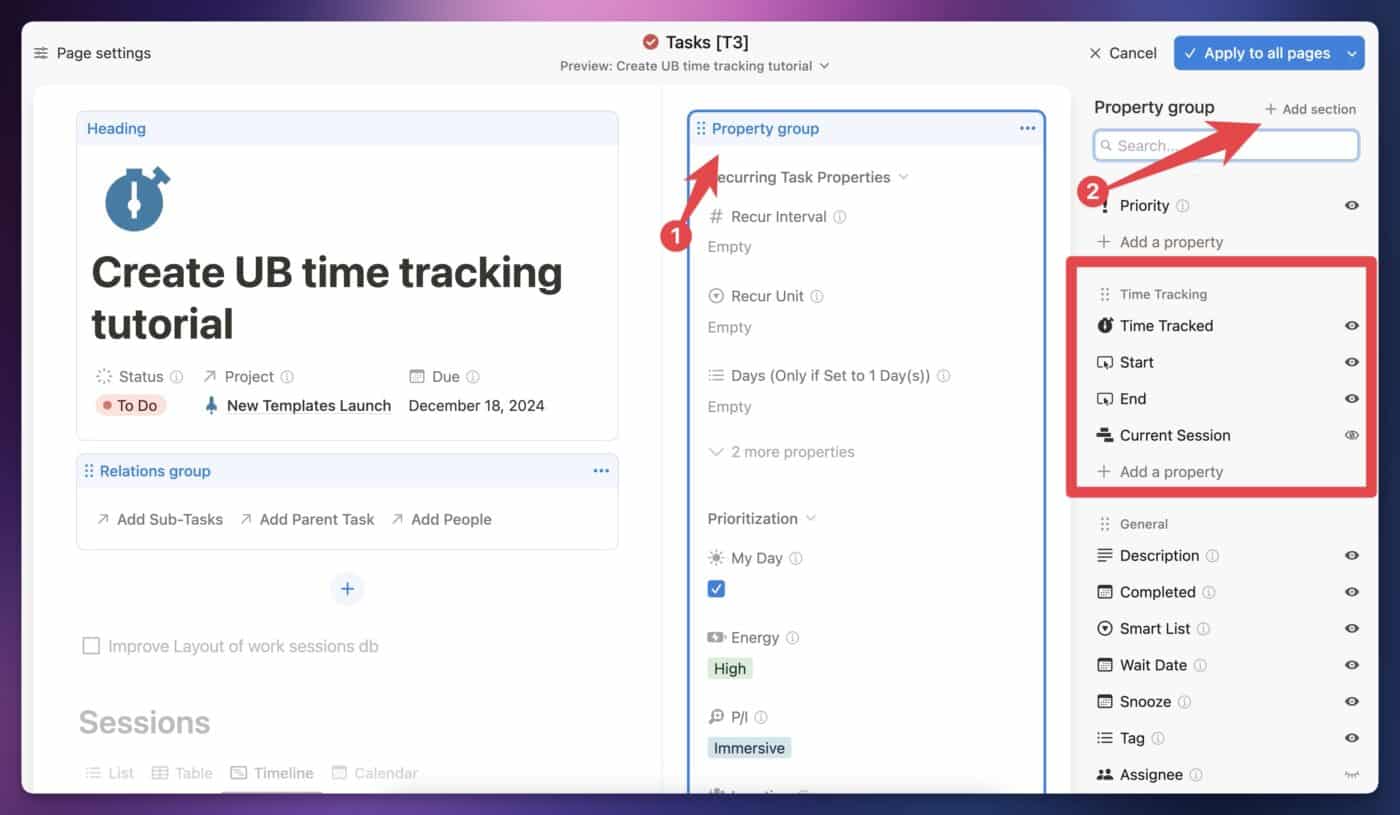
Here’s how I customized the layout of my time tracking properties. If you’d like to do the same, open any task page and click Customize Layout above the page title, then make the following changes:
- In the Property Group, add a section called Time Tracking, and move it wherever you like. I placed it beneath another custom section I created called Prioritization.
- I dragged my Time Tracked, Start, End, and Current Session properties into this section.
- I left the rest of the properties in the Helper Properties section, and set the visibility of each to Always Hide.
Create the Time-Tracked Task Template
At this point, your time tracking system is functional. You can click the Start button on any task to start a session, which will have its duration tracked, and you can click the End button to end that session.
However, all this information is currently hidden in database properties that aren’t very easy to access. So now we’re going to add a database template to your Tasks database, which you can apply to a page in order to see all of the work sessions associated with that task.
Navigate to your Tasks database, then click the blue down arrow next to the New button. Click New Template, and name it Time-Tracked Task.
On the page, create a Sessions header. Then, beneath it, create a list view of your Work Sessions database.
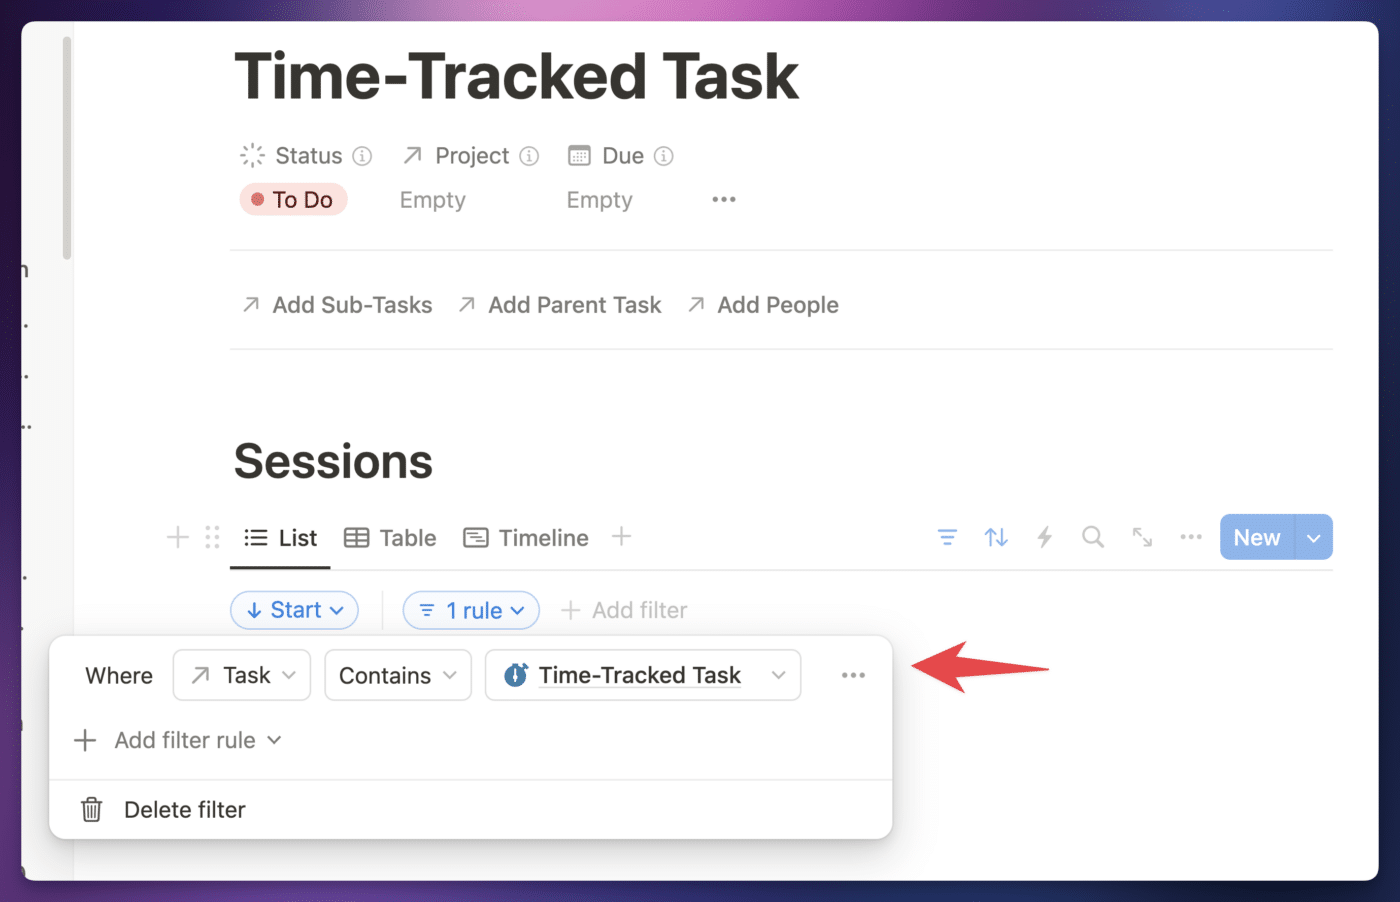
The most important thing you need to do in this view is to add a filter where the Task relation contains the Time-Tracked Task template page.
This is a self-referential filter, and the page reference will be updated to match any new page where you apply this template. In effect, it will ensure that anytime you create a new time-tracked task, the only work sessions that will show in that page’s view will be related to that page.
Beyond that, the way you configure this database view is completely up to you. Here’s how I did it:
- Sort: Start – Descending
- Properties: Name, Duration
The List view is my default view, but I also created Table and Timeline views. To create these, I duplicated the list view, which ensured that my filter and sort criteria were already set up.
With that, your page template is now complete. If you want to see a record of all of your work sessions on a time-tracked task, simply apply that page template by opening the task and clicking the template name in the page body.
Note that you could also copy and paste this database view you’ve created, along with the Sessions header, into any of the other existing page templates. For example, you could paste these blocks into the Task with Subtasks page template, which would give you both a view of the subtasks within the page along with a view of your work sessions.
Copy link to headingModify the Projects Database
Just as we can add up the total time tracked across multiple sessions on each task, we can also track the total time on entire projects.
To do this, you only need to add two additional properties to your Projects database. Both should be formula properties:
- Time Tracked (Mins)
- Time Tracked
These properties are nearly identical to the properties of the same names in the Tasks database. Here are their formulas.
Time Tracked (Mins)
prop("Tasks").map(
  current.prop("Time Tracked (Mins)")
).sum()
Code language: JavaScript (javascript)
Time Tracked
lets(
  duration, prop("Time Tracked (Mins)").sum(),
  hours, floor(duration / 60),
  hoursLabel, hours < 10 ? "0" + hours : hours,
  minutes, duration % 60,
  minutesLabel, minutes < 10 ? "0" + minutes : minutes,
  hoursLabel + ":" + minutesLabel + ":00"
)
Code language: JavaScript (javascript)Add the Time View to My Day
The final step in this process is to create at least one view of your Tasks database where it’s easy to start tracking time on a task.
I’ve done this by adding a new List-type view called Time in the Execute section of the My Day page.
This view is grouped by the Time Tracking Status property, which ensures the task I’m currently working on it shown in the Active Now section on its own.
I’ve also edited the displayed properties to show my Start and End buttons along with my Time Tracked property.
Finally, I made a small tweak to the formula in my Meta Labels property. Now the formula will display a ⏱️ emoji when a task is currently being tracked. Here’s my formula for that property:
lets(
  recurring,
  if(
    not empty(prop("Next Due")),
    "🔁",
    ""
  ),
  hasSubtask,
  if(
    prop("Sub-Tasks").filter(current.prop("Status") != "Done").length() > 0,
    "↳",
    ""
  ),
  trackingNow,
  if(
    prop("Sessions").filter(
      current.prop("End").empty()
    ).empty(),
    "",
    "⏱️"
  ),
  [trackingNow, recurring, hasSubtask].join(" ").replace("^\s","").replace("\s$","")
)
Code language: JavaScript (javascript)
The easiest way to create this view for yourself is to right-click the existing My Day view and duplicate it.
This will ensure that you retain all of the filter rules from that view. From there, you can make the following changes:
- Edited the displayed properties to show Start, End, and Time Tracked
- Hide other displayed properties in order to prevent the view from being too cluttered
You’re done! Now you have a robust time tracking setup built into Ultimate Brain.
From here, you could take things further, adding your time tracking buttons and other properties to other database views, or extending them with additional properties.
Copy link to headingView Time Tracking Entries in Notion Calendar
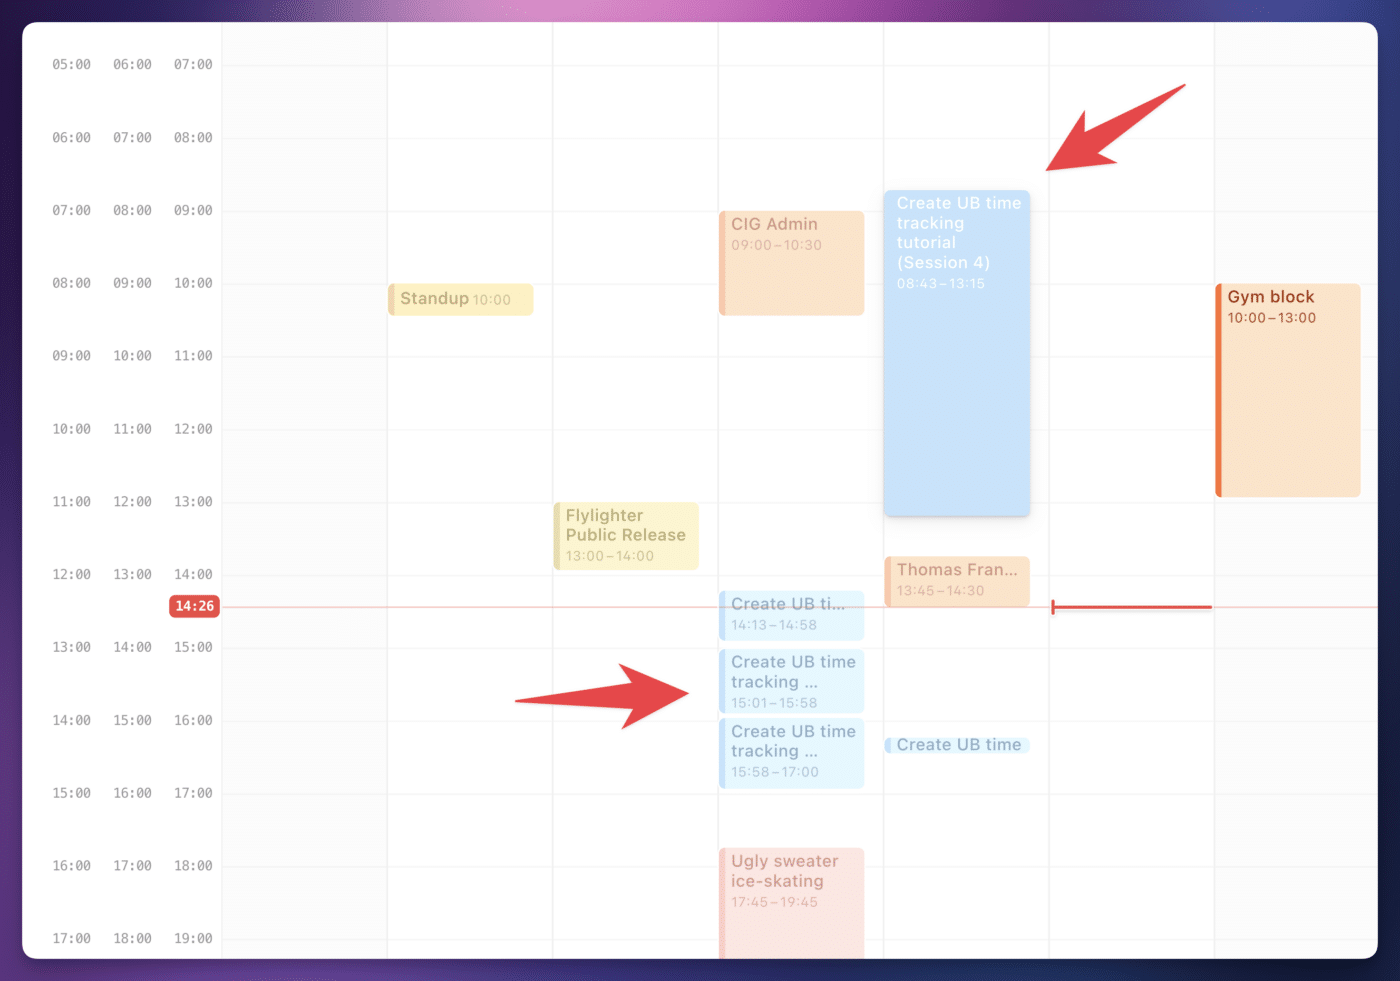
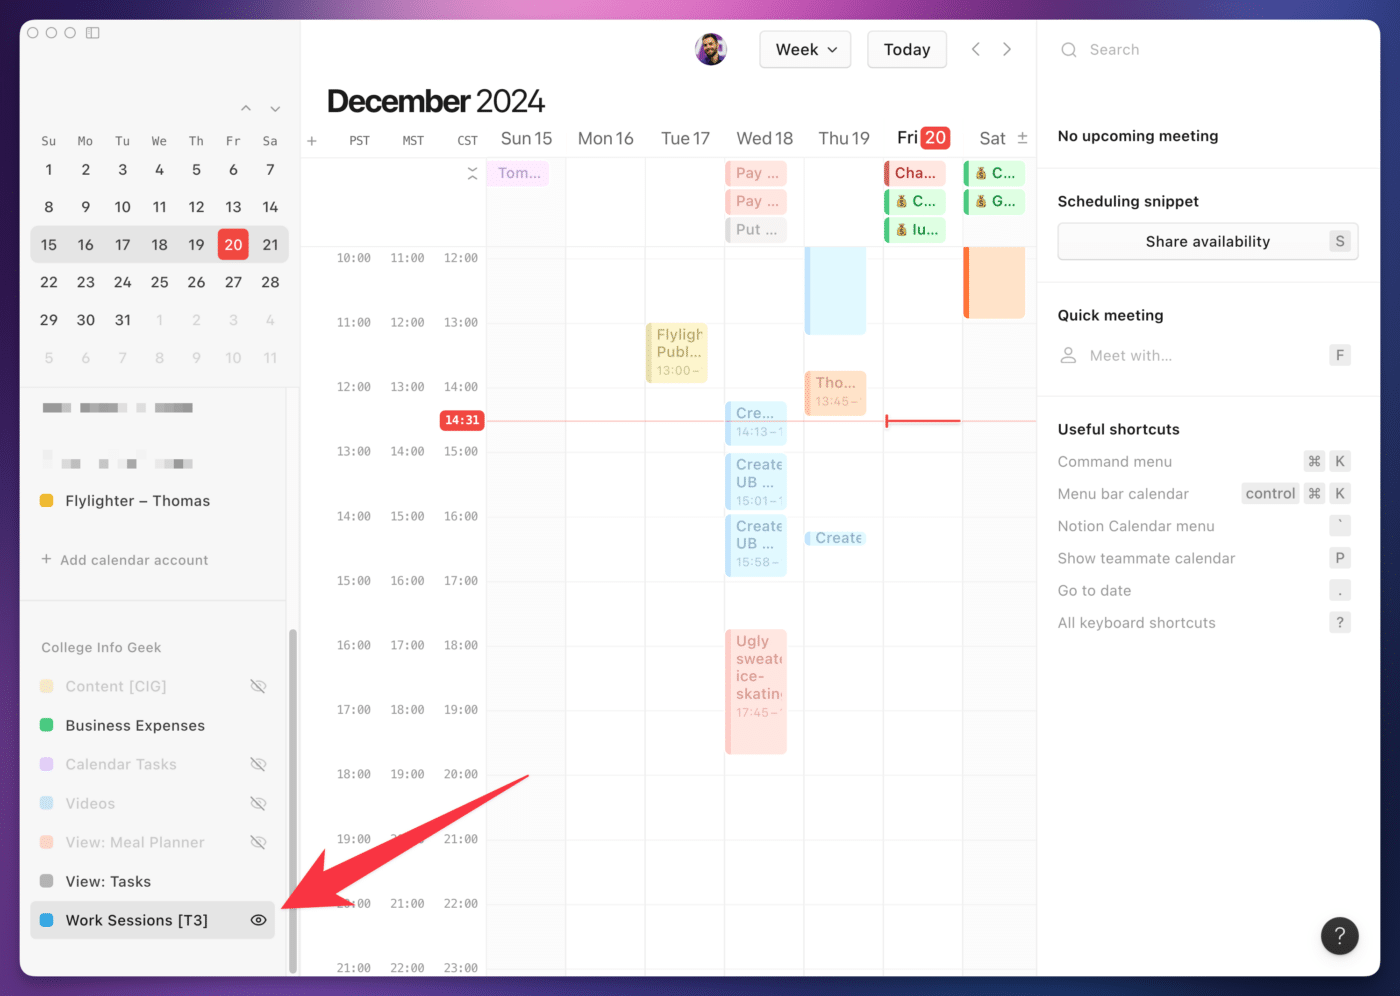
It’s also possible to view your work sessions in the Notion Calendar app, which will allow you to see their durations on Week or Day views. (Notion’s native Calendar layouts can’t display time slots like this.)
If you haven’t already integrated your Notion workspace with Notion Calendar, check out our Notion Calendar integration doc for more details on how to do that.
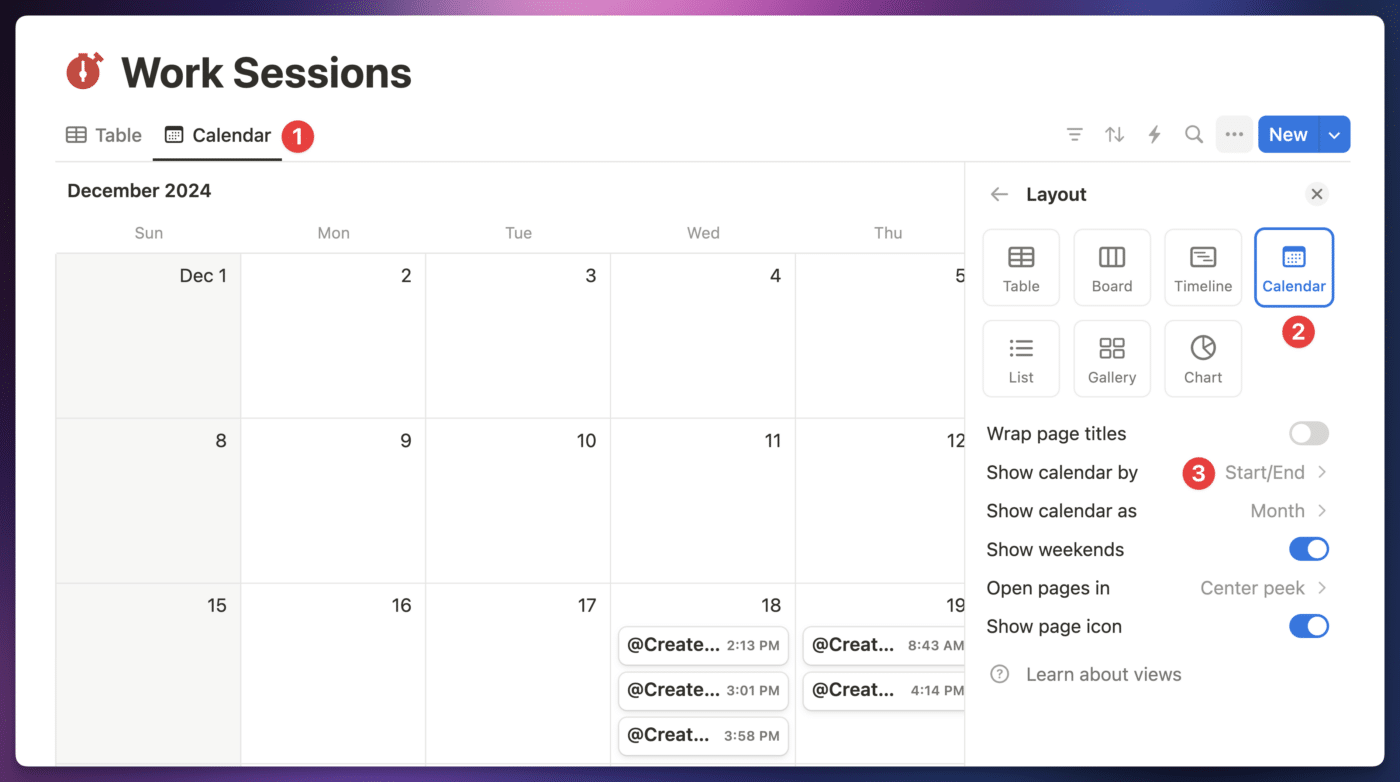
If you would like to do this, first create a Calendar view in your Work Sessions database.
Under Layout, find the Show Calendar By option and change it to Start/End. It’s necessary to use this formula property in order to see the full duration of the work session, since it contains the start and end time.
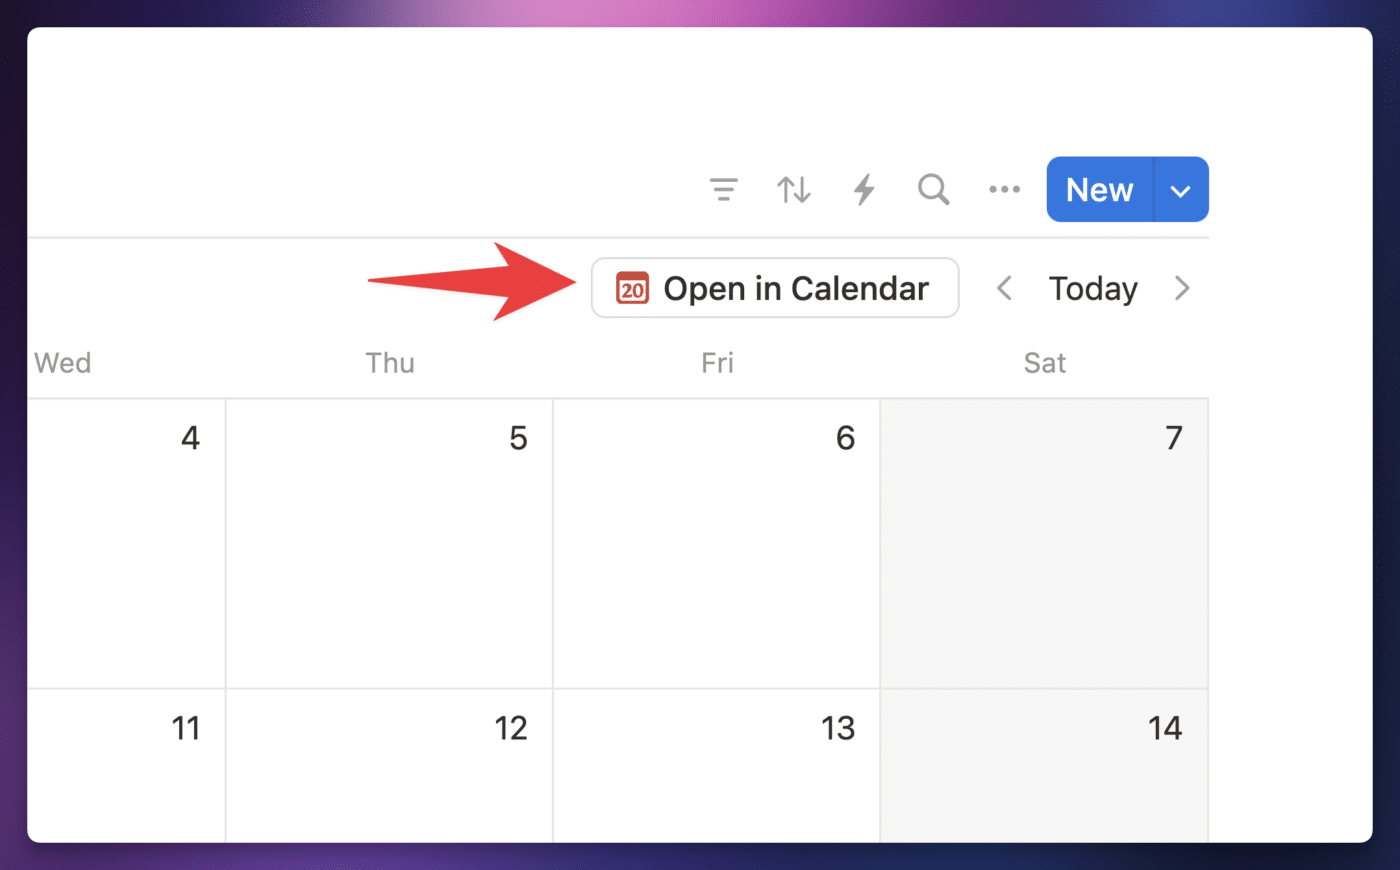
Once you have your calendar view created, click the Open in Calendar button in that view. This will create a new view in Notion Calendar.
You’ll see your calendar view at the bottom of the left sidebar. It may be hidden by default, so click the eye icon to show it.
You can also right-click the view to change its color on the calendar.


