
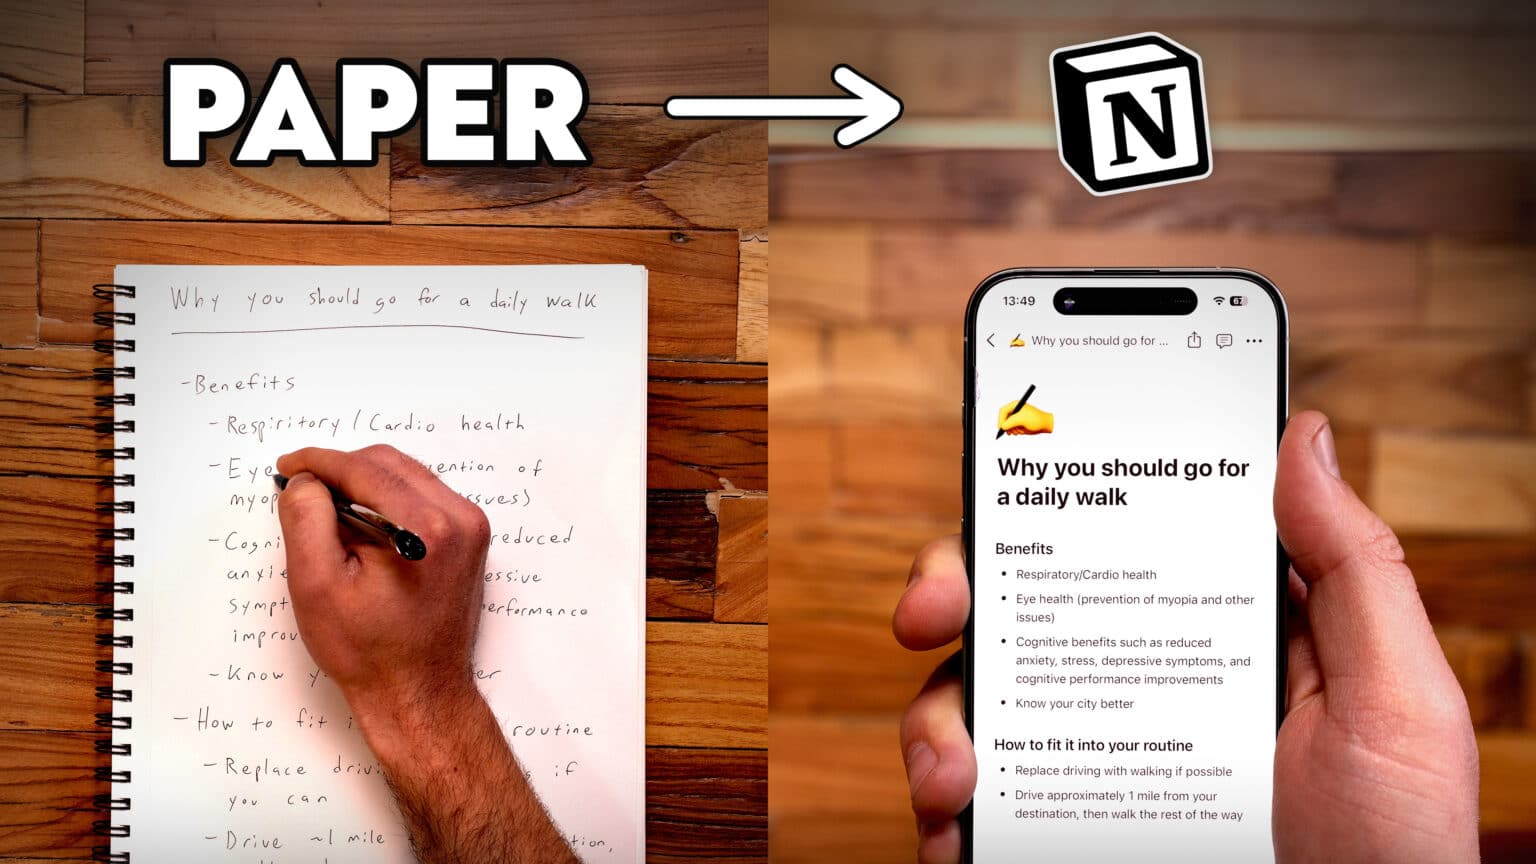
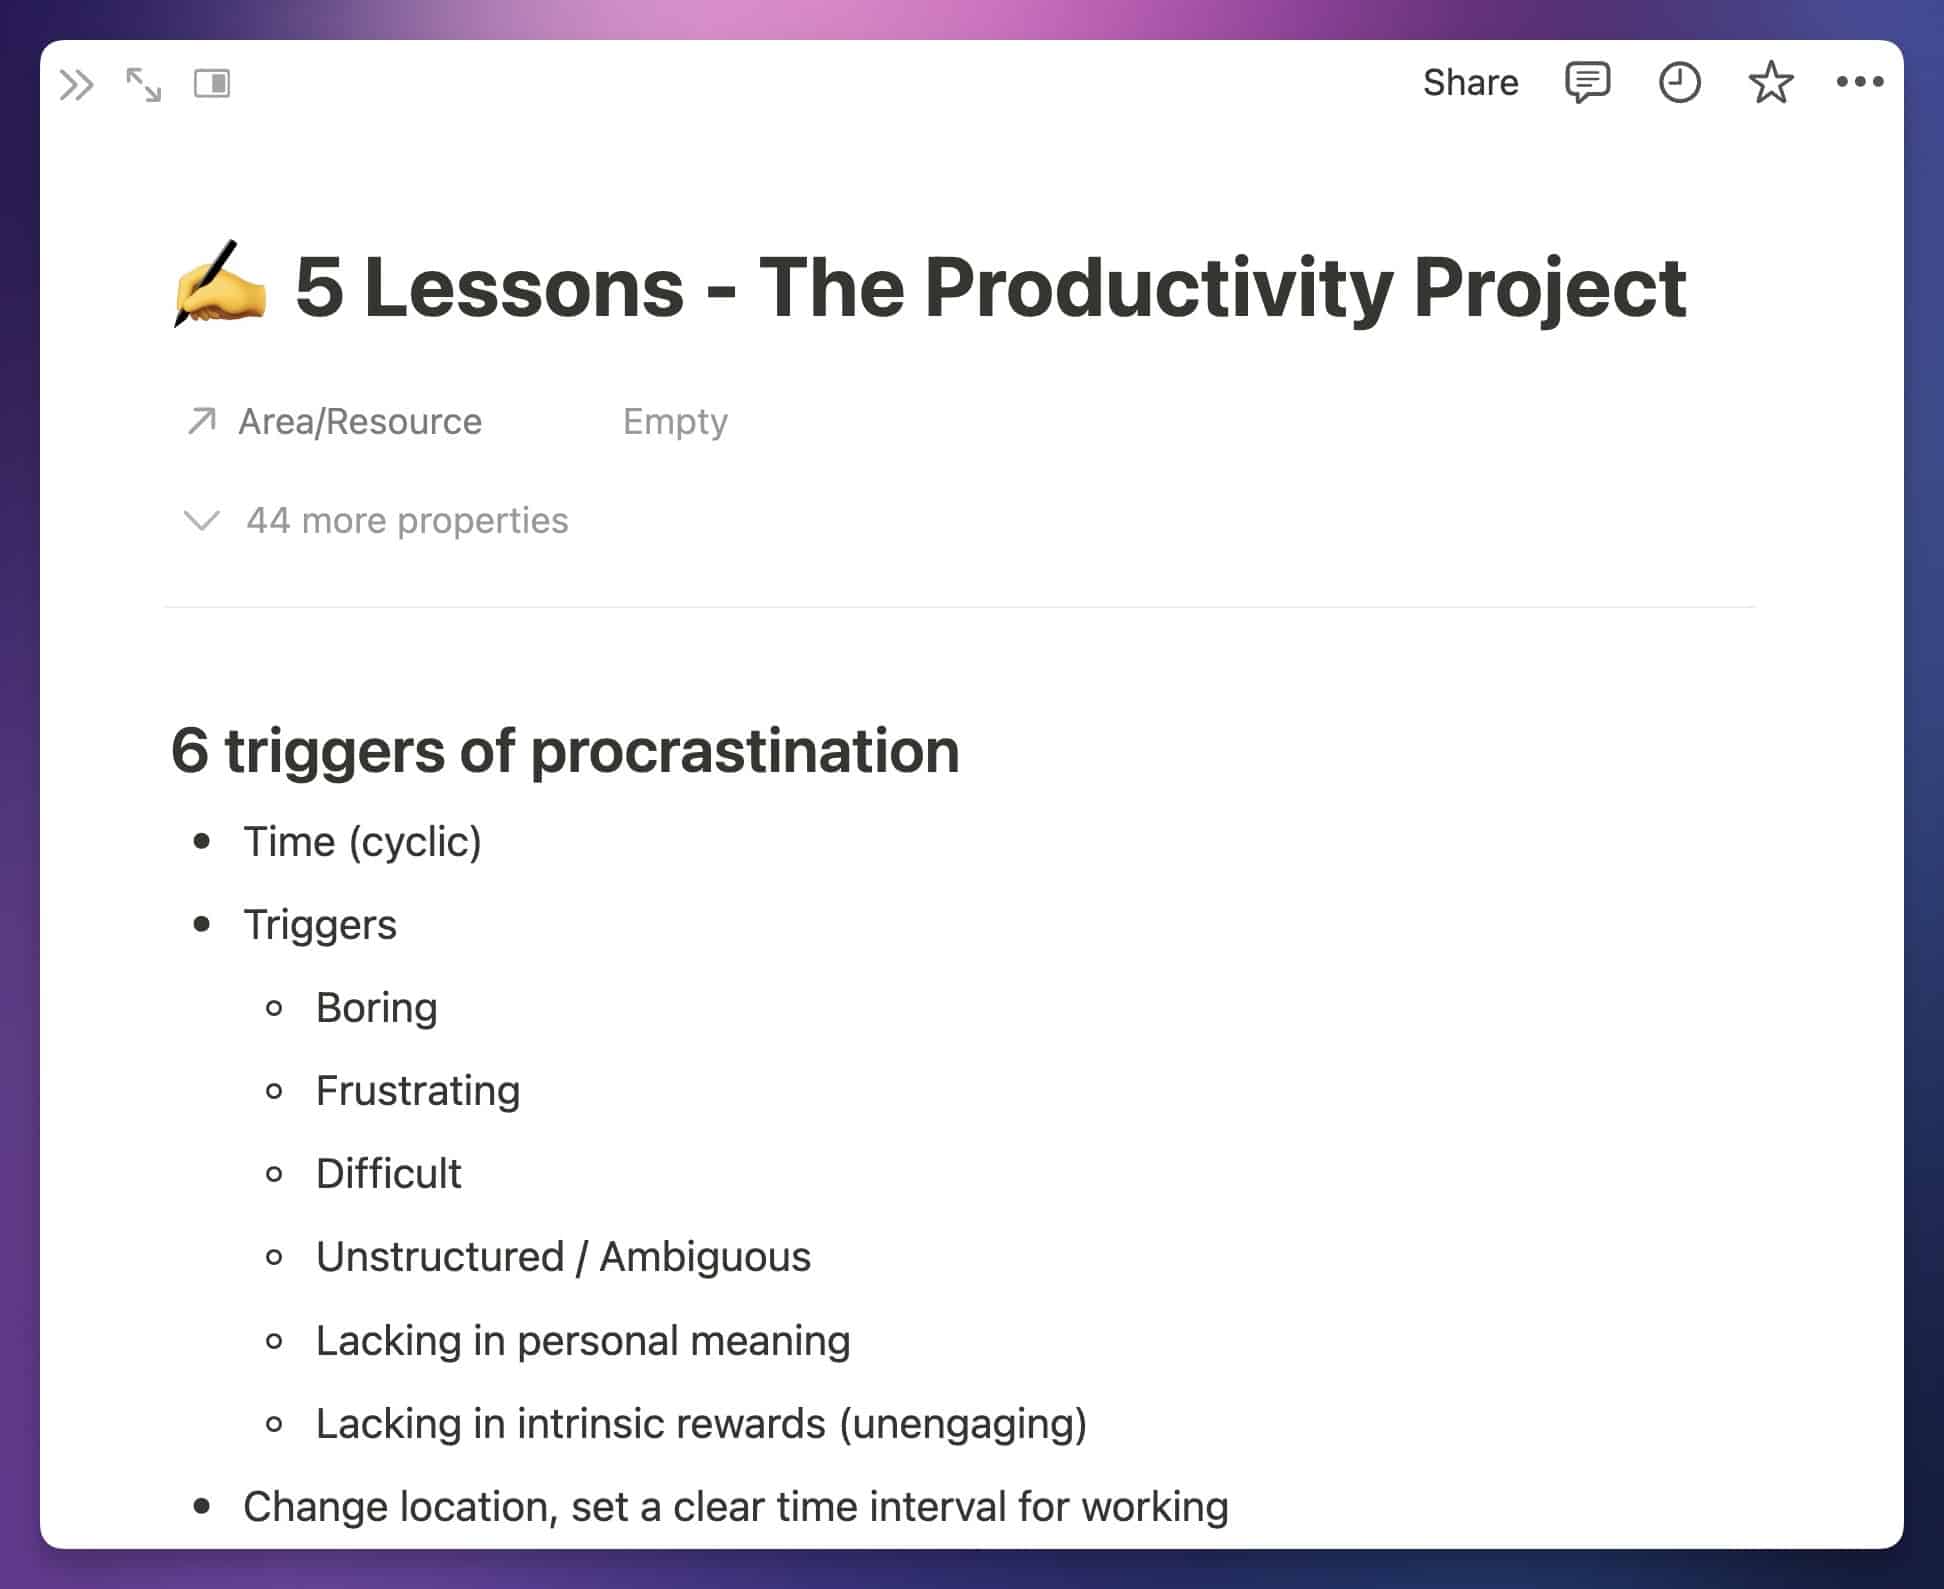
I recently built an automated workflow that takes my handwritten notes and converts them into digital text using ChatGPT.
There are actually several ways to do this, including using the official ChatGPT app.
The method I’ve built instead uses the ChatGPT API along with Pipedream, a platform for building automations. This brings a few key benefits:
- It’s cheap, costing around $0.005-$0.02 per page of notes
- It’s much faster to use
- It’s completely automated
- It supports multi-page PDFs
Most importantly, it will automatically send my notes to Notion (my note-taking app of choice).
[Image showing the paper note and the digitized version]
The workflow exports the notes to Markdown, so I can also send them to other destinations if I want – email, Slack, etc.
In this guide, I’ll show you how to build the same workflow for yourself.
If you haven’t heard, ChatGPT (and specifically the GPT-4 model) can now take images as input in addition to text.
In this tutorial, we’ll use this new capability to have it look at an uploaded picture of your notes, extract the text, and nicely format it.
Once you’ve set up this workflow, you’ll be able to simply take a picture of any paper note, upload it to a cloud storage app like Google Drive, and see a digitized version in Notion just moments later.
Tutorial Overview
Here’s a quick look at how this automation works.

When you take a picture of your handwritten notes, you’ll upload it to a cloud storage app like Google Drive, Dropbox, or OneDrive.
Once the image is successfully uploaded, your
If you have multiple images you want to bundle together, you can upload them as a PDF. I’ll explain how to modify the workflow for this purpose later in the tutorial.
The automation will then split the response from ChatGPT into a few pieces, including the title of the note and the body. Finally, it’ll send these details to Notion, creating a new page with your digitized notes.
If you’d rather send the results to another app or destination instead of Notion (e.g. email), you can simply set that destination as the last step in your workflow, as long as
Why Not Use the ChatGPT App?
If you have the official ChatGPT app on your phone, you can take pictures (or upload them from your Camera app) and ask ChatGPT to extract the text.
This works well, but there are two downsides:
- If you’re not paying for the ChatGPT Plus subscription ($20/mo), your access to GPT-4 may be limited.
- You need to manually copy and paste the extracted text from the ChatGPT app to wherever you want it to live
With this workflow, we completely remove the need for copying and pasting from the ChatGPT app. We also get the additional benefit of being able to upload an image or PDF and have the digitized text automatically sent to Notion.
The only real downside to using this workflow over the alternatives is that it involves a bit of initial setup. Fortunately, the setup doesn’t take very long. I’ll guide you through every step along the way.
Note: If you want even more flexibility and convenience with this workflow, check out Flylighter. It’s a set of tools my team and I are building to make capturing ideas and information instant and effortless – and after we launch our mobile apps, we’ll be building a beefed-up version of this workflow into them.
Setup Guide
Alright, let’s start building!
As a primer, here’s everything you’ll need to set up the workflow.
- A Pipedream account (free)
- An OpenAI account with at least $5 of purchased credit (required for GPT-4 access)
- A cloud storage account – I’ll mainly cover Google Drive here, as it’s what I use. But I’ll add asides for Dropbox and OneDrive as well.
- A Notion account (free) – or alternative destination. If you’re using Notion, you’ll also want to select a database where new pages will be created.
I’d also recommend getting a document scanner app. I use Adobe Scan, which is free. You can also simply upload pictures from your phone’s camera app (or even your computer), but Adobe Scan makes it easy to adjust the brightness and contrast of your photos so the text is as readable as possible.
You’ll also need an OpenAI API key, but I’d encourage you to create that later in the tutorial when it becomes relevant. You’ll only be able to see the key once on your OpenAI dashboard.
If you want to be able to upload PDF files that contain multiple images, you’ll also need a PDFco account and some credits. If you just want to upload single images, this isn’t required. See the section on handling multiple images at once for more details.
This workflow is free to set up, extremely cheap to run ($0.005-$0.02 per image), and works on
Choose Your Notion Database
If you’d like to send your digitized notes to Notion, then you’ll want to have a database in Notion set up where those new notes will be created.
If you’d prefer to send your notes somewhere else, all you’ll need to do is replace the final step in this workflow with an alternative destination. See the section on Using Destinations Other Than Notion for guidance.
This workflow will work with any Notion database – even a brand new, completely blank one.
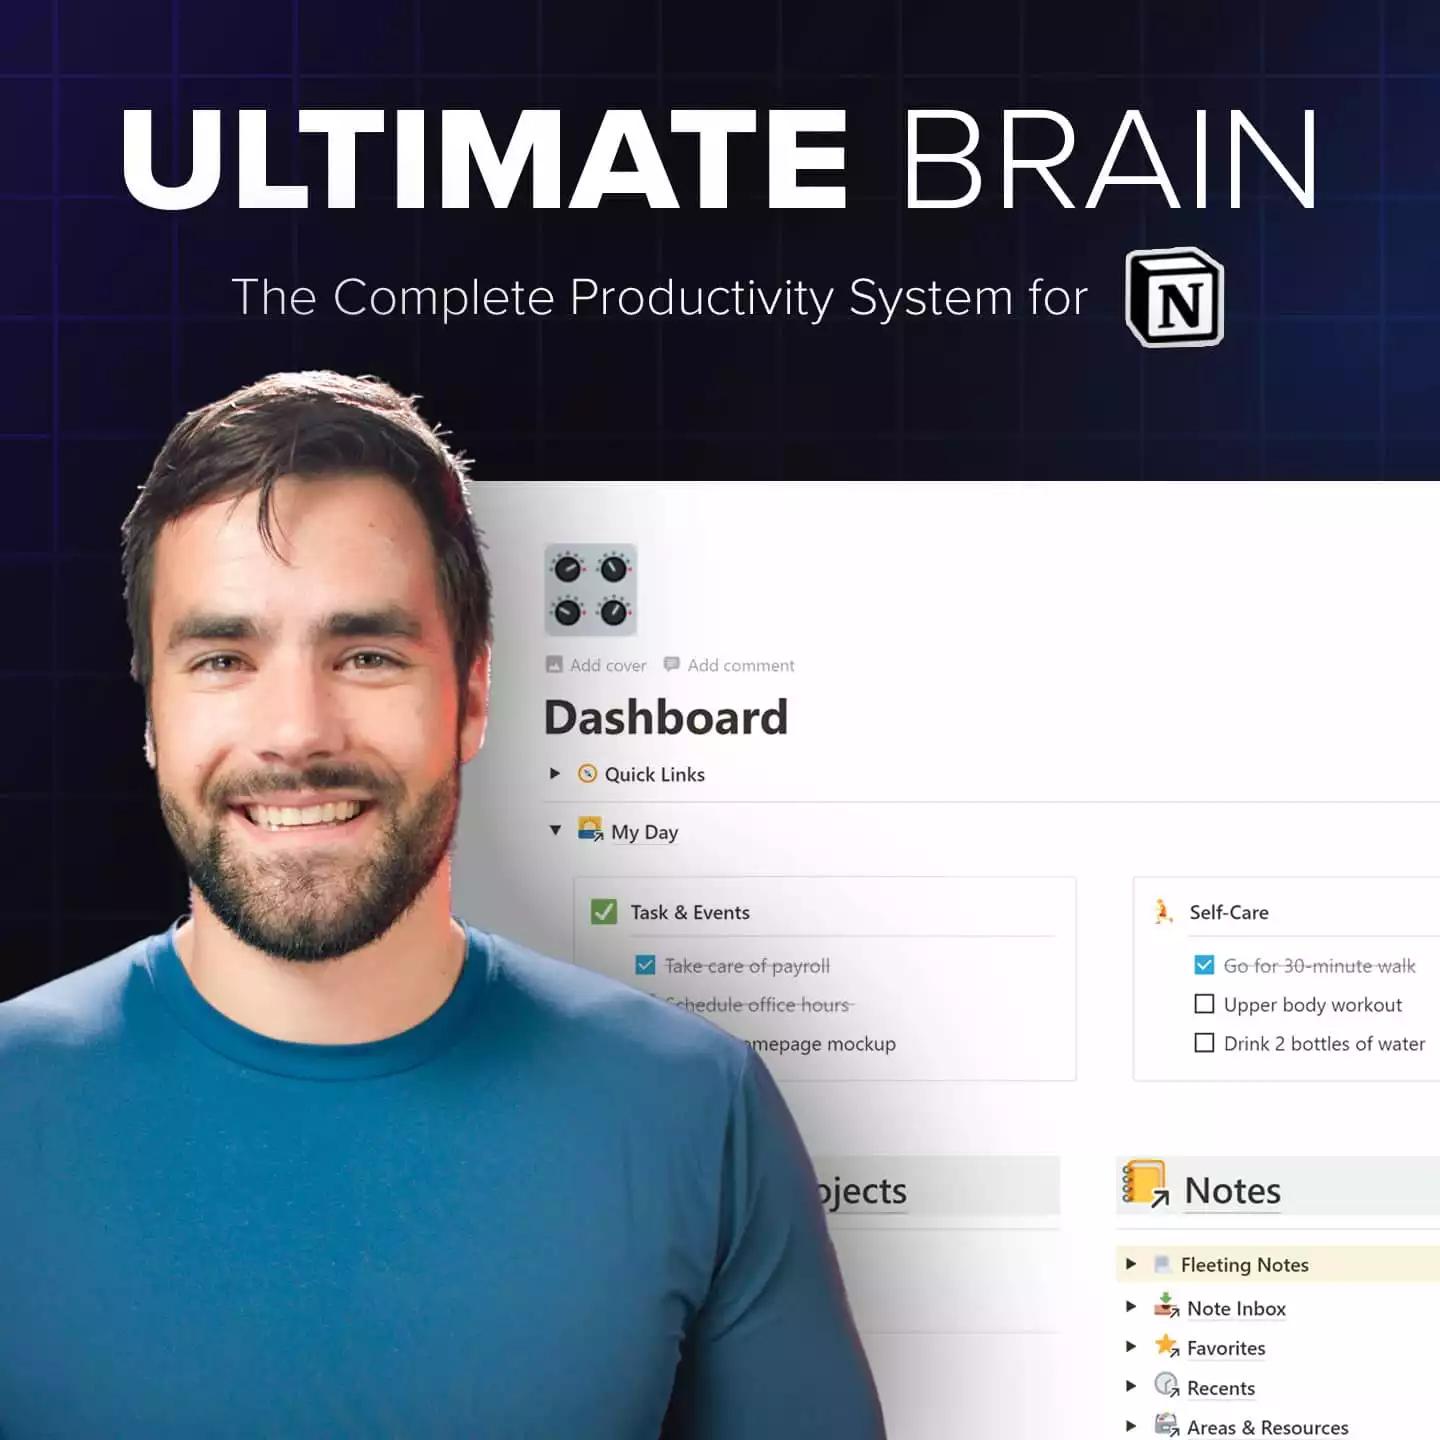
However, this workflow work especially well with my Ultimate Brain template, which comes with the best note-taking system you’ll find in a Notion template.
Ultimate Brain is my all-in-one productivity template for Notion, and it combines tasks, notes, projects, goal-tracking, daily planning, journaling, and more to form a complete second brain in Notion.
You can get it here:
Want to turn Notion into a complete productivity system? Ultimate Brain includes all the features from Ultimate Tasks - and combines them with notes, goals, and advanced project management features.
If you’d prefer to create your own notes database in Notion and need a refresher on how to do it, take a look at my complete guide to Notion databases:

Set Up the Pipedream Workflow
This workflow runs on Pipedream, which is my favorite automation builder platform. It’s similar to Zapier, but lets you write your own code and has a much more capable free plan.
I use it to run tons of automations in both my life and business, including the one that lets me take notes with my voice, and the one that adds full recurring task support to Notion.
To get started, create a
Pipedream’s free plan gives you 10 credits every day (300 max per month), and this workflow nearly always takes 1 credit. If you upgrade it to handle multi-image PDF files, it may take 2-3 per run – credit use depends on how long the workflow takes to complete.
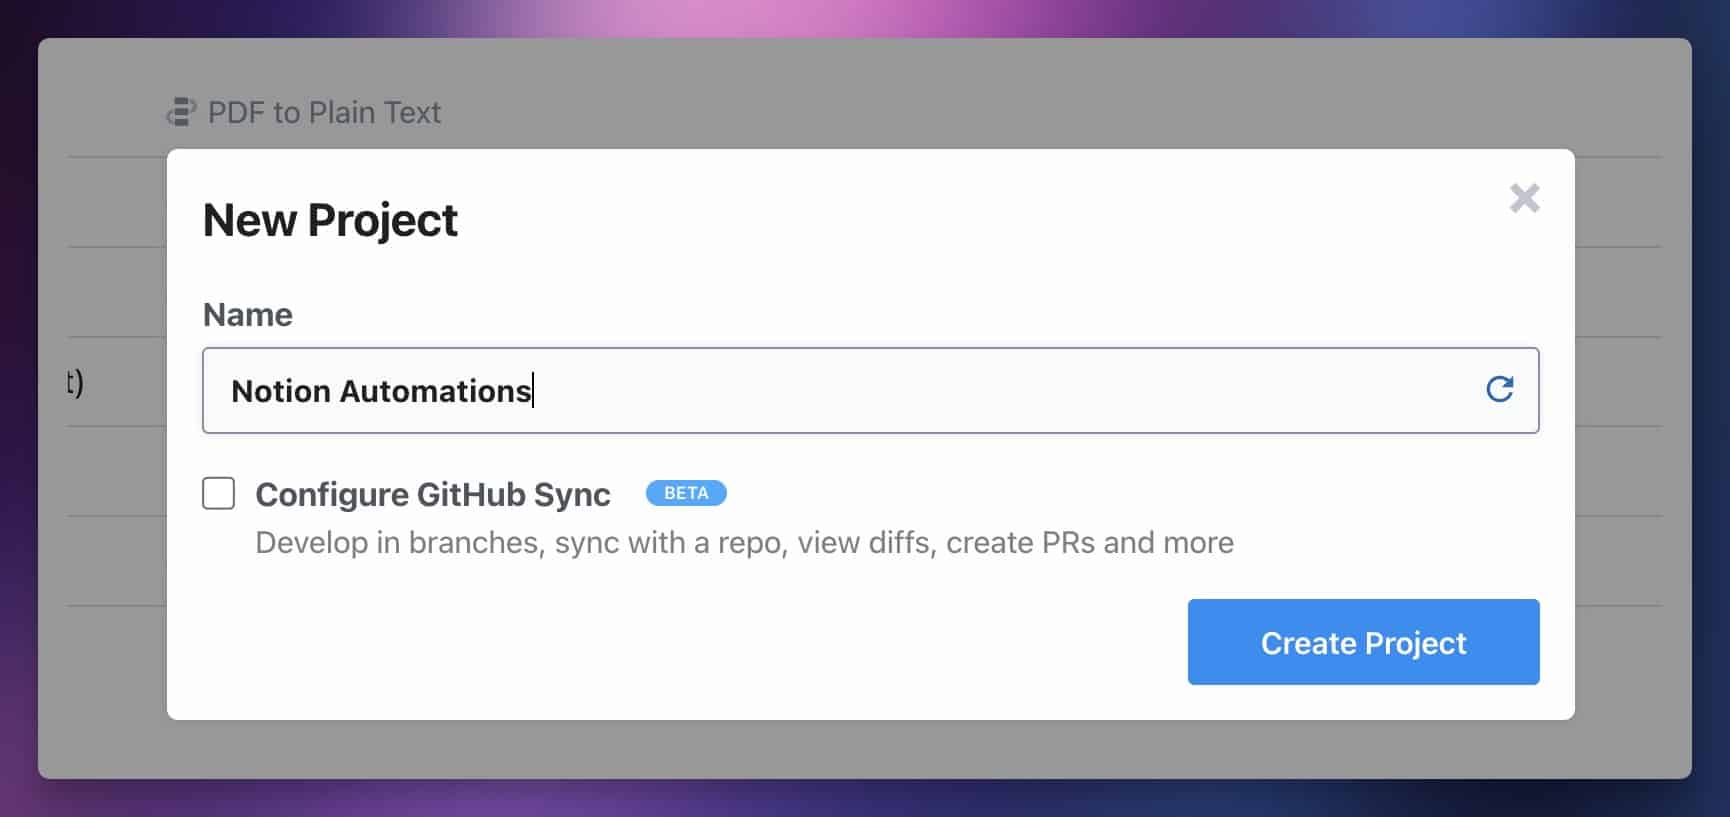
Once you’ve created your account, create a new project. Call it whatever you want – I might suggest Notion Automations. This project can hold multiple workflows.
Next, click the New menue and create a new Workflow.

Name your workflow Handwriting to Notion, or something else descriptive.
I also recommend setting the Timeout value to at least 120 seconds. Most runs will take far less time than this (typically 10-20 seconds), but since the ChatGPT API can sometimes respond slowly during times of high-demand, it’s good to ensure your workflow won’t time out before it completes.

Finally, click Create Workflow.
Create the Trigger
On the workflow canvas, let’s start by creating a Trigger. When something happens that matches the trigger condition, the workflow will run.
Let’s make the workflow trigger when a new image is uploaded to a specific Google Drive folder. If you want to use Dropbox or OneDrive, scroll to the bottom of this section and find the toggle sections for them.
Click Add Trigger, then find the trigger: Google Drive → New Files (Instant).
Set the trigger with the following settings:
- Google Drive Account: Connect your Google account.
- Drive: My Drive (or whichever Drive you want to use)
- Folders: I recommend choosing a specific folders for new uploads. Otherwise, the workflow will trigger when any file is uploaded to your Drive account.

Next, hit Save and Continue. This will set the trigger up so that it’s listening for new events.
When using Google Drive, you also change the sharing settings on the folder you’ll be using for image uploads, so that anyone with the link can access it. There is a way around this, which I’ll cover in a toggle section shortly.
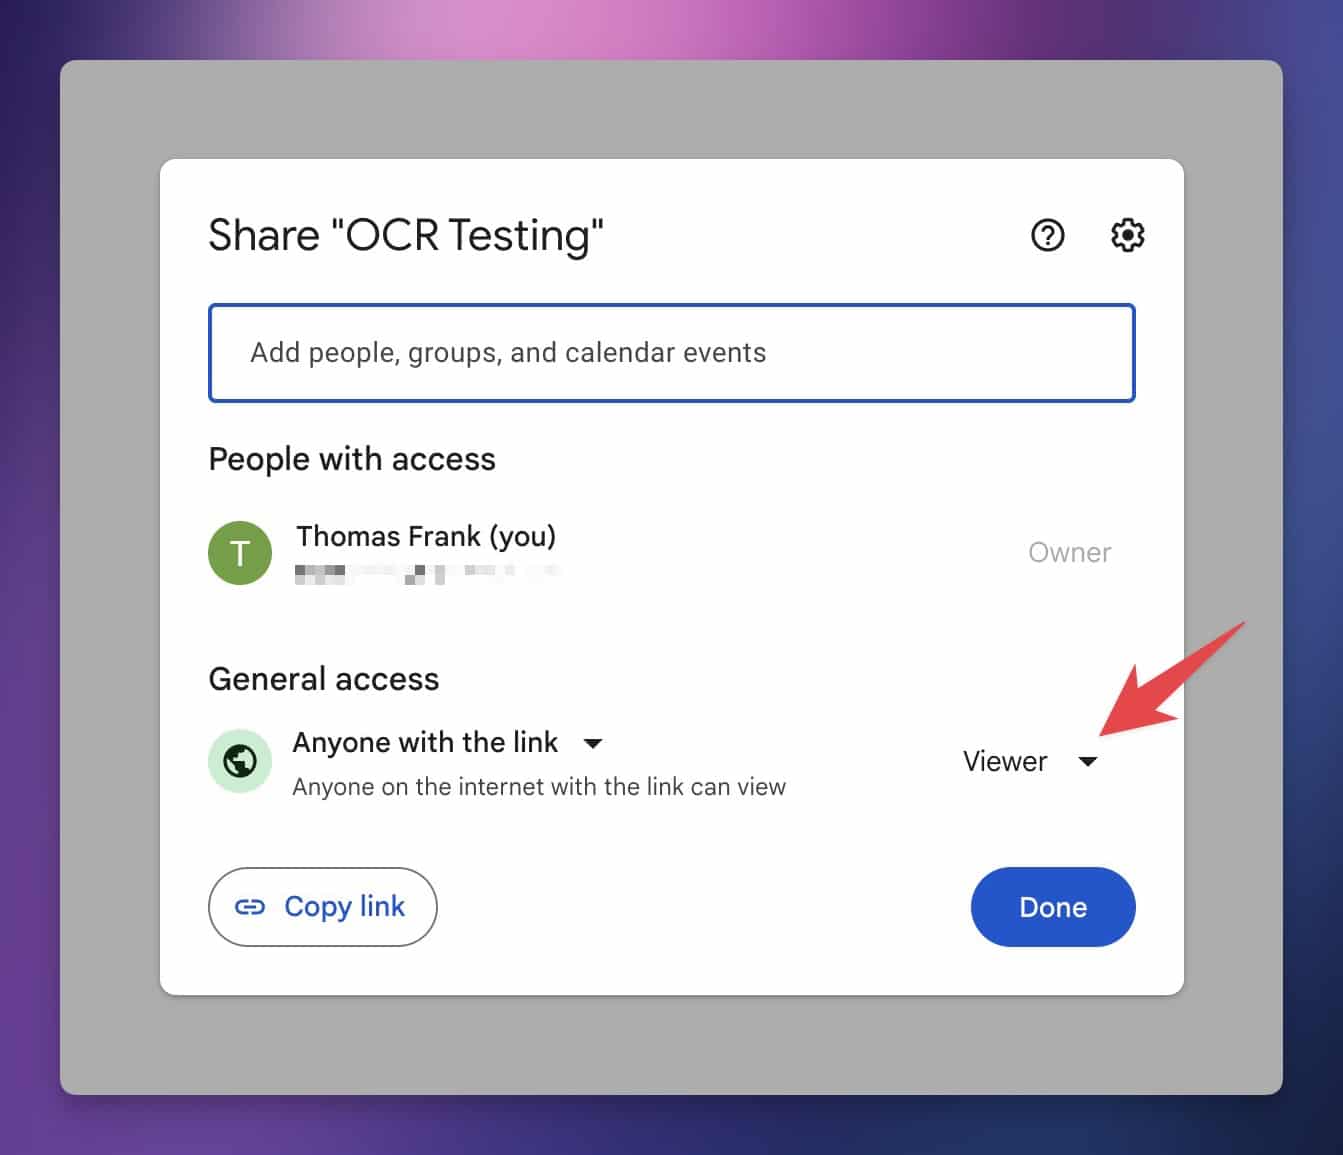
Navigate to your chosen folder in Google Drive, then click the folder title. Go to Share → Share:
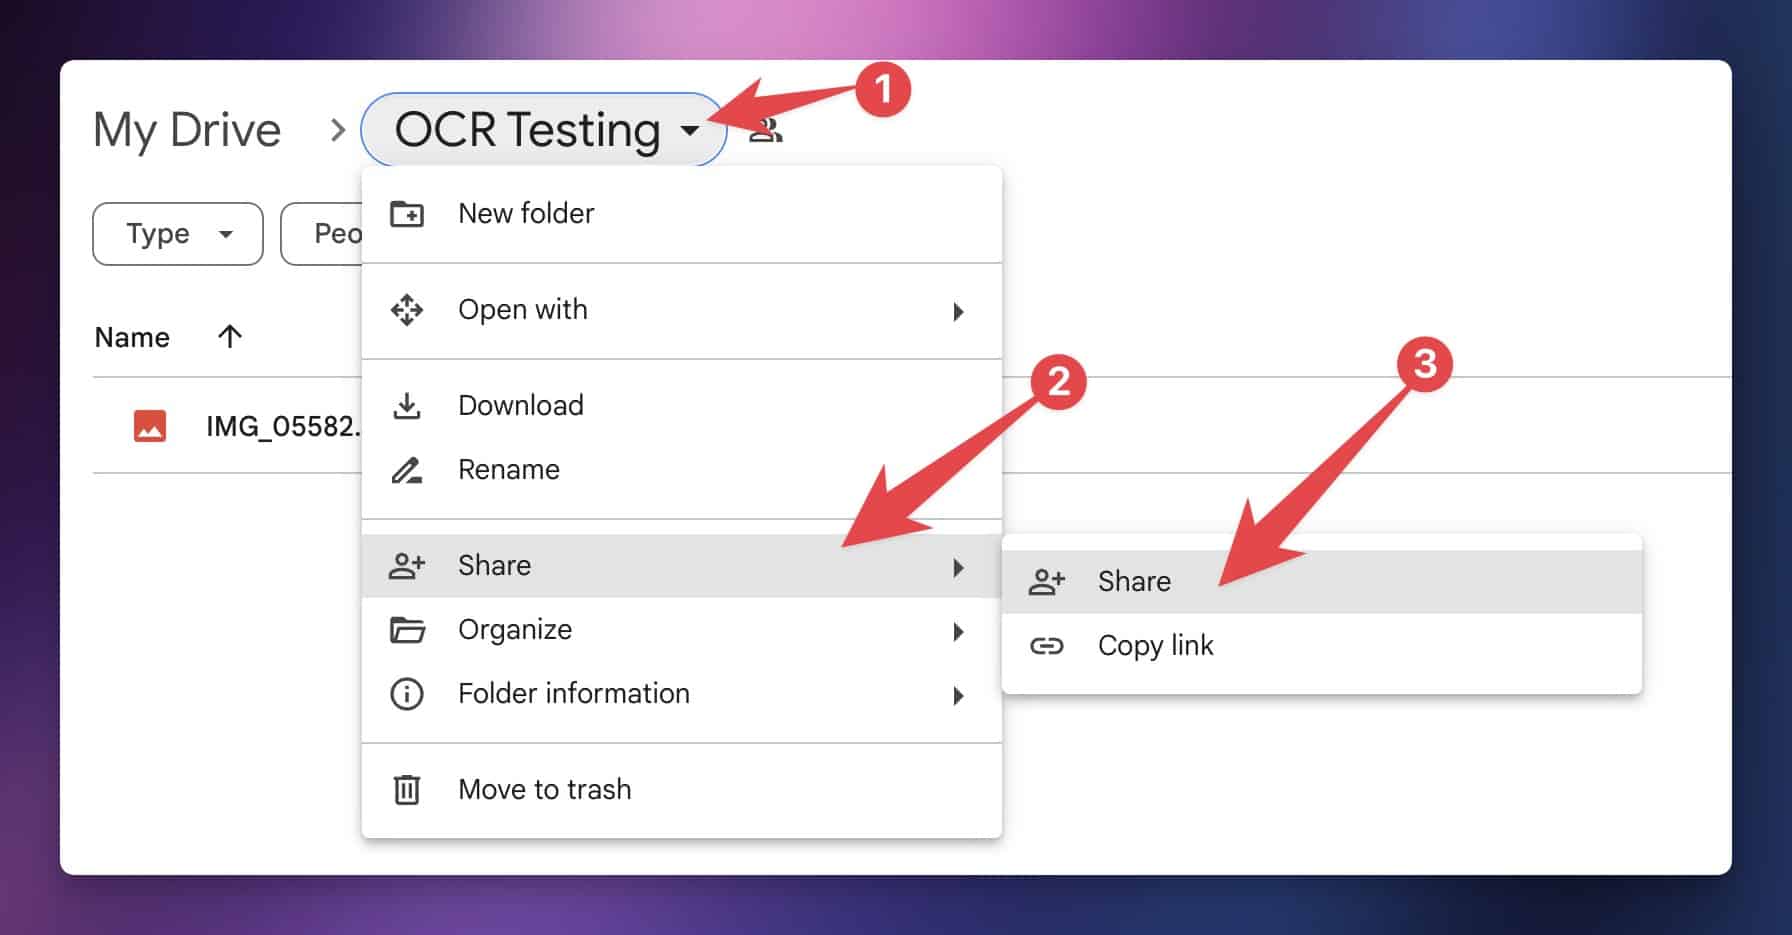
In the sharing settings, set General Access to Anyone with the link.
This will allow the ChatGPT API to download the image and extract the text from it. Without doing this step, ChatGPT won’t be able to access your image.
If you want to extend this workflow with PDF support, currently you won’t be able to use the instructions below. /tmp, then use the Custom API Call action in order to upload it to PDF.co. This is currently beyond the scope of this tutorial.
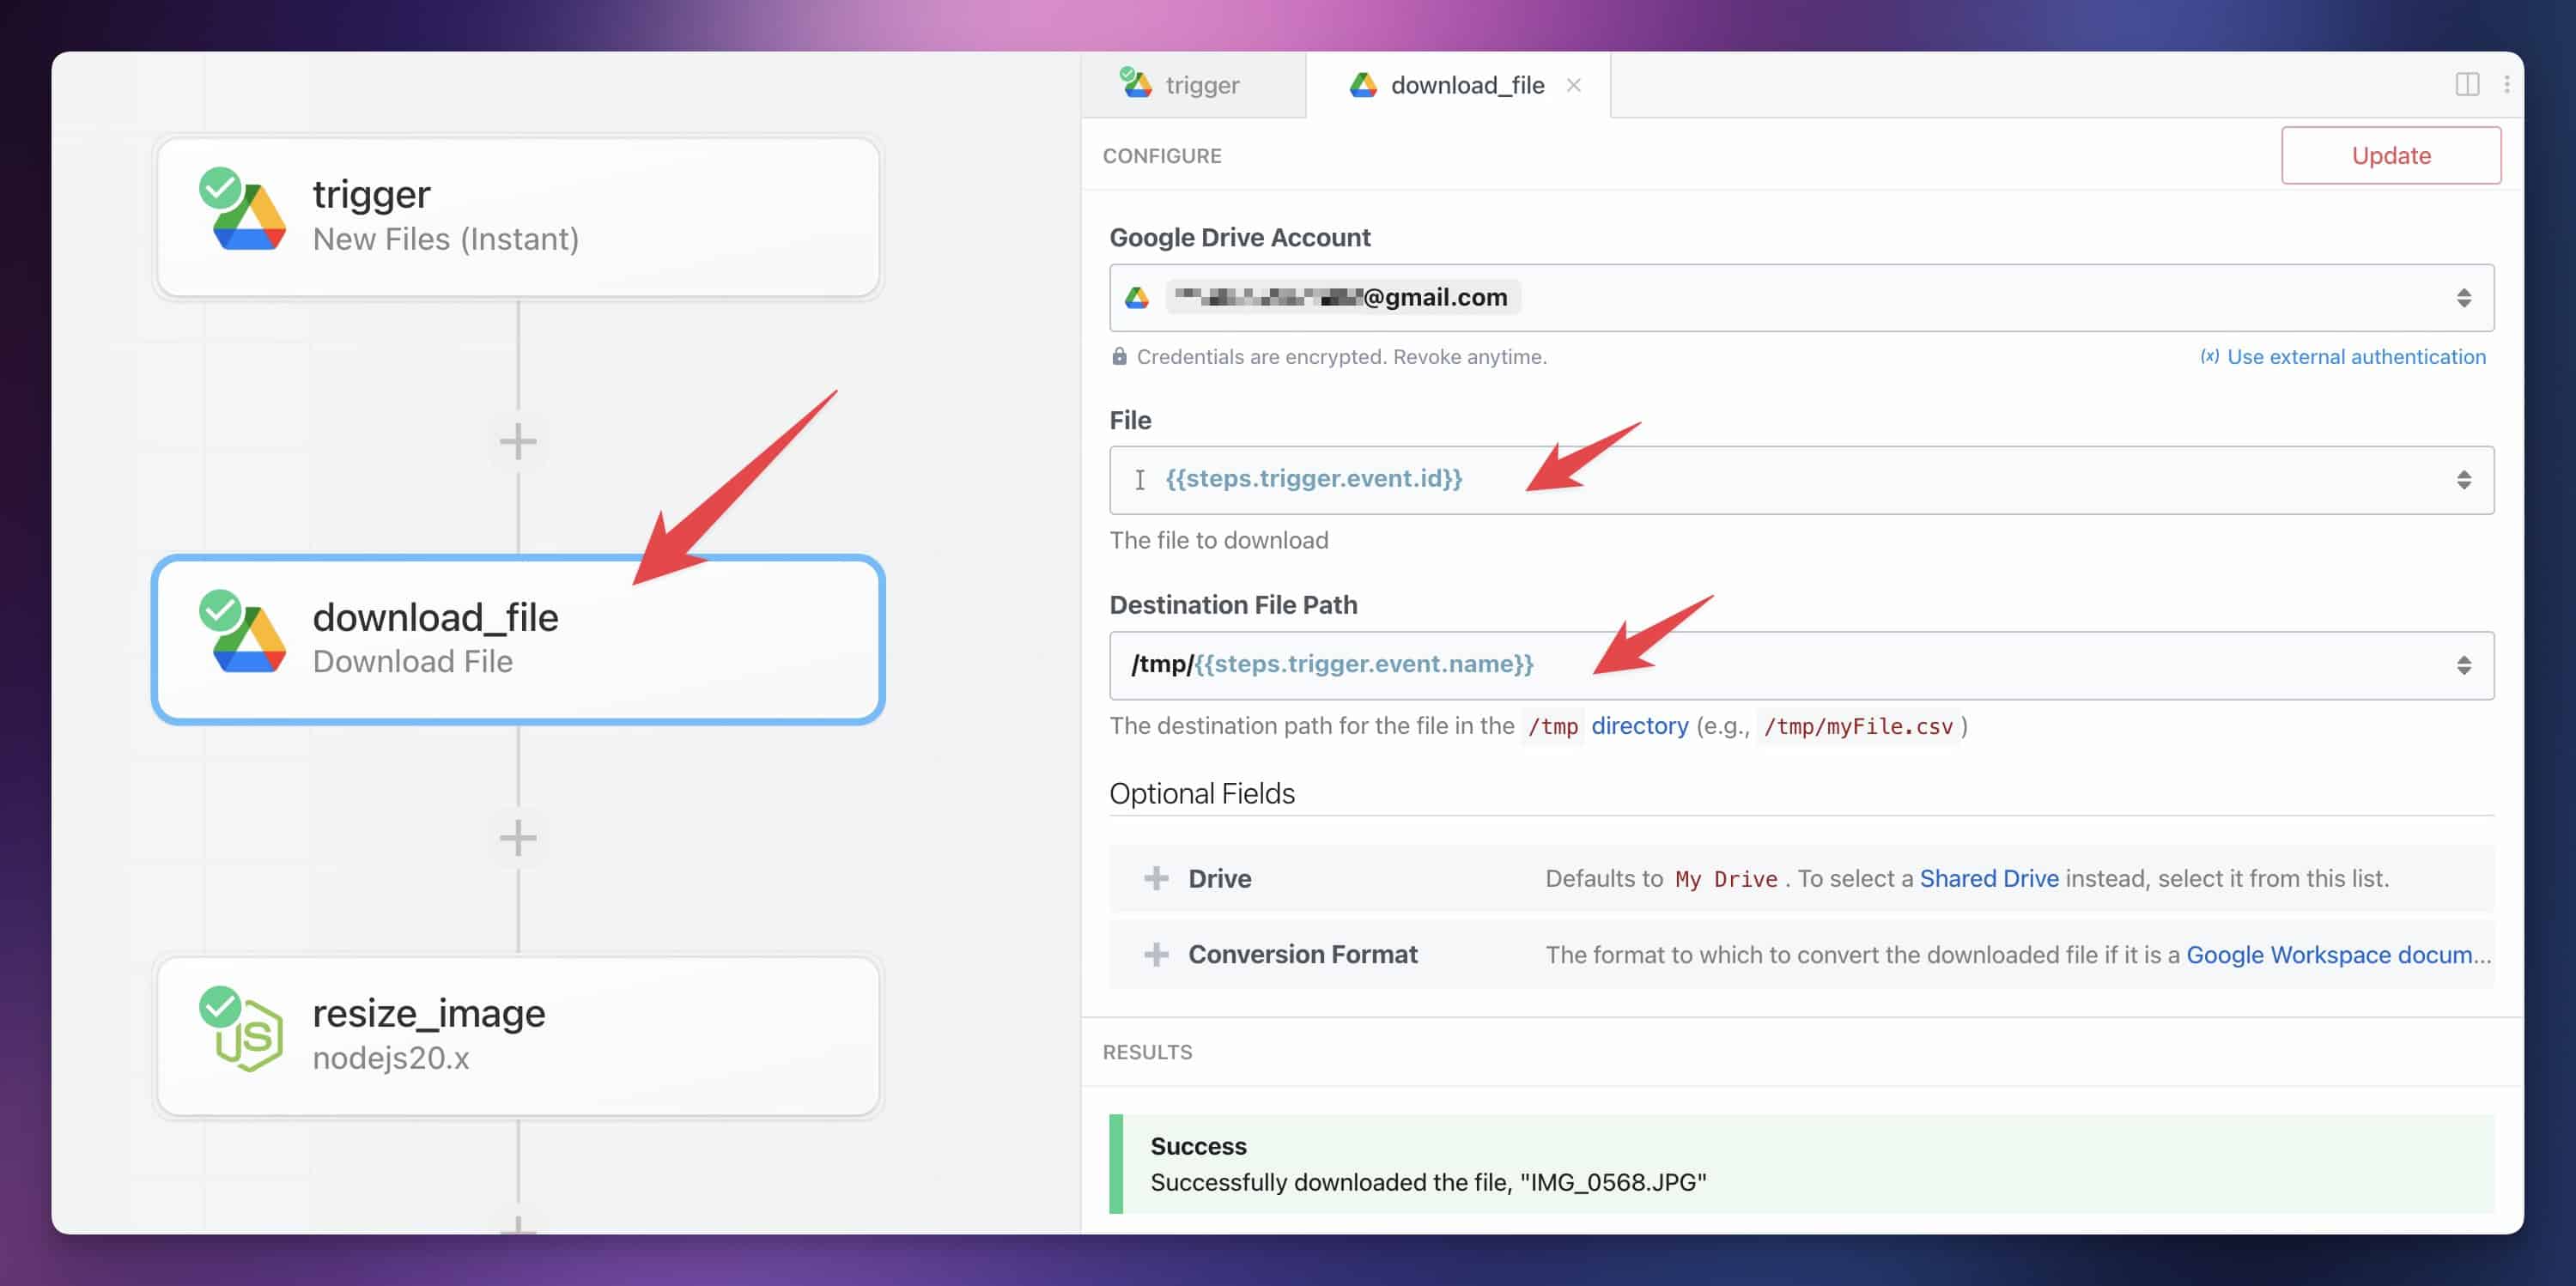
There is a way you can keep your Google Drive folder private while still using this workflow. It involves adjusting your workflow, so that:
- Pipedream downloads your image to your account’s
/tmpdirectory - The workflow converts the image to a Base64-encoded string
- We upload the Base64 string to ChatGPT, instead of linking directly to the image
First, add a step directly after your trigger step. Find the action: Google Drive → Download File. Ensure the step is named download_file, then connect the same Google Drive account as you did in the trigger step. Set the following values:
- File:
{{steps.trigger.event.id}} - Destination File Path:
/tmp/{{steps.trigger.event.name}}
Test the step, then add another one. This time, find the action: Node → Run Node Code.
Give this step the name resize_image.
In the code editor, paste in the following code:
import fs from "fs";
import sharp from "sharp";

export default defineComponent({
  async run({ steps, $ }) {
    const filePath = `/tmp/${steps.download_file.$return_value.name}`;

    // Resize the image to a width of 2000px, maintaining aspect ratio
    const resizedImagePath = `/tmp/resized-${steps.download_file.$return_value.name}`;
    await sharp(filePath)
      .rotate() // disable automatic rotation
      .resize(2000) // resizes to 2000px wide
      .toColourspace('b-w') // converts to black and white
      .sharpen() // sharpens the image
      .normalise({
          lower: 3,
          upper: 50
      })
      .gamma(1.5, 1) // adjusts the gamma
      .clahe(
          {
              width: 64,
              height: 64,
              maxSlope: 3,
          }
      )
      .toFile(resizedImagePath);

    // Convert the resized image to a Base64 string
    const resizedImageData = fs.readFileSync(resizedImagePath);
    const base64img = resizedImageData.toString('base64');

    return base64img;
  },
});
Code language: JavaScript (javascript)
Here’s what this code does:
- Reads the downloaded image from your
/tmpdirectory - Applies some image manipulations using sharp that make the image’s text more readable
- Converts the final image to Base64 and returns the encoded string
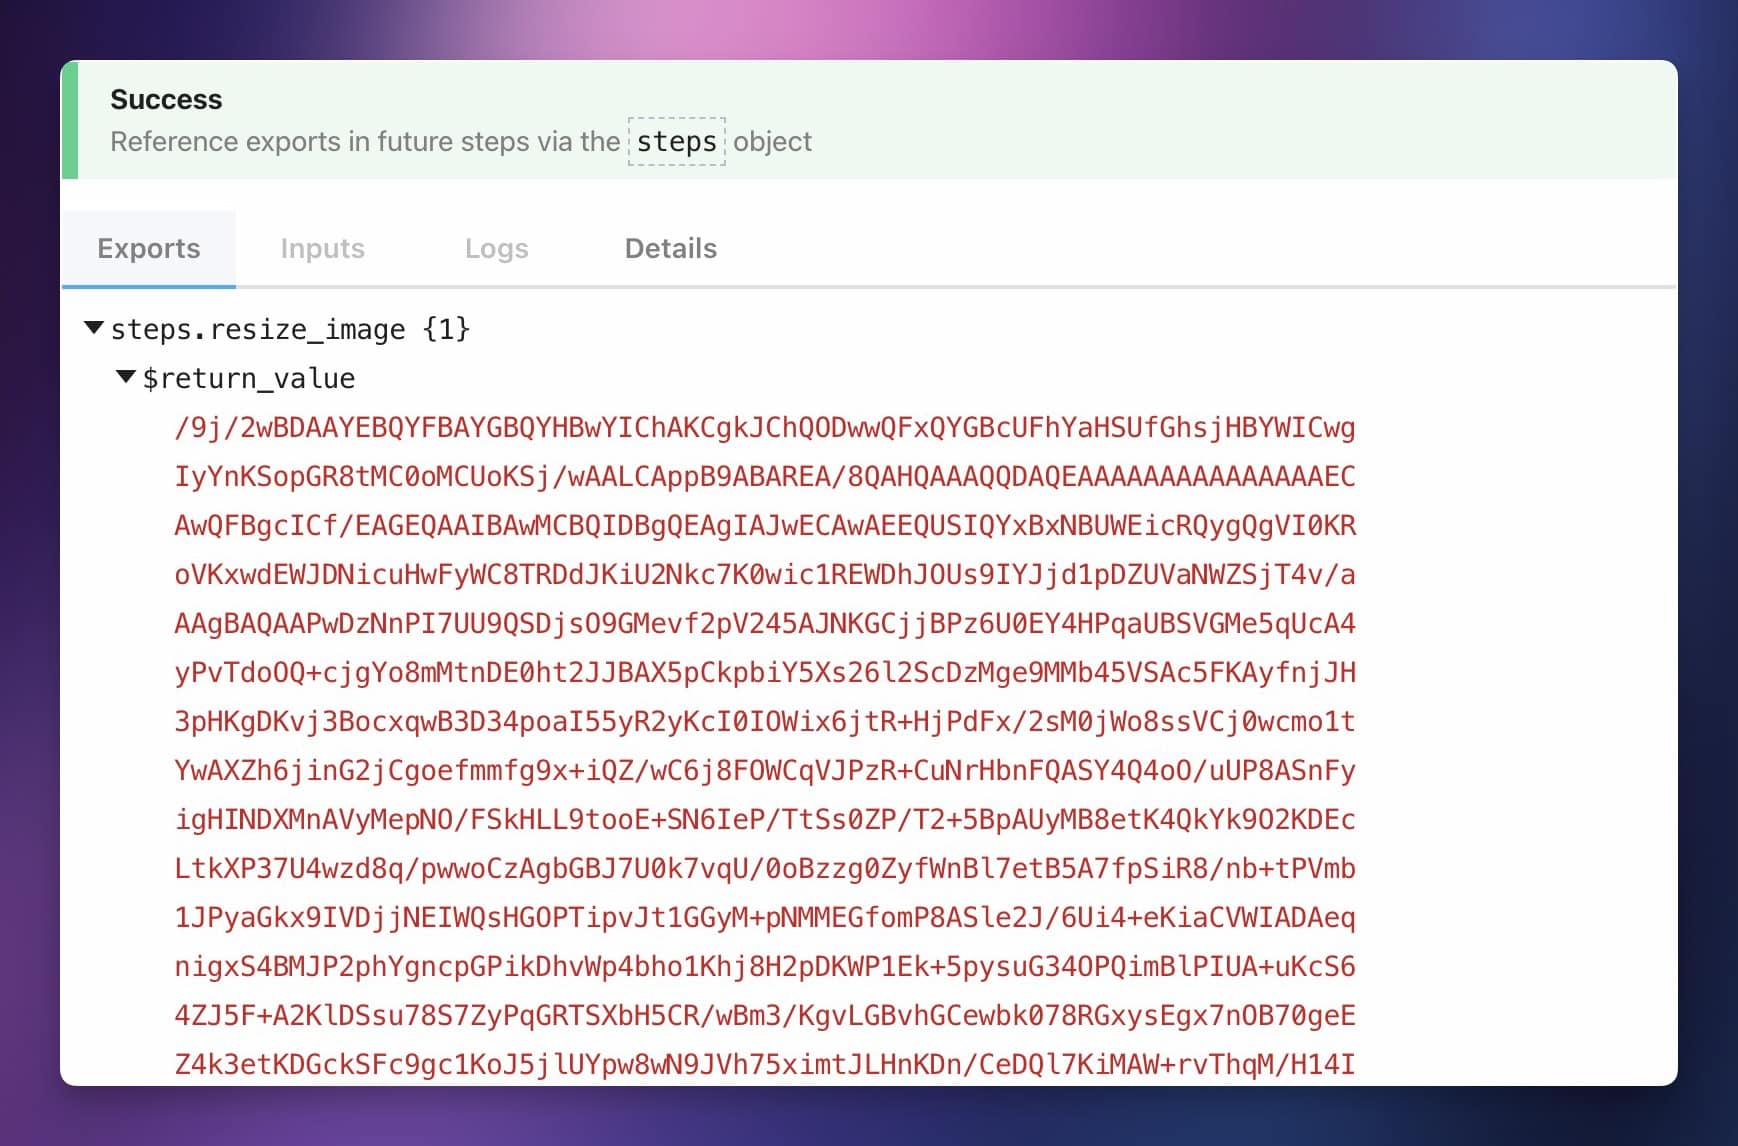
When you test this step, you should get an result like this:
Finally, in the vision step (ChatGPT step), follow all of the instructions below. The only change you’ll need to make is in the Images field.
Instead of referencing the WebContentLink object from Google Drive in the Construct an Array tab, you’ll need to paste in this value:
{{`data:image/jpeg;base64,${{steps.resize_image.$return_value}}`}}
Code language: JavaScript (javascript)
Again, be sure you’ve named the code step resize_image before you’ve tested it. If you don’t do that, the variable in the string above won’t have a valid target.
To use Dropbox with this workflow, add a Dropbox trigger instead of the Google Drive trigger.
Click Add Connection, and find the trigger: Dropbox → New File.
Connect your Dropbox account and choose a folder to watch for newly-uploaded images. Make sure the Include Media Info and Include Link settings are both set to true.
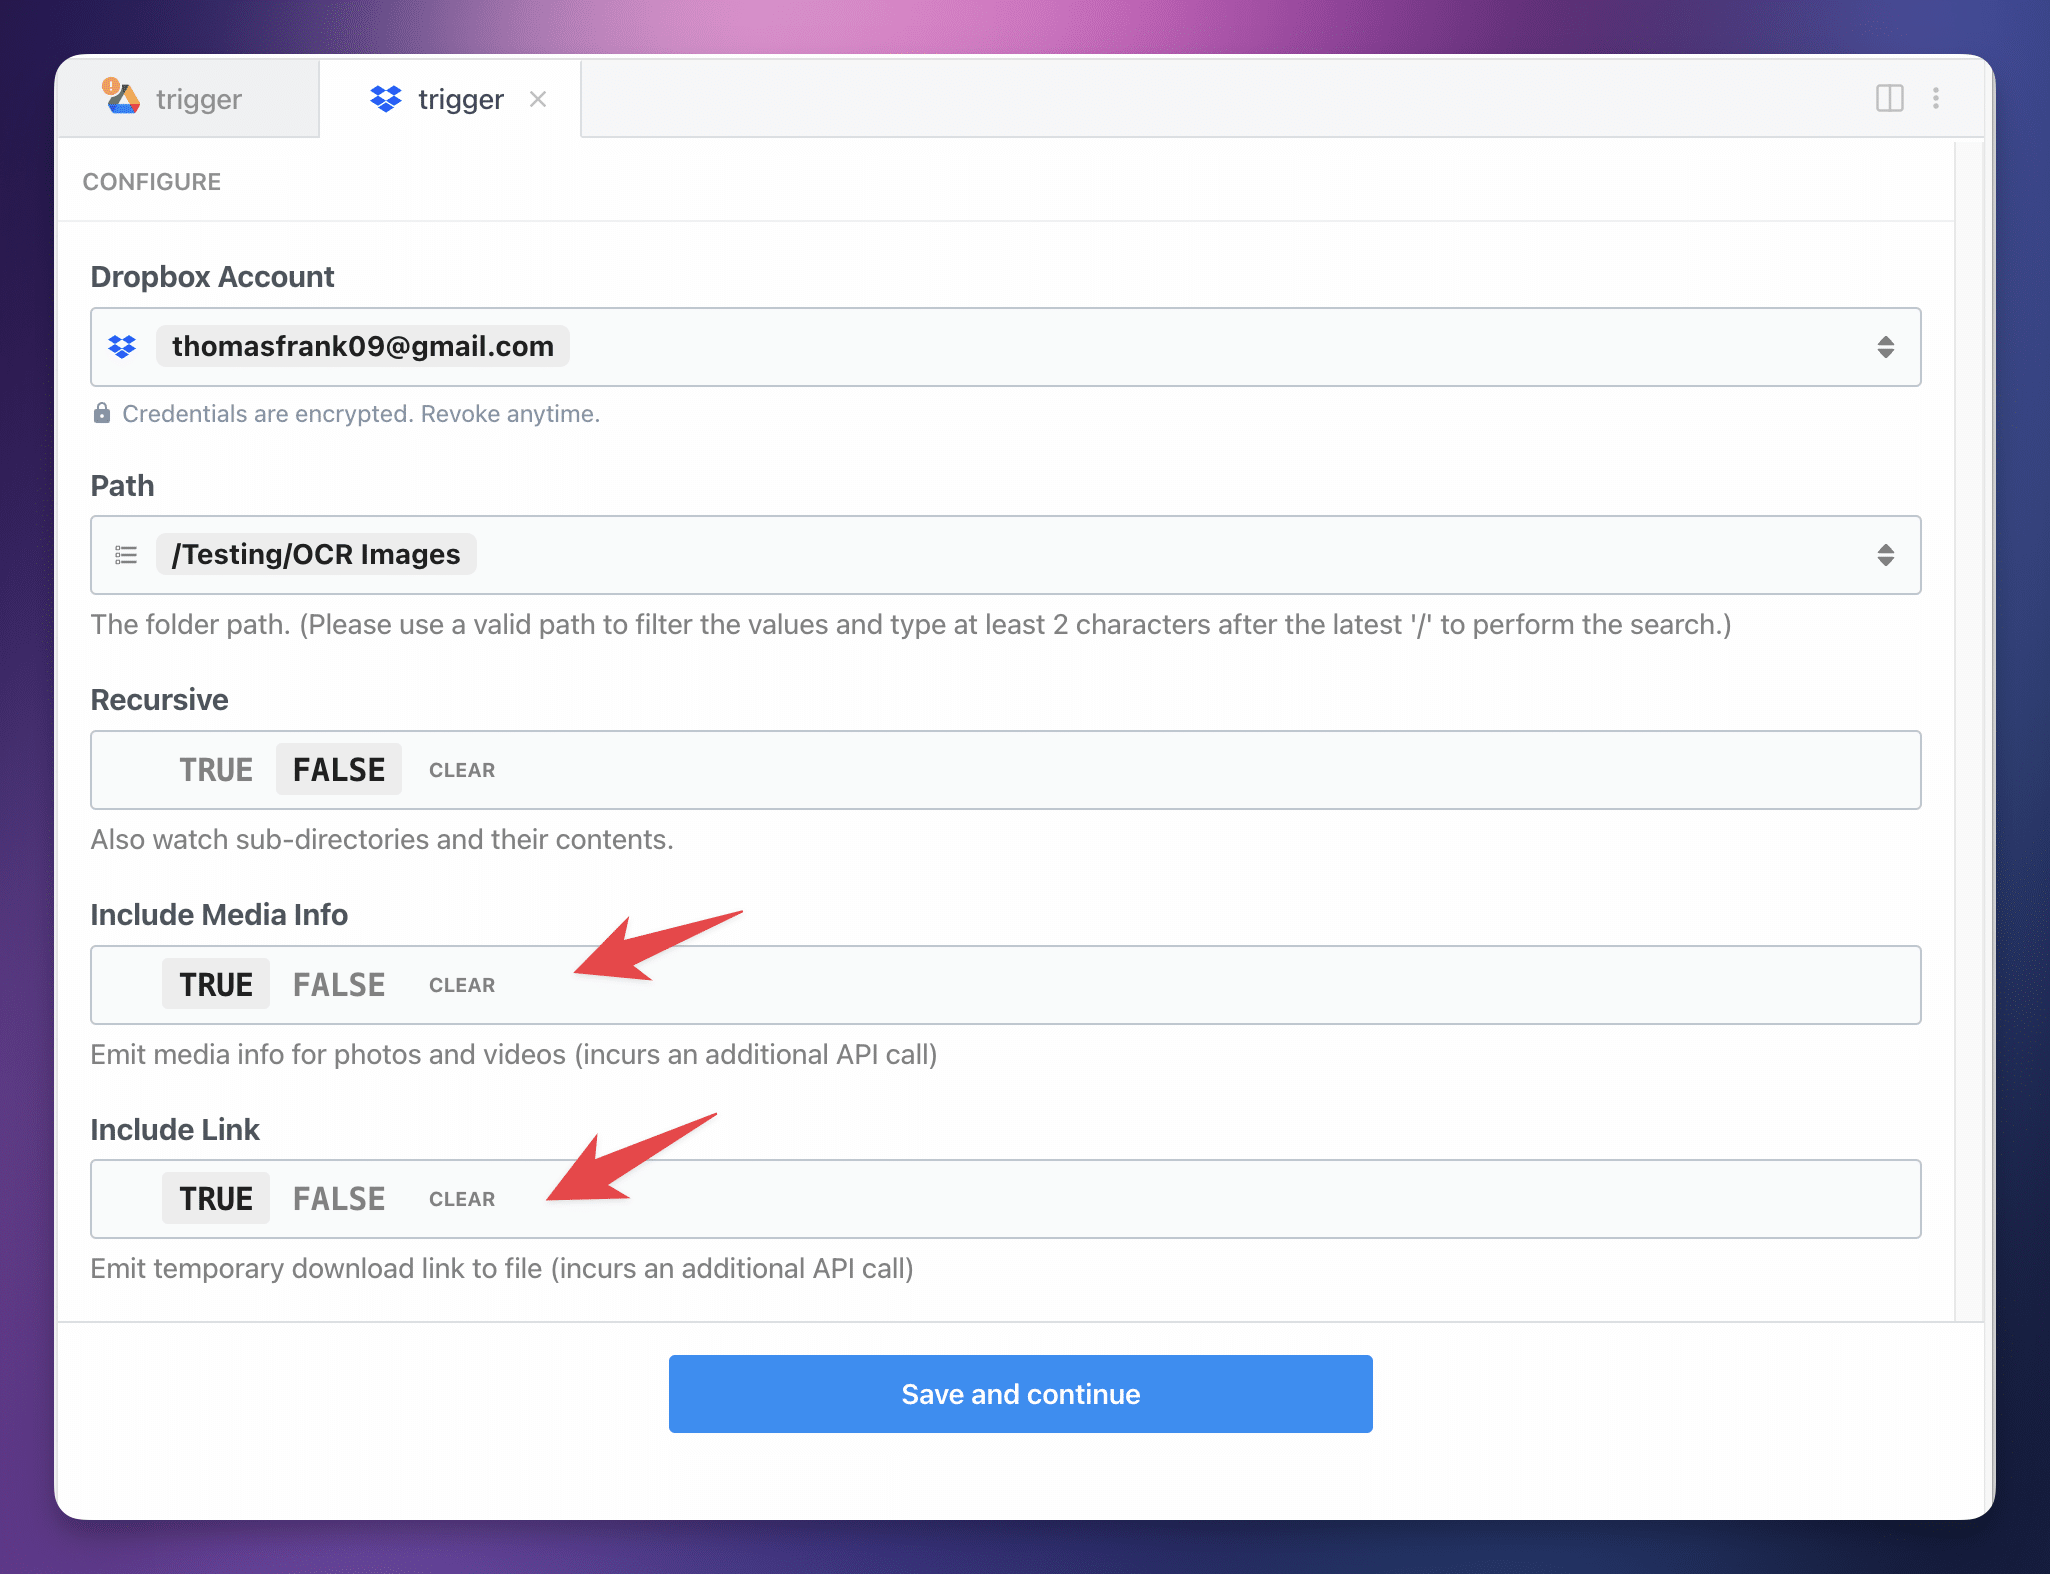
From here, hit Save and Continue. Follow the rest of the instructions – upload a test image, select the event that pops up after you do so, and then create the OpenAI (ChatGPT) action.
However, when pasting or selecting your variable reference in the ChatGPT step, make sure it matches this variable: steps.trigger.event.link
If you explore the Exports tab of your Dropbox trigger step after successfully uploading and selecting your test image, you’ll be able to find this variable in the dropbown menu. It’s like an address that points to that particular value, so it’s important to make sure it’s right. The variable name changes between the Google Drive, Dropbox, and OneDrive triggers since each service returns a response with a unique structure.
To use Microsoft OneDrive with this workflow, add a Microsoft OneDrive trigger instead of the Google Drive trigger.
Click Add Connection, and find the trigger: Microsoft OneDrive → New File in Folder (Instant).
Connect your Microsoft account and choose a folder to watch for newly-uploaded images. You can leave the Webhook subscription renewal schedule at its default value of 360 hours.
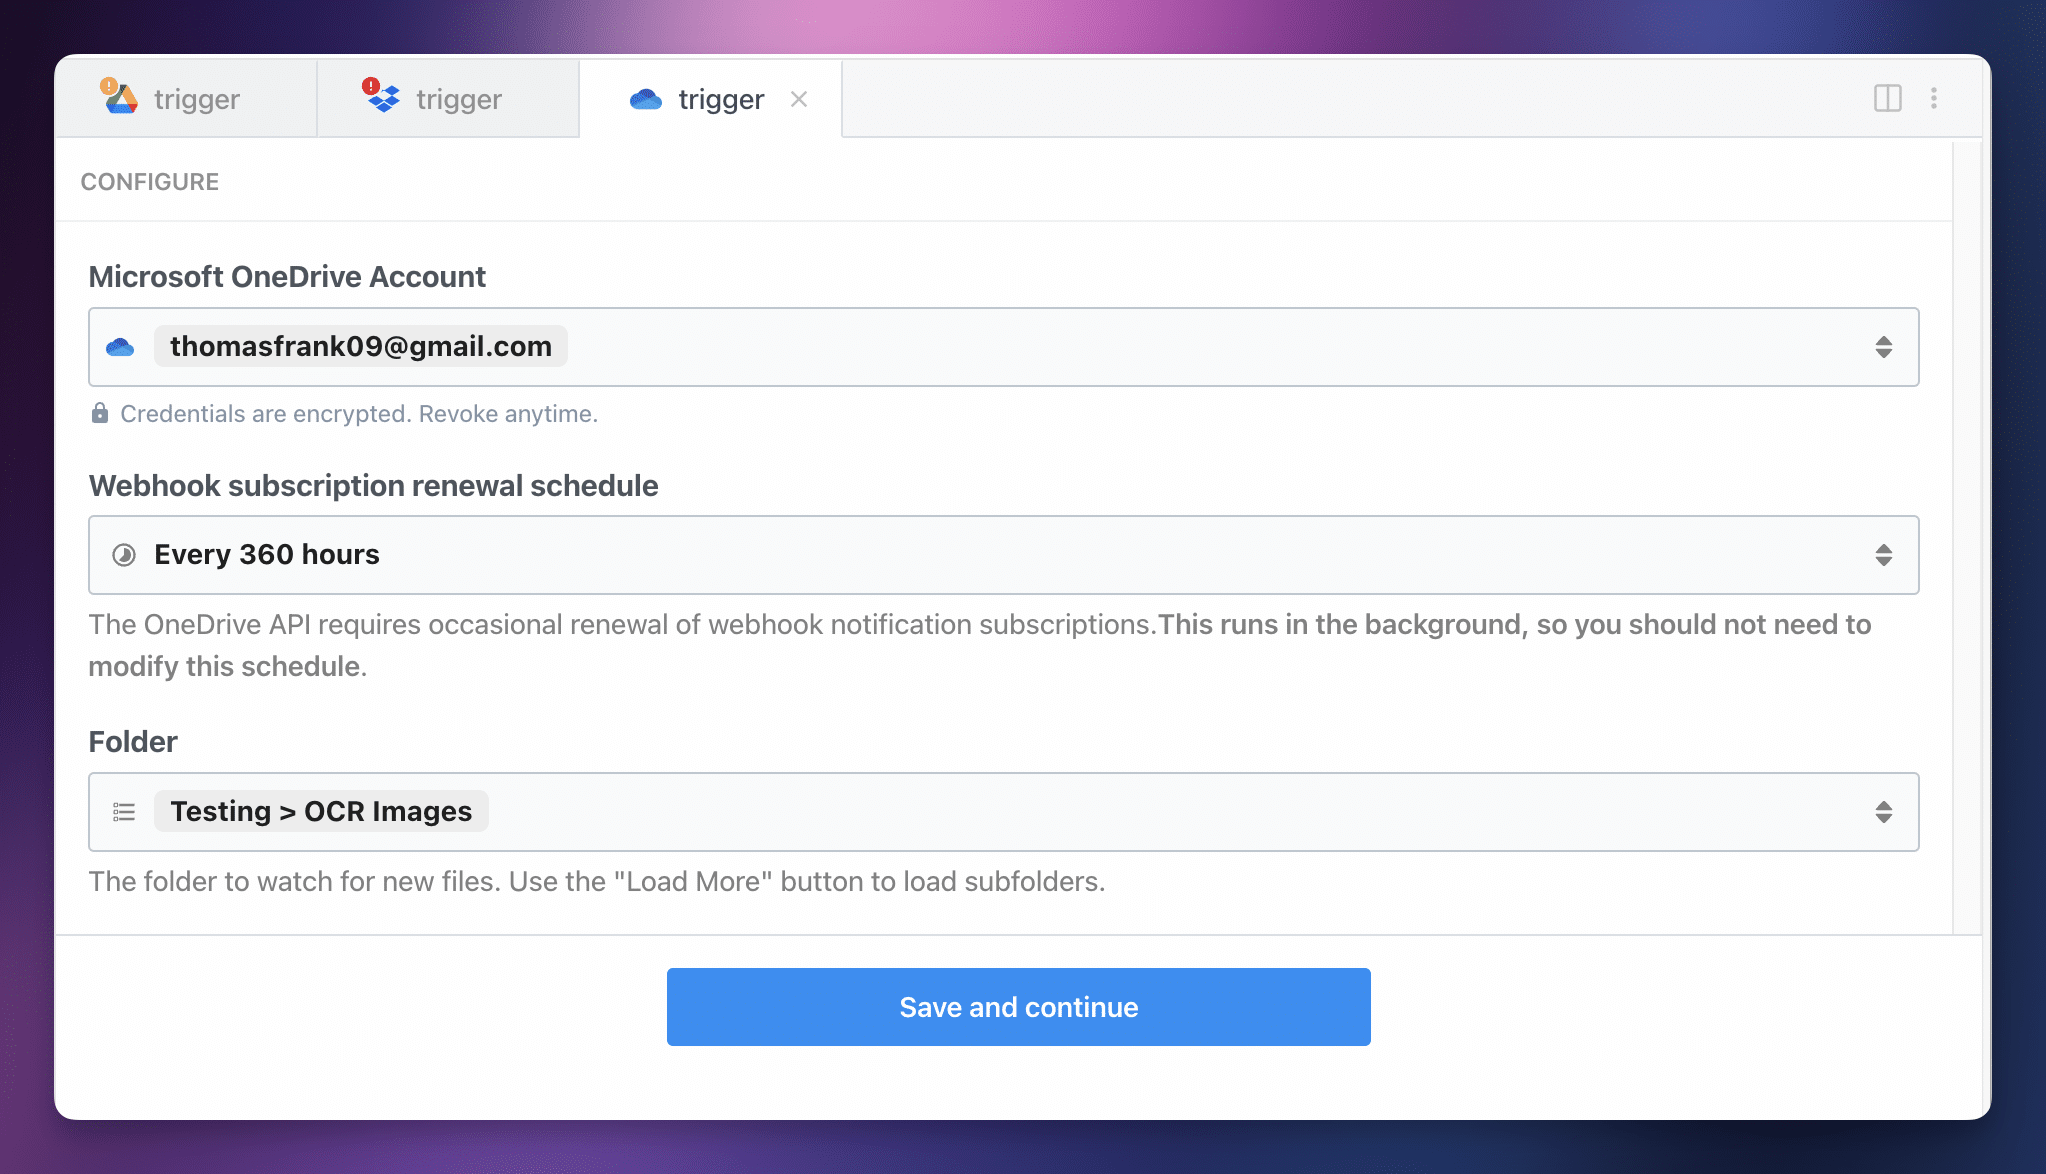
From here, hit Save and Continue. Follow the rest of the instructions – upload a test image, select the event that pops up after you do so, and then create the OpenAI (ChatGPT) action.
However, when pasting or selecting your variable reference in the ChatGPT step, make sure it matches this variable: steps.trigger.event["@microsoft.graph.downloadUrl"]
If you explore the Exports tab of your OneDrive trigger step after successfully uploading and selecting your test image, you’ll be able to find this variable in the dropbown menu. It’s like an address that points to that particular value, so it’s important to make sure it’s right. The variable name changes between the Google Drive, Dropbox, and OneDrive triggers since each service returns a response with a unique structure.
Upload a Test Image
ChatGPT currently can work with png, jpeg, (also jpg) and gif files. If you’re using an iPhone or smartphone that saves high-efficiency (heic) images by default, you’ll need to either change your camera settings or use an app that can save jpg images by default, like the Google Drive app itself.
Before you can build the rest of the workflow, you need to upload a test image to your chosen Google Drive folder. Once you do this, it’ll generate a new Event that you can select from the dropdown menu. You’ll then be able to use Event’s data to build the rest of the workflow.
To upload your test image, you can simply drag an image of your handwritten notes into Google drive (or use this sample image).
Alternatively, you can take a picture with your phone. If you have the official Google Drive app, you can simply navigate to your chosen folder and hit the + in the app to take a photo.
The Google Drive app also has a Scan Document function, which will let you scan multiple images and bundle them as a PDF. If you want, you can then modify this workflow to support multi-page PDFs.
In any case, once you’ve uploaded your image, click the event that shows up in the Select Event dropdown menu.
Important: Do not click Generate Test Event. You need to actually upload an image to your Google Drive folder and select the new event that pops up in the dropdown menu.
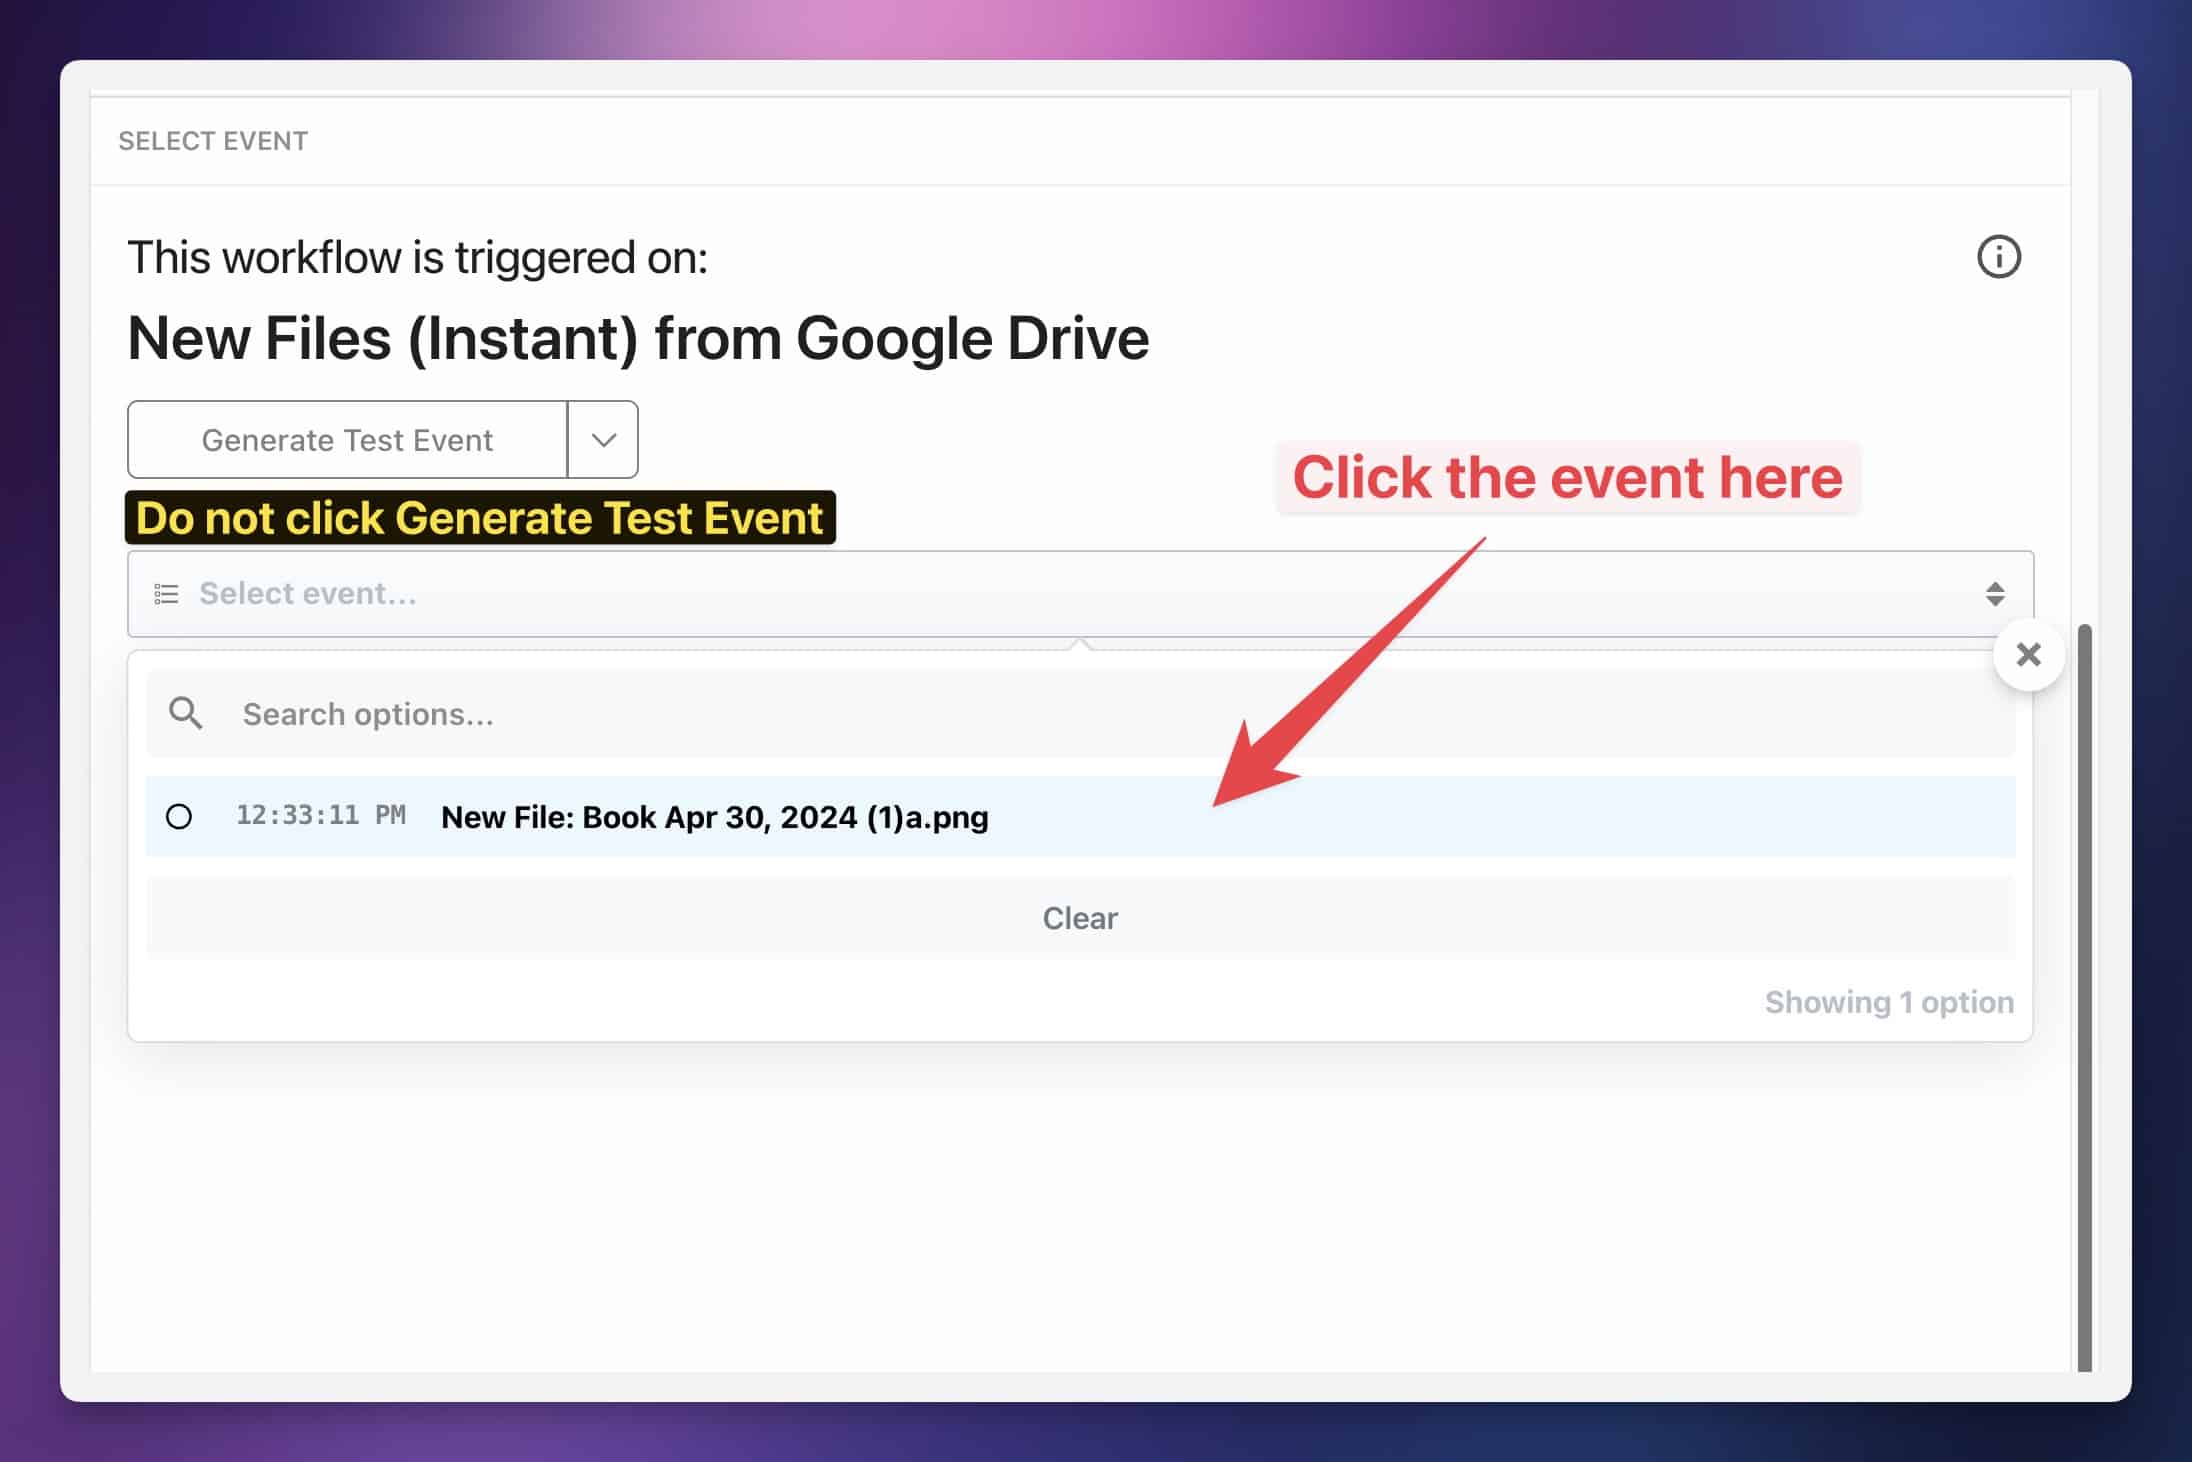
Then hit Continue.
Process the Image with ChatGPT
Next, we’ll build a step that will send your uploaded image to OpenAI’s GPT-4 model. We’ll also add a prompt and model instructions that tell GPT-4 to extract the text, rendering it as well-formatted Markdown.
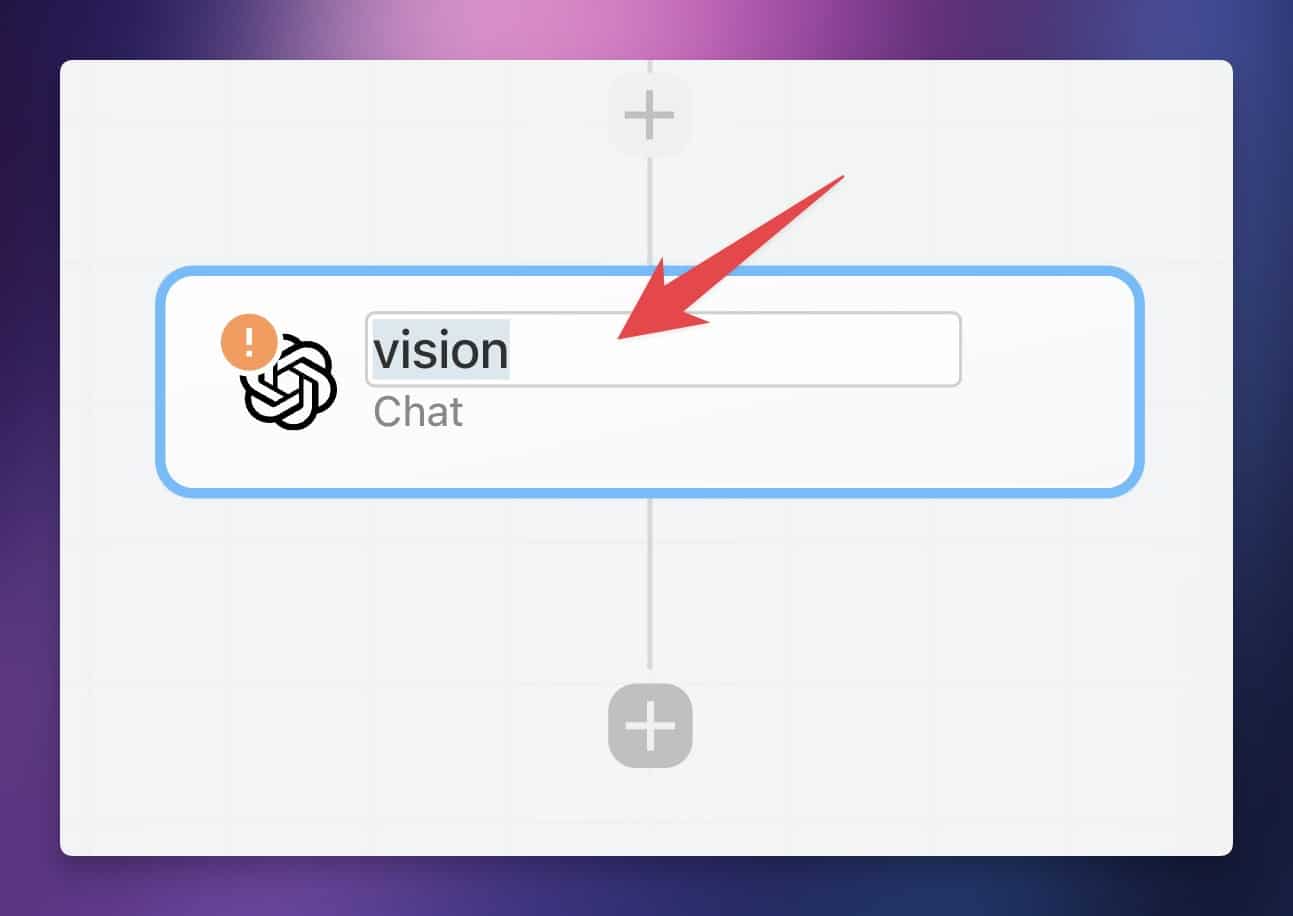
Hit the + button beneath your trigger step to add your workflow’s first action. Find the action: OpenAI (ChatGPT) → Chat.
On the canvas, click the chat name of the step and change it to vision.
Note: This is important! Rename the step to vision before you test it. Later steps in the workflow will reference this name.
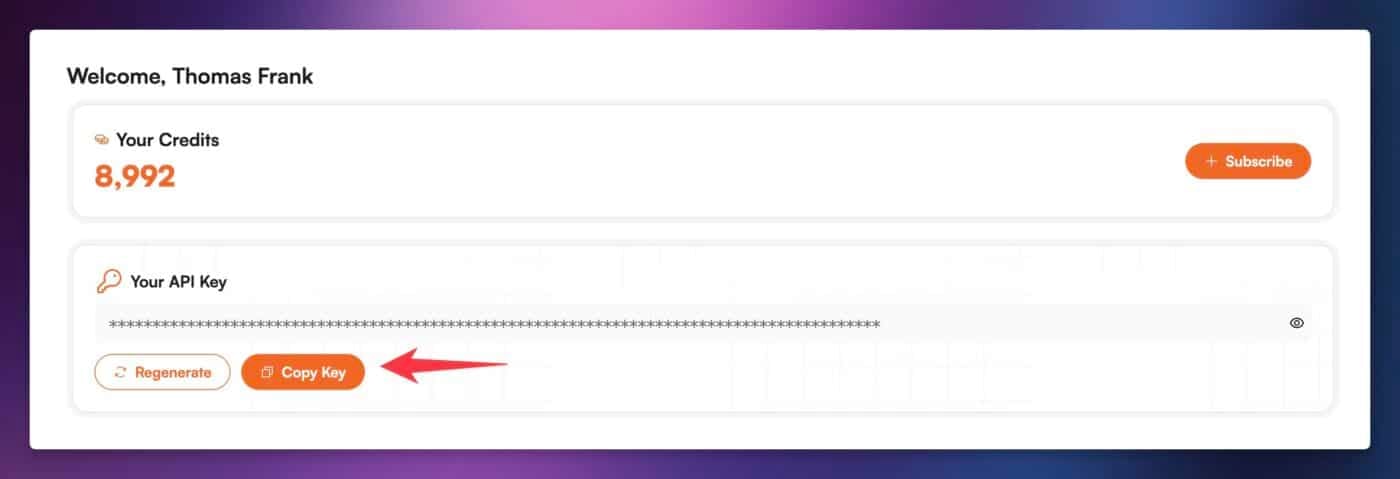
To configure the settings, you’ll need an OpenAI account, an API key, and at least $5 in credit purchased. This is required to get access to the gpt-4o model that can accept image inputs. Here are the steps:
- Create your OpenAI account
- Add at least $5 in pre-paid credits (you do not need to subscribe to ChatGPT Plus, and doing so does not remove the pre-paid credit requirement)
- Create a project API key and copy it to your clipboard (if you need help creating an API key, see the toggle section below).
You can create an API key from your API Keys page in your OpenAI user settings.
Note that you won’t be able to see it again after generating it, so be sure to copy it and paste it into Pipedream immediately. Don’t share the key with anyone else. Anyone who has the key can make requests to OpenAI as if they were you, which will incur charges against your balance. Always treat API keys like passwords.

Note that you can also limit how much you spend via your OpenAI account. This is less relevant now than it used to be, since OpenAI now requires you to pre-pay for credits, and since you can turn auto-recharge off.
In the
Under Model, select the gpt-4o model. This is OpenAI’s newest model; it costs half as much as gpt-4-turbo, and in my testing, it’s faster and even better at recognizing handwriting.
Note: This article was published shortly before gpt-4o was released. You may see screenshots showing the older gpt-4-turbo model.
In the optional fields, enable Images and System Instructions.
In the Images field, open the dropdown and click the first field in the Construct an Array tab. Here, you need to create a variable reference to your Google Drive image’s download link.
You can either paste in the value: {{steps.trigger.event.webContentLink}} – or you can find it by drilling down into the dropdown menu’s objects: steps → trigger → event → webContentLink – and then click Copy Path.
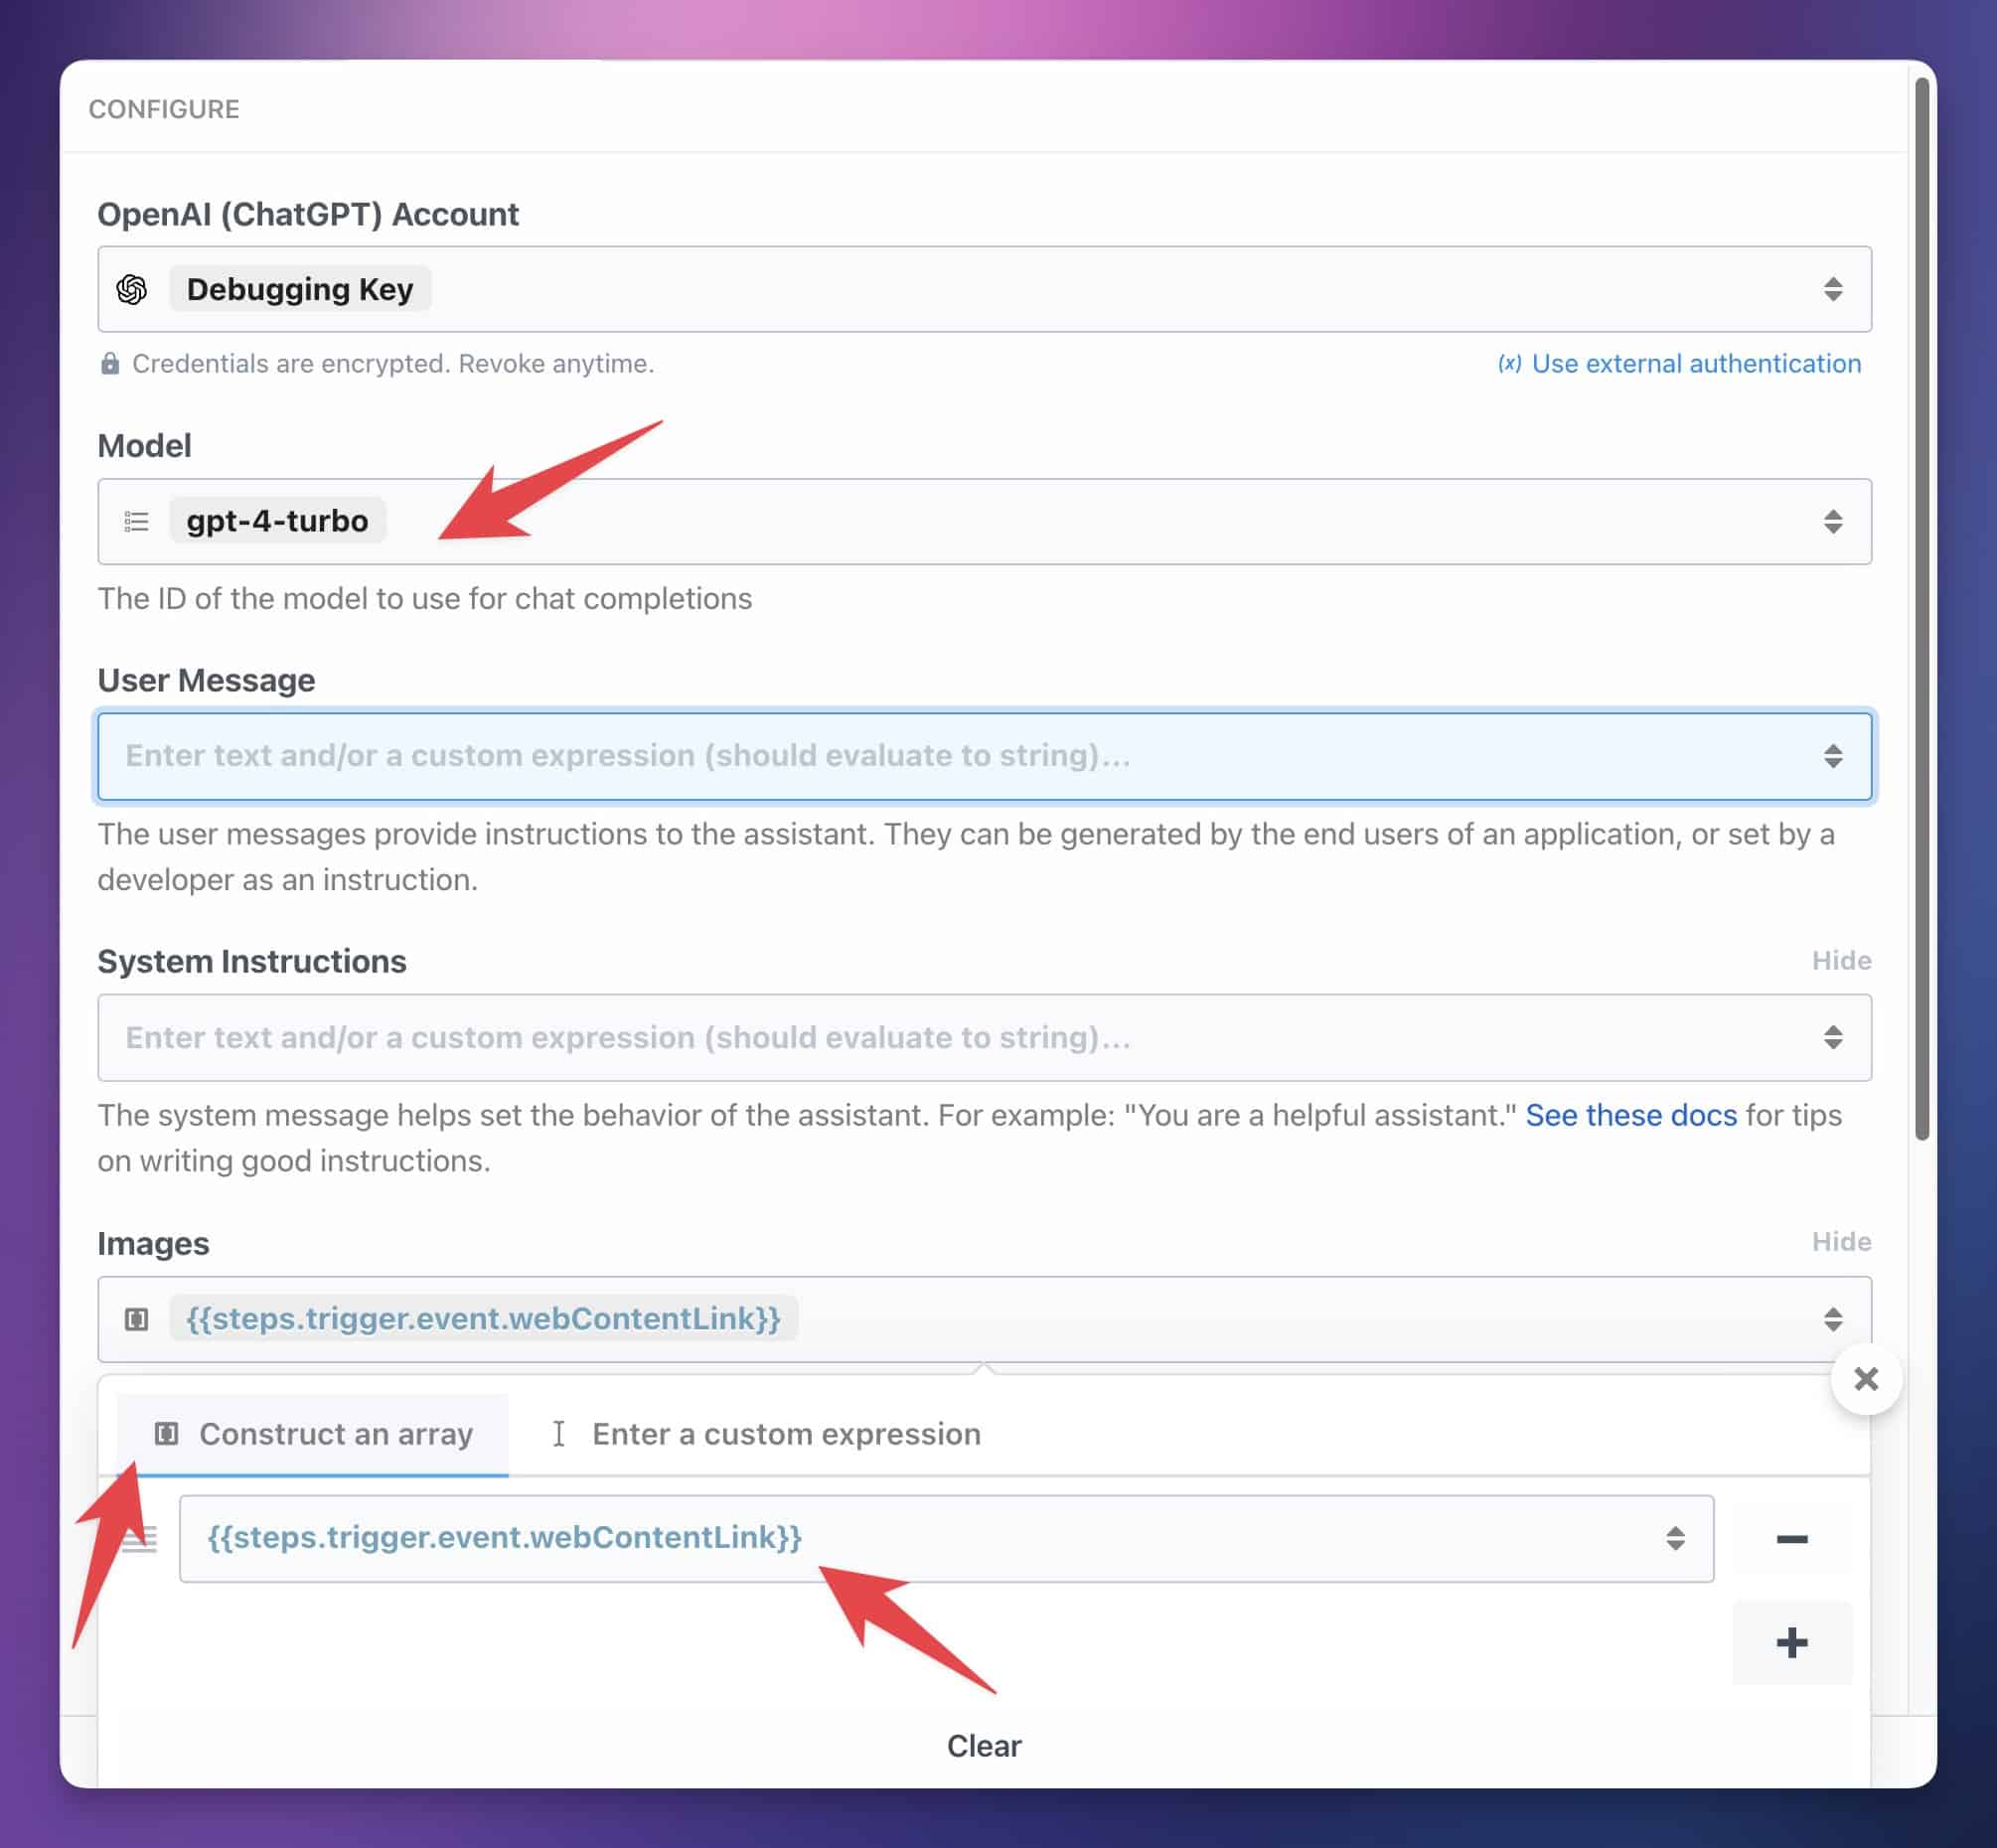
Next, add the following strings of text for the User and System fields. These will instruct the model to act as an OCR bot and extract the text.
Note: These are the prompts that I’ve found work best. However, you’re free to modify them if you have other needs!
User Message
Return the text in this image, as if you are an OCR algorithm for a note-taking app.
Code language: plaintext (plaintext)
System Instructions
You are an OCR bot that translates handwritten text into well-formatted Markdown. Scan the uploaded image data and return Markdown to the best of your ability. Treat text that is significantly larger than surrounding text as Headings, and lines starting with "-" or bullets as bullet list items.

Use the following Markdown conventions: # for h1, ## for h2, ### for h3, - for unordered lists, *text* for italics, **text** for bold, > for blockquotes. Replicate nested lists if they appear, but only to a single level of nesting.

Treat large blocks of text (such as a page full of non-formatted handwriting) as a simple string of text. Treat lines that start with box outlines as to-do items.

Do not try to create tables. Do not put text in code blocks. Do not use the string "```" to create code blocks. Do not use non-standard markdown such as "/->". Only return text, titles, and lists, including bolding or italics as needed.

Important: Do your best to maintain the structure of the notes in the image. Don't add unnecessary headings. Try to accurately reproduce all of the text in the image; don't omit text.

Important: Don't try to reproduce multiple columns. The result must be well-formatted markdown.

Important: Don't create more than 2 levels of nested bullet list items.

Imporant: Don't include faint text that is written backwards, which would be from the other side of the paper.

Add a note title to the top of your response, preceded by a "#" symbol (for a Heading 1 in Markdown).

Make sure the title would make sense in a personal note-taking system.

Example of a good title: "# The Benefits of Listening to Multiple Music Genres"

Example of a bad title: "Broad Music Tastes: The Benefits of Listenign to Multiple Music Genres"

Incredibly important; pay extra attention to this: Do not include a colon in the title.
Code language: plaintext (plaintext)
Once you’ve filled out all the fields, hit Test. If everything is set up correctly, you should see a Success message and the results:

Extract the Details
Next, we’ll add a code step that will split up the title and the body from ChatGPT’s response.
Currently, the response is just one big block of text, and
Hit the + button to add another action, then find the action: Node → Run Node Code.
Click the name of the step in the canvas and rename this step to extract_details. Then replace all of the code in the code editor with the following:
export default defineComponent({
async run({ steps, $ }) {
function addLineBreaks(markdownText) {
const lines = markdownText.split('\n');
const cleanedLines = lines.map((line) => line.trimEnd())
const newLines = []
for (let i = 0; i < cleanedLines.length; i++) {
let currentLine = cleanedLines[i];
let nextLine = cleanedLines[i + 1];
let elementRegex = /^(#|\*\s|[-+>|`]|\d+\.\s)/
if (currentLine.match(/^\s{4,}(\d|-|).*/)) {
currentLine = currentLine.replace(/^\s{4,}/, ' ')
}
if (currentLine.length > 0 &&
nextLine &&
nextLine.length > 0 &&
!elementRegex.test(currentLine) &&
!elementRegex.test(nextLine)
) {
newLines.push(currentLine)
newLines.push('')
} else {
newLines.push(currentLine)
}
}
return newLines.join('\n');
}
const ocrBody = steps.vision.$return_value.generated_message.content
const content = {
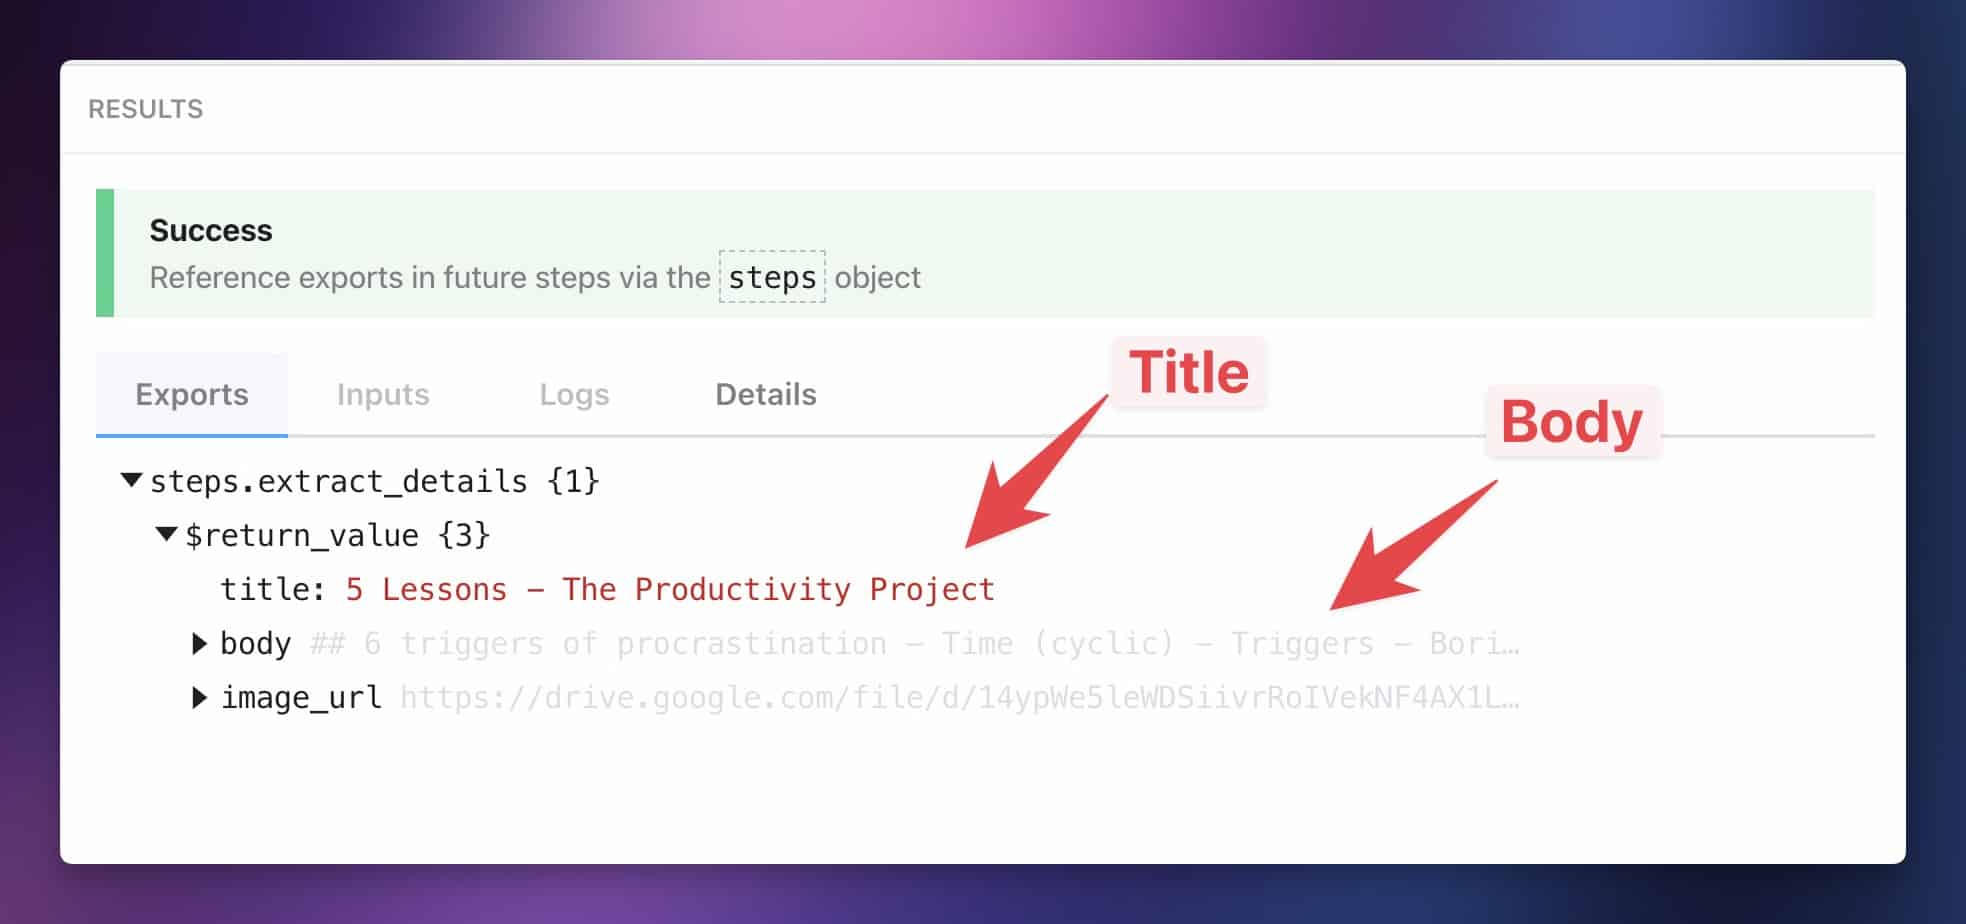
title: ocrBody.split('\n')[0].split(/(#\s*)/)[2],
body: addLineBreaks(ocrBody.replace(/^.*\n+/, "")),
image_url: steps.trigger.event.webViewLink
}
return content
},
})
Code language: JavaScript (javascript)Here’s what this code does:
- First, it creates the
ocrBodyvariable to hold the response from the ChatGPT step. The specific variable of that text response issteps.vision.$return_value.generated_message.content(hence why thevisionname of the step is important!) - It then splits off the first line of the response, putting it in a
titleproperty. - All of the other lines then go through a function that adds line breaks as required by Notion. Without this function, consecutive lines get mashed together in the Notion page.
Once you’ve pasted the code, hit Test. You should see a success message that looks something like this:
Create the Notion page
Finally, hit the + one more time to add the Notion action. Find the action: Notion → Create Page from Database.
Configure the fields like so:
- Notion Account: Connect a new Notion account if you haven’t done so already. When going through the authentication flow, be sure to give
Pipedream access to the database you want to use. You can also give it access to a parent page – e.g. if you want to save to Ultimate Brain’s All Notes database, you can givePipedream access to the top-level Ultimate Brain page. - Parent Database ID: Find the database you want to use for new pages here.
- Meta Types: Icon (optional)
- Property Types: Name (or Title if you’re using one of my templates)
For Icon Emoji, you can pick whatever you like. I chose to use ✍️. Note that you need to search using emoji directly; you can’t type keywords to describe the emoji.
Under Name (or Title), paste in:
{{steps.extract_details.$return_value.title}}
Code language: JavaScript (javascript)
Finally, under Page Content, paste in:
{{steps.extract_details.$return_value.body}}

Image Link: {{steps.extract_details.$return_value.image_url}}
Code language: JavaScript (javascript)
When you connect
- Find and check that database directly
- Give
Pipedream access to a page that contains the database. Permissions cascade down to child pages and databases by default.
If you still don’t see your database listed – or if you want to add a new one later – you can grant
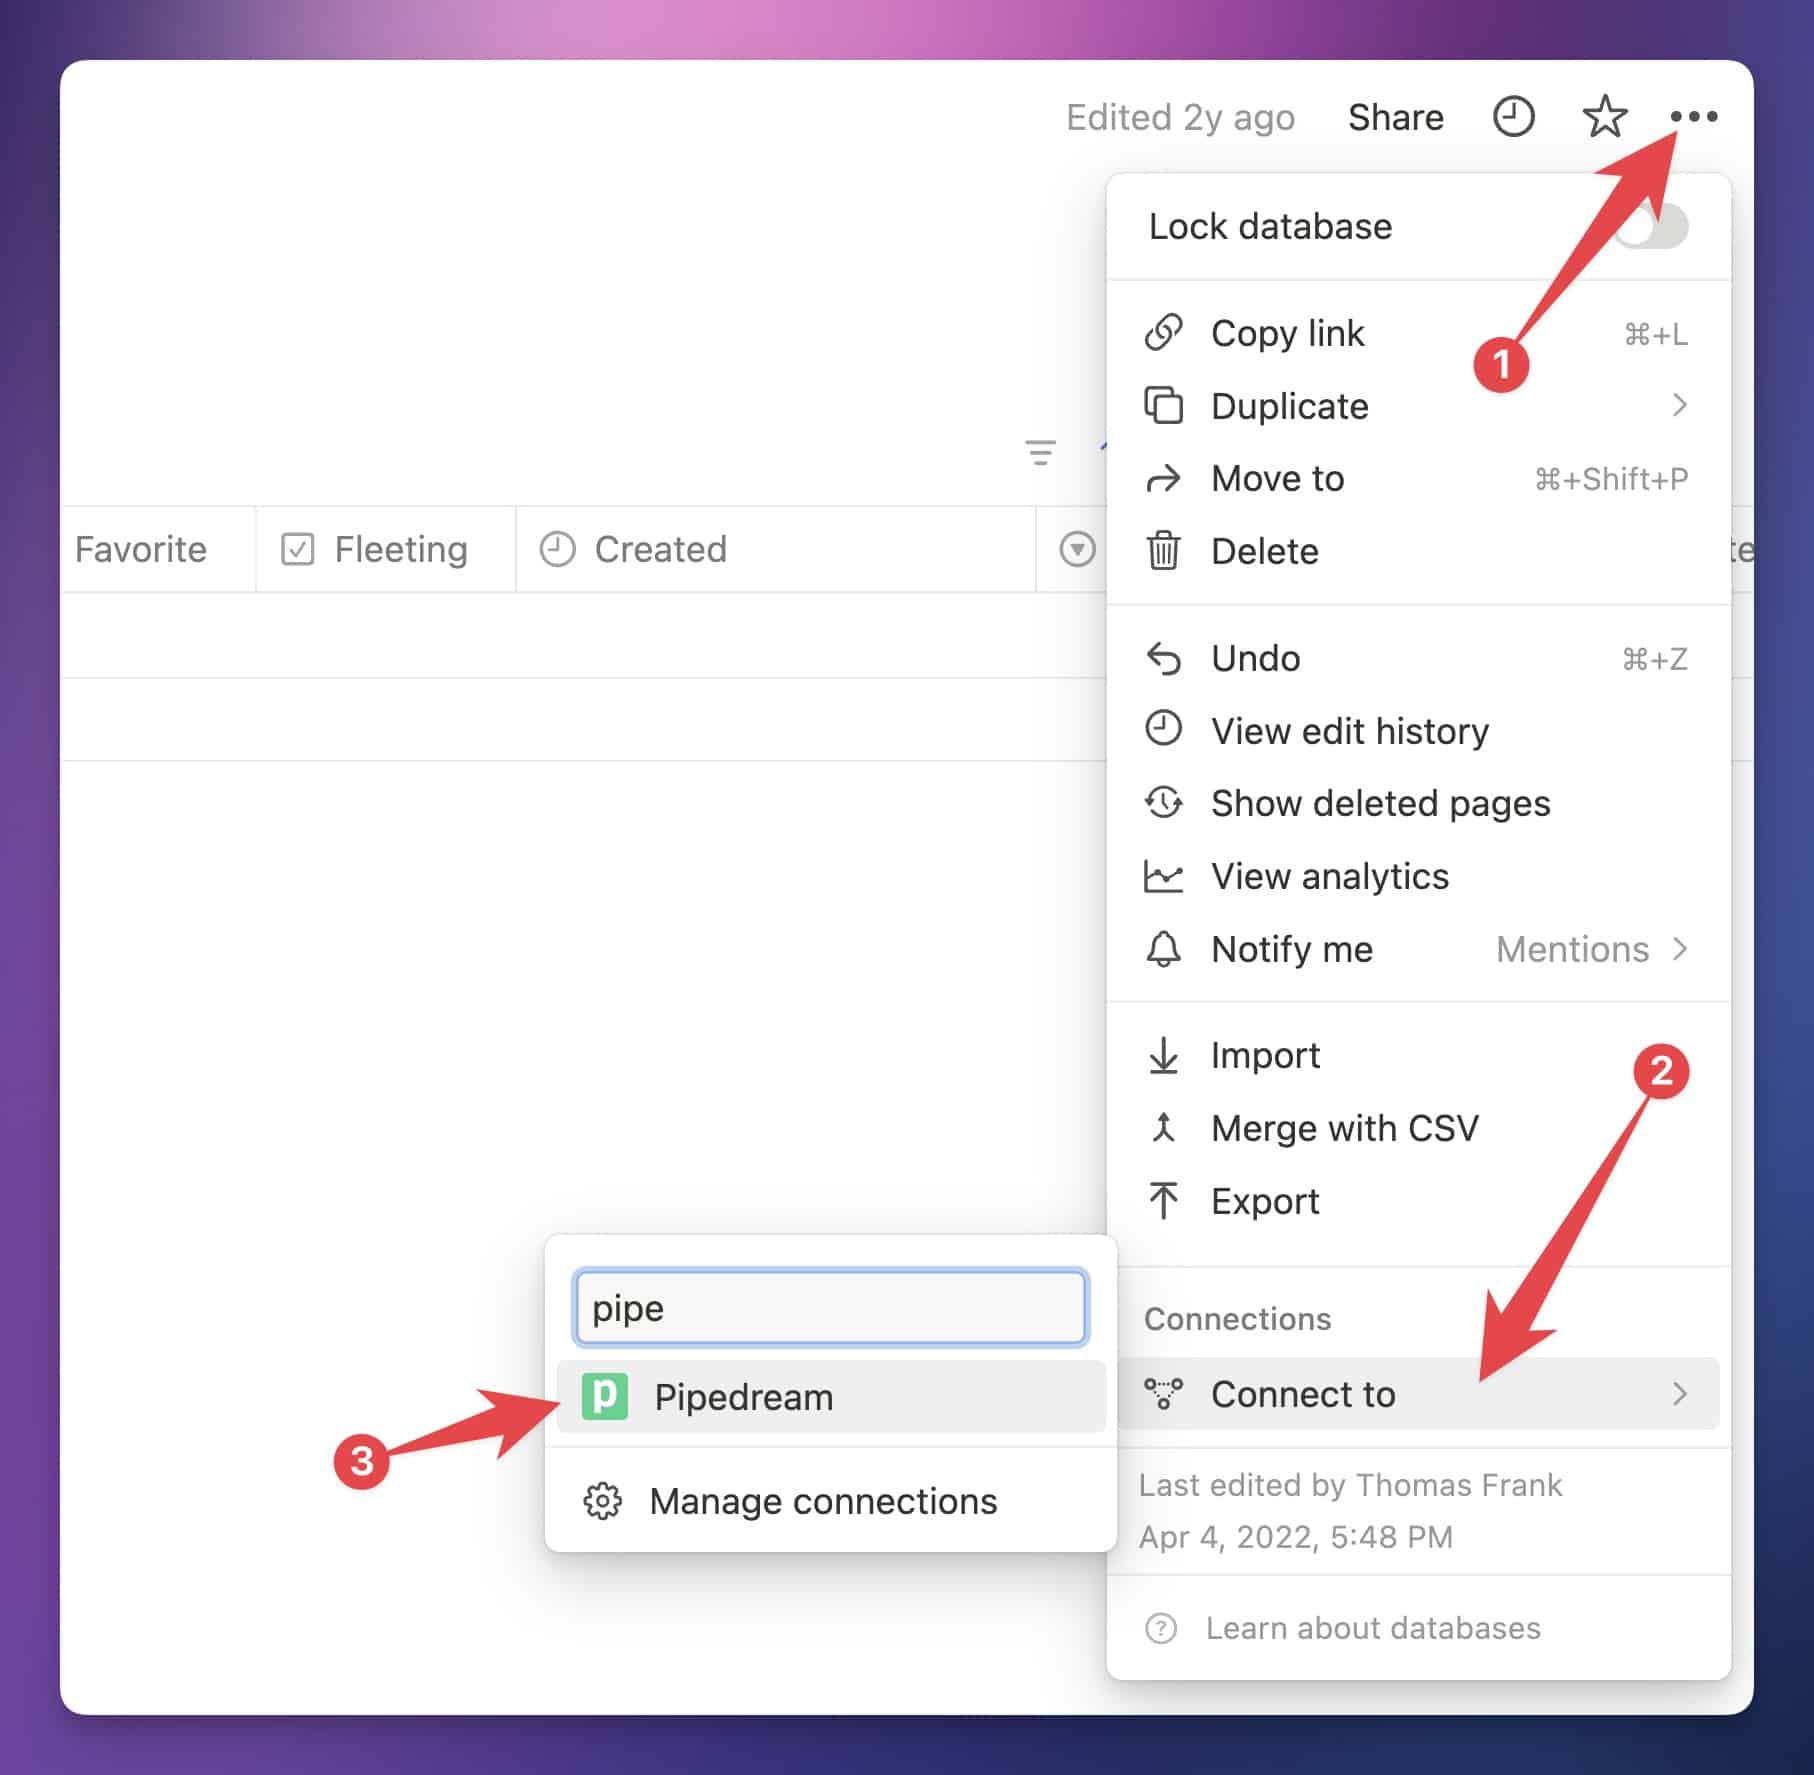
First, navigate to the database directly. A good way to ensure you get to the database itself (instead of a linked view of it) is to open a page from the database full-screen, then use the breadcrumbs at the top of the Notion app to go one level upward. That will take you to the source database.
From there, you can hit the ••• menu in the top-right corner of the page. Find the Connections menu, go to Connect To, and click Pipedream.
If you see
Once you’ve configured all the fields, hit Test. You should get a success message, and see the new page in your Notion database.
If the test went well, hit Deploy to make your workflow active. You’re done! Now, any time you upload a new image to your chosen Google Drive folder, the workflow will trigger and create a new Notion page with the extracted text.
Extending the Workflow
If you’ve followed the instructions in the previous section, you’ve now got a handy workflow that can extract the text from a single image and create a new page in Notion, complete with an AI-generated title.
Want to take things further? Below, I’ve included a couple of ways that you can add new capabilities to the workflow, including:
- Adding PDF support, so you can upload multiple images at once (and see their text all in the same Notion page)
- Sending the extracted text to other destinations, such as your email inbox
Handling Multiple Images at Once with PDFs
By default, this workflow is setup to handle individual images.
When you upload an image to cloud storage, the workflow triggers, and the result is a new page in Notion with your digitized text in the page body.
That leads to an obvious question: What if you need to digitize multiple pages of notes all at once?
For example, if you took several pages of notes for a single lecture or chapter of a book, you’d probably want all of those pages to be bundled into a single Notion page.
Luckily, we can add this capability to our workflow quite easily! It involves a few changes:
- Uploading a PDF containing images of each page of notes (instead of uploading individual images)
- Use PDF.co to split the PDF into images within the workflow
- Beefing up our ChatGPT step so it handles multiple images
The downside of using PDF files is that we need PDF.co to split them up, and it’s not free. Fortunately, it’s not expensive either. I cover the cost more thoroughly in the Cost Information section, but here’s a breakdown:
- When you sign up, they give you 10,000 credits for free that expire in a month
- After that, you can get a pack of 17,500 credits for $17.50, which won’t expire.
- Their PDF-to-JPG converter costs 12 credits per page, so that credit pack will cover over 1,400 pages
By adding this tool into the workflow, the total cost per page goes from a bit over $0.005 to around $0.02.
I tried to do the PDF conversion directly in
To add PDF conversion to your workflow, first sign up for an account at PDF.co. They’ll give you a 1-month free trial with 10,000 credits, so you can test out the workflow on a lot of pages before needing to buy a credit pack.
Next, generate and copy an API Key to your clipboard. You’ll need this when adding the PDF.co action to your
Within your
Choose the action: PDF.co → PDF to Anything Converter. Then configure the action with the following settings:
- PDF.co account: Connect a new account and paste in your API key
- URL depends on your cloud storage app:
- Google Drive:
{{steps.trigger.event.webContentLink}} - Dropbox:
{{steps.trigger.event.link}} - OneDrive:
{{steps.trigger.event["@microsoft.graph.downloadUrl"]}}
- Google Drive:
- Output Type: PDF to JPG
Note: Anything with {{}} symbols can also be selected from the variable dropdown menu that pops up. This is the most accurate way to ensure you’re selecting the right variable.

Next, delete the current vision step that sends your image to OpenAI. We need to create a new one that uses custom code.
In the original, single-image version of this workflow, using Pipedream’s no-code actions for OpenAI worked perfectly well. However, if you try to upload multiple images to GPT-4, it won’t do a good job at accurately extracting all the text.
The more images you upload, the more it’ll omit. It’ll act more like a summarizer than a true OCR bot. To ensure that it extracts as much of the text in each image as possible, we need to make call GPT-4 once for each image extracted from the PDF.
Once you’ve removed that original OpenAI step, add a new step right after your pdf_to_anything step.
Choose the action: OpenAI (ChatGPT) → Use Any OpenAI (ChatGPT) in Node.js. Then, click the title of the step on the canvas and once again rename it to vision.
Renaming the step to vision is important! It’s easy to overlook, but it needs to be done because further steps in the workflow reference that vision keyword in their variable paths.
Next, paste this code in the Code box of the vision step:
import OpenAI from "openai"; // OpenAI SDK
import Bottleneck from "bottleneck"; // Concurrency handler
import retry from "async-retry"; // Retry handler

export default defineComponent({
  props: {
    openai: {
      type: "app",
      app: "openai",
    },
    image_array: {
      type: "string[]",
      label: "Image URL Array",
      description: "Array of image URLs to process",
    },
    user_prompt: {
      type: "string",
      label: "User Prompt",
      description: "Prompt to send to OpenAI",
    },
    title_prompt: {
      type: "string",
      label: "Title Prompt",
      description:
        "This prompt will be added onto to the user prompt *only* for the first page of the PDF. Best used for instructing the model to generate a title for the document.",
    },
    system_prompt: {
      type: "string",
      label: "System Instructions",
      description: "System instructions to send to OpenAI",
    },
  },
  methods: {
    async processImage(url, openai, addTitle = false) {
      const result = await retry(
        async (bail, attempt) => {
          const response = await openai.chat.completions.create(
            {
              model: "gpt-4o",
              messages: [
                {
                  role: "system",
                  content: this.system_prompt,
                },
                {
                  role: "user",
                  content: [
                    {
                      type: "text",
                      text:
                        addTitle && this.title_prompt !== ""
                          ? `${this.title_prompt}\n${this.user_prompt}`
                          : this.user_prompt,
                    },
                    {
                      type: "image_url",
                      image_url: {
                        url: url,
                      },
                    },
                  ],
                },
              ],
            },
            {
              maxRetries: 3,
            },
          );

          return response;
        },
        {
          retries: 3,
          onRetry: (error, attempt) => {
            console.log(`Attempt ${attempt} failed: ${error.message}`);
          },
        },
      );

      return result;
    },
  },
  async run({ steps, $ }) {
    const pdf_image_urls = steps.pdf_to_anything_converter.$return_value.urls;

    /**
     * Method:
     * - Loop throught the array and:
     * - Send the image to gpt-4 with our prompts
     */

    const limiter = new Bottleneck({
      maxConcurrent: 30,
      minTime: 1000 / 30,
    });

    const openai = new OpenAI({
      apiKey: this.openai.$auth.api_key,
    });

    const results = await Promise.all(
      pdf_image_urls.map(async (url, index) => {
        if (index === 0) {
          return await limiter.schedule(() =>
            this.processImage(url, openai, true),
          );
        } else {
          return await limiter.schedule(() => this.processImage(url, openai));
        }
      }),
    );

    const text_results = results
      .map((result) => {
        return result.choices[0].message.content;
      })
      .join("\n\n");

    return {
      generated_message: {
        content: text_results,
      },
      full_responses: results,
    };
  },
});
Code language: JavaScript (javascript)
Here’s what this code does:
- Creates a variable to store the array of page images from the PDF.co step
- Loops through the array, making a call to the ChatGPT API for each element in it
- For the first element, it will optionally add extra detail to the prompt asking GPT-4 to generate a title for the note
- Stitches all the text from each response into a single, longer string of Markdown-formatted text
I’ve included a couple of other libraries – Bottleneck and async-retry – which smoothly handle rate-limiting and retry each request in case of failure, respectively. These two libraries are in my programming Bat-utility-belt, and I break them out any time I need to write code that makes requests to an API.
Once you’ve pasted in the code, hit the Refresh Fields button at the top of the code editor.
In the Configure tab above, you’ll now be able to fill out all of the fields for this step. Fill them out like so:
- OpenAI (ChatGPT) Account: Choose your configured account. If you don’t already have one, create an API key at OpenAI and paste it in. Ensure you’ve added at least $5 in credit so your account has access to GPT-4.
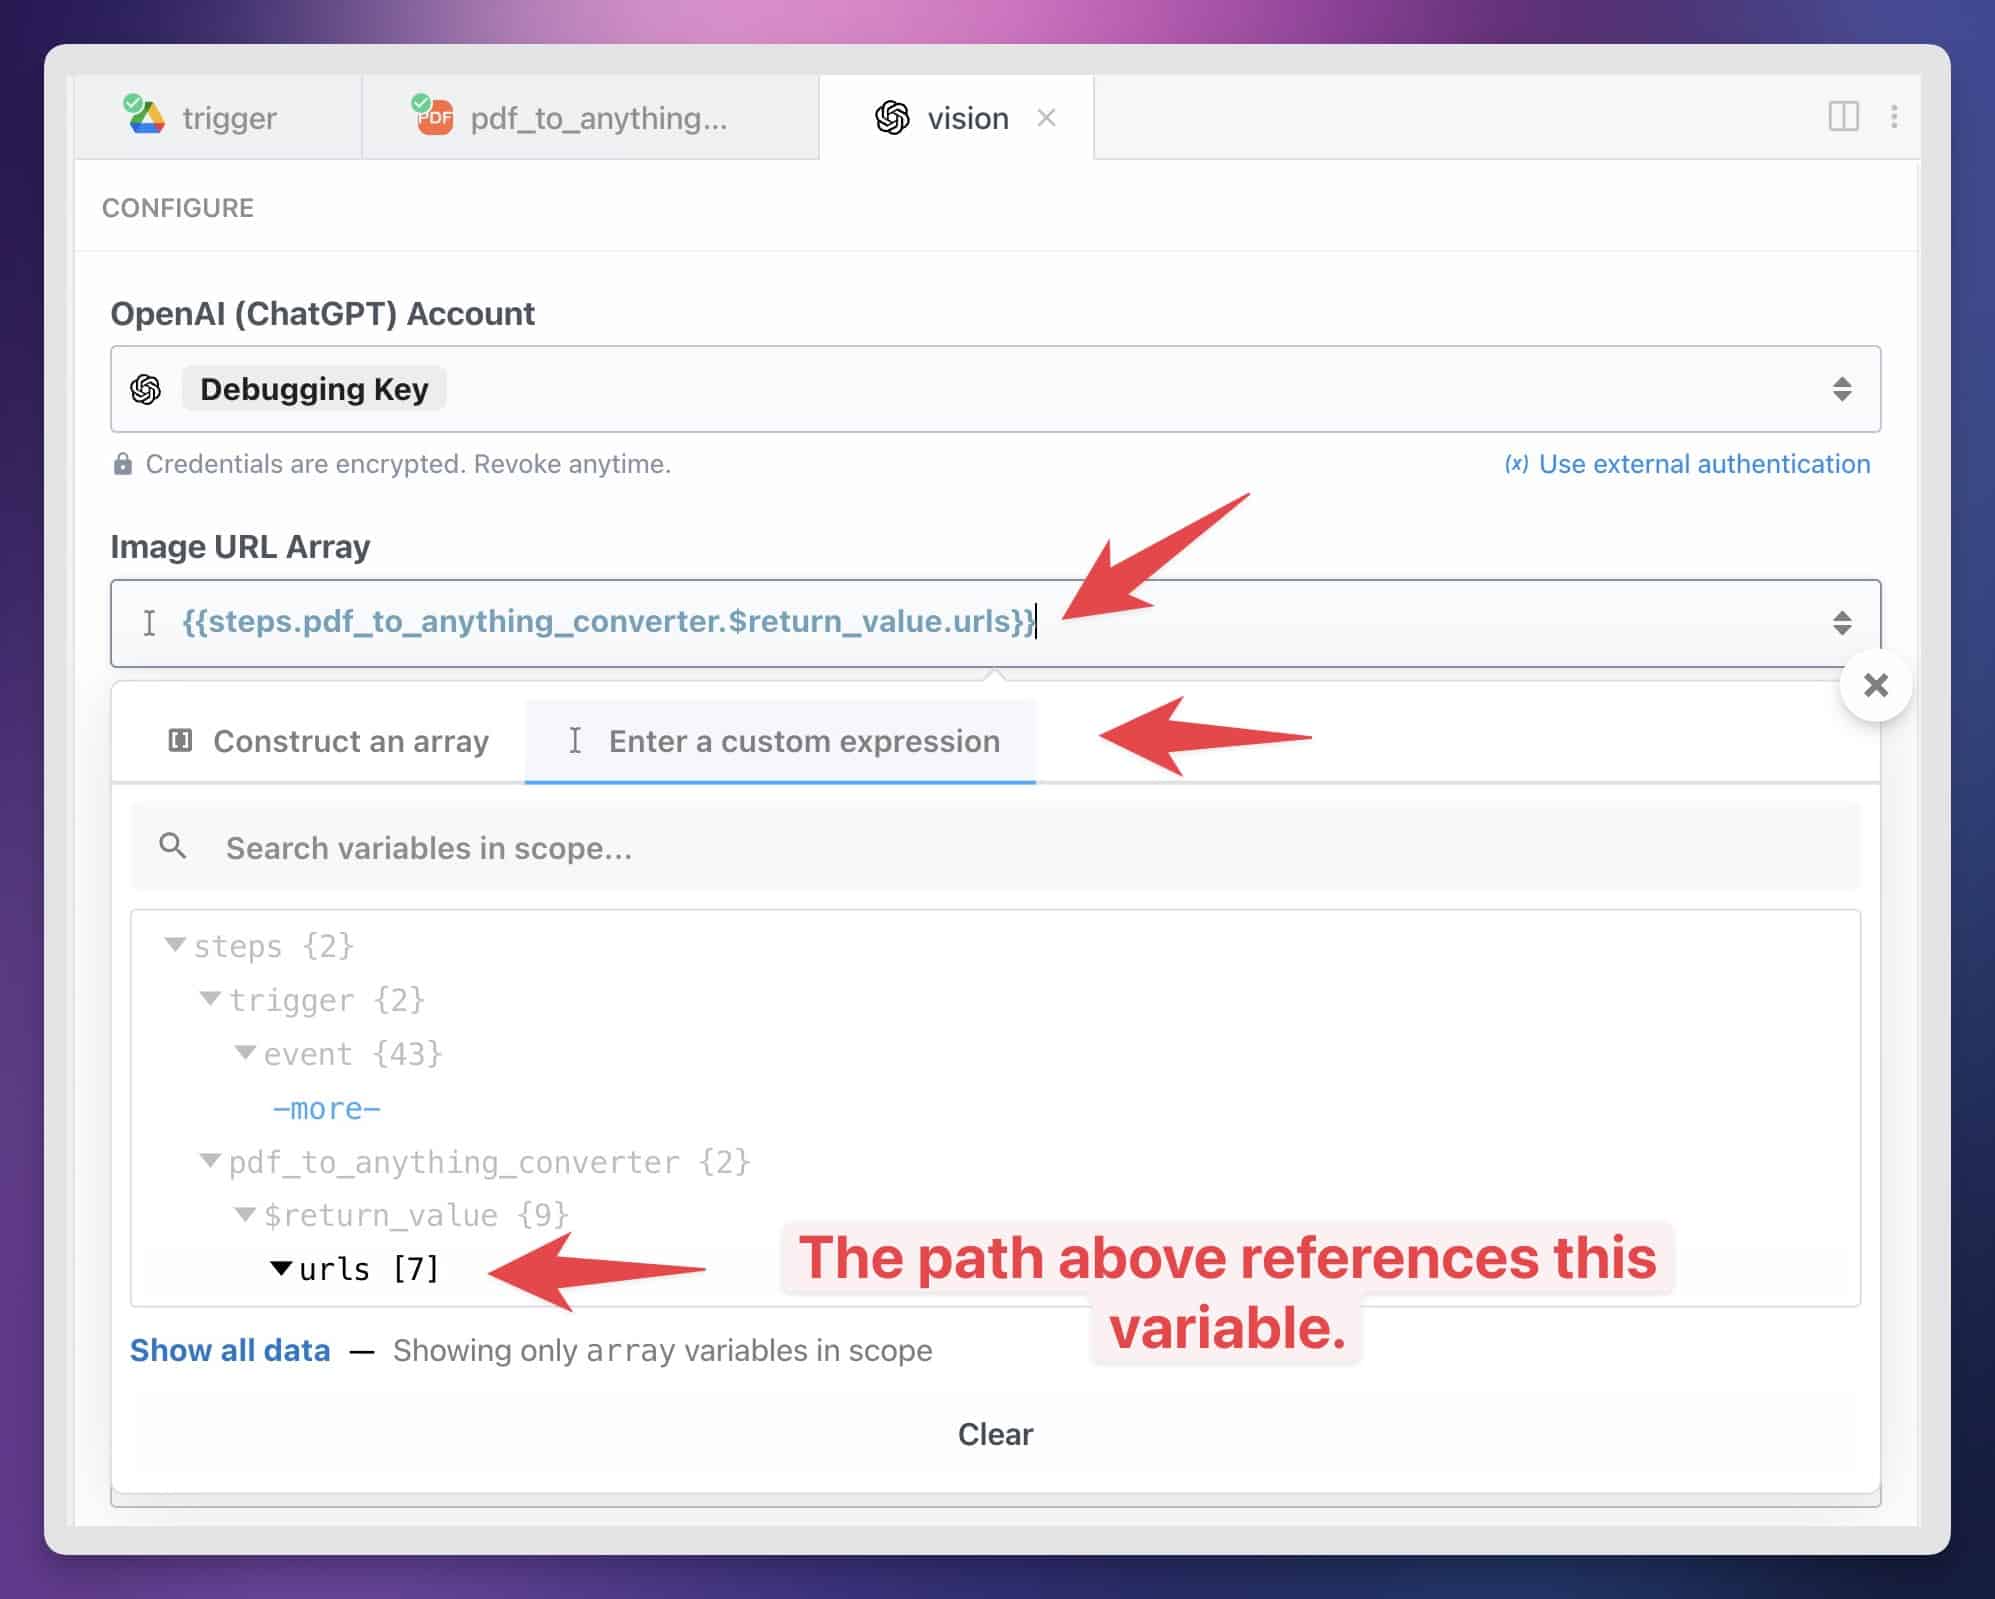
- Image URL Array: Click “Enter Custom Expression”, then paste the following in the field above that tab (not the search bar):
{{steps.pdf_to_anything_converter.$return_value.urls}}(alternatively, find this value in the dropdown menu)- Important: Don’t paste this value in the Construct an Array. This variable already points to an array, so we don’t need to construct one.
Next, fill out the prompt fields. Below, I’ve shared the prompts I’m using. These work well for me, but you’re welcome to experiment with changes as you like.
User Prompt:
Return the text in this image, as if you are an OCR algorithm for a note-taking app.
Code language: plaintext (plaintext)
Title Prompt:
Add a note title to the top of your response, preceded by a "#" symbol (for a Heading 1 in Markdown).

Make sure the title would make sense in a personal note-taking system.

Example of a good title: "# The Benefits of Listening to Multiple Music Genres"

Example of a bad title: "Broad Music Tastes: The Benefits of Listenign to Multiple Music Genres"

Incredibly important; pay extra attention to this: Do not include a colon in the title.
Code language: plaintext (plaintext)
System Instructions:
You are an OCR bot that translates handwritten text into well-formatted Markdown. Scan the uploaded image data and return Markdown to the best of your ability. Treat text that is significantly larger than surrounding text as Headings, and lines starting with "-" or bullets as bullet list items.

Use the following Markdown conventions: # for h1, ## for h2, ### for h3, - for unordered lists, *text* for italics, **text** for bold, > for blockquotes. Replicate nested lists if they appear, but only to a single level of nesting.

Treat large blocks of text (such as a page full of non-formatted handwriting) as a simple string of text. Treat lines that start with box outlines as to-do items.

Do not try to create tables. Do not put text in code blocks. Do not use the string "```" to create code blocks. Do not use non-standard markdown such as "/->". Only return text, titles, and lists, including bolding or italics as needed.

Important: Do your best to maintain the structure of the notes in the image. Don't add unnecessary headings. Try to accurately reproduce all of the text in the image; don't omit text.

Important: Don't try to reproduce multiple columns. The result must be well-formatted markdown.

Important: Don't create more than 2 levels of nested bullet list items.

Imporant: Don't include faint text that is written backwards, which would be from the other side of the paper.
Code language: plaintext (plaintext)
Once you’ve filled out all the fields, test the step and the rest of the workflow. You shouldn’t need to change any further steps in the workflow. Again, be sure you’ve named this step vision, otherwise the steps after it will fail to access the variables they need in order to work.
Using Destinations Other Than Notion
This guide primarily focuses on Notion, but you can absolutely send your notes to other destinations. Since we’re using
As an example, let’s remove the Notion action and add a new action: Email → Send Yourself an Email.
Try setting it up with Path references from our extract_details step:
Subject: New Note: {{steps.extract_details.$return_value.title}}
Text:
{{steps.extract_details.$return_value.body}}

Image: {{steps.extract_details.$return_value.image_url}}
Code language: JavaScript (javascript)
[Image of the action config]
With this action configured, your digitized notes will land right in your email inbox!
You could also send your notes to any other app that Pipedream supports, or to any app with a public API using their HTTP actions. If you’re willing to learn, you could save the note to a file in Pipedream and upload it to your Google Drive account. This would even allow you to automatically send your notes to local-first tools like Obisidan if you have your vault inside of Google Drive.
Cost Information
TL;DR on this section: Each image will cost around $0.005 – $0.02 (1-2 cents) to process. You’ll need to add at least $5 of credit in your OpenAI account to access GPT-4. This workflow is pay-as-you-go; there’s no subscription required.
OpenAI Costs
To run this workflow, you’ll need access to the GPT-4 model. Your account needs to be able to access GPT-4 via the OpenAI API, not through ChatGPT Plus.
According to OpenAI’s documentation, you’ll need to buy at least $5 of credit within your OpenAI account in order to have your account upgrade to Usage Tier 1. Once done, you’ll be able to access the gpt-4o model that this workflow requires. (You can also use gpt-4-turbo)
Vision capabilities are built right into gpt-4o, so you won’t need any additional access.
The actual cost to run the workflow will vary slightly based on the aspect ratio of the image you upload. If you take a look at OpenAI’s pricing page, you’ll see a calculator for GPT-4’s Vision feature. Since this workflow resizes images to 2,000px in width by default, the calculator estimates a $.003825/image cost for a 2000 x 2600 image:
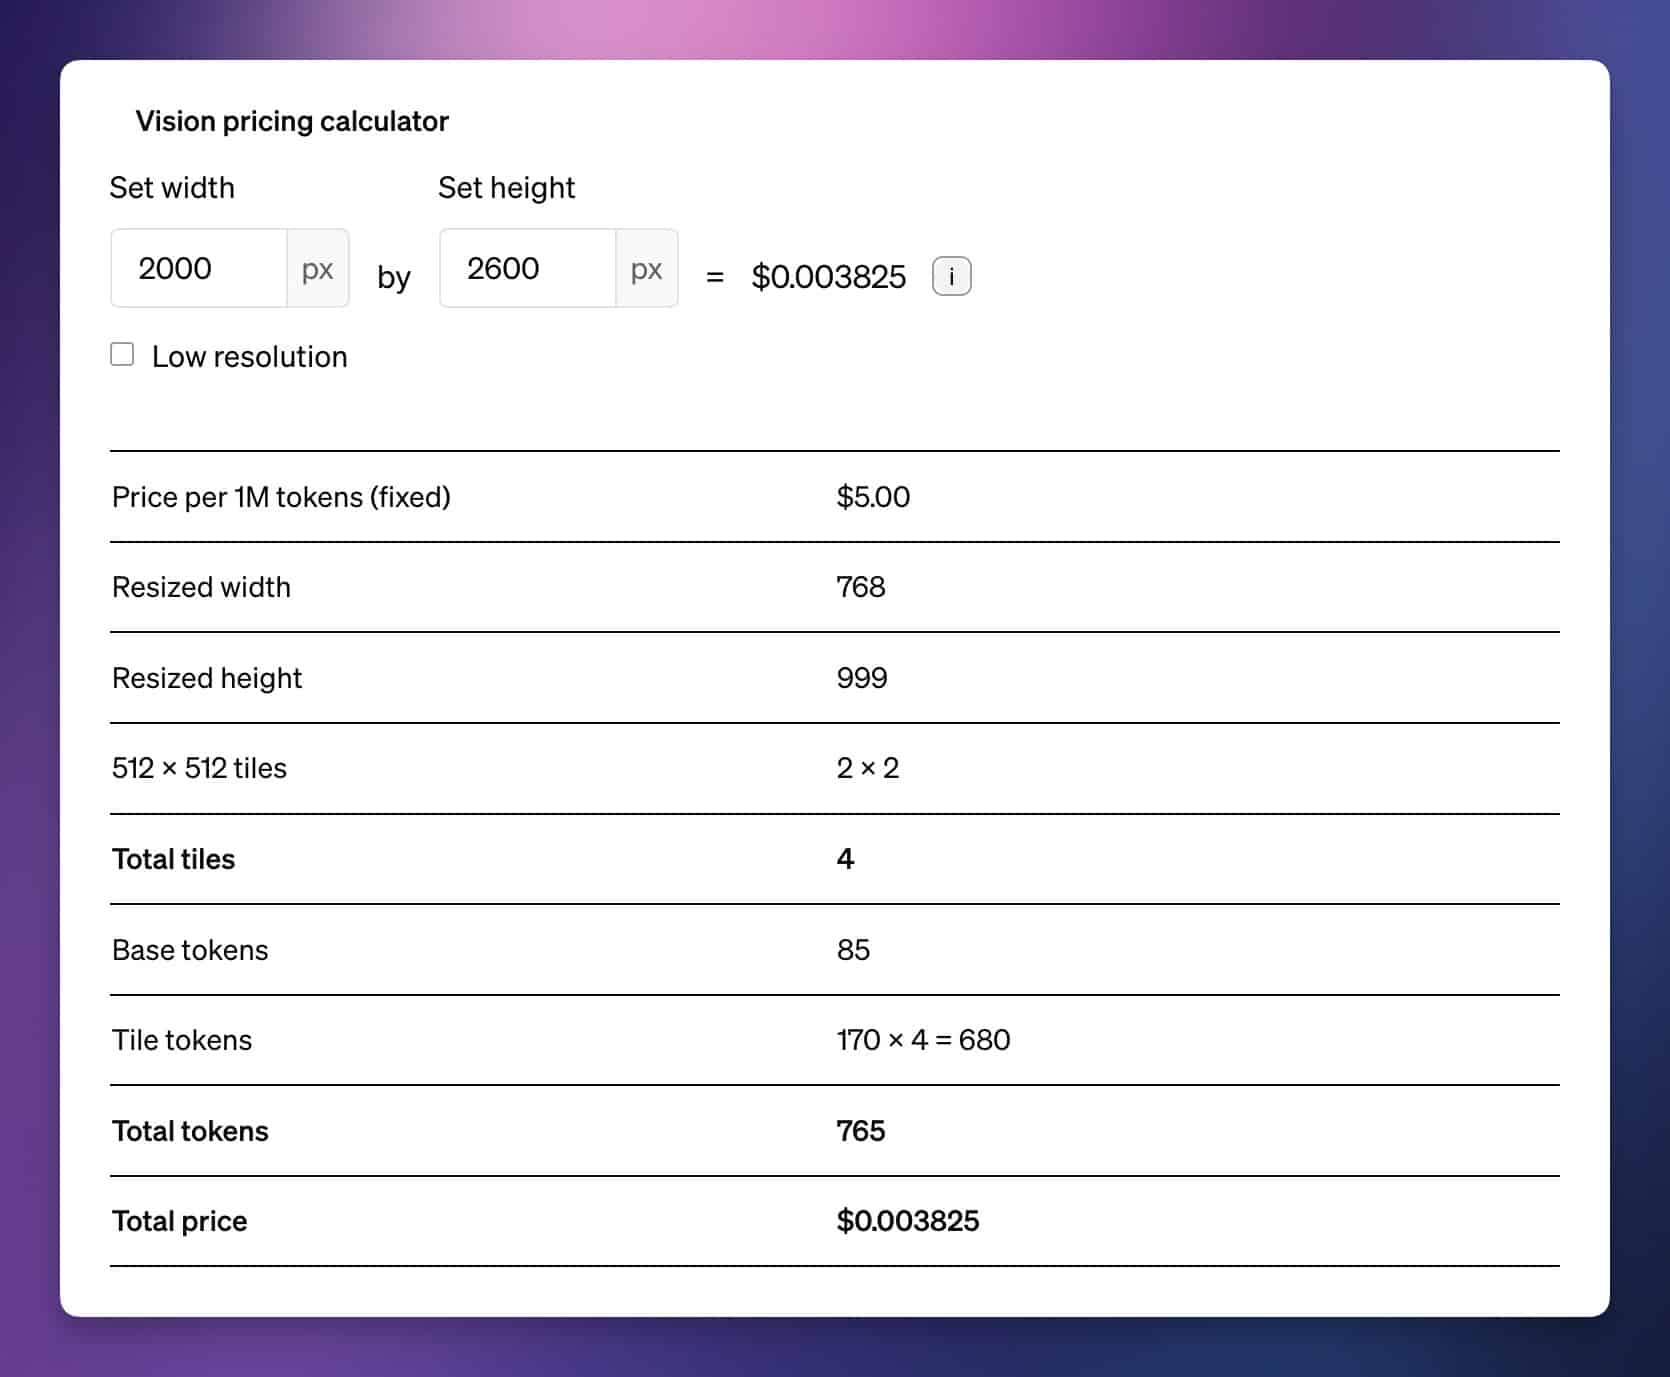
However, if the image were 2000 x 2700 (just 100px taller), the price goes up to $0.005525. This is because pricing for Vision requests is based on tiles, and each tile takes up 170 tokens. There is also an 85-token base charge for an image.
Whatever the size of your image, it will be resized and then fit into however many tiles are needed. If you’re taking pictures with your phone’s camera, then most images will likely take up 4-6 tiles.
You can learn more about how this calculation works at the GPT-4 Vision docs.
There are also a handful of additional tokens in each request, which are used by the user and system messages we include to instruct the model on how to behave.
PDF.co Costs
TL;DR here: If you want to upload PDF files with multiple images, you’ll need to get a PDF.co account and API key. They have a 1-month free trial; after that, you can get a credit pack for $17.50 that doesn’t expire and will cover 1,400 pages. That works out to an additional ~$0.01 per image.
If you just want to upload singular images of your handwritten notes, then this section isn’t relevant. Your cost will be roughly $0.005 per image, as outlined in the OpenAI section above.
However, uploading single images does have a downside: Each uploaded image will trigger the entire workflow, resulting in brand-new Notion page. If you have multiple pages of notes that you’d like to put in a single Notion page, this isn’t ideal.
The best way of getting around this is to bundle multiple images into a PDF file and upload that instead. The Adobe Scan app makes this easy, as it lets you scan multiple images at once and makes PDF files by default.
However, ChatGPT doesn’t accept PDF files. So we need a way of splitting the PDF file into images after the workflow is triggered – that way, we can send all the images to ChatGPT and have them digitized.
Unfortunately, this isn’t possible to do on
Instead, we need to use another service to convert PDF files into images. The best I’ve found is PDF.co, which has no-code actions on
PDF.co gives you a 1-month free trial with 10,000 credits; after that, you’ll need to either switch to a paid plan or (more ideally) buy a credit pack. The smallest credit pack is $17.50, which gives you 17,500 credits.
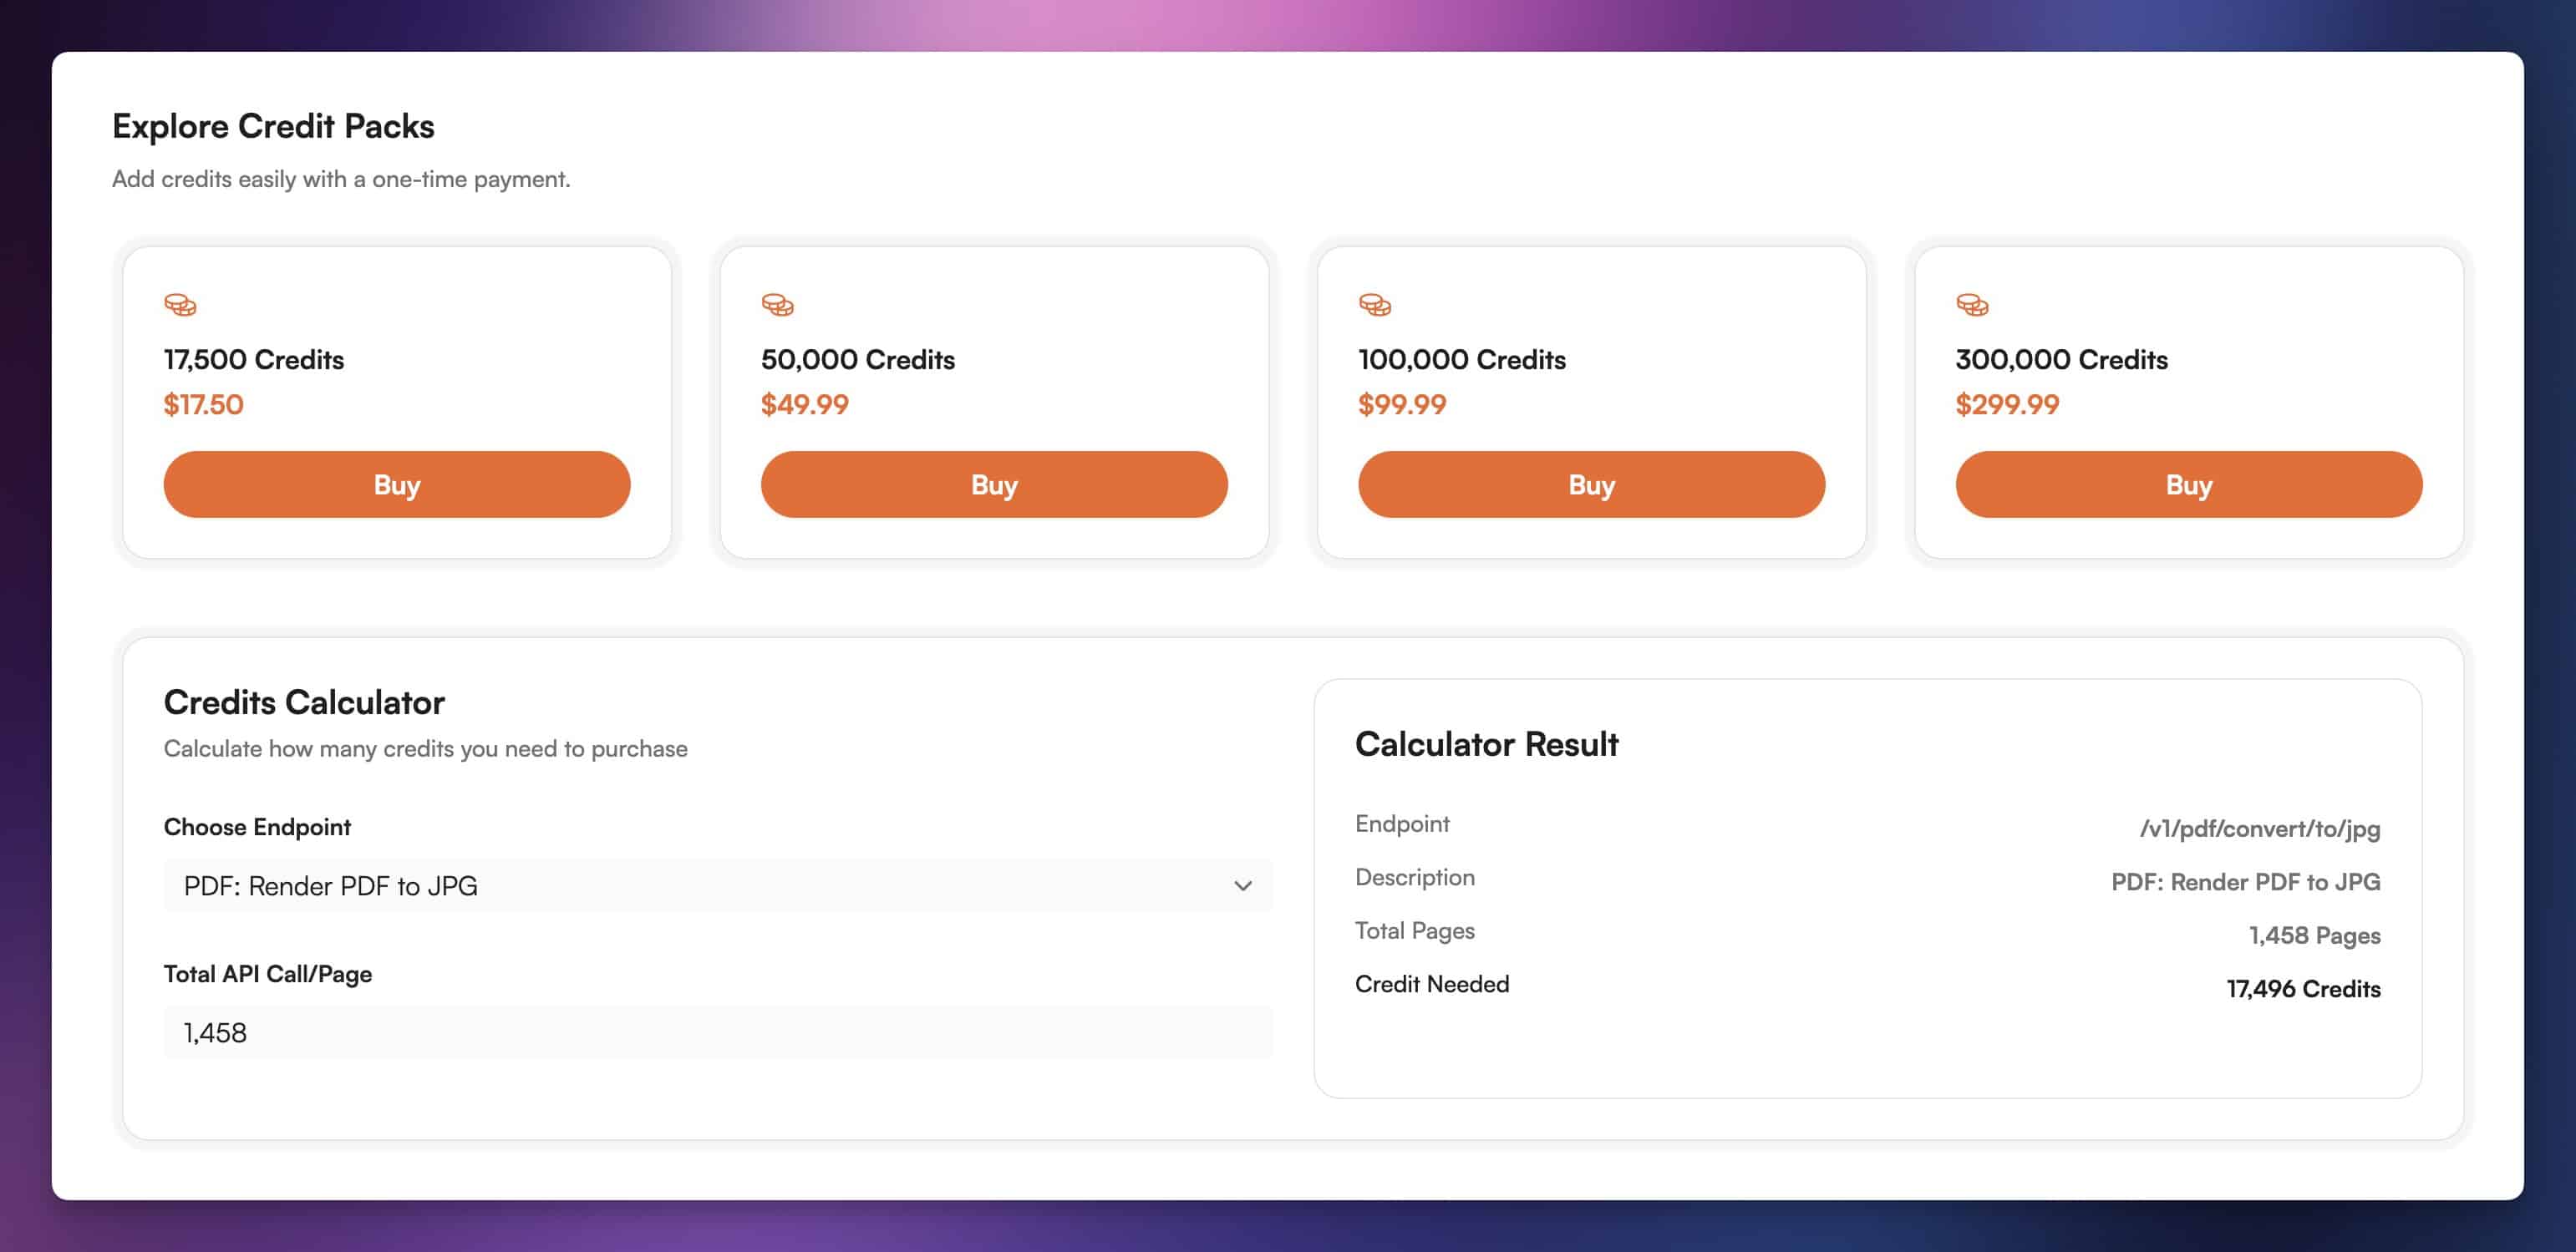
These credits don’t expire. The PDF to JPG endpoint costs 12 credits per page, which means the pack will handle 1,458 pages before you’ll need to buy any more.
Unfortunately, I haven’t been able to find a cheaper way to handle this part while still retaining the automation benefits of the
To make this cheaper, you could deploy your own custom web app in order to run the pdf2pic library. That would involve deploying an app to a hosting platform like Heroku, building your own API, and more.
That is far beyond the scope of this tutorial, though. It’s highly technical, and at the end of day I’m less interested in saving a few pennies than I am in having a seamless workflow at my fingertips that can take scans of my handwriting and send their text to Notion automatically.
In the interest of thoroughness, another alternative could be using images instead of PDF files. Instead of having your workflow trigger every time an image is uploaded, you could make it trigger on a schedule and process every image in a watch folder. With this method, you’d need to also remove the images from the watch folder, ideally move them somewhere else for permanent storage, consider your Pipedream plan’s credit limits when setting the trigger’s schedule, etc.
Privacy Information
TL;DR on this section: When you interact with OpenAI’s services, your data isn’t 100% private. Keep this in mind when uploading images and other data.
Since this automation uses the ChatGPT API, OpenAI does not use data uploaded with it to train their models. (They do train models with data submitted via the normal ChatGPT website and mobile apps!)
However, they do retain inputs and responses for 30 days before deleting them from their system. The only way around this is to request a Zero Data Retention exception for your account, and currently these exceptions are only granted for Enterprise accounts.
You can learn more about this at OpenAI’s Enterprise Privacy page.
Warnings and Best Practices
This workflow is powerful, and right now, it is likely the most capable and accurate OCR method that most of us can access. That said, it’s definitely not perfect!
Right now, this type of workflow (digitizing handwritten text) is one that I would describe as “for nerds like me” – i.e. it’s for folks who like doing stuff on the somewhat-cutting-edge, even if it means dealing with the occasional bug or two.
In this section, I’ll list out the issues and limitations I know of regarding this workflow. I’ll also include some best practices for dealing with each issue.
In general, there are four main issues with this workflow, all but one of which relate to the GPT-4 model itself:
- Computer vision isn’t perfect
- GPT-4 will refuse certain requests
- This workflow is expensive and unnecessary for some kinds of OCR
- This workflow (currently) doesn’t handle multiple images at once
Let’s briefly cover each one.
Inaccuracy Issues
Computer vision is hard. In fact, it’s one of the hardest problems in computer science, along with being one of the most widely-studied. This means extracting text from images – which is just a single application of computer vision – is also hard.
These little asides that I hide in toggle blocks are often my favorite parts of the article to write 😁
It might surprise you to know that the exact same foundational technology that powers ChatGPT is at the heart of OCR (optical character recognition).
Even as early as the 1980’s, computer scientiests were training neural networks to recognize letters and numbers in digitized images. Today, neural networks also power the text-completion features of ChatGPT, along with a whole lot of other things.
A neural network is a tough thing to explain in just a few sentences. Essentially, it’s a computational model that attempts to work in the same way as the human brain.
Nodes are connected to one another and pass data between one another. By giving each node a weight, and by connecting many, many layers of nodes, neural networks can be trained over time to do lots of things – identifying objects in images, doing next-character or next-word prediction in language models, etc.
For the most part, this is how has worked since the 1980’s. A computer program takes an image, processes it so the characters are as readable as possible, and then feeds characters or words through a neural network to identify them.
If you want to learn how this works at an even deeper level, 3blue1brown’s introductory video on neural networks does a fantastic job at explaining both neural networks AND OCR:
If you want to learn even more about the history of OCR, here’s a good article:

As a result, our OCR workflow will likely make mistakes, and likely at a more frequent rate than my AI voice notes workflow since automated transcription is a much more “solved” problem than computer vision and OCR.
To prevent the model from making mistakes, try to maintain a logical structure to your handwritten notes. I’d recommend using the Outline Method, which I detail in this article on note-taking systems.
More free-form approaches to handwritten note-taking, such as mind maps or note with lots of arrows, offshoots, and asides, won’t be as easily interpreted by the model. You might still be able to upload these types of images in order to extract keywords that you can search later on, but don’t expect the final output to be a perfect representation of what you put to paper.
OpenAI has also published a list of known limitations with GPT-4’s vision capabilities. A few notable ones that relate to extracting text from images:
- It’s not as good with non-English/non-Latin characters (e.g. Japanese or Korean)
- It’s not great with small text
- It can’t handle rotated text very well
I recommend using this workflow with English-language notes. When taking photos, I’d recommending using a document-scanner app like Adobe Scan, which can automatically crop your images and apply contrast/brightness tweaks to make the text as readable as possible.
GPT-4 Refuses Certain Requests
There are instances when GPT-4 will to refuse requests to extract text from images.
This typically happens when the model interprets that you’re trying to extract personal identifying information from images. Even if the model digitizes the text in your image, it may redact certain information, such as email addresses.
These limitations probably won’t be too much of an issue if you’re just using the workflow to digitize normal notes. But if you need to digitize notes that contain a lot of personal/contact information, you might need to look into alternatives.
Model Expense
Using a powerful AI model for OCR purposes can make sense when we’re working with difficult images, such as images of handwritten notes. The accuracy benefits of a model like GPT-4 totally make sense for this use case, which means the rough $0.005/image cost is a fair price to pay.
But for other use cases, using GPT-4 is total overkill. A great example is digitizing books or text printed from a computer that’s already well-structured.
For documents like these, an open-source OCR library like Tesseract will already be extremely accurate – and you can run it for free if you know what you’re doing. There are also free OCR tools like OCRSpace you can use.
Alternatives
I like to be thorough, so here are a few alternative tools and methods you can use to extract text from handwritten notes. I’ve collected them all in this table, and written up some additional detail and thoughts in the sections below.
| Tool | Cost | Notes |
|---|---|---|
| ChatGPT (official app) | Free | Should be just as accurate as the |
| TypingMind | $79 one-time + ChatGPT API costs | Can accept image uploads if you’ve paid for the $79 Premium license. |
| Anthropic Claude 3 | Usage-based | Competing AI model that can also accept image inputs. Very inaccurate in my testing. |
| Google Gemini Pro | Usage-based | Competing AI model that can also accept image inputs. Accurate but unreliable in my testing. |
| Google Lens | Free | Accuracy isn’t as good for handwriting. |
| CleanShot OCR | $29 one-time | Poor accuracy for handwriting. Great for extracting text from video frames or Zoom screen shares. |
| OneNote | Free | You can copy text from an images, but can’t easily search OneNote for text within images. |
| Evernote | Free plan available | Opposite to OneNote, Evernote makes OCR’d text searchable, but not extractable |
Here’s the TL;DR: The official ChatGPT app/site is the only option in this table that comes close to this workflow for the purpose of digitizing handwritten notes. The official ChatGPT app will also let you do this for free, within certain limits. All other options are currently not very good for this use case.
Competing AI models, such as Google’s Gemini Pro and Anthropic’s Claude 3, can be plugged into automated workflows like this one, as they have APIs. But in my testing, their ability to reliably and accurately extract text from images doesn’t come close to GPT-4. Gemini is very accurate, but often rejects prompts. Claude is very inaccurate.
The other options I’ve listed can be useful in other situations. Personally, I use CleanShot’s OCR tool to take screenshots of text that I can’t copy directly – e.g. text on a slide in a Zoom screen-share presentation.
And for digitizing very legible, structured text – like printed books – using GPT-4 is probably overkill, given the cost. Well-established (and open-source) libraries like Tesseract have long been used for this task, and there’s even a JS version that can run on Node.
ChatGPT-Based Alternatives
First, there’s the official ChatGPT app for iOS and Android, as well as the ChatGPT website itself. With the launch of the gpt-4o model, you can now upload images to ChatGPT for free, although this usage is subject to limits. To get around these limits, you can subscribe to ChatGPT Plus for $20/mo.
Note: Subscribing to ChatGPT Plus is completely separate from adding credit to your pay-as-you-go credit balance. Plus unlocks features in the official ChatGPT app/site, while credit is used to make requests to the ChatGPT API.
Once an image is uploaded, you can include a text prompt such as:
“Return the text in this image, as if you are an OCR algorithm for a note-taking app.”
Additionally, there are 3rd-party clients that will give a familiar UI for working with the ChatGPT API. My favorite is TypingMind – I use it for all of my “normal” conversational AI use cases.
While I love TypingMind, it does require that you buy the $79 (one-time) Premium license in order to upload images and use GPT-4’s vision capabilities. Additionally, it doesn’t have workflow automation capabilties, so you’ll still have to copy and paste any extracted text to your note-taking app.
Notion AI?
Notably, Notion’s own AI add-on product, Notion AI, cannot currently analyze images or extract text from them.
However, I’m listing Notion AI here as I anticipate this is a feature the Notion team will add at some point in the future.
While I do not have any insider knowledge about this, it is clear that Notion is pushing hard to innovate on the AI front, and they’ve steadily been adding new features to Notion AI since its launch. Additionally, since Notion AI uses models from OpenAI, Anthropic, and others under the hood, the image-input capabilities of those models could make their way into Notion with little difficulty.
If they do add this feature, you can expect to pay the $10/user/mo ($8 if annual) price to add Notion AI to your workspace.
AI Alternatives – Claude, Gemini, etc.
There are other advanced, multi-modal AI models that can accept image inputs. These include:
These models are competive with GPT-4 across many fields. They can also be access via API, which means you could include them in the
You can also use Claude and Gemini directly in the browser.
That said, the testing I’ve done with image inputs using these models hasn’t yielded good results – at least in the browser.
My current testing with Gemini has been frustrating. Sometimes, it will respond with the text from my uploaded image, just as I’ve asked. Other times, it will tell me it’s unable to do what I’m asking:

Meanwhile, Claude’s accuracy for OCR purposes is currently bad enough that it’s unusable. It reliably tries to extract the text, but even the Opus model can’t do it well.
I took this screenshot in TypingMind, which I used to access Opus with my API key:

Meta’s Llama-3 model, while competitive with GPT-4 on other tasks, can’t take image inputs right now.
For the moment, it seems that only GPT-4 can reliably handle text-extraction requests for images of handwritten notes. Though with the pace of AI model development, I anticipate that this will change in the near future.
Other Alternatives
Google Lens is a free Google feature that can identity and extract text from uploaded images. You can drag and drop images on their desktop site, or use the official Google Lens app on Android.
On iOS, Lens is built into the official Google app. With both mobile apps, you can take photos or upload existing ones from your phone. Best of all, using Lens is 100% free.
Unfortunately, the accuracy of Google Lens’s OCR tech leaves a lot to be desired. In my testing, Lens OCR fared better than other options – such as the built-in OCR in MacOS Photos – but was still light years behind GPT-4’s Vision capabilities.
On the desktop front, CleanShot X has an OCR option that can extract text from images. When it comes to handwriting, the accuracy is even worse than that of Google Lens – however, it gets a mention because it is the best screenshot tool in the world, and I often use it to extract text from videos and screen-shares on Zoom.
In fact, I used it today to extract some text out of a video demo that Eli, our lead dev, shared with to get feedback on some new Flylighter features we’re working on. If you’re using MacOS, CleanShot X deserves a spot in your quiver of apps.
If you’re on Windows, ShareX is a good (and free) alternative that can also do OCR and text extraction.
If you’re on a Mac, another OCR option you have is the one built right into MacOS. In Photos, you can actually select and copy text directly from images that contain it.
I’ll also mention OneNote and Evernote. These apps don’t provide the same flexibility as the other options we’ve covered, but they do each have OCR features of their own.
OneNote can actually copy text from images, though PC Mag’s review notes that searching OneNote for digitized text isn’t a great experience.
On the other hand, Evernote automatically identifies text in images (and PDF files) and makes it searchable – however, it does not let you extract that text and copy it to your clipboard.
There are also business/enterprise-focused OCR solution like Docsumo, Veryfi, Nanonets, and many more. I haven’t been able to test these, and most of them have high billing minimums.
Finally, if you’re a massive nerd (like me) and want to dive deeper into the world of OCR, I’ll share this list of OCR projects on Github:

Most of these projects are OCR code libraries that you could integrate into other projects. It may even be possible to use them on
It’s unlikely that any of these projects will have the same level of power and accuracy as GPT-4 Vision, but you may find them useful for less challenging use cases (e.g. digitizing printed documents).
More Resources
In this tutorial, I’ve done my best to show you how to automatically send your digitized notes to nearly any note-taking app or destination.
If your chosen destination happens to be Notion, then I have a recommendation for you:
My Ultimate Brain template is the best way to turn Notion into a complete second brain – and it comes with the best note-taking system you’ll find for Notion.
New notes from this tutorial’s workflow will show up in Ultimate Brain’s useful Inbox; from there, you can easily organize them with the template’s tagging system.
Learn more about Ultimate Brain and get your copy here:
Want to turn Notion into a complete productivity system? Ultimate Brain includes all the features from Ultimate Tasks - and combines them with notes, goals, and advanced project management features.
I’ve also created more automation tutorials that will let you boost Notion’s usefulness even further:
If you’d like to learn how to build your own automations, you can start with my Notion API crash course:
Finally, if you’d like to get notified when I publish new tutorials like this one, join my Notion Tips newsletter.
After you join, I’ll also send you all of my free Notion templates, cheat sheets, and other useful resources for mastering Notion.