
Life often feels chaotic these days, thanks in no small part to the variety of information we have to deal with.
Tasks, emails, event invitations, and notifications pop up all day long. Videos, articles, and interesting websites are constantly grabbing your attention. All the while, you’re getting tons of your own ideas that you don’t want to lose.
If you want to have any hope of managing this constant influx, you need a system to organize it all – and it needs to be flexible, so it can adapt to your unique set of interests and goals.
It also needs to work with all of your tools – your note-taking app, task manager, and even your computer’s file system.
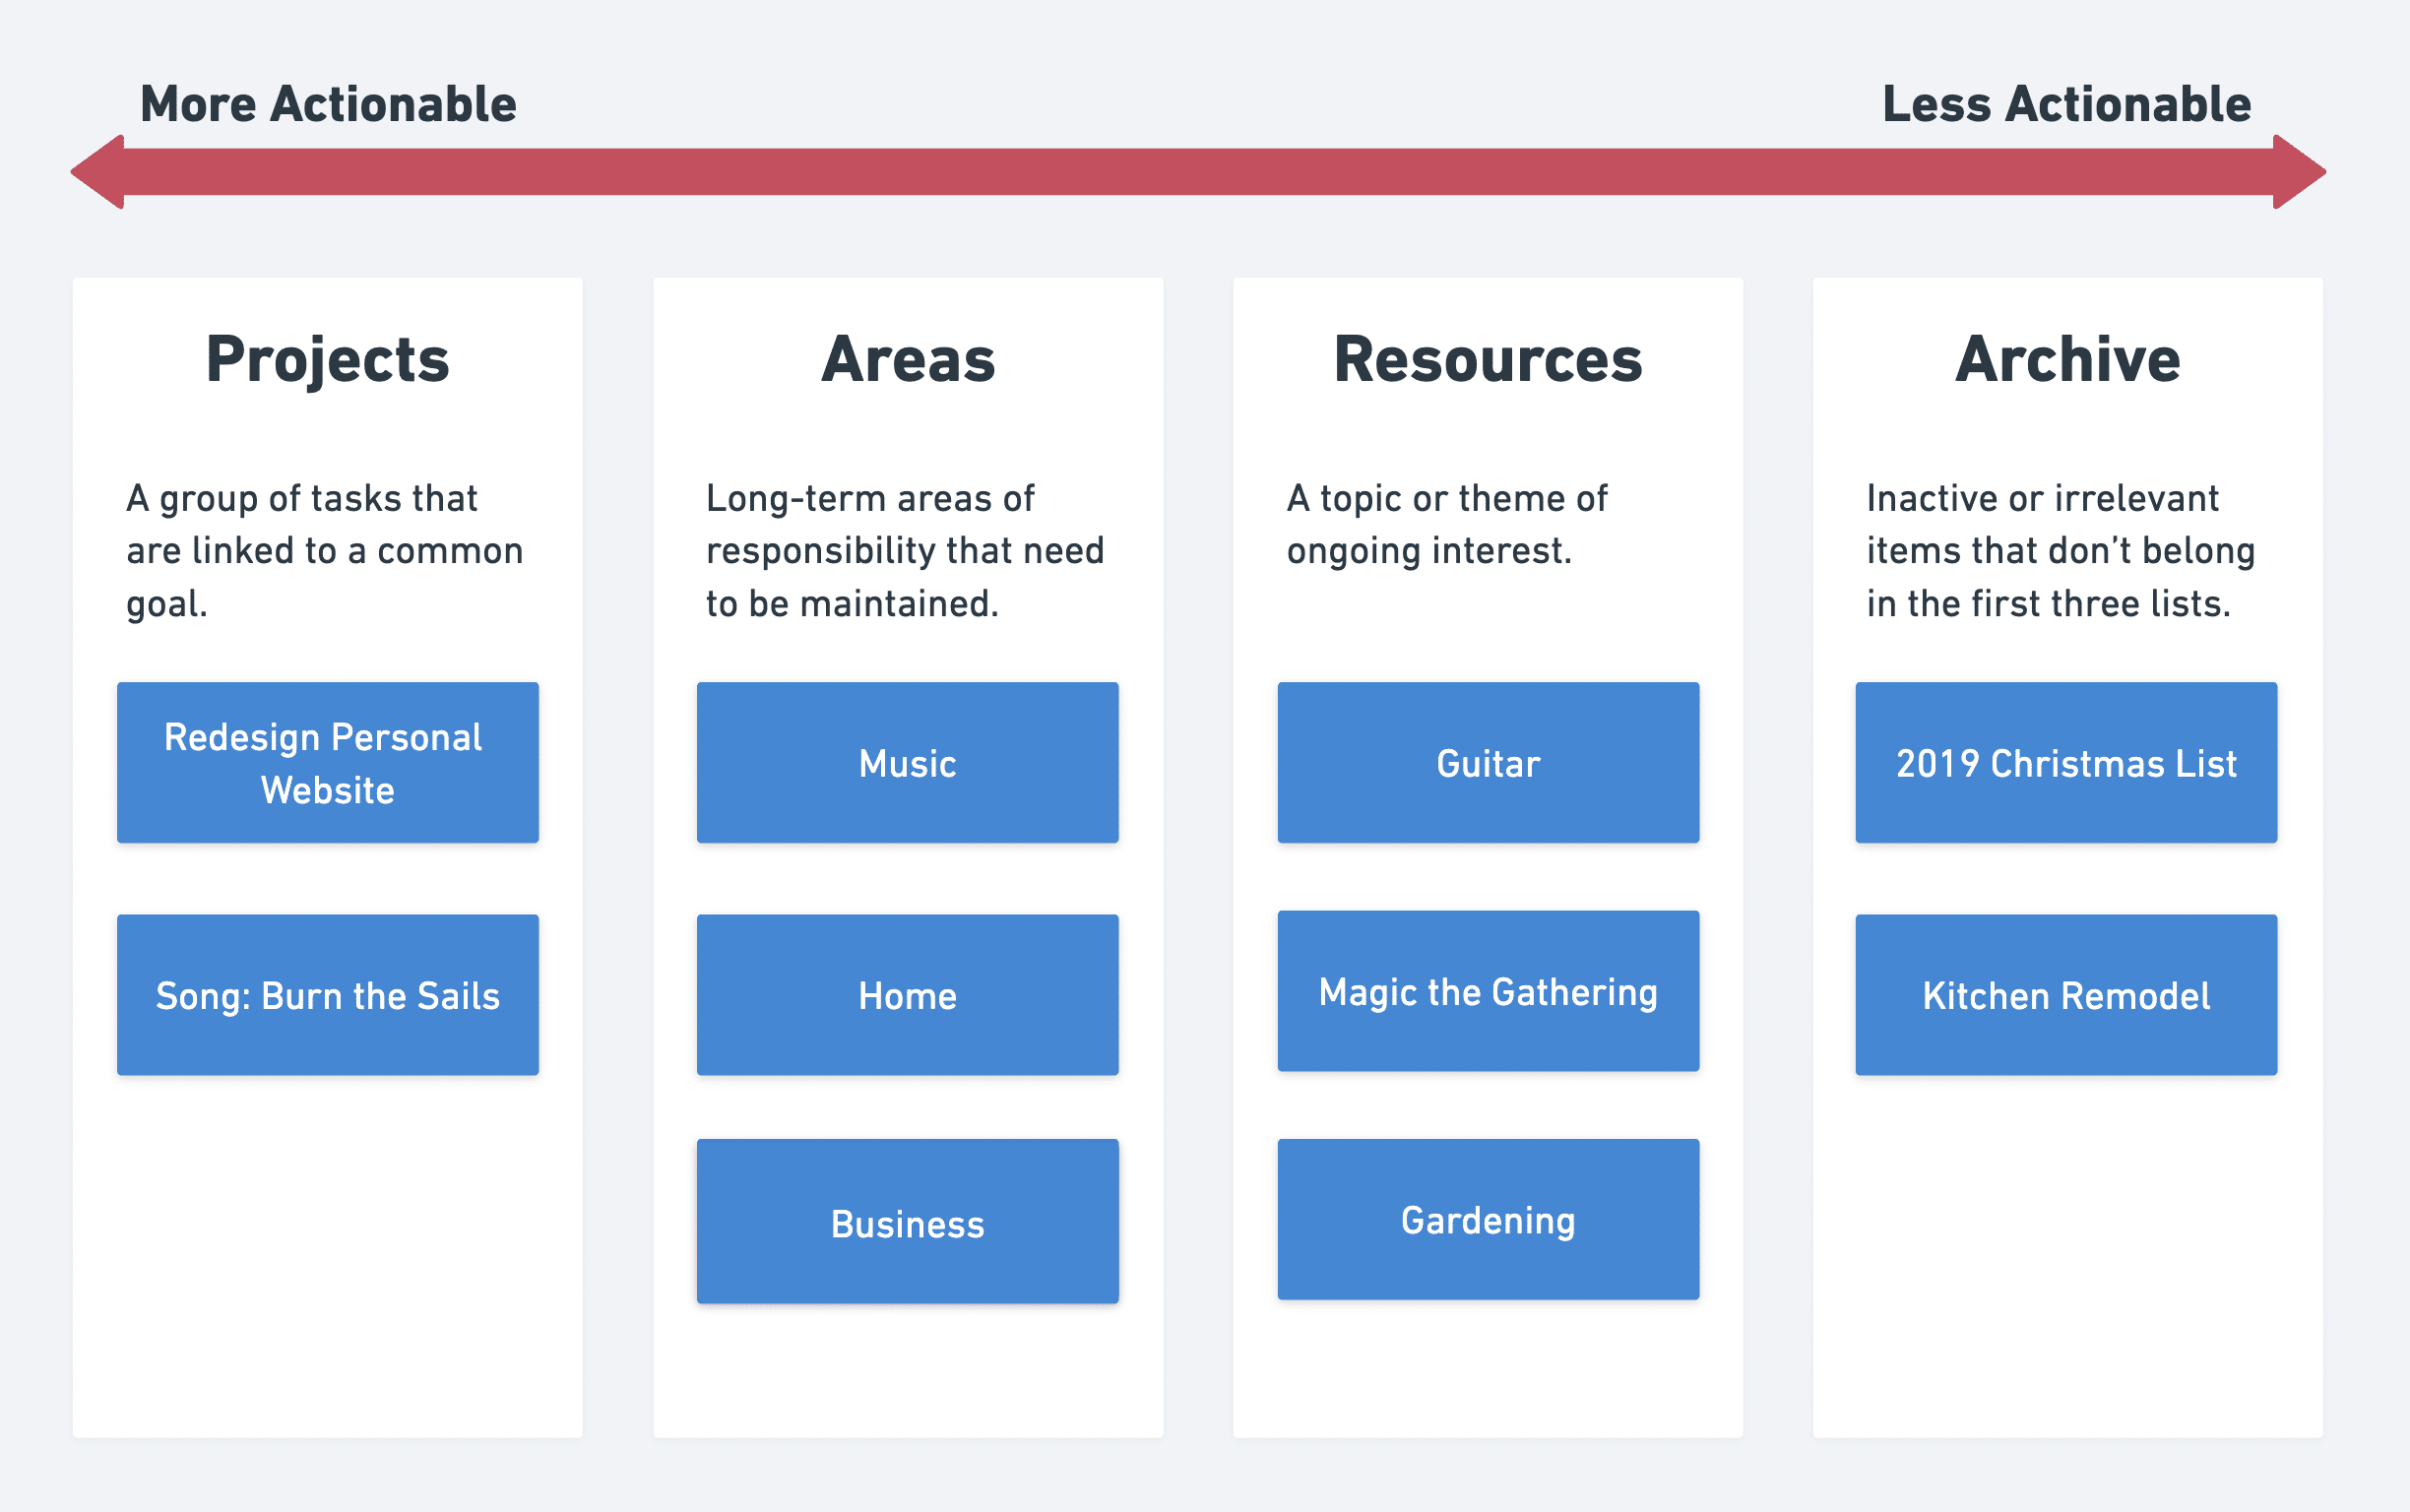
Luckily, that systems exists. It’s called PARA, which stands for:
- Projects
- Areas
- Resources
- Archive
PARA is a system that can adapt to nearly any productivity tool (or set of tools). I use it primarily with Notion, but it works well with nearly any productivity app, along with your computer’s default file system and even with paper folders.
Once you understand PARA and get it set up with the tools that make up your productivity system, you’ll have more clarity on where to capture new tasks, ideas, and resources. You’ll be able to find those resources later on more easily, too.
You’ll also find it easier to get a full picture of everything that’s going on in your life – and what you should prioritize right now.
In this guide, I’ll give you a short, simple overview of PARA and cover how to use it.
Copy link to headingWhat Is PARA?
PARA is a simple system designed to help you organize all of the inputs that come into your life. It’s primarily focused on digital organization, but you can use it to organize physical files as well (though I’m a fan of digitizing as much as I can).
This system was created by Tiago Forte, a digital productivity expert and author who has become a good friend of mine. Tiago originally taught PARA as a foundational piece of his Building a Second Brain course, and it has since become so widely-used that he’s written a full book on it:

I'll earn a commission if you click this link and make a purchase at no additional cost to you.
If you want to dig deep into PARA, feel free to grab a copy of the book or even consider taking his course. But if you want to get up and running with PARA quickly, you’ll this guide to be a perfect primer. You can also check out my notes on the book.
At its core, PARA is a collection of four “folders”:
- Projects – collections of tasks that serve a defined, near-term goal.
- Areas – long-term areas of responsibility.
- Resources – topical interests that you have.
- Archive – inactive items from the other three lists that are not relevant to you now.
Each of these “folders” is a container for specific items in your life. They can take the form of paper folders, digital folders in your computer’s file system, or lists/pages in a productivity app like Notion or Obsidian.
This makes the system tool-agnostic, which is one of its major strengths. You can adapt to any tool you’re using; it merely provides you with a conceptual framework that makes processing new inputs easier.
Another important element for each of these folders is actionability. Most items in the Projects folder are extremely actionable – they’re usually tasks. The Areas and Resources folders typically hold items that are less actionable, and everything in the Archive is not actionable at all.
Let’s take a closer look at each folder, and include a few examples for each one.
Copy link to headingProjects
Projects are short-term efforts with two key elements:
- A defined goal or outcome
- A deadline (or at least an estimated completion time)
A project is something you can finish. You should be able to do a task within a project and feel tangible progress towards the project’s completion. Projects are about outcomes.
For me, finishing this article is an example of a project. I can easily point to an outcome – the article needs to be published, accessible via the Productivity Atlas menu, and its content needs to meet specific criteria I’ve set.
I’ve also given myself a deadline for this article’s completion – one week, which gives me enough time to both read Tiago’s book and write the full article.
Here are a few other examples of projects I currently have going on:
- Publish a beginner’s course for Creator’s Companion in our customer community by this Friday (7 videos, covering specific content, with written summaries)
- Complete today’s workout by 7pm (squat, press, deadlift, pull-ups, dips, and curls – programmed by my coach)
- Launch our second beta round for Flylighter by January 15 (this involves releasing a new build, fixing known bugs, creating onboarding documents, and emailing all beta testers chosen for the next round)
Notice how all of these projects have specific success criteria and deadlines!
I’m stressing this – much like Tiago does in his book – because many people have a much fuzzier definition of “project”. Ask a person what projects they have on their plate right now, and you’re likely to get answers like:
- Organize my office
- Stay healthy
- Keep on top of customer support tickets
These are actually Areas, becuase all of them indicate a standard to be maintained. None of them have a defined outcome, so putting effort into them doesn’t get you any closer to “done”.
Areas are important (and we’ll cover them next), but it’s important to realize they’re not Projects.
Projects should take up the bulk of your attention and energy, as they are what actually move you closer to the outcomes you want in life.
Copy link to headingAreas
“Areas” are long-term areas of responsibility with some kind of standard to be maintained.
Here are a few of the Areas in my personal life:
- Health – recipes, health records, etc
- Home – scheduled tasks for home maintenance, info about my house, contact info for plumbers, contractors, etc
- Music – loose song ideas, gear lists, etc
And in my business, these could be considered Areas:
- Customer Service – documentation, processes for specific procedures
- Accounting – tax documents, receipts
- TJF Website – site architecture, plugins, documentation on backups and other procedures
Each of these areas has a standard that I, or my team, needs to maintain. Some of these standards are more explicit than others – for example, within Customer Service, one of our standards is to maintain a 24-hour response time to all customer questions during weekdays.
Other Areas, like Health, may not have such clear standards – but I still want to ensure I’m staying healthy, exercising regularly, getting enough sleep, getting sunlight, etc.
Copy link to headingResources
Resources are folders that can hold information related to interests you have. These can be:
- Skills you’re trying to learn, or hobbires you’re into – rock climbing, 3D animation, classical guitar, singing
- Topics you want to learn about – linear algebra, octopuses, industrial design, psychology
- Assets you want to collect – e.g. swipe files (like my thumbnail gallery)
Resources are different from Areas because they don’t have to do with your responsibilities.
Areas are for capturing and storing information that relates to things that you’re directly responsible for – whereas Resources don’t convey any responsibilities. They’re just your interests.
Copy link to headingArchives
Archive folders act like cold storage for information that’s no longer relevant to you. They can store:
- Projects that you’ve fully finished
- Areas you’re no longer responsible for – e.g. a house you don’t live in anymore
- Resources that you’re not interested in anymore
The point of an Archive folder is to provide safe storage for digital information that you want out-of-sight and out-of-mind. Rather than deleting information like this, you can store it in an Archive folder and go fetch it later if you need.
You’ll likely find yourself doing this more often than you think, too.
Maybe you find yourself in a new job 5 years from now, where you need to pull old work you’ve done as references material. Or maybe you pick up a new interest and realize there are a bunch of interested connections to another interest you used to have.
In any case, maintaining Archive folders makes it easy to go back and grab old stuff, while still keeping it out of your way.
Copy link to headingMinimum-Viable PARA
Before we get to the bigger section below on how to fully implement PARA, I’d like to talk about how to get the biggest benefits of PARA with the least amount of work.
In short: Just create a Projects folder.
PARA, as well as organization itself, is really about outcomes. The way you organize information doesn’t really matter. What does matter:
- Are you clear on your goals, and are you making progress on them?
- Are you able to focus on the task at hand?
- Can you easily find and access the information you need for the task at hand?
You probably have your own organizational system, and you don’t need to try to replace it overnight with some ideal, “perfect” PARA system.
Instead, you can take the first step by creating a Projects folder in each of your main organizational tools:
- Computer file system
- Task manager
- Note-taking app
Within each Project folder, create a sub-folder for each active project you’re working on. Put anything relevant to those projects in their respective folders, and organize other materials the same way you always have.
This will give you a clear, easily-accessible place for all of the most important information in your life.
Once you’re ready, you can move onto actually setting up a full PARA system.
Copy link to headingHow to Use PARA in a Basic Productivity System
To set up a full PARA system, follow this process:
- First, create an Archives folder in each organizational tool you’re using. Put everything into that folder. This will let you start from a clean slate without actually getting rid of anything – all the old stuff is safely in the Archives!
- Create a Projects folder, and create sub-folders for each active project in your life (as detailed in the section above).
- Create Area and Resource folders on an ad-hoc basis. This means you should pre-make sub-folders within your Area and Resource folders. Instead, wait until there’s a piece of information that needs to be filed away into one, and then create it. Otherwise, you’ll end up with a huge list of empty folders.
If you use Notion and want a complete PARA system for it, you’ll find it in my Ultimate Brain template:
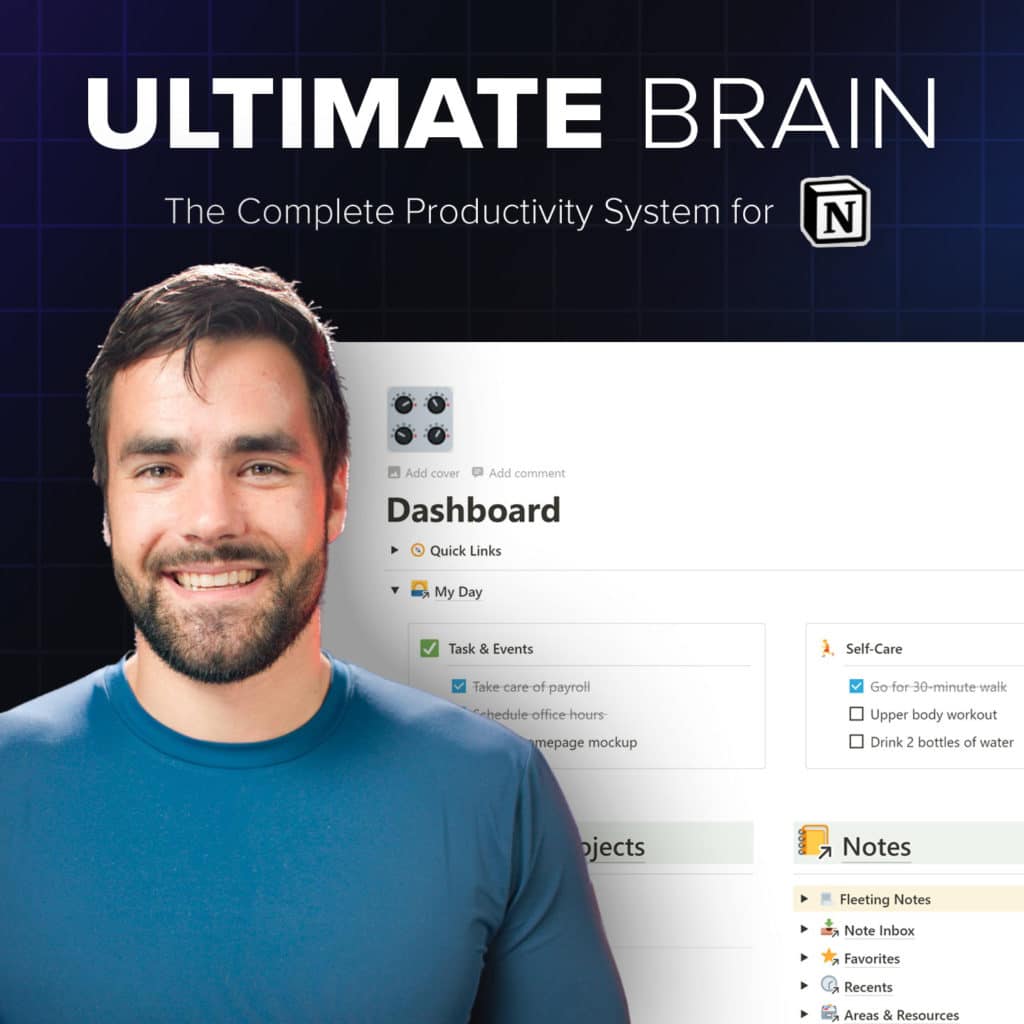
Want to turn Notion into a complete productivity system? Ultimate Brain includes all the features from Ultimate Tasks - and combines them with notes, goals, and advanced project management features.
Get $50 off with code SPRING50!
Modifying PARA
As Tiago told me, PARA is meant to be as simple as possible. Tiago has said that he’s interested in figuring out the “minimum needed amount of organization”, because the entire point of organization is to get stuff out of your way so you can focus on your current projects.
This also means that the base state of PARA is ripe for customizations and tweaks. Since PARA is a top-down system (i.e. it’s a very broad set of rules meant to be applied to many different use cases), you’ll get more out of it if you tweak it to better fit your own observations and the best practices you’ve discovered (i.e. bottom-up rules).
In this section, I’ll share a few tweaks I’ve personally made to the base PARA rules. Note that you don’t have to use these – and it’s possible that you actually shouldn’t. These rules are born from my own bottom-up observations of my own work, so I’m sharing them with you simply to show you examples of how you could modify PARA.
Copy link to headingProjects Inside of Areas
Tiago and I think a bit differently when it comes to Areas. Tiago believes that Projects and Areas should be separate within your organizational tools.
He has a good point about this; by keeping your Projects in a separate place, you’ll likely have more clarity about the number of projects you have going on in your life.
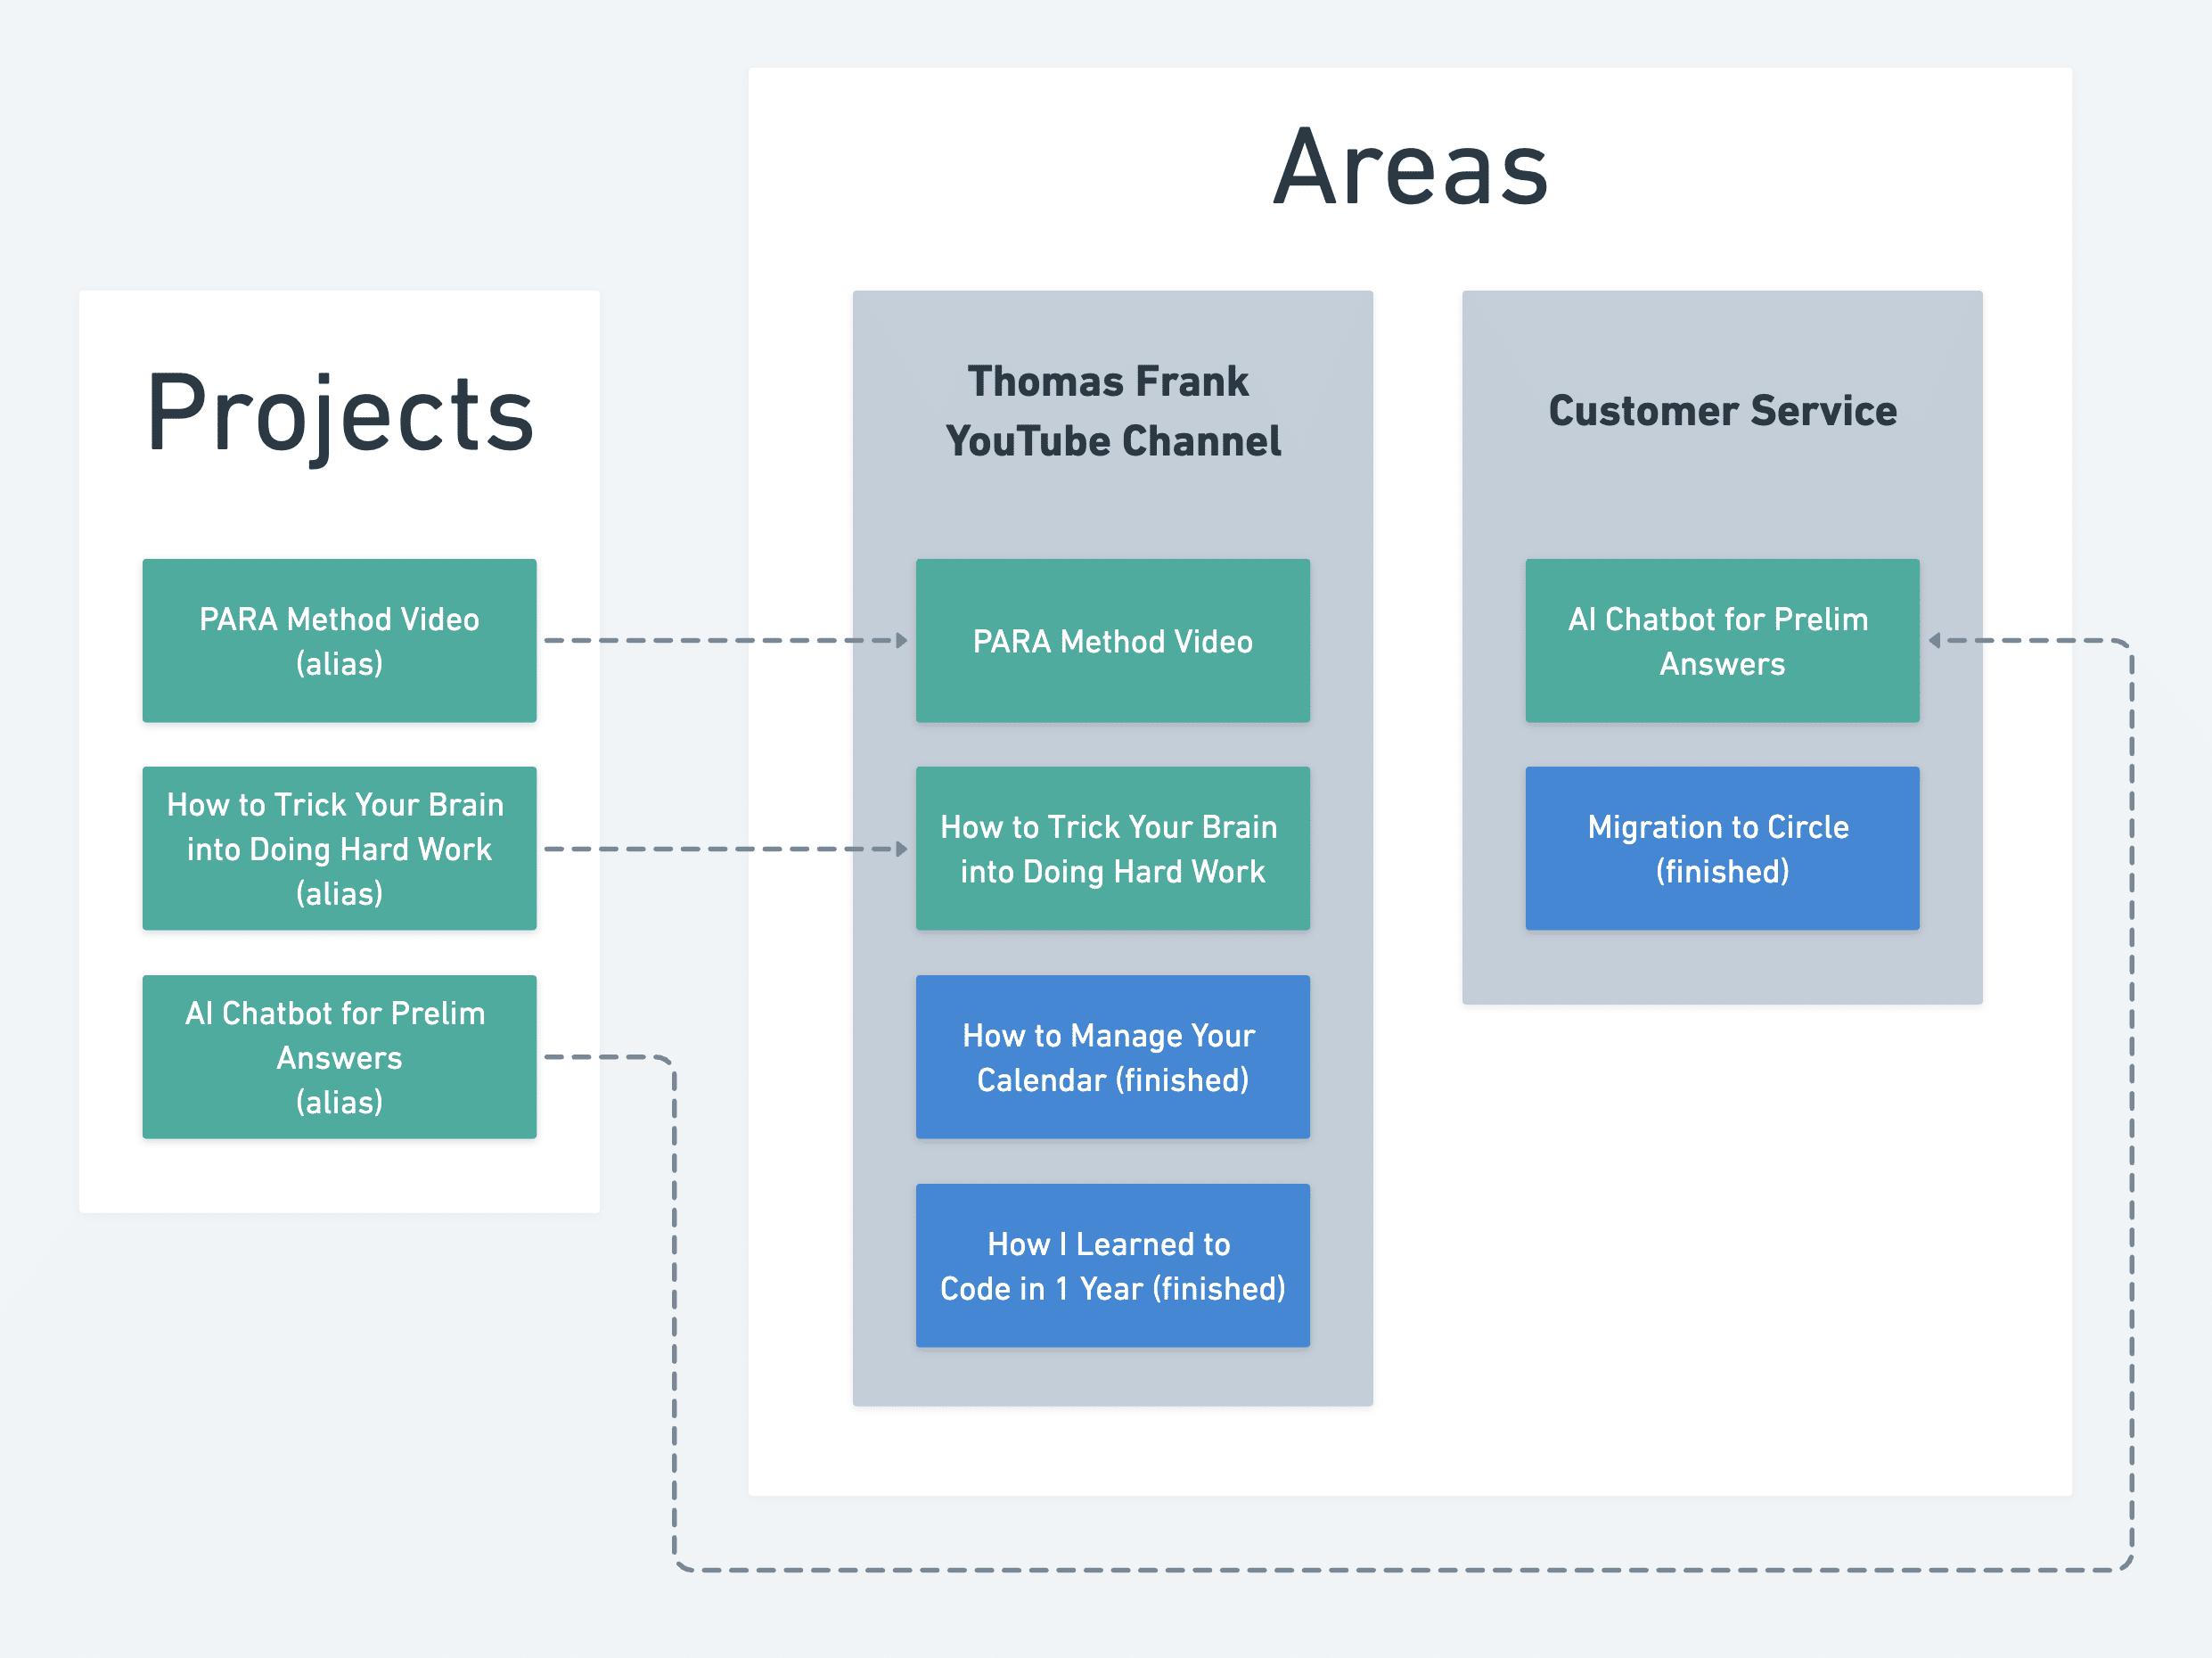
Personally, I like to think of Areas as “life buckets” – e.g. the different major categories of activity that make up my whole life. I feel that most (if not all) Projects fit into one of these life buckets, so I tend to organize my system to reflect that.
I place Project folders directly within the Areas that represent them – however, I still have a couple of tricks for ensuring that I can see all of my projects at a glance.
I use Notion as my main tool for digital organization (the others being my calendar and my computer’s file system), and each Area in my system contains a Projects section:
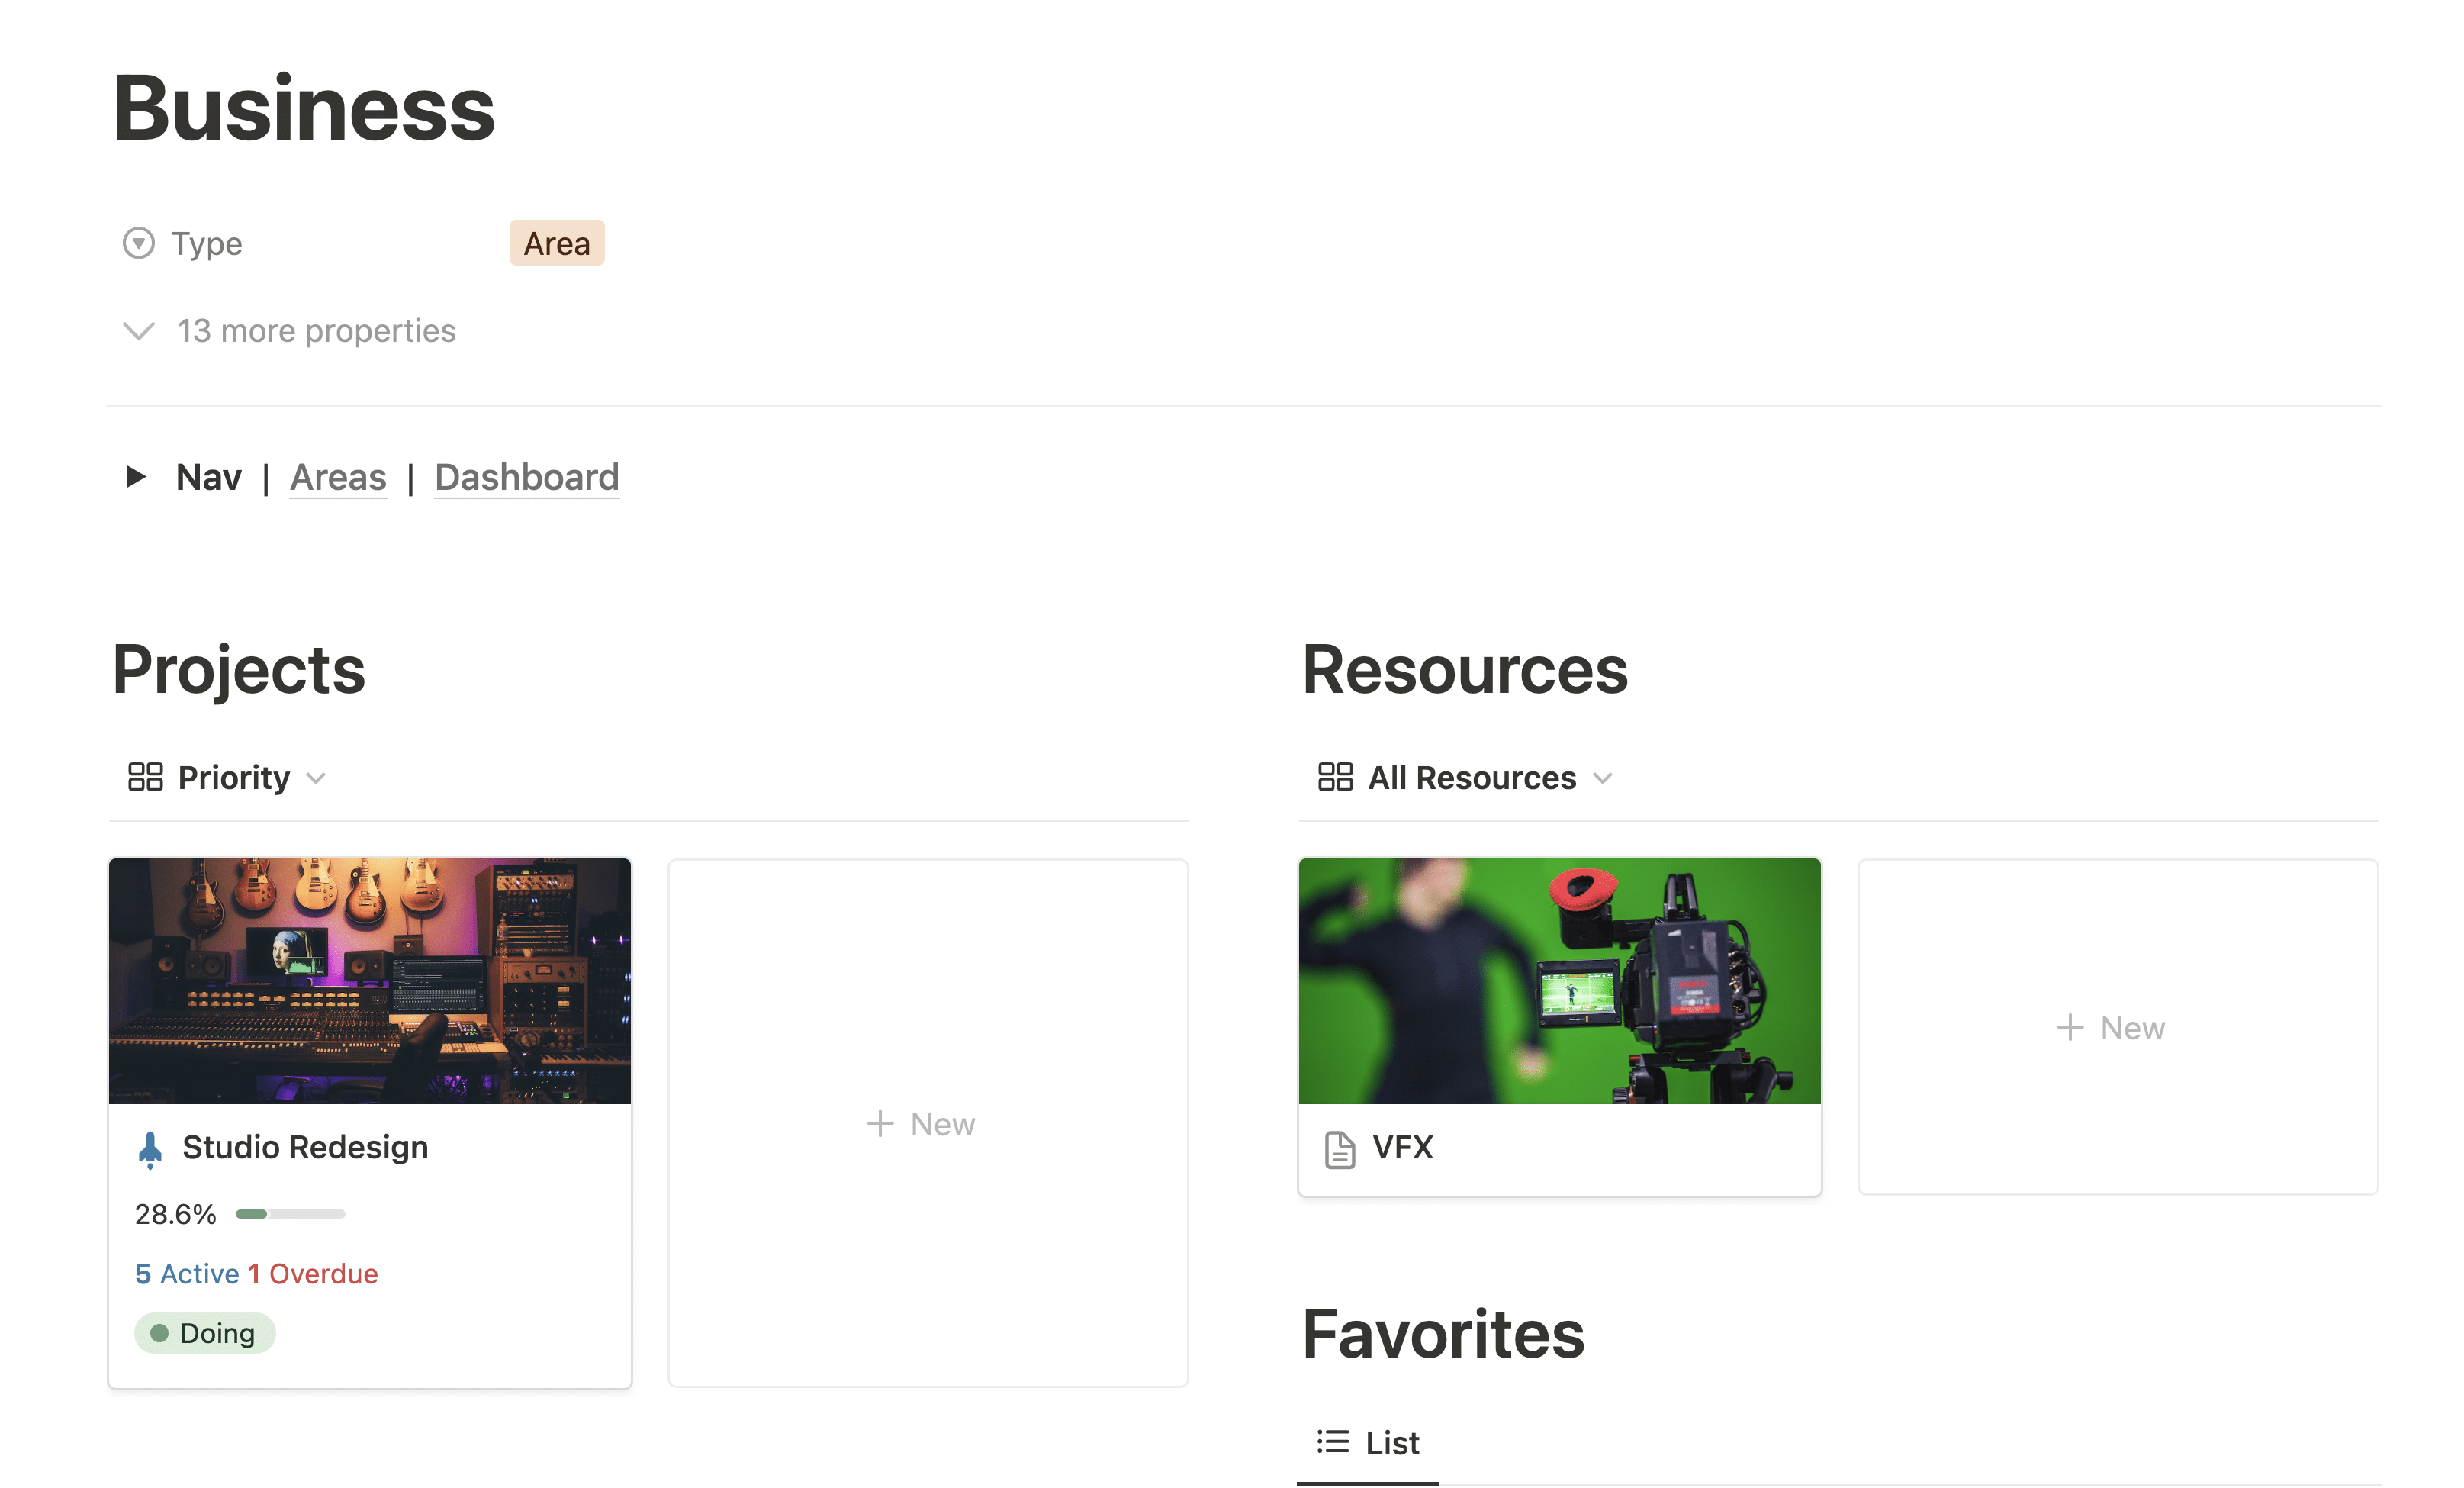
However, all of my projects (across all Areas) can also be seen in my system’s dedicated Projects dashboard.
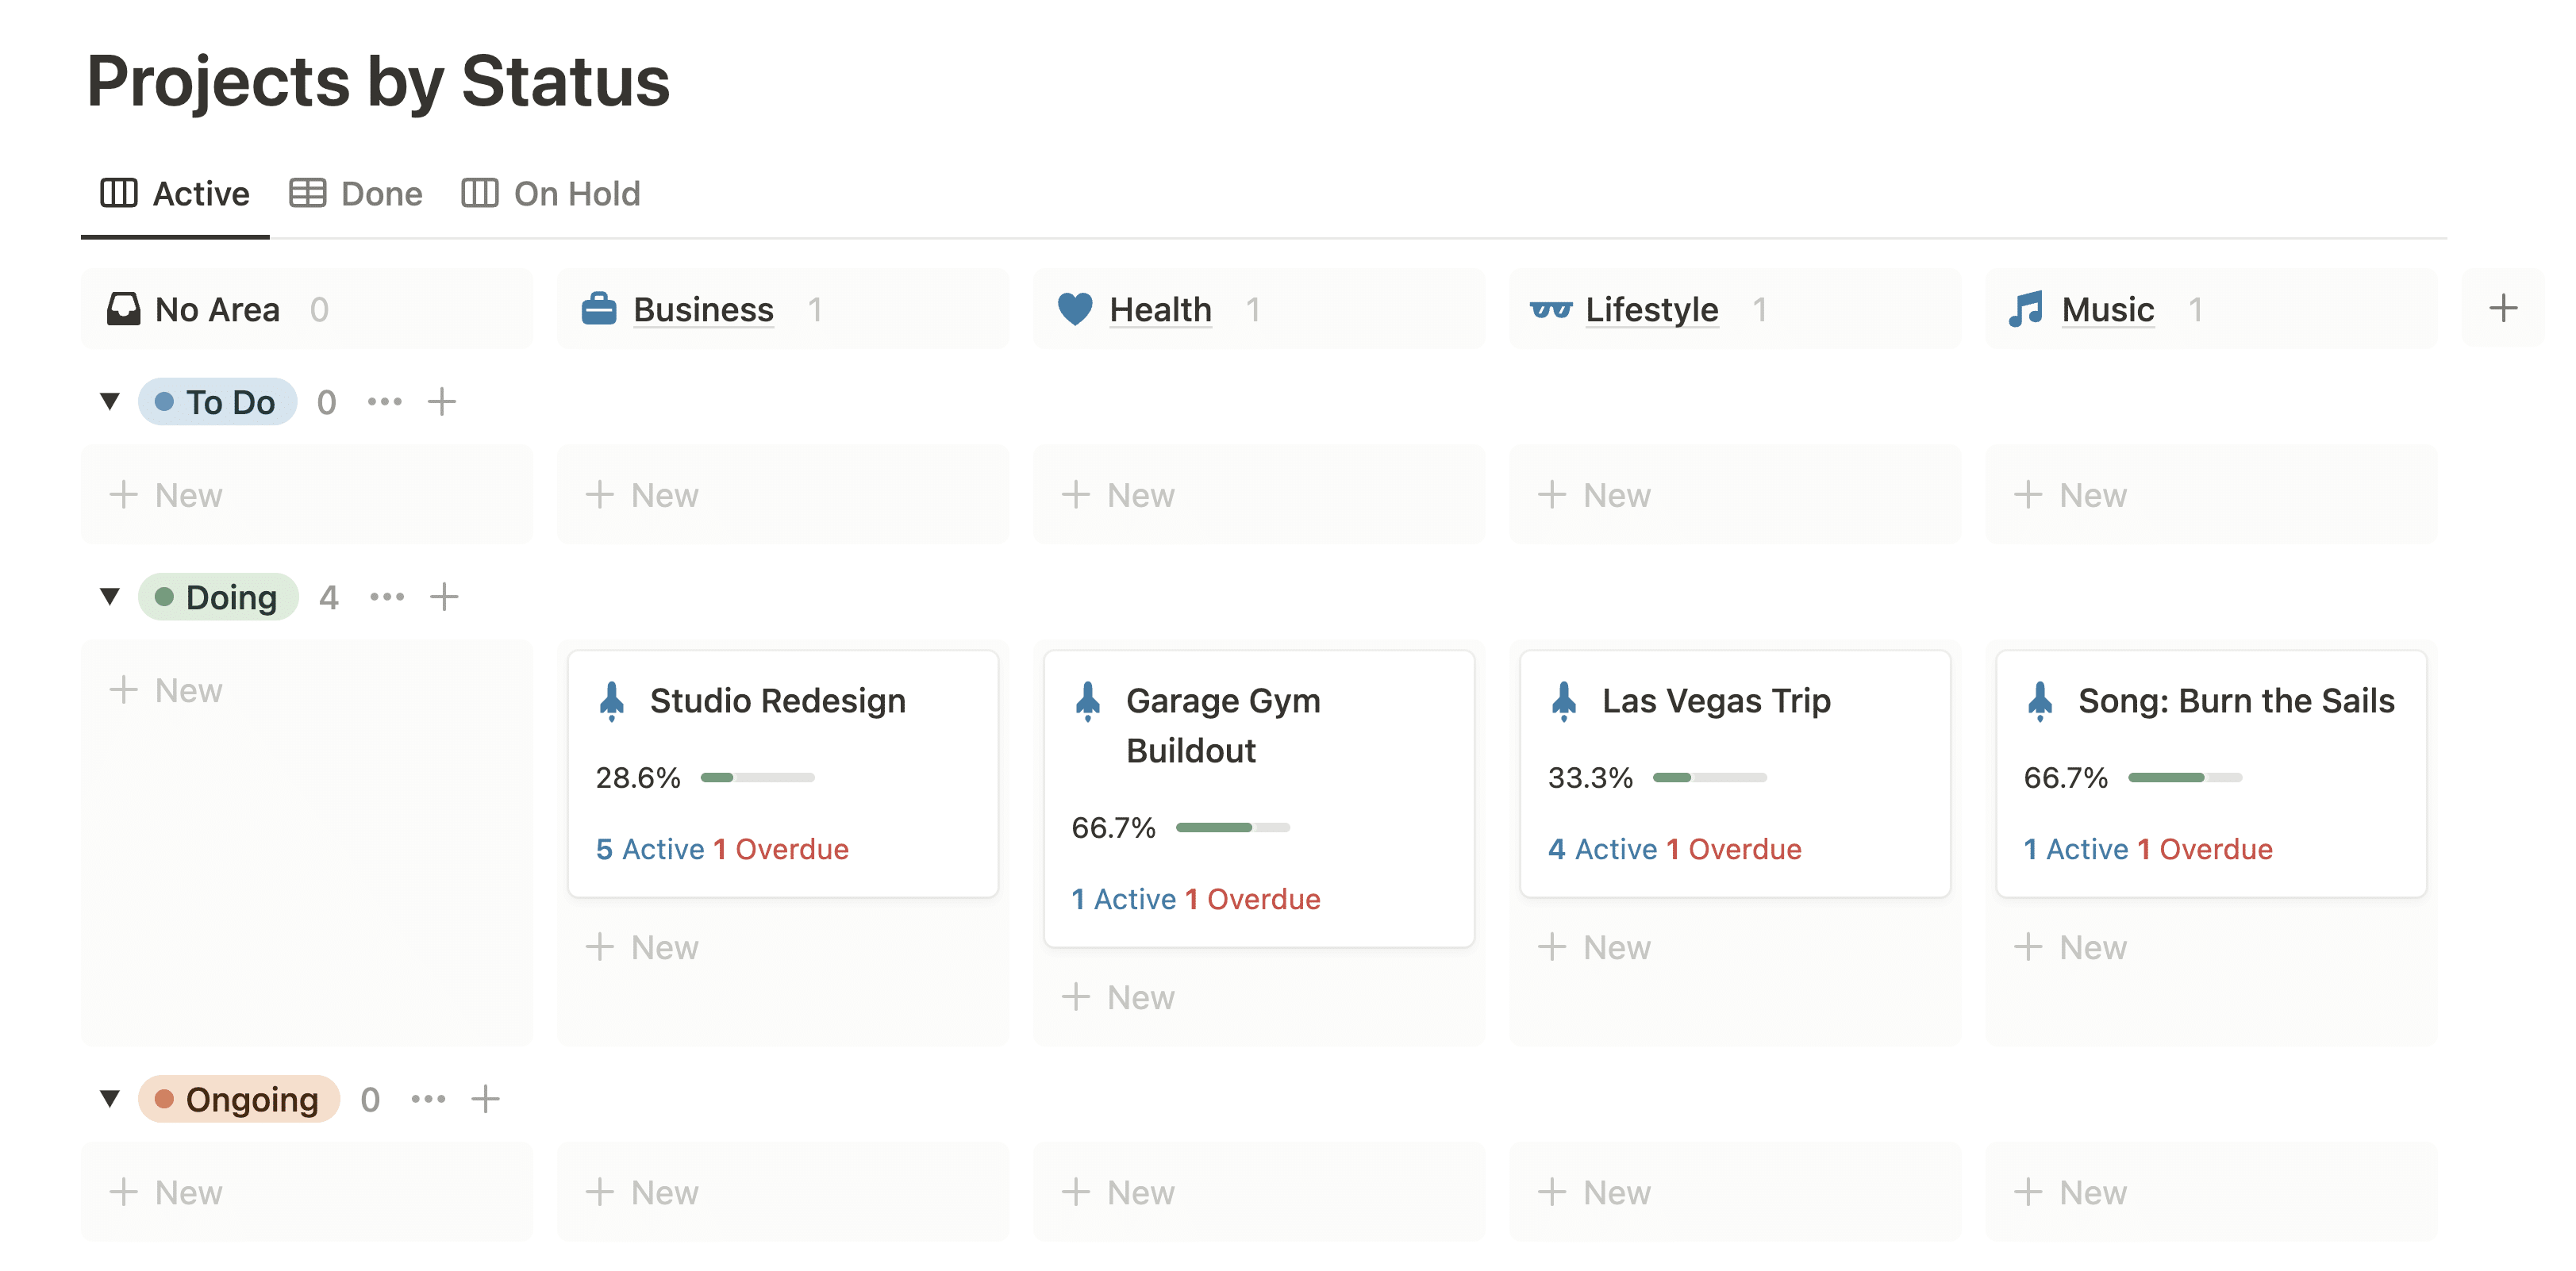
This gives me the best of both worlds; I can organize my Projects within the Areas where I feel they naturally fit, but I can see see all of my Projects in one place.
I can also adjust their statuses, ensuring I have a manageable number in the “Doing” category.
Within my computer’s file system, I achieve something similar by using folder aliases. This allows me to create Project sub-folders within Area folders, then create aliases (a.k.a. shortcuts) to those folders within a main Projects folder.
There’s another reason I do this beyond the whole “life buckets” concept.
As we’ll cover later, Tiago suggests moving finished projects to your Archives folder. But this isn’t always ideal for me.
One reason for this is that I’m a video creator, which means I’m often creating folders for specific video projects. Once I’ve created a video folder, I don’t want to move it – not even when the video project is done!
This is because my editor and I will often bring assets from past videos into new video projects, and moving folders around tends to break media links within our editing software (Premiere Pro and After Effects).
So by using the folder alias trick, I can ensure my video folders stay in a single spot while still reaping the benefits of a dedicated Projects folder.
You don’t have to do this; it just works well for me given the specific technical downsides of moving video project folders around.
Tiago himself stresses that PARA is flexible, and that you can adapt the system to your own needs. That’s why I’m sharing this adaptation I’ve made within my own system – hopefully it provides you with an example of how you could modify PARA.