

Have you ever wanted to embed content from one Notion page inside another? Well, now you can – that’s exaclty what Synced Blocks in Notion allow you to do.
Synced blocks were quietly introduced in an open beta in early June 2021, and fully released to the public on June 29, 2021.
This guide will teach you everything you need to know about how to use Synced blocks, and give you some ideas for where to use them.
Want to try these out for yourself? Check out this companion page I built in Notion; it contains examples of Synced blocks, and you can duplicated it in order to change things and learn by trying things out.
Copy link to headingWhat are Synced Blocks in Notion?
A Synced block is essentially a wrapper that lets you embed content from one Notion page into other pages.
Once done, you’ll be able to see and edit that content from anywhere you’ve pasted the Synced block. If you’ve ever used block embeds in Roam Research, you’ll be familiar with this concept. Essentially, a Synced block created a window from one Notion page back to the original Notion page where it was created.
This means that the content inside the Synced Block is – as the name implies – synced across every page where it exists. If you make a change to it anywhere, that change will instantly show up everywhere else.
Additionally, Synced blocks can be placed inside database templates and template blocks. Their behavior here can vary depending on whether or not the the template block/database template is the original location of the Synced block. See the section on Synced Blocks in Template below for more detail.
Copy link to heading5 Ideas for Using Synced Blocks
Wondering what you can do with Synced blocks? Here are a few ideas to get you started:
- Embedded notes and research
- Synced checklists, SOPs, and process documents
- Global inbox
- Headers and footers
- Synced navigation and link lists
You can also watch my video to see all of these ideas in action:
Embedded Notes and Research
In Roam Research, it’s easy to embed blocks from other pages into your current page.
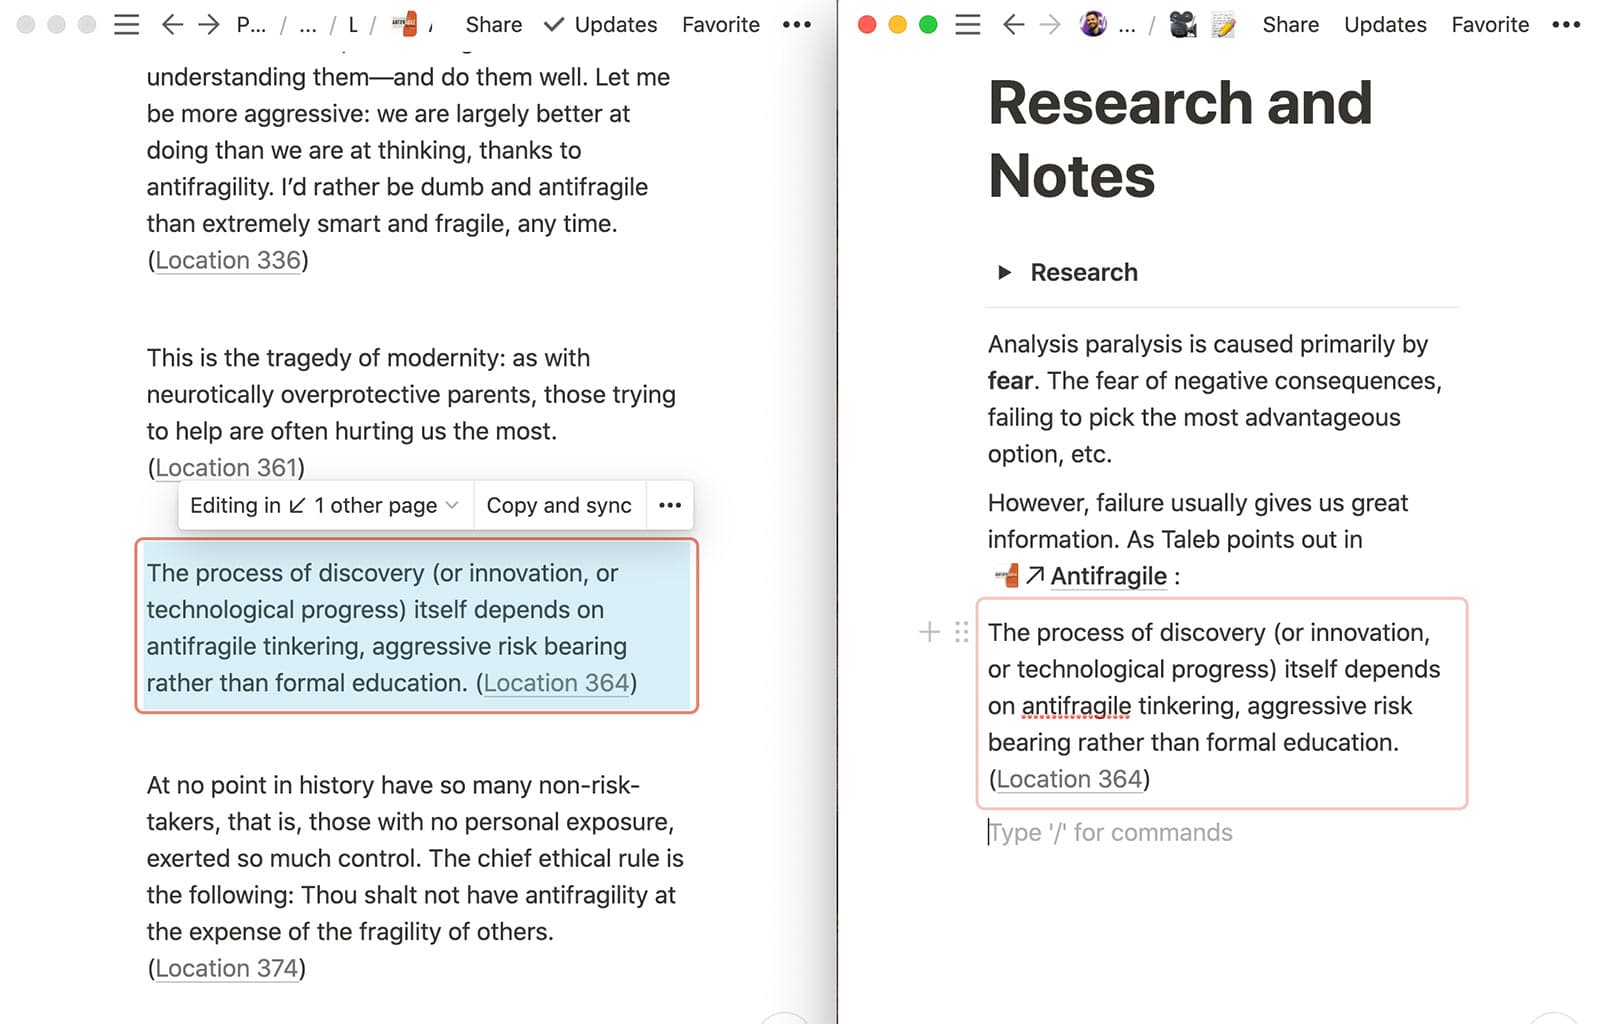
This is great if you’re writing an article or doing research. For example, say you take notes from the the books you read (like my notes from Hyperfocus, for example). If you were writing an article about how to focus, you could easily embed a block from your book notes right inside your article research page instead of copying and pasting.
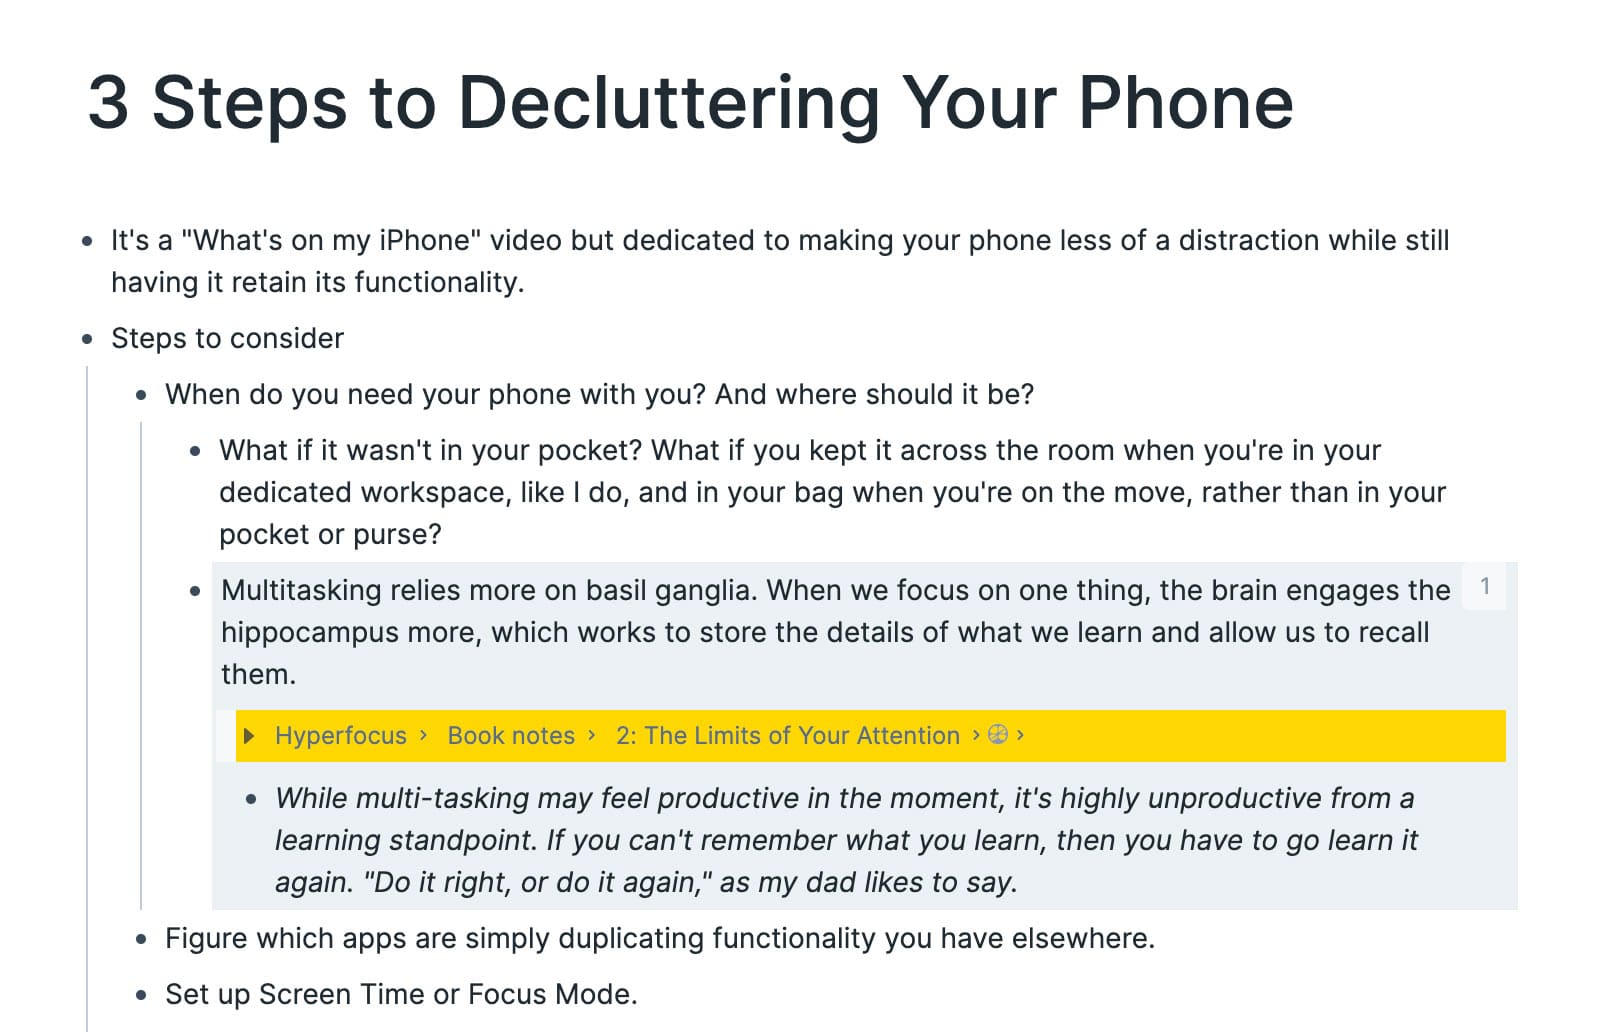
With Synced blocks, you can now do this in Notion. It’s not currently as powerful, since you’ll need to navigate to the page containing the Synced block, copy it, and paste it into your research.
Roam makes this process much easier, since you can just type /embed block and then search for the block you want. Perhaps we’ll see Notion add this feature soon!
Synced checklists and process documentation
One of Notion’s best use cases is as a company wiki or knowledgebase. Having a central, easily-found home for common processes, SOPs (Standard Operating Procedures), and checklists is very useful.
However, you might also want those instructions and checklists to live inside of project templates, or even inside of tasks. By putting that information inside a Synced block, it can live in both places at once.
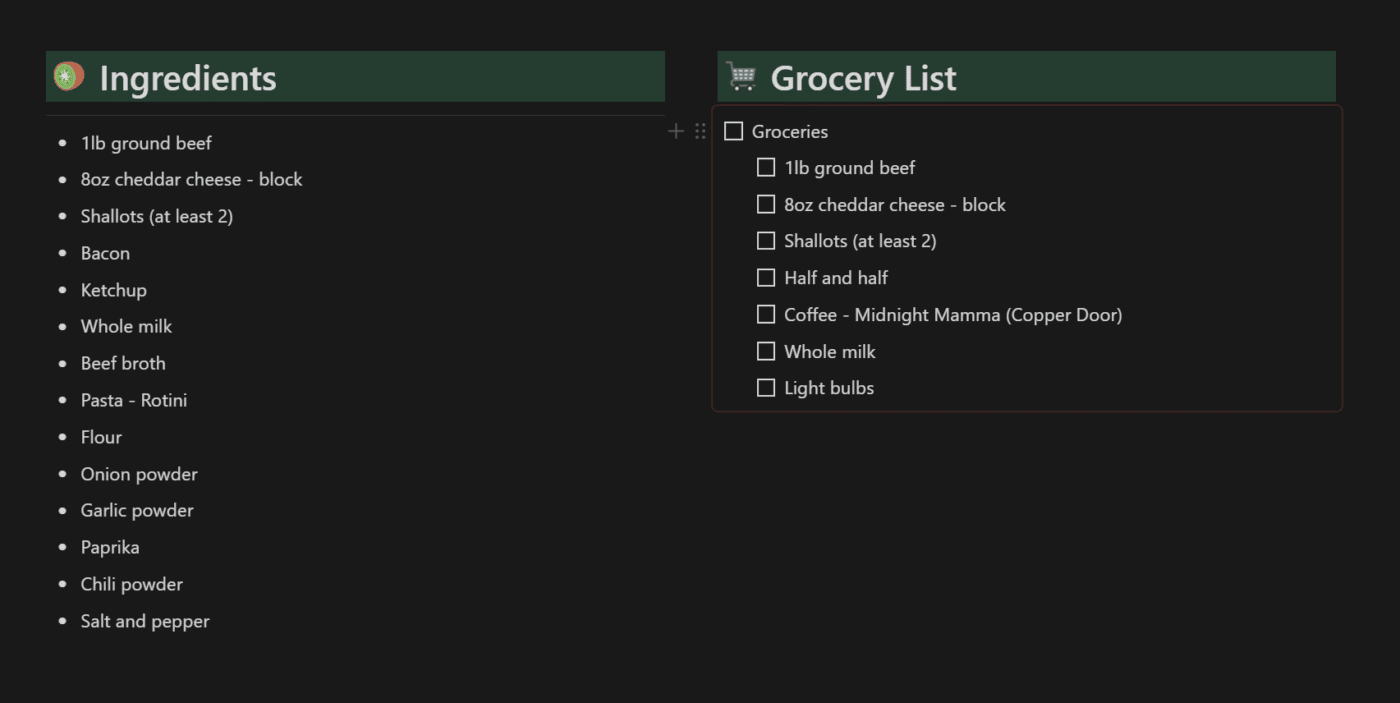
I also use this idea to show my grocery list inside of each recipe within my recipe tracker.
That way, I can review the ingredients needed for any recipe I’m planning on cooking. I can even hold Alt/⌥ to click-and-drag a copy of that ingredient from the ingredients list to my grocery list.
P.S. – This recipe tracker comes included in Ultimate Brain, my complete second-brain template. Check if out if you’re looking for a total productivity system for Notion; it includes notes, tasks, projects, GTD, whole-life organization, and more.
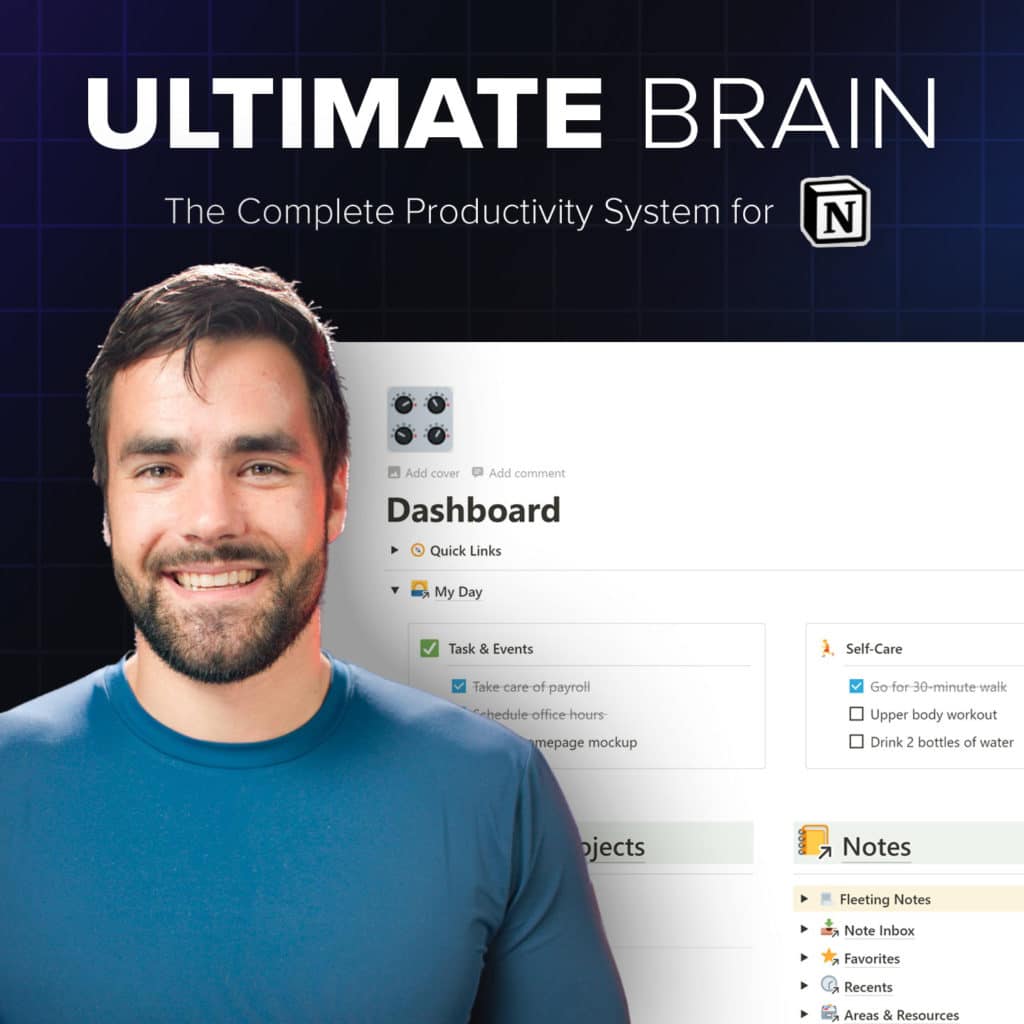
Want to turn Notion into a complete productivity system? Ultimate Brain includes all the features from Ultimate Tasks - and combines them with notes, goals, and advanced project management features.
Get $50 off with code SPRING50!
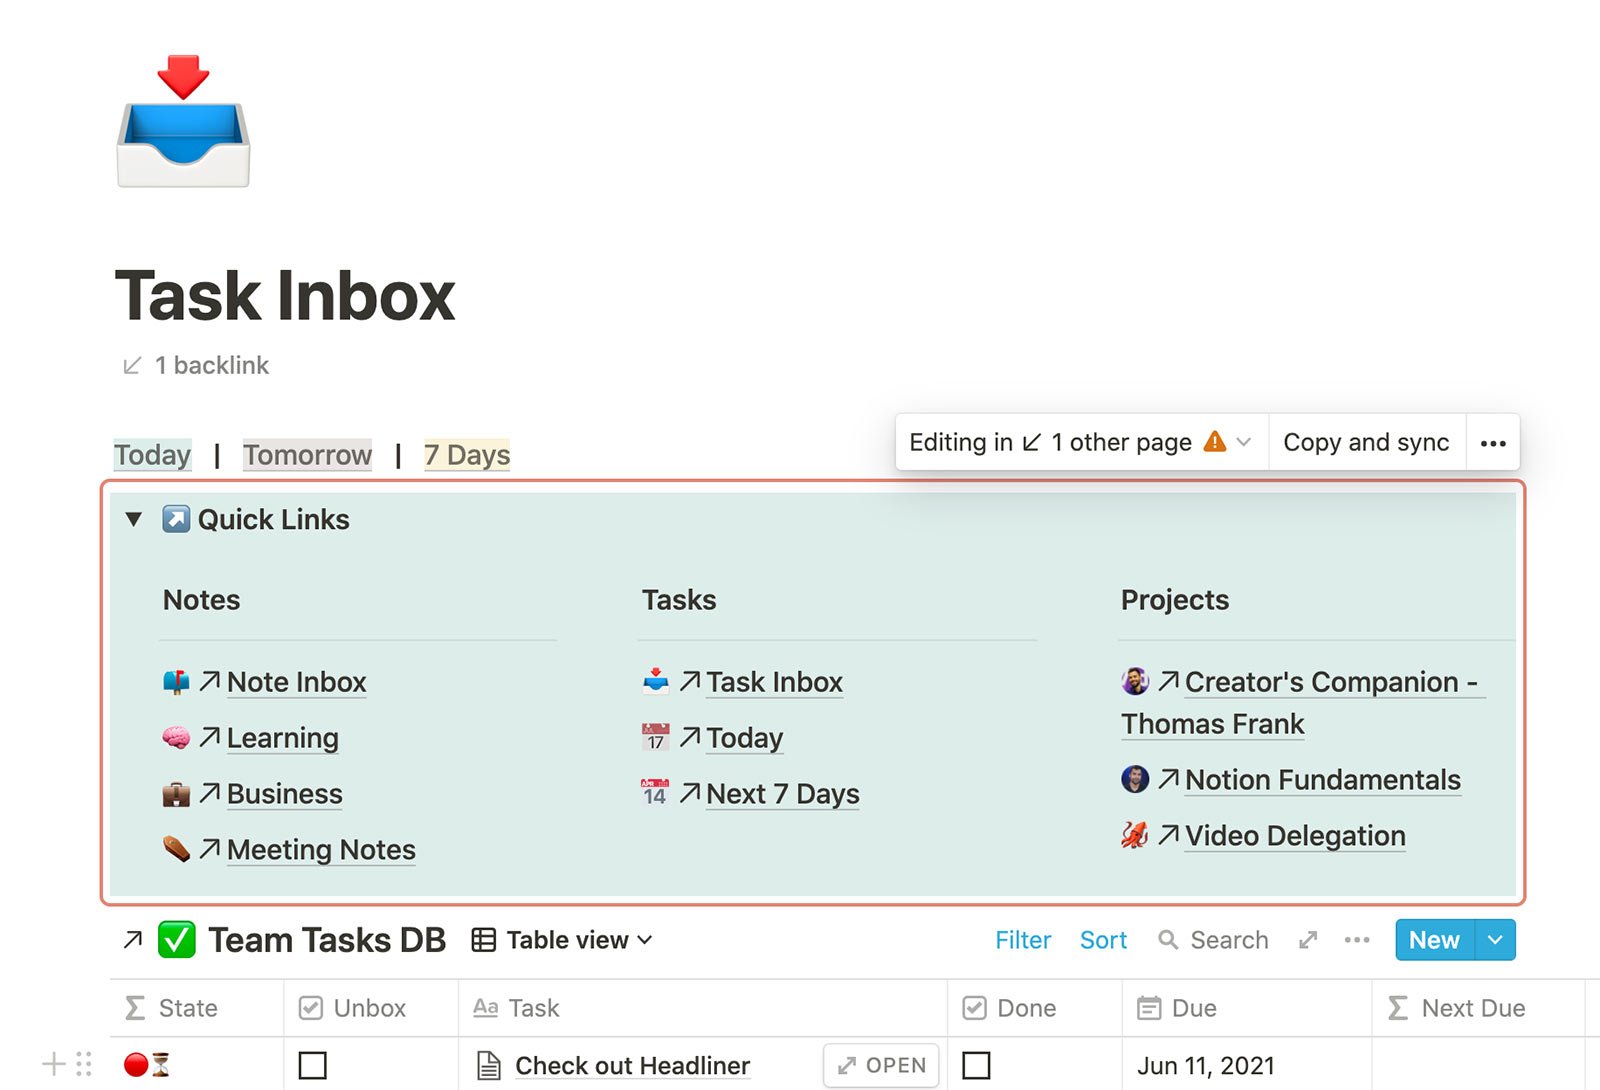
Global Inbox
Using a Synced block, it’s easy to create an inbox that can live on multiple pages. While this has been possible with Linked Databases for quite a while, Synced blocks take the possibilities to a whole new level.
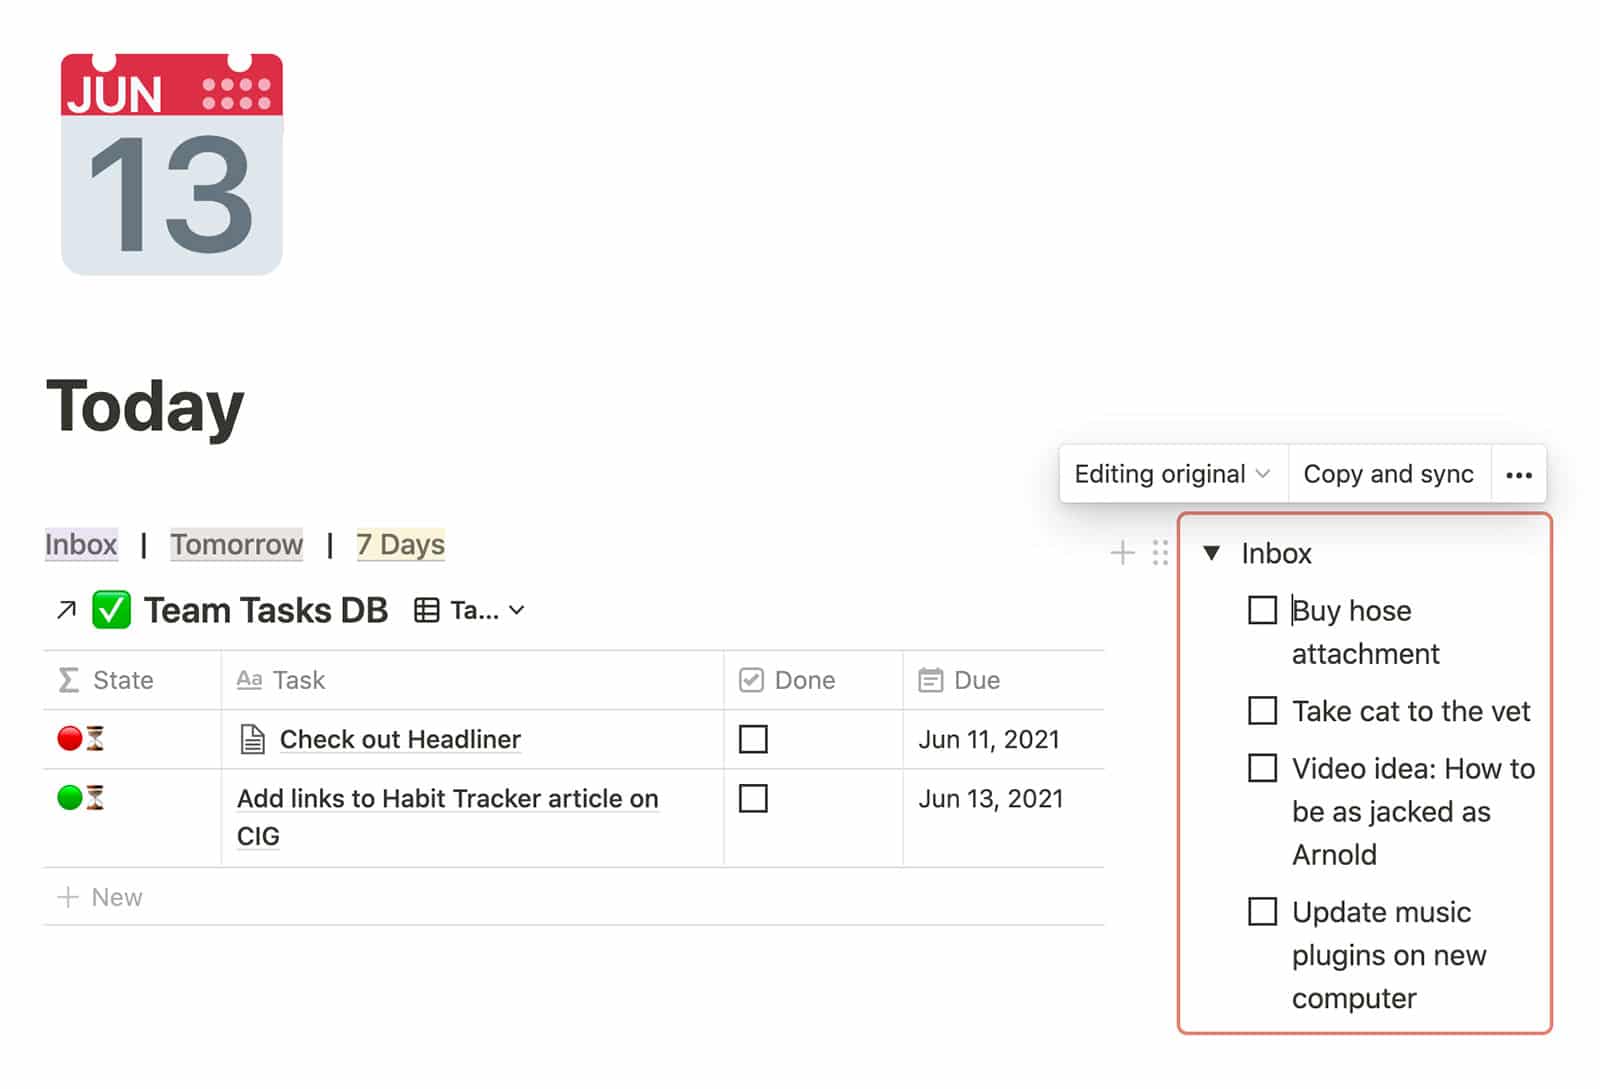
Here, I have a synced Toggle block where I can brain-dump tasks, video ideas, small notes – anything. I can then paste the Synced block into all my task manager views, notebooks, and anywhere else where I might want to access these things I’ve quickly jotted down.
From there, I could easily drag any of these items into the database view to the left in order to auto-apply certain properties, such as a due date or tag.
Imagine putting this global inbox in a meeting notes template – you could easily jot down tasks there during a team meeting, then drag them into their correct places later!
Copy link to headingHeaders and Footers
You can used Synced blocks to create a single header or footer for multiple pages in a workspace.
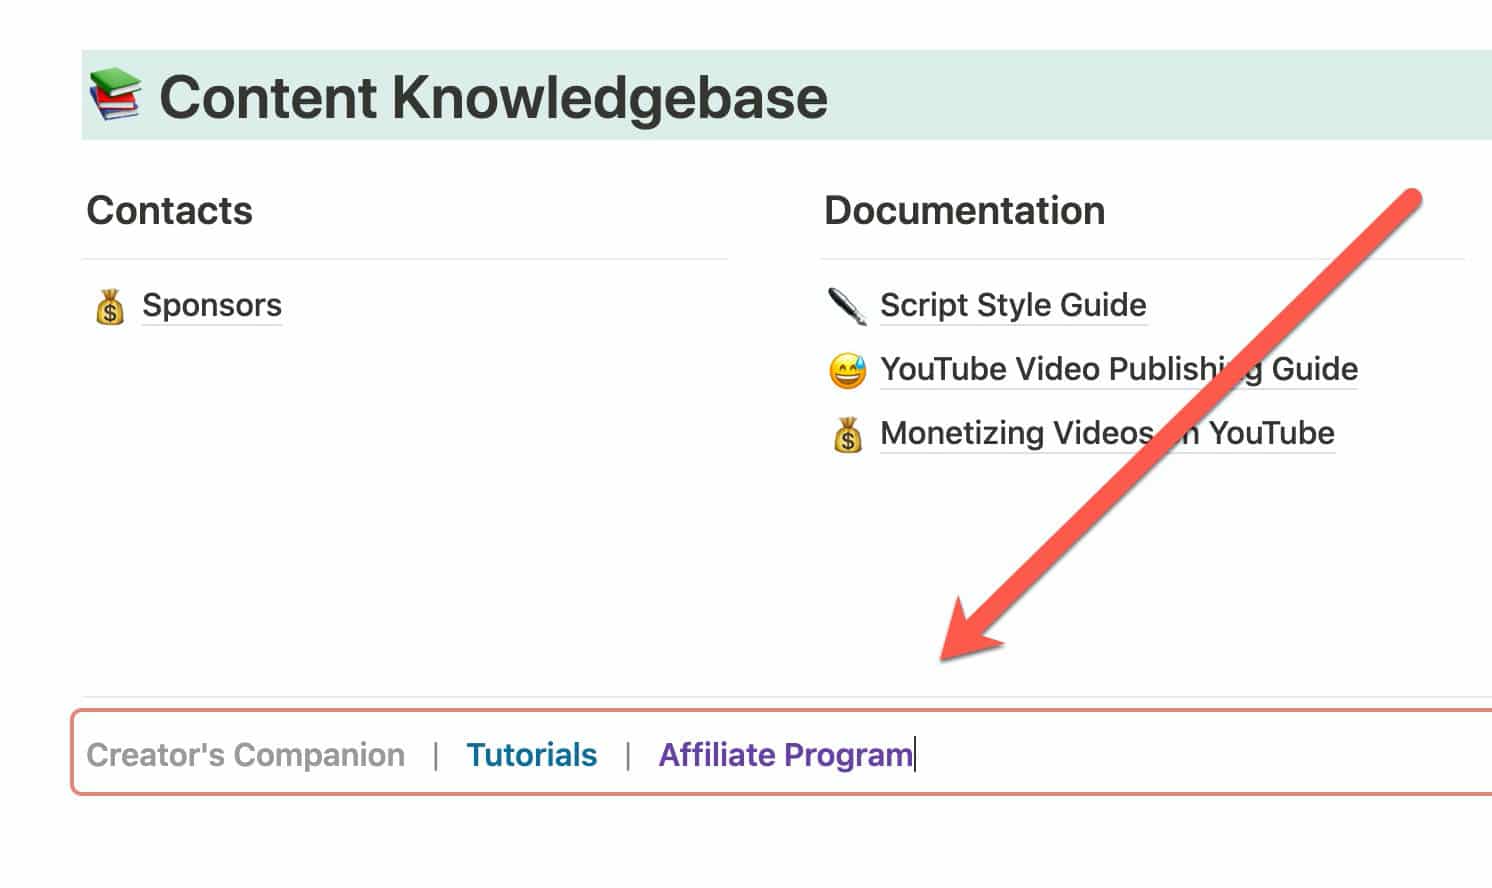
As an example, here’s a synced footer in the Creator’s Companion, my complete content planning template for YouTubers and other content creators:
Synced headers and footers will especially useful if you’re using Notion to create a website with a tool like Super or Potion.
Copy link to headingSynced Navigation and Link Lists
Notions’ sidebar lets you navigate your workspace, but it has limitations. A huge one is that you can’t navigate the contents of a database from the sidebar.
However, you can easily create page links to any page – including pages in databases – on any page in your workspace.
Here’s an idea – create a Synced block containing a toggle. Inside that, add links to pages that you access often. You can then paste this Synced block in any page – or even make it part of a global header on every page of your workspace.
If you’re wondering how I got multiple columns of links inside that toggle block, check out my guide on creating nested columns in Notion.
These are just a few ideas – the uses for Synced Blocks are likely to grow over time.
Copy link to headingHow to Create Synced Blocks
You can create a Synced Block in Notion in the same ways you’d create any other block:
- Type the
/Command and then start typing “Synced”, or scroll to Advanced Blocks to find it. Pro-tip: I like to type/sc, which brings me immediately to the synced block./Syncedlists the Github and Jira blocks first. - Click the
+button to the left of any block, then find Synced Block in the list of blocks.
You can also “turn” almost any other block into a Synced block. Doing this will simply place a new Synced block around the block (or multiple blocks) you’ve selected.
To learn all about turn blocks into other blocks, check out my Notion Block Basics guide.
Copy link to headingEmbedding a Synced Block
Once you’ve created a Synced block, you can click the Copy and Sync button, then paste your Synced block anywhere else in your workspace.
Once done, changing the content within the Synced block from any of its locations will cause the change to be instantly reflected everywhere else.
Copy link to headingUn-Syncing a Synced Block
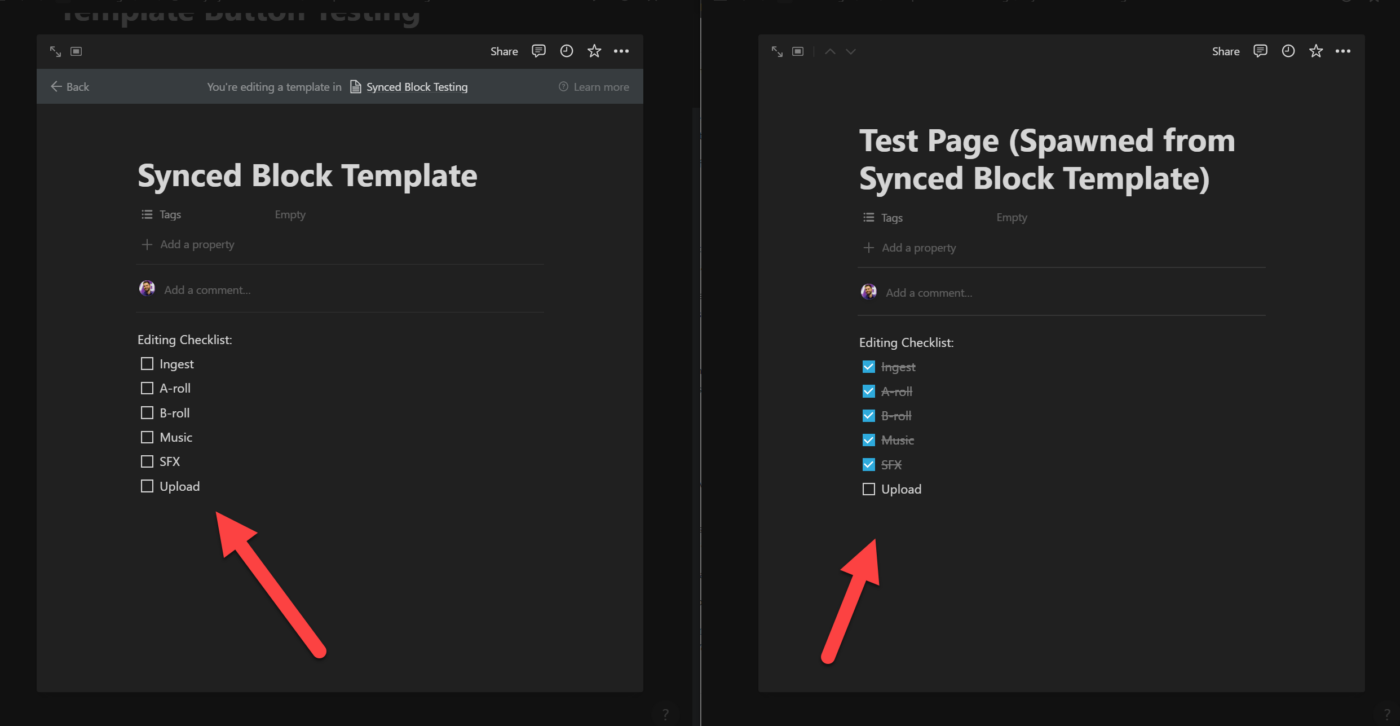
Sometimes you’ll want to make changes to a Synced Block’s content in one location without having those changes apply everywhere else.
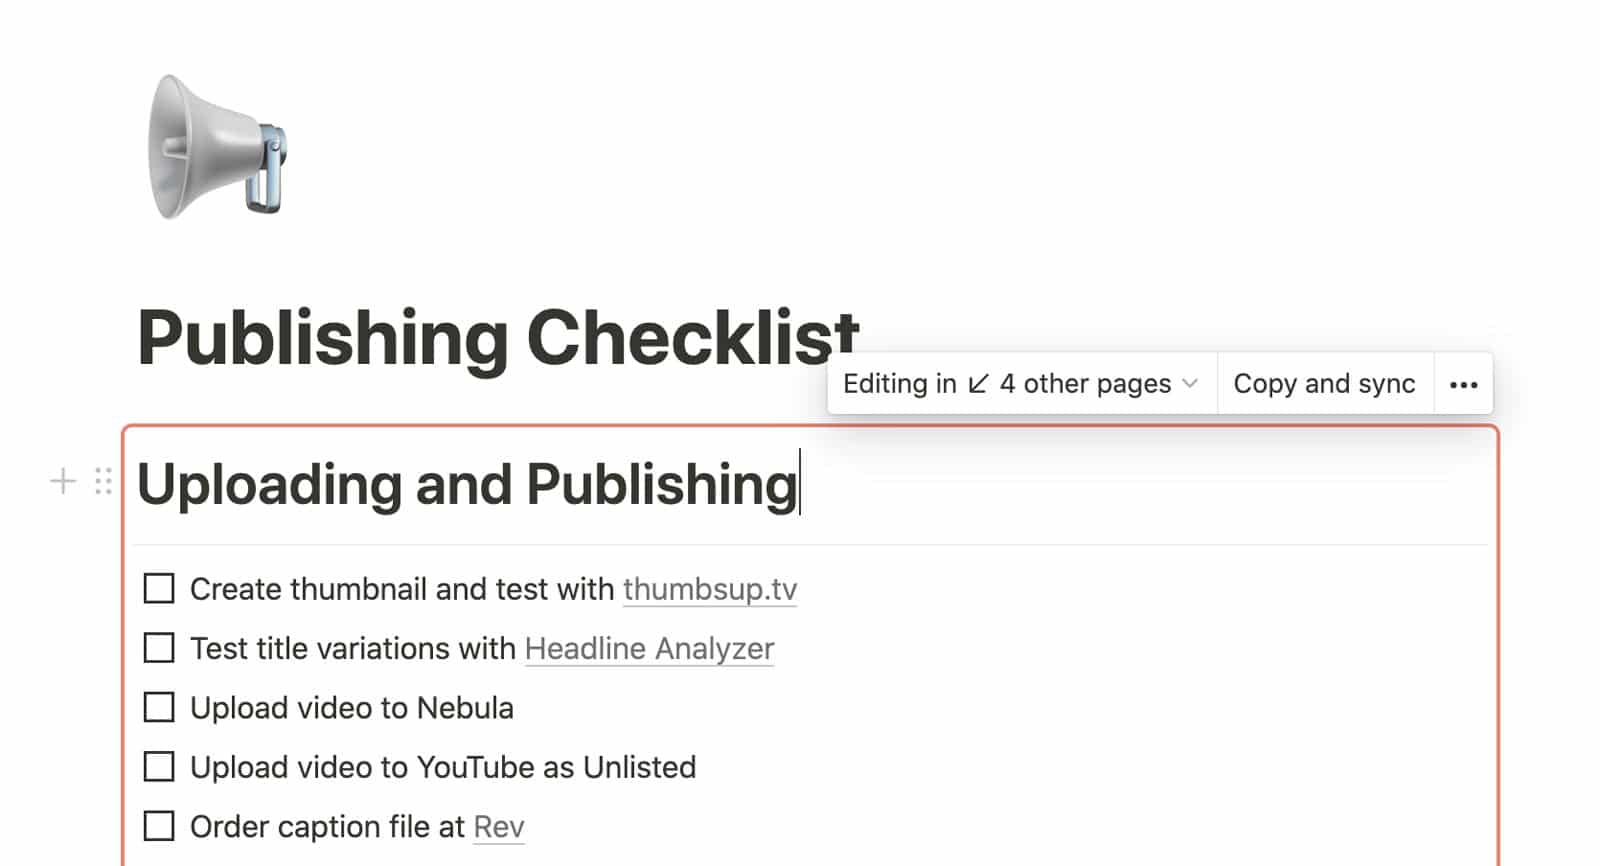
An example would be placing a Synced Block with a checklist inside a project template. We do this for YouTube videos – our publishing checklist lives in our central company wiki, but is in a Synced Block that also lives inside our video project database template. That way, the checklists’s home is in our centralized wiki (where it’s easy to find), but it can also be found and used within each video project once we’re ready to publish.
However, we want to check off the items on the checklist inside the video project without actually checking them off in the wiki – or on video projects that aren’t yet ready for publishing.
This is where the Unsync feature comes in handy. Click the three-dot menu at the top-right of the Synced Block, then choose Unsync.
Once done, the Synced Block will go away on that page, and the content will remain. It is now independent of the Synced Block, and can be edited without affecting content anywhere else.
Important: Note that Unsyncing the original location of a Synced Block will cause ALL locations of that Synced Block to un-sync. Be very careful doing this!
Copy link to headingSynced Blocks in Templates
When you place a Synced block inside a template block or a database template, its behavior will depend on whether the template block/database template contains the original synced block.
If it does, then copies of the tempalte block/database template will contain a brand new original synced block. It will contain the content of the synced block inside the template, but will not be connected to it.
However, if you simply copy and sync a Synced block that lives elsewhere into a template block/database template, copies of that template will get synced blocks that are still connected to the original.
This distinction gives you a lot of flexibility!
Copy link to headingSynced Block Permissions
Permissions matter with Synced blocks.
The permissions you have set on the page that contains the original Synced block will determine which users can see/edit the content, even when the Synced block is embedded elsewhere in your workspace.
You can use this to your advantage. For example, I showed how you can create headers and footers using Synced blocks above.
To prevent anyone else from editing these headers and footers, I place the original Synced block inside a page where permissions are set like so:
- I have Full Access
- Everyone else can view
Synced Blocks Inside Other Synced Blocks
Can you place a Synced block inside another Synced block? Yes, you can!
Notion currently doens’t allow you to drag-and-drop a Synced block inside another Synced block. However, you can still click Copy and Sync, then paste the block inside of another Synced block.
Warning: Once you place a Synced block inside another Synced block, there is no way to remove it! If you simply delete the content, you’ll delete it anywhere else that internal synced block lives.
It is also possible to place an original Synced block inside another Synced block; however, it requires a bit of a workaround:
- Create a page inside your “outer” Synced block
- Inside that page, create your “inner” Synced block
- Copy your “inner” Synced block to another location
- Turn that page into another type of block, such as a Heading.
Note that if you don’t first copy the “inner” block to another location, it will cease to be an internal Synced block once you turn the page into another block type.
Hopefully this guide has answered all your questions about Synced blocks!
If you want to learn more, check out my free Notion Fundamentals course, explore my Notion templates, or sign up for my Notion Tips email newsletter below. You can also follow me on Twitter @TomFrankly.
The Notion Tips Newsletter
Join 50,000+ folks and enjoy your morning coffee alongside my latest Notion guides and templates, delivered hot(?) and steaming(?) to your inbox.