
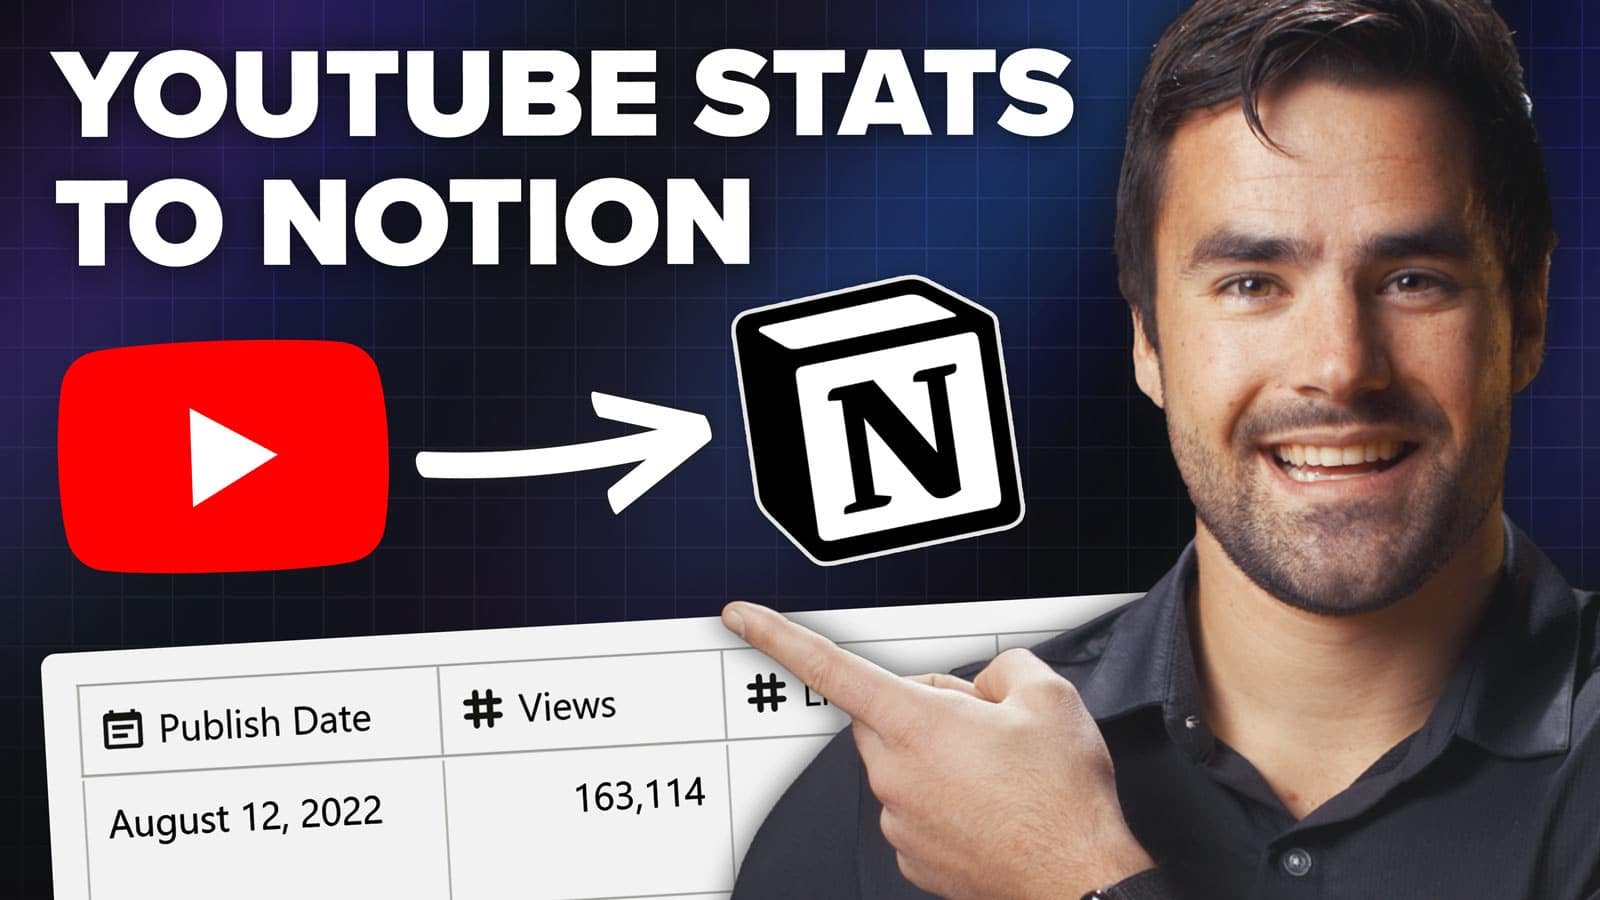
If you plan your YouTube content in Notion, you might be wondering if you can bring the stats from your published videos back into Notion.
Wouldn’t it be cool if you could display your live view counts, likes, and other data right on your Notion dashboard? What if you could pull in your thumbnails and use them as your page covers in Notion?
What if you could do it without writing any code?
Well, wonder no more – all of this is possible! In this tutorial, I’ll show you exactly how you can automatically bring YouTube data into Notion, just like this:
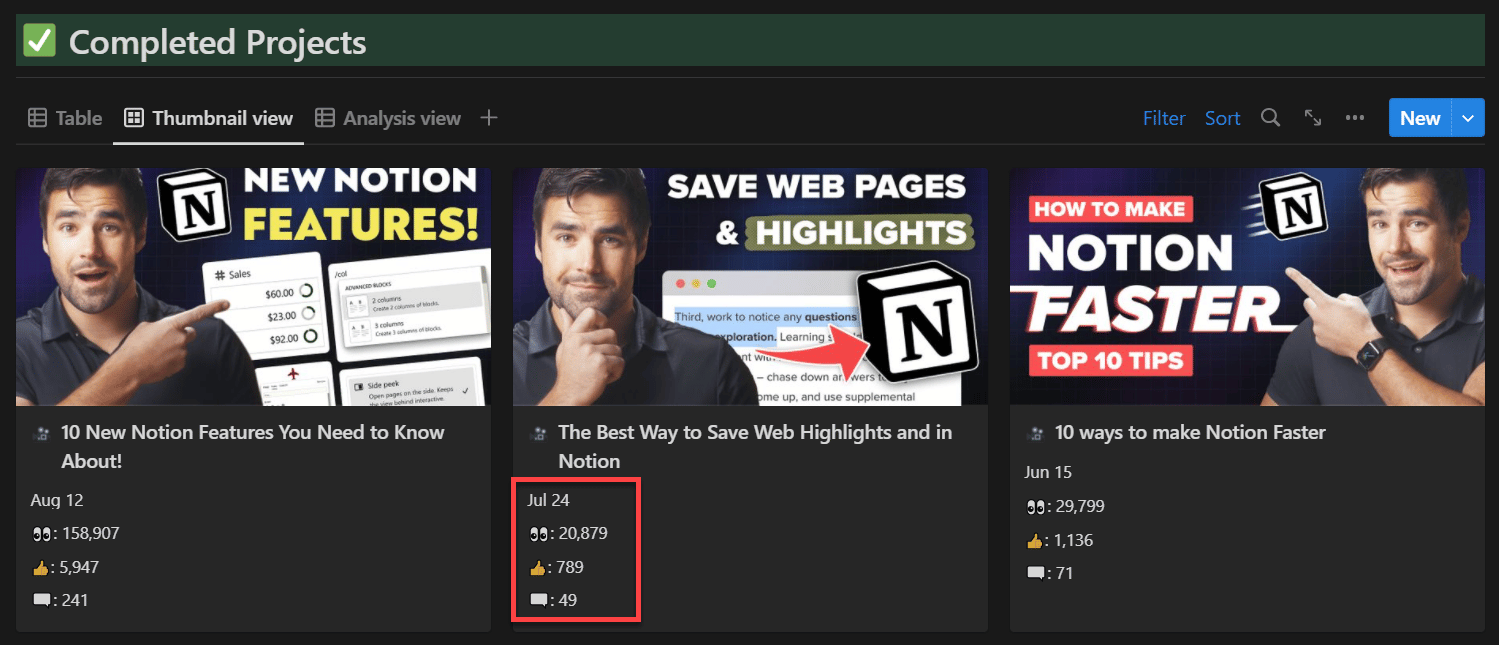
Here you can see my list of published videos on my Thomas Frank Explains channel (within my copy of Creator’s Companion). For each video, I have an updated count for views, likes, and comments – pulled directly from YouTube.
My page covers are also set using my actual YouTube thumbnails.
In this tutorial, I’ll show you the exact, step-by-step instructions for pulling YouTube data into Notion yourself and achieving this exact result. Specifically, we’ll be pulling the following data from YouTube (per-video):
- Views
- Likes
- Comments
- Publish Date
- Thumbnail
Best of all, you can build this automation for free, for a limited number of videos (see the section on cost considerations for full details).
Additionally, you can do it without any coding. This is a 100% no-code tutorial.
Choose your adventure: The video above shows this entire process step-by-step, as does the written version below!
Copy link to headingWhat You’ll Need to Get Started
To successfully finish this tutorial, you’ll need three things (I’ll show you how to get all of these, step-by-step):
- A Make.com account – this is the automation builder we’ll be using to accomplish everything without writing code.
- A Google Cloud account – you’ll use this to interact with the YouTube Data API.
- A Notion database that contains YouTube video URLs
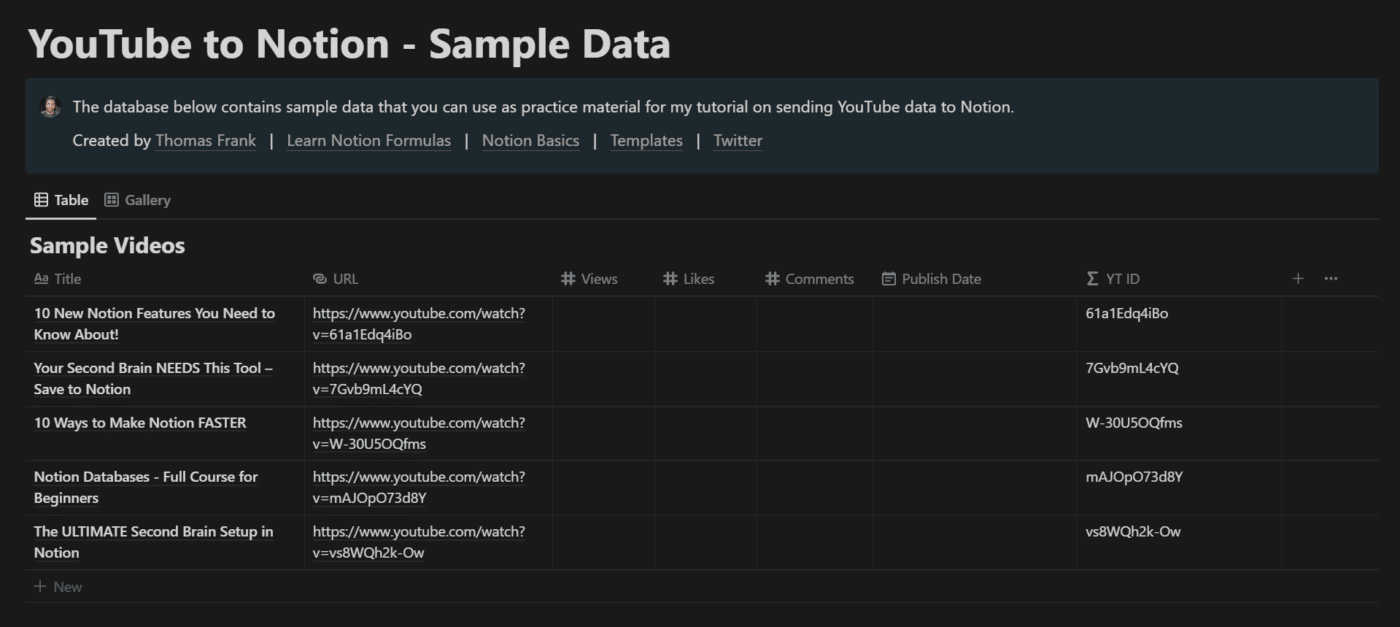
If you already have a Notion database with your own video URLs, you can use that. However, if you’d like a sample database that you can use for practice, you can use this sample template. Just duplicate it into your workspace and you’ll be ready to go.
Before we move on, I’ll note that if you are a serious creator and want a complete Notion system for tracking all of your content, you should check out Creator’s Companion:
Want a complete system for all of your channels, blogs, and social media accounts? Creator's Companion is the exact system my team and I use to manager our entire content creation process across all of our channels.
Get $30 off with code SPRING30!
This is the exact template that my team and I use to manage all of our content creation efforts across my YouTube channels and blogs. It allows you to manage the entire creation process, and includes dashboards for:
- Content calendar (across all channels and mediums)
- Idea capture
- Research and scripting
- B-roll and shot lists
- Publishing checklist
The template also includes access to an active support community, so you can get help with any technical questions you have.
I’ve updated our own copy of Creator’s Companion to pull in live YouTube stats, which allows us to compare our predictions with actual video performance.
If you do have Creator’s Companion, you’ll be able to use this tutorial to do the same thing with your YouTube stats!
Copy link to headingWhat You’ll Learn in This Tutorial
While this tutorial is primarily intended to help you send YouTube data to Notion, it will also help you learn more about some useful concepts and tools:
- Notion databases
- APIs
- JSON
- Make.com and no-code automation
Once you’ve worked your way through this tutorial, you’ll be able to use these tools and concepts to do a lot more. You’ll understand how to make countless different apps and services talk to each other, enabling you to build tools that don’t exist yet (without coding).
Note: I don’t assume any prior knowledge of JSON, APIs, or Make.com in this tutorial. If you can follow instructions, you’ll be able to complete this tutorial. I do, however, assume some prior knowledge of Notion databases. If you need a refresher on those, check out my full beginner’s guide to Notion databases.
If you do have prior experience with JSON, APIs, or Make.com, then you can go ahead and skip to the next section and start building right away.
If not, fear not! I’m going to briefly explain each of these concepts here in this section, and I’ll also link you to some useful resources you can use to learn more about each.
JSON is a super-flexible, super-useful format for transmitting data between computers.
It also happens to be the most important technology that powers Notion. In fact, if you’re ever hanging out with me and we’ve had enough drinks, you’ll probably hear me call Notion a “fancy graphical wrapper for JSON”, because that’s basically what it is.
But JSON doesn’t just power Notion; it’s also the data storage format that nearly every API in the world uses. It’s flexible, widely-used, and easy to understand.
JSON stands for JavaScript Object Notation.
Here’s an example piece of JSON data (which is real data returned by the YouTube Data API):
{
    "statistics": {
        "viewCount": "158907",
        "likeCount": "5947",
        "favoriteCount": "0",
        "commentCount": "241"
    }
}
Code language: JSON / JSON with Comments (json)
JSON is built on key:value pairs. An example from the snippet above would be "viewCount": "158907". "viewCount" is the key, and "158907" is the value that it points to (which is a string; more on that below the next code example).
All JSON data is contained within objects, which are represented by the curly braces ({}). An object is simply an unordered set of key:value pairs.
As you can probably tell, the value that corresponds to a key can actually be an object itself!
The statistics key corresponds to an object, which itself contains more key:value pairs.
Let’s look at a slightly more complex example, which also comes directly from the YouTube Data API:
{
    "snippet": {
        "publishedAt": "2022-08-12T22:27:41Z",
        "channelId": "UCd_WBvzBg1UbHE8j8MIL5Ng",
        "title": "10 New Notion Features You Need to Know About!",
        "thumbnails": {
          "default": {
            "url": "https://i.ytimg.com/vi/61a1Edq4iBo/default.jpg",
            "width": 120,
            "height": 90
          },
          "medium": {
            "url": "https://i.ytimg.com/vi/61a1Edq4iBo/mqdefault.jpg",
            "width": 320,
            "height": 180
          },
          "high": {
            "url": "https://i.ytimg.com/vi/61a1Edq4iBo/hqdefault.jpg",
            "width": 480,
            "height": 360
          }
        },
        "channelTitle": "Thomas Frank Explains",
        "tags": [
          "notion",
          "notionhq",
          "notion app"
        ],
        "categoryId": "27"
      }
}
Code language: JSON / JSON with Comments (json)
This block might look intimidating, but in reality it’s just more of the same thing I shared above. There are more nested levels, and there a couple new elements in the mix.
Let’s first talk about data types. Check out this line: "title": "10 New Notion Features You Need to Know About!"
Since the "title" key’s value is in quotation marks, we know that the value has the string data type.
JSON values have one of six different data types:
- string
- number
- Boolean (true/false)
- empty/null
- object
- array
We can see another key:value pair in the JSON snippet above: "width": 120. This value has the number data type.
Boolean values must either contain true or false, without quotation marks. Empty/null values must contain null without quotation marks.
We already covered objects, so that just leaves arrays. An array is an ordered list of values. Array values are stored within brackets ([]), and each element is given a number based its position in the array.
The number is essentially the key for each value, but it is not explicitly written into the array. It is implied based on the ordering of the elements in the array.
We can see an array within the YouTube snippet above:
"tags": [
    "notion",
    "notionhq",
    "notion app"
  ]
Code language: JSON / JSON with Comments (json)
This array contains strings, but an array can contain data of any type – numbers, objects, even nested arrays.
Array numbering starts at 0; this is called zero-based indexing. So the string "notion" has an index of 0, the string "notionhq" has an index of 1, and so on.
This introduction is all you’ll really need to understand the JSON we’ll be looking at in this tutorial. However, if you’d like to learn more, I recommend watching this video:
An API is essentially a set of tools that let web applications talk to each other. APIs are what allow:
- Social media scheduling tools like Buffer to post tweets to Twitter
- Notion to integrate with other tools like Github and Slack
- Connector tools like Make.com and Zapier to let you build custom connections between web apps
API stands for Application Programming Interface.
When a web app publishes an API, it is basically providing outside entities with a set of tools they can use to read and/or manipulate data stored on that web app.
If you’re not a coder, you almost never have to think about APIs. They just do their thing in the background, shuttling data back and forth between apps that you use.
Even if you use tools like Make.com, Zapier, IFTTT, etc. – usually the guts of the APIs you’re working with are hidden from you. These tools have built integrations that are set up to work with the APIs of the web apps they support, so usually all you need to do is set the options you want.
However, in this tutorial, we’ll be working directly with the YouTube Data API.
For that reason, it will be helpful if you understand a few key concepts about APIs and how they work.
Note: This is a non-comprehensive, purposefully simplified explanation of APIs intended for non-coders. I’m probably leaving a lot out, but I’ll link to more comprehensive resources at the end of this section.
You typically work with APIs by making HTTP requests. This means that your application (in the case of this tutorial, the Make.com automation we’ll be building), accesses a particular URL – much like you’d do in your web browser when you want to visit a website!
Note: You may have a conversation in the future about APIs with a nerd who will stress that you access URIs, not URLs. The distinction really does not matter here, but here’s an article on their differences if you’re curious.
Your request typically needs four pieces of data:
- The endpoint to be accessed
- The method to be used
- A query string containing the details of your request
- An API key for authentication
Let’s look at an example. The YouTube Data API features many different endpoints (e.g. sets of tools) for working with YouTube data.
Note: Remember that this section is a primer; follow the actual tutorial to see all of these concepts in action!
One of those endpoints is called Videos: list. It contains a set of methods meant for getting information about one or more videos – including view counts, upload date, and more.
If you read the JSON summary above, the JSON code snippets you saw were returned by Videos: list.
Looking at the Videos: list reference page, we can see a Request section which specifies the HTTP request needed to access this endpoint:
GET https://www.googleapis.com/youtube/v3/videos
Code language: HTTP (http)
This means that your application has to make a request to https://www.googleapis.com/youtube/v3/videos in order to access information about YouTube videos using this endpoint.
The section also specifies the method that must be used to interact with this endpoint: GET.
There are five common methods we use to interact with API endpoints:
- GET – used for reading data from the application. It is read-only, so it has no risk of modifying any data.
- POST – sends data to the application to create something new.
- PUT – sends data to the application to update an existing resource. Contains a full updated copy of the resource.
- PATCH – also updates an existing resource, but only contains the changes to be made instead of the entire updated resource.
- DELETE – sends an instruction to the application to delete an existing resource.
Videos: list is an endpoint that relays information about existing videos, so it makes sense that it requires the GET method.
One cool thing about endpoints that use GET – you can usually call them directly from your browser! And when doing so, you don’t even need to specify “GET” – you can just call the endpoint URL itself. I’ve done this in the screenshot below, using Videos: list to pull information about this video.

Here you can see a JSON response that looks very similar to the one shown above in the JSON primer.
Calling this method in the browser is mainly only useful for demonstration and learning purposes; typically, you’d want to call it from within an application that will then manipulate the data (as we’ll do later in this tutorial).
What I’d like to point out here, though, is the URL itself:
https://youtube.googleapis.com/youtube/v3/videos?part=snippet&id=61a1Edq4iBo&key=[MY_API_KEY]
Code language: HTTP (http)
This URL contains the two components we haven’t covered yet: The query string and the API key.
I’ve removed my API key for security purposes. API keys should always be kept private. Anyone with access to your API key could access an API essentially posing as you, accessing information that should be only available to you or taking actions on your behalf.
Let’s cover the query string first. This is essentially a set of instructions that tells the endpoint what we want. In this case, our query string is as follows:
part=snippet&id=61a1Edq4iBo&key=[MY_API_KEY]
Code language: HTTP (http)
This query string contains three details:
part=snippet– this tells Videos: list that we want the snippet for this video (which contains things like the publish date, title, description, etc.)id=61a1Edq4iBo– this is the id of the video we want information about. The id can be found in the video’s URL: https://www.youtube.com/watch?v=61a1Edq4iBokey=[MY_API_KEY]– this passes my API key as part of the request. Without a valid API key, I’ll get a “permission denied” error instead of the information I want.

So how do I know what to put in my query string? Simple: I check the API documentation.
Nearly every API you’ll encounter has documentation you can reference, which specifies the endpoints, methods, and more.
Google’s API docs are particularly helpful becuase they feature a “Try This Method” tool for each method. Check out the Videos: list page to try it for yourself!
After expanding the “Try This Method” box so it takes up more of the screen, I get this screen:
See how this actually helps me to build my query string?
- In the part field, I specify that I want the snippet. The available options are listed in the method’s documentation.
- In the id field, I specify the id of the video I want information about.
- After executing the request, I can see the actually HTTP request in the HTTP tab.
- Finally, I can see the JSON response, along with the code 200, which indicates a successful response (400 would indicate failure).
Of course, for this API request to be successful, I have to provide an API key.
The “Try This Method” box makes this easy; when you click Execute, the Google API Explorer will ask you to log in with your YouTube account. It will then execute the request without you needing to specify your own specific API key – it provides one behind the scenes. This makes trying out API methods very easy.
When you’re actually building automations, you’ll need to provide your own API key or otherwise authenticate yourself.
This will be handled differently depending on the API you’re trying to access. Some APIs will give you a single key; others may provide both a client ID and a secret key. Some applications will also require you to work through the OAuth protocol instead of merely providing an API key.
Each API will typically provide details on authentication in its documentation. Here are a couple of examples:
Note: When working with no-code automation tools like Make.com, typically the automation builder will handle all of this authentication for you. However, when you need to work with an unsupported tool (such as the YouTube API), you’ll need to use the generic HTTP Request modules they provide – and at that point, you’ll need to provide your API key manually.
I believe I’ve provided enough of an introduction here to serve the purposes of this tutorial and other no-code use cases you may have.
However, if you’d like to learn more about APIs, check out these resources. First, Fireship has a great (and quick) intro video on APIs:
If you want to go even deeper, freeCodeCamp has a wonderfully comprehensive video that will guide you through an entire code-based project:
As a non-coder, I’ve always been intimidated by APIs because most tutorials that cover them do so while assuming a certain level of coding knowledge.
It actually wasn’t until I started working with them through no-code tools like Make.com that I started to truly understand how they work.
So if you’re a non-coder and want to understand APIs more deeply, let’s continue on with this YouTube-to-Notion automation project!
Make.com is what I call an automation builder. It’s a web app that gives you a visual interface for connecting other web apps together in order to build custom workflows.
There are many other automation builders:
I prefer Make.com simply because I’ve found that it has a good combination of power, supported apps, ease-of-use, and price.
My favorite no-code automation builder that can create workflows between hundreds of apps.
Has a bit of a learning curve, but it significantly more powerful (and cheaper) than Zapier. Has a great free tier too.
I'll earn a commission if you sign up through this link and upgrade to a paid account (at no extra cost to you).
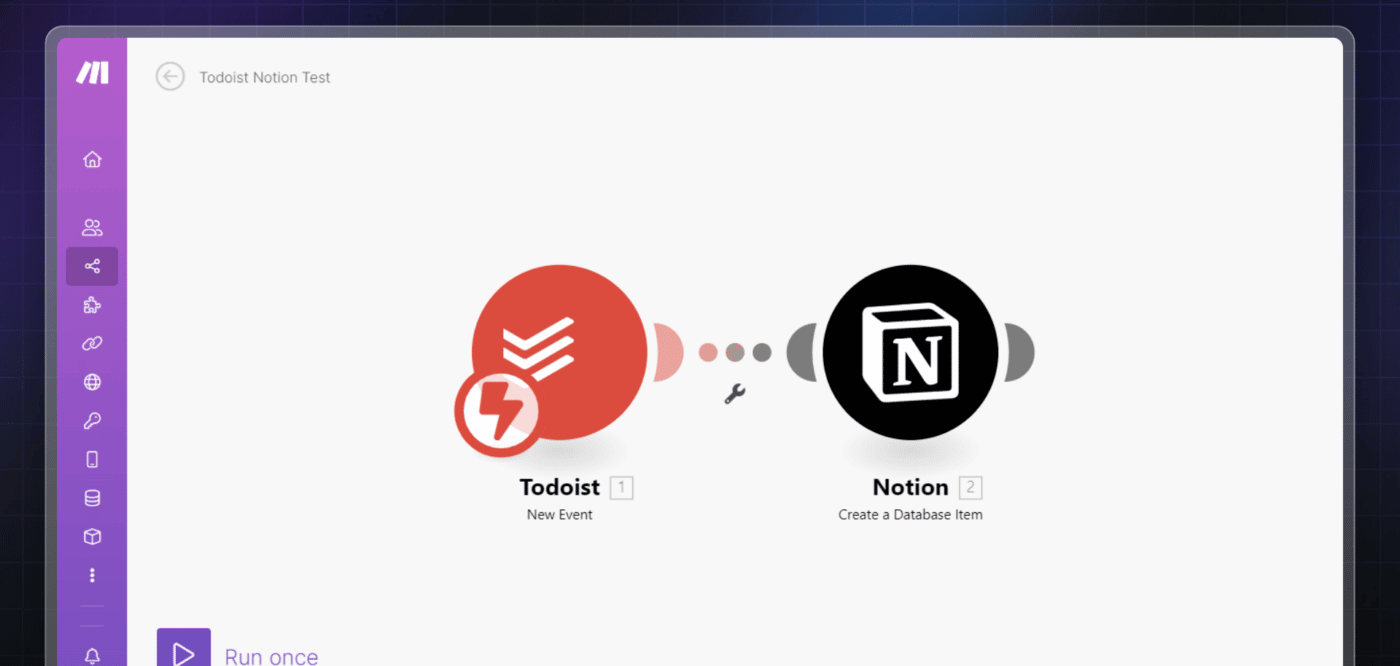
Here’s a look at Make’s visual builder interface. In this simple automation, new tasks created in Todoist are sent to a Notion database:
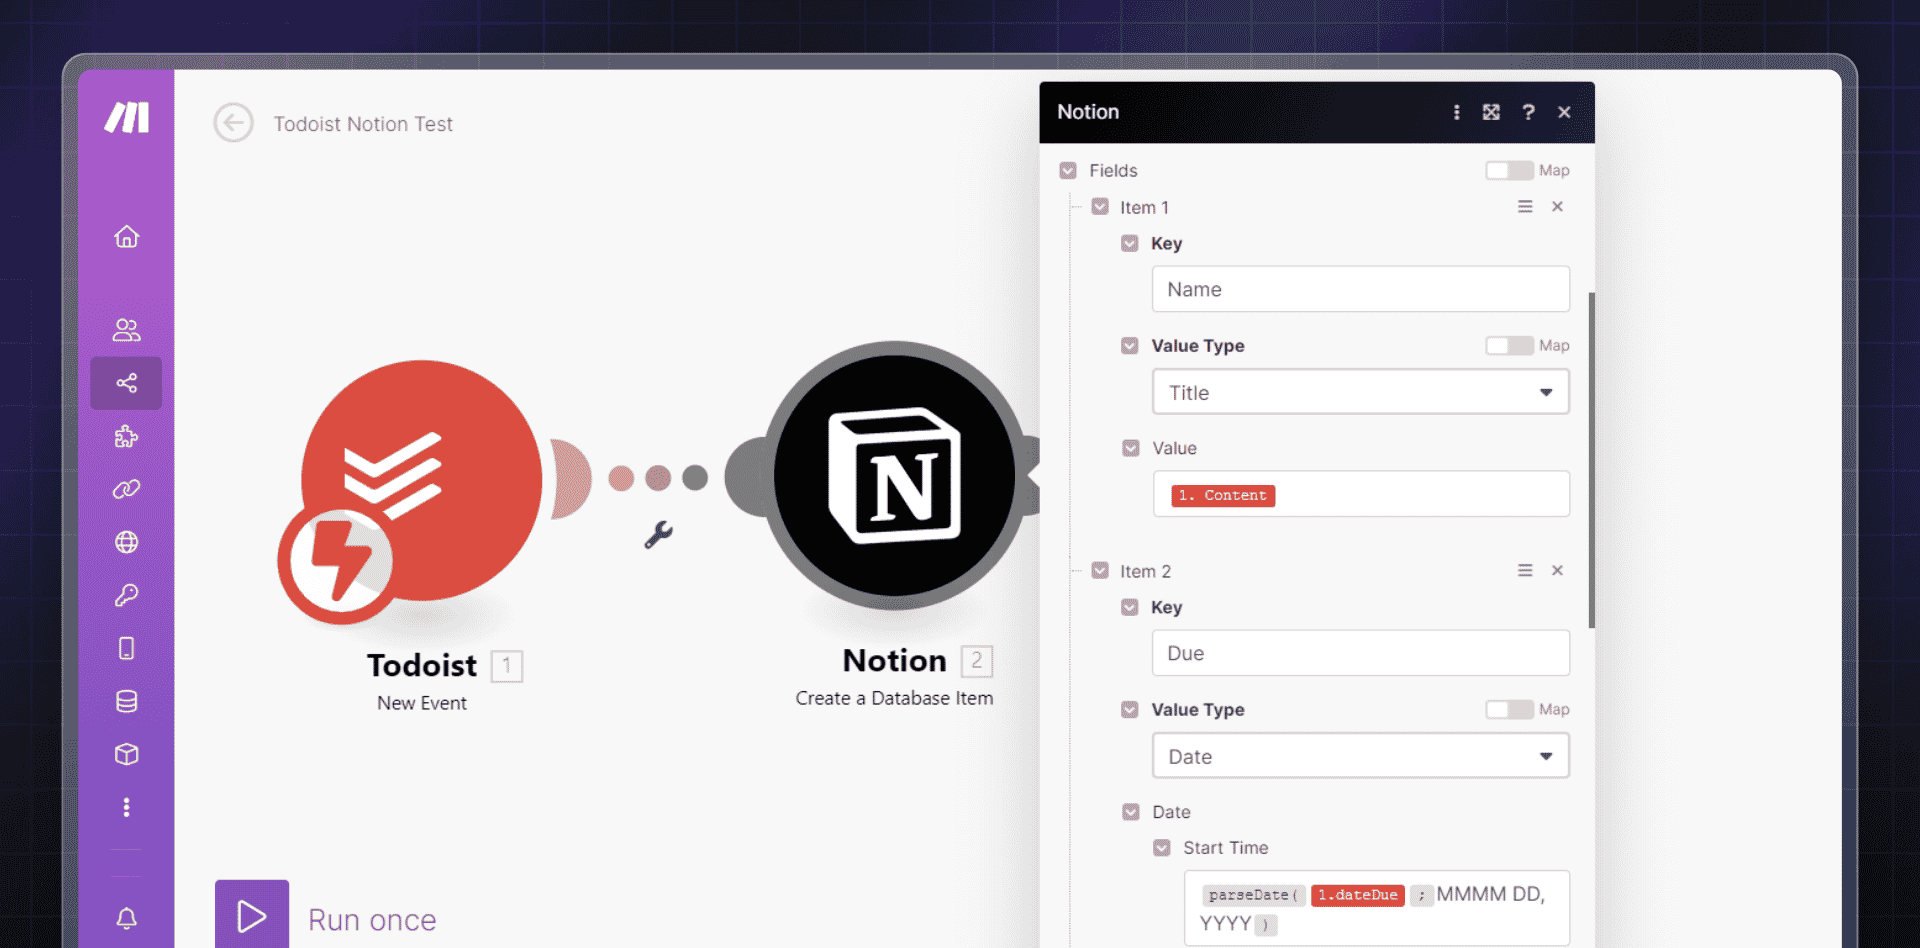
When working with Make’s supported apps, you’ll get pre-made fields that you can use to easily customize your workflows:
This makes creating complex automations very easy! Without tools like Make, you’d have to code your own web application, connect to both APIs (Todoist and Notion) manually, and run the app on a server constantly.
Automations can also be significantly more complex than the example above. They can have branching paths, filters, and loops. They can work with complex data, like arrays.
Best of all, Make gives you a general-purpose HTTP module (shown above), which you can use to connect to APIs that aren’t already supported by Make.
The best way to learn Make (and any other automation builder) is to build something with it, so let’s continue with the tutorial!
If you feel confident, let’s start building this automation!
Copy link to headingTutorial Summary & Overview
Before we dive straight into the details, let’s take a look at the process from a bird’s eye view so you know what you’re working towards.
The Goal: Create a no-code automation that brings views, likes, and comments from your YouTube videos into a Notion database on a regular basis. Additionally, pull data from YouTube to set each video’s publish date and page cover (using the video’s thumbnail).

To accomplish this, we’ll work through the following steps:
- Set up a Notion database with video URLs and video IDs (the latter generated using a simple formula).
- Obtain an API key from Google so we can work with the YouTube Data API (in a read-only manner).
- Create an automation on Make.com that sends YouTube video data to Notion.
Here’s what our Make.com automation will do, specifically:
- Pull a list of video IDs from Notion
- Query the YouTube Data API using those video IDs
- Get view, like, and comments counts, thumbnail URL, and video publish date from the YouTube Data API for each video
- Send all of this data back to Notion
Prepare Your Notion Database
Estimated Completion Time: 10-15 Minutes
The first step we’ll take is preparing a Notion database that contains the videos we want to track.
The steps I’ll demonstrate below will work on any Notion database. You do not need to be using any specific template.
In this step, you’ll:
- Identify the Notion database you want to use for tracking
- Ensure it contains a list of YouTube videos with live YouTube URLs
- Add properties for views, likes, comments, and publish date (if needed)
- Add a formula property that extracts the video ID from each video’s URL
Note: If you want to learn more about Notion databases or need a refresher, check out my complete guide to Notion databases.
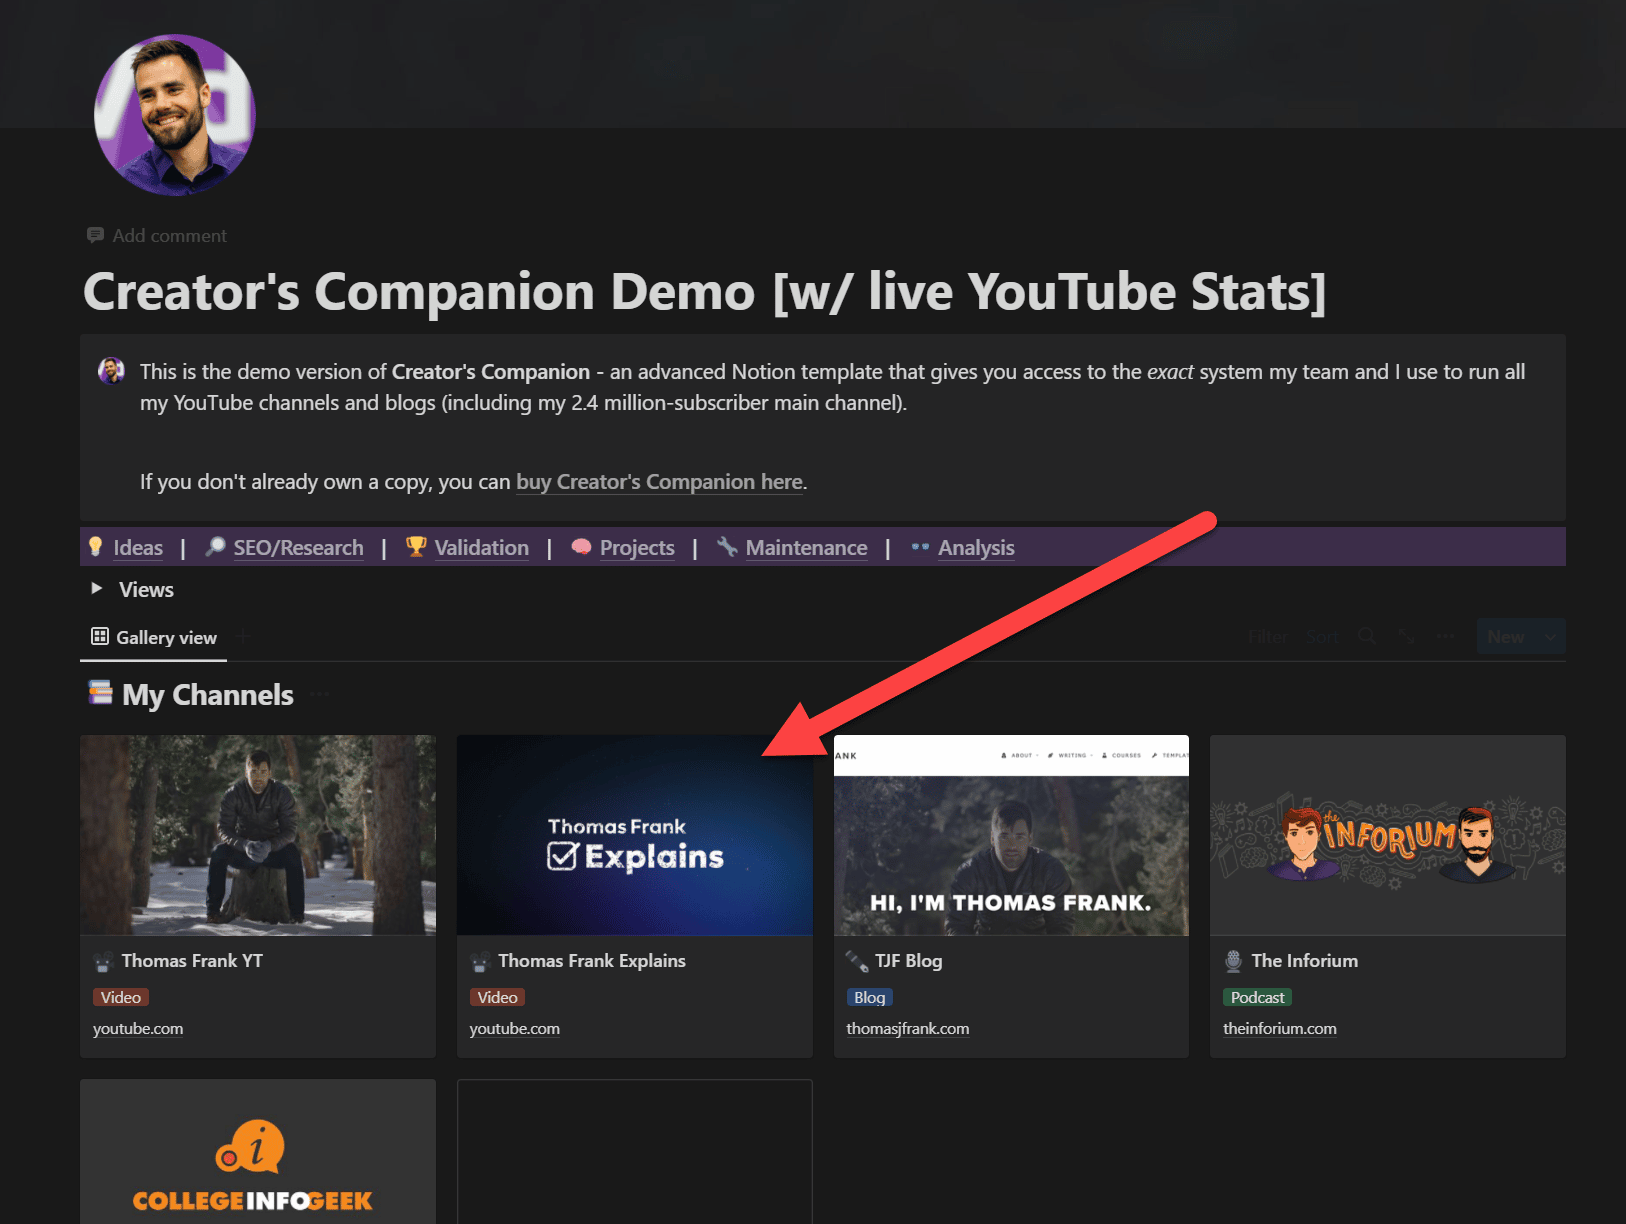
I’m going to use a public demo version of my Creator’s Companion template, which means you’ll be able to visit it and see a working example.
If you have Creator’s Companion, you can simply follow along with the steps I’ll demonstrate here. If not, simply apply the same steps to your custom database.
If you’d like a simple starting point, grab my free example template and then skip to the next section of the tutorial:
This example template already has all of the properties we’ll be creating, and it also contains a “finished” copy of the pictured database that has sample data, publish dates, and thumbnails already filled in. Even if you’re not using this template, you may want to reference it.
Copy link to headingStep 1: Add YouTube Video URLs to the Database
Create or navigate to a Notion database in your workspace that will be use for tracking your YouTube video stats.
Since I’m building this in Creator’s Companion, I’m going to be using its Master Content Tracker database, which is the template’s central database for all content.
Creator’s Companion uses linked databases to show useful filtered versions of this database within each Channel page.
I’ll go into the Channel page for my Thomas Frank Explains YouTube channel and navigate to the Completed Projects section, as I want to track stats for completed, published videos.
From here, the crucial part is making sure I have a record for each video I want to track. As you can see, I’ve now got a row for each published video on my channel.
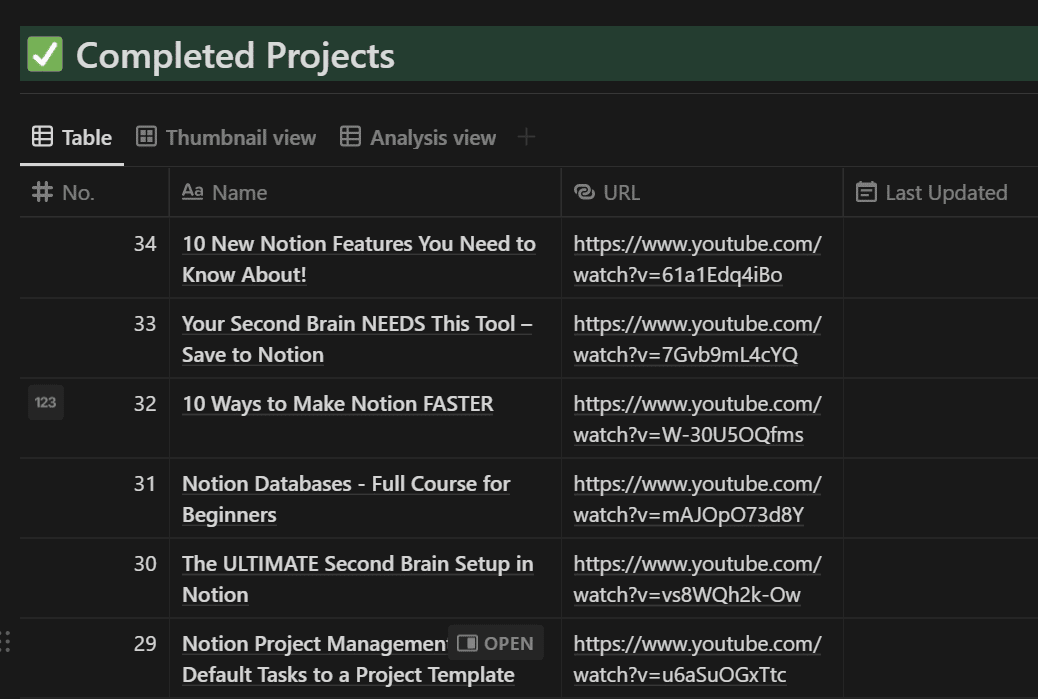
Remember, you can view this public demo page yourself to see how everything works!
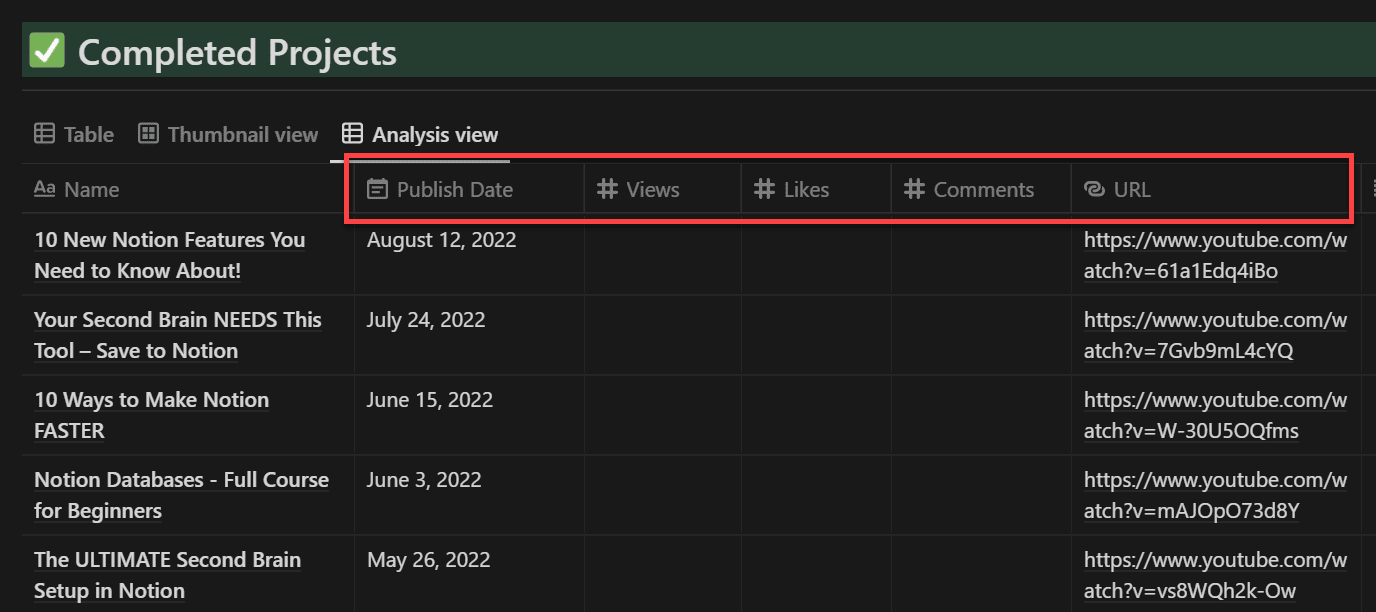
Copy link to headingStep 2: Create the Database Properties
If your database does not already have them, create the following five properties. Ensure their property types are as list here.
| Property Name | Type |
|---|---|
| Views | Number |
| Likes | Number |
| Comments | Number |
| Publish Date | Date |
| URL | URL |
Note: If you are unable to create new properties, your database is likely locked. Here’s how to lock/unlock any database (as long as you have full access to it). If you’re using Creator’s Companion, follow these steps to find your database’s location and unlock it.
Step 3: Add YouTube Video URLs
If you haven’t done so already, add the correct YouTube URL for each video to your Notion database.
Each video should be public, or at least unlisted. Private video URLs will not work, as we’ll only be working with public YouTube data in this tutorial.
Copy link to headingStep 4: Create the “YT ID” Formula Property
Next, create a Formula-type property and name it YT ID. This property will extract each video’s ID from its URL.
Check out my guide on creating formula properties if you need help with this.
Paste the following formula code into the formula editor:
if(test(prop("URL"), "youtu.be"), replace(prop("URL"), "^.*(?:\.be)/([^?&]*)\?*.*", "$1"), replace(prop("URL"), "^.*(?:\?v=|shorts/)([^?&]*)\?*.*", "$1"))
Code language: JavaScript (javascript)Curious about how this formula works? I’ll break it down for you here.
This formula uses the replace() function, which takes in an input string, looks for a sub-string within it, and then replaces that sub-string with a provided replacement string.
It also uses the if() function to determine if the URL is one of YouTube’s shortened “share” links. If it is, we use a different replace() call than if it isn’t.
Here’s a super-simple example of replace() that’s easy to understand:
replace("The best Ninja Turtle is Raphael.", "Raphael", "Donatello")
// Output: The best Ninja Turtle is Donatello.
Code language: JavaScript (javascript)
However, replace() gets much more useful when you use regular expressions in the second argument.
A regular expression is a string of special characters that can make your matching criteria much more flexible.
I’ve written a very detailed guide on regular expressions in Notion formulas, so I won’t cover all their details here.
Instead, I’ll simply break down one of the regular expressions used in the YT ID formula. Here it is:
replace(prop("URL"), "^.*(?:\?v=|shorts/)([^?&]*)\?*.*", "$1")
Code language: JavaScript (javascript)
The second argument contains the regular expression: ^.*(?:\?v=|shorts/)([^?&]*)\?*.*
Here’s the plain-English version of what this expression is doing:
Match the entire input string. After the first instance of either
?v=orshorts/, take all the characters and capture them up until the first instance of a?character, if it exists. Finally, replace the match (which is the entire input string) with the contents of the capture group.
This is the best way to extract a small piece of a string and output it within a Notion formula. Here’s how our regular expression does it:
^used at the start of the expression means, “The match must start from the beginning of the input string.”.is a special character which means “match any character (except new lines)”.*is a quantifier, which tells the regex engine to match zero or more of the preceding element – in this case, the.(?:)indicates a non-capturing group. It’s a group of characters that the regex engine won’t keep in memory for later reference.\?matches the?character. Since?is used as a special character (e.g.(?:)), we have to escape it to tell the regex engine that we want to match an actual?character.- The pipe (
|) character indicates either/or. So the engine can match either?v=orshorts/in this non-capturing group. ()is a capturing group. The regex engine will capture any text in this group and allow us to reference it later.[^?&]*equates to “match any number of characters that aren’t?or&“.[]defines a character class, and within the brackets, the^means “not”.//?*.*helps us avoid capturing any query strings that might come after the video id in the URL.
Capture groups are given a number by default – much like items in an array automatically have number references.
Our third and final argument within the replace() function is $1. The dollar sign ($) is a special character that tells the regex engine to reference a capture group, and the 1 tells it to reference the first capture group. Of course, we only have one capture group in this example!
Using this formula, we’re able to extract the video’s ID out of its URL. We can then pass that ID to the YouTube API later in the tutorial.
Note: You could also do this part on Make.com, as it comes with a regex-enabled text parser tool. I prefer to do it directly in Notion.
If you’d like to learn more, check out my comprehensive Notion formula reference guide. It’s a complete technical reference for Notion formulas. Specifically, you should check out:
If you want to push your formula knowledge even further and learn how to solve complex, real-world problems using Notion formulas, check out my 14-day Notion Formula Bootcamp.

At this point, your Notion database is prepped and ready to go!
Copy link to headingGet Your YouTube Data API Key
Estimated Completion Time: 5 Minutes
The next thing we’ll need is an API key from Google that will allow us to interact with the YouTube Data API.
Using it, we’ll be able to send Video IDs from our Notion database to the API, and get back each video’s publish date, statistics, thumbnail image, and more.
In this step, you’ll:
- Enable Google Cloud on your Google account
- Create a project
- Enable the YouTube Data API for that project
- Obtain an API key
- Restrict the key so it can only be used via Make.com
To get started, head to the Google Cloud Developer Console.
Note: Google Cloud is a vast resource that includes access to database tools, APIs, AI tools, and a lot more. Any time you want to work with a Google-owned API (such as the YouTube Data API), you’ll go through Google Cloud.
You’ll need to be signed into your Google account. If your account hasn’t already activated Google Cloud, you’ll be asked to do so before you can start accessing API features.
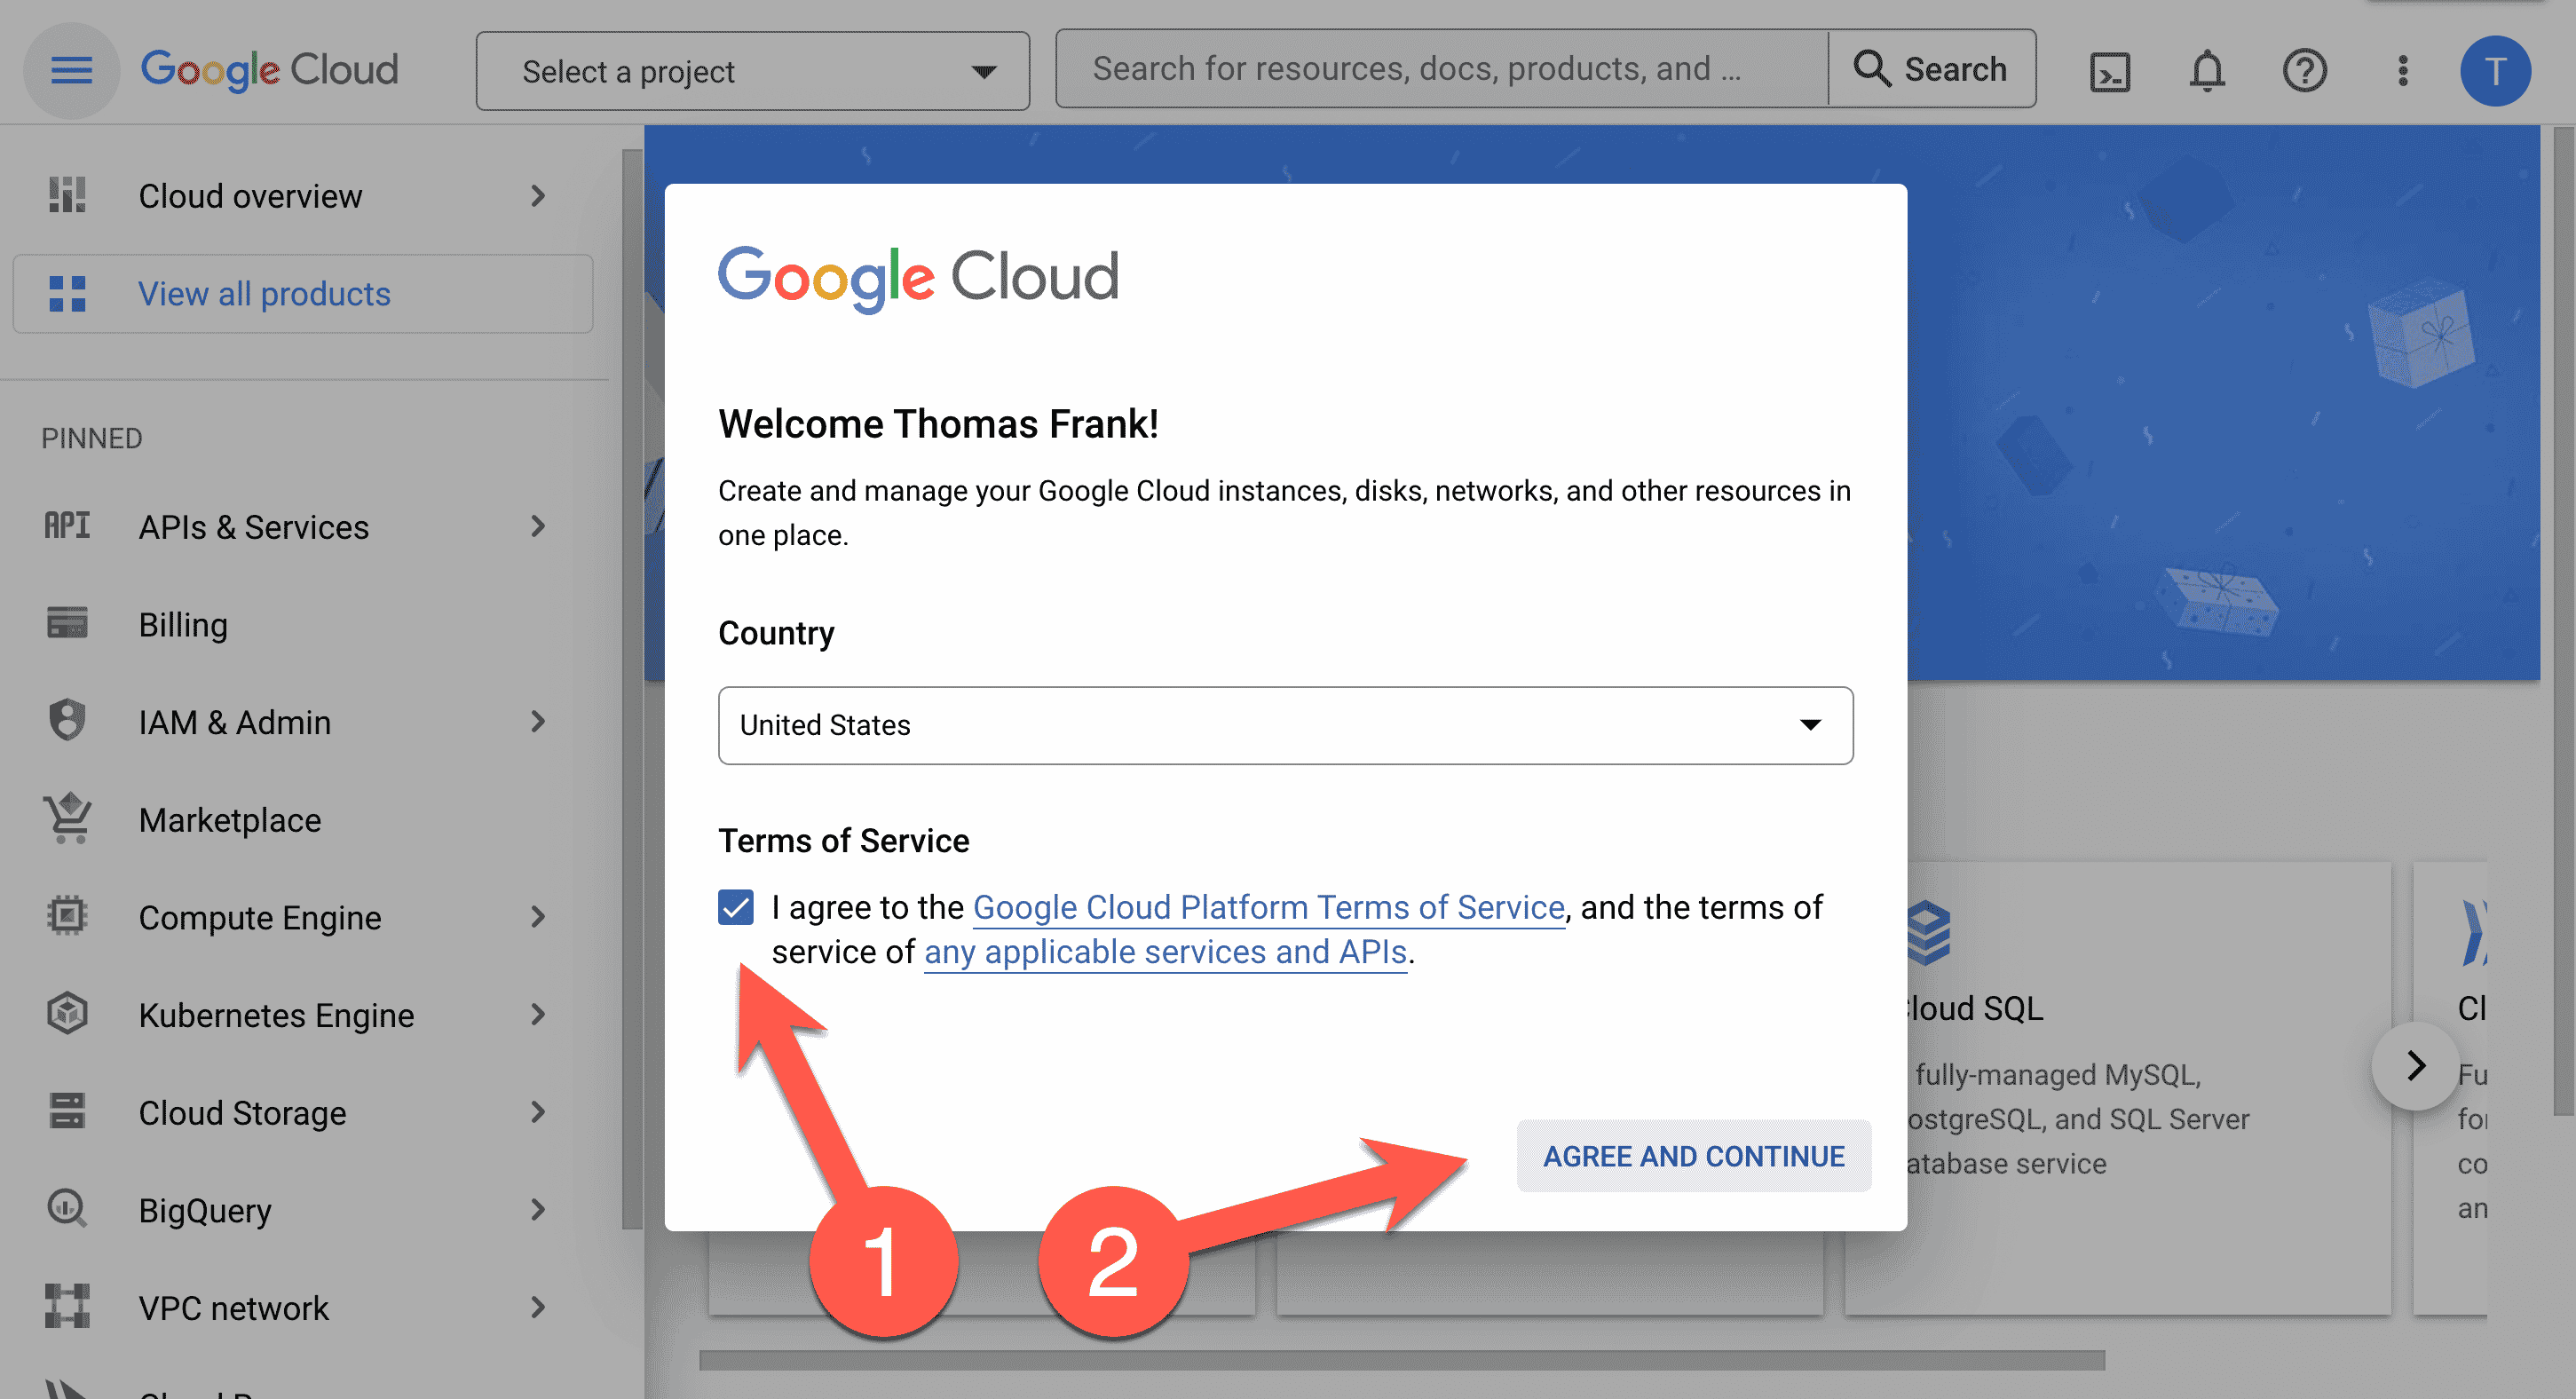
Next, we’ll create a project. This is necessary for enabling access to Google APIs and getting an API key.
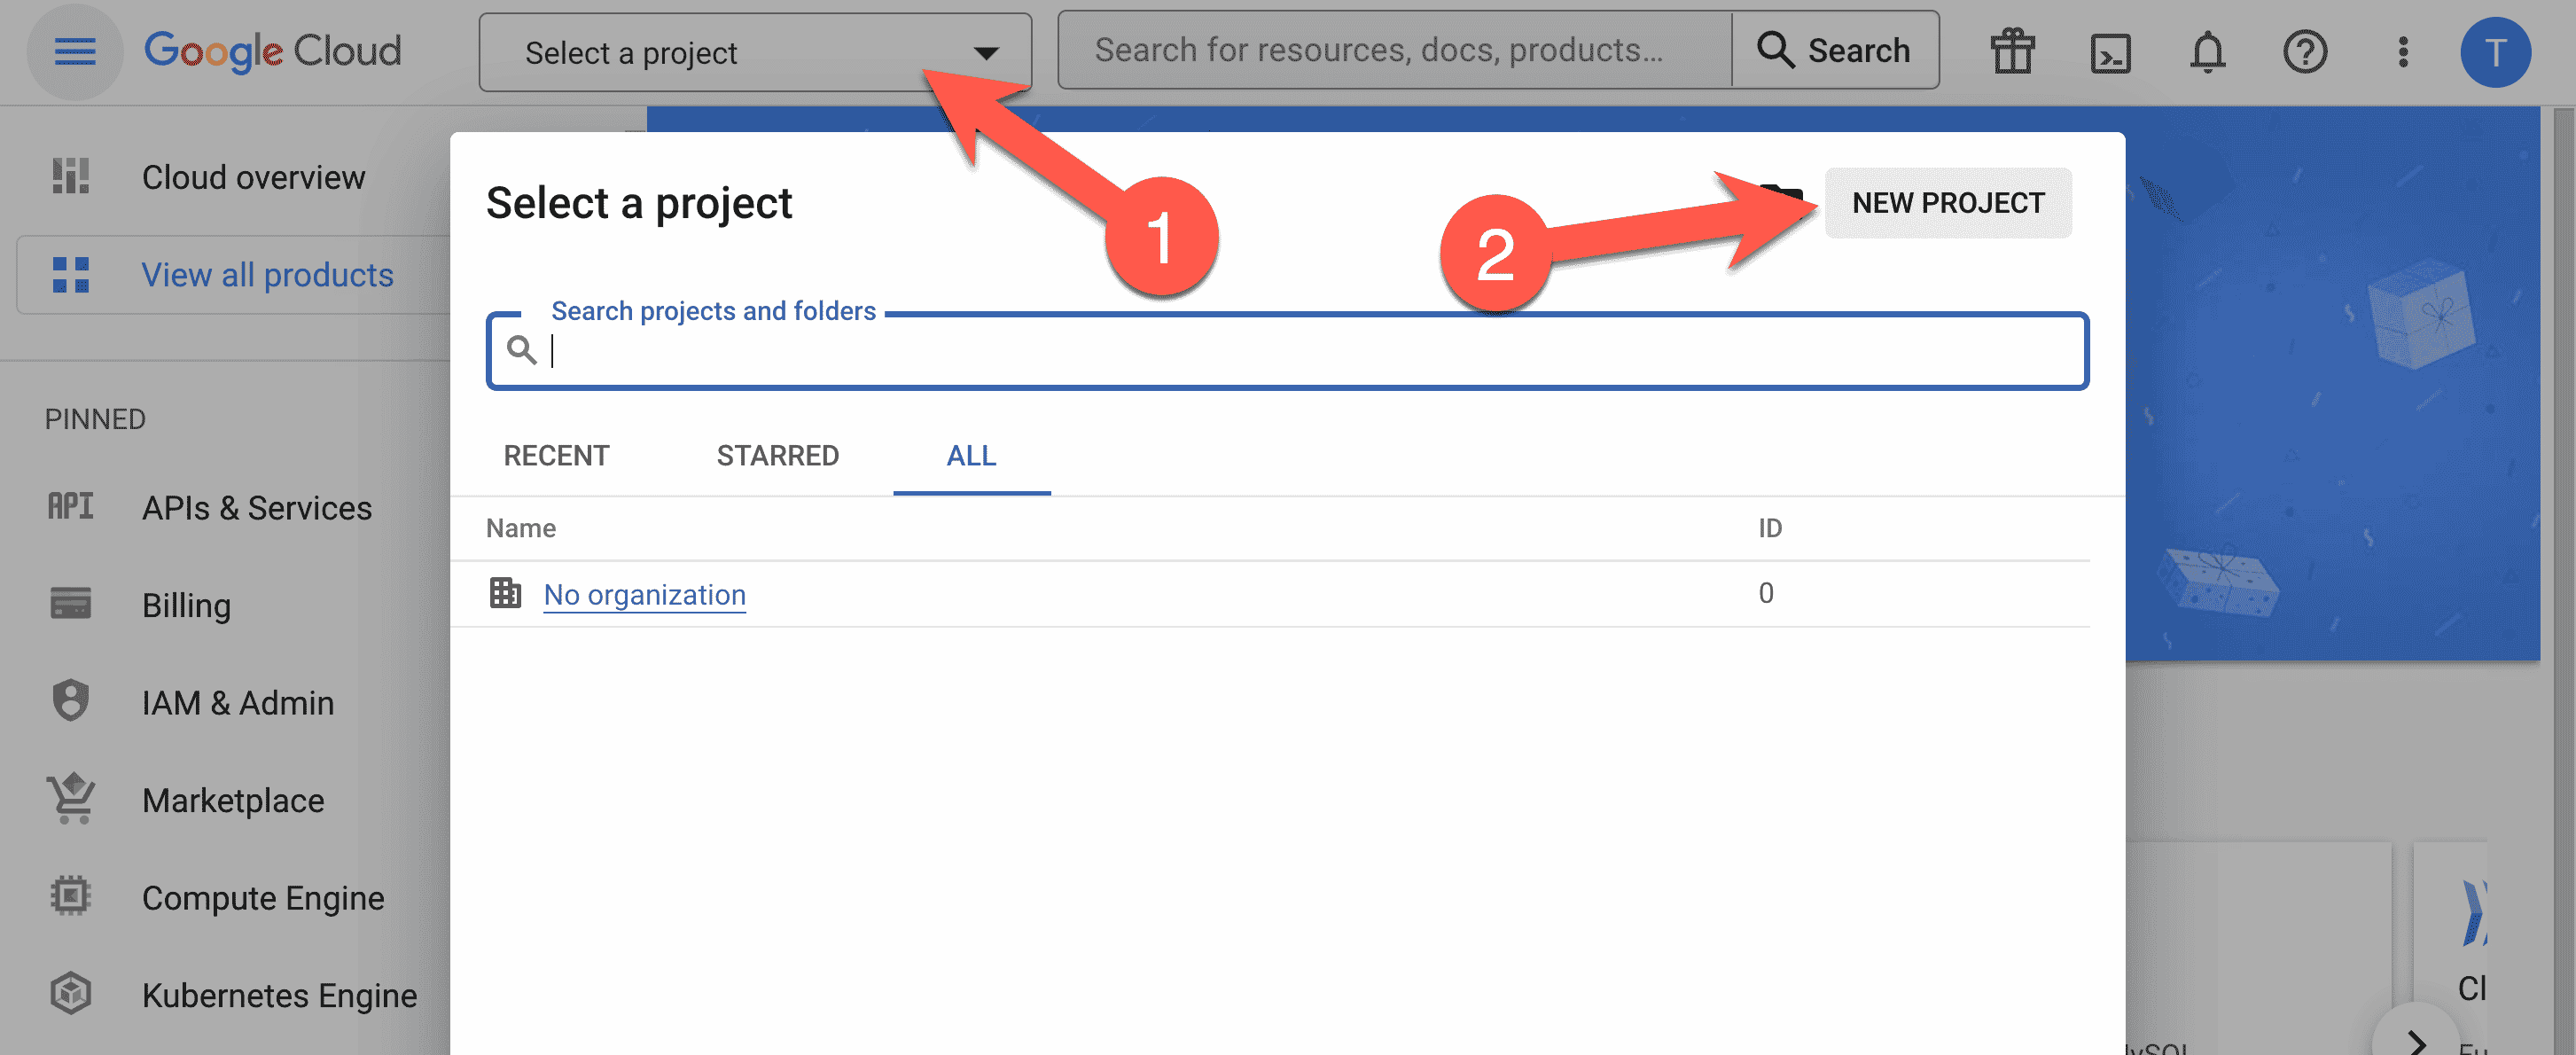
- Click Select Project near the top of the screen.
- Click New Project.
If you don’t see “Select a Project” at the of the screen, click APIs & Services on the lefthand sidebar. You’ll be prompted to create a project there if you don’t already have one.
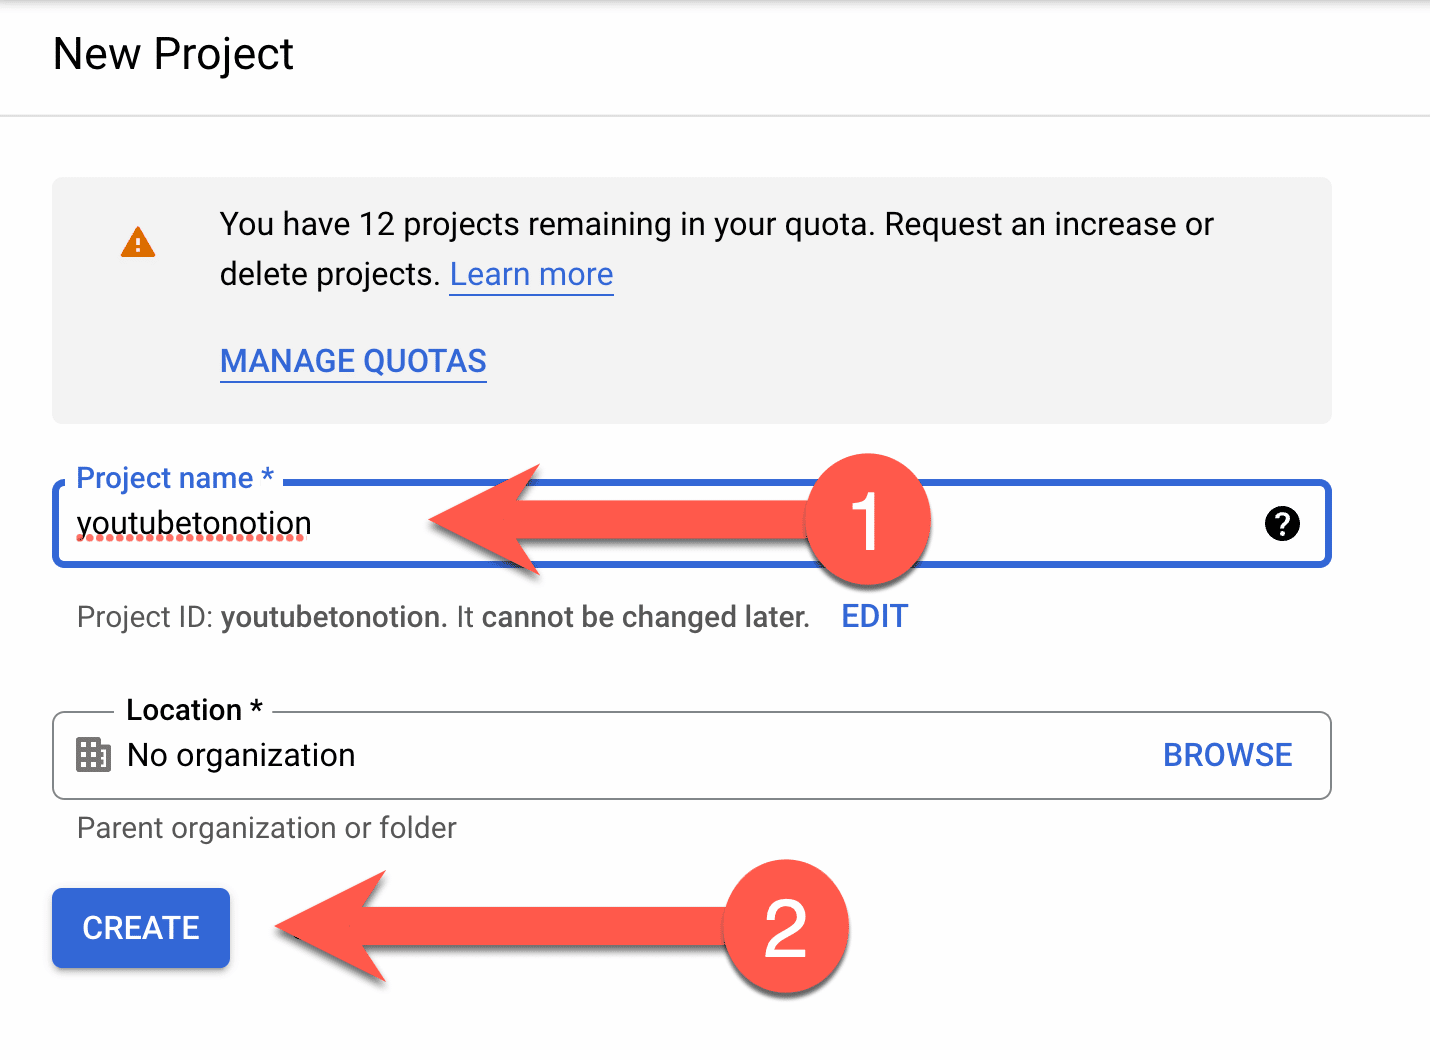
- Give you project a name.
- Click Create.
Note: This will work seamlessly if you’re using a personal Google/Gmail account. If you’re logged in with a work account through Google Workspace, then your organization’s Workspace account will need to be active. Additionally, your organization admin may need to give you account the ability to create new projects.
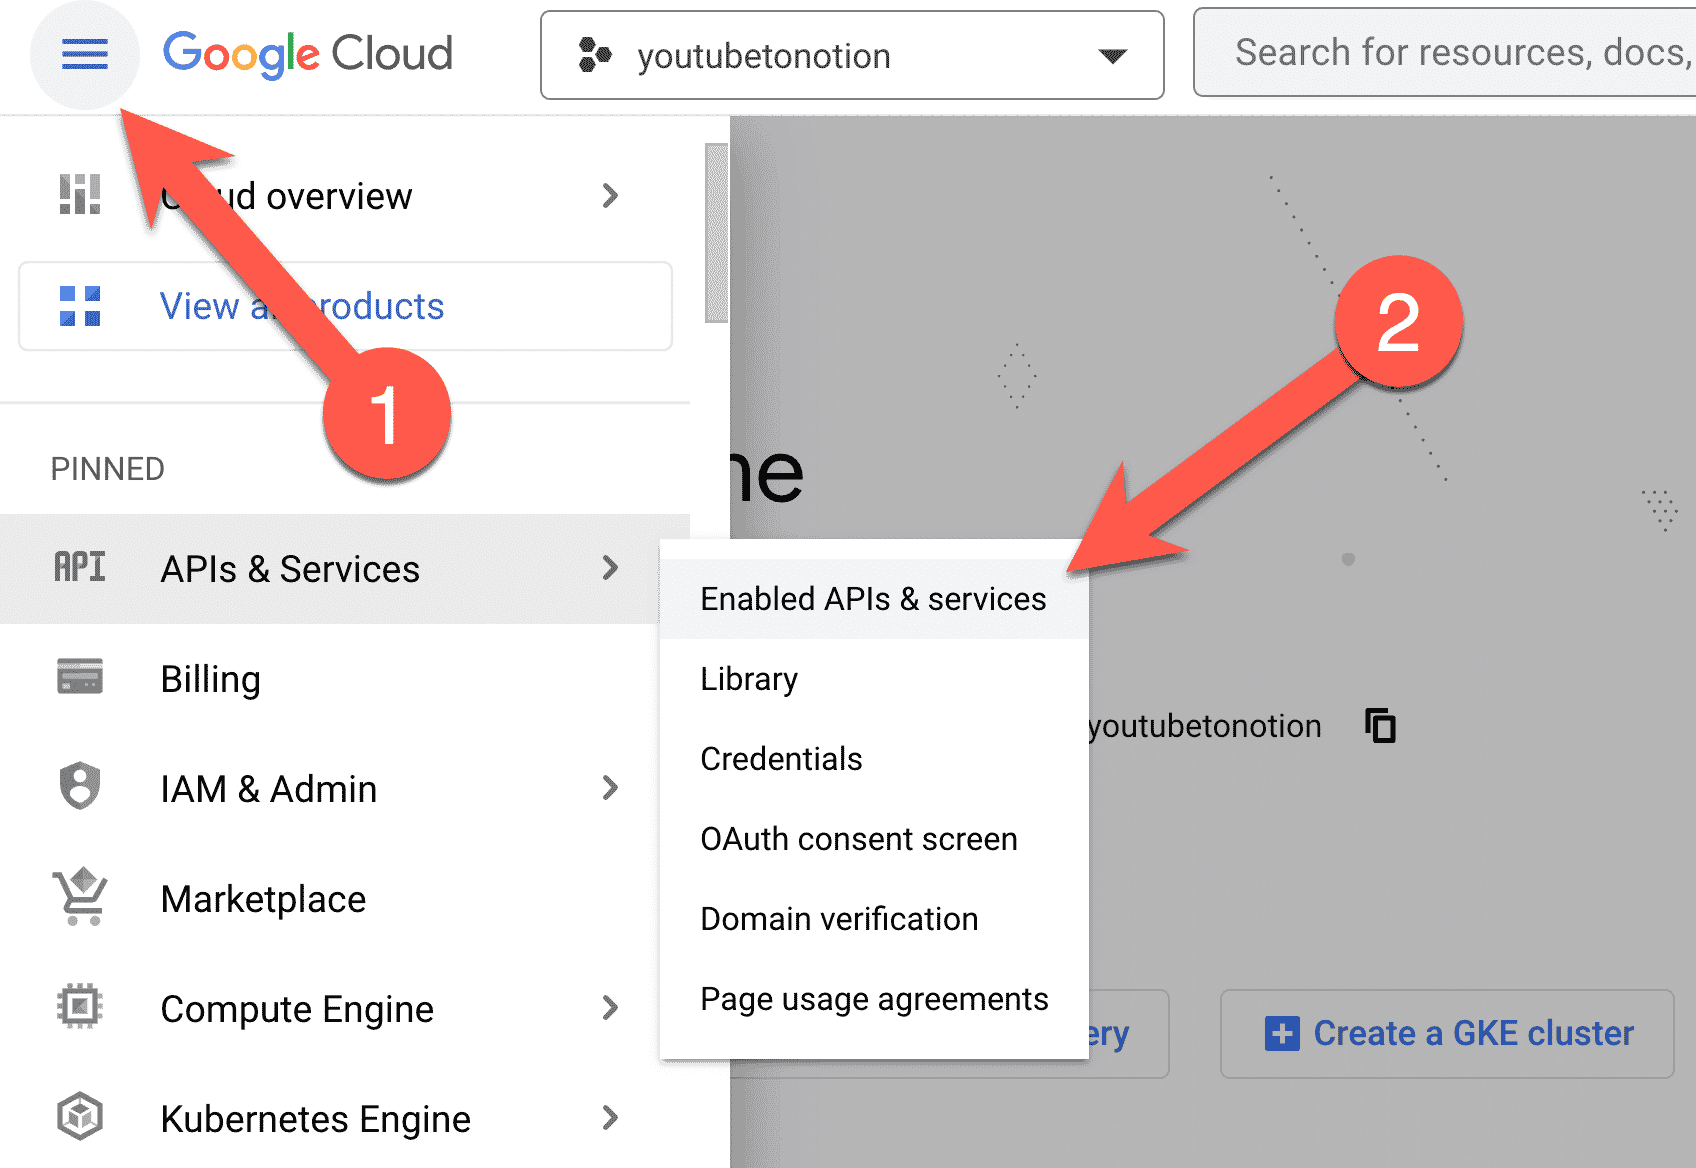
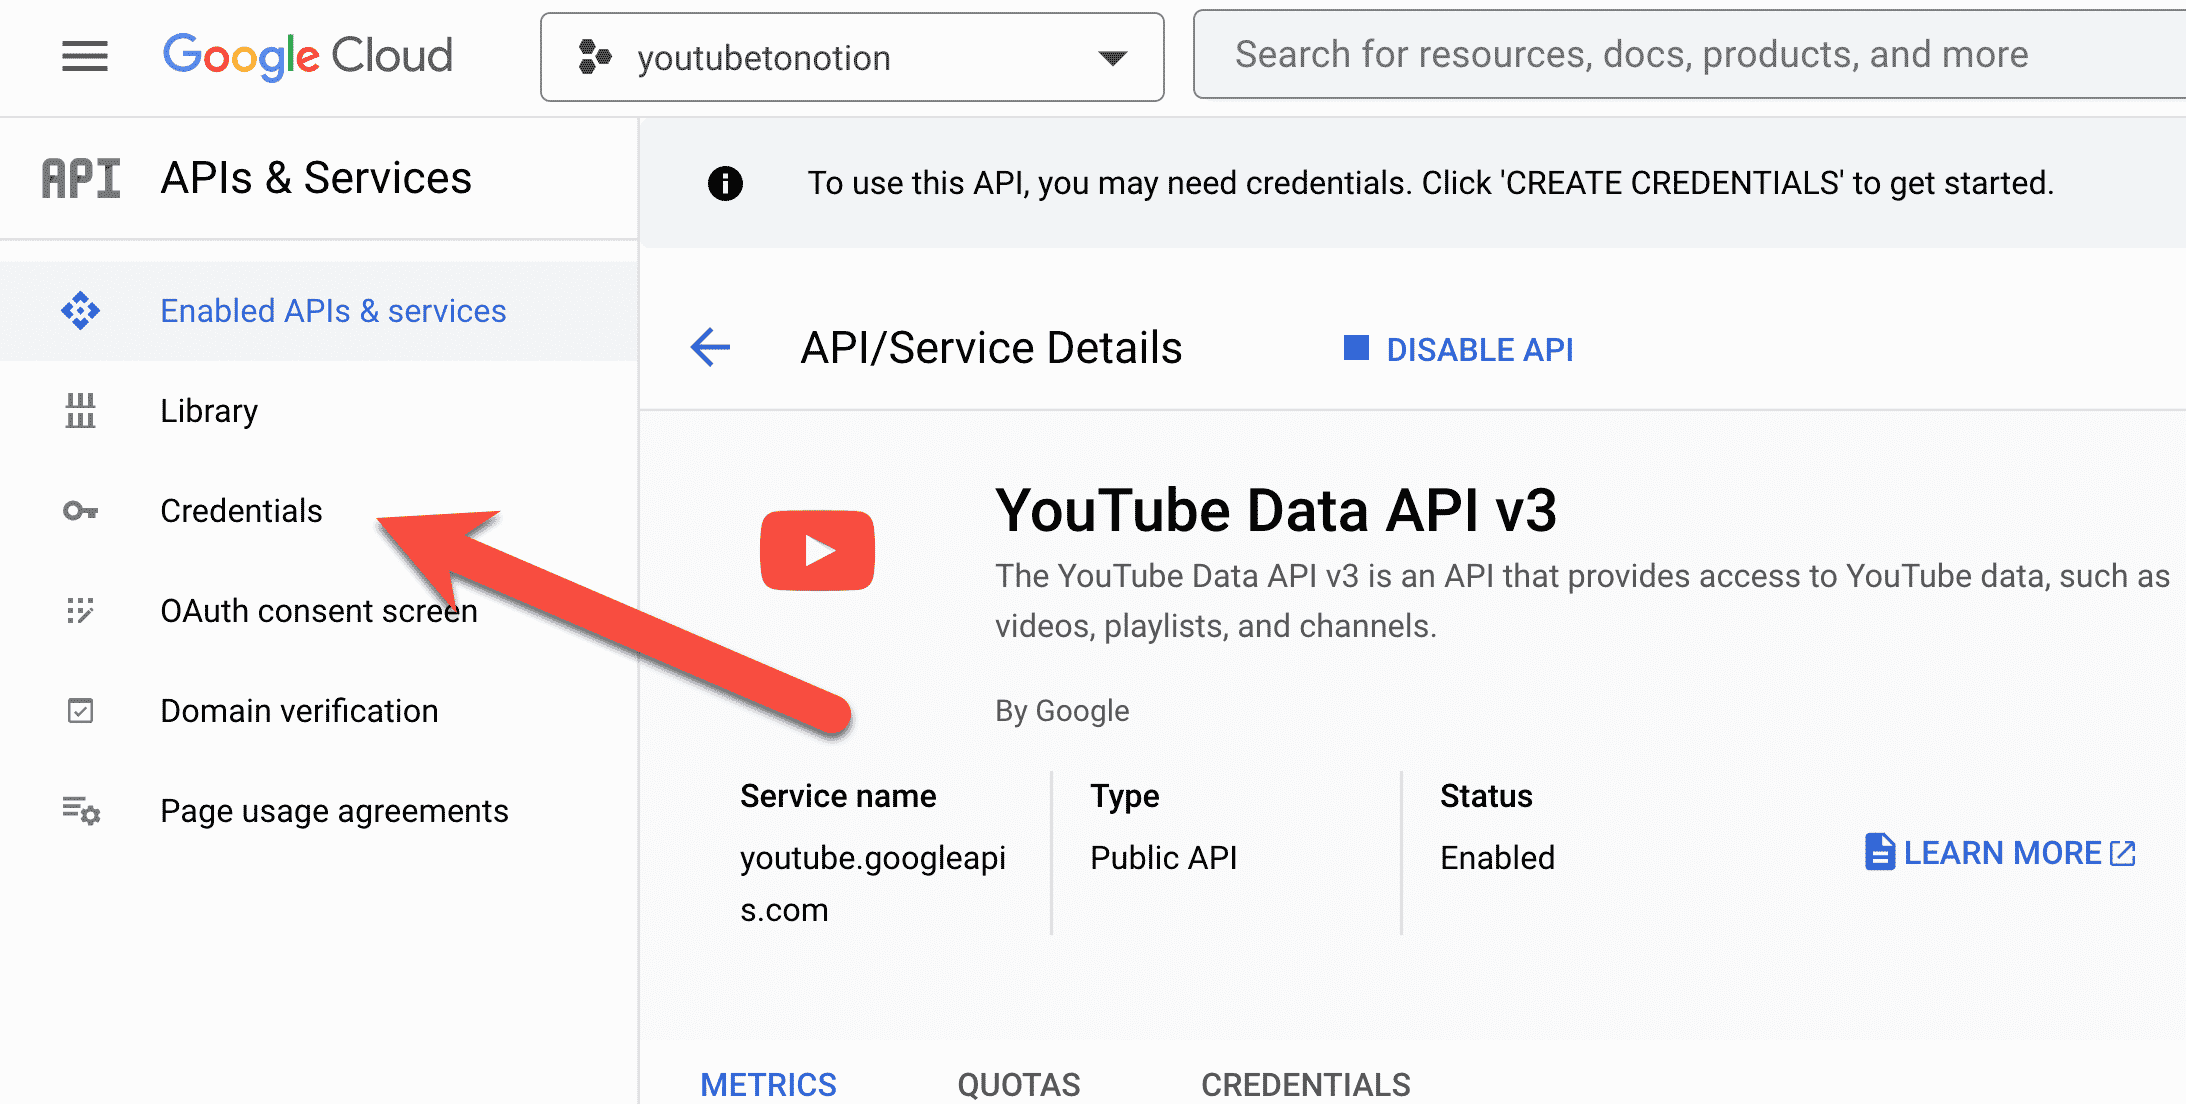
- Open the navigation menu
- Choose APIs & Services, then Enabled APIs & services.
- Near the top of the screen, click Enable APIs and Services.

- From the API Library, search for
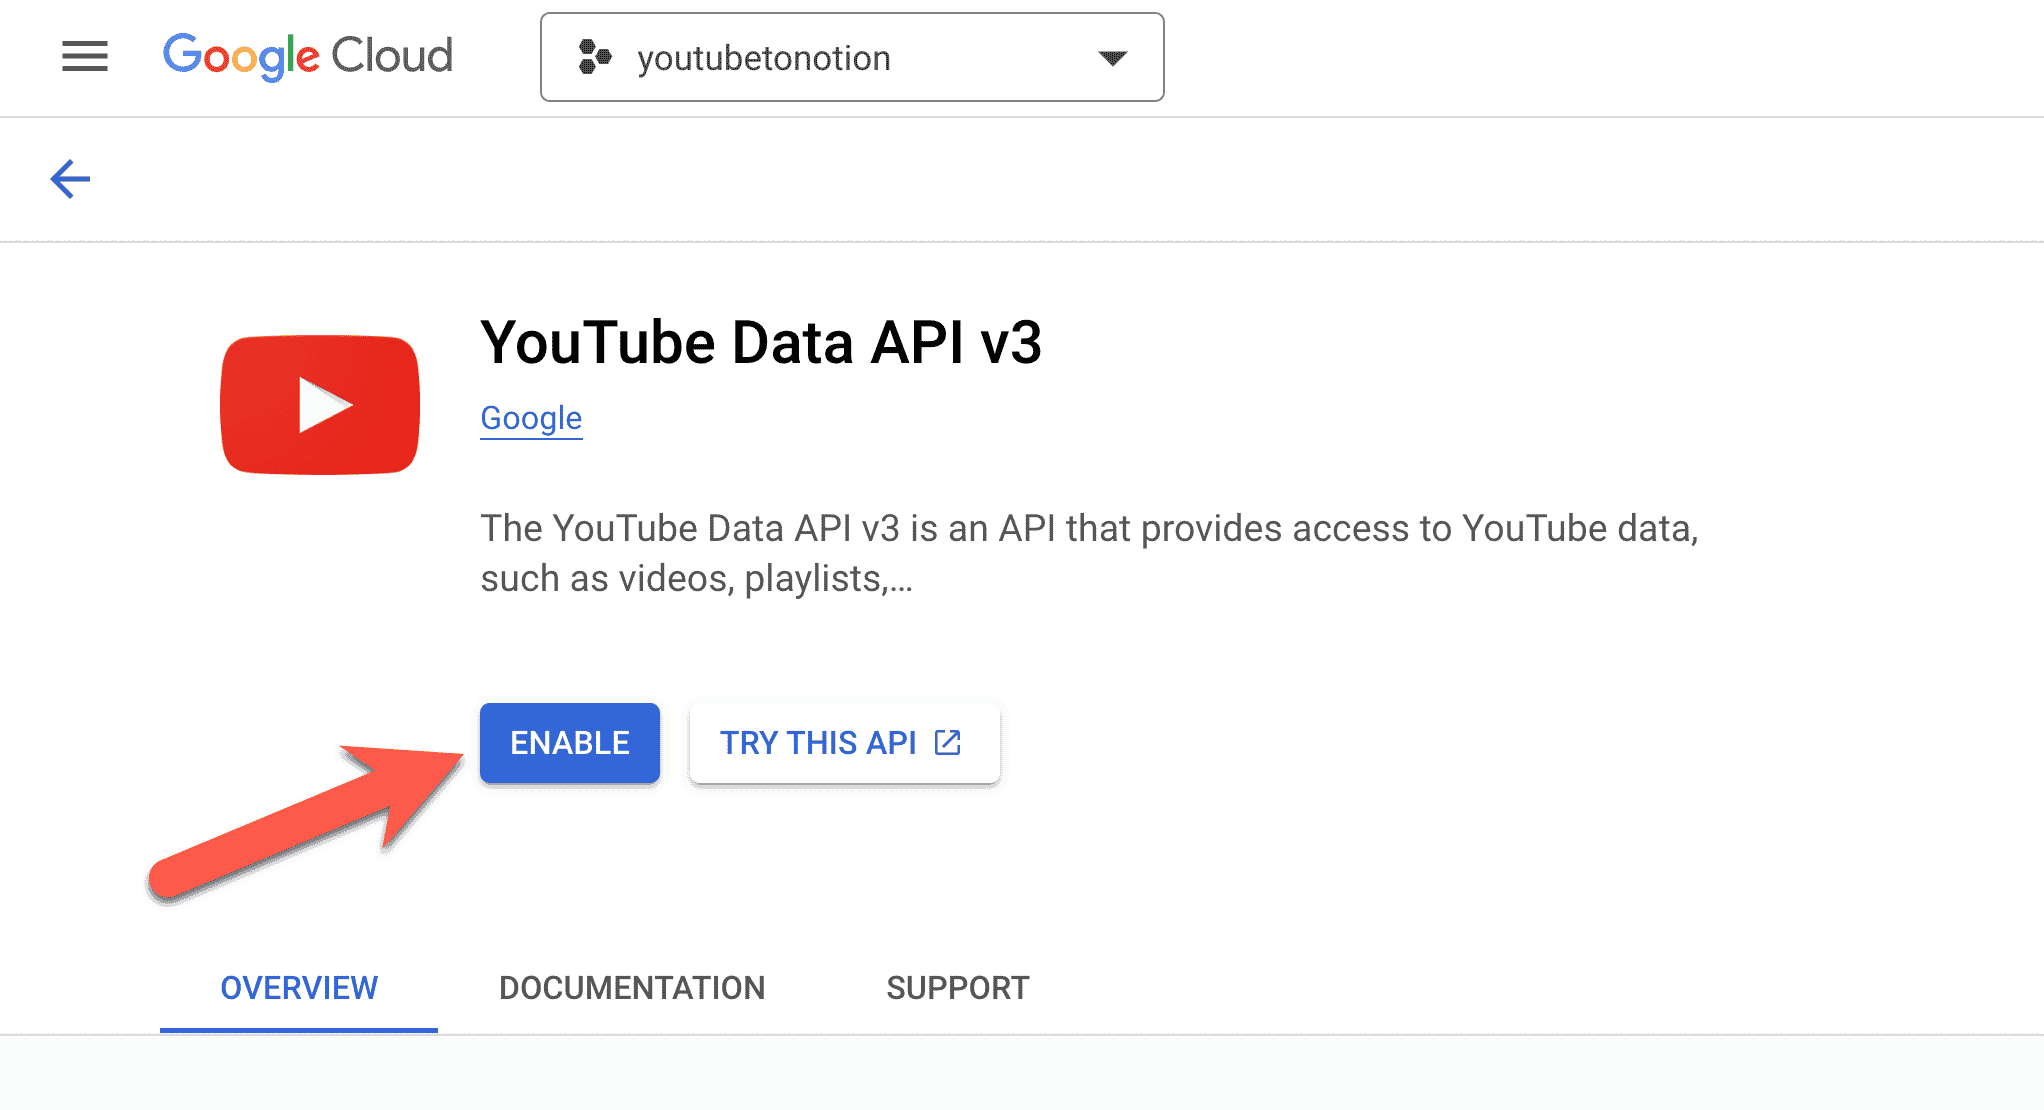
youtube data api v3. - Click YouTube Data Api v3 from the search results. It should be the only option.
- Click Enable to enable access to this API from your account.
The YouTube Data API is now enabled on your account, but you’ll still need an API key to work with it.
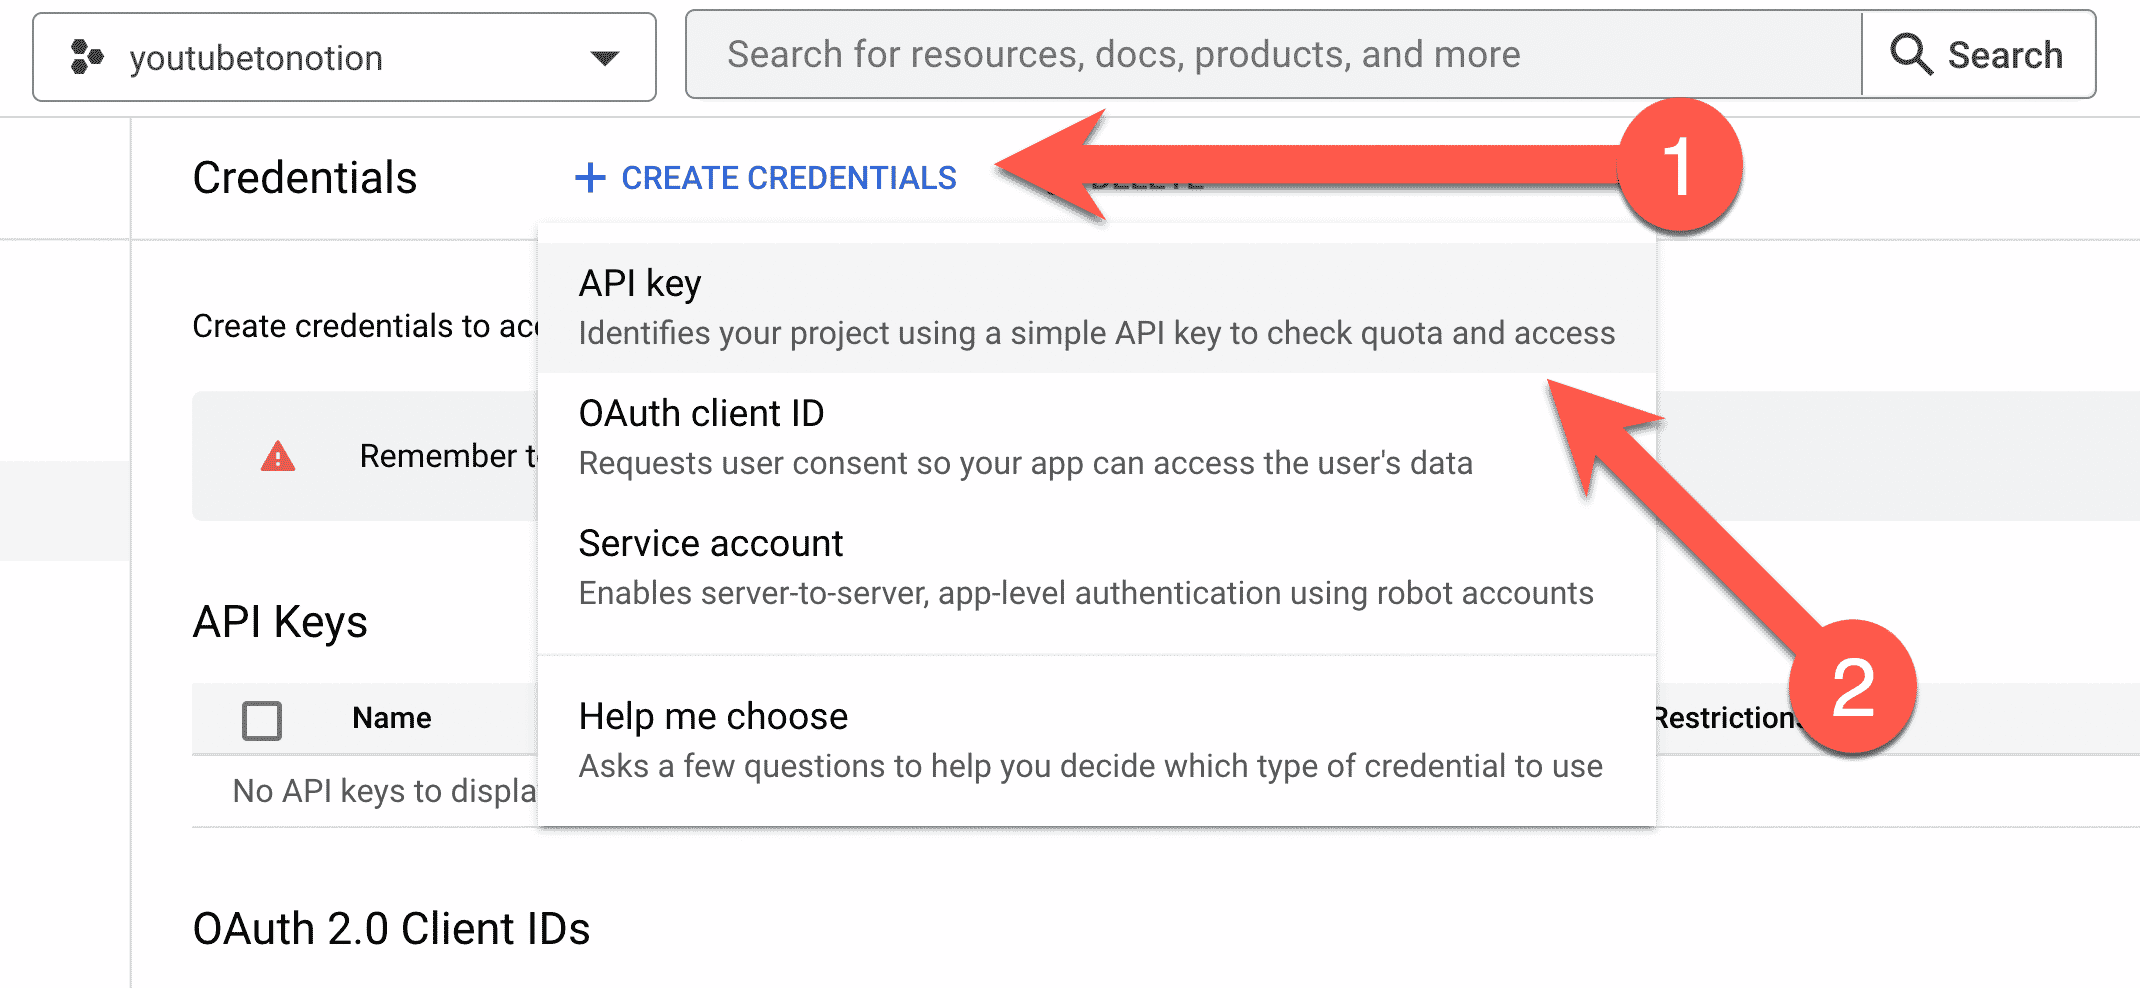
- From the navigation menu, click Credentials.
- Click Create Credentials near the top of the screen.
- Choose API key.
We’re not building a user-facing application, so there’s no need to worry about the dialogue that mentions configuring an OAuth consent screen.
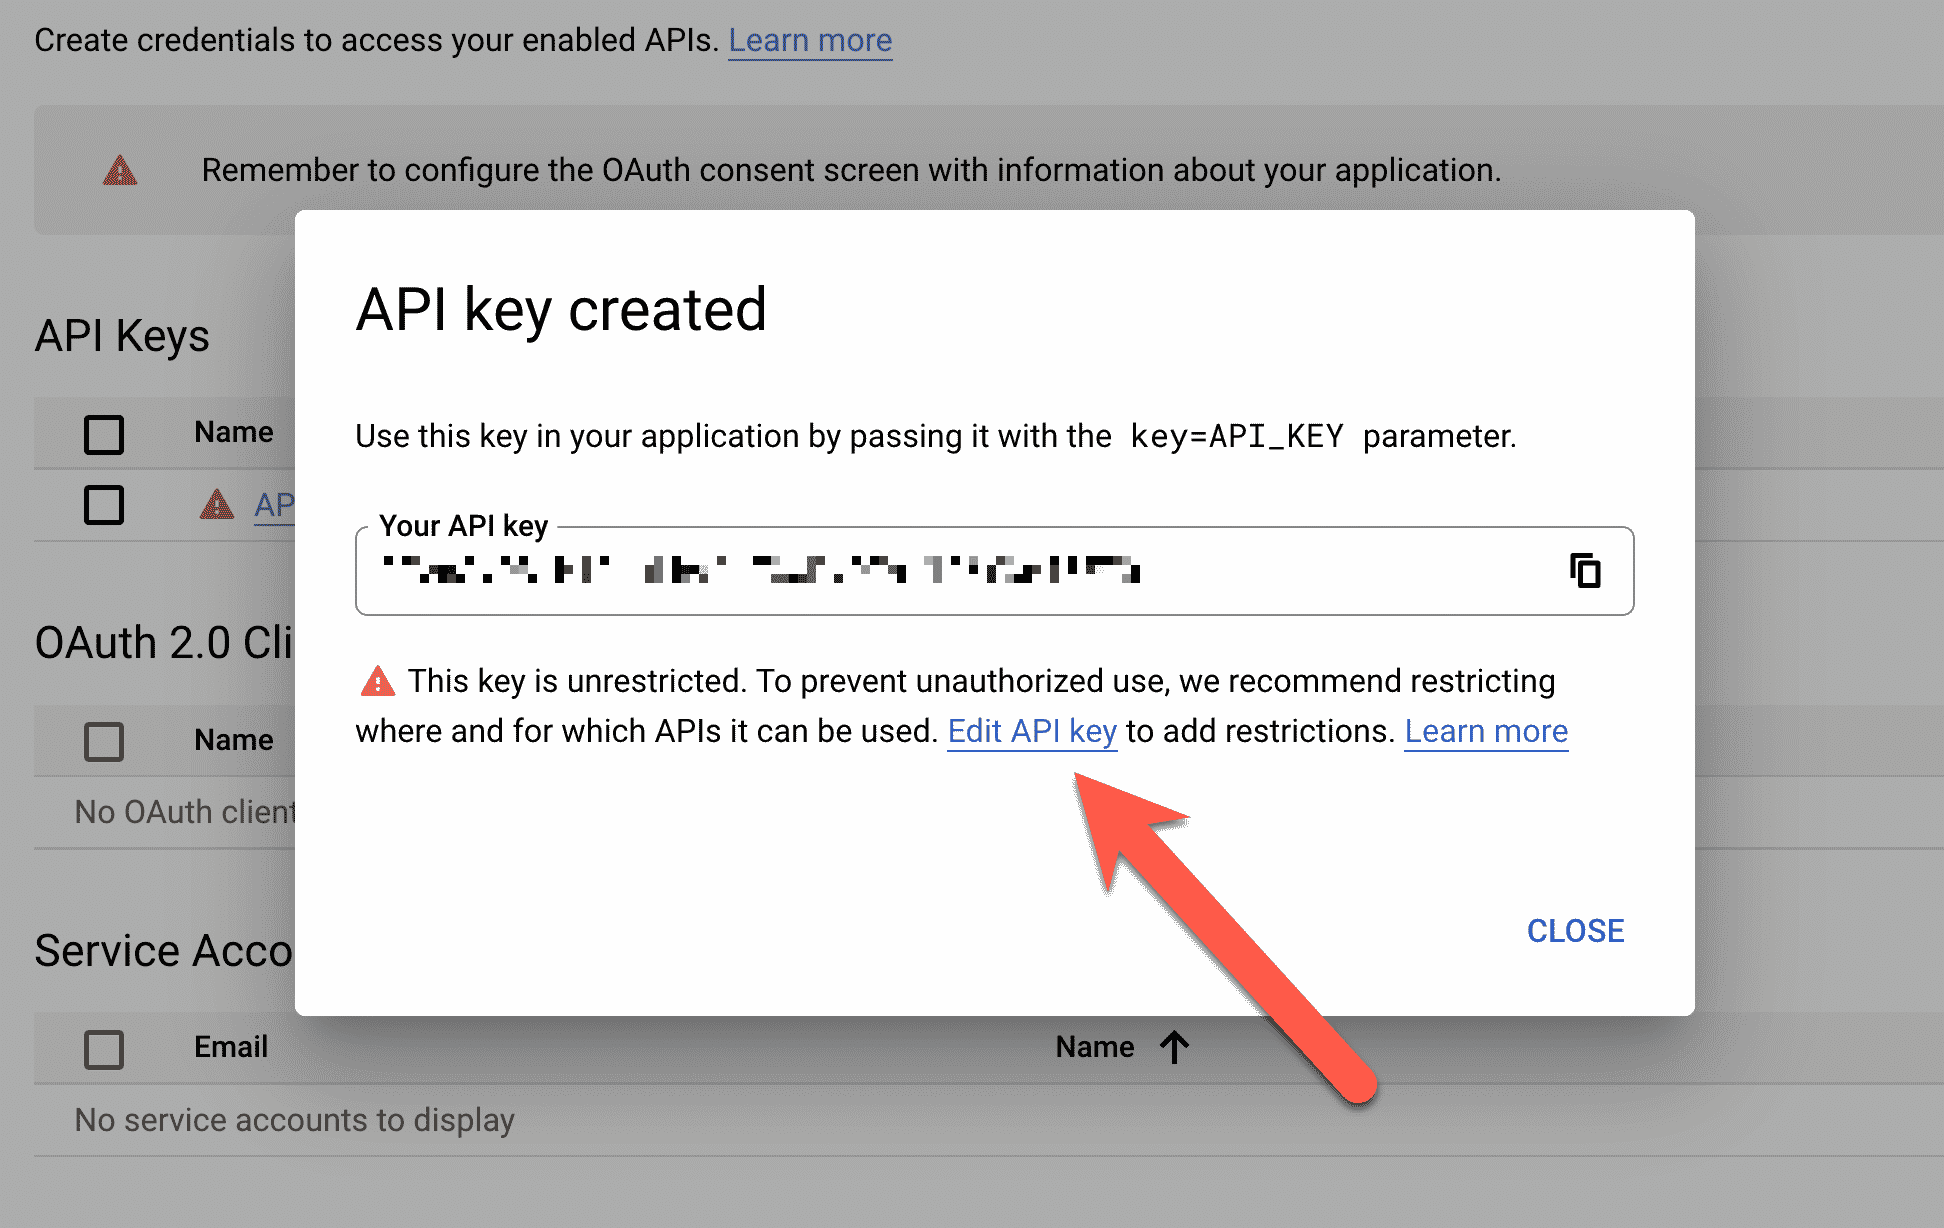
An API key will be created for you.
I’ve blurred mine here for security; copy yours for later use, but don’t share it with anyone else.
For extra security, we’ll also restrict what this key can be used for. Click Edit API key.
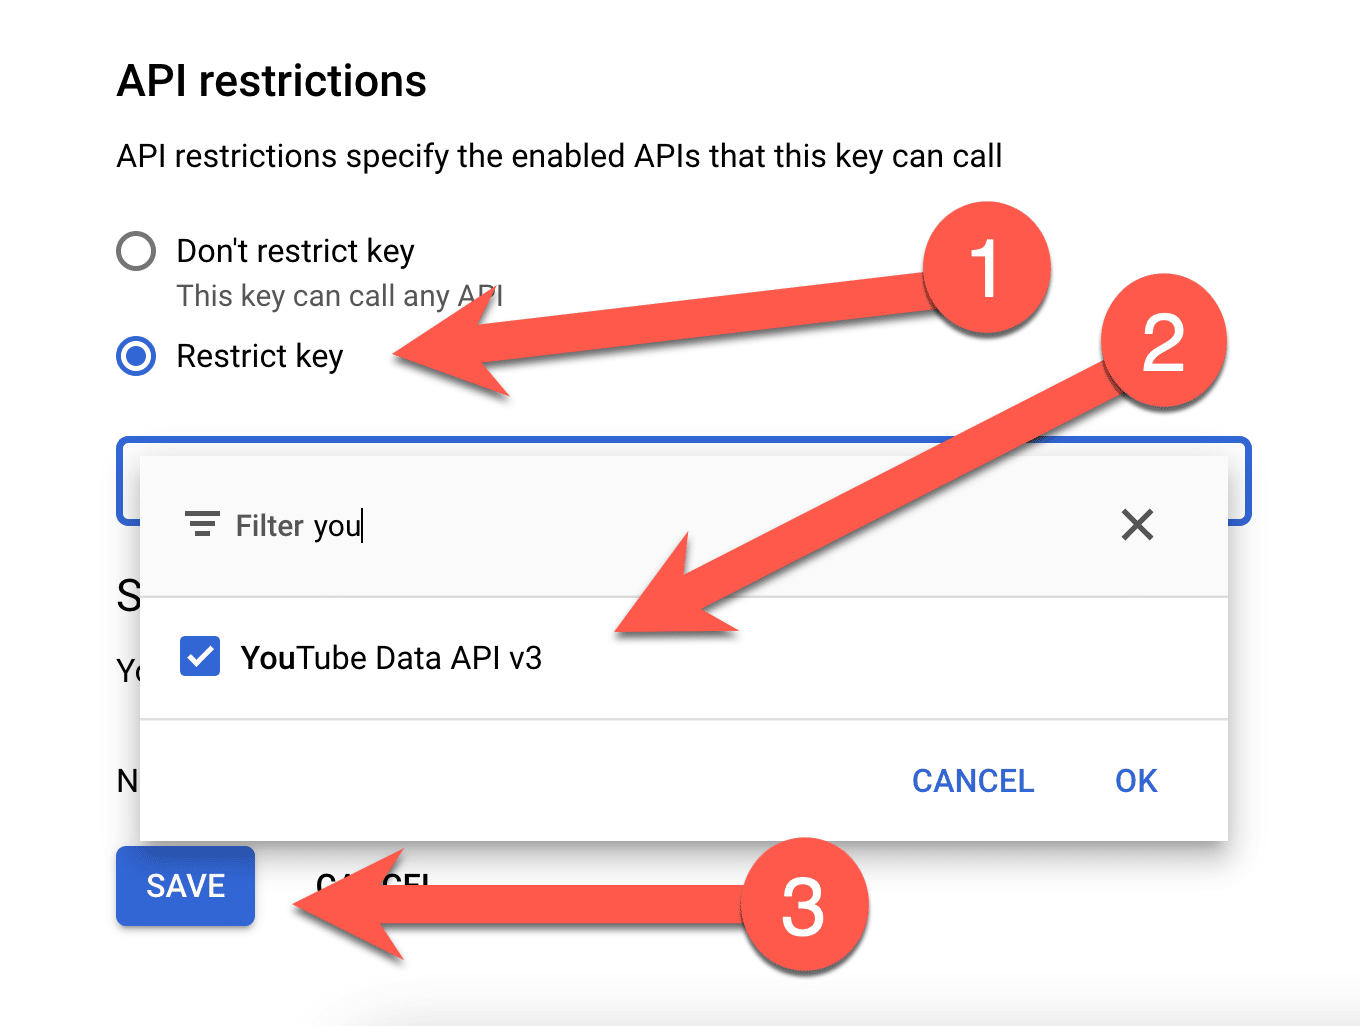
You can leave Application Restrictions set to None. However, we do want to set up some API Restrictions.
- Under API Restrictions, choose Restrict key.
- Search for and select YouTube Data API v3.
- Click Save.
Note: These restrictions are just for extra security. As long as you don’t share your key, no one else will be able to use it. However, in the event that it is shared, these restrictions limit what it’s able to do.
Now that you’ve set up your API key and ensured it has access to the YouTube Data API, we can move onto the next step!
For easy re-access, I recommend bookmarking Google Cloud so you can come back and fetch your API key whenever you need.
Copy link to headingBuild the Make.com Automation
Estimated Completion Time: 15-20 Minutes
The final step in this process is to create a no-code automation that will get data about each video from the YouTube API and send it to the correct database row in Notion.
To accomplish this without coding, we’ll be using Make.com, which is my favorite no-code automation builder. If you don’t already have an account, you can sign up for free here:
My favorite no-code automation builder that can create workflows between hundreds of apps.
Has a bit of a learning curve, but it significantly more powerful (and cheaper) than Zapier. Has a great free tier too.
I'll earn a commission if you sign up through this link and upgrade to a paid account (at no extra cost to you).
In this step, you’ll:
- Create a Make.com account (if you don’t already have one).
- Decide how to optimize your automation for update-frequency and cost (it can be done for free, but with limits).
- Build your automation visually using the Scenario builder.
- Enable your automation and set it to run on a schedule.
During the build process, you’ll do the following:
- Query your Notion database to get a list of video IDs
- Send those video IDs to the YouTube API
- Get information about each video, including view, like, and comment count, publish date, and thumbnail URL
- Update each video’s stats in Notion
- Set each Notion page’s cover to that video’s public thumbnail
Let’s get started!
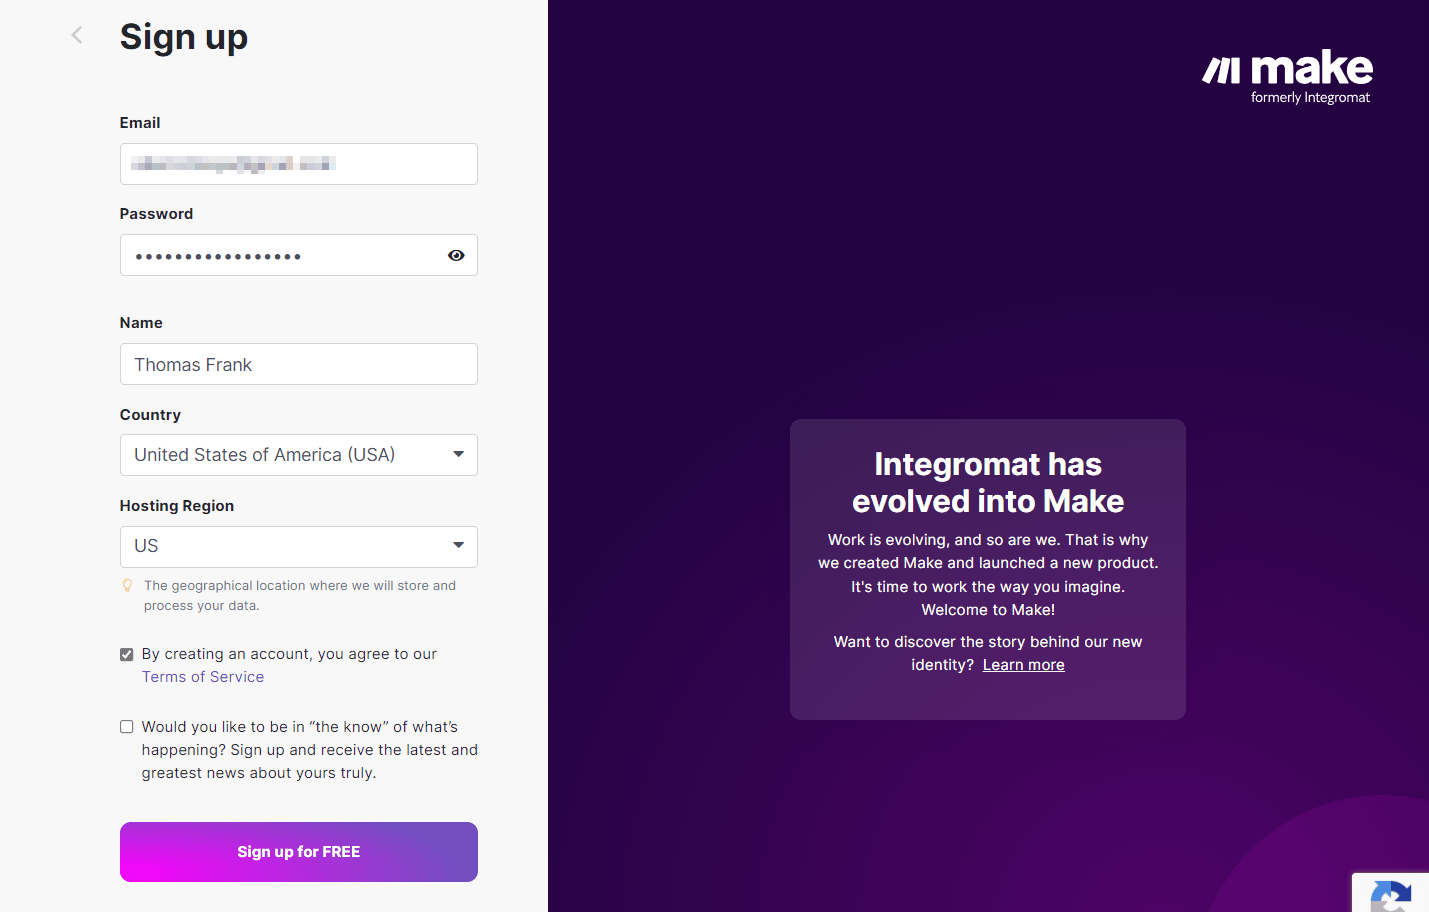
Copy link to headingStep 1: Create a Make.com Account
If you don’t have a Make.com account, let’s create one.
- Enter your new account details.
- Click the verification link sent to your email in order to enable the account.
Once you’ve got your account set up, you can go to Scenarios to start building your automation. Skip down to step 2 of this section to start doing that.
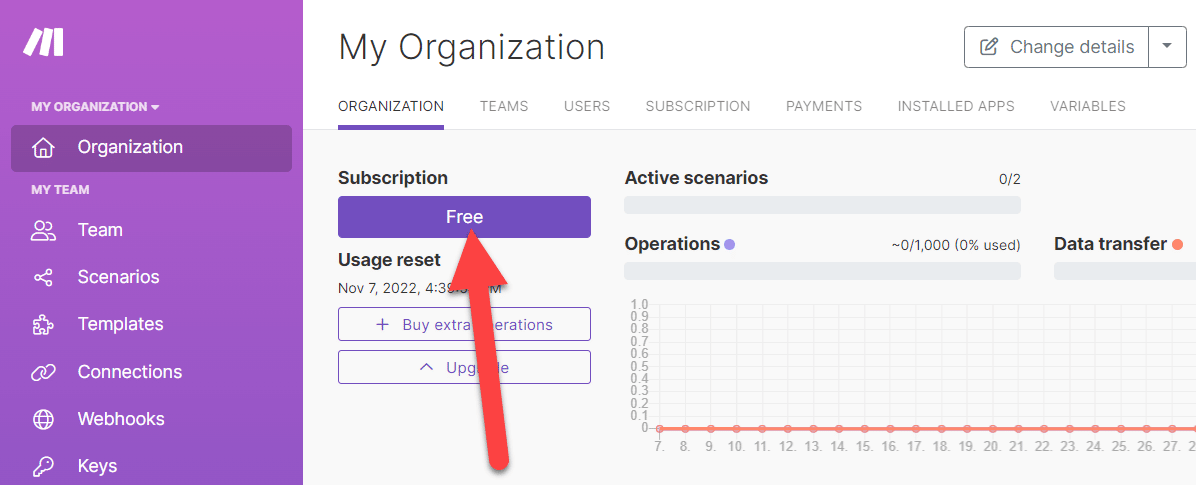
However, I’d recommend first clicking the Free button under Subscription to review the features and limitations of Make.com’s free account:
Make.com Pricing and Cost Considerations
Using Make.com, this tutorial can be completed for free!
A significant reason we’re not using Zapier for this tutorial is that multi-step workflows are only available on their paid plans (which are also much more expensive than the paid plans of other platforms).
Note: I’ll note that I actually use Make.com and Zapier for different purposes, so I have experience with both platforms. Make.com’s learning curve is significantly higher, but the platform is also more powerful. As I’ve continued to learn more about Make.com and how to use it, I’ve found myself moving automations from Zapier to it.
By contrast, Make.com allows you to create workflows with as many steps as you need, even on the free plan.
Another reason is that Zapier’s Notion integration is not as powerful, and since the Notion API’s launch, Zapier has been much slower to update their integration than other platforms like Make.com and n8n.
However, it’s important to understant that Make.com has limits on how much you can do on its free plan. This is true of all automation builders (the one exception I know of is n8n, but only if you self-host it on your own server or computer).
The most important limitation to understand is Make’s operation limit.
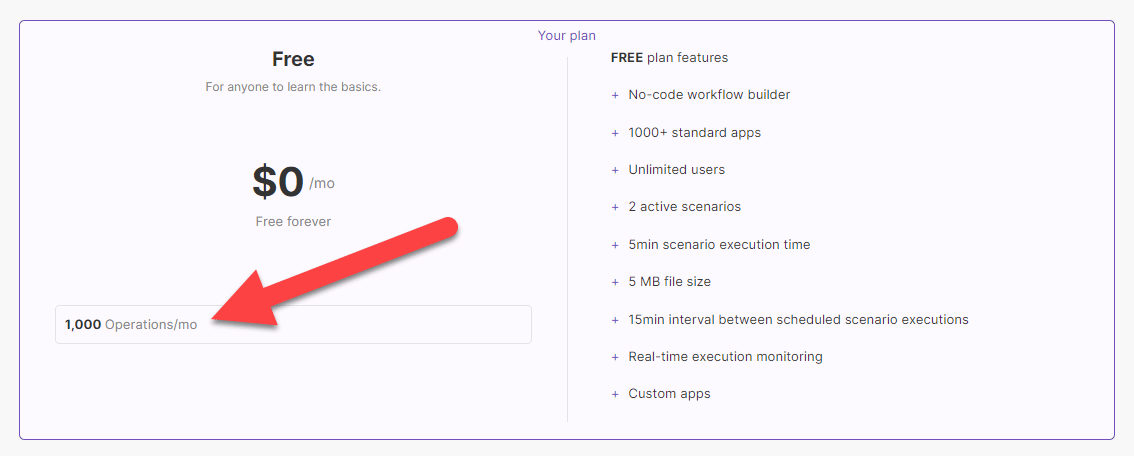
- On the free plan, you’re limited to 1,000 operations per month.
- If you upgrade to the $9/mo Core plan (the one I use), that goes up to 10,000 operations per month.
Once you’re on a paid plan, you can increase that number for an additional fee (20,000/mo, 40,000/mo, and so on).
Here’s how these limits apply to the automation we’re building here:
- To query the YouTube API and send data to Notion, it takes 2 operations per video each time you run your scenario.
- It also takes 2 operations per video to set your Notion page cover using your YouTube thumbnail, though this only needs to be done once per video (and you can simply skip this part if you’re ok uploading page covers manually).
- Finally, it takes 1 operation to query your Notion database (to get the list of Video IDs) each time you run your scenario.
Since setting the thumbnail only needs to happen once, I consider this automation to cost 2n+1 operations, where n is the number of videos you’re tracking.
If you’re tracking 50 videos, thats means each run of your automation will cost 101 operations.
With 1,000 operations/mo to play with on the free plan, that means you could run the scenario 9 times per month before running out.
Given this limitation, here are a few options:
- Schedule your stats to be updated once a week. That equates to roughly 4 times a month, which should be fine for sitting down and reviewing content performance on a regular basis.
- Add a “Track” checkbox to your database, manually select the videos you want to track, and set the automation to only track those videos.
- Upgrade to Make.com’s paid plan to increase your operation limit to 10,000/mo.
I’ll leave that up to you to decide!
Yes! But you’ll need some coding knowledge.
The ever-present trade-off when using no-code platforms is that they cost more to use than simply building apps and hooking into APIs yourself. But they’re far cheaper than hiring a developer, and they allow you to build amazing things without coding knowledge!
The closer you get to actually coding, the cheaper you can generally make things on an ongoing basis.
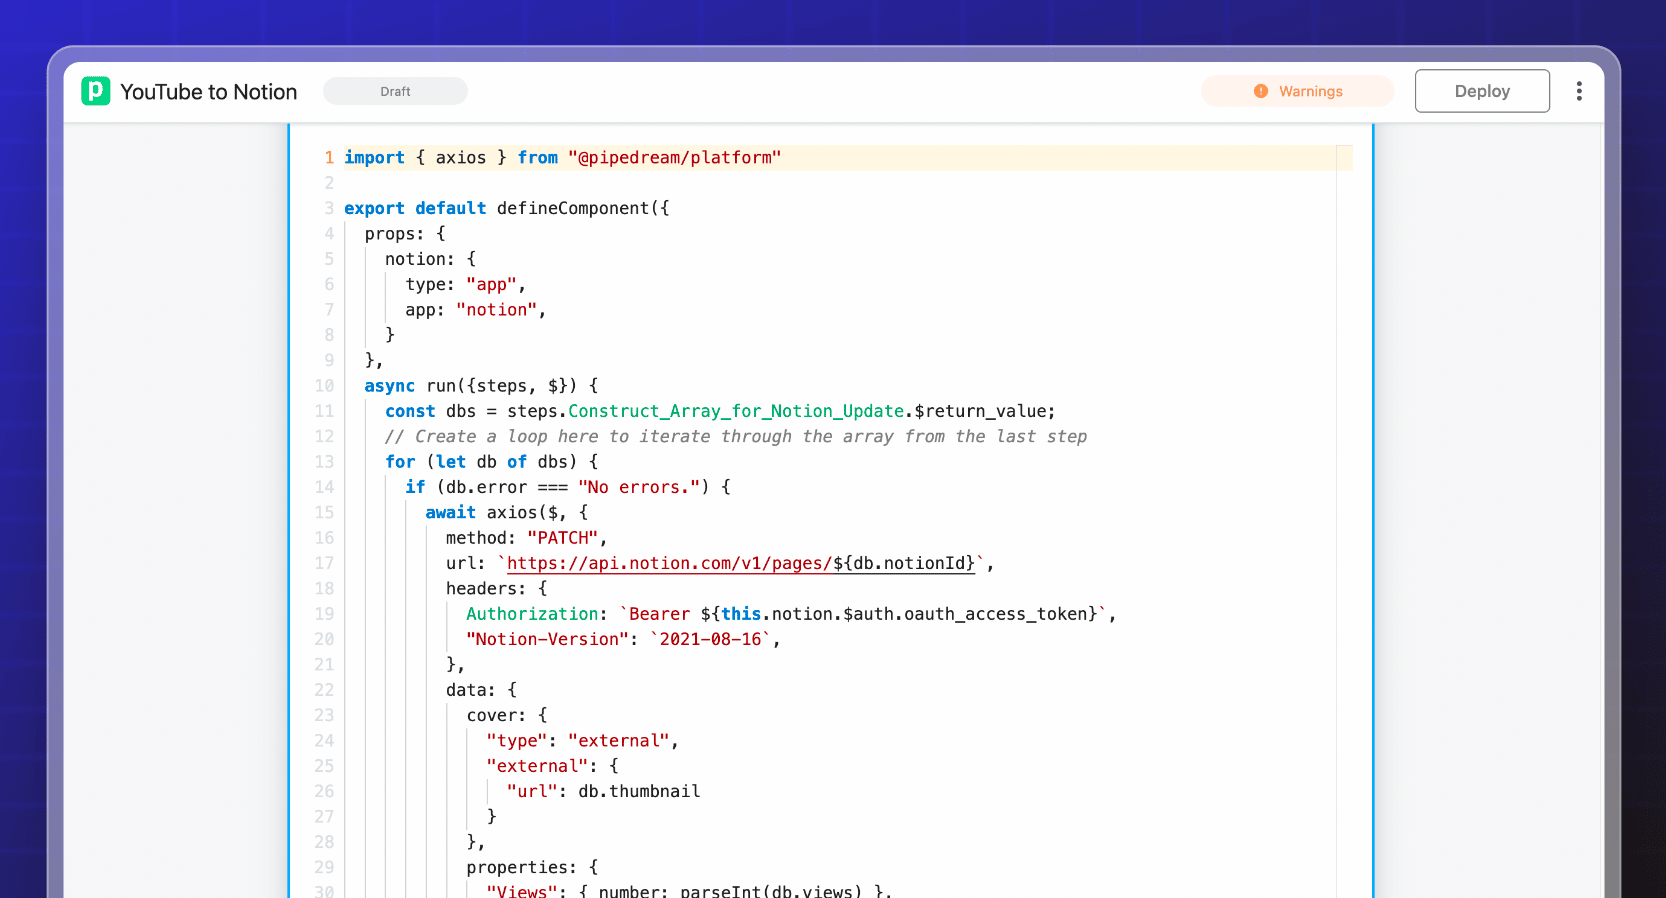
If you have some familiarity with JavaScript or Python, this automation can be set up and run much more cheaply using Pipedream. On their free plan, you’d be able to build the automation shown in this tutorial and run it multiple times a day (even for hundreds of videos).
Unlike Make and Zapier,
However, unlike Make.com,
Here’s a look at one step in my automation:
I’ve started to learn
However, I still need to scale it so that it can handle databases with more than 50 videos – unlike Make,
I’ll post a link to my
If you’d like to start learning JavaScript, here are some free beginner resources I recommend:
- JavaScript Algorithms and Data Structures on freeCodeCamp
- That Weird JavaScript Course by Fireship
- MDN Web Docs JavaScript Reference
- Beginner JavaScript Notes by Wes Bos
Here are a few resources for learning to work directly with the APIs used in this tutorial:
- Notion API – official documentation
- Notion API – Postman (features more detailed examples)
- YouTube Data API – official documentation
If you prefer learning with video, Traversy Media published a great video on coding with the Notion API:

And here’s a video from freeCodeCamp that will show you how to work with the YouTube Data API using HTML, CSS, and JavaScript:

Step 2: Build Your Make.com Scenario
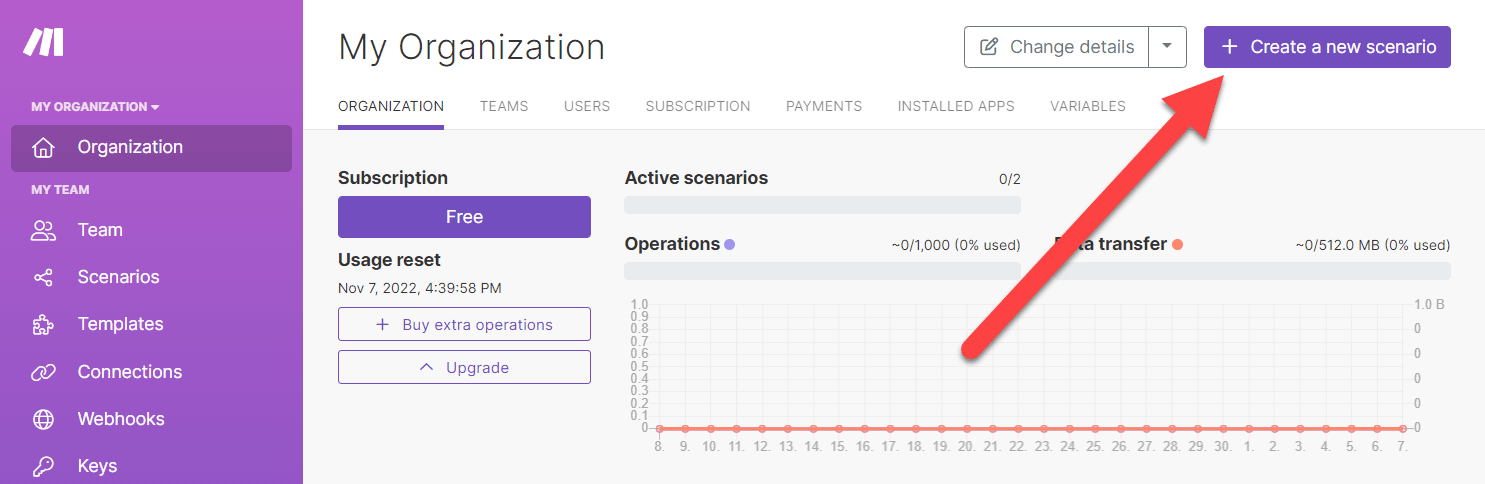
We’re finally ready to start building our automation. To start, click Create a New Scenario from the top of the Make.com interface.
You’ll now be presented with the Make.com Scenario Editor.
This is essentially a canvas where you can visually build your automation. To do that, you’ll create modules and connect them together.
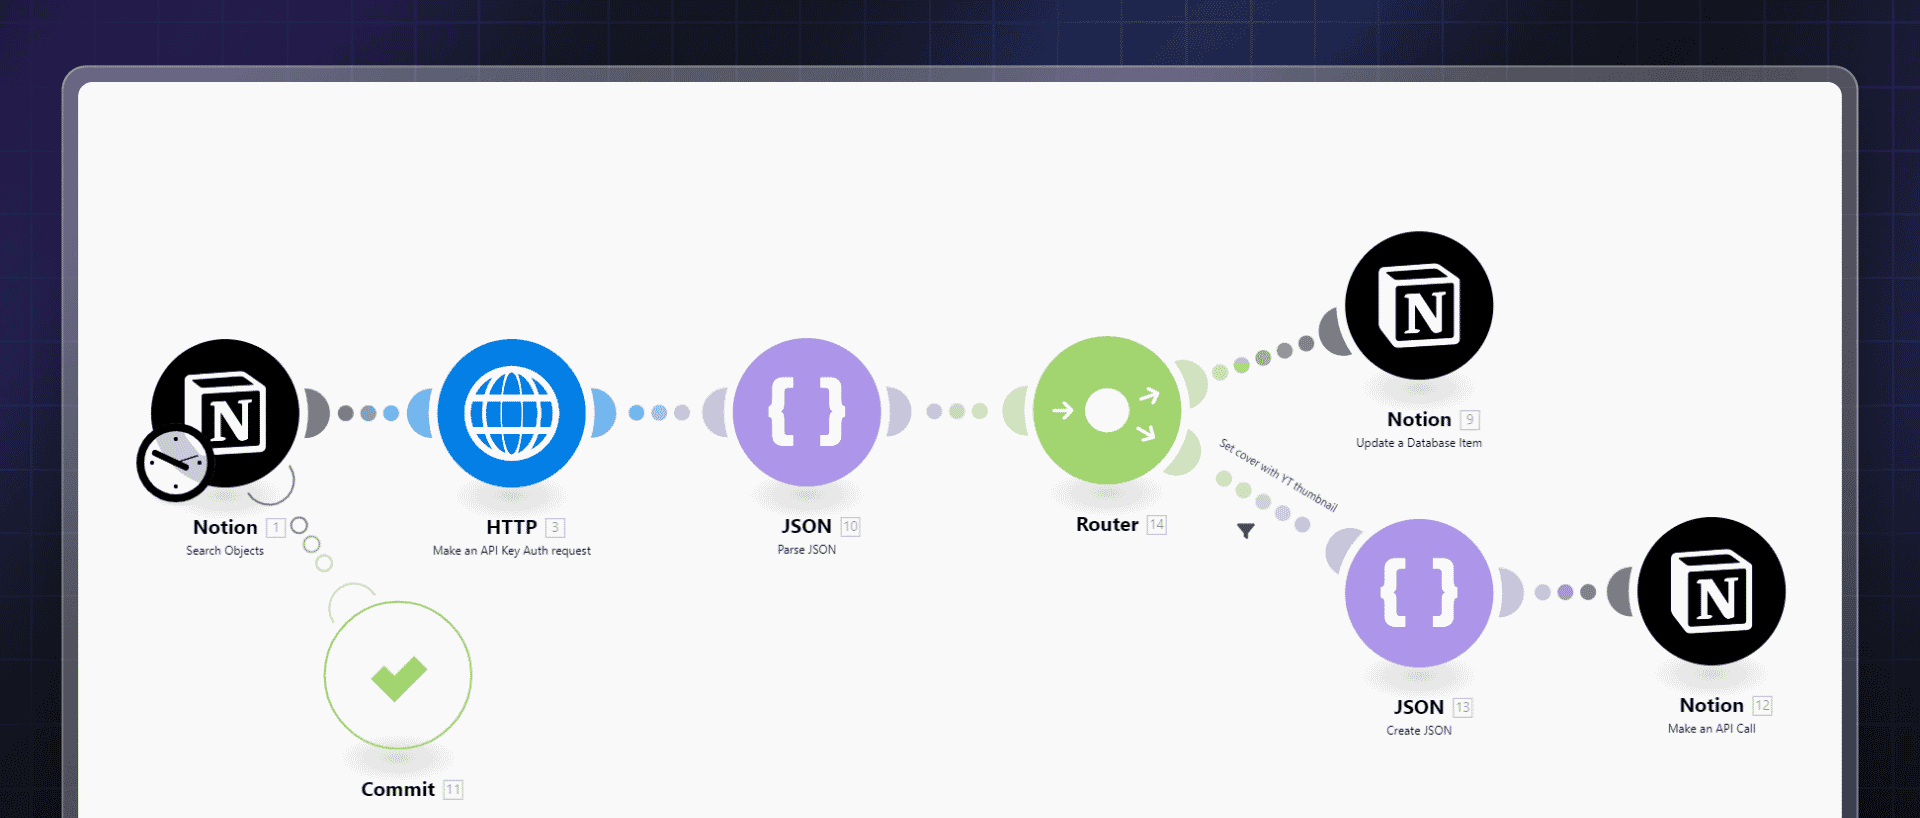
As a mental primer, here’s what your final scenario is going to look like:

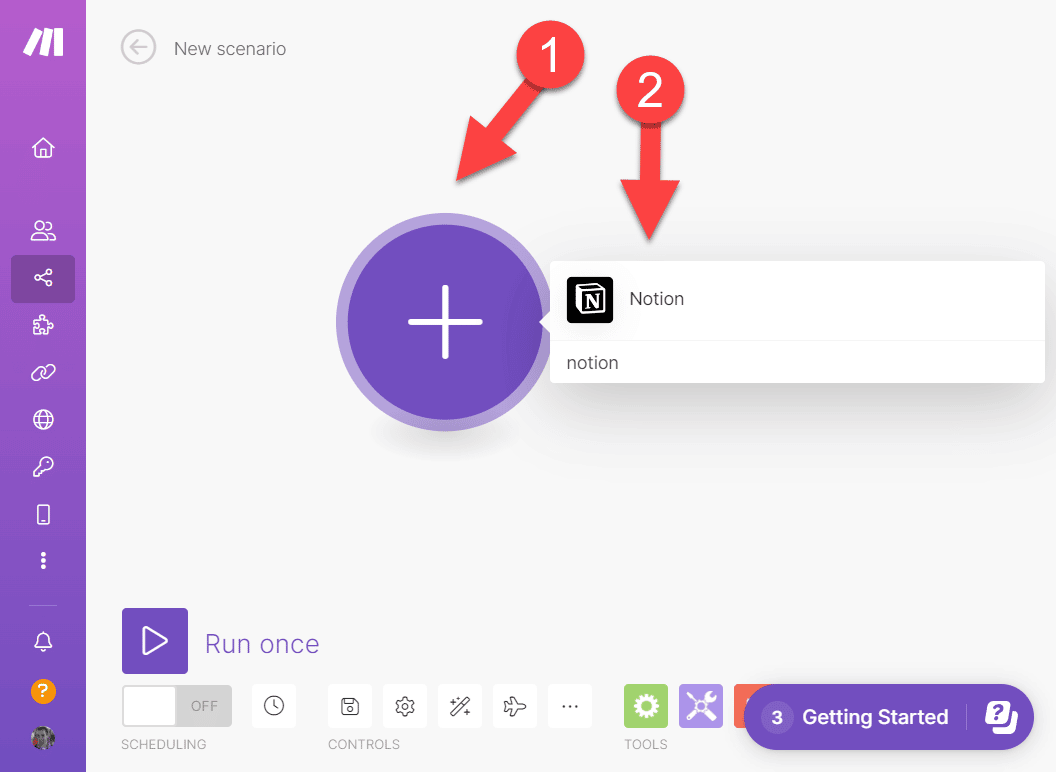
To start building that, let’s create our first module.
- Click the big Plus button on the screen.
- Search for and choose Notion from the menu of app choices.
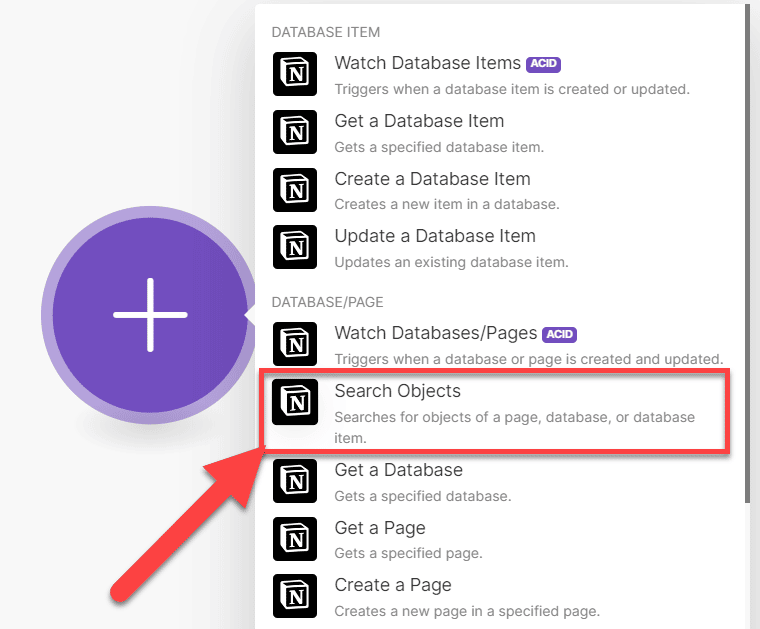
Once done, you’ll see a whole list of actions you can take from within Make.com’s Notion integration.
The first thing we need to do is query your Notion database in order to get a list of the database rows that we want to send to the YouTube API.
To do that, choose Search Objects.
We now need to connect your Make.com account to your Notion account so the Scenario can access your Notion database.
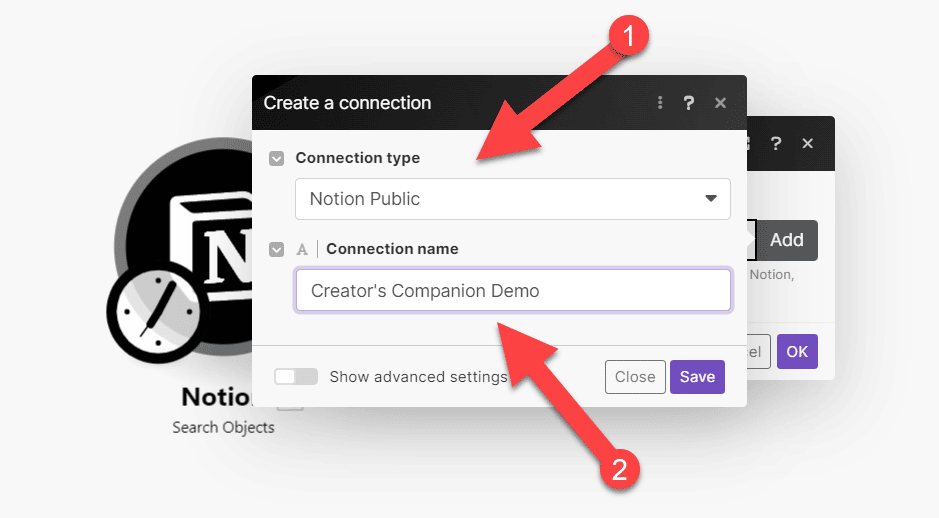
- Next to Connection, click Add.
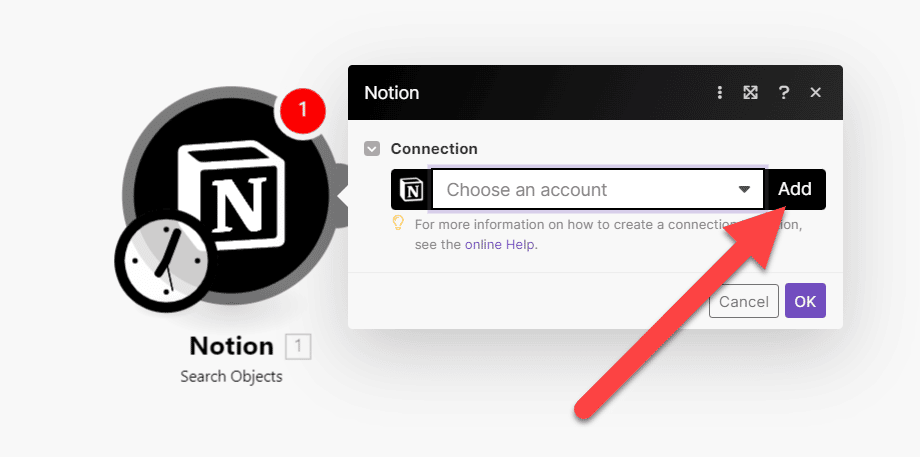
- Under Connection Type, choose Notion Public.
- Give your connection a name that you like – it doesn’t need to be anything specific.
A Notion authentication window will now pop up.
- Ensure you’re signed into the workspace that contains your target Notion database.
- Click Select pages.
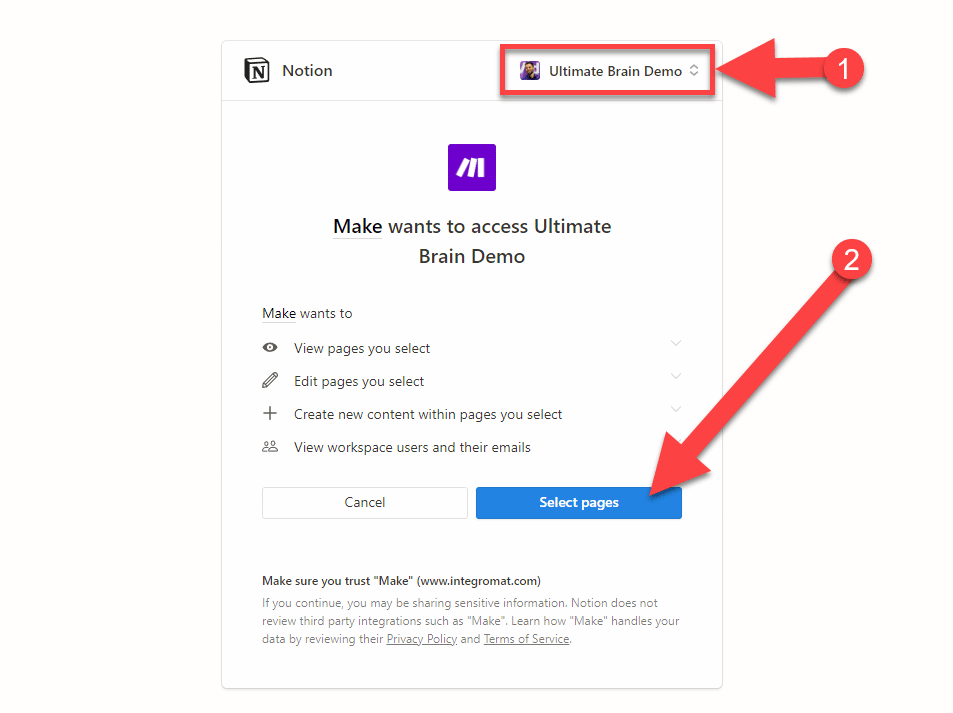
Next, select the pages for which you’d like to grant your Make.com connection access, and click Allow Access.
Important: Notion has cascading permissions, meaning child pages inherit the permissions of their parent page. Make sure your target database is contained within the page you select here (or search for it directly). Additionally, understand that your Make.com connection will have permissions to access any other pages underneath the selected page.
Here, I’m adding my Creator’s Companion Demo to the permissions list. This is a standalone demo version of Creator’s Companion, so the Master Content Tracker database that I’m targeting is a child of this page. (If you have the Creator’s Companion + Ultimate Brain bundle, note that Master Content Tracker has a different location. Refer to this page if you need to reference its location.)

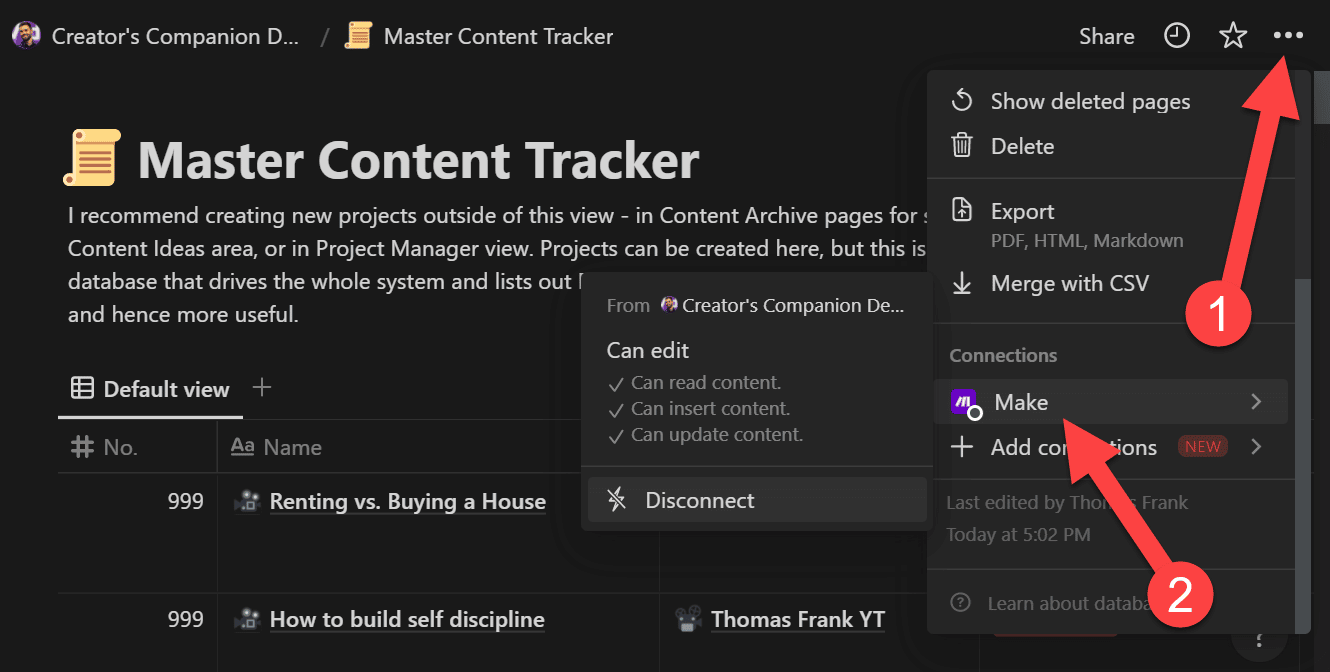
Once you’ve done this, you can verify that Make.com has access to your target database like so:
- Navigate to your database’s location in Notion.
- Click the
•••icon in the top-left corner. - Verify that Make is listed under the Connections sub-heading.
Back on Make, let’s configure this module.
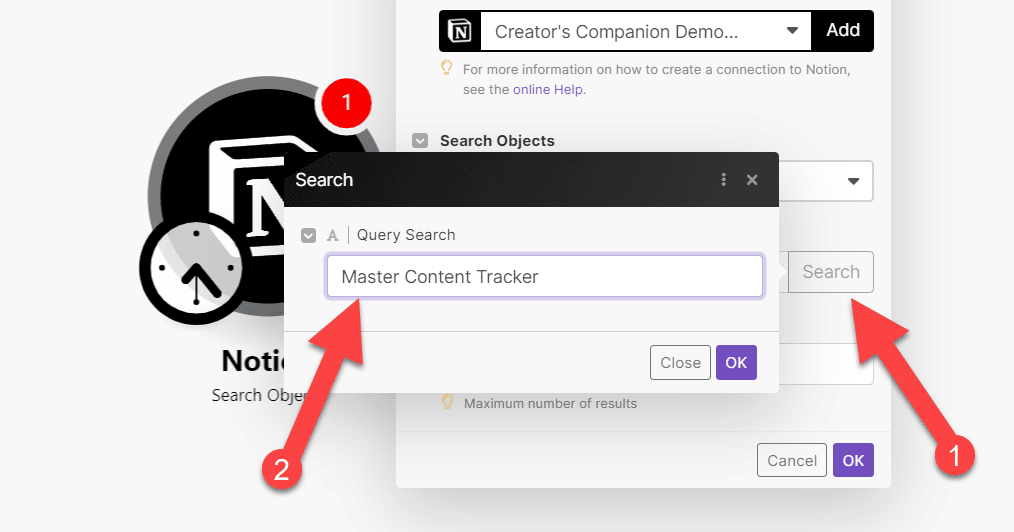
- Ensure Search Objects is set to Database Items (since we want to pull individual database items with this query).
- Under Database ID, click Search, and then search for the name of your database and click Ok. If you’ve given Make the correct permissions, it should pull in your database’s ID automatically.
If the Search dialogue doesn’t work correctly, you can also enter your database ID manually. Here’s how to find it.
From your Notion database’s home page (not a page containing a linked database view), click the ••• menu and click Copy Link.
This will copy the entire URL of your database to the clipboard. It will look something like this:
https://www.notion.so/ultimatebrain/8a37b5ad471a4153921eae0aaadb2c20?v=ede300269dd444eabaac7f00542c65c4
Code language: HTTP (http)
Your database ID is the bolded portion of the snippet above – it is the string of characters after the final / character and before the ?v= characters.
This means that my database’s ID is:
8a37b5ad471a4153921eae0aaadb2c20
Code language: HTTP (http)
If I paste this string directly into the Notion module in my Make.com Scenario, it’ll work perfectly.
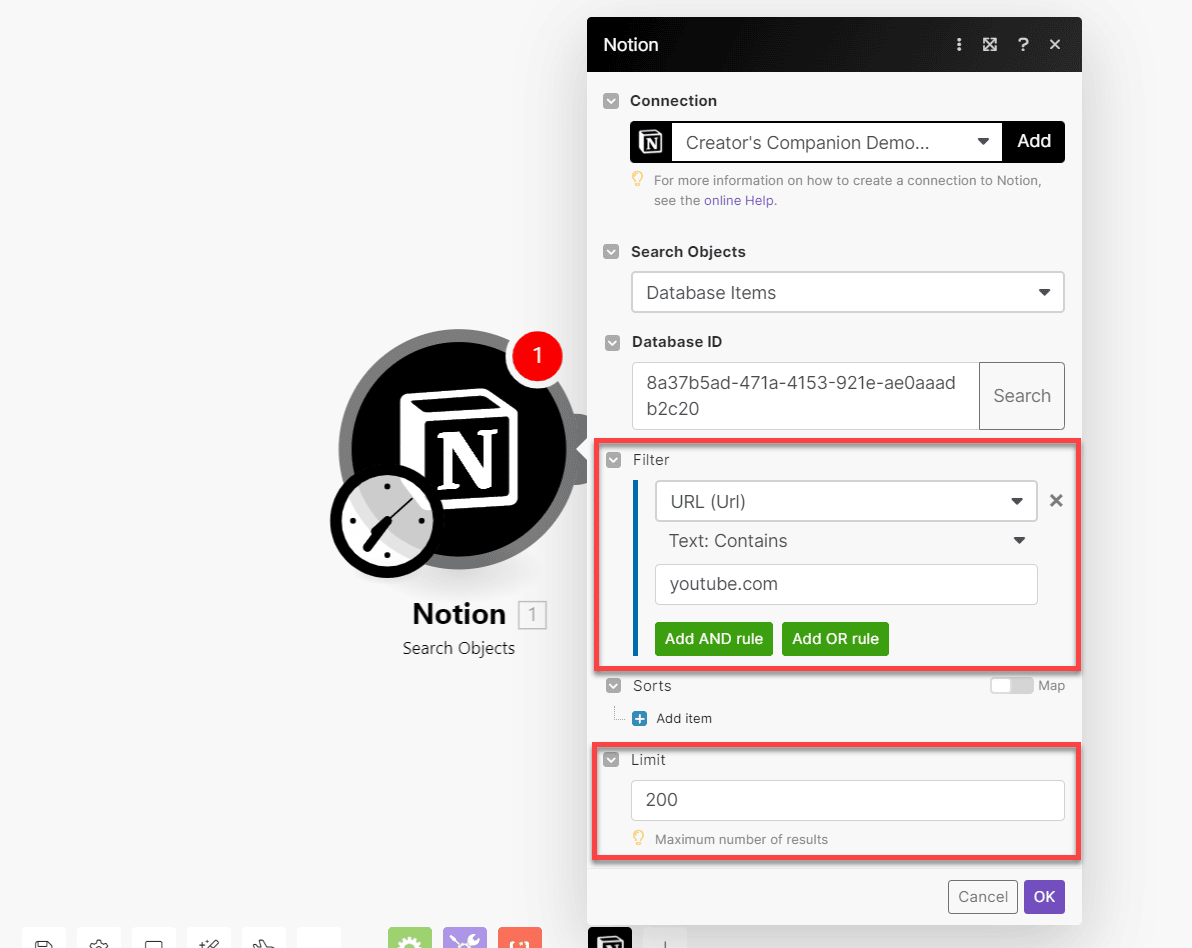
Next, we want to filter our query so we only pull database rows where the URL field is filled with a youtube.com URL. To do that, set up a filter:
- URL (URL)
- Contains
youtube.com
Additionally, you can set a limit for the query. Set this number high enough that it’ll fetch all the videos you want to track.
Note: The Notion API limits database queries to 100 rows at a time. In order to an integration to pull more, it has to paginate its requests. Fortunately, Make.com’s Notion integration does this for you, so you can set a limit higher than 100!
Next, let’s test the integration and make sure we get a response from Notion that contains data that we can send to YouTube.
- Right click the Notion module and click Run this module only.
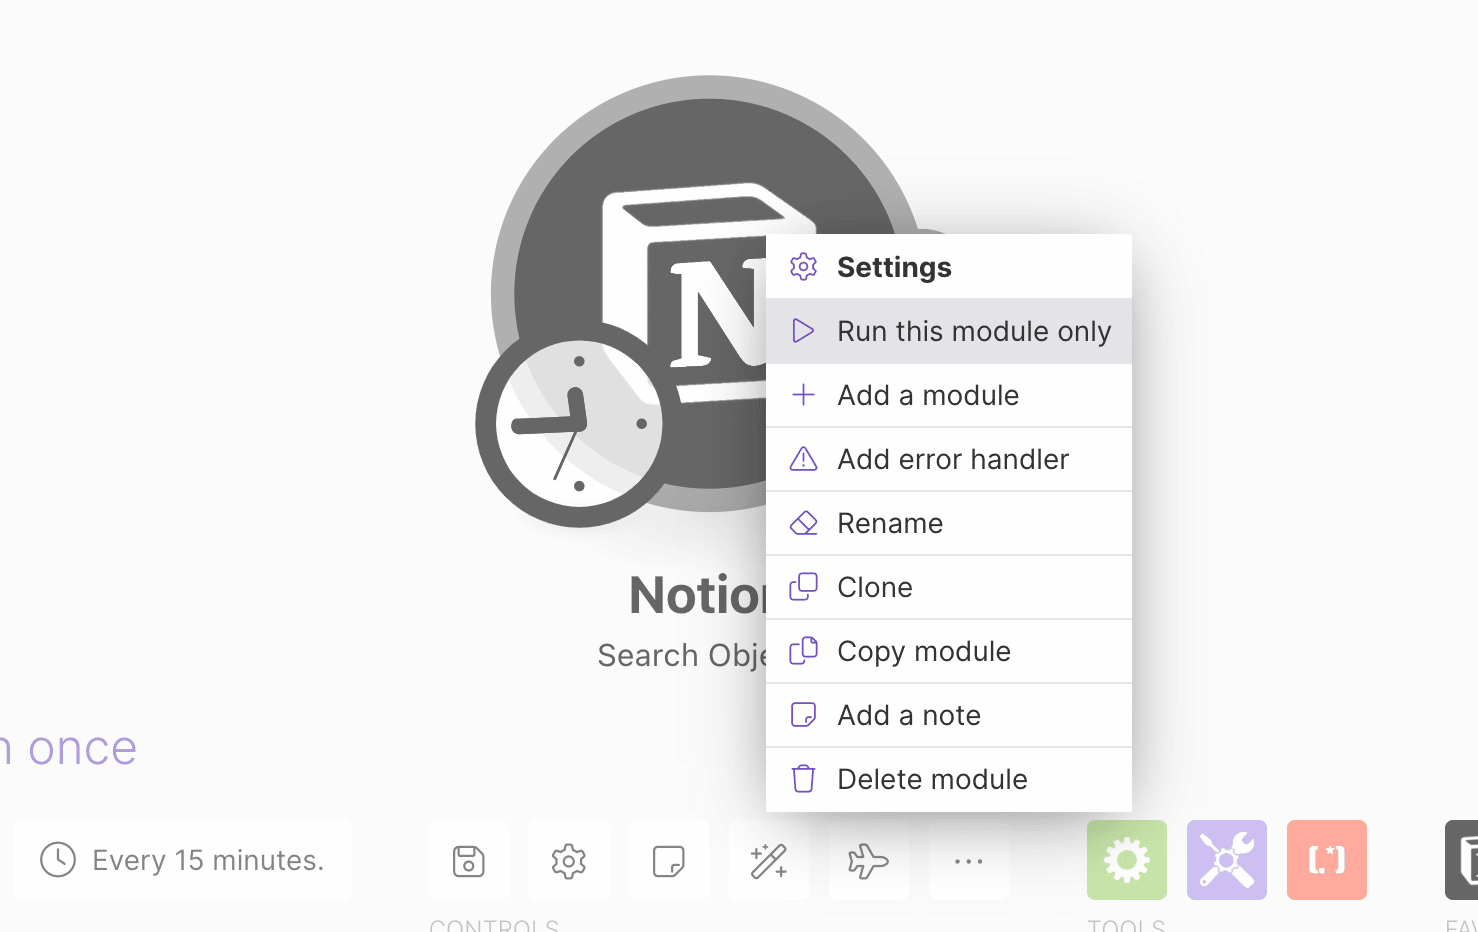
Note: Don’t skip these test runs while building this automation. They bring in data that you’ll need to reference later on, so you’ll get stuck if you skip them.
If the test was successful, you’ll see a green checkmark underneath the Notion module.
You can also click the magnifying glass icon in order to see the data that was returned. If you’ve followed everything perfectly so far, you should see a collection of Bundles in the output section of the window that comes up.

The Notion API technically returns an array of objects; each database row that matches the query we sent is an object, and the objects make up the elements of the array.
Make.com converts each element to a bundle. Bundles are then sent one-by-one through the chain of modules you have set up.
If you’re totally new to this concept, I like to think of it as similar to the classic Sega Dreamcast game Chu Chu Rocket. In that game, the player places directional blocks on a grid. Then, a chain of mice starts running.
Each mouse has its direction changed the moment it steps on the direction block:

Make.com scenarios do the same thing to bundles of data. Each bundle travels into a module; it is then operated upon by the module, and its output gets sent to the next module.
If you have a programming background, you can also think of an entire Make scenario like a for…of loop.
Typically, 1 operation is counted whenever a module processes an incoming bundle. This means that you can quickly use up your allotted Make.com operations if you’re building workflows that create lots of bundles.
However, you can often make your scenarios more efficient by using their built-in tools, such as the array aggregator.
This doesn’t work well for the YouTube-to-Notion workflow we’re building here (since we need to send page updates to Notion one-at-a-time), but you may find it useful in other automations!
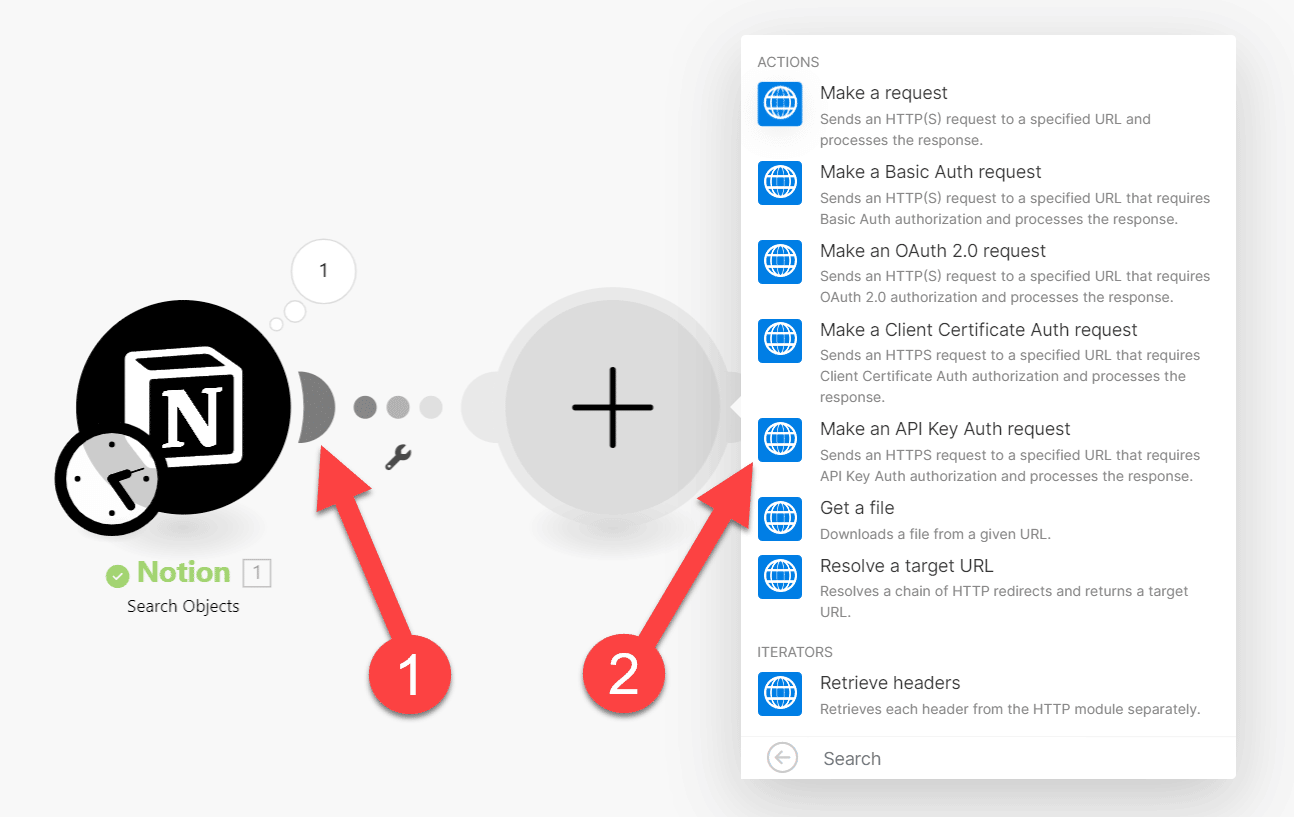
Next, we’ll pull the YT ID property value from each of these Notion bundles and send it to the YouTube API in order to get information about each video.
Make.com does not have a built-in YouTube API integration. Fortunately, they provide an HTTP module that we can use to talk to any API. We’ll use that to send our data to YouTube. Specifically, we’ll be calling the Videos:list method, which is used to get information about specific videos.
The HTTP module is a general purpose module that you can use to send API calls to any API. It allows you to interact with tools and web apps that Make.com doesn’t officially support. Learn more about it here.
- Click the
+icon to add another module. - Search for and choose the HTTP module.
- From the menu of actions, choose Make an API Key Auth Request.
To interact with the YouTube API, we’ll need to pass the API key we set up earlier with any request we make.
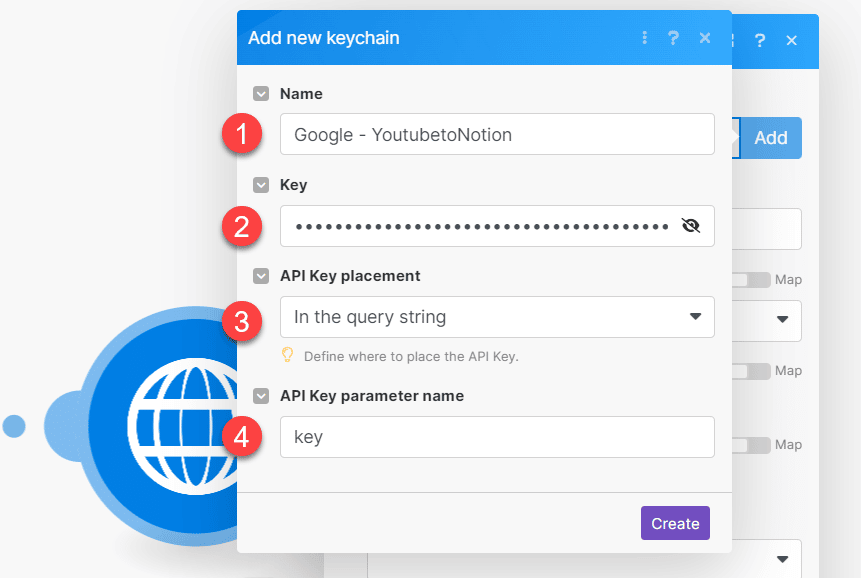
Under Credentials, click Add. You’ll now add a new Key to your Make.com account. Note that this will be saved to the Keys menu accessible from the sidebar, and you’ll be able to use it in other scenarios.
Enter the following details:
- Name: Anything you want – I like to match it to my Google Cloud project name
- Key: Your API key from Google Cloud
- API Key placement: In the query string
- API Key parameter name: key
Click Create.
Now we’ll define the endpoint and method for our HTTP request.
- URL: (click the clipboard icon in this code block to copy)
https://www.googleapis.com/youtube/v3/videos
Code language: HTTP (http)- Method: GET

Next, we’ll set the parameters that will be passed in the query string that get outputted by this HTTP module.
- Leave Headers blank. This entire request is passed via query string.
- Under Query String, create two Items.
- Within Item 1, set Name to
partand Value tosnippet,statistics. - Within Item 2, set Name to
id. Click the Value field and find Notion – Search Objects → properties_value → YT ID → string. Drag it into the Value field.
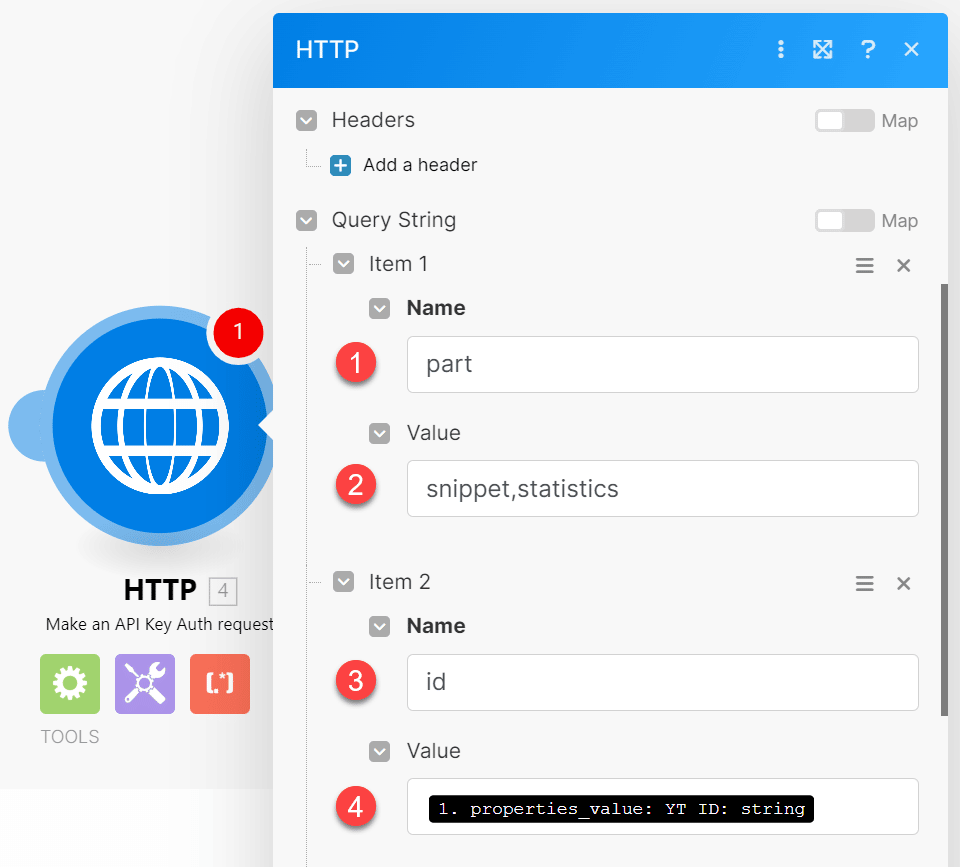
This process of clicking/dragging elements into fields is called mapping. Click here to learn more about mapping in Make.com.
Finally, under Parse Response, choose the Yes option.
If you choose No, the HTTP module will output YouTube’s response as a string (and a very long one at that).
To properly interact with the data in the next step, it needs to be formatted as JSON. Choosing Yes will tell Make to automatically output the response as JSON.
Let’s test the workflow we have so far:
- Near the bottom of the screen, click the Save Icon to save your work.
- Click Run Once.
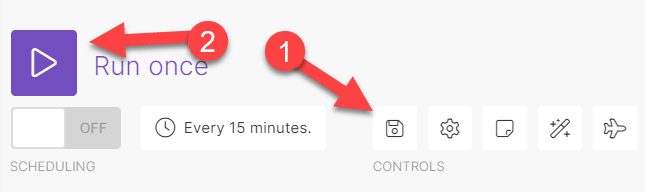
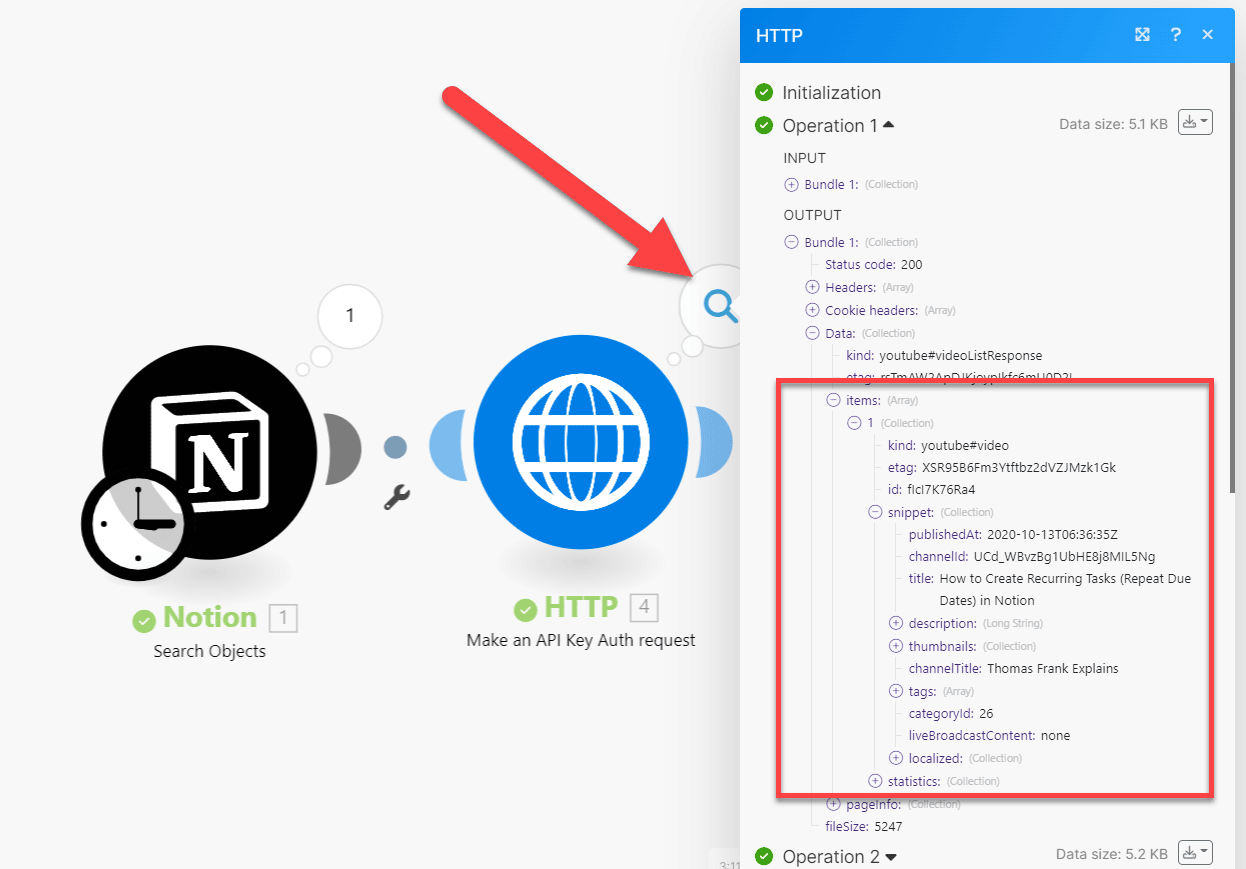
If your test was successful, you should be able to click the magnifying glass icon on the HTTP module and see one operation per bundle that was sent from the Notion module.
You can even toggle into the Output bundles. Under Data → items → 1 → snippet, you’ll be able to see your video’s title and some other info!
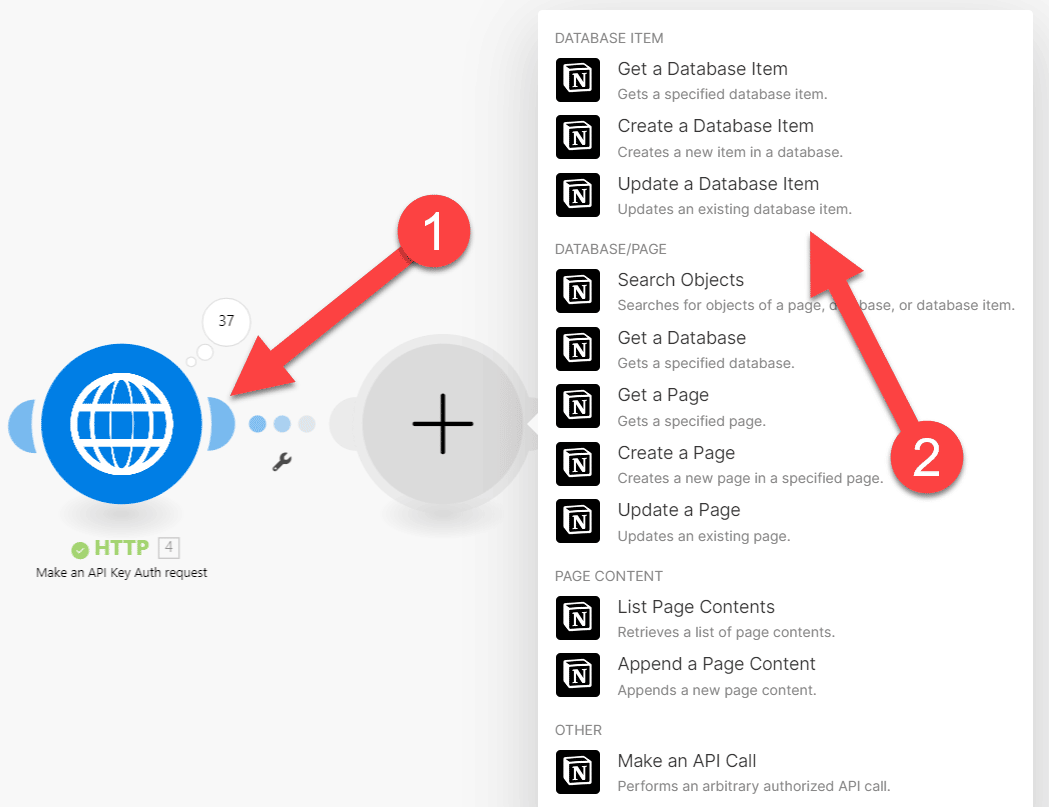
Now we can send this data back to Notion in order to update your video statistics there!
- From the HTTP module, click the
+icon to add another module. - Select Notion.
- Select Update a Database Item.
Set the following details:
- Enter a Database ID: Enter manually
- Database ID: Find and click Notion – Search Objects → Parent → Database ID
- Page ID: Find and click Notion – Search Objects → Page ID
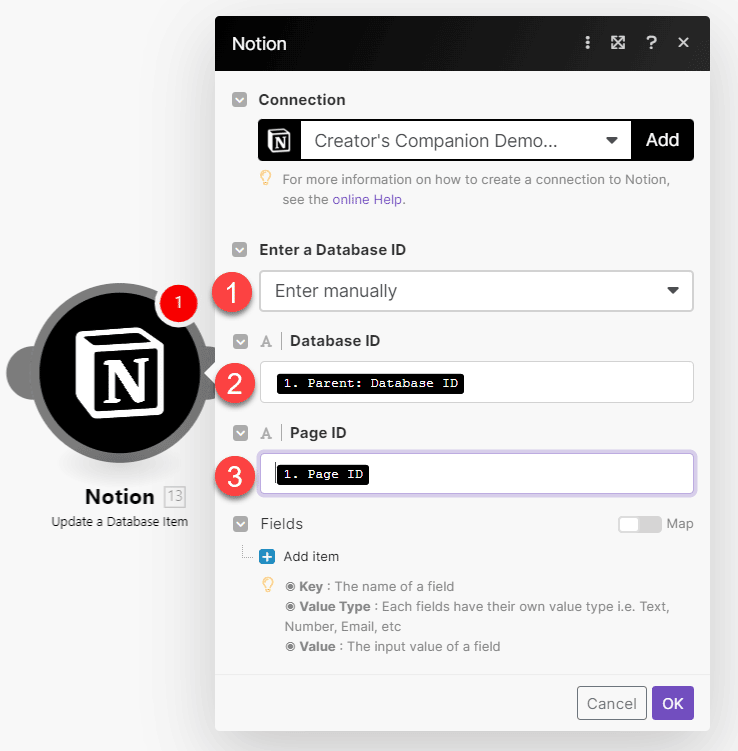
Next, we’ll define the properties to be updated. We’ll set the property name, type, and value it should recieve. For each Value, click the field and map the indicated value listed below by clicking it.
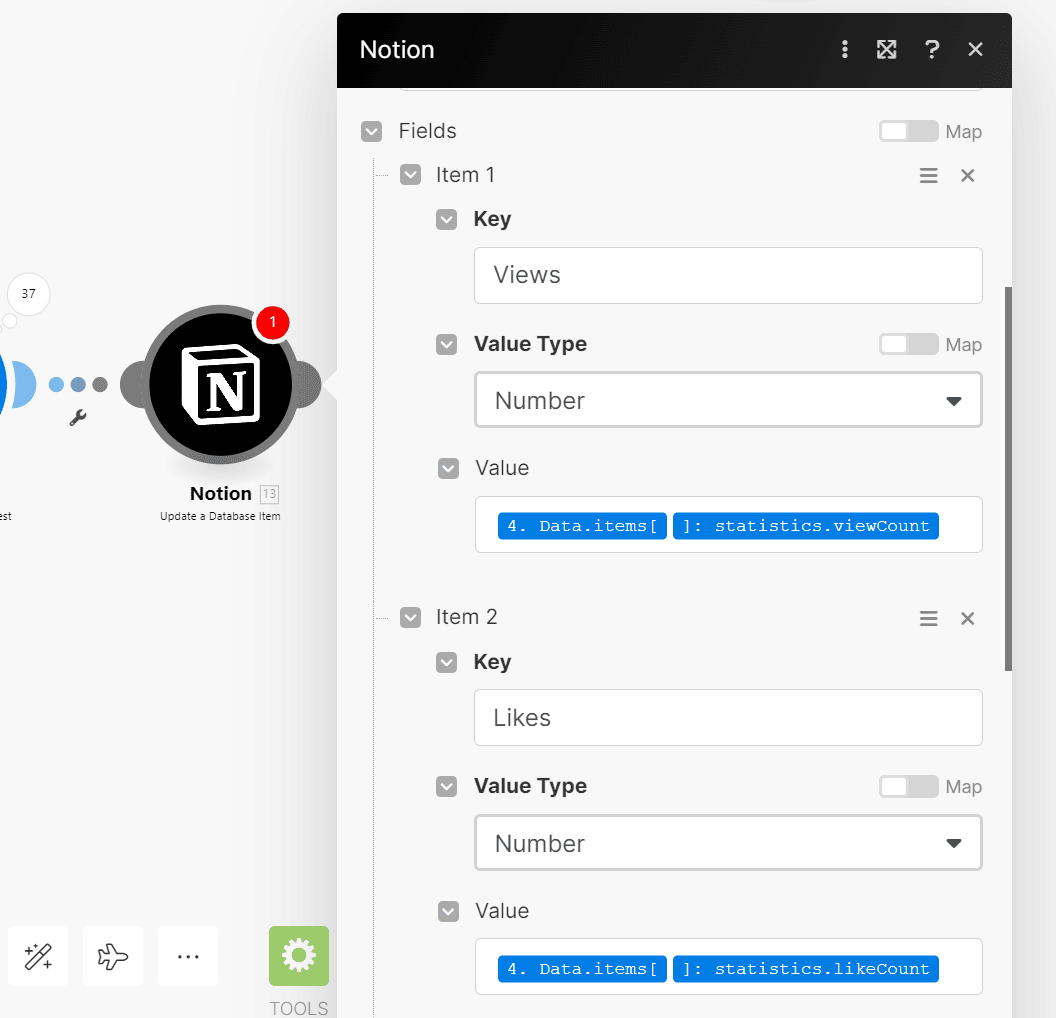
Item 1:
- Key:
Views - Value Type: Number
- Value: Click and Drag: HTTP → Data → items → statistics → viewCount
Item 2:
- Key:
Likes - Value Type: Number
- Value: Click and Drag: HTTP → Data → items → statistics → likeCount
Item 3:
- Key:
Comments - Value Type: Number
- Value: Click and Drag: HTTP → Data → items → statistics → commentCount
Item 4:
- Key:
Publish Date - Value Type: Date
- Value: Click and Drag: HTTP → Data → items → snippet → publishedAt
Everything else can be left blank. Click Ok when done.
Items 1 and 2:
Items 3 and 4:

Save your automation and then click Run Once again.
If you’ve set everything up correctly, you should now see your view, like, and comment counts (and your publish dates) updated in Notion!
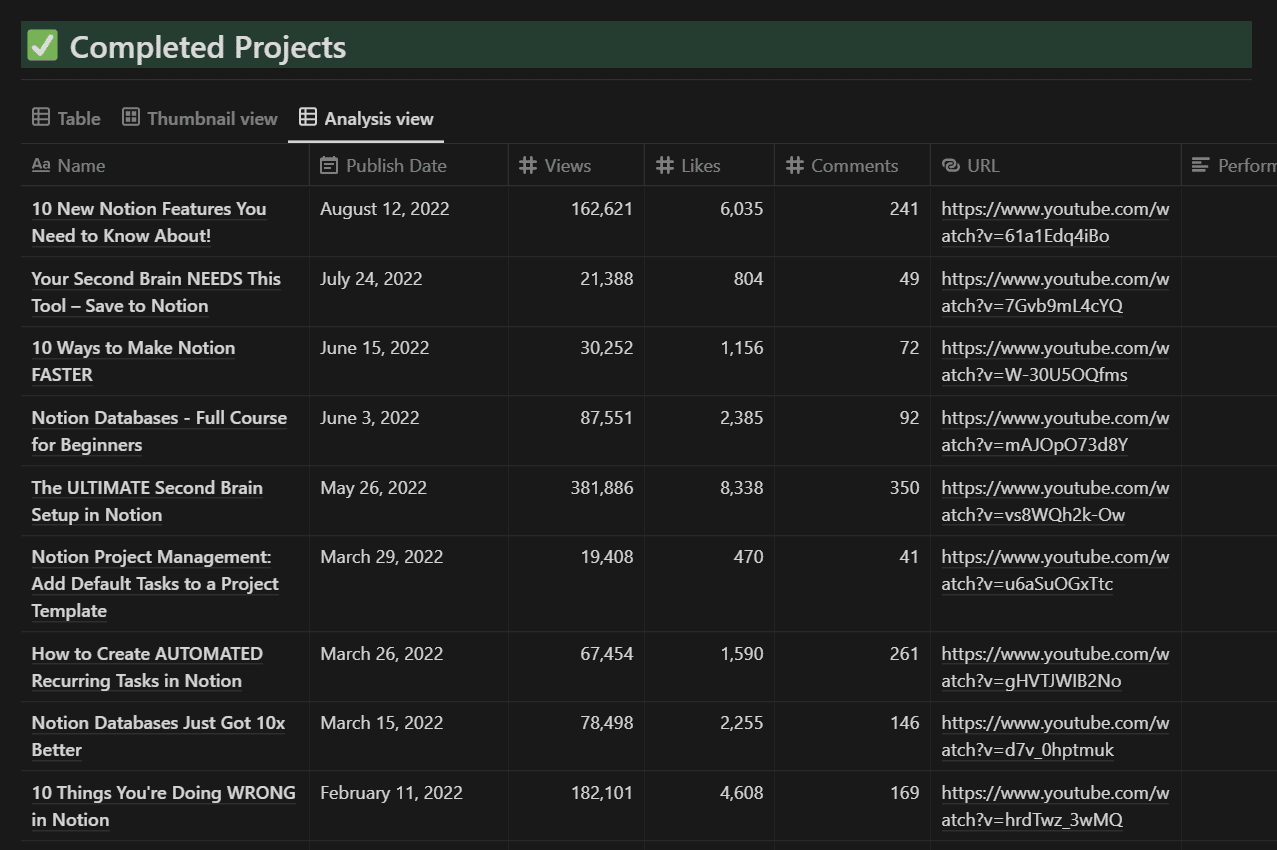
Here’s the Completed Projects section of my demo template, complete with updated stats!
Next, we’ll modify our automation so that it also sets each Notion page’s cover using your actual video thumbnails from YouTube.
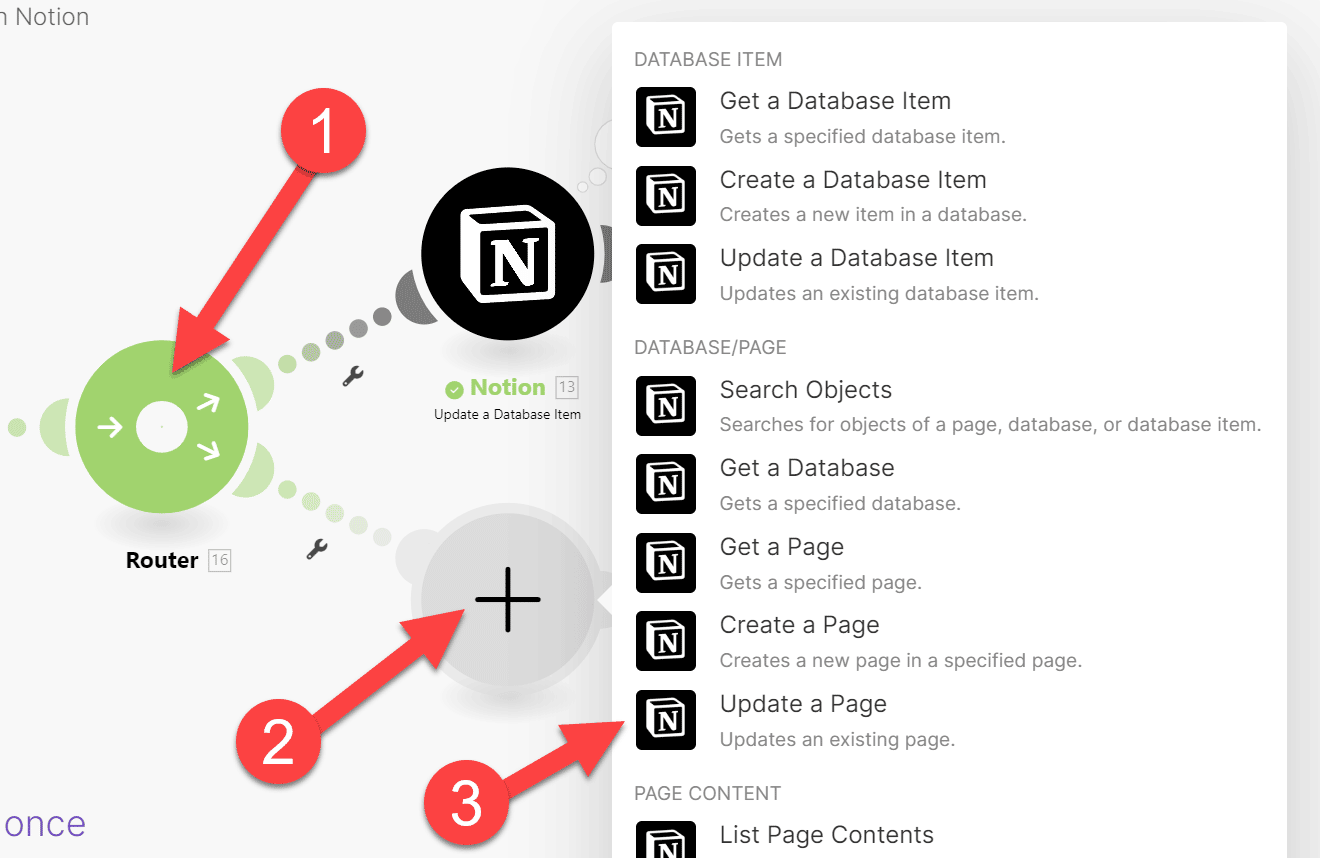
This involves adding another Notion module to our scenario, since the Update a Database Item module doesn’t give us access to the Page Cover property.
However, another Notion module means another operation for each bundle. Operations are limited, and since thumbnails don’t change often, you’ll probably want to set the page cover only once.
To do that, we’ll first add a Router to the automation. This allows you to add conditional logic to your workflow; bundles will travel down each path in a Router, but only if they fit the filter criteria of each path (if there is any).
- Right-click the dotted line between the HTTP module and the final Notion module.
- Click Add a Router.
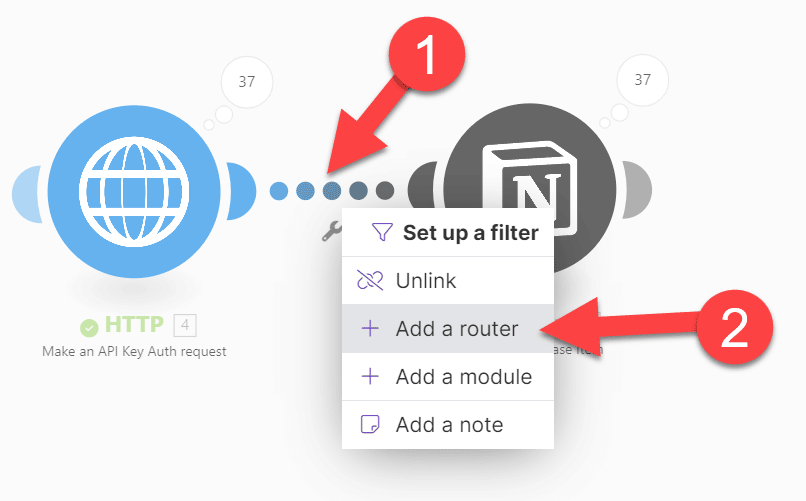
- Click the Router to add another path.
- On the new path, add a new module.
- Select Notion, then select Update a Page.
< shape.Within the Update a Page module, set the following:
- Page ID: Notion – Search Objects → Page ID
- Cover URL Link: HTTP → Data → items → snippet → thumbnails → maxres → URL
Click Ok.
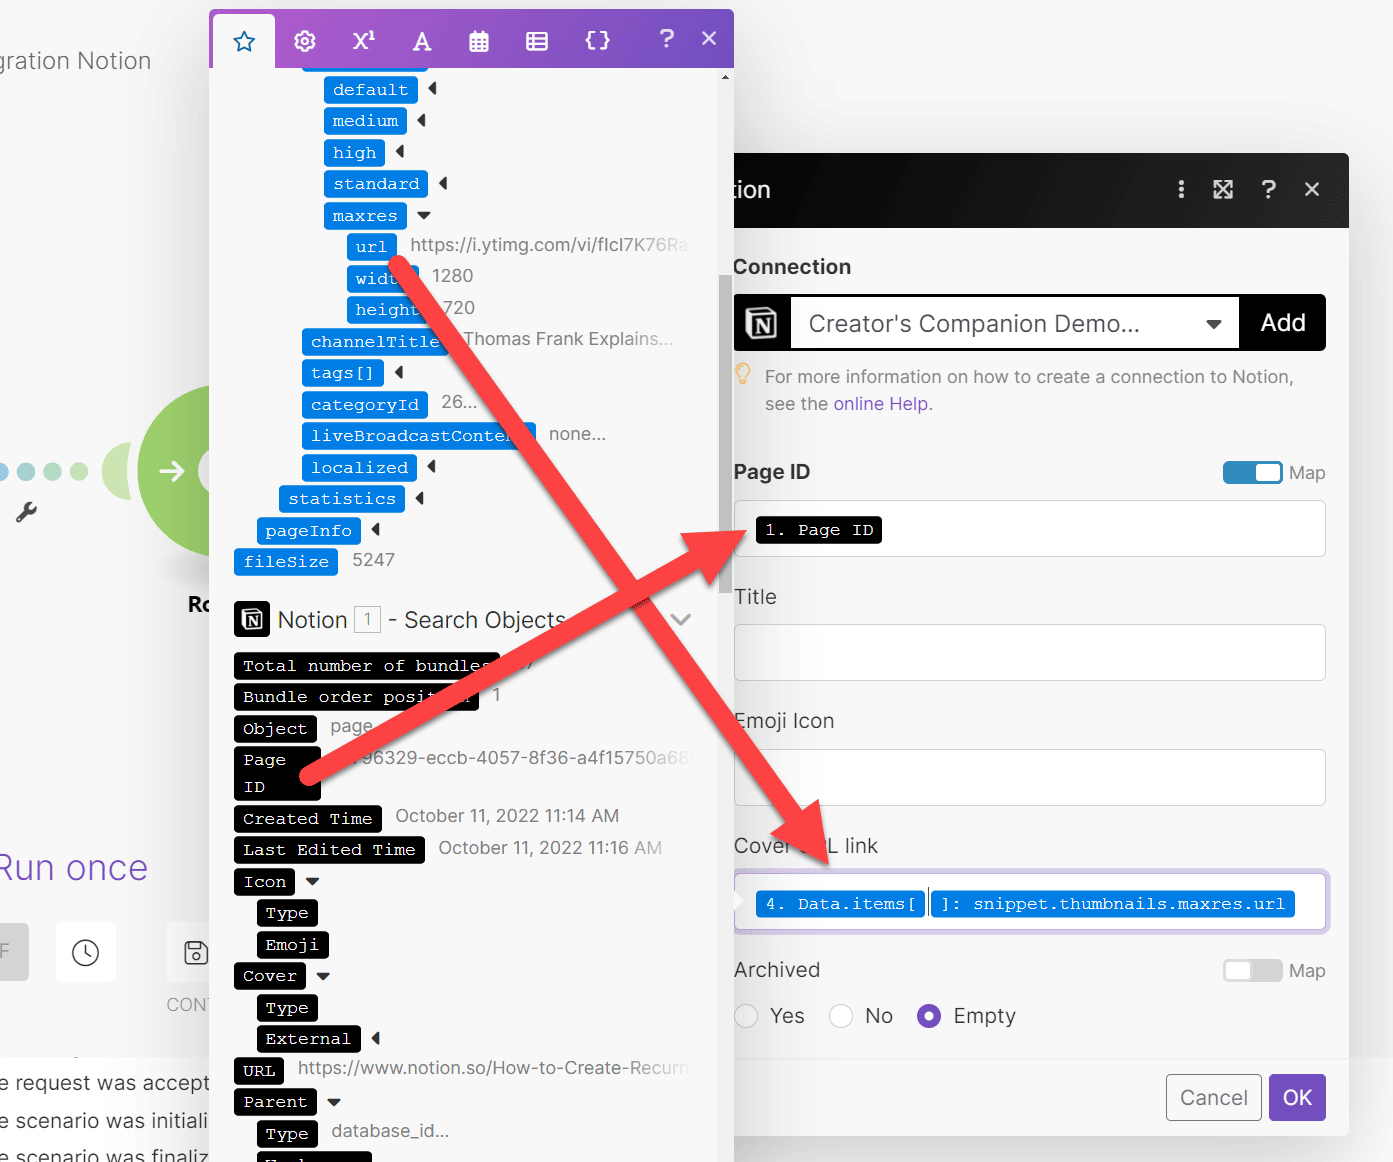
This module will now pull your video’s thumbnail URL directly from YouTube and set it as your video’s page cover in Notion.
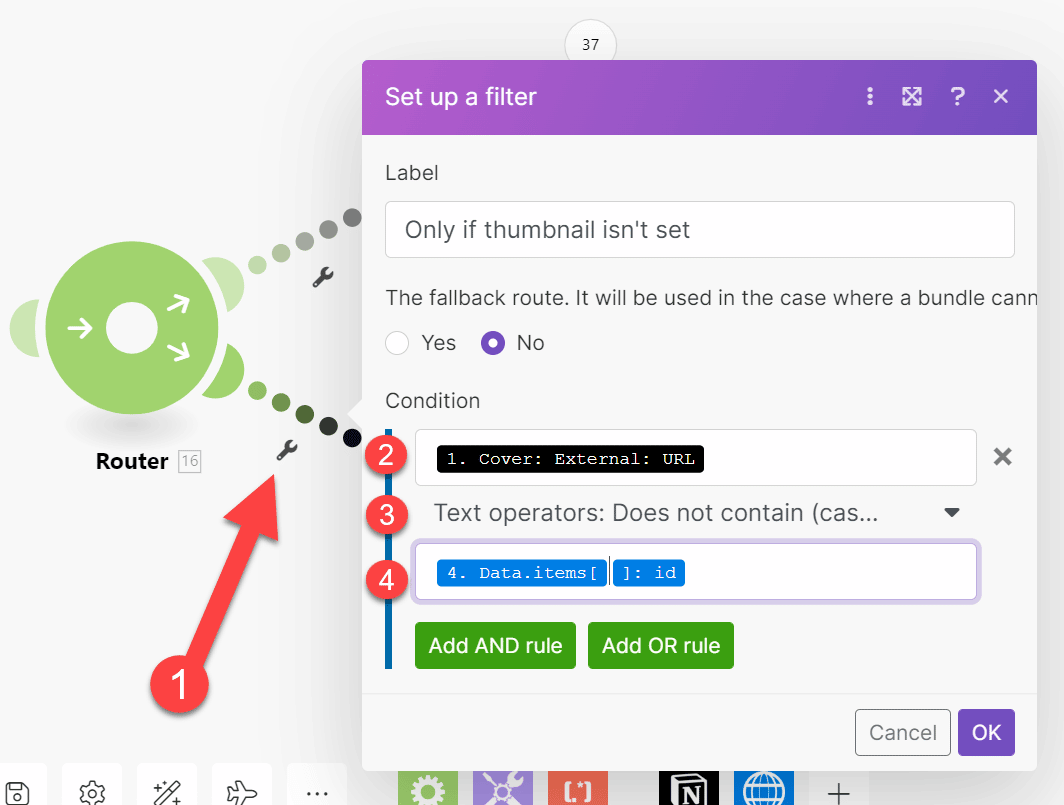
Finally, let’s set up a filter to make sure this only happens if the page cover hasn’t been pulled from YouTube already.
- Click the dotted line between the Router and the Update a Page module you just set up.
- Label the filter:
Only if thumbnail isn't set(or something else descriptive). - Leave Fallback Route on No.
Now set the Condition fields:
- Notion – Search Objects → Cover → External → URL
- Text operators: Does not contain (case insensitive)
- HTTP → Data → items → id
Finally, click Ok.
Each video’s thumbnail URL is derived from the video’s ID, which can be found within the video’s actual URL.
For example:
Video: https://www.youtube.com/watch?v=61a1Edq4iBo
Thumbnail: https://i.ytimg.com/vi/61a1Edq4iBo/maxresdefault.jpg
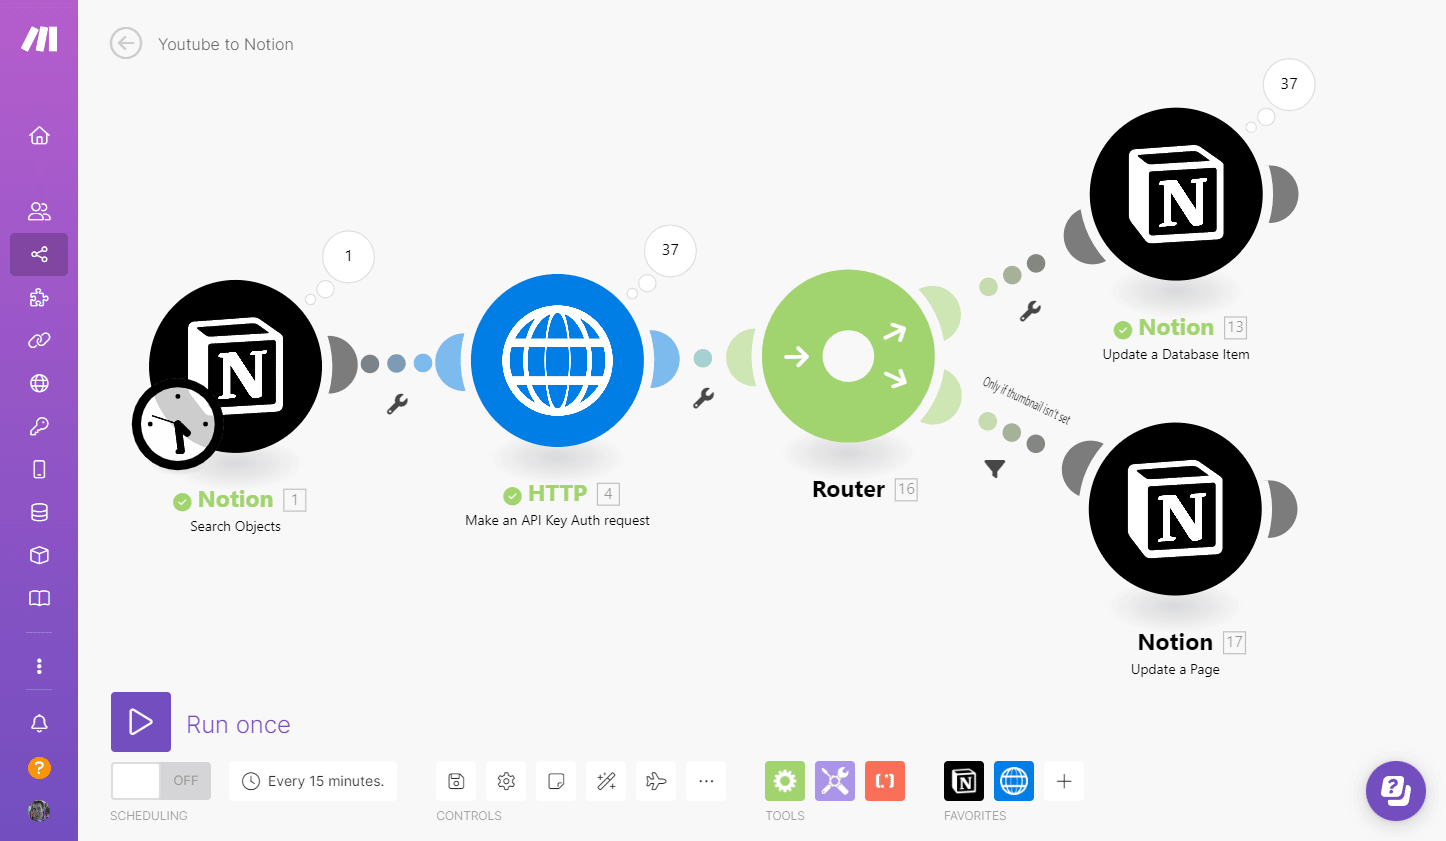
Code language: HTTP (http)Here’s how your final setup should look:
Step 3: Enable and Schedule the Scenario
If you’ve followed all the steps I’ve laid out, your scenario is now completely set up!
All that remains to be done now is to save your work, enable the scenario, and set a schedule for it.
Near the bottom of the screen, set the following options:
- Click the Save Icon.
- Set a schedule for your scenario. I’ve chosen Each Monday at 12:00 PM here – this means the scenario will run once a week.
- Turn the scenario On.
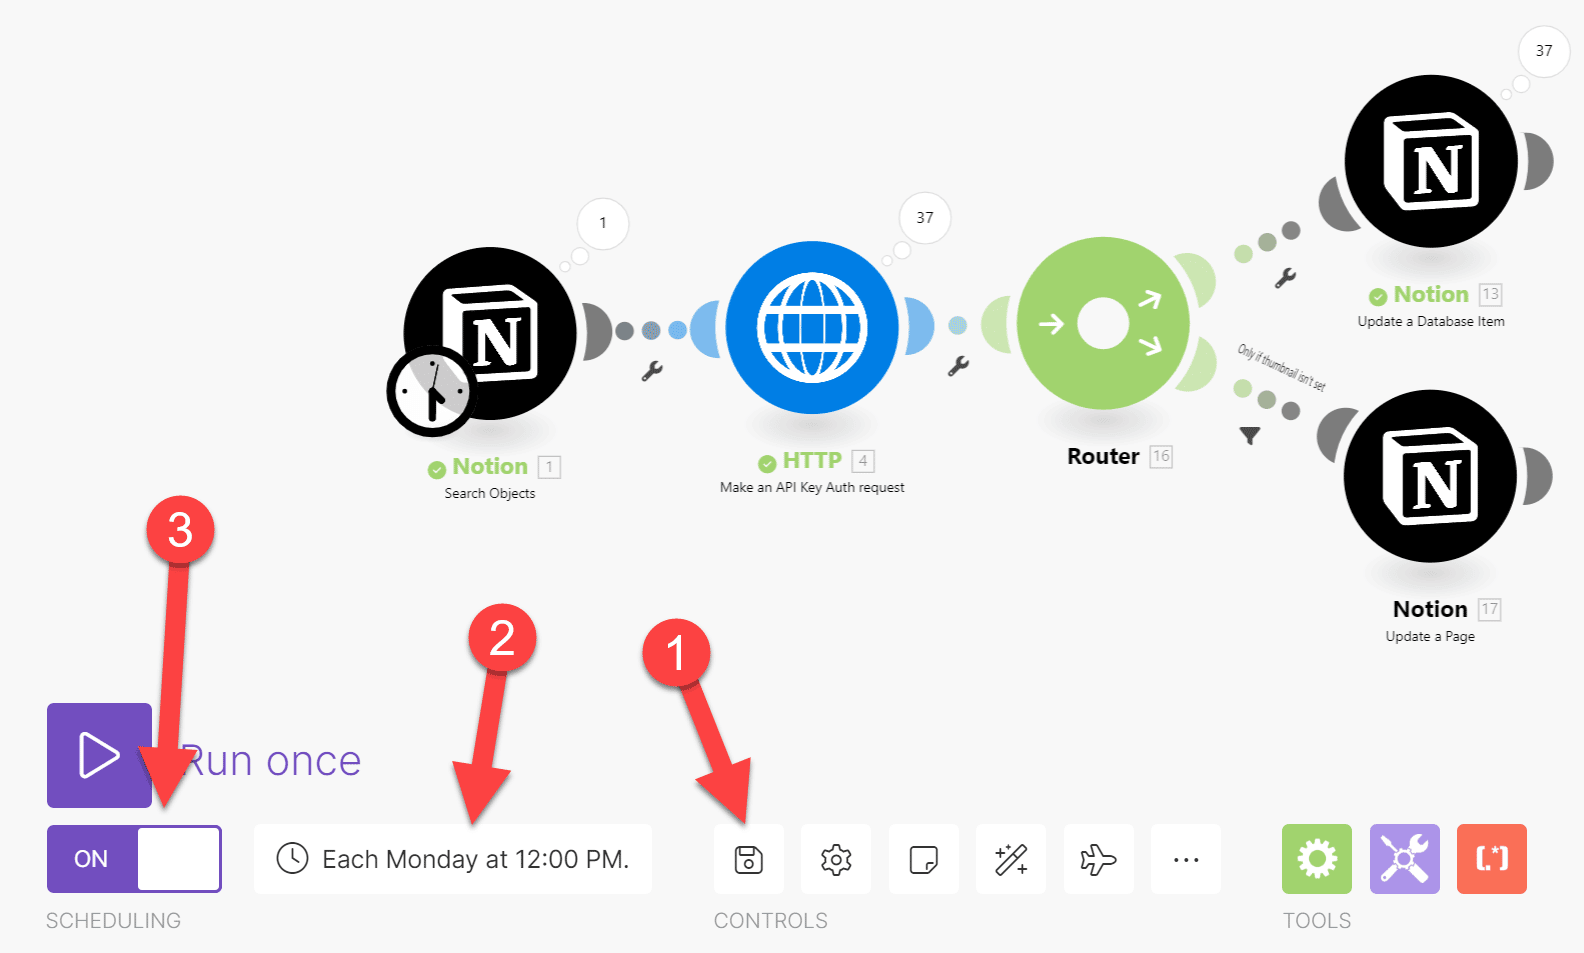
You’re free to set the schedule however you like; just keep in mind the operation limits of your Make.com plan when doing so.
Remember that each run of the scenario will take 2n+1 operations, where n is the number of videos you’re updating. And runs that involve thumbnail updates will take 1 additional operation per video that gets passes through the thumbnail filter.
Copy link to headingFinal Result
Here’s the result of this process applied to my demo copy of Creator’s Companion:
If you’d like to check out these stats live, here’s the direct link to this Thumbnail View in my demo.
If you’re curious about how I got these stat counts that start with emojis, they’re the result of a small formula!

Here’s the actual formula code:
"👀: " + replace(replace(format(prop("Views")), "(\d{1})(\d{3})$", "$1,$2"), "(\d{1})(\d{3},\d{3})", "$1,$2")
Code language: JavaScript (javascript)
You can learn how this formula works by checking out the replace and regular expression guides in my Notion Formula Reference.
Hopefully you’ve found this tutorial helpful, and hopefully it has also shown you the vast potential of these no-code tools!
By combining Notion with tools like Make, you can connect to hundreds of other web apps and do basically anything you want.
I’m planning to create lots of other no-code automation tutorials in the future. If you want to be the first to know when they go live, join my Notion Tips newsletter. Once you join, all also send you a handy link to all my free templates and Notion reference guides!
The Notion Tips Newsletter
Join 50,000+ folks and enjoy your morning coffee alongside my latest Notion guides and templates, delivered hot(?) and steaming(?) to your inbox.