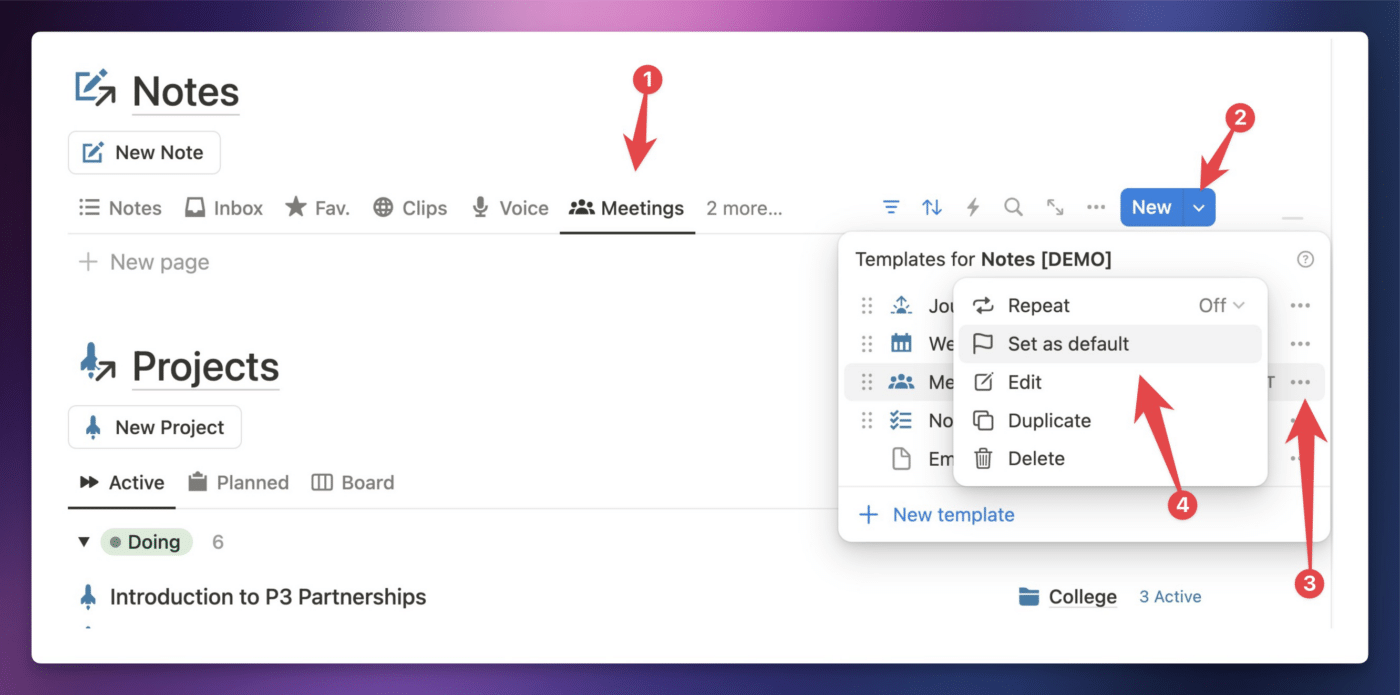
Most of the main databases in Ultimate Brain come with built-in database templates. For example, the Notes database includes several templates, such as the Journal: [Date] template, which creates a journal entry.
In this guide, you’ll learn:
- What database templates do
- How to apply a database template to a page
- How to clear a page and re-apply a template
- How to edit database templates and create new ones
- How to automatically apply database templates in a specific database view (or disable this)
- How to set up repeating database templates
Note: I’ll use the term “template” on this page as shorthand for “database template”. This use of the term is different from “Notion template”, which describes and a page you’ve shared publicly and allow people to duplicate into their own workspaces.
Copy link to headingWhat is a Database Template?
Database templates are essentially presets for new pages created in a database. Database templates can:
- Set default values on properties (example: Setting the Type property in the Tags database to Area)
- Add a pre-configured set of blocks to the page body
Most databases in my templates have one or more database templates. You can learn about the templates in each one in the Databases reference.
It’s important to know that database templates are like a recipe.
If you change a recipe for a cake, your changes won’t apply to cakes you’ve already baked. Likewise, if you change a database template, your changes won’t automatically happen on pages where you’ve already applied that template in the past.
Copy link to headingApply a Database Template to a Page
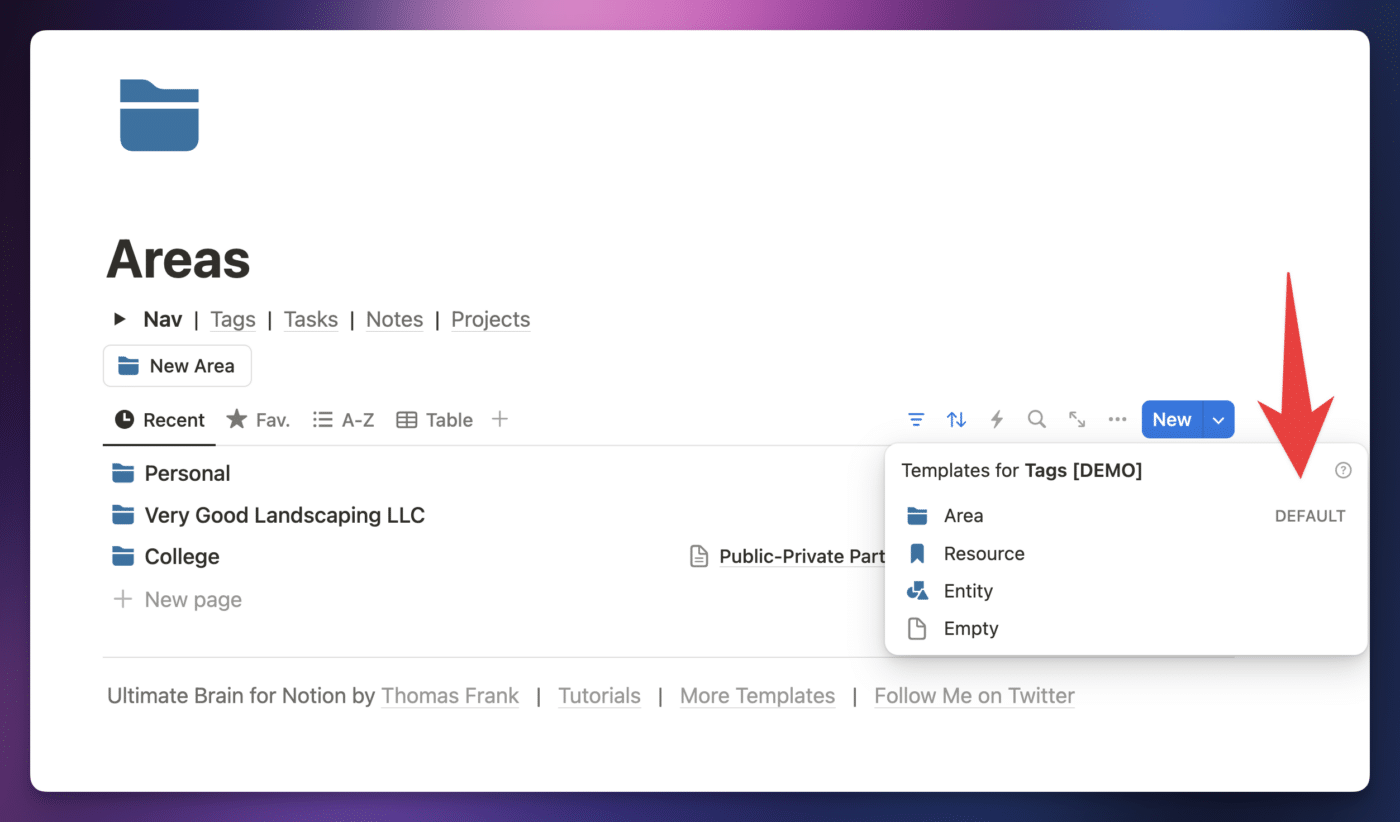
In some cases, database templates are applied to new pages automatically, the moment they’re created. This setting exists on specific database views; for example, the views in the Areas page (under Tags) are set to automatically apply the Area database template.
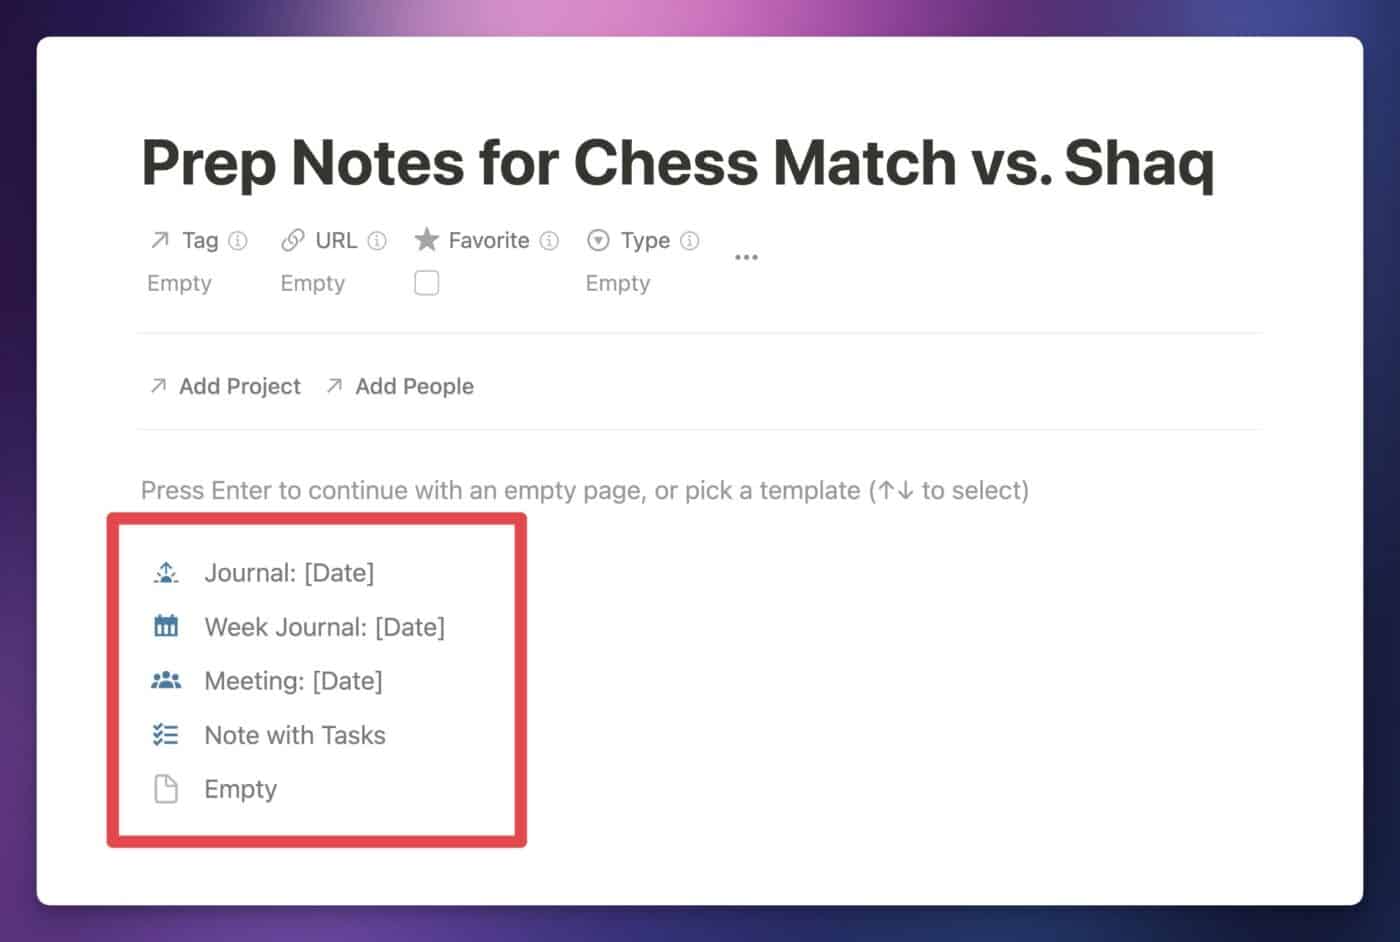
In other cases, a database view won’t apply a template automatically. In these cases, you’ll see all available templates listed in the page body as long as it’s empty. You can then click one to apply the template.
Note that applying a template won’t overwrite any property values that have already been set on the page.
Hint: If a database has templates, but you don’t see them on a “blank” page, then that page likely has a single empty Text block on it. You can ensure the page is completely empty by clicking on the page body, hitting ⌘/Ctrl + A to select all content, then hitting Backspace/Delete.
Copy link to headingClear a Page and Re-Apply a Template
Remember that templates are like recipes – if you change one, your changes won’t auto-update on all the pages where you’ve already applied the template in the past.
If you want to update an existing page to reflect your template updates, you’ll need to do the following:
- Clear out all the content in the page body by hitting ⌘/Ctrl + A to select all content, then hitting Backspace/Delete.
- Re-apply the template by choosing it from the template list (see the screenshot in the section above).
However, this creates a potential problem!
Since you have to clear out the page body before you can re-apply a template, this creates a potential for data loss if you’re not careful.
Before you clear out a page, make sure you understand what you’re doing and take steps to save anything that you don’t want to delete.
Copy link to headingChild Blocks vs. Linked Database Views
In Notion, everything is a block, and most blocks are children of other blocks.
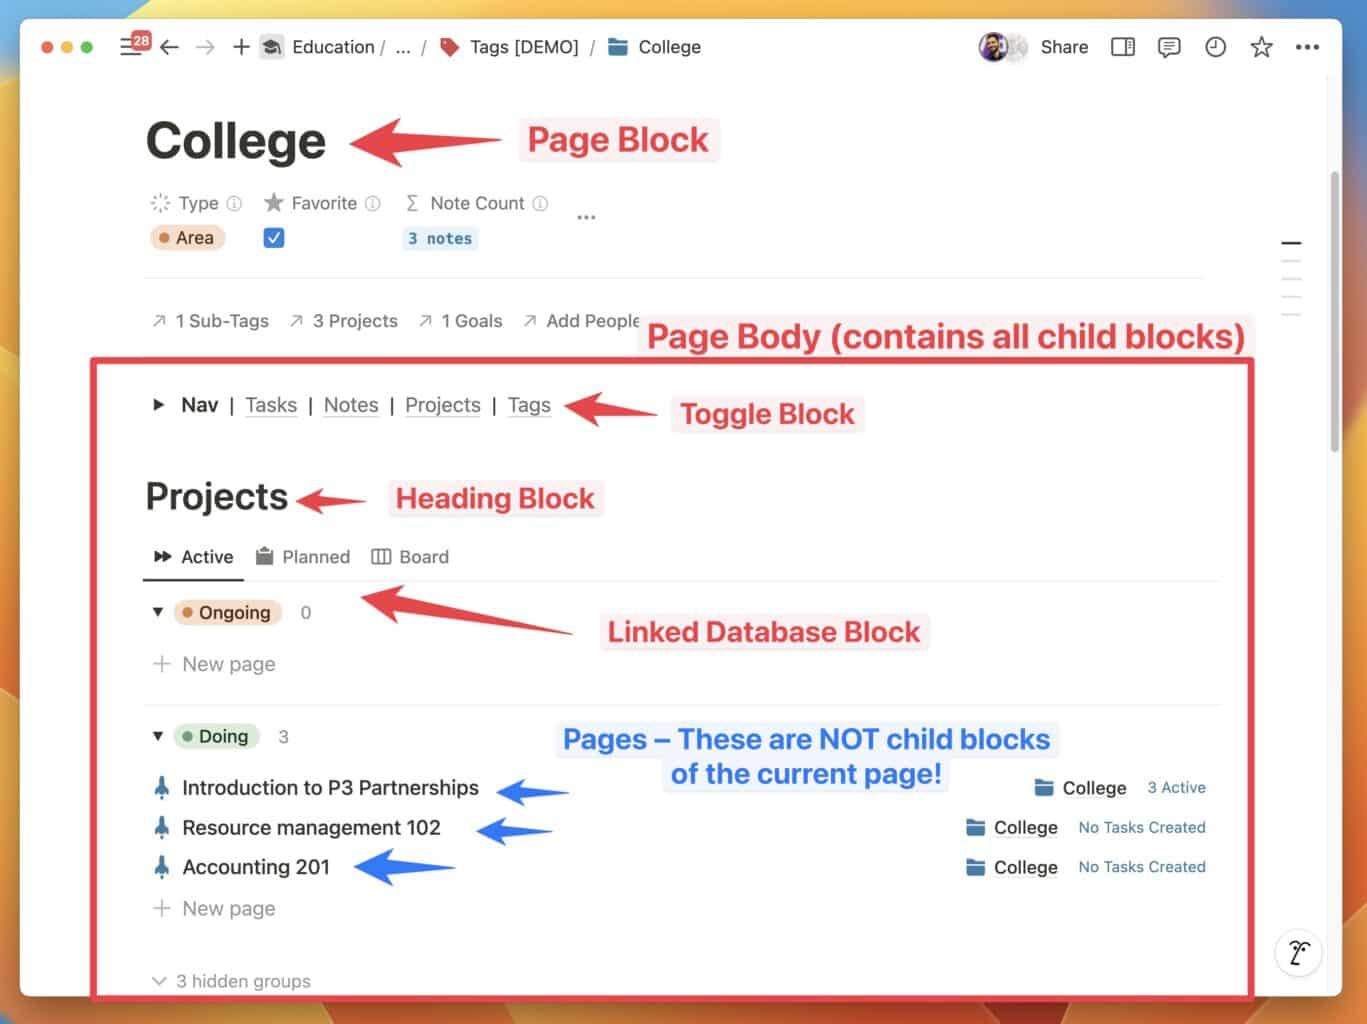
Pages are blocks, which means that every block on a page’s canvas – headings, lists, text blocks, images, and even other pages – are child blocks of that page block.
However, there’s one very common type of block you’ll see that Ultimate Brain that is a special case. The linked database block creates views that display pages which exist in a source database.
The linked database block itself is a child block of the page where it exists. But the pages it displays are not child blocks of the current page – instead, they’re children of their source database.
You can think of a linked database block as a “window” that shows pages which live somewhere else.
Why is this important, you might ask?
It’s important to understand the distinction between blocks and pages merely displayed by a linked database block. If you delete a block, it’s gone – just as you’d expect (Page Restore function notwithstanding).
But when you delete a linked database block, you don’t delete the pages that it displays. All you delete is the block itself. Those pages still live off in their source database, where they are happily sipping tea and are blissfully unaware of your wanton block-deletion spree.
So let’s say you’re deleting all the blocks on a page so you can re-apply a template. Here’s how all of this comes into play:
- The child blocks you delete are actually deleted.
- If the template contains those same child blocks, they’ll be “restored” – e.g. copies of them will be made.
- If the template doesn’t contain those same child blocks, they’ll be lost.
- The pages in any linked database blocks are not deleted.
- If the template contains a linked database block with the same settings (e.g. filters), you’ll see those same pages after applying the template.
Note: Technically, it is possible to select the actual pages in a linked database block and delete them. But if you make sure you’ve selected the linked database block itself, then the pages displayed by it wont’ be deleted when you delete the block itself.
Here are a couple of useful examples:
The Area template in the Tags database mainly adds linked database blocks to the page. You typically won’t have a reason to edit an Area page’s child blocks themselves – you’ll mainly just be creating or accessing other pages shown in these database views.
In this case, clearing the page content to re-apply a template is low-risk.
On the other hand, the Meeting Note template in the Notes database simply gives you a starting point for taking notes. If you add a bunch of your own blocks to a page after applying this template, then you don’t want to simply delete them before re-applying the template unless you’re ok with losing them.
If you’re not ok with losing them, use one of the strategies in the next section.
Copy link to headingPreserving Existing Content
If you want to preserve child blocks on a page, but you still want to clear the page and re-apply a template, do one of the following:
First, you can copy all the blocks to your clipboard, then paste them back into the page after re-applying the template.
This is generally safe, especially if you have clipboard history enabled on your computer. This is built into Windows and can be enabled; on MacOS, I use Raycast to get clipboard history.
However, an even safer way to preserve content is to simply move it to a “temporary” page elsewhere in Notion. Here’s how I do it.
- Create a sub-page on the current page using
/page. - Select all the blocks I want to preserve and drag them into that page.
- Right-click the page, choose Move To, and pick a new destination.
- Re-apply the template.
- Move the page back from the temporary location to the current page.
- Right-click the page, choose Turn Into, and pick Heading 1.
The final step – turning the holding page into a Heading 1 – will put all the blocks right back onto the main page.
P.S. – Yep, this process can be tedious, and it’s the #1 reason that transferring content from an older version of a Notion template to a newer one is a huge pain. For this reason, I tend to start from scratch on the rare occasions I switch to using a new version of Ultimate Brain – then I slowly move things over from my older copy as needed.
Copy link to headingCreate or Edit Database Templates
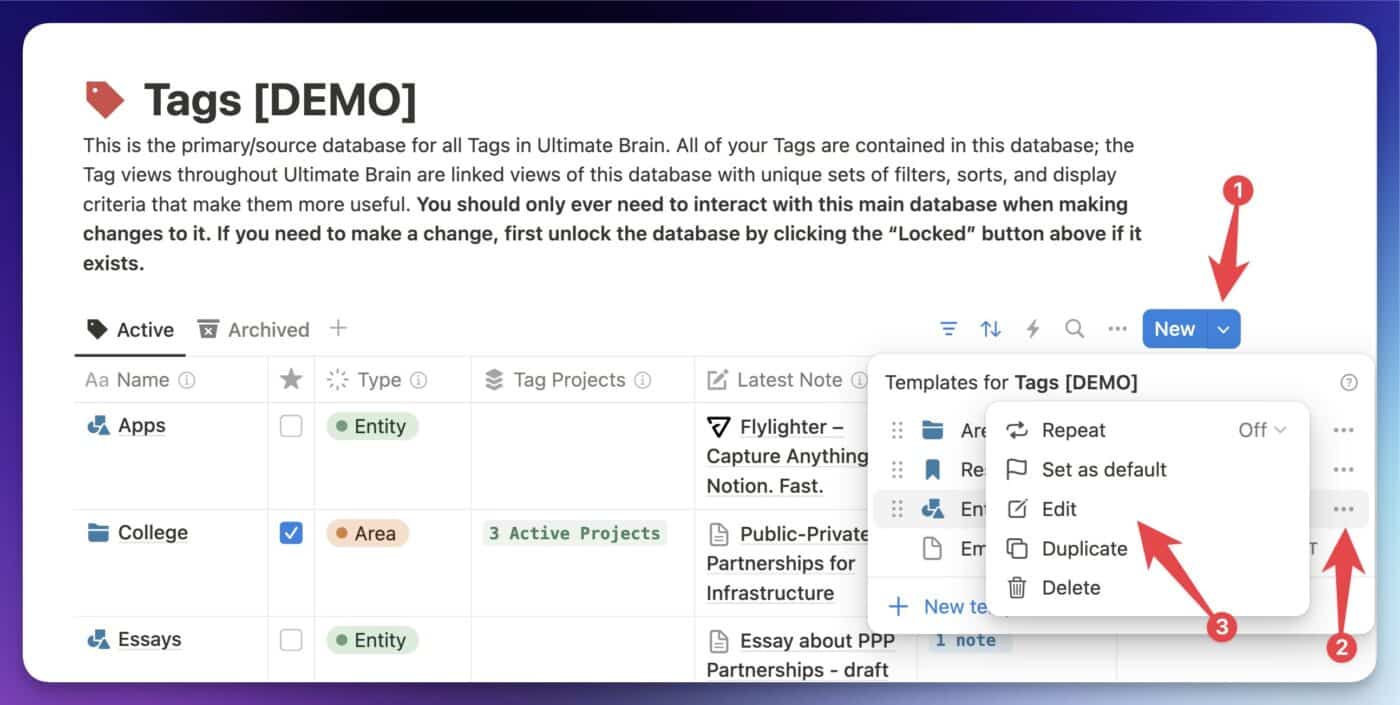
Before you can edit an existing database template, or create a new one, you’ll need to unlock your database.
Once you’ve done that, simply click the ••• menu next to any template you want to edit and click Edit.
If you’d like to create a new template instead, you can:
- Click New Template to start from scratch.
- Click
•••on an existing template, then click Duplicate if you’d like to use it as a starting point.
Auto-Apply Templates on New Pages
If you’d like to have a template automatically applied to new pages, you can set that template as a Default. You’ll need to unlock your database before you can make this change.
- Choose a view of the database.
- Find the template, click the
•••button, then click Set as Default
Once you click this button, you’ll be asked if you want to set the template on this view only, or for all views in the database.
If you’re in doubt, always choose this view only.
Copy link to headingRepeating Templates: Create Pages on a Schedule
If you want, you can set up a schedule on a page template. This will automatically create new pages – using the chosen template – on a schedule.
This feature is called repeating templates. It can be very useful for automatically creating meeting notes from a template on a schedule, among other uses cases.
I’ll note that it’s not very useful for recurring tasks, since Date properties (e.g. Due Date) in a template can only be auto-set to Now or Today's Date. This means you wouldn’ be able to see your upcoming tasks ahead of time. Fortunately, Ultimate Brain has built-in recurring tasks support using another method.
If you’d like to set up repeating templates, here’s a video covering the feature in detail:


