
If you want to learn how to work directly with the Notion API, this tutorial will teach you how to do it – even if you’re a beginner with no coding experience.
New: Want to make working with the Notion API much easier? Check out my open-source notion-helper package. I still recommend reading the guide below to learn the API, but notion-helper will make writing your requests take far less code.
In this tutorial, you’ll learn:
- What the Notion API is and what it can do
- What an API is (in general)
- How to create a Notion API integration inside your Notion workspace
- How to send data to Notion via the Notion API
- How to create new pages in a Notion database via the Notion API
- How to read, understand, and actually use API documentation
- Lots of beginner-to-intermediate level JavaScript
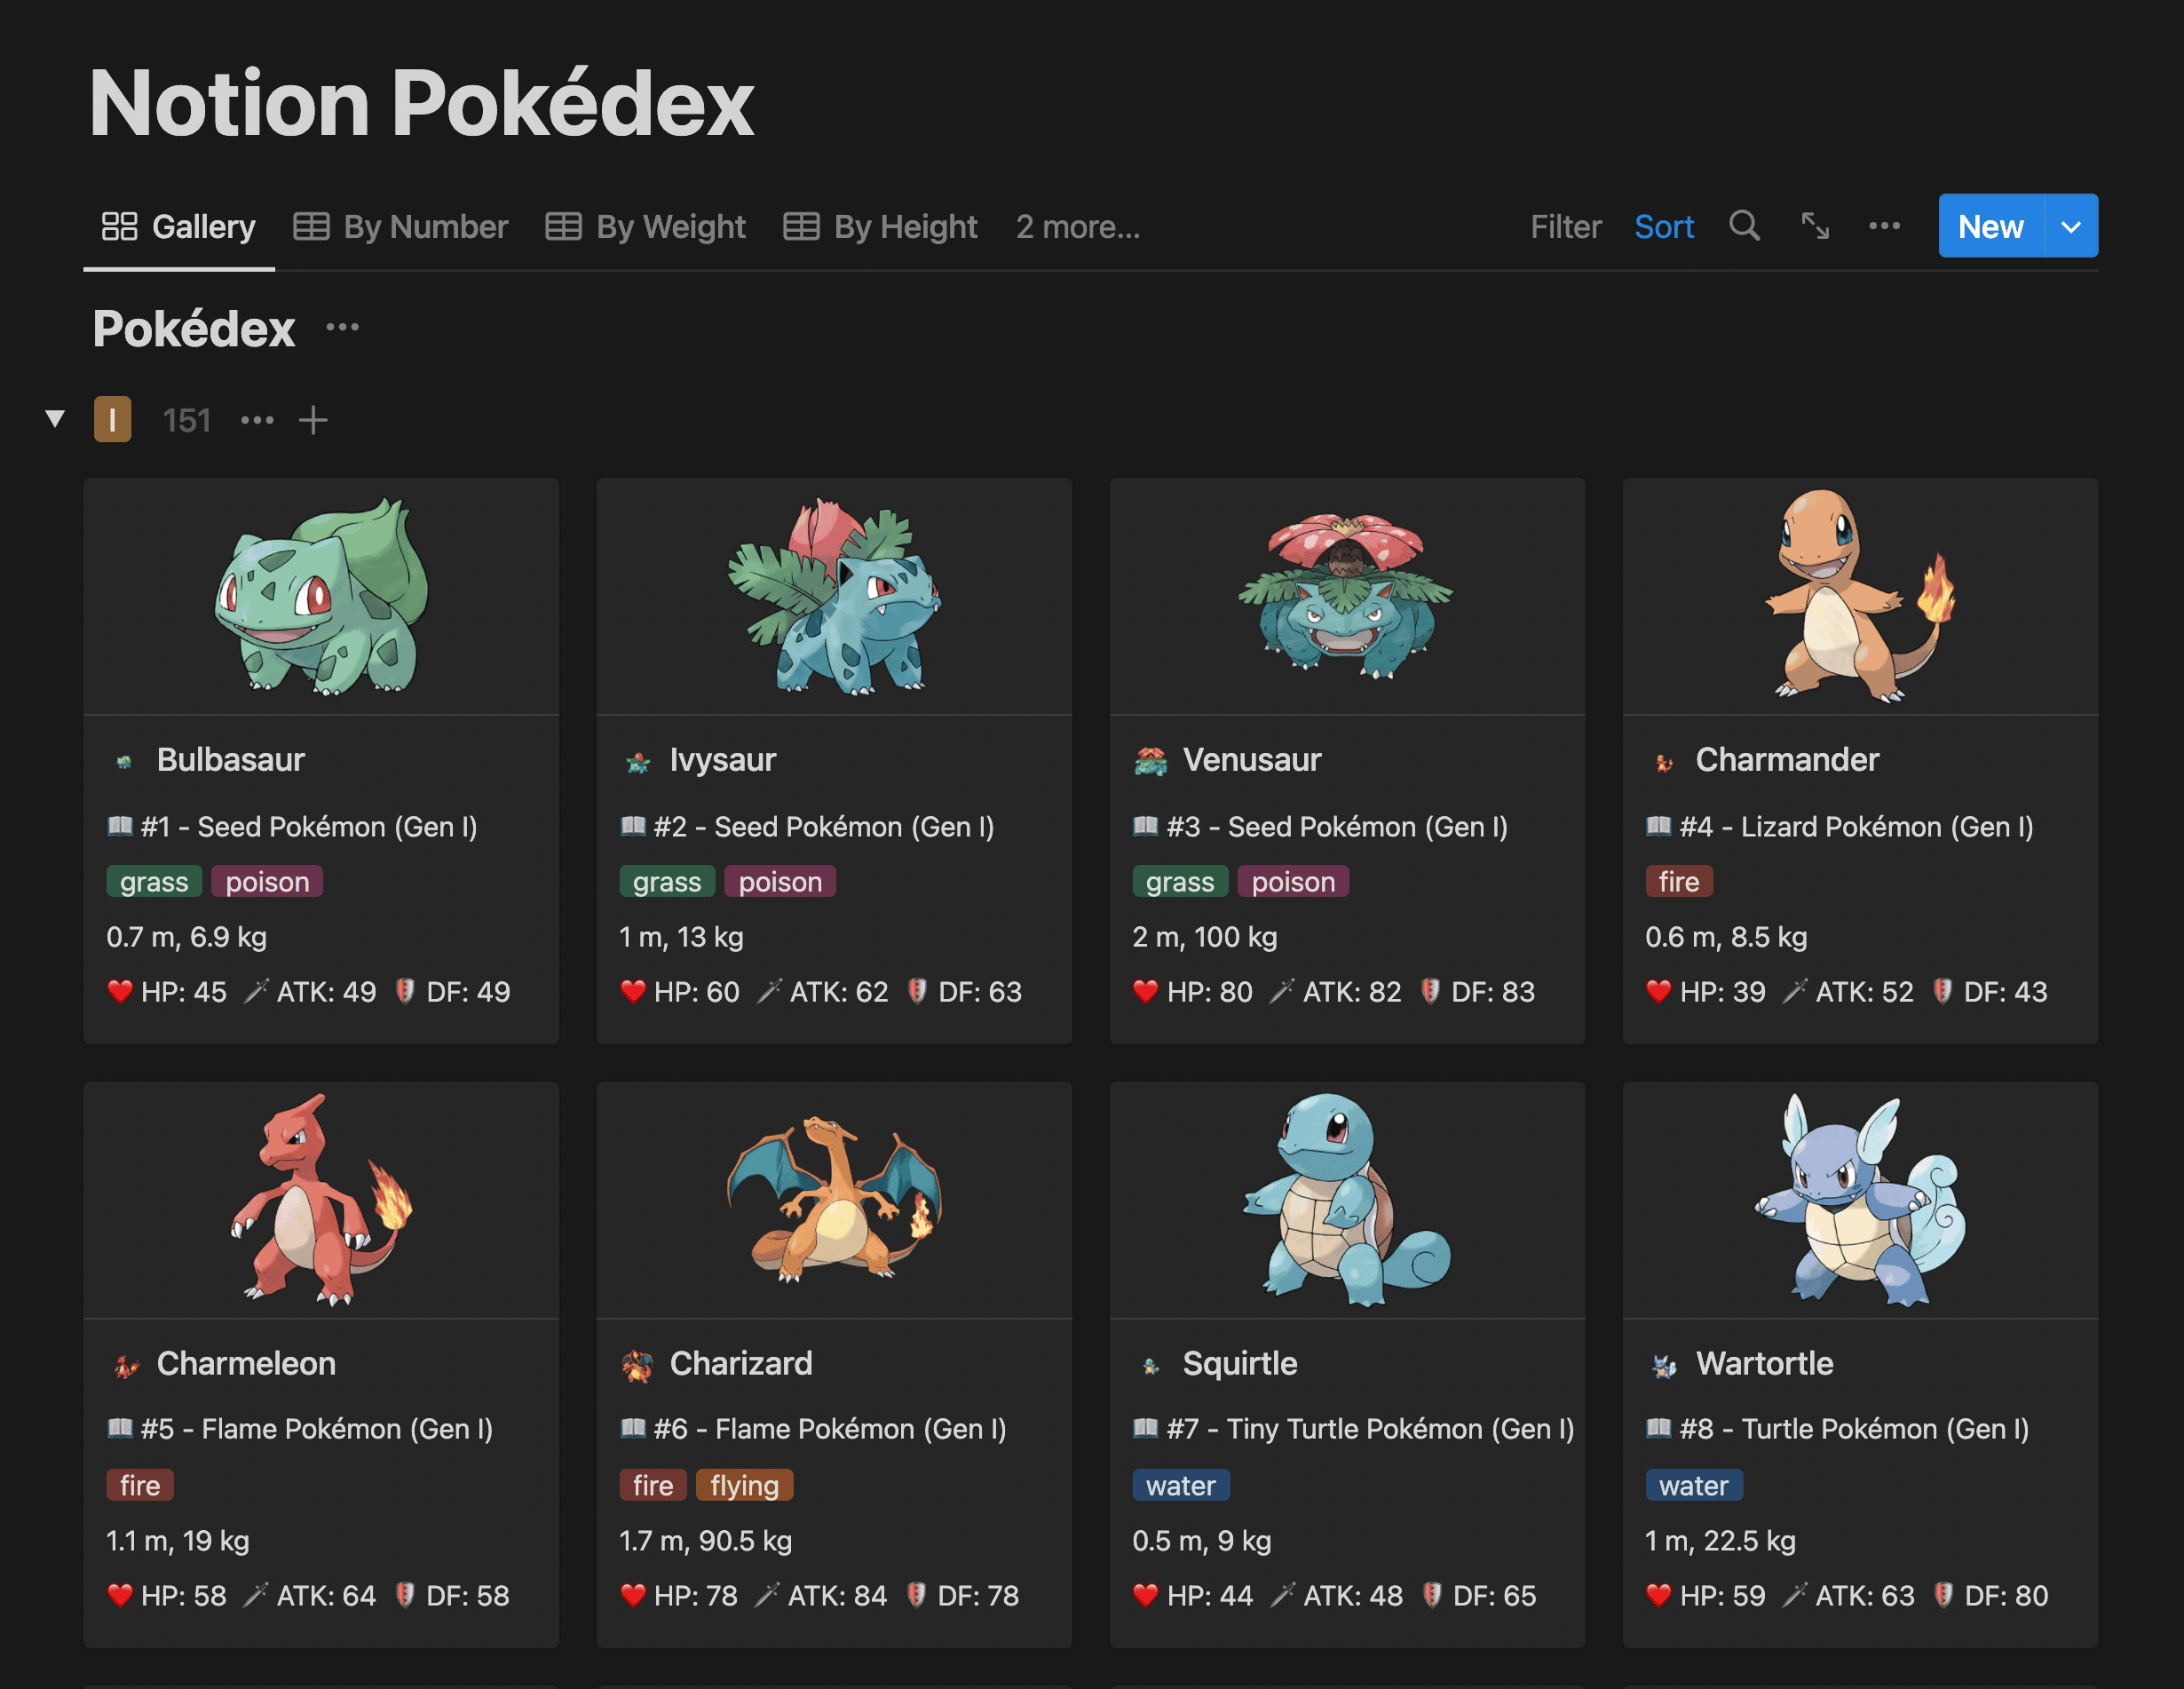
The Notion API already has great documentation, so here I’ll be teaching you how to actually use the API by walking you step-by-step through a fun example project – building a complete Pokédex in Notion!
Many people have built Pokédexes in Notion by hand, but we’ll build ours with zero manual data entry. Everything will be handled by the Notion API and a small JavaScript application that we’ll build, which will automatically create an entry for each Pokémon.
Here’s a look at the final product (you can also view this Pokédex directly on Notion):
This is a great introductory project for learning how to work with the Notion API. And once you’ve completed it, you’ll have the knowledge and skill to do nearly anything else with the API. I have many more API tutorials planned, so if you’d like to get notified when they go live, join my Notion Tips newsletter.
You won’t need any special software for this project – we’ll do everything in the browser using free tools. We’ll even code in the browser (of course, you can use your own local code editor if you want).
I’ve also included deep explanations (in handy collapsible toggles) and external links that explain everything, so you’ll be able to use this as a true zero-to-hero path for learning Notion’s API. There’s even a fully mapped-out learning path below.
Every Pokémon will get its own Notion database entry that includes its stats (HP, attack, defense, etc), types, flavor text, artwork, and more.
We’ll accomplish this by building a simple JavaScript application that pulls all of this data from PokéAPI, a free and open-source resource with an immense amount of information on all things Pokémon. Our app will then format the data and send it to Notion.
Note: This tutorial is meant for those who want to work directly with the Notion API using a programming language like JavaScript. If you’d like to work with the Notion API using no-code tools (like Make.com), check out this tutorial instead:

What is the Notion API?
To kick this off, let’s talk a bit about what the Notion API actually is.
The Notion API is a set of tools that allow you to connect your Notion workspace to other apps and services outside of Notion (including apps you build yourself). Using the API, you could:
- Add new rows to a sales database in Notion when customers make purchases on your online store (using a platform like Lemon Squeezy or Shopify)
- Auto-transcribe voice notes using a service like Deepgram and send the transcript to a Notion page (tutorial on this coming soon! Join the newsletter to get notified.)
- Use Notion as a CMS for blog posts and display them on a custom-built website (like Braydon Coyer does – though you can also use Notaku for this instead of building a site from scratch)
…and much more. The possibilities are basically endless.
The Notion API provides endpoints for many major functions, including:
- Querying, creating, and updating databases
- Retrieving, creating, updating, and archiving pages
- Retrieving, creating, updating, and deleting blocks
- Appending child blocks to a parent block
- Listing workspace users and retrieving specific user information
- Creating and retrieving comments
All API requests to the Notion API must be sent to the base URL https://api.notion.com, which you’ll see as the first part of the listed endpoint for any action you’d want to take. For example, if you wanted to query a database, you’d send a POST request to:
https://api.notion.com/v1/databases/{database_id}/query
Code language: HTTP (http)
Notion requires all API requests to be made over HTTPS, and they must be authenticated properly. To make API requests to your workspace, you’ll first need to create an integration (we’ll cover this later), then give that integration explicit access to pages in your workspace.
Notion also provides a JavaScript SDK for working with the API. As you’ll see later in the tutorial, it’s easy to add this to your project, and it gives you access to handy methods that make API requests easy to construct in your code.
If you’d like a more thorough overview, check out the official API documentation’s introduction. However, I think you’ll get a better grasp on the API by actually working with it – so let’s start doing that!
If you do happen to want a primer or refresher on what an API is (in general), check out the toggle block below.
APIs (Application Programming Interfaces) are sets of tools that allow different web services to talk to each other over the HTTP protocol.
An API can allow one service to read data from another one; alternatively, it can allow one service to create new data at another service, update existing data, or even delete data.
You’ll often see another acronym used to describe these four potential operations: CRUD.
- Create
- Read
- Update
- Delete

APIs are what allow you to posts Giphy GIFs directly in Slack. They enable those awesome link previews that you can create in a Notion page. And they are the many engines under the hood of connector tools like Zapier and Make.com.
APIs typically consist of one or more URLs, to which your application can make HTTP(S) requests in order to do one or more CRUD operations. These URLs are often called endpoints.
Note: You may have a conversation in the future about APIs with a nerd who will stress that you access URIs, not URLs. The distinction really does not matter here, but here’s an article on their differences if you’re curious.
In most cases, APIs will have separate endpoints for each type of operation you can do. In other words, you’ll almost never use the same endpoint to both read data and delete data.
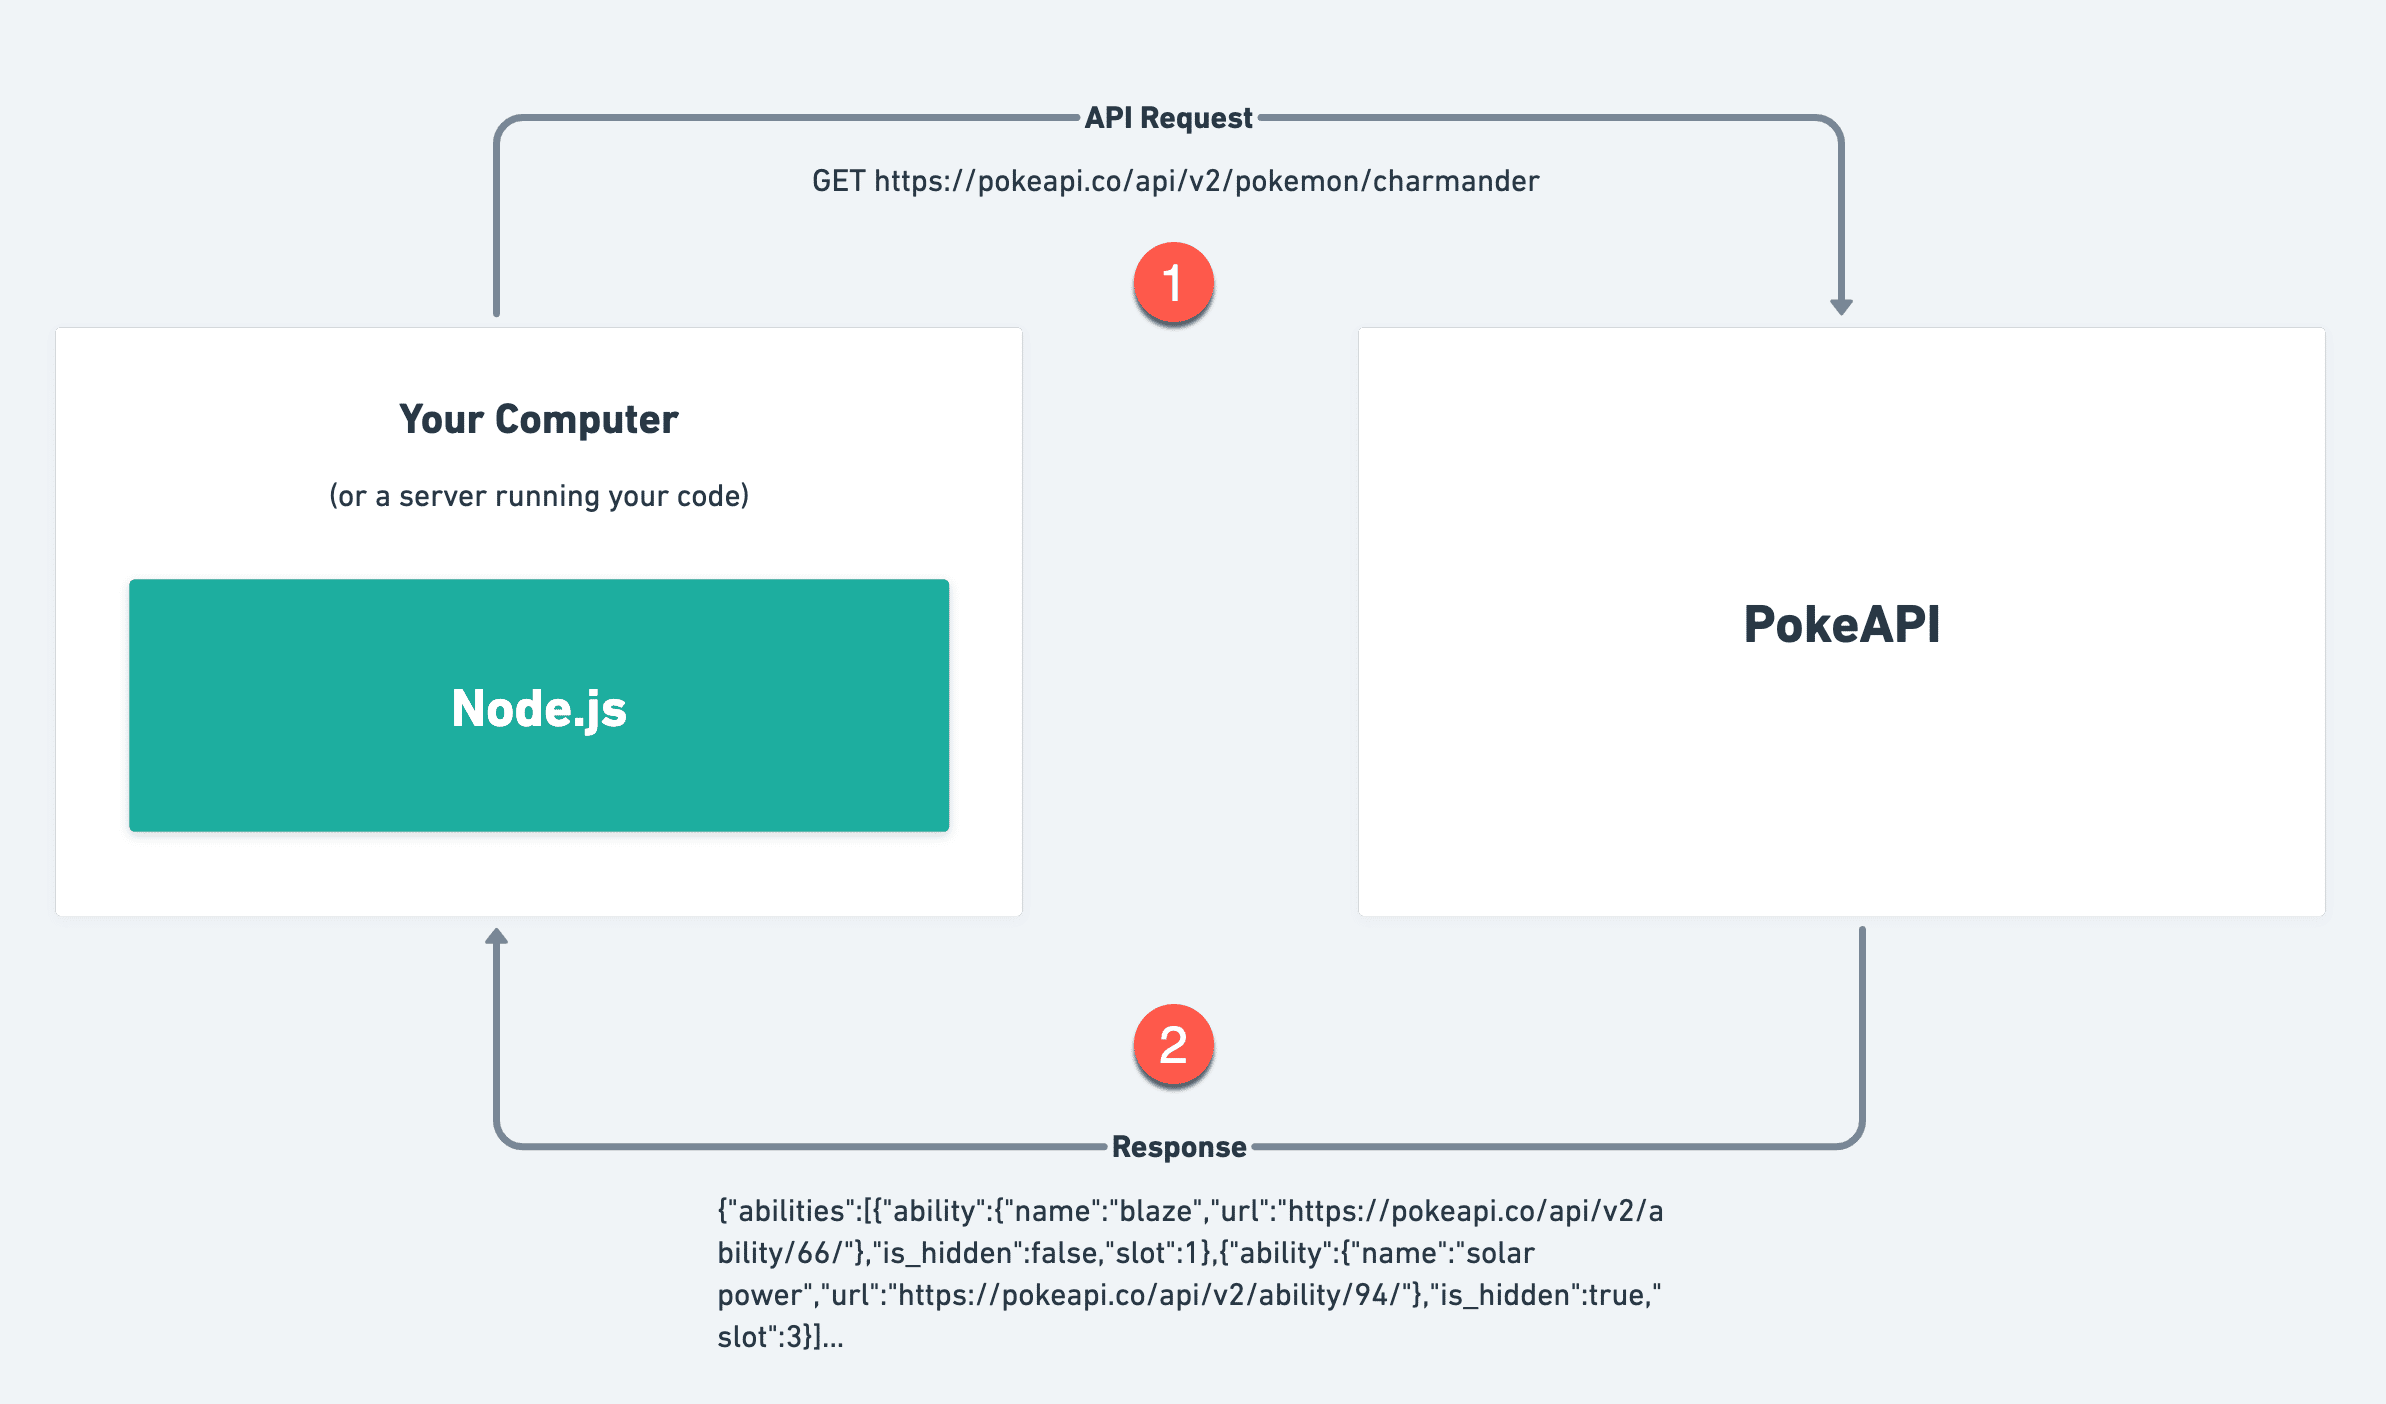
To see how an API actually works, let’s look at an example from PokeAPI – the API we’ll be working with later in the tutorial.
One of PokeAPI’s endpoints is the pokemon endpoint, accessible via either one of these URL schemes:
https://pokeapi.co/api/v2/pokemon/[pokemon name]https://pokeapi.co/api/v2/pokemon/[pokemon number]
To access information about Charmander, you’d either use https://pokeapi.co/api/v2/pokemon/charmander or https://pokeapi.co/api/v2/pokemon/4.
Since PokeAPI doesn’t require any special kind of authentication, you can even visit these URLs in your browser. Here’s a link you can try.
However, you’ll quickly realize that visiting that URL in the browser isn’t very useful; you’re just presented with a huge string of JSON.
I’ll cover JSON more thoroughly later, but you can watch this video now if you’re curious about what it is and how it works:

However, if you make that request from a program, you can use additional code to process that JSON response and do really useful things.
For example, you could write code that goes through all that data, pulls out the Pokemon’s name, and displays it. I show this example later in this guide (click here to jump to it), so I won’t repost it here.
Of course, you can do much more than just display the Pokemon’s name. Once you have the information, you can do basically anything with it, so long as you know how to write the required code.
That’s the power of an API: It allows you to do CRUD operations, and then combine them with any sort of code you want to write. The applications are basically limitless.
To wrap up this small primer, I’ll go over the five most common HTTP methods available to you when working with APIs. You’ll see these all the time, so it’s good to be familiar with them.
- GET – used for reading data from the application. It is read-only, so it has no risk of modifying any data.
- POST – sends data to the application to create something new.
- PUT – sends data to the application to update an existing resource. Contains a full updated copy of the resource.
- PATCH – also updates an existing resource, but only contains the changes to be made instead of the entire updated resource.
- DELETE – sends an instruction to the application to delete an existing resource.
In many cases, your requests to a particular API will need to contain both the URL to be accessed and the method to be used.
For example, if you want to create a page in Notion via the API, you’ll need to access the https://api.notion.com/v1/pages endpoint using a POST request.
You’ll learn much more about APIs simply by working through this project. However, you can also get additional insight with the following resources.
First, check out Fireship’s excellent (and short) overview:
If you fancy long videos, you may also enjoy freeCodeCamp’s APIs for Beginners course (though you could also just watch the video version of this tutorial near the top of this page!
“What If I Don’t Know How to Code?”
In this project, we’ll build our application using JavaScript. So if you have a basic understanding of JavaScript, you’ll be more comfortable going through it.
However, you don’t need to already know JavaScript to go through this tutorial.
My entire goal with this tutorial is to help non-technical people dip their toes into the world of coding and working with the Notion API. I’ve gone to great lengths to make it a truly comprehensive resource.
If you don’t know how to code – if you get confused and overwhelmed at most coding tutorials – I’ve been in your shoes.
At the beginning of last year (2022), I didn’t know how to code. I barely knew what an API was.
I tried to watch tutorials, but I’d get confused when the creator would throw around terms like “npm”, “node.js”, and “API endpoint” without explaining them.
Eventually, after much Googling and a lot of frustration, things started to click for me.
Hopefully I can spare you some of that frustrated Googling (Froogling?) with this tutorial.
As you’ll see later, I’ve added lots of toggles just like this one throughout the tutorial. The purpose of these is to give you an explanation for everything if you need it (and keeping these explanations in toggles lets more experienced coders skip past them easily).
However, the best piece of advice I can give you for learning how to do is this:
Run your code early and often.
The true “best” way to learn how to code is to write a lot of code and to get lots of feedback. Luckily, you get feedback pretty quickly when you’re coding; when there’s an error, it’ll be logged in your console or somewhere else.
So dive in and get your hands dirty!
As we go through this tutorial, I’ll include asides and primers about all of the tools and concepts we’ll use. However, I’ve also collected them all in this learning path toggle, enabling you to find them all in one place.
This project involves working with several tools, two different APIs, and multiple JavaScript programming methods and concepts.
Here, I’ve compiled a full list of all of these things, along with some general resources you can use to learn JavaScript more comprehensively.
I encourage you to use this as a reference, but don’t let its length intimidate you! If you follow the rest of the tutorial, I’m confident that you can get the entire project working even if you don’t understand everything right away.
Once you do, you’ll be in a better position to go back, dig into these resources, and really understand how they all fit together.
Tools Used in This Project
This is a list of the specific tools and libraries we’ll use in this project. Since we’ll be building in Glitch, you don’t really need to worry about their details – Glitch will take care of most of the work for you.
- Glitch – a free platform for building websites and web apps. Includes everything – a full code editor, Node.js backend, npm package manager, terminal, and more. (Update: Glitch has been shut down. I recommend Val.town now)
- Node.js (automatically set up by Glitch) – a runtime for JavaScript. Allows you to run JavaScript code outside of the browser, effectively enabling JavaScript to be used as a back-end (server-side) language. Learn more about Node here.
- Npm (automatically set up by Glitch) – the Node Package Manager. Allows you to very easily include external code libraries in your project and use them. There are thousands of packages, including one for Notion’s API.
- PokéAPI – an open-source API that enables you to access pretty much any data related to Pokémon that you could ever want.
- Notion API – Notion’s official API, which allows you to read, write, update, and delete resources in a Notion workspace.
- Axios – a free HTTP library that works with Node.js. This is the library we’ll use to access the PokéAPI.
Note: You can also build this project on your local machine. I’m using Glitch because it keeps things extremely simple and takes care of the setup. If you want to go the local route, you’ll need a code editor like VS Code. You’ll also need to install Node.js and npm.
JavaScript Learning Resources
These free courses and general-purpose resources are great for developing a full understanding of JavaScript.
- JavaScript Algorithms and Data Structures – a full, free, and interactive JavaScript course by freeCodeCamp. This is, IMO, the best beginner resource for learning JavaScript. The course has hundreds of mini-lessons, each of which teaches a concept and then has you actually use it in the in-browser code editor. I have only done the Basic JavaScript and ES6 sections of this course, personally. You absolutely don’t need to finish the entire course to understand this tutorial.
- That Weird JavaScript Course – Fireship’s great series of YouTube videos on JavaScript. Each is super-entertaining and does a great job at explaining JavaScript at a high level.
- The Modern JavaScript Tutorial – an excellent written guide to JavaScript.
- The MDN Web Docs – the definitive technical reference for JavaScript. I’ll be linking to this many, many times in this guide.
- Beginner JavaScript Notes – a free “cliff’s notes” version of Wes Bos’ paid Beginner JavaScript course.
- JSFiddle – a tool for running small code snippets in your browser. Great for testing things out without much required overhead.
Specific Concepts
This is a list of the individual concepts and programming patterns/data structures we’ll use in this tutorial. I’ve listed the actual methods we’ll use separately below.
These have been ordered roughly by their difficulty, and I’ve included a recommended understanding level for each. This isn’t a requirement; I think you can work your way through this tutorial and refer to these concepts as you go. It’s more an indication of my own perceived understanding of each concept at the time I built this project.
| Concept | Recommended Understanding |
|---|---|
| Variables – const vs. let | Full |
| Data types – string, number, etc | Full |
| Variable scope | Medium |
| Boolean values – truthiness and falsiness | Full |
| Console logging | Basic |
| Arrays | Basic |
| Objects | Basic |
| Accessing object properties | Full |
| Functions | Basic |
| Conditional statements | Medium |
| Ternary syntax (for conditionals) | Full |
| For loops | Full |
| For…of loops | Full |
| Try/catch blocks | Basic |
| Requiring modules in Node.js | Basic |
| REST APIs | Basic |
| Template literals | Basic |
| Arrow functions | Medium |
| Object destructuring | Medium |
| Destructuring nested objects | Full |
| Regular expressions | Basic |
| Promises | Basic |
| Async/await | Basic |
Specific Methods
We’ll use several built-in JavaScript methods throughout this tutorial. Below, I’ve linked to the documentation for each one on the MDN Web Docs. These are ordered alphabetically.
- Array.prototype.find()
- Array.prototype.join()
- Array.prototype.map()
- Array.prototype.pop()
- Array.prototype.push()
- setTimeout()
- String.prototype.replace()
- String.prototype.split()
- String.prototype.substring()
- String.prototype.toUpperCase()
How to Go Further
If you finish this tutorial and want to push your skills even further, here are a few challenge ideas:
- Use the Notion API and database relations to display the evolution chain for each Pokémon.
- Display a table within each Pokémon’s page that contains each move that it can learn.
- Push the data from your Notion Pokédex to a static website (example: Daniel Shiffman’s Nature of Code site uses Notion as a CMS)
Steal My Code and Create a Pokédex Instantly
Major update: Glitch shut down in July 2025. I’ve re-created my project in a new platform called Val.town. Access and remix my Val.town version of the Pokédex project here. Please read the README there – it works nearly identically to the Glitch project I reference throughout the tutorial, but there are a couple of small changes. I don’t currently have time to update this whole post to reflect the switch to Val, but if you read that README, you can still follow everything below!
If you just want the code you’ll need to build a Pokédex, you’re in luck! I’ve built this project on Glitch, which is a free platform that allows people to build and share working web apps and sites.
Here’s the direct link to my Glitch project.
There’s a handy Remix feature that allows you to fully copy my Pokédex project and run it for yourself. All you’ll need to do is create a free Glitch account, hit the Remix button, and follow the instructions in the README.md file.
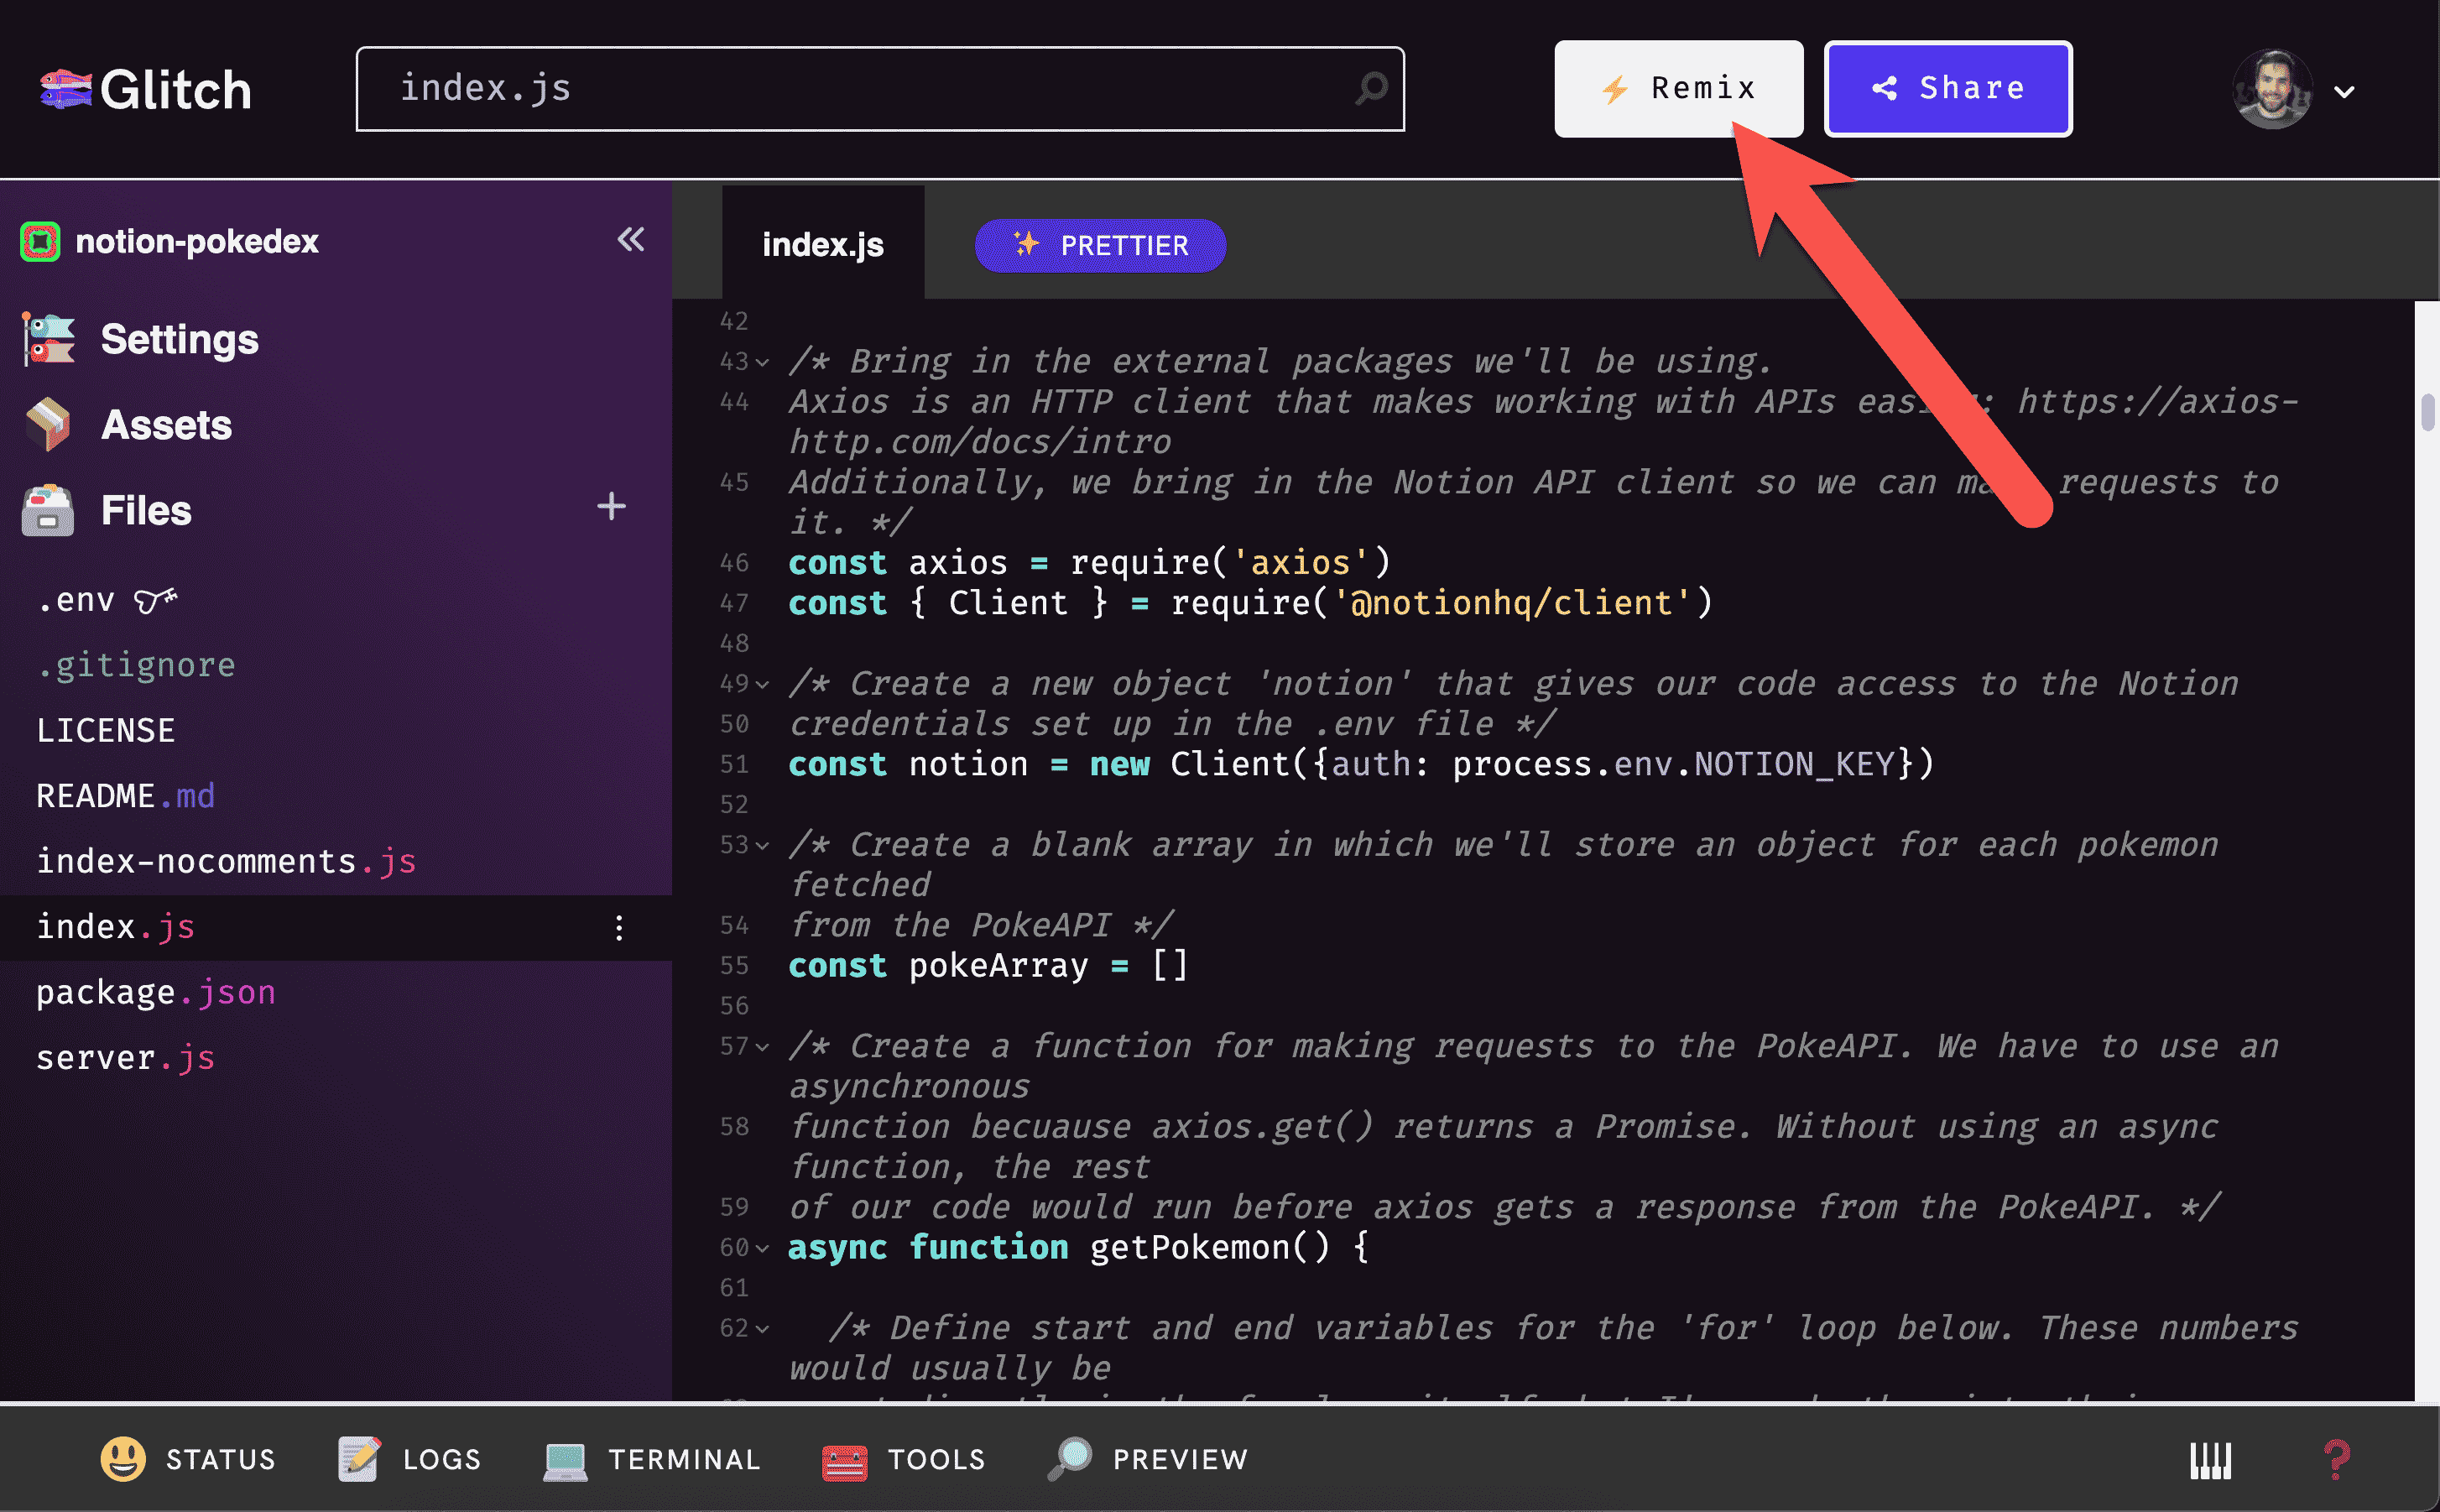
Even if you intend to follow this tutorial and build the project from scratch, I’d encourage you to first Remix mine and see how it works!
One of the most powerful ways to learn faster is to prime your brain by skipping ahead and getting a preview of what you’re trying to accomplish. Even if you don’t fully understand it, you’ll be setting your brain up to more readily understand each piece of the process once you go back and start it in earnest.
I’ve also meticulously commented my code, so you can work through it and get an explanation of how everything works.
To get the script running:
- Create a Glitch account and hit the Remix button on my project.
- Duplicate my Pokédex Template into your Notion workspace.
- Follow the instructions in this section → Create Your Notion Integration
- Follow the instructions in this section → Set Your Environmental Variables
- Open the Terminal.
- Type
node index.jsand hit Enter.
By default, the script will pull the first 10 Pokémon into your Notion database. To change this, modify the start and end variables (lines 65 and 66 in index.js, or 18 and 19 in index-nocomments.js).
Full Project Code
I’m also going to share the full code for this project right here.
As we work through the tutorial, I’ll include smaller code snippets that focus on the specific part we’ll be building at that point.
However, you may want to reference the project code in its entirety; when that happens, just open one of these toggles.
Remember that you can view this code directly on my Glitch project as well! It is located in the index-nocomments.js file.
const axios = require('axios')
const { Client } = require('@notionhq/client')


const notion = new Client({auth: process.env.NOTION_KEY})


const pokeArray = []

async function getPokemon() {
  const start = 1
  const end = 10
  for (let i = start; i <= end; i++) {
    const poke = await axios.get(`https://pokeapi.co/api/v2/pokemon/${i}`)
    .then((poke) => {
      const typesRaw = poke.data.types
      const typesArray = []
      for (let type of typesRaw) {
        const typeObj = {
          "name": type.type.name
        }
        typesArray.push(typeObj)
      }

      const processedName = poke.data.species.name.split(/-/).map((name) => {
        return name[0].toUpperCase() + name.substring(1);
      }).join(" ")
      .replace(/^Mr M/,"Mr. M")
      .replace(/^Mime Jr/,"Mime Jr.")
      .replace(/^Mr R/,"Mr. R")
      .replace(/mo O/,"mo-o")
      .replace(/Porygon Z/,"Porygon-Z")
      .replace(/Type Null/, "Type: Null")
      .replace(/Ho Oh/,"Ho-Oh")
      .replace(/Nidoran F/,"Nidoran♀")
      .replace(/Nidoran M/,"Nidoran♂")
      .replace(/Flabebe/,"Flabébé")

      const bulbURL = `https://bulbapedia.bulbagarden.net/wiki/${processedName
.replace(' ', '_')}_(Pokémon)`

      const sprite = (!poke.data.sprites.front_default) ? poke.data.sprites.other['official-artwork'].front_default : poke.data.sprites.front_default

      const pokeData = {
        "name": processedName,
        "number": poke.data.id,
        "types": typesArray,
        "height": poke.data.height,
        "weight": poke.data.weight,
        "hp": poke.data.stats[0].base_stat,
        "attack": poke.data.stats[1].base_stat,
        "defense": poke.data.stats[2].base_stat,
        "special-attack": poke.data.stats[3].base_stat,
        "special-defense": poke.data.stats[4].base_stat,
        "speed": poke.data.stats[5].base_stat,
        "sprite": sprite,
        "artwork": poke.data.sprites.other['official-artwork'].front_default,
        "bulbURL": bulbURL
      }

      console.log(`Fetched ${pokeData.name}.`)

      pokeArray.push(pokeData)
    })
    .catch((error) => {
      console.log(error)
    })
  }

  for (let pokemon of pokeArray) {
    const flavor = await axios.get(`https://pokeapi.co/api/v2/pokemon-species/${pokemon.number}`)
      .then((flavor) => {

        const flavorText = flavor.data.flavor_text_entries.find(({language: { name }}) => name === "en").flavor_text.replace(/\n|\f|\r/g, " ")
        const category = flavor.data.genera.find(({language: { name }}) => name === "en").genus
        const generation = flavor.data.generation.name.split(/-/).pop().toUpperCase()

        pokemon['flavor-text'] = flavorText
        pokemon.category = category
        pokemon.generation = generation

        console.log(`Fetched flavor info for ${pokemon.name}.`)
      })
      .catch((error) => {
        console.log(error)
      })
  }

  createNotionPage();
}

getPokemon();

const sleep = (milliseconds) => {
  return new Promise(resolve => setTimeout(resolve, milliseconds))
};

async function createNotionPage() {
  for (let pokemon of pokeArray) {

    const data = {
      "parent": {
        "type": "database_id",
        "database_id": process.env.NOTION_DATABASE_ID
      },
      "icon": {
        "type": "external",
        "external": {
          "url": pokemon.sprite
        }
      },
      "cover": {
        "type": "external",
        "external": {
          "url": pokemon.artwork
        }
      },
      "properties": {
        "Name": {
          "title": [
            {
              "text": {
                "content": pokemon.name
              }
            }
          ]
        },
        "Category": {
          "rich_text": [
            {
              "type": "text",
              "text": {
                "content": pokemon.category
              }
            }
          ]
        },
        "No": {
          "number": pokemon.number
        },
        "Type": {
          "multi_select": pokemon.types
        },
        "Generation": {
          "select": {
            "name": pokemon.generation
          }
        },
        "Sprite": {
          "files": [
            {
              "type": "external",
              "name": "Pokemon Sprite",
              "external": {
                "url": pokemon.sprite
              }
            }
          ]
        },
        "Height": { "number": pokemon.height },
        "Weight": { "number": pokemon.weight },
        "HP": { "number": pokemon.hp },
        "Attack": { "number": pokemon.attack },
        "Defense": { "number": pokemon.defense },
        "Sp. Attack": { "number": pokemon['special-attack'] },
        "Sp. Defense": { "number": pokemon['special-defense'] },
        "Speed": { "number": pokemon.speed }
      },
      "children": [
        {
          "object": "block",
          "type": "quote",
          "quote": {
            "rich_text": [
              {
                "type": "text",
                "text": {
                  "content": pokemon['flavor-text']
                }
              }
            ]
          }
        },
        {
          "object": "block",
          "type": "paragraph",
          "paragraph": {
            "rich_text": [
              {
                "type": "text",
                "text": {
                  "content": ""
                }
              }
            ]
          }
        },
        {
          "object": "block",
          "type": "paragraph",
          "paragraph": {
            "rich_text": [
              {
                "type": "text",
                "text": {
                  "content": "View This Pokémon's Entry on Bulbapedia:"
                }
              }
            ]
          }
        },
        {
          "object": "block",
          "type": "bookmark",
          "bookmark": {
            "url": pokemon.bulbURL
          }
        }
      ]
    }

    await sleep(300)

    console.log(`Sending ${pokemon.name} to Notion`)
    const response = await notion.pages.create( data )
    console.log(response)
  }

  console.log(`Operation complete.`)
}
Code language: JavaScript (javascript)Remember that you can view this code directly on my Glitch project as well! It it located in the index.js file.
/* Bring in the external packages we'll be using.

Axios is an HTTP client that makes working with APIs easier: https://axios-http.com/docs/intro

Additionally, we bring in the Notion API client so we can make requests to it. */
const axios = require('axios')
const { Client } = require('@notionhq/client')

/* Create a new object 'notion' that gives our code access to the Notion credentials set up in the .env file */
const notion = new Client({auth: process.env.NOTION_KEY})

/* Create a blank array in which we'll store an object for each pokemon fetched from the PokeAPI */
const pokeArray = []

/* Create a function for making requests to the PokeAPI. We have to use an asynchronous function becuause axios.get() returns a Promise.

Without using an async function, the rest of our code would run before axios gets a response from the PokeAPI. */
async function getPokemon() {

  /* Define start and end variables for the 'for' loop below.

  These numbers would usually be set directly in the for loop itself, but I've made them into their own variables so you can easily tweak them.

  They correspond to actual Pokemon numbers - e.g. 1 = bulbasaur. */
  const start = 1
  const end = 10

  /* This 'for' loop will make the first set of requests to the PokeAPI.

  We're using a basic 'for (let i = num)' loop because i will correspond to specific Pokemon numbers. So if you only wanted the original 151, you'd set start at 1 and end at 151. */
  for (let i = start; i <= end; i++) {

    /* Use the axios.get() method to make a GET request to the PokeAPI's 'pokemon' endpoint: https://pokeapi.co/docs/v2#pokemon

    This endpoint allows to to access MOST of the information we need. The only info we can't get from this endpoint is flavor text, generation #, and category (e.g. "Flame Pokemon"). For that info, we'll have to query the 'pokemon-species' endpoint later on.

    Note how we're using a template literal in order to pass our `i` variable's value into the URL.    This is what will allow us to call PokeAPI for the correct pokemon on each run of the loop, e.g. https://pokeapi.co/api/v2/pokemon/4 (when i = 4) will get Charmander. */
    const poke = await axios.get(`https://pokeapi.co/api/v2/pokemon/${i}`)
    .then((poke) => {

      /* Pokemon have a variable number of types (some have 1, some have 2). The Notion API expects Multi-Select property selections to come in the form of an array of objects, so we need to create an array of objects that we can pass when we're setting the 'Type' Multi-Select property's values.

      First, we store the types array from PokeAPI in the typesRaw variable. */
      const typesRaw = poke.data.types

      /* Now we'll create a blank array that will contain our type objects, which will be formated specifically so they'll work with the Notion  API. */
      const typesArray = []

      /*  Create a for...of loop that will loop through all the elements of typesRaw.

      For each one, we'll create an object 'typeObj' which is formatted as needed for the Notion API, which which contains ONE of the Pokemon's types. Since the number of loop iterations is defined by the length of the typesRaw array, we'll end up with a new array (typesArray) that contains an object for each of the Pokemon's types.

      E.G. - Butterfree is Bug-type and Flying-type, so its typesArray will have two elements. */
      for (let type of typesRaw) {
        const typeObj = {
          "name": type.type.name
        }

        /* Add the object onto the end of typesArray */
        typesArray.push(typeObj)
      }

      /* The PokeAPI returns very basic formatting for Pokemon names - e.g. 'Mr. Mime' is formatted as 'mr-mime'. We want to show names with proper punctuation and capitalization in Notion - e.g. 'Mr. Mime'.

      This is also important for auto-generating links to Bulbapedia, where more information about each Pokemon can be found (this is a basic Pokedex that doesn't include move information, locations, etc.)

      To accomplish this, we're running the poke.data.species.name object through several functions. First, the split().map().join() combo capitalizes the first letter of each word - e.g. 'mr-mime' becomes 'Mr Mime'.

      When methods are chained like this, they are executed left-to-right. So the return value of split() is fed into map(), and map()'s return value is fed into join().

      Then, we run that result through a gauntlet of replace() calls to deal with edge case Pokemon like Type: Null, Ho-Oh, Mr. Mime, and Nidoran♀ - all of which include punctuation or symbols. Each replace() call looks for a regular expression match and replaces the first one it finds with the next argument. */
      const processedName = poke.data.species.name.split(/-/).map((name) => {
        return name[0].toUpperCase() + name.substring(1);
      }).join(" ")
      .replace(/^Mr M/,"Mr. M")
      .replace(/^Mime Jr/,"Mime Jr.")
      .replace(/^Mr R/,"Mr. R")
      .replace(/mo O/,"mo-o")
      .replace(/Porygon Z/,"Porygon-Z")
      .replace(/Type Null/, "Type: Null")
      .replace(/Ho Oh/,"Ho-Oh")
      .replace(/Nidoran F/,"Nidoran♀")
      .replace(/Nidoran M/,"Nidoran♂")
      .replace(/Flabebe/,"Flabébé")

      /* Define a variable that holds the bulbapedia URL for the Pokemon. Bulbapedia has a very standardized URL scheme for Pokemon, so all we need to do is pass in the processedName variable and then replace any space characters it contains with underscores.

      All other special characters are left in the URL - even :,é,-,etc.

      Example URL: https://bulbapedia.bulbagarden.net/wiki/Mr._Mime_(Pokémon) */
      const bulbURL = `https://bulbapedia.bulbagarden.net/wiki/${processedName
.replace(' ', '_')}_(Pokémon)`

      /* Here we're defining a variable for the sprite using ternary syntax (? and : ) to create a conditional statement.

      We need to do this because certain Gen VIII Pokemon were introduced in Pokemon Legends: Arceus and do not have a sprite. The PokeAPI has an 'official-artwork' image for EVERY Pokemon, so we'll set the value of sprite to 'official-artwork' if a 'front_default' sprite doesn't exist.

      (!poke.data.sprites.front_default) is a Boolean check; if the value of this object is null, it'll evaluate to false. */
      const sprite = (!poke.data.sprites.front_default) ? poke.data.sprites.other['official-artwork'].front_default : poke.data.sprites.front_default


      /* Now we'll construct the object that will hold all of the data about this Pokemon. If you recall, we aren't able to pull generation, flavor text, or category from PokeAPI's 'pokemon' endpoint, so we'll add those to this object later.

      For now, each object property is being set to the value of the corresponding property returned from our first PokeAPI call.

      Note how ['official-artwork'] is defined differently. Property key names with dashes or spaces must be called using 'bracket notation' rather than 'dot notation'. */
      const pokeData = {
        "name": processedName,
        "number": poke.data.id,
        "types": typesArray,
        "height": poke.data.height,
        "weight": poke.data.weight,
        "hp": poke.data.stats[0].base_stat,
        "attack": poke.data.stats[1].base_stat,
        "defense": poke.data.stats[2].base_stat,
        "special-attack": poke.data.stats[3].base_stat,
        "special-defense": poke.data.stats[4].base_stat,
        "speed": poke.data.stats[5].base_stat,
        "sprite": sprite,
        "artwork": poke.data.sprites.other['official-artwork'].front_default,
        "bulbURL": bulbURL
      }

      /* Send a log to the console with each fetched Pokemon's name. Doing this will allow the console to show activity the whole time the script is running. Without it, you'll just see a blank spot in your console while the script takes minutes to run. */
      console.log(`Fetched ${pokeData.name}.`)

      /* Push our pokeData object onto the end of the pokeArray array. This is done each time our loop executes, resulting in an array full of objects - one for each Pokemon that you included in the loop (using the start and end numbers).

      Each object will look just like the pokeData object definition above, except the properties will contain actual information. If you want to see how these look, add console.log(pokeData) above this line. */
      pokeArray.push(pokeData)
    })
    .catch((error) => {

      /* if axios.get() fails and throws an error, this catch block will catch it and log it in the console. */
      console.log(error)
    })
  }

  /* We now need to call another PokeAPI endpoint to get three more pieces of information about each Pokemon:    - Flavor text (e.g. "Spits fire that is hot enough to melt boulders. Known to cause forest fires unintentionally.")  - Generation (e.g. I, II, III...)  - Category (e.g. "Flame Pokemon", "Owl Pokemon")

  These must be obtained from the pokemon-species endpoint (https://pokeapi.co/docs/v2#pokemon-species)

  We now have all of the Pokemon we'll sent to Notion in pokeArray, so we'll now use a for...of loop to loop through that array,  get the 'species' info for each element from PokeAPI, and add each piece of info to that pokemon's object in pokeArray. */
  for (let pokemon of pokeArray) {

    /* Just like we did above, here we use axios.get() to call the PokeAPI endpoint we want. Note that this time we're passing the pokemon.number property from the current element of pokeArray (which is stored in the pokemon variable created in this loop) into the PokeAPI URL. */
    const flavor = await axios.get(`https://pokeapi.co/api/v2/pokemon-species/${pokemon.number}`)
      .then((flavor) => {

        /* Create a variable to store the pokemon's flavor text. Depending on the pokemon, PokeAPI will have a differing number of flavor text options. These are all stored in an array called flavor_text_entries, and the English-language flavor text might be at any one of the indexes.

        See for yourself: Go to pokeapi.co and enter 'pokemon-species/charmander' in the testing box. Array index 0 (the first one) contains English-language flavor text.

        However, try 'pokemon-species/cramorant' and you'll see that the English flavor text doesn't show up until Array index 7.

        So instead of calling a specific array index, we have to search deeply inside the array's objects to find the one that has a 'language' object, which itself contains a 'name' property with a value of 'en'.

        To accomplish this, we call the find() method on the flavor_text_entries array, which returns the first array element that satisfies a test condition we'll set up though a function.

        That function is name === 'en'. To make sure the value of the nested 'name' property is fed into the function as the 'name' varible, we do what is called nested object destructuring. ({language: { name }}) tells find() that for each array element, go into its language object, then into the name property nested within, and pass name's value as the variable for the function.

        find() returns the full array element that matches the test condition, so we then tack on `.flavor_text` to get the value of its flavor_text property.

        Finally, we pass the found value through replace(/\n|\f|\r/g, " ") to replace any newline characters with spaces, resulting in a single line of flavor text. */
        const flavorText = flavor.data.flavor_text_entries.find(({language: { name }}) => name === "en").flavor_text.replace(/\n|\f|\r/g, " ")


        /* Here we do the exact same thing as was done with the flavorText variable, except for the 'genus' property, which is PokeAPI's term for the category - e.g. "Flame Pokemon" */
        const category = flavor.data.genera.find(({language: { name }}) => name === "en").genus

        /* Now we get the pokemon's generation. It is returned in this format: 'generation-i' - but we want it to simply be 'I', so we run the result through split(/-/), which splits the string into an array using the dash character (-) as the divider.

        Then we use pop() to "pop" the last element of that array off of the array and return it - this will always be the generation number in Roman numerals, e.g. 'iv'. Finally, we pass that value through toUpperCase() to capitalize it - e.g. 'IV'. */
        const generation = flavor.data.generation.name.split(/-/).pop().toUpperCase()

        /* Now we add our three new pieces of information to the current pokemon's object by creating three new properties within that object, and then assigning them the values from our three variables above.

        Note how pokemon['flavor-text'] uses bracket notation; this is required when an object property name has or will have spaces, dashes, or other special characters in it. Dot notation can only be used when property names contain letters, numbers, and underscores. */
        pokemon['flavor-text'] = flavorText
        pokemon.category = category
        pokemon.generation = generation

        /* Add a log entry in the console each time this information is fetched from PokeAPI. */
        console.log(`Fetched flavor info for ${pokemon.name}.`)
      })
      .catch((error) => {
        /* Log any errors thrown by axios.get(), just as in the previous loop block. */
        console.log(error)
      })
  }


  /* Once both loops have finished running, we call the createNotionPage() function which is defined below. It's important to note that we're calling this function within the getPokemon() function.

  Since getPokemon() is an async function, calling createNotionPage() outside of it (in the global context) will cause createNotionPage() to run before getPokemon() can finish construcing its array of objects.

  Calling it here forces createNotionPage() to run only after our two loops have completely finished fetching and formatting the data from PokeAPI. */
  createNotionPage();
}

/* Here's where we actually call the getPokemon() function. When you type `node index.js` in the Terminal to run this script, it immediately runs this function, which kicks off everything else.

Note how we've defined additional functions below this; these are totally fine to exist below this line because JavaScript "hoists"function definitions to the top when it actually runs a .js file. Look up "JavaScript Hoisting" to learn more about this. */
getPokemon();


/* Create a "wait" function to comply with Notion API rate-limiting.

The Notion API only allows ~3 requests per second, so after we create each new page in our Notion database, we'll call this sleep function and have it wait for 300ms. This will ensure that our app doesn't try to send data to Notion too quickly, which would cause our calls to eventually fail. */
const sleep = (milliseconds) => {
  return new Promise(resolve => setTimeout(resolve, milliseconds))
};

/* Create a function for sending our data to the Notion API. As with getPokemon(), this function has to be async because it is using axios.get(), which is an asynchronous method that returns a Promise first. Therefore, we must await it, and to do that it has to be inside an async function. */
async function createNotionPage() {

  /* Here's our main loop for the process of sending data to Notion. We already have our array of pokemon objects (pokeArray), so we can use a for...of loop to iterate through it.

  For each element, we'll construct a new object that formats the data in the way   Notion wants. Then we'll create a new page in our Notion database with that data. */
  for (let pokemon of pokeArray) {

    /* Here we'll construct the data object that we'll send to Notion in order to create a new page. This object defines the database in which the page will live (the "parent") and sets its icon, cover, and property values. It also adds a few blocks to the page's body, including the flavor text and a link to the pokemon's Bulbapedia page.

    I won't verbosely comment every piece of this object definition. Instead, I'll encourage you to study it and also point you to a few reference pages that you'll fine invaluable for working with the Notion API:

    - Property Values: https://developers.notion.com/reference/property-value-object
    - Block Objects: https://developers.notion.com/reference/block
    - Create a Page: https://developers.notion.com/reference/post-page

    Note how, for each block, we're setting the relevant property values to the variables in our pokemon object (except for     the database ID, which is set by process.env.NOTION_DATABASE_ID).

    It's also useful to note that EVERYTHING in Notion is a block. The 'data' object will end up being a block that is recognized by Notion as a page due to the 'parent' value we're giving it (a database), and due to the fact that we're using the notion.pages.create() method to create it.

    However, you can see below that this block has children, which are blocks that will show up as its page content. Note that you can create 'block children' under nearly any block - not just under a page!

    See more: https://developers.notion.com/reference/patch-block-children */
    const data = {
      "parent": {
        "type": "database_id",
        "database_id": process.env.NOTION_DATABASE_ID
      },
      "icon": {
        "type": "external",
        "external": {
          "url": pokemon.sprite
        }
      },
      "cover": {
        "type": "external",
        "external": {
          "url": pokemon.artwork
        }
      },
      "properties": {
        "Name": {
          "title": [
            {
              "text": {
                "content": pokemon.name
              }
            }
          ]
        },
        "Category": {
          "rich_text": [
            {
              "type": "text",
              "text": {
                "content": pokemon.category
              }
            }
          ]
        },
        "No": {
          "number": pokemon.number
        },
        "Type": {
          "multi_select": pokemon.types
        },
        "Generation": {
          "select": {
            "name": pokemon.generation
          }
        },
        "Sprite": {
          "files": [
            {
              "type": "external",
              "name": "Pokemon Sprite",
              "external": {
                "url": pokemon.sprite
              }
            }
          ]
        },
        "Height": { "number": pokemon.height },
        "Weight": { "number": pokemon.weight },
        "HP": { "number": pokemon.hp },
        "Attack": { "number": pokemon.attack },
        "Defense": { "number": pokemon.defense },
        "Sp. Attack": { "number": pokemon['special-attack'] },
        "Sp. Defense": { "number": pokemon['special-defense'] },
        "Speed": { "number": pokemon.speed }
      },
      "children": [
        {
          "object": "block",
          "type": "quote",
          "quote": {
            "rich_text": [
              {
                "type": "text",
                "text": {
                  "content": pokemon['flavor-text']
                }
              }
            ]
          }
        },
        {
          "object": "block",
          "type": "paragraph",
          "paragraph": {
            "rich_text": [
              {
                "type": "text",
                "text": {
                  "content": ""
                }
              }
            ]
          }
        },
        {
          "object": "block",
          "type": "paragraph",
          "paragraph": {
            "rich_text": [
              {
                "type": "text",
                "text": {
                  "content": "View This Pokémon's Entry on Bulbapedia:"
                }
              }
            ]
          }
        },
        {
          "object": "block",
          "type": "bookmark",
          "bookmark": {
            "url": pokemon.bulbURL
          }
        }
      ]
    }

    /*  Here we call our sleep() function, passing it a value of 300 so that the loop "sleeps" for 300ms before going onto the next cycle. This ensures that we respect the Notion API's rate limit of ~3 requests per second. */
    await sleep(300)

    /* Finally, we actually create the new page in our Notion database. First, we add a log item to the console for our own benefit.

    Then we call the notion.pages.create() function, which creates a new page in our database. We pass it our data object (defined above), which contains all of the necessary information.

    Finally, we store the Notion API's response in the response variable, and log it. */
    console.log(`Sending ${pokemon.name} to Notion`)
    const response = await notion.pages.create( data )
    console.log(response)
  }

  /* When the entire process is done, this will simply print "Operation Complete" in the console. */
  console.log(`Operation complete.`)
}
Code language: JavaScript (javascript)As I mentioned above, I only learned how to code in JavaScript this year, so my skills are not well-honed.
Fortunately, that doesn’t matter much. These days, computers are so powerful that simple applications can be built many ways. Even if the code isn’t perfectly-optimized, it’s “good enough” so long as it gets the job done and handles errors well.
Still, there are often better ways to do things. To show you an example, below I’m sharing my full-time developer Eli’s take on the getPokemon() function.
He readily admits that his code is less readable than mine, but it does result in a 40% reduction in code length. In professional setting, my code above would probably get refactored to look more like his.
async function getPokemon() {
const replacer = (str) => {
const n = {
"Mr M": "Mr. M",
"Mime Jr": "Mime Jr.",
"Mr R": "Mr. R",
"mo O": "mo-o",
"Porygon Z": "Porygon-Z",
"Type Null": "Type: Null",
"Ho Oh": "Ho-Oh",
"Nidoran F": "Nidoran♀",
"Nidoran M": "Nidoran♂",
"Flabebe": "Flabébé",
}
let pn = Object.keys(n).find((o) => str.includes(o))
return pn ? str.replace(pn, n[str]) : str
}
let urls = await fetch(`https://pokeapi.co/api/v2/pokemon?limit=50`)
.then((r) => r.json())
.then((d) => d.results.map(u => u.url))
let base = await Promise.all(urls.map(async (url) => {
let d = await fetch(url).then((r) => r.json())
let name = replacer(d.name.split(/-/).map((name) => {
return name[0].toUpperCase() + name.substring(1)
})[0])
return {
name: name,
number: d.id,
types: d.types.map((t) => t.type.name),
height: d.height,
weight: d.weight,
hp: d.stats[0].base_stat,
attack: d.stats[1].base_stat,
defense: d.stats[2].base_stat,
specialAttack: d.stats[3].base_stat,
specialDefense: d.stats[4].base_stat,
speed: d.stats[5].base_stat,
sprite: d.sprites.front_default,
artwork: d.sprites.other['official-artwork'].front_default,
bulbURL: `https://bulbapedia.bulbagarden.net/wiki/${name.replace(' ', '_')}_(Pokémon)`,
}
}))
let flav = await Promise.all(base.map(async (p) => {
let d = await fetch(`https://pokeapi.co/api/v2/pokemon-species/${p.number}`).then((r) => r.json())
return {
flavorText: d.flavor_text_entries.find(({language: {name}}) => name === "en").
flavor_text.replace(/\n|\f|\r/g, " "),
category: d.genera.find(({language: {name}}) => name === "en").genus,
generation: d.generation.name.split(/-/).pop().toUpperCase()
}
}))
return base.map((b, i) => ({...b, ...flav[i]}))
}
getPokemon().then((r) => {
createNotionPage(r)
})
Code language: JavaScript (javascript)In 2024, I released an JavaScript library called notion-helper that makes working with the Notion API much easier.
Below you’ll find a version of the Pokédex script above that uses notion-helper, along with a more modern HTTP client called ky. As you can see, it’s a much smaller script!
If you’re new to code, and if you want to thoroughly understand the Notion API, I’d still recommend going through the whole project in this post and writing all the API code from scratch. After that, though, you might find that notion-helper comes in handy when building future API requests.
import ky from "ky";
import { createNotion, createPage } from "notion-helper";
import { Client } from "@notionhq/client";

const notion = new Client({ auth: process.env.NOTION_KEY });
const dbId = "13342df2c64081e5a75fe9a119e75ecc";

const pokedex = await Promise.all(
    Array.from({ length: 20 }, async (_, i) => {
        const poke = await ky
            .get(`https://pokeapi.co/api/v2/pokemon/${i + 1}`).json();
        const species = await ky
            .get(`https://pokeapi.co/api/v2/pokemon-species/${i + 1}`).json();
        const name = species.names.find(
            ({ language: { name } }) => name === "en"
        ).name;
        const sprite = !poke.sprites.front_default
            ? poke.sprites.other["official-artwork"].front_default
            : poke.sprites.front_default;

        return createPage({
            client: notion,
            data: createNotion({ allowBlankParagraphs: true })
                .parentDb(dbId)
                .icon(sprite)
                .cover(poke.sprites.other['official-artwork'].front_default)
                .title("Name", name)
                .richText(
                    "Category",
                    species.genera.find(
                        ({ language: { name } }) => name === "en"
                    ).genus
                )
                .number("No", poke.id)
                .multiSelect("Type", poke.types.map((type) => type.type.name))
                .select(
                    "Generation",
                    species.generation.name.split(/-/).pop().toUpperCase()
                )
                .files("Sprite", sprite)
                .number("Height", poke.height)
                .number("Weight", poke.weight)
                .number("HP", poke.stats[0].base_stat)
                .number("Attack", poke.stats[1].base_stat)
                .number("Defense", poke.stats[2].base_stat)
                .number("Sp. Attack", poke.stats[3].base_stat)
                .number("Sp. Defense", poke.stats[4].base_stat)
                .number("Speed", poke.stats[5].base_stat)
                .quote(species.flavor_text_entries.find(({language: { name }}) => name === "en").flavor_text.replace(/\n|\f|\r/g, " "))
                .paragraph("")
                .paragraph("View This Pokémon's Entry on Bulbapedia:")
                .bookmark(
                    `https://bulbapedia.bulbagarden.net/wiki/${name.replace(
                        " ",
                        "_"
                    )}_(Pokémon)`
                )
                .build()
                .content
        });
    })
);
Code language: JavaScript (javascript)What You’ll Need to Get Started
To successfully complete this tutorial, you’ll need a few things:
- A Notion account. Even the free tier is able to work with the API!
- A Notion database that you’d like to use for your Pokédex (you can start with my template below).
- An integration in your Notion account. We’ll create this in the first step of the tutorial.
- A free Glitch account. This is the platform where we’ll build and run the application.
You can also build and run this project locally on your own computer. Likewise, you could do things like the pros, pushing your code to Github and then deploying it to a company that can host Node.js apps such as Vercel.
The reason I’ve chosen to build this project on Glitch is because it gives you a complete starting point for free. We can code directly in the Glitch editor and then run our code directly in Glitch’s terminal.
If you’d rather build this project locally, here are the prep steps you’ll need to take:
- Get a code editor – I recommend VS Code, as it has a built-in terminal for running your code along with many extensions and a huge community.
- Install Node.js and npm. The Node.js LTS installer should install both. Refer to this guide to see other ways to install (included the recommended-yet-harder nvm method), and to see how you can check that node and npm are indeed installed on your machine.
- Follow this guide to set up VS Code for a Node.js project and to move into the correct directory where you want to build your app.
- Once you have your project set up with a
package.jsonfile, typenpm install axiosin the terminal and hit Enter to add the Axios package to your project. It should show up in thepackage.jsonfile under dependencies. - Likewise, type
npm install @notionhq/clientin the terminal and hit Enter to install the Notion SDK package.
Just like on Glitch, you’ll need to create a .env file in your project and add your authentication details to it. However, Glitch automatically takes care of a few things you’ll have to do manually here.
First, type npm install dotenv and hit Enter in the terminal to install the dotenv package and add it to your package.json. (Glitch includes this by default.)
In your project’s root directory (the same top-level folder where package.json is contained), create a filed called .env (no other file extension).
Add your environment variables to this file and hit Save. Replace these default values with your Notion integration key and your target database’s ID. Refer to the Create a Notion Integration section for more detail on this.
NOTION_KEY = blargablargblarg
NOTION_DATABASE_ID = blargblarg
Code language: JavaScript (javascript)
At the top of your index.js file, you’ll also need to include:
require('dotenv').config()
Code language: JavaScript (javascript)
This will allow your app to access the variables defined in your .env file. You can test this by adding these lines to your index.js file, then running node index.js in the terminal:
console.log(process.env.NOTION_KEY)
console.log(process.env.NOTION_DATABASE_ID)
Code language: JavaScript (javascript)
If you plan on pushing your code to Github or otherwise using git for version control, you’ll also want to create a .gitignore file in your project’s root directory. Then, add .env to that file and commit your .gitignore to your repo (see this more comprehensive guide for more detail):
.env
Code language: JavaScript (javascript)
From there, you can follow the rest of the instructions in this tutorial.
If you’d like to learn more about .env files and running things locally, see this guide: How to Use Environment Variables in Node
You can use any database you want to create your Pokédex, but if you’d like a head start, you can use this free Pokédex Notion template I’ve created for you.
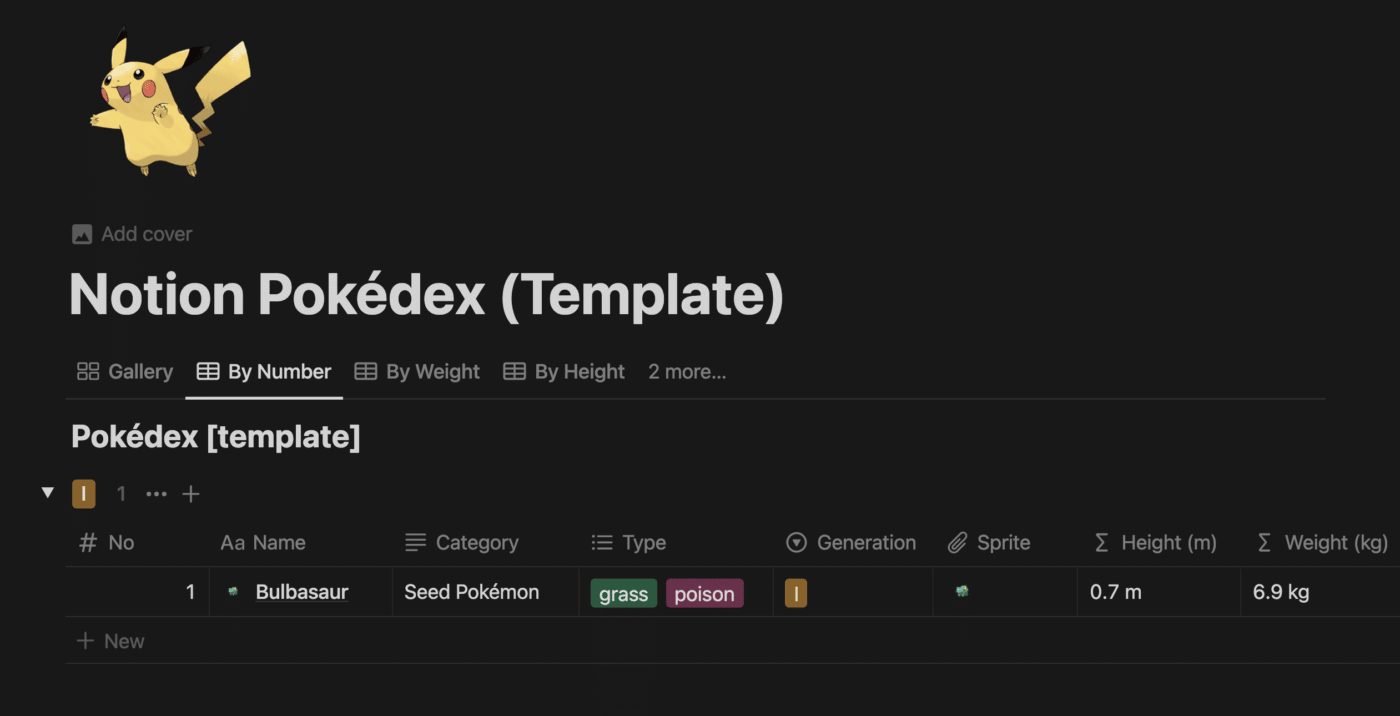
The template is an exact copy of my public Pokédex, minus all the actual Pokémon. It comes with all the properties and views pre-configured, so you can skip all of the database setup and get to coding.
Since I’m providing this template, I won’t cover the database set up in this tutorial. However, if you want to learn more about setting up Notion databases, check out my beginner’s guide to Notion databases. You may also find my complete Notion formula guide helpful for understanding some of the formulas in this template!
Copy link to headingTutorial Overview
Before we start coding, let’s do a quick overview and cover what we’ll be accomplishing.
We know that we want to pull information about each Pokémon from PokéAPI and then create a new page in our Notion database for each Pokémon – but how exactly will we do that?
First, the prep work: We’ll set up our Pokédex database on Notion, create a Notion API integration, and ensure the integration is able to edit the database (covered in the very next section).
Once that’s done, we’ll build the script that will actually execute the process of getting the data and sending it to Notion.
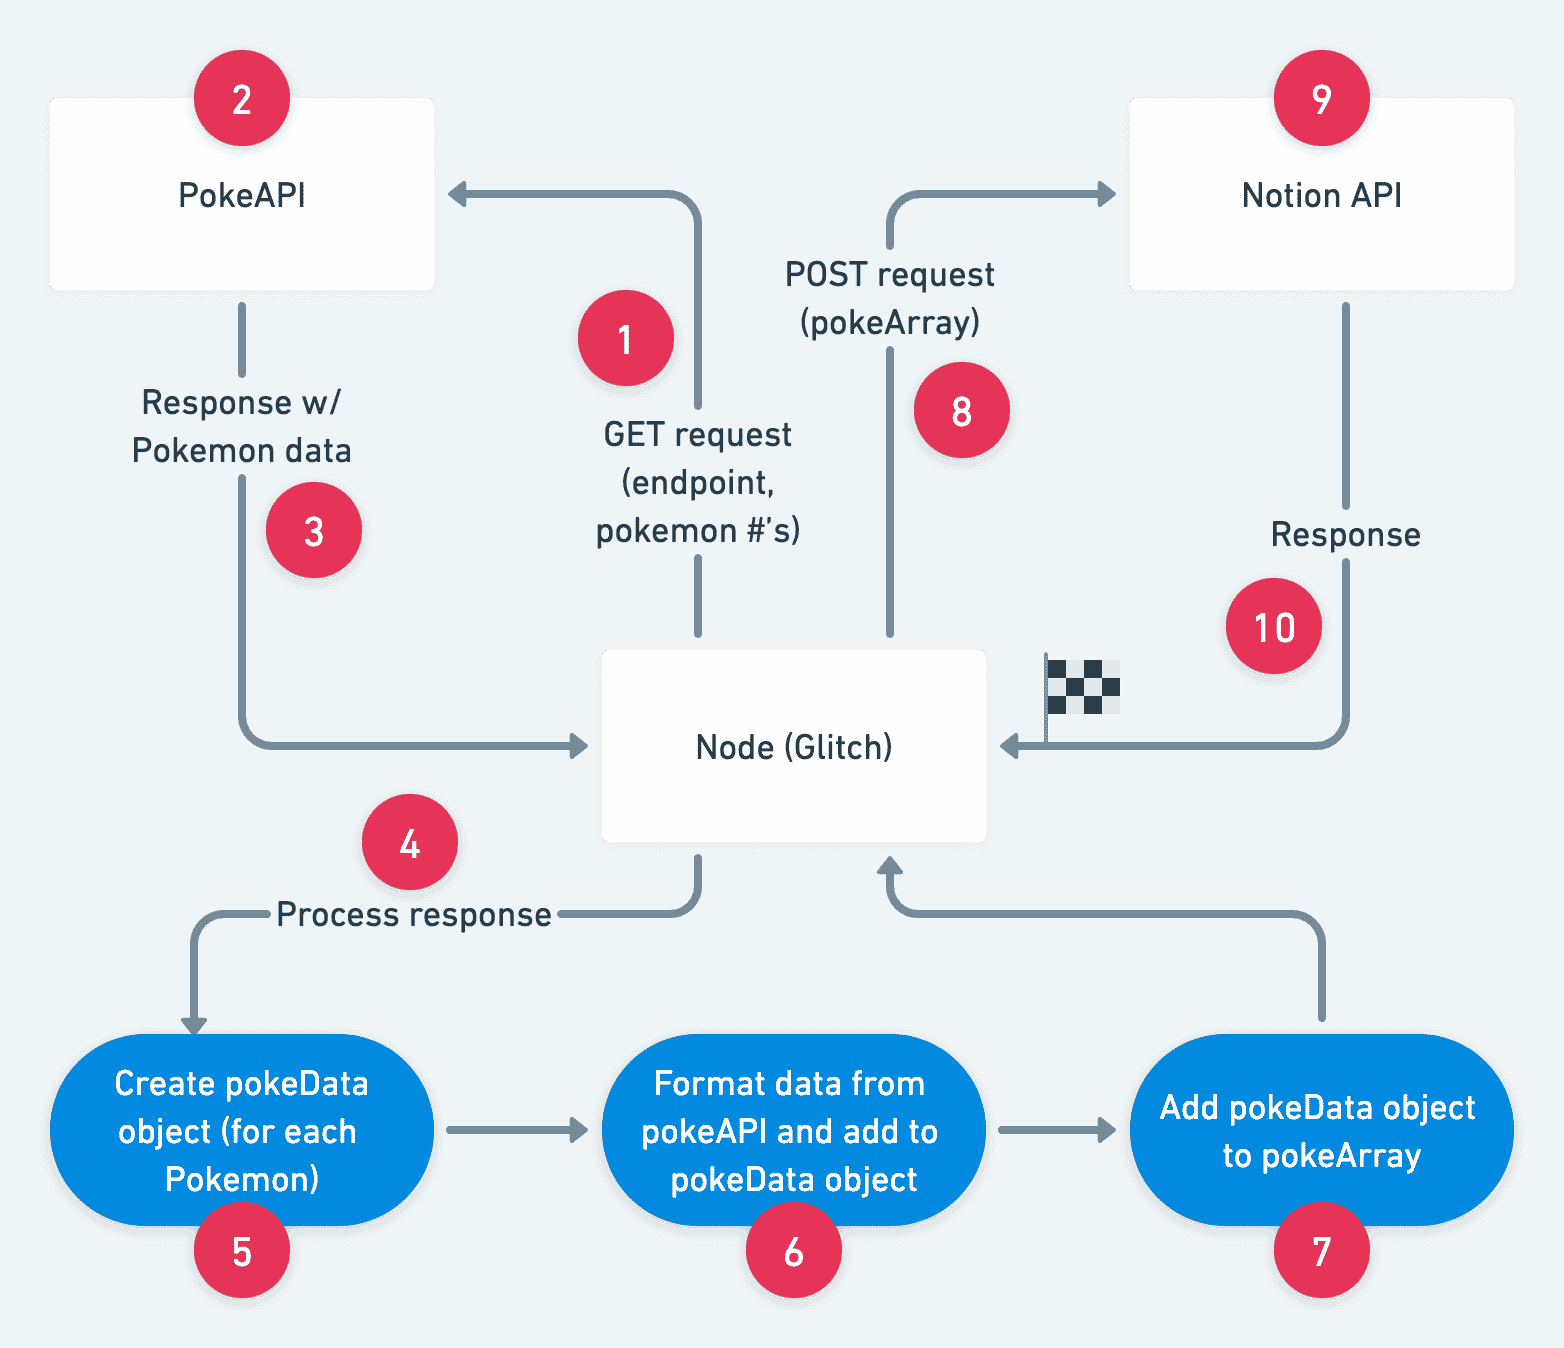
Let’s break down the process. Don’t worry if you don’t know what GET and POST requests are – I’ll explain them as they come up!
- For each Pokémon, we’ll send a GET request to PokéAPI. This will contain the URL that maps to the specific Pokémon we want information about – e.g.
https://pokeapi.co/api/v2/pokemon/4(you can paste that link directly in your browser to see the response). - PokéAPI will accept our GET request if it is formatted correctly.
- PokéAPI sends back a response that contains all of the Pokémon data we want, plus other meta info.
- The response contains way too much data, and it’s not always formatted perfectly. So we’ll do some work to process the response directly on our web server (Glitch/Node.js).
- For each Pokémon, we’ll create a custom JavaScript object called
pokeDatathat will contain all the info we’ll need. - We’ll do the work to extract and format the data from PokéAPI and add it to the
pokeDataobject – including name, height, weight, base stats, artwork, etc. - We’ll add each
pokeDataobject to an array calledpokeArray. - Now we’ll make a POST request to the Notion API for each Pokémon within
pokeArray. - Assuming our request is formatted correctly and authenticated, Notion will create a new page within our Pokédex database, setting property values and populating the page content with the information we sent over.
- Finally, the Notion API will send back a response that we’ll simply log.
Here’s a graphic that shows the entire process visually (you can also view this directly on Whimsical):
Now that you’ve got a map in your head for what we’ll be building, let’s build it!
Copy link to headingCreate a Notion Integration
The first thing we’ll do is create an integration within your Notion account. This integration will allow you to work with the Notion API and make changes to your workspace.
Note: You’ll also find these instructions in the getting started guide within the Notion API docs. We’ll be referencing these docs a lot later on, and I highly recommend getting familiar with them if you plan on building more Notion API integrations!
To start, make sure you’ve duplicated my Pokedex template into your Notion workspace. This template contains all the properties and views you’ll need.
Next, you’ll need to create an integration in your Notion account. Click here to go directly to the “My Integrations” area of your account.
Alternatively, you can find this page by going to Settings & Members within the Notion app, then navigating to My Connections → Develop or Manage Integrations.
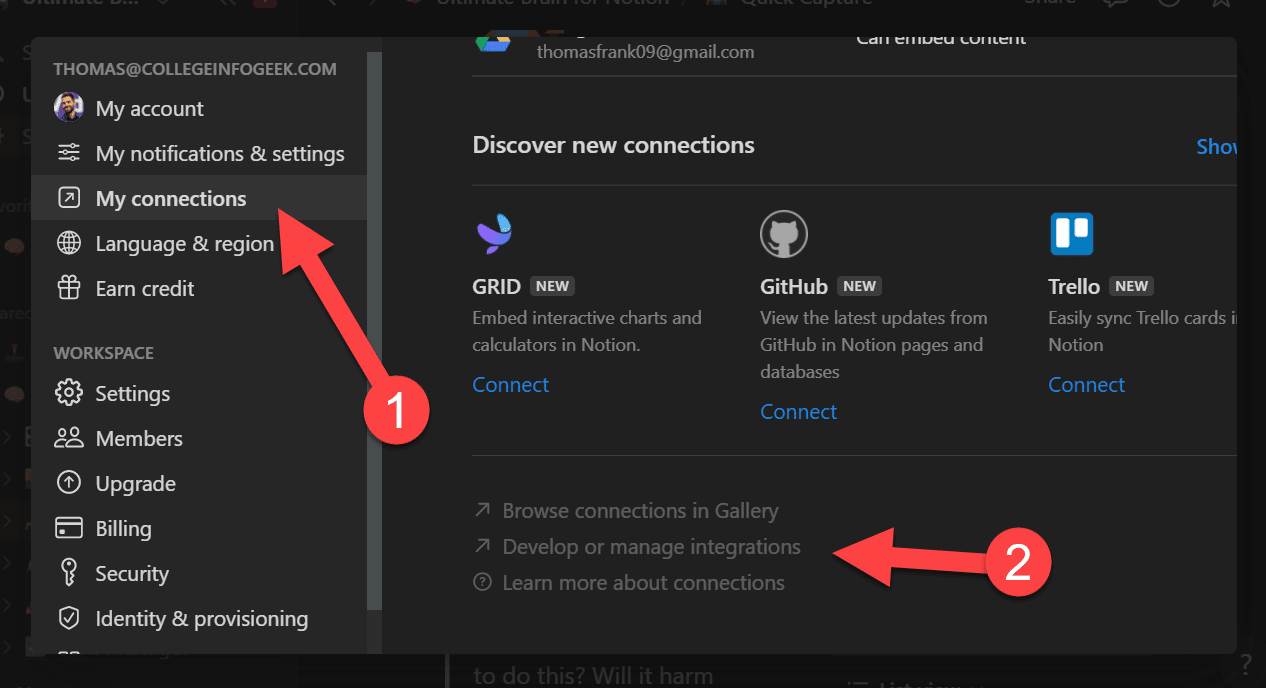
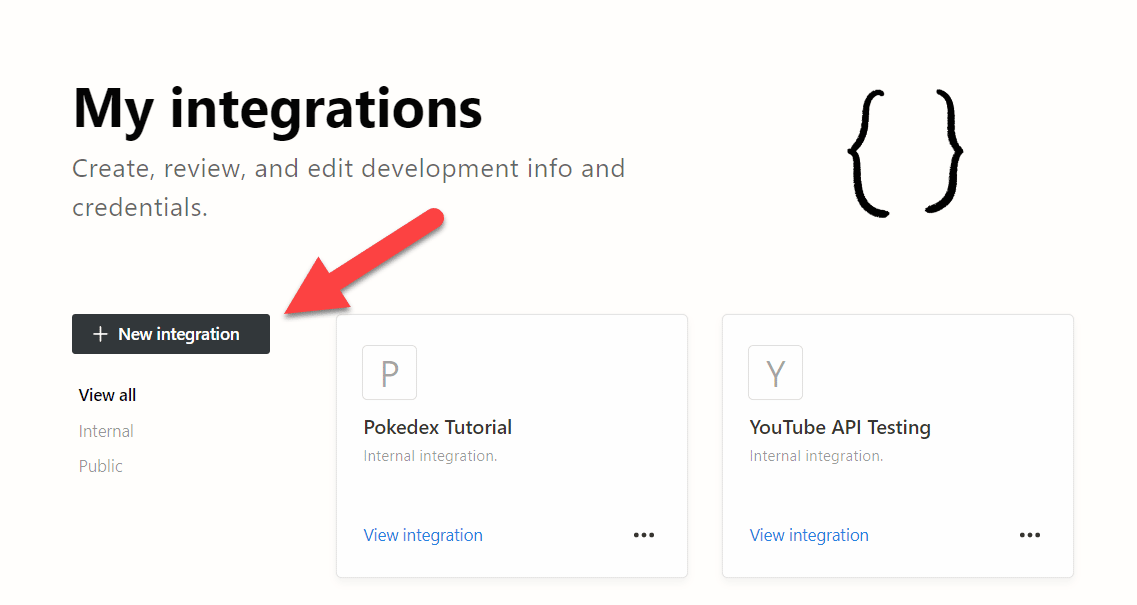
Click New Integration.
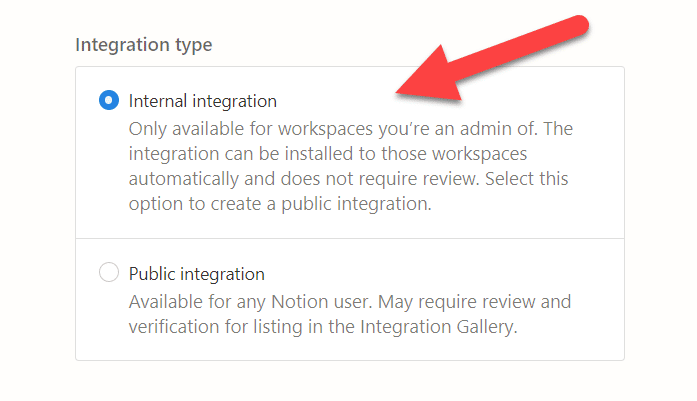
Fill out the Basic Information for your integration. You can leave most of the settings at their defaults, but set these as needed:
- Name: Any descriptive name. I’ll use “Notion Pokedex Integration” in this guide.
- Associated workspace: Choose the workspace you want this integration to work with (aka the one that contains your Pokedex database).
- User capabilities: Set to no user infomation. This project doesn’t need user info, and it’s a good practice to limit integrations to only the capabilities they need.
Click Submit.
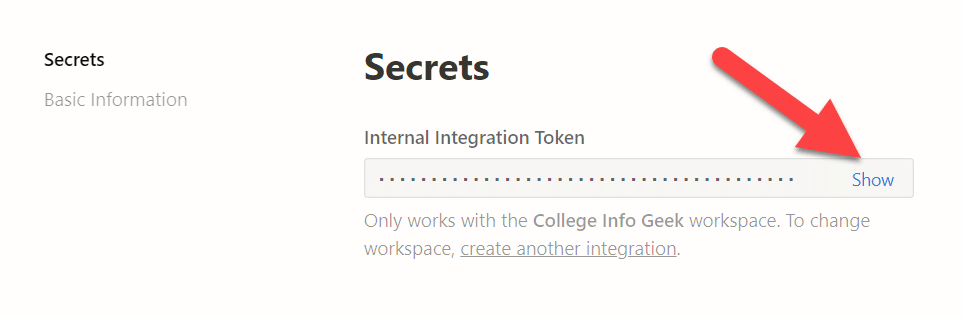
Once the integration has been created, you’ll see a field where you can show your internal integration token.
Copy this token to your clipboard; you’ll need it when we start setting up the project in Glitch.
Important: Keep this token secret. As this tutorial will show you, an integration token allows external tools and scripts to make changes to your Notion workspace.
Additionally, note where it says, “Only works with [your workspace name] workspace”. If you want to work with another workspace, you’ll need to create another integration.
You’ll also be able to see that your integration is set as Internal rather than Public. This is what you want! I’m just pointing it out in case you’re unsure which one should be selected.
Add Your Integration to Your Pokedex Database
Before we can move on, we need to give your integration permission to edit your database.
To do that, head to your Pokedex:
- Click the
•••icon in the top-right corner. - Find the Connections sub-menu.
- Find and select your integration.
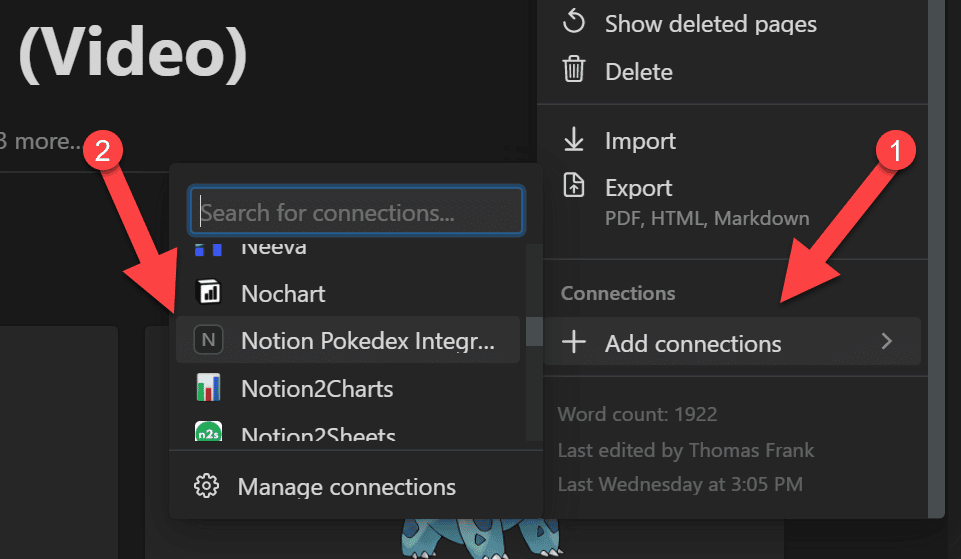
You’ll see the following message:
Notion Pokedex Integration will have access to this and all child pages. Continue?
Click confirm.
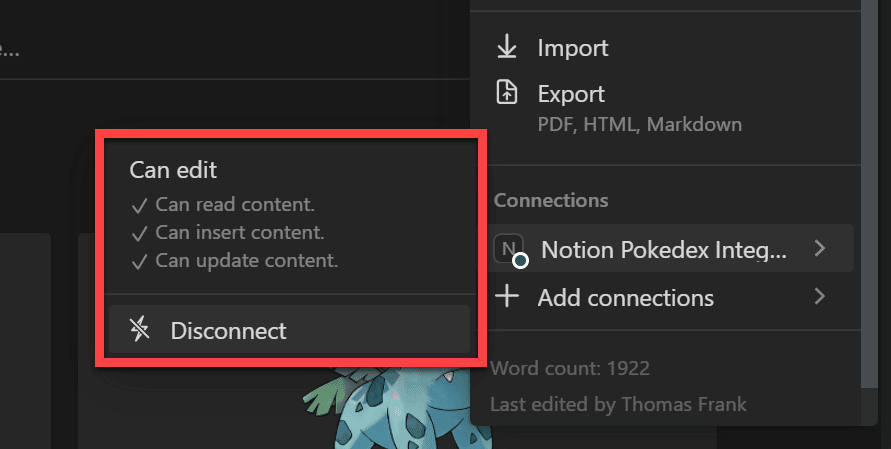
Once connected, you’ll be able to navigate back to that Connections menu and see your connected integration’s permissions for this page. Note that any child pages/databases of the current page will also be accessible to the integration.
Now that your integration can modify your Pokedex page, we can move onto the next step!
Copy link to headingCreate Your Glitch Project
We’ll be writing our actual code on Glitch, a free platform that lets you built and run websites and apps in a single, easy-to-use interface.
To get started, head to Glitch and create a free account.

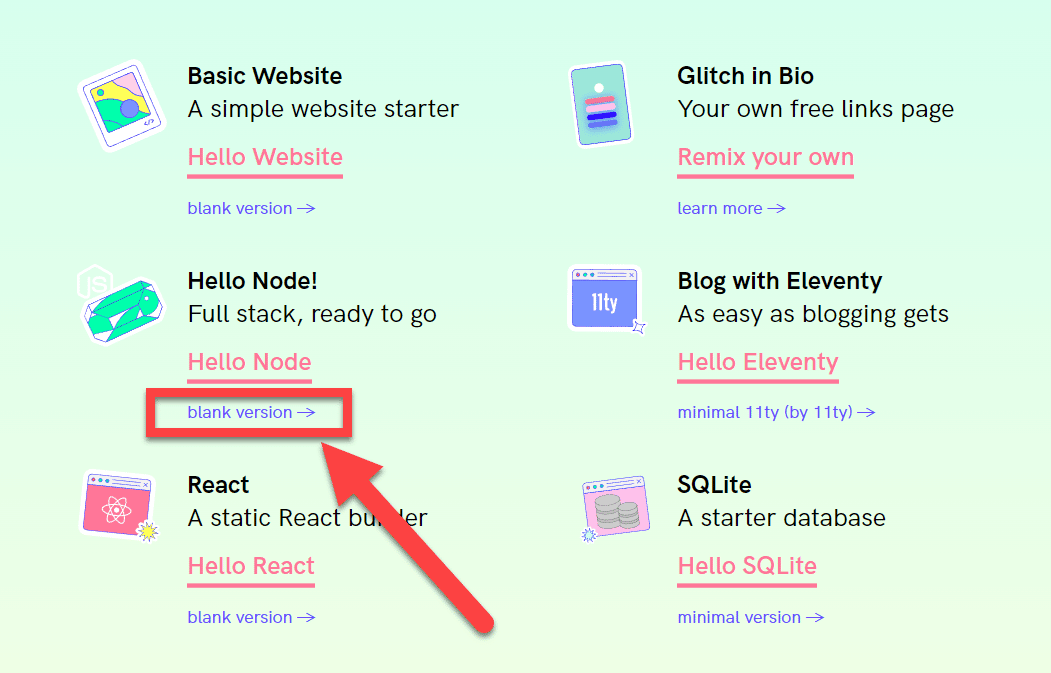
Next, click New Project.
You’ll be given the choice of a few different starter apps, but you should actually click Find More, as the one we want isn’t shown here.
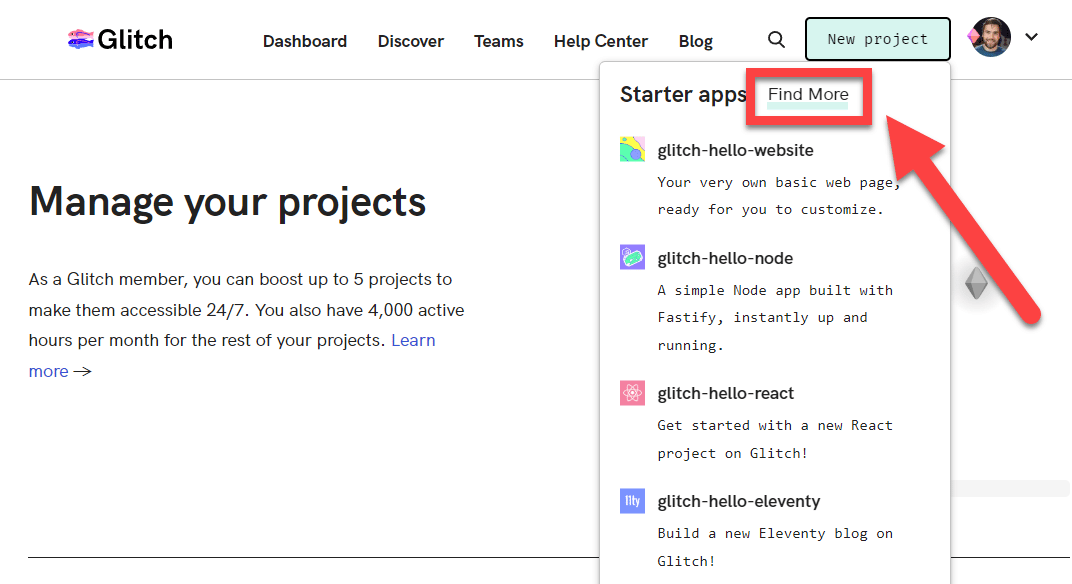
From this new page, find the Hello Node! starter project and choose the blank version.
While you can use the regular Hello Node! app (and I do in the video tutorial above), it comes with a bunch of extra stuff you don’t need. It also doesn’t come with a .env file by default, whereas the blank version does.
Once done, Glitch will set up a new project that is pre-configured to run Node.js, the server runtime that will allow us to run JavaScript code directly from the terminal (instead of needing to run it in web page).
Node.js is a backend runtime environment that allows JavaScript to be executed outside of the browser.
Originally, JavaScript was designed to be a programming language that could only run in a web browser. This was initially done for security reasons back when JavaScript was first being built in the mid-1990’s.
Over time, people started using JavaScript for more and more purposes. What was once meant to be a simple scripting language started getting used to build complex web applications.
In 2009, Node.js was released in order to allow developers to write the JavaScript syntax they were familiar with in other contexts. Node allows JS code to do all sorts of back-end tasks, like processing user data, reading and writing to file systems, and more.
If you want to learn more about Node.js, watch this video:

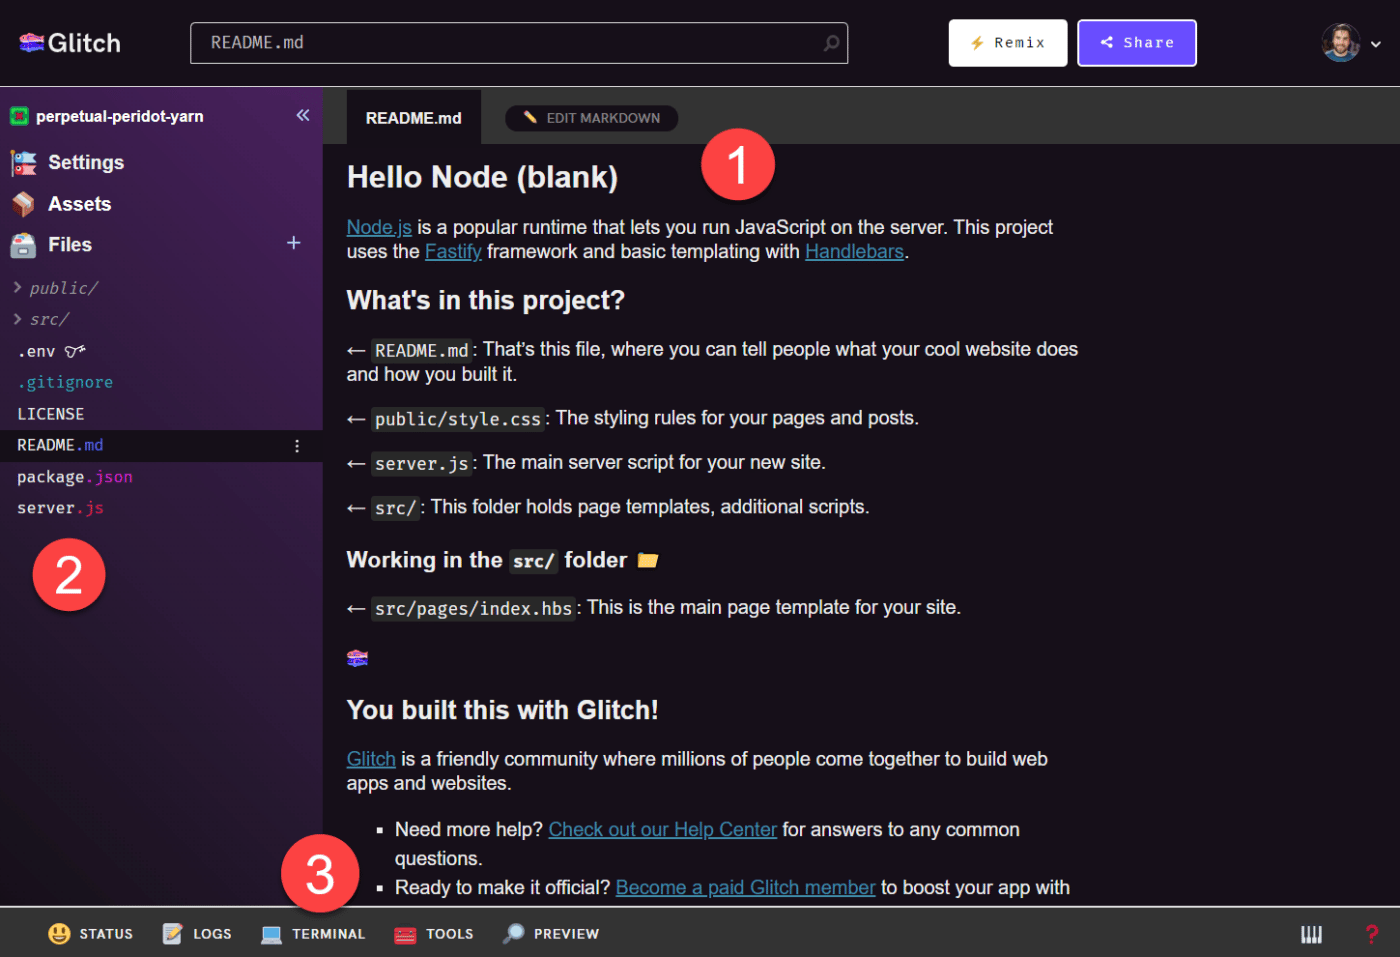
The Glitch app gives you a complete development environment. Here’s a quick tour, going over the most important parts:
- The editor is where you’ll write your code. As you can see below, it can also render markdown files (
.mdfiles) with formatting. - The sidebar gives you access to all of the files and assets within your project, and allows you to create more. You can also access your project settings here.
- The terminal will allow you to run your code. This is where we’ll run your Pokedex script.
The main thing you should do right now is create an index.js file. This will be the file where we write our JavaScript code in the next steps.
To do this:
- Click the
+icon next to Files in the sidebar. - Name the file
index.js. - Click Add This File.
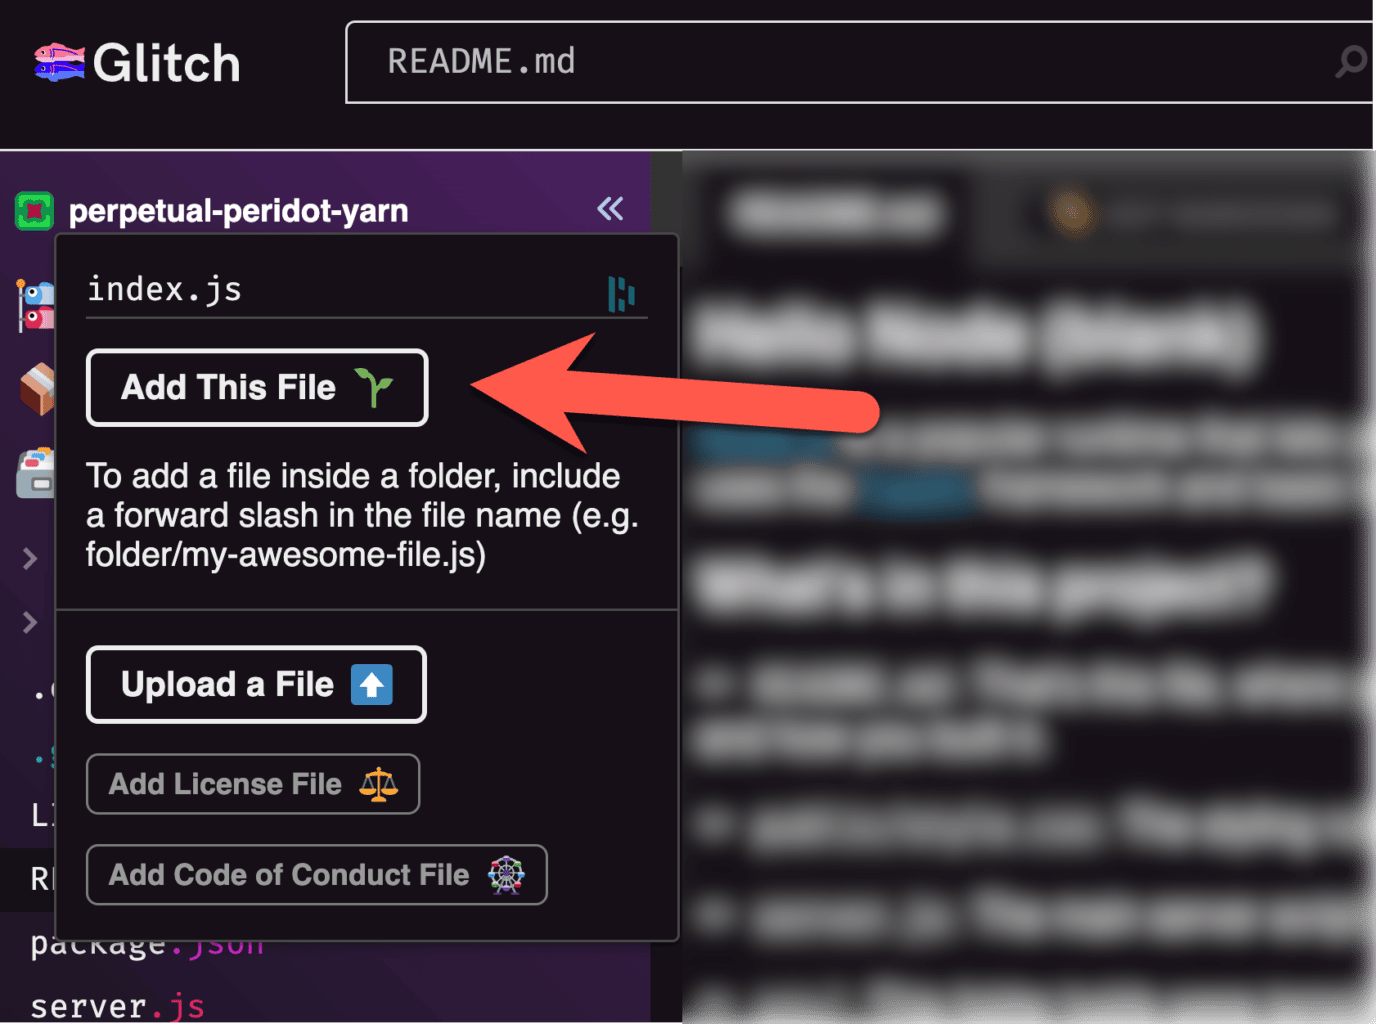
For now, you can leave this file blank. We’ll come back to it soon and start coding, but before that, we need to set up our environment variables and import a couple of packages.
Let’s go!
Copy link to headingSet your Environment Variables
For the script to be able to send Pokemon data to your Notion workspace, you’ll need to provide it with two pieces of specific information:
- Your internal integration token (set when you created your Notion integration earlier)
- The database ID for your Pokedex database
Both of these are private pieces of information that shouldn’t be shared.
When developing Node.js apps (which we’re doing here), there’s a best practice for storing private pieces of information with which the program needs to directly interact, and that’s to store them in as environmental variables in a .env file.
So that’s exactly what we’ll do now, and we’ll start by gathering these pieces of information.
A .env file is a special file that contains environmental variables. These are often variables that hold sensitive information, such as authentication tokes for API access.
.env files are never pushed to version-control systems like git, meaning that programmers and teams can use services like Github and even share open-source code without exposing sensitive information.
If you want to learn more, check out this video:
You should already have your internal integration key from when you set up your Notion integration; if not, head back to the My Integrations page and copy it.
Next, we’ll get your database ID.
Copy link to headingObtain Your Database ID
Your database ID can be found within the URL of your Notion database.
To find it, first navigate to your source database in Notion. If you’re using my Pokedex template, note that the template is a normal page that contains the source database.
Click the Open as full page button on the database view to access the source database.
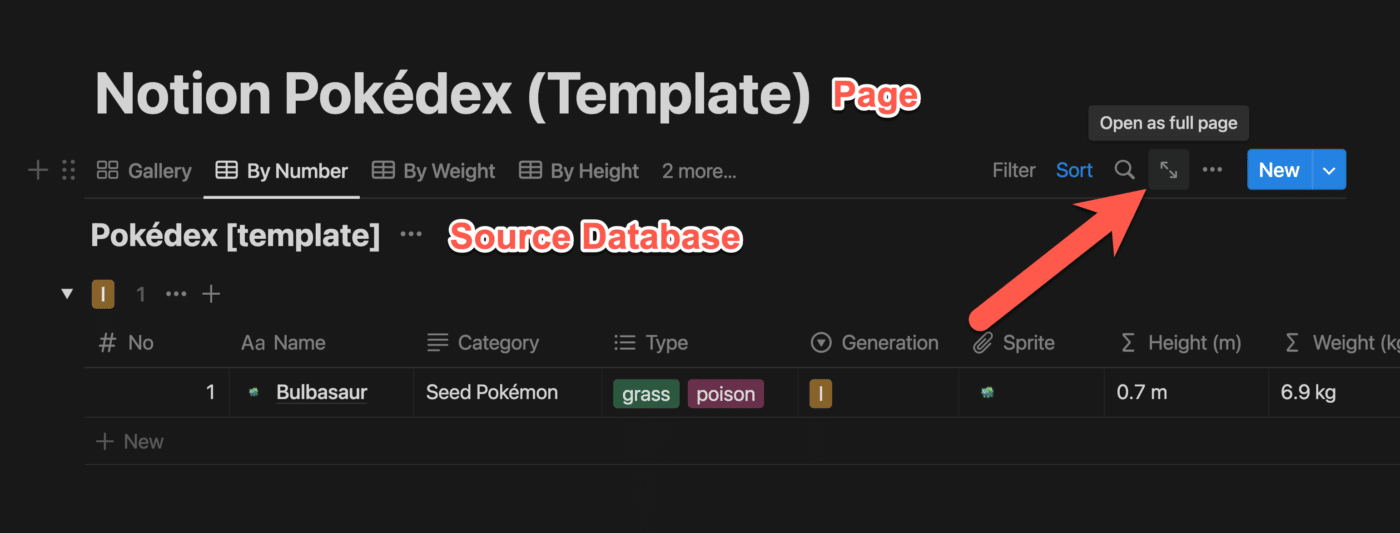
Once you’re looking at your source database, copy its URL by going to the ••• menu and clicking Copy Link. Alternatively, you can use the shortcut ⌘/Ctrl + L.
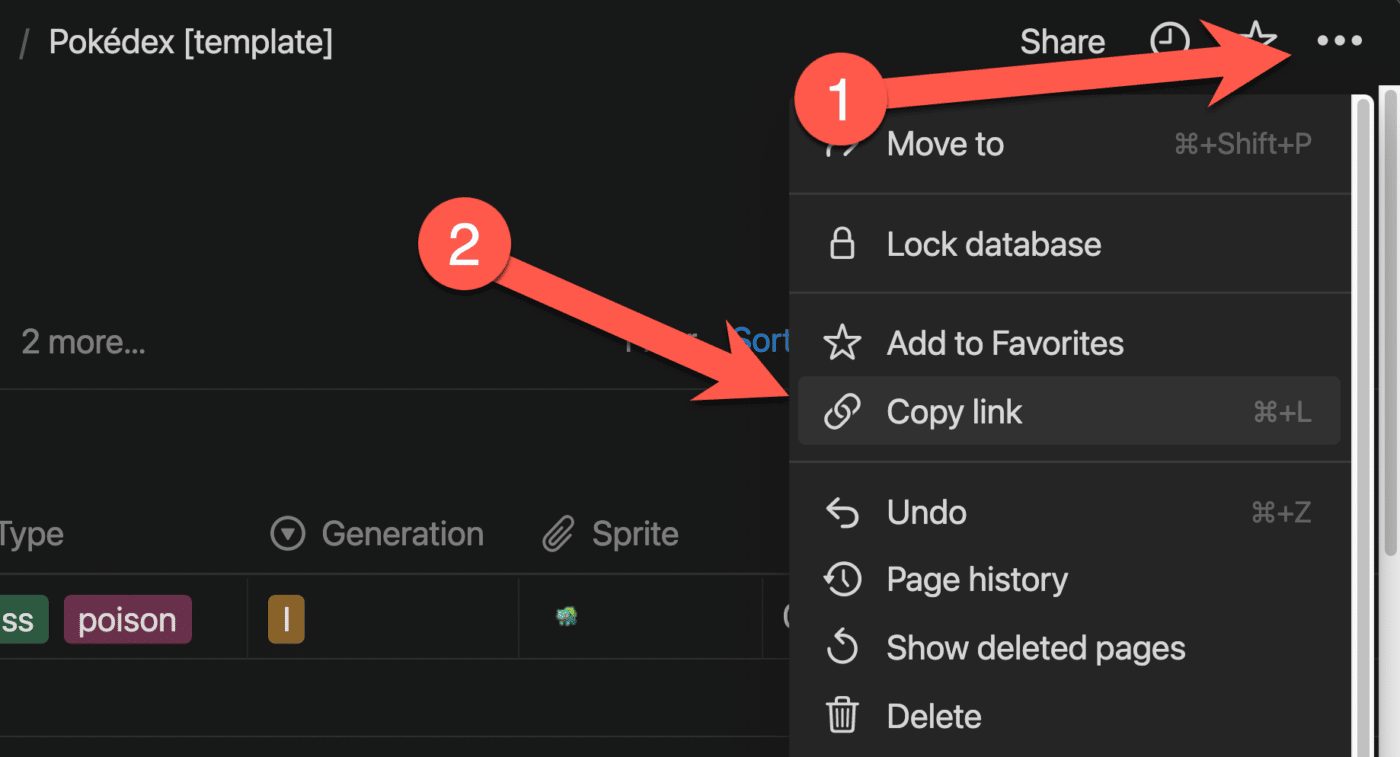
Within your database’s URL, your database ID is the string of characters after the final / and before the query symbols ?v=.
// Full URL
https://www.notion.so/thomasfrank/c9cdd00ed7314f9497f4ab23e9fa0bdd?v=2d6e86289d304cd1ab5ba08a0d9ec1b4

// Database ID
c9cdd00ed7314f9497f4ab23e9fa0bdd
Code language: JavaScript (javascript)
Copy your database ID and paste it in a temporary holding place along with your internal integration token.
P.S. – if you don’t have clipboard history enabled on your computer, now’s a great time to turn it on! On Windows, just hit ⊞ Win + V. If you’re on a Mac, get Raycast; it’s an incredibly powerful launcher tool with built-in clipboard history.
Copy link to headingEdit the .env File
Now that you have your internal integration token and database ID, head back to Glitch.
Your project should already have a .env file listed in the sidebar. If not, click the + one more time and create a file called .env.
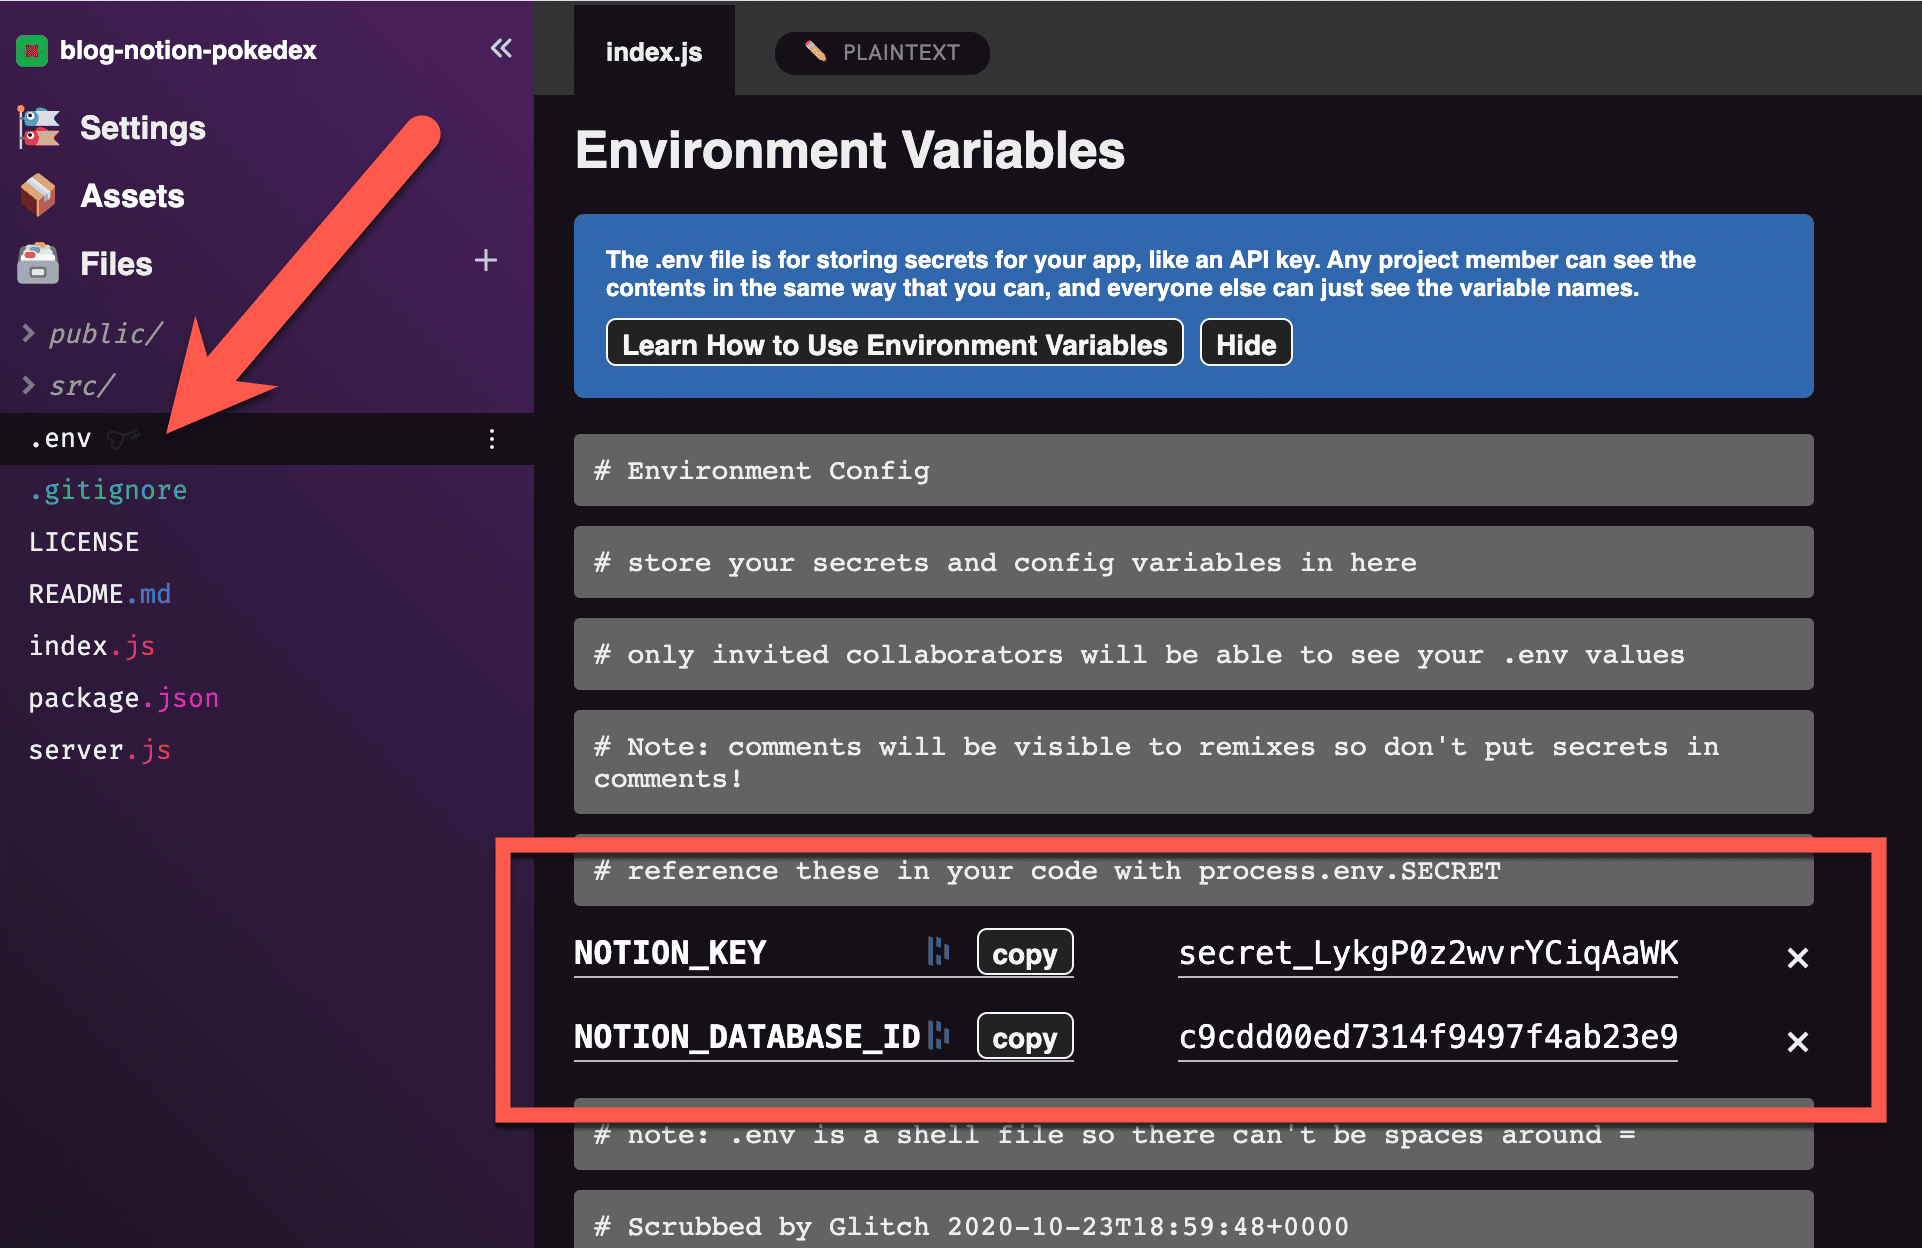
Add these two environmental variables. Ensure the labels are NOTION_KEY and NOTION_DATABASE_ID, but replace the example values with your own.
NOTION_KEY=secret_LykgP0z2wvrYCiqAaWKu3j5uSokRvosbsqgWaHIjLw6
NOTION_DATABASE_ID=c9cdd00ed7314f9497f4ab23e9fa0bdd
As the dialogue box pictured above will tell you, these environmental variable values will be visible to you and anyone else you specifically invite to edit your project.
However, anyone else will merely see the variable names – not the values. That means you’ll be able to safely let people view (or even Remix) your project without revealing them. To learn more about how .env works in Glitch, check out their article on Adding Private Data.
Add Your NPM Packages
The script we’re building uses two external libraries that do a lot of the heavy lifting. These include
- The Axios HTTP library
- The Notion API’s JavaScript SDK
Once we start coding, I’ll explain what these libraries actually do in more detail. For now, we simply need to bring them into our project and set up index.js so that our code can access and use them.
Luckily, bringing these libraries into our project is very easy. Node.js comes with a package manager called npm, which lets developers quickly import packages (which contain these libraries) into their projects.
Normally, a developer would install a package by typing npm install into the terminal along with the name of the package. For example, you could install the dadjoke library into your project by typing:
npm install dadjoke
You can actually do this on Glitch, and I’ll invite you to do so and then type dadjoke in the terminal to see what happens. For clarity: You do not need the dadjoke library for this project; it’s just a very simple library that you can easily use to test the npm install process.
However, Glitch provides an even easier way to install packages. Simply head to your package.json file and click Add Package.
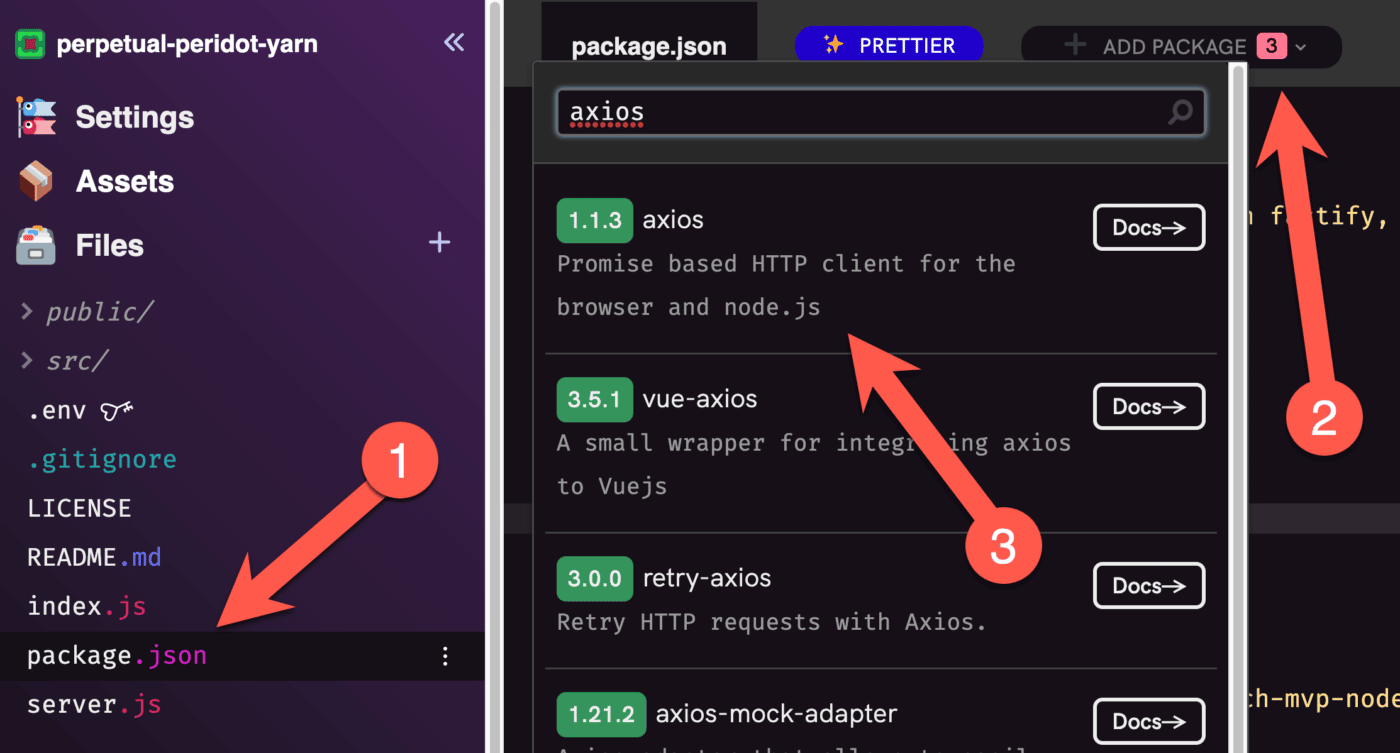
From there, you can search for packages and click them to install.
Search for and install the following packages. I’ve linked their npm pages below in case you need to double-check that you’re installing the right ones.
Once done, you’ll see that your package.json file has been updated with new depencies:
"dependencies": {
    "fastify": "^4.4.0",
    "handlebars": "^4.7.7",
    "@fastify/view": "^7.1.0",
    "@fastify/static": "^6.5.0",
    "@fastify/formbody": "^7.0.1",
    "axios": "^1.3.1",
    "@notionhq/client": "^2.2.3"
  }
Code language: JSON / JSON with Comments (json)As of this writing (Februrary 2023), both of the npm packages we’ll use in this project are in a working state.
However, I actually went through the experience of dealing with a broken npm package while making this tutorial. After I filmed the video version in November 2022, Axios had a buggy update that broke its ability to make API calls.
To make my script work, I had to manually roll Axios back to the 1.1.3 version.
Today, Axios’ current 1.3.1 version is working – so you (hopefully) shouldn’t have any troubles with it as you go through this tutorial.
That said, if you find that Axios – or any package – isn’t working in the future, here’s what to do.
First, check the package’s Github Issues page to see if others are posting about a potential bug. For example, here’s the Issue I ran into with Axios (you can even see a comment from me in this thread). Checking for Issues on Github can help you confirm that there’s a problem with the package itself, rather than your code.
Second, simply roll back to an earlier version of the package and see if that works. Axios’ 1.2 version broke my script, but I was able to roll back to 1.1.3 to get it working again.
In Glitch, this is incredibly easy – just go into package.json and change the version number of the package. Refresh the page, and Glitch will take care of the downgrade in the background.
Note: If you want to “lock in” a specific version of the package, take care to remove the caret ^ symbol – read up on SemVer if you’re curious about that. E.g. 1.1.3 instead of ^1.1.3.
Elsewhere (such as your own machine with Node.js installed), run the npm install command with the version you want specified, like so:
npm install [email protected]
Code language: Bash (bash)
Even if the package is already installed with a later version, this command will replace it with the older version you specify.
More detail on how to do this can be found at this post:
Now you’ve got the packages installed in your project. Before you can use them, however, you’ll need to “require” them within your index.js file.
Head over to index.js and add the following lines to the top of the file (which should currently be blank):
const axios = require('axios')
const { Client } = require('@notionhq/client')


const notion = new Client({auth: process.env.NOTION_KEY})
Code language: JavaScript (javascript)
For our purposes, it’s not incredibly important to know exactly how require() works. But if you’re curious, here’s a great article:

Make Your First Call to PokéAPI
We’re finally ready to start coding! In this step, we’ll make our first call to PokeAPI and log the name of a Pokemon in the Glitch terminal.
First, let’s look at how this actually works. In this Replit app, I’ve created a very simple script that will call PokeAPI once.
Go to the app link, then go ahead and hit Run to see what happens.
If everything went smoothly, you should see bulbasaur displayed in the terminal.
Here’s a look at the code:
const axios = require('axios')

async function getPokemon() {
  await axios.get(`https://pokeapi.co/api/v2/pokemon/1`).then((poke) => {

      console.log(poke.data.species.name)

    })
}

getPokemon()
Code language: JavaScript (javascript)
This very simple script does three things:
- Uses
require('axios')to make the axios library’s methods available for use in the script - Defines an asynchronous function
getPokemon(), which will call PokeAPI and console log the name of the first pokemon - Calls the
getPokemon()function in order to run it
Once the function is called, the code inside it runs. Here, we’re only doing two things:
- Using the
axios.get()method to call a specific resource within PokeAPI. In this case, it’s the first entry in the pokemon resource, which contains data about bulbasaur. - Once we get the response, we use JavaScript’s built-in
console.log()function to display the pokemon’s name in the terminal
PokeAPI returns JSON data, so we access specific pieces of that data by using dot notation. To get the name, we have to traverse the JSON data tree.


PokeAPI is mainly a learning tool, and they actually have a great interface for exploring the API’s data right on their homepage. I’d encourage you to check it out if you want to understand the JSON data structure found in the response a bit better.
Here’s a screenshot showing the name that we’re accessing:
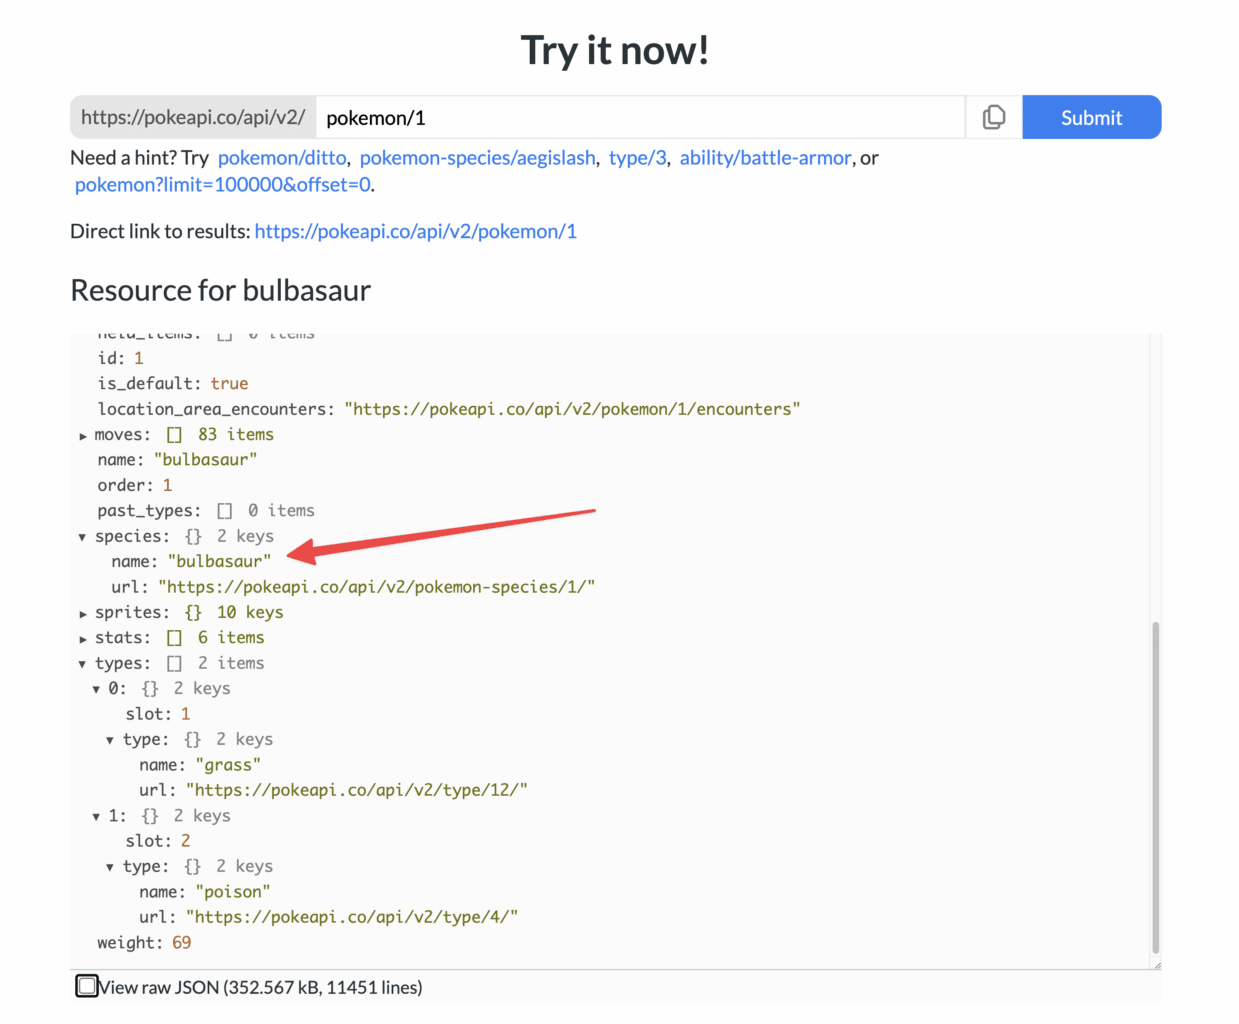
Here, you can see that there’s a species object, which contains a property called name. (There’s also a separate name property as well, but I’ve found that the species.name property is more reliable to use).
Note: You can see all of the properties accessible via this pokemon endpoint at the endpoint’s page in the official PokéAPI docs.
Of course, in the code above, we’re accessing:
console.log(poke.data.species.name)
Code language: JavaScript (javascript)
So where does the poke.data part come into play?
poke is a variable that we declare, which holds the entirety of the response from PokeAPI. Let’s look at the API call:
await axios.get(`https://pokeapi.co/api/v2/pokemon/1`).then((poke) => {

   console.log(poke.data.species.name)

})
Code language: JavaScript (javascript)
I’ll cover the await part in a second; right now, let’s look at the part that says .then((poke) => ... and break that down.
The code axios.get(`https://pokeapi.co/api/v2/pokemon/1`) calls the PokeAPI to get the resource stored at https://pokeapi.co/api/v2/pokemon/1.
Once the call is finished, we need to do something with the response. The .then() function allows us to do this.
Within it, we’re both defining and calling a function (using an arrow function) which stores the entire response in a variable called poke. It then uses console.log() to log the poke.data.species.name property’s value.
Using .then() just keeps our code nice and concise. We could re-write it using an old-school function declaration and get the same result:
async function getPokemon() {
  const poke = await axios.get(`https://pokeapi.co/api/v2/pokemon/1`)

  log(poke)
}

function log (poke) {
  console.log(poke.data.species.name)
}
Code language: JavaScript (javascript)
But this is more verbose, so using .then() is preferable.
Next, let’s address the data property in poke.data.species.name. We don’t see that on the PokeAPI website’s example response, so where is it coming from?
As it turns out, the response we get from PokeAPI contains a lot of information. We get a status code, headers, config information, and a lot of other information that we generally don’t need to worry about (but that’s good to have for debugging in case something goes wrong).
The entire response is contained within an object, and inside that object there is another nested object called data. This data object contains all the information that you can see on the PokeAPI homepage’s sample response.
More on objects:

In the accordion block below, I’ve included the entire response that PokeAPI returns for this API call. Take a second to look through it and identify the data object.
This is the entire response returned by PokeAPI for this API call. Find the data object within it to see how we’re accessing the pokemon’s name (line 238).
Note that, by default, console.log() won’t fully show the details of objects that are nested many layers deep. For that reason, most of the information in the data object is simply labeled [Object].
However, when you access specific properties in your code, you’ll get the actual values. For example, poke.data.species.name has a value of bulbasaur, which we were able to see in the console in the Replit embed above.
{
  status: 200,
  statusText: 'OK',
  headers: AxiosHeaders {
    date: 'Fri, 09 Dec 2022 20:29:25 GMT',
    'content-type': 'application/json; charset=utf-8',
    'transfer-encoding': 'chunked',
    connection: 'close',
    'access-control-allow-origin': '*',
    'cache-control': 'public, max-age=86400, s-maxage=86400',
    etag: 'W/"359f3-JlmmuiyGZkKyOFlSvLzln1IpB6Q"',
    'function-execution-id': 'tkmw3o8u9p36',
    'strict-transport-security': 'max-age=31556926',
    'x-cloud-trace-context': '3dba91851bd1a57c6ea5dade1ac7e883',
    'x-country-code': 'US',
    'x-orig-accept-language': 'en-US',
    'x-powered-by': 'Express',
    'x-served-by': 'cache-iad-kiad7000067-IAD',
    'x-cache': 'HIT',
    'x-cache-hits': '1',
    'x-timer': 'S1669043889.601956,VS0,VE1',
    vary: 'Accept-Encoding,cookie,need-authorization, x-fh-requested-host, accept-encoding',
    'alt-svc': 'h3=":443"; ma=86400, h3-29=":443"; ma=86400',
    'cf-cache-status': 'HIT',
    age: '51296',
    'server-timing': 'cf-q-config;dur=6.9999987317715e-06',
    'report-to': '{"endpoints":[{"url":"https:\\/\\/a.nel.cloudflare.com\\/report\\/v3?s=4KTK4BOb7zSytazr61FEYksT%2BVDQfvoEhzU6Ph%2FYbVr%2Bc9ZgsACueHvhFQy5%2BsijYeXyqKyD3Vo7sBe%2FieNvBWwCdvO%2B55koSkx9YXvyuZQXrpitHk2UCZt3rUoa"}],"group":"cf-nel","max_age":604800}',
    nel: '{"success_fraction":0,"report_to":"cf-nel","max_age":604800}',
    server: 'cloudflare',
    'cf-ray': '77707e289bca208d-IAD',
    [Symbol(defaults)]: null
  },
  config: {
    transitional: {
      silentJSONParsing: true,
      forcedJSONParsing: true,
      clarifyTimeoutError: false
    },
    adapter: [Function: httpAdapter],
    transformRequest: [ [Function: transformRequest] ],
    transformResponse: [ [Function: transformResponse] ],
    timeout: 0,
    xsrfCookieName: 'XSRF-TOKEN',
    xsrfHeaderName: 'X-XSRF-TOKEN',
    maxContentLength: -1,
    maxBodyLength: -1,
    env: { FormData: [Function], Blob: null },
    validateStatus: [Function: validateStatus],
    headers: AxiosHeaders {
      'User-Agent': 'axios/1.1.3',
      'Accept-Encoding': 'gzip, deflate, br',
      [Symbol(defaults)]: [Object]
    },
    method: 'get',
    url: 'https://pokeapi.co/api/v2/pokemon/1',
    data: undefined
  },
  request: <ref *1> ClientRequest {
    _events: [Object: null prototype] {
      abort: [Function (anonymous)],
      aborted: [Function (anonymous)],
      connect: [Function (anonymous)],
      error: [Function (anonymous)],
      socket: [Function (anonymous)],
      timeout: [Function (anonymous)],
      prefinish: [Function: requestOnPrefinish]
    },
    _eventsCount: 7,
    _maxListeners: undefined,
    outputData: [],
    outputSize: 0,
    writable: true,
    destroyed: true,
    _last: true,
    chunkedEncoding: false,
    shouldKeepAlive: false,
    _defaultKeepAlive: true,
    useChunkedEncodingByDefault: false,
    sendDate: false,
    _removedConnection: false,
    _removedContLen: false,
    _removedTE: false,
    _contentLength: 0,
    _hasBody: true,
    _trailer: '',
    finished: true,
    _headerSent: true,
    socket: TLSSocket {
      _tlsOptions: [Object],
      _secureEstablished: true,
      _securePending: false,
      _newSessionPending: false,
      _controlReleased: true,
      secureConnecting: false,
      _SNICallback: null,
      servername: 'pokeapi.co',
      alpnProtocol: false,
      authorized: true,
      authorizationError: null,
      encrypted: true,
      _events: [Object: null prototype],
      _eventsCount: 9,
      connecting: false,
      _hadError: false,
      _parent: null,
      _host: 'pokeapi.co',
      _readableState: [ReadableState],
      _maxListeners: undefined,
      _writableState: [WritableState],
      allowHalfOpen: false,
      _sockname: null,
      _pendingData: null,
      _pendingEncoding: '',
      server: undefined,
      _server: null,
      ssl: null,
      _requestCert: true,
      _rejectUnauthorized: true,
      parser: null,
      _httpMessage: [Circular *1],
      [Symbol(res)]: null,
      [Symbol(verified)]: true,
      [Symbol(pendingSession)]: null,
      [Symbol(async_id_symbol)]: 3,
      [Symbol(kHandle)]: null,
      [Symbol(kSetNoDelay)]: false,
      [Symbol(lastWriteQueueSize)]: 0,
      [Symbol(timeout)]: null,
      [Symbol(kBuffer)]: null,
      [Symbol(kBufferCb)]: null,
      [Symbol(kBufferGen)]: null,
      [Symbol(kCapture)]: false,
      [Symbol(kBytesRead)]: 6334,
      [Symbol(kBytesWritten)]: 175,
      [Symbol(connect-options)]: [Object],
      [Symbol(RequestTimeout)]: undefined
    },
    _header: 'GET /api/v2/pokemon/1 HTTP/1.1\r\n' +
      'Accept: application/json, text/plain, */*\r\n' +
      'User-Agent: axios/1.1.3\r\n' +
      'Accept-Encoding: gzip, deflate, br\r\n' +
      'Host: pokeapi.co\r\n' +
      'Connection: close\r\n' +
      '\r\n',
    _keepAliveTimeout: 0,
    _onPendingData: [Function: noopPendingOutput],
    agent: Agent {
      _events: [Object: null prototype],
      _eventsCount: 2,
      _maxListeners: undefined,
      defaultPort: 443,
      protocol: 'https:',
      options: [Object],
      requests: {},
      sockets: {},
      freeSockets: {},
      keepAliveMsecs: 1000,
      keepAlive: false,
      maxSockets: Infinity,
      maxFreeSockets: 256,
      scheduling: 'lifo',
      maxTotalSockets: Infinity,
      totalSocketCount: 0,
      maxCachedSessions: 100,
      _sessionCache: [Object],
      [Symbol(kCapture)]: false
    },
    socketPath: undefined,
    method: 'GET',
    maxHeaderSize: undefined,
    insecureHTTPParser: undefined,
    path: '/api/v2/pokemon/1',
    _ended: true,
    res: IncomingMessage {
      _readableState: [ReadableState],
      _events: [Object: null prototype],
      _eventsCount: 5,
      _maxListeners: undefined,
      socket: [TLSSocket],
      httpVersionMajor: 1,
      httpVersionMinor: 1,
      httpVersion: '1.1',
      complete: true,
      headers: [Object],
      rawHeaders: [Array],
      trailers: {},
      rawTrailers: [],
      aborted: false,
      upgrade: false,
      url: '',
      method: null,
      statusCode: 200,
      statusMessage: 'OK',
      client: [TLSSocket],
      _consuming: true,
      _dumped: false,
      req: [Circular *1],
      responseUrl: 'https://pokeapi.co/api/v2/pokemon/1',
      redirects: [],
      [Symbol(kCapture)]: false,
      [Symbol(RequestTimeout)]: undefined
    },
    aborted: false,
    timeoutCb: null,
    upgradeOrConnect: false,
    parser: null,
    maxHeadersCount: null,
    reusedSocket: false,
    host: 'pokeapi.co',
    protocol: 'https:',
    _redirectable: Writable {
      _writableState: [WritableState],
      _events: [Object: null prototype],
      _eventsCount: 3,
      _maxListeners: undefined,
      _options: [Object],
      _ended: true,
      _ending: true,
      _redirectCount: 0,
      _redirects: [],
      _requestBodyLength: 0,
      _requestBodyBuffers: [],
      _onNativeResponse: [Function (anonymous)],
      _currentRequest: [Circular *1],
      _currentUrl: 'https://pokeapi.co/api/v2/pokemon/1',
      [Symbol(kCapture)]: false
    },
    [Symbol(kCapture)]: false,
    [Symbol(kNeedDrain)]: false,
    [Symbol(corked)]: 0,
    [Symbol(kOutHeaders)]: [Object: null prototype] {
      accept: [Array],
      'user-agent': [Array],
      'accept-encoding': [Array],
      host: [Array]
    }
  },
  data: {
    abilities: [ [Object], [Object] ],
    base_experience: 64,
    forms: [ [Object] ],
    game_indices: [
      [Object], [Object], [Object],
      [Object], [Object], [Object],
      [Object], [Object], [Object],
      [Object], [Object], [Object],
      [Object], [Object], [Object],
      [Object], [Object], [Object],
      [Object], [Object]
    ],
    height: 7,
    held_items: [],
    id: 1,
    is_default: true,
    location_area_encounters: 'https://pokeapi.co/api/v2/pokemon/1/encounters',
    moves: [
      [Object], [Object], [Object], [Object], [Object],
      [Object], [Object], [Object], [Object], [Object],
      [Object], [Object], [Object], [Object], [Object],
      [Object], [Object], [Object], [Object], [Object],
      [Object], [Object], [Object], [Object], [Object],
      [Object], [Object], [Object], [Object], [Object],
      [Object], [Object], [Object], [Object], [Object],
      [Object], [Object], [Object], [Object], [Object],
      [Object], [Object], [Object], [Object], [Object],
      [Object], [Object], [Object], [Object], [Object],
      [Object], [Object], [Object], [Object], [Object],
      [Object], [Object], [Object], [Object], [Object],
      [Object], [Object], [Object], [Object], [Object],
      [Object], [Object], [Object], [Object], [Object],
      [Object], [Object], [Object], [Object], [Object],
      [Object], [Object], [Object], [Object], [Object],
      [Object], [Object], [Object]
    ],
    name: 'bulbasaur',
    order: 1,
    past_types: [],
    species: {
      name: 'bulbasaur',
      url: 'https://pokeapi.co/api/v2/pokemon-species/1/'
    },
    sprites: {
      back_default: 'https://raw.githubusercontent.com/PokeAPI/sprites/master/sprites/pokemon/back/1.png',
      back_female: null,
      back_shiny: 'https://raw.githubusercontent.com/PokeAPI/sprites/master/sprites/pokemon/back/shiny/1.png',
      back_shiny_female: null,
      front_default: 'https://raw.githubusercontent.com/PokeAPI/sprites/master/sprites/pokemon/1.png',
      front_female: null,
      front_shiny: 'https://raw.githubusercontent.com/PokeAPI/sprites/master/sprites/pokemon/shiny/1.png',
      front_shiny_female: null,
      other: [Object],
      versions: [Object]
    },
    stats: [ [Object], [Object], [Object], [Object], [Object], [Object] ],
    types: [ [Object], [Object] ],
    weight: 69
  }
}
Code language: JavaScript (javascript)
You may have also noticed the async and await keywords shown in our sample script. These have to do with asynchronous JavaScript and Promises, two topics that are intermediate-level in complexity.
I’ll explain them in the accordion block below and link you to some useful resources for learning them in more detail, but the gist is this:
Axios is a “promise-based” library, and to use it correctly within our script, we need to use async and await. If we don’t, responses might come back from the PokeAPI out-of-order.
Of course, there are other JavaScript tools for working with APIs that don’t force you to use Promises (like fetch), but I’m choosing to use Axios for this tutorial because it’s the default option used by Pipedream, which is an amazing automation platform that I’ll be using for upcoming Notion API tutorials.
Pipedream is a code-light platform that I’ll be featuring in upcoming tutorials; it’s generally a much easier tool for working with the Notion API and creating automations compared to what we’re doing here. I’ve used it personally to mirror Notion databases, send YouTube stats to Notion, create a speech-to-text automation, and more.
I’m not using it for this tutorial because I want you to be fully aware of what’s happening while you learn the Notion API, and because you may want to go off and build apps on your own tech stack! So this tutorial is sticking to more general purpose tools – but I did want to base it off of Axios so you’ll be fully prepped when you deal with it on Pipedream.
Axios is a “promise-based” library, which means that when we use the axios.get() method, we get a Promise.
In JavaScript, a Promise is essentially an IOU. It’s almost as if JavaScript is handing you a piece of paper that says:
“I promise to give you the full results of this API call if it is successful. And if it fails, I’ll give you details about the error.
The actual response, be it the successfully-retrieved data from the API or an error message, comes later on once the Promise resolves.
In general, this is quite useful because JavaScript is a single-threaded language, which means that it generally can only do one thing at a time.
This can become a problem with API calls, because they can often take a (relatively) long time to execute. In a program where lots of things are happening, an API call can block additional code steps that would otherwise execute extremely fast.
Promises allow that later code to execute before something like an API call finishes, since the Promise gets returned almost immediately. In complex applications, this means later code steps can do their thing, and then once the Promise resolves, you can take action on the actual response from the API.
As I mentioned above, I’m choosing Axios for this project specifically because Pipedream uses it heavily and I’ll be doing lots of Pipedream/Notion API tutorials in the future.
However, what we’re doing here doesn’t really need Promises or async/await. Our script is going to get all the information about all the Pokemon before doing anything else, so we would be fine to go with a totally synchronous option here if we wanted.
Still, asynchronous JavaScript can be very useful in other cases. If you want to learn more about it, here are some resources.
First, I highly recommend watching this talk on the Javascript event loop if you want to understand how JavaScript can be “asynchronous” despite being single-threaded:
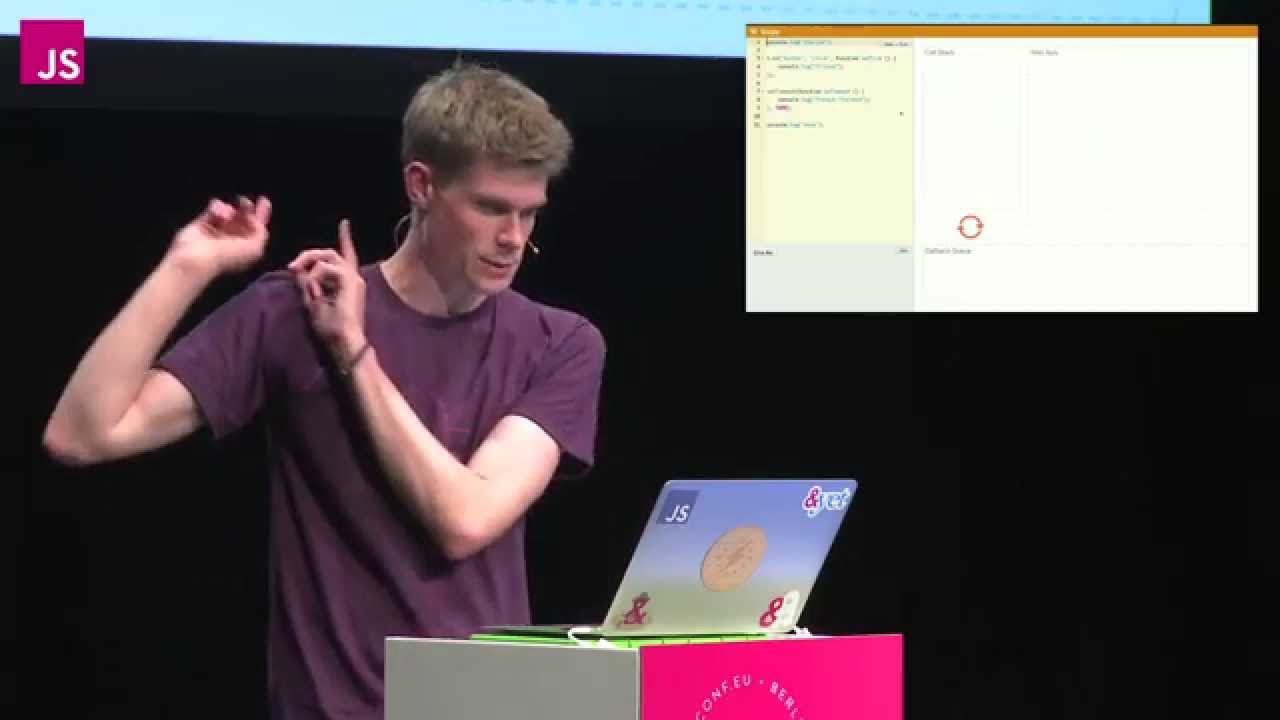
Next, I’d recommend watching my friend Daniel Shiffman’s series on Promises and async/await:
JSInfo also has some great articles on these topics:
With all that preamble out of the way, let’s start coding!
In the embedded Replit above, we made a single call to PokeAPI and logged bulbasaur’s name in the terminal. Let’s take that a step further and set the foundation for our script by adding the following code to index.js in our Glitch project (everything from here on out will go in index.js):
const axios = require('axios')
const { Client } = require('@notionhq/client')


const notion = new Client({auth: process.env.NOTION_KEY})


const pokeArray = []

async function getPokemon() {

  const start = 1
  const end = 10
  for (let i = start; i <= end; i++) {

    const poke = await axios.get(`https://pokeapi.co/api/v2/pokemon/${i}`)
      .then((poke) => {

        console.log(poke.data.species.name)

      })
      .catch((error) => {
        console.log(error)
      })

  }

}

getPokemon()
Code language: JavaScript (javascript)
Note: From this point on, we’ll often be adding new code in between existing lines. Sometimes we’ll even change existing lines. I’m doing it this way so the learning curve in this tutorial remains gradual. I’ll make sure to highlight those lines in the code blocks that follow this one. Remember, you can always reference the full code (with or without comments) in the Steal My Code section above.
In your terminal, type node index.js and then hit Enter to run your script. If you’ve set things up correctly so far, you should get a list of the first 10 Pokemon:
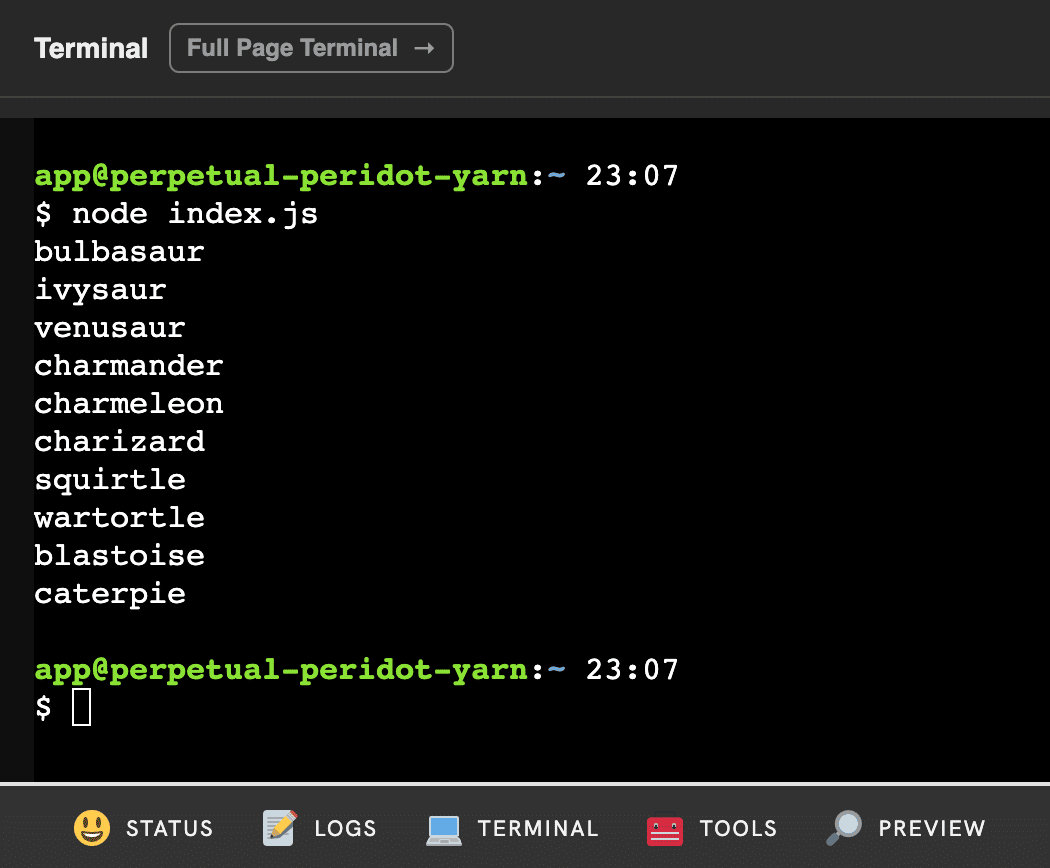
This code is very similar to the code in the embedded Replit example above.
One change is the addition of these lines:
const axios = require('axios')
const { Client } = require('@notionhq/client')

const notion = new Client({auth: process.env.NOTION_KEY})

const pokeArray = []
Code language: JavaScript (javascript)
The first two are creating a notion variable and bringing in the Notion SDK that we imported earlier, so we can use it within our script. We’ll start using it in earnest below when we send our first page to Notion.
We’re also creating an empty array with const pokeArray = []. As I mentioned in the tutorial overview, we’ll be adding an object for each Pokemon to this array. Then, we’ll loop through the array and create a new page in Notion for each of those Pokemon objects.
Another big difference is that we’ve added a for loop to the function; now we’re calling the PokeAPI from inside it.
This means that we’re making a call to PokeAPI every time the loop executes.
Additionally, we’ve tweaked our axios.get() function call slightly. It now reads:
axios.get(`https://pokeapi.co/api/v2/pokemon/${i}`)
Code language: JavaScript (javascript)
We’ve wrapped our PokeAPI URL in template literals (the backticks ``), which allows us to use variables within it.
We can use ${} to reference a variable within our string; in this case, we’re referencing i, which increases by 1 each time the loop runs.
In effect, each execution of the loop calls the next Pokemon from PokeAPI:
https://pokeapi.co/api/v2/pokemon/1https://pokeapi.co/api/v2/pokemon/2https://pokeapi.co/api/v2/pokemon/3
…and so on.
The start and end variables define how many times the loop will run. Currently, we’ve set them so that the loop runs 10 times, but hopefully you can see how tweaking them would let us get all 905 Pokemon!
Finally, I’ll point out the addition of the .catch() block of code:
const poke = await axios.get(`https://pokeapi.co/api/v2/pokemon/${i}`)
      .then((poke) => {

        console.log(poke.data.species.name)

      })
      .catch((error) => {
        console.log(error)
      })
Code language: JavaScript (javascript)
If our API throws an error for some reason, the catch block will be activated. Right now, we’re just logging the error in the console, but you could add more sophisticated error-handling code if you wanted. Learn more here:
At this point, your code should look exactly like this:
const axios = require('axios')
const { Client } = require('@notionhq/client')


const notion = new Client({auth: process.env.NOTION_KEY})


const pokeArray = []

async function getPokemon() {

  const start = 1
  const end = 10
  for (let i = start; i <= end; i++) {

    const poke = await axios.get(`https://pokeapi.co/api/v2/pokemon/${i}`)
      .then((poke) => {

        console.log(poke.data.species.name)

      })
      .catch((error) => {
        console.log(error)
      })

  }

}

getPokemon()
Code language: JavaScript (javascript)Format the Pokémon Data
The next thing we need to do is construct an object that will hold the information about each Pokemon that we want to send to Notion.

That information includes:
- Name
- Number
- Type(s)
- Category – e.g. “Flame Pokemon” or “Seed Pokemon”
- Generation
- Height
- Weight
- HP
- Attack
- Defense
- Special Attack
- Special Defense
- Speed
- Sprite
- Official Artwork
- Flavor text
- Bulbapedia URL
We could declare individual variables for each of these, but a better method is to construct an object and store the values inside it.
In JavaScript, an object is a collection of key:value pairs. Object keys always have defined names, and the key:value pairs do not have a specific order (unlike arrays).
Objects are heavily used in JavaScript, so check out this primer if you want to learn more about them:
We’re going to create an object for each Pokemon that will store all of the data we want to send to Notion.
For now, we won’t add all of the information. Instead we’ll stick with a few basics – name, number, height/weight, and basic stats. This will keep things simple; we’ll add the other pieces later on.
Remove the old console.log() line, and add the highlighted code within your .then() block:
const poke = await axios.get(`https://pokeapi.co/api/v2/pokemon/${i}`)
      .then((poke) => {

        const pokeData = {
          "name": poke.data.species.name,
          "number": poke.data.id,
          "height": poke.data.height,
          "weight": poke.data.weight,
          "hp": poke.data.stats[0].base_stat,
          "attack": poke.data.stats[1].base_stat,
          "defense": poke.data.stats[2].base_stat,
          "special-attack": poke.data.stats[3].base_stat,
          "special-defense": poke.data.stats[4].base_stat,
          "speed": poke.data.stats[5].base_stat
        }

        console.log(`Fetched ${pokeData.name}.`)
        console.table(pokeData)

        pokeArray.push(pokeData)

      })
      .catch((error) => {
        console.log(error)
      })
Code language: JavaScript (javascript)
In the pokeData object declaration, we are creating several keys, such as name, number, height, etc.
The value that corresponds to each key is dynamically set by accessing a specific value from the poke object, which contains the entire response from PokéAPI.
Later, we’ll access the values of this object in order to send information to Notion. You can see that we’re already doing it once here: console.log(`Fetched ${pokeData.name}.`).
After declaring the pokeData object and filling it up with values, we also add the object onto the end of our pokeArray array with pokeArray.push(pokeData).
You may remember that we declared that array near the top of our code: const pokeArray = [].
The [] symbols define the variable as being an array, but when it was declared, it was empty. In other words, it was an array with no elements inside it.
Using the push method, we “push” our pokeData object onto the end of the array. You can learn more about how this method works here:
Before we move on, you should also change your const end = 10 line to const end = 1 for now:
async function getPokemon() {

  const start = 1
  const end = 1
  for (let i = start; i <= end; i++) {
Code language: JavaScript (javascript)
This will cause the script to fetch only the first Pokémon, Bulbasaur. Later, we’ll change it to a higher number so we can fetch hundreds of Pokémon – but for now, it’ll keep things simpler if we fetch just one.
Once again, run node index.js in your terminal. You should see a result like this:
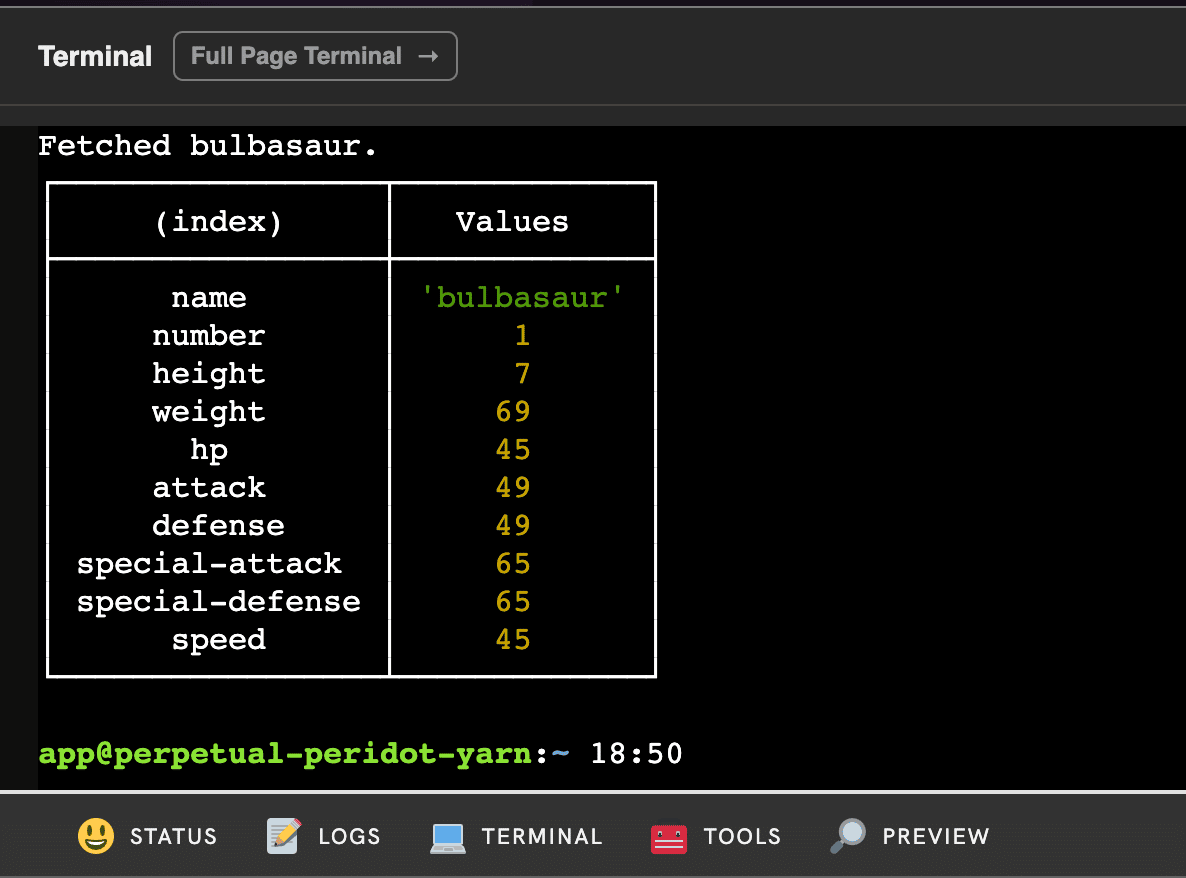
The console.table() method is another useful tool for seeing information in the terminal. It nicely formats data structures like objects, and by using it we can see all of the properties that we created within the pokeData object.
I’ve removed the console.table() line from my final code; you can choose whether or not to do the same. Leaving it in won’t change anything, as it’s just a logging tool.
At this stage, your code should look just like this:
const axios = require('axios')
const { Client } = require('@notionhq/client')


const notion = new Client({auth: process.env.NOTION_KEY})


const pokeArray = []

async function getPokemon() {

  const start = 1
  const end = 1
  for (let i = start; i <= end; i++) {

    const poke = await axios.get(`https://pokeapi.co/api/v2/pokemon/${i}`)
      .then((poke) => {

        const pokeData = {
          "name": poke.data.species.name,
          "number": poke.data.id,
          "height": poke.data.height,
          "weight": poke.data.weight,
          "hp": poke.data.stats[0].base_stat,
          "attack": poke.data.stats[1].base_stat,
          "defense": poke.data.stats[2].base_stat,
          "special-attack": poke.data.stats[3].base_stat,
          "special-defense": poke.data.stats[4].base_stat,
          "speed": poke.data.stats[5].base_stat
        }

        console.log(`Fetched ${pokeData.name}.`)
        console.table(pokeData)

      })
      .catch((error) => {
        console.log(error)
      })

  }

}

getPokemon()
Code language: JavaScript (javascript)Create Your First Page with the Notion API
Now that we have a tidy little object full of Pokémon data, let’s send it to Notion and create the first page in our Pokédex!
To do that, we’ll declare a second function called createNotionPage() at the bottom of our code, beneath the getPokemon() function call.
Additionally, we’ll call the createNotionPage() within the getPokemon() function’s declaration, at the very end before its closing curly brace.
Go ahead and add the highlighted lines to your code:
        pokeArray.push(pokeData)

      })
      .catch((error) => {
        console.log(error)
      })

  }

  createNotionPage()

}

getPokemon()

async function createNotionPage() {

  for (let pokemon of pokeArray) {

    const data = {
      "parent": {
        "type": "database_id",
        "database_id": process.env.NOTION_DATABASE_ID
      },
      "properties": {
        "Name": {
          "title": [
            {
              "text": {
                "content": pokemon.name
              }
            }
          ]
        },
        "No": {
          "number": pokemon.number
        },
        "Height": { "number": pokemon.height },
        "Weight": { "number": pokemon.weight },
        "HP": { "number": pokemon.hp },
        "Attack": { "number": pokemon.attack },
        "Defense": { "number": pokemon.defense },
        "Sp. Attack": { "number": pokemon['special-attack'] },
        "Sp. Defense": { "number": pokemon['special-defense'] },
        "Speed": { "number": pokemon.speed }
      }
    }

    console.log(`Sending ${pokemon.name} to Notion`)
    const response = await notion.pages.create( data )
    console.log(response)

  }

  console.log(`Operation complete.`)

}
Code language: JavaScript (javascript)
We’ll go through what this code does in a second. For now, we’re going to run the code and see what happens.
First, you’ll need to go to your Pokédex database’s ••• menu, go to Group, and set the No Generation option to visible. We currently aren’t passing generation information, so you’ll need to do this in order to see the page you’re about to send to Notion.
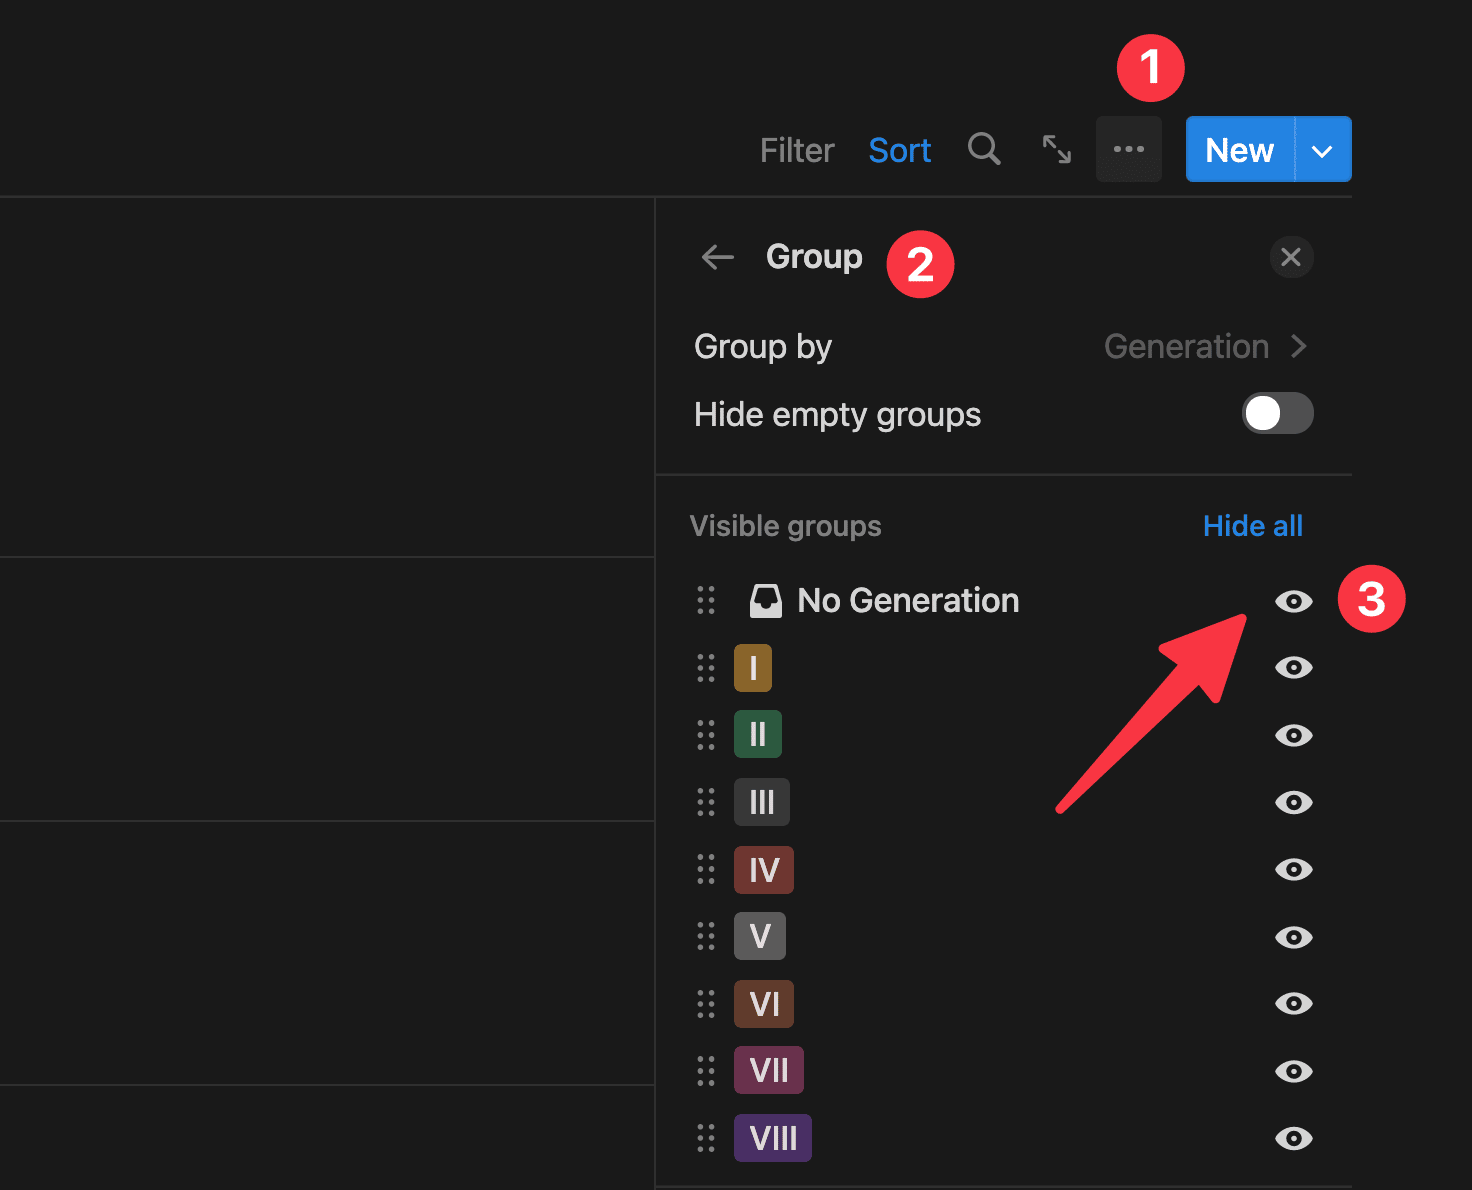
Next, go ahead and run node index.js in the terminal once more.
If your code and .env variables are set up correctly, you should see something similar to this in your terminal:
app@blog-notion-pokedex:~ 23:48
$ node index.js
Fetched bulbasaur.
┌─────────────────┬─────────────┐
│     (index)     │   Values    │
├─────────────────┼─────────────┤
│      name       │ 'bulbasaur' │
│     number      │      1      │
│     height      │      7      │
│     weight      │     69      │
│       hp        │     45      │
│     attack      │     49      │
│     defense     │     49      │
│ special-attack  │     65      │
│ special-defense │     65      │
│      speed      │     45      │
└─────────────────┴─────────────┘
Sending bulbasaur to Notion
{
  object: 'page',
  id: '64499d85-9748-4ddd-a08b-38a8c6dd6a2c',
  created_time: '2023-02-05T23:49:00.000Z',
  last_edited_time: '2023-02-05T23:49:00.000Z',
  created_by: { object: 'user', id: '19c6f4cd-6e7d-40ef-8489-9983b28e1bf5' },
  last_edited_by: { object: 'user', id: '19c6f4cd-6e7d-40ef-8489-9983b28e1bf5' },
  cover: null,
  icon: null,
  parent: {
    type: 'database_id',
    database_id: 'c9cdd00e-d731-4f94-97f4-ab23e9fa0bdd'
  },
  archived: false,
  properties: {
    Height: { id: 'C%3FgF', type: 'number', number: 7 },
    'Weight (kg)': { id: 'Dn_%5D', type: 'formula', formula: [Object] },
    Attack: { id: 'MRaQ', type: 'number', number: 49 },
    'HP Label': { id: 'MdMo', type: 'formula', formula: [Object] },
    Weight: { id: 'N%3BN%7B', type: 'number', number: 69 },
    'Stats Meta': { id: 'NZS%7B', type: 'formula', formula: [Object] },
    HP: { id: 'Rce%7D', type: 'number', number: 45 },
    'Sp. Attack': { id: 'U%7Bi%40', type: 'number', number: 65 },
    'Defense Label': { id: 'VRMi', type: 'formula', formula: [Object] },
    Sprite: { id: '%5BlYm', type: 'files', files: [] },
    No: { id: '%5DY%40D', type: 'number', number: 1 },
    'Ht/Wgt Meta': { id: 'cjoi', type: 'formula', formula: [Object] },
    Speed: { id: 'dCkj', type: 'number', number: 45 },
    'Height (m)': { id: 'e%5DNz', type: 'formula', formula: [Object] },
    Defense: { id: 'iLgx', type: 'number', number: 49 },
    'Height (ft)': { id: 'i%5DgP', type: 'formula', formula: [Object] },
    Meta: { id: 'oBLz', type: 'formula', formula: [Object] },
    'No Label': { id: 'oLD%3B', type: 'formula', formula: [Object] },
    'Sp. Defense': { id: 'pmEd', type: 'number', number: 65 },
    'Weight (lbs)': { id: 'qT%5Er', type: 'formula', formula: [Object] },
    Generation: { id: 'q%5CeI', type: 'select', select: null },
    Type: { id: 'smaD', type: 'multi_select', multi_select: [] },
    Category: { id: 'tESh', type: 'rich_text', rich_text: [] },
    'Attack Label': { id: 'xLfc', type: 'formula', formula: [Object] },
    Name: { id: 'title', type: 'title', title: [Array] }
  },
  url: 'https://www.notion.so/bulbasaur-64499d8597484ddda08b38a8c6dd6a2c'
}
Operation complete.
Code language: Bash (bash)
You should also see a new Bulbasaur entry in your Pokédex:
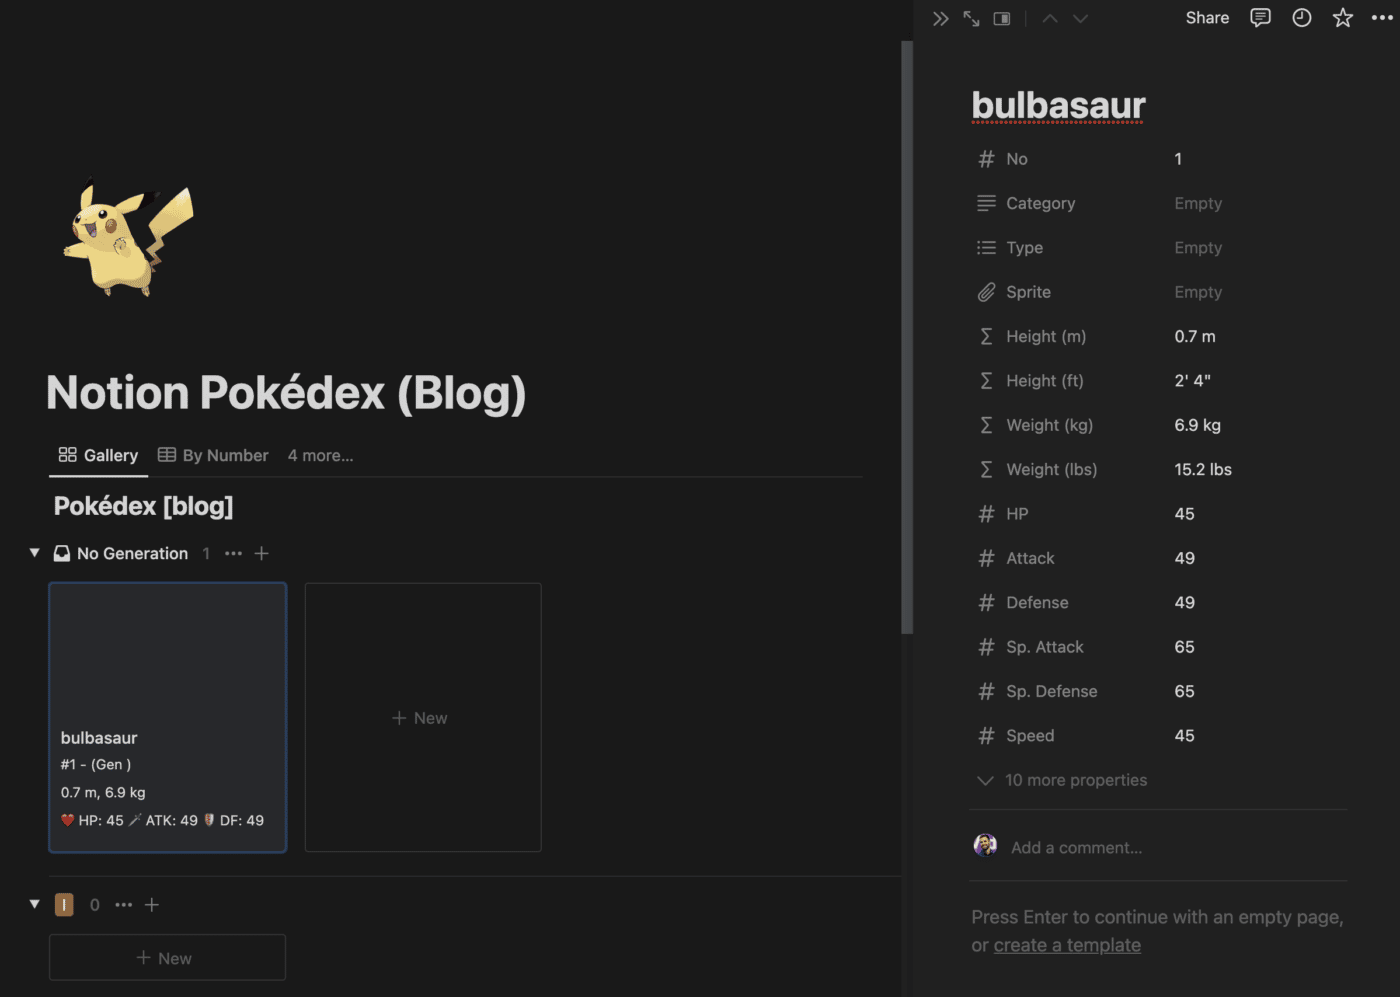
Congratulations! You’ve just created your first page in Notion using the Notion API.
If it didn’t work, make sure you added the line calling createNotionPage() right before the closing } in your getPokemon() function!
Now let’s walk through these code additions and see what’s actually happening.
The code we added here does five distinct things:
- Declares the
createNotionPage()function. - Creates a
for...ofloop, which allows us to iterate over the elements ofpokeArray, performing the same set of actions (defined within the loop) on each one. - Defines a
dataobject, which is formatted in the way the Notion API wants, and which is filled with the values of the current object withinpokeArraythat the loop is working on. - Sends a POST request to the
https://api.notion.com/v1/pagesendpoint of the Notion API in order to create a new page, using the information from thedataobject - Finally, calls the
createNotionPage()function from within thegetPokemon()function, after everything else in that latter function has finished executing.
At this point, the basic structure of the entire script is in place. You can jump back up to the flow chart (or view it on Whimsical in a new tab) to see that entire structure, but here’s a super-quick refresher.
When you run node index.js in the terminal, the following process kicks into high gear:
- Axios and the Notion API client are imported, the
notionvariable is created, and thepokeArrayarray is created (initially empty). getPokemon()is called.- Within
getPokemon(), a loop executes. For each loop iteration, we make a call to PokéAPI for a Pokémon, then place the data we want from the response into an object calledpokeData. - We then push that
pokeDataobject onto the end ofpokeArray. - After the loop has finished running as many times as is defined, we call
createNotionPage(). - Inside
createNotionPage(), we have a loop that will execute for each object withinpokeArray. - Each time, it will take the data from the current object within
pokeArraybeing worked on, place it in thedataobject, then send that object off to Notion within a request to create a new page.
In other words, we go through one loop to called PokéAPI a bunch of times and load up our pokeArray with lots of objects (one for each Pokémon), then we go through another loop a bunch of times to send those objects to our Notion Pokédex.
Now that you understand the gist of what’s happening, let’s dig into the actual call being made to the Notion API.
First, I’ll briefly cover what’s happening in our for...of loop:
for (let pokemon of pokeArray)
Code language: JavaScript (javascript)
This is a looping construct that iterates over every element in pokeArray. As you’ll recall, each element in that array is an object, defined by the pokeData object definition, which holds information about each Pokémon.
Each time the loop executes, the current element of pokeArray is temporarily stored in the pokemon variable defined in the loop declaration.
This means that we can access the Pokémon’s name like so: pokemon.name
Earlier in the script, we used pokeData.name to do the same thing. But since we define the variable name as pokemon in the loop declaration, we now use pokemon instead of pokeData.
In the code above, you can see that we’re using a for...of loop to iterate over our array:
for (let pokemon of pokeArray) {

}
Code language: JavaScript (javascript)
This is a type of for loop that can iterate over the values of an array or an object (for... in loops can iterate over the keys).
You can see the differences between for...of and for...in here:
In most cases, you want to access the actual values of an object or array, so a for...of loop is cleaner.
Note that you could also write a normal for loop, using the array’s length to set the end parameter:
for (let i = 0; i < pokeArray.length; i++) {

}
Code language: JavaScript (javascript)
Since we’re working on an array, these approaches are functionally identical.
Next, let’s look at the data object declaration.
const data = {
      "parent": {
        "type": "database_id",
        "database_id": process.env.NOTION_DATABASE_ID
      },
      "properties": {
        "Name": {
          "title": [
            {
              "text": {
                "content": pokemon.name
              }
            }
          ]
        },
        "No": {
          "number": pokemon.number
        },
        "Height": { "number": pokemon.height },
        "Weight": { "number": pokemon.weight },
        "HP": { "number": pokemon.hp },
        "Attack": { "number": pokemon.attack },
        "Defense": { "number": pokemon.defense },
        "Sp. Attack": { "number": pokemon['special-attack'] },
        "Sp. Defense": { "number": pokemon['special-defense'] },
        "Speed": { "number": pokemon.speed }
      }
    }
Code language: JavaScript (javascript)
data is an object that is structured exactly as the Notion API expects. Of course, you may now be wondering… how do I know how to structure the object?
That’s where the Notion API documentation comes in – and you’re going to want to get very familiar with it.
In this case, I looked at the reference for creating new pages:
On this page, you can get all the information you need to properly structure your request to the API. Let’s go over a few important parts of this page:
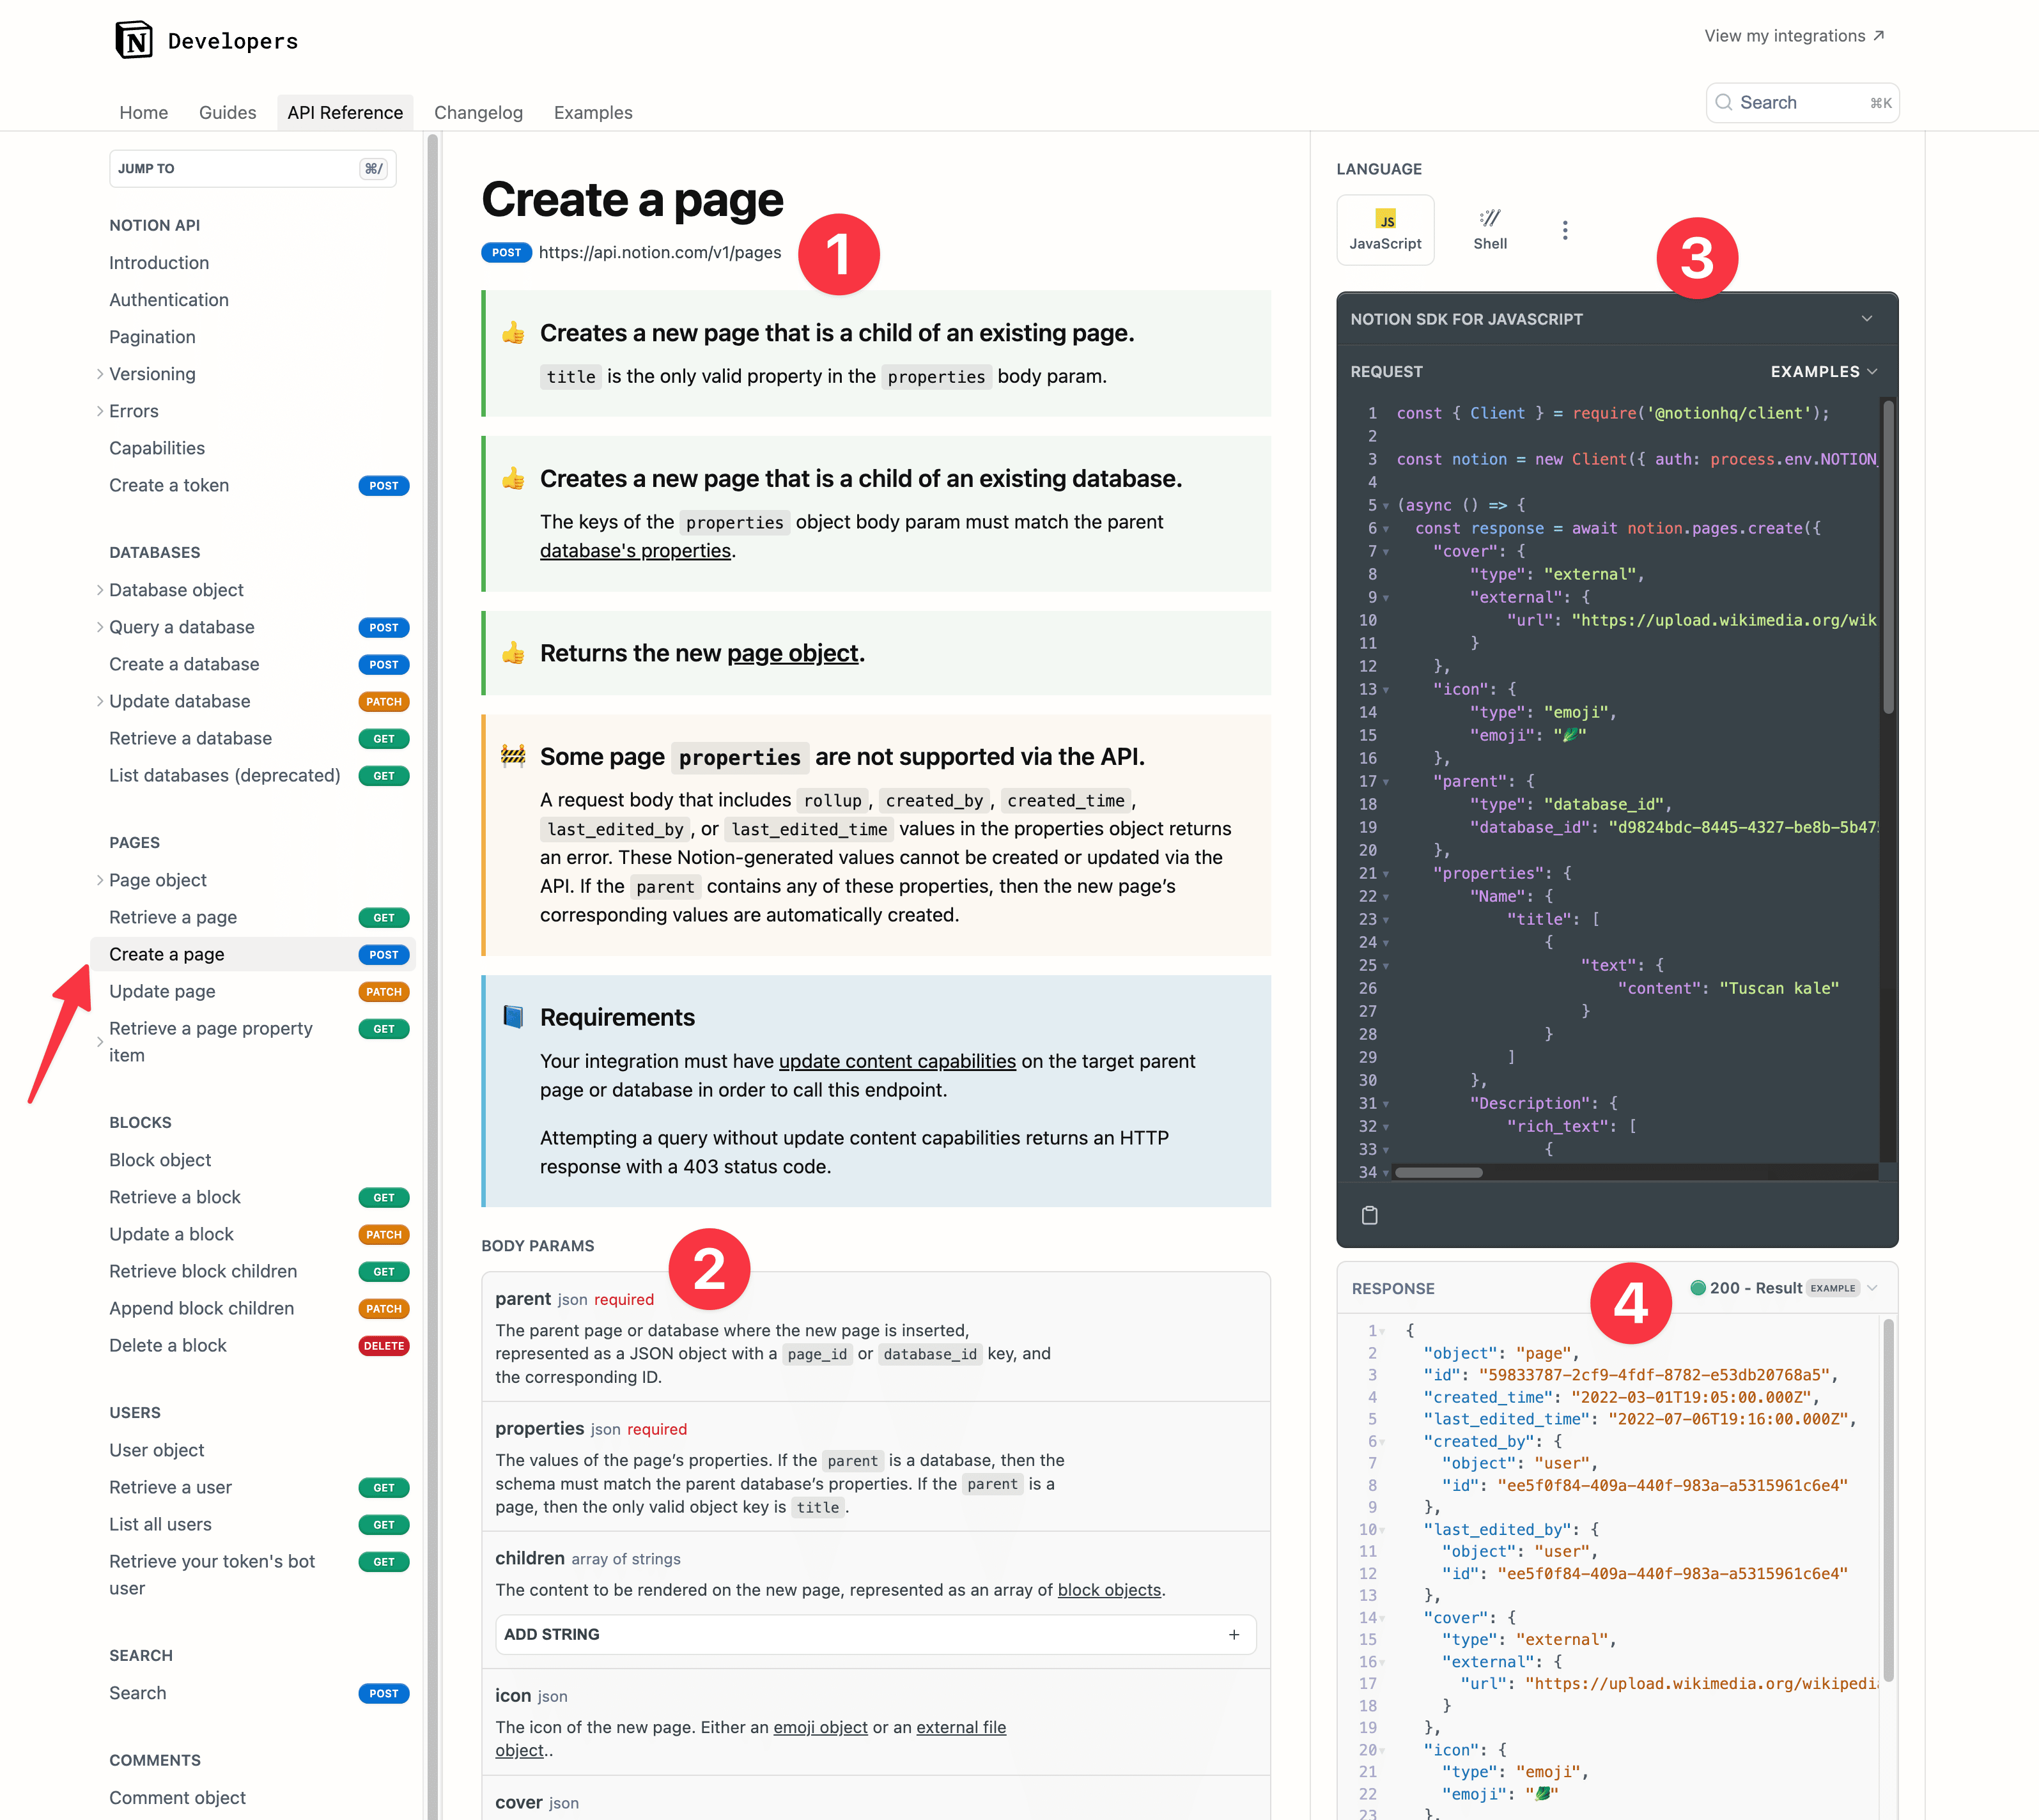
First, at the top of the page you’ll see the endpoint URL and the method required for sending this type of request. For creating a page, you send a POST request to https://api.notion.com/v1/pages – or you use a method that does the same for you (e.g. using notion.pages.create() as we are in our script).
Second, you’ll see the body parameters that can be sent with the request. You’ll also see the ones that are required – in this case, the parent (which is either a database or an existing page) and the properties.
Third, you’ll see the example code area. This shows a sample request, which you can use as a reference for modeling your own request.
Note that you can use the dropdown menus to see other requests. The default example uses the official Notion SDK for JavaScript, which we’re using in this project as well. It provides lots of handy methods for making API requests without writing as much code.
However, you can see several other examples. If you change the dropdown from Notion SDK to Axios, for example, you’ll see this code:
import axios from 'axios';

const options = {
  method: 'POST',
  url: 'https://api.notion.com/v1/pages',
  headers: {
    accept: 'application/json',
    'Notion-Version': '2022-06-28',
    'content-type': 'application/json'
  }
};

axios
  .request(options)
  .then(function (response) {
    console.log(response.data);
  })
  .catch(function (error) {
    console.error(error);
  });
Code language: JavaScript (javascript)
My only issue with this example code is that it actually doesn’t give you all of the information you need to make a request using Axios. Perhaps they’ll fix this in the future (you may see different code if you’re reading this well after I publish it), but for now, it’s incomplete.
Here’s the full code you’d need to use to create a page using Axios:
const axios = require('axios')

const options = {
  method: 'POST',
  url: 'https://api.notion.com/v1/pages/',
  headers: {
    accept: 'application/json',
    'Notion-Version': '2022-06-28',
    'content-type': 'application/json',
    Authorization: `Bearer ${process.env.NOTION_KEY}`
  },
  data: {
    parent: {
      "type": "database_id",
      "database_id": process.env.NOTION_DATABASE_ID
    },
    properties: {
      "Name": {
        "title": [
          {
            "text": {
              "content": "Test Page"
            }
          }
        ]
      }
    }
  }
};

axios
  .request(options)
  .then(function (response) {
    console.log(response.data);
  })
  .catch(function (error) {
    console.error(error);
  });
Code language: JavaScript (javascript)
The code is quite similar, but you can see that I’ve included two new pieces of information:
- An Authorization property in the headers object, containing my integration’s secret key
- A data object that contains both the parent and the properties.
Both of these are required, yet they aren’t shown in the Axios example.
This is a harsh truth I’ve learned as I’ve gone through my journey of learning APIs; you’re often expected to know a lot of fundamentals, and API documentation often doesn’t hold your hand. This is likely because developers are trying to write mountains of documentation very quickly, and they’re also experienced enough to know the missing pieces by heart.
Unfortunately, us noobs are often left scratching our heads as a result!
Fourth, you can see examples of responses that the API will send back. Here on the Create a Page doc, there are four possible responses:
- 200 – a successful response, indicating that the page has been created.
- 400 – invalid request (can mean several things)
- 404 – resource does not exist (in this case, the parent)
- 429 – your application has been rate limited
You can see a full list of the error responses that the Notion API may return here:
Using the information on this page – especially the example code – I was able to properly construct the data object.
There’s one other page that came in very handy for constructing this request, and that’s the Property Values reference:
Note: This page is currently not shown in the sidebar of the API reference. It’s quite hard to find, and it’s the only page that shows you explicitly how to set property values when creating or updating pages. There is also a Page Property Values page, which is listed in the sidebar, and which has a very similar title – but only shows you the responses that you get when you retrieve property values. Notion is in the middle of merging these two pages, but as of this writing, that process hasn’t been completed yet.
This page will show you how to properly construct an object in order to set any kind of property value (that is supported by the API).
For example, here’s how you’d set a value in the number-type property called No:
"No": {
    "number": 42
}
Code language: JavaScript (javascript)
Important Note: That first key value (in this case, “No”), must match the name of the property in your database.
Using the property references on that page, you’ll be able to figure out how to structure your request and add values to all of the properties in your target database (if indeed you’re creating a page in a database).
Finally, we have this small block of code that actually sends the request to Notion:
console.log(`Sending ${pokemon.name} to Notion`)
const response = await notion.pages.create( data )
console.log(response)
Code language: JavaScript (javascript)
Here, we’re simply using the notion.pages.create() method, passing our data object as the argument. Note that we could have defined the object directly between those parentheses, but I find it cleaner to define it first and then simply pass the variable as the argument.
The console.log() lines simply log information in the terminal.
Before we move one, I’d like to cover one more quirk from our data object definition:
"Defense": { "number": pokemon.defense },
"Sp. Attack": { "number": pokemon['special-attack'] },
Code language: JavaScript (javascript)
Note how the first line accesses the defense property: pokemon.defense – this method of accessing object properties is called dot notation. It can be used when the property name contains only letter, numbers, or underscores.
When a property name contains other characters – such as spaces or dashes – then you must use bracket notation to access it. The line accessing special-attack shows how: pokemon['special-attack']. Learn more here:
At this stage, your code should look just like this:
const axios = require('axios')
const { Client } = require('@notionhq/client')

const notion = new Client({auth: process.env.NOTION_KEY})


const pokeArray = []

async function getPokemon() {

  const start = 1
  const end = 1
  for (let i = start; i <= end; i++) {

    const poke = await axios.get(`https://pokeapi.co/api/v2/pokemon/${i}`)
      .then((poke) => {

        const pokeData = {
          "name": poke.data.species.name,
          "number": poke.data.id,
          "height": poke.data.height,
          "weight": poke.data.weight,
          "hp": poke.data.stats[0].base_stat,
          "attack": poke.data.stats[1].base_stat,
          "defense": poke.data.stats[2].base_stat,
          "special-attack": poke.data.stats[3].base_stat,
          "special-defense": poke.data.stats[4].base_stat,
          "speed": poke.data.stats[5].base_stat
        }

        console.log(`Fetched ${pokeData.name}.`)
        console.table(pokeData)

        pokeArray.push(pokeData)

      })
      .catch((error) => {
        console.log(error)
      })

  }

  createNotionPage()

}

getPokemon()

async function createNotionPage() {

  for (let pokemon of pokeArray) {

    const data = {
      "parent": {
        "type": "database_id",
        "database_id": process.env.NOTION_DATABASE_ID
      },
      "properties": {
        "Name": {
          "title": [
            {
              "text": {
                "content": pokemon.name
              }
            }
          ]
        },
        "No": {
          "number": pokemon.number
        },
        "Height": { "number": pokemon.height },
        "Weight": { "number": pokemon.weight },
        "HP": { "number": pokemon.hp },
        "Attack": { "number": pokemon.attack },
        "Defense": { "number": pokemon.defense },
        "Sp. Attack": { "number": pokemon['special-attack'] },
        "Sp. Defense": { "number": pokemon['special-defense'] },
        "Speed": { "number": pokemon.speed }
      }
    }

    console.log(`Sending ${pokemon.name} to Notion`)
    const response = await notion.pages.create( data )
    console.log(response)

  }

  console.log(`Operation complete.`)

}
Code language: JavaScript (javascript)Create Multiple Pages at Once
Now that we have the basic structure of our script in place, it’s time to kick things up a notch and fetch multiple Pokémon at once.
Fortunately, we already have both of our loops in place! So all we need to do in this step is:
- Tweak the
endvariable so that the initial loop runs more than once, and fetches more than one Pokémon - Add a “wait” function to prevent our script from getting rate-limited
Add/change the highlighted lines in your code:
async function getPokemon() {

  const start = 1
  const end = 10
  for (let i = start; i <= end; i++) {

    const poke = await axios.get(`https://pokeapi.co/api/v2/pokemon/${i}`)
      .then((poke) => {

        const pokeData = {
          "name": poke.data.species.name,
          "number": poke.data.id,
          "height": poke.data.height,
          "weight": poke.data.weight,
          "hp": poke.data.stats[0].base_stat,
          "attack": poke.data.stats[1].base_stat,
          "defense": poke.data.stats[2].base_stat,
          "special-attack": poke.data.stats[3].base_stat,
          "special-defense": poke.data.stats[4].base_stat,
          "speed": poke.data.stats[5].base_stat
        }

        console.log(`Fetched ${pokeData.name}.`)
        console.table(pokeData)

        pokeArray.push(pokeData)

      })
      .catch((error) => {
        console.log(error)
      })

  }

  createNotionPage()

}

getPokemon()

const sleep = (milliseconds) => {
  return new Promise(resolve => setTimeout(resolve, milliseconds))
};

async function createNotionPage() {

  for (let pokemon of pokeArray) {

    const data = {
      "parent": {
        "type": "database_id",
        "database_id": process.env.NOTION_DATABASE_ID
      },
      "properties": {
        "Name": {
          "title": [
            {
              "text": {
                "content": pokemon.name
              }
            }
          ]
        },
        "No": {
          "number": pokemon.number
        },
        "Height": { "number": pokemon.height },
        "Weight": { "number": pokemon.weight },
        "HP": { "number": pokemon.hp },
        "Attack": { "number": pokemon.attack },
        "Defense": { "number": pokemon.defense },
        "Sp. Attack": { "number": pokemon['special-attack'] },
        "Sp. Defense": { "number": pokemon['special-defense'] },
        "Speed": { "number": pokemon.speed }
      }
    }

    await sleep(300)

    console.log(`Sending ${pokemon.name} to Notion`)
    const response = await notion.pages.create( data )
    console.log(response)

  }

  console.log(`Operation complete.`)

}
Code language: JavaScript (javascript)
Now let’s test this out. First, delete your original Bulbasaur entry from your Pokédex, since it will be recreated.
Next, run node index.js in the terminal once more. If everything goes smoothly, you should see a lot of log information in your terminal. Additionally, you should now have ten entries in your Pokédex:
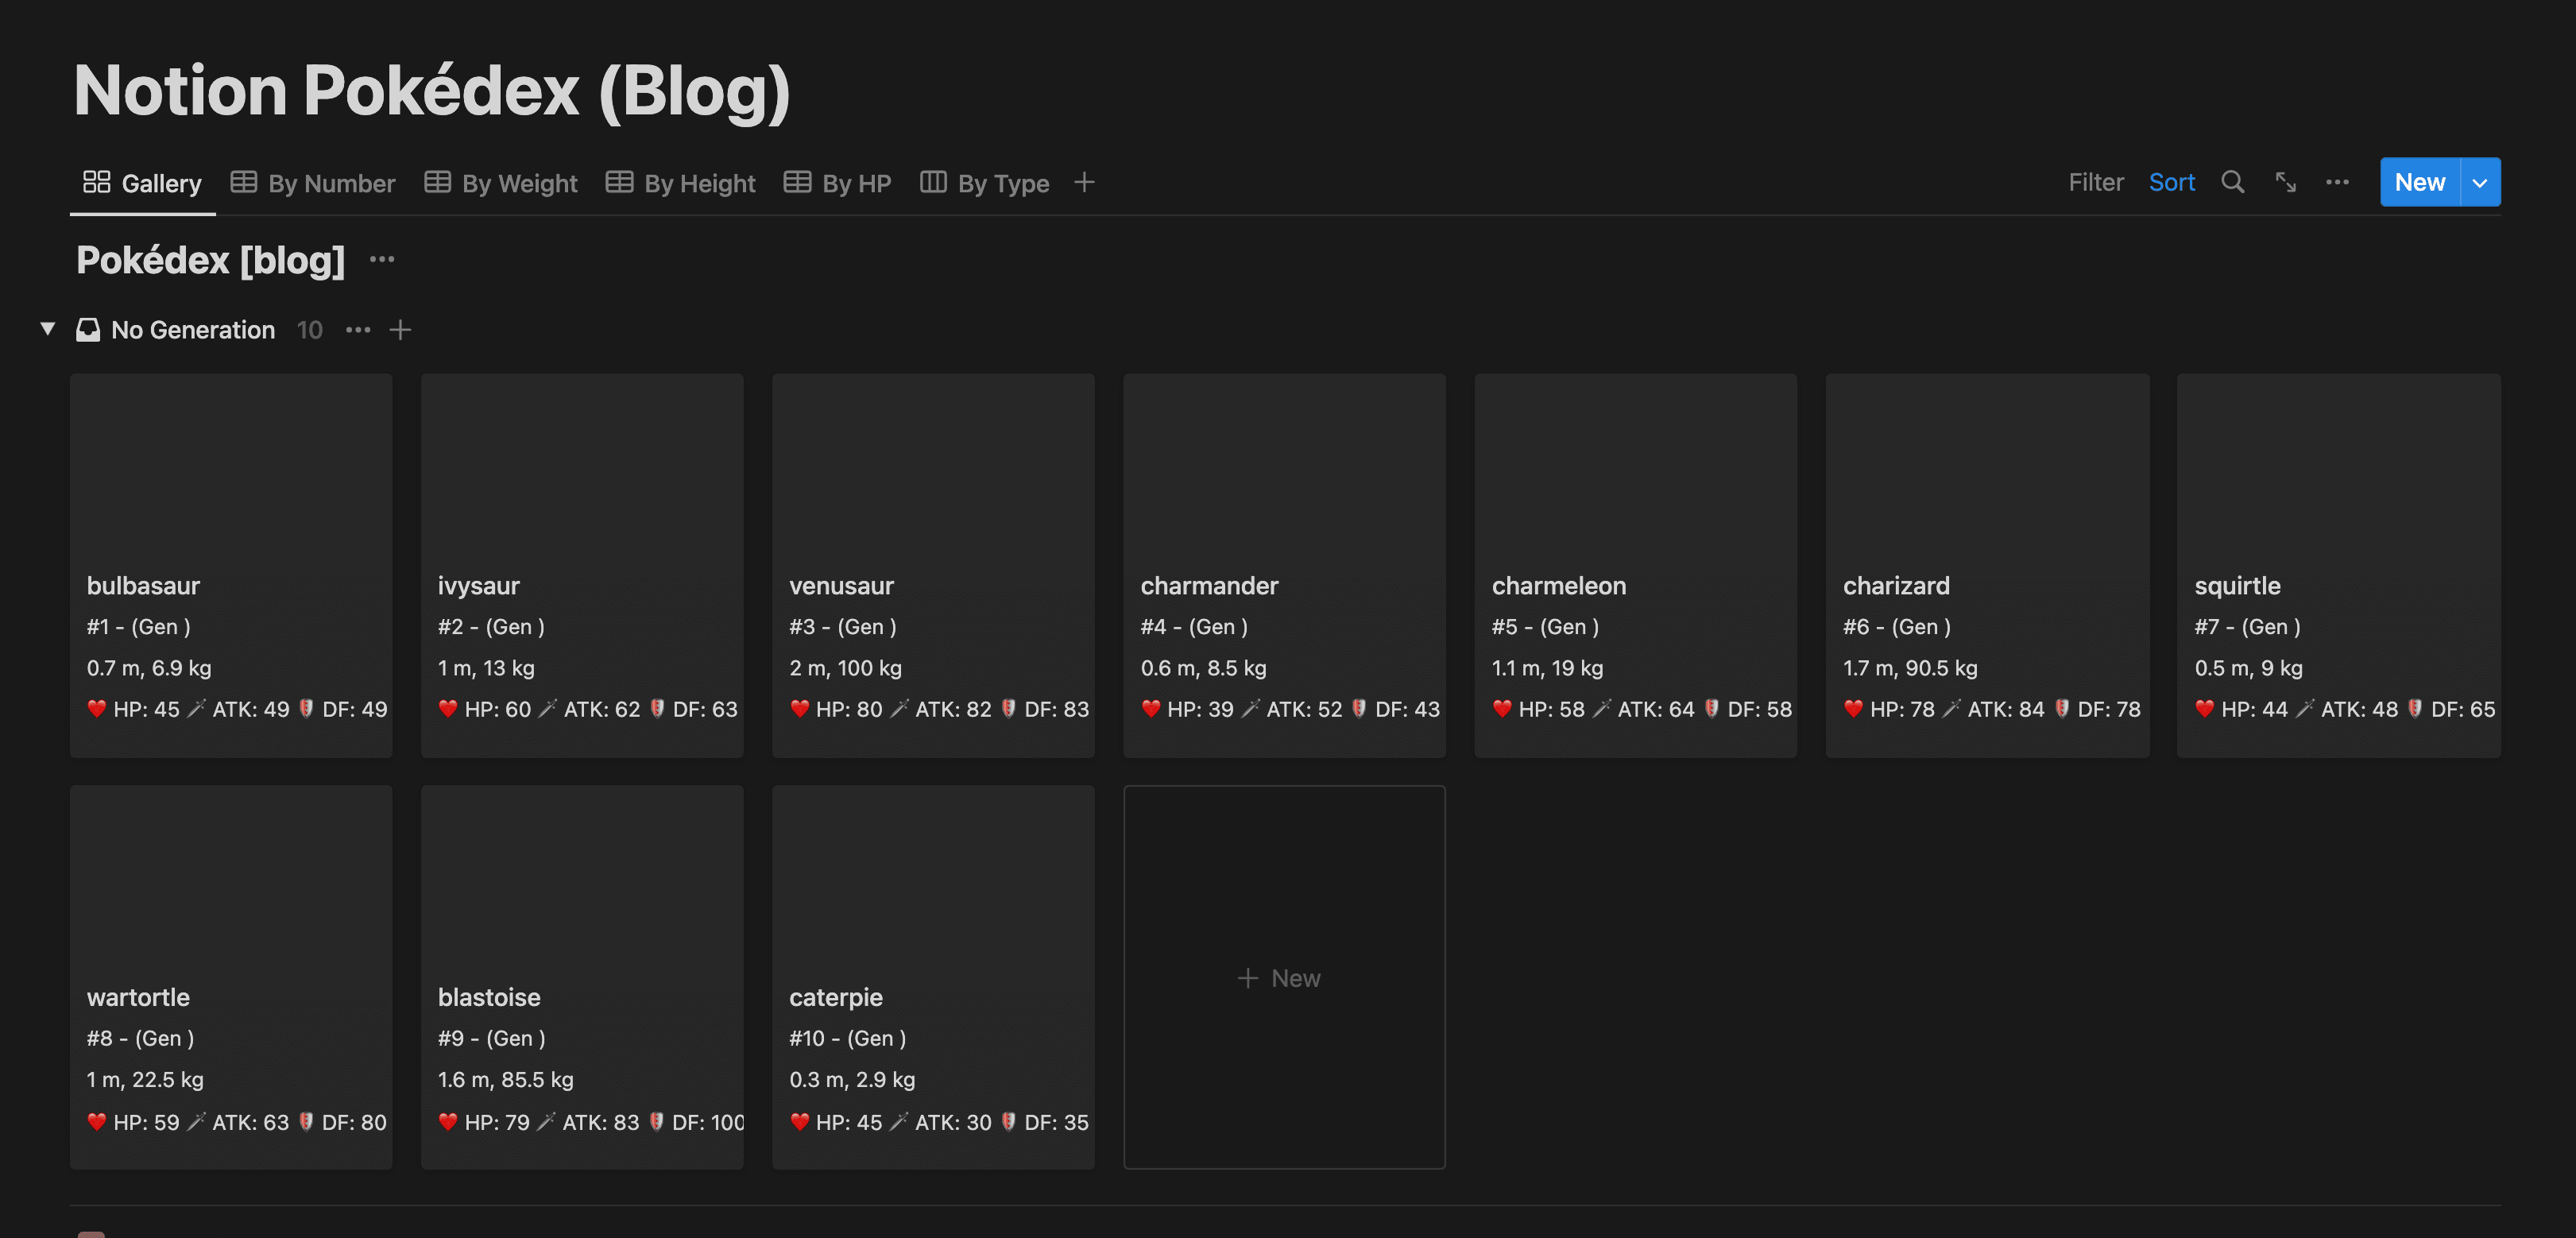
Let’s go over what we’ve added.
The first change here is pretty simple. We’re just changing const end = 1 to const end = 10, which will cause our initial loop to run ten times.
This means that we’ll make ten called to PokéAPI and add ten objects to pokeArray.
The other change is the addition of the following code beneath the getPokemon() call:
const sleep = (milliseconds) => {
  return new Promise(resolve => setTimeout(resolve, milliseconds))
};
Code language: JavaScript (javascript)
This is a simple function that takes a single argument (a number) and will cause the script to wait that many milliseconds before continuing whenever we call it.
You can see that we’re calling it right before sending each page to Notion:
await sleep(300)

console.log(`Sending ${pokemon.name} to Notion`)
const response = await notion.pages.create( data )
console.log(response)
Code language: JavaScript (javascript)
JavaScript doesn’t have a built-in sleep() function as some other languages do, but we can use the above code to approximate one. It uses a combination of setTimeout() (a built-in Web API method), a Promise, and async/await to essentially pause the script for the number of milliseconds we specify.
You don’t really need to understand the nuts and bolts of the sleep() function to use it; you can basically just copy and paste. However, if you’re curious about how and why it works, here’s a brief overview.
The built-in setTimeout() function will set a timer and execute a function after the timer is up. Here’s the reference for it:
However, setTimeout() will not delay the execution of the next line of code.
We can get around this issue by creating a Promise within our sleep() function, which is only fulfilled after the setTimeout() call inside it has finished running.
Then, by calling the function with the await keyword (e.g. await sleep(300)), we effectively cause our script to pause for 300 milliseconds before moving on.
The MDN documentation on Promises explains why this works:
You can also get more detail on this sleep() function itself here:


Why are we doing this, though?
The reason is that requests to the Notion API are rate-limited, meaning you can’t send a huge number of requests super-quickly to it. Notion is not unique here; almost all APIs have some kind of rate-limiting implemented.
The Notion API currently allows an average of three requests per second:
The rate limit for incoming requests per integration is an average of three requests per second. Some bursts beyond the average rate are allowed.
Read more here:
This doc also mentions that a rate-limited request (e.g. one that fails due to hitting the rate limit) will return a 429 error. If you get this, you’re supposed to set up your code to try the request again after a number of milliseconds that is specified in the Retry-After header value in the 429 response.
However, a quick-and-dirty way to make sure we never even see a 429 response is to make sure our script never sends requests too quickly.
Hence our await sleep(300) line before the actual call to the Notion API – we are waiting 300ms before sending each request, keeping our average very close to that three-requests-per-second limit.
There are certainly more sophisticated ways you could handle Notion’s rate limits, which would likely make your application run faster. I’d encourage you to explore them as you continue to learn and build!
At this stage, your code should look just like this:
const axios = require('axios')
const { Client } = require('@notionhq/client')

const notion = new Client({auth: process.env.NOTION_KEY})


const pokeArray = []

async function getPokemon() {

  const start = 1
  const end = 10
  for (let i = start; i <= end; i++) {

    const poke = await axios.get(`https://pokeapi.co/api/v2/pokemon/${i}`)
      .then((poke) => {

        const pokeData = {
          "name": poke.data.species.name,
          "number": poke.data.id,
          "height": poke.data.height,
          "weight": poke.data.weight,
          "hp": poke.data.stats[0].base_stat,
          "attack": poke.data.stats[1].base_stat,
          "defense": poke.data.stats[2].base_stat,
          "special-attack": poke.data.stats[3].base_stat,
          "special-defense": poke.data.stats[4].base_stat,
          "speed": poke.data.stats[5].base_stat
        }

        console.log(`Fetched ${pokeData.name}.`)
        console.table(pokeData)

        pokeArray.push(pokeData)

      })
      .catch((error) => {
        console.log(error)
      })

  }

  createNotionPage()

}

getPokemon()

const sleep = (milliseconds) => {
  return new Promise(resolve => setTimeout(resolve, milliseconds))
};

async function createNotionPage() {

  for (let pokemon of pokeArray) {

    const data = {
      "parent": {
        "type": "database_id",
        "database_id": process.env.NOTION_DATABASE_ID
      },
      "properties": {
        "Name": {
          "title": [
            {
              "text": {
                "content": pokemon.name
              }
            }
          ]
        },
        "No": {
          "number": pokemon.number
        },
        "Height": { "number": pokemon.height },
        "Weight": { "number": pokemon.weight },
        "HP": { "number": pokemon.hp },
        "Attack": { "number": pokemon.attack },
        "Defense": { "number": pokemon.defense },
        "Sp. Attack": { "number": pokemon['special-attack'] },
        "Sp. Defense": { "number": pokemon['special-defense'] },
        "Speed": { "number": pokemon.speed }
      }
    }

    await sleep(300)

    console.log(`Sending ${pokemon.name} to Notion`)
    const response = await notion.pages.create( data )
    console.log(response)

  }

  console.log(`Operation complete.`)

}
Code language: JavaScript (javascript)Refine Your Pokémon Data
At this point, your script can send basic information about multiple Pokémon to Notion all at once.
Now we’ll start the process of adding additional information to each Pokédex entry, as well as refining some of the information we already have.
Add/change the highlighted lines in your code:
async function getPokemon() {

  const start = 1
  const end = 10
  for (let i = start; i <= end; i++) {

    const poke = await axios.get(`https://pokeapi.co/api/v2/pokemon/${i}`)
      .then((poke) => {

        const typesRaw = poke.data.types
        const typesArray = []
        for (let type of typesRaw) {
          const typeObj = {
            "name": type.type.name
          }
          typesArray.push(typeObj)
        }

        const processedName = poke.data.species.name.split(/-/).map((name) => {
          return name[0].toUpperCase() + name.substring(1);
        }).join(" ")
        .replace(/^Mr M/,"Mr. M")
        .replace(/^Mime Jr/,"Mime Jr.")
        .replace(/^Mr R/,"Mr. R")
        .replace(/mo O/,"mo-o")
        .replace(/Porygon Z/,"Porygon-Z")
        .replace(/Type Null/, "Type: Null")
        .replace(/Ho Oh/,"Ho-Oh")
        .replace(/Nidoran F/,"Nidoran♀")
        .replace(/Nidoran M/,"Nidoran♂")
        .replace(/Flabebe/,"Flabébé")

        const bulbURL = `https://bulbapedia.bulbagarden.net/wiki/${processedName.replace(' ', '_')}_(Pokémon)`

        const sprite = (!poke.data.sprites.front_default) ? poke.data.sprites.other['official-artwork'].front_default : poke.data.sprites.front_default

        const pokeData = {
          "name": processedName,
          "number": poke.data.id,
          "types": typesArray,
          "height": poke.data.height,
          "weight": poke.data.weight,
          "hp": poke.data.stats[0].base_stat,
          "attack": poke.data.stats[1].base_stat,
          "defense": poke.data.stats[2].base_stat,
          "special-attack": poke.data.stats[3].base_stat,
          "special-defense": poke.data.stats[4].base_stat,
          "speed": poke.data.stats[5].base_stat,
          "sprite": sprite,
          "artwork": poke.data.sprites.other['official-artwork'].front_default,
          "bulbURL": bulbURL
        }

        console.log(`Fetched ${pokeData.name}.`)
        console.table(pokeData)

        pokeArray.push(pokeData)

      })
      .catch((error) => {
        console.log(error)
      })

  }

  createNotionPage()

}
Code language: JavaScript (javascript)
Remember, you can always jump back up to the Steal My Code section to see the final version of the code.
This step adds a lot of code, and makes some significant changes to the pokeData object declaration.
If you’re starting to feel overwhelmed, now might be a good time to get up and take a short break! I made a video about how breaks are crucial to learning and productivity a while ago, and it even has a Pokémon in the thumbnail… so you know I have to include it here.

Once you’re feeling fresh, let’s take some time to go through each of these new additions to our code.
At a glance, here’s what we’re accomplishing in this step:
- Get and store each Pokémon’s type(s)
- Reformat each Pokémon’s name to look nicer (e.g. changing “mr-mime” to “Mr. Mime”)
- Construct a valid Bulbapedia URL for each Pokémon, which we’ll later embed in that Pokémon’s page content
- Get and store the sprite and/or official artwork for each Pokémon
Each of these steps has a specific code block. For now, we’re simply getting and formatting this information; we’ll send it to Notion in a later step.
First, we get the Pokémon’s type – or multiple types!
const typesRaw = poke.data.types
const typesArray = []
for (let type of typesRaw) {
    const typeObj = {
    "name": type.type.name
    }
    typesArray.push(typeObj)
}
Code language: JavaScript (javascript)
This presents a bit of a challenge. Pokémon can have up to two types, and PokéAPI returns each Pokémon’s type(s) as an array filled with objects. See for yourself at the official docs for the pokemon endpoint.
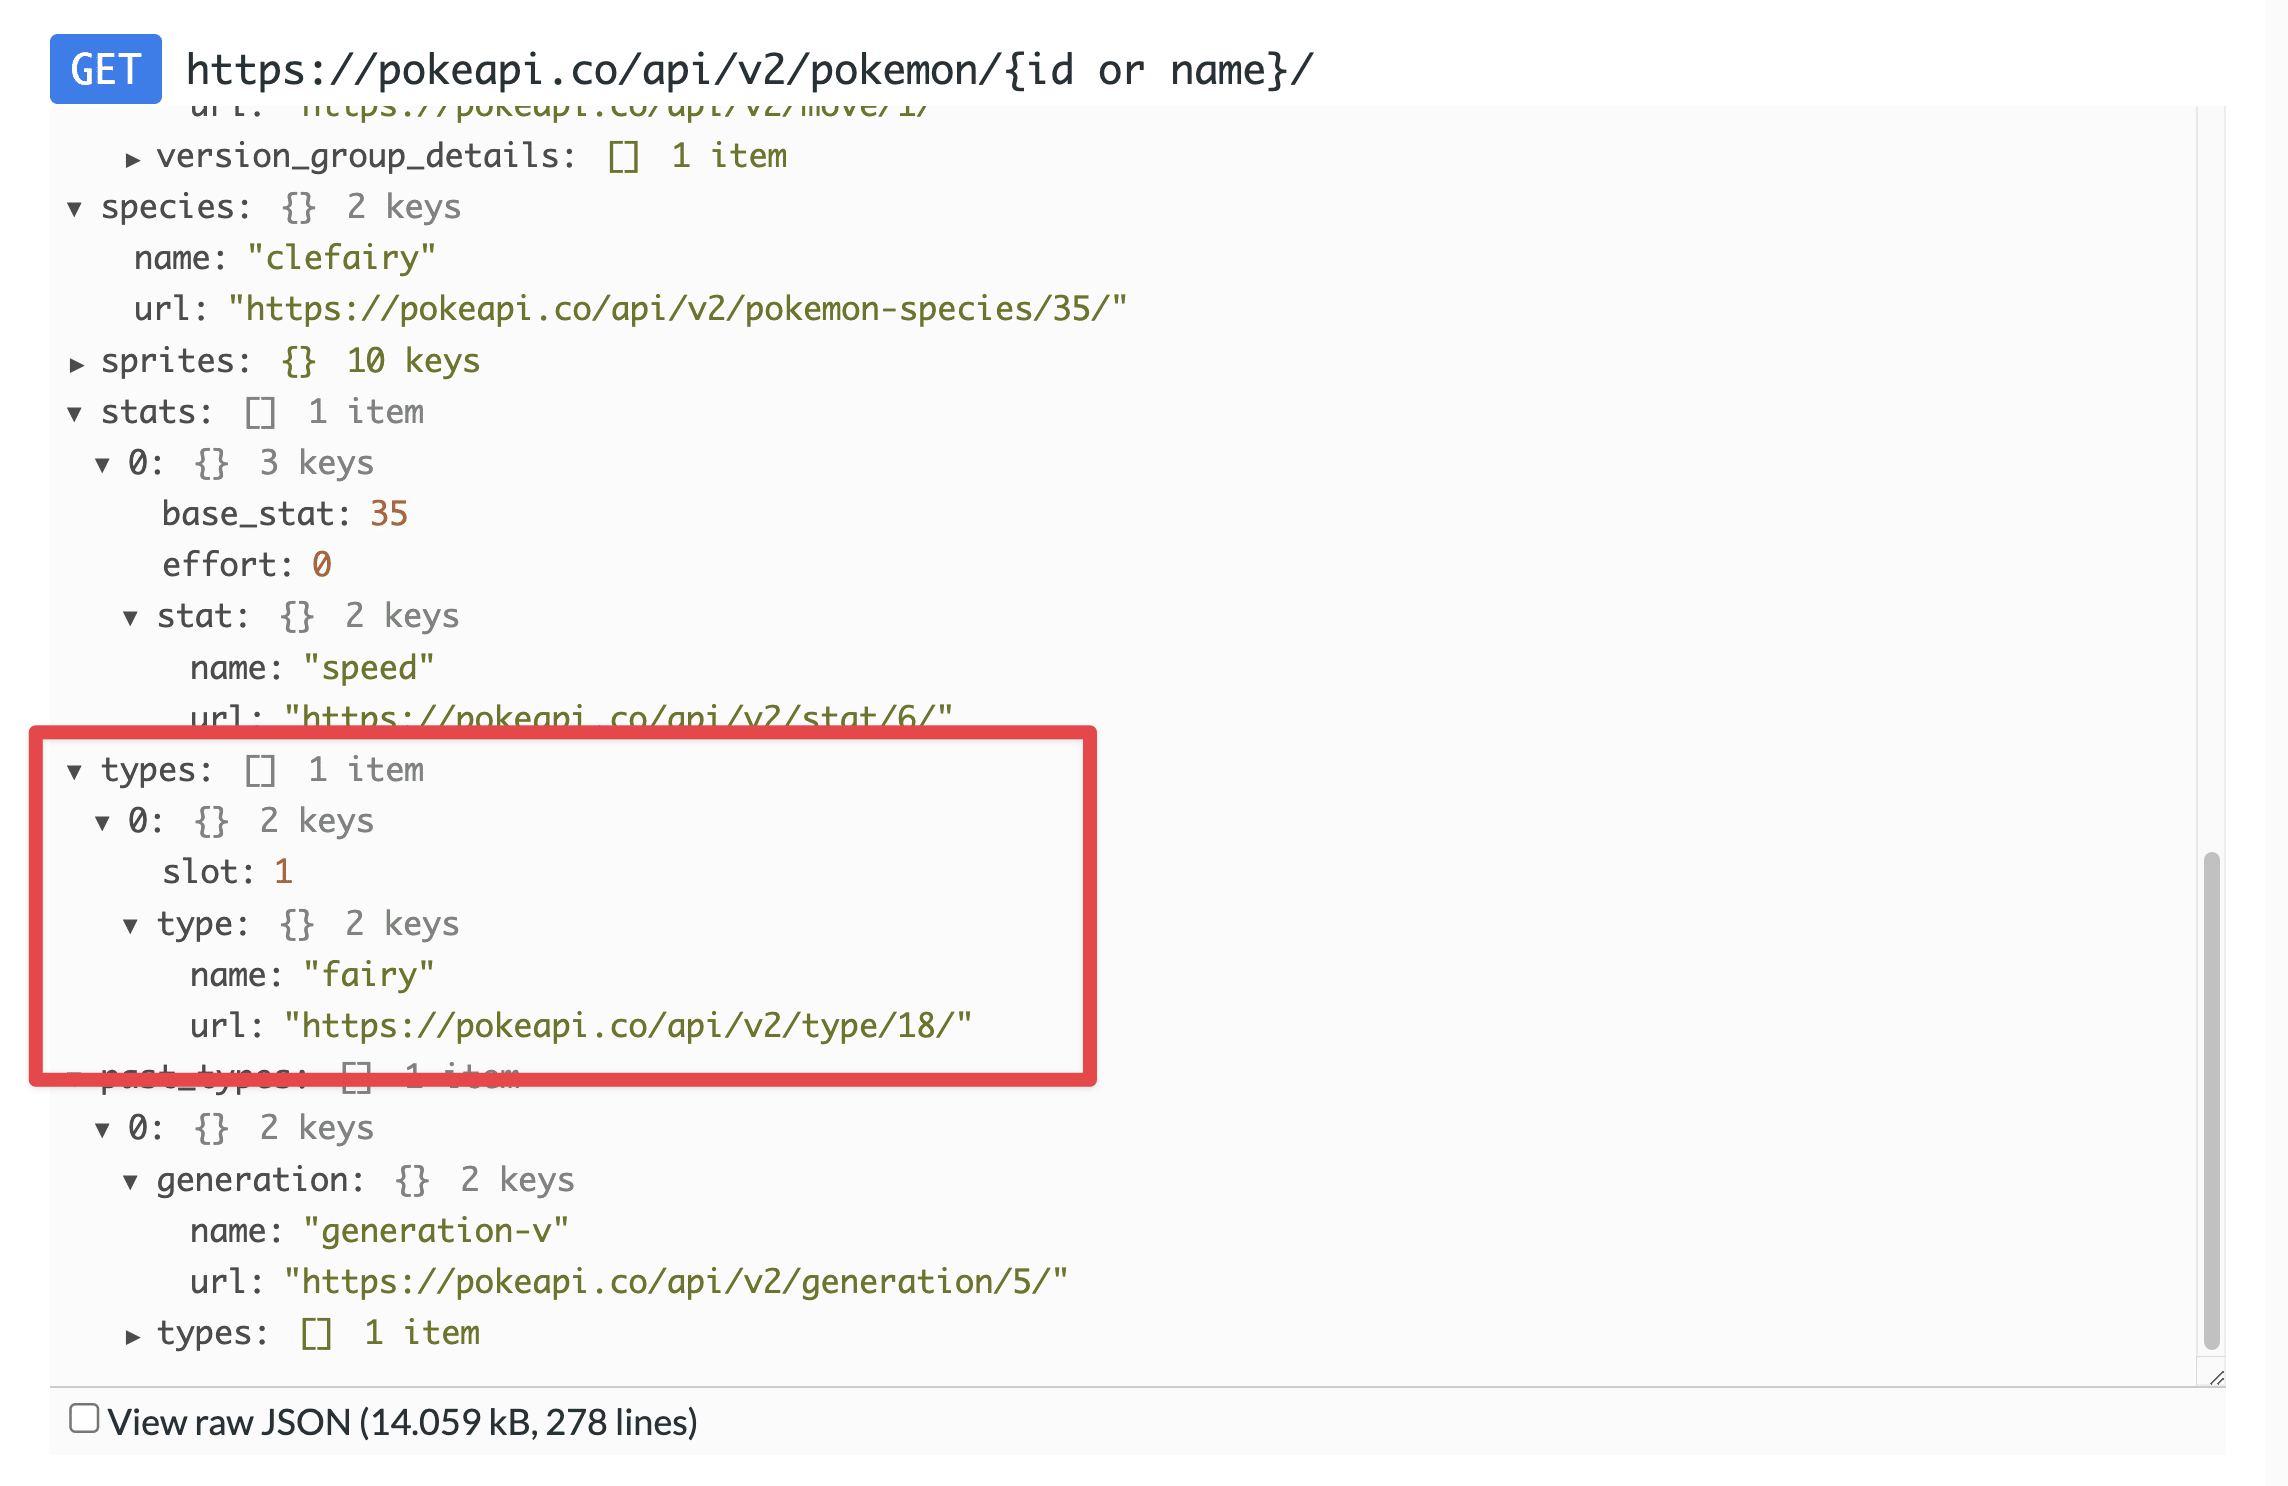
This means we have to:
- Dig into each object within the
typesarray and get the name of each type - Place to types into a new array of objects, structured in the way that the Notion API requires
To do this, we create a typesRaw variable, setting its value to the entire array of types from the API response: poke.data.types. We also create a new empty array called typesArray.
Once again, we’re using a for...of loop to iterate over typesRaw. Inside, we declare an object called typeObj, setting its name property to type.type.name.
The first type in that object is simply the type variable we defined in the for...of loop declaration, which represents the current object being iterated over. The second is the actual type property, the value of which is an object containing the name property (in addition to a url property that we aren’t using).
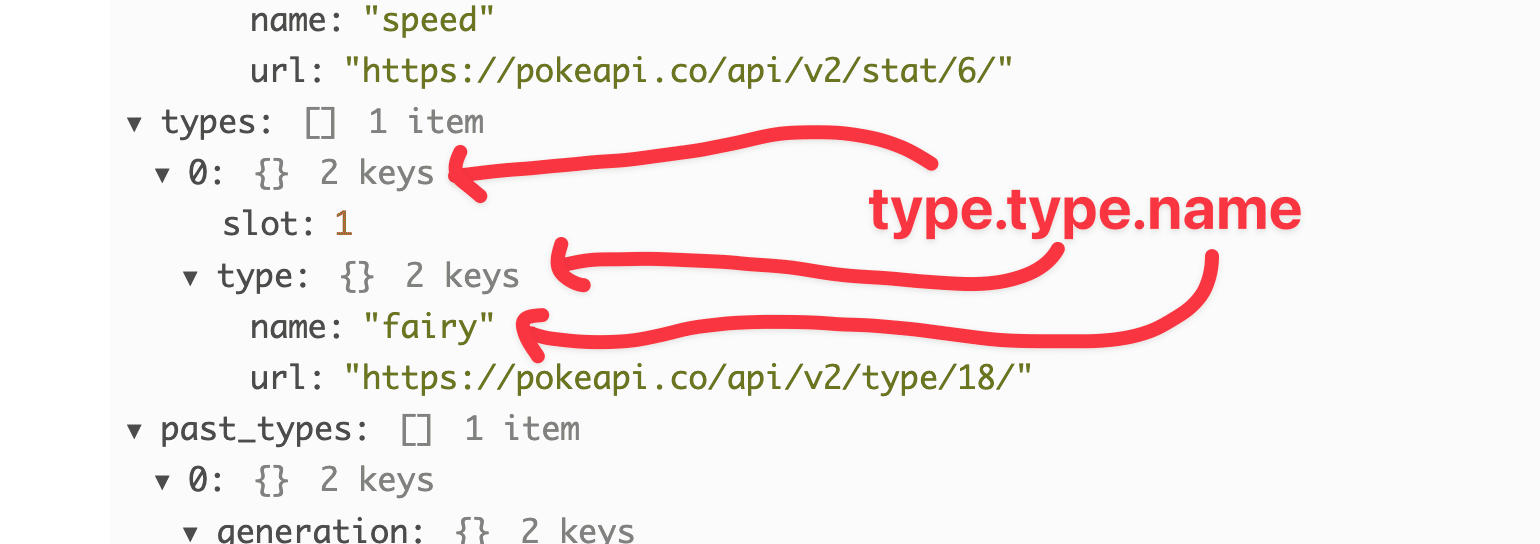
Next, we format the Pokémon’s name so it looks nicer. This process also has a secondary benefit; it will allow us to construct valid Bulbapedia URLs later.
const processedName = poke.data.species.name.split(/-/).map((name) => {
    return name[0].toUpperCase() + name.substring(1);
  }).join(" ")
  .replace(/^Mr M/,"Mr. M")
  .replace(/^Mime Jr/,"Mime Jr.")
  .replace(/^Mr R/,"Mr. R")
  .replace(/mo O/,"mo-o")
  .replace(/Porygon Z/,"Porygon-Z")
  .replace(/Type Null/, "Type: Null")
  .replace(/Ho Oh/,"Ho-Oh")
  .replace(/Nidoran F/,"Nidoran♀")
  .replace(/Nidoran M/,"Nidoran♂")
  .replace(/Flabebe/,"Flabébé")
Code language: JavaScript (javascript)
We’re doing a lot here code-wise, but the aims are simple:
- Capitalize each Pokémon’s name
- Handle edge cases where we need to add periods, accent characters (é), dashes, colons, or gender symbols (♂, ♀)
This block of code may initially look confusing, as it is quite dense. The reason for this is that I’ve used method chaining to condense it.
In JavaScript, you can call methods one after another with periods. This results in code that takes up less space, and for experienced programmers it can often be more readable.
However, for a beginner, it may be intimidating. So the best way to explain this code will be to rewrite it as distinct steps on their own lines. Run the code in this Replit app, then view the source.
Here, I have both the distinct steps as well as the method-chained approach in the code.
As you can see, both methods give the same exact result. However, using method-chaining takes up far fewer lines.
Learn more about method chaining:
Here’s what the code actually does, in order:
- Splits the name into an array of single-word values (will usually create a single-element array, but this is needed for Pokémon like Mr. Mime and Type: Null)
- Uses
map()to iterate over the returned array, executing these steps on each element:- Use
toUpperCaseto capitalize the first letter of the name - Concatenate that capitalized letter with the rest of the name (using
substring()to get everything except the first letter)
- Use
- Join the elements of that array back together as a single string, separating each with a space character (
" ") - Use
replace()to handle edge-case replacements, such as replacing “Mr M” with “Mr. M”
As for the actual methods being implemented here, I’ll link to the docs for each one:
- String.prototype.split()
- Array.prototype.map()
- String.prototype.toUpperCase() (using bracket notation to access the first character in the string)
- String.prototype.substring()
- Array.prototype.join()
- String.prototype.replace()
Third, we construct the Bulbapedia URL:
const bulbURL = `https://bulbapedia.bulbagarden.net/wiki/${processedName.replace(' ', '_')}_(Pokémon)`
Code language: JavaScript (javascript)
This step is fairly straightforward. We create a variable called bulbURL and set its value by creating a template literal (using the backtick ` characters), which allows us to reference variables within the string.
Bulbapedia has an extremely rigid structure for its URLs. It’s always the same, except for the Pokémon name:
https://bulbapedia.bulbagarden.net/wiki/Charmander_(Pokémon)https://bulbapedia.bulbagarden.net/wiki/Squirtle_(Pokémon)https://bulbapedia.bulbagarden.net/wiki/Mr._Mime_(Pokémon)
Thus, our URL structure just needed to use processedName to set the correct URL. The only fancy thing we’re doing here is using replace() to replace any space characters with underscores:
`https://bulbapedia.bulbagarden.net/wiki/${processedName.replace(' ', '_')}_(Pokémon)`
Code language: JavaScript (javascript)
More on replace():
Fourth, we define a variable called sprite that holds either the Pokémon’s sprite or its official artwork:
const sprite = (!poke.data.sprites.front_default) ? poke.data.sprites.other['official-artwork'].front_default : poke.data.sprites.front_default
Code language: JavaScript (javascript)
The reason we need to do either/or here is because Pokémon from Pokémon Legends: Arceus and later games don’t have sprites (their models are 3D). As a result, PokéAPI doesn’t have a sprite object for them, meaning we need to grab their official artwork instead.
Finally, we add our new key:value pairs to the pokeData object definition: sprite, bulbURL, and typesArray. Additionally, we change the value of the name property to be our new processedName variable.
const pokeData = {
    "name": processedName,
    "number": poke.data.id,
    "types": typesArray,
    "height": poke.data.height,
    "weight": poke.data.weight,
    "hp": poke.data.stats[0].base_stat,
    "attack": poke.data.stats[1].base_stat,
    "defense": poke.data.stats[2].base_stat,
    "special-attack": poke.data.stats[3].base_stat,
    "special-defense": poke.data.stats[4].base_stat,
    "speed": poke.data.stats[5].base_stat,
    "sprite": sprite,
    "artwork": poke.data.sprites.other['official-artwork'].front_default,
    "bulbURL": bulbURL
  }
Code language: JavaScript (javascript)
If you’d like to test your code at this point, I’d recommend commenting out the createNotionPage() function call. Adding // to the beginning of that line will turn it into a comment, preventing it from executing.
// createNotionPage()
Code language: JavaScript (javascript)
Doing this will allow you to see the log information for your code changes without sending more pages to Notion (which we’re not yet ready to do).
Run node index.js in the terminal once more, and you should see log information like this:
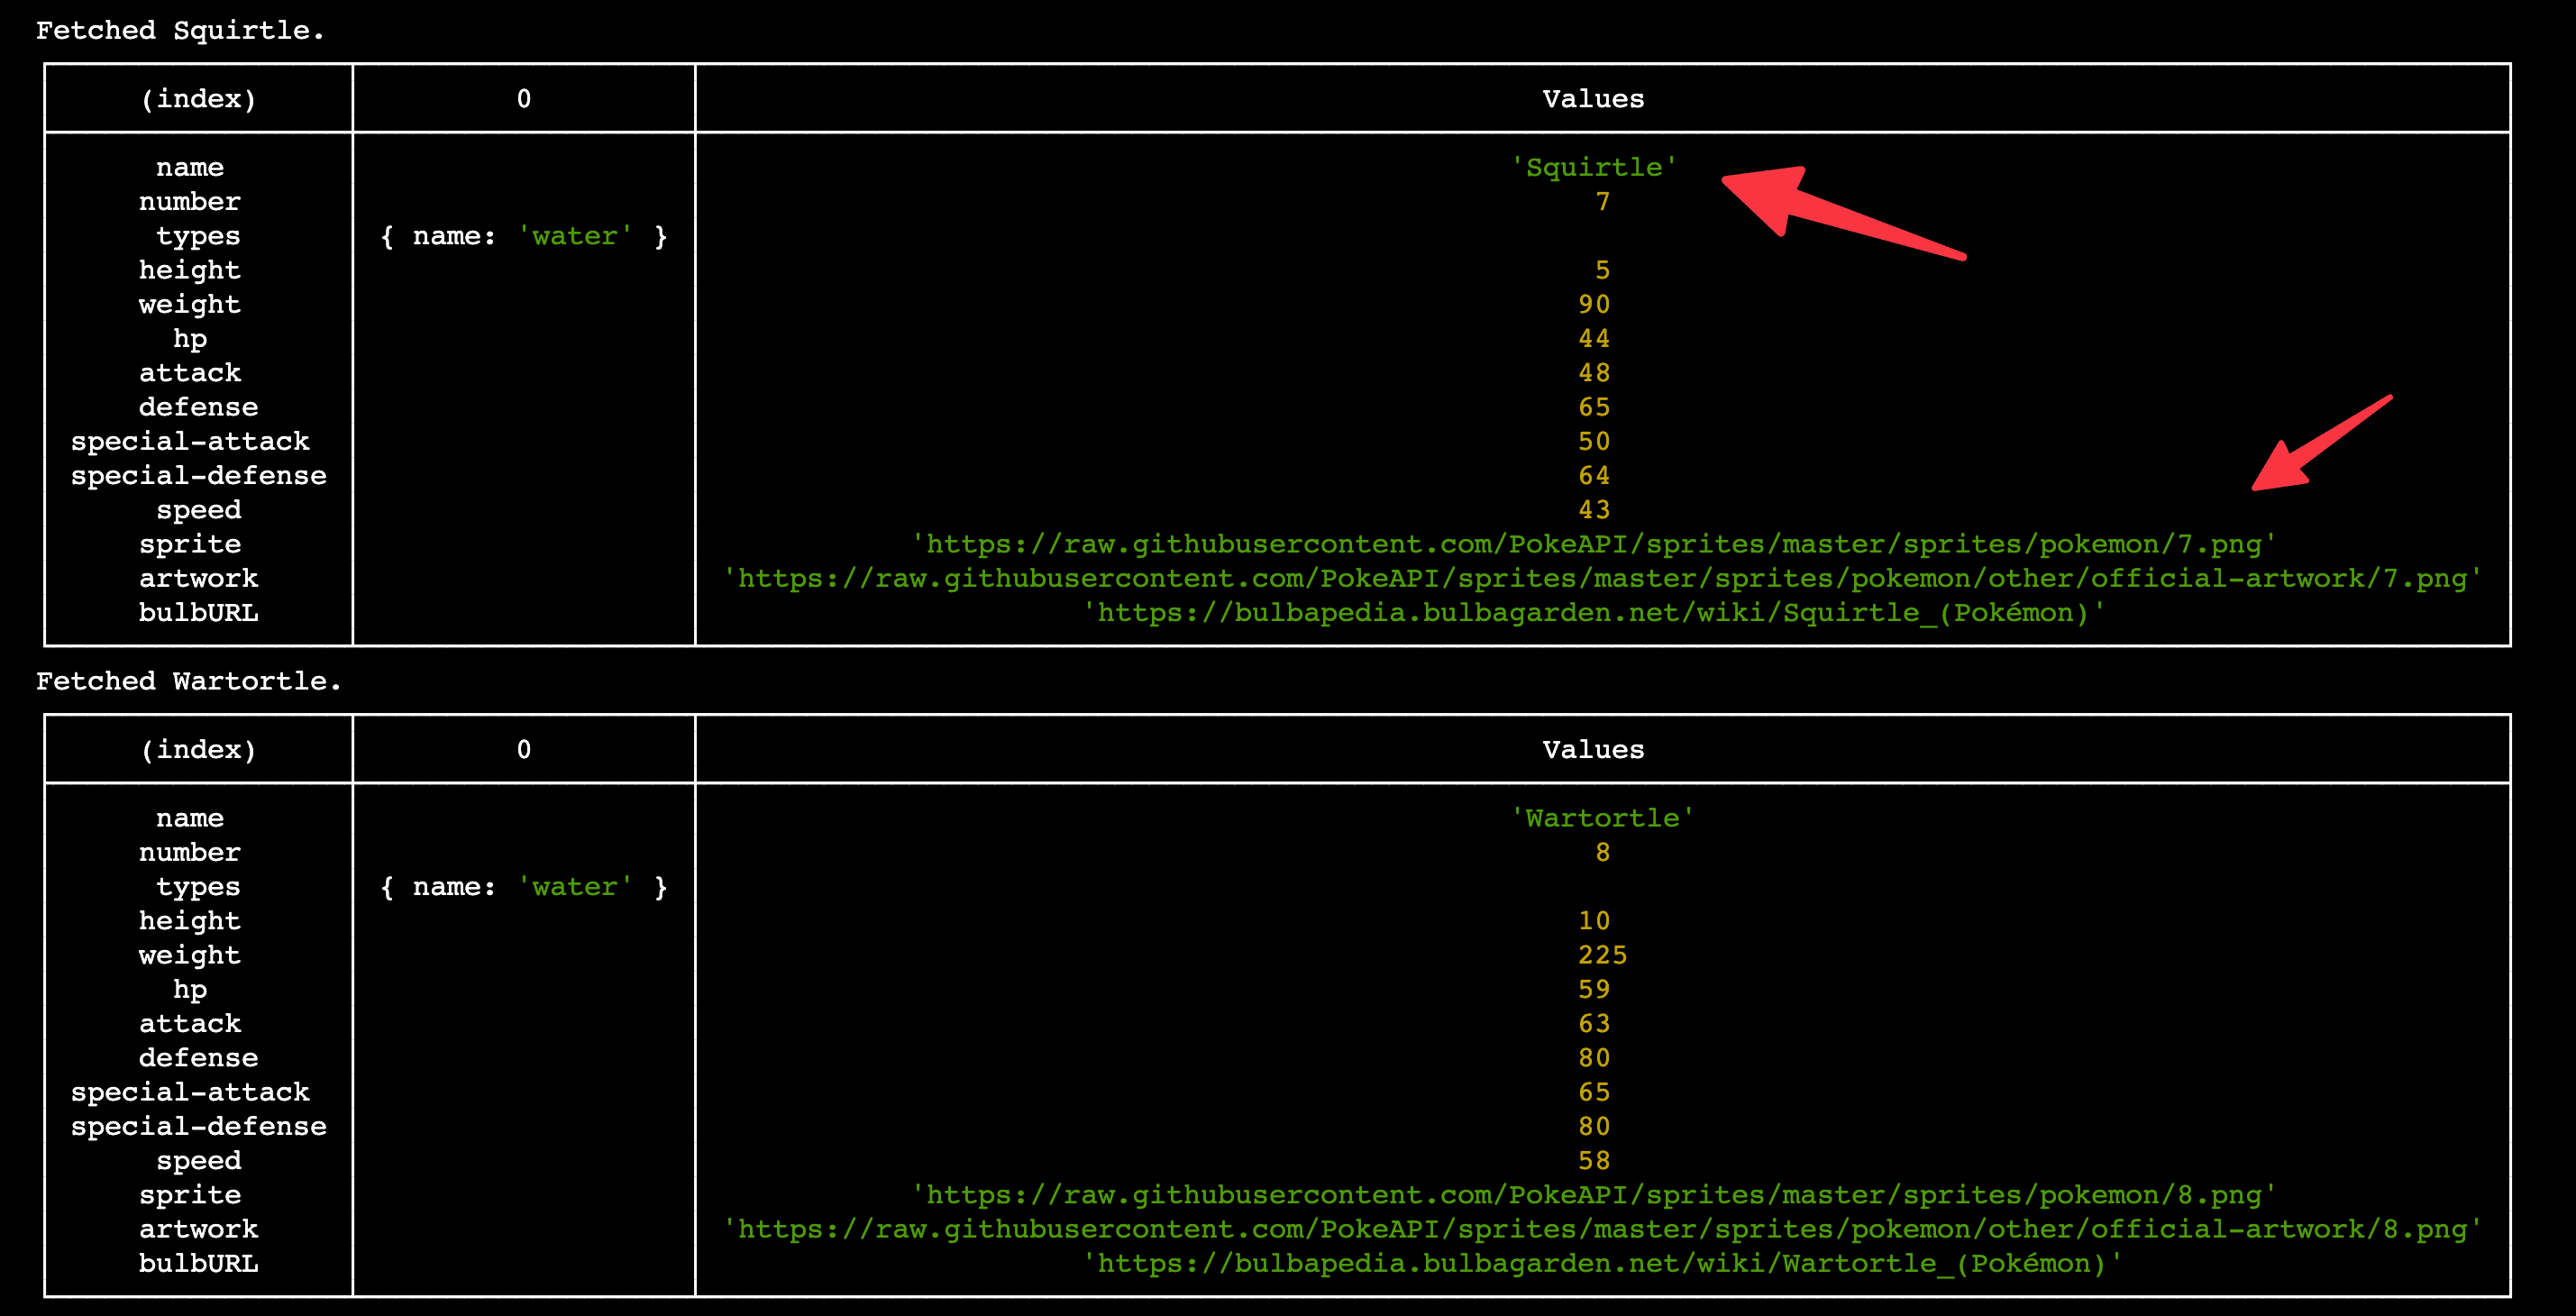
Here, our console.table() reports are now showing our nicely-formatted Pokémon names. We can also see the URLs for the sprite, official artwork, and Bulbapedia page.
At this stage, your code should look just like this. Note how createNotionPage() is commented-out at this point; later, we’ll remove the comment symbols to enable it again.
const axios = require('axios')
const { Client } = require('@notionhq/client')

const notion = new Client({auth: process.env.NOTION_KEY})


const pokeArray = []

async function getPokemon() {

  const start = 1
  const end = 10
  for (let i = start; i <= end; i++) {

    const poke = await axios.get(`https://pokeapi.co/api/v2/pokemon/${i}`)
      .then((poke) => {

        const typesRaw = poke.data.types
        const typesArray = []
        for (let type of typesRaw) {
          const typeObj = {
            "name": type.type.name
          }
          typesArray.push(typeObj)
        }

        const processedName = poke.data.species.name.split(/-/).map((name) => {
          return name[0].toUpperCase() + name.substring(1);
        }).join(" ")
        .replace(/^Mr M/,"Mr. M")
        .replace(/^Mime Jr/,"Mime Jr.")
        .replace(/^Mr R/,"Mr. R")
        .replace(/mo O/,"mo-o")
        .replace(/Porygon Z/,"Porygon-Z")
        .replace(/Type Null/, "Type: Null")
        .replace(/Ho Oh/,"Ho-Oh")
        .replace(/Nidoran F/,"Nidoran♀")
        .replace(/Nidoran M/,"Nidoran♂")
        .replace(/Flabebe/,"Flabébé")

        const bulbURL = `https://bulbapedia.bulbagarden.net/wiki/${processedName.replace(' ', '_')}_(Pokémon)`

        const sprite = (!poke.data.sprites.front_default) ? poke.data.sprites.other['official-artwork'].front_default : poke.data.sprites.front_default

        const pokeData = {
          "name": processedName,
          "number": poke.data.id,
          "types": typesArray,
          "height": poke.data.height,
          "weight": poke.data.weight,
          "hp": poke.data.stats[0].base_stat,
          "attack": poke.data.stats[1].base_stat,
          "defense": poke.data.stats[2].base_stat,
          "special-attack": poke.data.stats[3].base_stat,
          "special-defense": poke.data.stats[4].base_stat,
          "speed": poke.data.stats[5].base_stat,
          "sprite": sprite,
          "artwork": poke.data.sprites.other['official-artwork'].front_default,
          "bulbURL": bulbURL
        }

        console.log(`Fetched ${pokeData.name}.`)
        console.table(pokeData)

        pokeArray.push(pokeData)

      })
      .catch((error) => {
        console.log(error)
      })

  }

  // createNotionPage()

}

getPokemon()

const sleep = (milliseconds) => {
  return new Promise(resolve => setTimeout(resolve, milliseconds))
};

async function createNotionPage() {

  for (let pokemon of pokeArray) {

    const data = {
      "parent": {
        "type": "database_id",
        "database_id": process.env.NOTION_DATABASE_ID
      },
      "properties": {
        "Name": {
          "title": [
            {
              "text": {
                "content": pokemon.name
              }
            }
          ]
        },
        "No": {
          "number": pokemon.number
        },
        "Height": { "number": pokemon.height },
        "Weight": { "number": pokemon.weight },
        "HP": { "number": pokemon.hp },
        "Attack": { "number": pokemon.attack },
        "Defense": { "number": pokemon.defense },
        "Sp. Attack": { "number": pokemon['special-attack'] },
        "Sp. Defense": { "number": pokemon['special-defense'] },
        "Speed": { "number": pokemon.speed }
      }
    }

    await sleep(300)

    console.log(`Sending ${pokemon.name} to Notion`)
    const response = await notion.pages.create( data )
    console.log(response)

  }

  console.log(`Operation complete.`)

}
Code language: JavaScript (javascript)Get Flavor & Generation Data for Each Pokémon
In the last step, we added quite a lot of new information to our pokeData object definition. However, we’re still missing a few vital pieces – including each Pokémon’s:
- Generation (e.g. Gen I, II, III…)
- Category/Genera (e.g. “Flame Pokémon” or “Dancing Pokémon”)
- Flavor Text
The reason we haven’t gotten these pieces of information up until now is because they’re accessible via a completely different endpoint of PokéAPI: the pokemon-species endpoint. All of our previous information came from the pokemon endpoint.
In fact, PokéAPI has several different endpoints under the “Pokémon” umbrella:
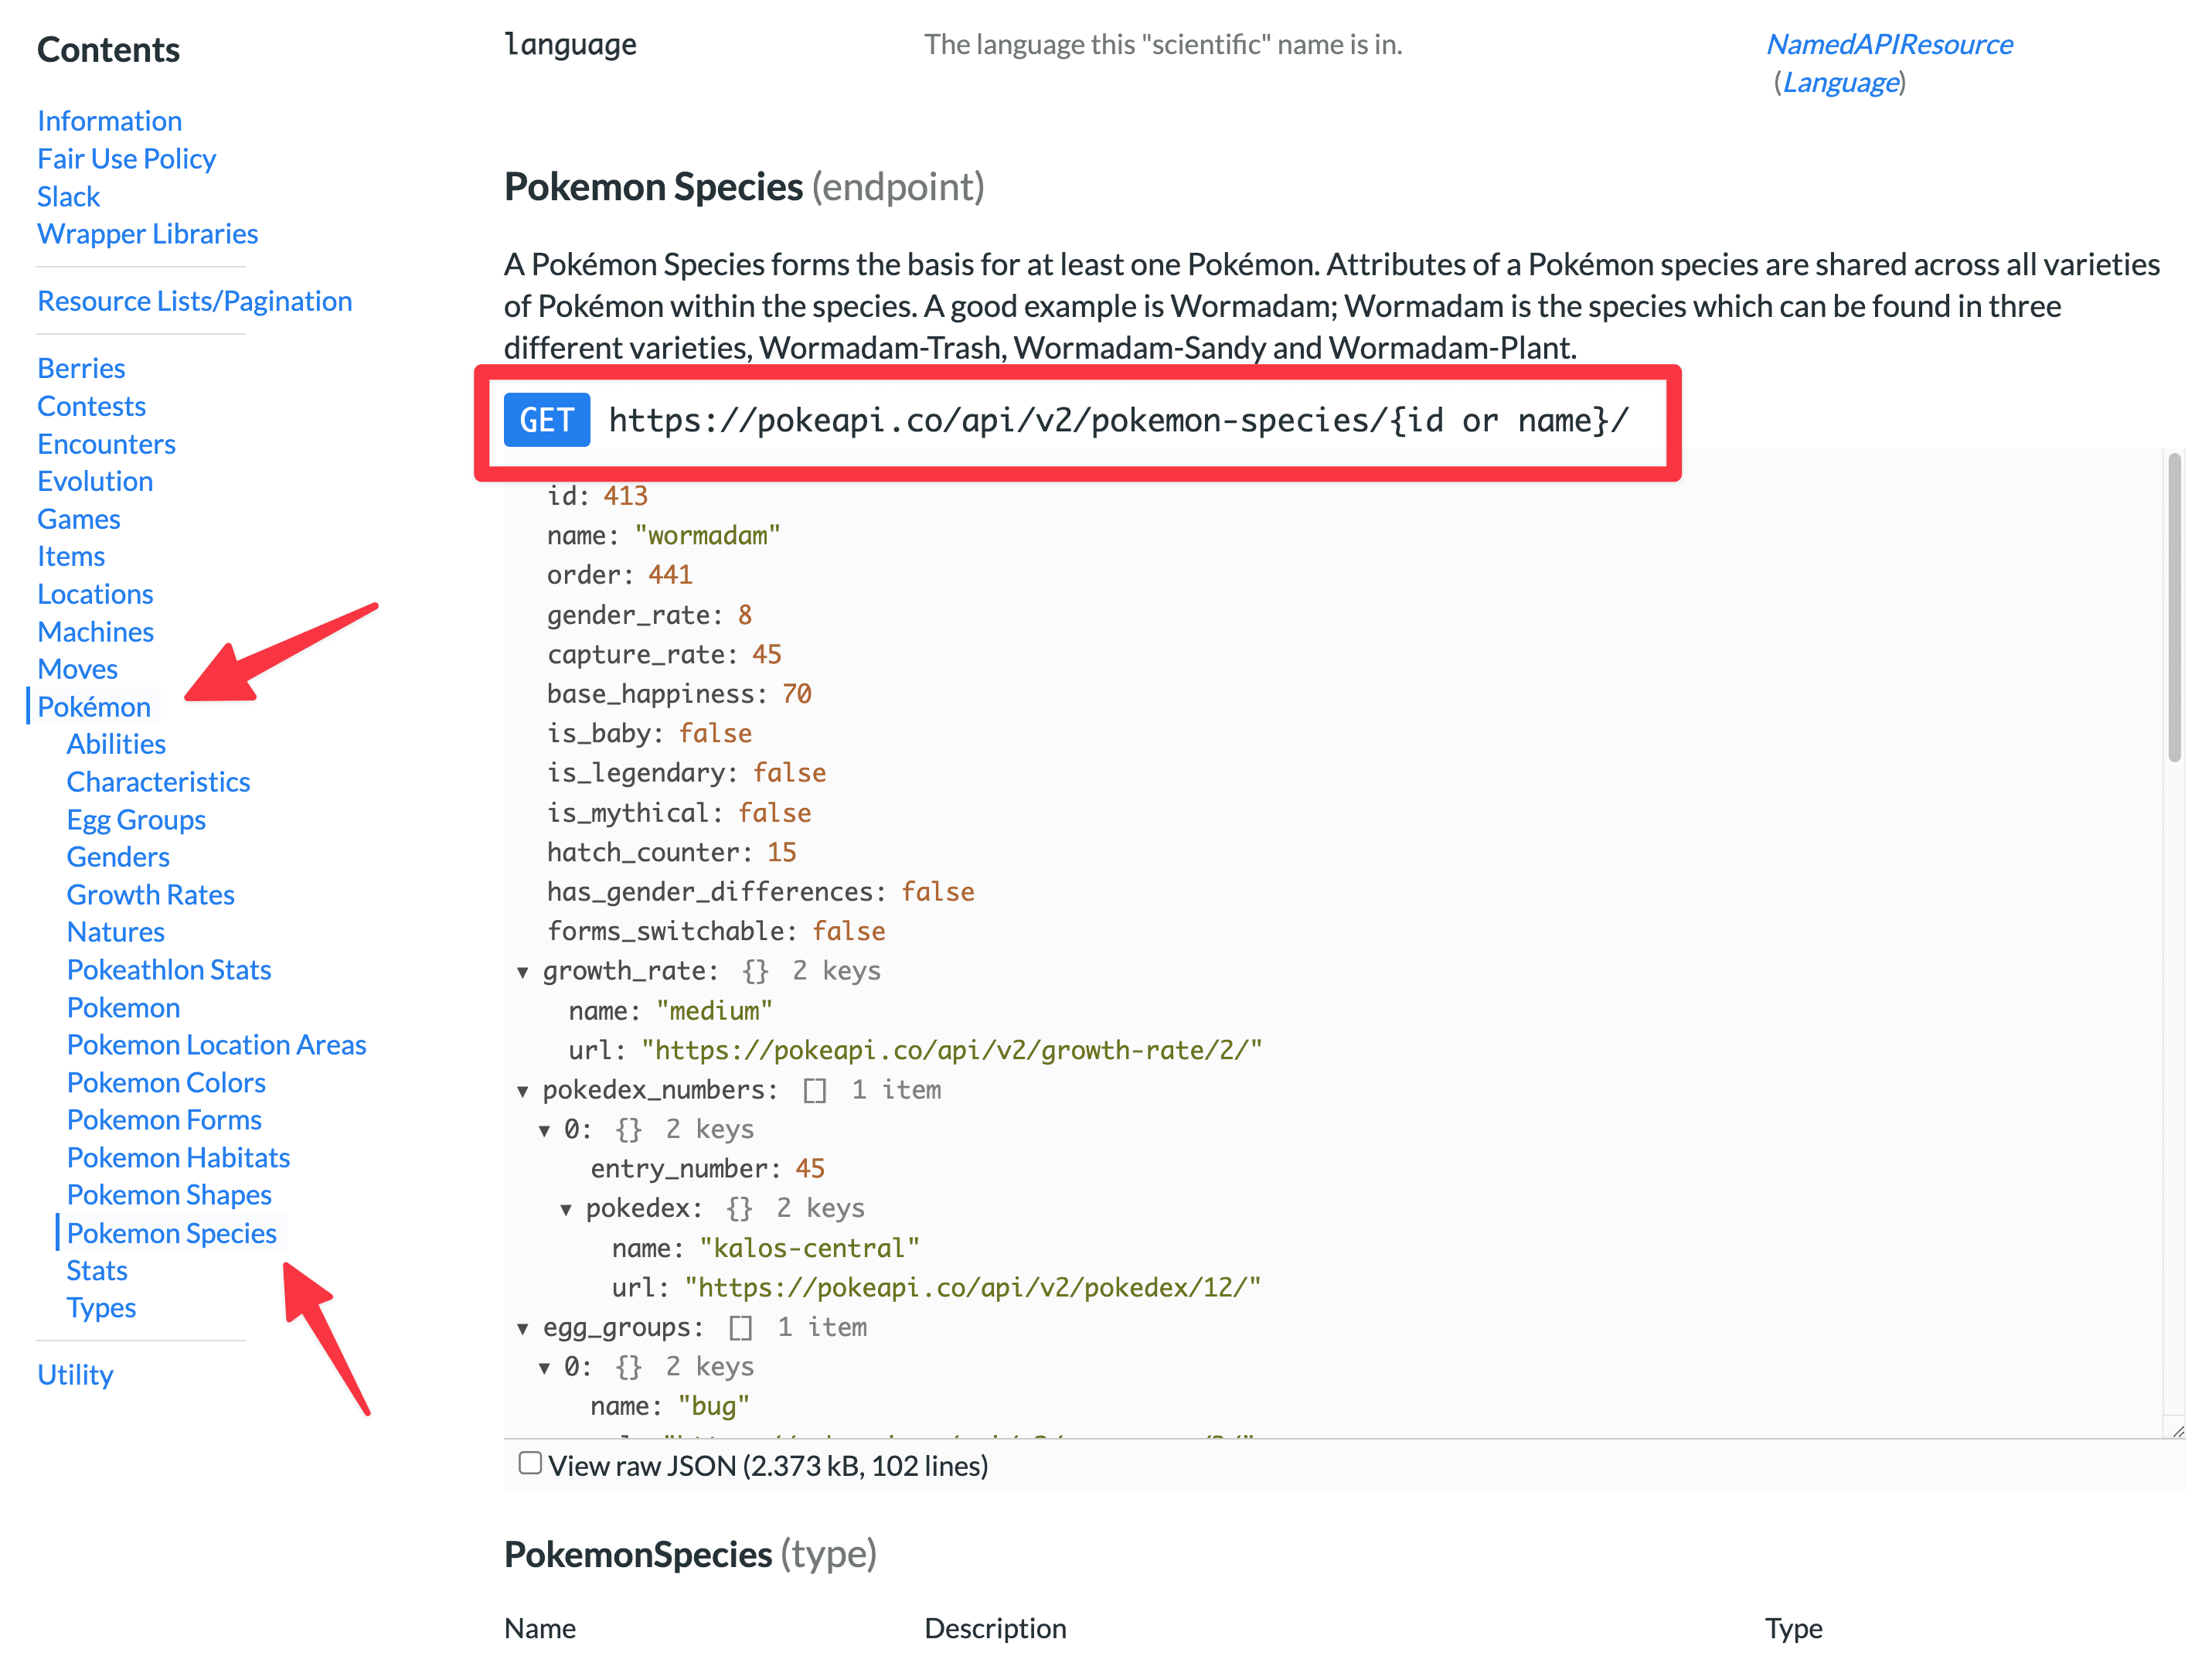
My guess as to why they’ve designed their API this way is to simply cut down on the amount of information that is returned from a single request.
In any case, we need to query the pokemon-species endpoint in order to get these piece of information. To do so, add the following lines to your code, just above your createNotionPage() function call within the getPokemon() function:
      pokeArray.push(pokeData)
    })
    .catch((error) => {
      console.log(error)
    })
  }

  for (let pokemon of pokeArray) {
    const flavor = await axios.get(`https://pokeapi.co/api/v2/pokemon-species/${pokemon.number}`)
      .then((flavor) => {

        const flavorText = flavor.data.flavor_text_entries.find(({language: { name }}) => name === "en").flavor_text.replace(/\n|\f|\r/g, " ")
        const category = flavor.data.genera.find(({language: { name }}) => name === "en").genus
        const generation = flavor.data.generation.name.split(/-/).pop().toUpperCase()

        pokemon['flavor-text'] = flavorText
        pokemon.category = category
        pokemon.generation = generation

        console.log(`Fetched flavor info for ${pokemon.name}.`)
      })
      .catch((error) => {
        console.log(error)
      })
  }

  //createNotionPage();
}
Code language: JavaScript (javascript)
This code sets up a for...of loop, just as we did when we created our createNotionPage() function (click here to jump back to that section if you need a refresher).
Within that loop, we’re using Axios to call the pokemon-species endpoint. Note how we use the pokemon.number property to define the specific URL:
await axios.get(`https://pokeapi.co/api/v2/pokemon-species/${pokemon.number}`)
Code language: JavaScript (javascript)
Since we’re iterating over each element of pokeArray, we’re just taking the number obtained from our previous call to the normal pokemon endpoint.
Once we get the response, we do three things:
- Declare the flavorText, category, and generation variables, setting their values by accessing the relevant information from the API response and formatting it.
- Add new properties to our
pokeDataobject, setting their values using the variables we just declared. - Log the event in the console.
Note that we could easily combine steps #1 and #2 here; we don’t need the interim variables (e.g. flavorText). I’ve only split these steps up to make things clearer.
There’s actually a lot going on here, and the steps we have to take to access and format the data in step #1 here are quite technical. Therefore, I’ll put each of them in a toggle that you can read through if you want.
To fetch and format the flavor text, we use this line of code:
const flavorText = flavor.data.flavor_text_entries.find(({language: { name }}) => name === "en").flavor_text.replace(/\n|\f|\r/g, " ")
Code language: JavaScript (javascript)
We do nearly the exact same thing to get the category, just without the replace() call at the end:
const category = flavor.data.genera.find(({language: { name }}) => name === "en").genus
Code language: JavaScript (javascript)
Here I’ll break down the flavorText variable assignment, but it applies to category as well.
Once again we’re method-chaining here, using these methods:
Here’s the problem we need to solve with flavor text: the pokemon-species endpoint’s response contains an array called flavor_text_entries – which may contain many flavor text objects in different languages.
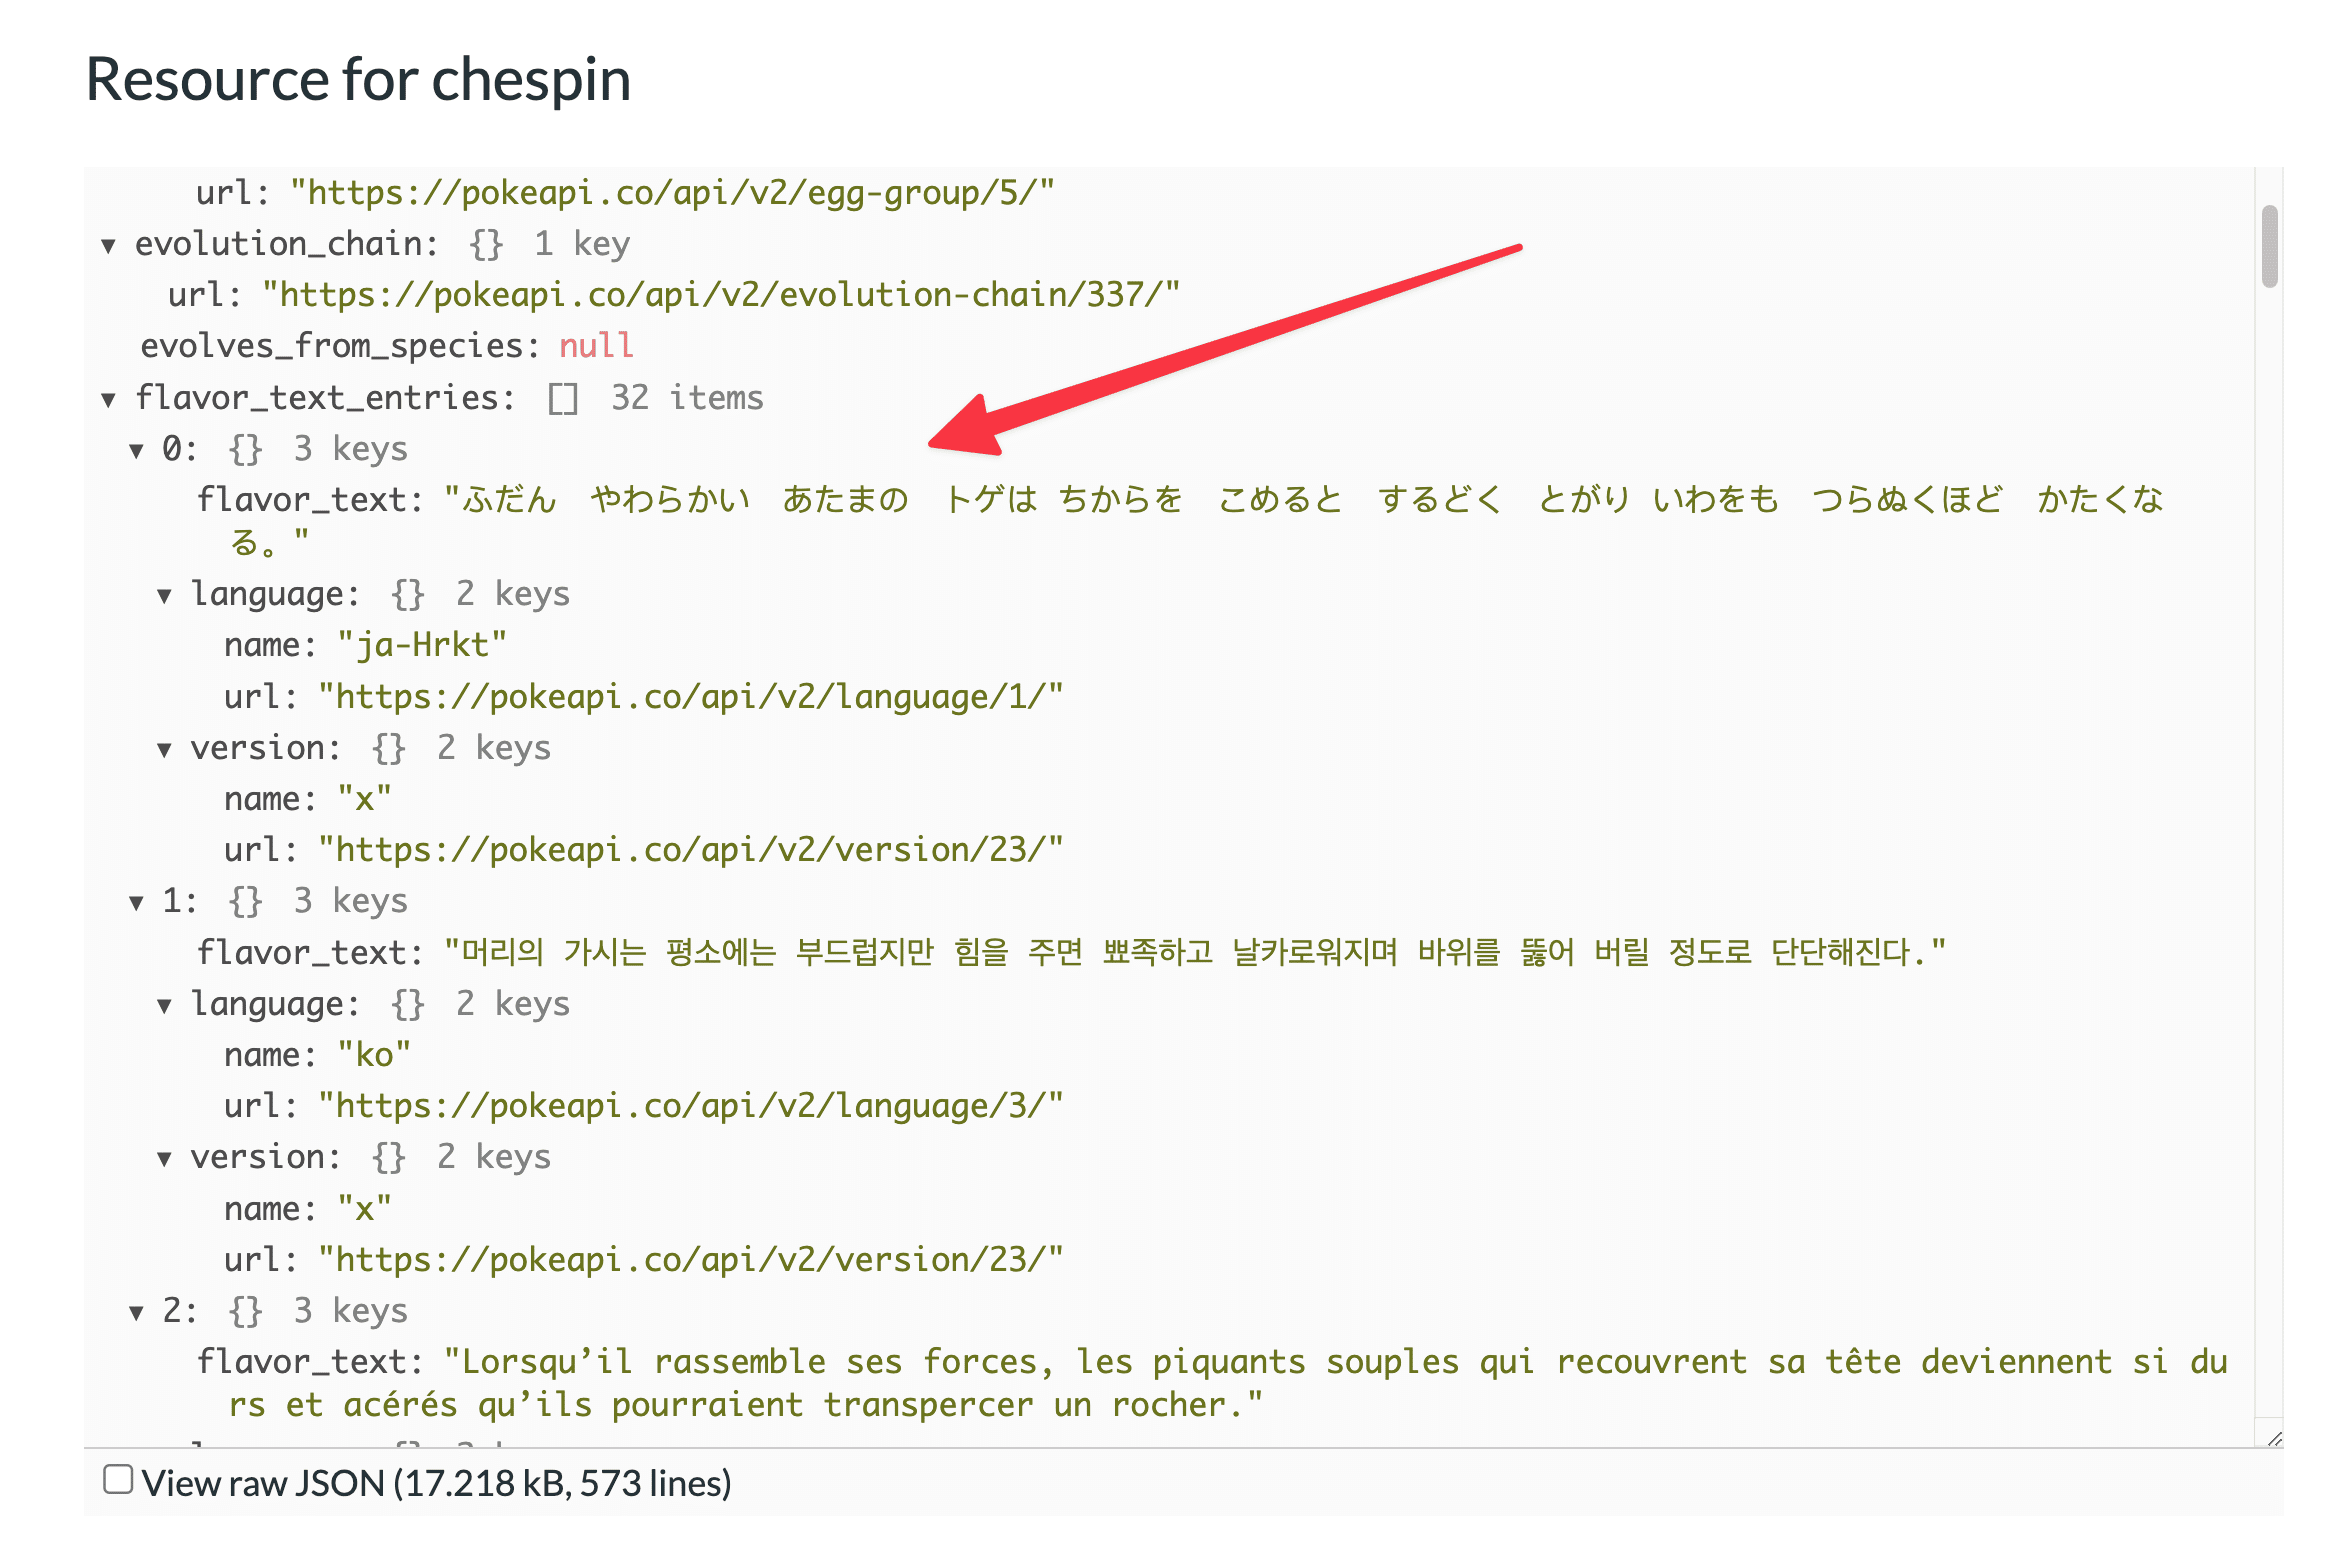
Additionally, the english flavor text is not always at the same index in the array – so we can’t just target a particular index.
Instead, we need to search through each object, find the one where the value of flavor_text_entries[X].language.name equals "en", and then get the flavor_text property from it.
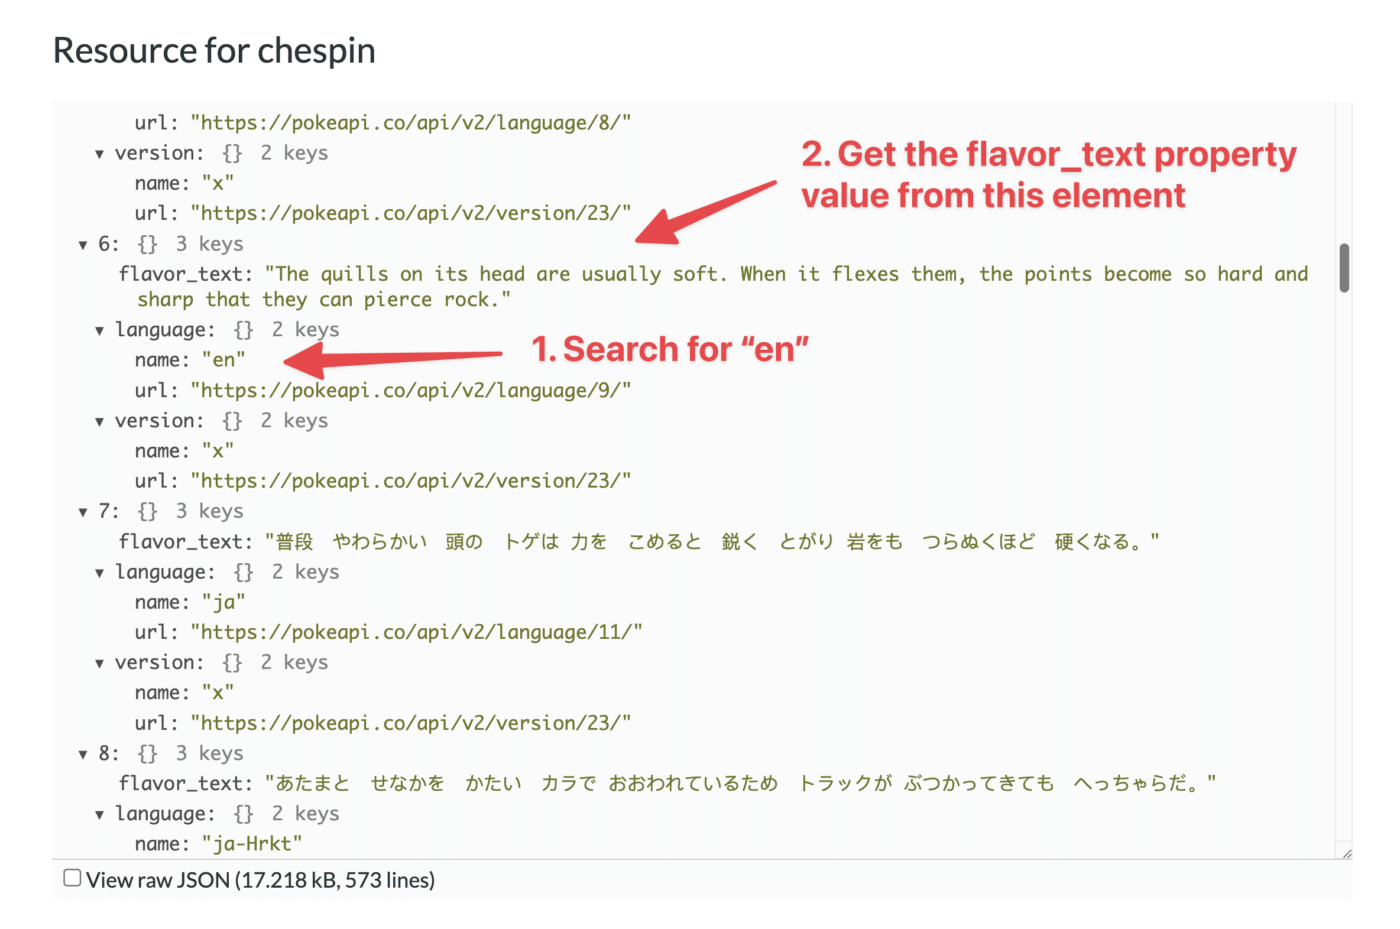
To do this, we use the find() method, which will search through an array and return the first element that satisfies the condition we specify in a testing function.
To make this clearer, let’s look at a simple Replit app that just uses find() to return the flavor_text entry from the array element that contains the English text.
In our test function, we’re doing something called nested object destructuring. This will make sense more readily if you understand destructuring in general:
Once you understand destructuring, you can dig into nested object destructuring:

The gist, though, is that instead of setting the entire object we’re currently iterating over as the argument in our test function, we’re “digging into” that object and setting only the nested name property as the argument instead.
From there, find() iterates over each element in the flavor_text_entries array until it finds the one where that nested name property’s value is "en".
Since the matched array element is the return value, we can simply access its flavor_text property (end of this line):
const flavorText = flavor.data.flavor_text_entries.find(({language: { name }}) => name === "en").flavor_text
Code language: JavaScript (javascript)
Unfortunately, this flavor text often contains lots of newline characters that make the text look very wonky. To deal with that, we finish our method chain with a replace() call:
replace(/\n|\f|\r/g, " ")
Code language: JavaScript (javascript)
Here, I’m using a regular expression to replace every instance of a newline character (typically these will be \n, but they can also be \f or \r) with a space character.
Here’s how that works:
- The
/characters define the beginning and end of the regular expression to be matched \n,\f, and\rare all the possible “newline” characters that will cause a line break in a string- The
|character means “or” - Finally, the
gflag means “match every instance of this expression, not just the first one
Regular expressions are a whole subject unto themselves, but if you want to learn them, start here:

You can find more regular expression resources at the Regex guide in my Notion Formula Reference:

Getting and formatting the generation is easier than getting the flavor text and category. We use this code:
const generation = flavor.data.generation.name.split(/-/).pop().toUpperCase()
Code language: JavaScript (javascript)
Here we’re fetching the generation, which PokéAPI formats like so: generation-vi.
We want a simple Roman numeral, like VI. We also want it capitalized. To do that, we go through this process:
- split() to split the string into array elements, using the
-character as our separator - pop() to remove the last element of the returned array and (more importantly) return it
- toUpperCase() to fully capitalize that returned element
Once we have those variables set, we simply create new properties in the current pokemon object (defined earlier by the pokeData definition, then represented as pokemon via the for...of loop definition):
pokemon['flavor-text'] = flavorText
pokemon.category = category
pokemon.generation = generation
Code language: JavaScript (javascript)
As you can see, all we have to do is create the new property with either dot notation or bracket notation, depending on the characters in its name. Read more on this here:

At this stage, your code should look just like this. Note how createNotionPage() is still commented out.
const axios = require('axios')
const { Client } = require('@notionhq/client')

const notion = new Client({auth: process.env.NOTION_KEY})


const pokeArray = []

async function getPokemon() {

  const start = 1
  const end = 10
  for (let i = start; i <= end; i++) {

    const poke = await axios.get(`https://pokeapi.co/api/v2/pokemon/${i}`)
      .then((poke) => {

        const typesRaw = poke.data.types
        const typesArray = []
        for (let type of typesRaw) {
          const typeObj = {
            "name": type.type.name
          }
          typesArray.push(typeObj)
        }

        const processedName = poke.data.species.name.split(/-/).map((name) => {
          return name[0].toUpperCase() + name.substring(1);
        }).join(" ")
        .replace(/^Mr M/,"Mr. M")
        .replace(/^Mime Jr/,"Mime Jr.")
        .replace(/^Mr R/,"Mr. R")
        .replace(/mo O/,"mo-o")
        .replace(/Porygon Z/,"Porygon-Z")
        .replace(/Type Null/, "Type: Null")
        .replace(/Ho Oh/,"Ho-Oh")
        .replace(/Nidoran F/,"Nidoran♀")
        .replace(/Nidoran M/,"Nidoran♂")
        .replace(/Flabebe/,"Flabébé")

        const bulbURL = `https://bulbapedia.bulbagarden.net/wiki/${processedName.replace(' ', '_')}_(Pokémon)`

        const sprite = (!poke.data.sprites.front_default) ? poke.data.sprites.other['official-artwork'].front_default : poke.data.sprites.front_default

        const pokeData = {
          "name": processedName,
          "number": poke.data.id,
          "types": typesArray,
          "height": poke.data.height,
          "weight": poke.data.weight,
          "hp": poke.data.stats[0].base_stat,
          "attack": poke.data.stats[1].base_stat,
          "defense": poke.data.stats[2].base_stat,
          "special-attack": poke.data.stats[3].base_stat,
          "special-defense": poke.data.stats[4].base_stat,
          "speed": poke.data.stats[5].base_stat,
          "sprite": sprite,
          "artwork": poke.data.sprites.other['official-artwork'].front_default,
          "bulbURL": bulbURL
        }

        console.log(`Fetched ${pokeData.name}.`)
        console.table(pokeData)

        pokeArray.push(pokeData)

      })
      .catch((error) => {
        console.log(error)
      })

  }

    for (let pokemon of pokeArray) {
      const flavor = await axios.get(`https://pokeapi.co/api/v2/pokemon-species/${pokemon.number}`)
        .then((flavor) => {

          const flavorText = flavor.data.flavor_text_entries.find(({language: { name }}) => name === "en").flavor_text.replace(/\n|\f|\r/g, " ")
          const category = flavor.data.genera.find(({language: { name }}) => name === "en").genus
          const generation = flavor.data.generation.name.split(/-/).pop().toUpperCase()

          pokemon['flavor-text'] = flavorText
          pokemon.category = category
          pokemon.generation = generation

          console.log(`Fetched flavor info for ${pokemon.name}.`)
        })
        .catch((error) => {
          console.log(error)
        })
    }

  // createNotionPage()

}

getPokemon()

const sleep = (milliseconds) => {
  return new Promise(resolve => setTimeout(resolve, milliseconds))
};

async function createNotionPage() {

  for (let pokemon of pokeArray) {

    const data = {
      "parent": {
        "type": "database_id",
        "database_id": process.env.NOTION_DATABASE_ID
      },
      "properties": {
        "Name": {
          "title": [
            {
              "text": {
                "content": pokemon.name
              }
            }
          ]
        },
        "No": {
          "number": pokemon.number
        },
        "Height": { "number": pokemon.height },
        "Weight": { "number": pokemon.weight },
        "HP": { "number": pokemon.hp },
        "Attack": { "number": pokemon.attack },
        "Defense": { "number": pokemon.defense },
        "Sp. Attack": { "number": pokemon['special-attack'] },
        "Sp. Defense": { "number": pokemon['special-defense'] },
        "Speed": { "number": pokemon.speed }
      }
    }

    await sleep(300)

    console.log(`Sending ${pokemon.name} to Notion`)
    const response = await notion.pages.create( data )
    console.log(response)

  }

  console.log(`Operation complete.`)

}
Code language: JavaScript (javascript)Add New Data to the Notion API Call
We’re at the last code step! All we need to do now is modify the data object definition within our createNotionPage() function, adding the new pieces of information that we’ve fetched (generation, types, flavor text, art, etc.).
Add the highlighted code to your data object definition:
async function createNotionPage() {
  for (let pokemon of pokeArray) {

    const data = {
      "parent": {
        "type": "database_id",
        "database_id": process.env.NOTION_DATABASE_ID
      },
      "icon": {
        "type": "external",
        "external": {
          "url": pokemon.sprite
        }
      },
      "cover": {
        "type": "external",
        "external": {
          "url": pokemon.artwork
        }
      },
      "properties": {
        "Name": {
          "title": [
            {
              "text": {
                "content": pokemon.name
              }
            }
          ]
        },
        "Category": {
          "rich_text": [
            {
              "type": "text",
              "text": {
                "content": pokemon.category
              }
            }
          ]
        },
        "No": {
          "number": pokemon.number
        },
        "Type": {
          "multi_select": pokemon.types
        },
        "Generation": {
          "select": {
            "name": pokemon.generation
          }
        },
        "Sprite": {
          "files": [
            {
              "type": "external",
              "name": "Pokemon Sprite",
              "external": {
                "url": pokemon.sprite
              }
            }
          ]
        },
        "Height": { "number": pokemon.height },
        "Weight": { "number": pokemon.weight },
        "HP": { "number": pokemon.hp },
        "Attack": { "number": pokemon.attack },
        "Defense": { "number": pokemon.defense },
        "Sp. Attack": { "number": pokemon['special-attack'] },
        "Sp. Defense": { "number": pokemon['special-defense'] },
        "Speed": { "number": pokemon.speed }
      },
      "children": [
        {
          "object": "block",
          "type": "quote",
          "quote": {
            "rich_text": [
              {
                "type": "text",
                "text": {
                  "content": pokemon['flavor-text']
                }
              }
            ]
          }
        },
        {
          "object": "block",
          "type": "paragraph",
          "paragraph": {
            "rich_text": [
              {
                "type": "text",
                "text": {
                  "content": ""
                }
              }
            ]
          }
        },
        {
          "object": "block",
          "type": "paragraph",
          "paragraph": {
            "rich_text": [
              {
                "type": "text",
                "text": {
                  "content": "View This Pokémon's Entry on Bulbapedia:"
                }
              }
            ]
          }
        },
        {
          "object": "block",
          "type": "bookmark",
          "bookmark": {
            "url": pokemon.bulbURL
          }
        }
      ]
    }
Code language: JavaScript (javascript)
In addition to the additions and changes highlighted above, be sure to add commas after the closing } symbols where needed.
For example:
"properties": {
    "Name": {
      "title": [
        {
          "text": {
            "content": pokemon.name
          }
        }
      ]
    },
    "Category": {
      "rich_text": [
        {
          "type": "text",
          "text": {
            "content": pokemon.category
          }
        }
      ]
    },
    "No": {
      "number": pokemon.number
    },
Code language: JavaScript (javascript)
When defining JavaScript objects or writing JSON, sequential properties must be separated by commas as shown above. If you run into errors when trying to run your code, be sure to check for missing commas. I’ve missed plenty of them in my code before.
In this step, we add the following information:
- Page Icon (Using the sprite)
- Page Cover (Using the official artwork)
- Properties:
- Category (rich text)
- Type (multi-select)
- Generation (select)
- Sprite (file)
- Child blocks (i.e. page content)
- Flavor text (quote block)
- A blank space (text block – for formatting/aesthetics)
- “View This Pokémon’s Entry on Bulbapedia:” (text block)
- Bulbapedia URL (bookmark block)
We’ve already covered objects quite heavily in this guide, so I won’t spend too much time explaining each addition here. Instead, I’ll point you to the relevant pages in the Notion API reference that explain them.
To learn how to set the page icon and page cover, refer to the example code shown on the Create a Page reference:
Note that images cannot be uploaded to Notion via the API at this time, so you must link to an image hosted externally (as we’re doing here).
For the properties, you can currently see how to format your objects when creating and updating pages here:
In the near future, all of this information will be consolidated into the Page Property Values page, which is linked in the reference’s sidebar.
To add child blocks/page content, refer to the example code in the Create a Page reference linked above.
You can also use the Append Block Children reference to learn how to add new blocks to existing pages and blocks (remember, pages are blocks themselves!):
At this stage, your code should look just like this. Note how createNotionPage() is still commented out. In the next step, we’re remove the // symbols and re-enable that function call.
const axios = require('axios')
const { Client } = require('@notionhq/client')

const notion = new Client({auth: process.env.NOTION_KEY})


const pokeArray = []

async function getPokemon() {

  const start = 1
  const end = 10
  for (let i = start; i <= end; i++) {

    const poke = await axios.get(`https://pokeapi.co/api/v2/pokemon/${i}`)
      .then((poke) => {

        const typesRaw = poke.data.types
        const typesArray = []
        for (let type of typesRaw) {
          const typeObj = {
            "name": type.type.name
          }
          typesArray.push(typeObj)
        }

        const processedName = poke.data.species.name.split(/-/).map((name) => {
          return name[0].toUpperCase() + name.substring(1);
        }).join(" ")
        .replace(/^Mr M/,"Mr. M")
        .replace(/^Mime Jr/,"Mime Jr.")
        .replace(/^Mr R/,"Mr. R")
        .replace(/mo O/,"mo-o")
        .replace(/Porygon Z/,"Porygon-Z")
        .replace(/Type Null/, "Type: Null")
        .replace(/Ho Oh/,"Ho-Oh")
        .replace(/Nidoran F/,"Nidoran♀")
        .replace(/Nidoran M/,"Nidoran♂")
        .replace(/Flabebe/,"Flabébé")

        const bulbURL = `https://bulbapedia.bulbagarden.net/wiki/${processedName.replace(' ', '_')}_(Pokémon)`

        const sprite = (!poke.data.sprites.front_default) ? poke.data.sprites.other['official-artwork'].front_default : poke.data.sprites.front_default

        const pokeData = {
          "name": processedName,
          "number": poke.data.id,
          "types": typesArray,
          "height": poke.data.height,
          "weight": poke.data.weight,
          "hp": poke.data.stats[0].base_stat,
          "attack": poke.data.stats[1].base_stat,
          "defense": poke.data.stats[2].base_stat,
          "special-attack": poke.data.stats[3].base_stat,
          "special-defense": poke.data.stats[4].base_stat,
          "speed": poke.data.stats[5].base_stat,
          "sprite": sprite,
          "artwork": poke.data.sprites.other['official-artwork'].front_default,
          "bulbURL": bulbURL
        }

        console.log(`Fetched ${pokeData.name}.`)
        console.table(pokeData)

        pokeArray.push(pokeData)

      })
      .catch((error) => {
        console.log(error)
      })

  }

    for (let pokemon of pokeArray) {
      const flavor = await axios.get(`https://pokeapi.co/api/v2/pokemon-species/${pokemon.number}`)
        .then((flavor) => {

          const flavorText = flavor.data.flavor_text_entries.find(({language: { name }}) => name === "en").flavor_text.replace(/\n|\f|\r/g, " ")
          const category = flavor.data.genera.find(({language: { name }}) => name === "en").genus
          const generation = flavor.data.generation.name.split(/-/).pop().toUpperCase()

          pokemon['flavor-text'] = flavorText
          pokemon.category = category
          pokemon.generation = generation

          console.log(`Fetched flavor info for ${pokemon.name}.`)
        })
        .catch((error) => {
          console.log(error)
        })
    }

  // createNotionPage()

}

getPokemon()

const sleep = (milliseconds) => {
  return new Promise(resolve => setTimeout(resolve, milliseconds))
};

async function createNotionPage() {

  for (let pokemon of pokeArray) {

    const data = {
      "parent": {
        "type": "database_id",
        "database_id": process.env.NOTION_DATABASE_ID
      },
      "icon": {
        "type": "external",
        "external": {
          "url": pokemon.sprite
        }
      },
      "cover": {
        "type": "external",
        "external": {
          "url": pokemon.artwork
        }
      },
      "properties": {
        "Name": {
          "title": [
            {
              "text": {
                "content": pokemon.name
              }
            }
          ]
        },
        "Category": {
          "rich_text": [
            {
              "type": "text",
              "text": {
                "content": pokemon.category
              }
            }
          ]
        },
        "No": {
          "number": pokemon.number
        },
        "Type": {
          "multi_select": pokemon.types
        },
        "Generation": {
          "select": {
            "name": pokemon.generation
          }
        },
        "Sprite": {
          "files": [
            {
              "type": "external",
              "name": "Pokemon Sprite",
              "external": {
                "url": pokemon.sprite
              }
            }
          ]
        },
        "Height": { "number": pokemon.height },
        "Weight": { "number": pokemon.weight },
        "HP": { "number": pokemon.hp },
        "Attack": { "number": pokemon.attack },
        "Defense": { "number": pokemon.defense },
        "Sp. Attack": { "number": pokemon['special-attack'] },
        "Sp. Defense": { "number": pokemon['special-defense'] },
        "Speed": { "number": pokemon.speed }
      },
      "children": [
        {
          "object": "block",
          "type": "quote",
          "quote": {
            "rich_text": [
              {
                "type": "text",
                "text": {
                  "content": pokemon['flavor-text']
                }
              }
            ]
          }
        },
        {
          "object": "block",
          "type": "paragraph",
          "paragraph": {
            "rich_text": [
              {
                "type": "text",
                "text": {
                  "content": ""
                }
              }
            ]
          }
        },
        {
          "object": "block",
          "type": "paragraph",
          "paragraph": {
            "rich_text": [
              {
                "type": "text",
                "text": {
                  "content": "View This Pokémon's Entry on Bulbapedia:"
                }
              }
            ]
          }
        },
        {
          "object": "block",
          "type": "bookmark",
          "bookmark": {
            "url": pokemon.bulbURL
          }
        }
      ]
    }

    await sleep(300)

    console.log(`Sending ${pokemon.name} to Notion`)
    const response = await notion.pages.create( data )
    console.log(response)

  }

  console.log(`Operation complete.`)

}
Code language: JavaScript (javascript)Run Your Final Test
It’s time to actually run your script!
Before you do, go into your code and “un-comment” the createNotionPage() function call at the end of your getPokemon() function:
          console.log(`Fetched flavor info for ${pokemon.name}.`)
        })
        .catch((error) => {
          console.log(error)
        })
    }

  createNotionPage()

}

getPokemon()
Code language: JavaScript (javascript)
This will ensure the createNotionPage() function is actually called, and that your pages get created in your Notion database.
Now it’s time for the moment of truth. Run node index.js in your terminal one more time; if all goes well, you should see these full-featured entries flooding into your Pokédex:
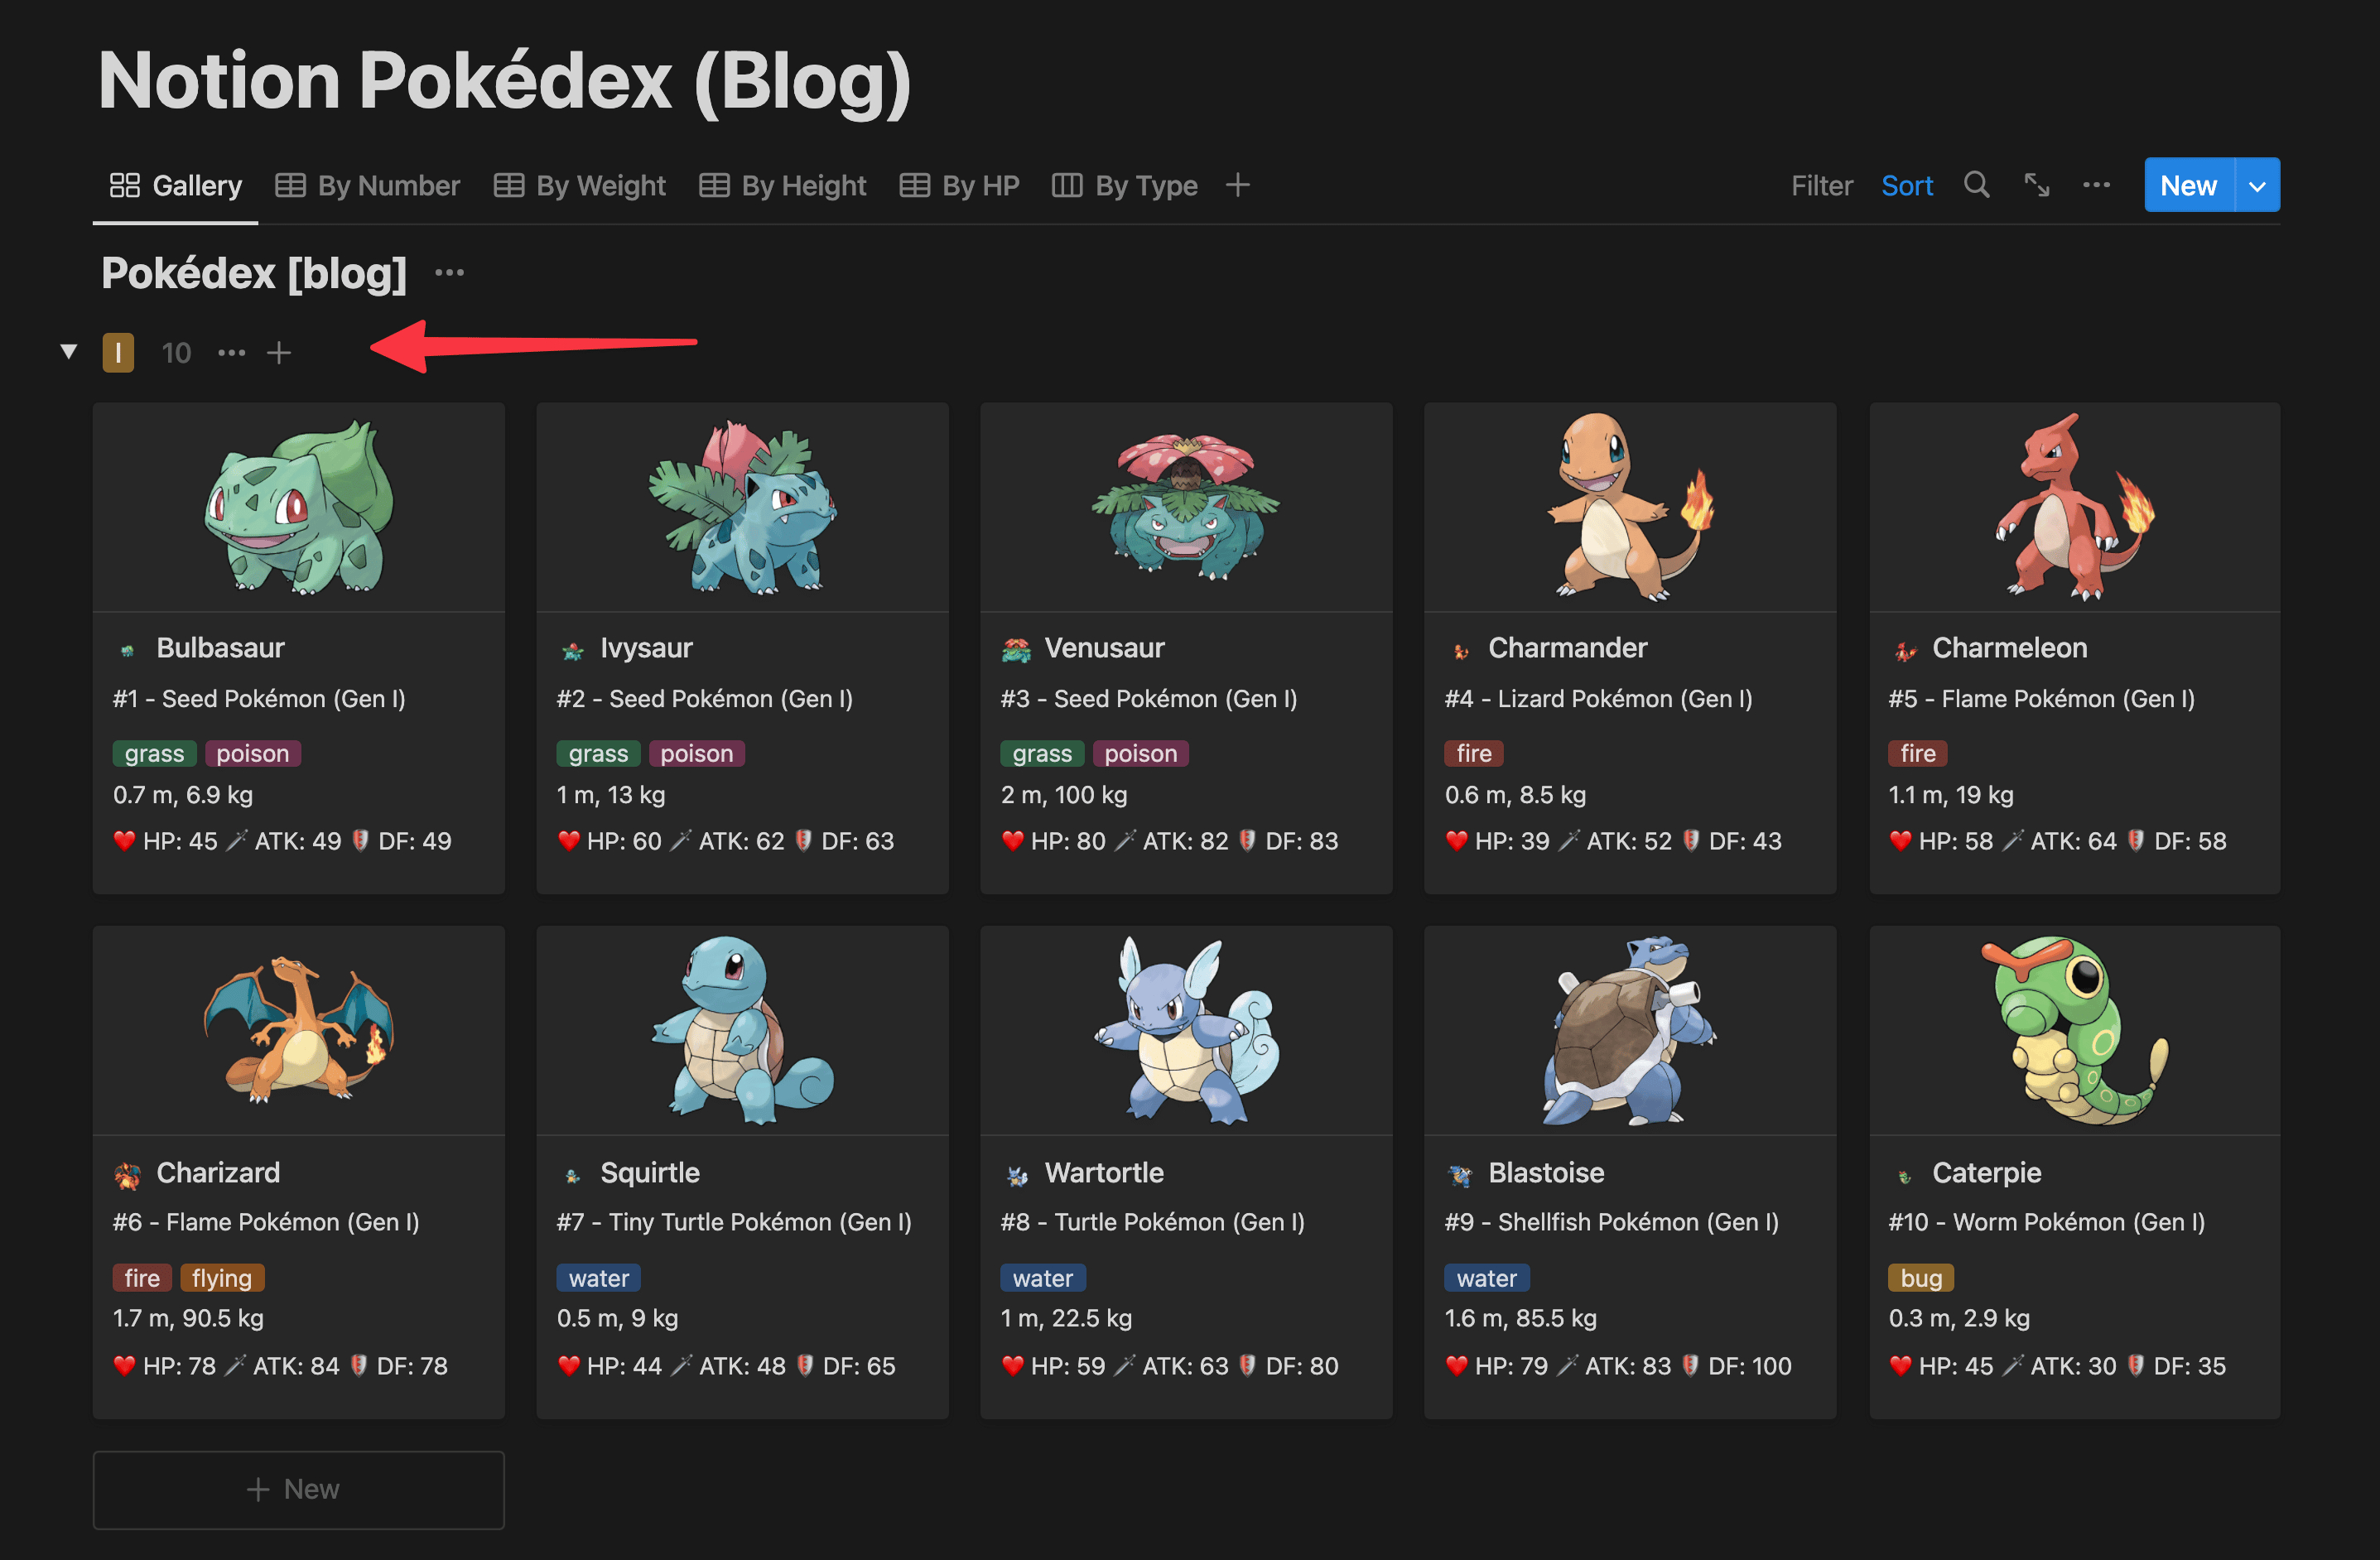
Since we also set up the Generation information, you’ll also get them neatly grouped under the I group!
If you click into each page, you should also see the flavor text and Bulbapedia link:
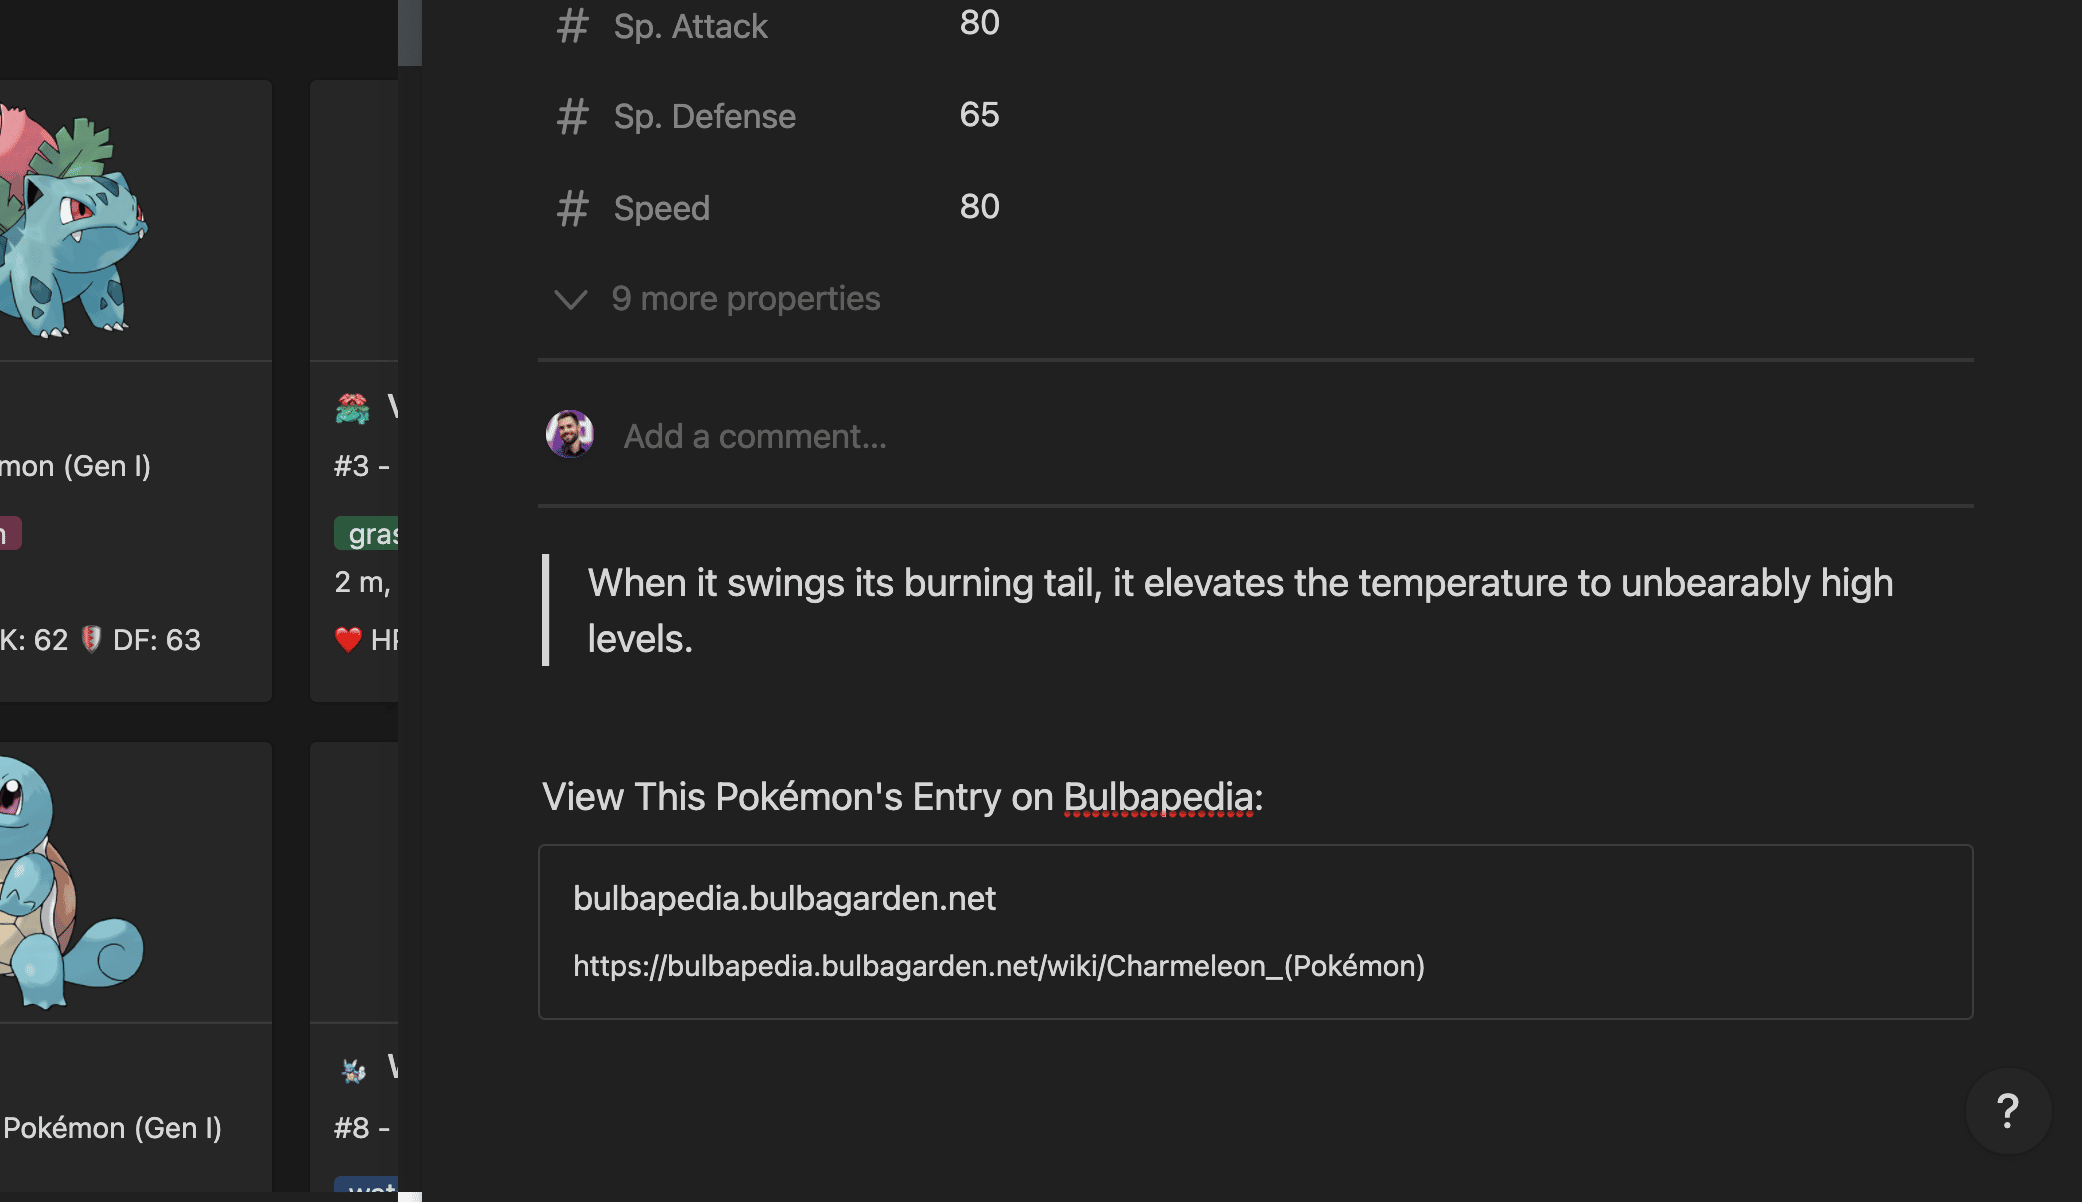
If everything looks good, then you can modify your start and end variables in order to fetch more Pokémon. You already have #1-#10, so now you can set:
start = 11end = 905
As of this writing, PokéAPI has not yet added flavor text, category, or generation information for Pokémon #906-#1,008 (those releases with Scarlet and Violet).
Therefore, this script will work flawlessly for all Pokémon up to #905.
If you’d like to add the newer Pokémon, you can see “default” values in the data object definition, as shown below. I found that I needed to do this for Category, Flavor Text, and Generation.
"Category": {
  "rich_text": [
    {
      "type": "text",
      "text": {
        "content": pokemon.category || "No Category Information"
      }
    }
  ]
}
Code language: JavaScript (javascript)
There are more elegant ways to handle this, but I’ll leave them as an exercise for you to tackle if you’re so inclined!
Once you’re modified those variables and ran the script again, you’ll be the proud owner of a full Pokédex in your Notion workspace.
Copy link to headingConclusion
If you’ve followed this tutorial, you hopefully now have a strong grasp on how to work with the Notion API using JavaScript.
What you’ll quickly learn if you start working with other APIs is… you also know how to work with them as well! As I’ve learned, working with one API greatly prepares you for working with almost any other API.
From here, you can use your newly-developed programming and API skills to do nearly anything you want.
One resource I’ll recommend now is Pipedream, which is a platform that lets you connect APIs and write actual code (unlike no-code tools, such as Make.com).
I love
This tutorial took months to produce; if you enjoyed it, you can support my work by grabbing one of my Notion templates (there are both free and paid options here):
You can also join my Notion Tips newsletter below for free; once you’re on it, I’ll send you tons of Notion cheat sheets and goodies. You’ll also be the first to know when I publish new tutorials and templates.
The Notion Tips Newsletter
Join 50,000+ folks and enjoy your morning coffee alongside my latest Notion guides and templates, delivered hot(?) and steaming(?) to your inbox.